bfa portfolio review | graphic design mounting guidelines · portfolio case (20 x 26 inch) black...
TRANSCRIPT

Instructions: Application Binder ( 9 x 12 inches )
Insert the following into the plastic sleeves:
(Front View)
Page 1 (etc.)
Page 1 = Check List
Page 2 = Transcripts
Page 4 = Project Description Sheet(s)
Purchase a Folder / Binder with plastic sleeves
(Inside View)
Label
Page 3 = Writing Sample / Statement of Intent
BFA Portfolio Review | Graphic Design Mounting Guidelines
Place label on the binder with the following information:
NameBFA Graphic Design
FINAL STEP: Place Binder In Portfolio Case
Page 1
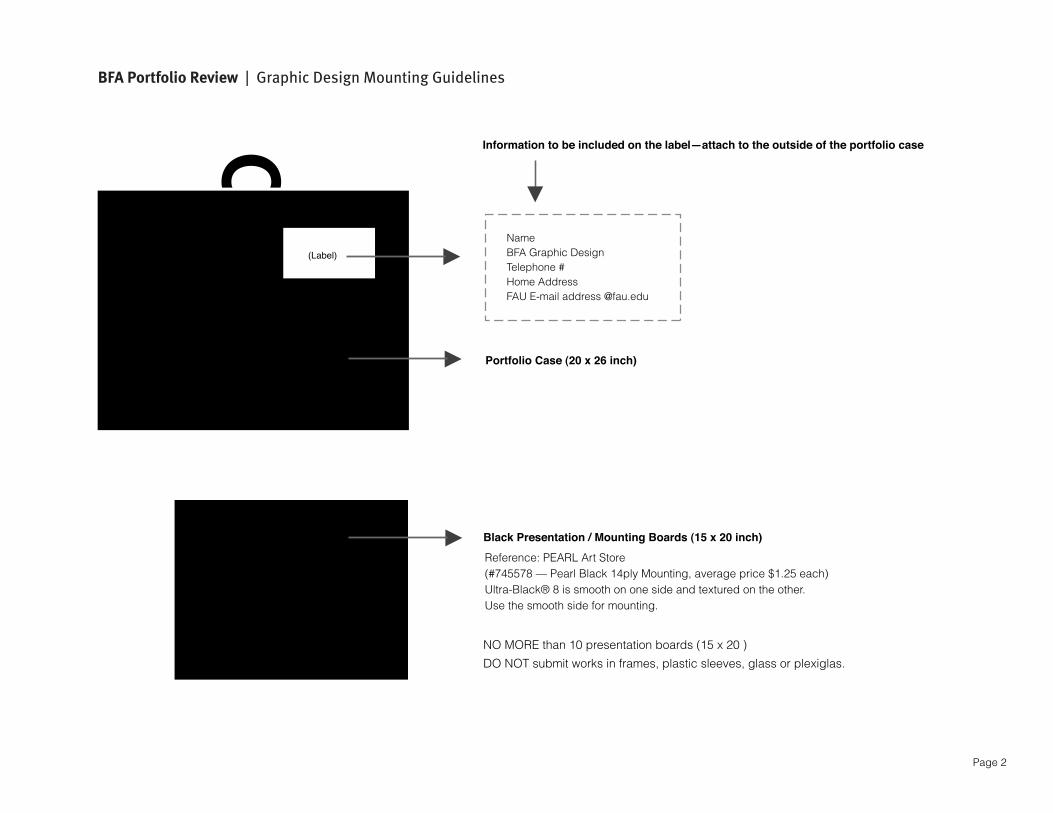
Portfolio Case (20 x 26 inch)
Black Presentation / Mounting Boards (15 x 20 inch)
NO MORE than 10 presentation boards (15 x 20 )
DO NOT submit works in frames, plastic sleeves, glass or plexiglas.
NameBFA Graphic Design
Telephone #Home AddressFAU E-mail address @fau.edu
(Label)
Information to be included on the label—attach to the outside of the portfolio case
Reference: PEARL Art Store(#745578 — Pearl Black 14ply Mounting, average price $1.25 each)Ultra-Black® 8 is smooth on one side and textured on the other.Use the smooth side for mounting.
BFA Portfolio Review | Graphic Design Mounting Guidelines
Page 2

Art work may be mounted vertical or horizontal
NOTE: If your course projects were lost, damaged and/or your work does not illustrate conceptual development, design prin- ciples, drawing skills or appropriate craftsmanship, then you are encouraged to submit self-directed studies .
Item Number:
Name:
Course prefix, number, title:
College or University:
Instructor:
Medium/materials:
Year executed:
15 x 20 inchBlack Presentation Board
White Cover Sheet
Description
Label Description
Label
White Cover Sheet
BFA Portfolio Review | Graphic Design Mounting Guidelines
Item Number: 1
Name: Joe Smith
Course prefix, number, title: Self Directed Project
College or University: NA (not applicable)
Instructor: NA (not applicable)
Medium/materials: e.g. cut paper
Year executed: 2009
Page 3
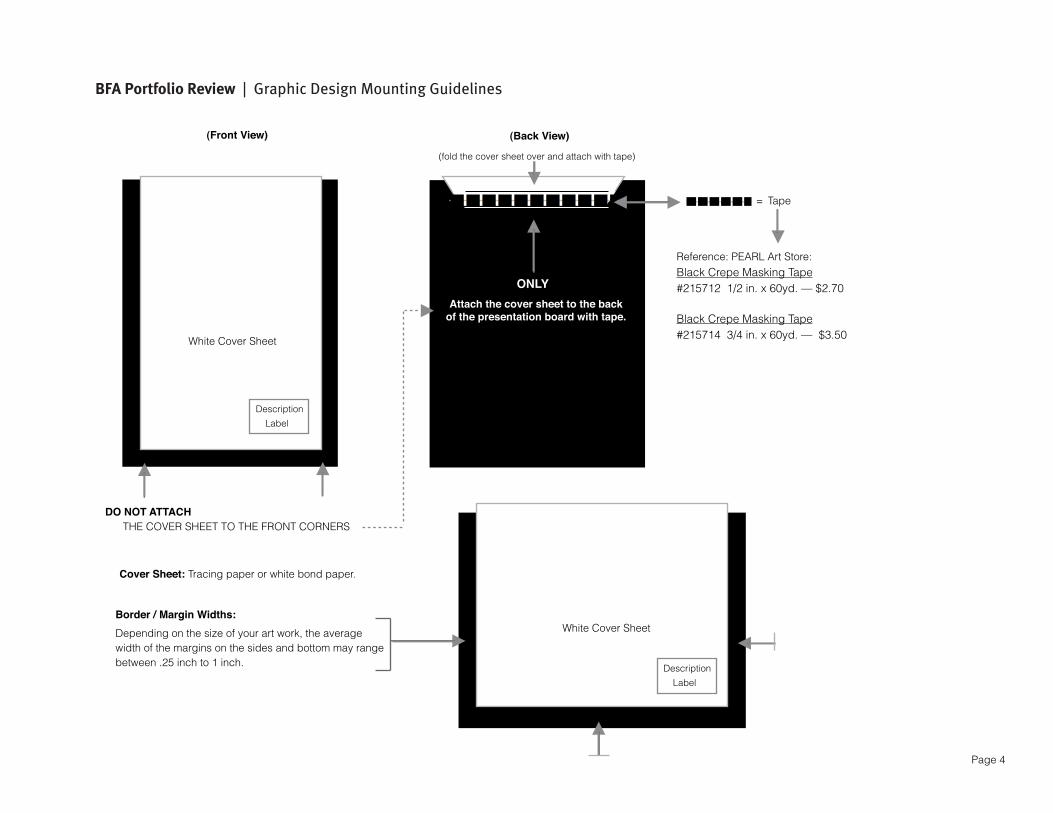
DO NOT ATTACH THE COVER SHEET TO THE FRONT CORNERS
Attach the cover sheet to the backof the presentation board with tape.
Reference: PEARL Art Store:Black Crepe Masking Tape#215712 1/2 in. x 60yd. — $2.70
Black Crepe Masking Tape#215714 3/4 in. x 60yd. — $3.50
= Tape
ONLY
Border / Margin Widths:Depending on the size of your art work, the average width of the margins on the sides and bottom may range between .25 inch to 1 inch.
White Cover Sheet
(Front View) (Back View)
Description
Label
White Cover Sheet
Description
Label
(fold the cover sheet over and attach with tape)
Cover Sheet: Tracing paper or white bond paper.
BFA Portfolio Review | Graphic Design Mounting Guidelines
Page 4

[Fold a heavier-weight paper and staple the sketches together.]
1[Next, attach the folded paper to the mounting board with glue or double-face tape.]
[Select and arrange your sketches] [Final step: attach the cover sheet with a description label.]
Optional: You may select a few gesture, still life, and perspective studies, etc. to include in your portfolio as one of the 10 presentation boards.
2 3 4
BFA Portfolio Review | Graphic Design Mounting Guidelines
Item Number: 3
Name: Jane Smith
Course prefix, number, title: ART1300 Drawing 1
College or University: FAU
Instructor: Broderick
Medium/materials: charcoal
Year executed: 2009
Page 5
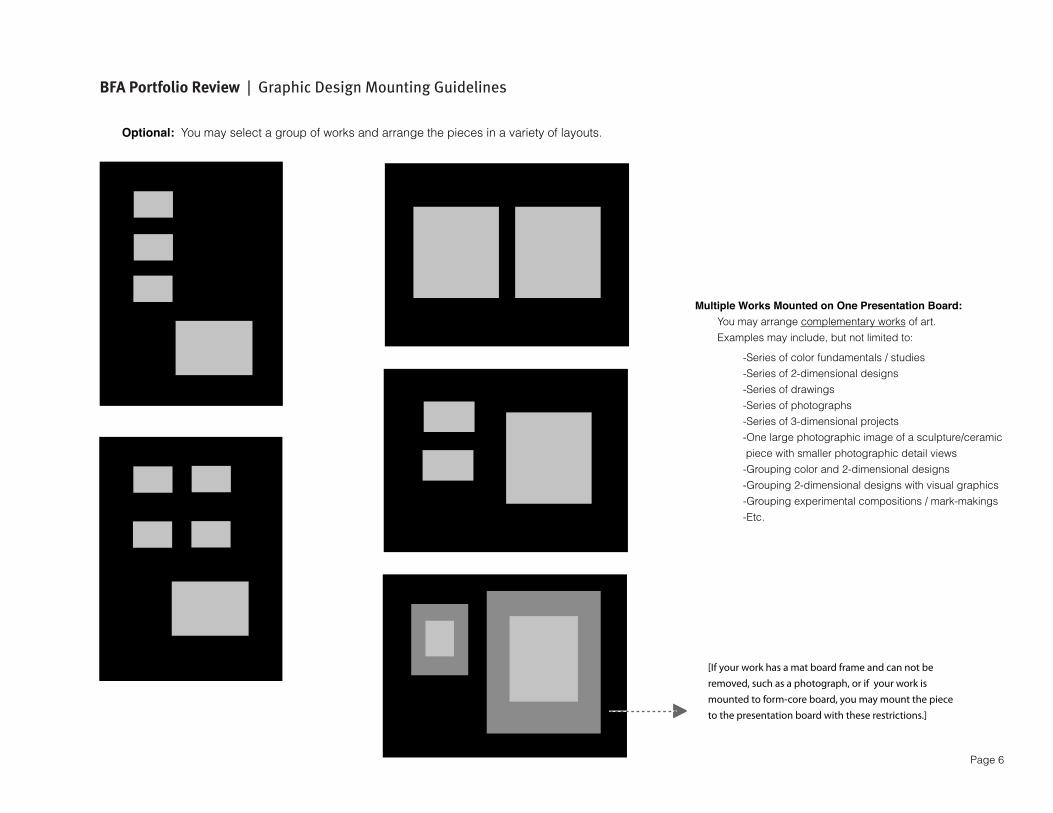
[If your work has a mat board frame and can not be removed, such as a photograph, or if your work is mounted to form-core board, you may mount the piece to the presentation board with these restrictions.]
Multiple Works Mounted on One Presentation Board: You may arrange complementary works of art. Examples may include, but not limited to:
-Series of color fundamentals / studies -Series of 2-dimensional designs -Series of drawings -Series of photographs -Series of 3-dimensional projects -One large photographic image of a sculpture/ceramic piece with smaller photographic detail views -Grouping color and 2-dimensional designs -Grouping 2-dimensional designs with visual graphics -Grouping experimental compositions / mark-makings -Etc.
Optional: You may select a group of works and arrange the pieces in a variety of layouts.
Page 6
BFA Portfolio Review | Graphic Design Mounting Guidelines

Instructions: For each work, place a description label on the cover sheet, corresponding to its location.
(Front View: Images Arranged on the Presentation Board) (Front View: Cover Sheet with Corresponding Labels)
1. label
2. label
1. Work
2. Work
4. Work
4. label
5. label
3. Work
1. Work 2. Work
4. Work 5. Work
5. Work
1. label 2. label
3. label 4. label
5. label
(Front View: Images Arranged on the Presentation Board) (Front View: Cover Sheet with Corresponding Labels)
BFA Portfolio Review | Graphic Design Mounting Guidelines
Page 7

Instructions: Mounting special projects (e.g. artist books)
(Front Views)
Depending on the dimension of your project, create a 3-D pocket or plastic sleeve for the piece.
NOTE: Attention should be given to the craftsmanship of the construction.
Depending on the size of your piece, you may elect to arrange and mount complementary projects to create a more pleasing layout & design composition.
Examples may include, but not limited to: - experimental mark-making - 2-dimensional and/or color explorations - Visual graphics
Apply the same instructions for positioning description labels on the cover sheet .
(e.g. Artist Book))
(3-D pocket )
(Securely mount the back side to the presentation board)
BFA Portfolio Review | Graphic Design Mounting Guidelines
Page 8

Apply a strip of Velcro
Next, apply the adjacent side of the Velcro strip to the outside of the portfolio case and attach the tube.
Or place in portfolio if the tube is small and fits.
Place the work inside the tube
Card board tube
Instruction: submitting flat work larger than 15 x 20 inches
(Attach the description label to the back of the piece)
Use 2 Portfolio
Identification Labels
BFA Portfolio Review | Graphic Design Mounting Guidelines
Page 9