best of step by step beads 2011
TRANSCRIPT

s t e p b y s t e p the best of
41MOST POPULARPROJECTSto stitch, string, and wirework
be
ad
wo
rkma
ga
zine
.co
m
MAKE THIS: “Equator Beads” necklace
PAGE 18
TH
E B
ES
T O
F S
TE
P B
Y S
TE
P B
EA
DS
41
MO
ST P
OP
ULA
R P
RO
JEC
TS
| E
AS
Y P
EY
OTE
FAV
OR
ITE B
EAD
ED JEW
ELRY D
ESIGN
S! COLOR SAVVYHow to Choosethe Right Colorsfor Your PiecesPAGE 94
EASY PEYOTE STITCH!9 gorgeous peyote designs
Favorite Beaded Jewelry Designs!
BONUS!7 Stunning Polymer + Metal Clay Projects
learn beadwork step-by-step!
13bead-by-bead tutorials
2011 SBSB_Cover.indd 1 10/27/11 11:06 AM
10272011110714

C2 SBSB 2011.indd C2 10/27/11 11:08 AM
10272011110859

beadworkmagazine.com 11 best of step by step beads
Dreamtime Creations1-417-678-5748 1-866-TRIMS-4U Se Habla Español
www.dreamtimecreations.com
Full line of .
Wholesale pricing for qualifi ed businesses Excellent customer service
Free shipping availableHuge inventory
Daily deals
Crystal Clubthe
Free To Join! Earn Rewards Points with every purchase!
Beads, Pendants
Trims, Rivets, Stones in Setting
Sew-on Stones, Flat Backs
Fancy Stones
Transfers, Crystal-It, Tattoos
Zippers, Crystal Yarn, and more
“Crystal Push Pins” Make and Take will be hosted by Kellie DeFries on January, 31st at 1pm in Westin La Paloma Resort and Spa.
We are proudly sponsoring a Make and Take during CREATE YOUR STYLE a SWAROVSKI ELEMENTS event in Tucson.
Endless color combinations, different coatings
Reinvent your vintage pr ojectswith fi ligree beads
001 SBSB 2011.indd 1 10/27/11 9:15 AM
10272011091622

2 best of step by step beads
Departments6 Editor’s Letter
131 Bead-by-Bead Tutorial
140 Basic Stringing and Wireworking Techniques
142 Contributors
Features94 Colorworks
by Margie Deeb
129 Patina 101 by Lora Hart
32
54 20 74
5
104
99
Loop De Loopby Martha Aleo
Pod Necklaceby Judy Dunn
s t e p b y s t e p the best of
002-SBSB-2011-TOC2.indd 2 10/25/11 2:33 PM
10252011143609

beadworkmagazine.com 3
10 Lucie’s Branching Out by Tarlee Scholl & The Hole
Bead Shoppe
14 Spiceberry by Jenna Colyar-Cooper
16 Silky Sensation by Lucy Arnold
18 Equator Beads by Leslie Rogalski
20 Blue Jean Queen by Carole Rodgers
23 Hoopla! by Beth Kraft
28 Rainforest by Terri Wlaschin
30 Silver Cometby Leslie Rogalski
32 Loop De Loop by Martha Aleo
34 Crystal Wave by Bonnie Clewans
36 Sparklefest by Meri Nash Aderhold
Projects
s
38 Tandem by Carole Rodgers
40 Peaceful Dreams by Lorelei Eurto
42 The Look of Links by Patricia C. Vener
44 Striking Jasper Melody Marie Murray
46 Eccentric Concentric by Leslie Rogalski
48 Crystal Raindrops by Jordana Hollander
50 Hollywood Chandeliers by Bonnie Clewans
52 Silver Waters by Pat Wexelblat
54 Bugles & Beads by Robin Cowart
56 Starfi sh by Lynn Davy
58 Crystal Buckles by Anne Jackson
61 Comet Anemone by Leslie Rogalski
50 48
58 108 40
23Hoopla!by Beth Kraft
72
14
002-SBSB-2011-TOC2.indd 3 10/31/11 10:08 AM
10312011100848

4 best of step by step beads
86Have a Ball!Allison and Tracy Stilwell
64 Turn It Over by Gabrielle E. Neijman
67 Eternity Circles by Cathi Tessier
70 Tangled Vines by Robin Cowart
72 Heart to Heart by Carol Dean Sharpe
74 Hip to be Square by Marilu Morency
76 River Cuff by Lynn Davy
79 Starburst by Leslie Rogalski
82 Poodle Beads by Leslie Rogalski
112Focal Frame Pendant
by Helen Breil
30
64
002-SBSB-2011-TOC2.indd 4 10/25/11 2:33 PM
10252011143610
beadworkmagazine.com 5
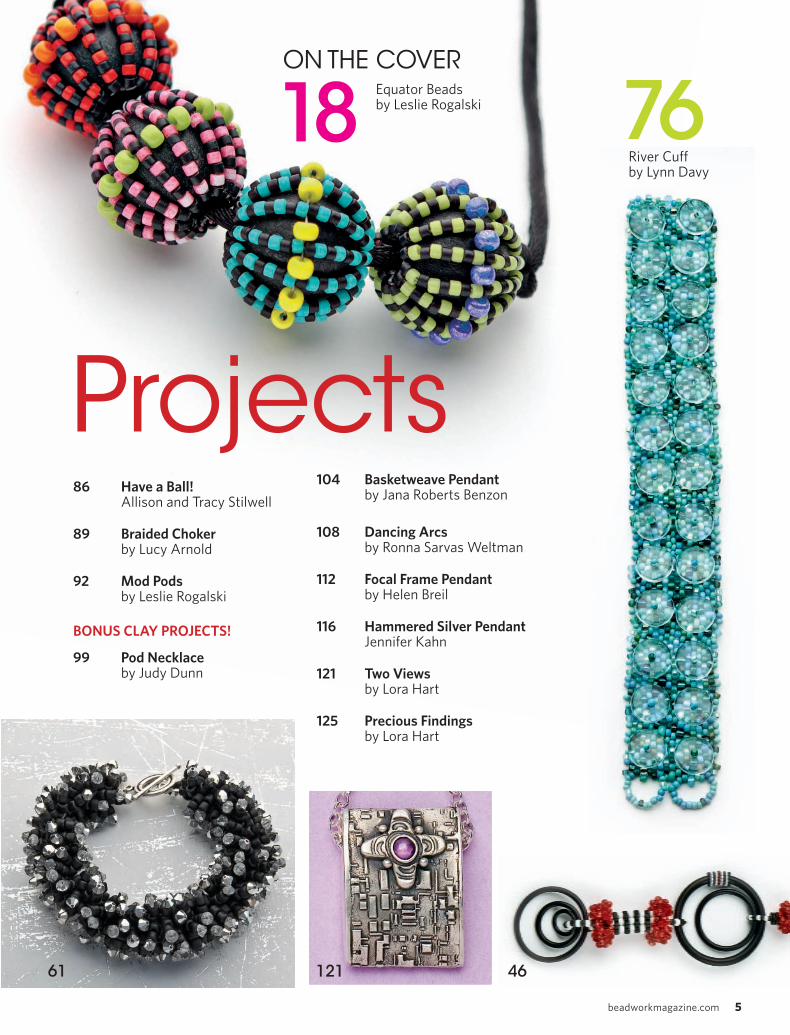
ON THE COVEREquator Beadsby Leslie Rogalski18
Projects86 Have a Ball! Allison and Tracy Stilwell
89 Braided Choker by Lucy Arnold
92 Mod Pods by Leslie Rogalski
BONUS CLAY PROJECTS!
99 Pod Necklace by Judy Dunn
104 Basketweave Pendant by Jana Roberts Benzon
108 Dancing Arcs by Ronna Sarvas Weltman
112 Focal Frame Pendant by Helen Breil
116 Hammered Silver Pendant Jennifer Kahn
121 Two Views by Lora Hart
125 Precious Findings by Lora Hart
76River Cuff by Lynn Davy
61 121 46
002-SBSB-2011-TOC2.indd 5 10/25/11 2:34 PM
10252011143610

6 best of step by step beads
EDITORIALEDITORIAL DIRECTOR James B. Bogner, III
EDITOR-IN-CHIEF Denise Peck
GUEST EDITOR Jane Dickerson
MANAGING EDITOR Karla Rosenbusch
EDITOR, BEADINGDAILY.COM Jennifer VanBenschoten
PUBLISHINGPUBLISHER, ART & JEWELRY DIVISION John P. Bolton
ADVERTISING MEDIA SALES DIRECTOR,
ART & JEWELRY DIVISION Jim McIntosh
SENIOR ADVERTISING SALES MANAGER
Marilyn C. Koponen
ADVERTISING MANAGER Debbi Simon
ADVERTISING COORDINATOR Jennifer Samsell
CLASSIFIED ADVERTISING Monica Turner
AD TRAFFICKERS Melissa Marie Brown, Tina Rolf
MARKETING MANAGER Christan Humphries
MARKETING ASSISTANT Jessi Zilk
CIRCULATION MANAGER Barbara Naslund
CONSUMER MARKETING BUSINESS MANAGER Tammy Gorham
ART AND PRODUCTIONART DIRECTOR Gail Olsheski
ASSISTANT ART DIRECTOR Oceana Garceau
PRODUCTION DIRECTOR Trish Faubion
SENIOR PRODUCTION COORDINATOR Chad Blichfeldt
PRODUCTION EDITOR Nancy Arndt
TECHNICAL ILLUSTRATION Bonnie Brooks
PHOTOGRAPHY Jim Lawson, Todd Murray
tm
Designs in this issue of Step by Step Beads are for inspiration
and personal use only. Step by Step Beads does not recommend,
approve, or endorse any of the advertisers, products, services, or
views advertised in Step by Step Beads. Nor does Step by Step
Beads evaluate the advertisers’ claims in any way. You should,
therefore, use your own judgment in evaluating the advertisers,
products, services, and views advertised in Step by Step Beads.
Exact reproduction for commercial purposes is contrary to the
spirit of good craftsmanship.
All contents of this issue of Step by Step Beads (ISSN 1549-0688)
are copyrighted by Interweave Press, LLC, 2011. Interweave
Press, LLC, 201 E. Fourth St., Loveland, CO 80537-5655; (970)
669-7672. All rights reserved. Reproduction in whole or in part is
prohibited, except by permission of the publisher.
Beadweaving with FriendsI remember the fi rst time that my good friend,
and former editor in chief of Step by Step Beads,
Leslie Rogalski taught me even-count peyote
stitch. Everything seemed so slippery to me, and
I couldn’t tell which beads were supposed to be
up or down. Then, she showed me a nifty trick that
you’ll fi nd on page 132 in the Bead by Bead
section—no doubt, the best-illustrated tutorials
for learning bead weaving.
Recently, I saw Leslie demonstrate this peyote technique in the new eMag,
Fabulous Peyote Stitch Jewelry with Crystal Accents, and I began to think about
how much I have learned from Step by Step Beads. Not only have I learned all
kinds of new designs and techniques, but I’ve found a whole new circle of artists and
friends, all woven together through our common love of beads.
While putting together this beautiful second volume of the Best of Step by
Step Beads, I was put in touch, once again, with all the artists I had worked
with so closely while I was managing editor. Looking at the projects and all the
wonderful photos and illustrations, it was like going through a family scrapbook.
I remember the joy of watching the projects come together from start to fi nish,
and now, many years later, I have updated the photos and bios so you can see
where our friends have been for the past few years.
The Best of Step by Step Beads brings together, in Volumes 1 and 2, some of
the editors’ favorites designs. For those of you who collected all the past single
issues, or for those who learned about us late in the game, we have brought you
beautiful, tidy, special collections to treasure and enjoy for many years to come!
Best wishes,
Jane Dickerson, Guest Editor
former Managing Editor/Editor in chief of Step by Step Beads
editor’s letter
Download a copy of all the latest eMags at
interweavestore.com/Jewelry/Magazines/eMags.html
™
06-SBSB-2011-SBS-EditorPage .indd 6 10/31/11 10:09 AM
10312011101003

beadworkmagazine.com 7
)
s
FOUNDER Linda Ligon
CEO Clay B. Hall
CFO Troy Wells
SENIOR VPS John P. Bolton, Bob Kaslik,
Stephen Koenig
VP, EVENTS AND EDUCATION Sara Dumford
VP, PRODUCTION Trish Faubion
VP, TECHNOLOGY T. J. Harty
VP, PEOPLE OPERATIONS Aaron Wilmot
BOOKSPUBLISHER Stephen Koenig
EDITORIAL DIRECTOR Marlene Blessing
AQUISITIONS EDITOR Allison KorleskI
ART DIRECTOR Liz Quan
PRODUCTION DIRECTOR Kristen Heller
MAGAZINES[ FIBER DIVISION ]
CLOTH PAPER SCISSORS •HANDWOVEN
INTERWEAVE CROCHET • INTERWEAVE KNITS
PIECEWORK • QUILTING ARTS • SPIN.OFF
[ ART AND JEWELRY DIVISION ]
AMERICAN ARTIST • BEADWORK
DRAWING • JEWELRY ARTIST
STEP BY STEP WIRE JEWELRY
STRINGING • WATERCOLOR
Interweave Press LLC
201 E. 4th St.
Loveland, CO 80537
(970) 669-7672
Visit our website
interweave.com
Beadwork (ISSN 1528-5634) is published bimonthly by
Interweave Press LLC, 201 E. Fourth St., Loveland, CO 80537-
5655. (970) 669-7672. USPS #018-351. Periodicals postage paid
at Loveland, CO 80538, and additional mailing offices. Subscription
rate is $29.95/one year in the U.S., $34.95/one year (U.S. funds)
in Canada and $39.95 (U.S. funds) in other countries (surface
delivery). Printed in the U.S.A. POSTMASTER: Please send address
changes to Beadwork, PO Box 469105, Escondido, CA 92046-9107.
For advertising information, call Jim McIntosh at (513) 961-0034, email [email protected].
For sales information, call (800) 272-2193, e-mail [email protected]. Visit the Interweave website at interweave.com. For editorial inquiries, e-mail [email protected].
Wire Style 245 New Jewelry Designs
112 pages; 1-hour DVDISBN: 978-1-59668-255-9
$22.95
includes
instructional
DVD
projectswire45
9 top jewelry
designers with
60minutes of
video instruction in
1book
06-SBSB-2011-SBS-EditorPage .indd 7 10/27/11 9:19 AM
10272011092008

008 SBSB 2011.indd 8 10/27/11 9:24 AM
10272011092453

for youmake it easygreat jewelry
Weto make
This design was made by Katie Hacker using Beadalon 19 Strand Silver Color Wire, Remembrance™ Memory Wire, Chain, and Findings. You can learn how to make this design at:http://www.beadalon.com/fairytalecollection.asphththththhthhttttptptptptptpptptptpppppppppppp:/:/:/:/:/:/:/:///w/w/ww/w/w/w/// wwwwwwwwwwwwwwwww.b.b.b.bb.b.b.b.bbeaeaeaeaaeaeaeaeaeadadadaddadadadadadad lololololololoon.n.n.n.n.n.n..cocococococococococom/m/m/m/m/m/m/m///fafafafafafafaaairirirriririrytytytyytytytyytytyyyyyyyyyyyy alalalaalalalaa ecececececececcececolololololololoo leleleeleleleeectctctctctctctctc ioioioioioioioon.n.n.n.n.n.n.n.asasasasasasasasasppppppppppppppp
Making your own jewelry is fun, easy, and very gratifying. Save money and express your style by creating your own earrings, bracelets and necklaces. Visit our website for hundreds of design ideas, step-by-step instructions, product videos, and inspirational ideas to discover how easy it is for you to Create Something Great™.
www.beadalon.comTo fi nd a Beadalon retailer near you, please visit www.beadalon.com/locatewheretobuy.asp
®
Create Something Great™
009 SBSB 2011.indd 9 10/27/11 9:28 AM
10272011092824

10 best of step by step beads
PEYOTE STITCH, STRINGING & FRINGEnecklace
Lucie’sBranching Out
Pe1. 1):
thr
lea
to m
3 s
Str
and
pas
thr
unt
Cu
tog
2. 2):
the
4”
Did you know?Lucie is the nickname
for Lucite?
This leafy necklace is made in
three stages: Work small, even-
count peyote strips and zip them
into tube beads. String them with
crystals and large seed beads on
a wire. Use a needle and thread
to sew a second strand through
those wired beads to add crystal
dangles and little branches of
fringe with Lucite leaves.
Tarlee Scholl & The Hole Bead Shoppe
010-SBSB-2011-Lucie's Branching Out.indd 10 10/25/11 9:09 AM
10252011091031

beadworkmagazine.com 11
Peyote stitch the tube beads 1. Pattern 1, wide red stripe center (fi gure
1): Cut 12” of thread, condition it, and
thread the needle. String a stopper bead
leaving a 4” tail. Work even-count peyote
to make a small panel 8 beads wide, with
3 stripes: String 3A, 2B, and 3A, beads 1–8.
String 1A, pass through bead 7. String 1A
and pass through bead 5. Pick up 1B and
pass through bead 3. String 1A and pass
through bead 1. Continue for 4 more rows,
until you have 5 beads along each side.
Curl the panel into a tube and zip the ends
together. Repeat for 1 more tube.
2. Pattern 2, two thin red stripes (fi gure
2): Cut 12” of thread, condition, and thread
the needle. String a stopper bead leaving a
4” tail. String 2A, 1B, 2A, 1B, and 2A. String
1A and pass through bead 7. String 1B and
pass through bead 5. String 1A and pass
through bead 3. String 1A and pass through
bead 1. Continue for 4 more rows, until
you have 5 beads along each side. Curl the
panel into a tube and zip the ends together.
Repeat for 1 more tube.
3. Pattern 3, two wide red stripes (fi gure
3): Cut 12” of thread, condition and thread
needle. String a stopper bead leaving a 4”
tail. String 1A, 2B, 2A, 2B, and 1A. String
1A and pass through bead 7. String 1B and
pass through bead 5. String 1A and pass
through bead 3. String one 1B and pass
through bead 1. Continue for 4 more rows,
until you have 5 beads along each side
(Figure 3). Curl the panel into a tube and
zip the ends together. Repeat for 1 more tube.
String beads on the wire4. Measure and cut 21” of beading wire.
Place a stopper bead 2” from one end of
the wire. String 26 size 6°s. String 1 vitrail
crystal, 1 size 6°, 1 peyote-tube Pattern 1,
1 size 6°, 1 vitrail crystal, and 3 size 6°s.
String 1 vitrail crystal, 1 size 6°, 1 peyote-
tube Pattern 2, 1 size 6°, 1 vitrail crystal,
and 3 size 6°s. String 1 vitrail crystal, 1 size
6°, 1 peyote-tube Pattern 3, 1 size 6°, 1 vit-
rail crystal, and 3 size 6°s. Repeat pattern,
reversing the order of the peyote tubes,
starting with peyote Pattern 3, then 2, then
1. String 26 size 6°s.
Crimp on the clasp5. On the wire, string 1 crimp tube and
one part of your clasp. Pass the wire back
through the crimp tube and several of the
size 6° beads. Pull the wire end so your
toggle and crimp tube snug gently together
against the beads; allow room in the wire
loop for the toggle to swing freely. Use the
crimping pliers to crimp the tube fi rmly.
Trim wire tail with wire snips.
Figure 1 Figure 2 Figure 3
learn the lingoConditioning: Usually run-
ning beeswax or a product
such as Thread Heaven
along a length of thread
going with the grain.
Conditioning straightens
and strengthens thread and
helps prevent tangling.
WHAT YOU NEED• 34 assorted Lucite leaves: 15x15mm, 22x13mm• 7 g green matte size 6° seed beads• 5 g matte olive rose size 11° seed beads• 2 g matte olive rose size 11° Japanese cylinder beads (color A)• 1 g rainbow transparent cranberry size 11° Japanese cylinder beads (color B)• 2 satin rose 8mm Swarovski crystals• 4 burgundy 8mm Swarovski crystals• 12 vitrail 8mm Swarovski crystals• 21” of fl exible beading wire • 2 sterling silver 2x2 crimp tubes• 1 sterling silver toggle• Matching color size D beading thread • Beeswax• Size 12 beading needles• Chain-nose pliers• Wire cutters• Ruler• Scissors• Bead Stopper or stopper bead• Crimping pliersFinished size: 16”
010-SBSB-2011-Lucie's Branching Out.indd 11 10/25/11 9:09 AM
10252011091031

12 best of step by step beads
6. Remove the stopper bead from the
other end of the wire. Repeat Step 5
but don’t pull the crimp tube too snugly
against the seed beads. Leave a little bit
of extra play in your strung work because
you will be using a needle and thread to
add the fringes and leaving the extra play
makes it easier to pass your needle be-
tween the strung beads. Use the crimping
pliers to crimp the tube fi rmly and trim tail
with wire snips.
Add crystal dangles7. Thread a needle with 1 yd of conditioned
thread. Work from left to right along your
strung beads. Tie a square knot between
the second crystal and the size 6° seed
bead next to the tube (fi gure 4a). String 8
size 11°s, 1 rose crystal, and 1 size 11°. Skip
the size 11° and pass back through the crys-
tal and 2 size 11°s (fi gure 4b). String 6 size
11°s and pass (moving clockwise) between
the fi rst crystal and size 6°, through the
size 6° (fi gure 4c), peyote tube, and size
6°. Pass a second time through the entire
dangle section to reinforce.
8. Pass through the next crystal, 3 size 6°
beads, crystal, size 6°, peyote tube, and
size 6°. Exit between the crystal and size
6° (fi gure 4d). Repeat Steps 7 and 8 for
the remaining sections, using burgundy
crystals for the 4 middle dangles and
another rose crystal on the end. Tie off the
thread with a square knot between beads
onto an existing thread or the beading
wire, weave the ends back into the bead-
work, and trim.
Add the fringes with leaves9. Fringes are added in the sections of 3
size 6° beads. The fi rst long fringe has 24
beads in its stem, with 1 leaf at the end
and 3 leaves on short “branches” added
along the stem. Secure 1 yd of conditioned
thread on your wire strand of beads by ty-
ing the end of the new thread in a square
knot between a crystal and the fi rst of
the 3 size 6° seed beads (fi gure 5a). Pass
through the fi rst size 6°. (Weave in the
tail later by threading it on another needle
and passing through the strung beads on
the wire.) String 24 size 11°s, 1 leaf, and 3
size 11°s. Skip the last 3 size 11°s, the leaf,
and 3 size 11°s before the leaf, and pass
through the next 5 size 11°s (fi gure 5a to
5b). The size 11°s you skip form a little
loop holding the leaf to the stem.
Figure 4
LUCIE’S BRANCHING OUTproject
Did you know? What’s the diff erence between vintage
Lucite and resin? Diff erences are subtle
and technical but could infl uence which
you buy. And what does “vintage” mean?
Both resin and Lucite are plastic compounds made up of chemical components.
However, resin can be a natural material as well as synthetic, or manmade. Synthetic
resin is a thermal–set plastic, created from a group of chemicals that when mixed
together create an end product that cannot be heated or changed to make another
product. The manufacturing process of resin is stringent to ensure the fi nal prod-
uct is homogeneous in structure. If all the components are not mixed correctly, the
fi nal product may break down. Resin hardens by the use of a hardening agent; the
chemicals are heated to the correct temperatures, injected or poured into a mold,
then cooled.
Lucite is a trademark name for a thermal–form plastic, a fi nished product that is
heated to a melting temperature and injected into a mold to make a shape. A ther-
mal–form plastic can be heated again and reshaped in a diff erent mold, which makes
Lucite recyclable.
We classify Lucite as “vintage” if it was produced over forty years ago and is no
longer being created in that form. Any vintage stock should be a fi nite supply. We do
not consider “made with a vintage mold” truly vintage. Vintage Lucite in mass is truly
hard to come by, and many genuine vintage stockpiles have long been depleted. As
with any purchase, know your vendor, ask questions, and have fun with beads!
010-SBSB-2011-Lucie's Branching Out.indd 12 10/25/11 9:09 AM
10252011091031
beadworkmagazine.com 13
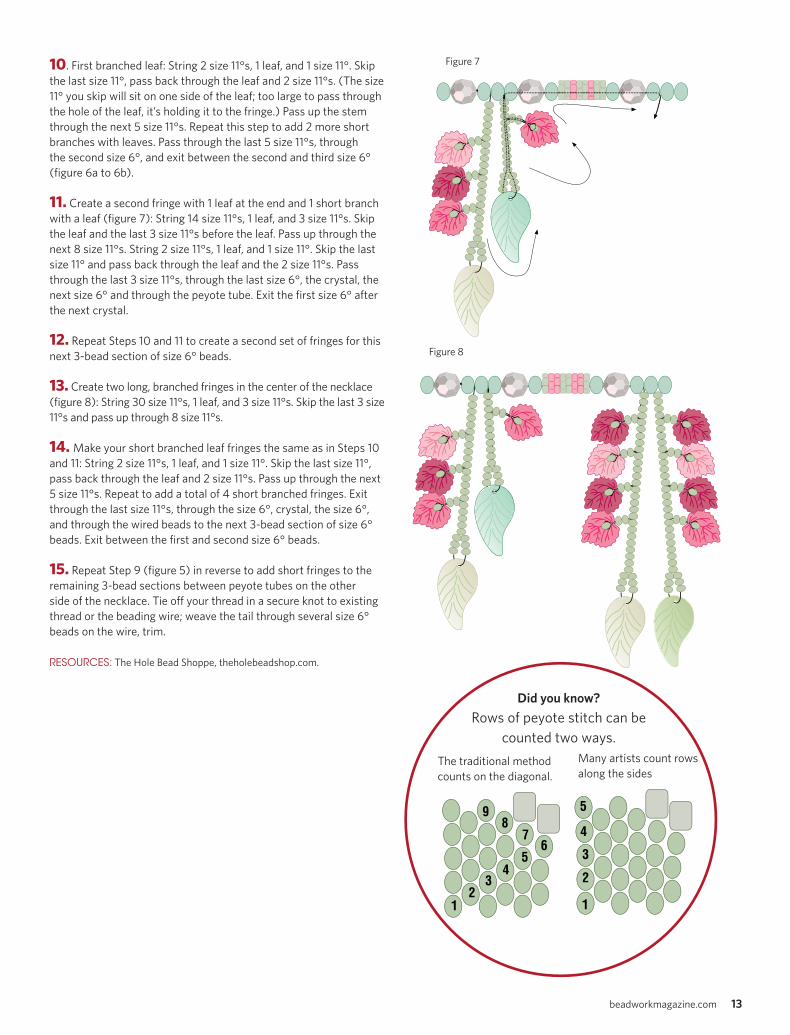
10. First branched leaf: String 2 size 11°s, 1 leaf, and 1 size 11°. Skip
the last size 11°, pass back through the leaf and 2 size 11°s. (The size
11° you skip will sit on one side of the leaf; too large to pass through
the hole of the leaf, it’s holding it to the fringe.) Pass up the stem
through the next 5 size 11°s. Repeat this step to add 2 more short
branches with leaves. Pass through the last 5 size 11°s, through
the second size 6°, and exit between the second and third size 6°
(fi gure 6a to 6b).
11. Create a second fringe with 1 leaf at the end and 1 short branch
with a leaf (fi gure 7): String 14 size 11°s, 1 leaf, and 3 size 11°s. Skip
the leaf and the last 3 size 11°s before the leaf. Pass up through the
next 8 size 11°s. String 2 size 11°s, 1 leaf, and 1 size 11°. Skip the last
size 11° and pass back through the leaf and the 2 size 11°s. Pass
through the last 3 size 11°s, through the last size 6°, the crystal, the
next size 6° and through the peyote tube. Exit the fi rst size 6° after
the next crystal.
12. Repeat Steps 10 and 11 to create a second set of fringes for this
next 3-bead section of size 6° beads.
13. Create two long, branched fringes in the center of the necklace
(fi gure 8): String 30 size 11°s, 1 leaf, and 3 size 11°s. Skip the last 3 size
11°s and pass up through 8 size 11°s.
14. Make your short branched leaf fringes the same as in Steps 10
and 11: String 2 size 11°s, 1 leaf, and 1 size 11°. Skip the last size 11°,
pass back through the leaf and 2 size 11°s. Pass up through the next
5 size 11°s. Repeat to add a total of 4 short branched fringes. Exit
through the last size 11°s, through the size 6°, crystal, the size 6°,
and through the wired beads to the next 3-bead section of size 6°
beads. Exit between the fi rst and second size 6° beads.
15. Repeat Step 9 (fi gure 5) in reverse to add short fringes to the
remaining 3-bead sections between peyote tubes on the other
side of the necklace. Tie off your thread in a secure knot to existing
thread or the beading wire; weave the tail through several size 6°
beads on the wire, trim.
RESOURCES: The Hole Bead Shoppe, theholebeadshop.com.
The traditional method
counts on the diagonal.
Many artists count rows
along the sides
Did you know?Rows of peyote stitch can be
counted two ways.
Figure 7
Figure 8
010-SBSB-2011-Lucie's Branching Out.indd 13 10/25/11 9:09 AM
10252011091031

EVEN-COUNT PEYOTE
14 best of step by step beads
bracelet
SpiceberryJenna Colyar-Cooper
WHAT YOU NEED• 3 g transparent garnet size 11° Delicas (DB0105)• 3 g galvanized rose gold size 11° Delicas (DB0460)• 3 g matte galvanized golden copper size 11° Delicas (DB1165)• 3 g matte galvanized berry size 11° Delicas (DB1167)• 3 g matte galvanized plum frost size 11° Delicas (DB1174)• 1 gold-fi lled 31mm 5-strand tube clasp• 40’ of smoke gray size D FireLine braided bead thread • Size 10 or 12 beading needles • Scissors
Finished length: 7¼”
Add a twist to a basic peyote bracelet! Strips of basic
even-count peyote are braided together to create an
intricate-looking bracelet.
Arist’s TipUse a single strand of FireLine to allow for a little more give
in each strip of peyote. If you fi nd you have diffi culty keep-
ing your tension steady, or are concerned about durability,
try doubling your FireLine.
014-SBSB-2011-Spiceberry.indd 14 10/25/11 9:11 AM
10252011091220

beadworkmagazine.com 15
Peyote–stitch the strips1. Thread a needle on a 5’ piece of beading thread. Work even-
count peyote 4 beads wide and 8” long for each of the fi ve
colors. Start a new thread for each strip.
2. Line the strips up matching their ends side by side in the fol-
lowing order: copper, garnet, plum, gold, and berry. Use remain-
ing working thread from your last strip or start a new 5’ piece of
thread: stitch the ends of the strips together in order, creating 2
new full rows of peyote. Be sure to pick up the correct colors to
match the strips as they’re laid out. Pass back through the last
row you created in Step 2 so your needle is exiting the fi rst bead
in the last half row (Figure 2).
Copper1
Garnet2
Plum3
Gold4
Berry5
Attach one bar clasp3. Line up the 5-strand tube bar clasp so that the edge of the
fi rst loop sits behind the bead your needle is exiting. Using your
remaining working thread, stitch around outside edge of the loop
4–5 times. Pass the needle through the next 2 beads so your
needle is exiting the third bead in the row (Figure 3). Repeat the
process for the remaining clasp loops.
Copper1
Garnet2
Plum3
Gold4
Berry5
4. When all loops are stitched to your peyote cuff , pass back
through existing thread paths of the 2 full rows you created in
Step 2 and 1 more row. This secures the strips for braiding.
Braid the peyote strips5. Anchor the clasp to something that will tolerate being tugged
on as you braid. Tape the clasp to your work table, for instance.
6. Starting with the copper on your left as in the illustration, take
the copper (strip 1) over the garnet (strip 2) and under the plum
(strip 3). The copper (strip 1) is now the middle strip.
7. Take the berry (strip 5) over the gold (strip 4) and under the
copper (strip 1). The berry should now be the middle strip.
8. Take the garnet (strip 2) over the plum (strip 3) and under
the berry (strip 5). The garnet should now be the middle strip.
9. Take the gold (strip 4) over the copper (strip 1) and under the
garnet (strip 2). The gold should be the middle strip.
10. Continue to braid, moving the outside strips over and under
adjacent strips. A piece of masking tape may help keep the braid
in place as you work.
Complete the cuff 11. When you’ve completed the braiding, temporarily bind the
braid with tape about ½” from the ends of the strips.
12. Line up the strips fl at next to each other in the order they’re
braided, similar to the way you lined them up in Step 2. Reposi-
tion the piece of tape if that helps to free up the ends to com-
plete your braid.
13. Thread a needle on a new 4’ piece of thread. Repeat Step 2
to stitch 2 new rows of peyote, making sure to string the correct
colors as you work the row.
14. Repeats Step 3 to attach the other part of your clasp to the
peyote cuff . Be sure the clasp is facing the right way on the strip
to fi t correctly when the cuff goes around your wrist!
RESOURCES: All materials and tools from www.FusionBeads.com.
Artist’s TipAs you braid the 5 strands, make sure to turn
the strips so they lay nicely.
014-SBSB-2011-Spiceberry.indd 15 10/25/11 9:11 AM
10252011091220
16 best of step by step beads
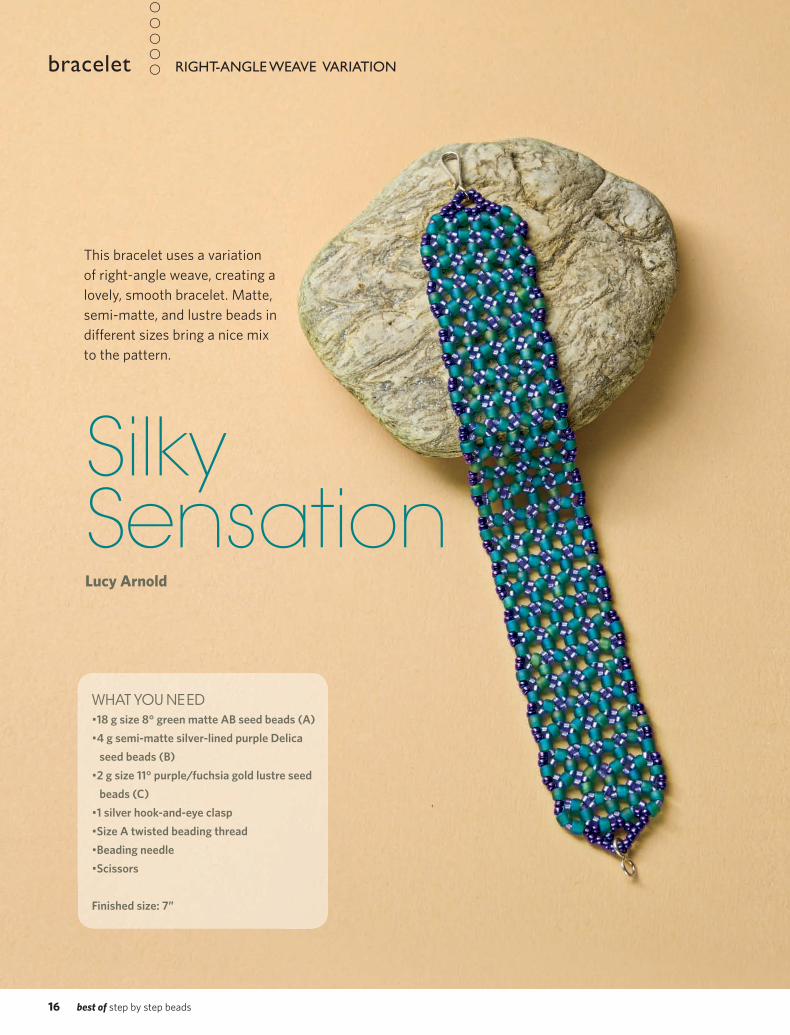
RIGHT-ANGLE WEAVE VARIATIONbracelet
Silky SensationLucy Arnold
WHAT YOU NEED•18 g size 8° green matte AB seed beads (A)•4 g semi-matte silver-lined purple Delica seed beads (B)•2 g size 11° purple/fuchsia gold lustre seed beads (C)•1 silver hook-and-eye clasp•Size A twisted beading thread•Beading needle•Scissors
Finished size: 7”
This bracelet uses a variation
of right-angle weave, creating a
lovely, smooth bracelet. Matte,
semi-matte, and lustre beads in
diff erent sizes bring a nice mix
to the pattern.
016-SBSB-2011-Silky Sensation.indd 16 10/25/11 9:12 AM
10252011091341

beadworkmagazine.com 17
1. Determine the length of the bracelet by
measuring your wrist and subtracting the
length of the clasp.
2. Thread the needle with 2–3 yards of thread.
3. String 1B and 1A. Repeat 4 times for a
total of 8 beads. Leaving a 6” tail, pass the
needle back through all the beads from
the beginning to form a circle. Continue
through the next A bead.
4. String 1B, 1A, 1B, 1A, 1B, 1A, and 1B
(7 beads). Pass back through the same
bead that the thread exited. Pass through
the next 4 beads. (Figure 1).
5. Repeat Step 4 for the length of the
bracelet (about 26 total stitches) or for
the length desired.
6. Pass through the beads of the last
stitch of the fi rst row exiting from the top
A bead. This is where the second row
begins. String 1B, 1A, 1B, 1A, 1B, 1A, and 1B
(7 beads). Pass through the same bead
that the thread exited. (Figure 2).
7. Pass through 6 beads of the new stitch,
exiting from an A bead. (Figure 3).
8. String 1B. Pass through the A bead of
the next stitch of the fi rst row. (Figure 4).
9. String 1B, 1A, 1B, 1A, and 1B (5
beads). Pass through the A bead on the
previous stitch.
10. Work the second, third, and fourth
rows, repeating the previous steps as
needed.
11. When the fourth row is completed,
stitch around one side of the bracelet,
stringing 2C beads between the A beads.
(Figure 5).
12. At one end of the bracelet, exit from
the fi rst C bead. String 3C. Pass through
the next 2C. String 3C. Pass through the
last bead of the next set of C. (Figure 6).
13. Weave through the beadwork and
emerge from the middle bead of one set
of 3C beads. String 3C, one end of the
clasp, and 3C beads. Pass through the
middle bead of the second set of C beads.
Weave through the beadwork and go
through these beads again a few times to
reinforce. (Figure 7).
1
2
3
4
Artist’s TipOn the second, third, and fourth rows, an extra Delica will be inserted between
each stitch, creating the pattern of 4 Delicas between the large beads. The extra
Delica is added either right before beginning or ending a stitch, since right-angle
weave alternates direction.
5
6
7
8
14. Stitch along the second side of the bracelet, repeating Step 11. (Figure 8).
15. Repeat Steps 12 and 13 at the other end of the bracelet using the other half of the clasp.
16. Weave thread ends into the beadwork and trim all threads.
RESOURCES: Check your local bead store.
016-SBSB-2011-Silky Sensation.indd 17 10/25/11 9:12 AM
10252011091342

18 best of step by step beads
BEADWORKbead
EQUATOR
BEADSLeslie Rogalski
It couldn’t be easier to make plain round beads your own by
embellishing them with seed beads. Any type of round bead
works from wood to resin to Lucite. String two rings of seed
beads to sit over the holes of the larger bead, then string
spokes of cylinder beads to “cage” the wood bead. Add an
equator of bright colored, contrasting size 8° seed beads
between each spoke. Bet you can’t make just one!
This tutorial is for a 16mm center bead. Other sizes of beads
will need adjustments to the number of seed beads in the
rings, spokes, and equator beads.
WHAT YOU NEED• 1 size 16mm round bead: wood,
resin, Lucite, etc.• 3g each black (A) and one color
(B) size 11° cylinder beads• 12 size 8° seed beads (non
cylinder) in contrasting color (C)• WildFire .006 beading thread• Beading needle 10 or 11• Scissors• Rolled paper tube or straw to fi t
through wood bead
018-SBSB-2011-Equator Bead.indd 18 10/25/11 9:13 AM
10252011091357
beadworkmagazine.com 19
Stitch the spokes (Figure 1)1. Pass a rolled tube of paper through the wood bead. The
paper tube is simply a tool to hold the beads in place over the
bead holes until the spokes are stitched.
2. Ring 1 (Figure 1, top ring): On a 10” piece of thread string a
ring of 13A, leaving a 4” tail. Tie a simple square knot with the
tail and working thread. Do not trim yet. Place over the paper
tube at the “bottom” bead hole.
3. Ring 2 (Figure 1 bottom ring): On a 20” piece of thread
string 13B leaving a 4” tail. Knot the tail and working thread to
form a ring. Place over the paper tube at the “top” bead hole.
Pass through a bead adjacent to the knot.
TIP: Work in the same direction adding spokes around both
rings, clockwise or counterclockwise. If you pass clockwise
through a bead in Ring 1, be sure to pass clockwise in a bead in
Ring 2 after stringing each spoke.
4. Spoke 1: String 14 beads starting with color A alternating
colors A and B. Pass through a bead in Ring 2.
5. Spoke 2: Starting with color B string 14 beads alternating
colors A an B. Pass through the next bead in Ring 1.
6. Repeat Steps 4 and 5 for a total of 12 spokes. Pass through
the fi nal ring bead.
Add equator beads (Figure 2)7. Pass halfway down into the fi rst spoke stitched, exiting
between the fourth color B and fi fth color A beads (including
the ring bead).
8. Make a loop around the thread of the spoke between the
cylinders—not through the spoke beads—and string 1C bead.
Pass around the thread in the next spoke between the fourth
color B and fi fth color A bead. String 1C. Continue to add C
beads between all the spokes by looping around the threads
for a total of 12 equator beads. The beads should sit spaced
evenly between the spokes.
9. To fi nish, weave the working thread through a spoke and
exit a ring bead near a tail thread at either bead hole. Knot the
working thread to one tail, weave in the ends and trim. Weave
in any other remaining tails and trim.
RESOURCES: Wood beads are readily available at bead and craft
stores and online. Seed beads and Beadalon WildFire: check your local
bead shop.
Figure 1
Figure 2
018-SBSB-2011-Equator Bead.indd 19 10/25/11 9:13 AM
10252011091358

20 best of step by step beads
TWO-NEEDLE RIGHT-ANGLE-WEAVE necklace
Kyanite is a lovely, lustrous mineral. Varying from blue
to green with pearly white streaks, it looks especially
good with denim! Use two needles to create a right-
angle-weave heart and string it from easy-to-make
asymmetrical straps. Make this pendant to wear with
your favorite comfy jeans!
Blue Jean Queen
WHAT YOU NEED• 11 fl at oval 18x13mm kyanite beads• 43 fl at round 8mm kyanite beads• 72 faceted round 4mm hematite beads• 26 fl at 4mm Bali daisy spacers• 15 round 2.5mm sterling silver beads • 1 sterling silver toggle clasp• 2 sterling silver clamshell bead tips• 3 sterling silver 5mm split rings
• 2 sterling silver 2mm crimp beads• DandyLine .011” black beading thread• 2 size #10 beading needles• Gem-Tac Permanent Adhesive • Scissors• Round-nose pliers• Chain-nose pliers• Split-ring pliers• Bead sorting dish or cloth
M
OP
EN
ING
PH
OT
O: JI
M L
AW
SO
N.
Carole Rodgers
020-SBSB-2011-BlueJeanQueen.indd 20 10/25/11 9:17 AM
10252011091814
beadworkmagazine.com 21
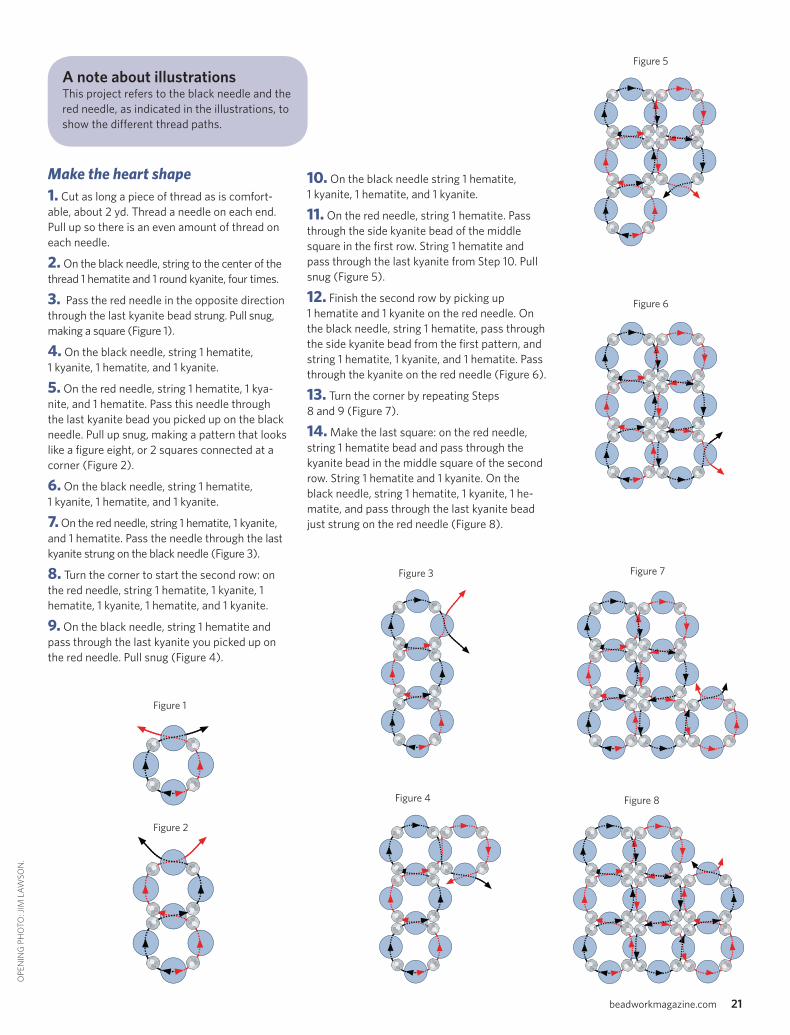
n n
A note about illustrationsThis project refers to the black needle and the
red needle, as indicated in the illustrations, to
show the diff erent thread paths.
Make the heart shape1. Cut as long a piece of thread as is comfort-
able, about 2 yd. Thread a needle on each end.
Pull up so there is an even amount of thread on
each needle.
2. On the black needle, string to the center of the
thread 1 hematite and 1 round kyanite, four times.
3. Pass the red needle in the opposite direction
through the last kyanite bead strung. Pull snug,
making a square (Figure 1).
4. On the black needle, string 1 hematite,
1 kyanite, 1 hematite, and 1 kyanite.
5. On the red needle, string 1 hematite, 1 kya-
nite, and 1 hematite. Pass this needle through
the last kyanite bead you picked up on the black
needle. Pull up snug, making a pattern that looks
like a fi gure eight, or 2 squares connected at a
corner (Figure 2).
6. On the black needle, string 1 hematite,
1 kyanite, 1 hematite, and 1 kyanite.
7. On the red needle, string 1 hematite, 1 kyanite,
and 1 hematite. Pass the needle through the last
kyanite strung on the black needle (Figure 3).
8. Turn the corner to start the second row: on
the red needle, string 1 hematite, 1 kyanite, 1
hematite, 1 kyanite, 1 hematite, and 1 kyanite.
9. On the black needle, string 1 hematite and
pass through the last kyanite you picked up on
the red needle. Pull snug (Figure 4).
10. On the black needle string 1 hematite,
1 kyanite, 1 hematite, and 1 kyanite.
11. On the red needle, string 1 hematite. Pass
through the side kyanite bead of the middle
square in the fi rst row. String 1 hematite and
pass through the last kyanite from Step 10. Pull
snug (Figure 5).
12. Finish the second row by picking up
1 hematite and 1 kyanite on the red needle. On
the black needle, string 1 hematite, pass through
the side kyanite bead from the fi rst pattern, and
string 1 hematite, 1 kyanite, and 1 hematite. Pass
through the kyanite on the red needle (Figure 6).
13. Turn the corner by repeating Steps
8 and 9 (Figure 7).
14. Make the last square: on the red needle,
string 1 hematite bead and pass through the
kyanite bead in the middle square of the second
row. String 1 hematite and 1 kyanite. On the
black needle, string 1 hematite, 1 kyanite, 1 he-
matite, and pass through the last kyanite bead
just strung on the red needle (Figure 8).
Figure 3
Figure 4
Figure 5
Figure 6
Figure 7
Figure 2
Figure 1
OP
EN
ING
PH
OT
O: JI
M L
AW
SO
N.
s
Figure 8
020-SBSB-2011-BlueJeanQueen.indd 21 10/25/11 9:17 AM
10252011091815
22 best of step by step beads
Figure 9
Figure 10
Figure 11
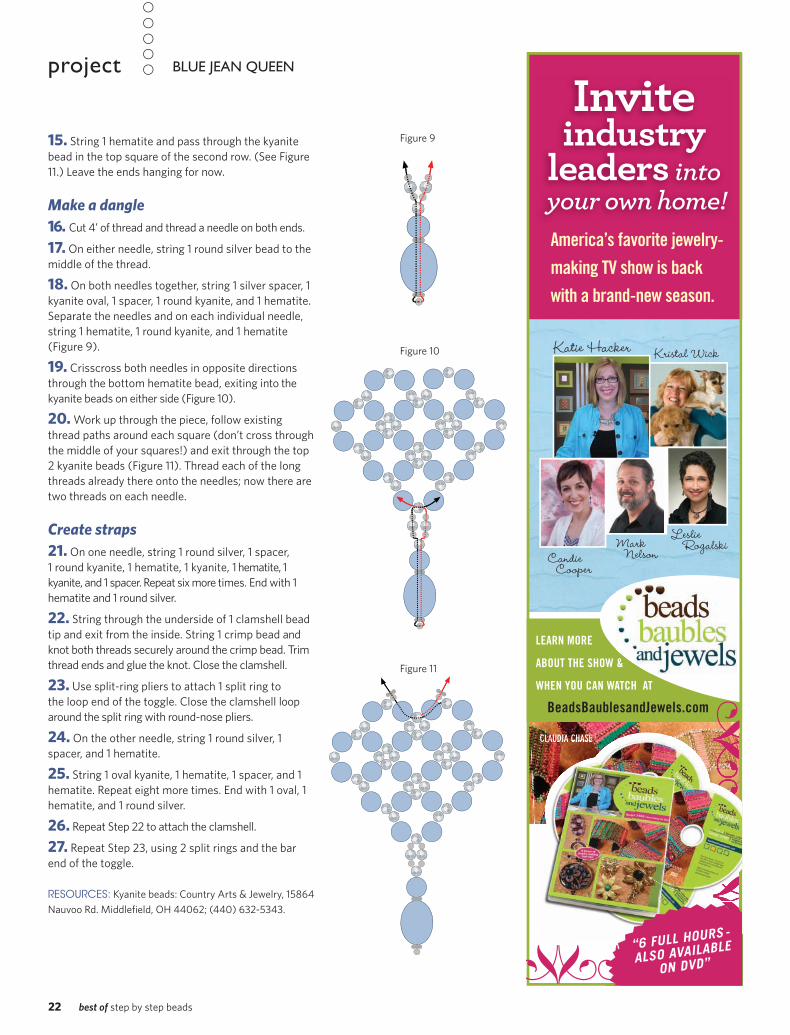
15. String 1 hematite and pass through the kyanite
bead in the top square of the second row. (See Figure
11.) Leave the ends hanging for now.
Make a dangle16. Cut 4’ of thread and thread a needle on both ends.
17. On either needle, string 1 round silver bead to the
middle of the thread.
18. On both needles together, string 1 silver spacer, 1
kyanite oval, 1 spacer, 1 round kyanite, and 1 hematite.
Separate the needles and on each individual needle,
string 1 hematite, 1 round kyanite, and 1 hematite
(Figure 9).
19. Crisscross both needles in opposite directions
through the bottom hematite bead, exiting into the
kyanite beads on either side (Figure 10).
20. Work up through the piece, follow existing
thread paths around each square (don’t cross through
the middle of your squares!) and exit through the top
2 kyanite beads (Figure 11). Thread each of the long
threads already there onto the needles; now there are
two threads on each needle.
Create straps21. On one needle, string 1 round silver, 1 spacer,
1 round kyanite, 1 hematite, 1 kyanite, 1 hematite, 1
kyanite, and 1 spacer. Repeat six more times. End with 1
hematite and 1 round silver.
22. String through the underside of 1 clamshell bead
tip and exit from the inside. String 1 crimp bead and
knot both threads securely around the crimp bead. Trim
thread ends and glue the knot. Close the clamshell.
23. Use split-ring pliers to attach 1 split ring to
the loop end of the toggle. Close the clamshell loop
around the split ring with round-nose pliers.
24. On the other needle, string 1 round silver, 1
spacer, and 1 hematite.
25. String 1 oval kyanite, 1 hematite, 1 spacer, and 1
hematite. Repeat eight more times. End with 1 oval, 1
hematite, and 1 round silver.
26. Repeat Step 22 to attach the clamshell.
27. Repeat Step 23, using 2 split rings and the bar
end of the toggle.
RESOURCES: Kyanite beads: Country Arts & Jewelry, 15864
Nauvoo Rd. Middlefi eld, OH 44062; (440) 632-5343.
BLUE JEAN QUEEN project
LEARN MORE
ABOUT THE SHOW &
WHEN YOU CAN WATCH AT
BeadsBaublesandJewels.com
CLAUDIA CHASE
America’s favorite jewelry-making TV show is back with a brand-new season.
Invite industry
leaders into your own home!
“6 FULL HOURS -
ALSO AVAILABLE
ON DVD”
Mark Nelson
Leslie Rogalski
Candie Cooper
Kristal WickKatie Hacker
020-SBSB-2011-BlueJeanQueen.indd 22 10/25/11 9:17 AM
10252011091815

SINGLE-NEEDLE RIGHT-ANGLE WEAVE AND BRICK STITCHbeaded slider
WHAT YOU NEEDSmall slider:•4 colors size 11° seed beads (A, B, C, D) •18–20 3mm fi re-polished beads• 2 lead-free solder rings, 1⁄2” size Large slider:•4 colors size 11° seed beads (A, B, C, D)•28–30 3mm fi re–polished beads•18–20 4mm fi re–polished beads•2 lead-free solder rings, 1⁄2” size •2 lead-free solder rings, 3⁄4” size Beaded end caps:•4 colors size 11° seed beads (A, B, C, D)•56–60 3mm fi re-polished beads•4 lead-free solder rings, 1⁄2” All: •FireLine 6lb or 8lb•Size 12 needles •Thread Heaven or beeswax•Thread Zapper or scissors
Hoopla!Beth Kraft
Single-needle right-angle weave and brick stitch are
used to combine fi re-polished beads and seed beads
with lead-free solder rings, creating stylish slider beads
and beaded end caps. Solder rings, sold in hardware
stores, come in many diff erent sizes and types, including
anodized aluminum, base metal, and precious metals.
Make sure they’re lead free! Experiment with diff erent
ring sizes but remember—the number of fi re-polished
beads will change depending on the ring size. Use
opaque fi re-polished beads for the richest color.
Artist’s TipEach design begins with a variation of right-angle
weave that will join 2 solder rings together.
beadworkmagazine.com 23
023-SBSB-2011-Hoopla.indd 23 10/27/11 9:50 AM
10272011095139

HOOPLA!project
Small slider1.Thread a needle with 5’ of FireLine or as long a length as
is comfortable.
2. Pass the tail end of the thread through the center of one
1/2” solder ring. Use a surgeon’s knot to tie the thread onto
the ring, leaving a 4” tail to be worked in and trimmed later.
3. Pick up 1 small fi re-polished bead. Pass the needle through
the center of the second 1/2” solder ring, bring the thread to
the outside of the second ring and pass back through the same
fi re-polished bead. The 2 rings will be parallel with the bead
between them.
4. Pick up 1A (blue) seed bead and 1 small fi re-polished bead.
Pass between the rings and through the center of the second ring.
5. Bring the thread to the outside of the second ring; pass
back through the second fi re-polished bead and continue
through the center of the fi rst solder ring.
6. Bring the thread to the outside of the fi rst ring and pass
back through the second fi re-polished bead. Pull the thread
taut. Pick up 1B (purple) seed bead; the seed beads should
be positioned on the sides of each ring with the fi re-polished
beads held fi rmly between the rings.
7. Pass through the fi rst fi re-polished bead, the A seed bead,
and exit the second fi re-polished bead to complete the fi rst
round of RAW; you are in position to start the next RAW unit.
8. Pick up 1B, 1 small fi re-polished bead, and 1A. Pass
through the second small fi re-polished bead, the second B,
and through the third small fi re-polished bead just added.
Pass between the rings and through the center of the fi rst
ring. Bring the thread to the outside of the fi rst ring and pass
back through the third fi re-polished bead; continue through
the center of the second ring. Bring the thread to the outside
of the second ring and pass back through the third fi re-polished
bead; you are in position for the next RAW unit. Repeat to en-
circle the rings with fi re-polished and seed-bead RAW units.
Note: The rings and thread will show between the
beads and along the edges as you stitch and will
be visible in the fi nished piece.
9. Add a seed bead on each ring to link the fi rst
and last fi re-polished beads into a RAW unit.
Brick stitch edgeUse seed bead color C (pink) to add brick-stitch edging
to the rings.
10. Pass thread down through the center of
the ring; pass under the ring to exit between
2 fi re-polished beads on the outside edge of
the ring. Pick up 2C and pass down through
the center of the ring, continue under the ring
between the A seed beads already in position
and pass back up through the second C added.
Position the 2 C so they lie on the top edge of
the ring. Pass down through the fi rst C bead from the top to
the bottom and pass back up through the second C bead,
bottom to top. The thread will be exiting from the top of the
second C bead. The extra pass around is only for beginning
brick stitch on the ring and helps stabilize the beads.
11. Pick up 1C, pass down through the center of the ring,
under the ring, up between the next A beads on the outside of
the ring, and back up through the C bead just added.
24 best of step by step beads
1/64"
023-SBSB-2011-Hoopla.indd 24 10/27/11 9:51 AM
10272011095139

22
25
12. Repeat Step 11 to cover the top of the ring, usually
between 18–22 seed beads. Join the fi rst and last seed
beads together.
13. To complete Side Two, turn the slide over, pass up through
the nearest fi re-polished bead, and exit moving from right to
left through a B seed bead. Repeat Steps 10–12. Weave the
thread into the beads and trim.
Large slider 14. Repeat Steps 1–8 using two 3/4” solder rings to create a
larger slider; use 4mm fi re-polished beads for the center beads
and 3mm fi re-polished beads instead of seed beads in the
RAW units.
15. Repeat Steps 10–12 to complete one round of seed-bead
brick-stitch edging on Side One of the large slider. When
fi nishing the brick stitch rounds do not cut the thread but
continue with the next step.
16. Exit from the top of the fi rst round of brick stitch. Pick
up 2C. Pass from inside to outside under the thread between
the next 2 seed beads in the previous row and up through the
second seed bead just added. Pass up through the center of
a 1/2” ring, around the outside edge of the ring, and pass back
down through the second seed bead just added. Pass under
the thread between seed beads on the previous row again and
exit up through the second C bead.
17. Pick up 1C, pass under the thread between the next 2 seed
beads in the previous row and pass back up through the seed
bead just added. Pass up through the center of the small ring,
around the outside edge of the ring, pass down through the
seed bead, under the thread and back up the seed bead.
18. Repeat Step 17, decreasing by a single bead in regular in-
tervals 3–4 times around the circle. Join the fi rst and last seed
beads together. Weave the thread into the beads and trim.
19. Repeat Steps 15–18 to complete Side Two of the large
slider. Beaded end cap.
20. Follow small slider Steps 1–12 for Side One of the beaded
end cap.
21. Exit from the top of the fi rst round of brick stitch. Use D
(orange) seed beads to add a second row of brick stitch. Pick
up 2D. Pass from inside to outside under the thread between
the next 2 seed beads in the previous row and up through the
second seed bead just added.
22. Pick up 1D, pass under the thread between the next 2
seed beads in the previous row, and pass back up through the
seed bead just added. Complete this second row of brick stitch
on Side One of the end cap. Pass through the beads to exit be-
tween the fi re-polished beads under the second ring to position
thread for next step.
23. Do not work a row of seed-bead brick stitch on Side
Two of the end cap; instead brick stitch about ten 3mm
fi re-polished beads inside the ring. Exit under the second
ring and to the outside between the RAW beads; pick up 2
fi re-polished, pass down through the center of the ring and
out under the ring between the seed beads. Pull or poke the
fi re-polished beads to lie along the inside rim of the ring. Pass
back up through the second fi re-polished bead just added.
Pass through the fi rst fi re-polished bead from the top to the
bottom, and pass through the second fi re-polished bead, from
bottom to top. The thread will be exiting from the top of the
second fi re-polished bead. The extra step stabilizes the beads
when starting brick on the ring.
beadworkmagazine.com 25
023-SBSB-2011-Hoopla.indd 25 10/27/11 9:51 AM
10272011095139

HOOPLA!project
24. Pick up 1 fi re-polished and pass under the ring. Pass
thread over the ring edge and up through the fi re-polished
from the bottom (ring side) to the top. Repeat around to fi ll
the ring with fi re-polished beads. Join the last 2 beads to-
gether exiting at the top of a fire-polished bead to position thread
for the next round.
25. Pick up 2C and pass under the thread between 2
fi re-polished beads in the previous row. Pass through the
second seed bead from bottom to top. Circle between the
seed beads and exit from the top of the second seed bead
just added.
26. Pick up 1C, pass under the thread between the 2 fi re-pol-
ished beads in the previous row, and pass back through the seed
bead just added. Repeat to complete a row of brick-stitched seed
beads inside the circle, on top of fi re-polished beads, decreasing
if needed. Pass through the fi rst bead from top to bottom and the
last bead added from the bottom to the top. Weave the thread
into the beads and trim.
RESOURCES: Nordic Gypsy Beads & Jewelry, nordicgypsy.com.
26 best of step by step beads
TURN ORDINARY MATERIALSINTO EXTRAORDINARY DESIGNS
fabulous fabric. glamorous glitter. TURN ORDINARY MATERIALS INTO EXTRAORDINARY DESIGNS
FROM WIRE AND YARN to crystals and charms be
amazed at the stunning outcome of simple materials.
Kristal Wick takes you on a trip into her studio
to learn mixed media jewelry like never before.
with this must-have, easy-to-follow jewelry resource you’ll use again and again!
Get Started Today
O P
W AT C H A P R E V I E W AT InterweaveStore.com/BeadedBraceletsDVD
withKristal Wick
023-SBSB-2011-Hoopla.indd 26 10/27/11 9:51 AM
10272011095140

027 SBSB 2011.indd 27 10/27/11 9:30 AM
10272011093054

28 best of step by step beads
WIREWORK AND STRINGINGnecklace
Rainforest NecklaceTerri Wlaschin
A neat twist on simple stringing, this stretchy necklace allows for an
adjustable size. The design is inspired by rainforests, whose riches
provide lush habitats to more than two thirds of all plant and animal
species on earth. The variations of blues and greens in this
necklace evoke the spirit of those great forests.
028-SBSB-2011-RainforestNecklace.indd 28 10/25/11 9:23 AM
10252011092445

beadworkmagazine.com 29
1. Cut 5 strands of beading wire each 22” in
length. Pull each wire individually over one jaw
of the round-nose pliers to curl it, the same way
you use scissors to make curling ribbon. Leave
about 2” of uncurled wire at the start of each wire.
2. Place a bead stopper 3” from the end on the
curly end of each strand. On the uncurled end
of each wire, string beads down to each stopper
as follows and be sure to place a second bead
stopper at the other end after stringing each
strand!
Strand One: 5A, 5B, 5C, 5A, 1 gemstone chip.
Repeat 10 times.
Strand Two: 1 chip, 15D. Repeat until you have
37 chips.
Strand Three: 1 bicone crystal, 1 chip, 1 bicone
crystal, and 5 random beads including 1 bugle
bead. (Shown: 1B, 1A, 1 bugle, 2D.) Repeat until
you have 15 bugle beads. String 1D, 1A, and 2C.
Strand Four: 5A, 5B, 5C, 5A, and 1 gemstone
chip. Repeat until you have 10 gemstone chips.
String 5A, 5B, 5C, 5A.
Strand Five: 5A, 1 gemstone chip, 5A, 1 bugle,
5E, 5D, 1 bugle, 5A, and 1 gemstone chip. Repeat
until you have 9 gemstone chips. String 5A, 1
bugle, 5E, and 3D.
3. Place strands side by side on your beadwork
surface. Strands should be about 10 ½" curled
but can vary within ½". Remove or add beads as
needed but leave at least 3" of beading wire on
each end for ease of crimping.
4. Turn one strand so its straight end is aligned
with the 4 curly ends. This wire will be used to
fi nish the necklace. Remove all 5 bead stoppers
on the 4 curly strands and the straight strand.
String all 5 strands through 1 crimp tube. Keep
the wire ends as even as possible and crimp
fi rmly. Trim only the 4 curly ends. Do not cut the
straight wire.
5. On the straight uncut wire end, string 1
crystal, 1 crimp tube, and one half of the clasp.
Pass the wire back through the crimp tube and
crystal, if possible. Snug the clasp up to the
beads so they snug against the fi rst crimp. Use
your crimp pliers to secure the crimp; trim the
straight wire end.
6. Make sure the bead stoppers on the other
wire ends are secure before proceeding! Hold
up the necklace by the clasp end so the strands
hang freely. Choose the longest strand and
twirl it around the other strands until it reaches
the end. Place the necklace down on the mat
without untwisting the necklace. Remove the
bead stoppers and string all 5 strands through
1 crimp tube, leaving at least one strand with
enough wire to repeat Step 5 to fi nish this end of
the necklace. Crimp fi rmly. Trim only 4 ends. Do
not cut the fi fth wire.
7. Repeat Step 5 with the other part of your clasp.
RESOURCES: Accents Beads, accentsbeads.com.
WHAT YOU NEED• 15 g size 8° seed beads (color A)• 8 g size 11° seed beads (color B)• 8 g size 11° seed beads (color C)• 8 g size 15° seed beads to match (color D)• 8 g size 15° seed beads to match (color E)• 8 g size 3/8” bugle beads to match• 32 size 6° bicone crystals to match
• 8” strand of matching gemstone chips• 8” strand of matching 8mm rondelles• 3” of medium to lightweight link chain for the clasp• 4 crimp tubes• .014 beading wire• Clasp to hook on chain
• 10 bead-stopper springs or clips• Crimping pliers• Wire cutters• Long chain-nose pliers
Finished length: 14”; will “stretch” to 18”.
028-SBSB-2011-RainforestNecklace.indd 29 10/25/11 9:23 AM
10252011092445

30 best of step by step beads
FLAT RIGHT–ANGLE WEAVEearrings
1t
y
J
y
t
1
Silver Comet Leslie Rogalski
PH
OT
O B
Y J
IM L
AW
SO
N.
These dramatic earrings are
actually just 90° turns of basic
fl at RAW; they hang askew on
the ear wire like zigzags of the
night sky!
WHAT YOU NEEDFor 1 3⁄4” earrings:• 32 Swarovski Jet 4mm bicones• 9 Swarovski Comet Argent light 4mm bicones• 2 closed 3mm silver jump rings• FireLine 6lb fi shing line• #12 bead needle• 1 pair silver ear wires• Scissors
030-SBSB-2011-SilverComet.indd 30 10/25/11 2:36 PM
10252011143739

beadworkmagazine.com 31
1.Thread your needle on a 4’ length of FireLine. String 4 crys-
tals, leaving a 6” tail: 1 light, 1 Jet, 1 light, 1 Jet. Tie a knot with
your working thread and tail, for ming a snug circle of bicones
(beads 1–4).
2. Working counterclockwise around this circle, pass through
beads 1, 2, and 3. Pick up 1 Jet, 1 light, and 1 Jet (beads 5, 6, and
7) and pass clockwise through beads 3, 5, and 6.
3. Pick up 1 light and 2
Jet (beads 8, 9, and 10) so
your colors turn the corner,
and pass counterclockwise
through beads 6 and 8.
4. Here’s your fi rst 90° turn, where you start working the
second leg of your zigzag: Pick up 1 Jet, 1 light, and 1 Jet (beads
11, 12, and 13) and pass clockwise through beads 8, 11, and 12.
Pick up 1 Jet, 1 light, and 1 Jet (beads 14, 15, and 16) and pass
counterclockwise through beads 12, 14, and 15.
5. Here’s another corner turn for color: Pick up 1 light and 2 Jet
(beads 17, 18, and 19). Pass clockwise through beads 15 and 17.
You’re now ready to start working your third leg of the zigzag.
6. Pick up 1 Jet, 1 light, and 1 Jet (beads 20, 21, and 22). Pass
counterclockwise through beads 17, 20, and 21.
7. In this last round, you attach the closed jump ring for your
ear wire. Pick up 1 Jet, 1 light, 1 jump ring, and 1 Jet. Pass twice
clockwise through beads 21, 23, 24, the jump ring, and 25. Knot
the thread discretely but securely between beads 25 and 21
and weave the end through existing thread paths, in a circular
motion. Trim carefully.
8. Gently twist open the loop of one ear wire, string on the
jump ring and earring, and close the ear–wire loop. Repeat for
your second earring.
RESOURCES: Check your local bead store.
PH
OT
O B
Y J
IM L
AW
SO
N.
Artist’s TipsRight–angle weave is always worked in a circular motion, changing
from clockwise to counterclockwise with each round. Each round
includes 4 beads but will share beads with the previous round:
You actually pick up 3 new beads, not 4, with each round in this
project. Notice in Steps 3 and 5 when the color turns the corners
to keep the mirror stripe of Comet Argent light in the middle of
your zigzag!
030-SBSB-2011-SilverComet.indd 31 10/25/11 2:36 PM
10252011143740

32 best of step by step beads
SIMPLE FRINGESnecklace
LoopDe LoopMartha Aleo
This necklace is a wonderful way
to use up odd beads and play with
color, shape, and design at the
same time. It’s easy to make and
fun to wear. And the beauty of this
necklace is that there is no right
or wrong way to make it. Use the
beads in your stash and let your
imagination go wild.
032-SBSB-2011-Loop de Loop.indd 32 10/25/11 9:24 AM
10252011092545

beadworkmagazine.com 33
WHAT YOU NEED• 1-2 g size 11° seed beads in colors of your choice• 1 tube size 6° seed beads in color of your choice• 2 large glass beads with holes big enough to cover
the folded crimps• Bead soup using 4–12mm beads: Czech pressed
glass, crystals, top-drilled beads, leaves, daggers, tube beads, bicones, druks and any other type and shape that strikes your fancy
• 2 crimp tubes
• 1 shank button• Size 13 beading needle• 20” of fl exible beading wire• Beige Sylamide thread• Beeswax• Crimping pliers• Wire cutters
Finished length: 24”
1. Cut 30” of beading wire. String 1 crimp
tube and the shank button on the end of
the wire. Bring 2–3” of wire back through
the crimp tube. Secure the crimp with
crimping pliers.
2. String 1 big–hole glass bead to cover the
crimp and 24” of size 6° seed beads, cover-
ing the 2–3” tail.
3. String 1 big–hole bead, 1 crimp tube, and
enough size 6° seed beads to make a loop
big enough to go around the button.
4. Bring the wire back through the crimp
tube, the big–hole bead, and 2–3” of seed
beads. Pull the wire to remove any slack.
Secure the crimp with crimping pliers and
trim the excess wire. If the loop is on the
large side, it won’t matter because the
weight of the necklace will hold the button
and loop closed.
5. Wax 3’ of Sylamide and thread the nee-
dle. Double the thread and knot it securely
on the end. Secure the thread between 2
size 6° seed beads about 6 beads in from
one of the ends of the necklace.
6. Bring the needle out of 1 size 6° seed
bead, pick up 10 size 11° seed beads, then go
up into the next size 6° bead. Repeat 8 times.
7. Pick up 20 size 11° seed beads then go
up into the next size 6° seed bead. Repeat
for 5 times.
8. Pick up 30 size 11° seed beads then go
up into the next size 6° seed bead. Repeat
to make a few more loops.
9. Start adding big beads to the bottom of
each loop as you make them. Make larger
graduated loops as you reach the center of
the necklace. Increase the size of the larger
beads as you go, using the largest ones at
the center of the necklace. See Illustration.
10. Work your way up the necklace on
the opposite side, doing everything in
reverse. When you are about 8 size 6°
seed beads from the end, secure the thread
with a knot. Take the needle and pass back
through several beads, tie another knot,
then trim the thread close to your work.
RESOURCES: Check your local bead store.
Artist’s TipTo add more thread, wax and
double another 36” length of
Sylamide. Tie a secure square
knot to the thread you are using,
bury the ends in a size 6° seed
bead, then continue.
032-SBSB-2011-Loop de Loop.indd 33 10/25/11 9:24 AM
10252011092546

34 best of step by step beads
TWO-NEEDLE LADDER STITCHbracelet
Crystal Wave
Bonnie Clewans
WHAT YOU NEED• 53 round 6mm crystals• 66 round 4 mm crystals• 8 round 3mm crystals• 1 toggle clasp (bar and ring)• 2 silver 10mm oval jump rings • 2 yd braided crystal (color) bead thread, 10 lb test, .006 dia.• 2 size 12 beading needles• Scissors• 2 pair chain-nose or round-nose pliers• G-S Hypo Cement or Super Glue
Finished size: 7”
Did you know?The holes in crystal elements can sometimes be
sharp. Take care when pulling your thread snug
to avoid cutting or abrading the thread. Braided
and thermally bonded threads are the most
durable threads for use with crystals.
Using two needles makes this bracelet
look like right-angle weave, but tech-
nically it’s a ladder stitch, created by
crisscrossing the two needles through
select beads. Create a ladder base of
larger crystals, then weave back through
the base adding wavy embellished edges
of smaller crystals. This method works up
so symmetrically it’s easy for beginners
to learn and fun for anyone to make!
Crystal color shown: Swarovski Blue Zircon (5000)
Crystallized Elements
034-SBSB-2011-Crystal Wave.indd 34 10/25/11 9:25 AM
10252011092616

beadworkmagazine.com 35
Create the ladder base1. Use your pliers to open one jump ring
and attach it to the toggle-bar loop. Repeat
for the toggle bar ring. Set both aside.
2. String one needle on each end of a 2 yd
piece of thread, leaving 6” tails.
3. On one needle, string one 4mm crystal,
two 3mm crystals, the jump ring with
the toggle bar attached, and two 3mm
crystals. Slide everything to the middle of
the thread.
4. Pass the other needle through the
4mm crystal in the opposite direction from
the fi rst needle, forming a loop holding
the clasp. Your needles should crisscross
through the 4mm crystal, exiting both
holes pointing in opposite directions
(fi gure 1).
5. Pass both needles in opposite directions
through all the crystals again to strengthen
the loop, crisscrossing again through the
4mm crystal.
6. String one 6mm crystal on each needle.
String a third 6mm on one needle and
crisscross the other needle through it (fi g-
ure 2) as you did with the 4mm in Step 4.
Continue adding 6mm crystals, crisscross-
ing in this ladder-stitch technique, until you
reach about 1” short of your desired length,
allowing for the clasp.
String the toggle–ring clasp7. String one 4mm crystal on one needle
and crisscross the other needle through it.
String two 3mm crystals on both needles.
String the jump ring with the toggle ring at-
tached on one needle. Pass both needles in
opposite directions through all the crystals,
as in the other clasp loop in Steps 4 and 5.
Both needles will exit on opposite sides of
the 4mm crystal as in fi gure 1.
Make the waves8. Pass one needle all the way back
through the ladder to reinforce, following
the zigzagging thread path. When you
reach the toggle, remove the needle tem-
porarily just to avoid accidental sticks.
9. Use the other needle to make the
waves: Pass through the next two 6mm
crystals, add four 4mm crystals, and pass
through the next crossover 6mm crystal
(fi gure 3). Repeat for the length of the
bracelet.
Finish10. When the clasp end is reached, pass
through the ladder-stitch base until the
threads meet. Knot the threads together
positioning the knot close to a crystal. Re-
thread a needle on the loose tail and weave
both tails through a few crystals following
thread paths; trim. Dab the knot with glue.
RESOURCES: Check your local bead shop.
Artist’s TipI always cut an extra long piece of thread, so I
can make several passes through the crystals
to be sure my beadwork is securely reinforced.
Figure 1
Figure 2
Figure 3Did you know?Braided beading thread such as
WildFire or FireLine is created in a way
to be stronger and with less stretch
than other beading threads. The larger
the diameter number, the thicker the
thread. The test weight is how much it
will bear before breaking.
034-SBSB-2011-Crystal Wave.indd 35 10/25/11 9:25 AM
10252011092616

36 best of step by step beads
TRIANGLE WEAVE bracelet
SparklefestArtist’s Tips• Triangle weave is worked in a circular
motion, changing stitch direction from
clockwise to counterclockwise.
• When working with a long length of thread,
wax frequently to minimize tangling.
• Use wintry-hued and AB crystals as the
outside color for the look of snowfl akes.
Use green crystals around the outside and
richer colors inside to evoke fl owers.
This super-sparkly band of “fl owers” is an easy-to-learn
variation of right-angle weave. Each fl ower has 6 triangle-
stitched “petals.” Once you become comfortable with
triangle weave, you’ll never want to stop, and the color
variations are limitless!
Meri Nash Aderhold
P
HO
TO
BY
JIM
LA
WS
ON
.
036-SBSB-2011-Sparklefest.indd 36 10/25/11 9:26 AM
10252011092717

beadworkmagazine.com 37
WHAT YOU NEED• 4 g of size 15° seed beads: silver, gold, or clear AB• CRYSTALLIZED Swarovski bicone elements (5301):• 52–58 color A (outside color) 4mm• 2 color A, (outside color) 3mm• 60–66 color B (inside color) 4mm (10–11 fl owers, depending on wrist size, 6 crystals per fl ower)• 1 size 10–12mm lobster clasp
• 1 size 5–7mm split ring• Size 13 beading needles• WildFire beading thread• Beeswax or Thread Heaven• Scissors to cut WildFire
Finished length: 6½”, without clasp
1. Thread a needle to the middle of
4 yd of well-waxed WildFire. Tie the ends
together in a square knot. Wax the thread
again now that it is doubled. Prevent tan-
gling by re-waxing after every 3 fl owers.
2. String 5 seed beads, the lobster clasp,
and 5 seed beads. Form a snug circle by
tying a knot. Exit next to the knot.
3. String one 3mm bicone (bead 1),
5 seed beads, one 4mm A (bead 2), and
5 more seed beads. Work in a fi gure-
eight path: pass counterclockwise back
up through bead 1, clockwise around the
clasp circle of 5 seed beads, the clasp,
and the next 5 seed beads, and exit
through bead 1. Pass counterclockwise
through the next 5 seed beads, the 4mm
(bead 2), and exit the next seed bead.
Your clasp end is now secure (Figure 1).
4. Triangle stitch 1, the fi rst “petal”: String
1 seed bead, 1B (bead 3), 2 seed beads,
1B (bead 4), and 1 seed bead. Close the
triangle: pass clockwise through a seed
bead, bead 2, and the next seed bead. Pass
clockwise through the remaining beads in
the triangle; exit through bead 3 and the
next seed bead (Figure 2).
5. Triangle stitch 2: String 1 seed bead,
1B (bead 5), 2 seed beads, one 4mm
A (bead 6), and 1 seed bead. Close the
triangle: pass counterclockwise through a
seed bead and bead 3 (4mm). Continue
around the triangle to exit bead 5 and the
next seed bead (Figure 3).
6. Triangle stitch 3: String 1 seed bead, one
4mm A (bead 7), 2 seed beads, 1B (bead
8), and a seed bead. Close the triangle: pass
clockwise through a seed bead and bead 5.
Continue around the triangle to exit bead 8
and the next seed bead (Figure 4).
7. Triangle stitch 4: String 1 seed bead, 1B
(bead 9), 2 seed beads, one 4mm A (bead
10), and 1 seed bead. Close the triangle: pass
counterclockwise through a seed bead and
bead 8. Continue around the triangle to exit
bead 9 and the next seed bead (Figure 5).
8. Triangle stitch 5: String 1 seed bead,
one 4mm A (bead 11), 2 seed beads, 1B
(bead 12), and a seed bead. Close the tri-
angle: pass clockwise through a seed bead
and bead 9. Continue around the triangle
to exit bead 12 and the next seed bead in
the center. Pass through the seed bead
next to bead 4 and through bead 4; exit
the next closest seed bead (Figure 6).
9. Complete the fi rst fl ower: string 1 seed
bead, one 4mm A (bead 13), and 1 seed
bead. Close the triangle and the whole
fl ower: pass counterclockwise through the
seed bead next to bead 12, through bead
12, and the next seed bead in the center.
Pass clockwise through the next center
seed bead and bead 9. Pass counterclock-
wise through 2 more seed beads and bead
10; exit the next seed bead (Figure 7).
10. Repeat Steps 4–9 to make 9–11 more
fl owers (depending on wrist size). Try
diff erent colors of B beads around the
outside for more variety!
11. String 4 seed beads, one 3mm A,
9 seed beads, and the split ring. Form a
circle of seed beads through the split ring;
pass back through the 3mm.
12. String 4 seed beads; pass through the
seed bead next to bead 10, through bead
10 and the next seed bead (Figure 8). Pass
through all the beads in Steps 9 and 10
several times to secure.
13. Weave the remaining tail back into
the piece through existing thread paths to
secure and trim.
RESOURCES: All materials from Fire Mountain
Gems and Beads, www.fi remountaingems.com.
1
2
34
6
5
789
10
1
2
34
6
5
789
10
11
12
1
2
34
Figure 2
1
2
Figure 1
1
2
34
6
5
Figure 3
1
2
34
6
5
78
Figure 4 Figure 5
1
2
34
6
5
789
10
11
12
14
Figure 7
Figure 6
5
789
10
11
12
Figure 8
P
HO
TO
BY
JIM
LA
WS
ON
.
036-SBSB-2011-Sparklefest.indd 37 10/25/11 9:26 AM
10252011092718
38 best of step by step beads
STRINGINGbracelet
Tandem Carole Rodgers
WHAT YOU NEED: Hematite Bracelet• 31 hematite 3.5x13mm 2-hole bar beads• 35 silver-plated 4mm round fl uted metal beads• 32 silver-plated 2x4mm disc spacer beads • 1 silver 15mm 3-strand round box clasp• 6 silver 2mm crimp beads• 27” of .018 sterling-plated fl exible beading wire
Beads with more than one hole off er unlimited
design possibilities. You can weave them or
string them in unusual ways and have a lot
of fun designing with them.
WHAT YOU NEED: Red Tortoise Shell Bracelet• 44 red tortoise shell 3.5x13mm 2-hole dome-top beads• 43 gold-plated 1x4mm disc spacer beads• 6 gold-plated 4mm round fl uted metal beads• 1 gold 3-strand clasp• 6 gold 2mm crimp beads• 27” of .015 gold-plated fl exible beading wire• Wire cutters• Crimping pliers• Bead sorting dish or cloth
Finished size: 7”
038-SBSB-2011- Tandem.indd 38 10/25/11 11:48 AM
10252011114937

beadworkmagazine.com 39
m
Hematite bracelet1. Cut the beading wire into three 9”
pieces. String 1 fl uted bead and 1 crimp
bead. Pass the wire through the middle
hole of the clasp and back through the
fl uted bead and crimp.
2. Push the wire up so you have about
a 4mm loop around the clasp loop and
about a ½” tail. Secure the crimp with
crimping pliers and trim the excess wire.
3. String 1 silver disc alternating with
1 hematite bead until you have used all
32 silver discs and 31 hematite beads.
String 1 crimp and 1 fl uted bead and
pass the wire through the middle loop
of the clasp. Leave a little ease so the
bracelet will bend comfortably. Bring
the wire back through the fl uted bead
and crimp, leaving a 4mm loop of wire
around the clasp loop. Secure the crimp
and trim the excess wire.
4. Place your bracelet on a flat
surface. Adjust the hematite beads so
they alternate directions through the
length of the bracelet, starting with 1
bead pointing up.
5. Attach the second wire to the out-
side loop of the clasp that is closest to
a bead that is pointing up. You will have
16 up beads and 15 down beads.
6. String 1 hematite bead and 1 fl uted
bead. Continue across bracelet passing
through 1 hematite and picking up 1
fl uted bead as you go. When you reach
the end of the bracelet, make sure the
wire is the same length as the middle
one. Attach the wire to the loop on the
clasp as before, secure the crimp with
crimping pliers, and trim the excess
wire.
7. Attach the remaining strand as you
did the previous strands. Starting with
a bead that is pointing down, string 1
hematite bead and 1 fl uted bead until
you reach the other side of the bracelet.
Secure this end of the beading wire as
before and trim the excess wire.
Red tortoise shell bracelet1. Using gold wire, string 1 crimp, 1 fl uted
bead, and the middle loop of the clasp.
Bring the wire back through the fl uted bead
and crimp. Secure the crimp and trim the
excess wire.
2. String the dome beads alternating
with the gold spacer discs. Use alter-
nate holes on the dome beads so all the
domes face up. Continue stringing until
all the dome and spacer beads have
been used.
3. String 1 crimp tube, 1 fl uted bead,
and the middle loop on the other clasp.
Secure the strand as before and trim the
excess wire.
4. Because the domes all have to face
up, your beads should already be in an
alternating pattern. Place the beads on
a fl at surface and attach 1 wire to the
outside loop of the clasp. String the
remaining holes on the dome beads and
secure the wire to the other end of the
clasp. Repeat for the fi nal strand.
RESOURCES: Focal bead: abeadstore.com.
All other resources: Fire Mountain Gems and
Beads, fi remountaingems.com.
Sorbet in Augustby Michelle Mach
Eye on Midnightby Sharon Borsavage
Trés
Tur
quoi
seby
Mar
lene
Ble
ssin
g
Check out these
stringing designs,
pick one or make
them all!
~ Free Stringing Designs! ~
Download your FREE eBook today:
5 FREEBeading
Projects to Learn How to Bead
GET YOUR FREE PROJECTS AT:
www.BeadingDaily.com/FreeStringingProjects
038-SBSB-2011- Tandem.indd 39 10/25/11 11:49 AM
10252011114937

40 best of step by step beads
WIREWORKnecklace
Peaceful Dreams Lorelei Eurto
WHAT YOU NEED• 7 bronzite 10x7mm rondelles• 2 faceted yellow jade 5-6mm rondelles• 6 smoky quartz 10x6mm beads• 2 etched cream 10x7mm lampworked glass rounds• 2 bronze-colored size 11° glass seed beads • 1 carved bone round• 1 bird pendant• 1 oxidized copper U component • 1 ceramic message stick connector
• 1 brass 22mm hammered ring• 1 brass fi ligree 11mm tube bead• 2 brass 4mm melon beads• 3 brass 4mm jump rings• 1 brass 2” eye pin• 36” of copper Artist wire• Round-nose pliers• Chain-nose pliers• Wire cutters
Create a simple wire-wrapped beaded
necklace with several handmade
artisan-jewelry components.
040-SBSB-2011-Peaceful Dreams.indd 40 10/25/11 9:27 AM
10252011092833
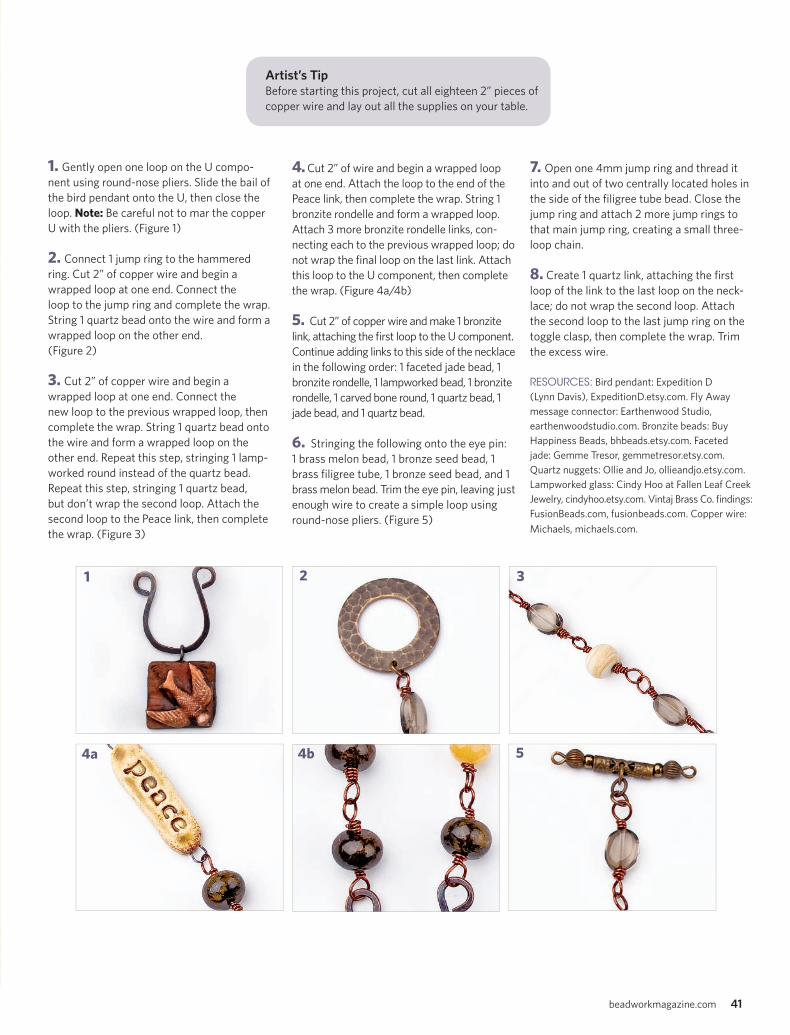
beadworkmagazine.com 41
Artist’s TipBefore starting this project, cut all eighteen 2” pieces of
copper wire and lay out all the supplies on your table.
1. Gently open one loop on the U compo-
nent using round-nose pliers. Slide the bail of
the bird pendant onto the U, then close the
loop. Note: Be careful not to mar the copper
U with the pliers. (Figure 1)
2. Connect 1 jump ring to the hammered
ring. Cut 2” of copper wire and begin a
wrapped loop at one end. Connect the
loop to the jump ring and complete the wrap.
String 1 quartz bead onto the wire and form a
wrapped loop on the other end.
(Figure 2)
3. Cut 2” of copper wire and begin a
wrapped loop at one end. Connect the
new loop to the previous wrapped loop, then
complete the wrap. String 1 quartz bead onto
the wire and form a wrapped loop on the
other end. Repeat this step, stringing 1 lamp-
worked round instead of the quartz bead.
Repeat this step, stringing 1 quartz bead,
but don’t wrap the second loop. Attach the
second loop to the Peace link, then complete
the wrap. (Figure 3)
4. Cut 2” of wire and begin a wrapped loop
at one end. Attach the loop to the end of the
Peace link, then complete the wrap. String 1
bronzite rondelle and form a wrapped loop.
Attach 3 more bronzite rondelle links, con-
necting each to the previous wrapped loop; do
not wrap the fi nal loop on the last link. Attach
this loop to the U component, then complete
the wrap. (Figure 4a/4b)
5. Cut 2” of copper wire and make 1 bronzite
link, attaching the fi rst loop to the U component.
Continue adding links to this side of the necklace
in the following order: 1 faceted jade bead, 1
bronzite rondelle, 1 lampworked bead, 1 bronzite
rondelle, 1 carved bone round, 1 quartz bead, 1
jade bead, and 1 quartz bead.
6. Stringing the following onto the eye pin:
1 brass melon bead, 1 bronze seed bead, 1
brass fi ligree tube, 1 bronze seed bead, and 1
brass melon bead. Trim the eye pin, leaving just
enough wire to create a simple loop using
round-nose pliers. (Figure 5)
7. Open one 4mm jump ring and thread it
into and out of two centrally located holes in
the side of the fi ligree tube bead. Close the
jump ring and attach 2 more jump rings to
that main jump ring, creating a small three-
loop chain.
8. Create 1 quartz link, attaching the fi rst
loop of the link to the last loop on the neck-
lace; do not wrap the second loop. Attach
the second loop to the last jump ring on the
toggle clasp, then complete the wrap. Trim
the excess wire.
RESOURCES: Bird pendant: Expedition D
(Lynn Davis), ExpeditionD.etsy.com. Fly Away
message connector: Earthenwood Studio,
earthenwoodstudio.com. Bronzite beads: Buy
Happiness Beads, bhbeads.etsy.com. Faceted
jade: Gemme Tresor, gemmetresor.etsy.com.
Quartz nuggets: Ollie and Jo, ollieandjo.etsy.com.
Lampworked glass: Cindy Hoo at Fallen Leaf Creek
Jewelry, cindyhoo.etsy.com. Vintaj Brass Co. fi ndings:
FusionBeads.com, fusionbeads.com. Copper wire:
Michaels, michaels.com.
2 31
4a 4b 5
040-SBSB-2011-Peaceful Dreams.indd 41 10/25/11 9:27 AM
10252011092833

42 best of step by step beads
BEAD STITCHINGbracelet
The Look of LinksPatricia C. Vener
WHAT YOU NEED• 3 g purple iris or purple fuchsia gold luster size 11° seed beads (A)• 1 g gold-colored or gold-lined size 11° seed beads (B)• 1 vermeil toggle clasp • 2 gold-fi lled jump rings• Braided or other strong beading thread to match beads • Beading needle #12 (thin)• Scissors• 2 pairs of pliers, round-nose or chain-nose
Finished size: 6½”
To lengthen this bracelet: There are 4½ “links” or loops per inch, 15A beads and 4B beads per loop. Obtain extra beads (about 68A (½ g) and 18B beads) for each inch of desired extra length.
This cleverly designed “chain” looks like separate beaded
links but is actually stitched in one piece. Supple and
graceful, it entwines your wrist like a delicate vine.
DID YOU KNOW?Seed-bead quantities are usually
counted or measured in grams, using
the symbol “g,” as in, 3 g. There are
about 120 size 11° beads in a gram.
Always have extra on hand!
042-SBSB-2011-Look of Links.indd 42 10/25/11 9:28 AM
10252011092919

beadworkmagazine.com 43
Make the links1. Thread a needle on 5’ of thread. Place a
stopper bead, leaving a 10” tail.
2. String 3A (purple), 1B (gold), 3A, 1B,
3A, 1B, 3A, and 1B for a total of 16 beads.
3. Pass through all beads again to
reinforce. Exit the fi rst gold bead strung.
Loop 1
4. Pull the loop snug. String another set of 16
beads as in Step 1: 3A, 1B, repeat for a total of
16 beads, ending with a gold (B) bead.
5. Pass up through the inside of the
previous loop, bringing several of the last
beads just strung through the existing
loop as well. Hold the loop and those last
beads fi rmly between your thumb and
forefi nger. Pass through the fi rst 3A and 1B
strung in this loop to close the loop that
links through the previous one.
Loop 1
Loop 2
6. Grasp the newly formed loop at the gold
bead where the working thread exits; pull
snug to tighten the loop so any connecting
thread from one loop to the next is as short
as possible. It may take practice.
7. Repeat from Step 4 to complete the
length you desire for your bracelet (Figure
3). If a pair of loops make more of a fi gure
eight than a loop, push the loops toward
each other at the connecting point and wiggle
the new loop back into its chain-link form.
1
3
2
Add the clasp8. Use two pliers to gently twist open a
jump ring and close it securely through
the loop of one part of your clasp. Repeat
with the second jump ring and the other
clasp. Set aside.
9. Check the bracelet for fi t, allowing
about 1” for the clasp. Create a fi nal loop
but string 1 jump ring in the middle of the
loop: String 3A, 1B, 3A, 1B, and one part
of your clasp. String 3A, 1B, 3A, and 1B.
Repeat Step 5 to connect this loop as the
fi nal link. Reinforce by passing around the
loop again. Pass back into the chain and
tie a secure surgeon’s knot between two
beads. Weave threads around through a
couple links to hide the tails and trim.
10. Remove the stopper bead on the
other end of the bracelet. Using the tail
thread, repeat Step 9 to capture the
remaining jump ring and clasp on the last
beaded link.
RESOURCES: Check your local bead shop.
Artist’s TipTip to tighten thread: Gently roll
beads between your thumb and
forefi nger as you tighten thread
whenever you have to pull beadwork
snug—it helps ease the bead friction
so the thread can pull tighter.
Learn the LingoVermeil–“vermay” is silver that
has been gold–plated. (Gold plate
can often be used on metal base.)
042-SBSB-2011-Look of Links.indd 43 10/25/11 9:28 AM
10252011092919

44 best of step by step beads
EVEN-COUNT PEYOTE & STRINGINGnecklace
Striking JasperMelody Marie Murray
WHAT YOU NEED• 1 jasper 45mm donut (fossilized crinoid jasper shown)• 70 mother-of-pearl 4mm round beads• 6 hill tribe silver beads, 5x4.5mm round with rope ends • 4 hill tribe silver 8mm overlapping round beads• 10 jet 4mm round faceted Swarovski crystal beads• 8 clear 4mm round faceted Swarovski crystal beads• 2 jet 6mm rondelle faceted Swarovski crystal beads• 4 g matte rainbow medium gray Delica DB307 beads (color A) • 1 sterling silver 15.5x5.5mm lobster clasp with jump ring attached• 1 sterling silver 6mm jump ring (2 if clasp does not include a jump ring)• 2 silver clamshells• 2 silver crimp beads• 8 lb size D smoke FireLine• Round-nose or chain-nose pliers• Scissors• Needle• Jewelry glue
This easy project teaches you how to peyote-
stitch your own beaded beads to string, then
use peyote again to make the bail for a striking
donut pendant. The end result is elegant with
its simple gray-and-white color scheme accented
with both black and silver.
044-SBSB-2011-Striking Jasper.indd 44 10/25/11 9:29 AM
10252011093004

beadworkmagazine.com 45
Make small tube beads1. Cut 3’ of FireLine and thread the needle.
Add a stop bead, if desired. String 4A.
Work even-count peyote to make a strip 4
beads wide by 14 rows long or 7 beads on
each side. Zip the ends together to make a
tube. Repeat for a total of 2 beads.
Make larger tube beads 2. Cut 3’ of FireLine and thread the
needle. Add a stop bead, if desired. String
4A. Work even-count peyote to make a
strip 10 beads wide by 14 rows long or 7
beads on each side. Zip the ends together to
make a tube. Repeat for a total of 4 beads.
3. Make the donut strip: Cut 5’ of FireLine
and thread the needle. Add a stop bead,
if desired. String 6A beads. Work even-
count peyote to make a strip 6 beads wide
by 54 rows long or 27 beads on each side.
Wrap the strip around the donut through
the hole and zip the ends together. The
strip will move freely around the donut.
Make the bail strip4. Cut 3’ of FireLine and thread the
needle. Add a stop bead, if desired. String
4A and work even-count peyote for 10
rows or 5 beads on each side. Stitch one
end of this strip to the donut-strip beads,
working in peyote. Stitch the other end of
the strip to the bail, working in peyote.
String the necklace5. Cut about 6’ of beading thread. Move
the needle to the center of the thread and
bring the ends together to work doubled.
Knot the ends of the thread securely around
a crimp bead, dot with glue, and trim ends.
Pass through a clamshell bead tip from the
inside so the crimp and knot sit inside the
clamshell. Close the clamshell around the
crimp bead.
6. String 5 mother-of-pearl beads, 1
round jet crystal bead, 5 mother-of-pearl,
1 round silver bead, 5 mother-of-pearl,
1 round jet crystal, 5 mother-of-pearl, 1
round silver, 5 mother-of-pearl, 1 clear
crystal, 1 large (10x7) peyote tube, 1 clear
crystal, 2 mother-of-pearl, 1 round jet
crystal, 1 small (4x7) peyote tube, 1 round
jet crystal, 3 mother-of-pearl, 2 silver
8mm overlapping round beads, 3 mother-
of-pearl, 1 clear crystal, 1 large (10x7)
peyote tube, 1 clear crystal, 1 mother-of-
pearl, 1 round silver, 1 jet rondelle crystal,
and 1 round jet crystal.
7. String on the focal bead, passing the
thread through the bead bail.
8. String 1 round jet crystal, 1 jet rondelle
crystal, 1 mother-of-pearl, 1 round silver,
1 mother-of-pearl, 1 clear crystal, 1 large
(10x7) peyote tube, 1 clear crystal, 3
mother-of-pearl, 2 silver 8mm overlapping
round beads, 3 mother-of-pearl, 1 round
jet crystal, 1 small (4x7) peyote tube, 1
round jet crystal, 2 mother-of-pearl, 1
clear crystal, 1 large (10x7) peyote tube,
1 clear crystal, 5 mother-of-pearl, 1 round
silver bead, 5 mother-of-pearl, 1 round jet
crystal, 5 mother-of-pearl, 1 round silver, 5
mother-of-pearl, 1 round jet crystal, and 5
mother-of-pearl.
9. Pass through a clamshell bead tip, then
pass through a crimp bead. Knot your
thread securely around the crimp bead,
dot with glue, and trim ends. Close the
clamshell around the crimp bead.
10. Using pliers, close the loop hook of
1 clamshell around a jump ring. Close the
loop hook of the other clamshell around
the jump ring of the clasp.
RESOURCES: Focal bead: abeadstore.com.
All other resources: Fire Mountain Gems and
Beads, fi remountaingems.com.
044-SBSB-2011-Striking Jasper.indd 45 10/25/11 9:29 AM
10252011093004

STRINGING
46 best of step by step beads
pendant
Eccentric Concentric Leslie Rogalski
WHAT YOU NEED
• Rubber O-rings, several sizes Shown:• 3 small thin rings OD ½” (3/32 CS)• 1 medium thin ring OD 7/8” (3/32 CS)• 1 medium thicker ring OD 1 1/32” (1/8 CS)• 1 large thick ring OD 1 7/8” (3/16” CS)
• Size 8° or 6° seed beads, 2 colors, 1 g or more each• 2 accent beads with largish holes (lightweight, such as resin, Lucite, or wood)• Rubber cord with clasp attached• Waxed linen to fi t through seed beads or beading thread and needle• Scissors
Here’s a fast necklace project with a billion
variation possibilities! A simple strand of seed beads
tied in a loop is all it takes to connect concentric sizes
of O-ring, sewn through any fun accent beads with large
enough holes to accommodate the thread or cord and
hide the knot. Play with other types of accent beads,
varying sizes of O-rings within O-ring—this project
has no limits, but watch the weight of the pen-
dant so your O-rings don’t sag into O-vals!
046-SBSB-2011-Eccentric Concentric.indd 46 10/25/11 9:34 AM
10252011093453

beadworkmagazine.com 47
1. Attach a stop bead on a 10” piece of
cord, leaving a 5” tail. String 1 accent bead,
and 13 seed beads, alternating colors,
starting and ending with the same color.
String the line of seed beads through 2
small O-rings, and pass the cord back
through the accent bead. Pull so the seed
beads meet at the hole of the accent bead,
forming a loop with the 2 small rings on it.
The 2 small rings will become your bail.
2. On the working cord exiting the accent
bead, string 13 seed beads alternating
colors as in Step 1, again starting and end-
ing with the same color. Pass this length of
seed beads through the 2 medium O-ring,
with the smaller one inside the larger one.
3. Bring your working thread with the
seed beads and 2 O-ring to meet the tail
thread hanging from the accent bead.
Remove your stopper bead. Knot the
working thread and tail together in a tidy
square knot. Keep the knot as close to
the hole of the accent bead as possible. If
you can, poke the ends back through the
accent bead, pull the knot into the accent
bead hole, and trim the ends (Figure 1).
4. Repeat Step 1 to add another dangle:
string your seed beads through the 2 con-
centric medium O-ring, then fi nish your
strand by passing through the remaining
tiny O–ring and the largest O–ring. Knot
as in Step 3.
RESOURCES: Rubber O-rings: Harbor
Freight, harborfreight.com.
Try This!Did you make the Poodle Beads from
page 82? I used mine as the focal beads
in a version of the Eccentric Concentric
necklace!
Artist Tips• Choose thick or thin rings visually
and don’t fret over the actual CS
numbers, but make a note of what
you use in case you need more of
a similar size. Use thinner CS rings
for inner concentric rings and extra
dangles, and larger CS rings for the
supporting rings.
• Make sure to have one or more
rings large enough to fi t as bails over
your cord.
• Choose lightweight materials for
beads, such as the resin shown here.
Lucite, seed–beaded bead, single
medium–sized crystals, shells, and
wood are also fun. Remember, bead
holes need to accommodate your
cord or needle and thread.
Did you know? O-rings are measured in inches and mm by
their inner and outer diameters (ID and OD)
and by the thickness of the ring, the cross sec-
tion (CS). CS measurements are tiny fractions
such as 1/16” and 3/32”.
INSIDEDIAMETER
(ID)
OUTERDIAMETER
(OD)
CROSS SECTION(CS)
046-SBSB-2011-Eccentric Concentric.indd 47 10/25/11 9:34 AM
10252011093453

48 best of step by step beads
BEADWORKbracelet
Crystal RaindropsJordana Hollander
Create the raindrop crystal band1. Thread the needle onto 4 yd of thread. Add a stop bead, leav-
ing a 10” tail.
2. String 6A and 1 crystal down to the stopper. Pass through
the 6A again, starting at the fi rst bead and working towards the
crystal. Hold the work between your thumb and index fi nger
with the crystal on top.
STOPBEAD
3. String 3A and 1 crystal. Pass through the last 3A of the previ-
ous 6 beads. Flip work to hold with the new crystal on top.
STOPBEAD
WHAT YOU NEED• 50 bicone 4mm crystals: about 7 crystals per inch, plus 2 for the toggle bar • 5 g size 11° seed beads (A) • Braided beading thread• Size 10 beading needle (thin)• Stop bead any color• Scissors
Finished length: about 7½” with clasp
Create beautiful beaded raindrops to surround
delicate bicone crystals, then fi nish with an
even-count peyote toggle clasp.
048-SBSB-2011-Crystal Raindrops.indd 48 10/25/11 11:16 AM
10252011111739

beadworkmagazine.com 49
4. Pass through the last 3A added. You will now see a V
surrounding the crystals; 3A on each side of the crystal.
STOPBEAD
5. Repeat Steps 3-4 until all the crystals are used. Snug the
thread after each stitch to remove any slack.
6. Work back along the bracelet to form the “raindrop” enclosures
of seed beads. String 6A. Pass through 3A on the left side of the V.
This forms the fi rst raindrop around the crystal. Turn your work to
hold the raindrop between your thumb and index fi nger.
re 5
STOPBEAD
7. String 6A. Pass through 3A on the right side of the V of the
next crystal and 2A of the previous raindrop. The next crystal to
be “raindropped” is on the top, so fl ip the work over as needed
to continue.
Figure 6
STOPBEAD
8. Repeat Step 7 to “raindrop” all crystals.
Make the clasp loop9. String 11A. Pass through the second and fi rst A from Step 7 to
form a loop the width of the bracelet.
Figure 7
STOPBEAD
10. Pass through the loop several times to reinforce. Use half-
hitch knots to secure the tail and working thread, weave in the
ends and trim.
Make the toggle bar11. On a new 1yd length of thread, work A beads in even-count
peyote for a strip 10 beads wide by 6 rows. Zip into a tube. See
the peyote zip-up Bead by Bead on page 60. Secure the tube
with a half-hitch knot; exit from inside the end of the tube. String
1 crystal and 1A. Pass back through the crystal; exit the other end
of the tube. String 1 crystal and 1A. Pass back through the crystal
into the tube and exit the other crystal and A bead. Repeat sev-
eral times to secure the crystal-seed bead ends of the tube. Exit
a center seed bead in the middle of the tube.
12. String 4A. Pass into an A bead on the end of the bracelet.
Pass completely through all A beads around the crystal. String
4A; pass into an A bead on the toggle tube adjacent to the one
exited, forming a two strand, 4-bead “neck” connecting the
toggle to the bracelet. Repeat the thread path several times to
secure; weave in ends and trim.
ure 7
RESOURCES: Check your local bead store.
048-SBSB-2011-Crystal Raindrops.indd 49 10/25/11 11:16 AM
10252011111739

50 best of step by step beads
NO-NEEDLE CRISSCROSS WEAVEearrings
Hollywood Chandeliers Bonnie Clewans
Fast and fabulous, these easy earrings use a no-needle, crisscross technique
you’ll love. With graduated sizes of glittering crystals or sparkly faceted glass
beads, the red carpet look is minutes away!
WHAT YOU NEED• 6 round 10mm crystals • 6 round 8mm crystals • 6 round 6mm crystals • 8 round 4mm crystals • 8 round 3mm crystals • 4 sterling silver 1x1mm crimp tubes• 1 pr horseshoe lever-back earrings• 2 pieces of .010 nylon-coated wire, 16” each• Fine chain-nose pliers• Fine wire cutter
Finished length as shown, excluding ear wire: 2”
050-SBSB-2011-Chandelier Earrings.indd 50 10/27/11 11:21 AM
10272011112216

beadworkmagazine.com 51
1. String three 10mm beads to the middle
of 1 strand of wire.
2. Crisscross the wires through one 8mm
bead in opposite directions (fi gure 1).
3. String one 8mm bead on each wire end
and crisscross through one 6mm bead.
String one 6mm bead on each wire and
crisscross through one 4mm bead. String
one 4mm bead on each wire and criss-
cross through one 4mm bead (fi gure 2).
4. Thread 1 crimp bead and two 3mm
beads on each wire. Crisscross through an
ear wire and pass each wire through the
beads and crimps on each side (fi gure 3).
5. Snug the wires to pull the beads into
a nice position without gaps, but not too
tightly that the beads don’t dangle grace-
fully. Use chain-nose pliers to squash the
crimp beads. Use the wire cutters to trim
any excess wire.
RESOURCES: CGM Findings, cgmfi ndings.com.
Bead Gallery, beadgallery.com.
Figure 1
Figure 2
Figure 3
050-SBSB-2011-Chandelier Earrings.indd 51 10/27/11 11:21 AM
10272011112216

52 best of step by step beads
Silver Waters Pat Wexelblat
WHAT YOU NEED• 40 sapphire 3mm Swarovski crystal bicone beads• 40 sapphire 4mm Swarovski crystal bicone beads• 320 sterling silver 2mm round hollow beads, with
holes big enough for 2 wire passes• 39 sterling silver 3mm round hollow, with holes
big enough for 4 wire passes• 2 sterling silver 2x2mm size 2 crimp tubes• 1 sterling silver foldover clasp • 5½’ of .014 or .013 fl exible beading wire • Chain-nose pliers• Crimping pliers• Wire cutters• Clamp or bead stopper clip
Finished length: 16”
Fast and fabulous! No needles needed for this
shimmering, feminine necklace. Use fl exible
beading wire and a crisscross technique.
BEADWEAVINGnecklace
Artist’s Tips• Be sure to keep all the larger crystals on one side
of the silver loops and all the smaller crystals on
the other side. This allows your necklace to curve
gracefully.
• If your work doesn’t lie flat, the wires inside the
beads are twisted. If this happens, remove some
beads to get back to the uneven section. Roll each
wire between your fingers until the bend disappears.
If you don’t correct it, the bend will be permanent.
052-SBSB-2011-Silver Waters.indd 52 10/31/11 10:12 AM
10312011101234

beadworkmagazine.com 53
1. Cut the 5½’ of wire in half. Insert 2” of
each wire in opposite directions through
a crimp tube. Use the crimper to roll the
tube into a small tight cylinder. Don’t
fl atten the tube with pliers, or it won’t fi t
inside the clasp ring.
A B
First ring2. On one long wire (A), string 2 silver
2mm, 1 small crystal, 2 silver 2mm, and
1 silver 3mm bead. Move all the beads
down the wire to the crimp tube, covering
the short wire end as well. Put a clip onto
the wires beside the last bead added.
A B
Note: The 3mm silver beads are the
crossover beads, through which both
wires will crisscross as you work the
length of this necklace.
3. On the other wire, string 2 silver 2mm,
1 large crystal, and 2 silver 2mm beads.
Move them down to the crimp tube,
covering the short wire end on that side.
4. Crisscross the wire just used through
the 3mm silver bead on the fi rst wire,
in the opposite direction. Pull to create
your fi rst ring. Make sure the beads have
covered the short wire ends protruding
from the crimp tube.
5. Using the long wire that exits the
crossover bead toward the small crystal
side, string 2 silver 2mm, 1 small crystal,
2 silver 2mm, and one silver 3mm
crossover bead.
6. Remove the clip from the other wire.
String 2 silver 2mm, 1 large crystal, and
2 silver 2mm beads.
7. Pass this wire through the 3mm silver
crossover bead on the other wire and pull
the ring closed.
8. Repeat Steps 5–7 until there are
38 rings, or two fewer than your planned
total length. (Remember to keep all the
small crystals on one side, the large
crystals on the other side.) Place clips on
the wire ends, then hold your necklace up
to check for length. Allow for the fi nal ring
and clasp.
Final rings9. On the wire that exits the same side
as the last small crystal strung, string 2
silver 2mm, 1 small crystal, 2 silver 2mm,
1 crimp tube, 2 silver 2mm, 1 large crystal,
and 2 silver 2mm. Pass through the 3mm
silver crossover bead in the previous loop.
Do not pull the loop tight yet.
10. Pass the other wire in the opposite
direction through all the beads and crimp tube
just added and through the crossover bead in
the opposite direction to the fi rst wire.
11. Gently pull the two wires protruding
from the crossover bead wire ends to
close the fi nal rings. Put clips on the wires
close to the crossover bead to hold the
rings in place. Use the crimp pliers to
crimp the tube fi rmly into a snug cylinder.
The crimp tube will end up inside the loop
of the foldover clasp, so be sure to crimp
as tight a roll as possible.
Add foldover clasp 12. Open the clasp and position it over
the crimped tube so that the pretty side
shows when the clasp is closed. Use
chain-nose pliers to roll the clasp ring
around the crimp tube until it holds but
still can rotate around the crimp tube. Use
the fi rst beaded loop as your clasp loop
when wearing the necklace.
RESOURCES: Silver beads: Rio Grande,
riogrande.com. Swarovski crystals: Atlantic
Gems, Inc., atlanticgems.com. Clasp: Rings &
Things, rings-things.com.
052-SBSB-2011-Silver Waters.indd 53 10/31/11 10:12 AM
10312011101234

54 best of step by step beads
LADDER STITCH & PICOTbracelet
Bugles & Beads Robin Cowart
Add glitter to your glamour with this
beautiful little bracelet. This easy-
to-make design uses a bugle-bead
base with seed beads and crystals
forming a lovely picot edge.
WHAT YOU NEED• 4 g size 3 bugle beads• 2 g size 15° seed beads• 80 (about) size 4mm crystal bicones• Clasp• Size 12 beading needle• 6 lb braided bead thread• Beading glue• G-S Hypo Cement
Finished size: 7”
054-SBSB-2011-Bugles & Beads.indd 54 10/25/11 12:06 PM
10252011120657

beadworkmagazine.com 55
1. Cut 2 yards of beading thread and thread the needle. Add a stop
bead, leaving a 6” tail.
2. String 2 bugle beads and slide them down to the stop bead. Pass
through the fi rst bugle strung so the beads are sitting next to each
other. Pass through the second bugle bead.
3. String 1 bugle bead, pass back through the second bugle, and
through the bugle bead just added.
4. Repeat the ladder stitch until you’ve reached your desired
length, minus the clasp.
5. String 6 seed beads, the clasp, and 6 seed beads. Pass through
the last bugle from the opposite side. Pass through the seed beads
and the clasp again to reinforce.
6. String 3 seed beads, 1 crystal, and 1 seed bead. Pass back
through the crystal.
7. String 3 seed beads and pass through the next bugle. Repeat
until to the end of the bracelet.
8. Repeat Step 5 to add the second part of the clasp.
9. Weave the thread into the beadwork and bind off with a
half-hitch knot. Remove the stop bead from the other end of the
bracelet and thread the needle onto the tail. Weave the thread
back into the beadwork and bind off . Secure all knots with
beading glue, let dry, and trim the tails.
RESOURCES: Check your local bead store.
PRESENTED BY M A G A Z I N E
SET YOUR STONES IN STYLE! Take your jewelry to the next level with beautiful beaded bezels. Join Melinda Barta as she shows you step by step how to set cabo-chons, rivolis, buttons, and more.
DESIGN CREATIVE CLOSURES FOR YOUR BEADED JEWELRY! Give your beadwork the professional look and durability it deserves with custom clasps. Get 10 watch-and-learn lessons and design techniques to finish your jewelry with hand-made toggles, rings, buttons
and loops, snaps, and more.
GivGivGGG eprproprooit it t dededGGeGananfinfifinfifimamamamamm
andandanan
i
Make Your Beadwork Stand-Out Among the Crowds!
Add Beautiful Bezels and Custom Clasps For One-Of-a-Kind Designs!
nexnexnexnexnexnexnexen ttttbeabeabeabeabbeabeabeaeeebeMelMelMelMelMelMelMeele iiiishoshoshoshoshshoshshstestestestesteesteeechchchchchchananananann
sssscccccc
SSSSSSSS
TTTTTT
AVAILABLE NOW AT
Shop.beadingdaily.com/BartaDVDs
054-SBSB-2011-Bugles & Beads.indd 55 10/28/11 3:55 PM
10282011155601

56 best of step by step beads
HERRINGBONE & PEYOTE STITCHearrings
Starfi sh Lynn Davy
WHAT YOU NEED• Seed beads in two adjacent sizes, 1 g small size 8° (A), 2 g large size 6° (B)• 2 jump rings, 6mm• 1 pair ear wires• Beading thread to match• Beading needle• Scissors • Round–nose pliers
A combination of peyote and
herringbone stitches in two seed–
bead sizes gives this quick-and-easy
starfi sh its seashore shape!
Learn the Lingostepping up: When you pass through a stitched
bead to be in position for the next round or row.
stack: A column of beads, most commonly used
to refer to pairs of beads in herringbone stitch.
056-SBSB-2011- Starfish.indd 56 10/25/11 11:19 AM
10252011112024
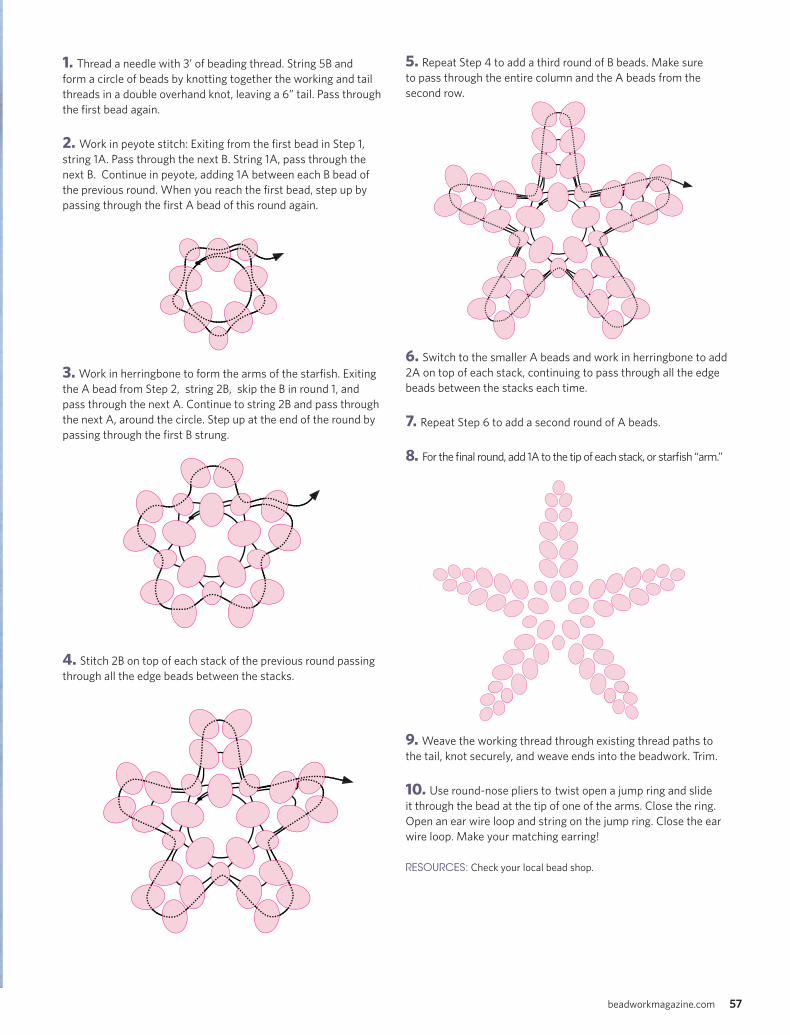
beadworkmagazine.com 57
1. Thread a needle with 3’ of beading thread. String 5B and
form a circle of beads by knotting together the working and tail
threads in a double overhand knot, leaving a 6” tail. Pass through
the fi rst bead again.
2. Work in peyote stitch: Exiting from the fi rst bead in Step 1,
string 1A. Pass through the next B. String 1A, pass through the
next B. Continue in peyote, adding 1A between each B bead of
the previous round. When you reach the fi rst bead, step up by
passing through the fi rst A bead of this round again.
3. Work in herringbone to form the arms of the starfi sh. Exiting
the A bead from Step 2, string 2B, skip the B in round 1, and
pass through the next A. Continue to string 2B and pass through
the next A, around the circle. Step up at the end of the round by
passing through the fi rst B strung.
4. Stitch 2B on top of each stack of the previous round passing
through all the edge beads between the stacks.
5. Repeat Step 4 to add a third round of B beads. Make sure
to pass through the entire column and the A beads from the
second row.
6. Switch to the smaller A beads and work in herringbone to add
2A on top of each stack, continuing to pass through all the edge
beads between the stacks each time.
7. Repeat Step 6 to add a second round of A beads.
8. For the fi nal round, add 1A to the tip of each stack, or starfi sh “arm.”
9. Weave the working thread through existing thread paths to
the tail, knot securely, and weave ends into the beadwork. Trim.
10. Use round-nose pliers to twist open a jump ring and slide
it through the bead at the tip of one of the arms. Close the ring.
Open an ear wire loop and string on the jump ring. Close the ear
wire loop. Make your matching earring!
RESOURCES: Check your local bead shop.
056-SBSB-2011- Starfish.indd 57 10/31/11 10:13 AM
10312011101349

58 best of step by step beads
EVEN-COUNT PEYOTEearrings
WHAT YOU NEED• 2 square or round 14mm Swarovski crystal frames• 3 g size 11° Delica or Aiko cylinder beads• 2 earring posts or French ear wires• 2 closed 5 or 6mm jump rings• Size 12 beading needles• Smoke 6 lb size D FireLine thread• Scissors to cut FireLine• 2 pliers (either round-nose or fl at-nose)
Did you know?Diff erent brands of cylinder beads are
not the same size. For a consistent piece
of beadwork, work the entire project
using the same brand. Aiko beads are
slightly larger than Delicas, for instance,
and mixing them will aff ect the look of
your work.
Crystal Buckles Anne Jackson
Here’s a fun project if you’re new to peyote or just
want something fast and fabulous! Make a simple
strip of peyote, then wrap it through lovely Swarovski
crystal frame components. Learn how to decrease the
end of the peyote strip to a neat little pointed tip.
058-SBSB-2010-Crystal Buckles.indd 58 10/27/11 9:54 AM
10272011095510
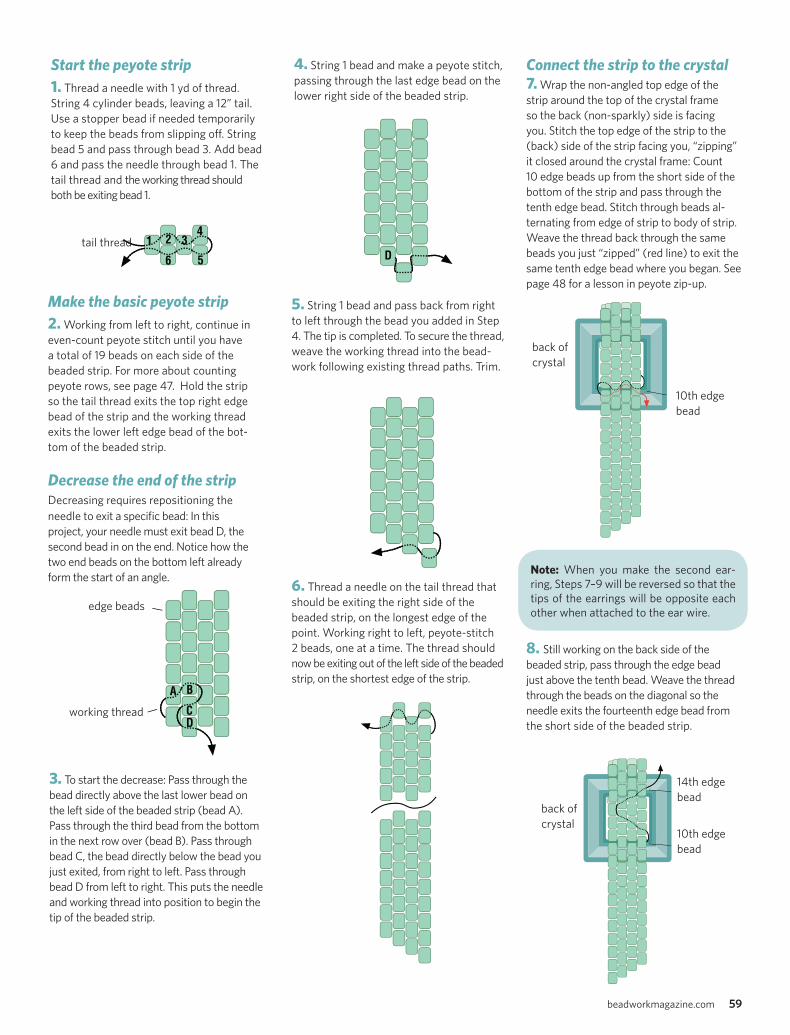
beadworkmagazine.com 59
Start the peyote strip1. Thread a needle with 1 yd of thread.
String 4 cylinder beads, leaving a 12” tail.
Use a stopper bead if needed temporarily
to keep the beads from slipping off . String
bead 5 and pass through bead 3. Add bead
6 and pass the needle through bead 1. The
tail thread and the working thread should
both be exiting bead 1.
Note: When you make the second ear-
ring, Steps 7–9 will be reversed so that the
tips of the earrings will be opposite each
other when attached to the ear wire.
tail thread
edge beads
working thread
back of
crystal10th edge
bead
14th edge
bead
back of
crystal
10th edge
bead
1
Make the basic peyote strip2. Working from left to right, continue in
even-count peyote stitch until you have
a total of 19 beads on each side of the
beaded strip. For more about counting
peyote rows, see page 47. Hold the strip
so the tail thread exits the top right edge
bead of the strip and the working thread
exits the lower left edge bead of the bot-
tom of the beaded strip.
Decrease the end of the stripDecreasing requires repositioning the
needle to exit a specifi c bead: In this
project, your needle must exit bead D, the
second bead in on the end. Notice how the
two end beads on the bottom left already
form the start of an angle.
3. To start the decrease: Pass through the
bead directly above the last lower bead on
the left side of the beaded strip (bead A).
Pass through the third bead from the bottom
in the next row over (bead B). Pass through
bead C, the bead directly below the bead you
just exited, from right to left. Pass through
bead D from left to right. This puts the needle
and working thread into position to begin the
tip of the beaded strip.
4. String 1 bead and make a peyote stitch,
passing through the last edge bead on the
lower right side of the beaded strip.
5. String 1 bead and pass back from right
to left through the bead you added in Step
4. The tip is completed. To secure the thread,
weave the working thread into the bead-
work following existing thread paths. Trim.
6. Thread a needle on the tail thread that
should be exiting the right side of the
beaded strip, on the longest edge of the
point. Working right to left, peyote-stitch
2 beads, one at a time. The thread should
now be exiting out of the left side of the beaded
strip, on the shortest edge of the strip.
Connect the strip to the crystal 7. Wrap the non-angled top edge of the
strip around the top of the crystal frame
so the back (non-sparkly) side is facing
you. Stitch the top edge of the strip to the
(back) side of the strip facing you, “zipping”
it closed around the crystal frame: Count
10 edge beads up from the short side of the
bottom of the strip and pass through the
tenth edge bead. Stitch through beads al-
ternating from edge of strip to body of strip.
Weave the thread back through the same
beads you just “zipped” (red line) to exit the
same tenth edge bead where you began. See
page 48 for a lesson in peyote zip-up.
8. Still working on the back side of the
beaded strip, pass through the edge bead
just above the tenth bead. Weave the thread
through the beads on the diagonal so the
needle exits the fourteenth edge bead from
the short side of the beaded strip.
058-SBSB-2010-Crystal Buckles.indd 59 10/27/11 9:54 AM
10272011095510

60 best of step by step beads
back of
crystal
10th edge
bead
14th edge
bead
back of
crystal
back of
crystal
12
Create the beaded bail 9. Stitch a 2-bead-wide strip onto the main
beaded strip attached to the crystal. This
will become the bail for the earring: Pass
through the bead immediately above the
fourteenth edge bead on the short side of
the strip. Peyote-stitch bead 1 and pass
through the next bead.
10. String and stitch bead 2 and pass back
through bead 1. Pass through the bead directly
below bead 1 (black line) and on a diagonal
down through the bead directly below bead 2
(red line). Pass through bead 2 to reinforce the
fi rst 2 beads of the bail.
11. Continue in peyote stitch until you have
a 2-bead-wide strip with 6 edge beads on
each side.
12. Pass the bail strip through a closed 5mm
or 6mm jump ring. Roll the 2-bead strip to the
back side of the beadwork and zip it to the fi rst
row of the 2-bead strip, weaving back and forth
between the end beads and the beadwork itself
as you did for the earring strip in Step 7. Weave
the thread into the beadwork to secure. Trim
on the back side of the beadwork.
Attach earring to ear wire13. Using your two pliers, gently twist open the
loop of an ear wire. String the closed jump ring
of the beadwork earring. Use the pliers to twist
the earring loop closed.
Remember, the second earring tip will angle in
the opposite direct from the fi rst earring you
made, for mirror symmetry in the pair!
RESOURCES: Swarovski crystal frames: Fire Mountain
Gems and Beads, fi remountaingems.com. Aiko seed
beads: Bobby Bead, bobbybead.com. Miyuki Delica
Beads: Caravan Beads, caravanbeads.com.
CRYSTAL BUCKLE EARRINGSproject
60 best of step by step beads
THE ULTIMATE COLLECTION OF READER-FAVORITE PROJECTS
165+FAST & EASYDESIGNS!MAKE IT AND WEAR IT TODAY!
Plus!
SEMIPRECIOUS GEMSTONESYou Can Afford P. 98
Make This Kazuri Simple
NecklaceP. 112
10AnniversaryEdition
th
HOW TO CHOOSE THE BEST BEADING WIREP. 167
Sell More WITH ETSY AND SOCIAL MEDIA P. 8
The Best of
TRENDY STY LES YOU CAN MAKE YOURSELF presented by Beadwork Creative Jewelry
➤ 101 necklaces➤ 34 bracelets➤ 30 earrings
192 PAGES OF THE BEST JEWELRY DESIGNS!
Which one will you make first?
Take a look at what’s insideINTERWE AVESTORE .COM/BestofC J
058-SBSB-2010-Crystal Buckles.indd 60 10/27/11 9:54 AM
10272011095510

FRINGEbracelet
My favorite anemone bracelets contrast the tip beads against the
fringe stem beads for a truly lush look. I’m a fan of matte metallic
against matte frosted colors, or light, bright tips against dark fringe.
This dazzler of a project shows brilliant crystals against rich matte
black for optimum sparkle.
Comet AnemoneLeslie Rogalski
Artist’s TipTo make this bracelet, crimp clasps
onto a core strand of beads, then
sew fringes between the beads.
WHAT YOU NEED• 30 g size 6° matte black seed beads (for fringe stems and core beads) • 230–250 Swarovski Comet Argent light 4mm bicones or rounds (for tips) • Matching silver or crystal–set clasp• 2 crimp tubes• .018 fl exible beading wire• FireLine 8lb• Beading needle• Scissors• Crimping pliers• Wire cutters• Bead Stoppers
beadworkmagazine.com 61
PH
OT
O B
Y J
IM L
AW
SO
N.
061-SBSB-2011- Comet Anemone.indd 61 10/25/11 11:21 AM
10252011112140

COMET ANEMONEproject
Determine your bracelet length1. Make the core fi nished length at least 1/2" to 3/4” larger than
your desired length because the fringes fi ll out space and will
otherwise cause the bracelet to be too tight. Always add at
least 6” of extra wire to allow a 3” tail at both ends for easier
crimping of your clasp and then subtract the clasp’s length.
Example: For a 7” bracelet with a 1” clasp, subtract 1” for a sub-
total of 6”, then add 3/4” of extra fringe space for a subtotal of
6 3/4”. Now add the extra 6” for crimping ease, and your wire
total is 12 3/4”. Better-safe-than-sorry tip: Cut a piece of wire
longer than needed!
Crimping the core strand of beads2. Thread 3” of beading wire through a crimp and one clasp
loop. Go back through the crimp and pull the wire so the crimp
rests close to the clasp loop but leaving the clasp loose enough
to swing freely. Crimp tightly with crimp pliers.
3. String on enough core beads as desired for length (minus
the other half of the clasp) but do not crimp the other clasp yet!
Place a Bead Stopper close to the last bead, leaving a generous
length of tail to crimp later on. Allow about a bead’s width of
space between the stopper and the bead next to it. By waiting
to crimp the other end of the core, you’ll be able to adjust the
length of your bracelet if you need to add or subtract to the
core. As you add fringe, your core beads will spread out along
the wire, and you may need to reposition the Bead Stopper
once or twice for your ideal length.
Adding the fringeYou will create 8 fringes at a time, 4 between each core bead,
before moving down the length of the bracelet. Hold the fringed
part of your bracelet in your non-sewing hand as you work to
keep your thread from getting tangled in the fringes.
4. String a comfortable length of thread onto a needle. Start-
ing at the crimped clasp end, leave a 5” tail and stitch through
the fi rst core bead. Tie a double square knot with your tail and
working thread between the fi rst 2 beads of your core (beads A
and B in the diagram).
5. Stitch through the second core bead (B) exiting between the
second and third core beads (B and C). Create fringe 1: Pick up
2 black beads (these form the stem of the fringe) and 1 crystal
(for the tip). Pass back through the 2 stem beads and continue
through the third core bead (C), exiting between core beads
C and D.
Note: Fringes should sit in a cluster against the core beads;
don’t try to pull them in between the core beads. Only your
working threads come from the wire between core beads. Pull
each fringe close in to the core bead by holding the tip crystal
and gently pulling your working thread so the fringe stem slips
down into position. Remember to also pull in the tip crystal
against the stem beads before continuing. As your fringes fi ll
out around each core bead, fringes will not come all the way
to the core beads: This is correct. The last few fringes in each
cluster may rest against previous fringes.
6. Create fringe 2: Pick up 2 black stem beads and 1 crystal.
Pass back through the stem beads and back through core bead
C, exiting between core beads B and C.
7. Create fringes 3 and 4: Pick up 2 black stem beads and 1
crystal and pass back through the 2 stem beads. Pass through
core bead C to exit again between C and D.
8. Create fringe 4 by repeating Step 6, exiting between core
beads B and C.
You now have 4 fringes, 2 between core beads B and C, and 2
between core beads C and D.
62 best of step by step beads
061-SBSB-2011- Comet Anemone.indd 62 10/31/11 10:14 AM
10312011101449

9. Repeat Steps 5 to 8 between the same core beads, adding
4 more fringes: Add 2 between core beads B and C, and 2
between core beads C and D. After picking up your fringe
beads for fringe 8, sew through the next core bead, bead D.
10. Continue adding 4 fringes between each core bead,
working your way toward the Bead Stopper end. About 8 core
beads before your Bead Stopper, measure the bracelet around
your wrist to see if you need to add or subtract core beads for
a correct length. Shake your hand so the fringes fl atten out
against your wrist a bit for the truest test of fi t. You’ll notice
now how the fringes add to the bulk of the bracelet!
How to add threadWhen you’re down to about 8” of working thread, exit the
base of a fringe at the core beads. Knot the tail onto a new
length of thread, making a surgeon’s knot or double square
knot as close as possible to the core, where it will be hidden
by fringes. Thread the new thread on a needle and stitch
back through the core beads to the next-to-the-last fringes
you just stitched. Follow the thread path through a fringe and
return forward through the core beads to resume making
fringes. Pull your new thread so the knot is hidden inside a
core bead, weave both tails into the core beads, then care-
fully trim any exposed tail ends. Continue adding fringe.
Finishing11. When you’re satisfi ed your bracelet length is comfort-
able (remember to include the length of your clasp in that
fi t), add your crimp and clasp on the other side following
Step 1. Leave a little room between the last few beads so you
can fi t your needle through.
Your last fringes should be between (you know what I mean)
the last 2 core beads. Knot your tail snugly around that last
bead as you did when you began your fringes in Step 3 and
weave in the remaining thread through one of the fringes;
trim carefully. At the other end of the bracelet, thread your
starting tail on your needle and weave into a fringe to ob-
scure;
trim carefully.
Your bracelet may seem snug when you fi rst put it on, but the
fringes will fl atten out against your wrist. Nice work!
RESOURCES: Check your local bead shop for all beads,
crystals, and fi ndings. FireLine fi shing line may also be found
at Wal-Mart or Cabelas.com.
Try This!
Create bunches of fringes around
size 6 core beads strung between
10–12mm rounds.
Make random length, spiked fringes
with bugle beads and varied sizes of
seed beads.
Blast your bracelet with texture us-
ing a mix of coordinated colors and
varied bead surfaces.
beadworkmagazine.com 63
061-SBSB-2011- Comet Anemone.indd 63 10/25/11 11:21 AM
10252011112141

SQUARE STITCH pendant
Turn It OverGabrielle E. Neijman
Square-stitch a versatile two-sided pendant with
three tiers of tiles and a matching bail, ready to
slide onto a cord of your choice.
WHAT YOU NEED• 12 g white-lined crystal size 11° Japanese seed beads (A)• 1 g each: white-lined turquoise size 11° Japanese seed beads
(B) white-lined green size 11° Japanese seed beads (C)white-lined purple size 11° Japanese seed beads (D) white-lined pink size 11° Japanese seed beads (E)
• Beading thread to match color A• Size 12 beading needle• Scissors• Cord of choice
PH
OT
O B
Y J
IM L
AW
SO
N.
64 best of step by step beads
064-SBSB-2011-Turn it Over.indd 64 10/31/11 10:15 AM
10312011101619

PH
OT
O B
Y J
IM L
AW
SO
N.
6. Pass through the last row of beads to exit from the
bottom of Tile 1. Repeat Step 5 to close the bottom of
the tile.
7. Follow the color charts to complete Tiles 2 and 3,
repeating Steps 1–6. Tie off threads and trim.
Bail8.Thread your needle with about 6’ of thread. Use color
A to square-stitch 18 beads across for as many rows as
are needed to fi t onto a cord of your choice. Remember
at the end of each row to go back through your previous
row and the row just stitched before starting the next row.
Connector tubes9.Thread your needle with about 2’ of thread. Use color
A to square-stitch a panel 4 rows, 4 beads across. Fold
the panel in half and square-stitch together the top and
the bottom rows (as in the tiles) to form a rectangular
tube. Weave in ends and trim. Repeat Step 9 two times
for a total of 3 connector tubes.
ROW B
ROW D
1 2 3
1 2 3
Artist’s tips• Don’t use transparent beads or the reverse side
will show through.
• Square-stitched tiles: Stitch these fl at, then fold
over to create a two-sided tile.
• Remember at the end of each square-stitched row
to go back through your previous row and the row
just stitched before starting the next row.
Tiles1. Thread your needle with about 6’ of thread.
2. Use color B to square-stitch 2 rows, 10
beads across.
3. Follow the color chart to complete Tile 1 in square
stitch as shown.
4. Close the tile into a two-sided form: Fold the tile
panel in half and match the B and D beads along the
short edge. Square-stitch the newly stacked edge-row
beads together to close the tile side.
5. Evenly match the edge beads along the top and bot-
tom of Tile 1. Exit B1, pass down through D2, up through
D3 and cross over to pass down through B2, and pass up
through B3. Follow the arrows to zigzag between the lay-
ers to close the top of the tile.
beadworkmagazine.com 65
Figure 4
Side A
Side B
Side A
Side B
Side A
Side B
Tile 2Tile 3
Side A
Side B
Tile 3
Side A
Side B
064-SBSB-2011-Turn it Over.indd 65 10/31/11 10:15 AM
10312011101620

Side A Side B
Tile sides shown separately for clarity.
1 2
Connector tube top view.
Connect the tiles10. Thread your needle with about 6’ of thread. Pass
down through the fi rst column of beads in one connec-
tor tube; leave a 4” tail. Pass down through Tile 1, Side
A, Row 5. Pass down through the fi rst column of beads
in a second connector tube. Pass down through Tile 2,
Side A, Row 5. Pass down through the fi rst column of
beads in the third connector tube. Pass down through
Tile 3, Side A, Row 5. Pass back up through Row 6 in all
tiles and the second column of beads in all connector
tubes to exit at the top of the fi rst connector tube.
Turn the pendant over. Cross thread over diagonally
to pass down through the fi rst column of the fi rst
connector tube.
Repeat Step 10 to add connector tubes to Side B.
Do not tie off thread.
Attach the bail11. Using your working thread, stitch the top 4 beads
on the fi rst connector tube to beads 9 and 10 in Rows 7
and 8 located near the center of the bail panel. Tie off
thread and trim. Evenly match the top and the bottom
rows of the bail and repeat Step 4 to square-stitch the
rows together to form a tube. Tie off thread and trim.
Slide onto your choice of cord!
RESOURCES: Check your local bead shop.
66 best of step by step beads
TURN IT OVER project
064-SBSB-2011-Turn it Over.indd 66 10/31/11 10:15 AM
10312011101620

beadworkmagazine.com 67
SQUARE STITCHnecklace
Eternity Circles presents a clever
and easy way to embellish a simple
square-stitch strip. Once you learn
the basic technique, you’ll have fun
trying all the variations. Make this
stylish “chain” to link your love of
beading to a hot fashion trend!
Eternity Circles
Cathi TessierPhoto by Jim Lawson.
067-SBSB-2011-Eternity Circles.indd 67 10/25/11 11:34 AM
10252011113458

ETERNITY CIRCLES
68 best of step by step beads
WHAT YOU NEED• 6 g rainbow gold silver-lined size 11° seed beads• 8 g rainbow silver silver-lined size 11° seed beads• 1 small magnet closure or clasp of your choice• WildFire 0.20 beading thread• Size 10 beading needle• ScissorsFinished length: optional for bracelet or necklace
Square-stitch strip1. Thread 2½ yd of thread on a needle.
String 4 gold beads, leaving a 10” tail for
adding the clasp later on. (This will be
enough thread for a bracelet. You will
need to add thread for a necklace. See
How to Add Thread on the next page.)
2. Pass through all 4 beads again. Tie the
tail and working thread in a knot to secure.
Use your fi nger to push the fi rst and
fourth beads to stack on top of the second
and third beads. Pass through the second
pair again.
3. String 2 gold beads. Pass through the
second pair and the pair just added in a
circular motion. Notice that you circle in
the opposite direction from the previous
stitch (Figure 1).
4. Stack 2 silver beads for the next row.
Again, note that your stitch direction
moves in the opposite direction from the
previous row. Working in square stitch,
stitch another 3 rows in gold and one in
silver (Figure 2).
Add circles5. String 8 silver beads and pass through
the previous silver row, forming a semi-
circle along the side of the strip (Figure
3). String 8 more silver beads. Complete
the circle with a semicircle on the other
side of the strip, passing through the last 2
silver beads just added in the strip. Do not
pass into the beads of the fi rst semicircle
you created (Figure 4).
6. Repeat Steps 2–5 for as long a length
as desired, less 1” allowance for the clasp,
ending with 3 rows of gold beads (Figure 5).
Figure 1
Artist’s Tips• Use a heavier gauge beading thread to add body to the
circles so they hold their shape.
• In square stitch, beads stack directly on top of each other.
Figure 2
Figure 5
Figure 3
Figure 4
project
067-SBSB-2011-Eternity Circles.indd 68 10/25/11 11:34 AM
10252011113458

beadworkmagazine.com 69
Figure 6
RESOURCES: Check your local bead shop.
• Vary the color of the circles.
• Vary the placement and shape of
the circle; create doubles, fi lled in
circles, swirls, and fi gure eights.
• Change the number of beads
in your circle to make them more
or less round, more or less
elliptical.
How to add threadWhen you have about 4” remaining, cut a new length of thread. Tie
the new thread to the remaining tail in a secure square knot, placing the
knot as close as possible to a bead. Thread a needle on your new work-
ing thread and continue for a few rows. The knot should be pulled inside
a bead. Thread the tails on a needle and weave them into the beadwork;
trim. Continue with your new thread.
Closure7. String 3 gold beads, 1 clasp loop, and 3
more beads. Pass through the last 2 gold
beads in the strip, forming a loop (Figure
6). Pass through the 3 gold beads, clasp, 3
gold beads and 2 strip beads several times
to reinforce the loop.
8. Weave through existing thread paths
into a few rows of the square-stitch strip
to secure the thread; trim carefully.
9. Thread the tail thread at the other end of
the bracelet onto a needle. Repeat Steps 7
and 8 to add the other half of the closure.
Figure 7
Try This!
Once you have mastered this technique
you can create your own unique designs
by varying the colors or size and shapes of
the circles. Have fun with it!
Editor’s Note: I found it easier to fi rst
create the entire strip, adding the rows of
silver (or other color for circles) randomly
along the way. When I reached the end, I
started a new thread and wove back down
my strip adding swirls, circles, and fi gure
eights (Figure 7).
067-SBSB-2011-Eternity Circles.indd 69 10/25/11 11:34 AM
10252011113458

70 best of step by step beads
Tangled Vines
Robin Cowart
WHAT YOU NEED• 6 g size 6° seed beads (for the inner core)• 6 g size 8° seed beads • 3 g size 11° seed beads• Nymo thread to match your beads• Beading needle • 15” of medium-weight fl exible beading wire• 1 toggle clasp set with jump rings• 2 crimp tubes• Chain-nose pliers or crimping tool• Wire cutters• Scissors• Thread Heaven• Hypo cement or jewelry glue
Finished size: as long as desired. Allow about 1” for clasp.
This is fast and fabulous! Add four
rows of simple swags to a strung
core of beads for a lush bracelet or
necklace rope. Use diff erent clasps
or toggles for added interest. This
project makes a bracelet. To make a
longer rope for a necklace, increase
the amount of beads and wire. To
make both, be sure to double your
crimps and clasps.
BEADWEAVINGbracelet
070-SBSB-2011-Tangled Vines.indd 70 10/27/11 10:45 AM
10272011104557

beadworkmagazine.com 71
d Make the base row1. String 1 crimp tube on the beading wire.
Pass about 2” of wire through the jump
ring on the toggle ring and back through
the crimp tube. Crimp tightly with pliers
and trim the beading wire.
2. String 60–75 size 6° seed beads or
enough to make a comfortable length
for your bracelet. Allow for the length
of the other part of the clasp in the
total length. Repeat Step 1 to attach the
remaining clasp.
3. Cut a 4’ piece of thread, condition it with
Thread Heaven, and thread your needle.
4. At one end of the base row, pass
through beads 1 and 2, leaving a 5” tail.
Tie a half-hitch knot with the working
thread around the beading wire between
beads 2 and 3. Pass through 4 more beads
and knot again around the wire. Repeat,
knotting between every 4 beads or so. Exit
between the last 2 beads.
Stitch the vines5. String 1 size 8°, 2 size 11°, and 1 size 8°.
Skip 2 base-row beads and pass through
the next size 6° bead. Tie a half-hitch knot
around the wire. Repeat to the end of the
base row, exiting through the last bead or
next-to-last bead. Tie a half-hitch knot.
6. Reverse direction and repeat Step 5.
Repeat 2 more times for a total of 4 vines. Do
not try to make the vines lie side-by-side; it
will have a fuller look if they do not. Separate
and “fl uff ” the vines when fi nished.
7. End the last vine row with a half-hitch
knot around the wire and work the thread
back through the base row, securing with
half-hitch knots as needed. Trim the tail.
Glue the fi nal few knots.
RESOURCES: Check your local bead store.
knots around core wire
Download your 7 FREE Peyote Stitch Patterns
It’s time to peyote stitch! Get your free projects at:
Beading Dailyis your Community for Inspiration, How-tos, Free Projects & More!
Banded Tapestry Cuff by Kathy King
The Illusion by Julie Ann Smith
Finger Foodby Leslie Rogalski
~ Master the beading stitch beaders love most!
~ Discover seven peyote stitch patterns that will expand your beading skills.
~ Learn how to create unique seed bead jewelry.
www.BeadingDaily.com/freepeyotepatterns
070-SBSB-2011-Tangled Vines.indd 71 10/27/11 10:45 AM
10272011104557

72 best of step by step beads
BRICK STITCHbracelet
Follow the pattern to create a cuff of stylized hearts using increasing
and decreasing brick stitch. For the perfect ending, brick-stitch a
separate heart-shaped “button” for a button-loop closure.
Heart to HeartCarol Dean Sharpe
PH
OT
O B
Y J
IM L
AW
SO
N.
072-SBSB-2011-Heart to Heart.indd 72 10/25/11 11:35 AM
10252011113544

beadworkmagazine.com 73
Attach the beaded loop5. On a new 12” piece of thread, string a
stopper bead leaving a 4” tail. Exit one of
the two gold tip beads on the end of the cuff .
6. String 30 beads or enough to loop
fi rmly over the button. Pass into the other
gold tip bead at the end of the cuff . Repeat
once more for security. If you desire to
leave a simple loop, weave the thread into
the beadwork to secure and trim.
7. For a peyote loop, after securing the
simple loop with one repeat, exit the fi rst
gold tip bead where the loop began. Pass
through the fi rst bead in the loop.
8. Work in peyote stitch around the loop:
string 1 bead, skip the second loop bead,
and pass through the third bead. String
1 bead, skip a bead, and string the next
bead. Continue in peyote stitch around the
loop. To fi nish, pass back into the beadwork
and weave in the thread to secure; trim.
Attach the heart-shaped button1. After completing the cuff : on a new 12”
length of thread, string a stopper bead leaving
a 4” tail. Pass through one of the two gold tip
beads at the end of the cuff . Exit to the front.
2. String 1 gold bead. Pass from back to
front through one of the two gold outline
beads in the “V” between the lobes of the
heart. Pass front to back through an adja-
cent bead. String 1 gold seed bead.
3. Make sure the heart is facing the same
direction as the hearts where it will attach,
so it blends into the design of the cuff . Pass
from front to back through the other gold
tip bead of the cuff end. Pull the heart but-
ton snug to the cuff . Weave the thread into
the cuff beadwork to secure and trim.
4. Remove the stopper bead from the
tail and thread a needle on the tail. Pull to
further snug the button; weave tail end into
the beadwork to secure and trim.
WHAT YOU NEED• Size 11° Delicas in the following colors:• 3 g gold dark luster red (DB-105)• 2 g bright 24k gold-plated (DB-31) or metallic yellow gold (DB-410) • 2 g transparent saff ron luster (DB-118)• Beading thread to match• Needle• Scissors
Finished length: 7 1/2”
A great tip!Use a new piece of thread to
attach any closure. If something
goes awry, you won’t need to
rework any of the main piece of
beadwork!
PH
OT
O B
Y J
IM L
AW
SO
N.
072-SBSB-2011-Heart to Heart.indd 73 10/27/11 10:22 AM
10272011102256

74 best of step by step beads
SQUARE STITCHbracelet
Hip to be
Square Marilu Morency
This clever variation on square stitch works up fast
because you string 2 cubes at once in each row! A little bit
of sparkle goes a long way with crystal montées strung
between the units of matte cube beads. Complete this chic
cuff with easy two-needle weaving in a crisscross method.
Learn the LingoMontées (pronounced “montayz”) are fl at-backed crystals already
attached to components that have
4-way thread or wire channels, ready
for stringing or attaching.
WHAT YOU NEED• 10 g matte metallic dark green iris 4mm cube beads • 1 g iris green size 8° seed beads• 8 or more 4mm crystal AB roses montées • 1” long slider clasp with 2 connector loops• Silkon #2 thread • 2 Big Eye needles • Scissors
Finished size: 7”
074-SBSB-2011-Hip to be Square.indd 74 10/25/11 11:35 AM
10252011113629

beadworkmagazine.com 75
Make the cube-bead unit1. String a needle onto both ends of 3 yd of thread.
2. Row 1: String 3 cube beads to the center of the thread.
3. Row 2: String 2 cube beads on the needle on the right side.
Pass back counterclockwise through beads 2 and 3 on Row 1.
Pass a second time through the 2 beads just added, beads 4 and
5. String 1 bead, bead 6.
1 2 3
6 5 4
4. Pass the left needle through beads 6 and 5 and clockwise
through beads 2 and 1. Pass through all the beads on Row 2,
exiting bead 4.
1 2 3
6 5 4
5. Row 3: On the left needle, string 2 cubes, beads 7 and 8.
Pass clockwise through beads 5 and 6 of Row 2. Pass through the
beads just added, beads 7 and 8. String 1 bead, bead 9. Using the
right-side needle, pass through all the beads of Row 3. One unit
of cubes is now complete.
1 2 3
6 5 4
7 8 9
String the montée connection6. On left needle, string 2 seed beads, 1 montée, and 2 seed
beads. On the right needle, string 2 seed beads and crisscross
through the montée from the opposite side. String 2 seed beads.
7. String 3 cube beads on the left needle. Pass in the opposite
direction through the beads with the right needle.
8. Repeat Steps 3 through 7 until the bracelet is the desired length.
Add the clasp9. Weave back into the last unit of cubes following existing
thread paths to secure the thread, exiting between cube beads
in the last row. String one of the loops of one part of the clasp
and pass under the threads between cube beads in the last row.
Repeat several times to secure. Pass through the cubes in the
last row to exit between the other 2 cubes and repeat this step to
attach the other loop of this part of the clasp. Knot to an existing
thread in the cube unit and weave the end into the beadwork to
secure. Trim.
10. Add a new 12” length of thread to the opposite end of the
bracelet. Repeat Step 9 to attach the other half of the clasp.
RESOURCES: Swarovski roses montées: Dreamtime Creations,
dreamtimecreations.com. Silkon and cube beads: Fire Mountain Gems
and Beads, fi remountaingems.com.
Artist Tip• Pin down the top end of the bracelet to a
bead mat, using a quilter’s pin.
074-SBSB-2011-Hip to be Square.indd 75 10/25/11 11:35 AM
10252011113629

76 best of step by step beads
EVEN-COUNT PEYOTE
River Cuff Lynn Davy
WHAT YOU NEED• 10 g size 11° seed beads, mixed blue, turquoise, and teal colors • 5 g size 8° seed beads, mixed colors to tone with the smaller beads• 26 clear 10mm pressed-glass rondelles with central holes• Beading thread that matches the beads• #12 beading needle• Scissors or thread clippers
This simple even-count peyote cuff was inspired by a river spar-
kling with raindrops. Seed beads in random colors are enhanced
by clear glass rondelles, and a little picot edge hints at ripples on
the water. The closure cleverly vanishes when the cuff is worn,
giving the illusion that the river is endless!
bracelet
Artist’s Tips
■ When choosing the beads, pick a mixture of diff erent fi nishes(silver-
lined, opaque, ceylon, matte) to add depth and interest to the colors. This
is a great way to use up leftover “bead soup” from other projects.
■ After stitching on 2–3 rondelles, knot the thread between beads. This
helps to avoid the accent beads working loose while worn, and also
means that if one catches and is pulled off , you don’t lose all of them.
■ Use beads with a shiny fi nish for the clasp loops and theshanks of the
clasp rondelles. Matte beads tend to fray the thread more over time.
■ Try using natural colors to mimic a pebbly riverbed, and arrange the
accent rondelles randomly instead of in pairs. You could also use
rondelles of diff erent sizes, or a mixture, and try out diff erent colors, too.
076-SBSB-2011-River Cuff.indd 76 10/27/11 10:24 AM
10272011102441
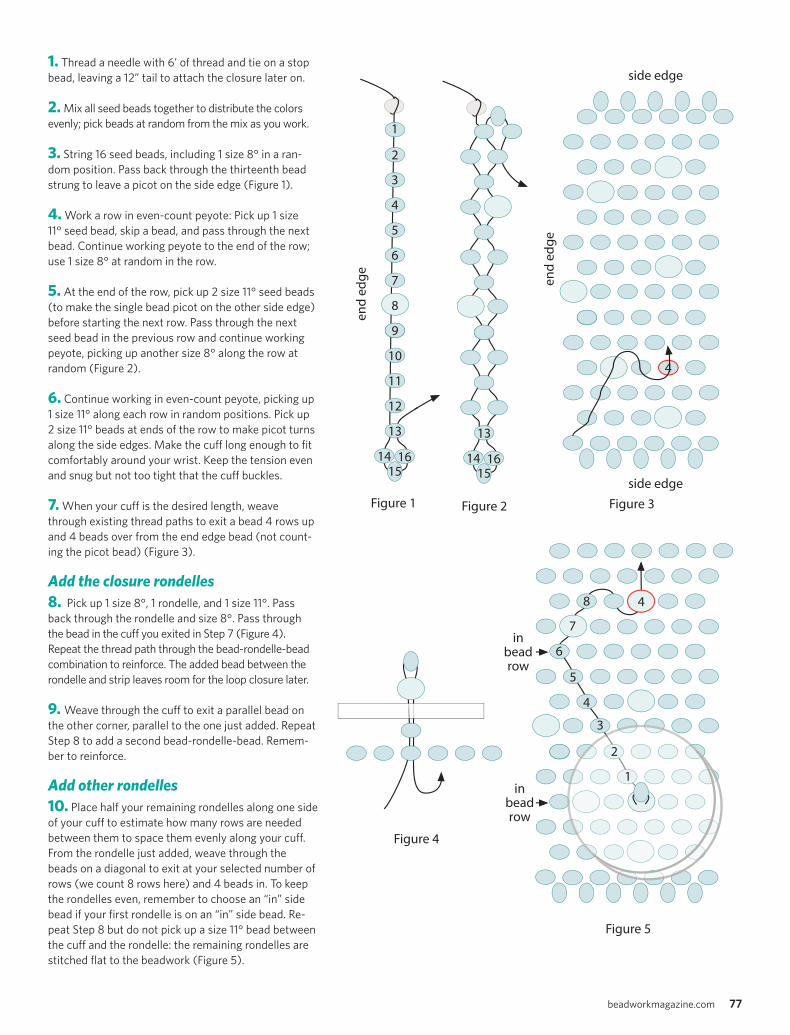
beadworkmagazine.com 77
Figure 1
1
2
3
4
5
6
7
8
9
10
11
12
13
1415
16
end
ed
ge
Figure 2
13
1415
16
Figure 3
4
end
ed
ge
side edge
side edge
4
Figure 5
1
2
3
4
5
6
7
8
inbeadrow
inbeadrow
Figure 4
1. Thread a needle with 6’ of thread and tie on a stop
bead, leaving a 12” tail to attach the closure later on.
2. Mix all seed beads together to distribute the colors
evenly; pick beads at random from the mix as you work.
3. String 16 seed beads, including 1 size 8° in a ran-
dom position. Pass back through the thirteenth bead
strung to leave a picot on the side edge (Figure 1).
4. Work a row in even-count peyote: Pick up 1 size
11° seed bead, skip a bead, and pass through the next
bead. Continue working peyote to the end of the row;
use 1 size 8° at random in the row.
5. At the end of the row, pick up 2 size 11° seed beads
(to make the single bead picot on the other side edge)
before starting the next row. Pass through the next
seed bead in the previous row and continue working
peyote, picking up another size 8° along the row at
random (Figure 2).
6. Continue working in even-count peyote, picking up
1 size 11° along each row in random positions. Pick up
2 size 11° beads at ends of the row to make picot turns
along the side edges. Make the cuff long enough to fi t
comfortably around your wrist. Keep the tension even
and snug but not too tight that the cuff buckles.
7. When your cuff is the desired length, weave
through existing thread paths to exit a bead 4 rows up
and 4 beads over from the end edge bead (not count-
ing the picot bead) (Figure 3).
Add the closure rondelles8. Pick up 1 size 8°, 1 rondelle, and 1 size 11°. Pass
back through the rondelle and size 8°. Pass through
the bead in the cuff you exited in Step 7 (Figure 4).
Repeat the thread path through the bead-rondelle-bead
combination to reinforce. The added bead between the
rondelle and strip leaves room for the loop closure later.
9. Weave through the cuff to exit a parallel bead on
the other corner, parallel to the one just added. Repeat
Step 8 to add a second bead-rondelle-bead. Remem-
ber to reinforce.
Add other rondelles10. Place half your remaining rondelles along one side
of your cuff to estimate how many rows are needed
between them to space them evenly along your cuff .
From the rondelle just added, weave through the
beads on a diagonal to exit at your selected number of
rows (we count 8 rows here) and 4 beads in. To keep
the rondelles even, remember to choose an “in” side
bead if your fi rst rondelle is on an “in” side bead. Re-
peat Step 8 but do not pick up a size 11° bead between
the cuff and the rondelle: the remaining rondelles are
stitched fl at to the beadwork (Figure 5).
076-SBSB-2011-River Cuff.indd 77 10/27/11 10:24 AM
10272011102441

78 best of step by step beads
Figure 5Figure 6
RIVER CUFFproject
11. Repeat Step 10 to add an evenly spaced
line of rondelles fl at against the strip along
one side of the strip. Adjust the last couple
rondelles as needed to fi ll the remaining
space on the strip.
12. Work through existing thread paths to exit
a parallel bead on the other side. Add a parallel,
evenly spaced line of rondelles. At the end,
weave your remaining working thread into the
cuff beadwork to secure, and trim.
Add the closure loops13. Remove the stop bead. Thread the tail
on a needle. String enough size 11° seed beads to
fi t snugly but smoothly over a closure rondelle.
Pass through an end edge bead 5 beads in from
the side of the strip (Figure 6). Check the loop
fi t over the rondelle. Undo if needed by remov-
ing the needle and pulling out the thread, adding
or subtracting beads for a better fi t over the
rondelle, and repeating the stitching of the loop
into the beadwork.
14. Weave through the beads to exit a paral-
lel strip bead on the other corner. Repeat the
rondelle-bead stitch from Step 13 to add the
second closure loop.
RESOURCES: Rondelles: Land of Odds, landofodds.com.
____________________________________________________________________________________________________________________________________________________________________________________________________________________________________________________________________________________________________________________________________________________________________________________________________________________________________________________________________________________________________________________________________________________________________________________________________________________________________________________________________________________________________________________________________________________________________________________________________________________________________________________________________________________________________________________________________________________________________________________
JEWELRY BY Sara Richardson,
Gaea Cannaday, Jeanine Center,
and Cindy Wimmer.
205 GREAT WIRE JEWELRY DESIGNS MADE SIMPLE.
4 FULL ISSUES (350+ PAGES)
ONE CONVENIENT FORMAT.
L E A R N M O R E AT shop.jewelrymakingdaily.com/EasyWireCD
still easy after all these years.
076-SBSB-2011-River Cuff.indd 78 10/27/11 10:24 AM
10272011102441

beadworkmagazine.com 79
pendant
StarburstLeslie Rogalski
Create a crystal starburst around an
exquisite wheel–shaped fi nding and learn
to decrease odd–count peyote to a center
point to display an accent dangle. Whip
up an easy square–stitched bail and
you’re ready to wear the pendant on your
favorite cord.
ODD-COUNT PEYOTE & SQUARE STITCH
WHAT YOU NEED• 1 rhodium–plated and cubic zirconia (CZ)
15mm (O.D.) wheel component• 1 rhodium–plated and CZ 6x8mm drop
component• 24 jet 4mm Swarovski crystal bicones• 1 g rhodium–electroplated Delica (DB 0032)
size 11° cylinder beads• .5 g matte black Delica size 11° cylinder beads• .5 g matte metallic green Delica (DB 0414)
size 11° cylinder beads• 1 silver 3 or 4mm closed jump ring• Silver chain (or other cord) of choice• Smoke 8lb FireLine• Scissors to cut FireLine• Size 10 beading needle• Flat–nose pliers• Round–nose pliers• Jewelry glue• Small Bead Stoppers
Finished pendant: 3” without bail
079-SBSB-2011- Starburst.indd 79 10/25/11 11:36 AM
10252011113931

80 best of step by step beads
Crystal starburst1. Working with doubled thread helps stiff en the fringes:
Fold a 6’ length of FireLine in half and thread your needle to
the fold.Tie a knot with the tails around 1 spoke of the CZ
wheel, leaving 6” tails.
2. Pick up 1 crystal,1 green bead, 1 crystal,and 1 rhodium-
bead. Skip the rhodium bead and pass back through all
other beads. Pull the fringe snug to the wheel. Pass your
needle into the wheel opening to the right of the knot and
out the next wheel opening moving around the wheel.
Repeat around the wheel creating a total of 11 fringes.
Make sure to pull each fringe very snug to the wheel. After
stringing the last fringe, pass through the fi rst wheel open-
ing and knot securely to the tail thread.
Peyote panel and dangle3. Gently work a closed jump ring into the open loop of the
dangle teardrop. Use your fl at–nose and round–nose pliers
to close the loop. Set aside.
4. Thread your needle on a comfortable length of FireLine or
at least 3’ long. String a stopper bead, leaving a 15” tail. String
1 rhodium, 2 black, 3 green, 2 black, and 1 rhodium beads.
Work a panel in odd–count peyote until you have 14 rhodium
beads along both sides of your panel. Remove the stopper
bead after a few rows.
5. Weave through the beadwork to reposition your thread
for the decrease: On the side you’re exiting, pass through the
second–to–last rhodium bead and the third–to–last black bead.
Pass through the second–to–last black bead and through the last
black bead. Work peyote to the end of the row.
pendant STARBURST
079-SBSB-2011- Starburst.indd 80 10/25/11 11:36 AM
10252011113932

beadworkmagazine.com 81
6. Continue to decrease to a center green
bead. Exit the center bead; string the closed
ring and dangle. Pass through the center
green bead and closed jump ring 2 times
to secure. Weave into the beadwork to
secure; trim.
7. Thread a needle on the tail thread. Fold
over the non–drop end and “zip” it closed
along the fi fth rows of the panel, forming a
narrow tube. See the Zip–Up Bead by Bead
on page 22. Exit out the tube end from inside
the hollow, not through a bead.
8. String 1 crystal and 1 rhodium bead; pass
back through the crystal. Pass through the
tube and pull the crystal and rhodium beads
snug. String 1 crystal and 1 rhodium bead.
Pass back through the crystal, the tube,
and the beads on the other end. Repeat once.
Weave thread through beadwork to exit one of
the edge rhodium beads on the top of the tube.
9. The starburst has 11 fringes: Place the
starburst so one fringe points straight up and
2 fringes point down, symmetrically, toward
you. Lay the panel fl at below the starburst
with the smooth rolled edge of the tube fac-
ing you—not the side you zipped up. Using
the working thread exiting the rhodium edge
bead, pass in a circular motion through the
fringe tip rhodium bead and out through the
rhodium edge bead.
Repeat twice more to secure. Weave
through the tube hollow to exit the other
edge rhodium bead. Repeat to attach the
other side of the tube to the other fringe.
Bail10. Attach a 3–bead–wide square–stitched
strip to the middle sunburst spoke: Rows 1
and 2: Leaving a 6” tail, string bead 1, pass
through the tip bead of the fringe (bead 2)
and string beads 3–6. Pass through all beads
again. Pull the rows of beads snugly against
each other. Pass through the previous row
and the row just strung.
11. Row 3: String beads 7–9. Pass through
the previous row and the row just strung.
12. Row 4: String beads 10–12. Pass through
the previous row and the row just strung.
Note: After the fi rst 4 rows, thread the tail
thread onto a needle and pass once through
Rows 2 and 1 to tighten the fi rst row. Do not trim.
13. Continue in 3–bead–wide square stitch
for enough rows to fi t around your chain or
cord. If you want to change the cords, make
the bail long enough to slide over a clasp.
14. When your bail is the desired length,
pass through Row 1, the last row, and
through Rows 1–4 (which will now be the
back of the bail). Trim. Thread the tail on a
needle and pass through the last few rows
stitched on the front of the bail. Trim.
RESOURCES: CZ fi ndings: Ezel Findings,
ezelfi ndings.com.
079-SBSB-2011- Starburst.indd 81 10/25/11 11:36 AM
10252011113935

82 best of step by step beads
EVEN-COUNT PEYOTE & FRINGEbeads
WHAT YOU NEED• 3 g size 6° seed beads (for the peyote tube)• Color shown: matte brown AB• 3 g size 8° seed beads (for the loops)• Color shown: matte olive green • Black .006 WildFire beading thread• Size 10 or 12 needle• Scissors• Bead Stopper
Artist’s TipRound seed beads (not cylinder beads) work
best for the looping fringes, but cylinder beads
work fi ne for peyote tubes.
Poodle BeadsLeslie Rogalski
A basic peyote tube takes on a fun, new look simply by adding looped fringes around
the edges. String one single bead as a pendant or make a bunch and string them with
other beads for a bracelet or necklace. Try crystals instead of seed beads for the loops
and give these puppies real personality! These beads were named by a dog-loving
friend even though she does not shave her poodles into ruff s. Ruff !
082-SBSB-2011- Poodle Beads.indd 82 10/25/11 11:37 AM
10252011114020

beadworkmagazine.com 83
Stitch a peyote tube1. On a 4’ piece of thread, string 8 size 6°
beads. Attach a Bead Stopper leaving a
6” tail.
2. Use only size 6° beads for the tube.
String 1 bead, and pass back through the
next-to-last bead just strung. This bead will
sit directly above the bead passed through.
3. String 1 bead, skip a bead, and pass
through the next bead. String 1 bead, skip
a bead, and pass through the next. Repeat,
working in peyote stitch. The beads will
push against the fi rst beads you strung and
give them a staggered appearance.
4. At the end of the row, reverse direction
to work back for the next row: string 1 size
6°, skip the end bead, and pass through the
next bead.
5. Pull the thread snug; wiggle the bead-
work between your fi ngers to assist in
allowing the thread to pull tighter. You
should now be able to remove the Stopper.
Continue in peyote stitch.
6. At the end of the row, reverse direction
as in Step 3.
7. Continue until you have a strip with 5
beads along each side.
Make the peyote tube8. Pass across the tube into the end bead
opposite the side where your thread exits.
Notice you pass into an “out” bead.
Note: A paper tube is shown here for illus-
trative purposes so the thread can be more
easily seen. When you make your peyote
tube you do not need this paper tube.
9. Crisscrossing back and forth, “zip” the
two sides of the tube together, passing
through the out beads.
1 4 7
2 5 8
3 6 9
082-SBSB-2011- Poodle Beads.indd 83 10/25/11 11:37 AM
10252011114021
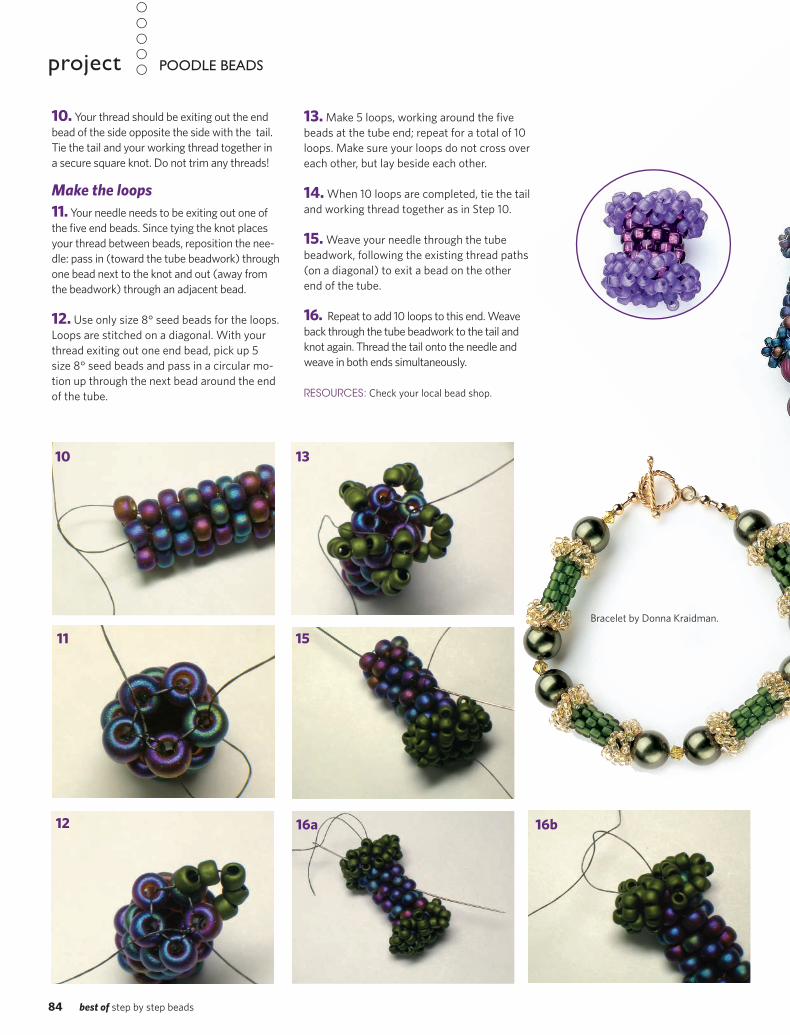
84 best of step by step beads
POODLE BEADSproject
10. Your thread should be exiting out the end
bead of the side opposite the side with the tail.
Tie the tail and your working thread together in
a secure square knot. Do not trim any threads!
Make the loops11. Your needle needs to be exiting out one of
the fi ve end beads. Since tying the knot places
your thread between beads, reposition the nee-
dle: pass in (toward the tube beadwork) through
one bead next to the knot and out (away from
the beadwork) through an adjacent bead.
12. Use only size 8° seed beads for the loops.
Loops are stitched on a diagonal. With your
thread exiting out one end bead, pick up 5
size 8° seed beads and pass in a circular mo-
tion up through the next bead around the end
of the tube.
13. Make 5 loops, working around the fi ve
beads at the tube end; repeat for a total of 10
loops. Make sure your loops do not cross over
each other, but lay beside each other.
14. When 10 loops are completed, tie the tail
and working thread together as in Step 10.
15. Weave your needle through the tube
beadwork, following the existing thread paths
(on a diagonal) to exit a bead on the other
end of the tube.
16. Repeat to add 10 loops to this end. Weave
back through the tube beadwork to the tail and
knot again. Thread the tail onto the needle and
weave in both ends simultaneously.
RESOURCES: Check your local bead shop.
10 13
11 15
12 16a 16b
Bracelet by Donna Kraidman.
082-SBSB-2011- Poodle Beads.indd 84 10/25/11 11:38 AM
10252011114021

beadworkmagazine.com 85
learn the lingoMaking a tube from a strip of
peyote is called the “zip up”
because the beads fi t together
like the teeth of a zipper, with
alternate beads staggered to sit
“in” and “out.”
Voilà!String poodle beads with other beads for fun, fast,
fi nished jewelry.
082-SBSB-2011- Poodle Beads.indd 85 10/25/11 11:38 AM
10252011114021

86 best of step by step beads
EMBELLISHMENTfelt beads
Have a Ball!
Wool felt beads provide a “ready-to-go” embellishment surface
for a fun variety of styles and materials. Here are three ways
to embellish a readymade felt bead: felting, embroidery, and
surface beading. Use embellished beads in necklaces, earrings,
bracelets, as decorations for clothing, bags, books, cards, holi-
day ornaments, and anything else you can imagine!
• Basic sewing skills will be very helpful in this project.
Learn the LingoWool roving: wool that has been washed,
combed, and prepared for further use. Roving
can be felted or spun into threads for weaving,
knitting, and other fi ber arts.
Allison and Tracy Stilwell
086-SBSB-2011-Have a Ball.indd 86 10/25/11 11:56 AM
10252011115722

beadworkmagazine.com 87
1. Pull off a small piece of roving in the
color of your choice. Roll the roving into a
small loose puff ball for a dot or twirl it into
a lightly packed string between your fi ngers
for a line, then position it on the felt bead
(Figures 1 and 2).
2. Work the roving into the felt bead: poke
the needle in and out of the color spot and
the felt bead underneath.
3. Defi ne the shape: fold stray fi bers inside
the edge of the shape. Gently use your
needle to clean up the fuzzy edges. Continue
working the roving into the felt (Figures 3 and 4).
4. When the shape is almost fi nished, move
the end of the needle in a circular motion
to gather the remaining fi ne wisps of roving
together. Work those wispy ends into the
bead. Clean up with scissors.
Figure 1
Figure 2
Figure 3
Figure 4
Artist’s TipMake new colors easily by blending two or more
roving colors. Gather little puff s of a few colors
together and pull the fi bers apart with your fi ngers,
keeping the ball of fl uff together until the colors
are mixed to your liking.
Add dots or lines
Felting needle tipA felting needle is very sharp, with a barbed tip that
hooks the fi bers together. Felting needles break easily
when bent, so keep the needle motion straight as it
is poked in and out of the roving. Poking can be in
any direction as long as the needle is not bent. Most
beginners break a few needles!
WHAT YOU NEED• Wool felt beads• Wool roving• Felting needles• Small sharp scissors
Try This! Vary the sizes and colors on the same bead.
086-SBSB-2011-Have a Ball.indd 87 10/25/11 11:56 AM
10252011115723
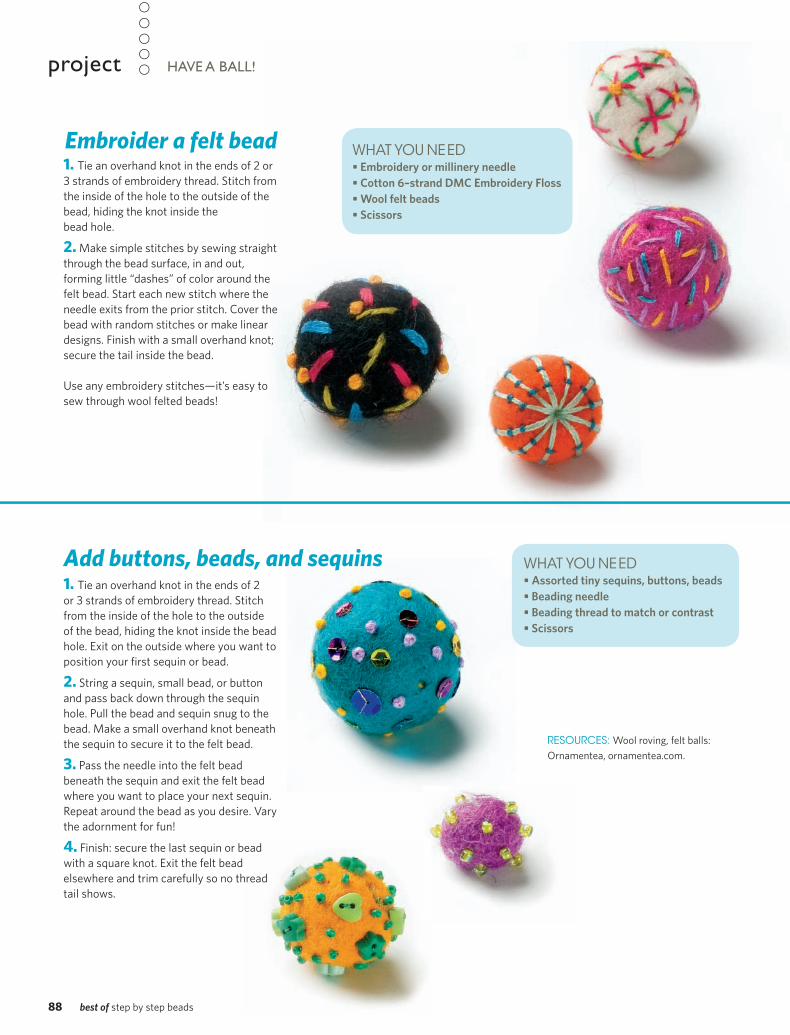
88 best of step by step beads
HAVE A BALL!project
1. Tie an overhand knot in the ends of 2 or
3 strands of embroidery thread. Stitch from
the inside of the hole to the outside of the
bead, hiding the knot inside the
bead hole.
2. Make simple stitches by sewing straight
through the bead surface, in and out,
forming little “dashes” of color around the
felt bead. Start each new stitch where the
needle exits from the prior stitch. Cover the
bead with random stitches or make linear
designs. Finish with a small overhand knot;
secure the tail inside the bead.
Use any embroidery stitches—it’s easy to
sew through wool felted beads!
RESOURCES: Wool roving, felt balls:
Ornamentea, ornamentea.com.
WHAT YOU NEED• Embroidery or millinery needle• Cotton 6–strand DMC Embroidery Floss • Wool felt beads• Scissors
Embroider a felt bead
WHAT YOU NEED• Assorted tiny sequins, buttons, beads• Beading needle• Beading thread to match or contrast• Scissors
Add buttons, beads, and sequins1. Tie an overhand knot in the ends of 2
or 3 strands of embroidery thread. Stitch
from the inside of the hole to the outside
of the bead, hiding the knot inside the bead
hole. Exit on the outside where you want to
position your fi rst sequin or bead.
2. String a sequin, small bead, or button
and pass back down through the sequin
hole. Pull the bead and sequin snug to the
bead. Make a small overhand knot beneath
the sequin to secure it to the felt bead.
3. Pass the needle into the felt bead
beneath the sequin and exit the felt bead
where you want to place your next sequin.
Repeat around the bead as you desire. Vary
the adornment for fun!
4. Finish: secure the last sequin or bead
with a square knot. Exit the felt bead
elsewhere and trim carefully so no thread
tail shows.
086-SBSB-2011-Have a Ball.indd 88 10/25/11 11:56 AM
10252011115723

beadworkmagazine.com 89
WHAT YOU NEED• Bead soup: See Step 2 for details• 2 three-hole spacer bars• 2 eye pins• 4 1⁄4 yd of thin, fl exible beading wire• 2 cone end caps• 6 crimp beads• Clasp• Cellophane or masking tape• Round-nose pliers• Chain-nose pliers• Wire cutters
Braided ChokerLucy Arnold
STRINGINGnecklace
Ph
oto
by
Jim
La
wso
n;
all
oth
er
ph
oto
s c
ou
rte
sy o
f th
e a
uth
or.
This braided choker works well with one,
two, or even three colors. It’s a wonderful
excuse to use a whole collection of diff erent
beads in your favorite color.
089-SBSB-2011-Braided Choker.indd 89 10/25/11 11:57 AM
10252011115808

90 best of step by step beads
1. Cut six 25” lengths of beading wire. Fold a small piece
of tape around each piece of wire about 5” from one end to
prevent the beads from slipping off .
2. String 14 1/2” of beads onto each wire according to the
chart. After you have strung each strand, fold a second piece
of tape on the wire at the end of your beads. There should be a
5” wire tail at each end of the beading.
Strand 1 104 size 11° metallic violet iris seed beads
100 size 8° light amethyst color-lined purple matte seed beads
Pattern: Alternate size 11° and 8° beads, beginning and ending
with a few size 11° beads.
Strand 2 66 size 11° silver-lined light amethyst aurora borealis (AB) seed beads
44 size 2 (4mm) multi-iris matte bugle beads
21 size 6° amethyst matte AB seed beads
Pattern: 1 size 11°, 1 bugle, 1 size 11°, 1 bugle, 1 size 11°, 1 size 6°. Repeat.
Strand 3 66 size 11° blue iris hexagonal cut seed beads
34 size 2 (4mm) silver-lined amethyst bugle beads
33 size 6° silver-lined amethyst seed beads
Pattern: 1 size 11° hex cut, 1 bugle, 1 size 11° hex cut, 1 size 6°,
beginning and ending with a size 11° or bugle beads.
Strand 4 115 size 11° lavender-lined Amy matte (AB) seed beads
106 size 8° purple/blue iris matte seed beads
Pattern: Alternate size 11° and 8° beads, beginning and ending with a
few size 11° beads.
Strand 5 118 size 11° silver-lined light amethyst AB seed beads
22 size 2 (4mm) blue iris bugle beads
19 dark freshwater pearls
Pattern: 3 size 11°, 1 bugle, 3 size 11°, 1 pearl, beginning and ending
with size 11° beads.
Strand 6 125 size 11° purple/blue iris matte seed beads
38 (5mm) dark multi-iris matte nibblettes
Pattern: Alternate 3 size 11° and 1 nibblette, beginning and ending
with size 11° beads.
3. Divide the beaded strands into 3 pairs, putting dissimilar
strands together. They may be dissimilar in size, shape,
or fi nish. Color family will be the one thing they all have
in common.
4. Select 1 pair and remove the tape from one end of each
strand. Put both wire ends through 1 hole of the 3-hole
spacer bar.
5. Holding the wire ends together, string 5 size 8°s and 1
crimp bead.
6. Pass the 2 wires through the loop of 1 eye pin, then back
down through the crimp bead and the 5 size 8°s. Remove any
excess slack. Squeeze the crimp bead closed with chain-nose
pliers and trim the wires as close as possible to the last size 8°.
7. Repeat Steps 4–6 with the remaining pairs.
8. String 1 cone end cap and 1 size 6° seed bead onto the eye pin.
9. Using chain-nose pliers, bend the eye pin down at a right
angle against the size 6° bead. Trim the pin to about 3⁄8”.
Artist’s TipThese instructions are for a 16” choker. I beaded 14 1/2” strands,
which resulted in 12 1/2” of braiding. In determining your fi nished
length, remember to include the measurement from the spacer bars
to the ends of the clasp; mine was 1 3/4”. Thus, my fi nal length was
12 1/2” + 1 3/4” + 1 3/4” = 16”. You can add or remove beads to make
your choker longer or shorter.
BRAIDED CHOKERproject
089-SBSB-2011-Braided Choker.indd 90 10/25/11 11:57 AM
10252011115809

beadworkmagazine.com 91
10. Make a simple loop by gripping the tip of the eye pin with
round-nose pliers. Rotate the pliers to form a closed loop.
11.Tape this end of the choker to your worktable. Carefully
braid the 3 pairs of beaded strands, keeping the tension even.
Tape the end of the braid to the worktable.
12. Add or subtract a few beads from each strand as neces-
sary so that they all end at the same length. Be sure the last few
beads on each strand are size 11° seed beads or small bugles.
13. String the pairs of wire ends through the second spacer
bar, maintaining the braiding to the end.
14. Repeat Steps 5 and 6.
15. Repeat Steps 8–10.
16. Attach one part of the clasp to each eye-pin loop.
RESOURCES: Check your local bead store.
Have fun with variations in color, size, and shape!TRY THIS!
089-SBSB-2011-Braided Choker.indd 91 10/25/11 11:57 AM
10252011115809

92 best of step by step beads
STRINGINGnecklace
WHAT YOU NEED• 4 focal beads• 7g size 6° opaque white seed beads• 7g size 6° opaque black seed beads• 7g size 8° opaque white seed beads• 7g size 8° opaque black seed beads• 12 size 8° “accent” seed beads for each color to match your focal beads• 2 E or size 3° opaque black beads• Large, fun silver toggle • Fine fl exible beading wire• 2 larger holed 3mm crimp tubes • Crimping pliers• Wire cutters• Bead Stoppers
Finished size: 22”
Mod PodsLeslie Rogalski
Match the scale and style of your designs with the right
fi nding. This modern toggle with its dotted ring seemed
the perfect way to compliment the energetic patterns in
the pod beads. To keep the look clean use only 1 crimp
tube with a larger hole for each pair of wires.
PH
OT
O B
Y J
IM L
AW
SO
N.
092-SBSB-2011-Mod Pods.indd 92 10/25/11 11:57 AM
10252011115824

beadworkmagazine.com 93
Strand 1
1. Cut a 26” piece of wire and place a Bead Stopper on one
end, leaving a 2” tail.
2. String 22 size 6° seed beads alternating black and white,
1 focal bead, 8 size 6° seed beads alternating black and
white, 1 focal bead, and a 12–14” length of alternating black
and white size 6° seed beads.
3. Check the length around your neck. Tip: Be careful; use a
Bead Stopper to prevent accidental loss of strung beads. The
other focal beads will be strung next, so make sure your long
black and white strand will be the right length for the focal
beads to be in a desired position. Add or subtract black and
white beads as needed to lengthen or shorten your necklace.
4. String 1 focal bead, 8 alternating black and white size 6°,
1 focal bead, and 22 alternating black and white size 6° to
mirror the section created in Step 2.
5. String 1 size 3°, 1 crimp tube, and the loop of one half of
the toggle. Pass back through the crimp tube, the size 3°, and
a few size 6° beads. Pull the wire to snug up to the toggle but
do not crimp yet. Set aside.
Strand 2
6. Cut a second 26” piece of wire.
7. Pass one end through the strung size 3° black bead, crimp
tube, and toggle ring; pass back through the crimp tube and
the black size 3°. Note: If you have trouble fi tting all wires
through the crimp tube, change the tube for another with a
larger hole. Pull wires to even out the loops around the toggle
ring, and crimp the tube fi rmly around all wires. The size 3°
should slide down over the crimp tube.
8. On the second wire, string a section of size 8° seed beads
equal to the 22-bead section of size 6° beads on the other
wire. Make sure to slide beads over the tail of the wire left
from crimping. Alternate black and white beads, and string a
couple accent color size 8° beads in the sequence as follows:
String 7 alternating black and white size 8°s starting with
white (next to the size 3°) and ending with a black. String 1
size 8° accent color, 1 black 8°, and 7 size 8° beads alternat-
ing black and white, starting with white. String a diff erent
accent color seed bead, 1 black 8°, and 7 size 8° alternating
black and white beads starting with a white.
9. Pass the wire through the fi rst focal bead, the size 6°
black and white beads and the second focal bead.
10. String 9 alternating black and white size 8° beads start-
ing and ending with black. String an accent color size 8°.
11. Repeat Step 8 to create a length of size 8° seed beads
equal to the longest length of size 6° beads. Vary the color
of the accent beads as you string.
12. When your strand of size 8° beads is long enough, pass
the wire through the third focal bead, the size 6° beads, and
the last focal bead. String a section of size 8° beads with
accent color beads to mirror the section strung in Step 8.
13. String a size 3° black seed bead and a crimp tube.
Pass through the loop of the other part of the toggle and
back through the crimp tube, the size 3°, and several size
8° beads. Place a Bead Stopper on the protruding tail to
prevent slippage temporarily.
14. Remove the Bead Stopper from the size 6 strand. Pass
the wire through the size 3° just strung, the crimp tube,
and the toggle loop. Pass back through the crimp tube,
the size 3°, and through several size 6° beads. Replace the
crimp with a larger holed crimp if you can’t fi t all the wires
through.
15. Pull the wires to snug the beadwork loosely but close
to the toggle; hold the crimp tube in place gently with your
pliers so it doesn’t slide into the beads. Crimp fi rmly around
all wires, between the black size 3° and the toggle. Snip any
protruding wire tails carefully.
Wear the toggle in front!
RESOURCES: Lampworked pods: Barbara Becker Simon,
bbsimon.com. Silver toggle: FusionBeads.com.
PH
OT
O B
Y J
IM L
AW
SO
N.
092-SBSB-2011-Mod Pods.indd 93 10/25/11 11:57 AM
10252011115824

94 best of step by step beads
You’re going about your day and stumble upon a combina-
tion of colors that you must use in your beadwork. But how
can you match a premixed medium such as beads to the
colors you see in real life?
First determine the overriding colors; squint your eyes
to help recognize masses of color. Looking at the photo of
trees in the mist, its easy to see the main color families:
Light pinks and orange-yellows of sky; dark yellow-greens
and brown of the earth; and rich browns of the trees and
fence. Work out your colors using whatever medium you
prefer before you begin beading. Spread out tubes of beads,
swatches of colored paper, color with markers and pencils,
or work on a computer.
Now zero in on color nuances. The smooth gradation of
the sky begins with a pinkish lavender then gradates down
to light pink sliding into white and shimmering yellow.
Many shades of brown and green lie in the grass. Deter-
mine what makes the color scheme sublime. Note the
graceful movement of color within the gradations. By sim-
ply using a few of these colors I can’t achieve this elegant
movement. I’m limited by my medium of beads. Unless I’m
weaving rows of seed beads into a tapestry, I accept that
this movement of color will not be part of my fi nal piece.
Much of the beauty of the color scheme is the appearance
of luminosity resulting from the gradations, and the colors’
lightness and darkness in relation to each other. I’ll use
lighter versions of bead colors to achieve more luminos-
ity. Pay attention to the amount of each color relative to
the other. I experiment with proportions, changing the Photo by Shutterstock from The Beader’s Color Palette, copyright © 2008 by Margie Deeb. Published by Watson-Guptill Publications.
Ph
oto
by
Ma
rgie
De
eb
fro
m
Th
e B
ea
de
r’s
Co
lor
Pa
lett
e.
Turning Inspiration into a Palette
Adapted and abridged from The Beader’s Color Palette
(Watson-Guptill, 2008) By Margie Deeb
dominant, secondary, and accent colors until I arrive at
proportions that feel balanced and whole. Lavender-pinks
make this palette unusual, so I want to give them more
voice. Pale pink will have more impact than white as
the lightest color. I’ve reduced the amount of green and
brown to accents.
From what I’ve learned above I’ve selected a possible
bead palette. Even though there’s no true lavender in the
photo, light amethyst works beautifully with the beads
I’ve chosen, as does the yellow green peridot. I’ve also
included a couple of yellow possibilities, one transparent
and one opaque. Because beads and gemstones are not
the exact colors of the fl at swatches, experiment not just
with proportions but also how diff erent fi nishes interact
with each other.
feature COLORWORKS
094-SBSB-2011Colorworks.indd 94 10/25/11 11:58 AM
10252011115958

beadworkmagazine.com 95
Analogous color schemes involve two or more colors adjacent
to each other on the wheel (including pure hues, shades, and
tints). Blues are analogous to greens: they are neighbors sitting
side by side on the color wheel.
The beauty of analogous schemes fi ll our world: the iridescence
of peacock feathers, the changing blues and greens under the
ocean, and the yellow-to-pink gradations of a lotus blossom.
The analogous palette has a mellifl uous quality. Its colors
swirl and fl ow into one another, defying boundaries. Where
does blue end and blue-green begin? The analogous palette
seeks no answer. It only revels in the mystery of movement.
Because of their proximity, blues and greens (and all adja-
cent colors) are intrinsically harmonious, making them easy to
combine successfully.
Analogous schemes are grouped in a specifi ed area of the
wheel, tending toward warm or cool, allowing mood and emo-
tion to step forth. And in the heat of summer, no scheme is
more refreshing than analogous blues and greens.
Blue is the coolest color of all, calm and relaxing. Life-giving green,
nature’s background, is the easiest color for our eyes to view.
Green restores harmony and balance and renews the weary
soul. Together they are one of the most popular and easy to
work with combinations.
Combine light blues, like those of blue lace agate, with exotic
deep blues, like lapis lazuli, azurite, or sodalite. Accents with
one or two of the many available green gemstones: cool opaque
malachite, mottled dull serpentine, translucent twinkling
Aqua blues and olive greens harmonize naturally. Seed beads stitched
around glass and foil cabachone by Dema Designs. Necklace by SaraBeth
Cullinan. Necklace designed for Margie Deeb’s “Color Report for Bead
Artists Spring/Summer 2009.” Photo by Margie Deeb.
The Beauty of Analogous ColorsBy Margie Deeb
aventurine, lustrous over-the-top chrysoprase, or jade in its
wide range of hues.
Apatite and aquamarine are gorgeous cyanish colored
gemstones that combine beautifully with purer green tones,
like malachite and chrysoprase. Turquoise is the perfect
in-between-color to close the gap when making a color
scheme that gradates blue to green.
094-SBSB-2011Colorworks.indd 95 10/25/11 11:58 AM
10252011115958

96 best of step by step beads
Finding inspiration in a country’s color comes naturally to every artist. But how to translate that
inspiration into a palette for beaded jewelry?
Look not only to color, but texture, form, composition, and design as well. Let’s take a brief virtual
tour of India, a world of color. Its fabrics sport daring blends of reds, pinks, yellows, blues, and greens.
Men wear brightly colored turbans. Women’s saris are spectral extravaganzas.
Buddhists in India’s Tibetan settlements regard saff ron yellow and auburn as sacred colors, and their
robes refl ect this.
In parts of India, single colors, punctuated by architectural accents, unify entire cities. Jaisalmer,
built of yellow sandstone, is the “golden city.” Most buildings in Jodhpur, the “blue city,” are painted
blue. And Jaipur, the “pink city,” uses ocher pink plasters to colors its walls.
Fine detail and daedal ornamentation are common in architecture and jewelry. Patterns include paisley
motifs, scrollwork, and fi ligree. In jewelry, India’s passion for gold can be traced to very early times. Sara-
Beth’s “Beledi” necklace epitomizes the texture and detail of Indian jewelry. The colors of Margie Deeb’s
“Twined Neon” necklace are saturated with the colors of vibrant festivals and marketplaces.
Study books, photos, and travel sites on the Web to get a feel for a place that attracts you. Then, let your
imagination take you there.
The mosque interior of the Taj Mahal inspired
SaraBeth Cullinan to create “Beledi,” a necklace
using shades of pink and detailed, intricate
filigree. The green of the distant trees finds its
way into the necklace as small pearl accents.
Glass and vermeil. Photo by Margie Deeb.
Powdered pigments on sale in an Indian marketplace inspired the
brilliant palette for “Twined Neon,” a loom-ed necklace designed by
Margie Deeb. Loomwork by Frieda Bates. Photo by Margie Deeb.
Ph
oto
gra
ph
by
Sh
utt
ers
toc
k:
ww
w.s
hu
tte
rsto
ck
.co
m
feature COLORWORKS
Finding Inspiration in the Colors of a CultureBy Margie Deeb
094-SBSB-2011Colorworks.indd 96 10/25/11 11:58 AM
10252011115958

beadworkmagazine.com 97
Using Dominance to Create HarmonyBy Margie Deeb
Visual harmony is created when there exists a balance
of similarities and diff erences. Enough concordance and
enough contrast must be at play to achieve dynamic tension.
But too many diff erences confuse the eye. What if ev-
ery bead in your stash were dumped into one huge bowl?
Though enticing, the arrangement wouldn’t be harmoni-
ous or well designed. Such a random mix off ers delightful
textures and colors, but provides no visual harmony. Af-
ter feasting for a moment on that random mix, your eye
will spot all the bright yellow (or white) beads and begin
visually grouping them. You are seeking order. And you are
fi nding order through concordance—colors that are similar.
The dominance of an element—be it color, line, design,
texture, or shapes and sizes of beads—unifi es a fi nished
piece, giving it a sense of oneness. Achieve harmony by
elevating one or two elements above all others, making
them dominant.
There are three easy ways to use color as your unifying element:
1. Establishing a single dominant color is the simplest
approach, as Kristy Nijenkamp has achieved in her lamp-
worked bracelet. Each bead contains many colors, but
the dominant color of the whole bracelet is the transparent
peach, which unifi es all the palette members.
2. The tonal approach uses dominant tones (muted
or intense) rather than specifi c hues. The vivid colors of
Margie Deeb’s “Spectral Tapestry” work as a group to
achieve color dominance. No single color dominates: the
piece is unifi ed by the intensity the colors share: they are
all fully saturated. The black outlines and frames each color,
further unifying the piece
3. Use a family of analogous (similar) colors.
“Mermaid’s Collar” by Margie Deeb features colors from
the same area on the color wheel. . .the cool side. They are
similar enough that the naturally harmonize, and diff erent
enough to create interest.
Now you know three ways to harmonize your work by
consciously using color dominance. Find that exquisite
balance between similarity and contrast, and you’re on
your way to color mastery.
In her lampworked bracelet,
Kristy Nijenkamp establishes
single color dominance with the
color peach.
The vivid colors of Margie
Deeb’s “Spectral Tapestry”
work as a group to achieve
color dominance.
“Mermaid’s Collar” by Margie
Deeb uses a family of cool,
analogous colors to achieve
color dominance.
094-SBSB-2011Colorworks.indd 97 10/25/11 11:58 AM
10252011115958
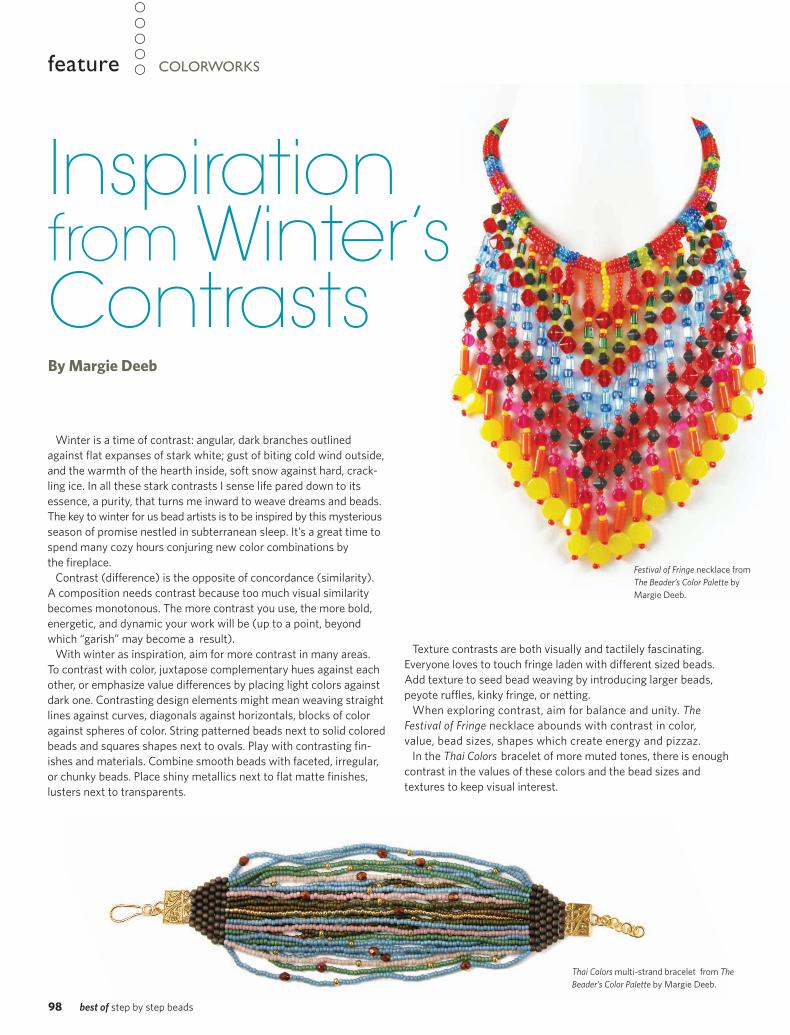
98 best of step by step beads
Texture contrasts are both visually and tactilely fascinating.
Everyone loves to touch fringe laden with diff erent sized beads.
Add texture to seed bead weaving by introducing larger beads,
peyote ruffl es, kinky fringe, or netting.
When exploring contrast, aim for balance and unity. The
Festival of Fringe necklace abounds with contrast in color,
value, bead sizes, shapes which create energy and pizzaz.
In the Thai Colors bracelet of more muted tones, there is enough
contrast in the values of these colors and the bead sizes and
textures to keep visual interest.
Thai Colors multi-strand bracelet from The
Beader’s Color Palette by Margie Deeb.
Winter is a time of contrast: angular, dark branches outlined
against fl at expanses of stark white; gust of biting cold wind outside,
and the warmth of the hearth inside, soft snow against hard, crack-
ling ice. In all these stark contrasts I sense life pared down to its
essence, a purity, that turns me inward to weave dreams and beads.
The key to winter for us bead artists is to be inspired by this mysterious
season of promise nestled in subterranean sleep. It’s a great time to
spend many cozy hours conjuring new color combinations by
the fi replace.
Contrast (diff erence) is the opposite of concordance (similarity).
A composition needs contrast because too much visual similarity
becomes monotonous. The more contrast you use, the more bold,
energetic, and dynamic your work will be (up to a point, beyond
which “garish” may become a result).
With winter as inspiration, aim for more contrast in many areas.
To contrast with color, juxtapose complementary hues against each
other, or emphasize value diff erences by placing light colors against
dark one. Contrasting design elements might mean weaving straight
lines against curves, diagonals against horizontals, blocks of color
against spheres of color. String patterned beads next to solid colored
beads and squares shapes next to ovals. Play with contrasting fi n-
ishes and materials. Combine smooth beads with faceted, irregular,
or chunky beads. Place shiny metallics next to fl at matte fi nishes,
lusters next to transparents.
Inspiration from Winter’s Contrasts
Festival of Fringe necklace from
The Beader’s Color Palette by
Margie Deeb.
By Margie Deeb
feature COLORWORKS
094-SBSB-2011Colorworks.indd 98 10/25/11 11:59 AM
10252011120014

beadworkmagazine.com 99
necklace
WHAT YOU NEED• 2 oz pearl Kato Polyclay• 2 oz translucent Kato Polyclay• Kato color concentrate for desired color• Size 6–11° seed beads in color to match or contrast• Nymo thread in coordinating color• Krylon leafi ng pen (this brand only)• .019 fl exible 49-strand beading wire
• Friction tube clasp • Cyanoacrylate glue (optional)• Cornstarch or spray water bottle • Beeswax• Pasta machine• Acrylic roller• Work surface• Texture sheet or textured rubber stamp• Flexible blade (rigid blade will not work)
This project uses the mica shift technique to create a subtle
pattern on the surface of the clay. A metal leafi ng pen adds a
gold highlight to the edges, then the components are stitched
together using a variation of a stitch used in bookbinding.
Pod NecklaceJudy Dunn
• Oval cutters: 1” x ¾” and 1¼” x 1”• 1 sheet of acid-free heavyweight paper• Baking pan • Toaster oven (dedicated for non- food use) • 400-grit sandpaper• Drill with 1–2mm drill bit• Scissors
POLYMER CLAY
099-SBSB-2011-Pod Necklace.indd 99 10/25/11 12:01 PM
10252011120349

100 best of step by step beads
POD NECKLACEproject
1. Blend the pearl and translucent clay
together in a 1:1 mix. Mixing the translu-
cent in with the pearl clay, creates space
between the mica particles, and increases
the depth in the mica shift pattern you
will create. Use the Kato color concen-
trates as desired to reach whatever color
you want. For this project, a tiny sliver of
red was used to reach this shade of pink.
For darker colors, slowly build up to your
intended color; a little will go a long way.
It is easier to add more color than to take
it away. The process of fully blending the
colors will also condition your clay.
2. Roll the sheet of clay out to thickest
setting on your pasta machine. Texture
the surface of the clay, using a texture
sheet or a rubber stamp with an allover
texture. If your texture sheet is thin and
fl exible, you may pass it through the pasta
machine with the sheet of clay. Otherwise,
use your acrylic roller to press the texture
into the sheet of clay. You may fi nd it
easier to add a thin dusting of cornstarch
or a spritz of water to the surface of your
texture sheet fi rst, for easier removal.
3. Lay the sheet of clay fl at on the work
surface, textured side up. Using your
fl exible blade, carefully remove the raised
portions of the clay sheet. The best way
to do this is with the blade as close to
horizontal as it shaves the surface of the
clay. This will remove the textured surface
and make a fl at surface again. After you
slice away the textured surface, you will
see the pattern created with the texture.
This image is formed by the light refl ect-
ing from the surface of the mica particles
embedded in the clay body. The process
of texturing the clay “shifts” the angles
of the particles in the clay so light is now
creating the same pattern as the texture,
but without the texture! This is called the
“mica shift” technique.
4. Once you have removed all the raised
areas on the sheet of clay, put the sheet
through the pasta machine at the second
or third setting down from the thickest
setting. Turn the sheet 90°, and pass it
through once more, at the next thinnest
setting (the fourth or fi fth setting on my
machine).
5. Lay the sheet of clay on your work
surface and use the oval cutters to cut
oval shapes from the sheet of clay. Cut at
least 8 small and 4 large ovals. Remove
the excess clay around the ovals.
6. Accordion–fold the piece of paper with
folds about 1” wide. Use acid-free paper
because the acid in paper can yellow the
clay during curing. Place the paper in your
baking pan. Preheat your oven to the clay
manufacturer’s recommended
temperature.
7. Gently fold the ovals about midway,
across the shorter length of the oval, to
about 90°, with the decorative surface on
the inside. Place the ovals face down on
the accordion folded paper. Continue with
all the ovals.
8. Cure at the manufacturer’s recom-
mended temperature for 45 minutes.
The longer cure time will make a stronger
piece, and as long as you do not exceed
the recommended curing temperature,
you will not harm the clay.
9. When the pieces have cooled, remove
from the paper and use a damp piece of
sandpaper to smooth any uneven edges
caused by the seam on the oval cutters.
Artist’s Tips• Use Kato Polyclay for this project.
It is rigid and strong when cured so
thin, and with the color concentrates,
gives the best range of colors.
• Use a Krylon leafi ng pen, others
may react over time with the clay
and soften it.
099-SBSB-2011-Pod Necklace.indd 100 10/25/11 12:01 PM
10252011120350

beadworkmagazine.com 101
13. You will now have two ends extend-
ing out of the back of the oval. They
should be about equal in length. The next
oval will be opposite this fi rst one. String
each end through the back of one of the
holes of the second oval.
One strand will go across the front and
out through the other hole.
12. Cut a 15–18” piece of Nymo thread.
Use beeswax to coat the thread; this will
minimize the risk of tangling and fraying
ends as you work with it. Feed one end of
the thread up through one hole on 1 oval.
String enough seed beads to reach from
one hole to the other. The number will
vary depending upon the size of the beads.
Feed the thread through the other hole.
10. Using the metal leafi ng pen, highlight
the edges of the pods. Two coats are usu-
ally required.
11. Using the drill, drill 2 holes along the
folded edge, about 4–5 mm from each
outside edge for the small pieces, and 5–6
mm from the outside edge for the larger
pieces. If desired, mark the hole place-
ment prior to drilling.
Learn The Lingocure: this is the proper term for what
happens to polymer clay when it’s in the
oven. Using the term “bake” is not an
accurate description since it’s not food.
When the clay cures, it forms bonds
that cause the long polymer chains in
the clay to lock together, making it rigid
as opposed to soft.
099-SBSB-2011-Pod Necklace.indd 101 10/25/11 12:01 PM
10252011120405
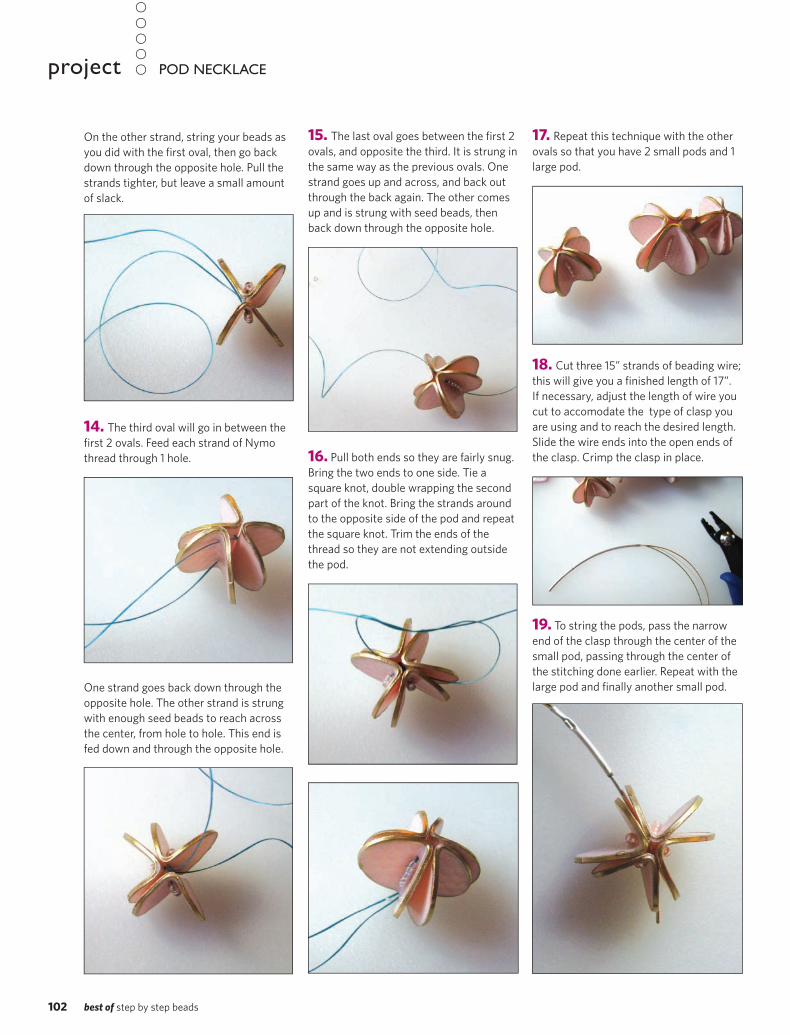
102 best of step by step beads
POD NECKLACE
15. The last oval goes between the fi rst 2
ovals, and opposite the third. It is strung in
the same way as the previous ovals. One
strand goes up and across, and back out
through the back again. The other comes
up and is strung with seed beads, then
back down through the opposite hole.
16. Pull both ends so they are fairly snug.
Bring the two ends to one side. Tie a
square knot, double wrapping the second
part of the knot. Bring the strands around
to the opposite side of the pod and repeat
the square knot. Trim the ends of the
thread so they are not extending outside
the pod.
17. Repeat this technique with the other
ovals so that you have 2 small pods and 1
large pod.
18. Cut three 15” strands of beading wire;
this will give you a fi nished length of 17”.
If necessary, adjust the length of wire you
cut to accomodate the type of clasp you
are using and to reach the desired length.
Slide the wire ends into the open ends of
the clasp. Crimp the clasp in place.
19. To string the pods, pass the narrow
end of the clasp through the center of the
small pod, passing through the center of
the stitching done earlier. Repeat with the
large pod and fi nally another small pod.
On the other strand, string your beads as
you did with the fi rst oval, then go back
down through the opposite hole. Pull the
strands tighter, but leave a small amount
of slack.
14. The third oval will go in between the
fi rst 2 ovals. Feed each strand of Nymo
thread through 1 hole.
One strand goes back down through the
opposite hole. The other strand is strung
with enough seed beads to reach across
the center, from hole to hole. This end is
fed down and through the opposite hole.
project
099-SBSB-2011-Pod Necklace.indd 102 10/25/11 12:01 PM
10252011120406

beadworkmagazine.com 103
20. Arrange the pods in whatever alignment
is most visually pleasing to you. The pods can
still be rotated along three diff erent axes.
This creates numerous options for how you
arrange the pods. Whether you line them
up, or arrange them a bit more randomly,
they will give you a diff erent look. If you
want the pods to be spaced out on your
cord, place a dot of cyanoacrylate glue on
the cable where you want the pod to sit.
Slide the pod over the glue, and let set.
A single pod, small or large, can make an
attractive pendant—or for a bolder look,
go for more pods clustered together or
spaced apart.
RESOURCES: Clay and oval cutters, pasta
machines: PrairieCraft.com, prairiecraft.com;
Polymer Clay Express, polymerclayexpress.
com; Munro Crafts, munrocrafts.com. Krylon
leafi ng pens: Staples, staples.com. Friction tube
clasps: Rio Grande, riogrande.com. Beading
thread and cable: Rings & Things, rings-things.
com; Fire Mountain Gems and Beads,
fi remountaingems.com.
5 FREE Beaded Bracelet
Projects
Download your FREE eBook today:
GET YOUR FREE PROJECTS AT:
www.BeadingDaily.com/FreeBraceletProjects
Wooded Wonderland [ Jess Italia Lincoln ]
Lost and Found[ Yelena Yershova ]
Check out these
bracelet designs,
pick one or make
them all!
Victorian Impressions [ Elizabeth Murray ]
099-SBSB-2011-Pod Necklace.indd 103 10/28/11 3:25 PM
10282011152600

104 best of step by step beads
POLYMER CLAYnecklace
WHAT YOU NEED• 2.5 oz. of polymer clay in
purple, turquoise, black, and white
• Cutting blade• Acrylic rolling tool or brayer• Acrylic block • Ceramic tile or cookie sheet
to bake on• Knitting needle or other
smoothing tool• Needle tool• Corn starch• 2mm Buna cord, 28” long or
desired length (be certain that you use Buna cord as others may not be ovenproof)
• Super glue• Point back rhinestone crystal• Pasta machine dedicated to
nonfood use (instructions are given using a pasta machine with 9 settings, #1 is the thickest, #9 is the thinnest)
• 3⁄32” drill bit• Optional: Latex gloves or
fi nger cots (to prevent fi ngerprints in clay)
PH
OT
O B
Y T
OD
D M
UR
RA
Y;
AL
L O
TH
ER
PH
OT
OS
CO
UR
TE
SY
OF
TH
E A
UT
HO
R.
Basketweave Pendant
I was playing with some slices from one of my favorite
types of millefi ori canes, the basketweave, and chanced
upon off -setting one square slice of cane on top of another.
Then the idea occured that this design lent itself wonder-
fully to a bolo-style necklace.... thus a new and interesting
style was born!
Jana Roberts Benzon
104-SBSB-2011-Basket Pendant.indd 104 10/25/11 12:02 PM
10252011120422

beadworkmagazine.com 105
PH
OT
O B
Y T
OD
D M
UR
RA
Y;
AL
L O
TH
ER
PH
OT
OS
CO
UR
TE
SY
OF
TH
E A
UT
HO
R.
Condition clay and create a Skinner Blend.1. Condition the clay by slicing thin pieces
off of the block of clay, and then rolling
the clay with an acrylic rod on your work
surface. Run the pieces through the pasta
machine on the thickest setting until the
clay softens and is pliable. You will be
creating a Skinner Blend (named for its
inventor, Judith Skinner).
2. At the thickest setting on the pasta
machine, roll out a sheet of clay ap-
proximately 3” x 6” in the purple and
turquoise colors, and approximately 2” x
6” in the black and white colors. Cut the
triangles and lay them out as shown; the
colors should be laid out from darkest to
lightest. This rectangle should measure
approximately 5” wide x 6” long. This
Skinner Blend is very forgiving, so don’t
worry if your triangles aren’t exact. Blend
the edges of each color together with your
fi nger or a rounded tool. Run through the
pasta machine on the thickest setting in
the direction shown.
3. Fold the bottom of the clay sheet up to
the top, making sure the sides line up.
4. Run this folded sheet through the
pasta machine on the thickest setting.
Repeat folding from the bottom up (not
side to side) and rolling through the pasta
machine until the colors are blended, ap-
proximately 15–20 times. Always put the
folded sheet of clay in the pasta machine
in the same direction; do not rotate the
sheet of clay. Remember to run the sheet
through the pasta machine fold fi rst to
prevent locking in air bubbles.
Create a blended loaf. 5. Now that you have a blended sheet of
clay, fold the sheet in half, this time matching
color to color (not the dark end to the light end).
6. Using the thickest setting on the
pasta machine, put the dark end of the
sheet in the pasta machine first and run
through the machine. Continue running it
through on four or five successively thin-
ner settings until you have a long, narrow
sheet of gradated colors, dark to light. Be
careful as you pass the sheet through the
pasta machine that it doesn’t fold over
on itself, or it may stick together and ruin
the sheet. Trim both light and dark ends.
7. Fold this sheet into a loaf using the
“accordion fold” method. Begin by placing
11/2” of the light end of the blended strip on
your work surface while draping the rest
of the blend over one hand. Fold the sheet
over the top of the 11/2” section, making
sure that you smooth out air bubbles with a
brayer or smoothing rod.
8. Continue taking the sheet back and
forth (accordion style) until you’ve formed
a loaf. Roll each fold to smooth out air bub-
bles. After you have completed the loaf,
square it up by slicing off the ragged edges
on all four sides.
Divide and wrap the loaf. 9. Lay the loaf on your work surface with
the light color on the bottom, dark on top.
Slice the loaf in half lengthwise making
two long, thin rectangles. Place these two
pieces together, matching up the light ends.
10. Put a layer of white clay, rolled to a
#5 (medium-thin thickness) on the pasta
machine, on the top and bottom.
104-SBSB-2011-Basket Pendant.indd 105 10/25/11 12:02 PM
10252011120422

106 best of step by step beads
11. Now place a layer of black clay rolled
to a #6 (thin thickness) on top of the
white. Your loaf, hereafter called a “cane,”
has a white and a black layer on both of the
long sides. As the cane must be “warm” to
reduce properly, proceed directly to Step 12.
BASKETWEAVE PENDANTnecklace
Reduce the cane and slice into pieces. 12. The next step is to reduce the
cane to a length of approximately 19”.
Reducing a square cane requires us-
ing several different methods. You are
basically trying to “coax” the cane into
lengthening. It is important to flip the cane
over and turn it often so that all portions
of the cane receive the same pressure and
lengthening, or the cane’s design may
become distorted. Begin reducing the
cane by gently pressing on the top and
sides of the loaf with an acrylic block
or ceramic tile and gently squeezing it
with your fingers (do not press on the
crisp edges of your cane; keep them
squared up). Use your brayer on all four
sides to help lengthen the cane.
13. Along with squeezing and pressing
with the acrylic block, run your hands
along the length of the cane to smooth
and lengthen it. It is important to keep the
edges crisp so that when the cane is fully
reduced, it has a nice rectangular shape—
with even sides, and the black and white
have stayed in place, not “migrating” down
the sides. Keep the edges crisp by periodi-
cally running your thumb and forefinger
along the edges while reducing. Take your
time in reducing the cane and apply all
of the methods mentioned in this step to
lengthen the cane to approximately 9”. At
this point, it should be warm enough for
you to grasp each end and gently pull, help-
ing it to lengthen a little more.
Continue applying all methods of reduction
until it is 19” long. Now cut the cane into
twelve 1/2” sections, removing approxi-
mately 1/2” of “scrap” from each end.
Assemble and reduce the cane.14. To assemble the cane, take each
of your pieces and place them in a
weave pattern with four pieces on each
row, alternating the direction that each
piece faces. You will notice “air gaps”
between the individual pieces in the
center...don’t worry about these yet.
15. Next, cut seven 11/2” strips from a
sheet of black clay rolled to a #5 (medium
thin) thickness on the pasta machine. Place
these strips on the black sides of the seven
pieces that “indent” in the cane’s four
sides. These strips help to flatten and even
up the four sides of the cane. It may still be
somewhat indented, but that is okay.
16. Begin reducing the cane by gently
compressing opposite sides of the cane at
the same time. Turn the cane and do the
other two sides simultaneously, alternating
back and forth between the sides until it
is completely compressed. As you do this,
the gaps will fill in.
104-SBSB-2011-Basket Pendant.indd 106 10/25/11 12:02 PM
10252011120423

beadworkmagazine.com 107
17. Your cane may now be a bit concave
on all four sides but this is okay, as they
will flatten out during reduction. Now
continue reducing the cane as described in
Step 12–13 until it measures approximately
1/2” on each of the four sides (it will be
approximately 10” in length). Cut off the
ragged ends and slice the cane into four
equal lengths.
18. Combine the four pieces of cane
together, placing the slices so that a con-
tinuous weave pattern is formed. Gently
compress so that the four pieces “fuse”
together. Smooth all four sides with the
brayer. Wrap this cane in a sheet of black
clay rolled to a #6 (thin) thickness on the
pasta machine.
Assemble the bolo pendant.19. After letting the cane rest for at least
one hour (refrigerate to hasten cooling), cut
two slices off of the cane, approximately
1/8” in thickness. After slicing, smooth the
surface of each slice by gently rubbing with
a finger that has been dipped in cornstarch.
Rinse the cornstarch off of the cane slices
and let them air dry before gently pinching
the corners with your gloved fingers. Use
your thumb and forefinger to exaggerate
the four corners on each slice.
20. Lay one piece on top of the other,
rotating to form a bolo shape. Determine
where you want the Buna cord to slide
through, and mark these four spots on the
top and bottom with a needle tool.
21. Lay both slices on the work surface with
the inner side facing up. You will now form a
“trench” for the Buna cord to lie in. Using the
marks you made with your needle tool as
a guide, lay the needle across the slice and
gently press down forming a trench. Make
two trenches in each slice, which will match
up and form a hollow tunnel when the two
sides are put back together.
22. If your needle tool is too narrow to
make a trench wide enough for the Buna
cord, rotate the needle to widen the trench.
Remember that the Buna cord should fit
snugly in the trench, so do not make it too
wide. Lay the Buna cord into the trenches
and place the two slices together, match-
ing up trenches to form a tunnel. Gently,
but firmly, press the slices together every-
where that they touch, but avoid pressing in
the trenches. Leave the Buna cord in place, as
it will be baked with the pendant. Press the
rhinestone crystal into the center of the front
of pendant; you will glue it in place later.
Bake and finish neckpiece.23. Form stopper beads by rolling two
large pea-size balls out of some of the
matching scrap clay. Bake the stopper
beads and Buna Cord filled pendant ac-
cording to the manufacturer’s instructions.
When cool, drill a hole by hand into the
core of the beads with a 3/32” drill bit. Place
a small dab of super glue on the tips of the
Buna cord and then slide the stopper beads
in place. Remove the rhinestone from the
pendant then glue it back in place with a
dab of super glue.
RESOURCES: Kato PolyClay, Nu-Blade,
lucite clay brayer: Prairie Craft Company, www.
prairiecraft.com. Pasta machine, buna cord:
Polymer Clay Express, polymerclayexpress.
com. Acrylic block: Scrapbooking Supplies R Us,
scrapbookingsuppliesrus.com.
104-SBSB-2011-Basket Pendant.indd 107 10/25/11 12:02 PM
10252011120423

108 best of step by step beads
focal bead POLYMER CLAY
WHAT YOU NEED• Clay-dedicated pasta machine or
acrylic roller or brayer• Polymer clay: gold, green, blue,
black, white, and brown•Tissue blade•Needle tool or bamboo skewer•Metallic powder•Small paint brush•Protective mask
Dancing Arcs
PolymerBead
Ronna Sarvas Weltman
PHO
TO B
Y J
IM L
AW
SON
; ALL
OTH
ER P
HO
TOS
CO
UR
TESY
OF
THE
AU
THO
R.
108-SBSB-2011-DancingArcs.indd 108 10/25/11 12:04 PM
10252011120455

beadworkmagazine.com 109
4. Tear or cut the blended sheet of clay into a
few pieces, put them together, and blend again
to achieve marbling. If the piece looks too bright
green, add a bit of brown to tone it down.
5. Continue blending to form a subtle marble eff ect,
but don’t blend it too thoroughly because in the next
step you will be blending it more.
Form a bead6. Roll the clay into a round bead. Tip: It’s a good
idea to form the bead before the clay is blended too
well, because rolling it into a bead is going to blend it
further, and you don’t want it so well blended that you
lose the marbling. You can always do a little more
marbling to make your blend subtler, but you can’t go
backwards if it’s blended too uniformly. If the blend
isn’t quite subtle enough, fl atten it with the pasta
machine, the brayer or even your fi ngers, and roll a
new bead.
7. Now the marbling is blended enough to have some
aesthetic subtlety but still has enough marbling to
form an interesting base bead.
Create a marble color blend1. Create an olive color blend. Begin by gathering a bit
of white, green, black, and blue.
2. Cut the clay into small pieces with a tissue blade,
so you will be able to create a more evenly marbled bead.
3. Run the pieces through a pasta machine or roll with a
brayer to blend the clay.
Make a beautiful bead that is striking enough to
stand on its own by creating the impression of
movement within a simple design. In this bead,
the subtle complexity of marbling adds color
movement, while the curved edges of triangular
embellishments add a graceful fl ow to a shape
that would otherwise be static. The gradations
of the marbling and curves of the triangles give
the bead a lively fl uidity that is reminiscent of
dance. Visual movement is heightened by add-
ing metallic powders, which refl ect light and
add to the vibrancy of the bead.
PHO
TO B
Y J
IM L
AW
SON
; ALL
OTH
ER P
HO
TOS
CO
UR
TESY
OF
THE
AU
THO
R.
108-SBSB-2011-DancingArcs.indd 109 10/25/11 12:04 PM
10252011120455

110 best of step by step beads
12. Bend the tissue blade so it forms a curve. Cut
out small triangles, slicing through the clay with the
curved tissue blade. This will create triangles with
curved edges, which adds a sense of movement
to the bead.
Place triangle accents on the bead13. Keeping the bead on the needle tool, gently
place the triangle accents on the bead. By laying
them on with a light touch, you can easily try out
the placement and move them as necessary. When
you’re happy with the placement, gently tap and
smooth the triangle accents so they’re fi rmly
adhered to the base bead.
8. Poke a hold into the bead. Gently grasp the bead with
your nondominant hand and twist the needle tool back
and forth with your dominant hand as you aim it at the
middle of your index fi nger. Note: Be sure your index fi n-
ger is placed exactly opposite the end where you’ve poked
the hole. We all have little homing devices in our fi ngers
that enable the point of the needle tool to aim straight for
them. It’s all part of that eye-hand coordination thing.
9. After you’ve pierced a hole in the bead, feed the
needle tool through the opposite side of the bead to
ensure a smooth, clean hole on both ends of the bead.
Keep the bead on the needle tool and set aside.
Create marbled triangle accents10. To create a toned-down gold color, fi rst gather
some gold clay with a bit of white and black.
11. Run the pieces through the pasta machine. Be
spontaneous! I only ran the colors through twice and
loved the way the marbling turned out. You can run it
through until the marbling suits you.
DANCING ARCSproject
108-SBSB-2011-DancingArcs.indd 110 10/25/11 12:04 PM
10252011120455

beadworkmagazine.com 111
Add metallic powder14. Because metallic powders refl ect light, they give
beads a more “resonant” look. They will also make the
marbling look subtler, since they add a sheer color layer.
Caution: Metallic powders are dangerous to inhale, so
always wear a protective mask around your mouth and
nose when using them.
15. A little powder goes a long way, so use it sparingly.
Using a small paintbrush, fi nely dust the bead with the
metallic powder, adding extra powder to the sides of the
triangles to give them a more fi nished look.
16. Bake your beads according to the manufacturer’s
directions for temperature and for at least 40 minutes.
RESOURCES: Bamboo skewers: Supermarket. All
other supplies: Dick Blick, dickblick.com or Michael’s,
Michaels.com.
Th
e C
raft
er’s
Gu
ide
to T
akin
g G
reat
Ph
oto
sT
he
Bes
t T
ech
niq
ues
for
Sh
ow
casi
ng
You
r H
an
dm
ade
Cre
atio
ns
Hei
di
Ad
nu
m
19
2 p
ag
es
$2
4.9
5
ISB
N 9
78
-1-5
96
68
-62
6-7
get
grea
t ex
pos
ure
Boost your online crafting business! This new book will help you take better photos of your handmade items.
108-SBSB-2011-DancingArcs.indd 111 10/25/11 12:04 PM
10252011120456

112 best of step by step beads
POLYMER CLAYpendant
Nothing shows off your work better than an
interesting frame. Create a customized insert
for an antiqued pewter bezel called a Focal
Frame, specially designed by Helen.
Focal Frame
PendantHelen Breil
WHAT YOU NEED• Kato, Premo, or Fimo polymer clay: 1 oz of light-colored (white, pearl, or light gray) 1 oz of black polymer clay • Verve Focal Frame with antique fi nish• 1 focal bead , about ¼” or 9mm in diameter
• 1 red Delica bead • Santa Fe Red Piñata ink by Jacquard• Pearl Ex or Perfectly Pearls mica powders• Gloss or varnish • Liquid polymer clay• Cornstarch
• Cyanoacrylate gel glue • Needle tool• Craft blade• Pasta machine• Toaster oven dedicated to non-food use• Q-tips• Rubber gloves
PH
OT
O B
Y J
IM L
AW
SO
N; A
LL O
TH
ER
PH
OT
OS
CO
UR
TE
SY
OF
TH
E A
UT
HO
R.
112-SBSB-2011-Focal Framed Pendant.indd 112 10/25/11 12:05 PM
10252011120611

beadworkmagazine.com 113
frame. Place the Focal Frame over the clay,
centering the starburst in the opening,
positioning the bail at the top. Pick up the
sheet of clay and begin pressing it into the
inside of the Focal Frame. Use your fi nger
to push the clay from the back of the frame
up toward you. Work your way around the
entire inside edge at least two times. Use
your pinkie fi nger in the tight spots. Note:
Be careful not to press on the clay so hard
that it tears or bulges over the top of the
metal. Remember, you will need to remove
the hardened clay after baking.
When you’ve completed all the edges and
the clay is nicely pushed up into the frame,
also push up gently in the middle of the
starburst area. The more the clay has been
“puff ed” out, the more pleasing the sunken-
in eff ect that is achieved when the focal
bead is inserted (Figure 3).
Trim the back4. Trim the excess clay from the back with
a craft blade. Work your way around each
“arm” of the frame, leaving a small border on
the frame as shown. Ensure the clay is pressed
well against the metal frame (Figure 4).
Apply mica powers5. Alcohol inks will be applied after bak-
ing. They are transparent, so adding mica
powder to the clay adds a pleasing glitter
that will shine through the ink. Using a
small paintbrush, apply a mica powder that
is as close to the light clay color as pos-
sible. Don’t worry about the powder getting
on the metal frame, it can be washed off
after baking.
Apply the focal bead6. The focal bead will also need to be
removed after baking, but no release agent
needs to be applied because the mica
powder will act as a release agent. Put the
pendant down on your work surface with
the bail at the top. Center the focal bead
over the center of your starburst pattern.
Press the focal bead fi rmly and evenly into
the clay, all the way down to your work sur-
face. You should have a nice rounded caved-
in eff ect. Place the pendant into the oven and
bake for 45 minutes at the manufacturer’s
recommended temperature (Figure 5).
Prepare the focal beadThis project uses an open-box bead fi lled
with black polymer clay, and a red Delica
has been embedded in the center of the
clay. If using a focal bead that does not
require any “fi nishing” work, go to Step 2.
1. Condition your black clay. Roll it through
the pasta machine on a medium setting
(fourth largest setting). Place the sheet on
your work surface. Apply a small amount
of liquid polymer clay to the back of the red
bead and place on the black clay so that the
bead hole faces up. Using the end of your
needle tool, push the bead partially into the
clay. Position the box bead over the small
red bead so that the red bead is centered in
the box and press down fi rmly. Trim away
the excess black clay around the box bead.
Ensure the black clay is secured to the back
of the box bead. Bake for 20 minutes at the
manufacturer’s recommended temperature
(Figure 1).
Create the starburst2. The front of the pendant insert will
be light-colored clay and the back will be
black. Condition the light-colored clay and
roll out a small sheet at the third largest
setting on your pasta machine. Do the
same for a sheet of black. Stack them one
on top of the other and put them through
the pasta machine together on the largest
setting. Put the sheet on your work surface,
light color up. Cut the sheet to a 2¼”
square. Make a starburst pattern, hold-
ing the needle tool at a 20° angle to the
clay. Start by scoring a line top to bottom
through the middle of the sheet and doing
the same side to side, creating a cross.
Bisect each of the resulting 4 squares in
the same way. Once the lines become fairly
tight you might fi nd it easier to create the
lines working from the center out to the
edges. Don’t worry about being too neat
through the middle. It will later be hidden
by the focal bead (Figure 2).
Attach clay to focal frame3. The clay will need to be removed from
the Focal Frame after baking, so you need
to apply a release to prevent the clay from
sticking to the metal. Apply some corn-
starch to the inside edges and back of the
Figure 1
Figure 2
Figure 3
Figure 4
PH
OT
O B
Y J
IM L
AW
SO
N; A
LL O
TH
ER
PH
OT
OS
CO
UR
TE
SY
OF
TH
E A
UT
HO
R.
112-SBSB-2011-Focal Framed Pendant.indd 113 10/25/11 12:05 PM
10252011120611

Remove the components 7. To protect the frame from the ink and
gloss, you need to remove the clay insert.
Once the pendant has cooled down but is
still warm, carefully remove the focal bead
using the needle tool to pry it out. Work-
ing from the back of the pendant, use the
needle tool to gently free the clay, working
your way carefully around each “arm.”
Once removed, wash the metal Focal
Frame with warm water and mild soap to
remove the cornstarch and mica powders.
Apply the ink8. For this project, you will be using Santa
Fe Red Piñata ink by Jacquard. The red inks
are the most transparent and easiest to
work with. Some of the other colors can be
too dark, and the radiating lines eff ect can
be lost. But thinning these other colors with
rubbing alcohol can help alleviate this prob-
lem. Note: These inks stain, so wear rubber
gloves and put down several layers of wax
paper or tissue on your work surface.
Apply a generous amount of Santa Fe
Red directly from the bottle and use the
tip of the bottle to disperse the ink. A ball
stylus is also a good tool to move the ink
around. Pick up the excess ink pooling in
the focal bead area or around the outside
edges with a Q-tip or the corner piece of
a tissue. Let dry for about 30 minutes or
until dry to the touch. Apply another layer
of ink. The color will deepen with each ap-
plication. You want the ink to pool in the
radiating lines so that the lines are darker
and therefore more pronounced. Let dry
completely. If desired, apply a third layer.
Here, the clay has been temporarily placed
Figure 5 Figure 6
Figure 7a Figure 7b
FOCAL FRAME PENDANTproject
back in the frame to show the vibrant shine
of three layers of ink, before the gloss is ap-
plied (Figure 6).
Apply the gloss 9. Once the ink has been applied and
dried, you need a protective coating. There
are many glosses on the market that can be
used. See www.glassattic.com/polymer/fi n-
ishes.htm for a list of some polymer–clay–
compatible glosses. My personal favorite
is All Night Media Plaid Liquid Embossing
clear gloss fi nish for paper. It has a gel-like
consistency that allows me to control the
gloss application. Also only one coat of
gloss is necessary with this product. Note: This product cannot go into the oven and
takes 24–48 hours to dry.
To protect the frame, apply the gloss to
the clay insert component only. Apply your
chosen gloss or varnish over the ink.
Note: Avoid dripping onto the outside bor-
der area. If the gloss builds up in this area,
your clay insert may not fi t back into your
metal frame. Use multiple coats of gloss if
necessary. Some glosses may also work as
glue. I applied one coat of gloss, includ-
ing the focal bead area, and reinserted the
focal bead while the gloss was still wet as a
means to secure it.
Glue the insert in place 10. Once the gloss is dry, put the fi nished
clay insert into the frame and ensure it still
fi ts. Use cyanoacrylate gel glue to attach
the clay insert to the Focal Frame. Your
pendant is complete!
Here are two other Focal Frame designs
with a slightly modifi ed technique for the
clay insert (Figure 7a and 7b).
RESOURCES: Focal frames, polymer clay, alcohol
inks, mica powders, needle tool, pasta machine,
blades: Shades of Clay, ShadesofClay.com. Square-
box focal bead (and all other focal beads shown):
Beadfx.com, product code: tc94-5653-60; Antique
Rhodium Metal Bead Frame, Small Double Dot Square.
114 best of step by step beads
112-SBSB-2011-Focal Framed Pendant.indd 114 10/25/11 12:05 PM
10252011120611

beadworkmagazine.com 115
Choose from 100 WORKSHOPS and take your skills to a new level
Shop 150 BOOTHS AND TABLES in the expo featuring beads, tools, findings, finished jewelry and more
Discover and try dozens of jewelry techniques: metalsmithing, wire work, bead stitching, resin, metal clay, and others!
Dig through a treasure trove of beads, gemstones, artisan creations, components–everything a jewelry maker needs to create!
You’ll enjoy four glorious days of creative inspiration:
SIGN UP TODAY TO SECURE YOUR SEATS
IN YOUR FAVORITE CLASSES!Wherever you are in your jewelry making journey, BEAD FEST SANTA FE should be on your itinerary!
NEW MEXICO IS FOR
JEWELRY L VERS! MAKE YOUR PLANS NOW TO JOIN YOUR FAVORITE INSTRUCTORS AND VENDORS IN THE LAND OF ENCHANTMENT.
SANTA FE COMMUNITY CONVENTION CENTERMARCH 15-18, 2012SANTA FE
SANTA FE, NEW MEXICO
Meredith Arnold Laura Zeiner
115 SBSB 2011.indd 115 10/27/11 10:54 AM
10272011105458

116 best of step by step beads
METAL CLAYnecklace
PH
OT
O O
F F
INIS
HE
D N
EC
KL
AC
E B
Y F
RA
NK
DE
SA
NT
IS;
AL
L O
TH
ER
PH
OT
OS
CO
UR
TE
SY
OF
CE
LIE
FA
GO
.
Jennifer Kahn
Hammered Silver Pendant
The two techniques, hammering the disk pendant
and setting the stone, are presented in separate
sections. As you make the pendant, I suggest work-
ing from one section to the other as parts are drying
— but be sure not to mix up your clays. If you have
each wrapped in Saran Wrap and you’re not sure
which is which, examine the color: the light one is
PMC+ and the darker one is PMC3.
116-SBSB-2011-Hammer.indd 116 10/25/11 12:07 PM
10252011120836

beadworkmagazine.com 117
• Approx. 1⁄2 of a 28-gram package of PMC+®
• Pea-size amount of PMC3® • Rolling tool• Deck of cards• Tefl on® Paper cut into a few 3” x 5”
pieces (available from kitchen stores)• 1 transparent, heavy-weight plastic
report cover cut into 3” x 5” pieces (available from offi ce supply stores)
• Olive oil• Plastic circle template with 2” circle
(available from offi ce supply stores)• Pin tool• Ruler • Tissue blade• Spray bottle• Saran Wrap®
• 3⁄16” and 9⁄32” Kemper® circle cutters
(available from polymer clay supply stores) You can also buy pieces of brass tube from hobby stores or cut them yourself from lengths of tubing.
• Very round cocktail straw (don’t use one that is misshapen or has a seam)
• Needle fi le• 400-grit sandpaper• Kiln shelf • Kiln• Ball peen hammer• Steel bench block• 6mm almandine garnet• Tweezers• Slip container (small plastic fl ip-top
container)• Palette knife• Salon board (cushioned nail boards)• Small watercolor brush
• Cotton swabs (several) • Brass brush or brass brush wheel on
polishing lathe• 1 sterling jump ring for the bail• Liver-of-sulfur or other patinating
solution• Baking soda• 1200-grit micron polishing paper, or
alternate polishing materials• .014 beading wire• Your choice of beads, I used spinel
and garnet chips and Thai silver spacer beads
• 2 sterling jump rings, soldered closed to fi nish the beaded strands
• 6 sterling crimp beads, 2mm • Crimping pliers• 2 chain nose pliers• Sterling S-hook clasp
WHAT YOU NEED
PH
OT
O O
F F
INIS
HE
D N
EC
KL
AC
E B
Y F
RA
NK
DE
SA
NT
IS;
AL
L O
TH
ER
PH
OT
OS
CO
UR
TE
SY
OF
CE
LIE
FA
GO
.
The Hammered DiskAlthough large in area, this piece does not use a lot of
PMC+® because it’s rolled out to only a 2-card thickness.
The disk gains strength because hammering work hardens
it. It’s bold, but delicate and it’s an easy piece to make.
Rolling out the clay1. Place 1⁄2 of a 28-gram package of PMC+® on a 3” x 5”
piece of Tefl on® with a stack of cards, 2-cards high, on either
side. On top of that, place a lightly oiled, 3” x 5” cut out
section of transparent heavy-weight plastic report cover. I
prefer the thickness and durability of the report cover. Also, after
it has been used for awhile it no longer needs oil to prevent it
from sticking to the clay. Roll over the clay/plastic “sandwich”
a few times.
Rotate the clay 90° — this will help yield a rounder shape.
Roll it a few more times. Remove the cover and lift the clay
off of the Tefl on®, reposition it, then resandwich it between
the plastic and Tefl on®. Roll a couple more times to ensure
uniform thickness.
Cutting out the disk2. Oil the circle template and place it (with the 2” circle
opening) on top of the rolled out clay. Holding a pin tool
perpendicular to the clay, cut out the disk. Before remov-
ing the template, line up 2 straight-edge tools (ruler, tissue
blade, etc.) with the quadrant guides on the template, then
use your pin tool to mark the center of the circle. Remove
the template, spray the excess clay with water, then wrap it
in a piece of plastic wrap.
116-SBSB-2011-Hammer.indd 117 10/25/11 12:07 PM
10252011120836

118 best of step by step beads
Cutting out the center hole and bail hole3. Position a 3⁄16” circle cutter over the cen-
ter mark made on your 2” disk — accuracy
is important here if you want your stone to be
centered. If you’re having trouble centering
the hole, try gently pressing down with the
cutter to create an impression, then pull
back up and check your accuracy. Based on
the impression you’ve made, judge how to
correct your circle (if it’s slightly off ). Repeat
until you have a sense of where to the cutter
should be placed for it to be centered. Press
fi rmly on the cutter; once you’re happy with
its placement, remove it. If the circle you’ve
cut stays in place, use a pin tool to lift it
out. Dampen the circle and add it to your
wrapped scrap. You will be using the same
circle cutter to cut out the hole in your bezel,
so keep it handy. After the disk has been fi red
and shrunk 12%, you’ll fi nd the hole will be
smaller too; this works to your advantage —
creating a nice shelf for your stone to sit on
after you’ve set it in your PMC3® bezel.
Using a cocktail straw or 3mm brass tube
section, cut out a hole for the bail approxi-
mately 1⁄8” from the edge, anywhere on the
disk. Set the piece aside to dry. As an alterna-
tive, use a fl ex-shaft, Dremel®, or hand drill to
make a hole in the PMC® when it’s leather-hard.
Drying and warping4. If you let the circle dry naturally, it won’t
warp. However, if you try to hasten the dry-
ing in any way (putting it under a light, on
a warmer, turning it over), it will most likely
warp. Ultimately this is not a problem, as it
will fl atten during fi ring. But if you need to re-
fi ne the shape after it’s dried, it must be fl at.
To correct any warps, spray the disk lightly
with water, wait 30-60 seconds (or until the
water disappears from the surface), then
place the disk between 2 sheets of Tefl on®.
Place the Tefl on®/clay sandwich under a
heavy book; after about 15-20 minutes, the
clay should fl atten out. Once fl at, place it on a
piece of Tefl on® for another 10 minutes to dry.
Refi ning the disk5. After the disk is completely dry, use a
needle fi le to refi ne the 2 holes made in the
disk. Hold a full or half-sheet of 400-grit
sandpaper in a curve in your hand. Sand
the entire edge of the piece by moving up
and down against the matching curve of
the sandpaper. Rotate the piece every few
passes until you’ve sanded the entire outside
edge of the disk.
Firing the disk6. Put the disk fl at on a kiln shelf and fi re at
1650°F for 10 minutes.
Hammering the disk7. Place the disk on a steel bench block
and hold it in place with one hand. Starting
on one side of the disk, hammer with the
rounded end of a ball peen hammer, rotating
the disk until the entire piece is hammered.
Don’t hit the edges too hard or they will distort
and get too sharp. If this does happen, fi le the
edge smooth with a jeweler’s fi le. Hammering
this way causes the disk to curve like a potato
chip. I like this added dimension, but if you
don’t — you can fl atten the disk with a rawhide
or plastic mallet. Your hammered disk is now
ready to be joined with the set stone.
HAMMERED SILVER PENDANTproject
116-SBSB-2011-Hammer.indd 118 10/25/11 12:07 PM
10252011120837

beadworkmagazine.com 119
3⁄16” circle cutter6mm garnet9⁄32” circle cutter
Setting the StoneAfter becoming frustrated with my usual method of stone setting (rolling out a small snake and joining the two ends around the stone), I started exploring other more ef-ficient options. I tried working with a PMC3® syringe — but it was messy, deformed easily, and I still had to deal with joining the two ends. So, I set out to find a way to solve the problem by capturing the stone in a continu-ous circle of clay.
It seemed logical to roll out a layer of PMC3®, cut out a circle, cut out an inner circle for the stone, and then push the stone into place. However, the force of all that caused the bezel to buckle and some-times tear. With some experimentation, I developed this simple method for making a uniform, seamless bezel.
Regardless of what size stone you’re working with, you’ll need two circle cutters (or pieces of brass tube, or straws). You need one that is slightly smaller than the outside diameter of your stone base and one that is about 1mm larger in diameter than your stone. For this project, I used a 6mm (15⁄64”) almandine garnet cabochon, and therefore used 3⁄16” and 9⁄32” circle cutters. Here, I used a garnet, but I’ve also successfully fired moonstone and peridot in PMC3® as well.
Rolling out the clay8. Roll out a pea-size piece of PMC3® 5
cards high, working in the same manner as
you did in Step 1. It’s important to roll the clay
to a 5-card thickness. This ensures the bezel
wall will be tall enough to hold the stone in
place after the shrinkage occurs during fi ring.
Cutting a hole for the stone9. Cut out a circle with the 3⁄16” circle cutter
(same one used for cutting the center hole
out of the disk in Step 3). Using tweezers,
pick up the stone and place it over the hole,
then push the stone down with your fi nger.
Place the clay from the cut-out hole into a
small container with a few spays of water
and put it aside — you’ll need it later for slip.
Cutting out the bezel10. Position the 9⁄32” circle cutter over
the stone. Press down gently to create an
impression then pull back up to check your
accuracy. If it’s not centered, use the impres-
sion you’ve made as a guide to correct your
circle — gently press down again. Based on
a few impressions, you should be able to
accurately position the cutter and cut out
the second circle which will create the bezel.
Be sure to keep the cutter perpendicular to the
clay — this will ensure a uniform bezel. And
don’t worry if the set stone remains in the cutter,
simply use the plunger to release it. Place the
bezeled stone aside to dry. Put your scrap in
the slip container and spray with water.
Making PMC3® slip11. While the bezel is drying, make some
slip by adding a little water to the clay in
your slip container. Mix the water and clay
together with a palette knife until it’s the
consistency of icing, adding water as needed.
Let the slip sit for about 20 minutes before
using it so the clay has a chance to absorb
the water thoroughly.
Refi ning the bezel12. Once the bezel is dry, sand the edge
carefully with a salon board. You can correct
any unevenness in the bezel wall (if you were
slightly off when you cut the bezel out) with
a salon board. Clean off any clay on the back
of the stone by scraping it with a pin tool or
your fi ngernail.
116-SBSB-2011-Hammer.indd 119 10/25/11 12:07 PM
10252011120837

120 best of step by step beads
Attaching the set stone to the hammered disk13. First, paint thick slip generously onto
the back of the stone and setting. Line up
the bezel with the hole in the center of your
disk, and then press down fi rmly to attach
the two. Remove any excess slip with a clean
paintbrush dampened with water. Turn the
piece over, holding the stone in place, and
clean the hole in the back with your damp-
ened paintbrush. Turn it over again (right-
side up) and set it aside to dry.
After it’s dry, paint an additional layer of
slip where the bezel meets the disk — so
there’s no gap. This step is crucial to ensure
attachment. Remove any excess slip with a
dampened brush. Once the slip has dried,
clean any residual clay from the metal with
a damp cotton swab; use a dry cotton swab
to clean the garnet with a dry cotton swab.
Be sure to clean the front and the back. It’s
important that no clay remain on the stone so
that light can pass through it.
Firing the set stone to the hammered disk14. Place the pendant (face up) fl at on the
kiln shelf. Fire at the lowest PMC3® setting,
1110°F, for 30 minutes. Because stones are
subject to thermal shock, it’s best to cool
your piece slowly. The safest way to do this
is to crack the kiln door open about an inch at
the end of the fi ring cycle, then let it cool for
an hour. The stone will appear black but will
change back to its original color as it cools.
Do not quench the piece.
Finishing the pendant 15. Burnish with a brass brush and a little
soap and running water, or use a brass
wheel on a polishing lathe (no soap or
water). This process will not harm the stone.
Add a sterling jump ring for the bail. To get a
dark, rich, black on the piece, dissolve a pea-
HAMMERED SILVER PENDANTproject
size piece of liver-of-sulfur gravel in about
2 cups of hot water. Patinate by alternately
dipping in liver-of-sulfur then cold water
until the piece is black.
Give it a fi nal rinse with cold water, then
wash with hot water and baking soda. Pat
dry. Polish off the high points on the surface
with 1200-grit micron polishing paper
wrapped tightly around your salon board.
Stringing the necklace 16. I chose beads that complemented my
set stone, and strung several strands to bal-
ance the boldness of the disk.
Cut three 16” lengths of beading wire (I
used Soft-Flex® .014). String 1 silver or spinel
bead, 1 crimp bead, and a jump ring onto
one of your beading strands. Bring the wire
back through the crimp bead and your silver
or spinel bead. Make sure there’s no excess
slack between the crimp bead and the jump
ring — you don’t want it stiff , just close
enough to the jump ring so excess wire isn’t
showing. Once everything is in place, com-
press the crimp with crimping pliers. Repeat
this process to add the other 2 wires to the
same jump ring.
17. For the fi rst strand, string spinel chips
with a garnet interspersed every inch. For
the second strand, string inch-long sec-
tions of tiny, Thai-silver beads interspersed
with spinel chips. For the third strand, string
half-inch sections of tiny, Thai-silver beads
with alternating chips of spinel and garnet.
Each strand was strung half way, then modi-
fi ed slightly in the center to accommodate
the pendant. Continue stringing each strand,
matching the second half to the fi rst
18. To fi nish the necklace, add a crimp bead
to the end of each wire and then pass all
3 wires through a jump ring. One wire at a
time — go back through the crimp bead and
a few spinel or silver beads. Gently pull the
beading wire to take up any excess slack —
remember, you don’t want your necklace
rigid, just very little excess wire showing.
Compress your crimp bead with crimping
pliers to secure the strand. Repeat for the
remaining two strands. Add a handmade,
sterling S-hook to your jump ring and your
necklace is ready to wear.
RESOURCES: PMC, garnet, jump rings, clasp,
wire, pliers, liver of sulfur: Rio Grande, riogrande.com.
116-SBSB-2011-Hammer.indd 120 10/25/11 12:07 PM
10252011120837

beadworkmagazine.com 121
METAL CLAYpendant
Women are complex creatures. We have many moods.
We experience diff erent aspects of our personalities
from day to day, and everybody knows it’s a woman’s
prerogative to change her mind. The design of this
reversible necklace allows us to dress for success no
matter which persona we’re trying to present. Display
the sensuous Cattails side when you’re indulging your
Bohemian spirit, and the gem-set Interference side on
days when you take yourself more seriously. Either way
you spin it, you’ll enjoy making and wearing this two-
sided pillow-bead pendant.
Two Views Lora Hart
WHAT YOU NEED•18 gram package of PMC®+•PMC®+ Slip/Paste•Speedfi re™ Kiln •Brass wire brush• Tissue blade or rectangular
cutter•PVC pipe roller•Reusable Parchment Paper•Badger Balm® •1⁄4” round stencil brush•4 mm cubic zirconia cabochon of your choice•12 oz. glass jar•Ziploc® bag•1⁄2 cup rice•Reusable parchment paper•Interference Texture Tile •Cattails Texture Tile• Cruciferious 1 series
Texture Tips
•Kemper™ Lilac Cutter Tool • Sturdy plastic covered
paper playing cards•320-grit sandpaper•400-grit sandpaper•600-grit sandpaper•1200-grit sandpaper•X-Acto knife•Emery board•Ink pad•Index card•Pencil•Round cocktail straw•Wire brush•Patina solution•polishing pad or cloth•Tumbler (optional)• Toothpick or chenille pipe
cleaner (optional)• Small piece ceramic fi ber
blanket
121-SBSB-2011-Two Views.indd 121 10/25/11 12:08 PM
10252011120939

122 best of step by step beads
TWO VIEWS PILLOW BEADpendant
1. Before beginning the project, lay out all the necessary
tools and materials in front of you. Spritz some water
onto your hands and apply a light coat of Badger Balm® to
seal in the moisture. Lubricate all the nooks and crannies
of each Texture Tile and Tip by using a small stencil brush
that has been tapped into the Balm. Make a nest for the
jar to rest on so it won’t roll around. I used a Ziploc® bag
partially fi lled with rice.
This bead consists of four parts: front, back, and two
sides. We’ll be making each part separately and as-
sembling them after they are bone dry. Because the very
structure of a bead gives it more strength than a fl at item,
we’ll be able to make the walls of our project two-playing
cards thick. But since parts of the Texture Tiles will make
a deep impression in the clay, we’ll start out a little thicker.
2. Use the PVC pipe to roll out a sheet of PMC+® three-
playing cards thick on a piece of reusable parchment paper,
then discard one card from each pile. Place the clay on top
of the Interference Texture Tile with two playing cards on
either side, and roll over the sheet again. Make sure to place
the playing card spacers on top of the tile, not next to it.
Tip: Playing cards are manufactured in various thick-
nesses. If you know you are using inexpensive thin plastic
cards, add one extra card to the number quoted. If you
are using better quality plastic-coated paper cards, roll on.
3. Gently remove the clay and place it face up on the
parchment. Use a tissue blade or rectangular cookie cut-
ter to cut a shape approximately 3⁄4” X 11⁄8” and drape it
sideways across the glass jar.
4. Repeat Steps 2 and 3 using the Cattails Texture Tile
and allow both pieces to dry. Since the exposed surface
of the clay will dry faster than the side that is in contact
with the glass, it will take over an hour to fi rm up enough
to remove if allowed to air dry. To speed up the process,
place the jar in a toaster oven or food dehydrator on its
nest at about 150° for ten minutes. Apply gentle pressure
with your fi ngernail to check if the piece is ready to re-
move. If there is any resistance, wait a few more minutes.
When you can, take the pieces off the jar and allow the
underside to dry completely.
5. Place a piece of 320-grit sandpaper fl at on the table.
Imagine a compass on the bead pieces with “north” at
one of the short ends. Working with one half of the bead
components, place your fi ngers at the base and begin to
move it back and forth across the paper.
Caution: If you put any force on the domed area it may
break. I fi nd that trying to sand fl at edges on both sides of
the rectangle at once can be challenging, so I like to con-
centrate on one side at a time, applying gentle pressure
with my fi ngertips on the north end. Then, I’ll fl ip the piece
around to sand the “south” side. Repeat with the other half
of the bead. Sand enough material away so that when joined
together, they form a knife-edge. Save the sanding dust to
add to your slip jar.
6. Brush some water along the sanded edges of one bead
part and follow with an application of slip. Immediately
wet the edges of the other part and join the two together
making sure that the sides are aligned and that the designs
are facing the correct way. Gently pinch the ends together
to make sure you have a nice tight fi t. Let dry completely
and sand if necessary.
PH
OT
O B
Y T
OD
D M
UR
RA
Y;
AL
L O
TH
ER
PH
OT
OS
CO
UR
TE
SY
OF
TH
E A
UT
HO
R.
121-SBSB-2011-Two Views.indd 122 10/25/11 12:08 PM
10252011120939

beadworkmagazine.com 123
7. Once the two joined halves are dry, sand the open
eliptical sides to make sure they will create a fl at, level
base for the sides.
8. Now let’s make a template for the “east” and “west”
sides of the bead. Tap the east side on the inkpad and
stamp the outline onto the index card. Use scissors to cut
the shape outside the lines. Because the two sides may
vary slightly, mark both the template and the side of the
bead it is intended for with a pencil mark and repeat this
step to make a template for the other side.
9. Roll out a sheet of clay three-cards thick. For contrast,
the sides will be given a mirror fi nish so do not texture the
clay. Place one template on the sheet and trace around
it with the X-Acto knife. Repeat with the other template.
Use an oiled cocktail straw to make a hole in the upper
third of each side part and let dry thoroughly.
10. To attach the sides to the body of the bead, brush
some water along the East side of the bead following with
a generous application of slip. Immediately wet the inside
edge of the appropriate fl at piece and join the two to-
gether. Then use a paintbrush to smooth away any slip that
oozed out of the join. Repeat with the other side and when
dry, fi le as necessary to match the contour of the bead.
We intentionally made these pieces thick so the next
step wouldn’t compromise their integrity. Laying one side
of the bead fl at on top of the sandpaper, sand the surface
with 400-, 600- and then 1200-grit sandpaper. Make
about 8–12 passes with each grit. I like to use the 3M®
Tri-M-Ite® Polishing Paper sold by Rio Grande®, but you can
also fi nd sandpaper in fi ne grits at an auto body shop. Repeat
with the other side and use your damp fi ngerprint to “sand”
all the edges. Use a wooden toothpick to sand the inside
edges of the holes and follow with 1200-grit sandpaper.
11. Before starting the next section, create four tiny balls
of clay. Roll out some clay one-card thick. Use the cocktail
straw to cut four circles. Cover three of the circles with
a damp paper towel so they don’t dry out. Pick up one
of the circles and roll it into a ball using the fi nger of one
hand in the palm of your other hand, then set aside to dry
completely. Repeat with the other three circles.
12. To make the appliqué for the stone setting, roll out
a sheet of clay three-cards thick. Press the Quatrefoil
Texture Tip from the Cruciferious 1 series into it, and make
a hole in the center with a cocktail straw. Use a straw
that is just slightly smaller than the circumference of the
cabochon so if the appliqué stretches a bit when you move
it onto the bead, the hole will still be a good size.
Use the 5⁄8” Lilac Kemper’s® cutter tool to cut out the
Quatrefoil shape; the two shapes will not be a perfect
match. Brush some water in the center of the bead on the
Interference side, apply slip to the back of the appliqué,
and place it on the bead. Press down on the appliqué with
a barely damp paintbrush to make sure it is fully attached
to the bead.
121-SBSB-2011-Two Views.indd 123 10/25/11 12:08 PM
10252011120940
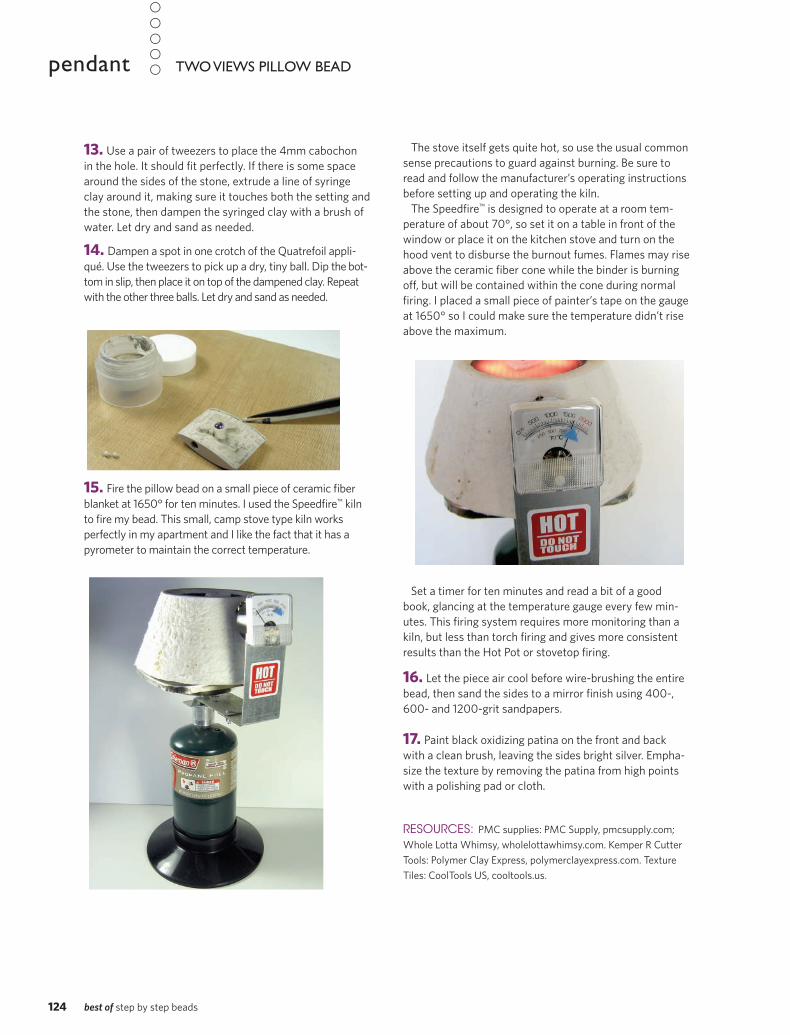
124 best of step by step beads
13. Use a pair of tweezers to place the 4mm cabochon
in the hole. It should fi t perfectly. If there is some space
around the sides of the stone, extrude a line of syringe
clay around it, making sure it touches both the setting and
the stone, then dampen the syringed clay with a brush of
water. Let dry and sand as needed.
14. Dampen a spot in one crotch of the Quatrefoil appli-
qué. Use the tweezers to pick up a dry, tiny ball. Dip the bot-
tom in slip, then place it on top of the dampened clay. Repeat
with the other three balls. Let dry and sand as needed.
15. Fire the pillow bead on a small piece of ceramic fi ber
blanket at 1650° for ten minutes. I used the Speedfi re™ kiln
to fi re my bead. This small, camp stove type kiln works
perfectly in my apartment and I like the fact that it has a
pyrometer to maintain the correct temperature.
The stove itself gets quite hot, so use the usual common
sense precautions to guard against burning. Be sure to
read and follow the manufacturer’s operating instructions
before setting up and operating the kiln.
The Speedfi re™ is designed to operate at a room tem-
perature of about 70°, so set it on a table in front of the
window or place it on the kitchen stove and turn on the
hood vent to disburse the burnout fumes. Flames may rise
above the ceramic fi ber cone while the binder is burning
off , but will be contained within the cone during normal
fi ring. I placed a small piece of painter’s tape on the gauge
at 1650° so I could make sure the temperature didn’t rise
above the maximum.
Set a timer for ten minutes and read a bit of a good
book, glancing at the temperature gauge every few min-
utes. This fi ring system requires more monitoring than a
kiln, but less than torch fi ring and gives more consistent
results than the Hot Pot or stovetop fi ring.
16. Let the piece air cool before wire-brushing the entire
bead, then sand the sides to a mirror fi nish using 400-,
600- and 1200-grit sandpapers.
17. Paint black oxidizing patina on the front and back
with a clean brush, leaving the sides bright silver. Empha-
size the texture by removing the patina from high points
with a polishing pad or cloth.
RESOURCES: PMC supplies: PMC Supply, pmcsupply.com;
Whole Lotta Whimsy, wholelottawhimsy.com. Kemper R Cutter
Tools: Polymer Clay Express, polymerclayexpress.com. Texture
Tiles: CoolTools US, cooltools.us.
TWO VIEWS PILLOW BEADpendant
121-SBSB-2011-Two Views.indd 124 10/25/11 12:08 PM
10252011120940

beadworkmagazine.com 125
METAL CLAY findings
WHAT YOU NEED
•18-gram package of PMC+®
•PMC+® syringe•PMC+® slip•20-gauge fi ne silver wire, 2"•Acrylic roller, or 6" piece of PVC pipe• Flat acrylic sheet, 21⁄2" x 6"
(or CD case)•Plastic page protector sheet•Sheet of parchment paper• #3 or #4 round watercolor-type
paintbrush• #000 or #18/0 round watercolor-
type paintbrush•Drinking straws• Coff ee stirrer straw (approx. 3.5mm
in diameter)•Round wooden toothpicks•Deck of playing cards
•Olive oil/Badger Balm®
•Scotch® tape•Circle template and X-Acto® knife or small circle cutter•Needle tool (optional) •Tweezers•Tissue blade•Round nose pliers•Flat nose pliers•Rawhide mallet (optional)•Stainless steel wire brush•Emery board•400-grit wet/dry sand paper •Shot glass•Graphite pencil•Tumbler (optional)•Plastic wrap •Moist towelettes •Styrofoam® block
Precious FindingsLora Hart
PH
OT
O B
Y F
RA
NK
DE
SA
NT
IS;
AL
L O
TH
ER
PH
OT
OS
BY
DO
NA
DIC
AR
LO.
125-SBSB-2011-Precious Findings.indd 125 10/31/11 10:31 AM
10312011103151

126 best of step by step beads
PRECIOUS FINDINGS project
Creating a seamless tube bead.1. Divide the package of PMC+® into 8 equal pieces and
set 1 piece aside. Wrap the remaining pieces in plastic wrap
and place them under a shot glass to stay fresh and moist.
2. Using a lightly oiled PVC pipe or round acrylic roller,
roll the clay 2-cards thick on a piece of parchment paper.
Cut the clay, using the tissue blade, into a rectangle
approximately 3⁄4" wide x 11⁄4" long. Wrap the remaining
clay in plastic wrap and set aside.
3. Wrap the clay rectangle around a lightly oiled plastic
drinking straw, overlapping one end on top of the other.
Using the tissue blade, trim the excess length so the 2
edges meet exactly. Brush a little water in the seam with
the paintbrush. Extrude a line of syringe PMC+® on top
of the seam and pat into place with the #3 or #4 brush,
making sure the extruded clay fi lls any void.
4. Lightly smooth the seam; it will be perfected after
the bead is dry. Be careful not to nick the clay with
your fi ngernail or use too much pressure, you don’t
want to mar the shape while the clay is wet. Set the
tube aside (still on the straw) to dry, placing it on a
toothpick that has been inserted in a block of Styro-
foam®. Repeat Steps 1–4 to make 4 more beads. Feel
free to vary the lengths, if you wish.
Tip: Water + clay = slip. You don’t want to get water
between the clay and straw as you work, because
it will create slip — and when dry, this will make it
diffi cult to remove the bead. Also, the outside of the
tube bead will dry faster than the inside, so use this to
your advantage.
5. Wait about 5 minutes and then remove the semi-dry
beads from the straw using a twisting motion, as if you
were trying to unscrew something. Note: You don’t
want the bead to dry completely on the straw because
shrinkage may cause it to be impossible to remove
without damage. Use tweezers to hold the straw while
gently twisting off the bead. Let the inside of the beads
dry thoroughly before moving on to the next step.
6. After the beads have dried, check the seam both
inside and out to see if you need to do any additional
fi lling with the syringe. You’re going for a perfectly
smooth and even thickness outside, and a smooth
surface inside; this will prevent any interior snags that
could damage the stringing material. Set aside to dry
and repeat as many times as necessary.
7. After the bead has been adjusted and dried, use a
dry piece of 400-grit sandpaper to even out the edges,
smooth any roughness, and perfect the seam.
Switch to a moist towelette to smooth the bead
perfectly. Take care not to get the bead too wet, or re-
move too much clay. Let dry thoroughly before moving
on to the next step.
Sometimes, fi nding the perfect components for a
special design can be challenging. By learning to
create your own original fi ndings, you can move
your jewelry making skills to a whole new level.
125-SBSB-2011-Precious Findings.indd 126 10/31/11 10:31 AM
10312011103151

beadworkmagazine.com 127
Applying slip.8. Place the bead on a straw or handle of a paint-
brush while working with it in a dry state. To prepare
the bead for the slip decoration, draw a design(s) all
around the tube with a graphite pencil.
Tip: To avoid having slip build up on your brush (which may
create unsightly globs on your work), periodically wipe the
excess off your brush onto a metal surface, like a needle tool.
Later, simply remove the dry clay bits from the tool and
drop them back into your slip jar to reuse at a later time.
9. Dip the tip of the #000 or #18/0 watercolor
brush into the slip and carefully paint over your pencil
designs. Let the slip dry thoroughly then repeat 7–9
times, building up to the desired thickness. Repeat this
decorating technique with all the beads.
Making jump rings.I like to make lots of jump rings at a time and save them
in a little container so they’re right there anytime I want
to use them. You’ll need 5 for this project.
10. Place a page protector sheet on your work surface.
Using a lightly oiled, fl at acrylic sheet or CD case as
your roller, roll a very thin “wire” of clay about 3” long.
Mine was 2mm in circumference, but yours can be thinner
or thicker depending on your design.
11. Using a #3 or #4 paintbrush, brush water on top
of and underneath the clay “wire” to avoid cracking
when you form the jump rings. Repeat until the clay
begins to move like a snake. Cover with plastic wrap
for about a minute, so the water is absorbed into the
center of the clay and doesn’t evaporate. Next, coil the
clay around a lightly oiled coff ee stirrer, keeping each
wind close to, but not touching, the previous coil.
12. Wait 1–2 minutes so the surface of the coil can
solidify but not dry completely. Using the tissue blade,
cut down the length of the coil to make individual jump
rings. Gently slide the jump rings off the straw and
press them into a perfectly round shape, making sure
the ends are touching. If the rings feel too dry, brush a
generous amount of water over them, cover with plas-
tic wrap, and wait for them to re-hydrate before press-
ing into shape. They should look like tiny Cheerios®. Let
dry thoroughly. Fill any voids with syringe clay and let
dry, then sand the entire jump ring smooth.
Attaching the jump rings.13. You will be attaching 3 jump rings to 1 tube bead,
and 1 jump ring to each of the other 2 tube beads.
Make sure all of the components are absolutely dry
before joining. Using a nail fi le, create a fl at space on
the jump ring, at the seam. Dampen the fl at section
with water and a paintbrush, then extrude a small line
of PMC+® syringe on the fl at section.
14. While the extruded clay on the jump ring is still
moist, dampen a place on the tube bead with your
paintbrush. Using tweezers, affi x the jump ring to the
tube bead by pressing the two together. Repeat to add the
other 2 jump rings to this tube bead.
15. Using the #3 or #4 brush, smooth away any ex-
cess clay that has squeezed out from underneath the
connection point. Let dry. Finesse the join with more
slip, syringe, or sandpaper, as needed. Repeat Steps
13–15 to attach the last 2 jump rings to the remaining
tube beads.
125-SBSB-2011-Precious Findings.indd 127 10/31/11 10:31 AM
10312011103206

128 best of step by step beads
Creating a toggle clasp.Before beginning the clasp, we will need
to prepare 2 wire connectors. Two diff erent
shapes work well for use in a clasp, a U-
shape and an Omega-shape. I’ve made one
of each type for the male and female parts
of the toggle clasp. You may use either, or
both, or a design of your own.
U-shape connector. 1. Bend a piece of wire over the tip of the
round nose pliers, forming a U-shape. Cut
the “U” to approximately 3mm long, mea-
suring from the top of the curve to the tip of
the “legs.”
2. Flatten the tips of the legs on the U by
squeezing with fl at nose pliers. This will help
the wire slide easily into the clay and ensure
that it won’t pull out after fi ring. Rough up
the ends of the wire with sandpaper before
implanting into the clay.
Omega-shape connector.3. This connector resembles the Greek let-
ter “Omega,” an open circle with a splayed
leg on either side. Wrap a piece of wire en-
tirely around the tip of your round nose pliers.
Using fl at nose pliers, bend the wire ends
back on themselves until they’re horizontal.
4. Cut the wire ends to approximately 1⁄2”,
from tip to tip. Squeeze the tips of the legs
to fl atten, using fl at nose pliers; this will
make it easier to insert them into the clay.
Rough up the legs of the Omega-shape with
sandpaper before implanting into the clay.
Making the female part of the clasp.5. Roll out a piece of clay 5-cards thick on
a piece of parchment paper. Cut the clay
into a rectangular shape 3⁄4” x 11⁄4” using the
tissue blade.
6. Using a template and X-Acto® knife or a
circle cutter, make a 1⁄2” hole in the top half
of the rectangle. Use tweezers or fl at nose
pliers to guide the wire into the center of the
clay at the other end of the rectangle. Check
both sides of the clasp to be sure the wire is
properly embedded. If the legs are sticking
out, remove and reinsert them or bury them
with some additional clay.
7. Using the paintbrush, paint some slip
into the holes where the wire entered the
clay. Allow the slip to travel up onto the
wire to further strengthen the join. Let dry
completely.
Making the male part of the clasp.8. Use your fi ngers and a lightly oiled fl at
acrylic sheet (or a CD case) to roll a wire
of clay approximately 3.5–4mm thick on
a page protector sheet. Cut the ends with
your tissue blade to create a log about 11⁄4”
long, then cut a shallow slit in the center of
the log to allow for easier insertion of the
Omega-wire. Use tweezers to implant the
legs in the slit, leaving the “O” exposed.
9. Using a paintbrush, fi ll the void with slip
and then gently press together. Careful! You
don’t want to dis tort the cylinder shape of
the bar. Let dry completely. If necessary,
continue to fi ll the void with syringe or
clay. Let dry. Sand both parts of the clasp
smooth and then decorate with slip. Let dry.
10. Fire the tube beads and toggle pieces
for 10 minutes in a 1650°F kiln. The clay
around the Omega-wire will shrink during
fi ring and this may cause the bar to bend
slightly. I like this eff ect, but you can use a
rawhide mallet to gently hammer the bar
straight again, if desired.
11. Remove your pieces from the kiln and
let them cool completely. Burnish to a sat-
iny fi nish with a wire brush, and if you have
a tumbler, tumble for additional polish.
RESOURCES: PMC materials and tools: Whole
Lotta Whimsy, wholelottawhimsy.com; PMC
Connection, pmcconnection.com.
PRECIOUS FINDINGS project
125-SBSB-2011-Precious Findings.indd 128 10/31/11 10:31 AM
10312011103206

beadworkmagazine.com 129
PATINA 101feature
Safety First!Use common sense safety
precautions when using any
chemical solution. Work in
a well-ventilated area, wear
eye protection, use tweezers
or dental fl oss to hold the
piece for dipping, and keep
clear, clean water nearby in
case of splashes. You can
also use a thin brush to paint
the patina in target areas.
BeforeBecause fi re and polishing compounds can aff ect the process, adding patina
should be the last step when fi nishing metal. Make sure your piece has been
soldered and cleaned of any dirt or grease, with alcohol or ammonia, before you
begin. Wear latex gloves to ensure that no body oils prevent the patina from
adhering to the metal or be sure to handle only the edges.
fresh from the kiln cleaned, tumbled, and ready to patina
Patina 101Lora Hart
Ph
oto
s c
ou
rte
sy o
f th
e a
uth
or
Patinas are one of the simplest ways to change and enhance the look of
any metal element included in your beaded jewelry designs. Store-bought
fi ndings can also be customized with a dip in home-brewed patina. The two
most common formulas developed for use with either sterling or fi ne silver
(PMC) are liver of sulfur (LOS), which creates an array of vibrant colors,
and hydrochloric acid (HA), commercially sold as Midas Black Max, Griffi th
Silver Black, and Vigor, which produces a black, antiqued surface.
129-SBSB-2011-Patina 101.indd 129 10/25/11 12:09 PM
10252011121041

130 best of step by step beads
Liver of SulfurThe dry dark-green nug-
gets of liver of sulfur (LOS)
are light and air sensitive,
and their eff ectiveness will
deteriorate with prolonged
exposure. Store LOS in a
dark, airtight container
(such as a brown bottle or
black 35mm fi lm contain-
er), and only make up as
much solution as you will
use in one session.
Developing from gold to brown to rose, violet, blue, and fi nally
black, results appear more quickly when both the metal and solu-
tion have been heated. Dissolve a pea-sized piece of LOS in a cup
of warm (never boiling) tap water and dip back and forth between
the light yellow mixture and cool water until you reach the desired
color. Dip one last time in very cold water to stop the progression. If
you’re coloring many pieces at one time, prolong the workability of
the LOS by placing it on a heating pad or coff ee warmer. If it starts
to look cloudy, it has lost its zip—pour it down the sink and start
another batch.
Hydrochloric AcidThis liquid solution
should be used at room
temperature in a well-
ventilated workspace. It
is considered hazard-
ous waste and must be
handled with care. Pour
about an inch into a
dedicated, lidded, plas-
tic dipping container.
Use full strength for a
deep black color or dilute to achieve a lighter shade of gray. Add
water, little by little, and test the result with a piece of scrap silver
before dipping your masterpiece. (Be sure to use tweezers as
a dipping tool.)
When you’re satisfi ed
with your oxidation,
soak the acid-coated
item in a mixture of
boiling water and baking
soda to neutralize.
After use, you must
dispose of the hydro-
chloric acid by clearly
labeling the container
and taking it to your lo-
cal hazardous waste facility.
AfterIf desired, remove the patina from the high areas with
a polishing pad such as Pro-Polish pads (the best in my
opinion), and throw in a tumbler for a fi nal high shine.
Let the patina mellow naturally with wear or coat lightly
with a sealant such as Krylon® Crystal Clear Acrylic
Coating from the art store or Futura® fl oor wax. Be
aware that these treatments may slightly darken the
appearance of the patina.
RESOURCES:Hydrochloric acid: Midas Black Max,
Griffi th Silver Black, Vigor. Pro-Polish polishing pads:
Whole Lotta Whimsy, www.wholelottawhimsy.com.
Protective glasses, liver of sulfur, jewelry tools, and supplies:
Rio Grande, www.riogrande.com.
HA with highlights removed
rosegold blue
129-SBSB-2011-Patina 101.indd 130 10/25/11 12:09 PM
10252011121042

beadworkmagazine.com 131
Brick–stitched beads sit next to each other like tires fl at on the
ground, holes vertical. Repeated increases and decreases in brick
stitch create a shape like a stepped pyramid. Like bricks in a wall, the
beads sit over the space between two beads in a previous row, not
directly on top of each other.
1. Always start brick stitch with a ladder: string
2 beads and pass through them both again
so the working thread exits bead 2. Beads
should lie fl at, side by side. String 1 bead;
pass up through bead 2 and down through
the bead just strung, bead 3 (Figure 1).
2. Continue making the ladder to your desired
width. Note how you circle around clock-
wise, then counterclockwise, with each new
bead. Exit up from your last bead (Figure 2).
3. Always start a new row with 2 beads, which
avoids exposing thread. String 2 beads and
pass your needle under the thread loop that
bridges between the last 2 beads of the pre-
vious row. Exit up through the second bead
just strung and continue 1 bead per stitch.
Note the natural increase in the new row, as
the bead you just added sticks out beyond
the previous row (Figure 3).
4. To decrease at the end of a row simply
stop adding beads (Figure 4).
5. To decrease at the start of a row, string
2 beads and pass under the second thread
bridge in from the end of the previous row
(Figure 5).
6. To increase at the end of a row: after exiting
the last bead, string another bead and pass
again under the last thread bridge. Exit
up through the new bead just strung. This
makes a natural increase, with your new
bead sticking out beyond the end of the
previous row (Figure 6).
7. To increase at the beginning of a row: brick
has a natural increase, as illustrated in
Step 3 (Figure 7).
8. Alternating rows of increase and decrease
creates an in-and-out pattern (Figure 8).
LEARNING THE BASICS ONE BEAD AT A TIMEBead by Bead
131-SBSB-2011-BxB.indd 131 10/25/11 12:11 PM
10252011121227

132 best of step by step beads
Circular brick stitch is usually stitched around a center bead,
with looping base threads around the center bead on which
your stitching will grow.
1. Pass through your center bead twice, exiting the top. Separate the
loops of thread to sit on opposite sides of the bead.
2. Always start a new row with 2 beads. String 2 beads. Pass under
the thread loop and through the second bead strung. Snug the
beads up to the center bead.
3. String 1 bead; pass under the thread loops and through the bead
just strung. Continue to stitch 1 bead at a time around the center
bead, back to the first bead strung.
4. Close the row by passing down through bead 1, around the thread
loop, and out bead 1 again.
5. Start the next row with 2 beads. Pass under the thread “bridge”
between the first 2 beads in the previous row; exit the second bead
just strung. As you work larger rows, you may need to string 2
beads on the same thread “bridge” every few stitches to allow for
the larger circumference of the row.
Peyote stitch works from side to side, usually in one
direction. Most artists fl ip their work over for each row
to stitch in the direction most comfortable for them.
1. Thread a needle with a comfortable length of thread. Pick up a
stop bead and pass through the stop bead again. Pick up an even
number of beads; these will make up the first 2 rows. This tutorial
shows 6 beads across.
Tip: Run a long needle through every other bead to pull the first
2 rows apart, making the “in” and “out” beads easy to identify. Hold
the needle in place with 2 pieces of tape or pieces of kneaded eraser.
2. Pick up bead 7, skip bead 6, sew through bead 5. Bead 7 sits
directly over bead 6.
3. Pick up bead 8, skip bead 4, sew through bead 3. Bead 8 sits
over bead 4. Pick up bead 9, skip bead 2, sew through bead 1.
4. Pick up bead 10, skip bead 1, sew through bead 9. When you reach
the end of the row, just pick up another bead and sew back in the
opposite direction, as you did in Step 2 with bead 7. Remove your
stopper bead and the needle when you feel comfortable doing so.
131-SBSB-2011-BxB.indd 132 10/25/11 12:11 PM
10252011121227
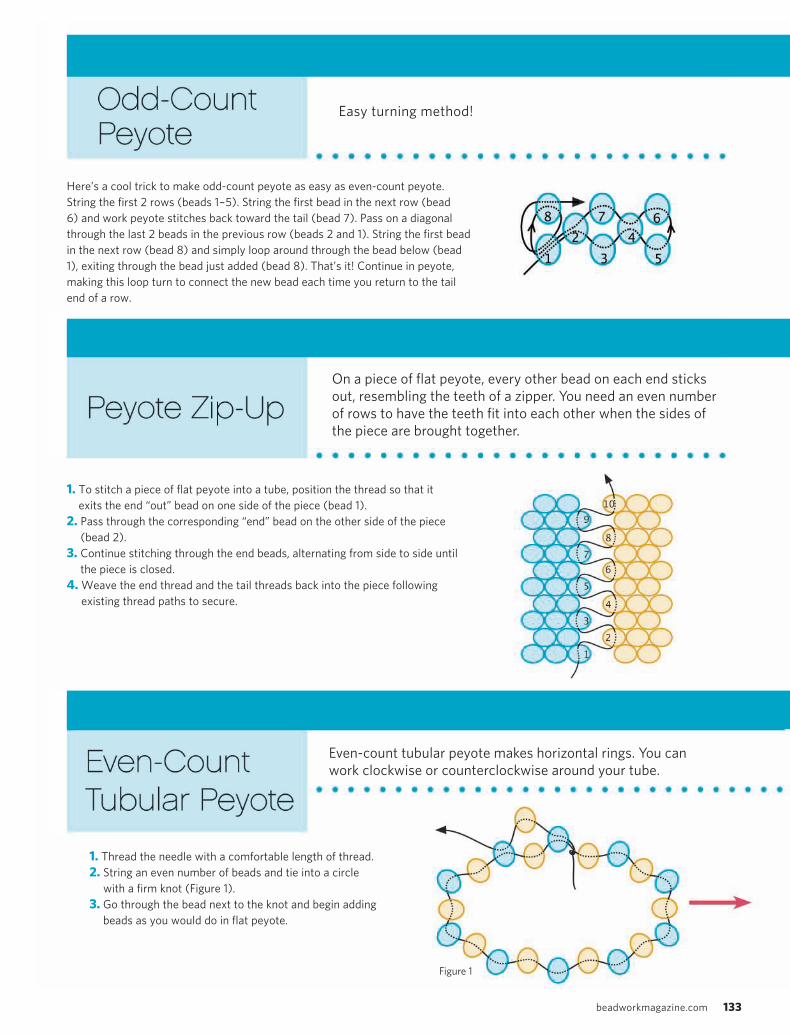
beadworkmagazine.com 133
Easy turning method!
Here’s a cool trick to make odd-count peyote as easy as even-count peyote.
String the first 2 rows (beads 1-5). String the first bead in the next row (bead
6) and work peyote stitches back toward the tail (bead 7). Pass on a diagonal
through the last 2 beads in the previous row (beads 2 and 1). String the first bead
in the next row (bead 8) and simply loop around through the bead below (bead
1), exiting through the bead just added (bead 8). That’s it! Continue in peyote,
making this loop turn to connect the new bead each time you return to the tail
end of a row.
1. To stitch a piece of flat peyote into a tube, position the thread so that it
exits the end “out” bead on one side of the piece (bead 1).
2. Pass through the corresponding “end” bead on the other side of the piece
(bead 2).
3. Continue stitching through the end beads, alternating from side to side until
the piece is closed.
4. Weave the end thread and the tail threads back into the piece following
existing thread paths to secure.
On a piece of fl at peyote, every other bead on each end sticks
out, resembling the teeth of a zipper. You need an even number
of rows to have the teeth fi t into each other when the sides of
the piece are brought together.
1. Thread the needle with a comfortable length of thread.
2. String an even number of beads and tie into a circle
with a firm knot (Figure 1).
3. Go through the bead next to the knot and begin adding
beads as you would do in flat peyote.
Even-count tubular peyote makes horizontal rings. You can
work clockwise or counterclockwise around your tube.
Figure 1
131-SBSB-2011-BxB.indd 133 10/25/11 12:11 PM
10252011121242

134 best of step by step beads
Right-angle weave, commonly referred to as RAW, works
best with rounded, donut-shaped seed beads, not cylinder
beads. Learn the rhythms of this popular stitch here, then
try all of the great RAW projects in this issue!
1. Thread your needle with a comfortably long piece of thread;
about 24” should be plenty for this tutorial. Leaving a 6” tail, string
beads 1, 2, 3, and 4, alternating colors A (gold), B (blue), A, and B.
Tie the 4 beads in a snug circle and knot the thread below bead 1.
2. Sew in a clockwise direction through beads 1, 2, and 3 (Figure 1).
3. Pick up 3 new beads, beads 5, 6, and 7, alternating colors again
so bead 5 is B, bead 6 is A, and bead 7 is B. Sew counterclockwise
through beads 3, 5, and 6. You should be exiting out the top of
bead 6 (Figure 2).
4. Continue to pick up beads alternating colors, following the illus-
trations. Pick up 3 new beads, beads 8, 9, and 10. Sew clockwise
through beads 6 and 8. Notice how with each new set of beads
your stitch direction alternates from clockwise to counterclockwise.
Notice also how the color A beads sit so the holes are vertical, while
the color B beads sit with their holes horizontal. The beads sit at
right angles to each other (Figure 3).
5. To add a new row, you will change direction again. Pick up beads
11, 12, and 13. Sew counterclockwise through beads 8, 11, 12, and 13.
Stitch clockwise through bead 7. Now pick up 2 new beads, 14 and
15, and sew clockwise through 13, 7, and 14. Pick up 2 more new
beads, 16 and 17. Stitch counterclockwise through beads 2 and 14
and exit through bead 16 (Figure 4).
6. Repeat Step 5 at the end of each row and make this practice piece
as long as you like. You may even stitch enough for a bracelet! Finish
off your last row with a discrete knot, weave the tails back into the
piece, and trim the ends. Stitch on the clasp of your choice.
4. Each time a row ends, go through the last bead of the
previous row (a) the first bead of the current row (b)
and than add a bead (c) to start the next row. This is
called a “step up” or “step down” (Figure 2).
5. You may find that placing the ring of beads on a tubu-
lar support, such as a dowel or straw, will be helpful.
Figure 2
Figure 1 Figure 2
Figure 3
Figure 4
even-count tubular peyote cont’d
131-SBSB-2011-BxB.indd 134 10/25/11 12:11 PM
10252011121242

beadworkmagazine.com 135
If you’re familiar with fl at RAW, you’re ready for cubic RAW.
Imagine a child’s block with 6 sides. Each side is made of a unit
of 4 beads sewn in RAW. Beginning with 3 units of fl at RAW, you
will join the sides into a tube using common beads, and do the same
to the top and bottom forming a 6-sided cubic unit of 12 beads.
1. Start with a comfortable length of thread on your needle,
about 24”. String beads 1–4 in alternating colors as shown,
leaving a 6” tail. Tie a knot and pass through beads 1 and 2
again (Figure 1).
2. String beads 5–7 counterclockwise in alternating colors
as shown. Pass through bead 2 from the previous unit and
pass through beads 5 and 6 again (Figure 2).
Tip: RAW stitching always alternates direction around the
circle of beads, clockwise to counterclockwise.
3. String beads 8–10 clockwise in alternating colors as
shown. Pass through bead 6 from the previous unit and
pass through beads 8 and 9 again (Figure 3).
4. Stitch these 3 units into a tube by stringing bead 11 and
passing through bead 4 of the first unit. String bead 12 and
pass through bead 9 of the third unit. Continue to pass
through bead 11. Snug up the thread to make a wobbly
tube (Figure 4).
5. Hold the cube so that the side with bead 11 (the bead that
the thread is exiting) faces you. You will see 4 beads of the
same color that are not stitched into a unit. Pass through
beads 3, 5, 10, and then 11 again. Snug up the thread, and
your wobbly tube will begin to feel more sturdy (Figure 5).
6. Pass through bead 4 on the corner and bead 12 on the
opposite side of the cube (Figure 6).
7. Here you will see 4 more beads of the same color that
are not stitched into a unit. The thread is exiting bead 12.
Stitch these 4 beads into a unit by passing through beads
8, 7, 1, and 12 again (Figure 7).
8. Pass through beads 12, 8, and 7 again. Your cube should
be feeling firmer now. Exit bead 2 (Figure 8).
9. Begin the second cube by stringing beads 13–15 in alter-
nating colors as shown. This unit shares bead 2 with the
first cube. Pass through bead 2 and then through
beads 13–14 again (Figure 9).
131-SBSB-2011-BxB.indd 135 10/25/11 12:11 PM
10252011121243

136 best of step by step beads
10. String beads 16–18 in alternating colors as shown.
Pass through bead 14 again to make unit 2 of the
second cube. Pass through beads 16 and 17 again
(Figure 10).
11. String bead 19 and pass through bead 4 of the first
cube. String bead 20 and pass through bead 17.
Continue around by passing through beads 19, 4,
and 20 again. Snug up the thread (Figure 11).
12. Turn the cube so that bead 20 faces you. Pass
through beads 1, 15, and 16. Continue to pass
through beads 20, 1, and 15 again. Pass through
bead 14 on the corner (Figure 12).
13. Turn the cube to the other side. Pass through beads
18, 19, 3, and 13. Continue to pass through bead 18,
and then through bead 17 on the corner (Figure 13).
14. Repeat Steps 9–13 to create more cubes.
Square stitch lines beads up one on top of another,
like loomed work. You pass through each bead sev-
eral times, so be sure your bead holes will accom-
modate your needle and several passes of thread.
Cylinder beads are great for square stitch. Your
thread shows on the outer edges or your work, so
choose a thread color accordingly.
cubic RAW cont’d
131-SBSB-2011-BxB.indd 136 10/25/11 12:11 PM
10252011121243

beadworkmagazine.com 137
1. String 4 color A beads (these are your core beads) and 3 color B
beads (these will be the outside beads, which spiral around the core
beads). Bring your needle back up through the 4A to form a loop.
Pull tight, keeping the B (outside) beads to the right (Figure 1).
2. Pick up 1A and 3B. Bring these beads down to your beadwork and
pass your needle up through the last 3A and the new A bead just
added (Figure 2).
3. Flip the B beads to the right, pushing them next to the previous row.
4. Repeat Steps 2 and 3, continuing in spiral stitch to any desired
length. The spiral becomes evident after about the fourth row
and will keep “stepping up” as it moves around your core beads
(Figure 3).
5. To finish off, knot discretely and weave the end and tail into the
piece. To create an endless circle, match the core bead ends
together and stitch through existing thread paths several rounds into
the piece. The spiral rounds should “step up” into each other naturally.
Knot in an inconspicuous place and weave ends into the piece.
When you have about 6” of thread remaining, weave it into
the beadwork, tying discrete half-hitch knots between beads.
Note where you are leaving off so you’ll know where to start your
new thread. Trim the thread carefully. String a stopper bead leav-
ing a 6” tail and exit in position to continue; remove the stopper
later and weave in the tail.
131-SBSB-2011-BxB.indd 137 10/25/11 12:11 PM
10252011121243

138 best of step by step beads
For this tutorial, you will work off a base row as in a single-
strand necklace. The base row beads (a-j) are shown slightly
larger. The netted sections are numbered (1-68), and the
intersecting beads are shown in gold.
1. String a base row of 10 base beads on a short piece of prac-
tice thread. In an actual project the ends would be attached
to your clasp. For this tutorial, attach a bead stop or tape to
each end of the thread to prevent the beads from sliding off.
2. Cut a new piece of thread that is at least 24” long. Attach
one end of the thread to the stop or tape on the left side of
the base row. You will be working from left to right. Thread a
needle onto the free end of your working thread. On the base
row, pass through bead (a) from left to right. String 13 beads
alternating 1G (gold) and 2B (blue) beads.
3. Pick up bead 14 (B) and go back through bead 13 (G). Pick
up 2B (beads 15 and 16), 1G (bead 17), and 2B (bead 18 and
19). Go through bead 7 (G), the first intersecting bead. Pick
up 2B (beads 20 and 21), 1G (bead 22), and 2B (beads 23
and 24). Go up through bead 1, another intersecting bead.
4. Moving from left to right, go through beads (b) through (e)
in the base row, exiting bead (e).
5. Pick up bead 1G (bead 25) and 2B (beads 26 and 27).
Go down through bead 22, an intersecting bead. Pick up 2B
(beads 28 and 29), 1G (bead 30), and 2B (beads 31 and 32).
Go down through bead 17, another intersecting bead.
6. Pick up 2B (beads 33 and 34), 1G (bead 35), and 1B
(bead 36). Go up through bead 35 (G). Pick up 2B (beads 37
and 38), 1G (bead 39), and 2B (beads 40 and 41). Go up
through bead 30.
7. Pick up 2B (beads 42 and 43), 1G (bead 44), and 2B
(beads 45 and 46). Go up through bead 25 (G). Moving from
left to right, go through beads (f) through (i) in the base row,
exiting bead (i) to start your next section of vertical netting.
8. Once you feel comfortable with this technique, try varying
the size, color, or style of intersection beads and base beads,
and the number of beads within each section.
131-SBSB-2011-BxB.indd 138 10/25/11 12:11 PM
10252011121243

beadworkmagazine.com 139
Many of us have made “daisy chain” beaded jewelry at some
point in our lives, a simple application of circular netting. The
term “circular” may appear misleading, for the shapes created
may look like a 6-pointed star or snowfl ake; however the
stitch is worked around and around in a circular manner.
1. Thread your needle onto a comfortably long piece of thread;
about 24”. Leaving a 6” tail, string 6 beads and tie in a snug
circle, with the knot between beads 1 and 6. This is Round 1.
Exit through bead 1 (Figure 1).
2. Round 2: Sew clockwise picking up new beads between each
bead on the central circle. Pick up bead 7; sew through bead
2. Pick up bead 8; sew through bead 3. Pick up bead 9; sew
through bead 4. Pick up bead 10; sew through bead 5. Pick up
bead 11; sew through bead 6. Pick up bead 12; and since this
is the end of a round, you “step up” to start the next round by
sewing through beads 1 and 7 (Figure 2).
3. Round 3: Continue working clockwise, making loops of beads
that bridge the space between the beads in the round you just
added. For this round, pick up 3 beads in each loop (or however
many will fill the space). With the needle exiting bead 7, pick
up beads 13–15 and sew through bead 8. Pick up beads 16–18
and sew through bead 9. Pick up beads 19–21 and sew through
bead 10. Pick up beads 22–24 and sew through bead 11. Pick up
beads 25–27 and sew through bead 12. Pick up beads 28–30
and sew through bead 7, then continue to step up for the next
round, through beads 13 and 14. Exiting bead 14 puts you in the
middle of the loop (Figure 3).
4. Round 4: This round will require larger loops of beads. Try
1 loop first to determine how many beads will keep the piece
lying flat; larger loops will create a ruffle, but too few will pull
the work and make it “cup.” Tip: It helps as a beginner to make
loops an odd number of beads so you have an actual middle
bead to exit in each loop. In the illustration there are 5 beads in
this final round. Pick up beads 31–35 and sew through bead 17
(the middle bead in the next loop). Pick up beads 36–40 and
sew through bead 20. Pick up beads 41–45 and sew through
bead 23. Pick up beads 46–50 and sew through bead 26.
Pick up beads 51–55 and sew through bead 29. Pick up beads
56–60 and sew through bead 14. Finish by weaving the work-
ing end of the thread through existing thread paths and back to
the tail end. Make a knot with the tail and working thread and
weave both ends into the piece. Carefully trim the ends close to
the beads (Figure 4).
5. Joining circles: Repeat Steps 1–3 as before, creating rounds
1–3. Round 4 will connect to the outer loops of the first circle.
Work round 4 beginning with your thread exiting bead 14.
Pick up beads 31 and 32 and sew through bead 53 in the first
completed circle (this acts as bead 33 in the new loop you’re
sewing). The first and second circles now have a common
bead. Pick up beads 34 and 35 and sew through bead 17 of the
second circle. Pick up beads 36 and 37 and sew through bead
48 of the first circle (this becomes bead 38 of the second
circle). Again, the first and second circle now have a common
bead. Continue around the second circle to complete round 4
as before, ending with bead 60 (Figure 5).
Figure 1 Figure 2
Figure 4Figure 3
Figure 5
131-SBSB-2011-BxB.indd 139 10/25/11 12:11 PM
10252011121243

140 best of step by step beads
Crimp tubes are seamless metal
tubes used to secure the end of a
beading wire. To use, string a crimp
tube and the connection fi nding (i.e.,
the loop of the clasp). Pass back
through the tube, leaving a short tail.
Use the back notch of the crimping
pliers to press the length of the tube
down between the wires, enclosing them in separate chambers of
the crescent shape. Rotate the tube 90° and use the front notch
of the pliers to fold the two chambers onto themselves, forming a
clean cylinder. Trim the excess wire.
Crimp beads are serrated metal beads. Twisted crimp tubes and
crimp beads can be secured by squeezing them fl at with chain- or
fl at-nose pliers.
Crimp covers hide crimp tubes and give a professional fi nish.
To attach, gently hold a crimp cover in the front notch of the
crimping pliers. Insert the crimped tube and gently squeeze
the pliers, encasing the tube inside the cover.
The overhand knot is the basic knot for tying off thread: Make a loop with the stringing
material. Pass the cord that lies behind the loop over the front cord then through the loop
and pull snug.
A square knot is the classic sturdy knot suitable for most stringing materials. Make an over-
hand knot, passing the right end over the left end. Make another overhand knot, this time
passing the left end over the right end. Pull tight.
The surgeon’s knot is a secure way to connect two threads: Wrap the two ends around each
other twice, then wrap one around the other once in the other direction and pull snug.
The half-hitch knot may be worked with two or more strands—one strand is knotted over
one or more other strands. The knot may be worked from right to left, left to right, or in a
combination of the two.
wireguard
crimp tube
crimp/
cord end
placing a crimp cover
basic stringing and wireworking techniques
surgeon’s
overhand
half-hitch
Knotting
Pass Through vs Pass Back ThroughPass through means to move your needle (or beading wire) in the same
direction that the beads have been strung. Pass back through
means to move your needle (or beading wire) in the
opposite direction.
Oxidizing Silver with Liver of SulfurAlways wear vinyl or latex gloves, work in a well-ventilated area
(liver of sulfur has an unpleasant odor that quickly dissipates), and
carefully read manufacturer’s directions when using chemicals.
Wash all silver to be colored with soap and water. Mix liver of
sulfur nuggets in hot (not boiling) water according to manufac-
turer’s directions in a disposable container. Most suggest mixing
1 pea-size nugget for every 1 cup of water. A weaker solution will
produce a lighter patina with warm hues; a stronger solution
will produce a darker patina.
For ease of dipping your silver into the solution, use 12" of beading or
sewing thread to string the bead(s), chain, or fi nding(s) you wish to
oxidize; tie the ends in an overhand knot. If coloring small items that
cannot be strung (such as crimp covers), you will need to drop them in
the solution and then quickly scoop them out with a plastic spoon.
Or, place small items on a paper towel and brush them with the solu-
tion; this method, however, often results in uneven coloring.
Dip the silver in the solution as many times as necessary to achieve
the desired patina. If the silver becomes darker than desired, it can
always be lightened later by buffi ng or polishing.
Rinse off the silver in cold water. To further stop oxidation, dip the
silver in a weak solution (1:4) of baking soda and water. Remove
any threads you used to suspend the metal. Allow the silver to dry,
then, if desired, use a polishing cloth or #0000 (extra fi ne) steel
wool to buff and polish it.
Store all used solution in the disposable container. After about a
week, it will degrade enough to be washed down a sink (preferably a
utility sink) with a lot of water. Contact your local hazardous waste
facility for more information on disposing of the liquid safely.
square
Crimp/cord ends consist of a loop attached to a tube. Dab the
leather, plastic, ribbon, or other cord with jewelry glue, then place
it in the crimp/cord end. If you’re using a crimp end, crimp it as
you would a crimp tube.
Wireguards provide a smooth metal channel to protect the string-
ing material from chaffi ng against a connector. String a crimp tube,
then pass up through one half of the guard and down the other
half. Pass the guard and wire through the loop of the connector,
pass the wire back through the crimp tube, snug the tube up to the
guard, then crimp.
Crimping
140-SBSB-2011-BasicStringing.indd 140 10/25/11 12:12 PM
10252011121332
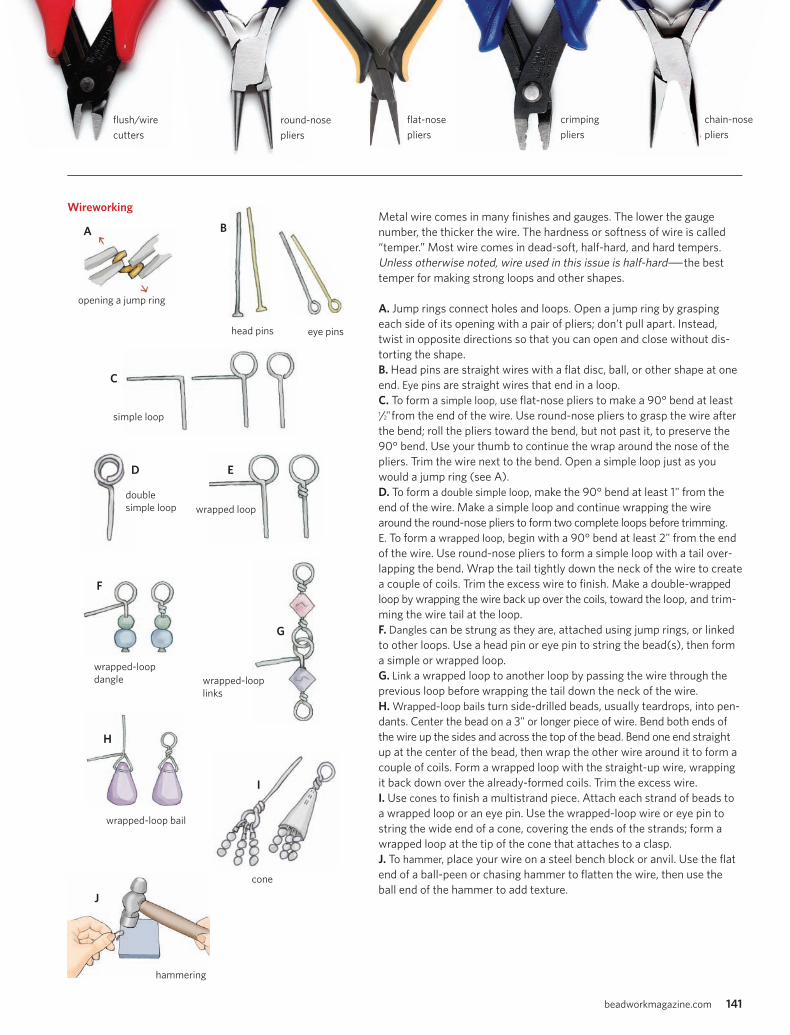
beadworkmagazine.com 141
opening a jump ring
A
head pins eye pins
B
C
simple loop
E
wrapped loop
F
wrapped-loop
dangle
G
wrapped-loop
links
H
wrapped-loop bail
cone
I
D
double
simple loop
chain-nose
pliers
crimping
pliers
fl ush/wire
cutters
fl at-nose
pliers
round-nose
pliers
J
hammering
Metal wire comes in many fi nishes and gauges. The lower the gauge
number, the thicker the wire. The hardness or softness of wire is called
“temper.” Most wire comes in dead-soft, half-hard, and hard tempers.
Unless otherwise noted, wire used in this issue is half-hard—the best
temper for making strong loops and other shapes.
A. Jump rings connect holes and loops. Open a jump ring by grasping
each side of its opening with a pair of pliers; don’t pull apart. Instead,
twist in opposite directions so that you can open and close without dis-
torting the shape.
B. Head pins are straight wires with a fl at disc, ball, or other shape at one
end. Eye pins are straight wires that end in a loop.
C. To form a simple loop, use fl at-nose pliers to make a 90° bend at least 1/2" from the end of the wire. Use round-nose pliers to grasp the wire after
the bend; roll the pliers toward the bend, but not past it, to preserve the
90° bend. Use your thumb to continue the wrap around the nose of the
pliers. Trim the wire next to the bend. Open a simple loop just as you
would a jump ring (see A).
D. To form a double simple loop, make the 90° bend at least 1" from the
end of the wire. Make a simple loop and continue wrapping the wire
around the round-nose pliers to form two complete loops before trimming.
E. To form a wrapped loop, begin with a 90° bend at least 2" from the end
of the wire. Use round-nose pliers to form a simple loop with a tail over-
lapping the bend. Wrap the tail tightly down the neck of the wire to create
a couple of coils. Trim the excess wire to fi nish. Make a double-wrapped
loop by wrapping the wire back up over the coils, toward the loop, and trim-
ming the wire tail at the loop.
F. Dangles can be strung as they are, attached using jump rings, or linked
to other loops. Use a head pin or eye pin to string the bead(s), then form
a simple or wrapped loop.
G. Link a wrapped loop to another loop by passing the wire through the
previous loop before wrapping the tail down the neck of the wire.
H. Wrapped-loop bails turn side-drilled beads, usually teardrops, into pen-
dants. Center the bead on a 3" or longer piece of wire. Bend both ends of
the wire up the sides and across the top of the bead. Bend one end straight
up at the center of the bead, then wrap the other wire around it to form a
couple of coils. Form a wrapped loop with the straight-up wire, wrapping
it back down over the already-formed coils. Trim the excess wire.
I. Use cones to fi nish a multistrand piece. Attach each strand of beads to
a wrapped loop or an eye pin. Use the wrapped-loop wire or eye pin to
string the wide end of a cone, covering the ends of the strands; form a
wrapped loop at the tip of the cone that attaches to a clasp.
J. To hammer, place your wire on a steel bench block or anvil. Use the fl at
end of a ball-peen or chasing hammer to fl atten the wire, then use the
ball end of the hammer to add texture.
Wireworking
140-SBSB-2011-BasicStringing.indd 141 10/25/11 12:12 PM
10252011121332

142 best of step by step beads
,
Meri Nash Aderhold is a competitive gymnastics coach
and mom by day, and a jewelry artist by night. She has
been making jewelry for 10 years. Meri lives in Ridgewood,
NJ with her husband, son, and golden retriever. See more of
her work at moonlightrain.com.
Martha Aleo works in seed beads, polymer clay, glass, metal,
and things she fi nds on the sidewalk. Her feature and project
articles have appeared in Web publications, print magazines,
and several books. She lives in Philadelphia with her husband
Ken, and Plumpton, her feline housemate. Find Martha at
ornamento.wordpress.com and ornamentodeux.tublr.com.
Lucy Arnold, has received numerous awards, and was
featured on HGTV. Her beaded jewelry, paintings, cards, and
miniature fantasy shoes can be seen at lucyarnold.com.
Current art projects are updated at lucyarnold.blogspot.com.
Jana Roberts Benzon teaches workshops internationally,
and sells her work at the Museum of Fine Arts, Boston, sev-
eral other galleries on the East Coast, and in the Intermoun-
tain Region. Her articles and artist features have appeared in
numerous publications. Jana creates from her studio in the
shadows of the majestic Wasatch Range Mountains in Utah.
Helen Breil lives in Canada and has been working with
polymer clay since 1997. She is a founding member of the
Southern Ontario Polymer Clay Guild and a member of
the Toronto and Grand River Bead Societies. See more of
Helen’s work at helenbreil.com.
Bonnie Clewans is an internationally known educator
and designer. She has been published in numerous books
and magazine, has served as a Consultant for Touchstone
Crystal, and as an Ambassador for Create Your Style with
Swarovski Elements.
Jenna Colyar-Cooper has enjoyed traveling the U.S. in
the last few years and has discovered a new passion for
volunteering (although her passion for beads will never be
displaced!). Along the way she has learned to travel lightly,
but keeps her beads and tools with her wherever she goes.
Robin Cowart loves all styles of beading. She always
encourages everyone who loves the craft to not be afraid to
try new stitches and styles. Robin enjoys life with her family
and bead collection in Iowa.
Lynn Davy has been seed beading and writing projects
for many years and has no intention of stopping anytime
soon. She is inspired by the wildlife and countryside near
her home in Dorset, UK. See more of her work at etsy.com/
shop/nemeton or nemeton.clara.co.uk.
Margie Deeb is the author of The Beader’s Guide to Color
and The Beader’s Color Palette. Twice a year she publishes
the invaluable Color Report for Bead & Jewelry Designers in
conjunction with Pantone, the world’s global color authority.
She works with all kinds of beading methods, including
on- and off -loom weaving and stringing. She is most known
for her fantastically colorful loom-woven pieces. Visit Margie’s website for her
books, patterns, jewelry, inspiration, and more at MargieDeeb.com.
Judy Dunn is a self-taught artist, living in Acton, MA. She
was drawn to working with polymer clay because of the rich
color and versatility of the medium, as well as its immedi-
acy. While she is less involved in polymer clay these days,
what she has learned about color from polymer clay shows
up in her work with fi ber or with pastels.
Lorelei Eurto is a self-taught jewelry designer and co-
author of Bohemian-Inspired Jewelry (Interweave, 2012).
She is always trying new techniques and tricks to make
unique jewelry. Working full-time in an art museum, Lorelei
is never more than a foot away from beautiful artwork to
inspire her designs. Read her daily blog at Lorelei1141.blogspot.com to see her
latest designs, or shop her Etsy store at Lorelei1141.etsy.com.
Lora Hart is the Artistic Advisor and one of 20 Senior In-
structors for PMC Connection. Her work has been featured
in many books, magazines, and calendars. Her historically
inspired jewels are sold in galleries and online. In 2010, Lora
launched her Mentorial program to help creative entrepre-
neurs around the world discover, re-imagine, and refi ne
their artistic voice; to learn more visit lorahart.com.
Jordana Hollander is a self-taught beadaholic. Her bead-
weaving designs have been published in several bead
magazines and “best of bead books.” She is happily married
with 3 wonderful daughters, and is a new grandma to Jack.
Contact Jordana at [email protected]. Purchase bead
kits or fi nished bead projects at JordanaDreams.etsy.com.
Anne Jackson and her husband Jim are currently an artist
team living and working in southwestern New York State,
making hand-turned woodwork with inlaid beadwork. Anne
has been teaching beading for the past fi ve years through a
local shop called Imagine in Bemus Point, New York, some-
thing she has discovered that she truly loves to do.
Jennifer Kahn was well-known artist Celie Fago’s appren-
tice and teaching assistant for nine years, accompanying
her in her travels around the country and abroad. Jen has her own
line of jewelry, which is sold at craft shows and in galleries across
Vermont. See more of her work at jenniferkahnjewelry.com.
Contributors
142 best of step by step beads
142-SBSB-2011-Contributors.indd 142 10/25/11 1:42 PM
10252011134415

beadworkmagazine.com 143
Beth Kraft is the owner of Nordic Gypsy Beads & Jewelry in
Rochester, MN. Her designs have been featured in several
national publications. She presents on Beads, Baubles, and
Jewels and Bead.TV. Beth teaches bead weaving and wire
work at several national bead shows and also at her store.
Visit nordicgypsy.com.
Marilu Morency enjoys combining her skills in beadwork,
painting, and fi ber arts. She is a gallery artist and teacher, liv-
ing with her family in Southern California. Marilu’s beadwork
has been on display at the Bead Museum, in Washington,
DC. In addition to gallery and custom work, Marilu enjoys
teaching others the art of beading.
Melody Marie Murray is a bead artist specializing in
sculptural peyote and interesting jewelry incorporating
her own lampwork beads. She is currently experimenting
with found pieces and the integration of disparate compo-
nents into cohesive wholes. She lives in Oregon and sells
her work at salamanderhouse.etsy.com. Follow her blog at
salamanderhouse.blogspot.com.
Gabriëlle E. Neijman (Esther) lives in the Netherlands and
spends her spare time seed-bead weaving. She sells her jew-
elry through her online store, GreenEnvyDesigns.nl, or visit
her gallery, green-envy-designs.deviantart.com. To contact
Esther, e-mail [email protected].
Carole Rodgers is an internationally-known designer, teacher,
and author. She is the author of 99 pattern leafl ets and
hundreds of magazine articles, as well as three full-length
beading books published by KP Books and four self-published
books on beading. Her newest book from KP Books The
Beaded Bracelet is due out in December 2011. To contact
Carole, e-mail [email protected].
Leslie Rogalski is an artist, editor, teacher, and media person-
ality with a passion for creating jewelry. She is a Create Your
Style with Swarovski ambassador and a design team member
for Beadalon and John Bead Corp. She is the former editor in
chief of Step by Step Beads and Beading Daily, and appears
frequently on Beads, Baubles, and Jewels and Jewelry TV.
Leslie is the creator of the original DoodleBeads DVDs, demonstrating top
seed-bead techniques through her acclaimed teaching method.
Tarlee Scholl is a member of The Hole Bead Shoppe Staff .
She has been beading over seven years and loves working
with crystals, pearls, and Lucies’. Lucies’ Branching Out is
one project in a series of designs with the Lucies’ name.
Tarlee sells kits and Lucies’ at theholebeadshoppe.com.
Carol Dean Sharpe has been the owner, designer, beader,
inventory manager, and bookkeeper at sandfi bers.etsy.com
for the past six years. She specializes in creating peyote
fl atwork cuff s (and the patterns for those cuff s), with an
occasional foray into brick stitch and right-angle-weave.
Tracy and Allison Stilwell have been combining fabrics,
buttons, papers, ribbons, threads, paints, and any number
of other materials for many years now. Wonderful quilts,
dolls, postcards, refurbished chairs, jackets, jeans, and
jewelry have all resulted from those eff orts. They both enjoy
following their creative bliss, running with sewing machines whirring, paints
fl owing, and threads weaving in and out of projects!
Cathi Tessier is the founder of the Guild of American Bead-
ers, a traveling movement of beaders who spread the skill
of beadwork as an artform. Cathi has traveled locally and
abroad, teaching bead classes for over 12 years at library
after-school teen programs, multi-cultural community pro-
grams, and home parties. Visit her website at lingeringbead.
weebly.com or e-mail her at [email protected].
Patricia C. Vener is an artist and beadweaver who enjoys
manipulating light and shadow, and color and texture, to
evoke a visceral emotional response. See Patricia’s art at
vener-art.com, on her blog, Twitter, Facebook fan page, in
her Etsy shop (silverdragon.etsy.com), and soon, Zazzle, for
graphics on production items (shoes, mugs, prints, etc.).
Ronna Sarvas Weltman is a jewelry artist and the author
of Ancient Modern: Polymer Clay + Wire Jewelry, and also
polymer clay and wire jewelry DVDs. She is also a contrib-
uting editor to Step by Step Wire Jewelry magazine.
Ronna teaches polymer clay, wire, and creativity classes
in the United States and internationally. She lives outside
Seattle, WA. Learn more about Ronna, her jewelry, and her workshops at
ronnasarvasweltman.com.
Pat Wexelblat’s work is getting more varied than ever, after
more than ten years playing with beads, clay, wire, and
ideas, and she’s still having fun doing it. Not only that, but
she’s still married to her best friend!
Terri Wlaschin lives in the Rockville/D.C. metro area with
her husband Pat and precious “pup” Raven. Her current
muses are metal, gemstone, polymer clay, and artisan
beads. Her shops can be found at starseedjewelry.etsy.com
and beads2die4.etsy.com. Terri can be reached via e-mail at
starseedjewelry.etsy.com.
beadworkmagazine.com 143
142-SBSB-2011-Contributors.indd 143 10/25/11 1:42 PM
10252011134415

144 best of step by step beads
i nc ludesinstruct iona l
DVD
WIRE ART JEWELRY
Wire Art Jewelry WorkshopStep-by-Step Techniques
and ProjectsSharilyn Miller
160 pages, 16 projects, 1-hour DVD
CALIFORNIA-BASED JEWELRY DESIGNER SHARILYN MILLER presents 16 new wire bracelets, necklaces, pendants, and earrings.
In Wire Art Jewelry Workshop, she shows you how to make each
stunning gallery-level piece and offers expert tips on creating custom
components and fi ndings. Plus, get a bonus DVD of Sharilyn
demonstrating each loop, twist, and bend for one-of-a-kind art jewelry.
experience
the market { stop to shop}
CaliforniaSan Gabriel Bead Co.—Arcadia
www.beadcompany.com Beads, books, gourds, tools, workshops, metals, and friendly advice. Tue–Thu 12–9, Fri 12–6, Sat 10–6, Sun 12–5. 325 E. Live Oak Ave. (626) 447-7753
IllinoisAyla’s Originals Bead Bazaar—Evanston
www.aylasoriginals.com Time stands still when you enter our sumptuous world of beads. Extraor-dinary colors, shapes, and creative possibilities await. We welcome you with genuine service and helpful hands. Come and let your imagination run free. (877) 328-AYLA1511 Sherman Ave. (847) 328-4040
MaineBeads on the Kennebec—Augusta
www.beadsonthekennebec.com Our customers say we’re the “best little bead shop in Maine.” An extraordinary selection of beads, tools, supplies, books, and a friendly, helpful atmosphere. Birthday/bridal beading parties, classes for all levels. Tue–Fri 10–5, Sat 10–3. 333 Water St. (207) 622-1666
MarylandBead Boutique—Prince Frederick
www.mdbeadboutique.com Large variety of unique and quality semi-precious beads, Swarovski, lampwork, freshwater pearls, seed beads, findings. Precious metals, PMC, charms, and tools. Great prices. Free work tables. Classes. Parties. Share our synergy! [email protected] Solomons Island Rd. South (410) 535-6337
MichiganStony Creek Bead & Gallery—Ypsilanti Twp.
www.stonycreekbead.blogspot.comSupporting the artist inside of you! Huge collection of Seed & Czech Beads. Bali, pearls, stones. Lampwork & Polymer Clay by MI artists. Classes, kits, books & so much more! I-94 to exit 183. South 1 mile. Tue - Fri 10-6, Sat 10-4, Sun 10-2 www.StonyCreekBead.blogspot.com2060 Whittaker Rd. (734) 544-0904
MissouriPlum Bazaar—Bransonwww.plumbazaarbeads.com
Bead store in historic downtown Branson, near the Branson Landing. Direct importer of beads. Bulk strands, turquoise, coral, gemstone beads, pearls, glass. Findings, sterling beads, complete line of supplies, and friendly instruction. Custom jewelry. Open 7 days! 123 E. Main St. (417) 337-7586 (PLUM)
New MexicoThe Beading Heart of Santa Fe—Santa Fe
www.beadingheartof santafe.comLargest selection of SEED BEADS in Santa Fe as well as numerous semi-precious strands, pearls, crystals, and Czech glass. We provide instruc-tion and feature finished jewelry by well-known local artists. We offer weekly classes in a variety of techniques for all skill levels, and we carry many pre-made kits. Our staff is friendly and knowledgeable and always welcome beaders to our “Community Table.” Mon–Sat 10–5:30. Email [email protected] West Alameda St. (505) 988-8961
North CarolinaOrnamentea—Raleigh
www.ornamentea.com Visit us for our wide selection of beads in glass, stone, pearl, and metal with worktables, classes, and the most helpful staff anywhere. We also carry art clay silver, Kato clay, glass-soldering supplies, paper-craft sup-plies, books, and unusual ribbons. We will be your favorite bead store!509 N. West St. (919) 834-6260
TexasAntiques, Beads & Crafty People—Pearland
www.abcraftypeople.com Our crafty people can help with your selection from our full line of bead- and jewelry-making supplies. Custom jewelry. Special orders welcome. Classes and parties. Mon–Sat 10–6. (S. of Houston) 2517 E. Broadway St. (281) 997-3600
CanadaBeadFX—Toronto
www.beadfx.com A must-see destination. Open 7 days a week. Breathtaking selection, great prices, and knowledgeable, bead-obsessed staff. We are a full-ser-vice bead store with classroom, design area, and lampworking studio. From Art Glass to Zircon (Blue), Zoisite (Ruby), and Zinnias (Swarovski). New stuff every week. Crystals, Seed beads, Stone beads, Pearls, Sterling, Copper, Wire, Metal Clay, Tools—way too much to list! If you want it, we have it. If we have it, you want it. 128 Manville Rd., #9 (877) 473-2323
Artbeads.com...............................................................c2
Beadalon.......................................................................9
BeadFX........................................................................51
Beadin’ Path, The.......................................................144
Cristina Leonard...........................................................51
Dreamtime Creations......................................................1
Ezel Findings................................................................51
Fire Mountain Gems & Beads.........................................c4
Rings & Things..............................................................27
Shiana..........................................................................51
Shipwreck Beads...........................................................39
Too Cute Beads..............................................................c3
Advertisers Index
144 SBSB 2011.indd 144 10/28/11 3:38 PM
10282011153915

C3 SBSB 2011.indd C3 10/27/11 11:14 AM
10272011111459

4 best of step by step beads
C4 SBSB 2011.indd C4 10/27/11 9:14 AM
10272011091437