bellcommander configuration guide polycom multicast...
TRANSCRIPT

1
BellCommander Configuration Guide – Polycom Multicast
Overview: BellCommander works with Polycom Soundpoint and VVX phones directly using multicast
for scheduled audio and on-demand notifications. BellCommander can either send multicast directly to
Polycom phones with the UC 4.0 or higher software or it can register as a SIP extension to a phone
system and make pages to phones through the phone system. This document details how to configure
BellCommander using multicast to Polycom phones. See our other phone-system specific guides at
http://www.acrovista.com/bellcommander/sip-version.html for SIP integration through the phone
system.
Audio Configuration
In this configuration of BellCommander, the BellCommander software is used for audio scheduling and
emergency notification. The BellCommander software communicates directly to the Polycom phones
using multicast.
Example Configuration:
The example configuration below is for a middle school with Polycom phones for all classrooms. The
BellCommander software communicates with the phones directly using multicast. The phones would
also register with a local or hosted SIP server to receive/make phone calls. The speakers are logically
organized by grades below, but the physical connection would be a standard network connection via a
PoE cable to each phone. The notification endpoints are options that allow BellCommander to send
audio to classroom PCs and Macs, IP speakers, and digital message boards.

2
Multicast Setup Guide
Phone Configuration:
BellCommander utilizes Polycom's Group Paging feature by acting as another phone on the system
(http://support.polycom.com/global/documents/support/technical/products/voice/Group_Paging_and_
PTT_FP62327.pdf) For the multicast audio to reach the phones, the BellCommander system will need
to have network access to reach the phones and if the phones are on a separate subnet, the switches
will need to be configured to forward multicast traffic.
To configure a Polycom phone:
1. Access the web interface for a phone by opening a web browser and typing the IP address of the
phone. On SoundPoint phones and VVX phones with firmware before version 5.3, enter
http://ipaddress where ipaddress is the phone's IP address. On VVX phones with firmware after
version 5.3, enter https://ipaddress
2. Login to the phone and go into the Advanced Settings.
3. Select Settings then Paging/PTT Configuration from the menu on the Advanced Settings page.
4. Note the multicast IP and port, since they'll be used in BellCommander.
5. Check the box to Enable Group Paging.

3
6. Click the Configure Groups button to configure the groups that the phone will be assigned to.
Set the Subscribe column to "Yes" for any groups/channels that the phone will play pages from.
Optionally, enter a name to identify the group number as. The same settings should be shared
by all phones in the group. In the example below, all 6th grade phones should be subscribed to
group 2. If group 3 was used for 7th grade, all 7th grade phones should be subscribed to group 3
and not group 2:
BellCommander Configuration:
1. In BellCommander, add the multicast addresses:
a. Open the BellCommander Device Manager by clicking the Devices button.
b. Select Multicast Groups from the Sound Device Type drop-down.
c. Click the Add… button.
d. Enter the following values:
Group Name – A name to identify the group by in BellCommander.
Multicast Group IP Address – The multicast IP address. The Polycom default is
224.0.1.116.
Multicast Port Number – The multicast port number. The Polycom default is 5001.
Interface IP – Generally, the computer’s IP with .255 at the end. If the computer is
192.168.2.132, then enter 192.168.2.255
TTL – Time-To-Live for packets. Generally, set to 1 if on the same subnet or 128 if
crossing subnets.

4
Multicast Type- Select Use Polycom Multicast and select the channel to send to.
e. Repeat steps c and d for each multicast group.
2. Test each multicast address, by selecting the multicast group from the list. Then, click the
Browse… button to locate a WAV file and click the Play Audio File button to play the WAV file.
The WAV file should play after the button is pressed.
5
Troubleshooting Notes:
If audio fails to play to the phones, check the following:
1. Verify that multicast IP and port settings match between BellCommander and the Polycom
phones and that group paging is enabled and that the groups are enabled on the Polycom
phones. Click the Save button if settings haven't been applied.
2. Try changing the multicast TTL from 1 to 128 in BellCommander.
3. Try temporarily disabling any firewalls on the BellCommander PC or on the network between
BellCommander and the phones or open the firewall on the network to allow UDP traffic on the
multicast port (default 5001).
4. If VMWare Workstation is being used on the system, it can cause multicast traffic to not be sent
if the drivers are not in synch with the network adapters. To synch the drivers, open the
VMWare Virtual Network Editor (open All Programs, select VMWare, then Virtual Network
Editor) on the host. Then, exit all running VMs and click the Change Settings button and then
click the Restore Defaults button.
5. If Sun VirtualBox is being used, disable the VirtualBox Host-Only Network Adapter.
Scheduling for Multicast Groups:
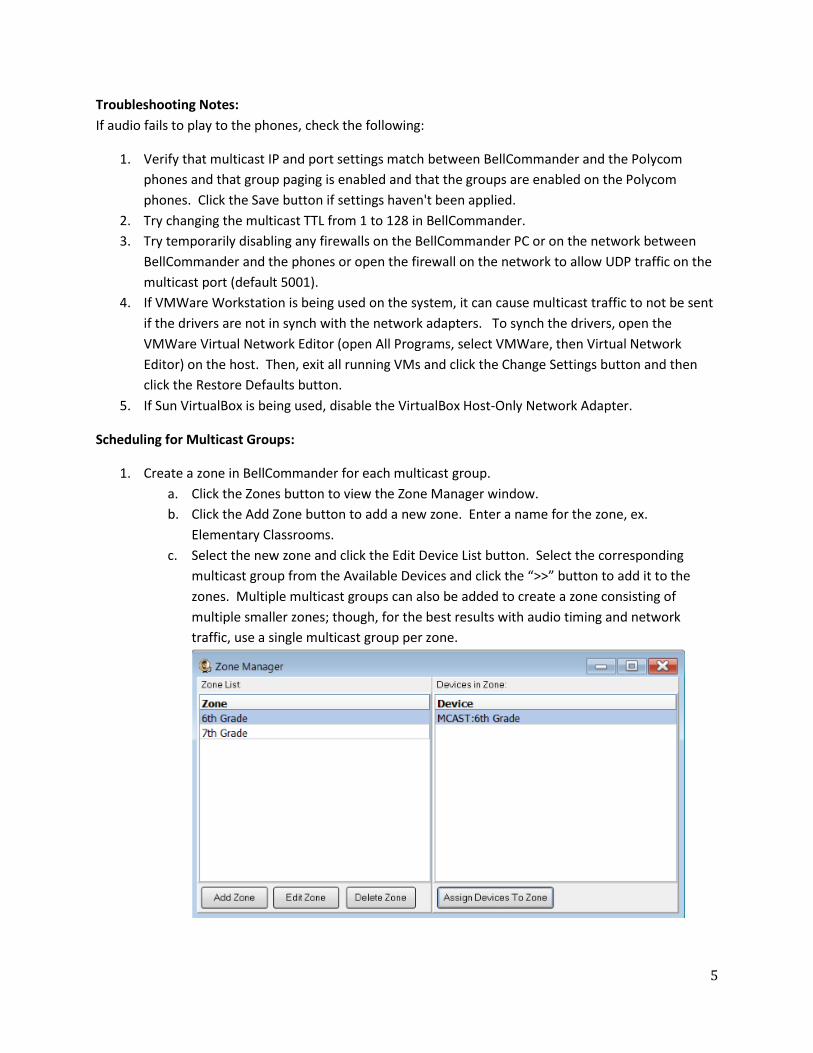
1. Create a zone in BellCommander for each multicast group.
a. Click the Zones button to view the Zone Manager window.
b. Click the Add Zone button to add a new zone. Enter a name for the zone, ex.
Elementary Classrooms.
c. Select the new zone and click the Edit Device List button. Select the corresponding
multicast group from the Available Devices and click the “>>” button to add it to the
zones. Multiple multicast groups can also be added to create a zone consisting of
multiple smaller zones; though, for the best results with audio timing and network
traffic, use a single multicast group per zone.

6
2. Create a day schedule. A day schedule represents a single day’s 24 hour schedule that can be
applied to dates on the BellCommander calendar. To create a Day Schedule:
a. Click the Day Scheduler button.
b. Click the top Add button to add a new day schedule. Enter a name to identify the
schedule, ex. Standard Schedule
c. Click the Add Bell button to add a new bell to the schedule. In the Add Bell window,
i. Select the time for the bell.
ii. Select the zone that the bell should play to.
iii. For a single sound file select, select “Sound File” for the event type and
select a WAV audio file.

7
3. Assign the day schedule(s) to the Calendar Scheduler. To assign schedules to the Calendar
Scheduler:
a. Click the Calendar button to view the Calendar Scheduler window.
b. Click the Set Default Weekly schedule button to set the default schedule and set the
following values:
Weeks in the schedule:
If schedule is the same every week, select “Same schedule every week”.
If schedule repeats bi-weekly, select “Schedule is a two week cycle”.
If schedule repeats tri-weekly, select “Schedule is a three week cycle”.
Schedule Start Date – If schedule starts in the future select a future date; otherwise, the
default value (12/30/1899) will start the schedule immediately.
Select Week Number – If using a bi-weekly or tri-weekly schedule, this allows the first,
second, or third week to be selected for the days of the week listed. Select 1 to
program the first week, 2 to program the second week, 3 to program the third week.
Days of the week – Use the drop-down for each day of the to select a schedule. If no
audio should be scheduled for the day of the week, leave the day name blank.
c. To set different schedules by date, add additional schedules in the Day Scheduler and
select dates on the calendar and click the Set Exception Schedule button to set different
schedules by date.

8
Notifications:
To configure notifications to broadcast to Polycom phones, follow the instructions on pages 2-3 to
configure the multicast groups on the phones. Then, either use an existing multicast group in
BellCommander or add a new group and assign the group to a zone in the Zone Manager.
To configure the notifications in BellCommander to use the Polycom phones:
1. Click the Notifications button on the toolbar to open the Notifications window.
2. Select a notification or add a new notification.
3. In the notification actions, add or edit the actions within a notification and select the zone that
was added. Then, select a WAV audio file to play:
After changing the notification, test the notification by clicking the notification button in the notification
bar on the left side of the main BellCommander window. Clicking the button once will activate the
notifications. Clicking the button a second time will de-activate the notification. While a notification is
active, no bell events will play.

9
To configure the notifications to be launched from a call into BellCommander, a SIP code should be
defined for the notification. To set the SIP code, edit the notification and enter a SIP code:
BellCommander should also register a SIP extension that authorized users can dial to trigger emergency
notifications. An extension should first be added to the phone system that BellCommander will
register. The procedure to add the extension will vary by phone system. See
http://www.acrovista.com/bellcommander/sip-version.html for phone system guides. Most systems
should be similar to Trixbox, if not listed. After adding the BellCommander extension to the phone
system, add the extension to BellCommander:
a. Open the BellCommander Device Manager by clicking the Devices button.
b. In the Sound Device Type drop-down select “SIP Extension”
c. Check “Enable SIP Extensions”
d. Enter the SIP server IP and port number.
e. Click the Apply button.
f. Add a SIP extension for BellCommander to register:
i. Click the Add… button under Local SIP Extensions.
SIP Extension - Extension that was added to .
Extension Password – Password for the extension that was added to the phone system.
Local Port Number – Can typically use the default value
Answer Option – Select to wait for user to enter SIP code. Alternatively, an emergency
notification can be launched immediately when the user dials the extension.
SIP Server Options – Select “Connect to default SIP server”
ii. After adding the extension, the extension should appear in the Local SIP Extension list
with a status of “Registered”
g. Add the extensions that are allowed to call BellCommander for emergency notification.
i. Click the Add… button under Allowed Extensions.

10
ii. Enter a phone extension that will be allowed to call BellCommander.
iii. Repeat for additional extensions. BellCommander is licensed by the number for allowed
extensions, so the number of allowed extensions may be restricted by the license.
To launch a notification from a phone, use a phone that is listed under the Allowed Extensions
list and dial the extension that was added under SIP Extensions. Enter the SIP code followed by
the # key to start the notification (ex. 991#). Enter the 999# to stop an active notification.
Paging:
Paging with the Polycom phones is normally performed directly within a phone system by a user dialing
a paging group extension/code that has Polycom phones assigned to it or by using the PTT feature on
the Polycom phones.
BellCommander can also act as a SIP to multicast gateway to page to the Polycom phones. Users would
call the BellCommander extension and BellCommander would take the audio from the call and send it
via multicast to the Polycom phones. This is a relatively new feature for Polycom phones, since SIP
audio has to be transformed by BellCommander to Polycom's multicast format. BellCommander version
5 Build 15c or higher will be needed for this feature.

11
To configure direct paging from the BellCommander extension to multicast, follow the same steps on
pages 9-10 to add a SIP extension to BellCommander, except set the Answer Option to Page Zone and
select the zone with the multicast group assigned to it.
To page from a phone, dial the BellCommander extension (500 in the example above) from a phone in
the Allowed Extensions list and BellCommander should answer and immediately begin sending audio
from the call to the multicast group.