bedtime lilly - zhaya.de · bedtime lilly feel free to sell your finished items. mass production...
TRANSCRIPT

Bedtime Lilly
Feel free to sell Your finished items. Mass production is - of course - not permitted. Do not copy, alter, share, publish or sell pattern, pictures or images. Copies be made for owner’s personal use only.
* * * ATTENTION: Please be aware that I only share my patterns via www.zhaya.de/www.zhaya.eu. If you have downloaded this FREE pattern from anywhere else, please delete it immediately - as there are sites where anonymous hackers upload pattern files containing viruses, allowing them to access your computer and steal your personal and financial details.
Materials: • Wool (Sport weight), e. g. Cotton, for me:
✴ for the sleepwear: Schachenmayr Catania solids/Scheepjes Catona Fb. 401 and some off-white or creme
✴ for the slippers: some off-white, creme or white (Catania/Catona) and some fluffy yarn with similar gauge (you can also use the cotton yarn and brush with a tough brush until it’s fluffy
✴ for the bed: Schachenmayr Catania/Catona: 2x 50 g Fb. 258, 50 g Fb. 105, Catania/Catona: 50 g Fb. 518
✴ for pillow and blanket: Catania/Catona 50 g Fb. 238 ✴ some pink yarn for the bunny noses
• Crochet hook in suitable size, for me: 2.0 mm and 3.5 mm • Some stuffing (for the pillow and if necessary for the mattress) • 4 little eyes for the bunny slippers (for me: 4 mm) - alternatively you can
embroider the eyes with some black thread without any problems • solid cardboard • maybe some foam material for the mattress - but it is also possible to fill the
mattress with stuffing • 3 little buttons, about 1 cm diameter
Abbreviations (US Terms): MR = magic ring sc = single crochet hdc = half double crochet dc = double crochet ch = chain st = stitch slst = slip stitch inc = increase dec = decrease BLO = back loop only FLO = front loop only rev sc = reverse single crochet
First published: 24. Mai 2017
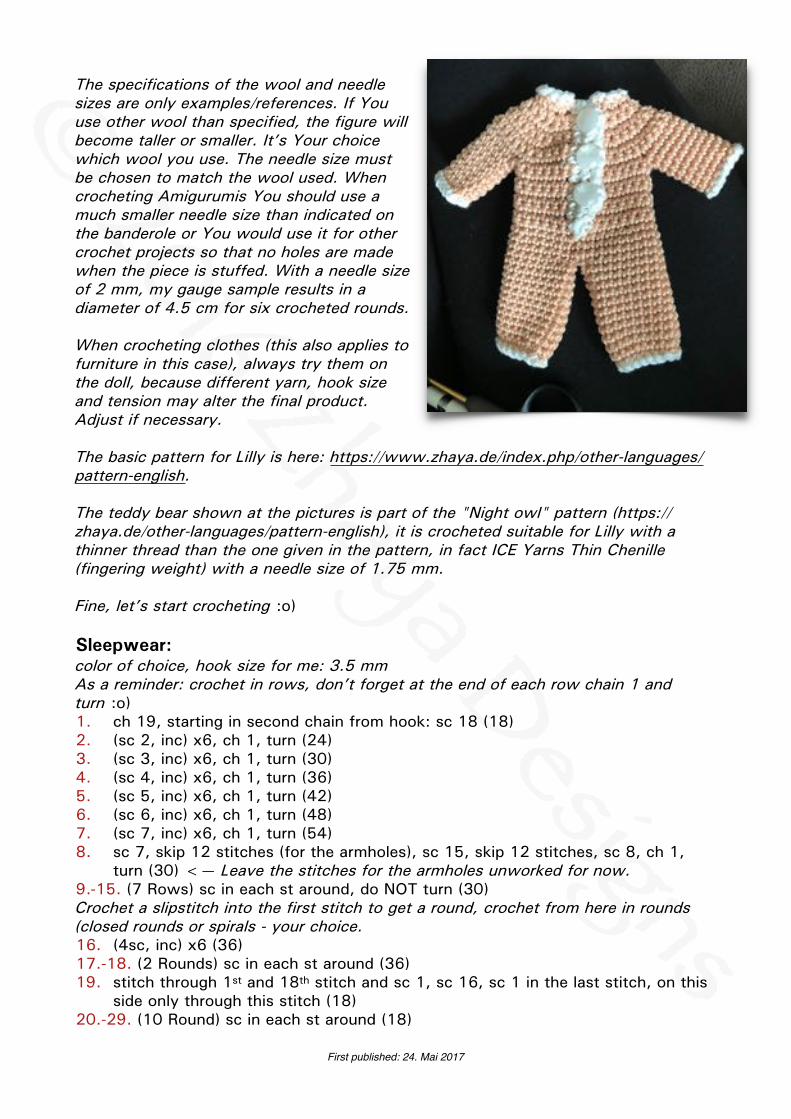
The specifications of the wool and needle sizes are only examples/references. If You use other wool than specified, the figure will become taller or smaller. It’s Your choice which wool you use. The needle size must be chosen to match the wool used. When crocheting Amigurumis You should use a much smaller needle size than indicated on the banderole or You would use it for other crochet projects so that no holes are made when the piece is stuffed. With a needle size of 2 mm, my gauge sample results in a diameter of 4.5 cm for six crocheted rounds.
When crocheting clothes (this also applies to furniture in this case), always try them on the doll, because different yarn, hook size and tension may alter the final product. Adjust if necessary.
The basic pattern for Lilly is here: https://www.zhaya.de/index.php/other-languages/pattern-english.
The teddy bear shown at the pictures is part of the "Night owl" pattern (https://zhaya.de/other-languages/pattern-english), it is crocheted suitable for Lilly with a thinner thread than the one given in the pattern, in fact ICE Yarns Thin Chenille (fingering weight) with a needle size of 1.75 mm.
Fine, let’s start crocheting :o)
Sleepwear: color of choice, hook size for me: 3.5 mm As a reminder: crochet in rows, don’t forget at the end of each row chain 1 and turn :o) 1. ch 19, starting in second chain from hook: sc 18 (18) 2. (sc 2, inc) x6, ch 1, turn (24) 3. (sc 3, inc) x6, ch 1, turn (30) 4. (sc 4, inc) x6, ch 1, turn (36) 5. (sc 5, inc) x6, ch 1, turn (42) 6. (sc 6, inc) x6, ch 1, turn (48) 7. (sc 7, inc) x6, ch 1, turn (54) 8. sc 7, skip 12 stitches (for the armholes), sc 15, skip 12 stitches, sc 8, ch 1,
turn (30) <— Leave the stitches for the armholes unworked for now. 9.-15. (7 Rows) sc in each st around, do NOT turn (30) Crochet a slipstitch into the first stitch to get a round, crochet from here in rounds (closed rounds or spirals - your choice. 16. (4sc, inc) x6 (36) 17.-18. (2 Rounds) sc in each st around (36) 19. stitch through 1st and 18th stitch and sc 1, sc 16, sc 1 in the last stitch, on this
side only through this stitch (18) 20.-29. (10 Round) sc in each st around (18)
First published: 24. Mai 2017
30. (4 sc, dec) x3 (15) Fasten off invisibly. For the second trouser leg join to round 19 again and crochet this trouser leg the same way. Join with a slipstitch or a standing single crochet to the lower side of an armhole. • inc, sc 10, inc • (7 Rounds) sc in each st around (14) Fasten off invisibly. Work the second sleeve the same way. Join with a contrasting color (e. g. off-white) with a slipstitch to a sleeve, crochet (ch 1, slst 1) until you reach the end of the round, finish with a chain and fasten off invisibly. Repeat this for the second sleeve and for both trouser legs. Join with a slipstitch to the right side of the collar (if you look at it from the front, it’s the left side), crochet again (ch 1, slst 1) around the collar, rotate 90 degrees: work sc 1 per row, make a slipstitch into the V-like point at the bottom, sc 1 per row at the other side, slipstitch into the first stitch of the collar, turn. Ch 1, skip the slip stitch, sc 1, (maybe adjust the size of the following buttonholes to fit your buttons) *ch 1-2, skip 1-2 stitches, sc 2-3* (you may adjust it too). Repeat this to make 2 more buttonholes (if you’re using bigger buttons you just need 2 buttonholes), end up with a slipstitch, turn. ch 1, skip the slipstitch, crochet (slst 1, ch 1) until the end of the row, finish with a slipstitch into the last single crochet. Fasten off invisibly. Attach the buttons.
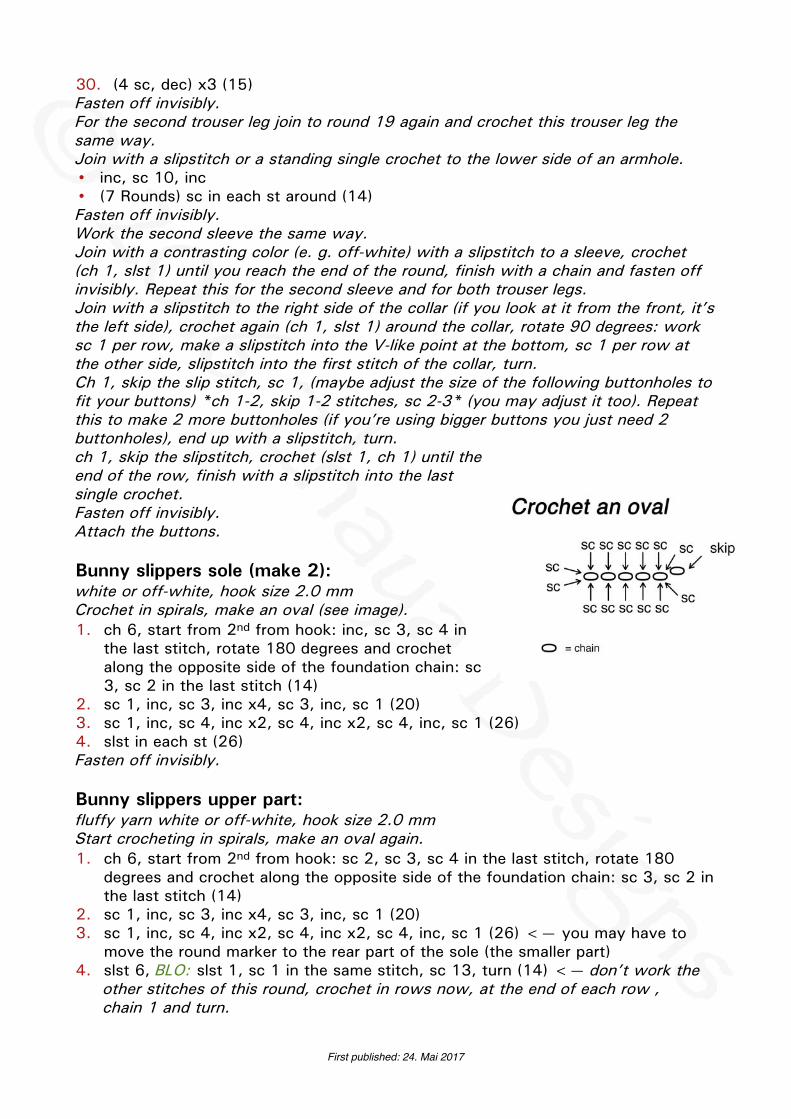
Bunny slippers sole (make 2): white or off-white, hook size 2.0 mm Crochet in spirals, make an oval (see image). 1. ch 6, start from 2nd from hook: inc, sc 3, sc 4 in
the last stitch, rotate 180 degrees and crochet along the opposite side of the foundation chain: sc 3, sc 2 in the last stitch (14)
2. sc 1, inc, sc 3, inc x4, sc 3, inc, sc 1 (20) 3. sc 1, inc, sc 4, inc x2, sc 4, inc x2, sc 4, inc, sc 1 (26) 4. slst in each st (26) Fasten off invisibly.
Bunny slippers upper part: fluffy yarn white or off-white, hook size 2.0 mm Start crocheting in spirals, make an oval again. 1. ch 6, start from 2nd from hook: sc 2, sc 3, sc 4 in the last stitch, rotate 180
degrees and crochet along the opposite side of the foundation chain: sc 3, sc 2 in the last stitch (14)
2. sc 1, inc, sc 3, inc x4, sc 3, inc, sc 1 (20) 3. sc 1, inc, sc 4, inc x2, sc 4, inc x2, sc 4, inc, sc 1 (26) <— you may have to
move the round marker to the rear part of the sole (the smaller part) 4. slst 6, BLO: slst 1, sc 1 in the same stitch, sc 13, turn (14) <— don’t work the
other stitches of this round, crochet in rows now, at the end of each row , chain 1 and turn.
First published: 24. Mai 2017
5.-7. (3 Rows) sc in each st around, ch1, turn (14) 8. sc 1, (skip 1 stitch, sc 1) x6, sc 1, ch 1, turn (8) 9. (skip 1 stitch, sc 1) x4, ch 1, turn (4) 10. (skip 1 stitch, sc 1) x2, ch 1, turn (2) 11.Crochet along the side sc 5-6, sc 1 in the corner (between upper part and sole),
slst 12 along the sole, sc 1 in the corner, sc 5-6 along the other side from the upper part, slst into the first sc
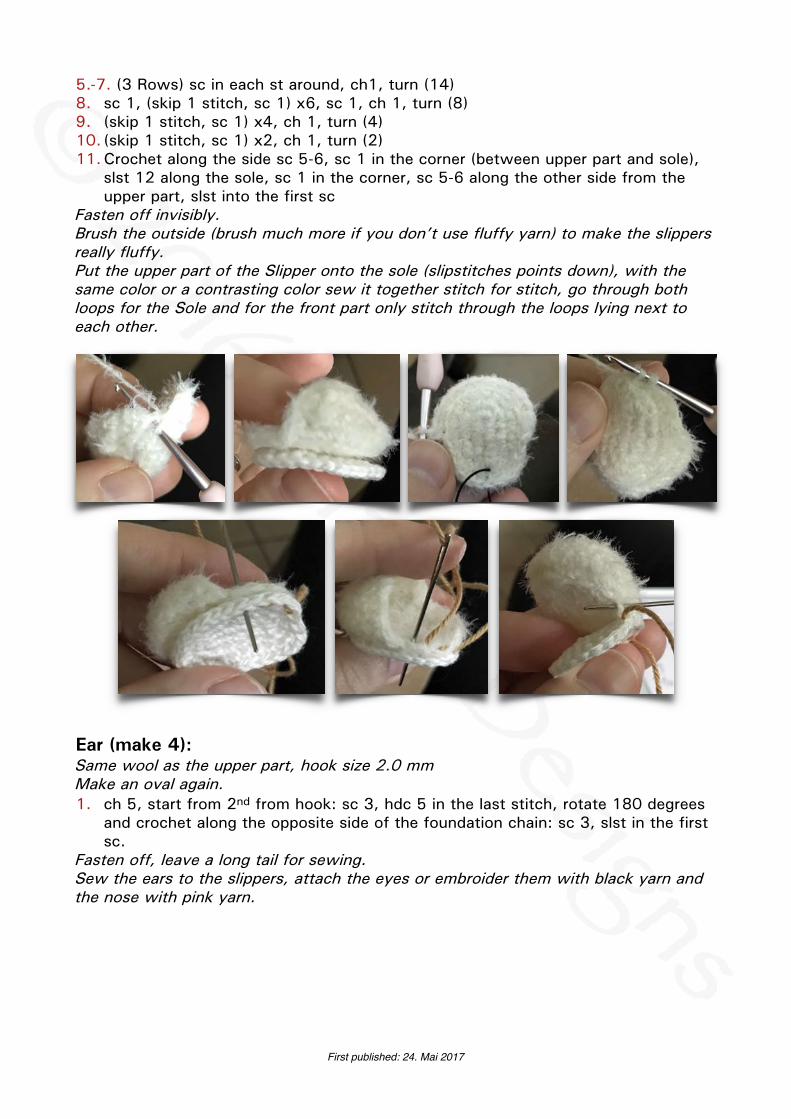
Fasten off invisibly. Brush the outside (brush much more if you don’t use fluffy yarn) to make the slippers really fluffy. Put the upper part of the Slipper onto the sole (slipstitches points down), with the same color or a contrasting color sew it together stitch for stitch, go through both loops for the Sole and for the front part only stitch through the loops lying next to each other.
Ear (make 4): Same wool as the upper part, hook size 2.0 mm Make an oval again. 1. ch 5, start from 2nd from hook: sc 3, hdc 5 in the last stitch, rotate 180 degrees
and crochet along the opposite side of the foundation chain: sc 3, slst in the first sc.
Fasten off, leave a long tail for sewing. Sew the ears to the slippers, attach the eyes or embroider them with black yarn and the nose with pink yarn.
First published: 24. Mai 2017

For the bed I have given stitch and row/lap numbers, but these are only examples. Other wool and needle size also changes the size, but in this case it is mainly depending on the cardboard sizes used, how much has to be crocheted. However, it is very easy to adjust the size, as only more stitches and rows have to be added, most pieces are crocheted without increases or decreases, so just keep crocheting or stop earlier.
First you have to cut the cardboard to the required size. If you don't have a very stable cardboard, you can help yourself simply by double-using the cardboard and gluing the layers together with glue. This gives good stability. Or use some plastics (e. g. of packaging).
To find out the size of the bed surface, put Lilly on the cardboard. It can be a bit short, because of the wool on each side. Of course, it doesn't have to be so short. Also needed is a headboard and footplate, a bit wider than the bed surface, the headboard has been made higher than the footplate (the footplate is only about ⅔ as high as the headboard. Also two equal side parts. The side parts are quite low in height and as wide as the bed surface is long (see pictures).
I’ve started with the headboard (but you can start with each other part too - it doesn't matter). I’ve been using hook size 2.0 mm for all the bed parts. You can use each wool, hook size and color you like.
Ch 28, from 2nd from hook: sc 27. The foundation chain must be slightly longer than the width of the cardboard. After 3-4 rows, check the width again, when crocheting, the stitches still shrink a little bit, so it is better to check more often at the beginning, so that it is not too narrow at the end. Even later, it should be a little bit overhanging on the left and right side of the crochet piece so that it can still be inserted into the stitches on the side for joining later. Now just crochet so many rows (not forgetting the chain at the beginning of each row to bridge the height) until the whole cardboard surface is covered and also sticks out a little bit above and below. For me it was after 40 rows.
Fasten off invisibly the first (inner) part (for me: the lighter color). Do not fasten off the second (outer) part (in my case the darker color). Put both parts exactly on top of each other, the inner part points to me, now go through the first stitch and pull the active loop through. Now crochet around with single crochets, only on the ground I made slip stitches. Insert the hook always into both parts, make 3 stitches into each corner. When 2 or 3 sides are closed, insert the cardboard. Close the round with a slipstitch into the first sc. You can make reverse single crochets along the top edge.
First published: 24. Mai 2017

The footplate is worked the same way, but I had already reached the desired height after 26 rows. For this I needed two parts as well, I used the lighter one inside and the darker one outside. Of course the colour design is completely up to you, you can of course use only one colour or many more colours. :o)
I have crocheted the bed surface and side parts in the darker colour, it doesn't matter which color you are using, because the bed surface is almost invisible. I have crocheted the fabric for the bed surface in one piece, so that it is enough for the cardboard (in my case ch 54 and 50 rows with sc 53 each were necessary). This time I didn't crochet the ends together, but sewed them together. Put the fabric around the cardboard and sew the first and the last row stitch by stitch together. The seam runs along the middle of the underside. Last sew the sides together (see the left picture).
Now you just need the side parts of the bed frame. I crocheted it with the darker color in such a way that the rows run in one direction from bottom to top at the sides of the bed. I have crocheted only one piece for the side pieces as well, so it fits around the cardboard (for me: ch 54 and 13 rows with sc 53 each). For these pieces I only crocheted the long side together (see picture on the right). The two short sides do not need to be closed, they close automatically when the bed frame is sewn together. However, they can also be sewn up with a few stitches.
Now all parts of the bed frame are finished and it's time to assemble. To do this, I first combined the side parts and the bed surface. The crocheted side of the side panels point downwards and are sewn together with the long sides of the bed surface. Once this has been done on both sides, only the bed surface with headrest and footrest have to be connected. The best way to do this is to put the parts together with pins first, so that you can find a good height for sewing together, put Lilly next to it and see how it fits best. On the picture below on the right the bed surface is still missing, but this is first sewn together with the side parts as described (see left picture below).
First published: 24. Mai 2017
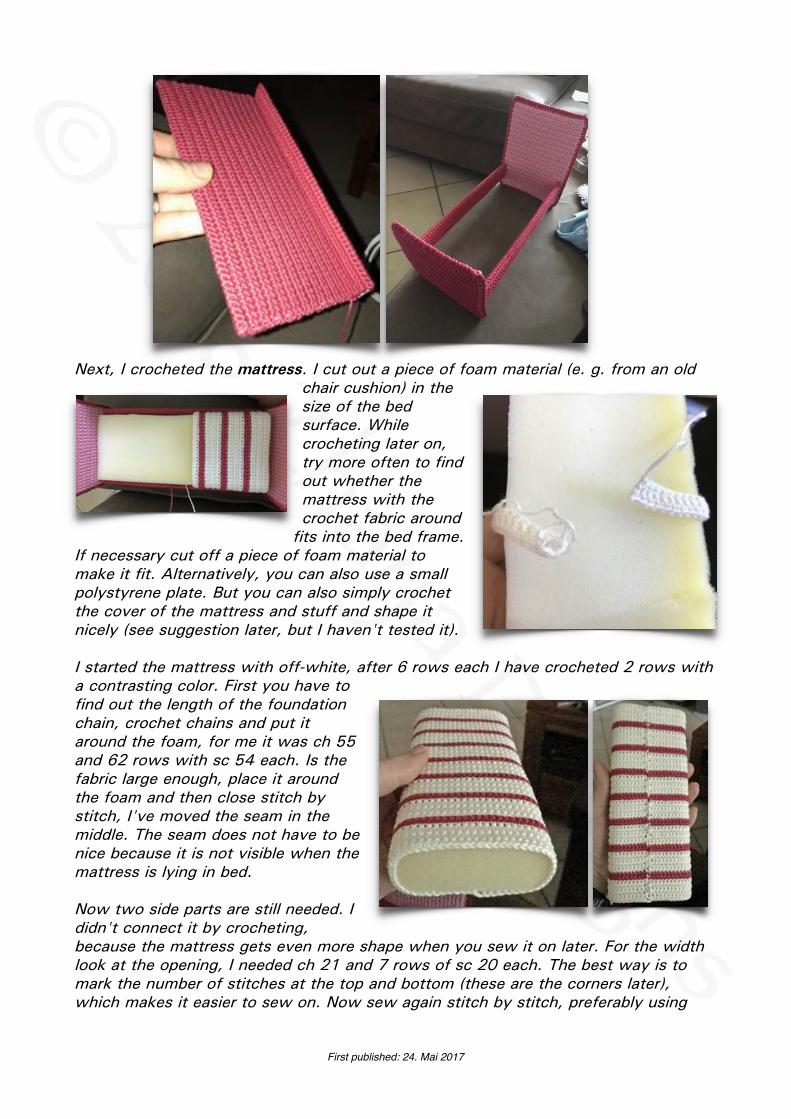
Next, I crocheted the mattress. I cut out a piece of foam material (e. g. from an old chair cushion) in the size of the bed surface. While crocheting later on, try more often to find out whether the mattress with the crochet fabric around
fits into the bed frame. If necessary cut off a piece of foam material to make it fit. Alternatively, you can also use a small polystyrene plate. But you can also simply crochet the cover of the mattress and stuff and shape it nicely (see suggestion later, but I haven't tested it).
I started the mattress with off-white, after 6 rows each I have crocheted 2 rows with a contrasting color. First you have to find out the length of the foundation chain, crochet chains and put it around the foam, for me it was ch 55 and 62 rows with sc 54 each. Is the fabric large enough, place it around the foam and then close stitch by stitch, I've moved the seam in the middle. The seam does not have to be nice because it is not visible when the mattress is lying in bed.
Now two side parts are still needed. I didn't connect it by crocheting, because the mattress gets even more shape when you sew it on later. For the width look at the opening, I needed ch 21 and 7 rows of sc 20 each. The best way is to mark the number of stitches at the top and bottom (these are the corners later), which makes it easier to sew on. Now sew again stitch by stitch, preferably using
First published: 24. Mai 2017

the ladderstitch. On the pictures above you can see how the side of the mattress still shapes a little. * If you want to fill the mattress with stuffing, it will be a bit more difficult, but it
should also work. For the size you have to look at the bed surface and the height of the side panels. In this case I would work directly in rounds, you have to look for the number of chains, close it to round with a slipstitch in the first chain, and then crochet a tube in spiral or circular loops. Make 2 side panels as shown above. Then sew on one side panel, stuff and shape mattress and finally sew on the other side panel. As already mentioned, I have not tested this version, because it is easier to make and more stable with foam material.
Only pillow and blanket are not crocheted yet. For both of them I used the largest needle size indicated on the banderole so that the fabric does not become too rigid - in my case hook size was 3.5 mm.
For the pillow I crocheted a foundation chain with powder pink in the approximate width of the bed surface, for me it was ch 25. Crochet so many rows with e. g. sc 24 that a square is created, but only go through the back loops in each row, because it makes the fabric more elastic. Crochet two of these squares, fasten off the first and do not fasten off the second. Place both parts on top of each other, the one with the active stitch comes to the back, this stitch is on the right. Now go through the first stitch of the front piece with your hook and pull the loop through. Work single crochets all around, make sc 3 in each corner and loosely stuff the pillow before finally closing it. Crochet a whole round of reverse single crochets and fasten off invisibly.
The blanket can be crocheted in any pattern and, of course, the size of the blanket should be adjusted to the bed. I used the following pattern: Crochet a suitable number of ch for the foundation chain (number has to be dividable by 3): 1. start from 3rd chain from hook: sc 1, skip 2 stitches, *(sc 1, ch 1, dc 1) in one
stitch, skip 2 stitches** repeat from * to ** and ending with sc 1 in the very last stitch, ch 1, turn
2. *(sc 1, ch 1, dc 1) in the next chain space** (You have to take a close look to make sure you don't miss the first chain space), repeat between * and ** ending with sc 1 in the last stitch, ch1, turn
Repeat round 2 until the desired length is reached. First published: 24. Mai 2017

Finally surround the blanket with sc, finish with a slst and fasten off invisibly. You can crochet a border as you like, e. g. slst 1, ch 1 alternating, picots, shells or similar.
Whoever has made it to this point will be rewarded with a bed for Lilly and her night suit :o)
I hope my description has become halfway understandable.
First published: 24. Mai 2017