bdi-2™ mobile data solution for windows® - … · highly familiar with the administration of the...
TRANSCRIPT

Page 1
BDI-2™ Mobile Data Solution for Windows®
Riverside Publishing Company 3800 Golf Road, Suite 200 • Rolling Meadows, IL 60008
Phone: 800.323.9540 • Web: www.riversidepublishing.com

Page 2
Table of Contents
BASIC NAVIGATION ........................................................................................................................................ 3
Starting and Logging In ............................................................................................................................ 3
Adding a Child Record .............................................................................................................................. 3
Starting a New Assessment ..................................................................................................................... 5
Entering Assessment Data: Guided ................................................................................................... 6
Entering Assessment Data: Unguided ............................................................................................. 10
Entering Assessment Data: General Navigation ............................................................................. 6
Adding Test Observations ...................................................................................................................... 10
Uploading Data from Mobile Data Solution to Data Manager .......................................................... 12
Failed Data Transfers ............................................................................................................................. 13
Upload History ......................................................................................................................................... 13
ADDITIONAL FUNCTIONS ............................................................................................................................ 13
Browsing/Updating Child Information ................................................................................................. 13
Deleting a Child Record ......................................................................................................................... 14
Resuming an Assessment ....................................................................................................................... 15
Reports ..................................................................................................................................................... 18
Head Start Notes ..................................................................................................................................... 21
Date Document Version March 1, 2011 Version 1.0
Riverside Publishing Customer Support: e-mail: [email protected] phone: 800.323.9540 ext 6070
hours: Monday-Friday 8AM to 6PM CT

Page 3
BASIC NAVIGATION
Starting and Logging In
• Double click the BDI-2 Mobile icon on your desktop to start the program.
• The login screen will appear.
• Enter your User ID and Password then click the Sign In button. Once you are signed in, the Welcome screen will appear.
Adding a Child Record
• Click on the Add a New Child Record link from the Welcome screen.
• Fill in the required information (fields marked with a red asterisk).

Page 4
• Assign the child to a location in the Data Manager hierarchy by selecting the Organizations tab on the left.
• Select the location and class/group with which the child is associated; click to put a check in the box beside the class into which the child is to be placed.
Note: It is necessary to assign a child to a class/group for data to be uploaded to Data Manager.
• Use the tabs on the left side of the screen to add any other additional (optional) information on the child’s address, family information, etc.
• Click Save when all needed information has been added.

Page 5
• The Home icon ( ) in the upper right corner of the screen will return you to the Home/Welcome screen.
Starting a New Assessment
The Start a New Assessment button on the Welcome screen will take you to the New Assessment screen. New complete assessments and new screeners are started from this screen.
• From the Welcome screen, select Start a New Assessment.
• Step 1: Select the child you want to assess. You can scroll and select the child from the list of children or you can search for a child (by first name, last name, date of birth, etc.).
• The selected child’s information will show on the right side of the screen.
• For each additional step for a new assessment, make a selection: o Step 2: Choose Complete or Screener o Step 3: Choose English or Spanish Retest o Step 4: Select the assessment date (the default is the present date) o Step 5: Select Guided or Unguided

Page 6
• Select Start Assessment.
Note: You can set defaults for Steps 2 through 5 by selecting the User Settings button in the upper right corner of the Welcome screen. This will allow you select the settings for each step; consequently, your selections become your default for each subsequent assessment.
Entering Assessment Data: General Navigation
Item Scoring
To score an item being administered, click the procedure then click the score. The system will record the score and display the next item.
Additional Item Information
• Select the Show More icon to receive detailed item administration and scoring information.
Guided: This mode presents questions in order within a subdomain. When you
enter scores for a question, it will automatically take you to the next question
within the subdomain. You can switch to Unguided mode in the middle of a test.
Unguided: This mode allows you to go between questions between Sub-domains
without having to follow a particular order. Once you select this mode, you cannot
switch back to the Guided mode. This mode is advantageous for examiners who are
highly familiar with the administration of the Battelle.

Page 7
• You will be provided with detailed information on how to administer and score the item.
Multiple Response Items
• Some items require more than one response. In such cases, select the responses from the selections shown.
• Click the Next button to proceed to the next question.

Page 8
Timed Items Some items are timed. In such cases, the program provides a timer for
administering the item.
• Click the Start Timer button to start the timer and then administer the item.
• When the child has completed the task, click the Stop Timer button to stop the timer.
• Click the check box beside the items that were completed correctly.
• Click the Next button to proceed to the next question.
Entering Assessment Data: Guided
In Guided mode, navigation through the questions is done automatically. Depending upon how the child performs on each task or activity, the program advances or moves back through the test items. If a child cannot successfully perform the task at the starting point to establish a basal, the program will continue to move back through test items until a basal is established.
When the Assessment Administration screen opens, the age-appropriate starting point is the first item highlighted on the question list.
After establishing a basal, continue testing until a ceiling is reached. Once the ceiling level has been reached, the subdomain is complete. When the subdomain is complete, the system will automatically move to the next subdomain.
In Guided mode, to score an item being administered, select the procedure and the score for the item. The system will record the score and display the next item.
• Enter the score (2, 1, or 0) and the procedure (Structured, Observation, or Interview) for the first item.

Page 9
• Continue with each item in the subdomain, entering scores and procedures, until the basal and ceiling have been established.
Note: You do not have to establish a basal or ceiling for the current domain before moving to another domain. To move to a new domain/subdomain, click the domain/subdomain name in the Domain List.
• When the basal and ceiling have been established for a subdomain, a green check mark will appear beside the subdomain name on the right side of the screen, indicating that the administration of that subdomain has been completed.
• The suggested first item for the subsequent subdomain will then be displayed.
• Continue administering items from any and/or every subdomain.

Page 10
• Continue until all needed items are administered.
• Select Save & Resume Later (if you need to continue with the assessment at a later time) or Conclude Assessment if the assessment is complete.
Entering Assessment Data: Unguided
• Select the subdomain where you want to begin the assessment from the list of subdomains on the right.
• The suggested first item for the selected subdomain will be displayed.
• Enter the score (2, 1, or 0) and the procedure (Structured, Observation, or Interview) for the item.
• Click Next to go to the next item in the subdomain or select a different subdomain from the list of subdomains on the right.
• Continue administering test items.
• Select Save & Resume Later (if you need to continue with the assessment at a later time) or Conclude Assessment if the assessment is complete.
Adding Test Observations
Test observations can be added to any test and are included in the reports.

Page 11
• Select Test Observations. (For an assessment that already has item data entered, select the child, then select Resume Assessment; from there you can select Test Observations.)
• Add information about the Test Validity or select another category from the menu on the left on which to make observations.
• Test observation information can be entered into the text box for other
categories of observations.

Page 12
Uploading Data from Mobile Data Solution to Data Manager
All child records created or edited within the BDI-2 Mobile Data Solution for Windows application which are complete will be displayed in the Records table.
• Click the checkbox beside the child record to select the record or click the Select All checkbox to select all child records.
Note: A child must have an assigned location in order for an assessment to upload to Data Manager.
• Click the Upload button to upload the selected records.

Page 13
Failed Data Transfers
All records that failed to upload will be displayed on the Failed Data Transfers screen.
• Click the checkbox beside the child record to select the record or click the Select All checkbox to select all child records.
• Click the Re-upload button to attempt to upload the selected records again.
• Click the Edit button to edit the selected record. The Edit button will become active when a single child record (without assessment) is selected.
Upload History
All records that have been uploaded within the past six months (or within the user defined Backup Time set on the User Settings screen) will be displayed here.
ADDITIONAL FUNCTIONS
Browsing/Updating Child Information
• From the Child Information menu on the Welcome screen, click Browse or Update a Child Record.
• Select the child that you want to browse/update.
• Select Edit Child Record.
• Make any needed changes.

Page 14
• Select a category from the options on the left side of the screen to view or edit information in other categories.
• Click OK when all changes have been made or click Cancel to exit without making changes.
Deleting a Child Record
Child records that have been created in the BDI-2 Mobile Data Solution and have not been uploaded to Data Manager can be deleted.
• From the Child Information menu on the Welcome screen, click Browse or Update a Child Record.
• Select the child that you want to delete.
• From the Action menu on the right, select Delete Child Record.

Page 15
• Select Yes if you want to permanently delete this child’s record.
Resuming an Assessment
• From the Assessments menu on the Welcome screen, click Resume an Assessment.
Page 16
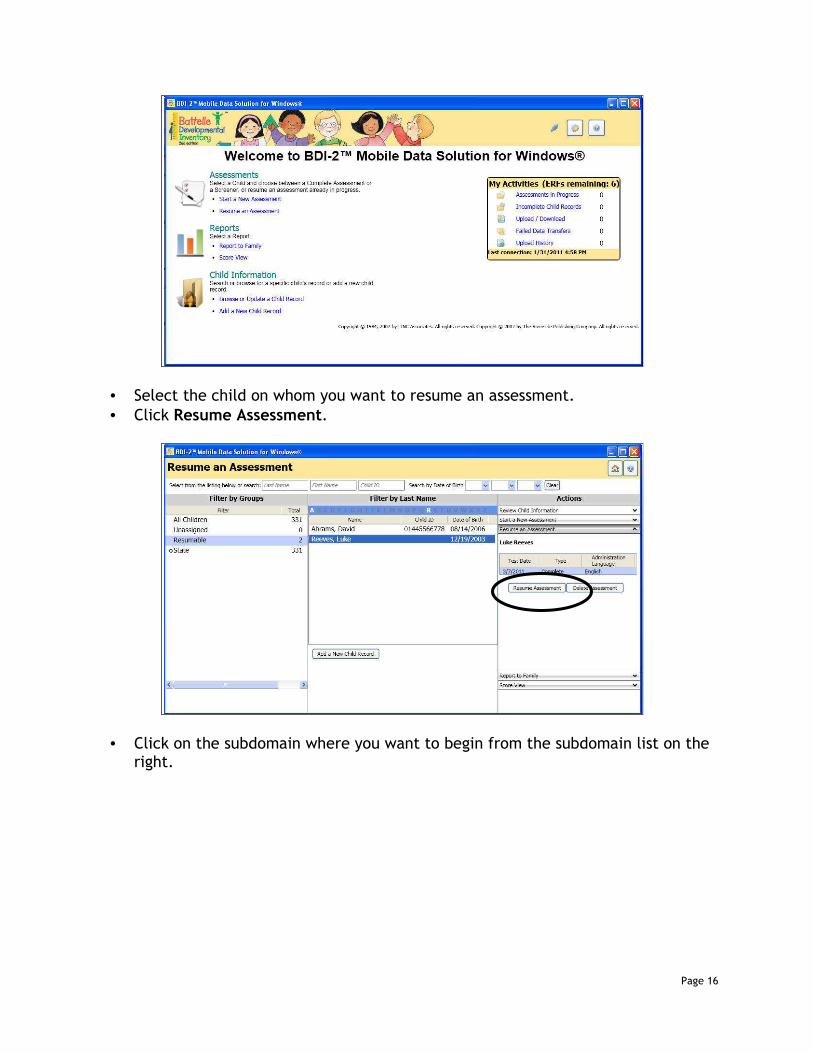
• Select the child on whom you want to resume an assessment.
• Click Resume Assessment.
• Click on the subdomain where you want to begin from the subdomain list on the right.

Page 17
• Enter the score (2, 1, or 0) and the procedure (Structured, Observation, or Interview) for the first item.
Note: Select the Show More icon to receive detailed item administration and scoring information.
• Continue with each item in the subdomain, entering scores and procedures, until the basal and ceiling have been established.
• When the basal and ceiling have been established for a subdomain, a green check mark will appear beside the subdomain name on the right side of the screen, indicating that the administration of that subdomain has been completed.
Note: You do not have to establish a basal or ceiling for the current domain before proceeding to the next domain. To move to a new domain, click the domain name in the Domain List.

Page 18
• Continue administering items from any and/or every subdomain.
• Continue until all needed items are administered.
• Select Save & Resume Later (if you need to continue with the assessment at a later time) or Conclude Assessment (if the assessment is complete and ready for upload).
Reports
There are two reports that are available within the MDS: Report to Family and Score
View. Once data has been uploaded to Data Manager, additional reports are available
within Data Manager.
• From the Reports menu on the Welcome screen, click Report to Family or Score
View.
Report to Family:
Note: The Report to Family can only be generated prior to uploading the assessment data. After uploading to Data Manager, the Report to Family can be generated in Data Manager. o Select the child on whom you want the report.

Page 19
o Click View Report.
o To navigate through this report or to print the report, use the bar at the
top of the screen.

Page 20
Score View:
o Select the child on whom you want the report.
o Click View Score.
Note: After selecting one of the report options, you can then select to view the
other report without returning to the Welcome screen.

Page 21
Head Start Notes
Notes that relate to Head Start can be entered into MDS.
• From the Child Information menu on the Welcome screen, click Browse or Update a Child Record.
• Select the child on whom you want to add Head Start Notes.
• From the Action menu on the right, select Head Start Notes.
• Select a category from the menu on the left.
Parent Report to Score View:
Score View to Parent Report:

Page 22
• Type in the text for the note.
• Click Save.