bb installation guide -...
TRANSCRIPT

SAP S/4HANA
September 2017
English
Attachment Service(J98)
SAP SEDietmar-Hopp-Allee 1669190 WalldorfGermany
Building Block Configuration Guide
SAP Best Practices Attachment Service (J98): Configuration Guide
Copyright
© 2017 SAP SE or an SAP affiliate company. All rights reserved.
No part of this publication may be reproduced or transmitted in any form or for any purpose without the express permission of SAP SE or an SAP affiliate company.
SAP and other SAP products and services mentioned herein as well as their respective logos are trademarks or registered trademarks of SAP SE (or an SAP affiliate company) in Germany and other countries. Please see http://global.sap.com/corporate-en/legal/copyright/index.epx#trademark for additional trademark information and notices.
Some software products marketed by SAP SE and its distributors contain proprietary software components of other software vendors.
National product specifications may vary.
These materials are provided by SAP SE or an SAP affiliate company for informational purposes only, without representation or warranty of any kind, and SAP SE or its affiliated companies shall not be liable for errors or omissions with respect to the materials. The only warranties for SAP SE or SAP affiliate company products and services are those that are set forth in the express warranty statements accompanying such products and services, if any. Nothing herein should be construed as constituting an additional warranty.
In particular, SAP SE or its affiliated companies have no obligation to pursue any course of business outlined in this document or any related presentation, or to develop or release any functionality mentioned therein. This document, or any related presentation, and SAP SE’s or its affiliated companies’ strategy and possible future developments, products, and/or platform directions and functionality are all subject to change and may be changed by SAP SE or its affiliated companies at any time for any reason without notice. The information in this document is not a commitment, promise, or legal obligation to deliver any material, code, or functionality. All forward-looking statements are subject to various risks and uncertainties that could cause actual results to differ materially from expectations. Readers are cautioned not to place undue reliance on these forward-looking statements, which speak only as of their dates, and they should not be relied upon in making purchasing decisions.
© SAP SE Page of

SAP Best Practices Attachment Service (J98): Configuration Guide
Icons
Icon Meaning
Caution
Example
Note
Recommendation
Syntax
Typographic Conventions
Type Style Description
Example text Words or characters that appear on the screen. These include field names, screen titles, pushbuttons as well as menu names, paths and options.
Cross-references to other documentation.
Example text Emphasized words or phrases in body text, titles of graphics and tables.
EXAMPLE TEXT Names of elements in the system. These include report names, program names, transaction codes, table names, and individual key words of a programming language, when surrounded by body text, for example, SELECT and INCLUDE.
Example text Screen output. This includes file and directory names and their paths, messages, source code, names of variables and parameters as well as names of installation, upgrade and database tools.
EXAMPLE TEXT Keys on the keyboard, for example, function keys (such as F2) or the ENTER key.
Example text Exact user entry. These are words or characters that you enter in the system exactly as they appear in the documentation.
<Example text> Variable user entry. Pointed brackets indicate that you replace these words and characters with appropriate entries.
© SAP SE Page of
SAP Best Practices Attachment Service (J98): Configuration Guide
ContentAttachment Service: Configuration Guide.................................................................................5
1 Purpose............................................................................................................................. 5
2 Preparation........................................................................................................................ 5
2.1 Prerequisites............................................................................................................5
2.2 Supported Deployments..........................................................................................5
3 Configuration.....................................................................................................................5
3.1 Attachment Service.................................................................................................5
3.1.1 Settings for Document Management...................................................................5
4 Manual Build Steps..........................................................................................................25
© SAP SE Page of

SAP Best Practices Attachment Service (J98): Configuration Guide
Attachment Service: Configuration Guide
1 PurposeThe purpose of this document is to describe the general configuration steps required to manually set up the configuration within the system landscape that has already been installed using the corresponding installation or configuration guides for installation.
If you want to install SAP S/4HANA locally (on-premise) and if you do not want to configure manually and prefer an automated installation process using BC Sets and other tools, you can set up a best-practice client and activate the implementation content. For more information, see the Administration Guide for the Implementation of SAP S/4HANA, on premise edition which is linked in the content library (included in the documentation package).
2 Preparation
2.1 PrerequisitesBefore you start installing this scenario, you must install the prerequisite building blocks. For more information, see the Building Block Prerequisites Matrix.
2.2 Supported DeploymentsThe configuration guide provides the implementation content for the different SAP S/4HANA products:
SAP S/4HANA Cloud – (CE) minimal scope and content
SAP S/4HANA – (OP) installed locally (on-premise), full scope and content coverage
Depending on the use case/deployment option/ S/4HANA product version, you need to implement the required scope/content starting with the Public cloud chapter and proceed with the next required sections.
For the full scope of the on premise scope & content – PC and OP are required
For the SAP S/4HANA Cloud scope & content – CE is required; OP is not required
3 Configuration
3.1 Attachment Service3.1.1 Settings for Document Management
3.1.1.1Define Number Ranges for Document Numbers
Use
© SAP SE Page of

SAP Best Practices Attachment Service (J98): Configuration Guide
In this activity, you define the number ranges for document numbers and the type of number assignment.You have the following options:
Internal number assignment
External number assignment
More hintsIf you maintain several number ranges for document management, the number ranges must not overlap.
Do not change the number range status of internal number range intervals.
Procedure1. Access the activity using one of the following navigation options:
IMG Menu Cross-Application Components → Document Management System → Control Data → Define number ranges for document numbers
Transaction Code
SPRO
2. On the Change View “Range Maintenance: Document”: Overview screen, choose Maintain Intervals.
3. On the Maintain Intervals: Document screen, enter the following values:
No From No. To Number Ext
01 00000000000000000001 00000000000000999999 checked
02 00000000010000000000 00009999999999999999
03 00010000000000000000 99999999999999999999
04 00000000000001000000 00000000009999999999 checked
4. Save your settings and choose Back (F3) to return to the Change View “Range Maintenance: Document”: Overview screen.
5. Choose Back (F3) to leave transaction.
ResultThe number ranges for document numbers have been defined for the Attachment Service.
3.1.1.2Defining Document Types
UseIn this activity, you define the document types SL1 for Simplified Logistics, SF1 for Simplified Financial, SC1 for Simplified CRM and SO1 for Simplified Other. These document types are needed for the Attachment Service
PrerequisitesA number range is defined.
Procedure
© SAP SE Page of

SAP Best Practices Attachment Service (J98): Configuration Guide
1. Access the activity using one of the following navigation options:
IMG Menu Cross-Application Components → Document Management System → Control Data → Define document types
Transaction Code
SPRO
2. On the Change View “Define Document Types”: Overview screen, choose New entries.
3. On the New Entries: Details of Added Entries screen, enter the following values:
Field Name Description User Action and Values Comment
Document Type SL1
Document Type description
Simplified Logistics
Use KPro<Select by ticking>
Version Assignment
<Select by ticking>
Archiving Authorization
<Select by ticking>
Internal Number Range
02Choose Number Ranges in order to define your own number ranges.
External number range
01
Number exit MCDOKZNR Choose Default to generate this entry.
Vers. No. Incr. 1 Choose "1" if you want versions to start with "00" instead of "01"
4. Save your settings and choose Back (F3) to return to the Change View “Define Document Types”: Overview screen.
5. On the Change View “Define Document Types”: Overview screen, select the document type SL1. Go into the folder Define document status.
6. On the Change View "Define document status": Overview screen, choose New Entries.
7. Add the new entries as follows:
Field Name Description User Action and Values Comment
Document Status AA Choose Enter.
Status type P Primary Status
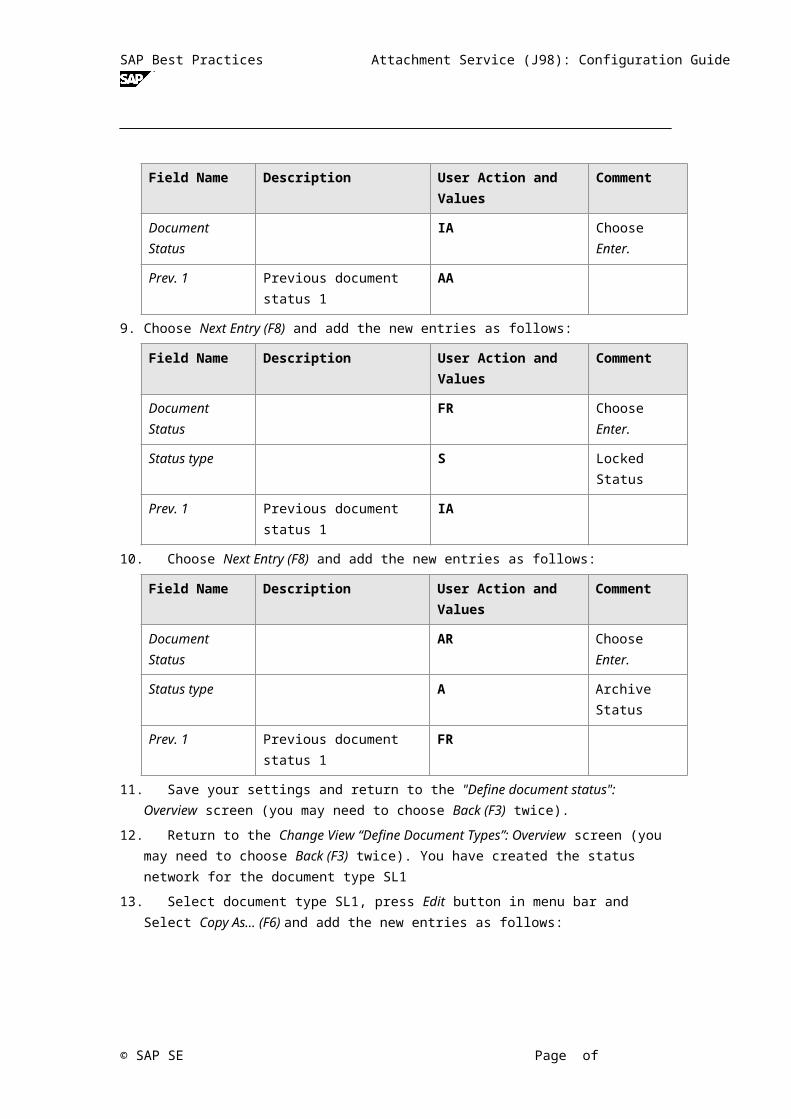
8. Choose Next Entry (F8) and add the new entries as follows:
© SAP SE Page of

SAP Best Practices Attachment Service (J98): Configuration Guide
Field Name Description User Action and Values
Comment
Document Status
IA Choose Enter.
Prev. 1 Previous document status 1
AA
9. Choose Next Entry (F8) and add the new entries as follows:
Field Name Description User Action and Values
Comment
Document Status
FR Choose Enter.
Status type S Locked Status
Prev. 1 Previous document status 1
IA
10. Choose Next Entry (F8) and add the new entries as follows:
Field Name Description User Action and Values
Comment
Document Status
AR Choose Enter.
Status type A Archive Status
Prev. 1 Previous document status 1
FR
11. Save your settings and return to the "Define document status": Overview screen (you may need to choose Back (F3) twice).
12. Return to the Change View “Define Document Types”: Overview screen (you may need to choose Back (F3) twice). You have created the status network for the document type SL1
13. Select document type SL1, press Edit button in menu bar and Select Copy As… (F6) and add the new entries as follows:
Field Name Description User Action and Values Comment
Document Type SC1 Overwrite existing value
Doc. Type Desc. Simplified CRM Overwrite existing value
14. Press Enter. Confirm the dialog box, which states: dependent entries copied,…15. Save your settings and return to the Change View “Define Document Types”: Overview
screen (you may need to choose Back (F3) twice). You have created the document type SC1 and the status network for the document type SC1 as copy from document type SL1.
16. Select document type SL1, press Edit button in menu bar and Select Copy As… (F6) and add the new entries as follows:
© SAP SE Page of

SAP Best Practices Attachment Service (J98): Configuration Guide
Field Name Description User Action and Values Comment
Document Type SF1 Overwrite existing value
Doc. Type Desc. Simplified Financial Overwrite existing value
17. Press Enter. Confirm the dialog box, which states: dependent entries copied.18. Save your settings and return to the Change View “Define Document Types”: Overview
screen (you may need to choose Back (F3) twice). You have created the document type SF1 and the status network for the document type SF1 as copy from document type SL1.
19. Select document type SL1, press Edit button in menu bar and choose Copy As… (F6) and add the new entries as follows:
Field Name Description User Action and Values Comment
Document Type SO1 Overwrite existing value
Doc. Type Desc. Simplified Other Overwrite existing value
20. Press Enter. Confirm the dialog box, which states: dependent entries copied.21. Save your settings and return to the Change View “Define Document Types”: Overview
screen (you may need to choose Back (F3) twice). You have created the document type SO1 and the status network for the document type SO1 as copy from document type SL1.
22. Select document type SL1, press Edit button in menu bar and choose Copy As… (F6) and add the new entries as follows:
Field Name Description User Action and Values Comment
Document Type AUT Overwrite existing value
Doc. Type Desc. Unit Testing Overwrite existing value
23. Press Enter. Confirm the dialog box, which states: dependent entries copied.24. Save your settings and return to the Change View “Define Document Types”: Overview
screen (you may need to choose Back (F3) twice). You have created the document type AUT and the status network for the document type AUT as copy from document type SL1.
25. Select document type SL1, press Edit button in menu bar and choose Copy As… (F6) and add the new entries as follows:
Field Name Description User Action and Values Comment
Document Type SRF Overwrite existing value
Doc. Type Desc. Simplify Stat.Report Overwrite existing value
26. Press Enter. Confirm the dialog box, which states: dependent entries copied.27. Save your settings and return to the Change View “Define Document Types”: Overview
screen (you may need to choose Back (F3) twice). You have created the document type SRF and the status network for the document type SRF as copy from document type SL1.
28. On the Change View “Define Document Types”: Overview screen, select the document type SL1. Go into the Define object links folder.
29. Choose New Entries and add the new entries as follows:
© SAP SE Page of
SAP Best Practices Attachment Service (J98): Configuration Guide
Field Name Description User Action and Values Comment
Document Type SL1
Object EKKO Choose Enter.
Screen no. 100
30. Save your settings and return to the Change View “Define Document Types”: Overview screen (you may need to choose Back (F3) twice). You have set up 2 possible object links for document type SL1.
31. On the Change View “Define Document Types”: Overview screen, select the document type SO1. Go into the folder Define object links.
32. Choose New Entries and add the new entries as follows:
Field Name Description User Action and Values Comment
Document Type SO1
Object /CPD/PFP Choose Enter.
Screen no. 201
AdditionalObject /CPD/PFP
Field Name Description User Action and Values Comment
Document Type SO1
Object /CPD/EP Choose Enter.
Screen no. 100
AdditionalObject /CPD/EP
33. On the Change View “Define Document Types”: Overview screen, select the document type AUT. Go into the folder Define object links.
34. Choose New Entries and add the new entries as follows:
Field Name Description User Action and Values Comment
Document Type AUT
Object DRAW Choose Enter.
Screen no. 202
35. On the Change View “Define Document Types”: Overview screen, select the document type SRF. Go into the folder Define object links.
36. Choose New Entries and add the new entries as follows:
Field Name Description User Action and Values Comment
Document Type SRF
Object SRF_REPRUN Choose Enter.
Sreen no. 201
© SAP SE Page of

SAP Best Practices Attachment Service (J98): Configuration Guide
37. Save your settings and return to the Change View “Define Document Types”: Overview screen.
38. Navigate to the “Define document status descriptions”: Overview change view.
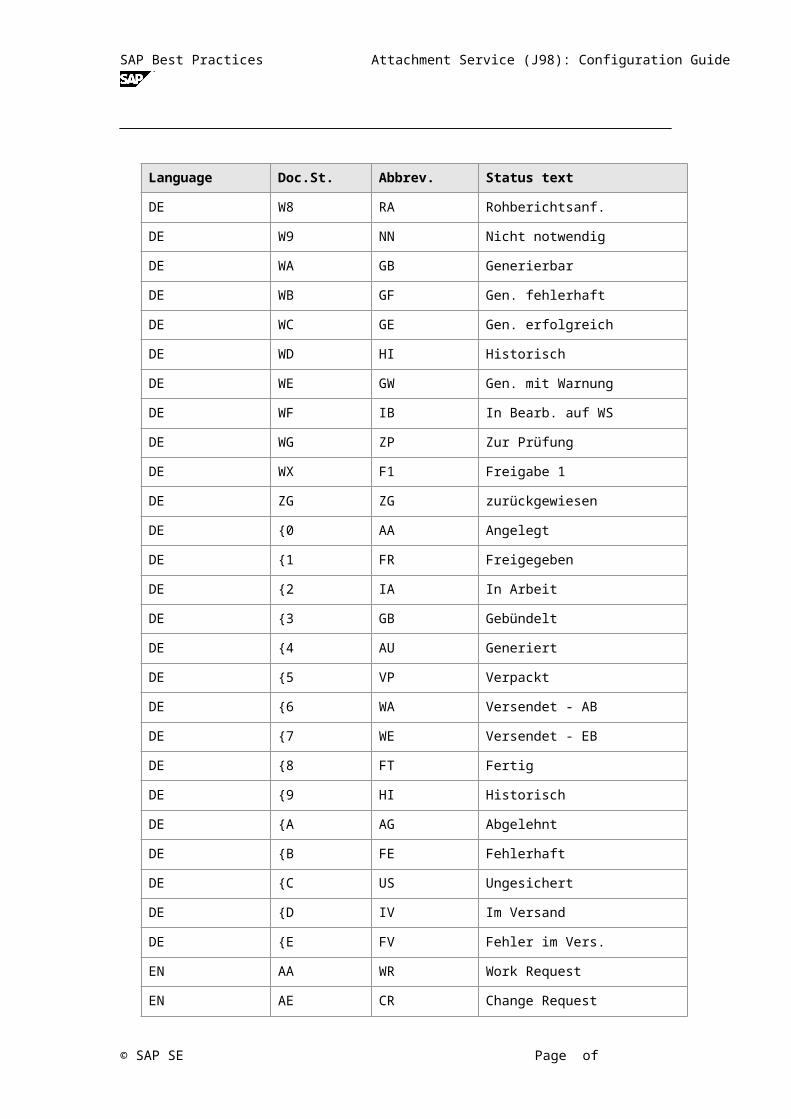
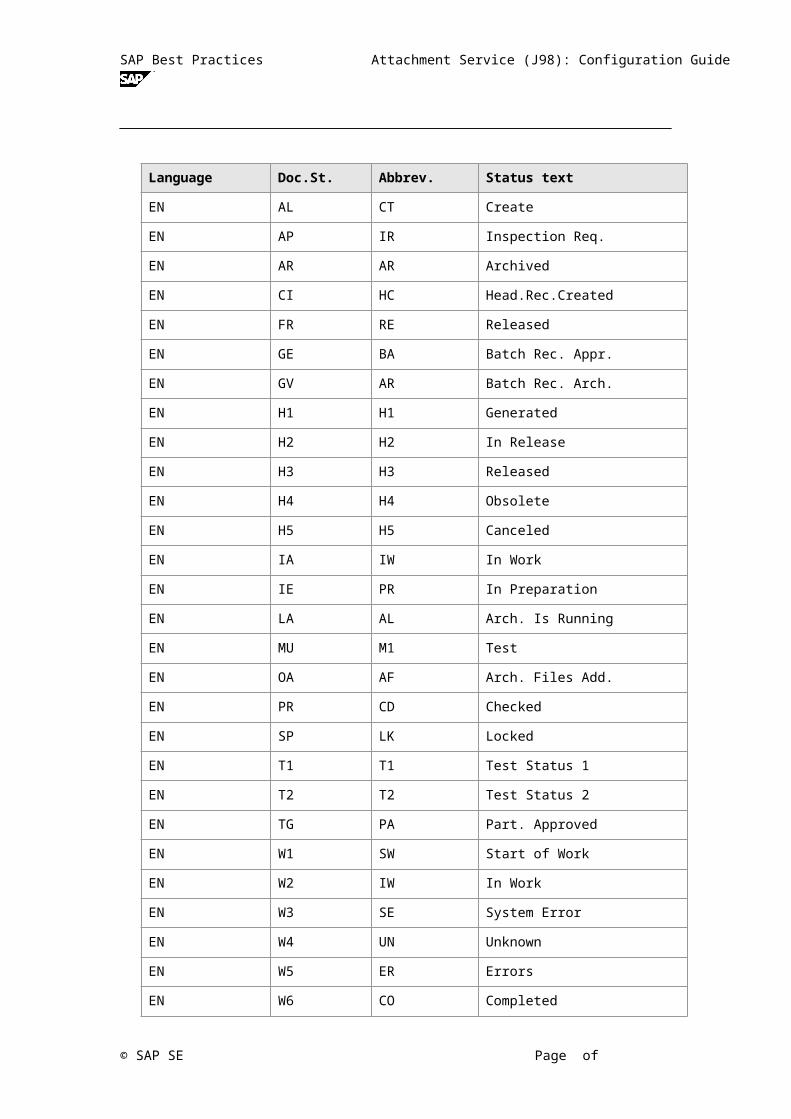
39. Maintain the following abbreviations and status texts:
Language Doc.St. Abbrev. Status text
DE IA IA in Arbeit
DE IE IE in Erstellung
DE LA AL Archiv. läuft
DE MU M1 testtest
DE OA AE ArchDat ergänzt
DE PR PR geprüft
DE SP SP gesperrt
DE T1 T1 Teststatus 1
DE T2 T2 Teststatus 2
DE TG TG teilgenehmigt
DE W1 AA Arbeitsanfang
DE W2 IA In Arbeit
DE W3 SF System Fehler
DE W4 UB Unbekannt
DE W5 FE Fehlerhaft
DE W6 FT Fertig
DE W7 FR Freigegeben
DE W8 RA Rohberichtsanf.
DE W9 NN Nicht notwendig
DE WA GB Generierbar
DE WB GF Gen. fehlerhaft
DE WC GE Gen. erfolgreich
DE WD HI Historisch
DE WE GW Gen. mit Warnung
DE WF IB In Bearb. auf WS
DE WG ZP Zur Prüfung
DE WX F1 Freigabe 1
DE ZG ZG zurückgewiesen
DE {0 AA Angelegt
© SAP SE Page of

SAP Best Practices Attachment Service (J98): Configuration Guide
Language Doc.St. Abbrev. Status text
DE {1 FR Freigegeben
DE {2 IA In Arbeit
DE {3 GB Gebündelt
DE {4 AU Generiert
DE {5 VP Verpackt
DE {6 WA Versendet - AB
DE {7 WE Versendet - EB
DE {8 FT Fertig
DE {9 HI Historisch
DE {A AG Abgelehnt
DE {B FE Fehlerhaft
DE {C US Ungesichert
DE {D IV Im Versand
DE {E FV Fehler im Vers.
EN AA WR Work Request
EN AE CR Change Request
EN AL CT Create
EN AP IR Inspection Req.
EN AR AR Archived
EN CI HC Head.Rec.Created
EN FR RE Released
EN GE BA Batch Rec. Appr.
EN GV AR Batch Rec. Arch.
EN H1 H1 Generated
EN H2 H2 In Release
EN H3 H3 Released
EN H4 H4 Obsolete
EN H5 H5 Canceled
EN IA IW In Work
EN IE PR In Preparation
EN LA AL Arch. Is Running
EN MU M1 Test
© SAP SE Page of

SAP Best Practices Attachment Service (J98): Configuration Guide
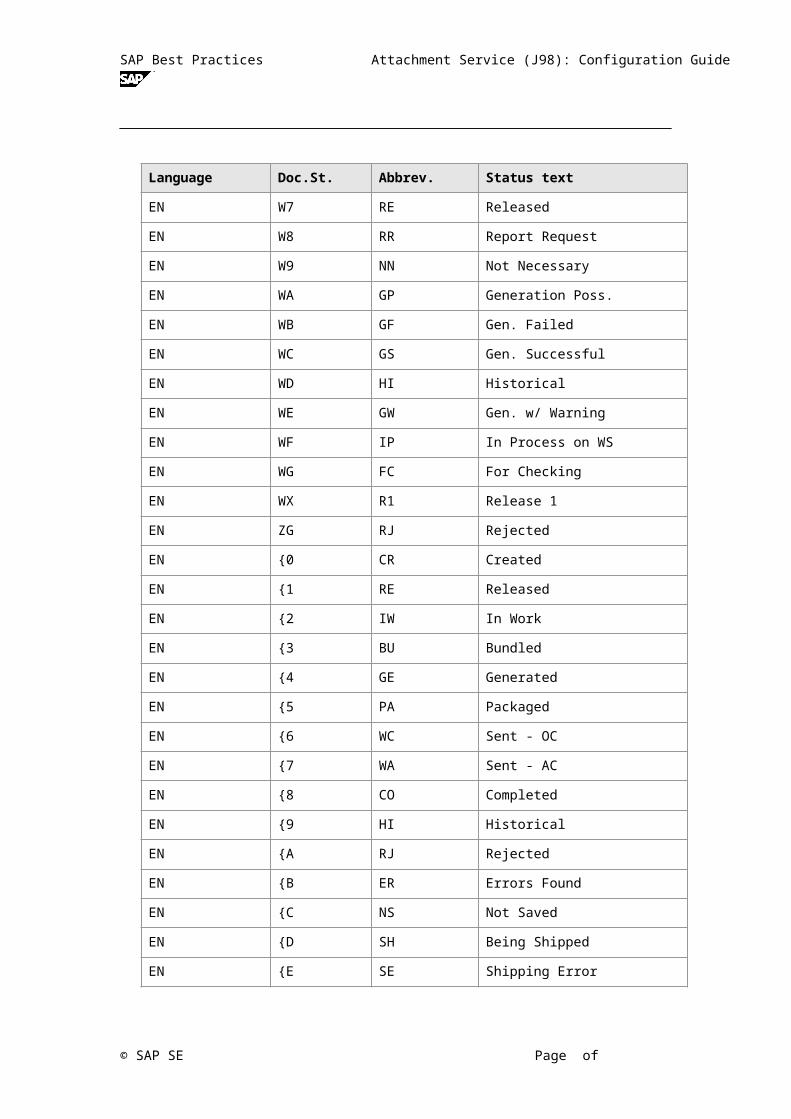
Language Doc.St. Abbrev. Status text
EN OA AF Arch. Files Add.
EN PR CD Checked
EN SP LK Locked
EN T1 T1 Test Status 1
EN T2 T2 Test Status 2
EN TG PA Part. Approved
EN W1 SW Start of Work
EN W2 IW In Work
EN W3 SE System Error
EN W4 UN Unknown
EN W5 ER Errors
EN W6 CO Completed
EN W7 RE Released
EN W8 RR Report Request
EN W9 NN Not Necessary
EN WA GP Generation Poss.
EN WB GF Gen. Failed
EN WC GS Gen. Successful
EN WD HI Historical
EN WE GW Gen. w/ Warning
EN WF IP In Process on WS
EN WG FC For Checking
EN WX R1 Release 1
EN ZG RJ Rejected
EN {0 CR Created
EN {1 RE Released
EN {2 IW In Work
EN {3 BU Bundled
EN {4 GE Generated
EN {5 PA Packaged
EN {6 WC Sent - OC
EN {7 WA Sent - AC
© SAP SE Page of

SAP Best Practices Attachment Service (J98): Configuration Guide
Language Doc.St. Abbrev. Status text
EN {8 CO Completed
EN {9 HI Historical
EN {A RJ Rejected
EN {B ER Errors Found
EN {C NS Not Saved
EN {D SH Being Shipped
EN {E SE Shipping Error
40. Save your settings and return to the Change View “Define Document Types”: Overview screen (you may need to choose Back (F3) twice). You have set up the status abbreviations and status texts
ResultThe document types used for the Attachment Service (SL1, SC1, SF1 and SO1) have been defined, a basic status network and some object links have been set up.
3.1.1.3Maintain Key Fields
UseYou can link document info records to various other SAP objects. The below customizing should be filled in as it is already done in section 3.1.1.
Actions In the Transaction code (TCode) field, enter the business transaction to be performed
during document processing.
In the Field name fields, enter the database key fields defined in the ABAP Dictionary.
In the PID fields, enter the parameter identification for the set/get parameters.
Do not delete any entries you have not made yourself. The key fields are used by other areas such as:
Classification
Digital mockup viewing
Procedure1. Access the next activity using the following navigation options:
IMG Menu Cross-Application Components Document Management Control Data Maintain Key Fields
Transaction Code
SPRO
2. Confirm the information message Caution: The table is cross-client with Enter.3. On the Change View “Key Fields for Classifiable Objects”: Overview screen choose New
Entries.
© SAP SE Page of
SAP Best Practices Attachment Service (J98): Configuration Guide
4. Make the following entries, in case they do not exist already
Table Trans-actionCode
Field Name(Key)
PID Field Name(Key)
PID Field Name (Text)in last column on the right!
/CPD/PFP DB_KEY KEY
EKKO M33K EBELN BES
RBKP MIR4 ROOT_KEY
VBRK VF03 VBELN
VBRP VF03 VBELN POSNR
5. Save your settings and leave the transaction (you will need to choose Back (F3)).
ResultThe key fields are maintained for the Attachment Service.
3.1.1.4Defining Data Carrier
UseIn this activity, you define the data carrier type PC.
Procedure1. Access the next activity using the following navigation options:
IMG Menu Cross-Application Components Document Management General Data Define Data Carrier
Transaction Code
SPRO
2. Confirm the information message Caution: The table is cross-client with Enter.3. On the Change View “Define data carrier type “archive””: Overview screen, double-click
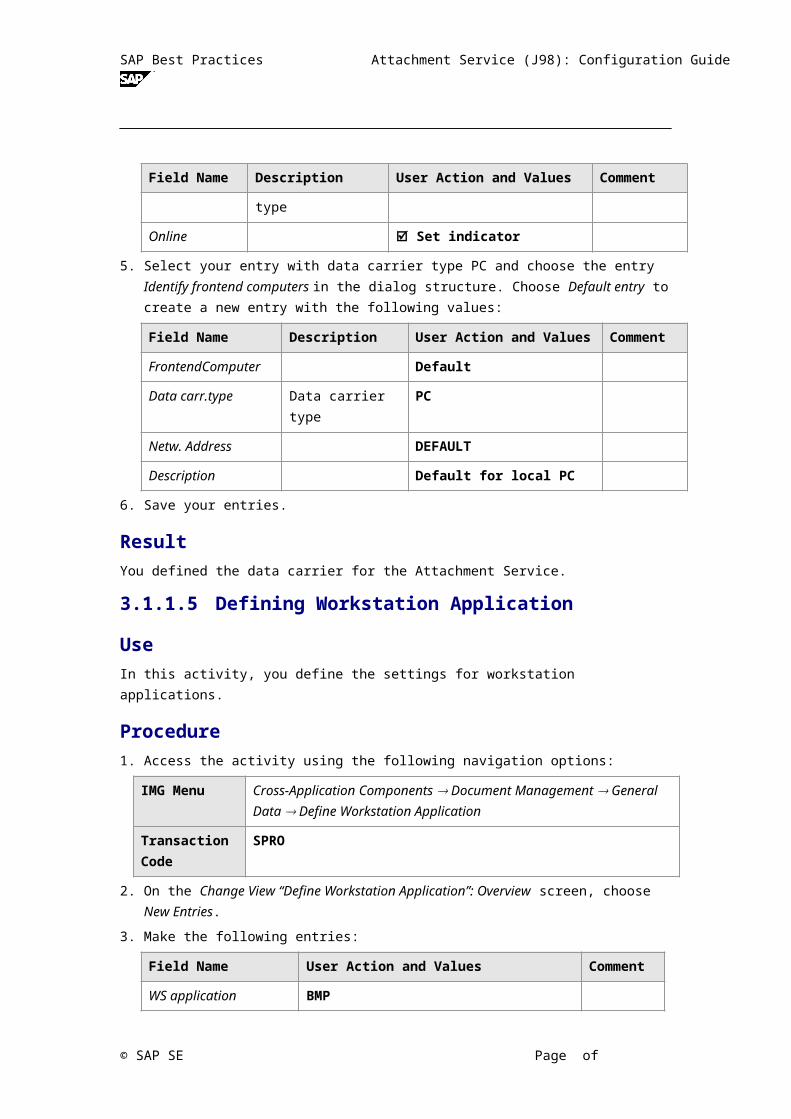
the folder Define data carrier type “server, front end” and choose New Entries.4. Make the following entries:
Field Name Description User Action and Values Comment
Type Data carrier type PC
Online Set indicator
5. Select your entry with data carrier type PC and choose the entry Identify frontend computers in the dialog structure. Choose Default entry to create a new entry with the following values:
Field Name Description User Action and Values Comment
FrontendComputer Default
Data carr.type Data carrier type PC
© SAP SE Page of
SAP Best Practices Attachment Service (J98): Configuration Guide
Field Name Description User Action and Values Comment
Netw. Address DEFAULT
Description Default for local PC
6. Save your entries.
ResultYou defined the data carrier for the Attachment Service.
3.1.1.5Defining Workstation Application
UseIn this activity, you define the settings for workstation applications.
Procedure1. Access the activity using the following navigation options:
IMG Menu Cross-Application Components Document Management General Data Define Workstation Application
Transaction Code
SPRO
2. On the Change View “Define Workstation Application”: Overview screen, choose New Entries.
3. Make the following entries:
Field Name User Action and Values Comment
WS application BMP
Description Graphic file
File format *.bmp
MIME type image/bmp
Start Authorization X
4. Save your entries and go back to the Change View “Define workstation application”: Overview screen.
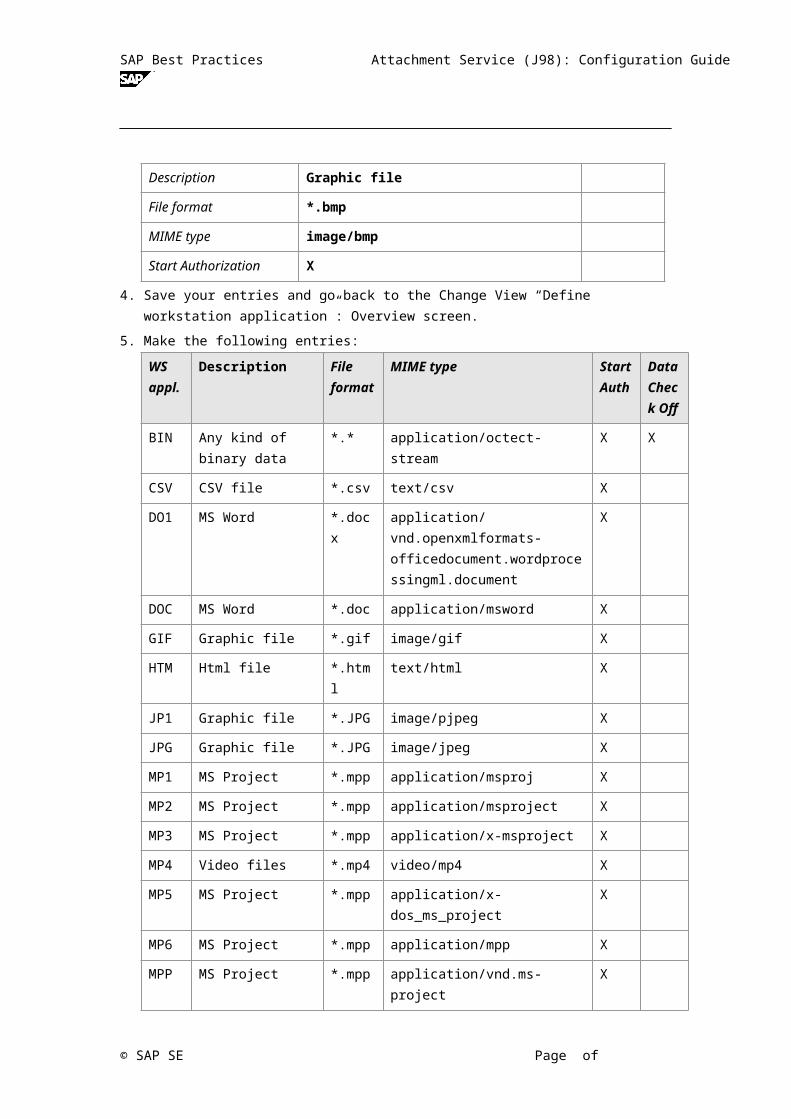
5. Make the following entries:
WS appl.
Description File format
MIME type StartAuth
Data Check Off
BIN Any kind of binary data
*.* application/octect-stream X X
CSV CSV file *.csv text/csv X
DO1 MS Word *.docx application/vnd.openxmlformats-officedocument.wordprocessing
X
© SAP SE Page of
SAP Best Practices Attachment Service (J98): Configuration Guide
ml.document
DOC MS Word *.doc application/msword X
GIF Graphic file *.gif image/gif X
HTM Html file *.html text/html X
JP1 Graphic file *.JPG image/pjpeg X
JPG Graphic file *.JPG image/jpeg X
MP1 MS Project *.mpp application/msproj X
MP2 MS Project *.mpp application/msproject X
MP3 MS Project *.mpp application/x-msproject X
MP4 Video files *.mp4 video/mp4 X
MP5 MS Project *.mpp application/x-dos_ms_project X
MP6 MS Project *.mpp application/mpp X
MPP MS Project *.mpp application/vnd.ms-project X
MSG Message file *.msg message/rfc822 X
PDF Acrobat Reader *.pdf application/pdf X
PNG Graphic file *.png image/png X
PP1 MS POWERPOINT *.PPTX application/vnd.openxmlformats-officedocument.presentationml.presentation
X
PPT MS POWERPOINT *.PPT application/vnd.ms-powerpoint X
RT1 rich text file *.rtf application/msword X
RTF rich text file *.rtf text/rtf X
TIF Graphic file *.tif image/tiff X
TXT Text *.txt text/plain X
XL1 Microsoft EXCEL *.xlsx application/vnd.openxmlformats-officedocument.spreadsheetml.sheet
X
XLS Microsoft EXCEL *.xls application/vnd.ms-excel X
XM1 XML File *.xml text/xml X
XML XML *.xml application/xml X
URL Uniform resource location
*.* Text/url X X
XBR XBRL - eXtensible Business Reporting Language
.xbrl application/xml X
© SAP SE Page of

SAP Best Practices Attachment Service (J98): Configuration Guide
JSO JSON file *.json application/json X
6. Save your entries.
ResultYou defined the settings for workstation applications for the Attachment Service.
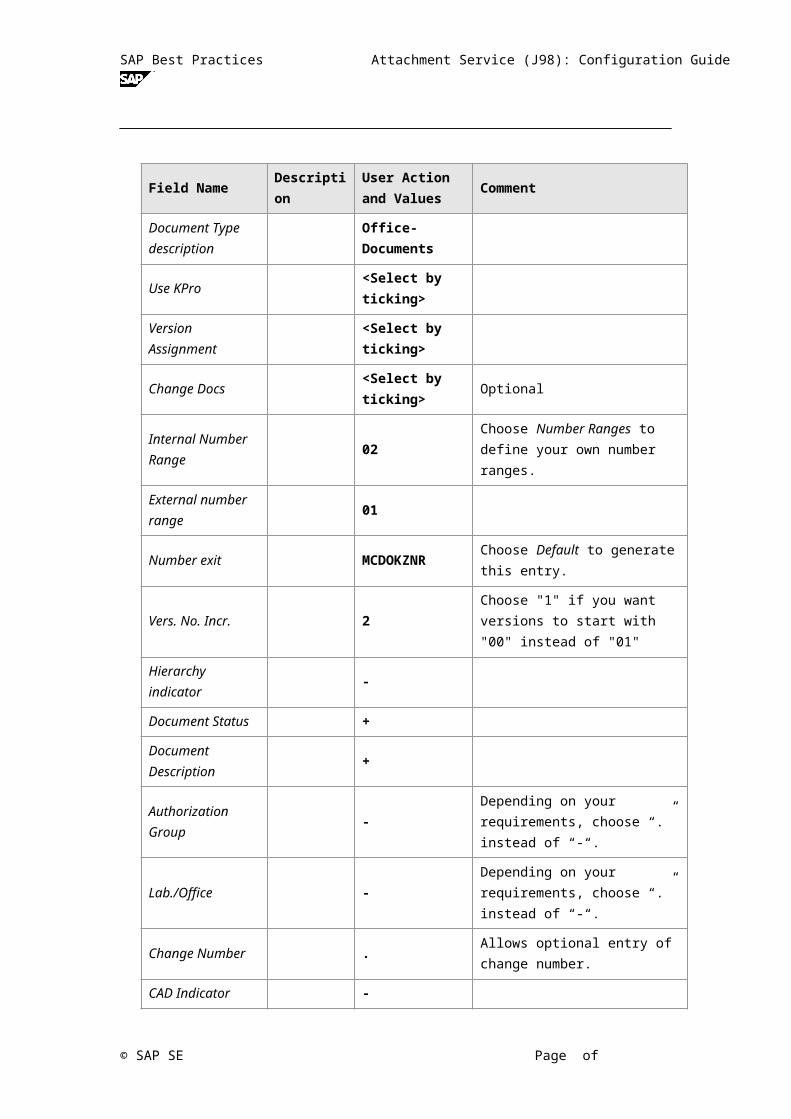
3.1.1.6Defining Document Types - YBOUseIn this activity, you define the document type YBO for Office documents.
PrerequisitesA number range has been defined.
Recommendation:
SAP Document Management stores the document info records (metadata) inside the SAP system. The document info records contain links to the original files. These originals should be stored on a SAP Content Server (a separate server).
If an SAP Content Server is not available, the storage category DMS_C1_ST can be used. Using this category will save the originals in the SAP database. This is useful for testing but not recommended for a productive environment.
Procedure1. Access the activity using one of the following navigation options:
IMG Menu Cross-Application Components → Document Management System → Control Data → Define document types
Transaction Code
SPRO
2. On the Change View “Define Document Types”: Overview screen, choose New entries.
3. On the New Entries: Details of Added Entries screen, enter the following values:
Field Name Description User Action and Values Comment
Document Type YBO
Document Type description
Office-Documents
Use KPro<Select by ticking>
Version Assignment
<Select by ticking>
© SAP SE Page of

SAP Best Practices Attachment Service (J98): Configuration Guide
Field Name Description User Action and Values Comment
Change Docs<Select by ticking> Optional
Internal Number Range
02 Choose Number Ranges to define your own number ranges.
External number range
01
Number exit MCDOKZNR Choose Default to generate this entry.
Vers. No. Incr. 2 Choose "1" if you want versions to start with "00" instead of "01"
Hierarchy indicator -
Document Status +
Document Description
+
Authorization Group
- Depending on your requirements, choose “.” instead of “-“.
Lab./Office - Depending on your requirements, choose “.” instead of “-“.
Change Number . Allows optional entry of change number.
CAD Indicator -
Superior Document
-
WS Application 2 -
CM Relevance -
4. Save your settings.
5. Choose Back (F3).6. On the Change View “Define Document Types”: Overview screen, select the document
type YBO and in the Dialog Structure pane, double-click Define document status.
7. On the Change View "Define document status": Overview screen, choose New Entries.
8. Make the following entries:
Field Name Description User Action and Values Comment
Document Status FR Choose Enter.
Object Check <Select>
Complete for ECM <Select>
© SAP SE Page of
SAP Best Practices Attachment Service (J98): Configuration Guide
Field Name Description User Action and Values Comment
Release Flag <Select>
Check-In Required <Select>
Check in <Select>
Status type S Locked Status
9. Choose Next Entry (F8) and add the new entries as follows:
Field Name Description User Action and Values Comment
Document Status IA Choose Enter.
Object Check <Select>
Check in <Select>
Status type I Initial Status
10. Save your settings and return to the "Define document status": Overview screen (you may need to choose Back (F3) twice).
11. Choose Select All (F7) to select both new statuses.
12. Choose Details (Ctrl-Shift-F2) to change the statuses.
13. For document status FR, enter IA into field Prev. 1, and then choose Next Entry (F8).
14. For document Status IA, enter FR into field Prev. 1.
This will allow you to switch back from status FR (released) to status IA (in work). You may omit this step if you prefer to not allow changes to released documents. In that case, users will have to create a new version whenever they need to make changes to a document that has already been released.
15. Save your settings and return to the Change View “Define Document Types”: Overview screen (you may need to choose Back (F3) twice). You have created the status network for the document type.
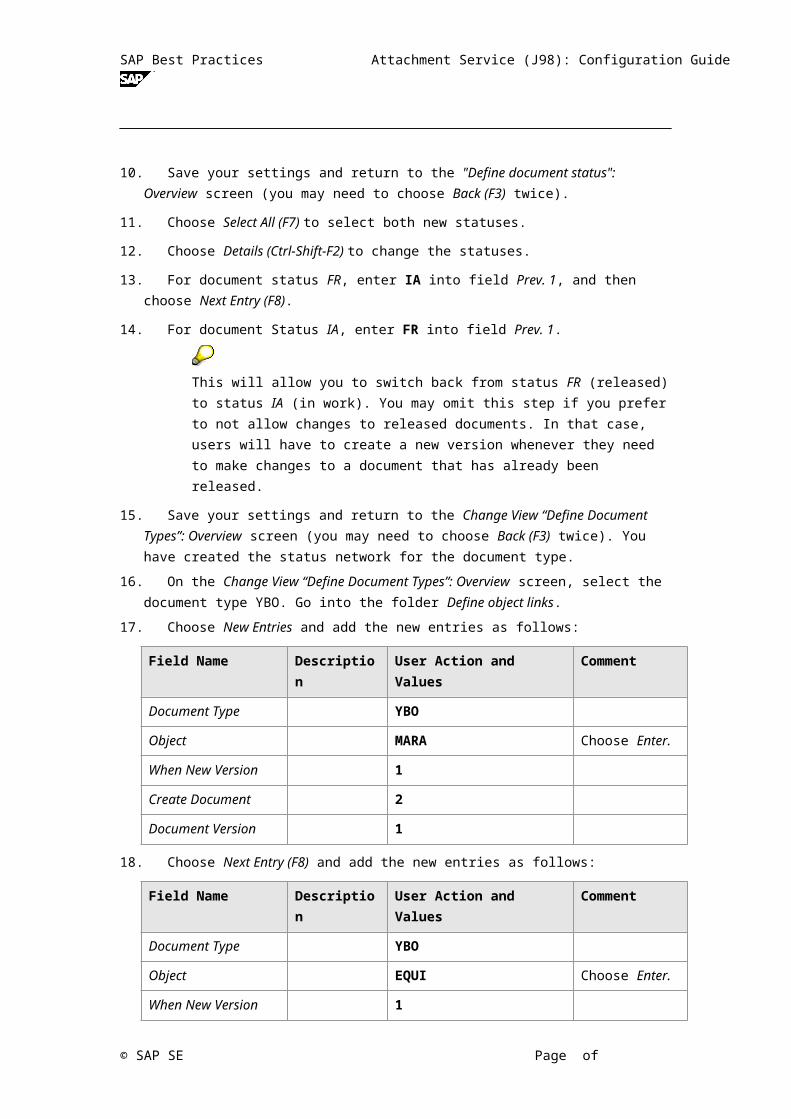
16. On the Change View “Define Document Types”: Overview screen, select the document type YBO. Go into the folder Define object links.
17. Choose New Entries and add the new entries as follows:
Field Name Description User Action and Values Comment
Document Type YBO
Object MARA Choose Enter.
When New Version 1
Create Document 2
Document Version 1
18. Choose Next Entry (F8) and add the new entries as follows:
© SAP SE Page of
SAP Best Practices Attachment Service (J98): Configuration Guide
Field Name Description User Action and Values Comment
Document Type YBO
Object EQUI Choose Enter.
When New Version 1
Create Document 2
Document Version 1
19. Choose Next Entry (F8) and add the new entries as follows:
Field Name Description User Action and Values Comment
Document Type YBO
Object EKPO Choose Enter.
When New Version 1
Create Document 2
Document Version 1
20. Choose Next Entry (F8) and add the new entries as follows:
Field name Description User action and values Comment
Document Type YBO
Object PRPS Choose Enter.
When New Version 1
Create Document 2
Document Version 1
21. Choose Next Entry (F8) and add the new entries as follows:
Field Name Description User Action and Values Comment
Document Type YBO
Object VBAP Choose Enter.
When New Version 1
Create Document 2
Document Version 1
22. Save your settings and return to the Change View “Define Document Types”: Overview screen (you may need to choose Back (F3) twice). You have set up four possible object links for document type YBO.
23. Save your settings and leave the transaction (you will need to choose Back (F3) several times). You have created object links to Material Master, Equipment Master, Purchase Order Item and WBS element.
© SAP SE Page of

SAP Best Practices Attachment Service (J98): Configuration Guide
ResultThe document type used (YBO = Office Documents) has been defined, a basic status network and some object links have been set up.
3.1.1.7Defining Document Types – Enhance SL1 for PRUseIn this activity, you enhance the document type SL1 for purchase requisition.
Procedure1. Access the activity using one of the following navigation options:
IMG Menu Cross-Application Components → Document Management System → Control Data → Define document types
Transaction Code
SPRO
2. On the Change View “Define Document Types”: Overview screen, go into the folder Maintain objects link descriptions.
3. On the Change View “Maintain object link descriptions”: Overview screen, choose New Entries and add the new entries as follows:
Lang. Object Object Description
EN EBAN Purchase Req. Item
4. Save your settings and return to the Change View “Define Document Types”: Overview screen (you may need to choose Back (F3) twice).
5. On the Change View “Define Document Types”: Overview screen, select the document type SL1. Go into the folder Define object links.
6. Choose New Entries and add the new entries as follows:
Field Name Description User Action and Values Comment
Document Type SL1
Object EBAN
Screen no. 247
7. Save your settings.
ResultThe document type SL1 was enhanced for purchase requisition.
3.1.1.8Defining Document Types – Enhance SO1 for SEUseIn this activity, you enhance the document type SO1 for supplier evaluation.
© SAP SE Page of

SAP Best Practices Attachment Service (J98): Configuration Guide
Procedure Access the activity using one of the following navigation options:
IMG Menu Cross-Application Components → Document Management System → Control Data → Define document types
Transaction Code
SPRO
On the Change View “Define Document Types”: Overview screen, go into the folder Maintain objects link descriptions.
On the Change View “Maintain object link descriptions”: Overview screen, choose New Entries and add the new entries as follows:
Lang. Object Object Description
EN SLCSRS_QST SupplierEvalResponse
Save your settings and return to the Change View “Define Document Types”: Overview screen (you may need to choose Back (F3) twice).
On the Change View “Define Document Types”: Overview screen, select the document type SO1. Go into the folder Define object links.
Choose New Entries and add the new entries as follows:
Field Name Description User Action and Values Comment
Document Type SO1
Object SLCSRS_QST
Screen no. 201
Save your settings.
ResultThe document type SO1 was enhanced for supplier evaluation.
3.1.1.9Defining Document Type - YP1
UseIn this activity, you define the document types YP1 for Image of Damage.
PrerequisitesA number range is defined.
Procedure41. Access the activity using one of the following navigation options:
IMG Menu Cross-Application Components → Document Management System → Control Data → Define document types
Transaction SPRO
© SAP SE Page of
SAP Best Practices Attachment Service (J98): Configuration Guide
Code
42. On the Change View “Define Document Types”: Overview screen, choose New entries.
43. On the New Entries: Details of Added Entries screen, enter the following values:
Field Name Description User Action and Values Comment
Document Type YP1
Document Type description
Image of Damage
Use KPro<Select by ticking>
Version Assignment
<Select by ticking>
Archiving Authorization
<Select by ticking>
Change Docs<Select by ticking>
Internal Number Range
02Choose Number Ranges in order to define your own number ranges.
External number range
01
Number exit MCDOKZNR Choose Default to generate this entry.
Vers. No. Incr. 1 Choose "1" if you want versions to start with "00" instead of "01"
Field Selection section
Class Data
Hierarchy Indicator
Document Status
Document Desc. .
User +
Authorization Group
Lab/Office
Change Number
CAD Indicator *
© SAP SE Page of

SAP Best Practices Attachment Service (J98): Configuration Guide
Field Name Description User Action and Values Comment
Superior Document
44. Save your settings and choose Back (F3) to return to the Change View “Define Document Types”: Overview screen.
45. On the Change View “Define Document Types”: Overview screen, select the document type YP1. Go into the folder Define document status.
46. On the Change View "Define document status": Overview screen, choose New Entries.
47. Add the new entries as follows:
Field Name Description User Action and Values Comment
Document Type YP1 Choose Enter.
Document Status AA Choose Enter.
Status type P Primary Status
48. Choose Save.
49. Choose Next Entry (F8) and add the new entries as follows:
Field Name Description User Action and Values
Comment
Document Type YP1 Choose Enter.
Document Status
IA Choose Enter.
Prev. 1 Previous document status 1
AA
50. Choose Save.
51. Choose Next Entry (F8) and add the new entries as follows:
Field Name Description User Action and Values
Comment
Document Type YP1 Choose Enter.
Document Status
FR Choose Enter.
Status type S Locked Status
Prev. 1 Previous document status 1
IA
52. Choose Save.
53. Choose Next Entry (F8) and add the new entries as follows:
© SAP SE Page of
SAP Best Practices Attachment Service (J98): Configuration Guide
Field Name Description User Action and Values
Comment
Document Type YP1 Choose Enter.
Document Status
AR Choose Enter.
Status type A Archive Status
Prev. 1 Previous document status 1
FR
54. Save your settings and return to the "Define document status": Overview screen (you may need to choose Back (F3) twice).
55. On the Change View “Define Document Types”: Overview screen, select the document type YP1. Go into the folder Define object links.
56. Choose New Entries and add the new entries as follows:
Field Name Description User Action and Values Comment
Document Type YP1
Object PMAUFK Maintenance Order
Screen no. 500
AdditionalObject
Field Name Description User Action and Values Comment
Document Type YP1
Object PMQMEL Maintenance Notific.
Screen no. 235
AdditionalObject
57. Save your settings and return to the Change View “Define Document Types”: Overview screen.
58. On the Change View “Define Document Types”: Overview screen, go into the folder Maintain object link descriptions.
59. Check and add the new entries as follows if they are not exist:
Field Name Description User Action and Values Comment
Lang. EN
Object PMAUFK
Object Description Maintenance Order
© SAP SE Page of

SAP Best Practices Attachment Service (J98): Configuration Guide
Field Name Description User Action and Values Comment
Lang. EN
Object PMQMEL
Object Description Maintenance Notific.
60. Save the entries.
61. Double click on the folder Maintain object link descriptions. Check and maintain the following entries if they are not exist:
Lang. Object Object Description Comment
EN PMAUFK Maintenance Order
EN PMQMEL Maint. Notification
62. Save your entries.
ResultThe document types YP1 have been defined, the related object links have been set up.
3.1.1.10 Defining Document Types – Enhance SL1 for RFQUseIn this activity, you enhance the document type SL1 for Ariba Sourcing.
Procedure1. Access the activity using one of the following navigation options:
IMG Menu Cross-Application Components → Document Management System → Control Data → Define document types
Transaction Code
SPRO
2. On the Change View “Define Document Types”: Overview screen, go into the folder Maintain objects link descriptions.
3. On the Change View “Maintain object link descriptions”: Overview screen, choose New Entries and add the new entries as follows:
Lang. Object Object Description
EN EKKO_RFQ
EN EKKO_QTN
© SAP SE Page of
SAP Best Practices Attachment Service (J98): Configuration Guide
4. Save your settings and return to the Change View “Define Document Types”: Overview screen (you may need to choose Back (F3) twice).
5. On the Change View “Define Document Types”: Overview screen, select the document type SL1. Go into the folder Define object links.
6. Choose New Entries and add the new entries as follows:
Document Type Object Screen no. Comment
SL1 EKKO_RFQ 100
SL1 EKKO_QTN 100
7. Save your settings.
ResultThe document type SL1 was enhanced for Ariba Sourcing.
4 Manual Build StepsSome settings cannot automatically be transported between systems or clients. In these cases, you either transport the settings manually, if possible, or make the settings in the target system or client.
The following table lists the configuration activities where automatic transport is not possible. Refer to the details and sequence in the sections above.
Configuration activity
Manual transport possible
Manual action in target system / client required
Remarks
3.1.1.1 Define Number Ranges for Document Numbers
No No See detailed instructions regarding manual transport given in chapter 3.1.1.1 Define Number Ranges for Document Numbers
We recommend that you plan especially for doing these manual build steps and rehearse the sequence in advance, if possible well before cut over.
© SAP SE Page of