bathroom vanity plans - chief architect software · t he details of a bathroom make a statement,...
TRANSCRIPT

Front view Side view
Quartersawn cherry top, 1 in. thick
Backsplash, 4 in. by 58 in.
Back, 56 in. by 181⁄2 in.*
3⁄4-in. spacers
Drawer slide supports
Pocket screws join the face frame.
Tapered leg, 21⁄2 in. by 353⁄4 in.
Panel, 1⁄4-in. MDF
Rabbet for side panels, 1⁄2 in. wide by 5⁄8 in. deep
Rabbet for mating leg, 1 in. wide by 1⁄2 in. deep
Drawer rail, 1 in. by 15 in.
Top and bottom rails, 13⁄4 in. by 53 in.
Center rail, 21⁄2 in. by 53 in.
Center stiles, 11⁄2 in. by 16 in.
Shelf with rabbeted edge
Shelf support cleat, 3⁄4 in. sq.
Door stop
Center side stile, 4 in. wide
Center side rail, 21⁄2 in. wide
Top and bottom side rails, 13⁄4 in. by 17 in.
Side front leg, 2 in. wide
13⁄4 in.
53⁄4 in.
8 in.
71⁄2 in. 16 in.363⁄4 in.
Top cleat, 3⁄4 in. by 31⁄2 in. by 171⁄4 in.
Center cabinet sides, 173⁄4 in. by 201⁄4 in.*
Bottom, 56 in. by 201⁄4 in.*
22 in.
10 in.
58 in.
60 in. 23 in.
* Back, center cabinet sides, and bottom made from 3⁄4-in. prefinished plywood. All other plywood is 3⁄4-in. unfinished.
COPYRIGHT 2015 by The Taunton Press, Inc. Copying and distribution of this article is not permitted.
FINE HOMEBUILDING38 Drawings: John Hartman

The details of a bathroom make a statement, and a vanity is often a focal point that ties those details together. The simplicity and clean lines of Shaker-style furniture appeal to me because they aren’t adorned with excessive trim, appliqués, or other embellishments, yet they are more
inviting and comfortable than modern pieces in a starker style. In addition, I think the Shaker style can work as well in a suburban raised ranch as it does in a 200-year-old farmhouse.
To build this vanity, you don’t need a cabinet shop, and you don’t need weeks of build time. With some common power tools and a slight increase in cost, you can build a vanity that is stronger and far more stylish than a production model, and that requires only a couple of weekends to complete.
a classic look with a lot less effortWhen designing this Shaker-inspired piece, I started with the same height, depth, and compatibility with standard plumbing fixtures that would be present on a store-bought vanity. From there, I added some details that you won’t easily find, such as mortised butt hinges, full-extension ball-bearing undermount drawer slides, a solid-wood top, and a traditional milk-paint finish. Compared to the details on a production-line vanity, these small changes can make a big difference in the overall feel of the finished project, and they aren’t that hard to execute. My goal in build-
Build Your Own
Bathroom Vanity
This traditional design is easily achieved with straightforward building materials and common power tools
JUNE/JULY 2015
BY JUSTIN FINK
Plan view
SOURCESDrawer boxes dovetailed Baltic birch, unassembled ($27 per drawer); barkerdoor.com
Knobs 1¼ -in.-dia. Shaker knob (bag of 10, $8.75); shakerworkshops.com
Drawer slides 563H undermount slides ($35 per pair, with locking devices); barkerdoor.com
Hinges 2-in. Rolled Barrel Butt Hinges ($12.50 per pair); horton-brasses.com
Faucet Kingston Brass KS395.AX ($150); faucetdirect.com
Sink Kohler K-207580 Serif ($165); amazon.com
Paint Milk Paint Soldier Blue ($19 per qt.); milkpaint.com
11⁄4-in.-dia. wooden knob
Drawer front
Door panel, 1⁄4-in. MDF
1⁄4-in. stub tenon and mating groove
Metal disk for magnetic catch
Baltic-birch dovetailed drawer box
undermount drawer slide
2-in. butt hinge
lower door rail, 23⁄4 wide
Door stiles, 2 in. wide
56 in.
15 in.20 in.15 in.
upper door rail, 2 in. wide
COPYRIGHT 2015 by The Taunton Press, Inc. Copying and distribution of this article is not permitted.
www.finehomebuilding.com JUNE/JULY 2015 39

ing this type of project is to respect the principles of tradi-tional woodworking but chal-lenge some of the techniques to make the building process a bit less fussy. Although the drawing on p. 38 may look intim idating, the necessary techniques for this build are basic, and I’ve included tips and tricks to increase your accuracy. The result is a van-ity that looks and feels like a hand crafted piece of furniture, but one that goes together with more ease.
The most luxurious tools I used here were a track saw and a thickness planer, but even those are negotiable. If you don’t have a track saw, then you can break down sheet goods with a circu-lar saw and a homemade cutting guide. Also, even though you may be purchasing rough lum-ber that requires planing on its face and edges, most hardwood suppliers will do this work for a reasonable rate (my supplier charges 25¢ per bd. ft.) if you don’t have a thickness planer.
Materials chosen for their strengthsThe build starts with the cabi-net’s plywood case, which is the foundation of the entire van-ity—the part to which the rest of the components will be attached. The case consists of a continuous bottom piece, upright dividers to separate the center cabinet from the drawer sections that flank it, and a continuous back that locks everything into place. You’ll need one sheet each of unfinished and prefinished 3⁄4-in. plywood.
The unfinished plywood is used for the areas of the van-ity that will either be painted or remain unseen. For water resistance and overall longevity of the undersink area, I prefer to use prefinished plywood. If you can’t find a source for pre-finished plywood, I recommend finishing both sides of a sheet
Make sheet goods more manageable. A track saw is ideal for dividing sheets of plywood into smaller, rough-size pieces. A sheet of 1-in.-thick rigid foam is a perfect sacrificial base and support for cutoffs. Run the parts through a tablesaw for final sizing to ensure that matching parts are the same dimension.
Fastened, but left loose. After screwing together the two pieces of plywood for each center divider and attaching the spacers to each end panel, tack the subassemblies to the cabinet bottom with 16-ga. nails. Nailed sparingly, the case parts are loose enough for adjustment once the face frame is attached.
Quick and clean tapers. The bottom of each leg stile receives a taper cut to give the finished vanity the look of a stand-alone piece of furniture. A plywood jig with an L-shaped fence allows the piece to be safely supported for a clean-cutting pass on the tablesaw.
One part sizes the others. A sacrificial miter-saw fence and shopmade throat plate ensure cleaner cuts. They also make it easy to register the stock, so you only have to measure the first piece in each group of parts, which can then be laid atop the next piece for repeat cuts.
aSSeMBly wiTh an eye on aCCuRaCy
Face FraMe
caSework
COPYRIGHT 2015 by The Taunton Press, Inc. Copying and distribution of this article is not permitted.
FINE HOMEBUILDING40

of plywood with several coats of polyurethane and letting it cure before cutting the sheet into pieces. Otherwise, it can be a hassle to apply and sand clear coats of finish on the inside of an assembled box.
The joinery used in the ply-wood case won’t be visible in the final piece; for that reason, you can use a finish nailer to tack most of the parts together. After assembling the face frame and attaching it to the boxes, lock the plywood together permanently with 2-in. screws.
Aside from the plywood used for the bottom shelf, all of the surfaces of the vanity that will be painted are built from 5/4 poplar (1-in. finished thickness) and 1⁄4-in. MDF. Both of these materials are readily available, inexpensive, and stable, and they take paint well.
For the top of my vanity, I decided to use solid quarter-sawn cherry. Compared to more conventional flatsawn lumber, quartersawn boards have rela-tively straight-running grain, an inherently stable orientation that minimizes movement across the surface of the wood as its mois-ture content changes.
Pocket holes are fast and strongThe parts for the face frame, side-panel frames, legs, doors, and drawer fronts are all cut at the same time. All are crosscut to 1 in. longer than their final desired lengths, ripped 1⁄8 in. wider than their desired width, and then run through the thick-ness planer on all four sides to bring them to their final dimen-sion before crosscutting them to their exact length.
Anywhere that I can, I use pocket-screw joinery as a fast and strong solution for hidden fastening. A pocket-hole jig is quick to set up, a cinch to use, and with hardly any moving parts, it just never seems to let
Faux floating panels. To achieve the look of true floating panels without all of the complex joinery, assemble each of the vanity side-panel frames with pocket screws, and then cut a 1⁄2-in.-wide by 5⁄8-in.-deep rabbet in the back side of the poplar stiles and rails to accept a 1⁄4-in. MDF panel.
An ideal spacer. When assembling the front face frame, use the drawer fronts—which are cut to the exact size of the opening—to help align the stiles and rails. Later, trim the drawer fronts to their slightly smaller finished size and you will have wasted no extra material on throw-away spacers.
The order matters.Because they are only tacked together, the plywood parts have room for adjustment, which allows you to bring the case and assembled frame into alignment. First, flush up and fasten the two long rails, then the two outermost stiles. Follow up with the inner stiles and then the drawer rails.
end PanelS
Face-FraMe aSSeMbly
caSe aSSeMbly
COPYRIGHT 2015 by The Taunton Press, Inc. Copying and distribution of this article is not permitted.
www.finehomebuilding.com JUNE/JULY 2015 41

me down. The only places on this project where I used a more tradi-tional form of joinery were on the two doors.
Because the doors incorporate floating panels, the surrounding poplar pieces need to be grooved on a tablesaw to accept the 1⁄4-in. MDF panels. But pocket screws won’t work when driven through a groove-edge board, and even if they did work, the exposed grooves and pocket holes would be visible when the cabinet doors were open.
Instead, cut stub tenons on the edges of the doors’ top and bottom rails, allowing them to fit into the same groove that is already being cut to accept the MDF panel. All of this joinery can be cut on the tablesaw, provided you carefully set the fence and blade height for each step. After glue up and sanding, trim the doors to fit using a
standard step-by-step door-fitting sequence (see “How to Install Inset Cabinet Doors,” FHB #226).
know when to buy rather than buildDrawer boxes aren’t much harder to build than any other part of this vanity. But when I compare the convenience and low cost of ordering dovetailed drawer components with the steps and amount of time involved in making them myself, it’s a simple decision. I buy my drawer components online from Barker Door, where the parts are cut to my specifications and arrive ready for glue up and finishing. For this project, the parts for all four drawers made of Baltic birch (a type of tightly veneered plywood) cost me $143, including shipping to
One setup, two passes. Door stiles and rails receive 1⁄2-in.-deep grooves made by cutting to one side of a marked centerline, then flipping the piece to widen the 1⁄8-in. kerf into a 1⁄4-in. groove. A featherboard ensures that parts stay firmly pressed against the fence.
Nibble the tenons. A stop block attached to the fence of a miter gauge registers each end of the door rails to create the shoulder cut of the 1⁄2-in.-long stub tenons, which are created by making a series of successive passes and testing the fit in the mating groove.
Not loose or tight, but snug. The panel and tenons should slide snugly into the grooves. If the tenons are too thin, glue shims to their cheeks. If they’re too fat, hit them with a sanding block. After glue up, trim the door to final height.
One door marks the other. With the first door sized, hung, and clamped in the closed position, temporarily hang the second door, and mark a line on the backside where the doors overlap.
Mortises made easy. After trimming the top and bottom of the doors, rout the hinge mortises on the doors and assembled face frame using a T-shaped plywood template and bearing-guided mortise bit.
Double-stick sled. The safest way to trim the second door, especially if the cut needs to be a slight taper, is to attach the door to a plywood sled with double-stick tape so it can be cut on the tablesaw.
inStalling the doorS
Making the doorS
no-FuSS MeThoDS FoR DooRS, ToP, anD DRaweRS
COPYRIGHT 2015 by The Taunton Press, Inc. Copying and distribution of this article is not permitted.
FINE HOMEBUILDING42
my doorstep. Had I bought the plywood and built the boxes myself, I would have spent $116 for materials alone, and I consider my time worth more than the $27 savings.
For drawer slides, don’t skimp. It’s the one part of this cabinet that gets used daily, so it’s the last place you want to save a buck. I use Blum undermount slides. They aren’t cheap, but they install easily, ride smoothly, and have a soft-close mechanism.
Step up to a solid-wood topFor the top of my vanity, I bought rough-dimensioned 6/4 cherry boards and planed them to a 1-in. finished thickness. After gluing up and sanding the top, I cut the hole for the sink using a template
and a jigsaw before applying the polyurethane finish. This sequence is important because it allows me to apply finish to the visible surface of the countertop and also to the edges of the sink cutout, which are likely to get wet at some point in the life of the vanity.
This vanity took about 30 hours to complete and cost me about $850 in materials—comparable in cash outlay to many commercially avail-able vanities of this size and style. In fact, this vanity was less expensive than many similar models being sold online. Plus, I know mine is built solid in a classic style that I believe will remain timeless, and it has a handmade touch that you can’t get from a factory-built vanity. □
Justin Fink is Project House editor. Photos by Rob Yagid.
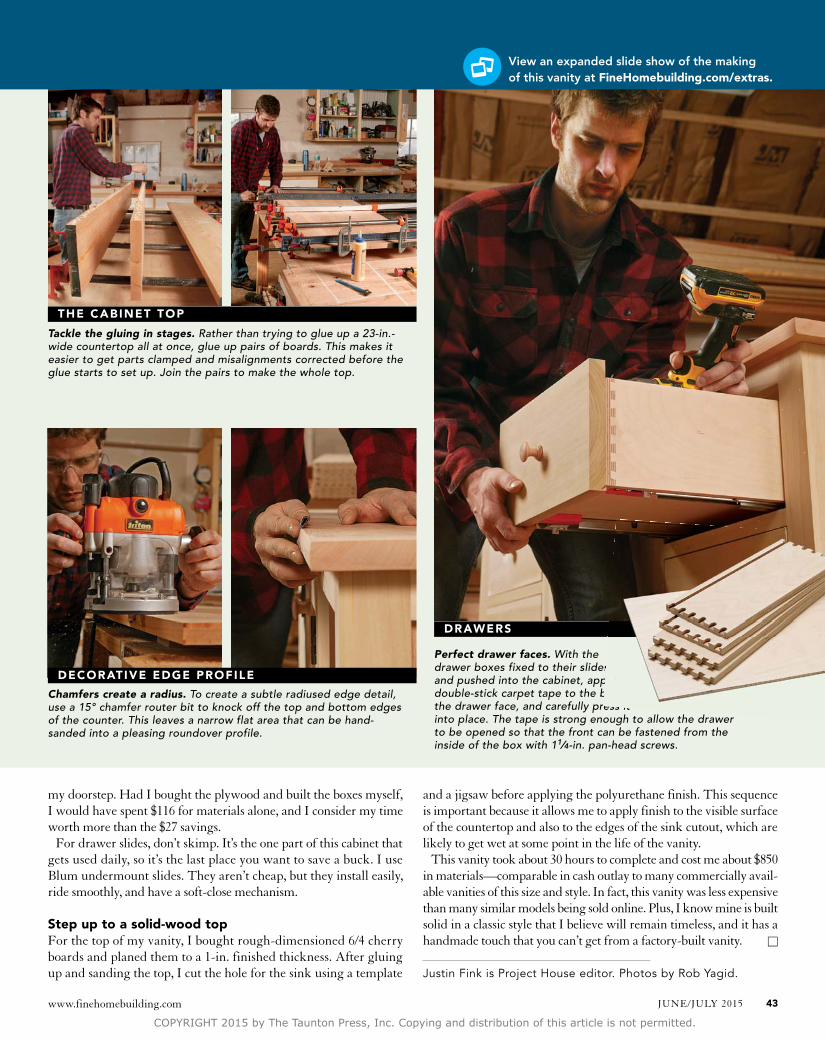
Tackle the gluing in stages. Rather than trying to glue up a 23-in.-wide countertop all at once, glue up pairs of boards. This makes it easier to get parts clamped and misalignments corrected before the glue starts to set up. Join the pairs to make the whole top.
Chamfers create a radius. To create a subtle radiused edge detail, use a 15° chamfer router bit to knock off the top and bottom edges of the counter. This leaves a narrow flat area that can be hand-sanded into a pleasing roundover profile.
Perfect drawer faces. With the drawer boxes fixed to their slides and pushed into the cabinet, apply double-stick carpet tape to the back of the drawer face, and carefully press it into place. The tape is strong enough to allow the drawer to be opened so that the front can be fastened from the inside of the box with 11⁄4-in. pan-head screws.
decoratiVe edge ProFile
the cabinet toP
drawerS
no-FuSS MeThoDS FoR DooRS, ToP, anD DRaweRS
drawer boxes fixed to their slides and pushed into the cabinet, apply double-stick carpet tape to the back of the drawer face, and carefully press it into place. The tape is strong enough to allow the drawer
View an expanded slide show of the making of this vanity at Finehomebuilding.com/extras.
COPYRIGHT 2015 by The Taunton Press, Inc. Copying and distribution of this article is not permitted.
www.finehomebuilding.com JUNE/JULY 2015 43