basic of intensive care - mohp.gov.eg…بادئ... · recognize different assessment and...
TRANSCRIPT
Basic of IntensiveCare
Professor Dr. Sahar Yassin Mohammed
Professor of Internal Medicine and Surgical NursingCollege -Ain Shams University
Reviewed By:
Professor Dr. Tarek Abd Elsalam Seleem
Prof. of Anesthesia And ICU
Faculty of Medicine Al-Azhar University
Second Year
2018/2019

Acknowledgments
This two-year curriculum was developed through a participatory and collaborative approach between the Academic faculty staff affiliated to Egyptian Universities as Alexandria University, Ain Shams University, Cairo University , Mansoura University, Al-Azhar University, Tanta University, Beni Souef University , Port Said University, Suez Canal University and MTI University and the Ministry of Health and Population(General Directorate of Technical Health Education (THE). The design of this course draws on rich discussions through workshops. The outcome of the workshop was course specification with Indented learning outcomes and the course contents, which served as a guide to the initial design.
We would like to thank Prof.Sabah Al- Sharkawi the General Coordinator of General Directorate of Technical Health Education, Dr. Azza Dosoky the Head of Central Administration of HR Development, Dr. Seada Farghly the General Director of THE and all share persons working at General Administration of the THE for their time and critical feedback during the development of this course.
Special thanks to the Minister of Health and Population Dr. Hala Zayed and Former Minister of Health Dr. Ahmed Emad Edin Rady for their decision to recognize and professionalize health education by issuing a decree to develop and strengthen the technical health education curriculum for pre-service training within the technical health institutes.
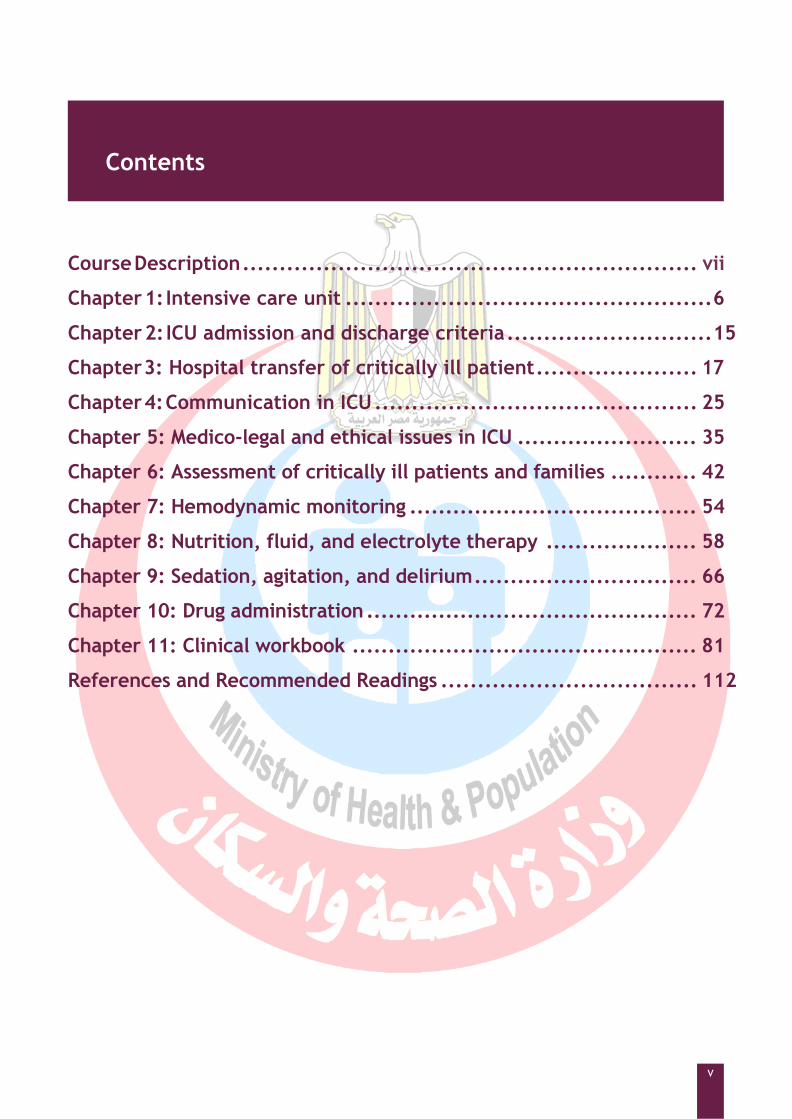
Course Description .............................................................. vii
Chapter 1: Intensive care unit .................................................. 6
Chapter 2: ICU admission and discharge criteria ............................ 15
Chapter 3: Hospital transfer of critically ill patient ...................... 17
Chapter 4: Communication in ICU ............................................ 25
Chapter 5: Medico-legal and ethical issues in ICU ......................... 35
Chapter 6: Assessment of critically ill patients and families ............ 42
Chapter 7: Hemodynamic monitoring ........................................ 54
Chapter 8: Nutrition, fluid, and electrolyte therapy ..................... 58
Chapter 9: Sedation, agitation, and delirium ............................... 66
Chapter 10: Drug administration .............................................. 72
Chapter 11: Clinical workbook ................................................ 81
References and Recommended Readings ................................... 112
Contents

توصيف مقرر دراسى
المقرر بيانات -1
: الكودى الرمز : المقرر اسم Basic of Intensive Care
المركزة الرعاية مبادئ
الثانية : المستوى/ الفرقة
الثالث المستوى
: التخصص
ساعة 2 عملى ساعة 2 نظرى: الدراسية الوحدات عدد
:المقرر هدف -2 This course will provide the technical student with basic knowledge regarding organization and management processes general intensive care unit
: المقرر تدريس من المستهدف -3
المعلومات. ا
: والمفاهيم
1. Describe intensive care unit design, intensive care unit characteristics.
2. States indications for patients admission and discharge criteria in the intensive care units
3. Recognize different type of staffing in the intensive care units
4. Identify common problems of critical care patients 5. Describe methods of prevention of common complications
of critically ill patient 6. Identify basic principles of medical aspesis 7. Identify basic principles of nutrition, fluid and acid-base
management 8. Describe management of common problems of critical care
patient regarding sleep, agitation, and pain 9. States causes and signs of cardiac and respiratory arrests 10. Recognize principles of drug administration
المهارات -ب
: الذهنية
1. Compare between different intensive care levels and classifications
2. Compare patient data against baseline assessment data to detect improvement and deterioration
3. Calculate drug and fluid doses
المهنية المهارات -ج
:بالمقرر الخاصة
1. Recognize different assessment and monitoring techniques for general ICU patient
2. Assist in-hospital patient transfer, pre and inter-hospital transport of the critically ill and injured patient
4. Perform basic skills of measuring vital signs, venipuncture and cannulation, drug administration, IV fluid therapy
5. Apply different monitoring techniques with cardiac moitoring, blood glucose monitoring, and pulse oximeter
6. Perform basic life support and assist in advanced cardiac life support
المهارات -د
: العامة
1. Discuss the legal and ethical issues and values that influence the practice of health team.
2. Present oral and/or written reports that are concise, pertinent, organized, accurate, legible, and grammatically correct
3. Demonstrate personal responsibility for own behaviors 4. Demonstrate ability to manage time and resources
effectively and prioritize for emergency actions 5. Communicate effectively with patient, family and health

care team
:المقرر محتوى -4
1. Intensive care unit characteristics, levels, patients, staff, organization design, ICU admission and discharge criteria
2. Patient assessment
Pre-arrival assessment
Admission assessment
Comprehensive admission assessment
Ongoing assessment 3. Hemodynamic monitoring
Circulatory assistive devices
Artificial airways 4. Common problems of critical care patients
Nutrition
Anxiety
Pain
Impaired communication
Sensory perceptual alteration
Sleep pattern disturbances 5. Prevention of common complications
Physiological instability
Deep venous thrombosis
Hospital acquired infection
Skin breakdown
Psychological impact 6. Communication with patients and families in the ICU 7. Documentation in the ICU 8. Medico-legal and ethical issues in ICU 9. Transporting the critically ill patient
In-hospital transfer of the critically ill patient
Pre – and inter-hospital transport of the critically ill and injured
10. General management of the patient
Nutritional therapy
Fluid and acid-base management
Glycemic control
Sleep
Pain control
Sedation, agitation, delirium management
Physical therapy
Cardiopulmonary resuscitation
Vascular access
Drug administration
والتعلم التعليم أساايب -5
1. Lecture and discussion 2. Small group teaching 3. Case scenarios 4. Teaching Videos 5. Clinical hands on
للطالب والتعلم التعليم أساليب -6
المحدودة القدرات ذوى
They should be submitted to simplified lectures with aids of demonstrations and pictures. The lectures should be repeated several times.
: الطالب تقويم -7
المستخدمة األساليب -أ
Case records and reports Quizzes Mid-term exam Final exam
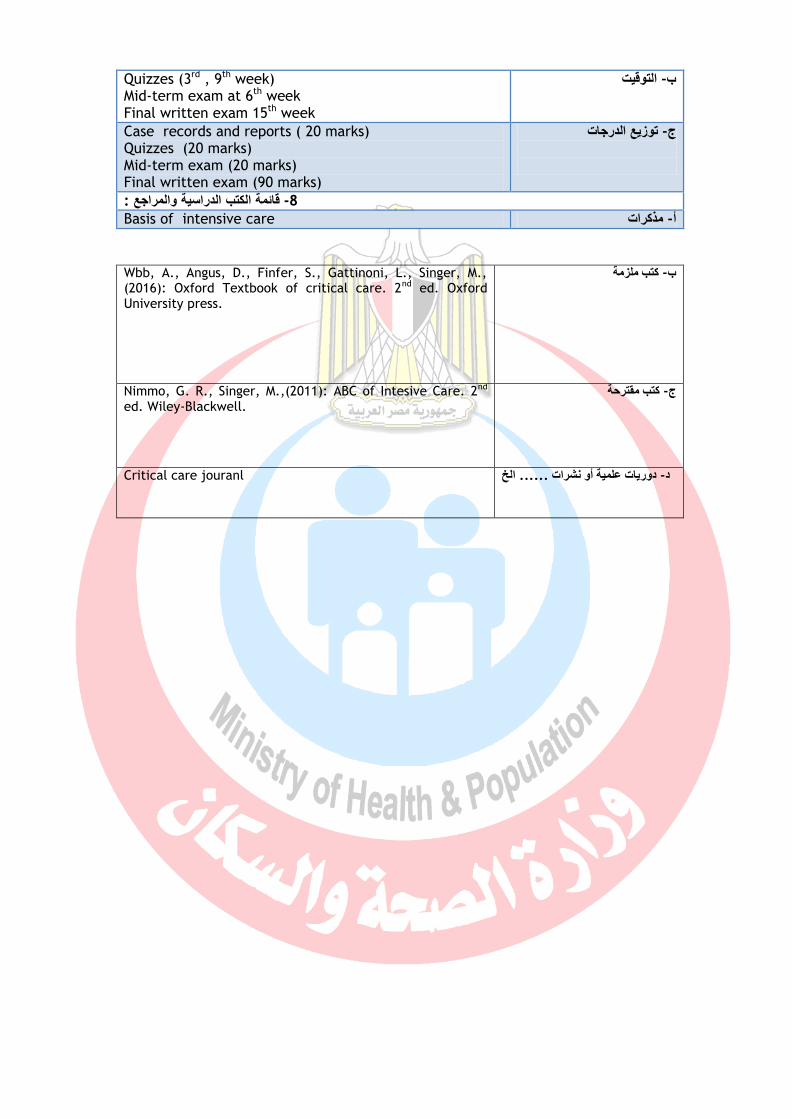
التوقيت -ب
Quizzes (3rd , 9th week) Mid-term exam at 6th week Final written exam 15th week
الدرجات توزيع -ج
Case records and reports ( 20 marks) Quizzes (20 marks) Mid-term exam (20 marks) Final written exam (90 marks)
: والمراجع اسيةالدر الكتب قائمة -8
Basis of intensive care مذكرات -أ
كتب ملزمة -ب
Wbb, A., Angus, D., Finfer, S., Gattinoni, L., Singer, M., (2016): Oxford Textbook of critical care. 2nd ed. Oxford University press.
كتب مقترحة -ج
Nimmo, G. R., Singer, M.,(2011): ABC of Intesive Care. 2nd ed. Wiley-Blackwell.
الخ...... دوريات علمية أو نشرات -د
Critical care jouranl
7
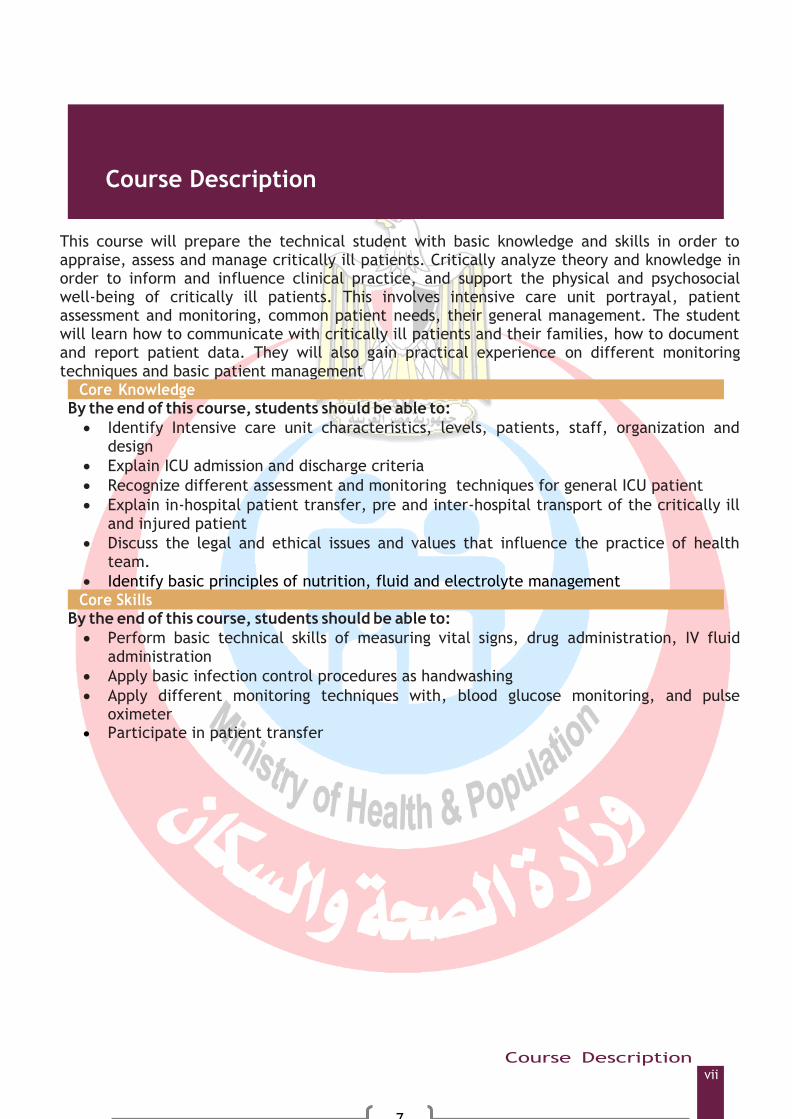
This course will prepare the technical student with basic knowledge and skills in order to appraise, assess and manage critically ill patients. Critically analyze theory and knowledge in order to inform and influence clinical practice, and support the physical and psychosocial well-being of critically ill patients. This involves intensive care unit portrayal, patient assessment and monitoring, common patient needs, their general management. The student will learn how to communicate with critically ill patients and their families, how to document and report patient data. They will also gain practical experience on different monitoring techniques and basic patient management
Core Knowledge By the end of this course, students should be able to:
Identify Intensive care unit characteristics, levels, patients, staff, organization and design
Explain ICU admission and discharge criteria
Recognize different assessment and monitoring techniques for general ICU patient
Explain in-hospital patient transfer, pre and inter-hospital transport of the critically ill and injured patient
Discuss the legal and ethical issues and values that influence the practice of health team.
Identify basic principles of nutrition, fluid and electrolyte management Core Skills By the end of this course, students should be able to:
Perform basic technical skills of measuring vital signs, drug administration, IV fluid administration
Apply basic infection control procedures as handwashing
Apply different monitoring techniques with, blood glucose monitoring, and pulse oximeter
Participate in patient transfer
Course Description
Course Description
vii


5
Course Overview
Methods of Teaching/Training with Number of Total Hours per Topic
ID
Topics
Inte
racti
ve
Lectu
re
Fie
ld W
ork
Cla
ss
Ass
ignm
ents
Rese
arc
h
Lab
1
2
Measuring vital signs 6
2 Patient assessment
Pre-arrival assessment
Admission assessment
Comprehensive admission assessment
Ongoing assessment Hemodynamic monitoring
4
3 Common needs of critical care patients
Nutrition and fluid therapy
Sleep pattern disturbances Sedation agitation and delirium
4
5
4
Communication with patients and families in the ICU
2
Documentation, reporting, and conferring 2
5 Medico-legal and ethical issues in ICU 3
Oxygen therapy 3
6 Transporting the critically ill patient
In-hospital transfer of the critically ill patient
Pre – and inter-hospital transport of the critically ill and injured
4
Medical asepsis: Hand washing 5
7 Drug administration 3 5
TOTAL HOURS (48) 24
24
6
Objectives Describe ICU design
List ICU supportive services
Identify ICU team, with their unique role in critical patient care
Define critical illness
Mention critical care patients whom in need for ICU
Differentiate between nurse practitioner and physician assistance
Compare between different level of care
Design of the intensive care unit
The intensive care unit (ICU) design process is complex and time consuming, and needs to balance innovation with practicality, space availability, physical limitations and cost. The ICU design process begins with a shared critical care medicine (CCM) and hospital vision for a new ICU. The new ICU reflects the desired appearance and feel of the new ICU, and addresses the goals for patient care, workflow, technology, and the environment. Two core principles should be appreciated: First, an ICU is an autonomous mini-hospital, whose design and functionality must be synchronized with the hospital. Secondly, the ICU design process is must balance innovation with practicality, space limitations, healing, and cost restraints. Several questions must be addressed.
• Is the ICU project a renovation or a new build? • How will the ICU be physically related to other hospital areas? • Is the ICU to be a multipurpose or specialty unit? • How many ICU beds are planned? • How much space is available • How will space be allocated (patient versus supportive areas)? • Will the ICU have centralized or decentralized care and support services,
or both? • Will smart technology be incorporated?
A list of equipment must be developed, finalized, and purchased early in the design process. Standardizing technologies allows staff to move easily from room to room, minimizes training, simplifies maintenance, limits repair contracts, and permits quantity discounts. New technologies should also be tested in a simulation laboratory prior to purchase.
Intensive Care Unit Design

7
Team roles during construction ICU design team members should monitor the ICU construction and look for problems that may not have been previously anticipated. Changes may be necessary, but they are expensive and time consuming. The project should be photographed stage by stage to provide a basis for repair or retrofit.
The patient room and supportive services The ICU patient room
The ICU patient room is at the core of the ICU patient, visitor, and staff experience. Each room should function semi-autonomously, be designed similarly, accommodate one patient only to maintain infection control and privacy, and provide a healing environment. ICU rooms have zones (patient, caregiver, and visitor) that are differentiated by room layout; however, the zones must be operationally flexible. The patient’s bed should be the room’s focal point. Medical devices, utilities, communications, and room controls are commonly mounted on stationary headboards or columns, or on mobile articulating columns (booms).
Core equipment includes an ICU bed, physiological monitor, mechanical ventilator, infusion pump, feeding pump, pneumatic compression devices, webcam, and specimen label printer. Point-of-care testing (POCT) and ultrasonography devices may also be considered to be core technologies, as they speed diagnosis and therapies, and are decreasing in their sizes and costs. Room environment
The emotional welfare of ICU patients, staff, and visitors is greatly impacted upon by the room’s environment. Thus, a healing milieu that controls sound, light, temperature, time, artwork and entertainment, and provides visiting areas and privacy should be developed. Physical noise barriers artwork (displayed on the walls, curtains, and ceiling tiles, or electronically), televisions, thermostat, and clock. Comfortable chairs, Wi-Fi, and electrical and USB outlets should also be available. The patient room should include a long-term visiting area if space permits. Room supplies and waste management
Supplies should be stored in secured and non-secured drawers, cabinets, and/or mobile carts or nurse servers ICU rooms should have their own bathrooms with automated bedpan macerators or closed bedpan cleaners. Room entry
The ICU room may open directly to or be set back from the hallway. ICU doors may be controlled manually or electronically. The area outside the patient room should include a decentralized staff workstation, computer, sink, storage space, hangers, and a manual or electronic identification or message board. Supportive services Centralized work areas
Centralized work areas provide important functions, including greeting desks, and quiet work and conferencing areas. Limited central bed visibility is supplemented with bed-based webcams.
8
Corridors and central-based storage for medical devices and carts ICU corridors establish physical and emotional ICU cohesiveness through
their lighting, artwork, sound control, and finishings. Local device and cart cubicles near the patient rooms minimize retrieval times. Hallway closets provide access to non-bedside ICU equipment and supplies. Preferably, ICU patients and supplies should enter the ICU via hallways that bypass the waiting room and visitor entranceways. Floorings and furnishing
Floors should be comfortable to walk on, non-slip, easy to clean, durable, and impermeable. Walls should be impact-resistant and hallway walls should have fixed protective barriers. The waiting room
A waiting room with soft-lighting, warm colours, artworks, Wi-Fi, power and USB outlets, televisions, vending machines, bathrooms, lockers and coat hangers, and long-term sleeping arrangements, if possible, should be located adjacent to the ICU. Seating arrangements should be configured as small groups of chairs separated by privacy dividers. Consultation rooms and a social worker’s office should support family meetings. Staff lounge
The staff lounge should have a pleasant ambiance with comfortable seating, artwork, ICU communications, televisions, computers, and a food area and refrigerator. There should also be private changing areas, scrub dispensers, lockers, bathrooms, nap alcoves, and storage areas (for coats and footwear). Staff communications
Telephones, overhead speakers, nurse-call (intercom) systems, and bi-directional transmitters should be integrated into the ICU. Nurse-call systems are capable of point-to-point and global communications, and can be integrated into real time locating systems (RTLS). Similarly, staff assigned bi-directional transmitters can handle point-to-point and global ICU and hospital communications, and convey voice, telephone, pagers, alarms, and e-mail using wireless and cellular networks. Pharmacy
A fully equipped satellite ICU pharmacy is necessary if the hospital has a decentralized medication system. In contrast, less support is required if the hospital pharmacy system is centralized. Medications may also be stored in secured cabinets at the ICU bedside. Free-standing laboratory
laboratory devices may be positioned in a defined centralized areas, depend on the ICU workflow, testing needs, space available, and resources. ICU logistics
Bulk supplies are usually stored in supply rooms in stationary or track-based shelving, closed supply cabinets, or rolling exchange carts. Infection control

9
Infection prevention requires good design and a ‘culture’ of infection prevention. As hand-washing and surface disinfection are the corner stones of infection control, ICUs should have multiple sinks, cleansing fluid dispensers, and easy to clean surfaces. However, design teams are now supplementing these with automated hand-washing surveillance, surface hygiene monitoring systems, copper or silver antibacterial surface coatings, impermeable, washable, and antimicrobially-coated keyboards and mice, and environmental decontamination (hydrogen peroxide or ultraviolet light) systems. Conference facilities, on-call suites, and offices
On-call suites, conference facilities, and respiratory therapy offices should be located within or near the ICU. Signage
The signage process is facilitated by virtual ICU walk-throughs to simulate patient, staff, and visitor traffic patterns, and maximize hallway efficiencies. Security
Electronic locks with card access should be used to protect and monitor entry to all sensitive ICU areas. Additionally, the ICU should be monitored with video cameras and locally-based webcams. Advanced informatics
Advanced ICU informatics systems seek to electronically integrate the ICU patient with all aspects of care (devices, data, supplies, caregivers, medical and administrative applications), and the electronic medical record (EMR). These systems should also help utilize the data, and monitor the ICU environment.
Staffing in the intensive care unit Like all complex organizations, intensive care units (ICUs) have numerous
variable elements of organization and structure, including how they are staffed. Staffing in the intensive care units
The team of professionals caring for patients in critical care units can be divided into three large groups:
Nurses, whose numbers include bedside nurses, administrative and educator nurses, and practical nurses.
Providers including physicians and advanced care practitioners.
Allied health personnel, including physician assistance, respiratory therapists, nutrition support specialists, pharmacists, physiotherapists, and social workers. Working with critically ill patients commonly require collaboration with a multidisciplinary team of health care professionals. The goal of team is to provide effective and comprehensive biological, psychological, social, and spiritual dimensions of a person care.
Members of ICU team: Intensivists

10
Registered nurses Advanced practice nurses Patient-care technician
• Provides direct patient care to critically ill patients • Bathes patients • Obtains vital signs • Assists with transportation of patients for testing
Physical therapist • Assesses muscle groups and mobility. • Develops specialized care plan • Teaches gait and transfer training to patients and other health care team members
Occupational therapist • Assesses a patient’s activities of daily living • Teaches the patient and his family methods for completing these tasks and
achieving the discharge plan Speech pathologist
• Assesses ability to swallow • Assesses for speech and language disorders • Teaches techniques for dealing with swallowing impairment, • Works with health care providers to reinforce treatment
Dietitian • Monitors a critically ill patient’s dietary intake • Assesses the patient’s daily caloric intake and reports deviations • Devises meal plans to meet the practitioner recommended needs for the
patient • Recommends dietary interventions
Social services Respiratory therapist Physician assistants/ physician extender Difference between nurse practitioners and physician assistants as ICU providers
Nurse practitioners Physician assistants
Education/Background Bachelor of nursing science degree and licensure as a registered professional nurse (RN)
Collage level course work
Degree conferred Master or doctorate Bachelor or master
Duration of the program 18 months to 5 years 26 months
Specialty focus in critical care
Yes No
Previous ICU experience Usually critical care nursing Varies, but usually not
Practice agreement required
Most do not require physician collaboration or supervision
Supervisory agreement with a physicians required
Pprocedure skills Part of the educational program Taught on job
Physician assistants (PAs) are specially trained health care professionals
who work under the supervision of a doctor. PAs conduct physical examinations,

11
order tests and medications, assist in surgery, and have autonomy in medical decision making. Typically, a PA helps the doctor care for patients in a CCU.
ICU patient
Patient who suffering from critical illness such as myocardial infarction, cerebrovascular accident, poisoning, pneumonia, surgical complications, major trauma as a result of road traffic accidents, a fall, burns, an industrial accident or violence or have life-threatening illnesses or injuries. Such patients may be unstable, have complex needs, and require intensive and vigilant care.
Timely detection of patients’ deterioration and appropriate clinical interventions can minimize the likelihood of serious adverse events, including cardiac arrest and death which is the aim of recognizing and managing the critically ill patients.
ICU levels
Level (0) Needs can be met through normal ward care.
Example: • Intravenous therapy. • Observations required less frequently than 4 hrly.
Level (1) Patients recently discharged from a higher level of care
Example: • Patients requiring a minimum of 4 hrly observations.
Patients in need of additional monitoring/clinical interventions, clinical input or advice Example
Requiring a minimum of 4 hrly observation on the basis of clinical need.
Requiring continuous oxygen therapy. Boluses of intravenous fluid (need not determined by CVP). Epidural analgesia or Patient Controlled Analgesia in use. Parenteral nutrition. Postoperative surgical patients who are still requiring 4 hrly
observations. Requiring administration of bolus intravenous drugs through a
Central Venous Catheter. With a tracheostomy. With a chest drain in situ. Requiring a minimum of 4 hourly GCS assessment. With diabetes receiving a continuous infusion of insulin. Who are at risk of aspiration pneumonia. On established intermittent renal support.

12
Requiring respiratory physiotherapy to treat or prevent respiratory failure.
Patients requiring critical care outreach service support Example: Abnormal vital signs but not requiring a higher level of critical care. Risk of clinical deterioration and potential need to step up to level 2
care. Level (2) Patients needing pre-operative optimization
Example: Cardiovascular, renal or respiratory optimisation required prior to
surgery. (Invasive monitoring inserted to assist optimisation (arterial line, and CVP as a minimum)).
Patients needing extended postoperative care Example:
Immediate care following major elective surgery. Emergency surgery in unstable or high risk patients. Where there is a risk of postoperative complications or a need for
enhanced interventions and monitoring. Patients stepping down to Level 2 care from Level 3
Example: Requiring a minimum of hourly observations. At risk of deterioration and requiring level 3 care again.
Patients receiving single organ support Example: (exceptions: Basic Respiratory and Basic Cardiovascular Support
occurring simultaneously without any other organ support should be considered as Level 2 and Advanced Respiratory Support alone is Level 3)
Patients receiving Basic Respiratory Support Example: Indicated by one or more of the following: Mask / hood CPAP or mask / hood Bilevel positive airway pressure
(noninvasive ventilation) Patients who are Intubated to protect the airway but needing no
ventilatory support CPAP via a tracheostomy More than 50% oxygen delivered by face mask. Close observation due to the potential for acute deterioration to the
point of needing advanced respiratory support. Physiotherapy or suction to clear secretions at least two hourly,
whether via tracheostomy, minitracheostomy, or in the absence of an artificial airway
Patients who are recently (within 24 hours) extubated after a period (greater than 24 hours) of mechanical ventilation via an endotracheal tube
Patients receiving Basic Cardiovascular Support

13
Example: Indicated by one or more of the following: Use of a CVP line for monitoring of CVP and to deliver titrated fluids
to treat hypovolaemia. Use of an arterial line for monitoring the arterial pressure and/or
sampling of arterial blood. Single intravenous vasoactive drug used to support or control arterial
pressure, cardiac output or organ perfusion. Single/multiple intravenous rhythm controlling drug(s) to support or
control cardiac arrhythmias Patients receiving Advanced Cardiovascular Support
Example: Indicated by one or more of the following: Multiple intravenous vasoactive and/or rhythm controlling drugs
(e.g. inotropes, amiodarone, nitrates). Continuous observation of cardiac output. Intra-aortic balloon pumping and other assist devices. Insertion of a temporary cardiac pacemaker
Patients receiving Renal Support Example: Indicated by: Acute renal replacement therapy (e.g.haemodialysis, haemofiltration
etc.) or provision of renal replacement therapy to a chronic renal failure
patient who is requiring other acute organ support in a critical care bed.
Patients receiving Neurological Support Example: Indicated by one or more of the following:
Central nervous system depression Invasive neurological monitoring or treatment Continuous intravenous medication to control seizures Therapeutic hypothermia using cooling protocols or devices
Patients receiving Dermatological Support Example: Indicated by one or more of the following
Patients with major skin rashes, exfoliation or burns. (e.g. greater than 30% body surface area affected).
Use of complex dressings (e.g. large skin area greater than 30% of body surface area, open abdomen, vacuum dressings or, large trauma such as multiple limb or limb and head dressings).
Level (3) Patients receiving Advanced Respiratory Support alone
Example: Indicated by one of the following: Invasive mechanical ventilatory support applied via a trans-laryngeal
tracheal tube or applied via a tracheostomy. Bi-level positive airway pressure (BIPAP) applied via a trans-laryngeal
tracheal tube or applied via a tracheostomy CPAP via a trans-laryngeal tracheal tube.
14
Extracorporeal respiratory support. Patients receiving a minimum of 2 organs supported
Examples: Basic Respiratory and Neurological support. Basic Respiratory and Hepatic Support. Basic Respiratory and Renal support. Basic Cardiovascular and Hepatic support. Basic Cardiovascular and Renal support. Advanced Cardiovascular and Renal support. Advanced Cardiovascular and Hepatic support. Advanced Cardiovascular and Neurological support.
15
Objectives
1. Recognize Determinants of admission and discharge decisions. 2. Compare between intensive care unit and high dependent unit admission
and discharge criteria. Introduction
The decision to admit or discharge a patient is the responsibility of the
intensive care specialist. Decisions will be based on the severity of the illness, chronic health and physiological reserve, and therapeutic susceptibility, and will be informed by the patient’s wishes. Outcomes of intensive care are affected by the timing of admission and discharge, and the quality of care outside the ICU.
The decision to admit patients to intensive care or discharge them to a
hospital ward (or even directly back home) is a daily task for intensivists. The outcomes of the decision are strongly influenced by available resources, staffing, and skills throughout the patient pathway. Determinants of admission and discharge decisions Context
Admission and discharge processes and outcomes vary widely between hospitals and between countries. There is growing research evidence showing that the outcomes of intensive care are affected by the timing of admission and discharge decisions, which in turn are influenced by resource availability in the ICU and probable inexpert care on the ordinary wards. Patient factors
Decisions to admit patients to ICU or discharge them to the ward are determined by the severity of their illness. Severity of illness is a composite of the magnitude of the acute disease, the patient’s physiological reserve, and the concurrent level of treatment and organ system support. Loss of functional capacity is an important predictor of frequent hospitalization and death, and co-morbid disease impacts on ICU and hospital outcomes. Diagnosis and prognosis are intimately linked to therapeutic specificity, and advances in treatment will alter prognosis. Patient preferences are fundamental determinants of ICU admission and discharge decisions, and in setting levels or limits on intensity of care.
ICU Admission And Discharge Criteria

16
Decision support Scoring systems
Physiological severity scoring, in particular the Acute Physiology and Chronic Health Evaluation (APACHE) system, was a transformational concept, introduced as a tool to characterize patient populations and to inform decision-making about individual patients. Guidelines for ICU admission and discharge
The UK guidelines on admission to and discharge from ICUs and HDUs were developed in response to adverse publicity surrounding the lack of intensive care beds. The working party chose simple criteria based on dependence on organ system support linked to intensive care (level 3) or high dependency care (level 2).
UK Guidelines on admission to and discharge from intensive care and high dependency units
Intensive care is appropriate for: High dependency care is appropriate for:
Patients requiring or likely to require advanced respiratory support alone
Patients requiring support for a single failing organ system, but excluding those needing advanced respiratory support
Patients requiring support of two or more organ systems
Patients who can benefit from more detailed observation or monitoring than can safely be provided on a general ward
Patients with chronic impairment of one or more organ systems sufficient to restrict daily activities (co-morbidity) and who require support for an acute reversible failure of another organ system
Patients no longer needing intensive care, but who are not yet well enough to be returned to a general ward
Post-operative patients who need close supervision
Department of Health (1996). Guidelines on Admission to and Discharge from Intensive Care and High Dependency Units. London: NHS Executive.
17
Objectives
1. List indications for in hospital transfer 2. List vital components of communicating patient data for transfer 3. Identify key elements to be stabilized prior to transfer 4. Identify minimum standard of monitoring during in-hospital transfer 5. Identify basic care needed during transfer 6. Recognize life support requirements for patient transfer 7. List emergency equipment and drugs for use during transfer 8. Describe care documentation and auditing for the transfer process 9. List common pitfalls that might be occur during transfer 10. Describe staffing qualifications for critical care tem responsible for
transfer 11. Mention recommendations for transfer procedural comptencies
In- Hospital transfer The intensive care unit (ICU) provides a safe environment for the critically-
ill patient where optimal standards of critical care can be delivered. However, patients typically develop critical illness outside the ICU, necessitating transport from their point of presentation to the ICU, while those in the ICU frequently need to be transferred out, in order to undergo diagnostic or therapeutic interventions.
The risks and hazards associated with such transfers are often underestimated. It might include:
1. Serious adverse outcomes such as equipment problems (e.g. battery failure),
2. Problem related to poor staff communication, 3. inadequate monitoring, and 4. Inadequate positioning of patients.
Many of the adverse cardiovascular and respiratory complications that arise can be related to movement of the non-optimized patient, dislocation of essential life sustaining devices (endotracheal tubes, venous access devices), and equipment failure.
One key issue in preventing critical incidents during in-hospital transfer is the training and competencies of the accompanying staff (transferred by personnel with the appropriate knowledge skills and experience). Indications for in-hospital transfer
The in-hospital transfer of the deteriorating patient requiring escalation to a higher level of care can be particularly challenging. The decision to transfer should be based on the balance between probable benefit of the proposed
Hospital Transfer of Critically Ill Patient

18
intervention and potential risk. Alternative strategies, including the use of bedside investigations such as ultrasound, should be considered.
Indications Example
Escalation of care
E.g. from ward, operating room, emergency department, following development/recognition of critical illness or deterioration of the patient
Investigation E.g. for CT or MRI or angiography
Therapeutic E.g. for definitive surgery, interventional radiology, cardiac catheterization
Planned/emergency evacuation of ICU
E.g. planned transfer from unit to allow essential building/maintenance work or unplanned evacuation, for example, resulting from power failure or fire
De-escalation of care
E.g. step down from ICU (level 3) care to high dependency unit (HDU; level 2)
Accompanying personnel and training
Critically-ill patients should be accompanied by at least two appropriately trained attendants during transfer. Although not all transfers require a physician; responsible personnel must be able to respond to the individual needs of the patient. Poor training and performance of staff contributes to the risk of errors of judgement, delay in problem recognition, and inadequate preparation of equipment as significant factors. Communication
A vital component of all transfers is clear and concise communication between the team responsible for transfer and personnel at the destination. Preparation
Except in situations where the transfer is for immediate life-saving intervention (e.g. to the operating theatre or angiography suite to control bleeding), patients should be optimally resuscitated and stabilized prior to transfer.
19
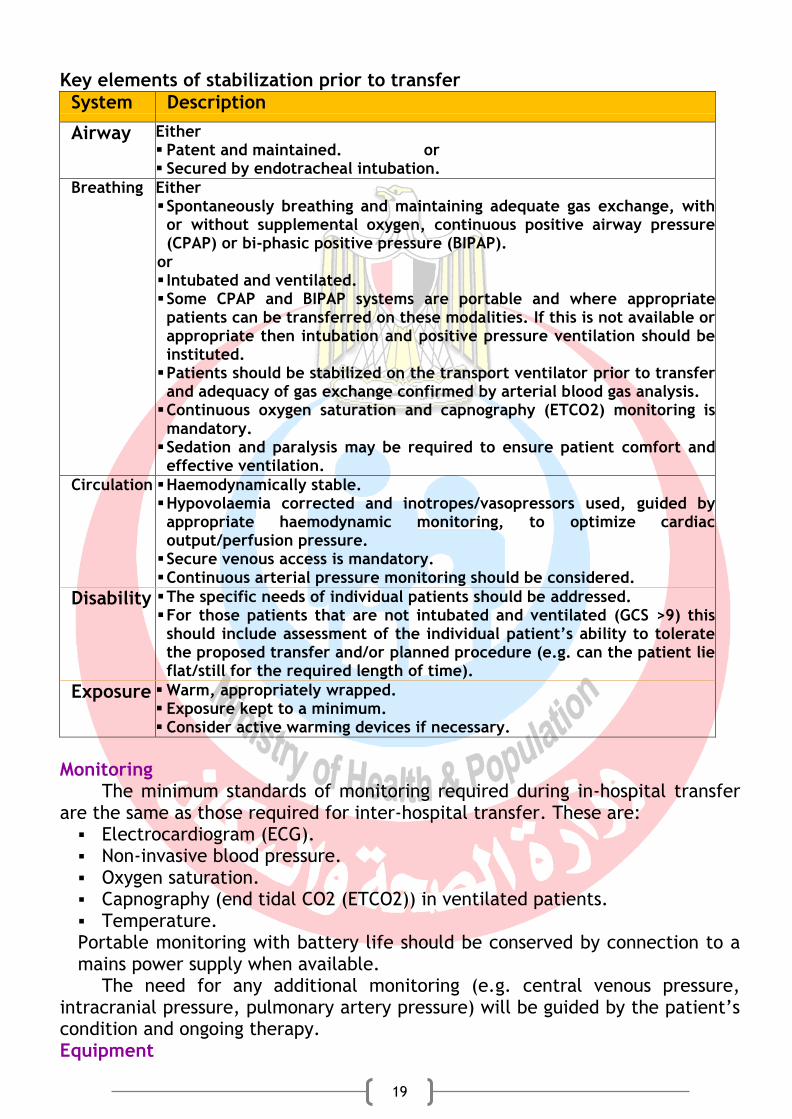
Key elements of stabilization prior to transfer
System Description
Airway Either Patent and maintained. or Secured by endotracheal intubation.
Breathing Either Spontaneously breathing and maintaining adequate gas exchange, with or without supplemental oxygen, continuous positive airway pressure (CPAP) or bi-phasic positive pressure (BIPAP).
or Intubated and ventilated. Some CPAP and BIPAP systems are portable and where appropriate patients can be transferred on these modalities. If this is not available or appropriate then intubation and positive pressure ventilation should be instituted. Patients should be stabilized on the transport ventilator prior to transfer and adequacy of gas exchange confirmed by arterial blood gas analysis. Continuous oxygen saturation and capnography (ETCO2) monitoring is mandatory. Sedation and paralysis may be required to ensure patient comfort and effective ventilation.
Circulation Haemodynamically stable. Hypovolaemia corrected and inotropes/vasopressors used, guided by appropriate haemodynamic monitoring, to optimize cardiac output/perfusion pressure. Secure venous access is mandatory. Continuous arterial pressure monitoring should be considered.
Disability The specific needs of individual patients should be addressed. For those patients that are not intubated and ventilated (GCS >9) this should include assessment of the individual patient’s ability to tolerate the proposed transfer and/or planned procedure (e.g. can the patient lie flat/still for the required length of time).
Exposure Warm, appropriately wrapped. Exposure kept to a minimum. Consider active warming devices if necessary.
Monitoring
The minimum standards of monitoring required during in-hospital transfer are the same as those required for inter-hospital transfer. These are: Electrocardiogram (ECG). Non-invasive blood pressure. Oxygen saturation. Capnography (end tidal CO2 (ETCO2)) in ventilated patients. Temperature. Portable monitoring with battery life should be conserved by connection to a mains power supply when available.
The need for any additional monitoring (e.g. central venous pressure, intracranial pressure, pulmonary artery pressure) will be guided by the patient’s condition and ongoing therapy. Equipment

20
Equipment required for in-hospital transfer can be divided into four categories. All equipment should meet the relevant national standards, and staff should be familiar with its function and operation. Basic care
While inter-hospital transfers require the use of a specialized transfer trolley, in-hospital transfers can often be carried out utilizing the patient’s own bed. The staff involved must therefore be familiar with the operation of the bed and particularly how to lay the patient flat in an emergency. It is common to place essential equipment on the bed (in proximity to the patient), but this creates a risk of injury to the patient and prevents unhindered access in an emergency. All essential equipment therefore should be carried on portable racking/shelves either attached to the end of the bed or mounted over the bed.
Typical end of bed ‘stack system’ to facilitate the transport of equipment during in-hospital patient transfer, with mountings for portable ventilator, infusion pumps syringe
drivers, and monitoring and secure housing for oxygen cylinders.
Life support Portable ventilators should be:
robust,
battery powered, and
economical with oxygen.
Contain require disconnection and high pressure alarms, the
abile to supply positive end expiratory pressure (PEEP) The following should be ready for use:
1. A self-inflating bag and mask with oxygen reservoir and tubing should be available in case of ventilator failure.
2. Sufficient oxygen supply must be available to complete the transfer. 3. Syringe drivers/infusion pumps are required to deliver drug and fluid
infusions. The concentrations of drug infusions should be optimized to minimize the need to change syringes during transfer.

21
Treatment
Equipment required to both deliver ongoing ICU management (e.g. additional syringe drivers/infusion pumps, underwater seal drains, etc.) and to respond to a potential emergency caused by physiological deterioration or equipment failure.
Where present, underwater seal drains add complexity to the transfer process due to the risk of dislodgment or compromise of drain integrity (e.g. allowing water/air to entrain back into the chest). Drains should not, however, be clamped during the transfer process, due to the greater risk of re-accumulation of the collection (particularly tension pneumothorax). Drains should be kept below the level of the chest at all times. A list of emergency equipment and drugs for use during in-hospital transfer is included in the tables. All equipment should be checked and tested prior to use. Emergency equipment and drugs for use during in-hospital transfer
System Items
Airway Oral and nasopharyngeal airways Suction device, and suction catheters Laryngeal mask Endotracheal and tracheostomy tubes Laryngoscopes Endotracheal tube introducers (stylet and bougie) Magill's forceps Tape for securing tracheal tube Stethoscope
Ventilation Fixed performance oxygen masks and tubing Self-inflating bag and mask with oxygen reservoir and
tubing Airway filters/heat moisture exchange (HME) filters Nasogastric tubes (assorted sizes) and drainage bag
Circulation Needles/syringes assorted sizes Alcohol and chlorhexidine skin preparation Intravenous/arterial/central venous catheters Aseptic line insertion packs (including gown and
gloves) Suture/fixation devices and dressings Intravenous fluids and administration sets 3-way taps/access devises
22
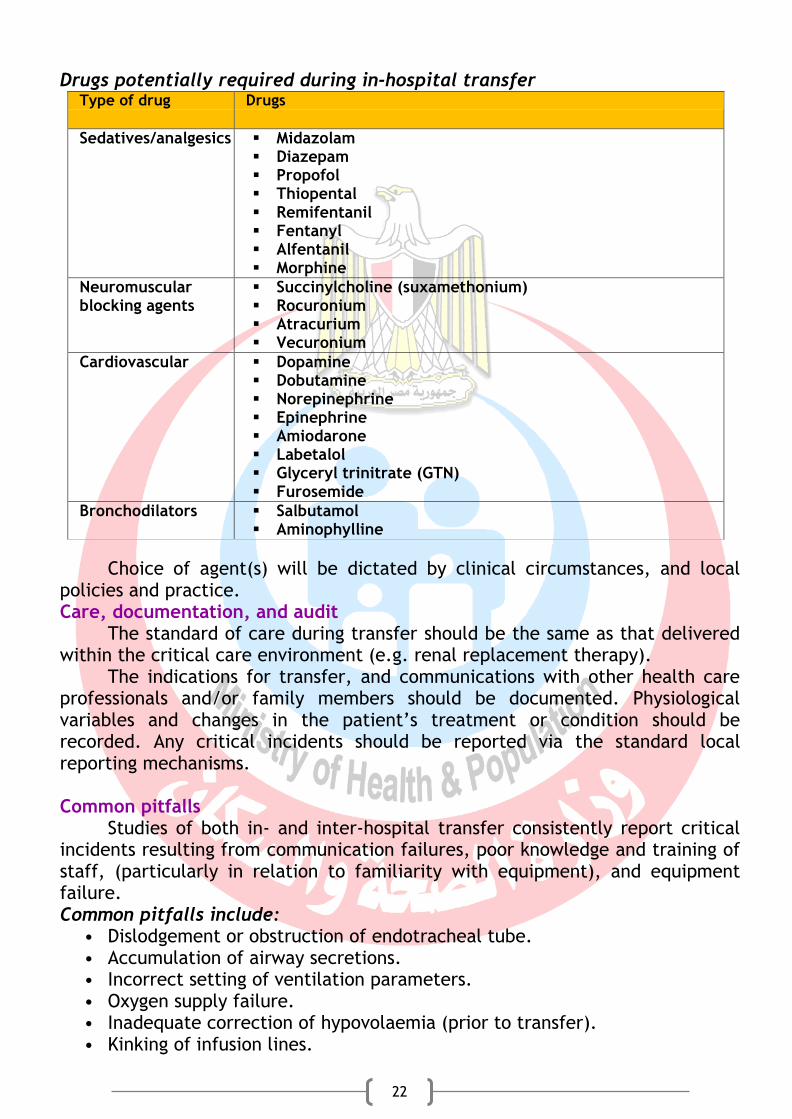
Drugs potentially required during in-hospital transfer Type of drug Drugs
Sedatives/analgesics Midazolam Diazepam Propofol Thiopental Remifentanil Fentanyl Alfentanil Morphine
Neuromuscular blocking agents
Succinylcholine (suxamethonium) Rocuronium Atracurium Vecuronium
Cardiovascular Dopamine Dobutamine Norepinephrine Epinephrine Amiodarone Labetalol Glyceryl trinitrate (GTN) Furosemide
Bronchodilators Salbutamol Aminophylline
Choice of agent(s) will be dictated by clinical circumstances, and local policies and practice. Care, documentation, and audit
The standard of care during transfer should be the same as that delivered within the critical care environment (e.g. renal replacement therapy).
The indications for transfer, and communications with other health care professionals and/or family members should be documented. Physiological variables and changes in the patient’s treatment or condition should be recorded. Any critical incidents should be reported via the standard local reporting mechanisms. Common pitfalls
Studies of both in- and inter-hospital transfer consistently report critical incidents resulting from communication failures, poor knowledge and training of staff, (particularly in relation to familiarity with equipment), and equipment failure. Common pitfalls include:
• Dislodgement or obstruction of endotracheal tube. • Accumulation of airway secretions. • Incorrect setting of ventilation parameters. • Oxygen supply failure. • Inadequate correction of hypovolaemia (prior to transfer). • Kinking of infusion lines.

23
• Depletion of infusion drugs. • Failure of syringe pumps. • Failure of other portable equipment (e.g. monitors). • Logistic issues, including beds not fitting into lifts or doorways, or being
difficult to manoeuvre. Pre- and inter- Hospital transfer
Patients need to pre and inter-hospital transfer are the most fragile neonate receiving mechanical ventilation, multiple intravenous medications, and intensive monitoring devices.
Critical care delivered in the out-of-hospital setting is an integral part of modern health care that can be life-saving when used appropriately. Critical care transport systems have special challenges, including logistics, weather conditions, traffic, geography, and strict governmental regulations. Many professional societies and governments have developed specific guidelines and regulations regarding critical care transport, with which all personnel involved with transport, must be familiar. Protocols and policies should address issues such as when transport is not safe or not indicated, as well as appropriate crew configurations, specific training, competencies, and equipment. Staffing considerations for critical care transport
Studies have shown that transport by a specialist retrieval team compared with standard ground ambulance teams resulted a reduction in patient mortality during the first 12 hours of arrival at the receiving hospital. Two personnel with critical care training should attend the patient at all times during the transfer, regardless of the mode of transportation. The team composition should include a critical care nurse, respiratory therapist with advanced life support experience. Occasionally, a physician (fully-qualified or in-training) may be used as part of the transport team. Equipment considerations
Equipment and medication may vary depending on the type of transport vehicle and patient condition (e.g. neonatal versus adult cardiac problem). However, at a minimum, appropriate monitoring devices, advanced cardiac life support medications, vasoactive medication infusions, narcotics, paralytic medications, anti-emetics, and blood products.
In addition to ventilators and intravenous pumps for medication drips. At a minimum, it is generally recommended that point-of-care (POC) testing should be available for basic electrolytes, blood gas analysis, complete blood count, lactate, and glucose. Procedural competencies
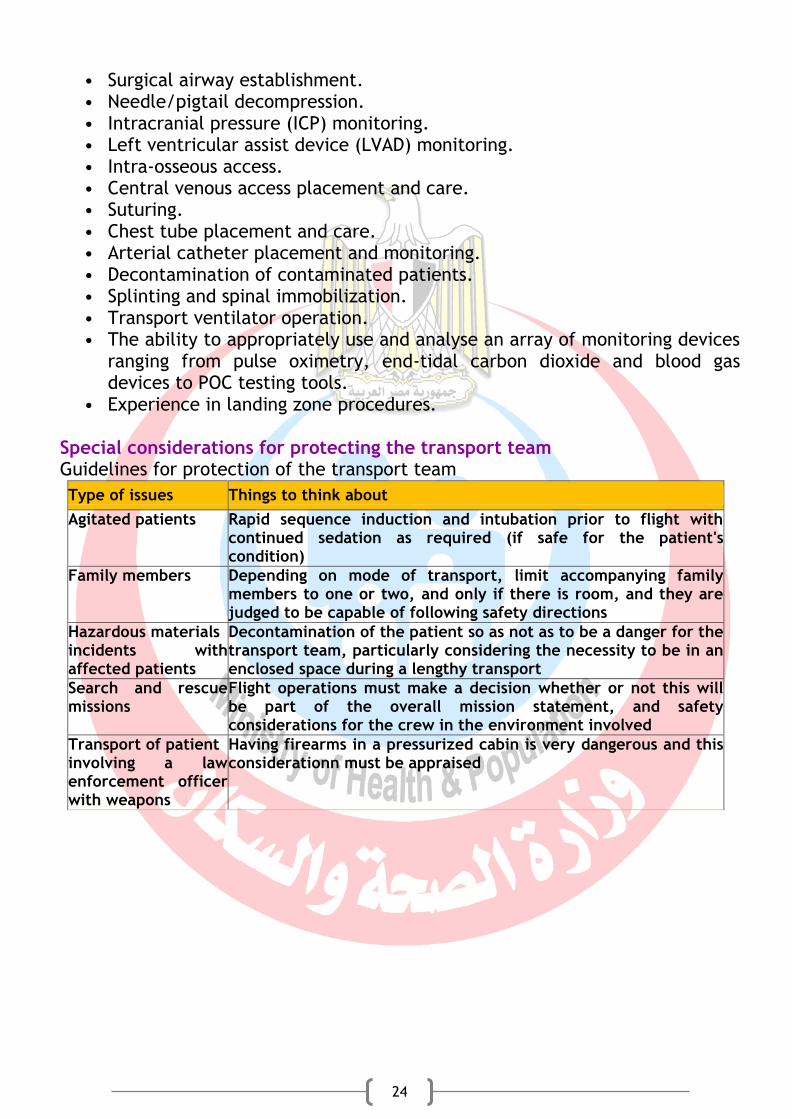
Recommendations for transportation teams trained in intensive care unit procedures, advanced trauma care, and paediatric/neonatal interventions/monitoring. All applicable levels of:
• Tracheal intubation.
24
• Surgical airway establishment. • Needle/pigtail decompression. • Intracranial pressure (ICP) monitoring. • Left ventricular assist device (LVAD) monitoring. • Intra-osseous access. • Central venous access placement and care. • Suturing. • Chest tube placement and care. • Arterial catheter placement and monitoring. • Decontamination of contaminated patients. • Splinting and spinal immobilization. • Transport ventilator operation. • The ability to appropriately use and analyse an array of monitoring devices
ranging from pulse oximetry, end-tidal carbon dioxide and blood gas devices to POC testing tools.
• Experience in landing zone procedures. Special considerations for protecting the transport team Guidelines for protection of the transport team
Type of issues Things to think about
Agitated patients Rapid sequence induction and intubation prior to flight with continued sedation as required (if safe for the patient's condition)
Family members Depending on mode of transport, limit accompanying family members to one or two, and only if there is room, and they are judged to be capable of following safety directions
Hazardous materials incidents with affected patients
Decontamination of the patient so as not as to be a danger for the transport team, particularly considering the necessity to be in an enclosed space during a lengthy transport
Search and rescue missions
Flight operations must make a decision whether or not this will be part of the overall mission statement, and safety considerations for the crew in the environment involved
Transport of patient involving a law enforcement officer with weapons
Having firearms in a pressurized cabin is very dangerous and this considerationn must be appraised
25
Objectives
1. Define effective team communication 2. Identify benefit of effective team communication 3. Identify risk of suboptimal communication 4. Recognize team benefits from good leader 5. Compare between explicit and implicit coordination 6. Describe benefits of family meeting 7. Describe the component of structured family meeting 8. List indication of family meeting 9. Summarize the mechanics of formal family meeting 10. Describe key communication skills and behavior for effective staff/family
communication 11. Identify meaning and purpose of documentation 12. Identify documentation guidelines in relation to content, timing, formats,
accountability, and confidentiality. 13. Identify different documentation formats 14. Describe care reporting in different methods 15. Describe types of conferring about care
Effective teamwork in the ICU
Without effective teamwork, high-quality critical care medicine is largely impossible. Communication skills are integral to good teamwork and can also be adapted. Better teamwork is a prime means to improve patient safety and medical culture. Critical care medicine means patients are too much for one clinician to manage alone. A useful principle from aviation is to focus not on who is right, but what is right.
A good leader must establish a ‘shared mental model’ (a common understanding, with everyone ‘on the same page’).
Without leadership, diffusion of responsibility can occur. Inexperienced teams can function well, but typically need more direction and centralized-control. As teams mature, their members learn to volunteer relevant information, also increases the team’s cognitive capacity. As teams mature they also anticipate and act with minimal talking (‘implicit coordination’). Team communication
Team communication is more than just talking: it aids task-execution, information-exchange and relationship-building. It is also more than just what is said—it matters how it is said and how it is understood. Moreover, non-verbal communication (gesture, posture, eye contact) and para-verbal communication (tone, loudness, pacing, and emphasis) are at least as important as verbal communication (potentially more so if there is incongruence).
Communication in Intensive Care Unit

26
Communication during medical crises is a major source of preventable death. In short, all members take responsibility for how messages are delivered, received, understood, and completed. Communication with patients and families in the ICU
Structured meetings should occur regularly with families of all intensive care unit (ICU) patients. Pre-meetings help to ensure all the appropriate people have been included and that the clinical team has a coherent understanding of the patient’s prognosis and treatment options. Listening and responding to families’ emotions are essential clinical communication skills.
Over the past decade, holding regular, structured meetings between clinicians and the families of patients in the intensive care unit (ICU) has been increasingly advocated by leaders in quality improvement, critical care, and bioethics. Although informal meetings should occur continually, formal meetings are indicated:
Within the first 72 hours of ICU admission.
When conflict occurs among family members, or between the family and the clinical team.
When the clinical team feels that the current goals of care should probably be revised.
When the family or clinical team requests a meeting.
When the patient’s clinical status changes. Additionally, the clinical team should meet every 5–7 days with families of
patients who have longer than average stays. Mechanics of the family meeting
Formal family meetings should include short, focused pre-meetings and debriefing sessions.
Pre-meeting: Before the family meeting, the clinical team should meet to ensure:
all the relevant people have been invited,
an appropriate space is available, and
plan a communication strategy. Inviting attendees If a previously competent patient has requested that certain people should not be involved in decision-making, the request should be honoured. Otherwise, any family members should be invited, particularly key family support figures and legal decision-makers. The patient’s medical condition, possible treatments, and the practical aspects of future transitions (e.g. to hospice or a nursing facility, or for a family to make funeral arrangements), and thus should be included. Setting
27
Most families feel uncomfortable if possible, ICUs should designate a quiet, private, comfortable room for family meetings. Clinicians should minimize possible interruptions, put their phones on vibrate, and bring tissues. Communication plan Finally, clinical teams should take time before the family meeting to review the relevant clinical information, and establish their overall goals and expectations for the meeting. The team should internally resolve any apparent conflict about the patient’s prognosis or potentially appropriate treatments.
The meeting proper Goal setting
It can be helpful to ascertain what the family’s expectations and goals are for the meeting, and to clarify the goals of the clinical team. Family illness narratives
Asking the family what other health care providers have told them about the clinical situation targets several goals. First, their descriptions show their understanding of and reactions to the illness. Secondly, clinicians can avoid unintentionally contradicting or seeming to contradict other members of the team who may have talked to the family. Finally, having the family narrate the clinical course can avoid unintentionally and abruptly providing information for which they are unprepared. If the narrative indicates low expectation of bad news, clinicians can give a warning shot, such as, ‘We all hope that being more awake than before is a good sign for him . . . Unfortunately, despite being more awake, he has developed new and serious problems this week.’ Clinical updates
Using this foundation, clinicians should explain the diagnosis and prognosis in clear, jargon-free language. It is often helpful to prognosticate in terms of ‘hoping for the best, and preparing for the worst’, and give specific details about when uncertain prognoses will be clearer. Answering questions and attending to emotions
Families need the opportunity to react to the clinical update. Clinicians should answer briefly and focus on the big picture—they should continue eliciting questions until all of them have been asked. Transitioning to decision-making
Decision-making is a common priority in family meetings. Clinicians should explain the goals of decision-making with statements like, ‘We want the treatments we provide to honour and respect her. If your mom was sitting here and could hear what we have been talking about, what would she say?’ Understanding the patient
It is important to stay focused on the patient as a way of being a good surrogate. Asking, ‘In order to make sure our treatments honour and respect her, it is helpful to know more about what she was like. Making decisions
28
The initial approach to making decisions should be to ask whether the patient has any written or oral directives regarding care as above. Absent applicable directives, providers should discuss possible treatment pathways and their expected outcomes. Regardless of the chosen pathway, they should reassure the family that they will not be abandoned and that the patient’s symptoms will be minimized. Wrapping up
Before concluding, the next meeting should be scheduled, the family informed about how to reach the team if needed before the next meeting. Debriefing
Debriefing is an important way to summarize the information exchanged during the meeting, process reactions to it, and identify strategies for improving communication with individual families or in general. Key skills and behaviors for clinicians
The most effective family communication focuses primarily on listening and responding to emotions. Especially when complex transitions or conflict are anticipated, palliative care and ethics consultation can provide further specialized skills and support. Allowing silence
Especially after delivering bad news, clinicians should allow families time to digest and react to it. This may involve pauses of more than 15 seconds. Responding to emotions
Clinicians should meet expressions of emotion with empathy. Families of critically-ill patients experience most commonly expressed
according to a ‘fight or flight or freeze’ paradigm.
Generalized structure of the ICU family conference
Premeeting - Attendees Representatives of all clinical services planning to attend the meeting proper. - Overarching goals
◆ Ensure relevant individuals have been
invited to meeting proper.
◆ Ensure an appropriate space has been
secured.
◆ Plan the communication:
• Establish a facilitator for the meeting proper.
◆ Achieve consensus among the team
about prognosis, appropriate possible treatments, where current decisions fall on the spectrum of shared decision-making.
- Key behaviours
◆ Introductions:
• Introduce team members and explain their roles. • Ask families to introduce themselves.
◆ Goal setting:
• Explain the team’s goals. • Ask the family to suggest other goals.
◆ Family illness narratives: ask the
family what they understand.
◆ Clinical updates: provide big-
picture, jargon-free clinical updates.
◆ Answer questions and respond to
emotions.
◆Understanding the patient:

29
◆ Plan a communication strategy.
- Key suggestions
◆ Aim for efficiency—should rarely
exceed 10 minutes. - Meeting proper attendees
◆ All family who want to attend,
especially designated surrogates.
◆ Physician and nurse representative(s)
of primary ICU service.
◆ Meaningfully involved consultants and
primary care providers.
◆ Social workers.
◆ Chaplains.
◆ Interpreters.
- Overarching goals
◆ Variably focus on updates, family
support, or decision- making.
◆ Ensure flexibility in response to family
needs.
• Ask about the patient as a person. • Ask about previously expressed health care preferences. • Reflect on values evidenced by the descriptions of the patient.
◆ Transitioning to decision-making:
• Summarize discussion of the patient’s values. • Ask permission to talk about treatment plans. • Explain the principle of substituted judgment.
◆ Making decisions.
◆ Wrapping up.
- Debriefing - Attendees
◆ Representatives of all clinical
services who attended the meeting proper. Overarching goals
◆ Delegate responsibility for items
in the treatment plan and for where family support will be needed.
◆ Review what went well.
◆ Troubleshoot places where
communication faltered. Key Suggestions
◆ Keep it brief.
◆ Keep it action-orientated.
Documenting, reporting, and conferring
Effective communication among healthcare professionals is essential to the coordination and continuity of care. Communicating effectively enables personnel to support and complement one another’s services and to avoid duplication and omission in care. DOCUMENTING CARE: Documentation is the written, legal record of all pertinent interactions with the patient – assessing, diagnosing, planning, implementing, and evaluating. These data are used to:
1. Facilitate patient care
30
2. Financial legal record 3. Help in clinical research 4. Support decision analysis
Patient record is a compilation of a patient’s health information.
Purpose of Patient Records: Patient records serves many purposes: Communication: helps healthcare professionals to communicate with the
patient at different times. Care planning: can see how the patient is responding to the treatment plan
from day to day. Modifications of the plan of care are based on these data. Quality review: evaluate the quality of care patients have received. Research: patient records may be studied by researchers to recognize or
treat identified health problems. Decision analysis:
Record review may reveal both underused and overused services, patients with prolonged stays who require special assistance, and financial information.
Education: Reading a patient’s chart can learn the clinical manifestations of particular health problems, effective treatment modalities, and factors that affect patient goal achievement.
Legal documentation: Patient records are legal documents that may use as evidence. The record can also be used in accident or injury claims made by the patient.
Historical documentation: The record has value as a historical document.
Documentation Guidelines: The patient records is the only permanent legal document that details the nurse’s interactions with the patient and is the nurses’ best defense if a patient or patient surrogate alleges nursing negligence. In brief, documentation should be consistent with professional and agency standards; complete, relevant, factual, and timely; orderly and sequential; legally prudent; and confidential. Content:
Enter information in a complete, accurate, relevant, concise, and factual manner.
Record patient findings (observations of behavior) rather than your interpretation of these findings.
Avoid words such as “good”, “average”, “normal”, or “sufficient”, which may mean different things to different readers.
Avoid generalizations such as “seems comfortable today”. A better entry would be “on a scale of 1 to 10, patient rates back pain 2 to 3 today as compared with 7 to 9 yesterday; vital signs returned to baseline.

31
Note problems as they occur in an orderly, sequential manner; record the nursing intervention and the patient’s response; update problems or delete as appropriate.
Document all medical visits and consultations. Document in a legally prudent manner. Document the nursing
response to questionable medical orders or treatment (or failure to treat). Factually record the date and time the physician was notified of the concern and the exact physician response. Documentation should give legal protection to the nurse, other caregivers, the healthcare agency or institution, and the patient.
Avoid use of stereotypes or derogatory terms when charting. Timing
Chart in a timely manner. Indicate the date and time of entry, observation and interventions.
This is crucial when a case is being reconstructed for legal purposes. Document nursing interventions as closely as possible to the time of
their execution. Never leave the unit for a break when caring for a seriously ill patient until all significant data is recorded.
Never document interventions before carrying them out. Format
Use correct grammar and spelling. Use standards terminology, only commonly accepted terms and abbreviations and symbols. Date and time each entry.
Chart nursing interventions chronologically on consecutive lines. Never skip lines.
Accountability Sign your first initial, last name, and title to each entry. Do not use
dittos, erasures, or correcting fluids. A single line should be drawn through an incorrect entry and words “mistaken entry” or “error in charting” should be printed above or beside the entry and signed. The entry should then be rewritten correctly.
Identify each page of the record with the patient’s name and identification number.
Recognize that the patient record is permanent. Confidentiality Inform the patient that the healthcare record will be kept private.
Patient records can be used for educational reasons. Actual patient names and other identifiers should not be used in written or oral student reports.
Formats for Documentation: Initial Nursing Assessment
Accurate documentation of patient data is important because they provide a baseline for later comparisons as patient’s condition changes.
Kardex and Patient Care Summary
32
Many healthcare institutions and agencies use kardex care plan to communicate conveniently and concisely the plan of nursing care for each patient. The inside of the kardex contains the nursing care plan, related outcomes and nursing interventions, and special; safety precautions.
Plan of Nursing care In a traditional plan of nursing care, nursing diagnoses, goals and expected outcomes, and nursing interventions are written for each patient. Critical/Collaborative Pathways It includes expected outcomes, a list of interventions to be performed, and the sequence and timing of those interventions. Progress Notes The purpose of the progress notes is to inform caregivers that he make toward expected outcomes. Follow Sheets Follow sheets are documentation tools used to record routine aspects of nursing care (e.g. graphic record, 24-hours fluid balance record, medication record…. etc)
REPORTING CARE: Reporting is the oral, written, or computer-based communication of patient data to others. Common methods of reporting, in addition to the patient records, include face-to-face meetings, telephone conversations, and written, audio or computer messages. Face-to-Face meetings:
Advantages 1. Message can be delivered immediately.
2. Non-verbal messages are readily conveyed. 3. Messages can be clarified; receiver’s questions can be raised and
answered. Disadvantages
1. Both the communicating and the receiving people must be available at the same time, in the same place.
2. Ordinarily there is no permanent record for later use. Telephone Conversation
Advantages 1. Messages can be delivered immediately.
2. Messages can be clarified; receiver’s questions can be raised and answered. 3. Two parties need not be present in the same place.
Disadvantages 1. Only the tone of voice and voice inflections can be communicated-no nonverbal messages.
33
2. Ordinarily, there is no permanent record Written Message
Advantages 1. Messages can be exchanges at times convenient for the people involved. 2. Record is available.
3. Time-efficient if message is understood. Disadvantages
1. Message usually cannot be validated with the sender. Audiotaped Message
Advantages 1. Messages can be exchanges at times convenient for the people involved. 2. Record is available.
3. Time-efficient if information communicated is complete. Disadvantages
1. Message usually cannot be validated with the sender. Computer Message
Advantages 1. Messages can be delivered immediately-even to those at a great distance.
2. Parties need not be present in same place. 3. Two-way communication is possibly by e-mail. 4. Record is available. 5. Many people can participate in exchange. Disadvantages
1. No nonverbal messages can be communicated. 2. Privacy concerns remain an issue.
CONFERRING ABOUT CARE: To confer is to consult with someone to exchange ideas or to seek information, advice, or instructions. Consultation and Referrals:
When nurses detect problems, they make referrals to other professionals. The process of sending for assistance is called “referral”.
Nursing Care Conference: Conferences are also used for instructing students and practitioners. A nursing care conference is a meeting of nurse to discuss some aspect of a patient’s care.
Nursing Care/Clinical Rounds Nursing care rounds are procedures in which a group of nurses visit selected patients individually at each patient’s bedside. Nurses should use language the patient can understand when holding discussion at the bedside. Nursing care round has two principles advantages over discussion in the meeting room:
34
nursing personnel can actually see the patient as a report of care given, and
patients can participate in discussion of their care.
35
Objectives
1. Define the most important ethical and legal terms 2. Describe elements of informed consent 3. Identify mechanisms exist when critical patient lacks decision making capacity 4. Describe patient's rights in the intensive care unit 5. Describe cases of illegitimate and legitimate violation of patient rights 6. Define low and its classifications 7. Identify purpose of accountability 8. Differentiate between intentional, unintentional torts, negligence and malpractice 9. Compare between informed and implied consent 10. Identify common bases that giving rise to malpractice and different strategies to
protect health care professionals 11. Explain Do Not Resuscitate Orders 12. Compare between withholding and withdrawal of treatment 13. Explain when the clinician can and can't switch off the life support machine 14. Describe types of advanced directive
Important legal and ethical terms Ethics: Branch of philosophy that involves clarification what is right and wrong which may be differ according to individual and society. Bioethics: Applied ethics focused on health care, medical research, and medical technology. Morality: Actions are morally right or wrong and persons are morally good or bad. Autonomy: Freedom from external control; Non-maleficence: "If one cannot do good but at least do no harm" Justice: Obligation to decide how benefits and burdens should be fairly distributed Fidelity: Obligation to remain faithful to one's commitments and/or promises; provide safe care and main competence in nursing practice Utility: "for is best for the common good what is best for the individuals" Crime: Act committed in violation of public law Liability: Legal responsibility to pay damages Personal Liability: "every person is liable for his or her own conduct" Good Samaritan Law: Liability to protect the health care providers Incident report: "records of unusual or unexpected incidents that occur in the course of an action" Law: Total rules and regulations by which a society is governed Delegation: Transfer of responsibility/performance of activity Negligence: Conduct that falls below general standard of practice Gross negligence: Extreme lack of knowledge, skill or decision making Malpractice: "the failure of a person with professional training to act in a reasonable and prudent manner"
Medico-legal and ethical issues
36
Battery: Willful touching of a person that may or may not cuase harm, touching that has no permission or has no permission. can happen when procedure is done without informed consent Invasion of privacy: Direct wrong, injures the feelings of a person and does not take revealed info into account Defamation: False communication Libel: Defamation by print, writing or pictures Slander: Defamation by spoken word Fraud: Wrongful or criminal deception intended to result in financial or personal gain. Informed consent: Signed document stating that patient understands medical procedure and risks Implied consent: The granting of permission for health care without a formal agreement between the patient and health care provider. Do Not Rescuscitate Orders: legal directive indicating that the patient should not receive CPR in the event of a cardiac arrest. Advanced directives: "written instructions regarding desired end of life care" Living Will: An advance directive that specifies the types of care a person does or does not want to receive in the event of becoming mentally incompetent during the course of a terminal illness, or becoming permanently comatose. Medical Directives: Specific and comprehensive advance care document developed or persons which addresses and tries to anticipate that person’s health care needs at the end of his life Durable Power of Attorney: An 'advance directive document that allows patients to appoint a surrogate decision maker to implement preferences for continued life support in the event of incapacitation. Euthanasia: Act of painlessly putting to death persons suffering from disease--illegal Voluntary euthanasia: Dying person has some control over the time and manner of death Informed consent in the ICU
IIn order to be deemed legally and ethically valid, there needs to be adequate disclosure of information, Informed consent in the medical setting has evolved during the past 50 years. Elements of informed consent
37
Typically, in order to be deemed legally and ethically valid, an individual’s consent must be:
properly informed
the individual must have understand factual information,
appreciate the situation,
make a decision, and
the decision must be free from coercion (i.e. voluntary). Disclosure of information
Patients must have adequate information, and physicians play a key role as educators in this process. Accordingly, physicians have a basic duty to disclose enough about the proposed treatments, risks and benefits. Furthermore, physicians must communicate in a way that the patient can understand. Physicians must also ask questions of patients to ensure that they demonstrate a deeper understanding of the treatment proposals, not merely prompt the patient to parrot information back. Decision-making capacity
In order to give valid informed consent, patients must have the following in order to make a decision and to commit to a choice. Understanding of information: the physician must be assured that the patient understands the basic factual information by asking him to summarize what we said and to correct as needed. Appreciation: the patients must also have some appreciation (the highest degree of understanding) of the nature and significance of the decision that they are faced with. Very basically, patients must recognize that this is their decision to make and that it is their life and values and future lives that are at stake. Reasoning: Usually, asking patients to state their reasons for their decision can serve as a ‘window’ into their reasoning process. Choice: patients must be able to commit to a decision or a choice. Voluntary decisions
A valid informed consent requires that patients’ decisions must be free from controlling influences. The institutional setting of the hospital and families may exert considerable pressure on patients. Informed consent and the capacity to consent
Critically-ill patients may have a diminished capacity to make decisions. Patients with acute illnesses may have limitations in their decision making capabilities due to:
presence of delirium,
underlying illness, or
use of sedatives and analgesics. The presence of these factors does not necessarily translate into
incapacity to provide a valid informed consent. When patients lack decision-making capacity to provide their own consent,
several mechanisms exist by which their autonomy can still be respected. Advance directives
38
There are two types of advance directives. 1- Instructional directive: specifies the patient’s preferences to specific
care decisions. Alternatively, a person can select a proxy decision maker. 2- A combined directive includes both instructions and the designation of a
proxy. Surrogate decision making
If a patient has not legally appointed a health care proxy, family members (or in some cases, friends who know the patient well) may still be able to serve as the patients’ surrogate decision maker and make health care decisions for patients. Special situations Critically-ill patients who lack both decision-making capacity and surrogate decision makers
No formal guidelines exist. Emergency clinical situations
In general, all invasive procedures require informed consent from the patient or the appropriate surrogate. Exceptions occur when emergent, life-saving procedures are required (e.g. endotracheal intubation), and patients lack decision making and surrogates are not available. It is the responsibility of individual units and institutions to establish guidelines for which procedures require formal written consent. Patient right in the ICU
However, particularly notable in critical care are patient rights to informed consent, treatment refusal, non-discrimination, pain management, and non-abandonment. Informed consent
Patients are usually ethically and legally entitled to informed consent. Furthermore, the clinician must provide all information in an understandable manner, which is sensitive to the patient’s language and cultural needs. Treatment refusal
A logical consequence of informed consent is the right to refuse treatment. Moreover, the patient has the right to refuse treatment, even if clinicians regard it as ‘medically indicated’ and even if such refusal will cause the patient’s death. Non-discrimination
Patients are entitled to treatment without regard to their race, sex, color, ancestry, national or ethnic origin, religious beliefs, sexual or political orientation, marital status, genetic information, age, or disability. Pain management
This includes physical, social, psychological, and spiritual pain management. Poor communication

39
In particular, poor communication both between team members, and between the team and the family is a common causal factor underlying adverse events.
Medico-legal liability in critical care
Malpractice law arose 1000 years ago in England and Europe.
Contemporary critical care medicine is team-based care. Although resources were limited, Greek physicians avoided ‘rescue Law
Laws are “rules which prohibit extremes in behavior (people’s behavior and their relationships with others) so that one can live without fear for oneself or one’s property. Legal awareness
Help clinicians to appreciate the importance of the legal framework which supports the structure of society. It also allows clinician to appreciate that personal and social problems may have a legal dimension. Classification of laws Law is divided into criminal and civil law. Criminal law: crime that prosecuted by the government. A crime may be classified as:
1. A misdemeanor is a lesser infraction of the law and is punishable by a fine or an imprisonment of less than a year.
2. A felony represents a more serious violation of the law and carries heavier fines and longer periods of imprisonment, and, in the most serious cases, perhaps even death.
Liability The person legally liable usually is required to pay for damages to the other
person. These may include actual costs of care, legal services, loss of earnings (present and future), and compensation for emotional and physical stress suffered. Liability is legally determined by a court. Personal Liability
Clinicians are always legally responsible or liable for their actions. Thus, the professional judgment and says, “I’ll take responsibility,” the physician or supervisor giving the directions may be liable also if harm results. Privacy and Confidentiality
Essential component of practice is protecting the client’s confidentiality and privacy. Privacy and confidentiality are key elements in maintaining the integrity of all health care professions. Informed consent
Law requires that the patient be given enough information before a treatment to make an informed, intelligent decision Usually, obtaining informed consent from the patient or the family is the responsibility of the physician, but the nurse is frequently asked to witness the consent form. In these cases, the
40
nurse is attesting that the signature on the consent form is the patient’s or the family member’s.
In all situations, the circumstances should be documented in detail. Common bases giving rise to malpractice
There are a number of common bases that have been consistently identified as giving rise to malpractice lawsuits against health professionals.
Failure to ensure patient safety and make this a priority.
Medication administration errors: are the result of failure to follow the basic techniques and guidelines of medication preparation and administration.
Failure to properly monitor, assess, and report a patient's status.
Not following the institution's policies and procedures, including risk management.
Equipment misuse, defect, or failure: Using equipment without proper training; failure to test equipment before use, and to read instructions, specifications, and warnings; attempting to repair, adapt, or modify equipment—the increasing use, complexity, and sophistication of medical devices have created innumerable possibilities for injury and liability.
Communication breakdown between nurse and physician or among other members of the health care team, not listening to the patient—it can be liable for failure to report the errors or impairment of others responsible for patient care. Inadequate documentation is a principal fact in adverse court decisions in malpractice lawsuits.
Strategies that may help preventing lawsuit There are several strategies for health care providers that may help
preventing lawsuit as being a patient advocate at all times.
Know and utilize the institution's policies and procedures.
Recognize the limits of clinician's knowledge and skills.
Constantly strive to improve their knowledge and skills.
Assume professional accountability for their own actions, peers actions, and of their subordinates.
Cultivate an awareness of the legal and ethical issues surrounding clinical practice.
Listen to the patients. Address their fears, needs, and anger.
Approach each patient with sincerity and concern.
Above all, protect your patient first, then yourself.
Identify all risks in their patients, peers, and their environment. Do Not Resuscitate Orders
Cardiac arrest requires the initiation of cardiopulmonary resuscitation (CPR) by competent persons. In health care settings, caregivers perform CPR and other lifesaving measures according to agency policy unless the primary prescribing practitioner has written a do not resuscitate (DNR) order in the client’s medical record. The prescribing practitioner’s DNR order provides an exception to the universal standing order to resuscitate.
41
Whether to resuscitate any patient is a decision that is made by the attending physician, the patient, and the family. If the patient is incompetent, the physician and family members make the decision.
Once the DNR decision has been made, the order should be written, signed, and dated by the responsible physician. It should be reviewed periodically; hospital policies may require review every 24 to 72 hours.
Withholding and Withdrawing Treatment, Especially at the End of Life
“Withholding” refers to never initiating a treatment, whereas “withdrawing” refers to stopping a treatment once started. On the other hand, it is often important to start a treatment to evaluate whether it works in the situation, until a diagnosis is confirmed, or a patient or family has the time to deliberate about the situation and make often-difficult decisions. Refusal of Treatment
The client’s right to refuse treatment is based on the principle of autonomy. In fairness, the client can refuse only after the treatment methods and their consequences have been explained. Switching off a life support machine A. The unconscious dying patient
The machine can be switched off if the patient is brain dead. If the patient can breathe without it but weakly, then the decision to put the patient back on the machine depends on the medical prognosis.
If the patient needs to have assistance again and the prognosis is hopeless, then there is unlikely to be a legal obligation to reconnect the respirator. B. The chronically dependent patient
If a mentally competent patient refuses to be ventilated, it would not be a criminal offence for anyone to disconnect it. If the machine is turned off against the wishes of the patient this would, of course, be murder. C. Temporarily dependent emergency patient
If the ultimate prognosis is recovery and improvement, then switching off the machine would be murder. However, if the ultimate prognosis is extremely poor and hopeless, then the considerations in above would apply. Advance Directives
Advance directives are a written statement, made in advance by an adult. Physicians, other members of the healthcare team, and family members use these documents to ensure that a person’s preferences are honored.
42
Objectives
1. Discuss the importance of a consistent and systematic approach to assessment of critically ill patients and their families.
2. Identify the assessment priorities for different stages of a critical illness: • Pre-arrival assessment • Admission quick check • Comprehensive admission assessment • Ongoing assessment
3. Describe how the assessment is altered based on the patient clinical status
Introduction The assessment of critically ill patients and their families is an essential
for critical care practitioners. Information obtained from an assessment identifies the immediate and future needs of the patient and family so a plan of care can be initiated to address or resolve these needs.
Traditional approaches to patient assessment include a complete evaluation of the patient's history and a comprehensive physical examination of all body systems. Traditional approaches and techniques for assessment must be modified in critical care to balance the need for information, while considering the critical nature of the patient and family's situation.
The assessment can then be individualized by adding more specific assessment requirements depending on the specific patient diagnosis.
Without this approach, it would be easy to miss subtle signs or details that may identify an actual or potential problem and also indicate a patient's changing status. Most critical care health professionals use a combination, a systems approach applied in a "top-to-bottom" manner. ASSESSMENT FRAMEWORK
Assessing the critically ill patient and family begins from the first time to see him and continues until transitioning to the next phase of care.
The stages of assessment process: 1. prearrival, 2. admission, 3. quick check ("just the basics"), 4. comprehensive admission, and 5. ongoing assessment.
Pre-arrival Assessment This notification comes from the initial health care team contact. The pre-
arrival assessment made the following: 1. allows the critical care team to anticipating the patient's
physiologic and psychological needs, 2. to determine the appropriate resources that are needed to care
for the patient, and
Assessment Of Critically Ill Patients And Families

43
3. to adequately prepare the environment to meet the specialized needs of the patient and family.
Admission Quick Check An admission quick check assessment is obtained immediately upon arrival
and is based on assessing the parameters represented by the ABCDE acronym. The admission quick check is a high-level view of the patient, but is essential because it validates that basic cardiac and respiratory function is sufficient.
TABLE 1-1. ABC DE ACRONYM
Airway Breathing Circulation, Cerebral perfusion, and Chief complaint Drugs and Diagnostic tests Equipment
Ongoing Assessment After the baseline comprehensive assessment is completed, ongoing
assessments, an abbreviated version of the comprehensive admission assessment, are performed at varying intervals. PRE-ARRIVAL ASSESSMENT: BEFORE THE ACTION BEGINS
A pre-arrival assessment begins when information is received about the pending arrival of the patient. This information assists the clinician in anticipating the patient's physiologic and emotional needs prior to admission and in ensuring that the bedside environment is set up to provide all monitoring, supply, and equipment needs prior to the patient's arrival.
SUMMARY OF PRE-ARRIVAL AND ADMISSION QUICK CHECK ASSESSMENTS
Pre-arrival Assessment • Abbreviated report on patient (age, sex, chief complaint, diagnosis, pertinent history, physiologic status, invasive devices. equipment and status of laboratory/diagnostic tests) • Room setup complete, including verification of proper equipment functioning Admission Quick Check Assessment • General appearance (consciousness) • Airway: Patency Position of artificial airway (if present) • Breathing: Quantity and quality of respirations (rate, depth, pattern, symmetry, effort, use of accessory muscles) Breath sounds Presence of spontaneous breathing • Circulation and Cerebral Perfusion: EGG (rate, rhythm, and presence of ectopy) Blood pressure Peripheral pulses and capillary refill Skin, color, temperature, moisture Presence of bleeding Level of consciousness, responsiveness

44
• Chief Complaint: Primary body system Associated symptoms • Drugs and Diagnostic Tests: Drugs prior to admission (prescribed, over-the-counter, illegal) Current medications Review diagnostic test results • Equipment: Patency of vascular and drainage systems Appropriate functioning and labeling of all equipment connected to patient • Allergies
Proper functioning of all bedside equipment should be verified prior to the patient's arrival. The standard monitoring and equipment list EQUIPMENT FOR STANDARD ROOM SETUP
• Bedside EGG and invasive pressure monitor with appropriate cables • EGG electrodes • Blood pressure cuff • Pulse oximetry • Suction gauges and canister setup • Suction catheters • Bag-valve mask device • Oxygen flow meter, appropriate tubing, and appropriate oxygen delivery device • IV poles and infusion pumps • Bedside supply cart that contains such things as alcohol swabs, non-sterile gloves, syringes, chux, and dressing supplies • Admission kit that usually contains bath basin and general hygiene supplies • Admission and critical care documentation forms
ADMISSION QUICK CHECK ASSESSMENT: THE FIRST FEW MINUTES
From the moment the patient arrives in the intensive care unit (ICU) setting, his or her general appearance is immediately observed and assessment of ABCDEs is quickly performed. The seriousness of the problem(s) is determined so that life-threatening emergent needs can be addressed first.
In addition, the patient's allergy status is determined, including the type of reaction that occurs and what, if any, treatment is used to alleviate the allergic response. Airway and Breathing
Patency of the patient's airway is verified by having the patient speak, watching the patient's chest rise and fall, or both.
If the airway is compromised, do the following: 1. head tilt, chin left and jaw thrust 2. Remove blood, vomitus, and foreign 3. Ensure that the airway is secured properly. 4. Note the position of the ET tube. 5. Suctioning of the upper airway.

45
Note the rate, depth, pattern, and symmetry of breathing; the effort it is taking to breathe; the use of accessory muscles.
Auscultate the chest for presence of bilateral breath sounds, quality of breath sounds, and bilateral chest expansion.
If chest tubes are present, note whether they are pleural or mediastinal
chest tubes. Ensure that they are connected to suction, if appropriate, and are not clamped or kinked. Circulation and Cerebral Perfusion
Palpating the pulse volume, heart rate, rhythm, and presence of ectopy. Obtain blood pressure and temperature.
Assess peripheral perfusion by:
evaluating the color,
temperature, and
moisture of the skin
capillary refill. Evaluating cerebral perfusion by evaluating the gross level of consciousness
(LOC). Observing the response of the patient during movement from the stretcher to the ICU bed can supply additional information about the LOC. Chief Complaint
Assessment of the chief complaint focuses on determining the body systems involved and the extent of associated symptoms. Drugs and Diagnostic Tests
Information about drugs and diagnostic tests is integrated into the priority of the admission quick check. If IV access is not already present, it should be immediately obtained and intake and output records started. If IV medications are presently being infused, check the drug(s) and verify the correct infusion of the desired dosage and rate.
COMMON DIAGNOSTIC TESTS OBTAINED DURING ADMISSION QUICK CHECK ASSESSMENT
Serum electrolytes Glucose Complete blood count with platelets Coagulation studies Arterial blood gases Chest x-ray ECG
Equipment Quickly evaluate all vascular and drainage tubes for location and patency,
and connect them to appropriate monitoring or suction devices. Note the amount, color, consistency, and odor of drainage secretions. Verify the appropriate functioning of all equipment attached to the patient and label as required.
EVIDENCE-BASED PRACTICE: FAMILY NEEDS ASSESSMENT
46
Quick Assessment • Offer realistic hope • Give honest answers and information • Give reassurance Comprehensive Assessment • Use open-ended communication and assess their communication style • Assess family members' level of anxiety • Assess perceptions of the situation (knowledge, comprehension, expectations of staff, expected outcome) • Assess family roles and dynamics (cultural and religious practices, values, spokesperson) • Assess coping mechanisms and resources (what do they use, social network and support)
COMPREHENSIVE ADMISSION ASSESSMENT
Comprehensive admission assessments determine the physiologic and psychosocial baseline so that future changes can be compared to determine whether the status is improving or deteriorating. Any abnormal findings or changes from baseline warrant a more in-depth evaluation of the pertinent system.
SUMMARY OF COMPREHENSIVE ADMISSION ASSESSMENT REQUIREMENTS
Past Medical History Medical conditions, surgical procedures Psychiatric/emotional problems Hospitalizations Previous medications (prescription, over-the-counter, illicit drugs) and time of last medication dose Allergies Review of body systems
Social History Age, gender Ethnic origin Height, weight Highest educational level completed Occupation Marital status Primary family members/significant others Religious affiliation Advanced Directive or Durable Power of Attorney for Health Care Substance use (alcohol, drugs, caffeine, tobacco) Domestic Abuse or Vulnerable Adult Screen
Psychosocial Assessment General communication Coping styles
47
Anxiety and stress Expectations of critical care unit Current stresses Family needs
Spirituality Faith/spiritual preference Healing practices
Physical Assessment Nervous system Cardiovascular system Respiratory system Renal system Gastrointestinal system Endocrine, hematologic, and immune systems Integumentary system
SUGGESTED QUESTIONS FOR REVIEW OF PAST HISTORY CATEGORIZED BY BODY SYSTEM
Body System History Questions Nervous • Have you ever had a seizure?
• Have you ever fainted, blacked out, or had delirium tremens (DTs)?
• Do you ever have numbness, tingling, or weakness in any part of your body?
• Do you have any difficulty with your hearing, vision, or speech? • Has your daily activity level changed due to your present
condition? • Do you require any assistive devices such as canes?
Cardiovascular • Have you experienced any heart problems or disease such as heart attacks? • Do you have any problems with extreme fatigue? • Do you have an irregular heart rhythm? • Do you have high blood pressure?
• Do you have a pacemaker or an implanted defibrillator?
Respiratory • Do you ever experience shortness of breath? • Do you have any pain associated with breathing? • Do you have a persistent cough? Is it productive? • Have you had any exposure to environmental agents that might affect the lungs?
• Do you have sleep apnea?
Renal • Have you had any change in frequency of urination? • Do you have any burning, pain, discharge, or difficulty when you urinate? • Have you had blood in your urine?
Gastrointestinal • Has there been any recent weight loss or gain? • Have you had any change in appetite? • Do you have any problems with nausea or vomiting? • How often do you have a bowel movement and has there been a

48
change in the normal pattern? Do you have blood in your stools? • Do you have dentures? • Do you have any food allergies?
Integumentary Endocrine and Hematologic Immunologic Psychosocial
• Do you have any problems with your skin? • Do you have any problems with bleeding? • Do you have problems with chronic infections? • Have you recently been exposed to a contagious illness? • Do you have any physical conditions which make communication difficult (hearing loss, visual disturbances, language barriers, etc.)? • How do you best learn? Do you need information repeated several times and/or require information in advance of teaching sessions? • What are the ways you cope with stress, crises, or pain? • Who are the important people in your "family" or network? Who do you want to make decisions with you, or for you? • Have you had any previous experiences with critical illness? • Have you ever been abused? • Have you ever experienced trouble with anxiety, irritability, being confused, mood swings, or suicide attempts? • What are the cultural practices, religious influences, and values that are important to the family? • What are family members' perceptions and expectations
of the critical care staff and the setting?
Spiritual • What is your faith or spiritual preference? • What practices help you heal or deal with stress? • Would you like to see a chaplain, priest, or other type
of healer?
Past Medical History
It is important to determine prior medical and surgical conditions, hospitalization, medications, and symptoms.
IDENTIFICATION OF SYMPTOM CHARACTERISTICS
Characteristic Sample Question
Onset Location Frequency Quality Intensity Quantity Setting Associated findings
How and under what circumstances did it begin? Was the onset sudden or gradual? Did it progress? Where is it? Does it stay in the same place or does it radiate or move around? How often does it occur? Is it dull, sharp, burning, throbbing, etc.? Rank pain on a scale (numeric, word description, FACES, FLAGG) How long does it last? What are you doing when it happened? Are there other signs and symptoms that occur when this happens?
49
Aggravating and Alleviating factors
What things make it worse? What things make it better?
Social History Inquire about the use and abuse of caffeine, alcohol, tobacco, and other
substances. Physical Assessment by Body System
The physical assessment section uses the techniques of inspection, auscultation, and palpation. Although percussion is a common technique in physical examinations, it is infrequently used in critically ill patients. Pain assessment is generally linked to each body system rather than considered as a separate system category.
Pain and discomfort are clues that alert both the patient and the clinician that something is wrong and needs prompt attention. Nervous System
The single most important indicator of cerebral functioning is the LOC. The LOC is assessed in the critically ill patient using the Glasgow Coma Scale. Remember that certain medications such as atropine or morphine may affect pupil size.
LOC and pupil assessments are followed by motor function assessment of the upper and lower extremities. If head trauma is involved or suspected, check for signs of fluid leakage around the nose or ears, differentiating between cerebral spinal fluid and blood. Complete cranial nerve assessment is rarely warranted. Assess mental status, (orientation to person, place, and time).
Drug toxicology and alcohol levels may be evaluated to rule out potential sources of altered LOC. Cardiovascular System
Cardiovascular system assessment factors are directed at evaluating central (blood pressure, heart rate, and rhythm) and peripheral perfusion (color and temperature of the skin, lips, mucous membranes and distal extremities). Assess the ECG for T-wave abnormalities and ST segment changes. Note the pulse pressure.
Electrolyte levels, complete blood counts (CBCs), coagulation studies, and lipid profiles are common laboratory tests evaluated for abnormalities of the cardiovascular system. Cardiac enzyme levels (creatine kinase-ME, troponin, B natriuretic peptide) are obtained for any complaint of chest pain or suspected chest trauma. Drug levels of commonly used cardiovascular medications, such as digoxin, may be warranted for certain types of dysrhythmias. A 12-lead ECG is typically evaluated on all patients,
Note the type, size, and location of IV catheters, and verify their patency. Verify all monitoring system alarm parameters as active with appropriate limits set. Note the size and location of invasive monitoring lines such as arterial, central venous, and pulmonary artery (PA) catheters. Verify all monitoring system alarm parameters as active with appropriate limits set. Note the size and location of invasive monitoring lines such as arterial, central venous, and pulmonary artery (PA) catheters. Confirm the appropriate flush solution is
50
hanging and that the correct amount of pressure is applied to the flush solution bag. Level the invasive line to the appropriate anatomic landmark and zero the monitor as needed. Respiratory System
Oxygenation and ventilation are the focal basis of respiratory assessment parameters. Reassess the rate and rhythm of respirations and the symmetry of chest wall movement. If the patient has a productive cough or secretions are suctioned from an artificial airway, note the color, consistency, and amount of secretions. Evaluate whether the trachea is midline or shifted.
Inspect the thoracic cavity for shape, (e.g., kyphosis or scoliosis). Palpate for equal chest excursion, presence of crepitus, and any areas of tenderness or fractures. If the patient is receiving supplemental oxygen, verify the mode of delivery and percentage of oxygen against physician orders.
Note the quality and depth of respirations. Arterial blood gases (ABGs) are frequently used for interpretation of oxygenation and ventilatory status.
If the patient is intubated, note the size of the tube and record the centimeter marking at the teeth or nares to assist future comparisons for proper placement. If the patient is connected to a mechanical ventilator, verify the ventilator mode, tidal volume, respiratory rate, positive end expiratory pressure, and percentage of oxygen against prescribed settings. If chest tubes are present, assess the area around the insertion site for crepitus. Note the amount and color of drainage and whether an air leak is present. Verify whether the chest tube drainage system is under water seal or connected to suction. Renal System
Urinary characteristics and electrolyte status are the major parameters used to evaluate the function of the kidneys. Most critically ill patients have a Foley catheter in place to evaluate urinary output every 1 to 2 hours. Note the amount and color of the urine. Inspect the genitalia for inflammation, swelling, ulcers, and drainage. Gastrointestinal System
The key factors when reviewing the gastrointestinal system are the nutritional and fluid status. Inspect the abdomen for symmetry or distention. Nutritional status is evaluated by weight and muscle tone, the condition of the oral mucosa, and laboratory values such as serum albumin and transferrin.
Auscultation of bowel sounds for presence or absence of intestinal sounds. Light palpation of the abdomen for tenderness, pain, and guarding or rebound tenderness. Remember to auscultate before palpating because palpation may change the frequency and character of the patient's peristaltic sounds.
Assess any drainage tube for location and function, and for the characteristics of any drainage. Check emesis and stool for occult blood as appropriate. Evaluate ostomies for location, color of the stoma, and the type of drainage. Endocrine, Hematologic, and Immune Systems
51
The endocrine, hematologic, and immune systems often are overlooked when assessing critically ill patients so the assessment parameters are included under other system assessments.
Assessment parameters specific to the hematologic system include laboratory evaluation of the red blood cells (RBCs) and coagulation studies. The immune system's primary function of fighting infection is assessed by evaluating the white cell and differential counts from the CBC. It is important to keep in mind, however, that many critically ill patients have impaired immune systems and the normal response to infection, such as white pus around an insertion site, may not be evident. Integumentary System
The skin is the first line of defense mechanism against infection. Inspect the skin for overall integrity, color, temperature, and turgor. Note the presence of rashes, striae, discoloration, scars, or lesions. Psychosocial Assessment
Patients are suffering illnesses that have psychological responses that are predictable, and, if untreated, may threaten recovery or life. General Communication
It is essential to determine pre-illness communication methods and styles to ensure optimal communication with the critically ill patient and family.
Important observations are facial expressions, eye movements, involuntary movements, and changes in physiologic parameters (heart rate, blood pressure, and respiratory rate). These nonverbal parameters may be more reflective of the patients' actual feelings by not complaining patients. Anxiety and Stress
Anxiety is both psychologically and physiologically exhausting. The critical care environment is very stressful, and may contribute to a patient's anxiety level. Restlessness, distractibility, hyperventilation, and unrealistic demands for attention are warning signs of escalating anxiety.
Medications such as interferon, corticosteroids, angiotensin-converting enzyme inhibitors, and vasopressors can induce anxiety. Abrupt withdrawal from benzodiazepines, caffeine, nicotine, and narcotics. Additional etiologic variables associated with anxiety include pain, sleep loss, delirium, hypoxia, ventilator synchronization or weaning, fear of death, loss of control, high-technology equipment, and a dehumanizing setting. Admission to or repeated transfers to the critical care unit may also induce anxiety. ONGOING ASSESSMENT
Identify new potential problems or changes from the comprehensive baseline assessment. Ongoing assessments become more focused and the frequency is driven: • Before and after transport of patients for diagnostic procedures • Deterioration in physiologic or mental status; and • Initiation of any new therapy.

52
ONGOING ASSESSMENT TEMPLATE
Body System Assessment Parameters
Nervous Cardiovascular Respiratory Renal Gastrointestinal Endocrine, hematologic, and immunologic Integumentary Pain/discomfort Psychosocial
• LOG • Pupils • Motor strength of extremities • Blood pressure • Heart rate and rhythm • Heart sounds • Capillary refill • Peripheral pulses • Patency of IVs • Verification of IV solutions and medications • Hemodynamic pressures and waveforms • Cardiac output data • Respiratory rate and rhythm • Breath sounds • Color and amount of secretions • Noninvasive technology information (e.g., pulse oximetry, end-tidal C02) • Mechanical ventilatory parameters • Arterial and venous blood gases • Intake and output • Color amount of urinary output • BUN/creatinine values • Bowel sounds • Contour of abdomen • Position of drainage tubes • Color and amount of secretions • Bilirubin and albumin values • Fluid balance • Electrolyte and glucose values • CBC and coagulation values • Temperature • WBC with differential count • Color and temperature skin • Intactness of skin • Areas of redness • Assessed in each system • Response' to interventions • Mental status and behavioral responses • Reaction to critical illness experience (e.g., stress, anxiety, coping, mood) • Presence of cognitive impairments (dementia, delirium), depression, or demoralization

53
• Family functioning and needs • Ability to communicate needs and participate in care • Sleep patterns

54
Objectives
1. List indications for hemodynamic monitoring 2. Define important hemodynamic terms 3. Assess blood pressure, pulse and respiration 4. Describe regulation of blood pressure, pulse, and respiration 5. Identify factors affecting blood pressure, pulse, and respiration 6. Describe each blood pressure class 7. Identify pressure monitoring system component in critical care unit 8. Describe arterial blood pressure, central venous pressure, O2 delivery monitoring 9. Identify different peripheral sites for measuring pulse 10. Define different abnormalities of blood pressure, pulse and respiration
Introduction
Hemodynamic monitoring provides information at the bedside about intracardiac and intravascular pressures and cardiac output. It is used in the critical care setting to assess cardiac function and evaluate the effectiveness of therapy. Because a primary goal of management of critically ill patients is to ensure adequate oxygenation of tissues and organs, hemodynamic monitoring is indicated for patients with conditions that are characterized by insufficient cardiac output due to alterations in intravascular volume (preload), alterations in vascular resistance (afterload), or alterations in myocardial contractility Common Indications for Hemodynamic Monitoring
• Cardiogenic shock • Severe heart failure • Sepsis or septic shock • Multiple organ system dysfunction (MODS) • Acute respiratory distress syndrome (ARDS) • Cardiac surgery
Patient monitoring are discussed in details in the book of Technical anesthesia principle
Variations in Blood Pressure Blood pressure can be within a wide range and still be normal. Because of considerable individual differences, it is important to know the normal blood pressure of a particular person. A rise or fall of 20 to 30mmHg in a person’s blood pressure is significant, even if it is within the generally accepted range. The following variations in blood pressure occur in the average healthy person: Age: Readings are lowest at birth. The older adult has decreased elasticity of the arteries, which increases peripheral resistance and therefore increases blood pressure.
Hemodynamic Monitoring
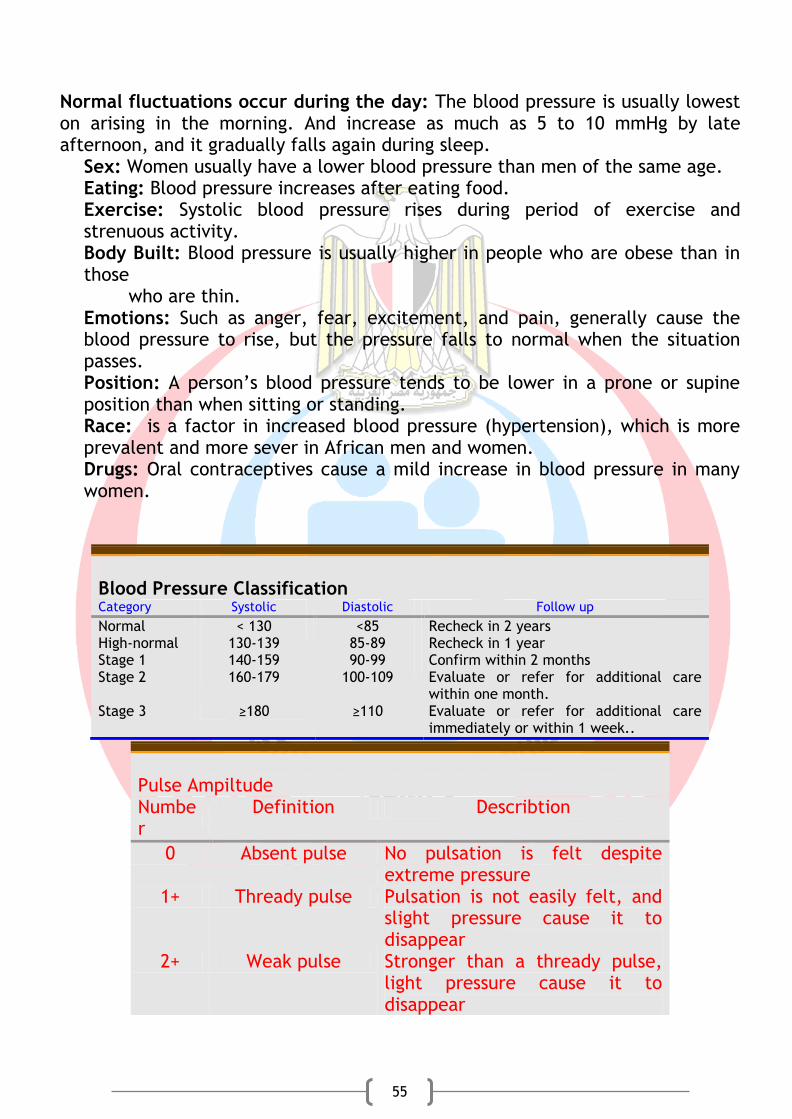
55
Normal fluctuations occur during the day: The blood pressure is usually lowest on arising in the morning. And increase as much as 5 to 10 mmHg by late afternoon, and it gradually falls again during sleep.
Sex: Women usually have a lower blood pressure than men of the same age. Eating: Blood pressure increases after eating food. Exercise: Systolic blood pressure rises during period of exercise and strenuous activity. Body Built: Blood pressure is usually higher in people who are obese than in those who are thin. Emotions: Such as anger, fear, excitement, and pain, generally cause the blood pressure to rise, but the pressure falls to normal when the situation passes. Position: A person’s blood pressure tends to be lower in a prone or supine position than when sitting or standing. Race: is a factor in increased blood pressure (hypertension), which is more prevalent and more sever in African men and women. Drugs: Oral contraceptives cause a mild increase in blood pressure in many women.
Blood Pressure Classification Category Systolic Diastolic Follow up
Normal < 130 <85 Recheck in 2 years High-normal 130-139 85-89 Recheck in 1 year Stage 1 140-159 90-99 Confirm within 2 months Stage 2 160-179 100-109 Evaluate or refer for additional care
within one month. Stage 3 ≥180 ≥110 Evaluate or refer for additional care
immediately or within 1 week..
Pulse Ampiltude Number
Definition Describtion
0 Absent pulse No pulsation is felt despite extreme pressure
1+ Thready pulse Pulsation is not easily felt, and slight pressure cause it to disappear
2+ Weak pulse Stronger than a thready pulse, light pressure cause it to disappear
56
Methods of Assessing the Pulse The pulse may be assessed by palpating (feeling) or auscultating (listening). The following are used:
The middle three fingers may be used to palpate all pulse sites except the apical pulse
A stethoscope may be used to auscultate the apical pulse
A doppler ultrasound may be used to assess the apical pulses
3+ Normal pulse Pulsation is easily felt, takes moderate pressure to cause it to disappear
4+ Bounding pulse The pulsation is strong and does not disappear with moderate pressure
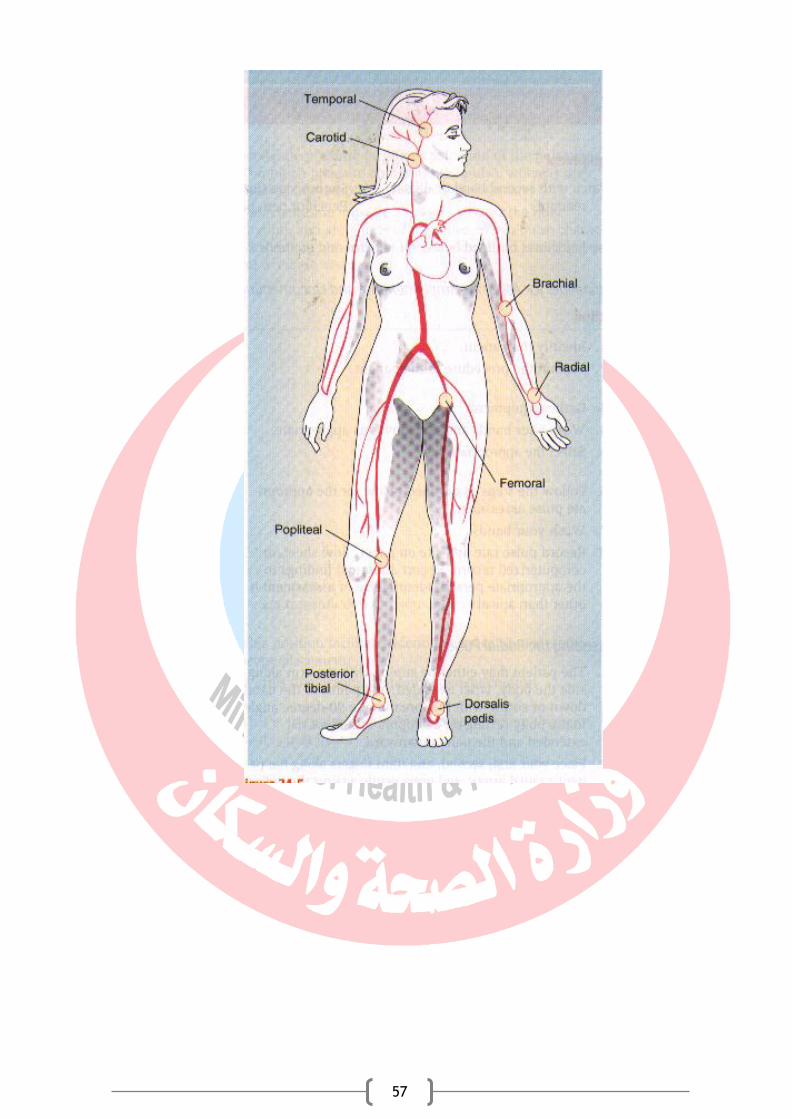
57
58
Objectives
1. Identify patients who are at risk for malnutrition 2. Describe methods of nutritional assessment 3. Identify clinical manifestations of nutritional deficiencies 4. List the important nutritional history information 5. Determine nutritional needs of patient in intensive care unit 6. Describe different forms of nutritional support oral, enteral, and parenteral. 7. Discuss nutritional considerations in special critical illness 8. Describe causes and, management of fluid imbalances 9. Compare between crystalloid and colloid solutions 10. Identify types of common colloid and crystalloid solutions 11. Identify common causes and intervention of electrolyte disturbances
introduction Nutrition is considered an integral component of standard care in the
critically ill patient. Nutrition therapy may both positively and negatively influence the morbidity and mortality of critically ill patients. Enteral nutrition (EN) should be used in preference to parenteral nutrition (PN).
Nutrition risk in the ICU:
preexisting weight loss,
decreased oral intake,
prior stay in hospital before admission to ICU,
preexisting comorbidities,
severity of current illness. When PN is indicated, strategies that maximize the benefit and minimize the risks of PN should be considered.
PATIENTS WHO ARE AT RISK FOR MALNUTRITIONS Adults Who Exhibit Any of the Following:
• Chronic disease • Chronic use of a modified diet • Increased metabolic requirements • Illness or surgery that may interfere with nutritional intake • Inadequate nutrient intake for >7 days • Regular use of three or more medications • Poverty
Infants and Children Who Exhibit Any of the Following: • Low birth weight • Small for gestational age • Weight loss of 10% or more • Weight-for-length or weight-for-height <5th percentile or >95th percentile
Nutrition, Fluid And Electrolyte Therapy In ICU

59
• Increased metabolic requirements • Impaired ability to ingest or tolerate oral feedings • Inadequate weight gain or a significant decrease in an individual’s usual growth percentile • Poverty
Nutrition assessment involves collection of four types of information: 1. Anthropometric measurements; 2. Biochemical (laboratory) data; 3. Clinical signs (physical examination); and 4. Diet and pertinent health history. Anthropometric Measurements
Height and current weight are essential anthropometric measurements, to detect changes in the measurements over time (e.g., track response to nutritional therapy). It will be compared with standard tables of weight-for-height or standard growth charts for infants and children. The body mass index (BMI). BMI = weight ÷ height2 is the simple and reliable tool for assessment.
ADULT BMI CLASSIFICATIONS
CLASSIFICATION BMI (kg/m2)
Underweight <18.5
Normal 18.5-24.99
Overweight Pre-obese Obese class I Obese class II Obese class III
≥25 25-29.99 30-34.99 35-39.99 ≥40
Biochemical Data Laboratory tests that provide information about nutritional status COMMON BLOOD AND URINE TESTS USED IN NUTRITION ASSESSMENT
Test COMMENTS AND LIMITATIONS
Serum Proteins Albumin or prealbumin
Levels decrease with protein deficiency and in liver failure. Albumin levels are slow to change in response to malnutrition and repletion. Prealbumin levels fall in response to trauma and infection.
Hematologic Values Anemia
Normocytic (normal MCV, MCHC)
Common with protein deficiency
Microcytic (decreased MCV, MCH, MCHC)
Indicative of iron deficiency (can be from blood loss)
Macrocytic (increased MCV) Common in folate and vitamin B12 deficiency
Lymphocytopenia Common in protein deficiency
Clinical or Physical Manifestations

60
Manifestations That May Indicate Protein-Calorie Malnutrition • Hair loss; dull, dry, brittle hair; loss of hair pigment • Loss of subcutaneous tissue; muscle wasting • Poor wound healing; decubitus ulcer • Hepatomegaly • Edema Manifestations Often Present in Vitamin Deficiencies • Conjunctival and corneal dryness (vitamin A) • Dry, scaly skin; follicular hyperkeratosis, in which the skin appears to have gooseflesh continually (vitamin A) • Gingivitis; poor wound healing (vitamin C) • Petechiae; ecchymoses (vitamin C or K) • Inflamed tongue, cracking at the corners of the mouth [vitamin B2], folic acid, vitamin B12) • Edema; heart failure [vitamin B1] • Confusion; [vitamin B1]) Manifestations Often Present in Mineral Deficiencies • Blue sclerae; pale mucous membranes; spoon-shaped nails (iron) • Poor sense of taste; Bad taste; eczema; poor wound healing (zinc). Manifestations Often Observed with Excessive Vitamin Intake • Hair loss; dry skin; hepatomegaly (vitamin A) Nutritional history information Inadequate Intake of Nutrients • Alcohol abuse • Anorexia, severe or prolonged nausea or vomiting • Confusion, coma • Poor dentition • Poverty Inadequate Digestion or Absorption of Nutrients • Previous gastrointestinal operations, especially gastrectomy, jejunoileal bypass, and ileal resection • Certain medications, (antacids and H2-blockers and anticonvulsants Increased Nutrient Losses • Blood loss • Severe diarrhea • Fistulas, draining abscesses, wounds, decubitus ulcers • Peritoneal dialysis or hemodialysis • Corticosteroid therapy (increased tissue catabolism) Increased Nutrient Requirements • Fever • Surgery, trauma, burns, infection • Cancer (some types) • Physiologic demands (pregnancy, lactation, growth) Determining Nutritional Needs
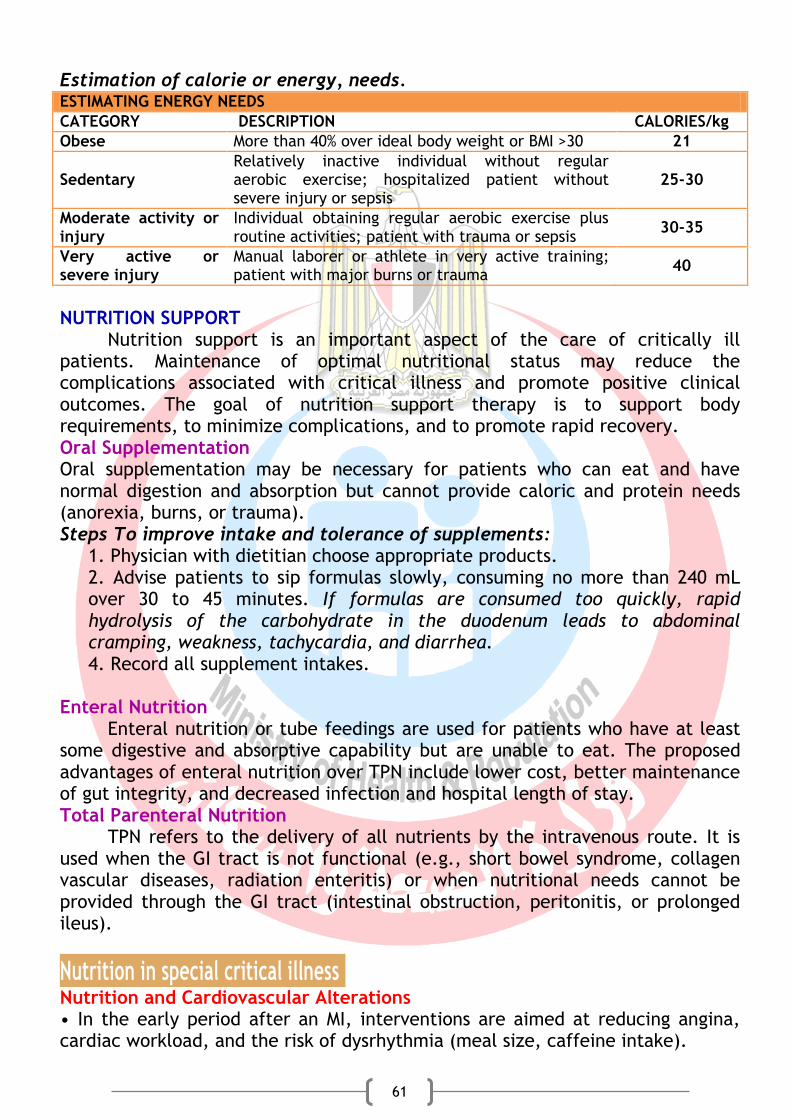
61
Estimation of calorie or energy, needs. ESTIMATING ENERGY NEEDS
CATEGORY DESCRIPTION CALORIES/kg
Obese More than 40% over ideal body weight or BMI >30 21
Sedentary Relatively inactive individual without regular aerobic exercise; hospitalized patient without severe injury or sepsis
25-30
Moderate activity or injury
Individual obtaining regular aerobic exercise plus routine activities; patient with trauma or sepsis
30-35
Very active or severe injury
Manual laborer or athlete in very active training; patient with major burns or trauma
40
NUTRITION SUPPORT
Nutrition support is an important aspect of the care of critically ill patients. Maintenance of optimal nutritional status may reduce the complications associated with critical illness and promote positive clinical outcomes. The goal of nutrition support therapy is to support body requirements, to minimize complications, and to promote rapid recovery. Oral Supplementation Oral supplementation may be necessary for patients who can eat and have normal digestion and absorption but cannot provide caloric and protein needs (anorexia, burns, or trauma). Steps To improve intake and tolerance of supplements:
1. Physician with dietitian choose appropriate products. 2. Advise patients to sip formulas slowly, consuming no more than 240 mL over 30 to 45 minutes. If formulas are consumed too quickly, rapid hydrolysis of the carbohydrate in the duodenum leads to abdominal cramping, weakness, tachycardia, and diarrhea. 4. Record all supplement intakes.
Enteral Nutrition
Enteral nutrition or tube feedings are used for patients who have at least some digestive and absorptive capability but are unable to eat. The proposed advantages of enteral nutrition over TPN include lower cost, better maintenance of gut integrity, and decreased infection and hospital length of stay. Total Parenteral Nutrition
TPN refers to the delivery of all nutrients by the intravenous route. It is used when the GI tract is not functional (e.g., short bowel syndrome, collagen vascular diseases, radiation enteritis) or when nutritional needs cannot be provided through the GI tract (intestinal obstruction, peritonitis, or prolonged ileus).
Nutrition in special critical illness Nutrition and Cardiovascular Alterations • In the early period after an MI, interventions are aimed at reducing angina, cardiac workload, and the risk of dysrhythmia (meal size, caffeine intake).
62
• In heart failure (reduce fluid retention). Nutrition and Pulmonary Alterations • Malnutrition has adverse effects on (respiratory function, surfactant production, and vital capacity). • Ventilatory support may require tube feeding or TPN. • Risks of pulmonary aspiration in the patient with an artificial airway, keeping him elevated 45 degrees during feedings. Nutrition and Neurologic Alterations • Patients with dysphagia or weakness and difficulty in swallowing of dry foods or thin liquids, such as water. • Prompt use of nutrition support is important for patients with head injuries or inflammatory response because all cause marked catabolism. Nutrition and Renal Alterations • The goal of intervention is to balance adequate calories, protein, vitamins, and minerals. • Patients with acute kidney injury need adequate amounts of protein to avoid catabolism of body tissues. • With the use of continuous peritoneal dialysis, hemofiltration, or hemodialysis, the fluid intake can be liberalized. This allows for more adequate nutrient delivery through oral, tube, or parenteral feedings. • The need for several water-soluble vitamins and trace minerals is increased in dialysis patients because these nutrients are small enough to pass through the dialysis filter. Nutrition and Gastrointestinal Alterations • Reduced production of albumin in liver disease leads to ascites and edema due to decreased colloid osmotic pressure in the plasma. • Causes of malnutrition in liver failure related to decreased intake, malabsorption, maldigestion, and abnormal nutrient metabolism. • In the patient with pancreatitis, has led to the use of TPN and bowel rest because feeding may stimulate the production of digestive enzymes and inhance liver damage. Nutrition and Endocrine Alterations • Blood glucose control is especially important in the care of surgical patients. • Poorly controlled diabetes reduces immune function by impairing granulocyte adherence, chemotaxis, and phagocytosis.
Fluids and electrolyte Critically ill patients often have fluid imbalances related to their primary
underlying disease. The most sensitive indices of changes in body water content are serial weights and intake and output patterns. Weight. One liter of fluid equals 1 kg of body weight. Critically ill patients often experience unmeasured insensible losses (eg, through ventilation, fever, and wounds).

63
Intake and output. The intake and output values are monitored every 1 to 2 hours, then summed at the end of a 24-hour period to provide an overall balance. Accurate intake and output is important in care of a critically ill patient. Fluid Volume Deficit
A fluid volume deficit is a physiological situation in which fluids are lost in an isotonic fashion (both fluid and electrolytes are lost together). Dehydration is the loss of water alone, resulting in a hyperosmolar state. Fluid volume deficits can occur from: • Fever. As much as 2,500 mL of fluid can be lost in a 24-hour. • Hyperventilation use of nonhumidified oxygen • Gastrointestinal tract. vomiting, nasogastric suction, diarrhea, or enterocutaneous drainage or fistulas. • Third-spacing can result from pleural or peritoneal effusions; edema or diffuse capillary leak. • Burns. Both evaporative and transudative losses through burned skin. • Renal losses. Renal losses are seen in the diuretic phase of acute tubular necrosis. Management :
To correct a fluid volume deficit, it is necessary to treat the underlying cause and replace the lost fluid. Maintenance Fluids
Under normal conditions, the average healthy adult requires about 2.5 L/d. Replacement Fluids The type of fluid given to a critically ill patient depends on the type of fluid lost.
1. Blood products for blood loss (in trauma or surgery) 2. Isotonic solutions for intravascular volume depletion (in diarrhea) 3. Hypotonic solutions for extravascular fluids depletion (dehydration)
The rate of administration depends on the patient’s medical history and amount of volume lost. Crystalloids
Crystalloid solutions are prepared with a specified balance of water and electrolytes.
Crystalloids are classified as: 1. hypotonic (osmolarity < 250 mEq/L), 2. isotonic (osmolarity approximately 310 mEq/L), or 3. hypertonic (osmolarity > 376 mEq/L). 4. Dextrose solutions (5% dextrose in water (D5W)) are administered,
the dextrose is metabolized, resulting in the administration of free water.
Free water, which is hypotonic, does not stay in the vascular space.
64
Normal (0.9%) saline is an isotonic solution. Approximately one third of the fluid administered remains in the vascular space, and the remaining fluid moves into the extracellular space or is lost through the renal system. When hypertonic solutions are administered (such as 3% or 7.5% saline), the hypertonicity pulls fluid from the extravascular space to the vascular space, increasing the intravascular volume.
Common Crystalloid Solutions
5% Dextrose in water (D5W): no electrolytes, 50 g dextrose • Supplies about 170 cal/L and free water to aid in renal excretion of solutes • Should not be used in excessive volumes in patients with increased antidiuretic hormone (ADH) activity or to replace fluids in hypovolemic patients 0.9% NaCl (isotonic saline): Na+ 154 mEq/L, Cl− 154mEq/L • Isotonic fluid commonly used to expand the extracellular fluid in presence of hypovolemia • Because of relatively high chloride content, it can be used to treat mild metabolic alkalosis 0.45% NaCl (½ strength saline): Na+ 77 mEq/L, Cl− 77mEq/L • A hypotonic solution that provides sodium, chloride, and free water (sodium and chloride provided in fluid allow kidneys to select and retain needed amounts) • Free water desirable as aid to kidneys in elimination of solutes
0.33% NaCl (1/3 strength saline): Na+ 56 mEq/L, Cl−56 mEq/L • A hypotonic solution that provides sodium, chloride, and free water • Often used to treat hypernatremia (because this solution contains a small amount of sodium, it dilutes the plasma sodium while not allowing the level to drop too rapidly) 3% or 7.5% Saline • Grossly hypertonic solution used to treat severe hyponatremia or to decrease intracranial pressure (ICP); may also be used to resuscitate trauma patients • Used only in settings where the patient can be closely monitored Lactated Ringer’s solution: Na+ 130 mEq/L, K+ 4 mEq/L, Ca2+ 3 mEq/L, Cl− 109 mEq/L, lactate (metabolized to bicarbonate) 28 mEq/L • Approximately isotonic solution that contains multiple electrolytes in about same concentrations as found in plasma (note that this solution is lacking magnesium and phosphate) • Used in the treatment of hypovolemia, burns, and fluid lost as bile or diarrhea • Useful in treating mild metabolic acidosis
Adapted from Metheny NM: Fluid and Electrolyte Balance: Nursing Considerations. Philadelphia, PA: Lippincott Williams & Wilkins, 2000, p 181, with permission. Colloids
Colloids are high-molecular-weight substances that do not cross the capillary membrane under normal conditions.
The starches dextran and hetastarch and the protein albumin differ from each other only slightly but exert similar oncotic pressure. Common Colloid Solutions Solution Contents Indications Comments Albumin Available in two
concentrations: 5%: oncotically similar to plasma 25%: hypertonic Both 5% and 25% solutions contain about 130–160 mEq/L of sodium
Used as volume expander in treatment of shock May be useful in treating burns and third-spacing shifts
Cost is approximately 25–30 times more than for crystalloid solutions. Increased interstitial oncotic pressure in disease states in which there is increased capillary leaking (eg, burns, sepsis) may occur; this may result in increased vascular loss of fluid. Use caution with rapid administration; watch for volume overload.
Hetastarch Synthetic colloid made from starch (6%) and added to sodium chloride solution
May be used to expand plasma volume when volume is lost from
Plasma volume expansion effects decrease over 24–36 h. Starch is eliminated by kidneys and liver; therefore,

65
hemorrhage, trauma, burns, and sepsis
use with caution in patients with liver and kidney impairment. Mild, transient coagulopathies may occur. Transient rise in serum amylase may occur
Dextran Glucose polysaccharide substance, available as low-molecular-weight dextran (dextran 40) or high-molecular-weight dextran (dextran 70) No electrolyte content
May be used to expand plasma volume when volume is lost from hemorrhage, trauma, burns, and sepsis
Has been associated with greater risk for allergic reaction than albumin or hetastarch. Interference with blood cross-matching may occur. May cause coagulopathy; has more profound effect on coagulation than hetastarch
Fluid Volume Excess
Fluid volume excess occurs when there is retention of sodium, resulting in the reabsorption of water. Electrolytes typically remain unchanged when there is an increase in total body water and electrolytes increase in parallel. Many critically ill patients may have mixed disturbances with manifestations of the confounding compensatory mechanisms. Causes of fluid volume excess include over administration of fluids; heart, kidney, or liver failure; excessive sodium intake; and medications (eg, steroids, desmopressin acetate [DDAVP]).
Management of fluid volume excess is directed toward correction of the underlying disorder. Diuretics are the mainstay of treatment for acute resolution of fluid volume excess. Sodium restriction reduces the amount of water reabsorption and can contribute to acute correction of volume overload. Electrolytes Electrolyte disorders commonly occur in critically ill patients, typically in combination with other conditions. Management of electrolyte disorders discussed in recovery book.
66
Objectives
1. Identify causes of sleep deprivation in intensive care 2. Describe interventions to promote sleep in intensive care 3. Use agitation and pain assessment scales 4. Identify level of sedation in intensive care 5. Describe collaborative management of agitation 6. Identify common causes od delirium in critically ill patients 7. Describe collaborative management of delirium
Sleep deprivation
Sleep deprivation is common in critically ill patients, due to environmental factors, anxiety, pain, medication side effects, and therapeutic interventions that disrupt sleep. Secretion of melatonin (a hormone that facilitates sleep) is inhibited by light and stimulated by darkness; the constant, high-intensity lighting typical of the critical care unit disrupts this normal rhythm. Sleep deprivation contributes to stress and, if prolonged, can lead to altered cognition, confusion, and difficulty with ventilator weaning. Interventions for Promoting Sleep
The patient’s own report of sleep quality is the best measure of sleep adequacy. A visual analog scale is recommended to evaluate sleep quality in select patients at high risk for sleep disruption. • Ensure the patient is comfortable • Schedule care and procedures. • Try to orient the patient to normal sleep–wake cycles as much as possible. • Make an effort to control noise, especially during the evening hours. • Ensure privacy by closing the door and pulling the curtains (if possible). • Institute a bedtime routine (eg, brushing teeth, washing face, 5-minute massage). • Employ anxiety-reducing strategies (eg, relaxation techniques, guided imagery, music therapy).
Many critical care patients demonstrate agitation and discomfort caused
by painful procedures, invasive tubes, sleep deprivation, fear, anxiety, and physiologic stress.
Sedation, agitation, delirium management
sedation, agitation, delirium management
67
Sedation and agitation Agitation describes hyperactive patient movements, he may pulling out
lines and tubes , or physical aggression and self-harm.
Causes of agitation: Agitation can be caused by, pain, anxiety, delirium, hypoxia, ventilator
dyssynchrony, neurological injury, uncomfortable position, full bladder, sleep deprivation, alcohol withdrawal, sepsis, medication reaction, or organ failure. Patient assessment and management of agitation: Agitation is assessed using a standardized assessment scales (SAS) or RASS, The goal is to treat the cause of the agitation rather than to over-medicate. Agitation Scales
SCORE DESCRIPTION DEFINITION
Riker Sedation-Agitation Scale (RSAS)
7 Dangerously agitated Pulls at endotracheal tube (ETT), tries to remove catheters, climbs over bed rail, strikes at staff, thrashes side to side
6 Very agitated Does not calm despite frequent verbal reminding of limits, requires physical restraints, bites ETT
5 Agitated Anxious or mildly agitated, attempts to sit up, calms down to verbal instructions
4 Calm and cooperative Calm, awakens easily, follows commands
3 Sedated Difficult to arouse, awakens to verbal stimuli or gentle shaking but drifts off again; follows simple commands
2 Very sedated Arouses to physical stimuli but does not communicate or follow commands; may move spontaneously
1 Unarousable Minimal or no response to noxious stimuli; does not communicate or follow commands
Richmond Agitation-Sedation Scale (RASS)
Score Term Description
+4 Combative Overtly combative, violent, immediate danger to staff
+3 Very agitated Pulls or removes tube(s) or catheter(s); aggressive
+2 Agitated Frequent nonpurposeful movement; fights ventilator
+1 Restless Anxious but movements not aggressive vigorous
0 Alert and calm
-1 Drowsy Not fully alert, but has sustained awakening (eye-opening/eye contact) to voice ( 10 seconds)
-2 Light sedation Briefly awakens with eye contact to voice (<10 seconds)
-3 Moderate sedation Movement or eye opening to voice (but no eye contact)
-4 Deep sedation No response to voice, but movement or eye opening to physical stimulation
-5 Unresponsive No response to voice or physical stimulation

68
Pain assessment scales
1. pain intensity scale 2. behavioral pain scale
Behavioral pain scale
Item Description Score
Facial Relaxed 1
Partially tightened (e.g brow lowering) 2
Fully tightened (e.g. eyelid closing) 3
Grimacing 4
Upper limbs No movement 1
Partially bent 2
Fully bent with finger flexion 3
Permanently retracted 4
Compliance with ventilation
Tolerating movement 1
Coughing but tolerating ventilation for most of the time 2
Fighting ventilator 3
Unable to control ventilation 4
Total 3 to 12
Management of agitation
Pre-emptive analgesia should be provided before painful procedures. The next step is to determine the minimum level of sedation required (intubated, mechanically ventilated patients). If the patient is experiencing pain, analgesia must be administered in addition to any sedative agents. Level of sedation: Light Sedation (Minimal Sedation, Anxiolysis)
Patients respond normally to verbal commands. Moderate Sedation with Analgesia (Conscious Sedation, Procedural Sedation)
Medication-induced depression of consciousness during which patients respond purposefully to verbal commands, alone or accompanied by light tactile
Pain intensity scale
69
stimulation. No interventions are required to maintain a patent airway, and spontaneous ventilation is adequate. cardiovascular function is usually maintained. Deep Sedation and Analgesia
Medication-induced depression of consciousness during which patients cannot be easily aroused but respond purposefully after repeated or painful stimulation. The ability to maintain ventilatory function independently is impaired. Patients require assistance in maintaining a patent airway, and spontaneous ventilation may be inadequate. Cardiovascular function is usually maintained. General Anesthesia
Medication-induced loss of consciousness during which patients are not arousable, even by painful stimulation. The ability to maintain ventilatory function independently is impaired, and assistance to maintain a patent airway is required. Positive-pressure ventilation may be required because of depressed spontaneous ventilation or medication-induced depression of neuromuscular function. Cardiovascular function may be impaired. Collaborative management:
Detection and treatment of pain, agitation, should be frequently reassessed often in these patients.
Depth and quality of sedation should be routinely assessed in all ICU patients.
The RASS and SAS are the most valid and reliable scales for assessing quality and depth of sedation in ICU patients.
Use sedation protocols and checklists to facilitate ICU sedation management.
Suggest using analgesia-first sedation for intubated and mechanically ventilated ICU patients.
Suggest using non-benzodiazepines for sedation (either propofol or dexmedetomidine) rather than benzodiazepines (either midazolam or lorazepam) in mechanically-ventilated adult ICU patients.
Delirium
Delirium represents a global impairment of cognitive processes, usually of
sudden onset, coupled with disorientation, impaired short-term memory, altered sensory perceptions (i.e., hallucinations), abnormal thought processes, and inappropriate behavior. CAUSES OF DELIRIUM IN CRITICALLY ILL PATIENTS Metabolic Causes • Acid-base disturbance • Electrolyte imbalance • Hypoglycemia Intracranial Causes
70
• Epidural or subdural hematoma • Intracranial hemorrhage • Meningitis • Encephalitis • Cerebral abscess • Tumor Endocrine Causes • Hyperthyroidism or hypothyroidism • Addison’s disease • Hyperparathyroidism • Cushing’s syndrome Organ Failure • Liver encephalopathy • Kidney encephalopathy • Septic shock Respiratory Causes • Hypoxemia • Hypercarbia Medication-Related Causes • Alcohol withdrawal syndrome • Benzodiazepines • Heavy metal poisoning Collaborative management of delirium
Recognition of the problem is the first step in sedation, analgesia, and delirium management. The Intensive Care Delirium Screening Checklist (ICDSC) include
1. Altered level of consciousness (A) No response (B) the need for vigorous stimulation (C) Drowsiness scores 1 point. (D) Wakefulness or sleeping (easily be aroused) is considered normal and scores zero points. (E) Hypervigilance is rated as an abnormal level of consciousness and scores 1 point.
2. Inattention Difficulty in following a conversation or instruction, easily distracted by
external stimuli, or difficulty in shifting focus all score 1 point. 3. Disorientation
Any obvious mistake in time, place or person scores 1 point. 4. Hallucination, delusion or psychosis
Hallucination (e.g., trying to catch a non-existent object) score 1 point. 5. Psychomotor agitation or retardation
Hyperactivity requiring the use of additional sedative drugs (e.g., pulling out IV lines, hitting staff), score 1 point. 6. Inappropriate speech or mood
71
Inappropriate, disorganized or incoherent speech, inappropriate mood related to events or situation all score 1 point. 7. Sleep/wake cycle disturbance
Sleeping less than four hours or waking frequently at night or sleeping during most of the day all score 1 point. 8. Symptom fluctuation
Fluctuation of the manifestation of any item or symptom over 24 hours (e.g., from one shift to another) scores 1 point. Pharmacological management of delirium
The neuroleptic medication haloperidol (Haldol) has traditionally been administered to treat hyperactive delirium. This antipsychotic agent stabilizes cerebral function by blocking dopamine-mediated neurotransmission at the cerebral synapses. Non pharmacologic interventions to prevent delirium
Provision of adequate sleep and early mobilization are recommended to reduce the incidence of delirium.
The non-pharmacologic strategies used to minimize pain.
back massage, music therapy, noise reduction,
decreasing lights at night to promote sleep,
clustering nursing care interventions to provide some uninterrupted rest,
speaking in a calm and gentle voice. Collaborative management
• Mobilize ICU patients early when possible. • Controlling light and noise, and decreasing stimuli at night to promote
sleep in ICU. • Suggest not using benzodiazepines in ICU patients with delirium unrelated
to alcohol/benzodiazepine withdrawal.

72
Objectives 1. Identify how to read medication orders 2. Identify all medication five rights 3. Describe procedures of different medication administration
Introduction
Medication administration is one of the most common and critical procedure in critical care unit. This chapter will be concerned with how to read medication orders, the most important rights in giving medication and procedure that should be followed in giving different types of medication. Reading Medication Orders All medication orders must include the: • Date and time of the order • Name of the medication, either generic or brand • Dosage of medication • Frequency for taking the medication (for example, twice per day) • Route of administration, such as oral, intramuscular, or intravenous • Patient’s name (in the hospital setting, the order will be written on a physician order age, which is stamped with the patient's name) • Signature of the prescriber Rights of Medication Following the rights of medication means that you will give the (1) right medication to the……. (2) right patient in the ……. (3) right dose using the……. (4) right route at the……. (5) right time with the……. (6) right documentation of the medication administration. This system helps you prevent medication errors. Procedures: Procedure: Administering Oral Medication
➤ Observe the “three checks” and the “rights of medication”: right patient, drug, dose, time, route, and documentation.
➤ Tablets and capsules: Pour the correct number into the medication cup.
➤ Liquids: Hold the plastic medication cup at eye level to measure the dose.
➤ Assist the patient to a high-Fowler’s position, if possible.
Chapter 10
Drug administration
73
➤ Enterically administered medications: Check for correct placement of the nasogastric or gastric tube.
➤ Correctly administer the medication. Powder: Mix with liquid, and give the mixture to the patient to drink. Lozenge: Instruct the patient not to chew or swallow it before dissolving it in his mouth. Tablet or capsule: Place the tablet or medication cup in the patient’s hand or mouth, and instruct the patient to swallow with sips of liquid. Sublingual: Have the patient place the tablet under the tongue and hold it there until it is completely dissolved. Buccal: Instruct the patient to place the tablet between the cheek and gums
and hold it there until it is completely dissolved.
➤ Stay with the patient until medications have been swallowed or dissolved. Procedure: Administering Ophthalmic Medication For instillations
➤ Use a high-Fowler’s position, with the head slightly tilted back.
➤ Work from the inner to outer canthus when cleansing or instilling medication.
➤ Apply the medication into the conjunctival sac.
➤ Do not apply the medication to the cornea.
➤ Do not let the dropper or tube touch the eye.
➤ For eye drops, press gently against the same side of the nose for 1 to 2 minutes to close the lacrimal ducts. For an eye ointment, ask the patient to gently close his eyes for 2 to 3 minutes. For irrigations
➤ Use a low-Fowler’s position, with head tilted toward the affected eye, if possible.
➤ Check the pH in the conjunctival sac, if indicated.
➤ Use a Morgan lens or IV tubing to irrigate the eyes.
➤ For direct-flow irrigation, irrigate from the inner canthus to the outer canthus.
➤ Irrigate for 20 minutes or until the desired pH is reached. Procedure: Administering Otic (ear) Medication
➤ Warm the solution to be instilled to body temperature.
➤ Assist the patient to a side-lying position, with the appropriate ear facing up.
➤ Straighten the ear canal. For an adult patient:
pull the pinna up and back;
for a child younger than 3 years, pull it down and back.
➤ Instill the prescribed number of drops into the ear canal.
➤ Do not force the solution into the ear or occlude the ear canal with the dropper.
74
➤ Instruct the patient to remain on his side for 5 to 10 minutes. Procedure: Administering Nasal Medication
➤ Determine head position: Consider the indication for the medication and the patient’s ability to assume the position.
➤ Explain to the patient that the medication may cause some burning, tingling, or unusual taste.
➤ Have the patient gently blow his nose and wash his hands afterward.
➤ Position the patient with the head down and forward for nasal sprays. Remember: “To spray your nose, look at your toes.”
For drops, assist the patient to a supine position with the head back.
➤ Place the tip of the sprayer into the right nostril, pointing the tip toward the outside of the nose (toward the outside corner of the right eye). Never point the tip toward the middle of the nose (the septum) or straight up (toward the sinus).
➤ Squirt the spray into the nose while patient inhales.
➤ Have the patient breath out through his mouth.
➤ Repeat for the other nostril.
➤ If the patient tastes the medicine, the head was not down or he did not inhale long enough. Advise him to put his head back down and sniff again without the medicine.
➤ If nose drops are used, ask the patient to stay in the same position for 1 to 5 minutes (depending on manufacturer’s guidelines).
Procedure: Administering Vaginal Medication For instillation
➤ Position the patient in a dorsal recumbent or Sims’ position.
➤ Inspect and cleanse the vaginal area before administering the medication.
➤ Use a water-soluble lubricant.
➤ Insert the suppository or applicator along the posterior vaginal wall about 8 cm (3 inches).
➤ Instruct the patient to maintain the position for 5 to 15 minutes after the medication is inserted.
For irrigation (douche)
➤ Warm the irrigation solution to approximately (40.6°C).
➤ Hang the irrigation solution approximately 30 to 60 cm above the level of the patient’s vagina.
➤ Position the patient in a dorsal recumbent position on a waterproof pad and bedpan.
➤ Lubricate the end of the irrigation nozzle.

75
➤ Insert the nozzle approximately 8 cm into the vagina, and start the flow of irrigation solution. Procedure: Inserting a Rectal Suppository
➤ Before inserting the suppository, assess for contraindications, such as rectal surgery, rectal bleeding, or cardiac disease.
➤ Don gloves.
➤ Position the patient in the Sims’ position.
➤ Lubricate the suppository.
➤ Insert the suppository past the internal sphincter about 1/2 to 1 inch in infants and 1 to 3 inches in adults. Never force the suppository during insertion.
➤ Instruct the patient to stay on his side for 5 to 10 minutes and retain (not expel) the suppository for about 30 minutes.
Procedure: Applying Medication to the Skin
➤ Wear gloves to avoid absorbing the medication through your own skin and to avoid cross-contamination.
➤ Before applying topical medication, cleanse the skin with soap and water.
➤ Do not apply medication to skin with open lesions, irritation, or known hypersensitivity.
➤ Avoid exposure to UV light/sunlight after applying medication.
➤ Assess for adverse skin reactions (e.g., hypersensitivity, redness, itching, or local irritation).
➤ Use gentle technique when applying topical medication to fragile skin, which is typical in older adults.
➤ Take care to not over-apply the medication.
➤ For transdermal patches, wear gloves when applying and removing; dispose of the patch in an appropriate receptacle, away from children and pets.
Procedure: Administering Metered-Dose Inhaler (MDI) Medication
➤ Identify the number of remaining inhalations in the canister. The “float method” is no longer recommended.
➤ Assist the patient to a seated position. Shake the inhaler. Remove the mouthpiece cap of the inhaler and insert the mouthpiece into the spacer while holding the canister upright.
➤ Remove the cap from the spacer.
➤ Ask the patient to breathe out slowly and completely.
➤ If a patient is unable to use the metered-dose inhaler independently, time the use of the device with the patient’s own respirations.

76
➤ Place the spacer’s mouthpiece into the patient’s mouth and ask him to seal his lips around the mouthpiece. Press down on the inhaler canister to discharge one puff of medication into the spacer.
➤ Ask the patient to slowly inhale, and then hold his breath for as long as possible.
➤ If a second puff is needed, wait at least 1 minute and repeat. Procedure: Preparing, Drawing Up, and Mixing Medication
➤ Maintain sterile technique.
➤ Recap the needle or vial access device (VAD) using a needle safety device or the one handed method.
➤ Change the needle, if indicated. Procedure: Drawing Up Medication from Ampules
➤ Tap the ampule to remove medication trapped in the top of the ampule or shake it with a quick snap of the wrist.
➤ Withdraw all of the medication from the ampule by inverting or tipping the ampule.
➤ Remove the filter needle and replace it with an appropriate size needle.
➤ Dispose of the broken ampule and filter needle in a sharps container. Procedure: Drawing Up Medication from Vials
➤ Scrub the rubber top of the vial with an alcohol.
➤ Draw air into the syringe equal to the amount of medication to be withdrawn.
➤ When inserting the needle or VAD through the rubber top of the vial, insert at a 45° to 60° angle, bevel up. Puncture the rubber top at that angle, but immediately raise to 90° as you insert the needle.
➤ Keeping the needle above the fluid line, inject air into the vial before inverting the vial and withdrawing the medication.
➤ Remove bubbles from the syringe, hold the vial at eye level, and check that the dose is correct before removing the needle.
Procedures: Mixing Medication from Two
➤ Make sure the medications are compatible.
➤ Before beginning, determine the total volume of all medications to be put in the syringe and whether that volume is appropriate for the administration site.
➤ Maintain the sterility of the needles and medication.
➤ Avoid contaminating a multidose vial with a second medication.
➤ Carefully expel air bubbles.
➤ Withdraw the second medication very carefully because the medications are mixed as you pull back the plunger; therefore, you must withdraw the exact
77
amount. If there is any excess, you must discard the contents of the syringe and start over.
➤ When opening ampules, protect yourself from injury.
➤ Use a filter needle or straw to withdraw medication from ampules; change to a needle of the proper length and gauge for administering the medication.
➤ When drawing up from a single-dose vial and ampule, draw up from the vial first.
➤ Do not use prefilled cartridges unless they have a safety needle; transfer the medication to a syringe with a safety device before administering.
➤ Always recap a sterile needle using a safety capping process or the one-handed scoop method.
Procedure: Recapping Needles Using One-Handed Technique Procedure: Recapping Contaminated Needles
➤ Recap a contaminated needle only if you cannot avoid it.
➤ Do not place your nondominant hand near the needle cap when recapping the needle or engaging the safety mechanism.
➤ If you are using a safety needle, engage the safety mechanism to cover the needle.
➤ Place the needle cap in a mechanical recapping device if one is available.
➤ If recapping devices are not available and you must recap the needle for your own and/or the patient’s safety, use the one-handed scoop technique Procedure: Recapping Sterile Needles
➤ Be sure to keep the needle and cap sterile.
➤ Do not place your non-dominant hand near the needle cap when recapping the needle or engaging the safety mechanism.
➤ Use one of the following methods: 1. Place the needle cap in a medication cup, and insert the needle into the
cap. 2. Place the cap on a clean surface so that the end of the needle cap
protrudes over the edge of the counter or shelf, and scoop with the needle.
3. Use a hard syringe cover: Stand it on end; insert the needle cap into the cover, and then insert the needle.
4. Place the needle cap on a sterile surface, such as on open alcohol prep pad, and use the one-handed scoop technique. This is the least desirable method.
Procedure: Administering Intradermal Medication
➤ Maintain sterile technique and standard precautions.
➤ Use a 1-mL syringe and a 25- to 28-gauge needle with a short bevel.
➤ Be aware that an intradermal dose is small, usually about 0.01 to 0.1 mL.
78
➤ Administer the injection on the ventral surface of the forearm, upper back, or upper chest.
➤ Hold the syringe parallel to the skin at a 5° to 15° angle, with the bevel up.
➤ Stretch the skin taut to insert the needle.
➤ Do not aspirate.
➤ Inject slowly, and create a wheal or bleb.
➤ Do not wipe the site with alcohol, massage, or bandage the site. Procedure: Administering Subcutaneous Medication
➤ Maintain sterile technique and standard precautions.
➤ Use a 1-mL syringe and a 25- to 27-gauge needle that is less than 1 inch long (usually 3⁄8 to 5⁄8 in.).
➤ A subcutaneous dose is typically no more than 1 mL.
➤ Most common injection sites: Use the outer aspects of the upper arms, abdomen, and anterior aspects of the thighs.
➤ Pinch the skin to inject, as a general rule.
➤ For an average-weight or thin patient, pinch up the skin and inject at a 45° angle. For an obese patient, inject at a 90° angle, if the adipose tissue pinches 2 inches or more, as a general rule. Use a longer needle and spread the skin taut instead of pinching.
➤ Do not aspirate when injecting heparin or insulin.
➤ Do not massage the site. Procedure: Locating Intramuscular Injection Sites
➤ Always palpate the landmarks and the muscle mass to ensure correct placement. Procedure: Locating the Ventrogluteal Site
➤ On adults, a triangle is formed between your fingers when you place your palm on the head of the trochanter, index finger on the anterior superior iliac spine, and middle finger pointing toward or on the iliac crest. This is the preferred site for adults and children older than 7 to 12 months. Procedure: Locating the Deltoid Site
➤ The injection site is an inverted triangle on the upper arm. The base is the lower edge of the acromion process, and the tip is even with the top of the axilla. This is a good site in healthy adults for small-volume injection, especially when other sites aren’t easily accessible because of drains or dressings. Procedure: Locating the Vastus Lateralis Site
➤ Midlateral thigh: On adults, one handbreadth below the head of the trochanter and one handbreadth above the knee. The site is the middle third of this area. This is the preferred site for infants who are not walking.
79
Procedure: Locating the Rectus Femoris Site
➤ Middle third of the anterior thigh: Use this site only if no others are accessible. It is more painful than other sites. Procedure: Administering an Intramuscular Injection
➤ Maintain sterile technique and standard precautions.
➤ Use a 1- to 5-mL syringe and a 21- to 25-gauge, 1-inch needle for deltoid site;
11/2-inch needle for adults; 3-inch needle if the patient is obese.
➤ The usual volume is no more than 3 mL per injection. If the volume for injection is more than 3 to 5 mL, divide the dose into separate injections.
➤ Select an appropriate injection site, and identify the site using anatomical landmarks: 1. The ventrogluteal site is preferred except in special circumstances (e.g.,
for many adult immunizations). 2. The deltoid site is acceptable for IM doses of 1 mL or less.
➤ Inject at a 90° angle.
➤ Follow agency procedure regarding aspiration. If appropriate, aspirate before injecting. If blood appears, withdraw the needle, discard it, and start over.
➤ Press the plunger slowly to inject the medication (5 to 10 sec/mL).
➤ Z-track technique is recommended. Procedure: Adding Medications to IV Fluid
➤ Check the compatibility of the IV solution and medication.
➤ Refer to agency policy regarding maximum number of meds that can be added to one IV solution.
➤ Assess the patency of the IV site.
➤ Maintain the sterility of IV fluids and medication admixture.
➤ Affix the medication label to the bag, with the name and amount of medication, date and time administered, and your name or initials. Procedure: Administering IV Push Medication
➤ Determine the type and amount of dilution needed for the medication.
➤ Determine the amount of time needed to administer the medication.
➤ Ensure the patency of the line before administration.
➤ Flush the line before and after administering the medication with normal saline. Flushing peripheral venous catheters with heparin 100 U/mL rather than with saline solution is recommended
➤ Maintain sterility.
80
Procedure: Administering Medications by Intermittent Infusion
➤ Ensure the compatibility of the IV solution and medication —both the solution in the primary IV system and in the secondary system.
➤ Assess the IV site and the patency of the line.
➤ Calculate the amount of medication to add to the solution.
➤ Use the correct amount and type of diluent solution.
➤ Use the correct rate of administration.
➤ Determine the correct primary line port in which to infuse the medication.
➤ Affix the correct label to the secondary bag identifying the infusate, patient name, start date and hour, discard date and hour, and your initials.
Procedure: Administering Medication through a Central Venous Access Device
➤ First verify the medication can safely be administered through a central site.
➤ Scrub all surfaces of the catheter port, including the extension “tail,” using an alcohol or CHG-alcohol combination product every time you enter the line.
➤ Flush the line before and after administering medication. Use saline, heparinized flush solution, or solution from the infusing IV line, according to agency policy.
➤ For multilumen catheters, flush all lumens.
➤ Clamp the line between the IV infusion set and the medication port. Open the clamp after medication is administered.

81
PRINCIPLES-BASED CHECKLIST TO USE WITH ALL PROCEDURES Procedure # _______ Procedure Title _________________________________________ Check (�) S (Satisfactory) or NI (Needs Improvement)
PROCEDURE STEPS S NI COMMENTS
Before Approaching Patient: Checks records (e.g., medication record) or obtains a
prescription, if necessary. Refers to agency protocols, if not familiar with them. Obtains signed informed consent, if needed. Performs hand hygiene; dons procedure gloves, if needed. Gathers supplies and equipment before approaching patient. Obtains assistance, if needed (e.g., to move a patient).
Preparing Patient: Introduces self and instructor to patient. Identifies patient: reads wrist band, and asks patient to state his
name. Follows agency protocol. Makes relevant assessments (e.g., takes vital signs) to ensure
that patient still requires the procedure, is able to tolerate it, and that there are no contraindications.
Explains the procedure to patient, including what he will feel and need to do (e.g., “You will need to lie very still”).
Provides privacy (e.g., asks visitors to step out, drapes patient). Uses good body mechanics: positions bed or treatment table to a working level; lowers the near siderail.
Uses good body mechanics: positions bed or treatment table to a working level; lowers the near siderail.
During the Procedure: Performs hand hygiene before touching patient, before gloving,
after removing gloves, and again before leaving the room. Observes universal precautions (e.g., dons and changes
procedure gloves when needed). Maintains sterility when needed. Maintains correct body mechanics. Provides patient safety (e.g., keeps siderail up on far side of the
bed). Continues to observe patient while performing the procedure
steps and pauses or stops the procedure if patient is not tolerating it.
Performs the procedure within an acceptable time period. Demonstrates coordination in handling equipment. Follows correct procedure steps.
After the Procedure: Evaluates patient’s response to the procedure. Leaves patient in a comfortable, safe position with the call light
within reach. If patient is in bed, returns the bed to the low position and
Chapter 11
Clinical workbook
82
raises the siderail (if patient requires this precaution). Disposes of supplies and materials according to agency policy. Washes hands again before leaving the room. Documents that the procedure was done; documents patient’s
responses.
Recommendation: Pass ___________________ Needs more practice _________________ Student:________________________________ Date:_____________________________ Instructor:____________________________ Date:___________________________________

83
Transferring a Patient to Another Unit in the Agency Procedure # _______ Procedure Title _________________________________________ Check (�) S (Satisfactory) or NI (Needs Improvement)
PROCEDURE STEPS S NI COMMENTS
Before, during, and after the procedure, follows Principles-Based Checklist to Use With All Procedures, including: Identifies the patient according to agency policy; attends appropriately to standard precautions, hand hygiene, safety, privacy, and body mechanics.
1. Explains transfer to patient ahead of time, if possible.
2. Obtains enough assistance to ensure safe transfer.
3. Gathers and labels medications for the new room.
4. Notifies the receiving unit and other departments (e.g., Dietary, Admitting).
5. Brings a utility cart to the room if it is needed to transport patient’s supplies and personal belongings.
6. Places patient’s personal belongings in a container for transfer.
7. Brings a wheelchair or stretcher to bedside; assists patient to the wheelchair or stretcher.
8. If patient must be transferred with equipment running (e.g., portable oxygen), obtains it ahead of time and sets it up for the transfer.
9. Takes patient to the new room.
10. Gives the handoff report, including all items on the structured format, or: name, age, physicians, surgical procedures and medical diagnoses, allergies, lab data, special equipment, current health status, status of advance directives and CPR, nursing diagnoses, and priorities for nursing care.
11. Documents per agency policies.
Recommendation: Pass ___________________ Needs more practice _________________ Student:________________________________ Date:_____________________________ Instructor:____________________________ Date:___________________________________

84
Transferring a Patient to a Long-Term Care Facility Procedure # _______ Procedure Title _________________________________________ Check (�) S (Satisfactory) or NI (Needs Improvement)
PROCEDURE STEPS S NI COMMENTS
Before, during, and after the procedure, follows Principles-Based Checklist to Use With All Procedures, including: Identifies the patient according to agency policy; attends appropriately to standard precautions, hand hygiene, safety, privacy, and body mechanics.
1. Notifies patient/family well in advance of transfer.
2. Prepares and copies patient records for the receiving facility
3. Packs patient’s personal items for transfer.
4. Arranges for transportation.
5.Checks medications for correct labeling; prepares them for transfer, as appropriate.
6. Assists patient into a hospital gown.
7. Notifies the receiving facility of transfer time and special equipment patient will need.
8. Notifies Admitting, other hospital departments, physician, and family of the transfer; confirms transportation.
9. Just before transfer, makes final assessment and signs off charting.
10. When transportation arrives, takes patient to the vehicle; or hands off patient to transporters in patient’s room. Removes patient’s identification band per agency policy.
11. Gives an oral report to long-term care facility nurse that includes: a. Reason for transfer b. Physical and psychosocial status c. Summary of care, treatment provided, and progress toward outcomes c. Referrals and community resources provided to patient
12. Notifies receiving facility if patient is colonized or infected with methicillin-resistant Staphylococcus aureus (MRSA) or other contagious microorganisms.
13. If patient has an IV, oxygen, or equipment that cannot be turned off for transfer, notifies the receiving agency far enough in advance so that the agency can make it available.
Recommendation: Pass ___________________ Needs more practice _________________ Student:________________________________ Date:_____________________________ Instructor:____________________________ Date:___________________________________

85
Assessing the Apical Pulse Procedure # _______ Procedure Title _________________________________________ Check (�) S (Satisfactory) or NI (Needs Improvement)
PROCEDURE STEPS S NI COMMENTS
Before, during, and after the procedure, follows Principles-Based Checklist to Use With All Procedures, including: Identifies the patient according to agency policy; attends appropriately to standard precautions, hand hygiene, safety, privacy, and body mechanics and documentation
1. Assists patient to a supine or sitting position (preferably sitting); exposes left side of the chest, only as much as necessary.
2. Cleans the stethoscope with a 70% alcohol or benzalkonium chloride wipe before using.
3. Selects, correctly locates, and palpates the apical site (5th intercostal space at the midclavicular line).
4. Warms the stethoscope in the hands for 10 seconds.
5. Uses the diaphragm of stethoscope over the PMI.
6. Counts for 60 seconds.
7. Notes rate, rhythm, and quality.
8. Identifies S1 and S2 heart sounds.
9. Again cleans the stethoscope with a 70% alcohol or benzalkonium chloride wipe
Recommendation: Pass ___________________ Needs more practice _________________ Student:________________________________ Date:_____________________________ Instructor:____________________________ Date:___________________________________

86
Assessing the Peripheral Pulse Procedure # _______ Procedure Title _________________________________________ Check (�) S (Satisfactory) or NI (Needs Improvement)
PROCEDURE STEPS S NI COMMENTS
Before, during, and after the procedure, follows Principles-Based Checklist to Use With All Procedures, including: Identifies the patient according to agency policy; attends appropriately to standard precautions, hand hygiene, safety, privacy, and body mechanics and documentation
Circle the site used: radial, brachial, carotid, dorsalis pedis, femoral, popliteal, posterior tibial, temporal
1. Selects, correctly locates, and palpates the site.
2. Uses fingers (not thumb) to palpate.
3. Counts for 30 seconds if regular; 60 seconds if irregular.
4. Notes rate, rhythm, and quality.
5. Compares bilaterally.
6. Carotid pulse: Palpates only on one side at a time.
7. Correctly locates the following sites: a. Radial
b. Brachial
c. Carotid
d. Dorsalis pedis
e. Femoral
f. Posterior tibial
g. Popliteal
h. Temporal
Recommendation: Pass ___________________ Needs more practice _________________ Student:________________________________ Date:_____________________________ Instructor:____________________________ Date:___________________________________

87
Assessing Body Temperature Procedure # _______ Procedure Title _________________________________________ Check (�) S (Satisfactory) or NI (Needs Improvement)
PROCEDURE STEPS S NI COMMENTS
Before, during, and after the procedure, follows Principles-Based Checklist to Use With All Procedures, including: Identifies the patient according to agency policy; attends appropriately to standard precautions, hand hygiene, safety, privacy, and body mechanics and documentation
1. Cleans thermometer before and after use if it is not disposable.
2. Selects the appropriate site and thermometer type.
3. “Zeroes” or shakes down glass or plastic thermometers to 96°F (36°C) as needed.*
4. Inserts the thermometer in a protective sheath or uses a thermometer designated only for patient.
5. Inserts in chosen route/site. a. Axillary: Dries axilla; places the thermometer tip in the middle of the axilla; lowers patient’s arm.
b. Oral: Places the thermometer tip under the tongue in the posterior sublingual pocket (right or left of frenulum). Asks patient to keep lips closed.
c. Rectal: Slides thermometer into a protective sheath; assists patient to Sims’ position; uses rectal thermometer; lubricates thermometer; dons procedure gloves; inserts 2.5–3.7 cm (1–1.5 in.) in an adult; 2.5 cm (0.9 in.) for a child, and 1.5 cm (0.5 in.) for an infant. Holds thermometer securely in place; does not leave patient unattended.
d. Temporal Artery Temperature: Removes the protective cap; cleans the lens/probe; places probe flat on center of the forehead; presses and holds button while stroking thermometer medially to laterally across the forehead; still holding the button, touches thermometer lens/probe behind the ear lobe; releases button to read temperature.
e. Tympanic membrane: Assures that thermometer lens is intact and clean; places disposable cover smoothly over the lens; positions patient’s head to one side and straightens the ear canal. Unless manufacturer directs otherwise: 1) For an adult, pulls the pinna up and back. 2) For a child, pulls the pinna down and back. Inserts the probe in the ear canal and rotates it toward the jaw.
f. Skin Temperature, Chemical Strip Thermometer: Places strip on the patient’s skin; leaves in place 15 to 60 seconds; observes for color changes; reads temperature before removing strip from the skin; discards the thermometer strip.
6. Leaves a glass or plastic thermometer for the recommended time (oral 5–8 minutes, rectal 3–5 minutes, axillary 8 minutes).
7. Leaves an electronic thermometer until it beeps.
8. Reads the temperature. (For a glass or plastic thermometer, wipes with tissue before reading; reads at eye level.)
9. Shakes down (glass or plastic thermometer) and cleans it.

88
10. Stores in recharging unit (electronic) or safe container (for glass or plastic).
*Mercury-containing thermometers are not recommended. Use only glass or plastic thermometers filled with galinstan or alcohol.
Recommendation: Pass ___________________ Needs more practice _________________ Student:________________________________ Date:_____________________________ Instructor:____________________________ Date:___________________________________

89
Assessing Respirations Procedure # _______ Procedure Title _________________________________________ Check (�) S (Satisfactory) or NI (Needs Improvement)
PROCEDURE STEPS S NI COMMENTS
Before, during, and after the procedure, follows Principles-Based Checklist to Use With All Procedures, including: Identifies the patient according to agency policy; attends appropriately to standard precautions, hand hygiene, safety, privacy, and body mechanics and documentation
1. Positions the patient sitting or in Fowler’s position, if possible.
2. Flexes patient’s arm and places patient’s forearm across his chest, or otherwise counts unobtrusively.
3. Palpates and counts the radial pulse, remembering the number.
4. Keeping fingers on the patient’s wrist, counts respirations.
5. Observes rate, rhythm, and depth.
6. Counts the number of breaths for 30 seconds if respirations are regular; 60 seconds if irregular. Begins timing with a count of 1 (if queried).
Recommendation: Pass ___________________ Needs more practice _________________ Student:________________________________ Date:_____________________________ Instructor:____________________________ Date:___________________________________
90
Measuring Blood Pressure (Brachial Artery) Procedure # _______ Procedure Title _________________________________________ Check (�) S (Satisfactory) or NI (Needs Improvement)
PROCEDURE STEPS S NI COMMENTS
Before, during, and after the procedure, follows Principles-Based Checklist to Use With All Procedures, including: Identifies the patient according to agency policy; attends appropriately to standard precautions, hand hygiene, safety, privacy, and body mechanics and documentation
1. Cleans the stethoscope before beginning the procedure.
2. Measures blood pressure after patient has been inactive for 5 minutes.
3. If possible, positions patient sitting, feet on floor, legs uncrossed; alternatively, lying down.
4. Exposes an arm (does not auscultate through clothing).
5. Supports patient’s arm at the level of the heart.
6. Uses appropriately sized cuff. (The width of the bladder of a
properly fitting cuff will cover approximately ⅔ of the length of the upper arm for an adult, and the entire upper arm for a child. Alternatively, the length of the bladder encircles 80% to 100% of the arm in adults.)
7. Positions the cuff correctly; wraps snugly; ensures it is totally deflated.
8. Places stethoscope earpieces in own ears.
9. Palpates the brachial artery on cuff arm: a. Closes the sphygmomanometer valve.
b. Inflates the cuff rapidly to about 80 mm Hg.
c. While palpating the pulse, continues inflating in 10 mm Hg increments until the pulse is no longer felt.
d. Notes the pressure at which the pulse disappears.
e. Continues inflating for 20–30 mm Hg more. f. Moves to Step 11.
10. Variations in Cuff Inflation (step 9). Palpates the brachial artery: a. Closes the sphygmomanometer valve.
b. Inflates the cuff rapidly to about 80 mm Hg.
c. While palpating the pulse, continues inflating in 10 mm Hg increments until the pulse is no longer felt.
d. Notes the pressure at which the pulse disappears.
e. Deflates the cuff rapidly.
f. Waits 2 minutes, then places the stethoscope over the brachial artery and inflates the cuff to a pressure that is 20–30 mm Hg above the level previously palpated. Moves to Step 11.
11. Places the stethoscope over the brachial artery, ensuring that: a. The stethoscope is not touching anything (e.g., clothing).
b. The diaphragm is not tucked under the edge of the blood pressure cuff.
12. Releases pressure at 2–3 mm Hg/second.
13. Records at least systolic and diastolic readings (first and last sounds heard—e.g., 110/80). Records level of muffling, if possible.
14. If necessary to remeasure, deflates cuff completely and waits at least 2 minutes.
91
14. Variation. If a mercury manometer must be used, reads the scale at eye level.
15. Variation. If an automatic blood pressure device is used: a. Follows the same guidelines as for taking a manual blood pressure (e.g., cuff size and placement, patient position).
b. Turns on the machine, making sure the cuff is deflated.
c. Applies the cuff; presses the button to start the measurement.
d. At the tone, reads the digital measurement.
Procedure Variation A. Measuring Blood Pressure in the Forearm
1. Uses properly sized cuff for forearm; places midway between the elbow and the wrist
2. Uses above procedure, but auscultates over radial artery.
3. Correctly locates radial artery.
Procedure Variation B. Measuring Blood Pressure in the Thigh
1. Places the patient in a prone position; alternatively, supine with knee slightly bent.
2. Uses the correct cuff size; wraps the cuff so lower edge is 1 in. above the popliteal fossa and centered over the popliteal artery.
3. Auscultates and palpates over the popliteal artery.
Procedure Variation C. Measuring Blood Pressure in the Calf
1. Places the patient in a supine position.
2. Uses the correct cuff size; wraps the cuff so the lower edge is 1 in. above the malleoli or ankle.
3. Places the stethoscope over the dorsalis pedis or the posterior tibial artery.
Procedure Variation D. Palpating the Blood Pressure
1. Applies the cuff, and palpates for the radial or brachial pulse.
2. Inflates the cuff until the pulse disappears, then inflates for 30 mm Hg more.
3. Releases the valve, slowly deflating the pulse
4. Notes manometer reading when pulse was felt again and records palpated reading.
NOTE: This checklist describes using the brachial artery in the upper arm; however, the checklist can also be used to assess lower arm, calf, and thigh blood pressures. Recommendation: Pass ___________________ Needs more practice _________________ Student:________________________________ Date:_____________________________ Instructor:____________________________ Date:___________________________________

92
Hand Hygiene Procedure # _______ Procedure Title _________________________________________ Check (�) S (Satisfactory) or NI (Needs Improvement)
PROCEDURE STEPS S NI COMMENTS
Before, during, and after the procedure, follows Principles-Based Checklist to Use With All Procedures, including: Identifies the patient according to agency policy; attends appropriately to standard precautions, hand hygiene, safety, privacy, and body mechanics
Using Soap and Water:
1. Pushes up the sleeves; removes jewelry and watch.
2. Adjusts water temperature to warm.
3. Wets hands and wrists under running water, keeping hands lower than wrists and forearms.
4. Avoids splashing water onto clothing.
5. Avoids touching inside of the sink.
6. Applies 3–5 mL liquid or foam soap.
7. Rubs soap over all surfaces of hands.
8. Rubs hands vigorously together for at least 15 seconds.
9. Lathers all surfaces of the hands and fingers.
10. Cleans under fingernails, if nails are dirty.
11. Rinses thoroughly, keeping hands lower than forearms.
12. Dries hands thoroughly: moves from fingers up forearms; blots with paper towel.
13. Turns off faucet with paper towel. Does not handle the towel with the other hand.
14. Applies recommended hand moisturizer.
Using Alcohol-Based Handrubs:
1. If hands are soiled, washes them with soap and water.
2. Removes jewelry, bares arms, and so on, as with the soap-and-water procedure.
3. Applies a sufficient quantity of antiseptic solution to cover the hands and wrists.
4. Vigorously rubs solution on all surfaces of fingers and hands.
5. Continues rubbing until hands are completely dry, or as recommended by the manufacturer or agency policy.
Recommendation: Pass ___________________ Needs more practice _________________ Student:________________________________ Date:_____________________________ Instructor:____________________________ Date:___________________________________

93
Medication Guidelines: Steps to Follow for All Medications, Regardless of Type or Route
Procedure # _______ Procedure Title _________________________________________ Check (�) S (Satisfactory) or NI (Needs Improvement)
PROCEDURE STEPS S NI COMMENTS
Before, during, and after the procedure, follows Principles-Based Checklist to Use With All Procedures, including: Identifies the patient according to agency policy; attends appropriately to standard precautions, hand hygiene, safety, privacy, body mechanics, and documentation
1. First Check: For the patient name, patient identifier, medication, dose, route, time, and drug allergies. Checks MAR and determines when medications are due.
2. Verifies the prescription, which should include the patient’s name, patient identifier, medication name, dose, route, time, and patient allergies.
3. Follows agency policies for medication administration, including the time frame. Does not prepour medications.
4. Performs hand hygiene.
5. Accesses patient’s medication drawer. Unlocks medication cart or logs onto the medication dispensing computer.
6. Obtains narcotic cabinet key (or code). Signs out medication when administering a narcotic or barbiturate; includes patient’s name, drug dose, and other pertinent information per agency policy. Notes drug count when removing a narcotic.
7. Selects the prescribed medication and compares with the MAR for the first five rights (patient, drug, dose, route, time)
8. Checks for drug allergies.
9. Checks patient identification band.
10. Calculates dosage accurately.
11. Checks the expiration date of all medications.
12. Does a Second Check after preparing medications; verifies the correct medication, dose, route, and time.
13. Locks the medication cart.
14. Administers the medications: a. Takes the medication and MAR into patient’s room. b. Identifies patient by using two forms of identification, according to agency policy. c. Performs Third Check. d. Performs any assessments needed. e. Explains role to patient; teaches about each medication. f. Administers medication using appropriate technique. g. Remains with patient until each medication is taken. h. Documents medication in patient’s MAR.
Recommendation: Pass ___________________ Needs more practice _________________ Student:________________________________ Date:_____________________________
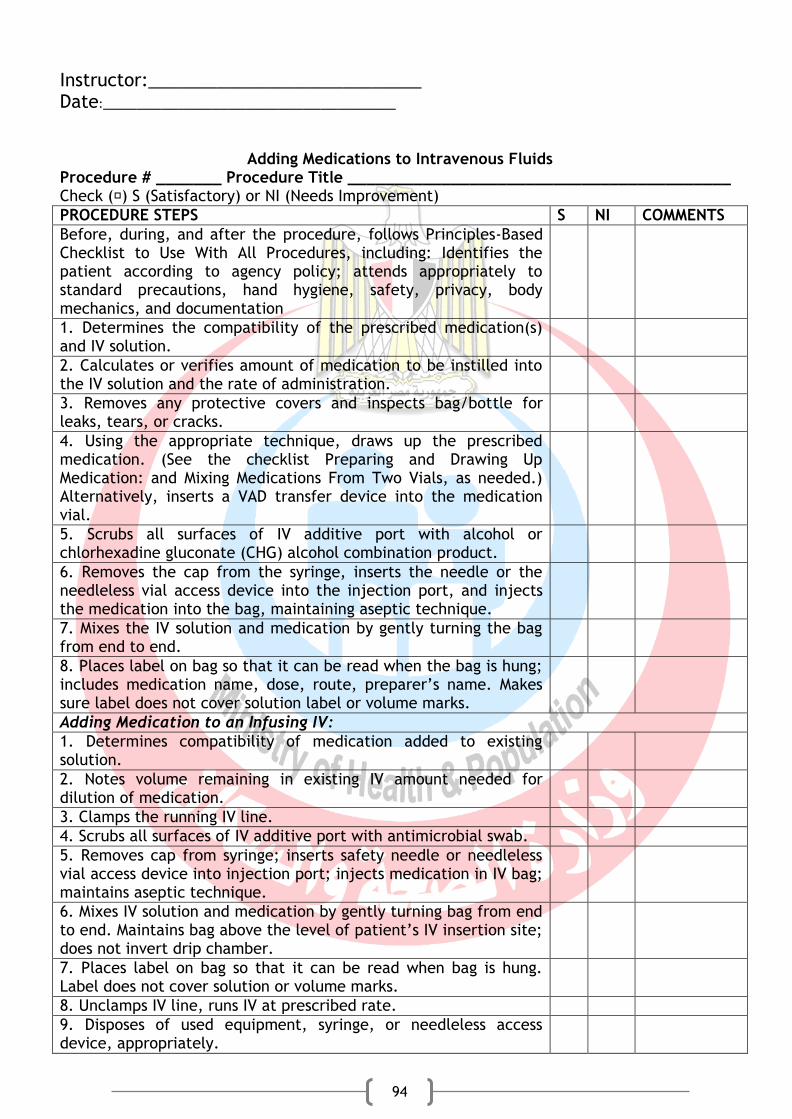
94
Instructor:____________________________ Date:___________________________________
Adding Medications to Intravenous Fluids Procedure # _______ Procedure Title _________________________________________ Check (�) S (Satisfactory) or NI (Needs Improvement)
PROCEDURE STEPS S NI COMMENTS
Before, during, and after the procedure, follows Principles-Based Checklist to Use With All Procedures, including: Identifies the patient according to agency policy; attends appropriately to standard precautions, hand hygiene, safety, privacy, body mechanics, and documentation
1. Determines the compatibility of the prescribed medication(s) and IV solution.
2. Calculates or verifies amount of medication to be instilled into the IV solution and the rate of administration.
3. Removes any protective covers and inspects bag/bottle for leaks, tears, or cracks.
4. Using the appropriate technique, draws up the prescribed medication. (See the checklist Preparing and Drawing Up Medication: and Mixing Medications From Two Vials, as needed.) Alternatively, inserts a VAD transfer device into the medication vial.
5. Scrubs all surfaces of IV additive port with alcohol or chlorhexadine gluconate (CHG) alcohol combination product.
6. Removes the cap from the syringe, inserts the needle or the needleless vial access device into the injection port, and injects the medication into the bag, maintaining aseptic technique.
7. Mixes the IV solution and medication by gently turning the bag from end to end.
8. Places label on bag so that it can be read when the bag is hung; includes medication name, dose, route, preparer’s name. Makes sure label does not cover solution label or volume marks.
Adding Medication to an Infusing IV:
1. Determines compatibility of medication added to existing solution.
2. Notes volume remaining in existing IV amount needed for dilution of medication.
3. Clamps the running IV line.
4. Scrubs all surfaces of IV additive port with antimicrobial swab.
5. Removes cap from syringe; inserts safety needle or needleless vial access device into injection port; injects medication in IV bag; maintains aseptic technique.
6. Mixes IV solution and medication by gently turning bag from end to end. Maintains bag above the level of patient’s IV insertion site; does not invert drip chamber.
7. Places label on bag so that it can be read when bag is hung. Label does not cover solution or volume marks.
8. Unclamps IV line, runs IV at prescribed rate.
9. Disposes of used equipment, syringe, or needleless access device, appropriately.
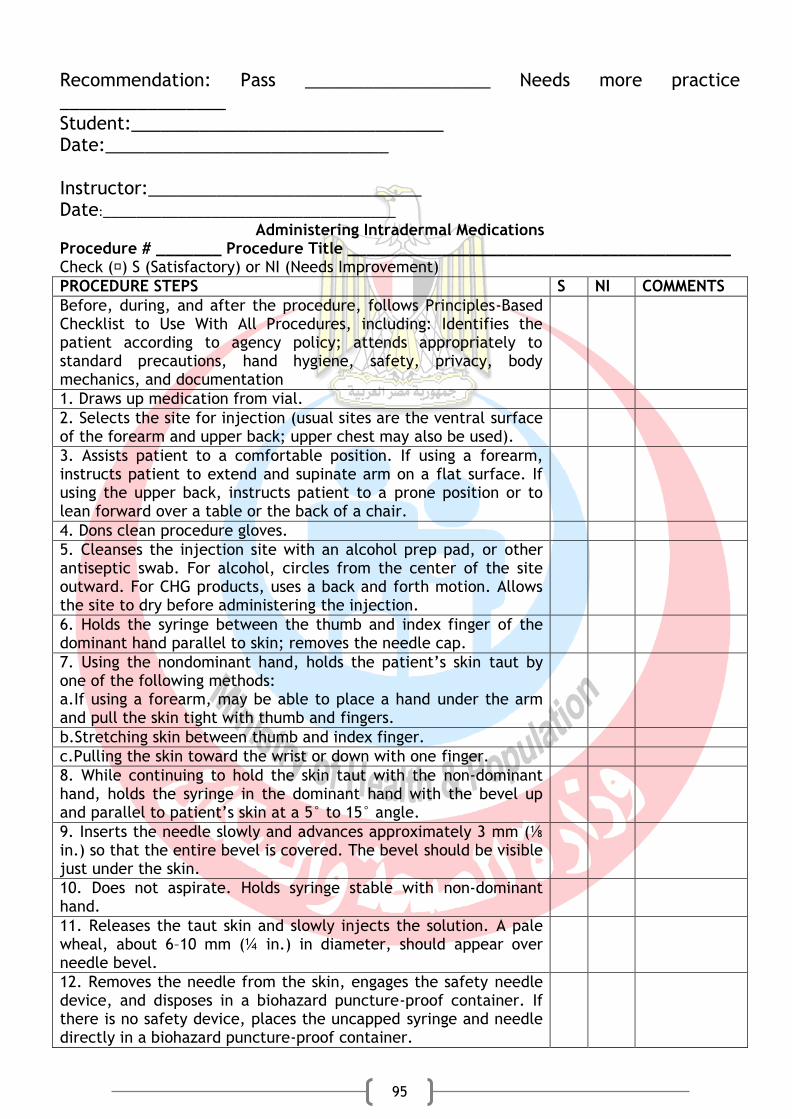
95
Recommendation: Pass ___________________ Needs more practice _________________ Student:________________________________ Date:_____________________________ Instructor:____________________________ Date:___________________________________
Administering Intradermal Medications Procedure # _______ Procedure Title _________________________________________ Check (�) S (Satisfactory) or NI (Needs Improvement)
PROCEDURE STEPS S NI COMMENTS
Before, during, and after the procedure, follows Principles-Based Checklist to Use With All Procedures, including: Identifies the patient according to agency policy; attends appropriately to standard precautions, hand hygiene, safety, privacy, body mechanics, and documentation
1. Draws up medication from vial.
2. Selects the site for injection (usual sites are the ventral surface of the forearm and upper back; upper chest may also be used).
3. Assists patient to a comfortable position. If using a forearm, instructs patient to extend and supinate arm on a flat surface. If using the upper back, instructs patient to a prone position or to lean forward over a table or the back of a chair.
4. Dons clean procedure gloves.
5. Cleanses the injection site with an alcohol prep pad, or other antiseptic swab. For alcohol, circles from the center of the site outward. For CHG products, uses a back and forth motion. Allows the site to dry before administering the injection.
6. Holds the syringe between the thumb and index finger of the dominant hand parallel to skin; removes the needle cap.
7. Using the nondominant hand, holds the patient’s skin taut by one of the following methods: a.If using a forearm, may be able to place a hand under the arm and pull the skin tight with thumb and fingers.
b.Stretching skin between thumb and index finger.
c.Pulling the skin toward the wrist or down with one finger.
8. While continuing to hold the skin taut with the non-dominant hand, holds the syringe in the dominant hand with the bevel up and parallel to patient’s skin at a 5° to 15° angle.
9. Inserts the needle slowly and advances approximately 3 mm (⅛ in.) so that the entire bevel is covered. The bevel should be visible just under the skin.
10. Does not aspirate. Holds syringe stable with non-dominant hand.
11. Releases the taut skin and slowly injects the solution. A pale wheal, about 6–10 mm (¼ in.) in diameter, should appear over needle bevel.
12. Removes the needle from the skin, engages the safety needle device, and disposes in a biohazard puncture-proof container. If there is no safety device, places the uncapped syringe and needle directly in a biohazard puncture-proof container.
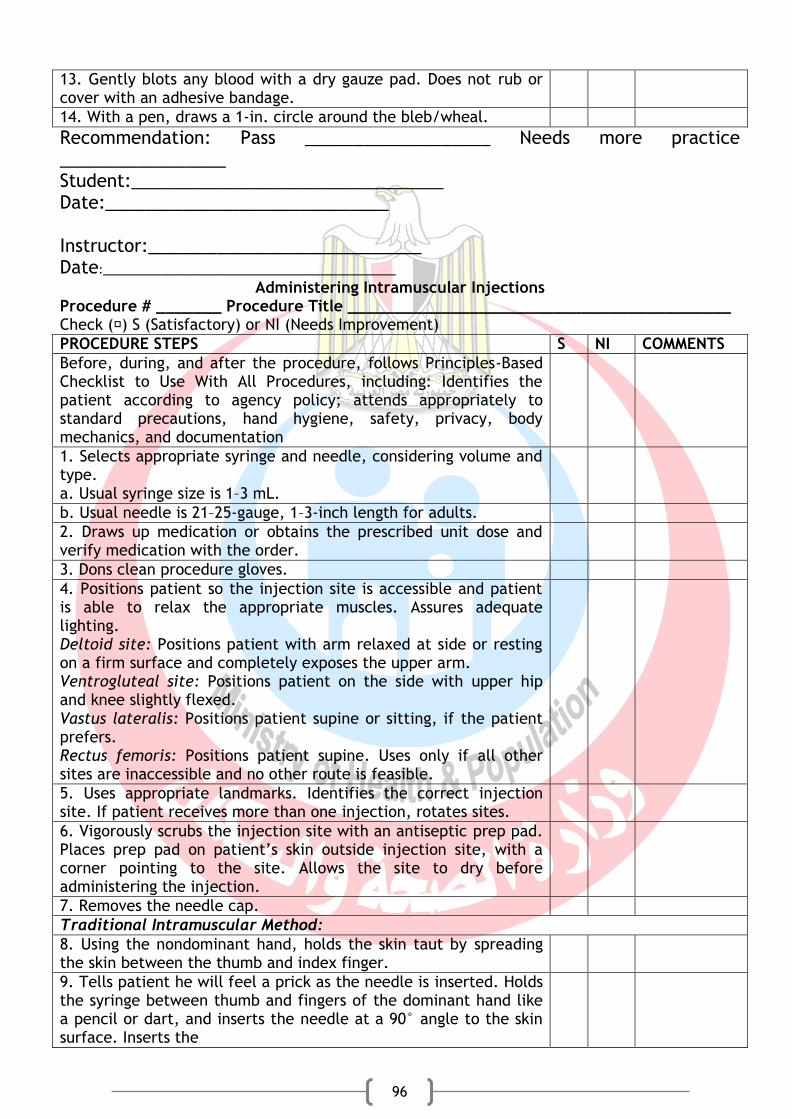
96
13. Gently blots any blood with a dry gauze pad. Does not rub or cover with an adhesive bandage.
14. With a pen, draws a 1-in. circle around the bleb/wheal.
Recommendation: Pass ___________________ Needs more practice _________________ Student:________________________________ Date:_____________________________ Instructor:____________________________ Date:___________________________________
Administering Intramuscular Injections Procedure # _______ Procedure Title _________________________________________ Check (�) S (Satisfactory) or NI (Needs Improvement)
PROCEDURE STEPS S NI COMMENTS
Before, during, and after the procedure, follows Principles-Based Checklist to Use With All Procedures, including: Identifies the patient according to agency policy; attends appropriately to standard precautions, hand hygiene, safety, privacy, body mechanics, and documentation
1. Selects appropriate syringe and needle, considering volume and type. a. Usual syringe size is 1–3 mL.
b. Usual needle is 21–25-gauge, 1–3-inch length for adults.
2. Draws up medication or obtains the prescribed unit dose and verify medication with the order.
3. Dons clean procedure gloves.
4. Positions patient so the injection site is accessible and patient is able to relax the appropriate muscles. Assures adequate lighting. Deltoid site: Positions patient with arm relaxed at side or resting on a firm surface and completely exposes the upper arm. Ventrogluteal site: Positions patient on the side with upper hip and knee slightly flexed. Vastus lateralis: Positions patient supine or sitting, if the patient prefers. Rectus femoris: Positions patient supine. Uses only if all other sites are inaccessible and no other route is feasible.
5. Uses appropriate landmarks. Identifies the correct injection site. If patient receives more than one injection, rotates sites.
6. Vigorously scrubs the injection site with an antiseptic prep pad. Places prep pad on patient’s skin outside injection site, with a corner pointing to the site. Allows the site to dry before administering the injection.
7. Removes the needle cap.
Traditional Intramuscular Method:
8. Using the nondominant hand, holds the skin taut by spreading the skin between the thumb and index finger.
9. Tells patient he will feel a prick as the needle is inserted. Holds the syringe between thumb and fingers of the dominant hand like a pencil or dart, and inserts the needle at a 90° angle to the skin surface. Inserts the
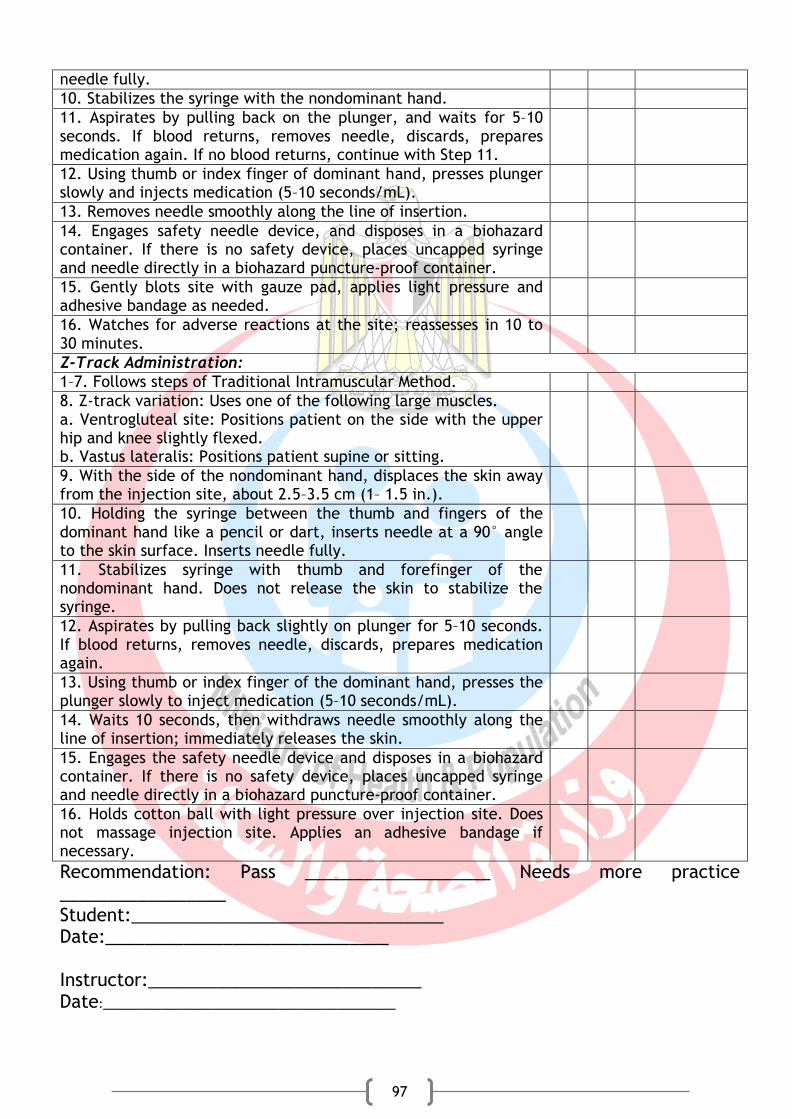
97
needle fully.
10. Stabilizes the syringe with the nondominant hand.
11. Aspirates by pulling back on the plunger, and waits for 5–10 seconds. If blood returns, removes needle, discards, prepares medication again. If no blood returns, continue with Step 11.
12. Using thumb or index finger of dominant hand, presses plunger slowly and injects medication (5–10 seconds/mL).
13. Removes needle smoothly along the line of insertion.
14. Engages safety needle device, and disposes in a biohazard container. If there is no safety device, places uncapped syringe and needle directly in a biohazard puncture-proof container.
15. Gently blots site with gauze pad, applies light pressure and adhesive bandage as needed.
16. Watches for adverse reactions at the site; reassesses in 10 to 30 minutes.
Z-Track Administration:
1–7. Follows steps of Traditional Intramuscular Method.
8. Z-track variation: Uses one of the following large muscles. a. Ventrogluteal site: Positions patient on the side with the upper hip and knee slightly flexed. b. Vastus lateralis: Positions patient supine or sitting.
9. With the side of the nondominant hand, displaces the skin away from the injection site, about 2.5–3.5 cm (1– 1.5 in.).
10. Holding the syringe between the thumb and fingers of the dominant hand like a pencil or dart, inserts needle at a 90° angle to the skin surface. Inserts needle fully.
11. Stabilizes syringe with thumb and forefinger of the nondominant hand. Does not release the skin to stabilize the syringe.
12. Aspirates by pulling back slightly on plunger for 5–10 seconds. If blood returns, removes needle, discards, prepares medication again.
13. Using thumb or index finger of the dominant hand, presses the plunger slowly to inject medication (5–10 seconds/mL).
14. Waits 10 seconds, then withdraws needle smoothly along the line of insertion; immediately releases the skin.
15. Engages the safety needle device and disposes in a biohazard container. If there is no safety device, places uncapped syringe and needle directly in a biohazard puncture-proof container.
16. Holds cotton ball with light pressure over injection site. Does not massage injection site. Applies an adhesive bandage if necessary.
Recommendation: Pass ___________________ Needs more practice _________________ Student:________________________________ Date:_____________________________ Instructor:____________________________ Date:___________________________________

98
Administering IV Push Through Primary IV Line
Procedure # _______ Procedure Title _________________________________________ Check (�) S (Satisfactory) or NI (Needs Improvement)
PROCEDURE STEPS S NI COMMENTS
Before, during, and after the procedure, follows Principles-Based Checklist to Use With All Procedures, including: Identifies the patient according to agency policy; attends appropriately to standard precautions, hand hygiene, safety, privacy, body mechanics, and documentation
1. Determines rate of administration for medication, and compatibility with solution infusing.
2. Prepares medication from vial, ampule, or prescribed unit dose. Verifies medication with the order.
3. Dilutes medication if needed. Temporarily pauses infusion pump to administer medication.
4. Dons procedure gloves.
5. Thoroughly scrubs all surfaces of the injection port closest to the patient with the alcohol prep pad or CHG-alcohol combination product.
6. Inserts medication syringe into injection port. If a needleless system is not available, uses syringe with a safety needle.
7. Pinches or clamps the IV tubing between the IV bag and the port.
8. Gently aspirates by pulling back on the plunger, and checks for blood return. (Some connectors neither require nor allow for aspiration; follow agency policy.)
9. If blood returns on aspiration, administers a small amount of the medication while observing for reactions to the medication.
10. Administers another increment of the medication (maypinch the tubing while injecting the medication, and release it when not injecting; this is optional).
11. Repeats Steps 7 and 8 until the medication has been administered over the correct amount of time.
12. Unclamps or releases pinching of the tubing and resets at the correct infusion rate (if the tubing was clamped during medication administration).
Recommendation: Pass ___________________ Needs more practice _________________ Student:________________________________ Date:_____________________________ Instructor:____________________________ Date:___________________________________
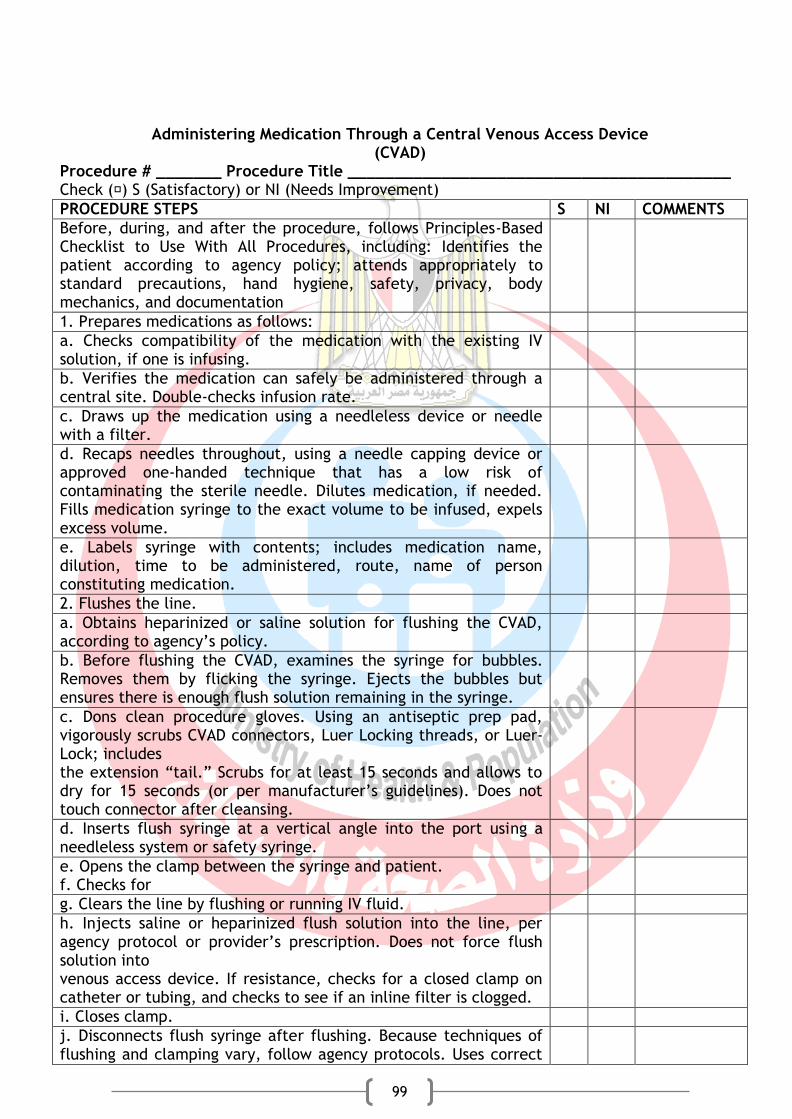
99
Administering Medication Through a Central Venous Access Device (CVAD)
Procedure # _______ Procedure Title _________________________________________ Check (�) S (Satisfactory) or NI (Needs Improvement)
PROCEDURE STEPS S NI COMMENTS
Before, during, and after the procedure, follows Principles-Based Checklist to Use With All Procedures, including: Identifies the patient according to agency policy; attends appropriately to standard precautions, hand hygiene, safety, privacy, body mechanics, and documentation
1. Prepares medications as follows:
a. Checks compatibility of the medication with the existing IV solution, if one is infusing.
b. Verifies the medication can safely be administered through a central site. Double-checks infusion rate.
c. Draws up the medication using a needleless device or needle with a filter.
d. Recaps needles throughout, using a needle capping device or approved one-handed technique that has a low risk of contaminating the sterile needle. Dilutes medication, if needed. Fills medication syringe to the exact volume to be infused, expels excess volume.
e. Labels syringe with contents; includes medication name, dilution, time to be administered, route, name of person constituting medication.
2. Flushes the line.
a. Obtains heparinized or saline solution for flushing the CVAD, according to agency’s policy.
b. Before flushing the CVAD, examines the syringe for bubbles. Removes them by flicking the syringe. Ejects the bubbles but ensures there is enough flush solution remaining in the syringe.
c. Dons clean procedure gloves. Using an antiseptic prep pad, vigorously scrubs CVAD connectors, Luer Locking threads, or Luer-Lock; includes the extension “tail.” Scrubs for at least 15 seconds and allows to dry for 15 seconds (or per manufacturer’s guidelines). Does not touch connector after cleansing.
d. Inserts flush syringe at a vertical angle into the port using a needleless system or safety syringe.
e. Opens the clamp between the syringe and patient. f. Checks for
g. Clears the line by flushing or running IV fluid.
h. Injects saline or heparinized flush solution into the line, per agency protocol or provider’s prescription. Does not force flush solution into venous access device. If resistance, checks for a closed clamp on catheter or tubing, and checks to see if an inline filter is clogged.
i. Closes clamp.
j. Disconnects flush syringe after flushing. Because techniques of flushing and clamping vary, follow agency protocols. Uses correct
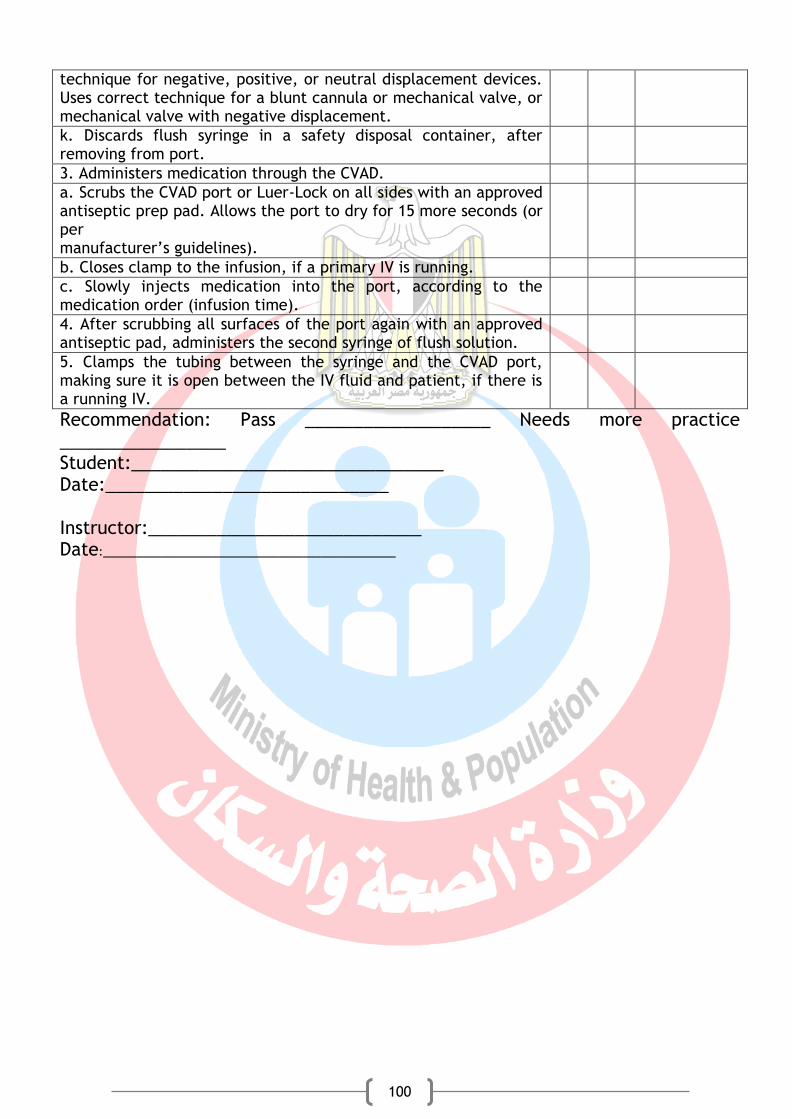
100
technique for negative, positive, or neutral displacement devices. Uses correct technique for a blunt cannula or mechanical valve, or mechanical valve with negative displacement.
k. Discards flush syringe in a safety disposal container, after removing from port.
3. Administers medication through the CVAD.
a. Scrubs the CVAD port or Luer-Lock on all sides with an approved antiseptic prep pad. Allows the port to dry for 15 more seconds (or per manufacturer’s guidelines).
b. Closes clamp to the infusion, if a primary IV is running.
c. Slowly injects medication into the port, according to the medication order (infusion time).
4. After scrubbing all surfaces of the port again with an approved antiseptic pad, administers the second syringe of flush solution.
5. Clamps the tubing between the syringe and the CVAD port, making sure it is open between the IV fluid and patient, if there is a running IV.
Recommendation: Pass ___________________ Needs more practice _________________ Student:________________________________ Date:_____________________________ Instructor:____________________________ Date:___________________________________

101
Administering Oral Medications Procedure # _______ Procedure Title _________________________________________ Check (�) S (Satisfactory) or NI (Needs Improvement)
PROCEDURE STEPS S NI COMMENTS
Before, during, and after the procedure, follows Principles-Based Checklist to Use With All Procedures, including: Identifies the patient according to agency policy; attends appropriately to standard precautions, hand hygiene, safety, privacy, body mechanics, and documentation
1. Prepares and administers medications.
Variation. Tablets and Capsules:
2. If pouring from a multidose container, does not touch the medication. Pours the tablet into the cap of the bottle, then into the medication cup.
3. Pours the correct number of tablets into the medication cup.
4. If necessary to give less than a whole tablet, breaks a scored tablet with gloved hands; uses a pill cutter if necessary. Does not break an unscored tablet.
5. If the drug is unit-dose, does not open package; places entire package in paper (soufflé) cup.
6. If patient has difficulty swallowing, checks to see if
7. Pours all medications scheduled at the same time into same cup, except uses a separate cup for any medications requiring preadministration assessment.
8. Completes preadministration assessments if needed.
9. If patient is able to hold it, places tablet or medication cup in her hand. If unable to hold it, places medication cup to her lips and tips tablet(s) into her mouth.
10. Provides a liquid to swallow tablets.
Variation. Sublingual Medications:
11. Places, or asks patient to place the tablet under the tongue and hold there until completely dissolved.
Variation. Buccal Medications:
12. Places, or asks patient to place, the tablet between the cheek and gums and hold there until completely dissolved.
Variation. Liquids:
13. Shakes the liquid, if necessary, before opening the container.
14. Places the bottle with lid flat side down on the counter.
15. Holds the bottle with the label in the palm of the hand.
16. Pours the medication, and slightly twists the bottle when finished to prevent dripping.
17. If medication drips over bottle lip when pouring, wipes with a clean tissue or paper towel—only the outside lip of the bottle.
18. Holds the medication cup at eye level to measure the dosage.
19. Positions patient in a sitting (high Fowler’s) position if possible; or raises the head of the bed as much as allowed.
Recommendation: Pass ___________________ Needs more practice _________________ Student:________________________________ Date:_____________________________
102
Instructor:____________________________ Date:___________________________________

103
Administering Subcutaneous Medications Procedure # _______ Procedure Title _________________________________________ Check (�) S (Satisfactory) or NI (Needs Improvement)
PROCEDURE STEPS S NI COMMENTS
Before, during, and after the procedure, follows Principles-Based Checklist to Use With All Procedures, including: Identifies the patient according to agency policy; attends appropriately to standard precautions, hand hygiene, safety, privacy, body mechanics, and documentation
1. Selects appropriate syringe and needle. Considers amount of adipose tissue: a. For insulin, must use an insulin syringe—typically 0.3, 0.5, or 1.0 mL. Most insulin needles are 28–31-gauge. Needle length is often 3⁄16–1 inch.
b. For non-insulin volumes less than 1 ml, uses a tuberculin (TB) syringe with a 25–27-gauge, ⅜–⅝-inch needle.
c. For a non-insulin volume of 1 mL, a 3-mL syringe may be used with a 25–27 gauge, ⅜–⅝-inch needle.
2. Draws up medication. See checklist for Preparing and Drawing Up Medication: Mixing Medications From Two Vials. Does not give more than 1 mL of medication in a site.
3. Selects appropriate site (outer aspect of the upper arms, abdomen, anterior aspects of the thighs, high on buttocks near waist level, and the scapular area on upper back). The site must have adequate subcutaneous tissue. For heparin, abdomen is the only site used.
4. Positions patient so injection site is accessible and patient can relax the muscle.
5. Dons clean procedure gloves.
6. Scrubs injection site with an antiseptic pad by circling from center of the site outward (for alcohol) or using a back-and-forth motion (for CHG products). Does not move back over already cleaned tissue. Allows site to dry before administering the injection.
7. Removes needle cap.
8. With the nondominant hand, pinches or pulls taut the skin at the injection site. a. If patient is obese or “pinch” of adipose tissue is greater than 2 in., uses a 90° angle.
b. If patient is average size or “pinch” is less than 1 in., uses a 45° angle.
c. If patient is obese and the adipose tissue pinches 2 in. or more, uses a longer needle (if available) and spreads skin taut instead of pinching. Enters tissue at a 90° angle.
9. Holds the syringe between thumb and index finger of the dominant hand like a pencil or dart, and inserts the needle at the appropriate angle into the pinched-up skinfold (spreads skin taut in obese patients).
10. Stabilizes the syringe with the fingers of the non-dominant hand.
11. Using the thumb or index finger of the dominant hand, presses the plunger slowly to inject the medication. (Alternatively, after inserting the needle, continues to hold the barrel with the

104
dominant hand and uses the nondominant hand to depress the plunger.) Does not give more than 1 mL of medication in a site.
12. Removes the safety needle smoothly along the line of insertion.
13. Gently blots any blood with a gauze pad.
14. Engages the needle safety device or places the uncapped syringe and needle directly into a sharps container.
Recommendation: Pass ___________________ Needs more practice _________________ Student:________________________________ Date:_____________________________ Instructor:____________________________ Date:___________________________________
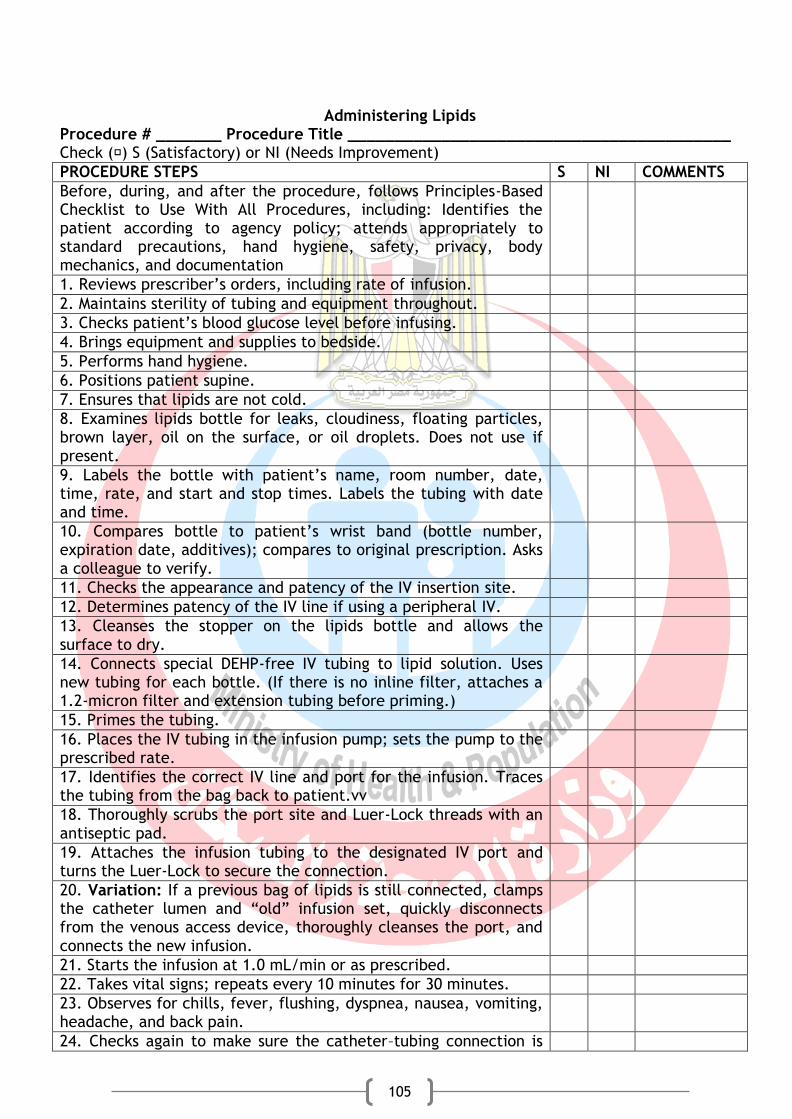
105
Administering Lipids Procedure # _______ Procedure Title _________________________________________ Check (�) S (Satisfactory) or NI (Needs Improvement)
PROCEDURE STEPS S NI COMMENTS
Before, during, and after the procedure, follows Principles-Based Checklist to Use With All Procedures, including: Identifies the patient according to agency policy; attends appropriately to standard precautions, hand hygiene, safety, privacy, body mechanics, and documentation
1. Reviews prescriber’s orders, including rate of infusion.
2. Maintains sterility of tubing and equipment throughout.
3. Checks patient’s blood glucose level before infusing.
4. Brings equipment and supplies to bedside.
5. Performs hand hygiene.
6. Positions patient supine.
7. Ensures that lipids are not cold.
8. Examines lipids bottle for leaks, cloudiness, floating particles, brown layer, oil on the surface, or oil droplets. Does not use if present.
9. Labels the bottle with patient’s name, room number, date, time, rate, and start and stop times. Labels the tubing with date and time.
10. Compares bottle to patient’s wrist band (bottle number, expiration date, additives); compares to original prescription. Asks a colleague to verify.
11. Checks the appearance and patency of the IV insertion site.
12. Determines patency of the IV line if using a peripheral IV.
13. Cleanses the stopper on the lipids bottle and allows the surface to dry.
14. Connects special DEHP-free IV tubing to lipid solution. Uses new tubing for each bottle. (If there is no inline filter, attaches a 1.2-micron filter and extension tubing before priming.)
15. Primes the tubing.
16. Places the IV tubing in the infusion pump; sets the pump to the prescribed rate.
17. Identifies the correct IV line and port for the infusion. Traces the tubing from the bag back to patient.vv
18. Thoroughly scrubs the port site and Luer-Lock threads with an antiseptic pad.
19. Attaches the infusion tubing to the designated IV port and turns the Luer-Lock to secure the connection.
20. Variation: If a previous bag of lipids is still connected, clamps the catheter lumen and “old” infusion set, quickly disconnects from the venous access device, thoroughly cleanses the port, and connects the new infusion.
21. Starts the infusion at 1.0 mL/min or as prescribed.
22. Takes vital signs; repeats every 10 minutes for 30 minutes.
23. Observes for chills, fever, flushing, dyspnea, nausea, vomiting, headache, and back pain.
24. Checks again to make sure the catheter–tubing connection is
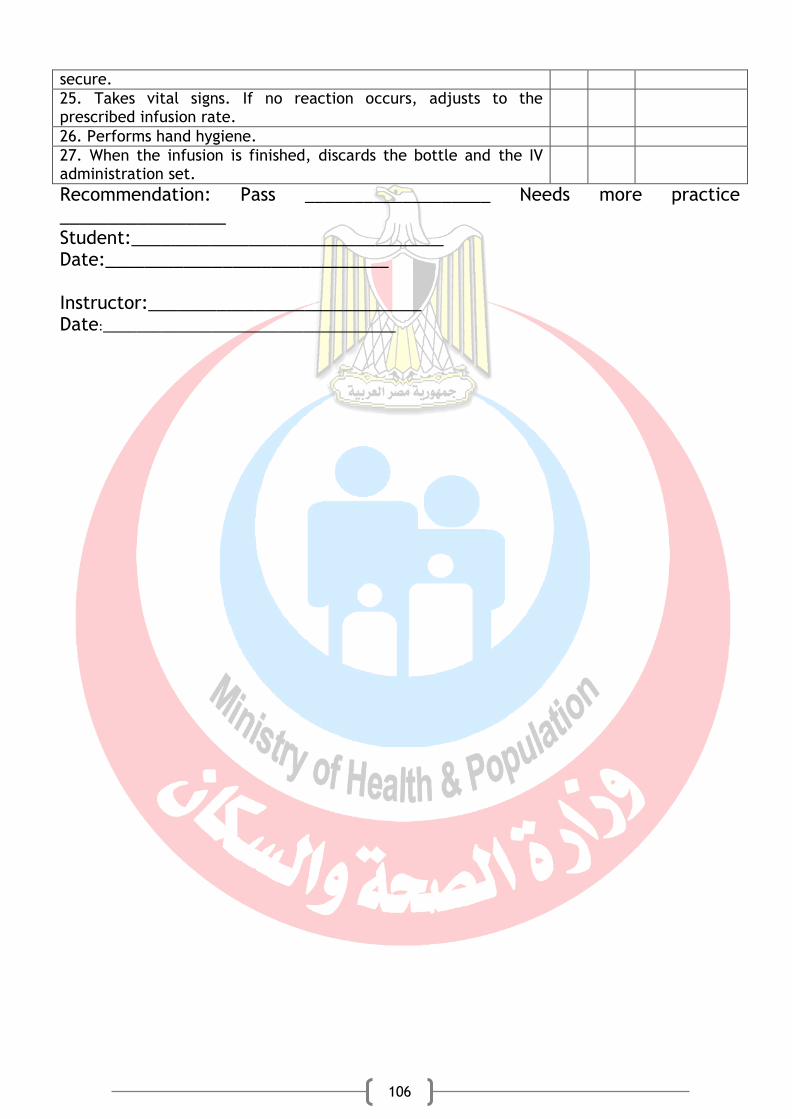
106
secure.
25. Takes vital signs. If no reaction occurs, adjusts to the prescribed infusion rate.
26. Performs hand hygiene.
27. When the infusion is finished, discards the bottle and the IV administration set.
Recommendation: Pass ___________________ Needs more practice _________________ Student:________________________________ Date:_____________________________ Instructor:____________________________ Date:___________________________________
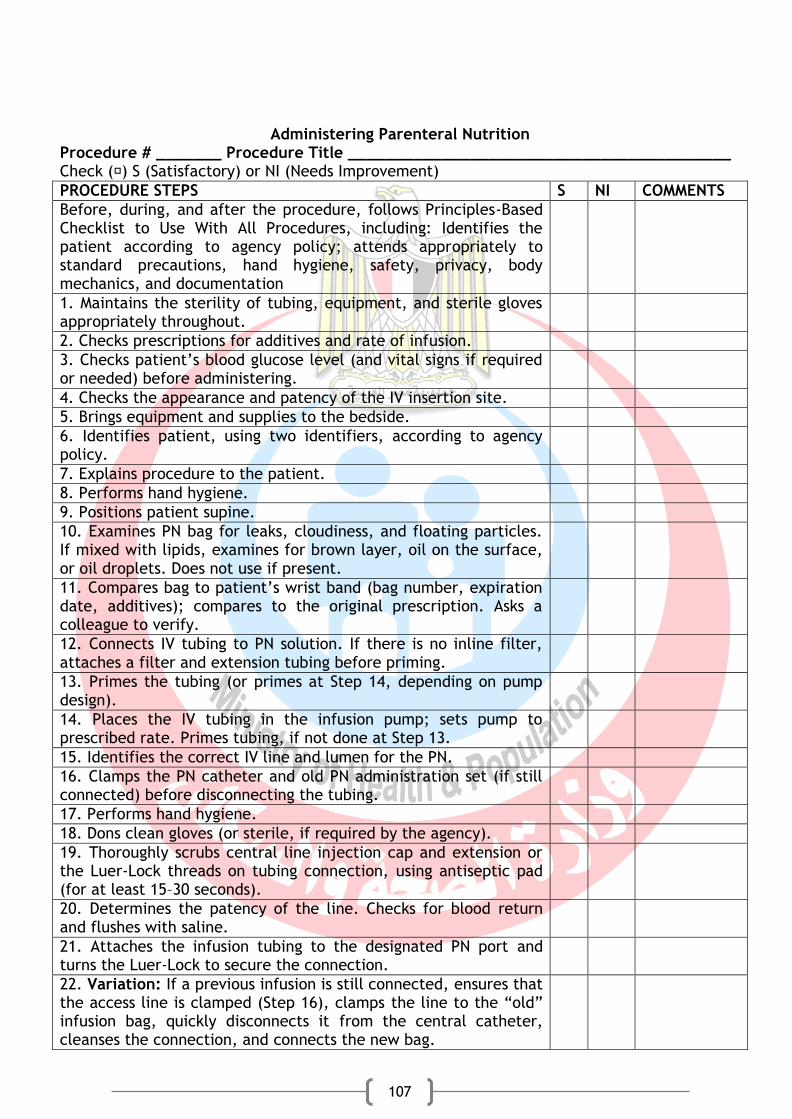
107
Administering Parenteral Nutrition Procedure # _______ Procedure Title _________________________________________ Check (�) S (Satisfactory) or NI (Needs Improvement)
PROCEDURE STEPS S NI COMMENTS
Before, during, and after the procedure, follows Principles-Based Checklist to Use With All Procedures, including: Identifies the patient according to agency policy; attends appropriately to standard precautions, hand hygiene, safety, privacy, body mechanics, and documentation
1. Maintains the sterility of tubing, equipment, and sterile gloves appropriately throughout.
2. Checks prescriptions for additives and rate of infusion.
3. Checks patient’s blood glucose level (and vital signs if required or needed) before administering.
4. Checks the appearance and patency of the IV insertion site.
5. Brings equipment and supplies to the bedside.
6. Identifies patient, using two identifiers, according to agency policy.
7. Explains procedure to the patient.
8. Performs hand hygiene.
9. Positions patient supine.
10. Examines PN bag for leaks, cloudiness, and floating particles. If mixed with lipids, examines for brown layer, oil on the surface, or oil droplets. Does not use if present.
11. Compares bag to patient’s wrist band (bag number, expiration date, additives); compares to the original prescription. Asks a colleague to verify.
12. Connects IV tubing to PN solution. If there is no inline filter, attaches a filter and extension tubing before priming.
13. Primes the tubing (or primes at Step 14, depending on pump design).
14. Places the IV tubing in the infusion pump; sets pump to prescribed rate. Primes tubing, if not done at Step 13.
15. Identifies the correct IV line and lumen for the PN.
16. Clamps the PN catheter and old PN administration set (if still connected) before disconnecting the tubing.
17. Performs hand hygiene.
18. Dons clean gloves (or sterile, if required by the agency).
19. Thoroughly scrubs central line injection cap and extension or the Luer-Lock threads on tubing connection, using antiseptic pad (for at least 15–30 seconds).
20. Determines the patency of the line. Checks for blood return and flushes with saline.
21. Attaches the infusion tubing to the designated PN port and turns the Luer-Lock to secure the connection.
22. Variation: If a previous infusion is still connected, ensures that the access line is clamped (Step 16), clamps the line to the “old” infusion bag, quickly disconnects it from the central catheter, cleanses the connection, and connects the new bag.
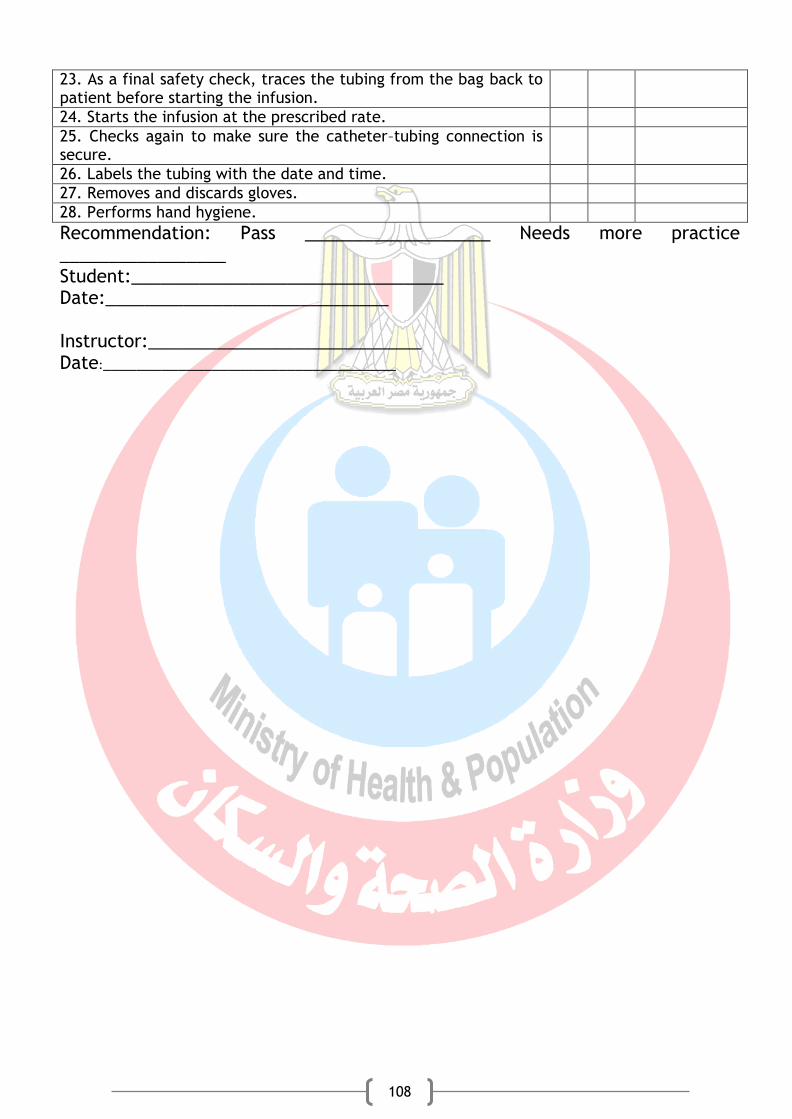
108
23. As a final safety check, traces the tubing from the bag back to patient before starting the infusion.
24. Starts the infusion at the prescribed rate.
25. Checks again to make sure the catheter–tubing connection is secure.
26. Labels the tubing with the date and time.
27. Removes and discards gloves.
28. Performs hand hygiene.
Recommendation: Pass ___________________ Needs more practice _________________ Student:________________________________ Date:_____________________________ Instructor:____________________________ Date:___________________________________

109
Checking Fingerstick (Capillary) Blood Glucose Levels Procedure # _______ Procedure Title _________________________________________ Check (�) S (Satisfactory) or NI (Needs Improvement)
PROCEDURE STEPS S NI COMMENTS
Before, during, and after the procedure, follows Principles-Based Checklist to Use With All Procedures, including: Identifies the patient according to agency policy; attends appropriately to standard precautions, hand hygiene, safety, privacy, body mechanics, and documentation
1. Verifies medical prescription for frequency and timing of testing.
2. Instructs patient to wash her hands with soap and warm water, if she is able. Lets dry completely.
3. Turns on the glucose meter. Calibrates according to the manufacturer’s instructions.
4. Checks the expiration date on the container of reagent strips and that it is the correct type for the monitor.
5. Dons procedure gloves.
6. Removes the reagent strip from container; tightly seals the container.
7. Places reagent strip into the glucose meter.
8. Selects a puncture site on the lateral aspect of a finger (heel or great toe for an infant) and cleans the site with soap and water (or according to facility policy), if the patient was not able to do so. Lets dry completely.
9. Uses a different site each time glucose is checked.
10. Positions the finger in a dependent position and massages toward the fingertip.
11. For infants, older adults, and people with poor circulation, places a warm cloth on the site for about 10 minutes before obtaining the blood sample.
12. Performs fingerstick: a. Engages the sterile injector and removes the cover.
b. Places a disposable lancet firmly in the end of injector.
c. Places the back of the hand on the table, or otherwise secures the finger so it does not move when pricked.
d. Positions the injector firmly against the skin, perpendicular to the puncture site. Pushes the release switch, allowing the needle to pierce the skin.
e. If there is no injector, uses a darting motion to prick the site with the lancet.
13. Lightly squeezes patient’s finger above the puncture site until a droplet of blood has collected.
14. Places a reagent strip test patch close to the drop of blood. Allows contact between the drop of blood and the test patch until blood covers the entire patch. Does not “smear” the blood over the reagent strip.
15. Inserts the reagent strip into the glucose meter, if not already inserted. (Follows manufacturer’s instructions.)
16. Allows the blood sample to remain in contact with the reagent strip for the amount of time specified by the manufacturer.
17. Using a gauze pad, gently applies pressure to the puncture

110
site.
18. After the meter signals, reads the blood glucose level indicated on the digital display.
19. Turns off the meter and disposes of the reagent strip, cotton ball, gauze pad, paper towel, alcohol pad, and lancet in the proper containers.
20. Removes the procedure gloves and disposes of them in the proper container.
Recommendation: Pass ___________________ Needs more practice _________________ Student:________________________________ Date:_____________________________ Instructor:____________________________ Date:___________________________________
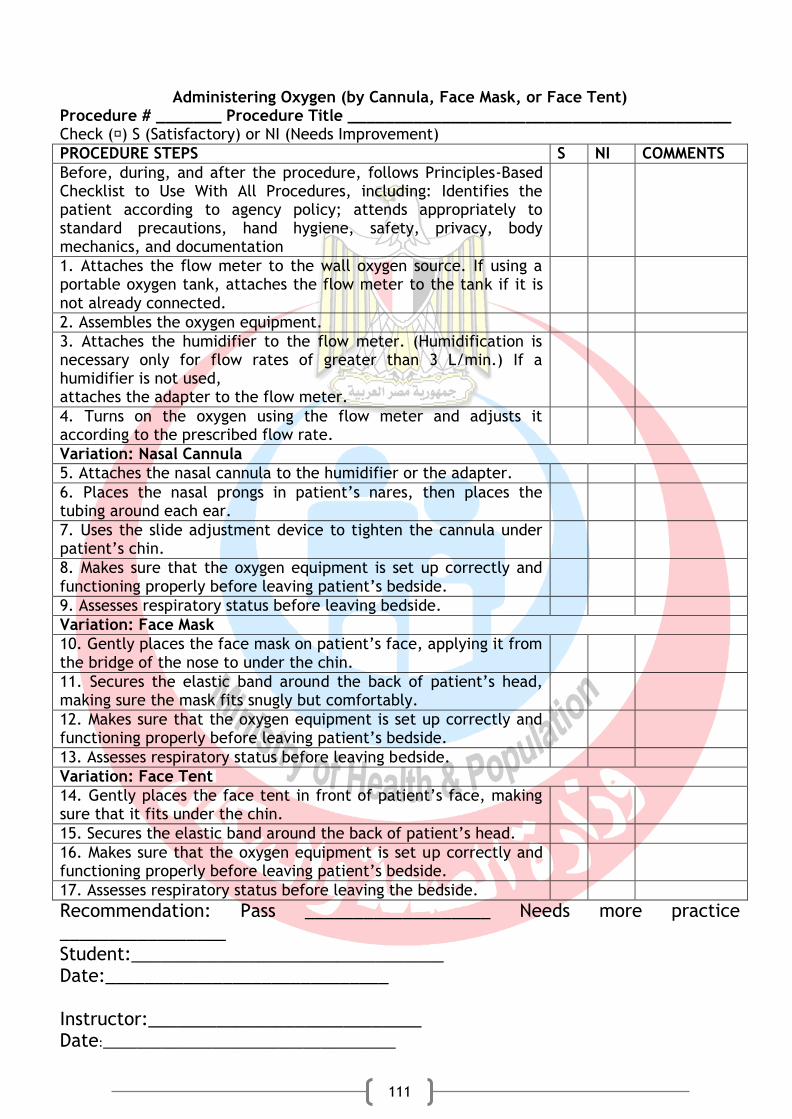
111
Administering Oxygen (by Cannula, Face Mask, or Face Tent)
Procedure # _______ Procedure Title _________________________________________ Check (�) S (Satisfactory) or NI (Needs Improvement)
PROCEDURE STEPS S NI COMMENTS
Before, during, and after the procedure, follows Principles-Based Checklist to Use With All Procedures, including: Identifies the patient according to agency policy; attends appropriately to standard precautions, hand hygiene, safety, privacy, body mechanics, and documentation
1. Attaches the flow meter to the wall oxygen source. If using a portable oxygen tank, attaches the flow meter to the tank if it is not already connected.
2. Assembles the oxygen equipment.
3. Attaches the humidifier to the flow meter. (Humidification is necessary only for flow rates of greater than 3 L/min.) If a humidifier is not used, attaches the adapter to the flow meter.
4. Turns on the oxygen using the flow meter and adjusts it according to the prescribed flow rate.
Variation: Nasal Cannula
5. Attaches the nasal cannula to the humidifier or the adapter.
6. Places the nasal prongs in patient’s nares, then places the tubing around each ear.
7. Uses the slide adjustment device to tighten the cannula under patient’s chin.
8. Makes sure that the oxygen equipment is set up correctly and functioning properly before leaving patient’s bedside.
9. Assesses respiratory status before leaving bedside.
Variation: Face Mask
10. Gently places the face mask on patient’s face, applying it from the bridge of the nose to under the chin.
11. Secures the elastic band around the back of patient’s head, making sure the mask fits snugly but comfortably.
12. Makes sure that the oxygen equipment is set up correctly and functioning properly before leaving patient’s bedside.
13. Assesses respiratory status before leaving bedside.
Variation: Face Tent
14. Gently places the face tent in front of patient’s face, making sure that it fits under the chin.
15. Secures the elastic band around the back of patient’s head.
16. Makes sure that the oxygen equipment is set up correctly and functioning properly before leaving patient’s bedside.
17. Assesses respiratory status before leaving the bedside.
Recommendation: Pass ___________________ Needs more practice _________________ Student:________________________________ Date:_____________________________ Instructor:____________________________ Date:___________________________________
112
Booker, K. J., (2015):Critical care nursing: monitoring and treatment for advanced nursing practice. WILEY Blackwell. USA Morton, P. G., and Fontaine, D. K., (2013): Essential of critical care nursing: A holistic approach. Wolters Kluwer. New York Chulay, M., and Burns, S. M., (2006): AACN Essentails of critical care nursing. MacGrow Hill. New York Webb, A., Angus, D., Finfer, S., Gattinioni, L., and Singer, M., (2016): Oxford textbook of critical care. 2nd ed., Oxford University press Hall, J. B., Schmidt, G. A., and Kress, J. P., (2015): Principles of critical care. 4th ed. MacGrow Hill. New York Urden, L. D., Stacy, K. M., Loung, M. E.,(2010): Critical care nursing: diagnosis and management. 7th ed., Elsevier. Canada
.Book Coordinator ; Mostafa Fathallah
General Directorate of Technical Education for Health
References