basic electronics - veer surendra sai university of...
TRANSCRIPT

BASIC ELECTRONICS
UNIT-1 (10 Hours) Introduction to Electronics: Signals, frequency Spectrum of Signals, Analog and Digital Signals, Linear Wave Shaping Circuits: RC LPF, Integrator, RC HPF, Differentiator. Properties of Semiconductors: Intrinsic, Extrinsic Semiconductors, Current Flow in Semiconductors, Diodes: p-n junction theory, Current-Voltage characteristics, Analysis of Diode circuits, Rectifiers, Clippers, Clampers, Special diodes UNIT-II (14 Hours) Bipolar junction Transistor (BJTs): Physical Structures & Modes of Operation, Transistor Characteristics, DC analysis, Introduction to Small Signal Analysis, Transistor as an amplifier, The RC coupled amplifier, Introduction to Power Amplifiers, Transistor as switch. Field Effect Transistors (FETs): Physical Structures & Modes of Operation of MOSFETs, MOSFET Characteristics, DC Analysis. Feedback Amplifiers & Oscillators: General Principles, Different types of feedback amplifier (block diagram only), Properties of Negative Feedback, Barkhausen criteria for Oscillation. Operational Amplifiers (OP-Amps): Ideal OP-AMP, Inverting Amplifier, Non-Inverting Amplifier. Adder, Subtractor, Integrator, Differentiator. UNIT-III (10 Hours) Digital Fundamentals: Binary Numbers, Signed-binary numbers, Decimal-to-Binary & Binary-to-Decimal Conversion, Binary Addition, Subtraction, Multiplication and Division, Hexadecimal Number Systems, Logic Gates, Boolean Algebra, De Morgan’s Theorems, Laws of Boolean Algebra, Basics of Flip flops, Shift Resistors, Counters. UNIT-IV (10 Hours) Introduction to Electronic Instruments: CRO, Multimeter, Signal Generators. Principles of Communication: Fundamentals of AM & FM, Transmitters & Receivers TEXT BOOKS: 1. Microelectronics Circuits, A.S Sedra, K.C. Smith, Oxford University Press. Selected portions from chapters 1to 5, 8, 13. 2. Electronics Fundamentals and Applications, D Chattopadhyay and P.C. Rakshit, NewAge International Publications. Selected portions from chapters 4 to 14, 16 to 20. REFERENCE BOOKS: 1. Integrated Electronics, Millman and Halkias, Mc.Graw Hill Publications. 2. Electronic Devices & Circuit Theory, R.L Boylestad and L. Nashelsky, Pearson Education

MODULE-I
INTRODUCTION TO ELECTRONICS: Electronics is the branch of science and engineering dealing with the theoty and use of a class of devices in which electrons are transported through a vacuum, gas or semiconductor. Signals: It contains information about a variety of things and activities. Example - Voice of the radio announcer, weather information Analog Signal: The signal magnitude can be represented at any instant of time by a sequence of numbers. Discrete Signal: It is a sequence of numbers that represent the magnitudes of the successive signal samples. Digital Signal: Signal is in the form of 0 and 1.
Frequency Spectrum of Signal: Any arbitrary signal is characterized by its frequency spectrum. The signal is represented in frequency domain. Fourier series: It is an expansion of periodic signal as a linear combination of sine and cosine with different frequencies and amplitudes. It is applied to periodic signals. Fourier transform: Fourier transform can be applied to aperiodic signals to find the frequency spectrum.

Low Pass Filter:
• Filter that passes low frequency components of a signal but rejects the high frequency components of a signal is called as low pass filter.
• Filters designed with passive components (Resistor, capacitor, inductor) are called as passive filters.
Behaviour of capacitor to frequency can be described as follows For f=0 (Low frequency) capacitive reactance of capacitor Xc= fCI
Vπ21
= =∞, So it
acts as a open circuit For f=∞ (High Frequency) capacitive reactance of capacitor Xc= fCI
Vπ21
= =0So it
acts as a short circuit Operation
For low frequency since capacitor is open circuited, current flowing in the circuit is zero. So the output voltage vout= vin For high frequency since capacitor is short circuited, the output voltage across a short is zero So the output voltage vout= 0 The frequency response curve can be shown as below

Calculation of cutoff frequency: vout=
C
C
XRX+
vin
outv = 22 C
C
XRX+
inv
If R=Xc
Vout= 2
1 vin=0.707 vin
At the frequency of which R=Xc, the output will be 70.7% of the input.
Xc=R=fCπ21
Cutoff frequency fc= RCπ21
LPF as Integrator: • Output voltage (current) is directly proportional to the integration of the input
voltage(current) • The time constant RC of the circuit should be very large as compared to the time
period of the input wave. • The value of R should be 10 or more times larger than Xc.
For high frequencies the capacitor has insufficient to charge up, its voltage is small. So the voltage across the resistor is approximately equal to the input voltage. vin=VR
i=Rv
RV inR
=
The charge q on the capacitor at any instant is q= ∫ idt
output voltage vout= vc= dtvRCC
idtCq
in∫∫ ==
1
High Pass Filter: • Filter that blocks low frequency components of a signal but passes the high
frequency components of a signal is called as high pass filter. • Filters designed with passive components (resistor, capacitor, inductor) are called
as passive filters.

Operation
For low frequency Since capacitor is open circuited, current flowing in the circuit is zero. So the output voltage vout= VR=0 For high frequency since capacitor is short circuited, So the output voltage vout= VR= vin The frequency response curve can be shown as below
Calculation of cutoff frequency:
vout= CXR
R+
vin
outv =22 C
C
XRX+
inv
If R=Xc
Vout=2
1 vin=0.707 vin
At the frequency of which R=Xc, the output will be 70.7% of the input. Xc=R=
fCπ21
Cutoff frequency fc= RCπ21
HPF as Differentiator:
• Output voltage (current) is directly proportional to the differentiation of the input voltage(current)
• The time constant RC of the circuit should be very small as compared to the time period of the input wave.
• The value of R should be 10 or more times smaller than Xc. For high frequencies the capacitor has enough time to charge up. So the voltage across the capacitor is approximately equal to the input voltage. vin= vc

The charge q on the capacitor at any instant is q=C vc
output voltage vout=iR=dtdq
R=CRdt
dvC = CRdtdvi
Semiconductor: • Conductivity lies between conductor and insulator. • Forbidden energy gap 0.2-2.5eV. • At 0K a pure semiconductor behaves as an insulator. • Semiconductor materials show a reduction in resistance with increase in
temperature. So said to have a negative temperature coefficient. Intrinsic Semiconductor:
• Semiconductor refined to reduce the number of impurities to a very low level. e.g : Semiconductor in pure form
• Group-IV elements. Si, Ge, Extrinsic Semiconductor:
• To increase the conductivity, impurities also called dopant (Group III or V) are added to the pure semiconductor material and is called extrinsic Semiconductor (n-type or p-type). The process is called doping.
• N-type Semiconductor- Pentavalent (As,Sb,P) atom is added to pure semiconductor. Diffused impurities with five valence electrons are called donor atoms.
• P-type Semiconductor- Trivalent (Al,B,Ga) atom is added to pure semiconductor. Diffused impurities with three valence electrons are called acceptor atoms.

• Holes are the majority carrier in p-type semiconductor and electrons are minority carrier. In n-type semiconductor electrons are the majority carrier and holes are the minority carrier. Diode:
• Solid state device created by joining the p-type and n-type material is called as semiconductor diode. No Bias (V=0)
• Absence of external voltage across the p-n junction is called the unbiased diode.
Because of the density gradient electrons and holes diffuse and they combine leaving the ions unneutralised and are called uncovered charges.
• The uncovered charges generate an electric field directed from n-side to p-side called as barrier field which opposes the diffusion process further.
• Since the vicinity of the junction is depleted of mobile charges. Hence called a as depletion region.

Reverse Bias (VD<0V)
• Positive polarity of the external bias VD is connected to n-type and negative terminal is connected to p-type.
• The number of uncovered positive and negative ions will increase in the depletion region causing widening the depletion region which creates a great barrier for the majority carrier to overcome, effectively reducing the majority carrier flow to zero and hence the current due to majority carrier Imajority=0
• The minority carriers which travels down the potential barrier remain unaffected and give a small current called the reverse saturation current denoted as Is.
Forward Bias (VD>0V)
• Positive polarity of the external bias VD is connected to p-type and negative terminal is connected to n-type.
• External bias VD exerts a force on the mobile carriers to move them towards the junction. At the boundary they recombine with the ions and reduce the width of the depletion region.
• The depletion region will continue to decrease in width as the voltage is increased further and a heavy flood of electrons will move from n-side to p-side giving the Imajority an exponential rise from p-side to n-side,
• The minority carrier flow will not be affected by this because the conduction level is determined by the limited number of impurities in the material and the current is

denoted by Is. The total current is given by
ID=IForward+IReverse
=Imajority - Iminority (Direction opposite) In terms of reverse saturation current, ID can be written as
ID=Isexp(KTeV
η)-Is is called the Shockley’s equation.
Where e- Charge of an electron K-Blotzman’s Conatant T-Temperature in Kelvin η- Quality factor depends upon the diode material (η=2 for Si and 1 for Ge) V- Supplied voltage across the junction
Breakdown Condition: (a) Zener Breakdown
• Too much of reverse bias across a p-n junction exert a strong force on a bound electron to tear it out from the covalent bond. Thus a large number of electron and hole pair will be generated through a direct rupture of the covalent bonds and they increase the reverse current and gives sharp increase in the characteristics. It is called zener breakdown. Diode employing the unique portion of the characteristics of a p-n junction is called zener diode.
• Maximum reverse voltage potential that can be applied before entering the zener region is called the peak inverse voltage (PIV) or peak reverse voltage (PRV).

(b) Avalanche Breakdown:
• With increasing reverse bias voltage, the electric field across the junction of a diode increases. At a certain value of the reverse voltage, the electric field imparts a sufficiently high energy to a thermally generated carrier. The carrier on colliding with an ion on its way disrupts a covalent bond and gives a new hole electron pair. This process is cumulative and gives an avalanche of carriers in a very short time. It is called avalanche multiplication.
Diode equivalent Circuit:
• Equivalent circuit is a combination of element properly chosen to best represent the actual terminal characteristics of a device or system in a particular operating point.
Ideal diode in forward and reverse biased condition is as follows

Diode Resistance levels: • According to the applied signal the resistance levels in a diode has
following type 1. DC or Static (DC signal) 2. AC or Dynamic(Small AC signal) 3. Average ac( Large AC signal)

CLIPPER
It controls the shape of the output waveform by removing or clipping a portion of the applied wave. Half wave rectifier is the simplest example.It is also referred as voltage limiters/ amplitude selectors/ slicers. Applications:
• In radio receivers for communication circuits. • In radars, digital computers and other electronic systems. • Generation for different waveforms such as trapezoidal, or squarewaves.
Helps in processing the picture signals in television transmitters. • In television receivers for separating the synchronizing signals from
composite picture signals
Types of Clipper Circuit
1. Series- Diode is in series with the source 2. Parallel- Diode is in parallel with the source.
• Clipper circuit which uses a DC battery is called a biased clipper.
SERIES CLIPPER: Assumption- diode is ideal in characteristics Analysis +ve Half Cycle: Diode is on because of forward biasing condition. Since no voltage drop across the diode the output voltage becomes VO=VR=Vi -ve Half Cycle: Diode is off because of reverse biasing condition. Since no current flows through the circuit the output voltage VO=0. Figure shows the output waveform of a simple series clipper with input as square and triangular waveform. Since the negative half cycle is clipped off in the output it is called as a negative clipper circuit.

Biased Series Clipper: Assumption- diode is ideal in characteristics Analysis Since the diode is on because of the 5v battery The transition of the diode from one state to another can be found out to be atVi=-5v above which the diode is ON and below which the diode is OFF. +ve Half Cycle: Since the diode is on the output voltage will be (Applying KVL) Vi+5=VR VO= Vi+5 -ve Half Cycle: Since the diode is off VO=0. Figure Shows the input and output waveform. Example of Other Series Clipper Circuits:

PARALLEL CLIPPER: Assumption- diode is ideal in characteristics Analysis +ve Half Cycle: Diode is on because of forward biasing condition. Since no voltage drop across the diode the output voltage becomes VO=Vd=0 -ve Half Cycle: Diode is off because of reverse biasing condition. Since no current flows through the circuit the output voltage VO=Vi. Figure shows the output waveform of a simple parallel clipper with input as square and triangular waveform. Since the positive half cycle is clipped off in the output it is called as a positive clipper circuit. Biased parallel Clipper: Assumption- diode is ideal in characteristics Analysis The transition of the diode from one state to another can be found out to be atVi=4v above which the diode is OFFand below which the diode is ON. +ve Half Cycle: Since the diode is OFF (above 4v) the output voltage will be (Applying KVL) Vi= VO -ve Half Cycle: Since the diode is ON (below 4v) VO=4v. Figure Shows the input and output waveform.

Example of Other Parallel Clipper Circuits:
CLAMPERS:
• A diode and capacitor can be combined to “clamp” an AC signal to a specific DC level.
• It must have a capacitor, a diode and a resistive element. • For additional shift an independent DC supply can be introduced in the circuit. • The time constant τ=RC must be large enough to ensure that the voltage across
the capacitor does not discharge significantly during the diode is nonconducting. Procedure to analyze a clamper circuit
1. Consider the part of the input signal that will forward bias the diode.
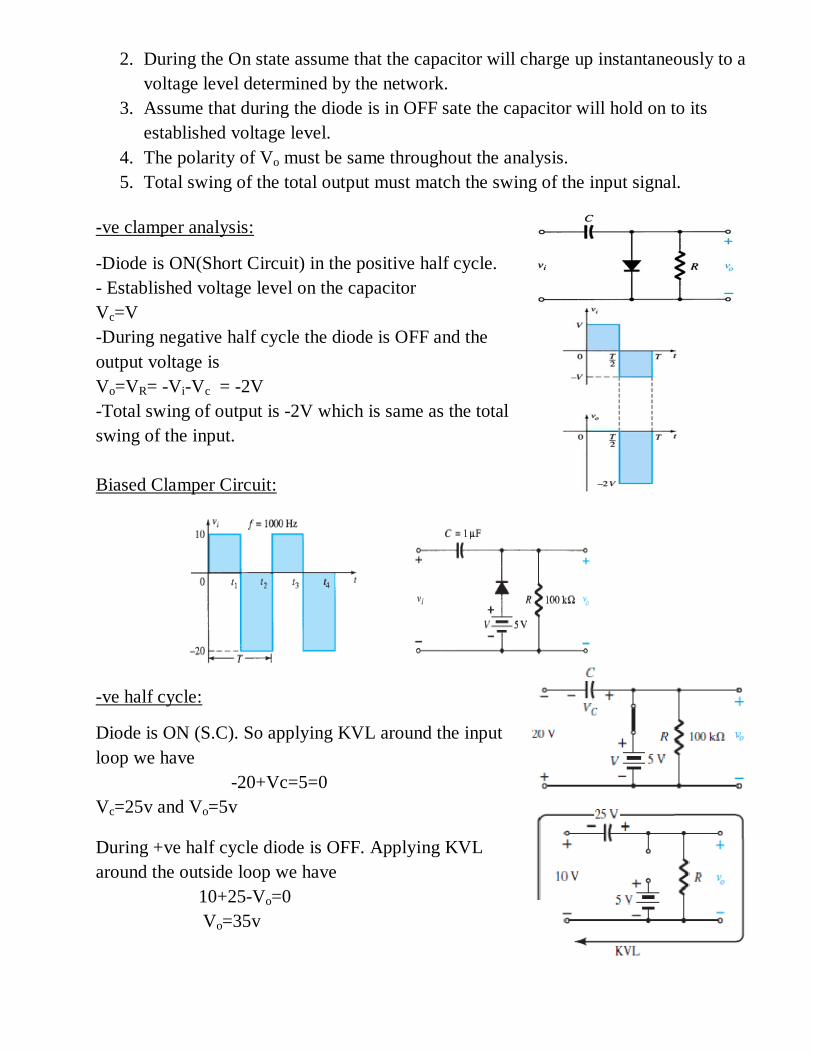
2. During the On state assume that the capacitor will charge up instantaneously to a voltage level determined by the network.
3. Assume that during the diode is in OFF sate the capacitor will hold on to its established voltage level.
4. The polarity of Vo must be same throughout the analysis. 5. Total swing of the total output must match the swing of the input signal.
-ve clamper analysis: -Diode is ON(Short Circuit) in the positive half cycle. - Established voltage level on the capacitor Vc=V
-During negative half cycle the diode is OFF and the output voltage is Vo=VR= -Vi-Vc = -2V -Total swing of output is -2V which is same as the total swing of the input. Biased Clamper Circuit: -ve half cycle: Diode is ON (S.C). So applying KVL around the input loop we have -20+Vc=5=0 Vc=25v and Vo=5v During +ve half cycle diode is OFF. Applying KVL around the outside loop we have 10+25-Vo=0 Vo=35v

Summary of the Clamper Circuit:
RECTIFIERS An important application of “regular” diodes is in rectification circuits. These circuits are used to convert AC signals to DC in power supplies. A block diagram of this process in a DC power supply is shown below.

Half-Wave Rectifier: The above circuit is called as a Half-wave rectifier since it will generate a waveform vothat will have an average value of particular use in the ac-to-dc conversion process. During 0-�
� (Positive Half Cycle) the diode is ON. Assuming an ideal diode with no
voltage drop across it the output voltage vo will be vo= VR=Vm During �
� -T(Negative Half Cycle) the diode is OFF(Open Circuit). So the current flowing
through the circuit will be 0. The output voltage vo will be vo= VR=i x R = 0 Figure shows the input and output waveform with output Vdc=0.318Vm.

Disadvantage: 1. The ac supply delivers power only half the time. 2. Pulsating current frequency is equal to the supply frequency.
Full wave Rectifier: The full wave rectifier utilizes both the positive and negative portions of the input waveform. Types of full wave rectifier are
(a) Centre tapped configuration (b) Bridge configuration
Centre tapped configuration:
• Current flows through the load resistance in the same direction during the full cycle of the input signal.
• Centre tap transformer is used with the secondary winding.
+ve Half Cycle: • Diode D1 is short circuited and D2 is open circuited. Current flows through the
upper half of the secondary winding.

-ve Half Cycle: • Diode D2 is short circuited and D1 is open circuited. Current flows through
the lower half of the secondary winding.
Complete input and output waveform can be shown as
While this full-cycle rectifier is a big improvement over the half-cycle, there are some disadvantages. Disadvantages:
• It is difficult to locate the centre tap on the secondary winging. • The diodes must have high PIV.
BridgeRectifier: The bridge rectifier uses four diodes connected in bridge pattern.

The operation ofthe bridge rectifier can be summarized as: +ve Half Cycle:
• Diode D1 and D3 are short circuited and D2 and D4 are open circuited. Current flows through D1 and D3 to give the output voltage across the resistor.
-ve Half Cycle: • Diode D1 and D3 are open circuited and D2 and D4 are short circuited.
Current flows through D2 and D4 to give the output voltage across the resistor.
Complete input and output waveform can be shown as Advantages:
• No centre tapped transformer is required. • PIV is less.
Disadvantages: • It requires four diode and the power loss in the rectifier element is more.

MODULE-II
TRANSISTOR:
1. Bipolar Junction Transistor (BJT) 2. Field Effect Transistor (FET)
Bipolar Junction Transistor (BJT):
• pnp-- n-type semiconductor is sandwiched between two p-type semiconductor. • npn-- p-type semiconductor is sandwiched between two n-type semiconductor. • It has three terminal naming E-Emitter, B-Base and C-Collector. • Both electron and hole responsible for the current conduction. So called bipolar junction
transistor. • Doping wise-Emitter>Collector>Base • Two Junctions- JEB (Junction emitter base) and JCB (Junction collector base).
Transistor Operation:
• JEB is forward biased by the battery VEE by which the depletion region will decrease and a majority carrier flow will occur from emitter to base giving current Imajority or IE.
• JCB is reverse biased by the battery VCC by which the depletion region will increase and a minority carrier flow will occur from base to collector giving current Iminority.
• When both the battery supplies are given simultaneously the holes in the base region due to the battery VEE will act as minority carrier. They will cross the base region to reach the collector giving the current IC. So the current equations of BJT can be written as IE= IC+ IB IC= Imajority+ Iminority IC =α IE+ ICO Where α is defined as the fraction of the total emitter current that represents holes which have travelled from emitter across the base to the collector and ICO is called as leakage current.

• Depending upon the common terminal between input and output circuit of a transistor it may be operated in 3 modes of a BJT (a) Common Base (b) Common Emitter (c) Common Collector
Common Base:
• Depending upon the biasing of the JEB and JCB, transistor has three region of operation.
Input Characteristics: The plot of the input current against the input voltage with the output voltage as a parameter for a particular region of operation (Active).
• Graph is plotted between input voltage VBE and current IE keeping output voltage VCB as a parameter.
• The current variation with the emitter to base voltage is similar to the forward characteristics of a p-n junction diode. However an increase in the magnitude of the collector to base voltage causes the emitter current to increase for a fixed VBE because of the early effect or base width modulation.
Output Characteristics: The plot of the output current against the output voltage with the input current as a parameter.
• Graph is plotted between output voltage VCB and output current IC keeping input current IE as a parameter.
JEB JCB Region of operation
Application
Forward Bias Forward Bias Saturation ON Switch
Forward Bias Reverse Bias Active Amplifier
Reverse Bias Reverse Bias Cutoff OFF Switch

• Active Region: In this region JEB is forward biased and JCB is reverse biased. The collector current is independent of VCB. It depends only on the emitter current IE. IC= Imajority+ Iminority IC =α IE+ ICBO Where ICBO (also noted as ICO) is the leakage current called as collector to base leakage current when emitter is open. Since this current is very small in magnitude IC≈ IE.
• Cut off Region: Here both the junctions are reverse biased. The region below IE=0 characteristic is called as cut off region. In this region IC= ICBO and in the range of nano amperes.
• Saturation Region: Here both the junctions are forward biased. The region is to the left of the graph where VCB is slightly positive and IE=0.It gives an exponential variation in the collector current.JCB is forward biased means collector is positive with respect to base. It gives rise to a hole current flowing from collector to base and is opposite to the original flow due to the transistor action. Output resistance of CB is very high because a very large change in collector voltage cases a very small change in collector current.
CB Current Amplification Factor:
It is the ratio of output collector current to the input emitter current.
DC current gain E
Cdc
II
=α α≈1 (Practically 0.9 to 0.998)
AC current gain E
Cac
II
∆∆
=α with VCB constant
Common Emitter:
Here emitter terminal is common between the base and the collector.

Input Characteristics:
• Graph is plotted between input voltage VBE and input current IB keeping output voltage VCE as a parameter.
• Characteristics are similar to that of a forward biased diode. For a constant VBE the magnitude of the base current decreases. With increasing VCE. This is because increasing VCE the effective base width and hence the recombination base current decreases.
Output Characteristics:
• Graph is plotted between output voltage VCE and output current IC keeping input current IB as a parameter.
• Active Region: In this region JEB is forward biased and JCB is reverse biased. Output characteristics in the active region are not horizontal lines because for a fixed value of IB the magnitude of collector current increases with VCE due to early effect. IC =α IE+ ICBO (CB) = α( IE+ IE)+ ICBO
IC= α/(1- α) IB + ICBO/(1- α) IC= βIB + ICEO
Since the leakage current ICEO is very small IC ≈ βIB • Cut off Region:
Here both the junctions are reverse biased. The region below IB=0 characteristic is called as cut off region. In this region IC= ICEO (Collector to emitter leakage current with base open)
• Saturation Region: Here both the junctions are forward biased by at least the cutin voltage. The current IC is independent of IB.
CE Current Amplification Factor: It is the ratio of output collector current to the input baser current.
DC current gain B
Cdc
II
=β practically 50-400
AC current gain B
Cac
II
∆∆
=β with VCE constant

Relation between α and �:
BCE III += E
C
II
=α and B
C
II
=β
βαC
CC III
+= β
βα+
=1 α
αβ−
=1
DC Biasing:
Biasing is the application of external dc supply to establish a fixed level of current and voltage. Transistor operates only at a particular point of the characteristics called operating point or Q-point/ Quiescent point.
Types of Biasing
1. Fixed Bias Configuration 2. Fixed bias with emitter resistor 3. Voltage divider bias configuration 4. Collector feedback configuration
Fixed Bias Configuration:
It is the simplest transistor DC bias configuration using npn transistor. In the DC analysis capacitors are open circuited as shown in the figure.

Base Emitter Loop:
Applying KVL wehave
VCC-IBRB-VBE=0
IB= B
BECC
RVV −
Since VBE and VCC are constant, the selection of a base resistor RB sets the level of base current for the operating point.
Collector Emitter Loop:
IC= β IB
VCC-ICRC-VCE=0
VCE= VCC-ICRC
So RB controls IB and IC, and the level of RC determines the magnitude of VCE.
VCE= VC- VE VBE= VB- VE
Fixed Bias with emitter resistor Configuration: It contains an emitter resistor to improve the stability level over fixed bias.
Base Emitter Loop: Applying KVL wehave
VCC-IBRB-VBE- IERE =0

IB = EB
BECC
RRVV
)1( ++−
β
Collector Emitter Loop:
IC= β IB
VCC-ICRC-VCE- IERE =0
VCE= VCC-IC (RC+RE)
Voltage divider bias Configuration:
In the previous bias configurations the Q-points were dependent on β which is temperature sensitive. Voltage divide bias arrangement reduces the dependency ob β.
Exact Analysis:
The input side can be solved by Thevenin equivalent circuit.
For thevenin equivalent resistance the input dc source is short circuited.
RTH=21
21
RRRR
+
For thevenin equivalent voltage the source VCC is returned to the circuit and the voltage is given by
VTH=VR2=21
2
RRRVCC
+
The Thevenin equivalent circuit is redrawn and the IBQ can be found by applying KVL
VTH-IBRTH-VBE-IERE=0
IB=ETH
BETH
RRVV
)1( ++−β
By solving the output collector emitter loop by KVL
VCE= VCC-IC (RC+RE)
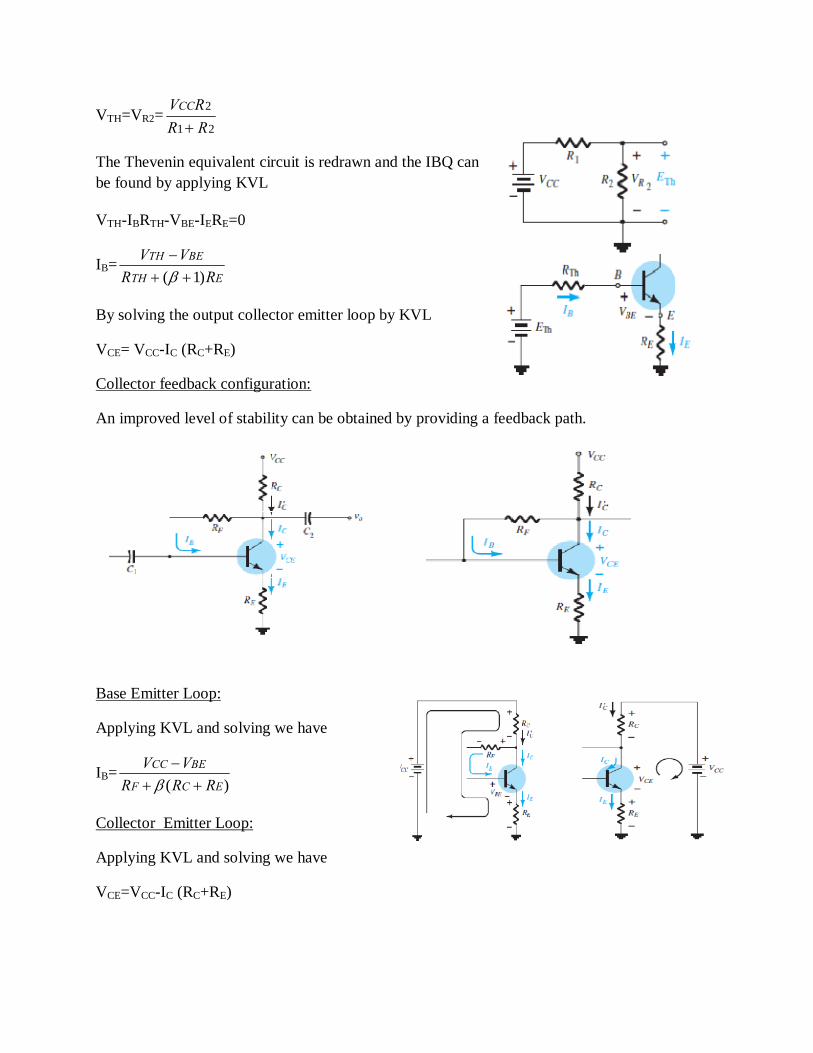
Collector feedback configuration:
An improved level of stability can be obtained by providing a feedback path.
Base Emitter Loop:
Applying KVL and solving we have
IB=)( ECF
BECC
RRRVV
++−
β
Collector Emitter Loop:
Applying KVL and solving we have
VCE=VCC-IC (RC+RE)
Field-Effect Transistors INTRODUCTION
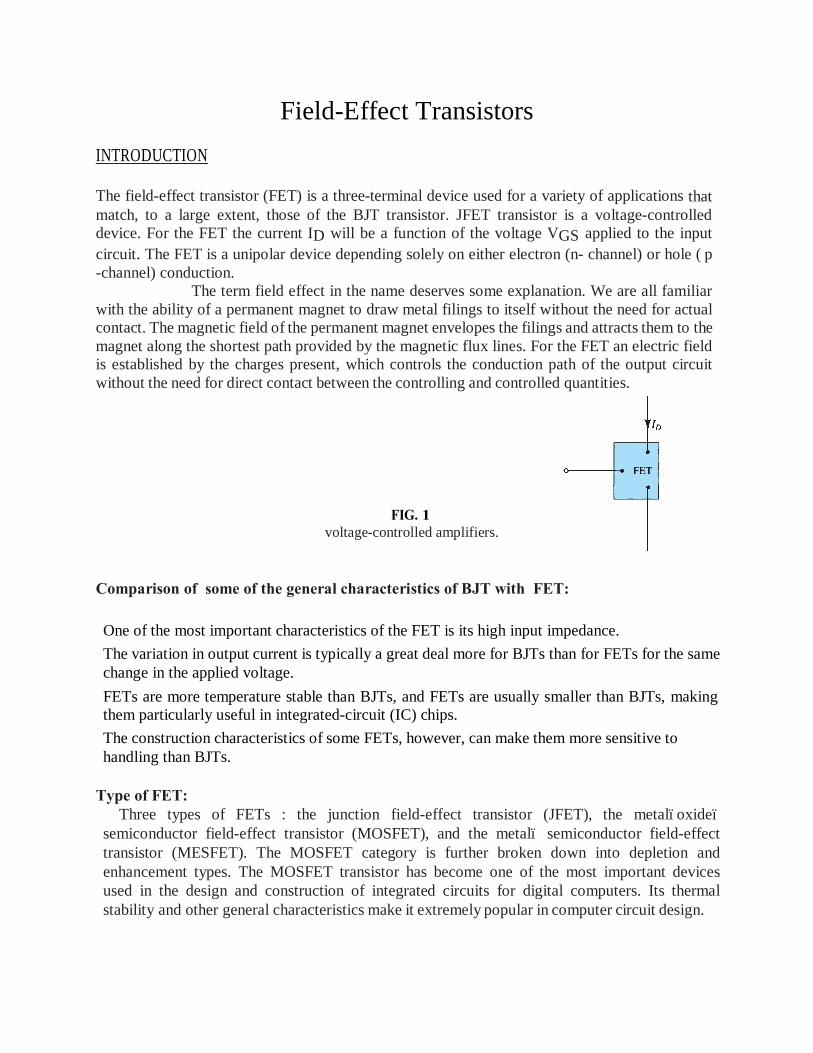
The field-effect transistor (FET) is a three-terminal device used for a variety of applications that match, to a large extent, those of the BJT transistor. JFET transistor is a voltage-controlled device. For the FET the current ID will be a function of the voltage VGS applied to the input circuit. The FET is a unipolar device depending solely on either electron (n- channel) or hole ( p -channel) conduction. The term field effect in the name deserves some explanation. We are all familiar with the ability of a permanent magnet to draw metal filings to itself without the need for actual contact. The magnetic field of the permanent magnet envelopes the filings and attracts them to the magnet along the shortest path provided by the magnetic flux lines. For the FET an electric field is established by the charges present, which controls the conduction path of the output circuit without the need for direct contact between the controlling and controlled quantities.
FIG. 1 voltage-controlled amplifiers.
Comparison of some of the general characteristics of BJT with FET:
One of the most important characteristics of the FET is its high input impedance. The variation in output current is typically a great deal more for BJTs than for FETs for the same change in the applied voltage. FETs are more temperature stable than BJTs, and FETs are usually smaller than BJTs, making them particularly useful in integrated-circuit (IC) chips. The construction characteristics of some FETs, however, can make them more sensitive to handling than BJTs.
Type of FET:
Three types of FETs : the junction field-effect transistor (JFET), the metal–oxide–semiconductor field-effect transistor (MOSFET), and the metal– semiconductor field-effect transistor (MESFET). The MOSFET category is further broken down into depletion and enhancement types. The MOSFET transistor has become one of the most important devices used in the design and construction of integrated circuits for digital computers. Its thermal stability and other general characteristics make it extremely popular in computer circuit design.

CONSTRUCTION AND CHARACTERISTICS OF JFETs
JFET is a three-terminal device with one terminal capable of controlling the current between the other two. The major part of the structure is the n-type material, which forms the channel between the embedded layers of p-type material. In the absence of any applied potentials the JFET has two p–n junctions under no-bias conditions. The result is a depletion region at each junction, as shown in Fig. 2 that resembles the same region of a diode under no-bias conditions.
FIG. 2 Junction field-effect transistor (JFET). VG = 0 V, VDS Some Positive Value A positive voltage VDS is applied across the channel and the gate is connected directly to the source to establish the condition VGS =0 V .Under the conditions the flow of charge is relatively uninhibited and is limited solely by the resistance of the n-channel between drain and source. The depletion region is wider near the top of both type materials. The current ID will establish the voltage levels through the channel as indicated on the figure. The result is that the upper region of the p-type material will be reverse-biased by about.
As the voltage VDS is increased from 0 V to a few volts, the current will increase as
determined by Ohm’s law and the plot of ID versus VDS.As VDS increases and approaches a level referred to as VP , the depletion regions will widen, causing a noticeable reduction in the channel width. The reduced path of conduction causes the resistance to increase. The more horizontal the curve, the higher the resistance, suggesting that the resistance is approaching “infinite” ohms in the horizontal region. If VDS is increased to a level where it appears that the two depletion regions would touch” , a condition referred to as pinch-off will result.

FIG 3 JFET at VGS = 0 V and VDS 7 0 V FIG 4 ID versus VDS for VGS = 0 V. As VDS is increased beyond VP, the region of close encounter between the two depletion regions increases in length long the channel, but the level of ID remains essentially the same. In essence, therefore, once VDS 7 VP the JFET has the characteristics of a current source. As shown in Fig. 5, the current is fixed at ID = IDSS, but the voltage VDS (for levels 7 VP) is determined by the applied load.
The choice of notation IDSS is derived from the fact that it is the drain-to-source current with a short circuit connection from gate to source.IDSS is the maximum drain current for a JFET and is defined by the conditions VGS =0 V and VDS>| VP |. VGS < 0 V The voltage from gate to source, denoted VGS, is the controlling voltage of the JFET. Curves of ID versus VDS for various levels of VGS can be developed for the JFET. For the n-channel device the controlling voltage VGS is made more and more negative from its VGS= 0 V level. The effect of the applied negative-bias VGS is to establish depletion regions similar to those obtained with VGS 0 V, but at lower levels of VDS. Therefore, the result of applying a negative bias to the gate is to reach the saturation level at a lower level of VDS, as shown in Fig. 6 for VGS = - 1 V. The resulting saturation level for ID has been reduced and in fact will continue to decrease as VGS is made more and more negative. Eventually, VGS when VGS = - VP will be sufficiently negative to establish a saturation level that is essentially 0 mA, and for all practical purposes the device has been “turned off.” In summary: The level of VGS that results in ID= 0 mA is defined by VGS =VP, with VP being a negative voltage for n-channel devices and a positive voltage for p-channel JFETs.
FIG.5 FIG. 6
Application of a negative voltage to the gate of a JFET. n-
Channel JFET characteristics with IDSS = 8 mA and VP = -4 V.

TRANSFER CHARACTERISTICS Derivation For the BJT transistor the output current and the input controlling current are related by beta, which was considered constant for the analysis to be performed. In equation form IC = f (IB) = βIB -(1) The squared term in the equation results in a nonlinear relationship between ID and VGS, producing a curve that grows exponentially with decreasing magnitude of VGS. -(2) The squared term in the equation results in a nonlinear relationship between ID and VGS, producing a curve that grows exponentially with decreasing magnitude of VGS. The transfer characteristics defined by Shockley’s equation are unaffected by the network in which the device is employed
FIG.7 Obtaining the transfer curve from the drain characteristics.
DEPLETION-TYPE MOSFET MOSFETs are further broken down into depletion type and enhancement type. The terms depletion and enhancement define their basic mode of operation; the name MOSFET stands for metal–oxide–semiconductor field-effect transistor Basic Construction: The basic construction of the n-channel depletion-type MOSFET is provided in Fig. A slab of p-type material is formed from a silicon base and is referred to as the substrate. It is the foundation on which the device is constructed. In some cases the substrate is internally connected to the source terminal. The gate is also connected to a metal contact surface but remains insulated from the n-channel by a very thin silicon dioxide (SiO2) layer. SiO2 is a type of insulator referred to as a dielectric, which sets up opposing (as indicated by the prefix di-) electric fields within the dielectric when exposed to an externally applied field.
2
1
−=
P
GSDSSD V
VII
CI BI

Basic Operation:
The gate-to-source voltage is set to 0 V by the direct connection from one terminal to the other, and a voltage VDD is applied across the drain-to-source terminals. The result is an attraction of the free electrons of the n-channel for the positive voltage at the drain. The result is a current similar to that flowing in the channel of the JFET. In fact, the resulting current with VGS 0 V continues to be labeled IDSS. VGS is set at a negative voltage such as -1 V. The negative potential at the gate will tend to pressure electrons toward the p-type substrate (like charges repel) and attract holes from the p-type substrate (opposite charges attract). Depending on the magnitude of the negative bias established by VGS, a level of recombination between electrons and holes will occur that will reduce the number of free electrons in the n-channel available for conduction. The more negative the bias, the higher is the rate of recombination. The resulting level of drain current is therefore reduced with increasing negative bias for VGS. ENHANCEMENT-TYPE MOSFET The characteristics of the enhancement-type MOSFET are quite different from depletion type MOSFET. Basic Construction: A slab of p-type material is formed from a silicon base and is again referred to as the substrate. As with the depletion-type MOSFET, the substrate is sometimes internally connected to the source terminal, whereas in other cases a fourth lead (labeled SS) is made available for external control of its potential level. The source and drain terminals are again connected through metallic contacts to n-doped regions, but note in Fig. the absence of a channel between the two n-doped regions. This is the primary difference between the construction of depletion-type and enhancement-type MOSFETs—the absence of a channel as a constructed component of the device. In summary, therefore, the construction of an enhancement-type MOSFET is quite similar to that of the depletion-type MOSFET, except for the absence of a channel between the drain and source terminals. Basic Operation:
If VGS is set at 0 V and a voltage applied between the drain and the source of the device of Fig, the absence of an n-channel (with its generous number of free carriers) will result in a current of effectively 0 A—quite different from the depletion-type MOSFET and JFET, where ID = IDSS. It is not sufficient to have a large accumulation of carriers (electrons) at the drain and the source (due to the n-doped regions) if a path fails to exist between the two. With VDS some positive voltage, VGS at 0 V, and terminal SS directly connected to the source, there are in fact two reverse-biased p–n junctions between the n-doped regions and the p-substrate to oppose any significant flow between drain and source.
The level of VGS that results in the significant increase in drain current is called the threshold voltage and is given the symbol VT. On specification sheets it is referred to as VGS(Th), although VT is less unwieldy and will be used in the analysis to follow. Since the channel is nonexistent with VGS 0 V and “enhanced” by the application of a positive gate-to-source voltage, this type of MOSFET is called an enhancement-type MOSFET.
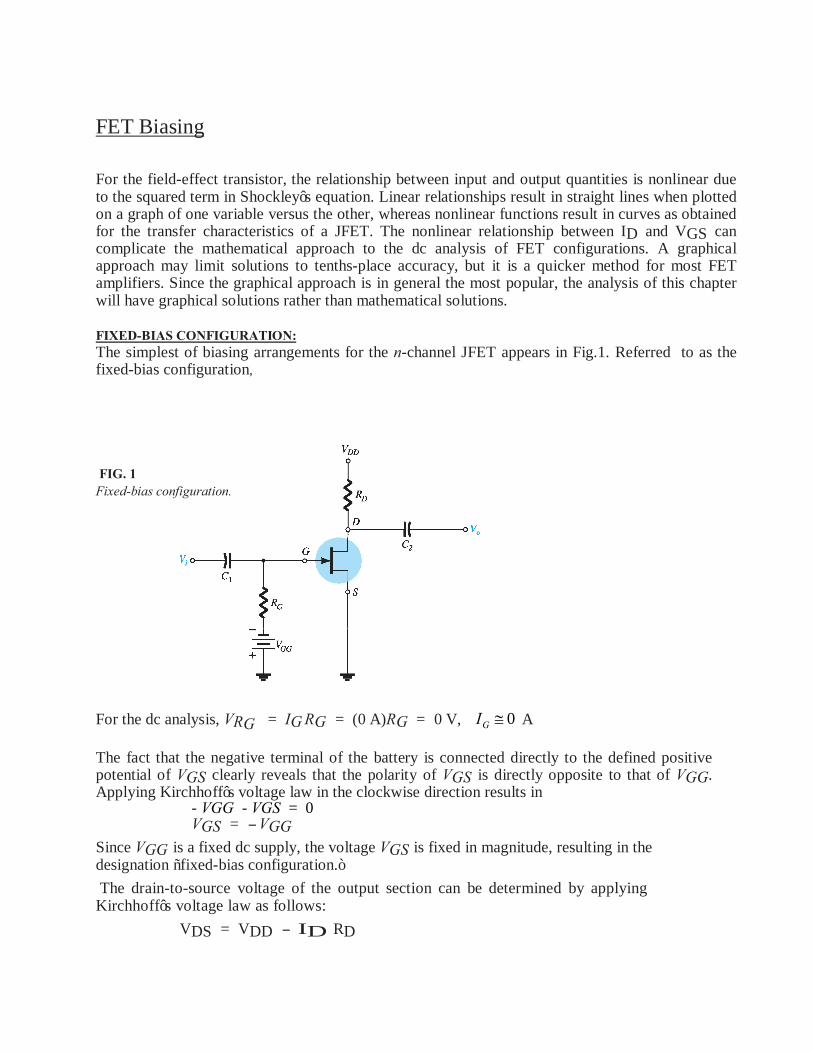
FET Biasing For the field-effect transistor, the relationship between input and output quantities is nonlinear due to the squared term in Shockley’s equation. Linear relationships result in straight lines when plotted on a graph of one variable versus the other, whereas nonlinear functions result in curves as obtained for the transfer characteristics of a JFET. The nonlinear relationship between ID and VGS can complicate the mathematical approach to the dc analysis of FET configurations. A graphical approach may limit solutions to tenths-place accuracy, but it is a quicker method for most FET amplifiers. Since the graphical approach is in general the most popular, the analysis of this chapter will have graphical solutions rather than mathematical solutions. FIXED-BIAS CONFIGURATION: The simplest of biasing arrangements for the n-channel JFET appears in Fig.1. Referred to as the fixed-bias configuration, FIG. 1 Fixed-bias configuration. For the dc analysis, VRG = IG RG = (0 A)RG = 0 V, 0≅GI A The fact that the negative terminal of the battery is connected directly to the defined positive potential of VGS clearly reveals that the polarity of VGS is directly opposite to that of VGG. Applying Kirchhoff’s voltage law in the clockwise direction results in
- VGG - VGS = 0 VGS = - VGG
Since VGG is a fixed dc supply, the voltage VGS is fixed in magnitude, resulting in the designation “fixed-bias configuration.” The drain-to-source voltage of the output section can be determined by applying Kirchhoff’s voltage law as follows: VDS = VDD - ID RD

V
= VDS + = VDS + 0 V,
SELF-BIAS CONFIGURATION
The self-bias configuration eliminates the need for two dc supplies. The controlling gate-to-source voltage is now determined by the voltage across a resistor RS introduced in the source leg of the configuration. For the dc analysis, the capacitors can again be replaced by “open circuits” and the resistor RG replaced by a short-circuit equivalent since IG = 0 A.
The current through RS is the source current IS, but IS = ID and VRS = IDRS
SDGS RIV −= that VGS is a function of the output current ID and not fixed in magnitude as occurred for the fixed-bias configuration. VOLTAGE-DIVIDER BIASING The basic construction is exactly the same, but the dc analysis of each is quite different. IG =
0 A for FET amplifiers, but the magnitude of IB for common-emitter BJT amplifiers can affect the dc levels of current and volt- age in both the input and output circuits. Recall that IB provides the link between input and output circuits for the BJT voltage-divider configuration, whereas VGS does the same for the FET configuration. Since IG = 0 A, Kirchhoff’s current law requires that IR1 = IR2, and the series equivalent circuit appearing to the left of the figure can be used to find the level of VG. The voltage VG, equal to the voltage across R2, can be found using the voltage-
divider rule as follows:
Applying Kirchhoff’s voltage law
21
2
RRVRV DD
G +=
SDGGS RIVV −=
GSGDSD VVVV == ,

Feedback Amplifiers and Oscillators:
• Feedback implies the transfer of energy from the output of a system to its input. If a portion or the whole of the output signal of an amplifier is fed back and superimposed on the input signal, the performance of the amplifier changes significantly. Then the amplifier is said to be a feedback amplifier.
• Negative/Inverse/Degenerative Feedback:- Feedback signal diminishes the magnitude of the input signal.
• Positive/Direct/Regenerative Feedback:- Feedback signal enhances the magnitude of the input signal.
Negative/Inverse/Degenerative Feedback
In the above circuit the input signal to the amplifier with gain A is the difference of the input signal VS and feedback signal Vf . The feedback circuit can contain passive elements like resistors, inductors, capacitors and active elements like transistors.
Transfer Gain of a feedback amplifier:
VO=AVi (A= VO/ Vi is the gain without feedback or open loop gain)
Vf = βVO (β= Vf/VO is known as the feedback fraction, the feedback ratio, the reverse transfer ratio or the reverse transmission factor) Vi=Vs- Vf (Positive sign for positive feedback)
Vs = Vi +Vf= VO/A+ βVO
Af=VO/Vs=A/(1+Aβ) is the gain with feedback called as closed loop gain.
The quantity Aβ is called as loop gain, the feedback factor, the return ratio or the loop transmission.
The feedback introduced into an amplifier is usually expressed in decibles(dB) by the relationship

F=dB of Feedback =20log10���
��=20log10� �
�����
For negative feedback F is negative and for positive feedback F is positive.
Feedback amplifier topologies: Depending up on the input mixer and output sampler configuration we have 4 feedback topologies.
1. Voltage Series 2. Voltage Shunt 3. Current Series 4. Current Shunt
Effect of Negative Feedback:
A number of improvements are obtained in negative feedback
1. Better stabilised voltage gain 2. Higher input impedance and lower output impedance 3. Improved frequency response 4. Reduced noise 5. More linear operation
Positive/Direct/Regenerative Feedback:
In positive feedback input signal to the amplifier with gain A is the additione of the input signal VS and feedback signal Vf .
VO=AVi

Vf = βVO Vi=Vs+Vf
Vs = Vi -Vf= VO/A- βVO
Af=VO/Vs=A/(1-Aβ)
Oscillator Operation:
The use of positive feedback that results in a feedback amplifier having closed-loop gain Af greater than 1 satisfies the phase conditions will result in operation as an oscillator.
When the switch at the amplifier input is open, no oscillation occurs. Considering fictitious voltage Vi at the amplifier input VO=AVi. And Vf=AβVi.
If the circuits of the base amplifier and the feedback network provide Aβ of a correct magnitude and phase, Vf can be made equal to Vi. Then, when the switch is closed and the fictitious voltage Vi is removed, the circuit will continue operating since the feedback voltage is sufficient to drive the amplifier, resulting in a proper input voltage to sustain the loop operation. The output waveform will still exist after the switch is closed if the condition Aβ=1 is met. This is known as Barkhausen criterion for oscillation.

Operational Amplifier
The Operational Amplifier is a direct-coupled , high gain , negative feedback amplifier. It is nothing more than a differential amplifier which amplifies the difference between two inputs.
General circuit diagram of an op-amp
The terminal marked - is called the inverting terminal which means signal applied there will appear phase inverted at the output while the terminal marked + is called the non inverting terminal means that the signal applied here will appear in phase and applied at the output . Please understand that the - and + do not denote any type of voltage it means that output voltage is proportional to the difference of Non Inverting and inverting voltages which is Vo = V2 - V1 . When there is no feedback , no voltage or capacitor between output and input the op-amp is said to be in open loop condition .
Characteristics of an ideal op-amp An Ideal Op-Amp has the following characteristics. * An infinite voltage gain * An infinite bandwidth * An infinite input resistance: The resistance b/w V1 and V2 terminals is infinite . * Zero output resistance: Vo remains constant no matter what resistance is applied across output . * Perfect balance: When V1 is equal to V2 the Vo is 0 . Single-Ended Input
Single-ended input operation results when the input signal is connected to one inputwith the other input connected to ground.
FIG.2.Single ended input

Double-Ended Output
While the operation discussed so far had a single output, the op-amp can also be operated with opposite outputs, as shown in Fig. 1. An input applied to either input will result in outputs from both output terminals, these outputs always being opposite in polarity. Figure 3 shows a single-ended input with a double-ended output. As shown, the signal applied to the plus input results in two amplified outputs of opposite polarity. Figure 4 shows the same operation with a single output measured.
FIG.3Double-ended output
FIG.4Double-ended output with single-ended input
Common-Mode Operation When the same input signals are applied to both inputs, common-mode operation results, the two inputs are equally amplified, and since they result in opposite polarity signals at the output, these signals cancel, resulting in0-V output. Practically, a small output signal will result
FIG.5Common-modeoperation
Common-Mode Rejection A significant feature of a differential connection is that the signals which are opposite at the inputs are highly amplified, while those which are common to the two inputs are only slightly amplified—the overall operation being to amplify the difference signal while rejecting the common signal at the two inputs.

DIFFERENTIAL AND COMMONMODEOPERATION One of the more important features of a differential circuit connection, as provided in an op-amp, is the circuit’s ability to greatly amplify signals that are opposite at the two inputs, while only slightly amplifying signals that are common to both inputs. An op-amp provides an output component that is due to the amplification of the difference of the signals applied to the plus and minus inputs and a component due to the signals common to both inputs. Since amplification of the opposite input signals is much greater than that of the common input signals, the circuit provides a common mode rejection as described by a numerical value called the common-mode rejection ratio (CMRR). Differential Inputs When separate inputs are applied to the op-amp, the resulting difference signal is the difference between the two inputs.
Common Inputs When both input signals are the same, a common signal element due to the two inputscan be defined as the average of the sum of the two signals.
Output Voltage
Since any signals applied to an op-amp in general have both in-phase and out-of phase components, the resulting output can be expressed as
Where Vd = difference voltage given by Eq. Vc = common voltage given by Eq. Ad =differential gain of the amplifier Ac = common-mode gain of the amplifier
Common-Mode Rejection Ratio Having obtained Ad and Ac (as in the measurement procedure discussed above), wecan now calculate a value for the common-mode rejection ratio (CMRR), which isdefined by the following equation:

The value of CMRR can also be expressed in logarithmic terms as
We can express the output voltage in terms of the value of CMRR as follows:
Basic of Op-Amp
The circuit shown provides operation as a constant-gain multiplier. An input signal, V1, is applied through resistor R1 to the minus input. The output is then connected back to the same minus input through resistor Rf. The plus input is connected to ground. Since the signal V1 is essentially applied to the minus input, the resulting output is opposite in phase to the input signal. Figure 6a shows the op-amp replaced by its ac equivalent circuit. If we use the ideal op-amp equivalent circuit, replacing Ri by an infinite resistance and Ro by zero resistance, the ac equivalent circuit is that shown in Fig.6b. The circuit is then redrawn, as shown in Fig. 6c, from which circuit analysis is carried out.

FIG.6.Operation of op-amp as constant-gain multiplier: (a) op-amp ac equivalent circuit; (b) ideal op-amp equivalent circuit; (c) redrawn equivalent circuit.

PRACTICAL OP-AMP CIRCUITS
Inverting Amplifier The most widely used constant-gain amplifier circuit is the inverting amplifier, as shown. The output is obtained by multiplying the input by a fixed or constant gain, set by the input resistor (R1) and feedback resistor (Rf)—this output also being inverted from the input. Using Eq. (14.8) we can write
Noninverting Amplifier The connection of Fig. 8shows an op-amp circuit that works as a noninverting amplifier or constant-gain multiplier. It should be noted that the inverting amplifier connection is more widely used because it has better frequency stability (discussed later). To determine the voltage gain of the circuit, we can use the equivalent representation shown in Fig. 14.16b. Note that the voltage across R1 is V1 since Vi =0 V. This must be equal to the output voltage, through a voltage divider of R1 and Rf, so that
FIG.8.Noninverting constant-gain multiplier

Summing amplifier
The circuit shows a three-input summing amplifier circuit, which provides a means of algebraically summing (adding) three voltages, each multiplied by a constant-gain factor. Using the equivalent representation shown in Fig. 9, the output voltage can be expressed in terms of the inputs as
In other words, each input adds a voltage to the output multiplied by its separate constant-gain multiplier. If more inputs are used, they each add an additional component to the output.
FIG.9Summing amplifier; (b) virtual-ground equivalent circuit.
Subtractor:
FIG.10 Substractor

The aim of the subtractor is to provide an output which is equal to the difference of the two input signals or proportional to their difference. For minimum offset error R1 || R2 = R3 || R4 .
Op-Amp as Integrator The operational amplifier integrator is an electronic integration circuit. Based around the operational amplifier (op-amp), it performs the mathematical operation of integration with respect to time; that is, its output voltage is proportional to the input voltage integrated over time.
The input current is offset by a negative feedback current flowing in the capacitor, which is generated by an increase in output voltage of the amplifier. The output voltage is therefore dependent on the value of input current it has to offset and the inverse of the value of the feedback capacitor. The greater the capacitor value, the less output voltage has to be generated to produce a particular feedback current flow.
Ideal circuit
The circuit operates by passing a current that charges or discharges the capacitor Cf during the time under consideration, which strives to retain the virtual ground condition at the input by off-setting the effect of the input current. Referring to the above diagram, if the op-amp is assumed to be ideal, nodes v1 and v2 are held equal, and so v2 is a virtual ground. The input voltage passes a current vin/R1.through the resistor producing a compensating current flow through the series capacitor to maintain the virtual ground. This charges or discharges the capacitor over time. Because the resistor and capacitor are connected to a virtual ground, the input current does not vary with capacitor charge and a linear integration of output is achieved.
The circuit can be analyzed by applying Kirchhoff's current law at the node v2, keeping ideal op-amp behavior in mind.

in an ideal op-amp, so:
Furthermore, the capacitor has a voltage-current relationship governed by the equation:
Substituting the appropriate variables:
in an ideal op-amp, resulting in:
Integrating both sides with respect to time:
If the initial value of vo is assumed to be 0 V, this results in a DC error of:
The Op-amp Differentiator Amplifier
The basic Op-amp Differentiator circuit is the exact opposite to that of the Integrator Amplifier circuit that we looked at in the previous tutorial. Here, the position of the capacitor and resistor have been reversed and now the reactance, Xc is connected to the input terminal of the inverting amplifier while the resistor, Rƒ forms the negative feedback element across the operational amplifier as normal.

This Operational Amplifier circuit performs the mathematical operation of Differentiation that is it “produces a voltage output which is directly proportional to the input voltage’s rate-of-change with respect to time“. In other words the faster or larger the change to the input voltage signal, the greater the input current, the greater will be the output voltage change in response, becoming more of a “spike” in shape.
As with the integrator circuit, we have a resistor and capacitor forming an RC Network across the operational amplifier and the reactance ( Xc ) of the capacitor plays a major role in the performance of a Op-amp Differentiator.
Op-amp Differentiator Circuit
The input signal to the differentiator is applied to the capacitor. The capacitor blocks any DC content so there is no current flow to the amplifier summing point, X resulting in zero output voltage. The capacitor only allows AC type input voltage changes to pass through and whose frequency is dependent on the rate of change of the input signal.
At low frequencies the reactance of the capacitor is “High” resulting in a low gain ( Rƒ/Xc ) and low output voltage from the op-amp. At higher frequencies the reactance of the capacitor is much lower resulting in a higher gain and higher output voltage from the differentiator amplifier.
However, at high frequencies an op-amp differentiator circuit becomes unstable and will start to oscillate. This is due mainly to the first-order effect, which determines the frequency response of the op-amp circuit causing a second-order response which, at high frequencies gives an output voltage far higher than what would be expected. To avoid this high frequency gain of the circuit needs to be reduced by adding an additional small value capacitor across the feedback resistor Rƒ.

The charge on the capacitor equals Capacitance x Voltage across the capacitor
The rate of change of this charge is
but dQ/dt is the capacitor current i
from which we have an ideal voltage output for the op-amp differentiator is given as:
Therefore, the output voltage Vout is a constant -Rƒ.C times the derivative of the input voltage Vin with respect to time. The minus sign indicates a 180o phase shift because the input signal is connected to the inverting input terminal of the operational amplifier.

MODULE-3
Number System The decimal number system (Base 10) is a familiar number system. Some other number systems that are having equal importance are: Binary (Base 2),octal(Base 8), Hexadecimal(Base 16)
All number systems have some common characteristics: • The digits are consecutive. • The number of digits is equal to the size of the base. • Zero is always the first digit. • The base number is never a digit. • When 1 is added to the largest digit, a sum of zero and a carry of one results. • Numeric values determined by the have implicit positional values of the digits.
Binary Numbers
The binary number system is used to model the series of electrical signals computers use to represent information. It is also called the “Base 2 system”. Each digit in binary is a 0 or a 1 and is called a bit, which is an abbreviation of binary digit. 0 represents the no voltage or an off state and 1 represents the presence of voltage or an on state There are several common conventions for representation of numbers in binary.The most familiar is unsigned binary. An example of a 8-bit number in this case is 010011112 = 0*27 + 1*26 +_ _ _+ 1*20 = 64 + 8 + 4 + 2 + 1 = 7910 The largest number which can be represented by n bits is 2n − 1. For example, with 4
bits the largest number is 11112 = 15. The most significant bit (MSB) is the bit representing the highest power of 2, and the Least significant bit (LSB) represents the lowest power of 2. Example : Binary: 1110110111 MSB LSB Table : Binary numbering scale

Decimal equivalent
Binary No.
0 0000
1 0001
2 0010
3 0011
4 0100
5 0101
6 0110
7 0111
8 1000
9 1001
Decimal to Binary Conversion The easiest way to convert a decimal number to its binary equivalent is to use the repeated division of a decimal number by 2 and records the quotient and remainder.
The remainder digits (a sequence of zeros and ones) form the binary equivalent in least significant to most significant digit sequence Example: Convert 67 to its binary equivalent:
6710 = x2
Step 1: 67 / 2 = 33 R 1 Divide 67 by 2. Record quotient in next row
Step 2: 33 / 2 = 16 R 1 Again divide by 2; record quotient in next row
Step 3: 16 / 2 = 8 R 0 Repeat again
Step 4: 8 / 2 = 4 R 0 Repeat again
Step 5: 4 / 2 = 2 R 0 Repeat again
Step 6: 2 / 2 = 1 R 0 Repeat again

Step 7: 1 / 2 = 0 R 1 STOP when quotient equals 0
Thus (67)10= (1 0 0 0 0 1 1)2
Similarly we can convert 57 and 211 as given below
53 = 32 + 16 + 4 + 1 = 25 + 24 + 22 + 20 = 1*25 + 1*24 + 0*23 + 1*22 + 0*21 + 1*20 = 110101 in binary = 00110101 as a full byte in binary
211= 128 + 64 + 16 + 2 + 1 = 27 + 26 + 24 + 21 + 20 = 1*27 + 1*26 + 0*25 + 1*24 + 0*23 + 0*22 + 1*21 + 1*20 = 11010011 in binary
Binary to Decimal Conversion Multiply the binary digits by increasing powers of two, starting from the right and then find the decimal number equivalent by summing those products. Example:
What is 10011010 in decimal? 10011010 = 1*27 + 0*26 + 0*25 + 1*24 + 1*23 + 0*22 + 1*21 + 0*20 = 27 + 24 + 23 + 21 = 128 + 16 + 8 + 2 = 154
What is 00101001 in decimal?
00101001 = 0*27 + 0*26 + 1*25 + 0*24 + 1*23 + 0*22 + 0*21 + 1*20 = 25 + 23 + 20 = 32 + 8 + 1 = 41
Representation of Negative Numbers There are two commonly used conventions for representing negative numbers. With sign magnitude, the MSB is used to flag a negative number. So for example with 4-bit numbers we would have 0011 = 3 and 1011 = −3. This is simple to see, but is not good for doing arithmetic.

With 2's complement, negative numbers are designed so that the sum of a number and its 2's complement is zero. Using the 4-bit example , we have 0101 = 5 and its 2's complement −5 = 1011. Adding (remember to carry) gives 10000 = 0. (The 5th bit doesn't count!) Both addition and multiplication work as you would expect using 2's complement. There are two methods for forming the 2's complement: 1. Make the transformation 0 ! 1 and 1!0, then add 1. 2. Add some number to −2MSB to get the number you want. For 4-bit numbers an example of finding the 2's complement of 5 is −5 = −8 + 3 = 1000 + 0011 = 1011. n 2’s complement
– Step 1: Find 1’s complement of the number Binary # 11000110 1’s complement 00111001
– Step 2: Add 1 to the 1’s complement 00111001 + 00000001 ------------------ 00111010 Octal Number System
Also known as the Base 8 System. Uses digits 0 – 7.It can be readily converts to binary by grouping three (binary) digits starting from the radix point. Each octal number converts to 3 binary digits
Example: 1) Convert 42710 to its octal equivalent:
427 / 8 = 53 R3 Divide by 8; R is LSD 53 / 8 = 6 R5 Divide Q by 8; R is next digit 6 / 8 = 0 R6 Repeat until Q = 0
Thus 42710= 6538
2) Convert 6538 to binary 6 5 3 ↓ ↓ ↓ 110 101 011
Thus 6538= 1101010112
Hexadecimal Representation

It is very often quite useful to represent blocks of 4 bits by a single digit. Thus in base 16 there is a convention for using one digit for the numbers 0,1,2,: : :,15 which is called hexadecimal. It follows decimal for 0 to 9, then uses letters A to F for representing 10 to 15 respectively.
CONVERSIONS
• Convert 83010 to its hexadecimal equivalent: 830 / 16 = 51 R14 51 / 16 = 3 R3 3 / 16 = 0 R3 Thus 83010 = 33E( As 14 is represented as E) Binary to Hexadecimal Conversion
The easiest method for converting binary to hexadecimal is to use a substitution code.Each hex number converts to 4 binary digits as shown in the table.
Floating Point Numbers
n Real numbers must be normalized using scientific notation: 0.1…× 2n where n is an integer
n Note that the whole number part is always 0 and the most significant digit of the fraction is a 1 – ALWAYS!
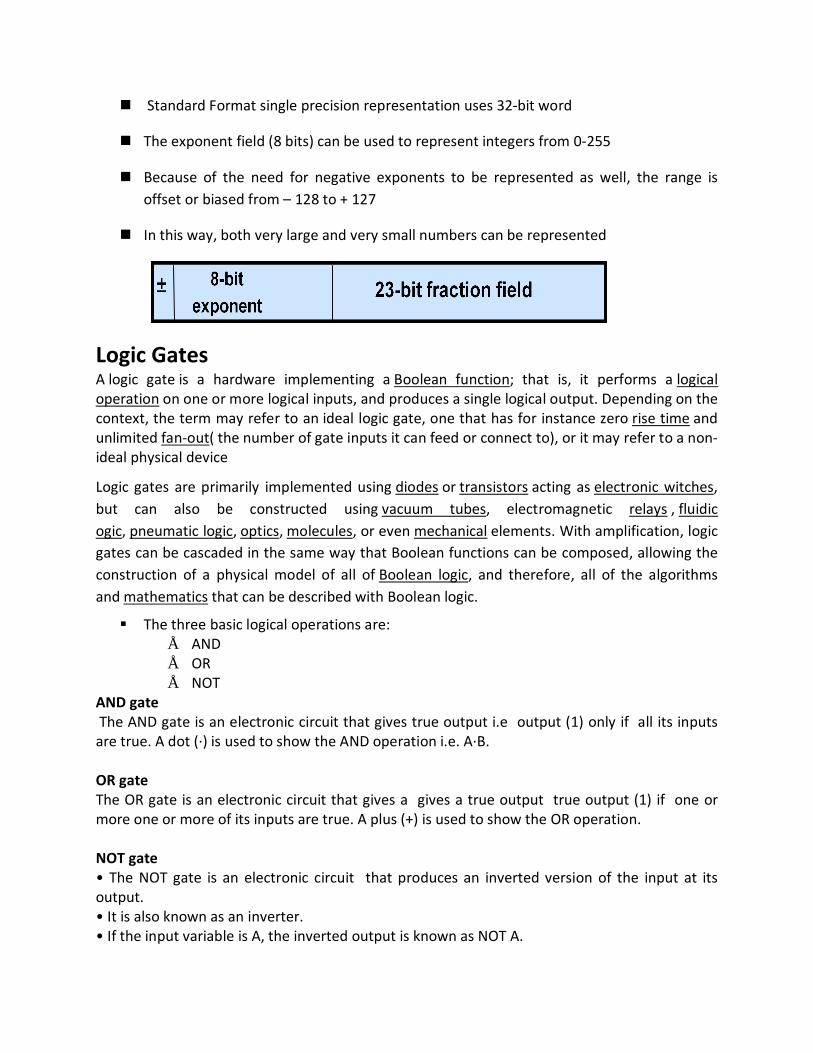
n Standard Format single precision representation uses 32-bit word
n The exponent field (8 bits) can be used to represent integers from 0-255
n Because of the need for negative exponents to be represented as well, the range is offset or biased from – 128 to + 127
n In this way, both very large and very small numbers can be represented
Logic Gates A logic gate is a hardware implementing a Boolean function; that is, it performs a logical operation on one or more logical inputs, and produces a single logical output. Depending on the context, the term may refer to an ideal logic gate, one that has for instance zero rise time and unlimited fan-out( the number of gate inputs it can feed or connect to), or it may refer to a non-ideal physical device
Logic gates are primarily implemented using diodes or transistors acting as electronic witches, but can also be constructed using vacuum tubes, electromagnetic relays , fluidic ogic, pneumatic logic, optics, molecules, or even mechanical elements. With amplification, logic gates can be cascaded in the same way that Boolean functions can be composed, allowing the construction of a physical model of all of Boolean logic, and therefore, all of the algorithms and mathematics that can be described with Boolean logic.
§ The three basic logical operations are: • AND • OR • NOT
AND gate The AND gate is an electronic circuit that gives true output i.e output (1) only if all its inputs are true. A dot (·) is used to show the AND operation i.e. A·B. OR gate The OR gate is an electronic circuit that gives a gives a true output true output (1) if one or more one or more of its inputs are true. A plus (+) is used to show the OR operation. NOT gate • The NOT gate is an electronic circuit that produces an inverted version of the input at its output. • It is also known as an inverter. • If the input variable is A, the inverted output is known as NOT A.

• This is also shown as A', or Ā with a bar over the top. NAND gate • This is a NOT-AND gate which is equal to an AND followed by a NOT gate. • The outputs of all NAND gates are true if any of the inputs are false. • The symbol is an AND gate with a small circle on the output. The small circle represents inversion. NOR gate • This is a NOT-OR gate which is equal to an OR gate followed by a gate followed by a NOT gate . • The outputs of all NOR gates are false if any of the inputs are true. • The symbol is an OR gate with a small circle on the output. The small circle represents inversion represents inversion. EXOR gate • The 'Exclusive-OR' gate is a circuit which will give a true output if either, but not both, of its two inputs are true. • An encircled plus sign (⊕) is used to show the EXOR operation. EXNOR gate • The 'Exclusive-NOR' gate circuit does the opposite to the EXNOR gate. • It will give a false output if either, but not both, of its two inputs are true. • The symbol is an EXOR gate with a small circle on the output small circle on the output . • The small circle represents inversion.


Boolean Algebra
Invented by George Boole in 1854. It’s a convenient way and systematic way of expressing and analyzing the operation of logic circuits.
An algebraic structure defined by a set B = {0, 1}, together with two binary operators (+ and ·) and a unary operator.
Terms going to be used-
n Variable – a symbol used to represent a logical quantity. n Complement – the inverse of a variable and is indicated by a bar over the variable. n Literal – a variable or the complement of a variable.
Boolean Addition n Boolean addition is equivalent to the OR operation n A sum term is produced by an OR operation with no AND ops involved.
n i.e. n A sum term is equal to 1 when one or more of the literals in the term are 1. n A sum term is equal to 0 only if each of the literals is 0.
Boolean Multiplication n Boolean multiplication is equivalent to the AND operation n A product term is produced by an AND operation with no OR ops involved.
n i.e. n A product term is equal to 1 only if each of the literals in the term is 1.
DCBACBABABA +++++++ ,,,
DBCACABBAAB ,,,

n A product term is equal to 0 when one or more of the literals are 0.
Laws of Boolean Algebra
The basic laws of Boolean algebra: n The commutative laws
The commutative law of addition for two variables is written as: A+B = B+A The commutative law of multiplication for two variables is written as: AB = BA
n The associative laws The associative law of addition for 3 variables is written as: A+(B+C) = (A+B)+C The associative law of multiplication for 3 variables is written as:
A(BC) = (AB)C n The distributive laws
The distributive law is written for 3 variables as follows: A(B+C) = AB + AC
Rules of Boolean Algebra DeMorgan’s Theorems n DeMorgan’s theorems provide mathematical verification of:
n the equivalency of the NAND and negative-OR gates n the equivalency of the NOR and negative-AND gates.
n The complement of two or more ANDed variables is equivalent to the OR of the
complements of the individual variables.
n The complement of two or more ORed variables is equivalent to the AND of the complements of the individual variables.
Constructing a Truth Table for a Logic Circuit
1.6.5
1.400.311.2
0.1
=+
=+=•=•=+=+
AAAAA
AAAA
AA
BCACABABABAA
AABAAA
AAAAA
+=+++=+
=+=
=•
=•
))(.(12.11.10
.9
0.8.7
YXYX +=•
YXYX •=+

n Once the Boolean expression for a given logic circuit has been determined, a truth table that shows the output for all possible values of the input variables can be developed. n Let’s take the example:
A(B+CD) n There are four variables, hence 16 (24) combinations of values are possible. n To evaluate the expression A(B+CD), first
find the values of the variables that make the expression equal to 1 (using the rules for Boolean add & mult).
n In this case, the expression equals 1 only if A=1 and B+CD=1 because A(B+CD) = 1·1 = 1
n Now, determine when B+CD term equals 1. n The term B+CD=1 if either B=1 or CD=1
or if both B and CD equal 1 because B+CD = 1+0 = 1 B+CD = 0+1 = 1 B+CD = 1+1 = 1
n The term CD=1 only if C=1 and D=1 n Summary:
A(B+CD)=1 When A=1 and B=1 regardless of the values of C and D When A=1 and C=1 and D=1 regardless of the value of B
n The expression A(B+CD)=0 for all other value combinations of the variables.
n Putting the results in truth table format
Latches & Flip-flops Digital circuits can be classified as
1. Combinational circuits: In this case present output of the circuit depends on present inputs only.
2. Sequential circuits:
INPUT OUTPUT
A B C A(B+CD)
0 0 0 0
0 0 0 0
0 0 1 0
0 0 1 0
0 1 0 0
0 1 0 0
0 1 1 0
0 1 1 0
1 0 0 0
1 0 0 0
1 0 1 0
1 0 1 1
1 1 0 1
1 1 0 1
1 1 1 1
1 1 1 1

• Present output not only depends on present inputs but also on the previous state of output. • It can be realized as combinational circuit with a feedback path along with a memory element.
The most basic memory element can be realized by two inverters forming a static memory cell. Assume A=0 and B=1, then the below circuit will maintain these values indefinitely (as long as it has power applied) . The state is defined by the value of the memory cell
Fig: Static memory cell S-R Latches :
• Most basic type of latch. • It is known as set-reset latch as it has two stable output state. • NOR gates can be used instead of inverters. The SR latch below has two inputs S and R,
which will control the outputs Q and Q’. • Here Q and Q’ feed back into the circuit. They’re not only outputs, they’re also inputs! • To figure out how Q and Q’ change, we have to look at not only the inputs S and R, but
also the current values of Q and Q’: Qnext = (R + Q’current)’ Q’next = (S + Qcurrent)’
Fig : S-R latch using NOR gate
• The state S=R=1 is invalid and not allowed Fig : Truth table S-R latch using NOR gate
S R Q 0 0 No change 0 1 0 (reset) 1 0 1 (set)

Fig: S’-R’ Latch using cross coupled NAND gate Gated SR latch
A gated SR latch circuit diagram constructed from NOR gates.
A synchronous SR latch (sometimes clocked SR flip-flop) can be made by adding a second level of NAND gates to the inverted SR latch (or a second level of AND gates to the direct SR latch). The extra NAND gates further invert the inputs so the simple SR latch becomes a gated SR latch (and a simple SR latch would transform into a gated SR latch with inverted enable).
With E high (enable true), the signals can pass through the input gates to the encapsulated latch; all signal combinations except for (0,0) = hold then immediately reproduce on the (Q,Q) output, i.e. the latch istransparent.
With E low (enable false) the latch is closed (opaque) and remains in the state it was left the last time E was high.
The enable input is sometimes a clock signal, but more often a read or write strobe.

Gated D latch
A D-type transparent latch based on an SR NAND latch
A gated D latch based on an SR NOR latch
This latch exploits the fact that, in the two active input combinations (01 and 10) of a gated SR latch, R is the complement of S. The input NAND stage converts the two D input states (0 and 1) to these two input combinations for the next SR latch by inverting the data input signal. The low state of the enable signal produces the inactive "11" combination. Thus a gated D-latch may be considered as a one-input synchronous SR latch. This configuration prevents application of the restricted input combination. It is also known as transparent latch,data latch, or simply gated latch. It has a data input and an enable signal (sometimes named clock, or control). The word transparent comes from the fact that, when the enable input is on, the signal propagates directly through the circuit, from the input D to the output Q.
Transparent latches are typically used as I/O ports or in asynchronous systems, or in synchronous two-phase systems (synchronous systems that use a two-phase clock), where two latches operating on different clock phases prevent data transparency as in a master–slave flip-flop.
Latches are available as integrated circuits, usually with multiple latches per chip. For example, 74HC75 is a quadruple transparent latch in the 7400 series.

Gated D latch truth table
E/C D
Q Q Comment
0 X Qprev Qprev No change
1 0 0 1 Reset
1 1 1 0 Set
Symbol for a gated D latch
The truth table shows that when the enable/clock input is 0, the D input has no effect on the output. When E/C is high, the output equals D.
J-K Flip-flop This simple JK flip Flop is the most widely used of all the flip-flop designs and is considered to be a universal flip-flop circuit. The sequential operation of the JK flip flop is exactly the same as for the previous SR flip-flop with the same “Set” and “Reset” inputs. The difference this time is that the “JK flip flop” has no invalid or forbidden input states of the SR Latch even when S and R are both at logic “1”.
The JK flip flop is basically a gated SR Flip-flop with the addition of a clock input circuitry that prevents the illegal or invalid output condition that can occur when both inputs S and R are equal to logic level “1”. Due to this additional clocked input, a JK flip-flop has four possible input combinations, “logic 1″, “logic 0″, “no change” and “toggle”. The symbol for a JK flip flop is similar to that of an SR Bistable Latch as seen in the previous tutorial except for the addition of a clock input.

Both the S and the R inputs of the previous SR bistable have now been replaced by two inputs called the J and K inputs, respectively after its inventor Jack Kilby. Then this equates to: J = S and K = R.
The two 2-input AND gates of the gated SR bistable have now been replaced by two 3-input NANDgates with the third input of each gate connected to the outputs at Q and Q. This cross coupling of the SR flip-flop allows the previously invalid condition of S = “1” and R = “1” state to be used to produce a “toggle action” as the two inputs are now interlocked.
If the circuit is now “SET” the J input is inhibited by the “0” status of Q through the lower NAND gate. If the circuit is “RESET” the K input is inhibited by the “0” status of Q through the upper NAND gate. As Qand Q are always different we can use them to control the input. When both inputs J and K are equal to logic “1”, the JK flip flop toggles as shown in the following truth table.
The Truth Table for the JK Function
same as
for the
SR Latch
Input Output Description
J K Q Q
0 0 0 0 Memory
no change 0 0 0 1
0 1 1 0 Reset Q » 0
0 1 0 1
1 0 0 1 Set Q » 1
1 0 1 0
toggle 1 1 0 1 Toggle

action 1 1 1 0 Shift registers Shift registers are a type of sequential logic circuit, mainly for storage of digital data. They are a group of flip-flops connected in a chain so that the output from one flip-flop becomes the input of the next flip-flop. Most of the registers possess no characteristic internal sequence of states. All flip-flop is driven by a common clock, and all are set or reset simultaneously. Register: n A set of n flip-flops n Each flip-flop stores one bit n Two basic functions: data storage (Fig 1.2) and data movement (Fig 1.1).
Shift Register: A register that allows each of the flip-flops to pass the stored information to its adjacent neighbour. Fig 1.1 shows the basic data movement in shift registers. Counter: A register that goes through a predetermined sequence of states Figure 1.1: Basic data movement in shift registers [Floyd]
Fig 1.2: The flip-flop as a storage element

Storage Capacity: The storage capacity of a register is the total number of bits (1 or 0) of digital data it can retain. Each stage (flip flop) in a shift register represents one bit of storage capacity. Therefore the number of stages in a register determines its storage capacity. Classification The shift registers can be classified as
• Serial In - Serial Out(SISO) Shift Registers • Serial In - Parallel Out (SIPO)Shift Registers • Parallel In - Serial Out (PISO)Shift Registers • Parallel In - Parallel Out (PIPO)Shift Registers
Serial In - Serial Out Shift Registers The serial in/serial out shift register accepts data serially – that is, one bit at a time on a single line. It produces the stored information on its output also in serial form. Basic four-bit shift register A basic four-bit shift register can be constructed using four D flip-flops, as shown in Fig 2.1. The operation of the circuit is as follows.
• The register is first cleared, forcing all four outputs to zero. • The input data is then applied sequentially to the D input of the first flip-flop on the left
(FF0). • During each clock pulse, one bit is transmitted from left to right. • Assume a data word to be 1001. • The least significant bit of the data has to be shifted through the register from FF0 to
FF3.
Fig 2.1: Basic four-bit shift register In order to get the data out of the register, they must be shifted out serially. The data is loaded to the register when the control line is HIGH (ie WRITE). The data can be shifted out of the register when the control line is LOW (ie READ).

Fig. 2.2 illustrates entry of the four bits 1010 into the register. Fig.2.3 shows the four bits (1010) being serially shifted out of the register and replaced by all zeros.
Figure 2.2: Four bits (1010) being entered serially into the register.

Figure 2.3: Four bits (1010) being serially shifted out of the register and replaced by all zeros Serial In - Parallel Out Shift Registers For this kind of register, data bits are entered serially in the same manner as discussed in the last section. The difference is the way in which the data bits are taken out of the register. Once the data are stored, each bit appears on its respective output line, and all bits are available simultaneously. A construction of a four-bit serial in - parallel out register is shown below(Fig.2.4).
Fig.2.4: A four-bit serial in - parallel out register Parallel In - Serial Out Shift Registers A four-bit parallel in - serial out shift register is shown below. The circuit uses D flip-flops and NAND gates for entering data (ie writing) to the register.
Fig.2.4: A four-bit serial in - parallel out register D0, D1, D2 and D3 are the parallel inputs, where D0 is the most significant bit and D3 is the least significant bit. To write data in, the mode control line is taken to LOW and the data is clocked in. The data can be shifted when the mode control line is HIGH as SHIFT is active high. Parallel In - Parallel Out Shift Registers

For parallel in - parallel out shift registers, all data bits appear on the parallel outputs immediately following the simultaneous entry of the data bits. The following circuit is a four-bit parallel in - parallel out shift register constructed by D flip-flops.
Fig.2. 5: parallel in - parallel out shift registers The D's are the parallel inputs and the Q's are the parallel outputs. Once the register is clocked, all the data at the D inputs appear at the corresponding Q outputs simultaneously. Bidirectional Shift Registers The registers discussed so far involved only right shift operations. Each right shift operation has the effect of successively dividing the binary number by two. If the operation is reversed (left shift), this has the effect of multiplying the number by two. With suitable gating arrangement a serial shift register can perform both operations. A bidirectional, or reversible, shift register is one in which the data can be shift either left or right. A four-bit bidirectional shift register using D flip-flops is shown below.
Fig.2.6: Bidirectional shift registers(Ref. Floyd)

MODULE-IV
CATHORE RAY OSCILLOSCOPE:
Cathode ray oscilloscope (CRO) is a versatile instrument used to visually observe wave shapes and to take measurements on them applied to the input terminals.
Basic principle • Electron Gun: It generates the beam which moves down the tube and strikes
the screen. The screen glows at the point of collision, producing a bright spot. Electric or magnetic fields are used to deflect and move the spot to trace out a patter.
• Y plates (Vertical deflection plates): These are used to deflect the beam vertically.
• X plates (Horizontal deflection plates): These are used to deflect the beam horizontally.
• When voltage is applied to the vertical and horizontal plates simultaneously the deflection of the beam is proportional to the resultant of the two voltages

and the position of the beam is in between the vertical and horizontal axis of the screen.
• For ac signal display the signal voltage is applied to the vertical plates and it moves the spot vertically to positions, corresponding to the instantaneous values of the signal. Simultaneously the spot is moved horizontally by a sweep voltage applied to the horizontal plates. The sweep must be linear and must move in one direction. Signal Generators:
• A standard signal generator produces known and controllable voltages. It is used as a power source for measurement of gain, signal-to-noise ratio, bandwidth, SWR and other properties.
• • • •
• RF oscillator generates the carrier frequency using LC tank circuit with constant output over any frequency range.
• Modulation is done with the wideband amplifier which delivers the output to an attenuator. The output voltage is read by an output meter.
• Modulation oscillator gives the frequency that has to be modulated by the carrier frequency.
Principles of Communication:
Modulation is the process by which some characteristics of a high frequency wave called the carrier, is changed according to the instantaneous value of a low

frequency wave called the modulating wave. The resultant wave is called the modulated wave.
Amplitude Modulation:
Amplitude modulation is obtained by varying the amplitude of the carrier by the modulating signal, the change in amplitude from the unmodulated value being proportional to the instantaneous value of the modulating signal independent of its frequency.
Modulating signal in sinusoidal form can be written as
vm=Vmcoswm t
Carrier wave can be written as
vc=Vccoswc t
The amplitude of the modulated carrier is
V(t)= Vc+ KaVmcoswm twhere Ka is the proportionality constant.
The amplitude modulated carrier is represented by
(vc)AM=Vc( 1+mcoswm t)coswc t
where m(=KaVm/Vc) is known as the modulation index.

AM Transmitter:
CARRIER OSCILLATOR A oscillator is used to operate the transmitted at a desirable fixed radio frequency (RF).The power output of the oscillator,being not sufficiently large,is amplified in several stage to the desirable.
BUFFER AMPLIFIER
This amplifier isolates the oscillate from the succeeding stage, so that the variation of coupling and antenna loading do not influence the oscillator frequency.
FREQUENCY MULTIPLIER
Oscillator cannot generate very high carrier frequencies. To obtain such frequencies, the frequency multiplier is used to multiply the frequency of oscillator output signal to the required value.
POWER AMPLIFIER
The modulated carrier is fed to this stage for final amplification before being carried to the antenna.
AUDIO AMPLIFIER

This amplifier is used to amplify the audio signal output of the microphone that converts the speech or music to be transmitted into equivalent electrical signal.
MODULATOR
The function of the modulator is to amplitude modulate the RF carriernin accordance with the amplified audio signal.
AM RECIEVER
ANTENNA The antenna picks up all radiated signals and feeds them into the RF amplifier. These signals are very small (usually only a few microvolt). RF AMPLIFIER
This circuit can be adjusted (tuned) to select and amplify any carrier frequency within the AM broadcast band. Only the selected frequency and its two side bands pass through the amplifier. (Some AM receivers don't have a separate RF amplifier stage.) LOCAL OSCILLATOR This circuit generates a steady sine wave at a frequency 455 KHz above the
selected RF frequency. MIXER This circuit accepts two inputs, the amplitude modulated RF signal from the output of the RF amplifier (or the antenna when there is no RF amplifier) and the sinusoidal output of the local oscillator (LO). These two signals are then "mixed" by a nonlinear process called heterodyning to produce sum and difference

frequencies. For example, if the RF carrier has a frequency of 1000 KHz, the LO frequency is 1455 KHz and the sum and difference frequencies out of the mixer are 2455 KHz and 455 KHz, respectively. The difference frequency is always 455 KHz no matter what the RF carrier frequency. IFAMPLIFIER
The input to the If amplifier is the 455 KHz AM signal, a replica of the original AM carrier signal except that the frequency has been lowered to 455 KHz, The IF amplifier significantly increases the level of this signal. DETECTOR This circuit recovers the modulating signal (audio signal) from the 455 KHz IF. At this point the IF is no longer needed, so the output of the detector consists of only the audio signal.
AUDIOANDPOWERAMPLIFIERS This circuit amplifies the detected audio signal and drives the speaker to produce sound.
FM MODULATION
Mathematically, a frequency modulated (FM) waveform can be described using the equation
where s(t) is the FM wave, Accos2πfct is the high frequency sinusoidal carrier and m(t) is the baseband message signal (the voice signal). The parameter kf is the frequency sensitivity of the FM modulator.

FM TRANSMITTER
Audio amplifier
IF amplifier Mixer Frequency multiplier
Crystal oscillator
Transmitter oscillator
Reactance modulator
Frequency multiplier
Rf power amplifier
Discriminator
Microphone

AUDIO AMPLIFIER
It amplifies the audio signal from the microphone which converts the sound into
equivalent electrical signal.
REACTANCE MODULATOR
This transforms the audio amplitude changes into frequency changes of the
transmitter oscillator.
TRANSMITTER OSCILLATOTR
An RF oscillator is used here to generate the desirable oscillations.
FREQUENCY MULTIPLIER
A number of frequency multipliers are used in this stage to raise the frequency to
the required value.
MIXER
A part of the output of block of frequency fc and that of frequency fo .The frequency
multipler block beat together in the mixer stage to produce a fc-fo Signal.
IF AMPLIFIER
The IF amplifier significantly increases amplitude of fc-fo frequency component
signal.
DISCRIMINATOR:The output of the IF amplifietr is applied to a phase
discriminator which gives a zero DC output voltage if the frequency of its input
signal to which it is tuned remains constant.
FM RECEIVER

The RF amplifier amplifies the received signal intercepted by the antenna. The amplified signal is then applied to the mixer stage.
The second input of the mixer comes from the local oscillator. The two input frequencies of the mixer generate an IF signal of 10.7 MHz. This signal is then amplified by the IF amplifier..
The output of the IF amplifier is applied to the limiter circuit. The limiter removes the noise in the received signal and gives a constant amplitude signal. This circuit is required when a phase discriminator is used to demodulate an FM signal.
The output of the limiter is now applied to the FM discriminator, which recovers the modulating signal. However, this signal is still not the original modulating signal. Before applying it to the audio amplifier stages, it is de-emphasized.
De-emphasizing attenuates the higher frequencies to bring them back to their original amplitudes as these are boosted or emphasized before transmission. The output of the de-emphasized stage is the audio signal, which is then applied to the audio stages and finally to the speaker. It should be noted that a limiter circuit is required with the FM discriminators. If the demodulator stage uses a ratio detector instead of the discriminator, then a limiter is not required. This is because the ratio detector limits the amplitude of the received signal. In Figure (a) a dotted block that covers the limiter and the discriminator is marked as the ratio detector.
In FM receivers, generally, AGC is not required because the amplitude of the carrier is kept constant by the limiter circuit. Therefore, the input to the audio stages controls amplitudes and there are no erratic changes the volume level. However, AGC may be provided using an AGC detector. This generates a dc voltage to control the gains of the RF and IF amplifier.
