basic anxiety management skills - queen's · pdf filelearning basic anxiety management...
TRANSCRIPT

BASIC ANXIETY MANAGEMENT
SKILLS
2
The Importance of Practice
Would you play a piano concert in front of an audience without ever having played the piano? Or write a final exam without going to any classes, reading any material, or even thinking about the subject beforehand? In this section, we discuss some Basic Anxiety Management Skills. You can think of each skill as a tool that you need to develop in order to help manage your anxiety. It`s important to remember that these skills work like any other skill set; in order to get the most out of these tools you need to practice them. Do you know how to drive a car? Think about learning how to drive. When you first get behind the wheel of a car there are so many things to keep in mind: the steering wheel, a whole bunch of mirrors, the back window, signals, traffic around you, try not to mix up the gas and the brake pedal! It’s very difficult to keep all of these different things in your working memory at once. Everything is very mechanical and forced and you need to put in a lot of effort to juggle all of these things in your working memory at one time in order to drive safely. Now think about driving after practicing for a long time. You can get from point A to point B without even thinking about it. It becomes much easier because the skill set of driving moves from your working memory (which is very limited!) to your long-term memory (which is very vast!). It becomes automatic. Learning Basic Anxiety Management Skills follows the same principle; in the beginning, these skills are awkward and difficult and may not seem all that helpful. In fact, some people may worry whether or not they are doing the basic skills right or they may get anxious if they don’t feel instantly better. That’s all normal; it’s a skill in development. But in time it gets easier, more automatic, and more effective. In a similar vein, we don’t learn how to drive on the highway! We learn on the back roads or in parking lots. We learn where there are less distractions from juggling all the parts of this new skill in our working memory. If we only practice our Basic Skills when we really need them—like in the middle of a panic attack, for example—we are basically learning how to drive in the fast lane of the highway… and that isn’t the best way to make the most of this skill set. Keep in mind that many of the techniques found in this book may seem fairly simple, so it`s tempting to try them out and then not use them again until we absolutely need them. But to our brain, we are adding an unfamiliar element to an already stressful situation, and our bodies do not like unfamiliar situations! Therefore, it is important to practice the following Basic Skills when your stress isn’t at its highest (when you’re on “the back roads” instead of on “the highway”), and to maintain a consistent practice in order to make these skills more automatic and more effective. Practicing during “down times”, or when our body is not at a high level of stress, helps make the techniques routine, and will have a greater effect on decreasing the anxiety reaction when you actually need it! Now, let`s get started…

Self Care/SPEMS
You may have heard of the term Self Care before. People talk about the concept of Self Care in a variety
of ways: taking some ‘me time’, hanging out with friends, getting outside for a bit. When dealing with
anxiety, however, it is important to unpack the idea of Self Care a bit more.
Self Care underlies healthy living in general, and it is particularly relevant for your mental health. For this
reason, we’ve put this section before all other Basic Skills—ideally, you should check-in with your
current Self Care and establish new, healthy Self Care habits before attempting any other Basic Skills.
You won’t become a world-class skater without first buying a pair of skates—and you wouldn’t get to be
very good if those skates were made of wood! Similarly, the Basic Skills and other techniques found in
this workbook require a solid foundation; in this case the bedrock of anxiety management is Self Care.
Within this workbook we divide Self Care into five domains. These domains can be thought of as buckets
that need filling. We are at our best when our buckets are full, or nearly full, but it takes work to keep
them that way. When we are feeling low, or our anxiety is high, it may be because our buckets are low
or—in some cases—empty. It’s important to look at all five buckets; it’s typical to lose sight of one or
two of the buckets every once in a while, and these are often the ones that need filling the most!
Self Care is unique to the individual. We can fill our buckets in many different ways. Because there are
so many ways to fill each bucket, something that works well for one person may not work well for
another. Many people find it easier to think about each bucket as having different ‘taps’ that are able to
fill it—maybe it’s a hot water tap, maybe it’s a cold water tap—but the crucial thing is that the bucket is
getting filled, and with a fuller bucket you are more able to enjoy parts of your life. For example, if your
friend’s social bucket is low, they may need to hang out with other people a bit more in order to fill it
(let`s call this using the `hot water` tap). But maybe when your social bucket is low, you find it gets filled
better by getting away from social situations and giving yourself some time alone (the `cold water` tap).
Even though this may seem contradictory, remember that it is what works for you that counts. As you
read through this section, think about how your buckets have been filled in the past and how are
currently being filled (or not filled, as the case may be).Use the spaces provided to reflect on what you
currently do to fill your buckets and how effective those practices are for you. You can also find this
information in Worksheet 2.1 SPEMS: How Do You Fill Your Bucket, in Appendix B.
Below, we’ve listed the five different domains of Self Care and some ideas for how you can fill them.
Note that we’ve listed two possible ‘taps’ for each of the buckets below, but you are not limited to two;
feel free to get creative! These five domains include: social, physical, emotional, mental, and spiritual.
Together, they create the acronym SPEMS. Acronyms generally make things easier to remember;
however, this particular acronym is particularly appropriate because the word ‘spem’ is Latin for ‘hope’!
This is fantastic, as SPEMS—and Self Care in general—is meant to give you hope for a better future!
Social Self Care: The Social bucket has to do with people around you, and the connections that you have with them.
“People” can refer to pretty much anybody that you have a relationship with; they can be friends,
classmates, or family members. In some cases, our social connections to others are not strong enough
so we need to put effort into planning time to spend with others. On the other hand, we may spend too
much time with the people in our lives (those social connections can become overloaded), in which case
being able to take some time for ourselves may actually help to fill this bucket.
Possible taps/ways to fill the bucket:
1. How can I connect with other people?
Examples: Going to a party, texting friends, re-connecting with high school friends, going for coffee
with a classmate, reaching out for support when something is bothering you.
2. How can I disconnect when social interactions are getting too much?
Examples: Turning off your phone for an hour, going for a walk, going for coffee with yourself.
How do I fill my Social Bucket?
Physical Self Care: The Physical bucket takes a look at the body, and ensures that healthy care habits are happening. This
bucket is primarily focused on physical activity, nutrition, and rest/sleep. Like anything else to do with
Self Care, these three components can vary for the individual; however, there are some general
guidelines to consider. Regular physical activity is important–ideally at least a moderate level of activity
(enough to increase your heart rate)–several times per week. Regarding nutrition, aim to have snacks
and meals that provide a wide variety and healthy range of nutrients in your diet. Sleep is a tricky one
for many people to maintain (students especially). The amount of sleep your body requires decreases as
you get older; for university-aged people, the average person needs just under 8 hours of sleep per
night, while the average older adult require about 5 hours. Ensure that your sleep is consistent and an
important part of your routine!
Possible taps/ways to fill the bucket:
1. How can I be physically active?
Examples: Going to the gym, taking a walk, doing yoga, hiking, biking.
2. How can I relax?
Examples: Taking a bath, having a nap, doing meditation, laying on the beach, going to bed early.
How do I fill my Physical Bucket?

Emotional Self Care: The Emotional bucket is often forgotten. The important part of this bucket is to ensure that you are
giving yourself space and permission to feel a range of emotions–both ‘positive’ and ‘negative’. Note
that crucial word: permission. As with many aspects of dealing with anxiety, balance is key. Emotional
Self Care ensures we aren’t trying to bottle up everything negative in our lives, but rather we are giving
ourselves permission to experience some of those distressing emotions in a healthy and effective way.
Possible taps/ways to fill the bucket:
1. How can I ensure I laugh?
Examples: Watching a funny video, telling a joke to a friend, reminiscing about good times, being
around people who make you laugh.
2. How can I let myself worry – in a healthy way?
Examples: Planning ‘Worry Time’ every day, watching a sad movie, taking time to remember people
who are no longer with you, journaling.
How do I fill my Emotional Bucket?

Mental Self Care: The Mental bucket is about both activating and relaxing your brain. There is a big caveat to Mental Self
Care: it does not include school or homework! This is because school is generally not considered Self
Care, as you are typically fulfilling requirements set by someone else, such as a professor or TA.
Obviously, you need to have time in your schedule as a student to focus on academics; however, life still
exists outside of school. If learning and academia is really what excites you, try finding something to
learn about beyond what you need to do for class (something interesting and just for you), even if it’s
just for five minutes a day–that is truly Mental Self Care!
Possible taps/ways to fill the bucket:
1. How can I exercise my brain?
Examples: Doing puzzles, trying a new recipe, learning a new language outside of the classroom,
having debates with friends.
2. How can I relax my thinking?
Examples: Watching TV, doing meditation, letting your mind wander, trying to do absolutely nothing
for at least five minutes.
How do I fill my Mental Bucket?

Spiritual Self Care: The Spiritual bucket is about recognizing things outside of yourself and your own day-to-day life. This is
often the most difficult bucket to define, as spirituality can mean so many different things, and it’s
important to note that it can–but does not necessarily–mean religion. For example, to many people
Spiritual Self Care can simply be getting outside and taking the time to notice things in nature that they
don’t always have time to notice. Others may do the exact same activity and will take the time to reflect
on their religious views. Within the same Spiritual bucket it is also good to recognize and reflect on
yourself as an individual; different than being socially alone, this emphasizes that you are important and
deserve to do things that you want ‘just because’ every once in a while!
Possible taps/ways to fill the bucket:
1. How can I recognize things outside of myself?
Examples: Spending time in nature, going to religious services, reading spiritual texts, volunteering
to help others.
2. How can I give myself ‘me time’, and recognize that what I want matters?
Examples: Eating ice cream just because, watching TV, saying no to other people, making time for
solitude and quiet reflection.
How do I fill my Spiritual Bucket?

Deep Breathing Deep breathing, diaphragmatic breathing, or box breathing are all commonly-used names for this tool in our Anxiety Management Workbook. This tool may not be new to you, however, we hope that this workbook will help you understand why deep breathing can be helpful for you, and how to use it to maximize its effectiveness. The purpose of this exercise is to hit the brake pedal on stress, or activate the parasympathetic nervous system to calm our body’s fight-or-flight response. Let’s start by discussing how to use deep breathing as an anxiety management tool.
Before You Begin:
1. Lie down or sit in a comfortable chair, maintaining good posture. Your body should be as relaxed as possible. Close your eyes. Scan your body for tension.
2. Find a quiet space where you won’t be interrupted. Turn off your phone and, if you have housemates,
put a sign on your door so you can have some uninterrupted time for yourself.
3. Start out by simply bringing your attention to your breathing. Place one hand on your abdomen, and one hand on your chest. When we are anxious, our breathing tends to be quick and shallow. If you are engaging in shallow breathing, the hand on your chest is the one more likely to be moving up and down. Notice which hand is moving, and how fast it is moving.
Getting Started:
4. Begin by taking a slow, easy, mindful breath in, through your nose, gently pulling the air deep down into your abdomen. You should feel your abdomen rise with this inhalation and your chest should only move a little. Inhale for a count of 5.
5. Hold that breath deep in your lungs for a count of two.
6. Slowly exhale, making sure to keep your mouth, jaw, and tongue relaxed. Exhale for a count of 5-7.
Notice which hand is moving (the one on your chest, or your abdomen?). As all of the air is released with exhalation, gently contract your abdominal muscles to completely empty your lungs of all air. It is important to remember that we deepen our breath by completely emptying our lungs on an exhale, not by filling them with more air on an inhale.
7. Repeat.
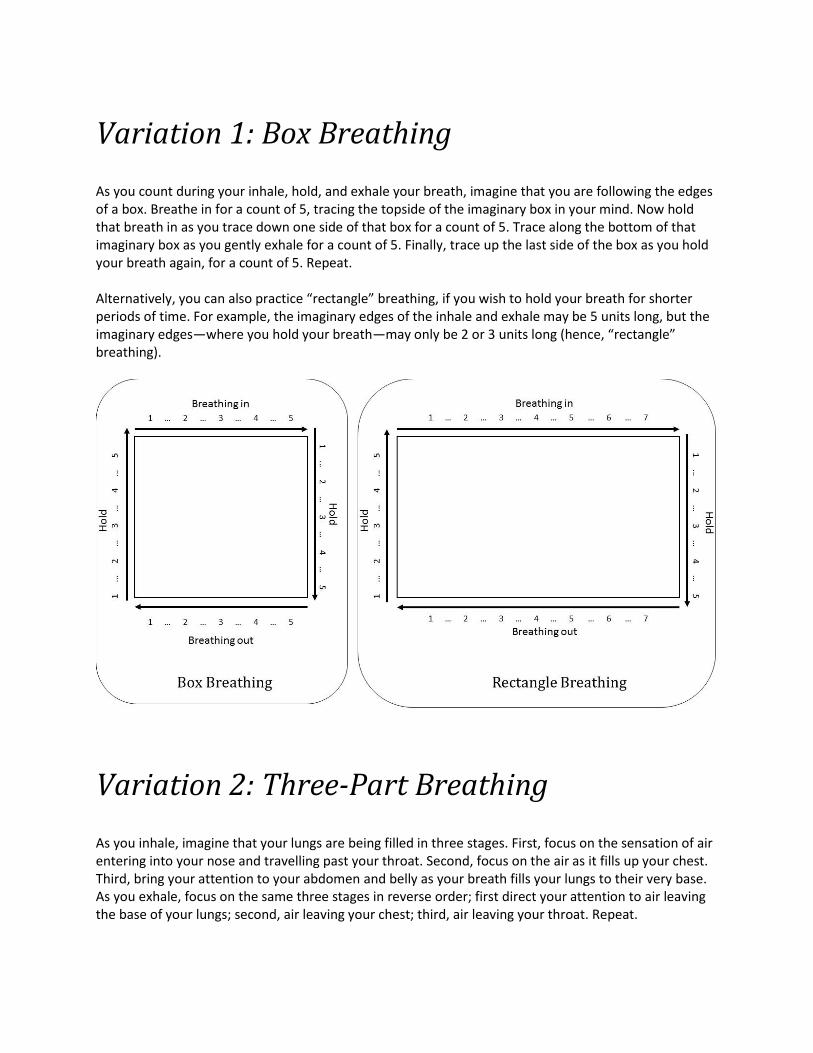
Variation 1: Box Breathing As you count during your inhale, hold, and exhale your breath, imagine that you are following the edges of a box. Breathe in for a count of 5, tracing the topside of the imaginary box in your mind. Now hold that breath in as you trace down one side of that box for a count of 5. Trace along the bottom of that imaginary box as you gently exhale for a count of 5. Finally, trace up the last side of the box as you hold your breath again, for a count of 5. Repeat. Alternatively, you can also practice “rectangle” breathing, if you wish to hold your breath for shorter periods of time. For example, the imaginary edges of the inhale and exhale may be 5 units long, but the imaginary edges—where you hold your breath—may only be 2 or 3 units long (hence, “rectangle” breathing).
Variation 2: Three-Part Breathing As you inhale, imagine that your lungs are being filled in three stages. First, focus on the sensation of air entering into your nose and travelling past your throat. Second, focus on the air as it fills up your chest. Third, bring your attention to your abdomen and belly as your breath fills your lungs to their very base. As you exhale, focus on the same three stages in reverse order; first direct your attention to air leaving the base of your lungs; second, air leaving your chest; third, air leaving your throat. Repeat.

Additional Notes to Remember Practice deep breathing at least two times per day for 7-10 minutes each time. This is the minimum amount of time that it takes for your parasympathetic nervous system (i.e., brake pedal) to be fully activated (i.e., to hit the floor). Set an alarm so you don’t need to worry about when your practice is over. Note that, sometimes, individuals practicing deep breathing may start to feel lightheaded. This sensation simply means that your brain is getting more oxygen than it needs; absolutely nothing bad can come from this! Some people fear that the lightheadedness means that they are going to faint, but fainting is the result of the brain getting too little oxygen, not too much. If this happens to you, simply take a break from the exercise and breathe normally for a few minutes; the lightheaded feeling will pass. When you restart the exercise, just take it slow and easy. You can also try to leave a pause between breaths, or try not to breathe quite as deeply. With time, deep breathing becomes more effective, and its effects are noticeable more quickly (that is, it takes less times for your brake pedal to fully reach the floor). So after a few weeks of practice, you can start to feel the calming response of deep breathing with as little as one to three deep breaths. This is a great tool to use when you don’t have time to take 10 minutes to breathe, but need something quick or something in the moment to help reduce stress. It’s a great tool; no equipment or assembly required, you can do it anywhere at any time and no one will even notice!

Mindfulness Mindfulness is non-judgmental, purposeful attention to the present moment. This may seem simple enough, but take a moment to reflect on how often you find yourself doing some sort of mundane activity—like having a shower or walking to class—where you realize that you are “on autopilot”, “a million miles away”, “off in space”, or just not really paying attention to what you’re doing. The countless idioms to describe our state of mind when we are not present in the moment perhaps reflect how often we engage in this behaviour (whether we’re aware of it or not). Mindfulness is the exact opposite of this; it is the act of staying present in the moment. In other words, mindfulness is the act of keeping your mind here, in the present, instead of letting it wander.
Mindfulness is an important tool for anxiety management (and mental health, in general) because it teaches us to observe our thoughts. Thoughts are critical in anxiety (see Five Part Model, Page 2); they happen all of the time and are difficult to control. Mindfulness works by allowing us to view our thoughts in a more objective, or non-judgmental way. Mindfully noticing our thoughts can be looked at as the first step in recognizing the connection between our thoughts and our feelings or our behaviours, and also as a way to minimize the impact of negative emotions attached to harmful or anxious thoughts.
Mindfulness is in no way a new concept. Mindfulness originates from Buddhist meditative practices. Its conception dates back thousands of years; however, mindfulness is not necessarily religious or spiritual in its nature. Recently, mindfulness has been incorporated into Western medicine practices as an effective tool for improving mental health. This movement was largely the result of Dr. Jon Kabat-Zinn, a former molecular biologist from MIT, who sparked interest in the medical applications of this practice. As a result, the past few decades have produced a vast amount of scientific research demonstrating the effectiveness of mindfulness as a treatment for the management of anxiety, depression, pain, and even sexual dysfunction. This isn’t a “magic cure-all”, but instead, we are starting to learn that mindfulness improves people’s mental health by providing people a tool to manage their thoughts, which, as you know, play a key role in anxiety. Even brain-imaging studies have been used to show that people who undergo short-term mindfulness training programs experience increases in brain matter, more activation in the brain region associated with positive affect, and improved immune functioning. That is, only now is science starting to acknowledge what the Buddhist monks knew all along: mindfulness can help improve our thinking, our mood, and our overall health!
So how does mindfulness work? The neurons in our brains are constantly firing, which means that our minds are constantly thinking. How do you just “turn it off?” The answer is: you don’t. Instead, you learn to simply observe the thoughts as they happen, observe any feelings that may be attached to those thoughts, and then actively bring your attention back to the present. To illustrate: Imagine that it is a beautiful summer day and you are lying in the soft grass on top of a hill watching the clouds go by. Each thought that you have is like a passing cloud. You watch it as it passes, but you don’t get caught up in all of the intricate details of the cloud, or get swept away by whatever feelings come to mind when you see that cloud. Instead, you simply notice the cloud and allow it to pass as you continue to stare into the sky. More clouds will come, and that’s ok. You simply acknowledge them, and let them pass gently by.
There are many different mindfulness exercises. You will need to find what practice works best for you. In the beginning, staying present in the moment can be a difficult task, especially if you are someone who tends to have lots of anxious (worrying) thoughts! Below, we outline three simple mindfulness techniques. Get a feel for which is right for you, and remember that there are many other alterative mindfulness exercises out there.
Option 1: Simple Mindfulness Meditation In this option, you will use a point of focus, or an “anchor” to keep yourself present and in the moment.
Before you Begin 1. Make sure you are in a comfortable position. Typically, it is recommended that you are in a
“relaxed, alert posture”; this can mean sitting cross-legged on a pillow on the floor, or sitting in a comfortable chair with your head and neck supported. You want to make sure that you are in a relatively quiet place with few disruptions.
2. Set aside 15-30 minutes. Set an alarm to go off after the decided amount of time so you don’t have to worry about the time while you are practicing your mindfulness.
3. Decide whether you would like your eyes open or closed. Some people prefer their eyes closed in order to reduce distractions. Others prefer to keep their eyes open; if this is you, simply focus on a spot a little distance in front of your nose.
Getting Started 4. Pick a point of focus. This could be anything, for example a short saying or mantra (e.g., “I am
good”; “I am enough”; “everything is ok”), or your breath. Breath is a very common point of focus in mindfulness because it is constant, rhythmic, and it is always present.
5. Slowly ease yourself into your practice. Spend about one minute simply brining awareness to yourself, giving your mind the opportunity to settle in to its practice. What sensations do you notice in your body? Do you have the urge to fidget? Is there anything around or within you that is calling your attention to it? Simply notice these things without attaching any labels or values to them.
6. Bring your attention to your point of focus. Actively bring you attention to your point of focus with the intention of keeping yourself in the present moment. That is, if your breath is your point of focus, simply pay attention to the sensation of air moving in through your nostrils, down your throat, notice as the air fills your lungs and as your chest and belly expand. Don’t do anything to change your breath, simply sit with it. Notice when you mind begins to wander and simply bring your attention back to your point of focus when this happens.
7. Bring your attention back to your point of focus. Know that your mind will wander. Simply recognize when this happens and try to use non-judgment to bring your attention back to your point of focus. Try to observe your thoughts with a passive curiosity, but do not get caught up in the emotions that may be attached to those thoughts. Bring your focus back to your point of focus. Thoughts will come and that is ok. Simply acknowledge where you mind has wandered each time, and bring your focus back each time.
8. Bring your attention back to your point of focus some more. In the beginning it may feel like you are doing this a lot. That’s ok. Our mind is used to jumping all over the place; this is especially true for people who tend to be anxious. This is why we call it a mindfulness practice. It takes time to develop the skill.

Option 2: Grounding In this option, you will use your five senses to bring yourself into the present moment and sustain this mindful presence.
Before you Begin
1. Prepare yourself as you would for Option 1; make sure you are comfortable and in a place where you are not likely to be disturbed. This practice tends to be shorter in duration, so you may not feel the need to set an alarm (but if you predict that your thoughts will continuously be distracted by the time, you absolutely can).
2. Again, you will slowly ease yourself into the practice by taking one or two minutes to notice any
sensations and begin to calm your mind. Start to bring your focus into the present moment. Recognize where your mind is and bring it back to the present if you find it is wandering.
Getting Started
3. You will begin with your sense of sight. Take note of five things that you can see around you. Spend a moment really noticing each of the five things that you see. What colour is each object? What texture does it have? How is the light hitting it? Is it moving or stationary? Acknowledge each sensation with passive acceptance.
4. Next, take note of five things that you can hear around you. Feel free to close your eyes if this
will help you be more present with each sound. Notice what you notice about each sound. Is the sound loud? Is it pleasant or unpleasant? What quality does the sound have? Sit with each sensation for a moment, just noticing them.
5. Now take note of five things that you can feel, just where you are. Perhaps you can feel your
body resting on a chair or pillow? Is there a breeze where you are? What is the temperature like? Are there any internal sensations, from inside of your body that you can notice? Just be aware of these sensations, as you sit with each sensation in turn.
6. Finally, notice five things that you can smell and/or taste. Is this sensation strong or subtle?
Pleasant or unpleasant or neutral? Simply notice and sit with each sensation before you move onto the next one.
Option 3: Active Mindfulness Some people prefer to be active as opposed to sitting passively in their mindfulness practice. This option incorporates active movement into mindfulness.
Before You Begin
1. Decide on an activity that you can perform during your active mindfulness practice. This can be anything, really, but choose an activity that is fairly simple in order to give your mind the space it needs to be present in the moment. The activity you choose should be something that can be performed slowly and with a great deal of awareness. Examples of active mindfulness include: washing the dishes, taking a shower, leisurely cross-country skiing, or a slow walk. Be sure that any activity you choose is something that can be done safely!
2. Begin the activity you have planned. Allow yourself a minute or two to ease yourself into your
practice. Simply observe what you notice about your experience in the present moment. Are there any internal sensations that you are having? Are there any external sensations? Where is your mind? Notice where your thoughts are, acknowledge this, and begin to actively bring them back to the present moment.
Getting Started
3. Bring your attention to what you are doing in the present moment. For example, if you have chosen to walk, bring your attention to all of the physical sensations of walking. Notice as you lift one foot in the air and feel each muscle and tendon as you swing that leg forward. Bring your attention to the pad of your foot as it touches down on the ground. What part of your foot touches the ground first? What does the sensation of the weight of your body feel like coming down on your foot? On your leg? On your hip? What is happening to the other foot? At what point does the heel of your other foot come off the ground? What is happening to your hands and your arms? What does the contrast feel like between the left and the right side of your body at any given moment?
4. As you keep your attention on the physical sensations of the activity of your choice, remember
to notice where your thoughts are. When you thoughts move away from the present moment—and they will—acknowledge this and simply bring them back to the moment. Notice if emotions are attached to those thoughts, but do not get engaged in those feelings; simply notice them as if you would notice clouds in the sky and gently bring your focus back to your activity and the present moment.

Additional Notes to Remember: Mindfulness is a very effective tool for stress management, but it is also a very tricky tool to master. Our minds are constantly on the go. Keeping thoughts in the present moment can feel like trying to herd a group of cats. With that being said, research shows that mindfulness can have positive effects on mental health regardless of the number of treatment sessions a person gets; that is, it may take a while to master the skill, but a regular practice is all you need to reap the benefits of this tool. That brings us to the next thought; practice! Remember that mindfulness is not an easy skill to master, and that is ok! In the beginning, you will find that you are constantly bringing your thoughts back to the present moment. Sometimes, it may feel as if you spend most of your practice bringing your thoughts to the present and very little time in the present at all! Other times, you may not even realize that your thoughts have wandered until it’s been a few minutes. This is all part of the practice of mindfulness. With time, it will get easier and it will become more effective. Mindfulness is a tool that can be done anywhere, for any amount of time. We highly recommend setting up a daily mindfulness practice for at least 15-30 minutes once a day, but the more your practice the more benefit you will receive from this tool. Reminding yourself to be present at regular intervals throughout the day can help, too. Putting your phone away for chunks of time during the day is one great way to help. When you set up your practice, make it a part of your routine, like brushing your teeth, and resolve to practice mindfulness even (especially) when you don’t feel like it. This is not a skill that you “need to be in the mood” for. In fact, some of your most effective mindfulness practice will likely be done when you “didn’t really feel like it”. Take a moment in the space below to develop a plan for working a regular mindfulness practice into your daily routine. Remember to be specific with your plan. Finding a way to piggyback your mindfulness practice onto pre-existing routines can be very helpful (e.g., I will practice mindfulness when I wash the dishes after dinner, or when I walk to class).
My plan to regularly practice mindfulness is…

Progressive Muscle Relaxation One of the more discrete changes that happen in our body when we are stressed or anxious is muscle tension. Muscle tension is an adaptive feature of the fight-or-flight response to help us escape danger. That is, shallow breathing helps blood cells fill up on oxygen, and an increased heart rate pumps that oxygenated blood to the muscles. The muscles use this oxygen-rich blood as fuel to build up tension in preparation to either fight, or to run away to safety (flight). You can think of an anxious person’s muscles as an elastic band all stretched out and ready to snap in a burst of energy. Progressive Muscle Relaxation, or PMR, is a technique that helps release the tension that builds up in our muscles from anxiety or stress. Although high muscle tension is a perfect mechanism for escaping danger, what happens when there is no immediate threat? Well, why don’t you try it out. Make a tight first with your hand, as tight as you can. Now tense up your wrist really tightly and bend it in towards your biceps, now bend in your biceps until your entire arm is as tense as you can possibly make it. Now hold and squeeze as hard as you can while you count to 10! Squeeze! Squeeze! Squeeze! Tight! Tight! Tight! Now let go. Let your arm drop loosely to your side. Let all the tension melt away. Ahhh… So what just happened? When you are anxious for long periods of time, your body is going through the same thing that your arm just went through; holding onto all of that muscle tension requires a lot of energy. Holding onto muscle tension throughout your body for the entire day is… well, exhausting. Highly anxious people tend to feel completely drained by the end of the day, but are unable to explain why. High muscle tension resulting from sympathetic nervous system activation is a good guess as to why that is; it’s like running a marathon, even while you’re sitting in your seat! PMR works to promote relaxation by letting the tension out of the muscles. Similar to deep breathing, this sends a message through the vagus nerve, which runs throughout the body, to calm down and this, in turn, activates the parasympathetic nervous system, or the brake pedal of stress. Typically, PMR is practiced for a minimum of 15 minutes; however, we also include a shorter alternative in this chapter to use if anxiety strikes you in the moment. Follow the directions below to practice:
Before You Begin
1. Pick a spot. Find a quiet, private spot where you can practice this exercise. As this exercise typically takes about 15–30 minutes, you want to find a place where you will likely not be disturbed for this length of time. For example, make sure that demanding pets with an affinity to walk all over you are not around. Try to find a place with minimal outside noise, turn off distractions like the TV and put your phone on airplane mode. A bedroom or reading area tend to make good places to practice.
2. Get comfortable. Ideally, you want to be seated in a comfortable chair that can support your
legs, arms, head, and neck. It is also possible to practice PMR when you are lying down, but make sure that you are not practicing in your bed (according to rules of sleep hygiene, your bed is only for sleeping! Using it to practice PMR may actually disrupt your sleep schedule). If you choose to practice PRM lying down, try not to do it at a time or place where sleep would come easily; you don’t want to sleep through this important tool!
3. Set a timer. If you are going through the exercise without an audio recording (i.e., running
through the steps in your mind), make sure to set an alarm in order to remove the need to worry about keeping track of time. If you are really prone to worrying, set two alarms!
Getting Started 4. Tensing. In order to truly relax each muscle group, you will first need to tense it as hard as you
can. This is so that your body can recognize the contrast between tense and relaxed muscles. You will go in order from the tip of your toes to the top of your head (see page 29 for a full list of the muscle groups to focus on in your PMR exercise). Make sure that you are isolating your tension to only one muscle group at a time; don’t let the tension seep into another muscle group. For example, if you are tensing your chest, make sure that your shoulders are not creeping up to your ears. Watch that your jaw is not tensing with other muscle groups, as well (it has a tendency to do that!). As you tense each muscle group, focus on all of the sensations your body creates. Tease apart all of the feelings. Does it feel warm? Cold? Does the muscle feel strong? Is the muscle shaking? What values do you place on these feelings? Does it feel pleasant or not so nice? Stay with all of the feelings. Remember to squeeze as hard as you can for the entire time you are tensing the muscle group, but not so hard that it causes serious pain or injury. Continue to hold the tension for about 10 seconds.
5. Relaxing. Once you are done tensing, completely let go of all tension. Let that body part drop back down or feel that body part sink deeper into the chair/couch/floor that it’s resting on. Imagine that all of the tension is flowing out of that muscle group like water (e.g., picture the tension dripping from your fingertips, or flowing down your legs to the floor). Focus on the new sensations that your body creates as the tension seeps out of that muscle group. See if you can contrast the feelings of relaxation with the sensations you experienced when the muscles were tense. What temperature is the muscle group now? What values would you place on the
feelings now? Continue to release all tension for about 15 seconds (longer than the time you tensed it).
6. Repeat. Follow the same format for each muscle group in order from your toes to your head. Use the list below, and tense each muscle group one at a time. Remember to keep the tension isolated just to a single muscle group.
7. Final check. Once you’ve gone through flexing and relaxing all of the muscle groups, scan your
body one last time. Is there any area that is still holding tension? If so, repeat the tensing and relaxing procedure a final time on those muscle groups. Once all of your body is feeling relaxed, take the remainder of your 15-30 minutes to sit with this sensation of full-body relaxation. Note if tension starts to creep into any muscle group and repeat the tense/relax procedures. Otherwise, sit with the feeling of relaxation. Be as present in your body as you can be. Enjoy.
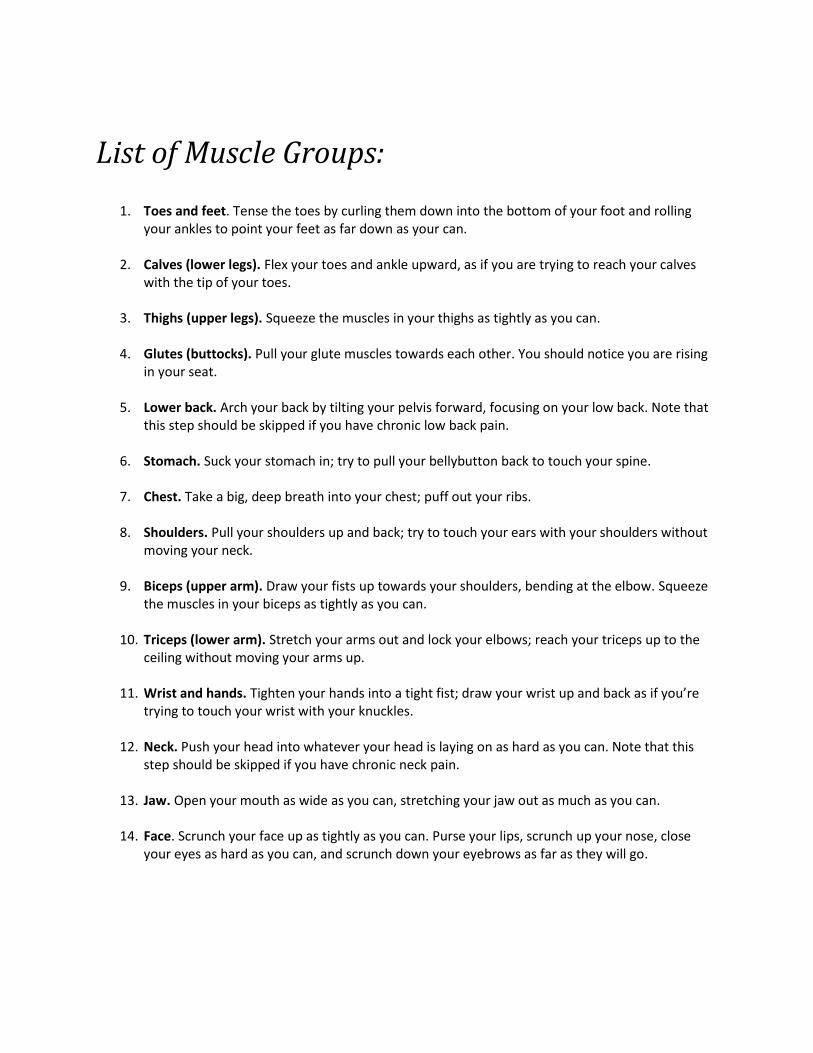
List of Muscle Groups:
1. Toes and feet. Tense the toes by curling them down into the bottom of your foot and rolling your ankles to point your feet as far down as your can.
2. Calves (lower legs). Flex your toes and ankle upward, as if you are trying to reach your calves
with the tip of your toes.
3. Thighs (upper legs). Squeeze the muscles in your thighs as tightly as you can.
4. Glutes (buttocks). Pull your glute muscles towards each other. You should notice you are rising in your seat.
5. Lower back. Arch your back by tilting your pelvis forward, focusing on your low back. Note that
this step should be skipped if you have chronic low back pain.
6. Stomach. Suck your stomach in; try to pull your bellybutton back to touch your spine.
7. Chest. Take a big, deep breath into your chest; puff out your ribs.
8. Shoulders. Pull your shoulders up and back; try to touch your ears with your shoulders without moving your neck.
9. Biceps (upper arm). Draw your fists up towards your shoulders, bending at the elbow. Squeeze
the muscles in your biceps as tightly as you can.
10. Triceps (lower arm). Stretch your arms out and lock your elbows; reach your triceps up to the ceiling without moving your arms up.
11. Wrist and hands. Tighten your hands into a tight fist; draw your wrist up and back as if you’re
trying to touch your wrist with your knuckles.
12. Neck. Push your head into whatever your head is laying on as hard as you can. Note that this step should be skipped if you have chronic neck pain.
13. Jaw. Open your mouth as wide as you can, stretching your jaw out as much as you can.
14. Face. Scrunch your face up as tightly as you can. Purse your lips, scrunch up your nose, close
your eyes as hard as you can, and scrunch down your eyebrows as far as they will go.
Variation 1: PMR on the Go If you do not have time to run through an entire PMR session, consider using the basic principles of PMR to tense and relax a single muscle group. Although this will not provide all of the benefits of a full session of PMR, it can certainly help reduce anxiety a bit. Depending on the muscle group you will be practicing on, you will likely want to sit in a relatively comfortable spot, although this may not be necessary. Just make sure that you will be able to fully relax the muscle group you’re focusing on when the time comes. Wherever you are, simply pick the muscle group that you would like to focus on. Tense that group as much as you can without causing pain and hold for 5-10 seconds. Then release all of the muscle tension for 10-15 seconds (remember to spend more time relaxing it than flexing it). Focus on the sensations in that part of your body and try to contrast the feeling of tension compared to relaxation. With some practice, you will start to recognize certain body parts that you tend to tense more. For example, common points of tension tend to be the jaw (common cause of headaches) and the shoulders. These tend to be good sites on which to practice PMG on the go.
Additional Notes to Remember PMR, like many of the Basic Skills explored in this workbook, require practice. In the beginning, PMR may feel awkward, difficult, or unpleasant. This is especially true if you tend to be very introspective with respect to body sensations; that is, some people are much more aware of things going on inside of their bodies than other people. If this is you, tensing your muscles for up to 10 seconds may be very unpleasant and—perhaps in the beginning—even stressful. However, it is important to continue practicing and push through this emotional discomfort. It is only with practice that this tool will become more effective. And remind yourself that, as an anxious person with your fight-or-flight response constantly activated, your muscles are likely to be tense most of the time anyway; tensing your muscles for PMR is nothing new! Furthermore, PMR is working with your body by sending a message to the vagus nerve (i.e., “it’s ok for you to relax now, muscles”) in order to turn off the fight-or-flight response. Nothing bad can happen to you by practicing PMR. It may take a while for this skill to feel effective for you, but with practice, it will come! If you think it would be easier to practice PMR with an audio-recording, as opposed to running through the script in your head, there are many options. First, you can consider recording yourself or ask a friend if you can record them reciting an adaptation of the script we provide. Alternatively, you can find many guided Progressive Muscle Relaxation scripts online.

Worry Time Everyone experiences worries at one point or another, but sometimes those worries can start to get in the way of other things. Worrying can act like a chain reaction: one worrying thought pops up, which tends to bring a different worrying thought, and that is attached to a number of additional worrying thoughts. Worry tends to increase in response to two different situations: (1) When we have a particular thing that is making us anxious (e.g., an upcoming exam); or (2) When our over-all anxiety is high. Worrying maintains or increases our anxiety, and it can eat up a lot of time and energy. Thoughts tend to come up as if they’re acting of their own accord. No one enjoys having worrying thoughts, but we all have them on occasion. Worry Time is a tool that gives you permission to worry in a controlled way, so that the worrying thoughts that pop up over the course of a day can be dealt with, instead of allowing them to eat up more than their share of your precious time and energy. Here’s how it works:
Before You Begin 1. Pick a time in the evening to practice your Worry Time. Make sure that you have plenty of time
to “unwind” in between Worry Time and your bedtime so as not to interfere with your ability to fall asleep. Typically, it is a good idea to practice Worry Time just before you have something to do (like dinner time, or cleaning the dishes), so that you can shift your thoughts to something different immediately afterwards.
2. Find a quiet place, somewhere where you are unlikely to be disturbed.
3. Set a timer for no more than 15 minutes. This is the time that you are allowed to worry for. You
don’t want to make that time too long, otherwise you may cross over from “worrying” to “ruminating” (when the same negative thoughts just go round and round and round in your head), which is not helpful!
Getting Started 4. Sit down with a pen and paper, or open up a new word processing document on your computer.
Once your timer starts, begin writing down all of your worries. Use this time to worry your heart out! There is no worry too big or too small for Worry Time.
5. When the timer goes off, stop! Turn the paper over or take your hands away from the keyboard.
Some people do not like to hold onto their worries, so feel free to rip up that paper or close the document without saving. That is it; the end of your Worry Time.
6. Try to immerse yourself in a different activity as soon as you can, in order to help prevent your
mind from continuing on the trail of some of those worrying thoughts.
7. Throughout the day, if a worrying thought comes up for you, take note. Tell yourself “ok, that is something I will need to worry about in Worry Time tonight”. If it helps, you can even write that thought down on a notepad or in your phone to remember for Worry Time.
Variation 1:
Instead of writing out your worries during Worry Time, you can talk them out. If you have a trusted person who wouldn’t mind sitting with you and quietly listen to you vent, you can use them as a sounding board. It’s not necessary for this person to provide feedback (in fact, this person should be silent during your Worry Time). This is a chance for you to get your worries out, not work them out! Alternatively, you can talk your worries out to yourself, if that would be easier for you.
Additional Notes to Remember
Worry Time is different from ruminating or dwelling on thoughts because it offers you a controlled time
to deal with them. For some people, one Worry Time per day isn’t enough. That’s just fine. You can have
more than one Worry Time per day. With practice, you will begin to notice that you don’t need as much
Worry Time, and you can try reducing the number of times you practice this tool in a day.
Also, it is very important to leave your worries at Worry Time. This doesn’t mean that you can absolutely
stop thoughts from popping up during the day, but you can decide to limit the time you give these
thoughts. This is why it is a good idea to have another activity planned for immediately after Worry
Time; so you can move on from these thoughts. Additionally, consider using Mindfulness (page 18),
Time Management Skills (page 30) or Thought Records (page 36) for more directive ways of dealing with
worry outside of your Worry Time. This skill isn’t intended for you to avoid your worries outside of
Worry Time, it’s meant to teach you how to tolerate these worries, and stop them from taking up too
much of your valuable time.

Time Management When we don’t have very effective time management strategies it can seem as if it’s impossible to fit in
the millions of assignments and readings that need to be finished before their due dates. Naturally, this
leads to an increase in stress and anxiety. Managing your time is a skill that—when done effectively—
can decrease the sensation of overwhelm by developing a strategy to manage the various tasks that
often build up day-to-day.
The use of a well thought out schedule decreases the amount of pressure for individual tasks, and
crossing items off the (do-able!) to-do list garners an incredible sense of achievement that can help to
counteract anxiety. By practicing and developing the skill of Time Management, you will be setting
yourself up for success in your studies. Properly navigating the time that you do have can increase your
productivity, which affords you more energy to devote to the tasks that you truly enjoy (and, in turn,
helps decrease overall levels of stress)! The wonderful part about learning Time Management skills is
that you will be able to use these skills throughout the rest of your life—in jobs, with family, and even in
relationships.
Steps in managing your time:
1. Analyze Your Current Situation Take some time to look at how you are actually using your time right now. This is an important first step, because it is very difficult to make a plan for where you’re going unless you have an idea of where you currently are! Ironically enough, this part can take some time to do. In Appendix B you will find a blank schedule of a full week (Worksheet 2.2 Time Management: Scheduling Your Time). In order to evaluate how you tend to spend your time, make a plan to fill out the schedule at the end of each day for the next week. Be sure to include ‘down time’, such as hanging out with friends, eating, and of course include any time that you are sleeping, as well.
2. Prioritize Write down everything that you have to do. Once this list is complete, take a look at all of the things that
need to get done. Note that seeing your entire to-do list on one page may increase your stress levels
slightly at first, but it will be worth it in the end! By writing a list of everything you have to do, it allows
you to plan the order to complete the tasks in a logical way that will most benefit you (i.e., prioritize!).
Typically, you will want to deal with the most urgent and important items first. Once these “big ticket”
items are completed, your stress should decrease, which makes it easier to complete the rest of your
list.
In order to help decide which task needs doing first, use the following table to break up which items are
urgent, which are important, and which are both (or neither). Items that are urgent and important
should be at the top of your list. Ideally, you are aiming to minimize the number of urgent tasks you

WORKSHEET 2.3 Time Management:
Prioritizing Your To-Do List
have, and mostly focus on important tasks. Typically, we define important as having at least one of the
following characteristics:
1. It’s a challenge 2. Completing it will put you ahead in some way 3. You are the only person who can do it
Use the following table to prioritize your to-do list according to the important/urgent criteria. You can
also find this table in Appendix B (Worksheet 2.3 Time Management: Prioritizing Your To-Do List)
3. Put Things into a Schedule Once you have decided on your priorities, it’s time to start putting all of your tasks into a schedule
including items that are important (e.g. your partner’s birthday party), urgent (e.g. an assignment due
tomorrow afternoon), and even those that do not fall into either of these categories (e.g. finishing the
final level of your newest video game). Remember that it’s important to have a schedule laid out,
because this is what will hold you accountable once you start crossing items off your list. It will also help
you develop a realistic plan for completing all of your tasks in a timely manner. Many students find it
useful to have a calendar for these reasons, either digitally or in paper form.
Important Not important
Urg
ent
No
t u
rgen
t

Remember that you have 168 hours every week–minus those hours during which you are sleeping, of
course. That’s still quite a bit of time, and sometimes seeing how much space there is can lessen the
overwhelm!
Using the blank schedule in Appendix B (Worksheet 2.2 Time Management: Scheduling Your Time); start
by filling in those items that you cannot change, for example lectures and fixed appointments. Take a
look at your schedule now and consider all of the free spaces you have! Fill in the rest of the schedule
according to your priorities. Don’t forget to include downtime/SPEMS, and time for a good night’s sleep.
Remember that it’s okay (and actually quite necessary) to have unplanned or white space, too.
4. Maximize Your Plan Every once in a while, when completing the above step, you will find that you have a decision to make—
maybe two items conflict, or something comes up that is unexpected. Decision-making can be tough,
but when it comes to time management, there are some questions you can ask yourself that may help:
Is the timing that I’ve laid out appropriate? Am I better at doing certain tasks at certain times of the day?
If I was an employer, would I pay myself to do what I’m doing/want to do?
Put things into perspective—what will the impact of my decision be five minutes from now? Five hours? Five days? Five years?
If you are still having difficulties choosing between various priorities, have a look at the Decisional
Balance Tool, found on page 34 and in Appendix B (Worksheet 2.4 Decision Making: Decisional Balance
Sheet).
5. Ensure Accountability Many people will get through the above steps, pat themselves on the back, walk away feeling great
about their Time Management skills… and never end up completing any of the plans that they set out to
do! This is because they may be lacking accountability. Accountability is something (or someone) that
will ensure you will actually complete the tasks that you have set out to do. Everybody is held
accountable in different ways. For some people, it is enough to have a to-do list, because those people
are able to stay accountable to themselves; however, these people are the exception, not the rule. Most
of us need something more. Maybe it’s having a friend or family member call and check in, or maybe it’s
setting up a game between classmates with challenges and rewards. How do you stay accountable?

6. Be Adaptable! This is much easier said than done, but it is important to remember that no matter how much effort
we’ve put into planning and managing our time, unexpected things always come up. Remember: it’s
okay to change your schedule, even if the reason is outside of your control. If some things on your list
don’t get completed as a result of schedule changes, there is literally another 168 hours waiting for you
next week!
Some additional tips or strategies that students often find helpful in managing their time and becoming
motivated:
If to-do lists don’t work for you, try making a ‘not-to-do’ list. Figure out what things you do that are not helping (e.g., things you do to procrastinate), and tell yourself that you will not do them for a certain period of time. For example, ‘I will not go on any social media sites from 6:00-8:00pm tonight’.
Try the five-minute rule. Starting on a task is often the most difficult part of the process, so rather than looking at it as multiple hours of work, set a timer for just five minutes. Start the task and fully devote yourself to working on the task for those five minutes. When the timer rings, give yourself permission to stop. But if you are motivated to keep going, then continue! Remember, if you find yourself not wanting to continue, that’s fine. At the very least, you still have completed five minutes’ worth of work!
Try to find ways to build up motivation over the long-term. Often times, once we’ve started working we can stay motivated for a while, but trying to get re-started after taking a break—whether it be a few minutes or a few days—can be very challenging. If you are taking a short break, try to keep your motivation going by stopping for your break five or ten minutes before you “run out of steam”. If you work until you are completely out of steam every time, it will very difficult to get back to work after a break. Alternatively, if you’re taking a longer break (e.g., you’re finishing up for the night and plan to keep working in the morning), consider leaving yourself a “fun” or engaging task to start up with after your long break. This way, you will be more motivated to start working tomorrow compared to if you stopped right before a task you really don’t enjoy.
Routine is very important—and helpful! Train your brain to know that certain times of the day are study times, and other times are relaxation times. The more you can keep up a similar schedule, the easier tasks become. Having a routine lets you go into “auto-pilot” mode, which takes away a lot of the decision-making that anxious people find so difficult, and therefore frees up a lot of time and valuable mental energy!
Discover your “productivity helpers”. For those activities you must do yourself, find ways to be as efficient as you can, that is, your “productivity helpers”. How can you take the pressure off of yourself as much as possible? For example, create reusable templates for anything that you do repeatedly, or write out study notes now so you have them ready during exam time. Your time is your most valuable resource—don’t squander it.

Decision Making Making decisions can be challenging for anybody, but anxiety can make it even more difficult. Anxiety often comes in the form of the fear of the unknown. In order to minimize anxiety, it’s not uncommon to try to plan for every possible outcome (see Chapter 3 on GAD, page 53). The problem is that planning for all possible outcomes can be incredibly overwhelming, and often cripple our ability to make a decision. Alternatively, it may just be easier to avoid the situation all together, and not make a decision at all. Below is a tool to help evaluate your options in order to make a decision; it’s called a Decisional Balance Tool. This tool can be used for big decisions (e.g., “What do I want to major in?”; “Should I take this part-time job?”), or smaller decisions (“What do I want to eat for lunch?”; “Should I go out with friends tonight, or stay in and study?”).
How to Use a Decisional Balance Sheet This tool is intended to help you come to a decision by: (1) Developing a reasonable number of options, and (2) Evaluating each option. First, you will write out all of your possible options (column 1). Sometimes there are only 2 options, sometimes there are more. Remember to try to look at all of the options available to you; ask for other people’s opinions if you think you may be overlooking something. Next, write out the costs and benefits to each option. Keep these as objective as possible; base the benefits and costs on facts as much as you can, not on opinions or hypotheticals. Ask yourself, “if 3 other people were to look at this right now, would they agree?”. If the answer is no, it’s probably not an objective point. Example
Andria is in her second year of BioChem, and is very unhappy with her program so far. She is considering changing into Philosophy, because she believes that she will enjoy it more, but she is having a very difficult time making this decision. Andria uses a Decisional Balance Sheet to work through this tough decision.

Options:
Benefits:
Costs:
(1) Stay in BioChem I’ve already spent 2 years in the program
…??? (nothing else)
I do not enjoy the material
I find the material very difficult to understand, and I am struggling to keep up with the workload
My levels of anxiety are very high because I am struggling in the program
I am unhappy
I have few friends in my program
(2) Switch into Philosophy I will be doing something that I love
I will be happier and less stressed out
In my philosophy elective, my mark was very high and I expect I could maintain a high average in the program
I find writing easy, so I will likely have less difficulty keeping up with the workload
I already have 3 friends in the program
My future job prospects may be less certain (but I can’t know for sure)
I may need to take an extra year to catch up on courses; financial expenses
WORKSHEET 2.4 Decision Making:
Decisional Balance Sheet
In the back of this workbook, you will find a handout with a full-sized Decisional Balance Sheet (Appendix B, Worksheet 2.4 Decision Making: Decisional Balance Sheet). Use this handout to tackle a decision that you are struggling with now. Write down all possible options first, and then take some time to explore the benefits and costs of each option. At the bottom of the handout there is a space to write the decision that you come to. Be sure to fill this out when you have completed the Decisional Balance Sheet.

The Thought Record One of the most important Basic Anxiety Management Skills is the ability to deal effectively with your
thoughts. Negative automatic thoughts—or ‘anxious cognitions’ as they are sometimes called—play a
central role where anxiety is concerned. Remember the Five Factor Model? (Page 2). Recall that our
thoughts, mood, physical state, behaviours, and situation all mutually influence one another. When we
are feeling anxious our mind will tend to generate more and more anxious thoughts. And, conversely,
the more anxious thoughts we think about and dwell upon, the more anxiety we will feel, both
emotionally and physically. Anxious thoughts will, in turn, influence our behaviour and how we choose
to handle our life situation. In the sections above we examined Basic Anxiety Management Skills that
primarily help reduce the emotional, physical, behavioural, and situational effects of anxiety, although
some of these—such as Mindfulness—can help quiet the mind as well. In this section, we will focus in on
our anxious thoughts.
Thoughts pass through our minds all the time, including benign thoughts and more emotionally charged
thoughts. This is what our minds love to do—our minds love to be busy and to think things. This is part
of the benefit—and at times the liability—of being in possession of a higher order brain! Ideally, we
want to be able to take advantage of the amazing things our brains can do, while also being able to slow
and calm down our minds when they behave in ways that are unhelpful. Anxiety tends to ramp up the
speed of our thoughts and compel us to think increasingly worrisome, extreme, and frightening
thoughts. Getting pulled into this cycle is definitely unhelpful.
Recall that there is an evolutionary basis for anxiety. When our bodies, minds, and emotions get revved
into high gear, this is known as the fight-or-flight response, and it is a survival mechanism that was
useful early in human history when we needed to keep ourselves safe from predators. We needed to be
able to think quickly (which is why our minds often race when anxious), and accurately assess danger
(which is why our brains focus on all the bad things that can happen when we are feeling anxious).
When we think anxious thoughts, our bodies can’t differentiate between an actual physical threat in the
world (like a sabre-toothed tiger) or a non-physical threat (like worry about passing a course or getting a
job). Our bodies respond as though we are actually in physical danger. This is why anxiety is often
accompanied by emotional and physical symptoms. Our bodies and minds are hardwired to do this and
can handle this in short bursts. The problem with anxiety is that we get stuck in this high gear and can’t
get out, which in turn leads to emotional distress, and over time, exhaustion and burnout.
So what can you do to intervene with your anxious thoughts? Well, you can’t control what you think. In
fact, trying to do so sometimes increases anxiety. What does work is subjecting your anxious thoughts to
the light of day by saying them out loud to someone else, or, as you’ll see below, writing them down on
paper. Getting anxious thoughts out of our head is the first step in helping us to see the distortion in our
thinking. The next step is to subject our thoughts to questioning, critique, or inquiry. When we do so,
the anxious thought usually lessens in intensity and may even be released entirely from our mind, at
least for a period of time, giving us some relief from our anxiety.

In order to go through this process, we use a widely-used tool called a Thought Record. The Thought
Record helps us to articulate our anxious thoughts, and then walks us through a process of inquiry to
question those thoughts. Finally, the Thought Record helps us to create a list of calmer, more balanced
and reasonable ways of thinking about ourselves and our situation.
In the following section, you will find step-by-step instructions for how to complete your own Thought
Record. Sample Thought Records will be included in subsequent chapters so that you can look at case
examples for the specific type of anxiety you are experiencing. In addition, there are two versions of the
blank Thought Record template in Appendix B for your use; one version is two pages (Worksheet 2.5a
Thought Record (2 page version)), for when you have a lot on your mind; the second version is a single
page (Worksheet 2.5b Thought Record (1 page version)), for quicker Thought Records.
Introduction to the Thought Record
Developing Awareness In order to be able to use a Thought Record to reduce anxiety, you will first need to be aware of what
your anxious thoughts actually are. It is possible that you are already quite aware of your anxious
thoughts and are able to begin writing them down immediately. If so, please proceed to the next section
on Completing the Thought Record. However, it is very common for people to have no conscious
awareness, or perhaps only a vague semi-awareness of the anxious thoughts that go through their mind.
If this is the case for you, try the following before attempting to use a Thought Record:
Over the next few days, practice Mindful Awareness of your anxious thoughts (for more information on
Mindfulness, see page 18). Simply begin to bring your attention to the thoughts that go through your
mind. As you go to class, get in the shower, or stand in line to get your lunch, notice what thoughts you
are having. Pay special attention to what thoughts occur just before your anxiety spikes or during the
times that you feel anxious. These are your anxious cognitions. You may wish to write the thoughts
down in a special notebook or in your phone when they happen. Then you can transfer these anxious
thoughts into a Thought Record at a later time.

Completing the Thought Record
Once you have some idea of what your anxious thoughts are, it is time to move on to the completion of
the actual Thought Record. There are three columns in the Thought Record. You can use the prompts at
the bottom of each column to help you. But first, review these detailed instructions for how to complete
your own personal Thought Record.
Column 1: Anxious/Negative Thoughts
In Column 1, write down any anxious thoughts that you are currently having. Thought Records work best
when they are done following an event that causes anxiety or if we are feeling particularly anxious. You
can also write down anxious thoughts that you had earlier in the day (even if you are not feeling anxious
now), or about a particular situation in your life around which you have been experiencing anxiety.
Remember that you can complete as many Thought Records as you’d like, so don’t feel as though you
need to write down every anxious thought you have on just one form.
Once you have listed your current or most pressing Anxious/Negative Thoughts, circle your Hot Thought
or group of related Hot Thoughts. Generally speaking, your Hot Thought is the anxious thought that
triggers the most intense anxiety. The thought or thoughts you have circled will be the one(s) you will be
working with for the remaining two columns of the Thought Record.
You are now ready to move on to Column 2.
Column 2: Identify Thought Distortions
In Column 2 you are asked to identify what specific Anxious Thought Distortions best describe your Hot
Thought(s). Read through the descriptions below of the most common Anxious Thought Distortions (For
ease of reference you will also find these listed at the bottom of Column 2 of the Thought Record
template).
Anxious Thought Distortions
One of the things that anxiety does is it drives our thoughts to extremes. Anxiety pulls our thoughts
down the road to believing in the most frightening, negative possible outcomes for situations, which in
turn ramps up our anxiety even more. When we are feeling anxious, the challenge is to keep our
thoughts as reality-based as possible.

Here is a list of the most common Anxious Thought Distortions. See if you can recognize your own
anxious thinking in any of these:
1. Catastrophizing. This is probably the most common Anxious Thought Distortion. Catastrophizing
occurs when your anxiety leads you to focus on and worry about the worst possible outcome of
a given situation. Typically, people begin by worrying about some concerning aspect of their
situation, then a snowball effect occurs in which one anxious thought leads to an even worse
anxious thought, and so on, until finally they are worrying about the worst possible case
scenario, which they then anxiously focus on. This leads us to the next Thought Distortion.
2. Overestimating Probability. When we anxiously worry about the worst possible outcome, we
also tend to vastly overestimate the statistical probability of the worst thing happening. In life,
terrible things usually only happen rarely. Most of the time things work out fine, or when we
encounter difficulties we are able to resolve them. When we are anxious, we tend to believe
that the worst possible outcome is very likely to occur when in fact, usually, it is statistically very
unlikely to occur.
3. Perfectionism. Perfectionistic thoughts drive us to always do more or be better. There is nothing
wrong with striving for excellence, but perfectionistic thought distortions are extreme,
unrelenting, and unreasonable. Perfectionism tells us that we are never good enough, we aren’t
doing enough, and we aren’t allowed to make mistakes. Perfectionistic thoughts often start with
“I should” or “I have to”.
4. Focusing on only the Negatives. Anxious thoughts tend to be (no surprise here) very negative.
Anxiety drives scary thoughts about ourselves and the world. In the process, we lose sight of
positive aspects of ourselves, our abilities, and our experiences in the world. We need to take a
step back and look at the whole picture—which usually includes both negative and positive.
5. Predicting the Future. This is also sometimes called Fortune Telling. When we are anxious we
tend to start having “What If?” thoughts. What if this bad thing happens or that bad thing
happens? We get into a mindset where we are predicting what will happen and then we start
believing our own predictions as though they are reality. We need to remind ourselves that we
can’t know what the future will bring, and reassure ourselves that it’s okay to be in a state of
openness and not knowing.
6. Generalizing. Generalizing happens when we believe that something will happen in a particular
way because it has happened that way before. “Because I failed my Christmas exam in this
course I know I’m going to fail the final”. Just because something has happened badly once
doesn’t mean it will necessarily happen that way again. This is especially true if you are using
new skills, such as Basic Anxiety Management Skills. Circumstances may have changed or be
different now. It is important to look realistically at the unique aspects of each situation.

7. Underestimating Your Ability to Cope. The fact is that, occasionally, bad or difficult things do
happen to us in life. We can’t prevent all bad things from ever happening. The question is how
do we cope or handle it when something difficult or upsetting does occur? This Anxious
Thought Distortion tells us that we couldn’t handle it, that we would fall apart, die of
embarrassment, or lose everything if something bad happened. But studies have shown that, on
average, people are much better at coping with terrible events than even they expect. Handling
difficult life experiences can help people to discover their own inner strengths, receive support
from others they didn’t know they had, and learn important lessons in their lives. When bad
things happen, we cope, we grow, and others rise up to help us. Try asking yourself “What
would I do if my worst fear happened?”; “How would I handle it?”; “What are my options?”
8. Mind Reading. We Mind Read when we imagine that we know what someone else is thinking,
for example: “She thinks I did a terrible job on my presentation”. Once we assume we know
what others are thinking or feeling we start worrying and become anxious about that. People
think all kinds of things; none of us can possibly know what someone else is thinking. Also, we
can’t control what people think about us; often what others think is filtered through their own
subjective perspective. Have you ever thought something not so great about someone else? Is it
possible to do that but still absolutely like the person? Of course it is! Practice letting go of
worrying about something you can’t control: other people’s thoughts.
Column 3: Balanced/Realistic Self-Talk
You are now ready to move to the third and final column. To complete this column, try as best as you
can to take a step back and examine your Hot Thought from a distance, as objectively as possible. Read
it over. Say it out loud. Then use the following questions (also listed at the bottom of Column 3 of the
Thought Record template) to question your Hot Thought(s):
Is the Hot Thought true? Is it always true? Is it partially true? Are there ways in which it is not true? Are there times when it is not true?
What is the evidence to support the Hot Thought? What is the evidence against it?
If you had to debate this thought or make a counterargument against it, what would you say?
Is there another way of looking at this?
What’s the bigger picture?
If you are catastrophizing, what is the probability of this thought actually happening? If your feared outcome does happen, how terrible would it be? Could you handle it, figure out how to move on with your life?
What would a good friend say to you about your perspective on this?
Are there kinder, more respectful ways of thinking about yourself in your life that allow you to be a human being who makes mistakes, with strengths and limitations?
Then, using these questions as guides, write down your new insights and alternative perspectives in
Column 3.

General Rules for Writing Balanced/Realistic
Self-Talk: 1. Use “I” statements. E.g., “I now choose to stay present-focused when writing my exams”.
2. Use the present tense. E.g., “I am now calm and grounded while I figure out how to get all my
work done”.
3. Use positive assertions, not negative ones. E.g. “I now use my Basic Skills to calm myself”
versus “I’m not going to have a Panic Attack”.
4. Use simple, balanced statements of reality. E.g., “I can be anxious and still do this.”
After Your Thought Record is Complete: Once you have completed a Thought Record, fold or detach the third column (Balanced/Realistic Self-
Talk). Keep the column somewhere you can easily refer to it. Tape it on your bathroom mirror or carry it
around in your bag with you for easy reference.
Then, use your Balanced/Realistic Self-Talk in one of two ways:
1. Read through the list repeatedly throughout the day to remind yourself of your balanced
perspective.
And/Or
2. Pick one statement from the list and repeat it over and over to yourself in your own mind. This is
especially important if you are entering a situation that triggers anxiety for you, or if you are
experiencing a higher than usual level of anxiety. By doing this you are effectively interrupting
your mind from thinking about and dwelling on anxious thoughts that ramp up your anxiety
levels. Instead, you are consciously focusing your mind on more realistic, calming thoughts.
You can return to your Balanced/Realistic Self-Talk sheet any time your anxiety begins to spike.
Remember that you can complete a Thought Record any time you are feeling anxious.
Take some time now to complete a Thought Record of your own. Or, review the chapter that addresses
the particular form of anxiety that you are experiencing, then complete a Thought Record. Don’t forget
that there are one- and two-page Thought Record templates in Appendix B.
Remember that by doing this work consistently with your anxious thoughts, you are creating new, more
positive and calming mental habits for yourself. Be patient with yourself; it takes time to retrain your
brain after months or even years of anxious thoughts taking hold. Be consistent, use your Thought
Record whenever anxiety arises, and you will reap the rewards over time.

Thought .. 1. Anxious/Negative Thoughts: 2. Identify Thought Distortions:
(select from list below)
1. Anxious/Negative Thoughts:
2. Identify Thought Distortions:
• Write down Anxious/Negative Thoughts
• Circle your Hot Thought or group of related Hot
Thoughts
Catastrophizing – focusing on the worst possible
outcome
Overestimating probability – of bad things
happening
Perfectionism – pressuring the self to be perfect: “I
should…”
Focusing on only the negatives – ignoring positives
Predicting the future – how can you know what will
happen?
Generalizing – ignoring differences in circumstances
Underestimating your ability to cope – if something
bad does happen
Mind reading – imagining you know what another is
thinking
WORKSHEET 2.5a Thought Record

Record 3. Balanced/Realistic Self-Talk:
(use the questions below)
3. Balanced/Realistic Self-Talk:
(Ask yourself…)
Is the Hot Thought true? Is it always true? Is it partially true? Are there ways in which it is not true? Are there times when it is not true?
What is the evidence to support the Hot Thought? What is the evidence against it?
If you had to debate this thought or make a counterargument against it, what would you say?
Is there another way of looking at this?
What’s the bigger picture?
If you are catastrophizing, what is the probability of this thought actually happening? If your feared outcome does happen, how terrible would it be? Could you handle it, figure out how to move on with your life?
What would a good friend say to you about this?
Are there kinder, more respectful ways of thinking about yourself in your life that allow you to be a human being who makes mistakes, with strengths and limitations?
WORKSHEET 2.5a Thought Record

Behavioural Experiments
Keep in mind the Five Part Model (page 2), and how multiple factors impact anxiety. One tool that uses this model to manage anxiety is the Behavioural Experiment, which helps create more balanced, healthy thoughts by targeting your behaviour. Behavioural Experiments can be used in two different ways: (1) To test out an anxious thought in order to help build up evidence against that thought; or (2) To build up evidence in favour of a new, balanced alternative thought after filling out a Thought Record. To illustrate how Behavioural Experiments work, think of your old, anxious thought as a comfort food, like grandma’s fried chicken. You know fried chicken isn’t really good for you, but you’ve been eating it for as long as you can remember and you can’t see yourself without it. Now think of a helpful, balanced thought as a healthy habit, like going to the gym. You know that going to the gym is much better for you than grandma’s fried chicken, but you’re hesitant to move on: “What if I don’t know how to use the machines at the gym and people laugh at me?”; “I’m not in as good shape as other people at the gym, they’re going to feel sorry for me”; “I’m probably going to end up hurting myself”; “I don’t think I’ll like the gym that much anyway”. But soon you find a workout class that you enjoy and those anxious thoughts suddenly hold less weight because you learn that they aren’t true. After going to the gym for a few weeks you don’t hurt yourself and you have no objective evidence to support that people feel sorry for you. Eventually, you start to crave the post-workout high, and one day you may even choose a salad over your grandma’s grease-soaked poultry. In the above example, the idea of going to the gym produced anxious thoughts predicting awful outcomes about embarrassment or injuries. Behavioural Experiments help us learn that we never know how things will turn out unless we test it out. “Facing your fears” is one of the most important skills you can use for managing or even eliminating anxiety. Additionally, the creation of new, balanced alternative thoughts may require some time and active practice before they become more believable, but Behavioural Experiments offer us a way to buy into the new thoughts, like one might buy into a new workout routine. So by testing out anxious thoughts (with behaviours), Behavioural Experiments help: (1) Reduce or eliminate anxious thoughts (your brain won’t want to hold onto the thoughts if you see they aren’t accurate); and (2) Give more weight to balanced, alternative thoughts (your brain will want to hold onto these thoughts if it sees they are more accurate). The more you expose yourself to these Behavioural Experiments, the more effective they become. That is, repeated exposure to these experiments helps condition our minds to accept new, more balanced ways of thinking. Behavioural Experiments offer a safe, structured way to disprove worrisome thoughts and give more support to balanced alternative thoughts!

How to Use Behavioural Experiments Behavioural Experiments are an important tool for testing out thoughts. They can be used to gather information for a Thought Record (i.e., evidence to support or not support your Hot Thought), or they can be used to help you “buy into” a new balanced, alternative thought (i.e., give more evidence to the thought by trying it out). Below, we include two different examples of people who use Behavioural Experiments to help with their anxiety. After you explore the examples, find the blank Behavioural Experiment sheet in Appendix B (Worksheet 2.6 Behavioural Experiment) and complete your own!
Things to Remember It is important to remember that changes in our thoughts do not happen right away. Sometimes it will take many repeated Behavioural Experiments before you start to truly believe a new, healthy thought. Be patient with yourself, but also consider using this as incentive to practice regularly. Start small and work your way up. If you need to, you can break down your Behavioural Experiment into multiple small experiments. With most of the skills we speak about in this workbook, you don’t want to set impossible goals for yourself or else you will just end up discouraged. If you are ever in doubt, make your behavioural experiment smaller or easier than you think you can handle and work your way up from there. This will help create a sense of accomplishment (just don’t make the goals too small so as not to make serious progress). Example (following-up on a Thought Record)
Sean has trouble saying no. He is in the fourth year of his engineering degree, and he is a coach at the gym 3 nights per week. Sean is very busy finishing up his degree, but the director at the gym asked Sean to take over another coach’s classes for a few weeks while that coach was recovering from an injury. Sean is very stressed out about this situation, so he did a Thought Record to help cope with this stress. His Hot Thought was “if I don’t say yes to the gym director, then he won’t be able to find a replacement coach and he’ll be disappointed in me” His balanced, alternative thought was “There are at least two other coaches the gym director could ask to help; just because I say no doesn’t mean I am completely letting him down”.
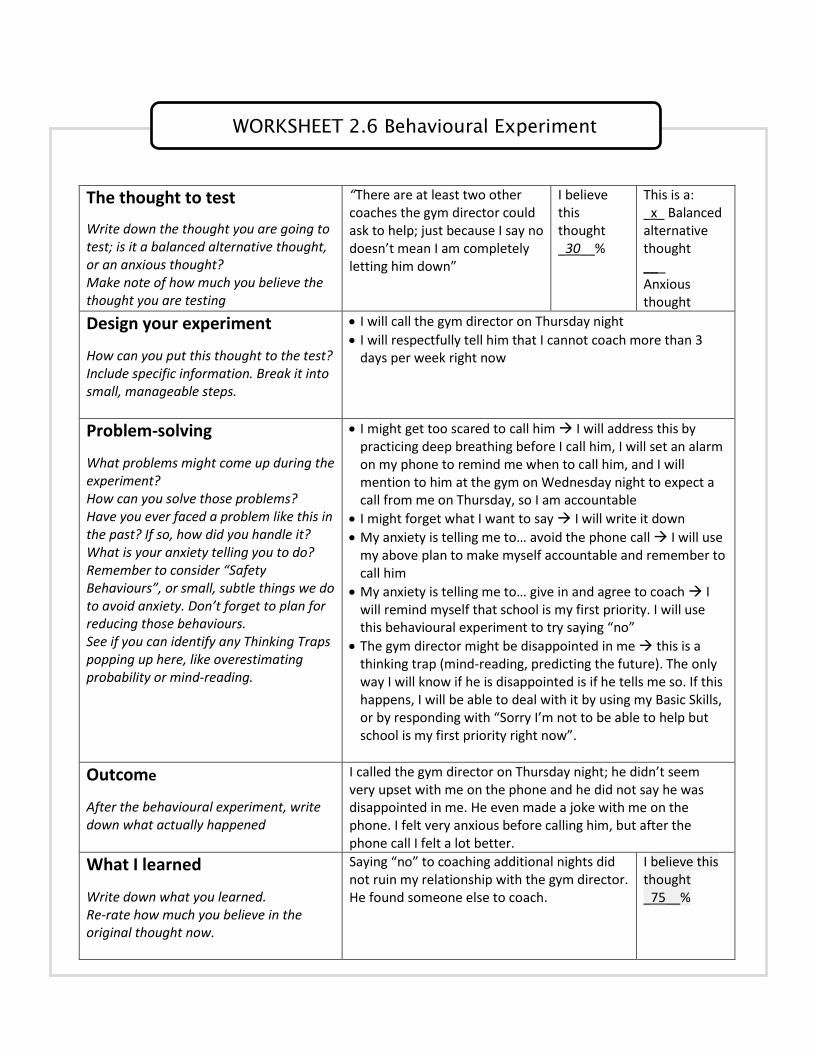
WORKSHEET 2.6 Behavioural Experiment
The thought to test
Write down the thought you are going to test; is it a balanced alternative thought, or an anxious thought? Make note of how much you believe the thought you are testing
“There are at least two other coaches the gym director could ask to help; just because I say no doesn’t mean I am completely letting him down”
I believe this thought _30__%
This is a: _x_ Balanced alternative thought ___ Anxious thought
Design your experiment
How can you put this thought to the test? Include specific information. Break it into small, manageable steps.
I will call the gym director on Thursday night
I will respectfully tell him that I cannot coach more than 3 days per week right now
Problem-solving
What problems might come up during the experiment? How can you solve those problems? Have you ever faced a problem like this in the past? If so, how did you handle it? What is your anxiety telling you to do? Remember to consider “Safety Behaviours”, or small, subtle things we do to avoid anxiety. Don’t forget to plan for reducing those behaviours. See if you can identify any Thinking Traps popping up here, like overestimating probability or mind-reading.
I might get too scared to call him I will address this by practicing deep breathing before I call him, I will set an alarm on my phone to remind me when to call him, and I will mention to him at the gym on Wednesday night to expect a call from me on Thursday, so I am accountable
I might forget what I want to say I will write it down
My anxiety is telling me to… avoid the phone call I will use my above plan to make myself accountable and remember to call him
My anxiety is telling me to… give in and agree to coach I will remind myself that school is my first priority. I will use this behavioural experiment to try saying “no”
The gym director might be disappointed in me this is a thinking trap (mind-reading, predicting the future). The only way I will know if he is disappointed is if he tells me so. If this happens, I will be able to deal with it by using my Basic Skills, or by responding with “Sorry I’m not to be able to help but school is my first priority right now”.
Outcome
After the behavioural experiment, write down what actually happened
I called the gym director on Thursday night; he didn’t seem very upset with me on the phone and he did not say he was disappointed in me. He even made a joke with me on the phone. I felt very anxious before calling him, but after the phone call I felt a lot better.
What I learned
Write down what you learned. Re-rate how much you believe in the original thought now.
Saying “no” to coaching additional nights did not ruin my relationship with the gym director. He found someone else to coach.
I believe this thought _75__%
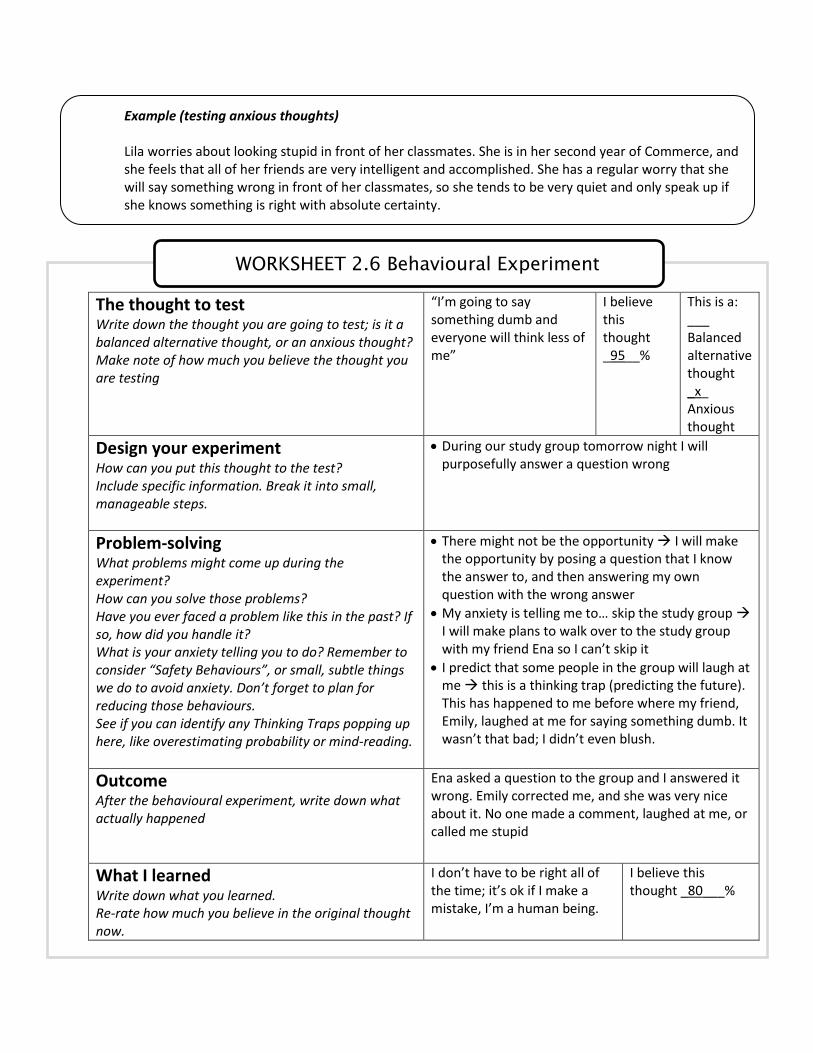
WORKSHEET 2.6 Behavioural Experiment
Example (testing anxious thoughts) Lila worries about looking stupid in front of her classmates. She is in her second year of Commerce, and she feels that all of her friends are very intelligent and accomplished. She has a regular worry that she will say something wrong in front of her classmates, so she tends to be very quiet and only speak up if she knows something is right with absolute certainty.
The thought to test Write down the thought you are going to test; is it a balanced alternative thought, or an anxious thought? Make note of how much you believe the thought you are testing
“I’m going to say something dumb and everyone will think less of me”
I believe this thought _95__%
This is a: ___ Balanced alternative thought _x_ Anxious thought
Design your experiment How can you put this thought to the test? Include specific information. Break it into small, manageable steps.
During our study group tomorrow night I will purposefully answer a question wrong
Problem-solving What problems might come up during the experiment? How can you solve those problems? Have you ever faced a problem like this in the past? If so, how did you handle it? What is your anxiety telling you to do? Remember to consider “Safety Behaviours”, or small, subtle things we do to avoid anxiety. Don’t forget to plan for reducing those behaviours. See if you can identify any Thinking Traps popping up here, like overestimating probability or mind-reading.
There might not be the opportunity I will make the opportunity by posing a question that I know the answer to, and then answering my own question with the wrong answer
My anxiety is telling me to… skip the study group I will make plans to walk over to the study group with my friend Ena so I can’t skip it
I predict that some people in the group will laugh at me this is a thinking trap (predicting the future). This has happened to me before where my friend, Emily, laughed at me for saying something dumb. It wasn’t that bad; I didn’t even blush.
Outcome After the behavioural experiment, write down what actually happened
Ena asked a question to the group and I answered it wrong. Emily corrected me, and she was very nice about it. No one made a comment, laughed at me, or called me stupid
What I learned Write down what you learned. Re-rate how much you believe in the original thought now.
I don’t have to be right all of the time; it’s ok if I make a mistake, I’m a human being.
I believe this thought _80___%