basho fury sumo - sideline strategysumo match in basho fury sumo. two sumotori (sumo wrestler) cards...
TRANSCRIPT
Page | 1
BASHO FURY SUMO GAME RULES
©2016 Sideline Strategy Games
INTRODUCTION The sport of Sumo has long been a fascination of mine. I can’t explain what draws me to the sport, but the
intensity and ferocity of a Sumo match is unparalleled in any other sport. I was compelled to bring Sumo
onto my tabletop in a game that plays as quickly as the actual matches and produces accurate results. The
culmination of these efforts is the game you currently hold in your hands. Throughout the remainder of this
instruction book, you will encounter several Sumo specific names and terms. Rather than provide a glossary
of terms at the end, a “translation” will follow these words in ( ). A Sumo Primer is included. This serves as
an introduction to this fascinating and lightning fast paced sport. If you are not familiar with the sport of
Sumo, it may be beneficial to review the primer first and then have it handy as you read through the rules.
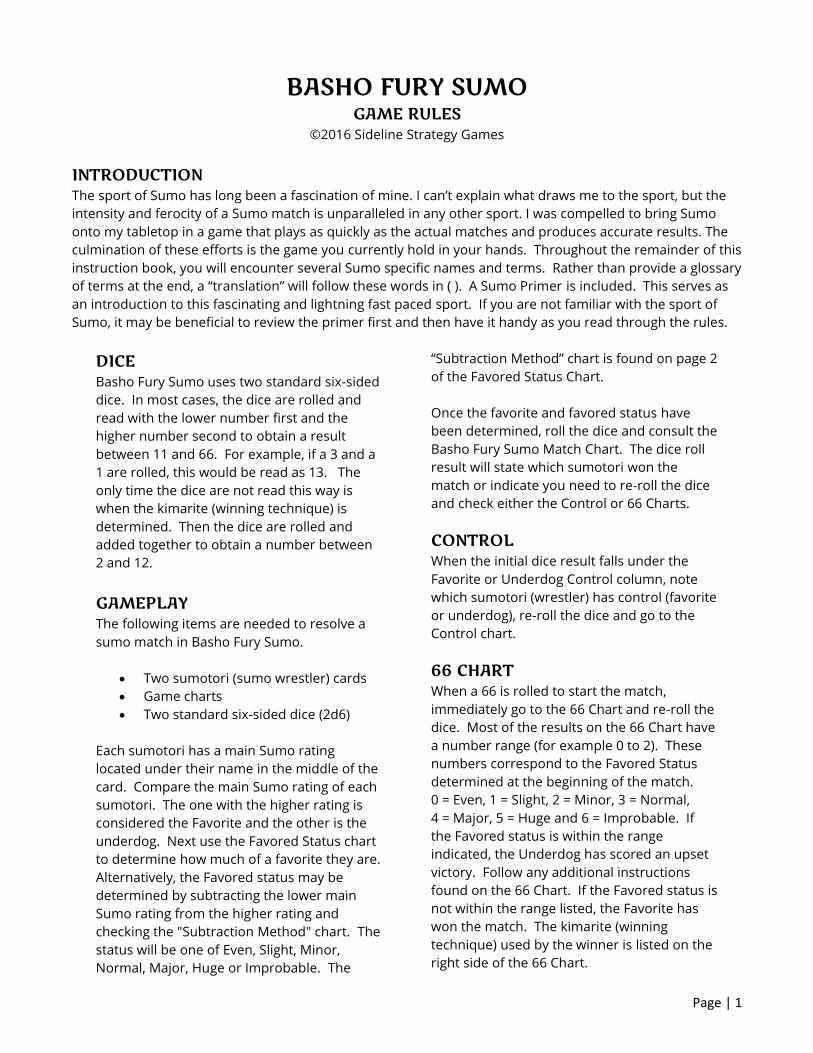
DICE Basho Fury Sumo uses two standard six-sided
dice. In most cases, the dice are rolled and
read with the lower number first and the
higher number second to obtain a result
between 11 and 66. For example, if a 3 and a
1 are rolled, this would be read as 13. The
only time the dice are not read this way is
when the kimarite (winning technique) is
determined. Then the dice are rolled and
added together to obtain a number between
2 and 12.
GAMEPLAY The following items are needed to resolve a
sumo match in Basho Fury Sumo.
Two sumotori (sumo wrestler) cards
Game charts
Two standard six-sided dice (2d6)
Each sumotori has a main Sumo rating
located under their name in the middle of the
card. Compare the main Sumo rating of each
sumotori. The one with the higher rating is
considered the Favorite and the other is the
underdog. Next use the Favored Status chart
to determine how much of a favorite they are.
Alternatively, the Favored status may be
determined by subtracting the lower main
Sumo rating from the higher rating and
checking the "Subtraction Method" chart. The
status will be one of Even, Slight, Minor,
Normal, Major, Huge or Improbable. The
“Subtraction Method” chart is found on page 2
of the Favored Status Chart.
Once the favorite and favored status have
been determined, roll the dice and consult the
Basho Fury Sumo Match Chart. The dice roll
result will state which sumotori won the
match or indicate you need to re-roll the dice
and check either the Control or 66 Charts.
CONTROL
When the initial dice result falls under the
Favorite or Underdog Control column, note
which sumotori (wrestler) has control (favorite
or underdog), re-roll the dice and go to the
Control chart.
66 CHART
When a 66 is rolled to start the match,
immediately go to the 66 Chart and re-roll the
dice. Most of the results on the 66 Chart have
a number range (for example 0 to 2). These
numbers correspond to the Favored Status
determined at the beginning of the match.
0 = Even, 1 = Slight, 2 = Minor, 3 = Normal,
4 = Major, 5 = Huge and 6 = Improbable. If
the Favored status is within the range
indicated, the Underdog has scored an upset
victory. Follow any additional instructions
found on the 66 Chart. If the Favored status is
not within the range listed, the Favorite has
won the match. The kimarite (winning
technique) used by the winner is listed on the
right side of the 66 Chart.

Page | 2
Another potential result from the 66 Chart is
the matta result. This means one of the
sumotori made a false start and the match
needs to be restarted from the beginning.
Some results from the 66 Chart increase or
decrease one or both sumotori’s ratings.
These changes only apply to the main Sumo
rating. The secondary ratings (Pow, Bal, Tec)
are never adjusted.
EDGE! Some results from the Control and 66 charts
redirect the action to the EDGE! Chart. This
represents when the match moves to the
edge of the dohyo (sumo ring). Re-roll the
dice to find the result of the match. Each
result also gives the kimarite (winning
technique) used to win the match. Some
results also have the Mono-ii result. This
means the Shimpan (ringside judges) have
called for a review to determine if the Gyoji’s
(in-ring judge) decision was correct or not.
The Mono-ii chart is located on the same page
as the Edge! Chart in the lower right corner.
Re-roll the dice and check the chart to
determine if the original decision is upheld,
reversed or if it was too close to call and the
match needs to be re-started from the
beginning.
INJURY
Several results on the Control, 66 and Edge
charts indicate to check one or both sumotori
for injury. To do so, first roll the dice and
check if the result is within the Inj range on
the sumotori card. If the dice result is within
the Inj range, the wrestler may be injured.
Otherwise, he is not injured. Re-roll the dice
and consult the Injury chart. Some cards will
have a + after the injury range. This means
the sumotori may miss an additional Basho
(tournament) as noted on the Injury chart. An
Inj range of 11* means the dice result must be
11 and then a second roll is made. If the dice
result is doubles, the sumotori may be
injured. If not doubles, no injury.
TIMING (optional)
To determine the time of the match, keep
track of the number of dice rolls it takes to
determine a winner. Roll the dice and look
under the appropriate column on the Timing
chart to determine the time of the match.
Only dice rolls to determine the winner are
counted. Subsequent rolls (for Kimarite,
injury, mono-ii, etc…) are not counted.
FAVORITE / UNDERDOG
If the sumotori both have the same Sumo
rating at the top of their card, then compare
their rank to determine which is the Favorite
and which is the Underdog. If they have the
same rank, then compare the secondary
ratings (Pow, Bal, Tec). The sumotori with the
highest secondary rating is the Favorite. For
example, if sumotori One has a high rating of
100 for Pow and sumotori Two has a high
secondary rating of 102 for Bal, sumotori Two
will be the favorite. If still tied, roll the dice for
each and the highest roll is the Favorite. If
tied, keep rolling until a Favorite is
determined.
FAVORED STATUS
To use the Favored Status chart, find the
higher rated sumotori’s rating on the left side
of the chart under the column heading “High
Rating”. Then locate the lower rated
sumotori’s rating within the ranges provided
to the right of the High Rating. At the top of
the page above each range is a column
heading (Improbable, Huge, Major, Normal,
Minor, Slight, Even) that indicates the favored
status for this match.
PRINTING The game materials are formatted to print on
US Letter size paper (8.5” x 11”). The charts
are intended to be printed back to back on
four sheets of paper. You may have to set
your PDF program to “fit to printable area”
when printing the charts.
Page | 3
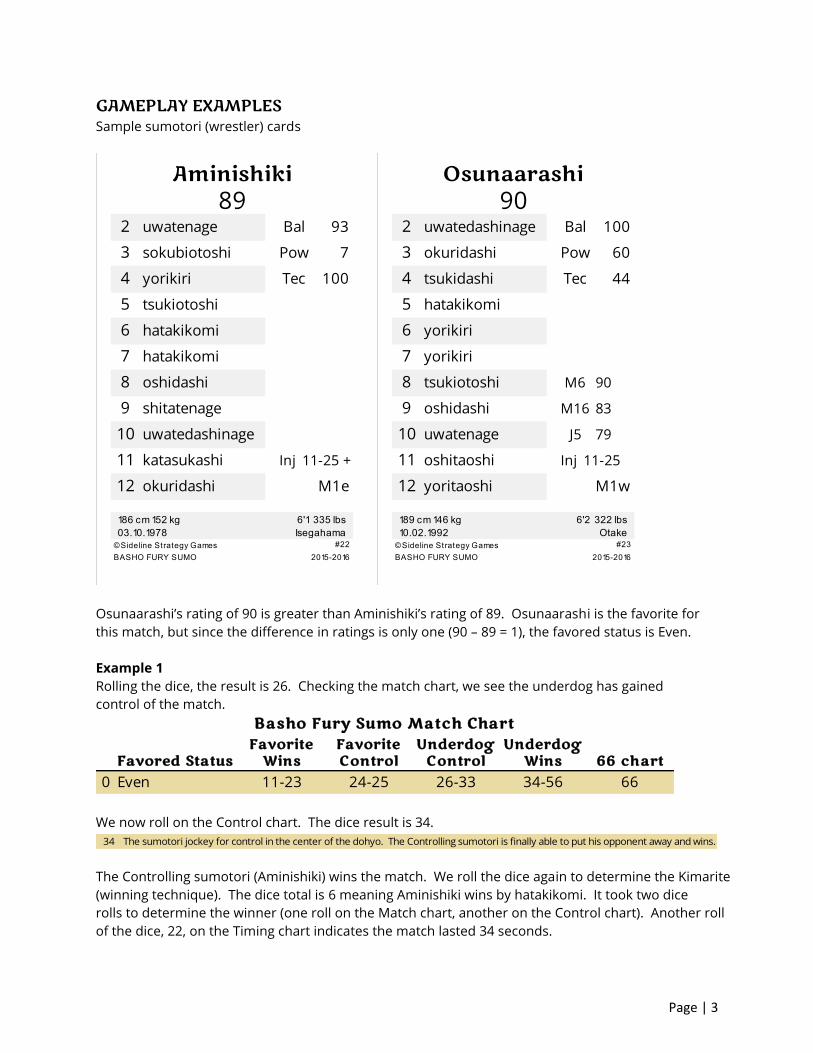
GAMEPLAY EXAMPLES Sample sumotori (wrestler) cards
Osunaarashi’s rating of 90 is greater than Aminishiki’s rating of 89. Osunaarashi is the favorite for
this match, but since the difference in ratings is only one (90 – 89 = 1), the favored status is Even.
Example 1
Rolling the dice, the result is 26. Checking the match chart, we see the underdog has gained
control of the match.
We now roll on the Control chart. The dice result is 34.
The Controlling sumotori (Aminishiki) wins the match. We roll the dice again to determine the Kimarite
(winning technique). The dice total is 6 meaning Aminishiki wins by hatakikomi. It took two dice
rolls to determine the winner (one roll on the Match chart, another on the Control chart). Another roll
of the dice, 22, on the Timing chart indicates the match lasted 34 seconds.
186 cm 152 kg 6'1 335 lbs 189 cm 146 kg 6'2 322 lbs
03.10.1978 Isegahama 10.02.1992 Otake
©Sideline Strategy Games ©Sideline Strategy Games
BASHO FURY SUMO 2015-2016 BASHO FURY SUMO 2015-2016
12 okuridashi M1e 12 yoritaoshi M1w
11 katasukashi Inj 11-25 + 11 oshitaoshi
10 uwatedashinage 10 uwatenage
9 shitatenage 9 oshidashi
8 oshidashi 8 tsukiotoshi
7 hatakikomi 7 yorikiri
6 hatakikomi 6 yorikiri
5 tsukiotoshi 5 hatakikomi
4 yorikiri Tec 100 4 tsukidashi
3 sokubiotoshi Pow 7 3 okuridashi
Aminishiki Osunaarashi89 90
2 uwatenage
#22 #23
Inj 11-25
J5 79
M16 83
M6 90
Tec 44
Pow 60
Bal 100Bal 93 2 uwatedashinage
Favorite Favorite Underdog UnderdogFavored Status Wins Control Control Wins 66 chart
0 Even 11-23 24-25 26-33 34-56 66
Basho Fury Sumo Match Chart
34 The sumotori jockey for control in the center of the dohyo. The Controlling sumotori is finally able to put his opponent away and wins.

Page | 4
Example 2
Using Osunaarshi and Aminishiki’s cards again, this time the initial dice roll is 16 which falls within
the 11-23 range under Favorite Wins. Osunaarashi wins the match. A total of 7 on the next dice roll
indicates Osunaarashi used yorkiri to win the match. Since only one roll was needed to determine
the winner, roll the dice and check under the 1 column on the Timing chart. The result is 12 showing
Osunaarashi blasted Aminishiki out of the dohyo (ring) in just 6 seconds!
Example 3
This time the dice roll to start the match is 24. The result is Favorite Control. Osunaarshi takes
control of the match and we roll on the Control Chart. A 22 is rolled.
This result says to compare each sumotori’s Bal rating. Osunaarashi has a Bal rating of 100 while
Aminishiki has a rating of 93 giving Osunaarashi the victory. A total of 6 on the Kimarite (winning
technique) roll shows Osunaarashi again used the yorikiri technique to win the match. The match
time was 19 seconds (a roll of 34 under column 2).
Example 4
Using the same cards above, the initial dice roll is a 66. Re-roll the dice and check the appropriately
named 66 Chart. The next roll result is 34.
Since the favored status was Even, the corresponding number for Even is 0 which falls within the 0
to 2 range indicated. Aminishiki wins the match in a mild upset and receives a 5 point boost to his
sumo rating of 89 making him a 94 for the remainder of the Basho. We also check Osunaarashi for
injury as noted. An injury roll of 44 is higher than the Inj range of 11-25 on Osunaarashi’s card so
there is no injury. If the roll had been within the 11-25 range, we would have re-rolled and checked
the injury chart to determine the severity of the injury and which body part was injured.
22 BALANCE - compare each sumotori's Bal ratings, higher wins the match. If tied, Controlling sumotori wins the match.
34 0 to 2 Underdog wins in MILD upset. 3 to 6 Favored sumotori wins. If Favored loses, check for injury. Tsuridashi 34
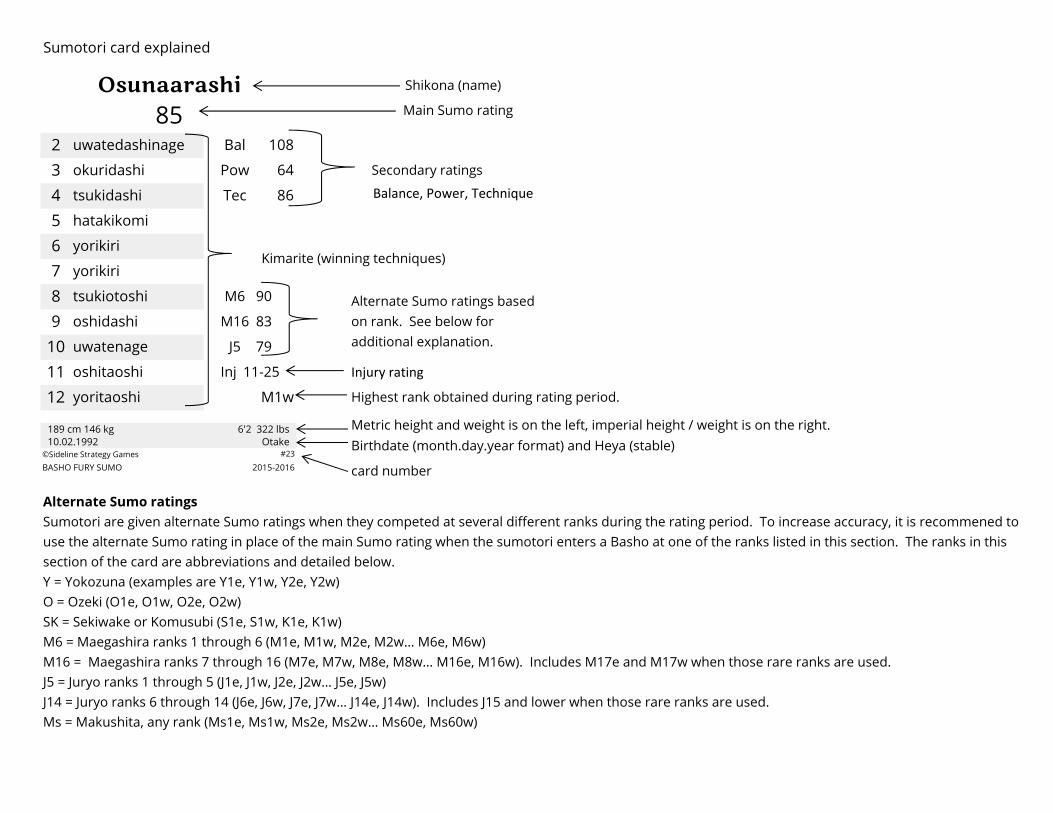
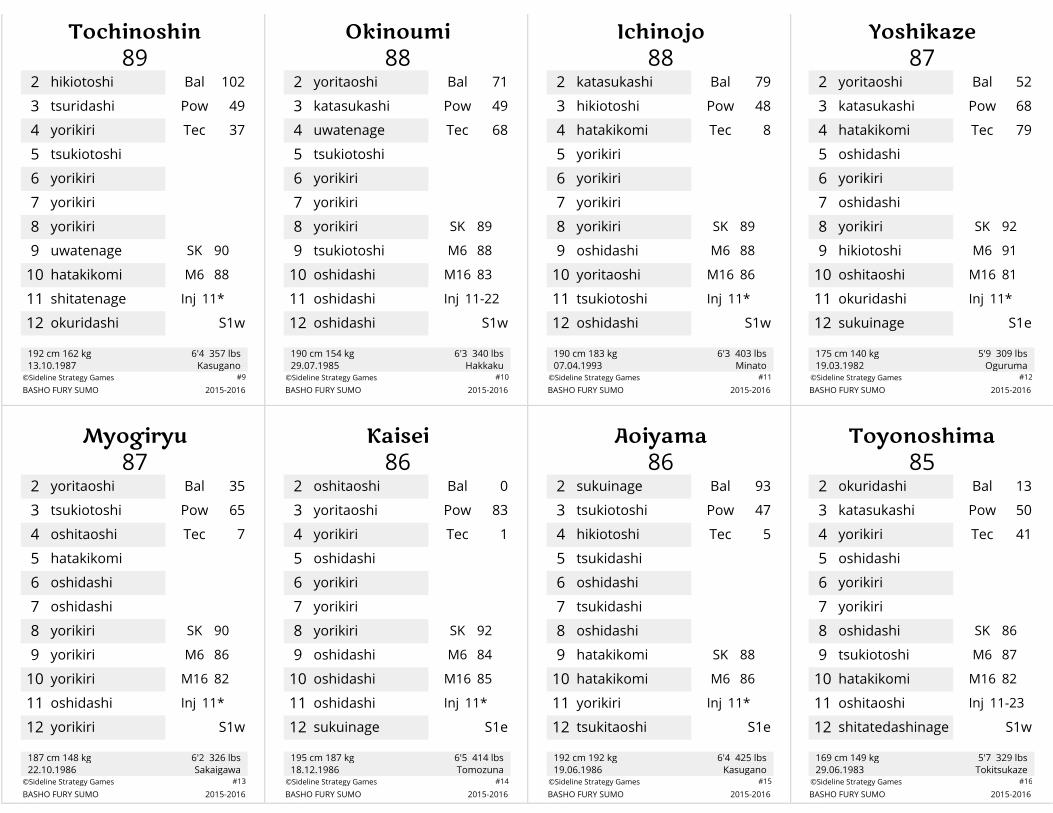
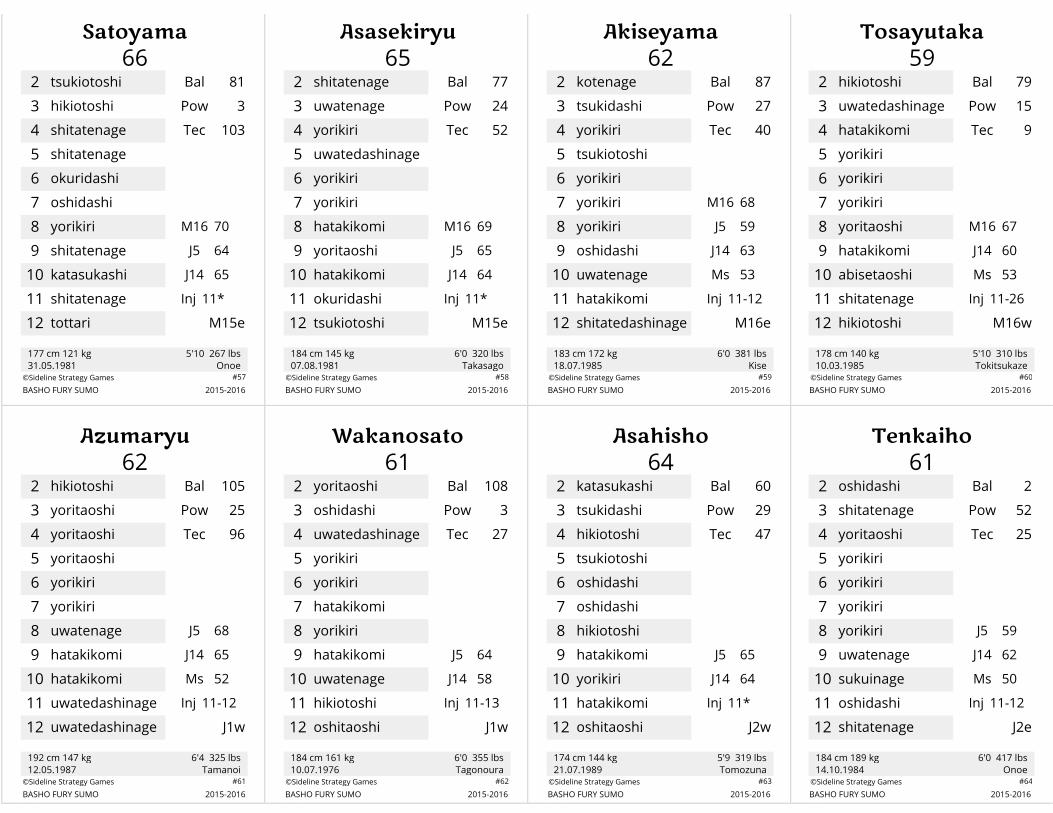
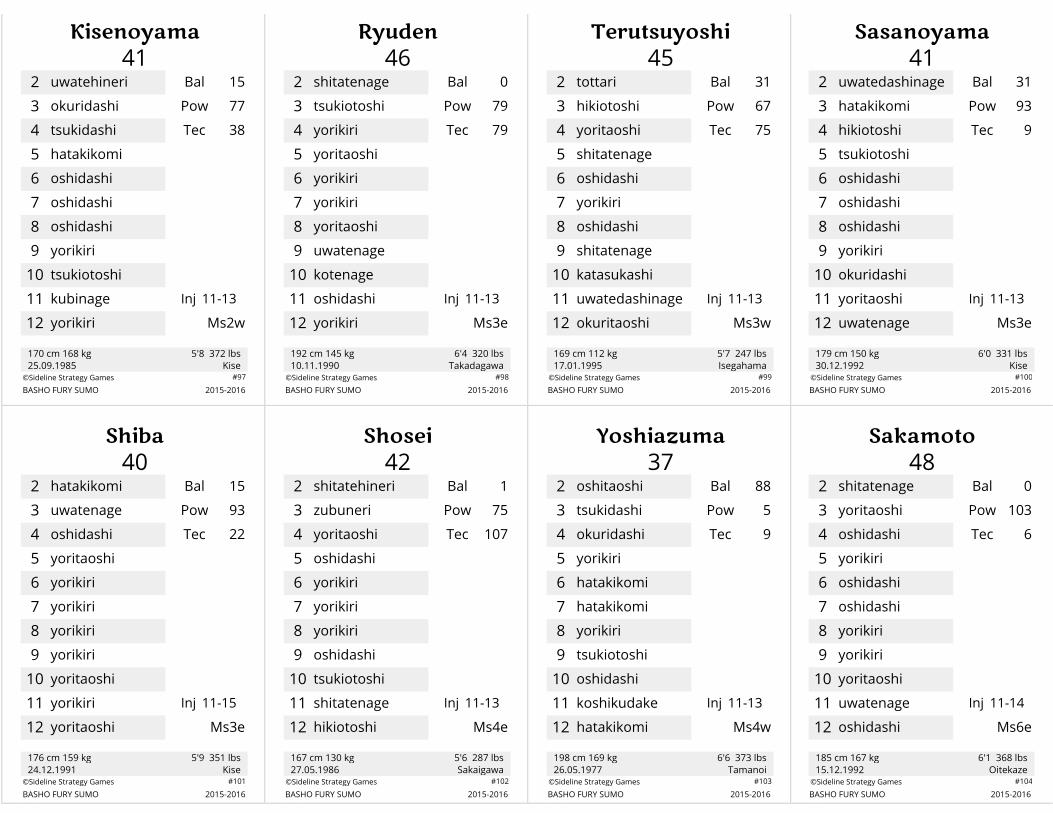
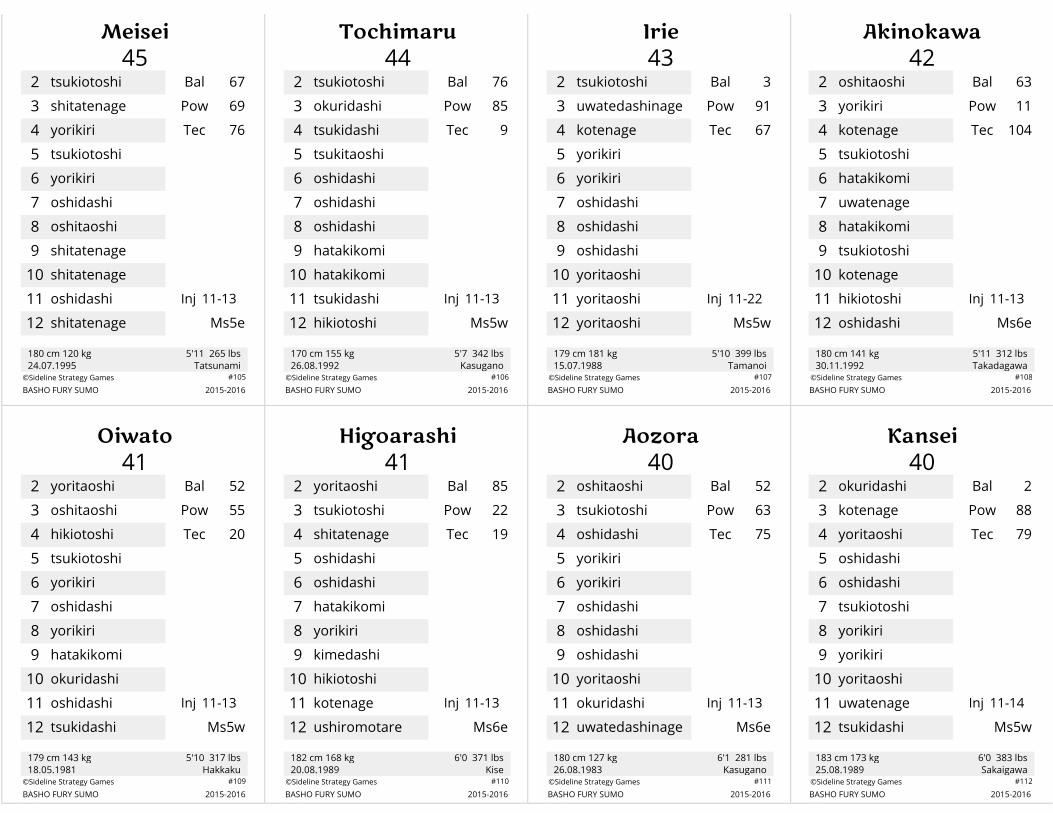
Sumotori card explained
Main Sumo rating
189 cm 146 kg 6'2 322 lbs
10.02.1992 Otake©Sideline Strategy Games
BASHO FURY SUMO 2015-2016 card number
Alternate Sumo ratings
Sumotori are given alternate Sumo ratings when they competed at several different ranks during the rating period. To increase accuracy, it is recommened to
use the alternate Sumo rating in place of the main Sumo rating when the sumotori enters a Basho at one of the ranks listed in this section. The ranks in this
section of the card are abbreviations and detailed below.
Y = Yokozuna (examples are Y1e, Y1w, Y2e, Y2w)
O = Ozeki (O1e, O1w, O2e, O2w)
SK = Sekiwake or Komusubi (S1e, S1w, K1e, K1w)
M6 = Maegashira ranks 1 through 6 (M1e, M1w, M2e, M2w… M6e, M6w)
M16 = Maegashira ranks 7 through 16 (M7e, M7w, M8e, M8w… M16e, M16w). Includes M17e and M17w when those rare ranks are used.
J5 = Juryo ranks 1 through 5 (J1e, J1w, J2e, J2w… J5e, J5w)
J14 = Juryo ranks 6 through 14 (J6e, J6w, J7e, J7w… J14e, J14w). Includes J15 and lower when those rare ranks are used.
Ms = Makushita, any rank (Ms1e, Ms1w, Ms2e, Ms2w… Ms60e, Ms60w)
#23
Bal 108
Shikona (name)
Metric height and weight is on the left, imperial height / weight is on the right.
3 okuridashi Pow 64
Osunaarashi
852 uwatedashinage
5 hatakikomi
4 tsukidashi Tec 86
8 tsukiotoshi M6 90
7 yorikiriKimarite (winning techniques)
6 yorikiri
10 uwatenage J5 79
9 oshidashi M16 83
12 yoritaoshi M1w
11 oshitaoshi Inj 11-25
Birthdate (month.day.year format) and Heya (stable)
Secondary ratings
Balance, Power, Technique
Alternate Sumo ratings based
on rank. See below for
additional explanation.
Injury rating
Highest rank obtained during rating period.

Favorite Favorite Underdog UnderdogFavored Status Wins Control Control Wins 66 chart
0 Even 11-23 24-25 26-33 34-56 66
1 Slight 11-24 25-26 33-34 35-56 66
2 Minor 11-26 33-34 35 36-56 66
3 Normal 11-34 35 36 44-56 66
4 Major 11-35 36-44 45 46-56 66
5 Huge 11-45 46 55-56 66
6 Improbable 11-55 56 66
Wins: The Favorite/Underdog has won the match. If desired, re-roll the dice and refer to the winning
sumotori's card to determine Kimarte (winning technique) and time of match.
Control: The Favorite/Underdog sumotori has gained control of the match. The in-control sumotori is now
considered the Favorite. Re-roll the dice and refer to the Control chart.
66 chart: An upset or rare occurrence is possible. Note the numeric value of the Favorite Status, Re-roll
the dice and refer to the 66 chart.
Basho Fury Sumo Match Chart
Basho Fury Sumo ©2016 Sideline Strategy Games

1 2 3 4 or more
11 12s 16s 39s 2m 15s
12 6s 17s 58s 1m 5s
13 10s 29s 52s 1m 11s
14 12s 27s 51s 1m 13s
15 21s 38s 49s 1m 14s
16 22s 41s 53s 1m 32s
22 8s 34s 42s 2m 25s
23 6s 32s 48s 1m 50s
24 10s 26s 46s 1m 22s
25 15s 25s 43s 1m 18s
26 23s 32s 56s 1m 24s
33 14s 28s 44s ?10s
34 15s 19s 54s 1m 9s
35 9s 31s 40s 1m 6s
36 11s 25s 45s 1m 12s
44 20s 37s 36s 2m 40s
45 24s 30s 47s 1m 35s
46 13s 33s 57s 1m 7s
55 11s 36s 55s ?20s
56 9s 18s 50s 1m 45s
66 7s 35s 59s ?30s
If the kimarite result is Hatakikomi or Hikiotoshi and only
one dice roll was needed to determine the winner, the
match time is 4 seconds. If more than one dice roll and/or
different kimarite, use the timing chart above.
? = re-roll one die. If the result is 1, 2, or 3, count that as
the number of minutes the match lasted. If the result is
4, 5 or 6, the match is 1 minute plus the seconds indicated.
m = minute(s), s = seconds
Dice
Roll
Timing Chart
Number of dice rolls during match
Basho Fury Sumo ©2016 Sideline Strategy Games

re-roll the dice and find result on the table below.
66 result Kimarte
11 EDGE! The match has moved to the edge of the dohyo. Please reference the EDGE! chart and re-roll the dice. 11
12 0 to 2 Underdog wins in MILD upset. 3 to 6 Favored sumotori wins. If Favored loses, check for injury. Sukuinage 12
13 0 to 3 Underdog wins match. 4 to 6 Favored sumotori wins. Tsukidashi 13
14 0 to 1 Underdog wins match. 2 to 6 Favored sumotori wins. Makiotoshi 14
15 Matta (false start) called. Restart match from the beginning. Underdog did not touch both hands down. 15
16 Underdog wins in surprise upset. Reduce Favored rating by 20 and check Favored for injury. Yoriki 16
22 Matta (false start) called. Restart match from the beginning. Underdog started early. 22
23 0 to 2 Underdog wins in MILD upset. 3 to 6 Favored sumotori wins. Check both sumotoris for injury. Hikkake 23
24 0 to 3 Underdog with UPSET victory. 4 to 6 Favored sumotori wins. Uwatedashinage 24
25 0 to 1 Underdog with UPSET victory. 2 to 6 Favored sumotori wins. Sotogake 25
26 0 to 5 Underdog with UPSET victory. 6 Favored sumotori wins. Tsukiotoshi 26
33 0 to 4 Underdog with UPSET victory. 5 to 6 Favored sumotori wins. Tsukitaoshi 33
34 0 to 2 Underdog wins in MILD upset. 3 to 6 Favored sumotori wins. If Favored loses, check for injury. Tsuridashi 34
35 0 to 3 Underdog wins match. 4 to 6 Favored sumotori wins. Tsukiotoshi 35
36 Matta (false start) called. Restart match from the beginning. Favored did not touch both hands down. 36
44 0 to 4 Underdog wins in MAJOR upset. 5 to 6 Favored wins. Check both sumotoris for injury. Kirikaeshi 44
45 0 to 2 Underdog wins in MILD upset. 3 to 6 Favored sumotori wins. If Underdog loses, check for injury. Kotenage 45
46 0 to 1 Underdog wins match. 2 to 6 Favored sumotori wins. Katasukashi 46
55 EDGE! The match has moved to the edge of the dohyo. Please reference the EDGE! chart and re-roll the dice. 55
56 0 to 5 Underdog wins in MAJOR upset. 6 Favored wins match. Okuritaoshi 56
66 Both sumotori take nasty fall off the dohyo. Favored sumotori awarded the win. Check both sumotori for injury. Utchari 66
The 0 to 5 number indicates the Favored status from the match chart (0 = Even, 1 = Slight, 2 = Minor, 3 = Normal, 4 = Major, 5 = Huge).
If the Favored status is within the range listed, the Underdog wins the match. Otherwise the Favored sumotori wins the match.
If the Underdog wins in an upset and the result includes a word in all capital letters, refer to additional consequences below.
MILD: Increase Underdog's rating by 5 for remaininder of Basho. No change to Favored sumotori's rating.
UPSET: Increase Underdog's rating by 5. Re-roll the dice, if the result is doubles, reduce the Favored sumotori's rating by 5. If the result
is not doubles, increase the Underdog's rating by an additional 2 points for a total increase of 7 points.
MAJOR: Immediately increase Underdog's rating by 5 and an additional 3 after each consecutive win. If/when Underdog loses a match,
keep all additions, but do not increase the rating again during this Basho. The Favored sumotori's rating is reduced by 5 after the loss.
If the Favored sumotori suffers a loss in next match, further reduce by 3 for a total reduction of 8. No other adjustments for additional
wins or losses.
Dice
Roll
66 chartDice
Roll
Basho Fury Sumo ©2016 Sideline Strategy Games

re-roll the dice and find result on the table below.
EDGE! result Won Kimarte
11 Favored sumotori pins underdog's arms against his body and forces him out. F Kimedashi 11
12 Favored sumotori grabs underdog's mawashi, lifts him to his toes and forces him out. F Yorikiri 12
13 Favored sumotori has mawashi grip but underdog turns and forces favorite out with both hands. INJURY? U Oshidashi 13
14 POWER - sumotori with higher Pow rating forces opponent out. If tied, Underdog is able to force Favored out. U Yorikiri 14
15 BALANCE - sumotori with higher Bal rating forces opponent out of the dohyo. If tied, Favored wins. F Oshidashi 15
16 Favorite has low grip on underdog who reaches over favorite's back to grasp mawashi and force him out. U Harimanage 16
22 Favored sumotori has underdog on edge of dohyo, but steps out first giving victory to underdog. U Visamiashi 22
23 Both sumotori have mawashi grips as they fall out of dohyo. Gyoji awards victory to favorite. MONO-II F Yorikiri 23
24 Underdog turns at the edge and forces favored sumotori out with body. U Tsukidashi 24
25 Underdog reaches over favored sumotori's back and pulls him to ground before stepping out himself. U Harimanage 25
26 Underdog wraps up favorite and twists his body, but falls underneath favorite on way to dohyo. INJURY? F Utchari 26
33 Favorite turns underdog around and pushes him out from behind. F Okuritaoshi 33
34 Favorite lifts underdog and throws him out, but is pulled with him. Gyoji awards win to favorite. MONO-II F Okuritsuridashi 34
35 Underdog wraps up favorite and twists him out. Gyoji rules that underdog stepped out first. MONO-II F Utchari 35
36 Favorite pushes underdog out for win. F Tsuridashi 36
44 Favorite backs underdog out for victory. F Ushiromotare 44
45 TECHNIQUE - sumotori with higher Tech rating forces opponent out with arm lock. If tied, Favored wins. F Kotenage 45
46 Favorite lifts underdog's leg and pushes him out. F Watashikomi 46
55 Favorite pushes underdog down and out of the dohyo. F Okuritaoshi 55
56 Underdog throws favorite, but both land together hard. Gyoji awards the match to Underdog. MONO-II U Okuritsuridashi 56
66 Controlling sumotori is given a favored status of 2. Re-roll the dice and refer to the 66 Chart. 66
The Favored sumotori is either the favorite from the beginning of the match
or the sumotori that was in control from the Control chart.
MONO-II: Shimpan (ringside judges) question Gyoji's decision and meet in Dice Roll Result
dohyo to discuss. Re-roll dice and check MONO-II chart to the right. 11 - 26 Gyoji decision upheld, no change to winner.
INJURY? : Check both sumotori for injury. 33 - 45 Gyoji decision reversed, change winner (same Kimarte).
Won: A quick reference showing the winner of the match. F = Favorite, 46 - 66 Shimpan unable to come to conclusive decision.
U = Underdog. May be changed by MONO-II result. Start the match from the beginning again.
EDGE!Dice
Roll
Dice
Roll
MONO-II
Basho Fury Sumo ©2016 Sideline Strategy Games
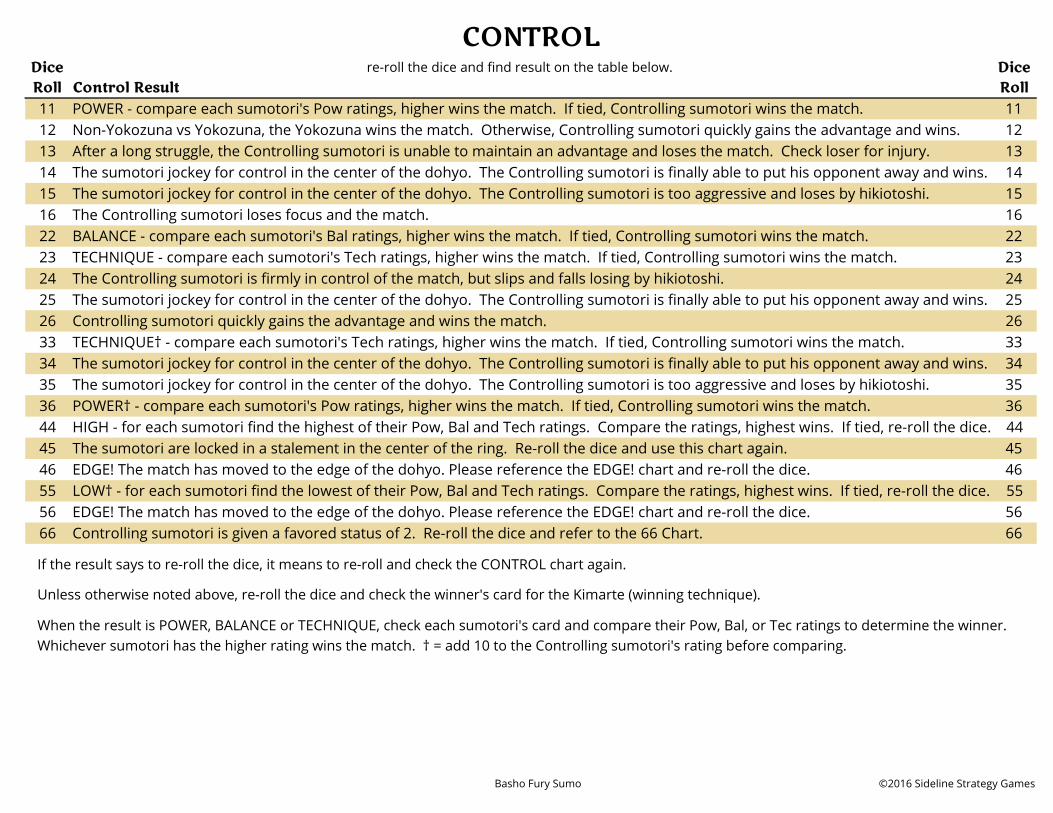
re-roll the dice and find result on the table below.
Control Result
11 POWER - compare each sumotori's Pow ratings, higher wins the match. If tied, Controlling sumotori wins the match. 11
12 Non-Yokozuna vs Yokozuna, the Yokozuna wins the match. Otherwise, Controlling sumotori quickly gains the advantage and wins. 12
13 After a long struggle, the Controlling sumotori is unable to maintain an advantage and loses the match. Check loser for injury. 13
14 The sumotori jockey for control in the center of the dohyo. The Controlling sumotori is finally able to put his opponent away and wins. 14
15 The sumotori jockey for control in the center of the dohyo. The Controlling sumotori is too aggressive and loses by hikiotoshi. 15
16 The Controlling sumotori loses focus and the match. 16
22 BALANCE - compare each sumotori's Bal ratings, higher wins the match. If tied, Controlling sumotori wins the match. 22
23 TECHNIQUE - compare each sumotori's Tech ratings, higher wins the match. If tied, Controlling sumotori wins the match. 23
24 The Controlling sumotori is firmly in control of the match, but slips and falls losing by hikiotoshi. 24
25 The sumotori jockey for control in the center of the dohyo. The Controlling sumotori is finally able to put his opponent away and wins. 25
26 Controlling sumotori quickly gains the advantage and wins the match. 26
33 TECHNIQUE† - compare each sumotori's Tech ratings, higher wins the match. If tied, Controlling sumotori wins the match. 33
34 The sumotori jockey for control in the center of the dohyo. The Controlling sumotori is finally able to put his opponent away and wins. 34
35 The sumotori jockey for control in the center of the dohyo. The Controlling sumotori is too aggressive and loses by hikiotoshi. 35
36 POWER† - compare each sumotori's Pow ratings, higher wins the match. If tied, Controlling sumotori wins the match. 36
44 HIGH - for each sumotori find the highest of their Pow, Bal and Tech ratings. Compare the ratings, highest wins. If tied, re-roll the dice. 44
45 The sumotori are locked in a stalement in the center of the ring. Re-roll the dice and use this chart again. 45
46 EDGE! The match has moved to the edge of the dohyo. Please reference the EDGE! chart and re-roll the dice. 46
55 LOW† - for each sumotori find the lowest of their Pow, Bal and Tech ratings. Compare the ratings, highest wins. If tied, re-roll the dice. 55
56 EDGE! The match has moved to the edge of the dohyo. Please reference the EDGE! chart and re-roll the dice. 56
66 Controlling sumotori is given a favored status of 2. Re-roll the dice and refer to the 66 Chart. 66
If the result says to re-roll the dice, it means to re-roll and check the CONTROL chart again.
Unless otherwise noted above, re-roll the dice and check the winner's card for the Kimarte (winning technique).
When the result is POWER, BALANCE or TECHNIQUE, check each sumotori's card and compare their Pow, Bal, or Tec ratings to determine the winner.
Whichever sumotori has the higher rating wins the match. † = add 10 to the Controlling sumotori's rating before comparing.
CONTROLDice
Roll
Dice
Roll
Basho Fury Sumo ©2016 Sideline Strategy Games

re-roll the dice and find result on the table below.
Injury Result Body Part injured
11 Misses remainder of Basho. Reduce rating by 10 at start of next Basho. Knee
12 Re-roll one die. Sumotori misses that many matches due to illness. Reduce rating by 5 for remainder of Basho. Illness
13 Suffers very minor injury. Does not miss any matches, no ratings change. Leg
14 Suffers very minor injury. Does not miss any matches, no ratings change. Arm
15 Suffers minor injury. Re-roll one die and reduce rating by die result. Foot
16 Suffers major injury. Re-roll both dice and reduce rating by total of dice. Leg
22 Misses remainder of Basho. Reduce rating by 7 at start of next Basho. Elbow
23 Reduce rating by 3 for remainder of Basho. Ankle
24 Reduce rating by 4 for remainder of Basho. Ankle
25 Reduce rating by 5 for remainder of Basho. Sumotori with + withdraws and misses rest of Basho. Wrist
26 Reduce rating by 5 for remainder of Basho. Sumotori with + withdraws if he loses next two matches. Foot
33 Misses remainder of Basho. Reduce rating by 5 at start of next Basho. Knee
34 Reduce rating by 6 for remainder of Basho. Shoulder
35 Reduce rating by 7 for remainder of Basho. Sumotori with + withdraws if he loses next matche. Shoulder
36 Reduce rating by 10 for remainder of Basho. Withdraws if he loses three consecutive matches. Shoulder
44 Misses remainder of Basho. Reduce rating by 10 at start of next Basho. Ankle
45 Reduce rating by 8 for remainder of Basho. Withdraws if he loses two consecutive matches. Elbow
46 Reduce rating by 9 for remainder of Basho. Withdraws if he loses three consecutive matches. Elbow
55 Misses remainder of Basho. Reduce rating by 10 at start of next Basho. Back
56 Misses next match. Give win to scheduled opponent. Reduce rating by 7 for remainder of Basho. Back
66 Misses remainder of Basho and next Basho. Reduce rating by 10 in first Basho back from injury. Back
All ratings adjustments remain in effect for the duration of the Basho. The ratings may be modified by additional injury or events
from other charts.
When a sumotori is injured and misses their next match, give the scheduled opponent a victory and the injured sumotori a loss. Any
additional days/matches missed, mark as an absent for the injured sumotori. If there are additional matches already scheduled, a
replacement opponent should be used. This may mean moving up lower ranked sumotori and/or using a Makushita opponent.
Some sumotori have a + in their injury rating. When these sumotori are injured for the remainder of the Basho, they may miss the next
Basho. If the injury result says to miss the remainder of the Basho and next Basho, these sumotori may miss the next two Basho. Roll
the dice before the Basho. If the dice result is within the Inj rating, the sumotori misses the Basho. Otherwise he is okay to compete.
An injury rating of 11* means the first roll must be 11 and a second roll is made and must be doubles (11, 22, 33, 44, 55 or 66) for an
injury to occur.
INJURYDice
Roll
Basho Fury Sumo ©2016 Sideline Strategy Games

High HighRating Improbable Huge Major Normal Minor Slight Even Rating Improbable Huge Major Normal Minor Slight Even
120 0 - 95 96 - 105 106 - 110 111 - 113 114 - 116 117 - 118 119 - 120 85 0 - 60 61 - 70 71 - 75 76 - 78 79 - 81 82 - 83 84 - 85
119 0 - 94 95 - 104 105 - 109 110 - 112 113 - 115 116 - 117 118 - 119 84 0 - 59 60 - 69 70 - 74 75 - 77 78 - 80 81 - 82 83 - 84
118 0 - 93 94 - 103 104 - 108 109 - 111 112 - 114 115 - 116 117 - 118 83 0 - 58 59 - 68 69 - 73 74 - 76 77 - 79 80 - 81 82 - 83
117 0 - 92 93 - 102 103 - 107 108 - 110 111 - 113 114 - 115 116 - 117 82 0 - 57 58 - 67 68 - 72 73 - 75 76 - 78 79 - 80 81 - 82
116 0 - 91 92 - 101 102 - 106 107 - 109 110 - 112 113 - 114 115 - 116 81 0 - 56 57 - 66 67 - 71 72 - 74 75 - 77 78 - 79 80 - 81
115 0 - 90 91 - 100 101 - 105 106 - 108 109 - 111 112 - 113 114 - 115 80 0 - 55 56 - 65 66 - 70 71 - 73 74 - 76 77 - 78 79 - 80
114 0 - 89 90 - 99 100 - 104 105 - 107 108 - 110 111 - 112 113 - 114 79 0 - 54 55 - 64 65 - 69 70 - 72 73 - 75 76 - 77 78 - 79
113 0 - 88 89 - 98 99 - 103 104 - 106 107 - 109 110 - 111 112 - 113 78 0 - 53 54 - 63 64 - 68 69 - 71 72 - 74 75 - 76 77 - 78
112 0 - 87 88 - 97 98 - 102 103 - 105 106 - 108 109 - 110 111 - 112 77 0 - 52 53 - 62 63 - 67 68 - 70 71 - 73 74 - 75 76 - 77
111 0 - 86 87 - 96 97 - 101 102 - 104 105 - 107 108 - 109 110 - 111 76 0 - 51 52 - 61 62 - 66 67 - 69 70 - 72 73 - 74 75 - 76
110 0 - 85 86 - 95 96 - 100 101 - 103 104 - 106 107 - 108 109 - 110 75 0 - 50 51 - 60 61 - 65 66 - 68 69 - 71 72 - 73 74 - 75
109 0 - 84 85 - 94 95 - 99 100 - 102 103 - 105 106 - 107 108 - 109 74 0 - 49 50 - 59 60 - 64 65 - 67 68 - 70 71 - 72 73 - 74
108 0 - 83 84 - 93 94 - 98 99 - 101 102 - 104 105 - 106 107 - 108 73 0 - 48 49 - 58 59 - 63 64 - 66 67 - 69 70 - 71 72 - 73
107 0 - 82 83 - 92 93 - 97 98 - 100 101 - 103 104 - 105 106 - 107 72 0 - 47 48 - 57 58 - 62 63 - 65 66 - 68 69 - 70 71 - 72
106 0 - 81 82 - 91 92 - 96 97 - 99 100 - 102 103 - 104 105 - 106 71 0 - 46 47 - 56 57 - 61 62 - 64 65 - 67 68 - 69 70 - 71
105 0 - 80 81 - 90 91 - 95 96 - 98 99 - 101 102 - 103 104 - 105 70 0 - 45 46 - 55 56 - 60 61 - 63 64 - 66 67 - 68 69 - 70
104 0 - 79 80 - 89 90 - 94 95 - 97 98 - 100 101 - 102 103 - 104 69 0 - 44 45 - 54 55 - 59 60 - 62 63 - 65 66 - 67 68 - 69
103 0 - 78 79 - 88 89 - 93 94 - 96 97 - 99 100 - 101 102 - 103 68 0 - 43 44 - 53 54 - 58 59 - 61 62 - 64 65 - 66 67 - 68
102 0 - 77 78 - 87 88 - 92 93 - 95 96 - 98 99 - 100 101 - 102 67 0 - 42 43 - 52 53 - 57 58 - 60 61 - 63 64 - 65 66 - 67
101 0 - 76 77 - 86 87 - 91 92 - 94 95 - 97 98 - 99 100 - 101 66 0 - 41 42 - 51 52 - 56 57 - 59 60 - 62 63 - 64 65 - 66
100 0 - 75 76 - 85 86 - 90 91 - 93 94 - 96 97 - 98 99 - 100 65 0 - 40 41 - 50 51 - 55 56 - 58 59 - 61 62 - 63 64 - 65
99 0 - 74 75 - 84 85 - 89 90 - 92 93 - 95 96 - 97 98 - 99 64 0 - 39 40 - 49 50 - 54 55 - 57 58 - 60 61 - 62 63 - 64
98 0 - 73 74 - 83 84 - 88 89 - 91 92 - 94 95 - 96 97 - 98 63 0 - 38 39 - 48 49 - 53 54 - 56 57 - 59 60 - 61 62 - 63
97 0 - 72 73 - 82 83 - 87 88 - 90 91 - 93 94 - 95 96 - 97 62 0 - 37 38 - 47 48 - 52 53 - 55 56 - 58 59 - 60 61 - 62
96 0 - 71 72 - 81 82 - 86 87 - 89 90 - 92 93 - 94 95 - 96 61 0 - 36 37 - 46 47 - 51 52 - 54 55 - 57 58 - 59 60 - 61
95 0 - 70 71 - 80 81 - 85 86 - 88 89 - 91 92 - 93 94 - 95 60 0 - 35 36 - 45 46 - 50 51 - 53 54 - 56 57 - 58 59 - 60
94 0 - 69 70 - 79 80 - 84 85 - 87 88 - 90 91 - 92 93 - 94 59 0 - 34 35 - 44 45 - 49 50 - 52 53 - 55 56 - 57 58 - 59
93 0 - 68 69 - 78 79 - 83 84 - 86 87 - 89 90 - 91 92 - 93 58 0 - 33 34 - 43 44 - 48 49 - 51 52 - 54 55 - 56 57 - 58
92 0 - 67 68 - 77 78 - 82 83 - 85 86 - 88 89 - 90 91 - 92 57 0 - 32 33 - 42 43 - 47 48 - 50 51 - 53 54 - 55 56 - 57
91 0 - 66 67 - 76 77 - 81 82 - 84 85 - 87 88 - 89 90 - 91 56 0 - 31 32 - 41 42 - 46 47 - 49 50 - 52 53 - 54 55 - 56
90 0 - 65 66 - 75 76 - 80 81 - 83 84 - 86 87 - 88 89 - 90 55 0 - 30 31 - 40 41 - 45 46 - 48 49 - 51 52 - 53 54 - 55
89 0 - 64 65 - 74 75 - 79 80 - 82 83 - 85 86 - 87 88 - 89 54 0 - 29 30 - 39 40 - 44 45 - 47 48 - 50 51 - 52 53 - 54
88 0 - 63 64 - 73 74 - 78 79 - 81 82 - 84 85 - 86 87 - 88 53 0 - 28 29 - 38 39 - 43 44 - 46 47 - 49 50 - 51 52 - 53
87 0 - 62 63 - 72 73 - 77 78 - 80 81 - 83 84 - 85 86 - 87 52 0 - 27 28 - 37 38 - 42 43 - 45 46 - 48 49 - 50 51 - 52
86 0 - 61 62 - 71 72 - 76 77 - 79 80 - 82 83 - 84 85 - 86 51 0 - 26 27 - 36 37 - 41 42 - 44 45 - 47 48 - 49 50 - 51
FAVORED STATUS CHART
Basho Fury Sumo ©2016 Sideline Strategy Games

High HighRating Improbable Huge Major Normal Minor Slight Even Rating Huge Major Normal Minor Slight Even
50 0 - 25 26 - 35 36 - 40 41 - 43 44 - 46 47 - 48 49 - 50 15 0 1 - 5 6 - 8 9 - 11 12 - 13 14 - 15
49 0 - 24 25 - 34 35 - 39 40 - 42 43 - 45 46 - 47 48 - 49 14 0 - 4 5 - 7 8 - 10 11 - 12 13 - 14
48 0 - 23 24 - 33 34 - 38 39 - 41 42 - 44 45 - 46 47 - 48 13 0 - 3 4 - 6 7 - 9 10 - 11 12 - 13
47 0 - 22 23 - 32 33 - 37 38 - 40 41 - 43 44 - 45 46 - 47 12 0 - 2 3 - 5 6 - 8 9 - 10 11 - 12
46 0 - 21 22 - 31 32 - 36 37 - 39 40 - 42 43 - 44 45 - 46 11 0 - 1 2 - 4 5 - 7 8 - 9 10 - 11
45 0 - 20 21 - 30 31 - 35 36 - 38 39 - 41 42 - 43 44 - 45 10 0 1 - 3 4 - 6 7 - 8 9 - 10
44 0 - 19 20 - 29 30 - 34 35 - 37 38 - 40 41 - 42 43 - 44 9 0 - 2 3 - 5 6 - 7 8 - 9
43 0 - 18 19 - 28 29 - 33 34 - 36 37 - 39 40 - 41 42 - 43 8 0 - 1 2 - 4 5 - 6 7 - 8
42 0 - 17 18 - 27 28 - 32 33 - 35 36 - 38 39 - 40 41 - 42 7 0 1 - 3 4 - 5 6 - 7
41 0 - 16 17 - 26 27 - 31 32 - 34 35 - 37 38 - 39 40 - 41 6 0 - 2 3 - 4 5 - 6
40 0 - 15 16 - 25 26 - 30 31 - 33 34 - 36 37 - 38 39 - 40 5 0 - 1 2 - 3 4 - 5
39 0 - 14 15 - 24 25 - 29 30 - 32 33 - 35 36 - 37 38 - 39 4 0 1 - 2 3 - 4
38 0 - 13 14 - 23 24 - 28 29 - 31 32 - 34 35 - 36 37 - 38 3 0 - 1 2 - 3
37 0 - 12 13 - 22 23 - 27 28 - 30 31 - 33 34 - 35 36 - 37 2 0 1 - 2
36 0 - 11 12 - 21 22 - 26 27 - 29 30 - 32 33 - 34 35 - 36 1 0 - 1
35 0 - 10 11 - 20 21 - 25 26 - 28 29 - 31 32 - 33 34 - 35 0 0
34 0 - 9 10 - 19 20 - 24 25 - 27 28 - 30 31 - 32 33 - 34
33 0 - 8 9 - 18 19 - 23 24 - 26 27 - 29 30 - 31 32 - 33
32 0 - 7 8 - 17 18 - 22 23 - 25 26 - 28 29 - 30 31 - 32
31 0 - 6 7 - 16 17 - 21 22 - 24 25 - 27 28 - 29 30 - 31
30 0 - 5 6 - 15 16 - 20 21 - 23 24 - 26 27 - 28 29 - 30 "Subtraction Method"
29 0 - 4 5 - 14 15 - 19 20 - 22 23 - 25 26 - 27 28 - 29 Subtract the lower rating from the higher rating and
28 0 - 3 4 - 13 14 - 18 19 - 21 22 - 24 25 - 26 27 - 28 reference the chart below.
27 0 - 2 3 - 12 13 - 17 18 - 20 21 - 23 24 - 25 26 - 27
26 0 - 1 2 - 11 12 - 16 17 - 19 20 - 22 23 - 24 25 - 26 Favored Status Difference between ratings
25 0 1 - 10 11 - 15 16 - 18 19 - 21 22 - 23 24 - 25 Even 0 to 1
24 0 - 9 10 - 14 15 - 17 18 - 20 21 - 22 23 - 24 Slight 2 to 3
23 0 - 8 9 - 13 14 - 16 17 - 19 20 - 21 22 - 23 Minor 4 to 6
22 0 - 7 8 - 12 13 - 15 16 - 18 19 - 20 21 - 22 Normal 7 to 9
21 0 - 6 7 - 11 12 - 14 15 - 17 18 - 19 20 - 21 Major 10 to 14
20 0 - 5 6 - 10 11 - 13 14 - 16 17 - 18 19 - 20 Huge 15 to 24
19 0 - 4 5 - 9 10 - 12 13 - 15 16 - 17 18 - 19 Improbable 25 or more
18 0 - 3 4 - 8 9 - 11 12 - 14 15 - 16 17 - 18
17 0 - 2 3 - 7 8 - 10 11 - 13 14 - 15 16 - 17
16 0 - 1 2 - 6 7 - 9 10 - 12 13 - 14 15 - 16
FAVORED STATUS CHART
Basho Fury Sumo ©2016 Sideline Strategy Games

193 cm 150 kg 6'4 332 lbs 185 cm 135 kg 6'1 298 lbs 186 cm 150 kg 6'1 331 lbs 188 cm 177 kg 6'2 390 lbs
11.03.1985 Miyagino 14.04.1984 Isegahama 10.08.1985 Izutsu 03.07.1986 Tagonoura©Sideline Strategy Games ©Sideline Strategy Games ©Sideline Strategy Games ©Sideline Strategy Games
BASHO FURY SUMO 2015-2016 BASHO FURY SUMO 2015-2016 BASHO FURY SUMO 2015-2016 BASHO FURY SUMO 2015-2016
180 cm 177 kg 5'11 390 lbs 192 cm 158 kg 6'4 349 lbs 183 cm 158 kg 6'0 349 lbs 189 cm 154 kg 6'2 340 lbs
30.01.1984 Sadogatake 29.11.1991 Isegahama 06.04.1986 Sakaigawa 09.03.1987 Kasugano©Sideline Strategy Games ©Sideline Strategy Games ©Sideline Strategy Games ©Sideline Strategy Games
BASHO FURY SUMO 2015-2016 BASHO FURY SUMO 2015-2016 BASHO FURY SUMO 2015-2016 BASHO FURY SUMO 2015-2016
Bal 108
6 yorikiri
3 uwatenage Pow 105
4 oshidashi Tec 107
Harumafuji
1012 hatakikomi Bal 63
#1
11 hatakikomi Inj 11-22
12 sukuinage Y1e
9 oshidashi
10 tsukiotoshi
7 yorikiri
8 uwatenage
5 uwatenage
6 yorikiri
3 hikiotoshi Pow 106
4 yorikiri Tec 108
Hakuho
1042 okuridashi
Kisenosato
992 kotenage Bal 93
3 okuridashi Pow 106
4 yorikiri Tec 71
5
11 shitatenage Inj 11-26 +
12 tsukiotoshi Y1e
9 hatakikomi
10 hatakikomi
7 yorikiri
8 oshidashi
oshidashi
6 yorikiri
Kakuryu
1002 yoritaoshi Bal 100
3 uwatenage Pow 92
4 yorikiri Tec 107
5
#4
Kotoshogiku
962 sukuinage Bal 0
11 yoritaoshi Inj 11*
12 uwatenage O1e
9 tsukiotoshi
10 oshidashi
7 yorikiri
8 yorikiri
oshidashi
6 yorikiri
#3#2
11 yoritaoshi Inj 11-24 +
12 oshitaoshi Y1e
9 uwatedashinage
10 oshidashi
7 yorikiri
8 shitatenage
5 uwatenage
6 yorikiri
#5
Terunofuji
942 yoritaoshi Bal 106
3 kimedashi Pow 63
4 yorikiri Tec 97
5
11 oshidashi Inj 11-22
12 oshidashi O1e
9 yorikiri
10 oshidashi
7 yorikiri
8 yorikiri
5 yorikiri
6 yorikiri
3 watashikomi Pow 102
4 tsukiotoshi Tec 36
Tochiozan
922 okuritaoshi Bal 37
3 tsukiotoshi Pow 67
4 sukuinage Tec 48
5
11 yorikiri Inj 11-13
12 kubinage O1w
9 yorikiri
10 kubinage
7 oshidashi
8 yorikiri
kubinage
6 kubinage
Goeido
932 sukuinage Bal 39
3 hatakikomi Pow 50
4 tsukiotoshi Tec 89
5
#8
11 oshitaoshi Inj 11*
12 oshidashi S1e
9 yorikiri SK 92
10 hatakikomi M6 91
7 oshidashi
8 oshidashi
yorikiri
6 oshidashi
#7#6
11 sukuinage Inj 11-22
12 hatakikomi O1e
9 oshidashi SK 98
10 kotenage M6 91
7 yorikiri
8 yorikiri O 94
uwatenage
192 cm 162 kg 6'4 357 lbs 190 cm 154 kg 6'3 340 lbs 190 cm 183 kg 6'3 403 lbs 175 cm 140 kg 5'9 309 lbs
13.10.1987 Kasugano 29.07.1985 Hakkaku 07.04.1993 Minato 19.03.1982 Oguruma©Sideline Strategy Games ©Sideline Strategy Games ©Sideline Strategy Games ©Sideline Strategy Games
BASHO FURY SUMO 2015-2016 BASHO FURY SUMO 2015-2016 BASHO FURY SUMO 2015-2016 BASHO FURY SUMO 2015-2016
187 cm 148 kg 6'2 326 lbs 195 cm 187 kg 6'5 414 lbs 192 cm 192 kg 6'4 425 lbs 169 cm 149 kg 5'7 329 lbs
22.10.1986 Sakaigawa 18.12.1986 Tomozuna 19.06.1986 Kasugano 29.06.1983 Tokitsukaze©Sideline Strategy Games ©Sideline Strategy Games ©Sideline Strategy Games ©Sideline Strategy Games
BASHO FURY SUMO 2015-2016 BASHO FURY SUMO 2015-2016 BASHO FURY SUMO 2015-2016 BASHO FURY SUMO 2015-2016
Tochinoshin
892 hikiotoshi Bal 102
6 yorikiri
#9
Okinoumi
882 yoritaoshi Bal 71
3 katasukashi Pow 49
4 uwatenage Tec 68
5
11 shitatenage Inj 11*
12 okuridashi S1w
9 uwatenage SK 90
10 hatakikomi M6 88
7 yorikiri
8 yorikiri
5 tsukiotoshi
6 yorikiri
3 tsuridashi Pow 49
4 yorikiri Tec 37
Yoshikaze
872 yoritaoshi Bal 52
3 katasukashi Pow 68
4 hatakikomi Tec 79
5
11 tsukiotoshi Inj 11*
12 oshidashi S1w
9 oshidashi M6 88
10 yoritaoshi M16 86
7 yorikiri
8 yorikiri SK 89
yorikiri
6 yorikiri
Ichinojo
882 katasukashi Bal 79
3 hikiotoshi Pow 48
4 hatakikomi Tec 8
5
#12
Myogiryu
872 yoritaoshi Bal 35
11 okuridashi Inj 11*
12 sukuinage S1e
9 hikiotoshi M6 91
10 oshitaoshi M16 81
7 oshidashi
8 yorikiri SK 92
oshidashi
6 yorikiri
#11#10
11 oshidashi Inj 11-22
12 oshidashi S1w
9 tsukiotoshi M6 88
10 oshidashi M16 83
7 yorikiri
8 yorikiri SK 89
tsukiotoshi
6 yorikiri
#13
Kaisei
862 oshitaoshi Bal 0
3 yoritaoshi Pow 83
4 yorikiri Tec 1
5
11 oshidashi Inj 11*
12 yorikiri S1w
9 yorikiri M6 86
10 yorikiri M16 82
7 oshidashi
8 yorikiri SK 90
5 hatakikomi
6 oshidashi
3 tsukiotoshi Pow 65
4 oshitaoshi Tec 7
Toyonoshima
852 okuridashi Bal 13
3 katasukashi Pow 50
4 yorikiri Tec 41
5
11 yorikiri Inj 11*
12 tsukitaoshi S1e
9 hatakikomi SK 88
10 hatakikomi M6 86
7 tsukidashi
8 oshidashi
tsukidashi
6 oshidashi
Aoiyama
862 sukuinage Bal 93
3 tsukiotoshi Pow 47
4 hikiotoshi Tec 5
5
#16
11 oshitaoshi Inj 11-23
12 shitatedashinage S1w
9 tsukiotoshi M6 87
10 hatakikomi M16 82
7 yorikiri
8 oshidashi SK 86
oshidashi
6 yorikiri
#15#14
11 oshidashi Inj 11*
12 sukuinage S1e
9 oshidashi M6 84
10 oshidashi M16 85
7 yorikiri
8 yorikiri SK 92
oshidashi

194 cm 157 kg 6'4 346 lbs 176 cm 162 kg 5'9 358 lbs 186 cm 161 kg 6'1 355 lbs 187 cm 163 kg 6'2 359 lbs
11.10.1986 Isenoumi 02.04.1991 Sadogatake 18.02.1987 Isegahama 28.02.1990 Tagonoura©Sideline Strategy Games ©Sideline Strategy Games ©Sideline Strategy Games ©Sideline Strategy Games
BASHO FURY SUMO 2015-2016 BASHO FURY SUMO 2015-2016 BASHO FURY SUMO 2015-2016 BASHO FURY SUMO 2015-2016
190 cm 161 kg 6'3 355 lbs 186 cm 152 kg 6'1 335 lbs 189 cm 146 kg 6'2 322 lbs 184 cm 131 kg 6'0 289 lbs
16.11.1984 Kataonami 03.10.1978 Isegahama 10.02.1992 Otake 11.05.1987 Sakaigawa©Sideline Strategy Games ©Sideline Strategy Games ©Sideline Strategy Games ©Sideline Strategy Games
BASHO FURY SUMO 2015-2016 BASHO FURY SUMO 2015-2016 BASHO FURY SUMO 2015-2016 BASHO FURY SUMO 2015-2016
Ikioi
852 tsukiotoshi Bal 45
6 oshidashi
#17
Kotoyuki
822 hatakikomi Bal 3
3 oshitaoshi Pow 84
4 tsukidashi Tec 8
5
11 yorikiri Inj 11*
12 sukuinage S1w
9 kotenage M6 85
10 yorikiri M16 82
7 oshidashi
8 oshidashi SK 87
5 kotenage
6 oshidashi
3 hatakikomi Pow 30
4 yorikiri Tec 58
Takayasu
872 oshitaoshi Bal 88
3 okuridashi Pow 26
4 oshidashi Tec 85
5
11 kotenage Inj 11*
12 yorikiri K1e
9 oshidashi M6 89
10 okuridashi M16 86
7 yorikiri
8 yorikiri SK 85
tsukiotoshi
6 yorikiri
Takarafuji
882 uwatenage Bal 96
3 sukuinage Pow 30
4 hatakikomi Tec 76
5
#20
Tamawashi
802 kotenage Bal 19
11 yoritaoshi Inj 11-22
12 shitatedashinage K1e
9 tsukiotoshi M6 84
10 hikiotoshi M16 86
7 hatakikomi
8 uwatenage SK 93
yorikiri
6 yorikiri
#19#18
11 tsukitaoshi Inj 11*
12 sukuinage S1e
9 tsukidashi M6 89
10 tsukiotoshi M16 76
7 oshidashi
8 tsukidashi SK 86
oshidashi
6 hatakikomi
#21
Aminishiki
862 uwatenage Bal 97
3 sokubiotoshi Pow 7
4 yorikiri Tec 95
5
11 sukuinage Inj 11*
12 tsukidashi K1e
9 tsukidashi M6 78
10 yorikiri M16 79
7 oshidashi
8 hatakikomi SK 87
5 oshitaoshi
6 oshidashi
3 tsukiotoshi Pow 51
4 oshidashi Tec 24
Sadanoumi
812 hikkake Bal 2
3 uwatedashinage Pow 43
4 uwatenage Tec 73
5
11 oshitaoshi Inj 11-25
12 yoritaoshi M1w
9 oshidashi M16 83
10 uwatenage J5 79
7 yorikiri
8 tsukiotoshi M6 90
hatakikomi
6 yorikiri
Osunaarashi
852 uwatedashinage Bal 108
3 okuridashi Pow 64
4 tsukidashi Tec 86
5
#24
11 katasukashi Inj 11*
12 tottari M1w
9 tsukiotoshi M6 85
10 yoritaoshi M16 78
7 yorikiri
8 oshidashi
yorikiri
6 yorikiri
#23#22
11 katasukashi Inj 11-25 +
12 okuridashi M1e
9 shitatenage
10 uwatedashinage
7 hatakikomi
8 oshidashi
tsukiotoshi

177 cm 134 kg 5'10 297 lbs 179 cm 149 kg 5'10 328 lbs 182 cm 150 kg 6'0 331 lbs 189 cm 200 kg 6'2 442 lbs
09.02.1984 Nishonoseki 25.12.1992 Dewanoumi 05.11.1991 Tokitsukaze 25.12.1984 Sakaigawa©Sideline Strategy Games ©Sideline Strategy Games ©Sideline Strategy Games ©Sideline Strategy Games
BASHO FURY SUMO 2015-2016 BASHO FURY SUMO 2015-2016 BASHO FURY SUMO 2015-2016 BASHO FURY SUMO 2015-2016
183 cm 145 kg 6'0 321 lbs 191 cm 149 kg 6'3 330 lbs 182 cm 170 kg 6'0 376 lbs 170 cm 144 kg 5'7 317 lbs
19.10.1990 Oitekaze 09.08.1988 Tomozuna 22.08.1986 Kise 21.06.1979 Oguruma©Sideline Strategy Games ©Sideline Strategy Games ©Sideline Strategy Games ©Sideline Strategy Games
BASHO FURY SUMO 2015-2016 BASHO FURY SUMO 2015-2016 BASHO FURY SUMO 2015-2016 BASHO FURY SUMO 2015-2016
Shohozan
772 tsukidashi Bal 2
6 oshidashi M6 84
#25
Mitakeumi
752 oshitaoshi Bal 71
3 tsukiotoshi Pow 93
4 hatakikomi Tec 59
5
11 yoritaoshi Inj 11*
12 okuridashi M1w
9 yorikiri J5 64
10 uwatenage J14 77
7 oshidashi M6 81
8 oshidashi M16 79
5 yorikiri
6 oshidashi
3 sukuinage Pow 83
4 uwatenage Tec 38
Sadanofuji
712 tsukidashi Bal 40
3 hatakikomi Pow 38
4 hatakikomi Tec 18
5
11 okuridashi Inj 11-12
12 uwatenage M2e
9 oshidashi J14 69
10 yoritaoshi Ms 50
7 yorikiri M16 80
8 yorikiri J5 74
tsukiotoshi
6 yorikiri M6 88
Shodai
742 hatakikomi Bal 82
3 shitatenage Pow 75
4 sukuinage Tec 104
5
#28
Endo
782 hatakikomi Bal 5
11 oshidashi Inj 11*
12 hatakikomi M2w
9 yorikiri M16 74
10 yorikiri J5 63
7 oshidashi
8 oshitaoshi M6 77
hatakikomi
6 oshidashi
#27#26
11 yorikiri Inj 11-14
12 yorikiri M1e
9 yorikiri J14 71
10 yorikiri Ms 52
7 oshidashi M16 80
8 oshidashi J5 73
tsukidashi
6 yorikiri
#29
Kyokushuho
792 uwatenage Bal 108
3 tsukiotoshi Pow 31
4 yorikiri Tec 52
5
11 tsukidashi Inj 11-23
12 tsukiotoshi M3e
9 oshidashi M16 78
10 shitatenage J14 71
7 yorikiri
8 yorikiri M6 79
5 oshidashi
6 yorikiri
3 sukuinage Pow 64
4 oshidashi Tec 33
Takekaze
782 hikkake Bal 92
3 okuridashi Pow 11
4 tsukiotoshi Tec 27
5
11 hikiotoshi Inj 11*
12 kotenage M4w
9 oshidashi M6 81
10 hatakikomi M16 78
7 yorikiri
8 yorikiri
oshidashi
6 yorikiri
Tokushoryu
792 uwatenage Bal 52
3 okuridashi Pow 35
4 tsukiotoshi Tec 75
5
#32
11 hatakikomi Inj 11*
12 hatakikomi M4e
9 hatakikomi M6 80
10 hatakikomi M16 77
7 oshidashi
8 hikiotoshi
hikiotoshi
6 oshidashi
#31#30
11 kotenage Inj 11-22
12 okuridashi M4e
9 hatakikomi M16 80
10 oshidashi J14 66
7 yorikiri
8 hatakikomi M6 81
sukuinage

179 cm 178 kg 5'10 394 lbs 185 cm 131 kg 6'1 290 lbs 187 cm 162 kg 6'2 358 lbs 192 cm 126 kg 6'4 278 lbs
11.10.1992 Kokonoe 09.01.1984 Arashio 07.08.1988 Kise 25.08.1983 Onomatsu©Sideline Strategy Games ©Sideline Strategy Games ©Sideline Strategy Games ©Sideline Strategy Games
BASHO FURY SUMO 2015-2016 BASHO FURY SUMO 2015-2016 BASHO FURY SUMO 2015-2016 BASHO FURY SUMO 2015-2016
182 cm 166 kg 6'0 368 lbs 185 cm 149 kg 6'1 328 lbs 185 cm 202 kg 6'1 447 lbs 185 cm 185 kg 6'1 408 lbs
14.11.1988 Kokonoe 05.10.1982 Yamahibiki 23.02.1987 Kise 16.11.1984 Sakaigawa©Sideline Strategy Games ©Sideline Strategy Games ©Sideline Strategy Games ©Sideline Strategy Games
BASHO FURY SUMO 2015-2016 BASHO FURY SUMO 2015-2016 BASHO FURY SUMO 2015-2016 BASHO FURY SUMO 2015-2016
Chiyootori
782 yoritaoshi Bal 29
6 yorikiri
#33
Sokokurai
772 tsuridashi Bal 38
3 uwatenage Pow 31
4 yorikiri Tec 105
5
11 oshidashi Inj 11-23
12 tsukidashi M4e
9 oshidashi M16 79
10 tsukiotoshi J5 72
7 yorikiri
8 oshidashi M6 82
5 shitatenage
6 yorikiri
3 okuridashi Pow 72
4 hatakikomi Tec 59
Amuru
752 yoritaoshi Bal 71
3 shitatenage Pow 28
4 okuridashi Tec 84
5
11 oshidashi Inj 11-24
12 uwatenage M4w
9 yorikiri J5 69
10 hikiotoshi J14 59
7 yorikiri M6 86
8 yorikiri M16 72
hatakikomi
6 oshidashi
Jokoryu
692 tsukiotoshi Bal 64
3 shitatenage Pow 15
4 hatakikomi Tec 44
5
#36
Chiyotairyu
722 katasukashi Bal 93
11 hatakikomi Inj 11-15
12 oshidashi M5e
9 hatakikomi M16 77
10 hatakikomi J5 69
7 yorikiri
8 oshidashi M6 76
tsukiotoshi
6 yorikiri
#35#34
11 kotenage Inj 11-22
12 hikiotoshi M4w
9 sukuinage M16 77
10 tsukiotoshi J5 71
7 yorikiri
8 yorikiri M6 83
oshidashi
6 yorikiri
#37
Kitataiki
712 okuridashi Bal 52
3 hatakikomi Pow 49
4 yoritaoshi Tec 4
5
11 yorikiri Inj 11-22
12 uwatenage M5w
9 tsukidashi M16 74
10 yorikiri J5 67
7 hatakikomi
8 hatakikomi M6 78
5 tsukidashi
6 oshidashi
3 hikiotoshi Pow 31
4 oshidashi Tec 11
Toyohibiki
742 yoritaoshi Bal 2
3 oshitaoshi Pow 98
4 yorikiri Tec 2
5
11 kimedashi Inj 11*
12 kimetaoshi M6e
9 yorikiri M16 78
10 kotenage J5 72
7 oshidashi
8 oshidashi M6 80
yorikiri
6 oshidashi
Gagamaru
772 yoritaoshi Bal 52
3 tsukidashi Pow 84
4 yorikiri Tec 3
5
#40
11 okuridashi Inj 11*
12 hatakikomi M6w
9 tsukidashi M16 74
10 tsukiotoshi J5 73
7 oshidashi
8 yorikiri M6 74
oshidashi
6 oshidashi
#39#38
11 uwatenage Inj 11*
12 oshidashi M5e
9 oshidashi J5 77
10 oshidashi J14 59
7 yorikiri M6 77
8 kimedashi M16 72
yorikiri

180 cm 163 kg 5'11 361 lbs 181 cm 145 kg 5'11 321 lbs 191 cm 156 kg 6'3 344 lbs 175 cm 153 kg 5'9 337 lbs
06.05.1985 Isegahama 26.02.1990 Takanohana 13.09.1974 Tomozuna 10.07.1991 Oitekaze©Sideline Strategy Games ©Sideline Strategy Games ©Sideline Strategy Games ©Sideline Strategy Games
BASHO FURY SUMO 2015-2016 BASHO FURY SUMO 2015-2016 BASHO FURY SUMO 2015-2016 BASHO FURY SUMO 2015-2016
186 cm 143 kg 6'1 315 lbs 179 cm 135 kg 5'10 299 lbs 182 cm 136 kg 6'0 300 lbs 184 cm 143 kg 6'0 317 lbs
10.09.1979 Tokitsukaze 10.11.1993 Oitekaze 09.02.1988 Kagamiyama 10.07.1990 Kokonoe©Sideline Strategy Games ©Sideline Strategy Games ©Sideline Strategy Games ©Sideline Strategy Games
BASHO FURY SUMO 2015-2016 BASHO FURY SUMO 2015-2016 BASHO FURY SUMO 2015-2016 BASHO FURY SUMO 2015-2016
Homarefuji
742 oshitaoshi Bal 17
6 yorikiri
#41
Takanoiwa
732 tsukidashi Bal 22
3 okuridashi Pow 87
4 uwatenage Tec 34
5
11 oshidashi Inj 11*
12 uwatedashinage M6w
9 yorikiri M16 76
10 tsukidashi J5 69
7 oshidashi
8 oshidashi M6 72
5 tsukiotoshi
6 oshidashi
3 hikiotoshi Pow 45
4 hatakikomi Tec 40
Kawabata
682 hikiotoshi Bal 68
3 yorikiri Pow 87
4 oshidashi Tec 67
5
11 yorikiri Inj 11-13
12 kotehineri M7e
9 sukuinage
10 katasukashi
7 yorikiri
8 yorikiri
sukuinage
6 yorikiri
Kyokutenho
742 kotenage Bal 0
3 uwatenage Pow 8
4 katasukashi Tec 97
5
#44
Tokitenku
752 kakenage Bal 15
11 tsukiotoshi Inj 11-12
12 okuridashi M7w
9 tsukiotoshi J14 65
10 oshitaoshi Ms 53
7 oshidashi M16 78
8 oshidashi J5 71
hatakikomi
6 oshidashi
#43#42
11 hatakikomi Inj 11*
12 shitatenage M6e
9 oshidashi J5 66
10 uwatedashinage J14 72
7 yorikiri M6 79
8 oshidashi M16 77
yorikiri
6 oshidashi
#45
Daieisho
712 okuridashi Bal 44
3 hikiotoshi Pow 67
4 oshidashi Tec 32
5
11 ketaguri Inj 11-13
12 uwatedashinage M8w
9 uwatenage M16 76
10 uchigake J5 71
7 yorikiri
8 yorikiri
5 susoharai
6 yorikiri
3 hatakikomi Pow 12
4 susoharai Tec 108
Chiyonokuni
642 uwatenage Bal 89
3 hikiotoshi Pow 103
4 hatakikomi Tec 52
5
11 okuridashi Inj 11-13
12 hikiotoshi M9w
9 uwatedashinage J14 66
10 uwatedashinage Ms 47
7 yorikiri M16 74
8 uwatenage J5 63
uwatenage
6 yorikiri
Kagamio
672 shitatenage Bal 45
3 hatakikomi Pow 14
4 yorikiri Tec 72
5
#48
11 yorikiri Inj 11-15
12 yoritaoshi M9e
9 hatakikomi J14 66
10 tsukidashi Ms 47
7 hatakikomi M16 83
8 hatakikomi J5 76
oshidashi
6 oshidashi
#47#46
11 hatakikomi Inj 11*
12 utchari M9w
9 yorikiri J5 69
10 tsukiotoshi J14 67
7 oshidashi
8 oshidashi M16 75
tsukidashi

184 cm 122 kg 6'0 269 lbs 184 cm 156 kg 6'0 344 lbs 182 cm 183 kg 6'0 405 lbs 178 cm 176 kg 5'10 389 lbs
21.08.1986 Minezaki 11.06.1989 Kise 19.04.1987 Tamanoi 17.04.1991 Kokonoe©Sideline Strategy Games ©Sideline Strategy Games ©Sideline Strategy Games ©Sideline Strategy Games
BASHO FURY SUMO 2015-2016 BASHO FURY SUMO 2015-2016 BASHO FURY SUMO 2015-2016 BASHO FURY SUMO 2015-2016
185 cm 131 kg 6'1 289 lbs 193 cm 144 kg 6'4 318 lbs 184 cm 149 kg 6'2 330 lbs 182 cm 121 kg 6'0 267 lbs
18.08.1988 Shikoroyama 01.06.1994 Takadagawa 25.08.1990 Isenoumi 28.07.1986 Yamahibiki©Sideline Strategy Games ©Sideline Strategy Games ©Sideline Strategy Games ©Sideline Strategy Games
BASHO FURY SUMO 2015-2016 BASHO FURY SUMO 2015-2016 BASHO FURY SUMO 2015-2016 BASHO FURY SUMO 2015-2016
Arawashi
692 hikiotoshi Bal 39
6 oshidashi
#49
Hidenoumi
692 okuridashi Bal 59
3 hikiotoshi Pow 64
4 tsukiotoshi Tec 36
5
11 oshidashi Inj 11*
12 uwatedashinage M12e
9 hatakikomi J5 66
10 tsukiotoshi J14 67
7 yorikiri
8 shitatenage M16 73
5 uwatenage
6 yorikiri
3 tottari Pow 22
4 yoritaoshi Tec 102
Chiyomaru
662 uwatenage Bal 98
3 yorikiri Pow 17
4 tsukiotoshi Tec 67
5
11 tsukitaoshi Inj 11*
12 okuridashi M13e
9 tsukiotoshi J5 67
10 yoritaoshi J14 63
7 oshidashi
8 tsukidashi M16 67
yorikiri
6 oshidashi
Fujiazuma
662 hatakikomi Bal 9
3 oshitaoshi Pow 71
4 yorikiri Tec 7
5
#52
Seiro
682 yoritaoshi Bal 101
11 oshidashi Inj 11-22
12 oshitaoshi M13w
9 hatakikomi J5 65
10 tsukidashi J14 64
7 hikiotoshi
8 oshidashi M16 70
hatakikomi
6 hikiotoshi
#51#50
11 yorikiri Inj 11*
12 yorikiri M12w
9 yorikiri J5 69
10 yorikiri J14 66
7 oshidashi
8 oshidashi M16 71
yorikiri
6 oshidashi
#53
Kagayaki
682 oshidashi Bal 3
3 yoritaoshi Pow 75
4 oshidashi Tec 38
5
11 hikiotoshi Inj 11*
12 oshitaoshi M14w
9 uwatenage J5 68
10 okuridashi J14 64
7 yorikiri
8 yorikiri M16 71
5 hatakikomi
6 yorikiri
3 tsukiotoshi Pow 27
4 oshidashi Tec 93
Kitaharima
662 sukuinage Bal 7
3 okuridashi Pow 84
4 tsukiotoshi Tec 52
5
11 uwatenage Inj 11-12
12 hatakikomi M14e
9 oshidashi J14 63
10 tsukiotoshi Ms 53
7 yorikiri M16 75
8 yorikiri J5 73
oshidashi
6 yorikiri
Nishikigi
662 yoritaoshi Bal 8
3 kotenage Pow 98
4 oshidashi Tec 52
5
#56
11 yoritaoshi Inj 11*
12 tsukidashi M15e
9 yorikiri J5 64
10 oshitaoshi J14 66
7 oshidashi
8 oshidashi M16 71
yorikiri
6 oshidashi
#55#54
11 okuridashi Inj 11*
12 oshitaoshi M14e
9 tsukiotoshi J5 67
10 tsukidashi J14 72
7 oshidashi
8 yorikiri M16 69
yorikiri
177 cm 121 kg 5'10 267 lbs 184 cm 145 kg 6'0 320 lbs 183 cm 172 kg 6'0 381 lbs 178 cm 140 kg 5'10 310 lbs
31.05.1981 Onoe 07.08.1981 Takasago 18.07.1985 Kise 10.03.1985 Tokitsukaze©Sideline Strategy Games ©Sideline Strategy Games ©Sideline Strategy Games ©Sideline Strategy Games
BASHO FURY SUMO 2015-2016 BASHO FURY SUMO 2015-2016 BASHO FURY SUMO 2015-2016 BASHO FURY SUMO 2015-2016
192 cm 147 kg 6'4 325 lbs 184 cm 161 kg 6'0 355 lbs 174 cm 144 kg 5'9 319 lbs 184 cm 189 kg 6'0 417 lbs
12.05.1987 Tamanoi 10.07.1976 Tagonoura 21.07.1989 Tomozuna 14.10.1984 Onoe©Sideline Strategy Games ©Sideline Strategy Games ©Sideline Strategy Games ©Sideline Strategy Games
BASHO FURY SUMO 2015-2016 BASHO FURY SUMO 2015-2016 BASHO FURY SUMO 2015-2016 BASHO FURY SUMO 2015-2016
Satoyama
662 tsukiotoshi Bal 81
6 yorikiri
#57
Asasekiryu
652 shitatenage Bal 77
3 uwatenage Pow 24
4 yorikiri Tec 52
5
11 shitatenage Inj 11*
12 tottari M15e
9 shitatenage J5 64
10 katasukashi J14 65
7 oshidashi
8 yorikiri M16 70
5 shitatenage
6 okuridashi
3 hikiotoshi Pow 3
4 shitatenage Tec 103
Tosayutaka
592 hikiotoshi Bal 79
3 uwatedashinage Pow 15
4 hatakikomi Tec 9
5
11 hatakikomi Inj 11-12
12 shitatedashinage M16e
9 oshidashi J14 63
10 uwatenage Ms 53
7 yorikiri M16 68
8 yorikiri J5 59
tsukiotoshi
6 yorikiri
Akiseyama
622 kotenage Bal 87
3 tsukidashi Pow 27
4 yorikiri Tec 40
5
#60
Azumaryu
622 hikiotoshi Bal 105
11 shitatenage Inj 11-26
12 hikiotoshi M16w
9 hatakikomi J14 60
10 abisetaoshi Ms 53
7 yorikiri
8 yoritaoshi M16 67
yorikiri
6 yorikiri
#59#58
11 okuridashi Inj 11*
12 tsukiotoshi M15e
9 yoritaoshi J5 65
10 hatakikomi J14 64
7 yorikiri
8 hatakikomi M16 69
uwatedashinage
6 yorikiri
#61
Wakanosato
612 yoritaoshi Bal 108
3 oshidashi Pow 3
4 uwatedashinage Tec 27
5
11 uwatedashinage Inj 11-12
12 uwatedashinage J1w
9 hatakikomi J14 65
10 hatakikomi Ms 52
7 yorikiri
8 uwatenage J5 68
5 yoritaoshi
6 yorikiri
3 yoritaoshi Pow 25
4 yoritaoshi Tec 96
Tenkaiho
612 oshidashi Bal 2
3 shitatenage Pow 52
4 yoritaoshi Tec 25
5
11 hatakikomi Inj 11*
12 oshitaoshi J2w
9 hatakikomi J5 65
10 yorikiri J14 64
7 oshidashi
8 hikiotoshi
tsukiotoshi
6 oshidashi
Asahisho
642 katasukashi Bal 60
3 tsukidashi Pow 29
4 hikiotoshi Tec 47
5
#64
11 oshidashi Inj 11-12
12 shitatenage J2e
9 uwatenage J14 62
10 sukuinage Ms 50
7 yorikiri
8 yorikiri J5 59
yorikiri
6 yorikiri
#63#62
11 hikiotoshi Inj 11-13
12 oshitaoshi J1w
9 hatakikomi J5 64
10 uwatenage J14 58
7 hatakikomi
8 yorikiri
yorikiri

187 cm 167 kg 6'2 369 lbs 185 cm 158 kg 6'1 349 lbs 183 cm 118 kg 6'0 261 lbs 184 cm 200 kg 6'0 442 lbs
21.08.1982 Onomatsu 26.01.1983 Kataonami 20.07.1991 Kokonoe 07.07.1991 Oguruma©Sideline Strategy Games ©Sideline Strategy Games ©Sideline Strategy Games ©Sideline Strategy Games
BASHO FURY SUMO 2015-2016 BASHO FURY SUMO 2015-2016 BASHO FURY SUMO 2015-2016 BASHO FURY SUMO 2015-2016
173 cm 103 kg 5'8 228 lbs 189 cm 157 kg 6'2 347 lbs 178 cm 149 kg 5'10 330 lbs 176 cm 148 kg 5'9 327 lbs
10.01.1990 Miyagino 31.01.1982 Fujishima 29.05.1991 Kokonoe 04.07.1996 Onomatsu©Sideline Strategy Games ©Sideline Strategy Games ©Sideline Strategy Games ©Sideline Strategy Games
BASHO FURY SUMO 2015-2016 BASHO FURY SUMO 2015-2016 BASHO FURY SUMO 2015-2016 BASHO FURY SUMO 2015-2016
Daido
602 okuridashi Bal 58
6 oshidashi
#65
Tamaasuka
592 uwatenage Bal 7
3 yoritaoshi Pow 52
4 oshidashi Tec 7
5
11 yoritaoshi Inj 11-13
12 uwatedashinage J3w
9 kotenage J14 58
10 tsukiotoshi Ms 54
7 uwatenage
8 hatakikomi J5 64
5 oshidashi
6 hatakikomi
3 hikiotoshi Pow 3
4 oshidashi Tec 76
Kawanari
632 oshitaoshi Bal 58
3 hatakikomi Pow 94
4 yorikiri Tec 1
5
11 hikiotoshi Inj 11-12
12 shitatedashinage J2w
9 uwatedashinage J14 65
10 okuridashi Ms 44
7 hatakikomi
8 yorikiri J5 66
sukuinage
6 uwatenage
Chiyoshoma
572 shitatenage Bal 93
3 tottari Pow 17
4 uwatenage Tec 108
5
#68
Ishiura
632 tsukiotoshi Bal 42
11 yoritaoshi Inj 11-12
12 sukuinage J5w
9 oshidashi J14 64
10 hikiotoshi Ms 55
7 yorikiri
8 oshidashi J5 62
oshidashi
6 yorikiri
#67#66
11 okuridashi Inj 11-12
12 hikiotoshi J3w
9 uwatedashinage J14 59
10 yorikiri Ms 54
7 oshidashi
8 yorikiri J5 65
yorikiri
6 oshidashi
#69
Shotenro
562 kimedashi Bal 30
3 yorikiri Pow 41
4 hatakikomi Tec 7
5
11 hikiotoshi Inj 11-12
12 komatasukui J5e
9 shitatenage J14 63
10 shitatenage Ms 52
7 oshidashi
8 oshidashi J5 66
5 yorikiri
6 yorikiri
3 okuridashi Pow 48
4 oshidashi Tec 88
Onosho
622 hikiotoshi Bal 3
3 oshitaoshi Pow 104
4 yorikiri Tec 1
5
11 tsukiotoshi Inj 11*
12 oshitaoshi J7e
9 tsukiotoshi
10 oshidashi
7 yorikiri
8 yorikiri
hikiotoshi
6 yorikiri
Chiyoo
632 uwatenage Bal 76
3 hikiotoshi Pow 26
4 oshidashi Tec 103
5
#72
11 hatakikomi Inj 11-14
12 uwatenage J6w
9 oshidashi J14 63
10 tsukidashi Ms 54
7 oshidashi
8 oshidashi
oshidashi
6 oshidashi
#71#70
11 oshitaoshi Inj 11-15
12 tsukidashi J5e
9 hikiotoshi J14 58
10 uwatedashinage Ms 49
7 oshidashi
8 hatakikomi J5 61
oshidashi

181 cm 140 kg 5'11 309 lbs 190 cm 174 kg 6'3 385 lbs 184 cm 128 kg 6'0 283 lbs 173 cm 149 kg 5'8 328 lbs
28.09.1984 Shibatayama 12.02.1989 Takasago 18.10.1989 Tomozuna 05.08.1996 Takanohana©Sideline Strategy Games ©Sideline Strategy Games ©Sideline Strategy Games ©Sideline Strategy Games
BASHO FURY SUMO 2015-2016 BASHO FURY SUMO 2015-2016 BASHO FURY SUMO 2015-2016 BASHO FURY SUMO 2015-2016
184 cm 154 kg 6'0 340 lbs 172 cm 113 kg 5'8 249 lbs 177 cm 122 kg 5'10 270 lbs 194 cm 214 kg 6'4 472 lbs
27.07.1991 Oitekaze 22.06.1992 Kise 31.01.1989 Dewanoumi 13.05.1984 Kise©Sideline Strategy Games ©Sideline Strategy Games ©Sideline Strategy Games ©Sideline Strategy Games
BASHO FURY SUMO 2015-2016 BASHO FURY SUMO 2015-2016 BASHO FURY SUMO 2015-2016 BASHO FURY SUMO 2015-2016
Wakanoshima
582 oshitaoshi Bal 34
6 oshidashi
#73
Asabenkei
582 kotenage Bal 67
3 uwatenage Pow 87
4 oshidashi Tec 15
5
11 okuridashi Inj 11-12
12 tsukiotoshi J7w
9 yoritaoshi J14 62
10 oshidashi Ms 51
7 yorikiri
8 yorikiri
5 yoritaoshi
6 yorikiri
3 uwatenage Pow 71
4 yorikiri Tec 25
Sato
522 sokubiotoshi Bal 106
3 okuridashi Pow 88
4 hikiotoshi Tec 52
5
11 tsukiotoshi Inj 11-12
12 uwatedashinage J7w
9 tsukiotoshi J14 61
10 okuridashi Ms 52
7 yorikiri
8 yorikiri
yorikiri
6 oshidashi
Kyokutaisei
582 hikiotoshi Bal 102
3 okuridashi Pow 20
4 oshidashi Tec 107
5
#76
Abiko
592 sotogake Bal 93
11 oshitaoshi Inj 11-13
12 yorikiri J6w
9 tsukiotoshi J14 67
10 tsukidashi Ms 43
7 oshidashi
8 hatakikomi
hatakikomi
6 oshidashi
#75#74
11 yorikiri Inj 11-12
12 hikiotoshi J7w
9 yoritaoshi J14 63
10 hatakikomi Ms 47
7 yorikiri
8 yoritaoshi
yoritaoshi
6 yorikiri
#77
Ura
582 shitatenage Bal 108
3 ashitori Pow 85
4 yorikiri Tec 108
5
11 kotenage Inj 11-12
12 hatakikomi J9w
9 sukuinage J14 63
10 hikiotoshi Ms 53
7 yorikiri
8 uwatenage
5 yorikiri
6 yorikiri
3 yoritaoshi Pow 58
4 tsukiotoshi Tec 70
Tokushinho
552 oshitaoshi Bal 60
3 tsukidashi Pow 54
4 okuridashi Tec 0
5
11 uwatenage Inj 11-12
12 shitatenage J9e
9 oshidashi J14 60
10 tsukiotoshi Ms 52
7 yorikiri
8 yorikiri
oshidashi
6 yorikiri
Dewahayate
572 tsukidashi Bal 1
3 sukuinage Pow 70
4 yoritaoshi Tec 33
5
#80
11 oshidashi Inj 11-12
12 kimetaoshi J9w
9 yorikiri J14 60
10 hatakikomi Ms 48
7 oshidashi
8 yorikiri
yorikiri
6 oshidashi
#79#78
11 katasukashi Inj 11-15
12 hikkake J8w
9 yorikiri J14 68
10 yorikiri Ms 46
7 oshidashi
8 hikiotoshi
tsukiotoshi

179 cm 120 kg 5'10 265 lbs 180 cm 174 kg 5'11 384 lbs 185 cm 121 kg 6'1 267 lbs 182 cm 158 kg 6'0 348 lbs
26.07.1982 Tokitsukaze 01.11.1990 Chiganoura 04.05.1994 Shikoroyama 15.07.1992 Hakkaku©Sideline Strategy Games ©Sideline Strategy Games ©Sideline Strategy Games ©Sideline Strategy Games
BASHO FURY SUMO 2015-2016 BASHO FURY SUMO 2015-2016 BASHO FURY SUMO 2015-2016 BASHO FURY SUMO 2015-2016
175 cm 111 kg 5'11 246 lbs 178 cm 153 kg 5'10 338 lbs 180 cm 202 kg 5'11 445 lbs 194 cm 149 kg 6'4 329 lbs
20.11.1991 Sadogatake 23.04.1987 Kasugano 18.03.1992 Kise 30.04.1985 Kise©Sideline Strategy Games ©Sideline Strategy Games ©Sideline Strategy Games ©Sideline Strategy Games
BASHO FURY SUMO 2015-2016 BASHO FURY SUMO 2015-2016 BASHO FURY SUMO 2015-2016 BASHO FURY SUMO 2015-2016
Sotairyu
452 ashitori Bal 52
6 oshidashi
#81
Masunoyama
602 tsukiotoshi Bal 3
3 okuritaoshi Pow 96
4 yorikiri Tec 0
5
11 hikiotoshi Inj 11-22
12 tsukiotoshi J9w
9 tsukiotoshi J14 60
10 uwatenage Ms 39
7 yorikiri
8 yorikiri
5 hatakikomi
6 oshidashi
3 uwatedashinage Pow 14
4 oshidashi Tec 99
Daiki
542 tottari Bal 15
3 tsukidashi Pow 107
4 oshidashi Tec 52
5
11 uwatenage Inj 11-12
12 okuridashi J10w
9 hatakikomi J14 60
10 hatakikomi Ms 52
7 hikiotoshi
8 hikiotoshi
oshidashi
6 oshidashi
Horikiri
572 okuridashi Bal 93
3 tsukidashi Pow 13
4 hikiotoshi Tec 93
5
#84
Kotoeko
532 kakenage Bal 27
11 tsukiotoshi Inj 11-14
12 hikiotoshi J13w
9 yorikiri J14 66
10 oshitaoshi Ms 47
7 oshidashi
8 oshidashi
yorikiri
6 oshidashi
#83#82
11 oshidashi Inj 11-22
12 tsukidashi J10e
9 oshidashi J14 61
10 oshidashi Ms 54
7 oshidashi
8 oshidashi
yorikiri
6 oshidashi
#85
Tochihiryu
472 hatakikomi Bal 6
3 okuridashi Pow 71
4 oshidashi Tec 93
5
11 yorikiri Inj 11-13
12 uchimuso J13e
9 oshidashi J14 58
10 sukuinage Ms 51
7 yorikiri
8 oshidashi
5 oshidashi
6 yorikiri
3 hatakikomi Pow 75
4 tsukiotoshi Tec 58
Kizenryu
542 kekaeshi Bal 108
3 yorikiri Pow 2
4 kotenage Tec 106
5
11 hatakikomi Inj 11-13
12 okuridashi J13w
9 yorikiri J14 58
10 hatakikomi Ms 44
7 oshidashi
8 oshidashi
yorikiri
6 oshidashi
Takagi
472 kimetaoshi Bal 34
3 kimedashi Pow 100
4 okuridashi Tec 0
5
#88
11 katasukashi Inj 11-13
12 uwatehineri J14w
9 hatakikomi J14 58
10 hatakikomi Ms 52
7 uwatenage
8 kotenage
kotenage
6 uwatenage
#87#86
11 tsukidashi Inj 11-13
12 oshitaoshi J13w
9 tsukiotoshi J14 55
10 tsukidashi Ms 46
7 oshidashi
8 oshidashi
tsukiotoshi

180 cm 155 kg 5'11 342 lbs 178 cm 160 kg 5'10 355 lbs 185 cm 145 kg 6'1 321 lbs 182 cm 140 kg 6'0 309 lbs
05.04.1986 Shibatayama 11.07.1989 Kise 13.04.1995 Takadagawa 28.08.1994 Oitekaze©Sideline Strategy Games ©Sideline Strategy Games ©Sideline Strategy Games ©Sideline Strategy Games
BASHO FURY SUMO 2015-2016 BASHO FURY SUMO 2015-2016 BASHO FURY SUMO 2015-2016 BASHO FURY SUMO 2015-2016
181 cm 162 kg 5'11 358 lbs 171 cm 145 kg 5'7 320 lbs 178 cm 133 kg 5'10 294 lbs 175 cm 116 kg 5'9 256 lbs
06.11.1990 Tatsunami 12.07.1991 Kokonoe 01.03.1990 Dewanoumi 10.03.1990 Onomatsu©Sideline Strategy Games ©Sideline Strategy Games ©Sideline Strategy Games ©Sideline Strategy Games
BASHO FURY SUMO 2015-2016 BASHO FURY SUMO 2015-2016 BASHO FURY SUMO 2015-2016 BASHO FURY SUMO 2015-2016
Sakigake
512 uwatenage Bal 79
6 oshidashi
#89
Hamaguchi
472 tsukiotoshi Bal 27
3 okuridashi Pow 85
4 uwatenage Tec 36
5
11 yoritaoshi Inj 11-13
12 hikiotoshi J14e
9 okuridashi J14 55
10 shitatenage Ms 50
7 yorikiri
8 yorikiri
5 yorikiri
6 yorikiri
3 hatakikomi Pow 47
4 tsukiotoshi Tec 22
Daishoho
492 katasukashi Bal 100
3 oshidashi Pow 14
4 uwatenage Tec 82
5
11 oshidashi Inj 11-13
12 okuridashi Ms1e
9 tsukiotoshi
10 yoritaoshi
7 oshidashi
8 oshidashi
tsukidashi
6 oshidashi
Hakuyozan
482 sukuinage Bal 3
3 yorikiri Pow 67
4 oshitaoshi Tec 40
5
#92
Akua
482 kakenage Bal 93
11 tsukidashi Inj 11-13
12 uwatenage Ms2w
9 uwatenage
10 katasukashi
7 hatakikomi
8 yorikiri
hatakikomi
6 hatakikomi
#91#90
11 yorikiri Inj 11-13
12 hikiotoshi J14w
9 yorikiri J14 56
10 oshitaoshi Ms 45
7 oshidashi
8 oshidashi
oshidashi
6 oshidashi
#93
Chiyoarashi
472 oshidashi Bal 52
3 oshitaoshi Pow 79
4 oshidashi Tec 0
5
11 hatakikomi Inj 11-13
12 kotenage Ms2e
9 oshidashi
10 oshidashi
7 hatakikomi
8 yorikiri
5 oshidashi
6 hatakikomi
3 oshidashi Pow 52
4 oshidashi Tec 32
Keitenkai
422 hatakikomi Bal 64
3 hikiotoshi Pow 17
4 uwatenage Tec 93
5
11 oshidashi Inj 11-13
12 hatakikomi Ms2e
9 hatakikomi
10 tsukidashi
7 oshidashi
8 hikiotoshi
tsukidashi
6 oshidashi
Kairyu
452 yorikiri Bal 46
3 tsukidashi Pow 59
4 tsukidashi Tec 108
5
#96
11 oshidashi Inj 11-13
12 kirikaeshi Ms2e
9 yorikiri
10 oshidashi
7 shitatenage
8 yorikiri
kirikaeshi
6 kirikaeshi
#95#94
11 tsukidashi Inj 11-26
12 hatakikomi Ms2e
9 oshidashi
10 hatakikomi
7 oshidashi
8 oshidashi
oshidashi
170 cm 168 kg 5'8 372 lbs 192 cm 145 kg 6'4 320 lbs 169 cm 112 kg 5'7 247 lbs 179 cm 150 kg 6'0 331 lbs
25.09.1985 Kise 10.11.1990 Takadagawa 17.01.1995 Isegahama 30.12.1992 Kise©Sideline Strategy Games ©Sideline Strategy Games ©Sideline Strategy Games ©Sideline Strategy Games
BASHO FURY SUMO 2015-2016 BASHO FURY SUMO 2015-2016 BASHO FURY SUMO 2015-2016 BASHO FURY SUMO 2015-2016
176 cm 159 kg 5'9 351 lbs 167 cm 130 kg 5'6 287 lbs 198 cm 169 kg 6'6 373 lbs 185 cm 167 kg 6'1 368 lbs
24.12.1991 Kise 27.05.1986 Sakaigawa 26.05.1977 Tamanoi 15.12.1992 Oitekaze©Sideline Strategy Games ©Sideline Strategy Games ©Sideline Strategy Games ©Sideline Strategy Games
BASHO FURY SUMO 2015-2016 BASHO FURY SUMO 2015-2016 BASHO FURY SUMO 2015-2016 BASHO FURY SUMO 2015-2016
Kisenoyama
412 uwatehineri Bal 15
6 yorikiri
#97
Ryuden
462 shitatenage Bal 0
3 tsukiotoshi Pow 79
4 yorikiri Tec 79
5
11 kubinage Inj 11-13
12 yorikiri Ms2w
9 yorikiri
10 tsukiotoshi
7 oshidashi
8 oshidashi
5 hatakikomi
6 oshidashi
3 okuridashi Pow 77
4 tsukidashi Tec 38
Sasanoyama
412 uwatedashinage Bal 31
3 hatakikomi Pow 93
4 hikiotoshi Tec 9
5
11 uwatedashinage Inj 11-13
12 okuritaoshi Ms3w
9 shitatenage
10 katasukashi
7 yorikiri
8 oshidashi
shitatenage
6 oshidashi
Terutsuyoshi
452 tottari Bal 31
3 hikiotoshi Pow 67
4 yoritaoshi Tec 75
5
#100
Shiba
402 hatakikomi Bal 15
11 yoritaoshi Inj 11-13
12 uwatenage Ms3e
9 yorikiri
10 okuridashi
7 oshidashi
8 oshidashi
tsukiotoshi
6 oshidashi
#99#98
11 oshidashi Inj 11-13
12 yorikiri Ms3e
9 uwatenage
10 kotenage
7 yorikiri
8 yoritaoshi
yoritaoshi
6 yorikiri
#101
Shosei
422 shitatehineri Bal 1
3 zubuneri Pow 75
4 yoritaoshi Tec 107
5
11 yorikiri Inj 11-15
12 yoritaoshi Ms3e
9 yorikiri
10 yoritaoshi
7 yorikiri
8 yorikiri
5 yoritaoshi
6 yorikiri
3 uwatenage Pow 93
4 oshidashi Tec 22
Sakamoto
482 shitatenage Bal 0
3 yoritaoshi Pow 103
4 oshidashi Tec 6
5
11 koshikudake Inj 11-13
12 hatakikomi Ms4w
9 tsukiotoshi
10 oshidashi
7 hatakikomi
8 yorikiri
yorikiri
6 hatakikomi
Yoshiazuma
372 oshitaoshi Bal 88
3 tsukidashi Pow 5
4 okuridashi Tec 9
5
#104
11 uwatenage Inj 11-14
12 oshidashi Ms6e
9 yorikiri
10 yoritaoshi
7 oshidashi
8 yorikiri
yorikiri
6 oshidashi
#103#102
11 shitatenage Inj 11-13
12 hikiotoshi Ms4e
9 oshidashi
10 tsukiotoshi
7 yorikiri
8 yorikiri
oshidashi
180 cm 120 kg 5'11 265 lbs 170 cm 155 kg 5'7 342 lbs 179 cm 181 kg 5'10 399 lbs 180 cm 141 kg 5'11 312 lbs
24.07.1995 Tatsunami 26.08.1992 Kasugano 15.07.1988 Tamanoi 30.11.1992 Takadagawa©Sideline Strategy Games ©Sideline Strategy Games ©Sideline Strategy Games ©Sideline Strategy Games
BASHO FURY SUMO 2015-2016 BASHO FURY SUMO 2015-2016 BASHO FURY SUMO 2015-2016 BASHO FURY SUMO 2015-2016
179 cm 143 kg 5'10 317 lbs 182 cm 168 kg 6'0 371 lbs 180 cm 127 kg 6'1 281 lbs 183 cm 173 kg 6'0 383 lbs
18.05.1981 Hakkaku 20.08.1989 Kise 26.08.1983 Kasugano 25.08.1989 Sakaigawa©Sideline Strategy Games ©Sideline Strategy Games ©Sideline Strategy Games ©Sideline Strategy Games
BASHO FURY SUMO 2015-2016 BASHO FURY SUMO 2015-2016 BASHO FURY SUMO 2015-2016 BASHO FURY SUMO 2015-2016
Meisei
452 tsukiotoshi Bal 67
6 oshidashi
#105
Tochimaru
442 tsukiotoshi Bal 76
3 okuridashi Pow 85
4 tsukidashi Tec 9
5
11 oshidashi Inj 11-13
12 shitatenage Ms5e
9 shitatenage
10 shitatenage
7 oshidashi
8 oshitaoshi
5 tsukiotoshi
6 yorikiri
3 shitatenage Pow 69
4 yorikiri Tec 76
Akinokawa
422 oshitaoshi Bal 63
3 yorikiri Pow 11
4 kotenage Tec 104
5
11 yoritaoshi Inj 11-22
12 yoritaoshi Ms5w
9 oshidashi
10 yoritaoshi
7 oshidashi
8 oshidashi
yorikiri
6 yorikiri
Irie
432 tsukiotoshi Bal 3
3 uwatedashinage Pow 91
4 kotenage Tec 67
5
#108
Oiwato
412 yoritaoshi Bal 52
11 hikiotoshi Inj 11-13
12 oshidashi Ms6e
9 tsukiotoshi
10 kotenage
7 uwatenage
8 hatakikomi
tsukiotoshi
6 hatakikomi
#107#106
11 tsukidashi Inj 11-13
12 hikiotoshi Ms5w
9 hatakikomi
10 hatakikomi
7 oshidashi
8 oshidashi
tsukitaoshi
6 oshidashi
#109
Higoarashi
412 yoritaoshi Bal 85
3 tsukiotoshi Pow 22
4 shitatenage Tec 19
5
11 oshidashi Inj 11-13
12 tsukidashi Ms5w
9 hatakikomi
10 okuridashi
7 oshidashi
8 yorikiri
5 tsukiotoshi
6 yorikiri
3 oshitaoshi Pow 55
4 hikiotoshi Tec 20
Kansei
402 okuridashi Bal 2
3 kotenage Pow 88
4 yoritaoshi Tec 79
5
11 okuridashi Inj 11-13
12 uwatedashinage Ms6e
9 oshidashi
10 yoritaoshi
7 oshidashi
8 oshidashi
yorikiri
6 yorikiri
Aozora
402 oshitaoshi Bal 52
3 tsukiotoshi Pow 63
4 oshidashi Tec 75
5
#112
11 uwatenage Inj 11-14
12 tsukidashi Ms5w
9 yorikiri
10 yoritaoshi
7 tsukiotoshi
8 yorikiri
oshidashi
6 oshidashi
#111#110
11 kotenage Inj 11-13
12 ushiromotare Ms6e
9 kimedashi
10 hikiotoshi
7 hatakikomi
8 yorikiri
oshidashi

180 cm 135 kg 5'11 298 lbs 188 cm 146 kg 6'2 322 lbs 175 cm 112 kg 5'9 247 lbs 185 cm 171 kg 6'1 377 lbs
05.11.1984 Kise 19.12.1984 Onomatsu 26.08.1987 Minezaki 22.09.1993 Tokitsukaze©Sideline Strategy Games ©Sideline Strategy Games ©Sideline Strategy Games ©Sideline Strategy Games
BASHO FURY SUMO 2015-2016 BASHO FURY SUMO 2015-2016 BASHO FURY SUMO 2015-2016 BASHO FURY SUMO 2015-2016
185 cm 137 kg 6'1 303 lbs 182 cm 150 kg 6'0 331 lbs 183 cm 155 kg 6'0 343 lbs 174 cm 118 kg 5'9 262 lbs
21.06.1989 Miyagino 14.07.1983 Sadogatake 13.05.1989 Miyagino 10.06.1989 Kasugano©Sideline Strategy Games ©Sideline Strategy Games ©Sideline Strategy Games ©Sideline Strategy Games
BASHO FURY SUMO 2015-2016 BASHO FURY SUMO 2015-2016 BASHO FURY SUMO 2015-2016 BASHO FURY SUMO 2015-2016
Higonojo
392 tsukiotoshi Bal 38
6 hatakikomi
#113
Yamatofuji
422 tsukidashi Bal 108
3 oshitaoshi Pow 2
4 tsukiotoshi Tec 27
5
11 hikiotoshi Inj 11-13
12 yoritaoshi Ms6e
9 yorikiri
10 yorikiri
7 oshidashi
8 oshidashi
5 yorikiri
6 oshidashi
3 hatakikomi Pow 95
4 yorikiri Tec 4
Oyanagi
422 oshitaoshi Bal 0
3 uwatenage Pow 106
4 tsukidashi Tec 100
5
11 okuridashi Inj 11-13
12 watashikomi Ms7e
9 yoritaoshi
10 oshidashi
7 yorikiri
8 yorikiri
uwatenage
6 yorikiri
Gochozan
422 shitatenage Bal 15
3 oshitaoshi Pow 61
4 oshidashi Tec 52
5
#116
Hokaho
412 yoritaoshi Bal 107
11 yorikiri Inj 11-14
12 yorikiri Ms7w
9 yorikiri
10 yorikiri
7 oshidashi
8 oshidashi
oshidashi
6 oshidashi
#115#114
11 hikiotoshi Inj 11-13
12 okuridashi Ms8w
9 hatakikomi
10 oshidashi
7 hatakikomi
8 hatakikomi
hatakikomi
6 oshidashi
#117
Kotomisen
402 tsukidashi Bal 63
3 yoritaoshi Pow 60
4 oshidashi Tec 6
5
11 kotenage Inj 11-13
12 hatakikomi Ms7w
9 hatakikomi
10 uwatenage
7 yorikiri
8 oshidashi
5 hatakikomi
6 yorikiri
3 sukuinage Pow 63
4 yorikiri Tec 20
Aokishin
392 shitatedashinage Bal 52
3 hikiotoshi Pow 81
4 yorikiri Tec 30
5
11 yorikiri Inj 11-14
12 okuridashi Ms8w
9 yorikiri
10 yorikiri
7 yorikiri
8 oshidashi
uwatedashinage
6 hatakikomi
Daikiho
402 uwatenage Bal 108
3 oshidashi Pow 86
4 hatakikomi Tec 100
5
#120
11 hatakikomi Inj 11-13
12 uwatenage Ms8e
9 yoritaoshi
10 yoritaoshi
7 yorikiri
8 oshidashi
oshidashi
6 yorikiri
#119#118
11 okuridashi Inj 11-13
12 oshitaoshi Ms8e
9 oshitaoshi
10 hatakikomi
7 oshidashi
8 yorikiri
hikiotoshi

188 cm 132 kg 6'2 291 lbs 178 cm 114 kg 5'10 253 lbs 166 cm 134 kg 5'5 296 lbs 193 cm 201 kg 6'4 443 lbs
07.10.1995 Tatsunami 21.01.1989 Fujishima 21.12.1981 Irumagawa 14.07.1989 Azumazeki©Sideline Strategy Games ©Sideline Strategy Games ©Sideline Strategy Games ©Sideline Strategy Games
BASHO FURY SUMO 2015-2016 BASHO FURY SUMO 2015-2016 BASHO FURY SUMO 2015-2016 BASHO FURY SUMO 2015-2016
174 cm 110 kg 5'9 243 lbs 187 cm 128 kg 6'2 283 lbs 181 cm 128 kg 6'1 283 lbs 179 cm 131 kg 5'10 289 lbs
24.04.1992 Oitekaze 12.09.1987 Tatsunami 14.11.1994 Chiganoura 10.03.1992 Shikoroyama©Sideline Strategy Games ©Sideline Strategy Games ©Sideline Strategy Games ©Sideline Strategy Games
BASHO FURY SUMO 2015-2016 BASHO FURY SUMO 2015-2016 BASHO FURY SUMO 2015-2016 BASHO FURY SUMO 2015-2016
Rikishin
392 hikiotoshi Bal 24
6 yorikiri
#121
Mugendai
392 hikkake Bal 105
3 okuridashi Pow 52
4 uwatenage Tec 97
5
11 yoritaoshi Inj 11-13
12 oshitaoshi Ms8e
9 yorikiri
10 tsukidashi
7 oshidashi
8 oshidashi
5 yorikiri
6 oshidashi
3 hatakikomi Pow 91
4 yorikiri Tec 6
Hishofuji
442 hatakikomi Bal 109
3 kimedashi Pow 57
4 yorikiri Tec 1
5
11 tottari Inj 11-13
12 kakenage Ms9e
9 tsukiotoshi
10 tsukidashi
7 oshidashi
8 oshidashi
hikiotoshi
6 oshidashi
Sagatsukasa
382 hikkake Bal 69
3 sukuinage Pow 42
4 hatakikomi Tec 82
5
#124
Iwasaki
412 tsukitaoshi Bal 93
11 uwatedashinage Inj 11-14
12 yorikiri Ms11e
9 oshidashi
10 oshidashi
7 yorikiri
8 yorikiri
okuridashi
6 yorikiri
#123#122
11 shitatenage Inj 11-13
12 sukuinage Ms9w
9 tsukiotoshi
10 yoritaoshi
7 hatakikomi
8 oshidashi
yorikiri
6 hatakikomi
#125
Ryuonami
402 yoritaoshi Bal 106
3 shitatenage Pow 4
4 uwatenage Tec 108
5
11 okuritaoshi Inj 11-14
12 kakenage Ms10w
9 oshidashi
10 oshidashi
7 yorikiri
8 yorikiri
5 hatakikomi
6 hatakikomi
3 tsukiotoshi Pow 73
4 okuridashi Tec 52
Matsumoto
392 tsukidashi Bal 79
3 hatakikomi Pow 71
4 tsukitaoshi Tec 27
5
11 oshitaoshi Inj 11-13
12 shitatenage Ms11e
9 hatakikomi
10 hatakikomi
7 oshidashi
8 oshidashi
yorikiri
6 oshidashi
Masunosho
402 hikiotoshi Bal 82
3 tsukiotoshi Pow 87
4 yorikiri Tec 22
5
#128
11 tsukidashi Inj 11-13
12 tsukidashi Ms10w
9 tsukidashi
10 tsukidashi
7 tsukidashi
8 tsukidashi
tsukidashi
6 tsukidashi
#127#126
11 hikiotoshi Inj 11-13
12 oshidashi Ms11w
9 tsukiotoshi
10 uwatedashinage
7 yorikiri
8 uwatenage
hatakikomi
182 cm 104 kg 6'0 229 lbs 182 cm 101 kg 6'0 223 lbs 187 cm 168 kg 6'2 371 lbs 172 cm 143 kg 5'8 316 lbs
16.06.1982 Hakkaku 29.12.1991 Arashio 23.01.1986 Chiganoura 29.12.1989 Oitekaze©Sideline Strategy Games ©Sideline Strategy Games ©Sideline Strategy Games ©Sideline Strategy Games
BASHO FURY SUMO 2015-2016 BASHO FURY SUMO 2015-2016 BASHO FURY SUMO 2015-2016 BASHO FURY SUMO 2015-2016
180 cm 145 kg 5'11 321 lbs 189 cm 117 kg 6'2 258 lbs 176 cm 153 kg 5'11 338 lbs 181 cm 135 kg 5'11 298 lbs
12.11.1991 Chiganoura 14.01.1993 Sadogatake 17.04.1980 Takadagawa 14.10.1983 Shikihide©Sideline Strategy Games ©Sideline Strategy Games ©Sideline Strategy Games ©Sideline Strategy Games
BASHO FURY SUMO 2015-2016 BASHO FURY SUMO 2015-2016 BASHO FURY SUMO 2015-2016 BASHO FURY SUMO 2015-2016
Suzaku
372 sukuinage Bal 93
6 yorikiri
#129
Onami
372 katasukashi Bal 82
3 okuridashi Pow 36
4 oshidashi Tec 88
5
11 yoritaoshi Inj 11-13
12 abisetaoshi Ms12e
9 oshidashi
10 shitatenage
7 yorikiri
8 okuridashi
5 yorikiri
6 okuridashi
3 uwatenage Pow 27
4 oshidashi Tec 93
Daishoryu
372 shitatenage Bal 3
3 tsukiotoshi Pow 71
4 yorikiri Tec 38
5
11 tsukiotoshi Inj 11-23
12 okuridashi Ms16w
9 okuridashi
10 hikiotoshi
7 oshidashi
8 oshidashi
sukuinage
6 yorikiri
Masutoo
372 yoritaoshi Bal 64
3 uwatenage Pow 46
4 yorikiri Tec 40
5
#132
Masunoumi
372 hikiotoshi Bal 0
11 utchari Inj 11-13
12 watashikomi Ms16e
9 yorikiri
10 yorikiri
7 oshidashi
8 oshidashi
yoritaoshi
6 oshidashi
#131#130
11 okuridashi Inj 11-13
12 hatakikomi Ms14w
9 hatakikomi
10 oshidashi
7 uwatedashinage
8 uwatenage
okuridashi
6 yorikiri
#133
Kotodaigo
372 oshidashi Bal 105
3 hatakikomi Pow 76
4 yoritaoshi Tec 27
5
11 tsukiotoshi Inj 11-14
12 tsukidashi Ms16w
9 yorikiri
10 yorikiri
7 oshidashi
8 oshidashi
5 oshidashi
6 oshidashi
3 yoritaoshi Pow 82
4 yorikiri Tec 3
Sensho
372 shitatenage Bal 0
3 yoritaoshi Pow 0
4 tsukidashi Tec 100
5
11 hatakikomi Inj 11-13
12 yoritaoshi Ms20e
9 oshidashi
10 oshidashi
7 oshidashi
8 oshidashi
oshidashi
6 oshidashi
Dairaido
372 okuridashi Bal 34
3 oshitaoshi Pow 85
4 hikiotoshi Tec 1
5
#136
11 okuridashi Inj 11-14
12 oshitaoshi Ms20w
9 tsukiotoshi
10 hikiotoshi
7 yorikiri
8 oshidashi
uwatenage
6 hatakikomi
#135#134
11 harimanage Inj 11-23
12 oshitaoshi Ms17w
9 okuritaoshi
10 sukuinage
7 yorikiri
8 tsukiotoshi
yorikiri

Basho:
Result East Rank West Result
Y
Y
O
O
S
K
M1
M2
M3
M4
M5
M6
M7
M8
M9
M10
M11
M12
M13
M14
M15
M16
Result East Rank West Result
J1
J2
J3
J4
J5
J6
J7
J8
J9
J10
J11
J12
J13
J14
Makuuchi Banzuke
Juryo Banzuke

BASHO: Day:
Shikona (name) Rating NotesKimariteDice RollsFavorite - status WinnerControl

Basho Day Rank Shikona record Rank Shikona record Kimarte / Notes

Each sumotori (wrestler) sprinkles salt over the dohyo (fighting area)
before entering. They then began the pre-match rituals by
stamping their feet on the ground (to drive away evil spirits).
The wrestlers match their opponent's movements as they continue
the pre-match rituals.
The wrestlers take their mark and face each other in a posture that
will allow them to move forward and start the match at any moment.
As soon as both wrestlers place their fists on the ground, the match
begins.
The beginning of the match is called the tachiai which translates to
initial charge and is where most matches are often won or lost.
The match ends when one wrestler touches the ground with any
part of his body other than the soles of his feet or touches any area
outside of the dohyo ring. A wrestler may not punch, choke, kick,
gouge eyes, or pull hair in his efforts to force his opponent down
to the ground or out of the dohyo.
There are now more than 80 different kimarite (winning techniques) a wrestler can use to win a
match. The kimarite describes the types of pulling, pushing, throwing, tripping, and flipping moves
a wrestler uses to send his opponent out of the dohyo ring or causes his opponent to touch the
ground with any part of his body other than the soles of his feet.
The Basics, from start to end, of a sumo match

Kimarte Translation Description
Abisetaoshi Backward Force Down The attacker forces his opponent over backward from a grappling position
Amiuchi Fisherman's ThrowThe attacker pulls the opponent's arm with both hands in a backward twisting throw. It resembles the traditional way of
casting a Japanese fishing net.
Ashitori Leg Pick The attacker grabs and lifts the opponent's leg with both hands
Chongake Pulling Heel HookThe attacker hooks his heel behind the defender's heel from the inside left foot to left foot, or right to right and pulls that
leg toward him, grabs the defender's arm on the same side and twists him sideways or backwards into the clay
Fumidashi Rear Step OutFumidashi is recorded outside sumo's official listing of winning techniques. A rikishi accidentally steps back over the edge
without his opponent initiating any kind of technique
Gasshohineri Clasped Hand Twist DownMost effective with a double inside grappling grip, the attacker clasps his hands behind the defender's back and twists
him down and over
Harimanage Backward Belt ThrowThe attacker reaches over the opponent's shoulder to grab the mawashi from behind and then pulls him past his own
body while twisting into him, usually as a last-ditch throw at the edge
Hatakikomi Slap DownOften seen at the tachiai, the attacker shifts away from opponent's charges and slaps the opponent's shoulder, back or
arm with one or both hands, forcing him to touch the ground with one or both hands
Hikiotoshi Hand Pull DownSimilar to hatakikomi, the attacker pulls the opponent down while backing away by pulling on the arm, shoulder or front
of the opponent's mawashi
Hikkake Arm Grabbing Force OutThe attacker slings his opponent out of the ring by grabbing his arm with both hands -often in response to a pushing-
thrusting attack -and pulling him while moving backwards and to the side
Ipponzeoi One Armed Shoulder Throw Similar to the judo technique of the same name, the attacker heaves his opponent over his shoulder or hip.
Izori Backwards Body DropThe attacker dives under his opponent's charge and grabs behind one or both knees, or the front of the defender's
mawashi, and uses his lower body or back to lift the opponent up and over backward
Kainahineri Two-Handed Arm Twist DownThe attacker locks up one of the defender's arms with both arms and, turning into his opponent, twists him over and into
the clay.
Kakenage Hooking Inner Thigh ThrowThe attacker hooks one leg inside the defender's legs and turns away in order to raise the hooked leg up and back to
force the defender up and over into the clay.
Kakezori Hooking Backwards Body Drop
With his head under one of the defender's arms and an inside grip of his opponent's mawashi on the opposite side, the
attacker attempts to twist the defender over or hook the defender's closest leg, driving his head into the defender's side
to force him over backward.
Katasukashi Under-Shoulder Swing DownThe attacker forces his opponent down by placing one hand on the opponent's shoulder blade from the inside and one
from the outside, pulling him down and forward.
Kawazugake Hooking Backward Counter ThrowThe attacker hooks his opponent's closest leg from the inside and takes him over backward by pulling the hooked leg
forward and across his own body.
Kekaeshi Minor Inner FootsweepThe attacker sweeps his opponent's leg out from under him by kicking the defender's leg from the inside, often
accompanied by a well-timed slap on the defender's back.
Ketaguri Pulling Inside Ankle SweepUsually seen at the tachiai (initial charge), the attacker leaps to the side and kicks or sweeps his opponent's lead leg from
the inside while slapping the shoulder or pulling the arm closest to him.
Kimedashi Arm Barring Force OutThe attacker locks up the defender's elbows by wrapping his own arms around them from the outside, pulling up and in
to march or swing the opponent backward and out of the ring.

Kimarte Translation Description
Kimetaoshi Arm Barring Force DownThe attacker locks up one or both of the opponent's elbows with an outside grip, then throwing his weight into and on
top of the opponent.
Kirikaeshi Twisting Backward Knee TripThe attacker takes a deep step forward, placing his knee behind his opponent's lead leg, then twists his opponent
backward and over that knee.
Komatasukui Over Thigh Scooping Body DropBest used in combination with an over-arm or under-arm throw. As the opponent takes a deep step forward to defend
against the throw, the attacker grabs the opponent's leg and pulls up to drive the opponent over backward.
Koshikudake Inadvertent CollapseKoshikudake is recorded outside sumo's official list of winning techniques. A rikishi falls over backward without his
opponent attempting any technique, often the result of a rikishi overcommitting to an attack.
Koshinage Hip ThrowThe attacker turns into his opponent while pulling him onto his hips, straightening his knees, throwing the defender over
and onto his back.
Kotehineri Armlocking Twist DownThe attacker wraps his arm around the defender's inside gripping arm to lock up the defender's biceps or elbow and
twists him around and down in the direction of that inside arm.
Kotenage Armlock ThrowThe attacker wraps his arm around the opponent's inside gripping arm, locking it up on or near the elbow and turning
away from him, usually at the edge of the ring.
Kozumatori Ankle Pick
The attacker leans into his opponent and grabs the opponent's ankle or base of the calf, then pulls that ankle up and
toward him while driving into his foe, forcing him over onto his back. Another ariation has the attacker pulling on the
same ankle or calf from behind.
Kubihineri Head Twisting ThrowThe attacker wraps one hand around his opponent's neck and the other hand around the opponent's inside gripping arm,
then pulling the hand on the opponent's neck and twisting the opponent onto the clay.
Kubinage Headlock ThrowThe attacker turns into his opponent and throws him by wrapping one arm around his neck as he makes that turn. The
other hand is usually gripping the opponent's arm furthest from him from the outside.
Makiotoshi Twist Down The attacker throws his opponent by twisting him toward his own, inside hand, but not gripping the mawashi.
Mitokorozeme Triple Attack Force Out
Executing three techniques almost simultaneously, the attacker attempts an inside leg trip with one leg, grabs the
defender's other leg behind the thigh and tries to pull that leg out from under him and drives his head into his opponent's
stomach or chest to force him backwards.
Nichonage Body Drop ThrowThe attacker places one leg in front of the defender's leg, usually at the knee, then sweeps back with his leg as he pulls
forward, throwing the defender over that extended leg.
Okurigake Rear Leg TripFrom behind the defender, the attacker hooks one of his legs around one of the defender's legs, then pulls that hooked
leg towards him, dropping his opponent forward and down.
Okurihikiotoshi Rear Pull DownAfter circling behind the defender, and from any of several gripping positions, the attacker backpedals away, dropping
the defender back and down.
Okurinage Rear Throw DownAfter circling behind the defender, the attacker throws the defender forward and down, or to the side and down. To
record this technique, the attacker must be standing behind the defender at the time of the throw.
Okuritaoshi Rear Push DownSimilar to okuridashi, the attacker forces his opponent down from behind to end the match before the opponent is
forced over the edge.
Okuritsuridashi Rear Lift Out
After circling around the defender, the attacker drops his hips, lifts the defender up and carries him over the edge of the
ring. * Because both of the defender's feet are in the air, the attacker can touch outside the ring with one foot before the
defender's feet cross over without losing the match.
Okuritsuriotoshi Rear Lifting Body SlamAfter circling around behind the defender, the attacker lifts his opponent using any one of several possible grips and then
slams him down.
Omata Thigh Scooping Body Drop
When the defender attempts to block an overarm or underarm throw by taking a deep step forward, the attacker grabs
that leg from the inside with his free hand and lifts it up and backwards, driving his body into the defender and forcing
him over onto his back.

Kimarte Translation Description
Osakate Backward Twisting Overarm ThrowFrom a deep, standard outside grip, usually at the edge of the ring, the attacker bends backwards and swings his
opponent around and out in the direction of that outside gripping hand.
Oshidashi Frontal Push OutThe attacker pushes his opponent out of the ring without gripping the mawashi. Unlike a frontal thrust out tsukidashi,
the attacker must maintain hand contact at all times.
Oshitaoshi Frontal Push Down Similar to tsukitaoshi frontal thrust down, the attacker pushes his opponent backwards and then over.
Sabaori Forward Force DownWith both hands on his opponent'smawashi, the attacker pulls the defender in, throwing his weight high into and on top
of the defender, causing the defender's knees to buckle.
Sakatottari Arm Bar Throw CounterA counter move to the tottari arm bar throw, the wrestler attempting the technique frees the arm being barred, then
turns the hip closet to his opponent inward, forcing the opponent to fall forward.
Shitatedashinage Pulling Underarm ThrowFrom an inside grip on the mawashi, the attacker turns away from his opponent, pulling him forward and down into the
clay with that inside hand.
Shitatehineri Twisting Underarm Throw From an inside grip, the attacker twists his opponent down into the clay, pulling him in the direction of the inside hand.
Shitatenage Underarm ThrowOne of the most common throwing techniques, the attacker pulls straight down with his inside gripping hand as he turns
away from his opponent.
Shumokuzori Bell Hammer Backwards Body Drop
The attacker ducks under the defender's lead arm and the defender will find himself draped over the attacker's body in a
fireman's carry position. The attacker then lifts the defender, taking him over backward. The attacker will land on his back
an instant after the defender is thrown over onto his.
Sokubiotoshi Head Chop DownThe attacker finds the defender leaning too far forward, then chops down with his wrist or forearm at the defender's
neck or the back of his head, forcing him to touch the ground with one or two hands.
Sotogake Outside Leg Trip The attacker pulls his opponent into him and hook the opponent's lead leg from the outside, driving him over backward.
Sotokomata Over Thigh Scooping Body DropAs the defender steps forward, the attacker grabs the lead leg from the outside, then lifts the leg, driving his opponent
over backward.
Sotomuso Outer Thigh Propping Twist Down
The attacker releases his inside gripping hand and reaches across the front of the defender's body to block, or prop, the
defender's far leg. At the same time, he locks up the defender's inside-gripping arm while twisting his body into his
opponent. With the defender's far leg blocked from stepping forward, this forces him to fall over onto his back.
Sototasukizori Outer Reverse Backwards Body Drop
While the defender has an inside grip, the attacker bars that gripping arm across his own body, then reaches over that
barred arm with his free hand palm up, grabbing the defender's closest leg from the inside at the thigh. Pulling the leg up
and over forces the defender to touch the ground with his free hand.
Sukuinage Beltless Arm ThrowFrom an inside gripping position, the attacker releases the gripping hand and extends that inside arm across his
opponent's back as he turns away and pulls the opponent forward and down.
Susoharai Rear Footsweep
The attacker uses a pulling arm throw or arm-grabbing force-out attempt to work the defender into a perpendicular
position. The attacker then sweeps behind the defender's forward foot from the rear and pulls the defender backward,
throwing him onto his side or back.
Susotori Ankle PickAs the defender attempts a throw, the attacker reaches down and grabs the ankle of his opponent's leg furthest from the
defender's throwing arm. He then pulls that leg up and behind him while driving the defender over onto his back.
Tasukizori Reverse Backwards Body Drop
During a heated slapping exchange, the attacker ducks under the defender's lead arm with his back turned to the
defender's side. Getting a hold on the defender's lead arm and his back leg at the thigh from the inside, the attacker then
leans backward, driving the defender over onto his side or back.
Tokkurinage Two-Handed Head Twistdown
The attacker takes adantage of the defender leaning forward, grabbing the opponent's head or neck with both hands to
twist the defender down and over onto his back. *This technique was also called gasshohineri but that name is now used
to describe a variation of tokkurinage.
Tottari Arm Bar ThrowThe attacker grabs one of his opponent's arms as he turns parallel to him. After wrapping his free arm around that arm
from below, the attacker then bars it across his stomach or chest, forcing the opponent forward and down.

Kimarte Translation Description
Tsukaminage Lifting ThrowFrom an outside grip, the attacker pulls his opponent past him. As he completes the pull, he will heae the defender into
the air and then drive him into the clay. The motion of this technique motion is always right to right, or left to left.
Tsukidashi Frontal Thrust OutThe attacker drives his opponent backward and over the edge with a rhythmical thrusting motion. Unlike oshidashi
frontal push out, the attacker does not have to maintain hand contact at all times.
Tsukihiza Knee Touch DownTsukihiza is recorded outside sumo's official listing of winning techniques. A rikishi stumbles without any real contact
with his opponent and loses by touching down with one or both knees.
Tsukiotoshi Thrust DownThe attacker drives his opponent down into the clay with a thrusting motion after placing his open hand on the
opponent's upper rib cage, or at the shoulder leel. This is often used as a last ditch effort at the edge.
Tsukitaoshi Frontal Thrust DownAfter the attacker has won a heated slapping exchange, the opponent's hips are usually too far forward, and the attacker
is able to thrust him over onto his back or side.
Tsukite Hand Touch DownTsukite is recorded outside sumo's official listing of winning techniques. A rikishi stumbles without any real contact with
his opponent and loses by touching down with one or both hands.
Tsumatori Rear Toe Pick
The attacker must work his way to the side of his forward-moving opponent. As the defender lifts the foot closest to the
attacker, the attacker reaches down, grabs that foot at the toes and pulls it back and up to forces his opponent to fall
forward.
Tsuridashi Lift Out
This power technique can be executed from either a single or double inside grip, or even a double outside grip. The
attacker takes hold of the opponent's mawashi, drops his hips and heaves his opponent into the air, lifting him over and
out of the ring.
Tsuriotoshi Lifting Body SlamIn this power technique, the attacker drops his hips while pulling the defender in, then lifts him into the air. But rather
than deposit his opponent outside the ring, the attacker swings his opponent sideways and drives him into the clay.
Tsutaezori Underarm Forward Body DropThe attacker dives under one of the defender's arms while maintaining a grip on that arm. Leaning back and into the
defender, he forces him to fall forward and touch down with his free hand.
Uchigake Inside Leg Trip
As the attacker pulls his opponent forward, he hooks the opponent's lead leg from the inside; hooking right leg to left leg,
or left to right. He then pulls the opponent's leg out from under him, pulling with a circular motion, as he drives him over
onto his back.
Uchimuso Inner Thigh Propping Twist Down
From either an inside or outside grip, the attacker sweeps his opponent's leg up by hitting the inner thigh with the back
of his free hand. As that hand makes contact with the opponent's thigh, the attacker pulls with his other hand in the
same direction as the sweeping hand.
Ushiromotare Backward Lean OutWhen the defender has circled behind the attacker, usually at the edge of the ring, the attacker leans back into his
opponent, forcing him back and over the edge, or back and down.
Utchari Backward Piot Throw
In this last-ditch effort to win after being driven to the edge, the attacker drops his hips while pulling his opponent up and
past him. The attacker is quite often forced over onto his back, but the twisting motion of his hips forces his opponent to
touch down a fraction of a second before he does.
Uwatedashinage Pulling Overarm ThrowFrom an outside grip, the attacker pulls his opponent forward and down as he turns away. The major difference
betweven this technique and uwatenage overarm throw is the forward pull.
Uwatehineri Twisting Overarm ThrowFrom an outside grip, the attacker twists his opponent in the direction of the outside hand. This is usually seven when the
opponent is defending against an overarm throw.
Uwatenage Overarm ThrowThis is one of the most common throwing techniques. After establishing an outside grip, the attacker throws his
opponent by heaing him down at a sharp angle as he turns away.
visamiashi Forward Step Outvisamiashi is recorded outside sumo's official listing of winning techniques. An attacking rikishi accidentally steps too far
forward and out of the ring before winning the match, giing the ictory to his opponent.
Waridashi Upper-Arm Force Out
From either an inside or outside grip, the attacker grabs the defender's arm at the biceps and while pushing on that arm,
drives the defender back and out. The attacker needs significantly more strength than his opponent to execute this
technique.
Watashikomi Thigh Grabbing Push DownAs the attacker drives his opponent to the edge, he grabs the defender's leg at the hamstring or behind the knee. Still
driving forward, the attacker pulls that leg towards him, forcing the defender either over the edge or onto his back.

Kimarte Translation Description
Yaguranage Inner Thigh Throw
From either an inside or outside grip, the attacker pulls his opponent into him, drops his hips and places the outside of his
knee against the defender's inner thigh. From here, he starts the throwing motion, driving that leg up, forcing the
defender over onto his side.
Yobimodoshi Pulling Body Slam
This power technique is only seen when there is a wide gap in strength between the two opponents. The attacker pulls
the defender in the direction of the attacker's inside grip. Then, using the defender's reaction against that pull, he
releases his inside grip, turn his palm down and takes the defender in the other direction, heaving him off his feet.
Yorikiri Frontal Force OutThe attacker drives his opponent backwards and out of the ring, maintaining a grip on that opponent's mawashi at all
times
Yoritaoshi Frontal Crush OutThe opponent is driven backwards and collapses under the force of the attack. The attacker must maintain some grip on
his opponent's mawashi.
Zubuneri Head Piot Throw
The attacker buries his head in the defender's chest and then locks up the defender's inside arm by wrapping his own
arm around it. He then twists that inside arm across his own body and uses his head as a fulcrum to spin the defender to
spin around and over onto his back.