base station & wireless controller installation guide ... · base station & wireless...
TRANSCRIPT
Base Station & Wireless Controller Installation Guide Base Station & Wireless Controller Installation Guide
Document number: 87042-2 Date: February 2005
Raymarine UK Ltd, Portsmouth, Hampshire, UK PO6 3TD +44 (0) 23 9269 3611Raymarine Inc. Nashua, NH 03063-4219, USA Toll Free: 800-539-5539
+1 603-881-5200
Base Station & Wireless Controller Installation Guide
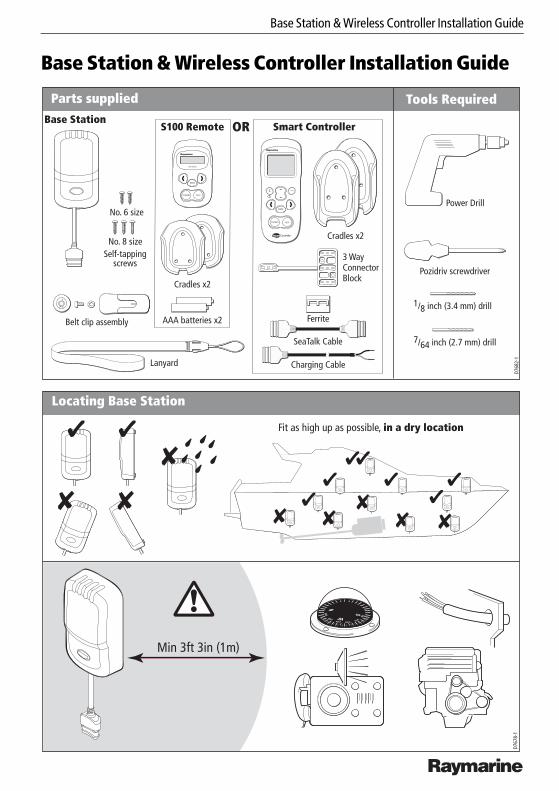
Self-tapping screws
Base Station
Pozidriv screwdriver
Power Drill
Parts supplied Tools Required
7/64 inch (2.7 mm) drill
1/8 inch (3.4 mm) drill
S100 REMOTE
MODE
STANDBY PILOT
S100 Remote Smart Controller
Belt clip assembly
Lanyard
OR
Cradles x2
Cradles x2
3 Way ConnectorBlock
SeaTalk Cable
Charging Cable
FerriteAAA batteries x2
STANDBY PILOT
MODE
D768
2-1
No. 6 size
No. 8 size
Min 3ft 3in (1m)
Locating Base Station
D767
8-1
Fit as high up as possible, in a dry location
1.
3.
2.
1.
2.
D767
5-1
3.
4.
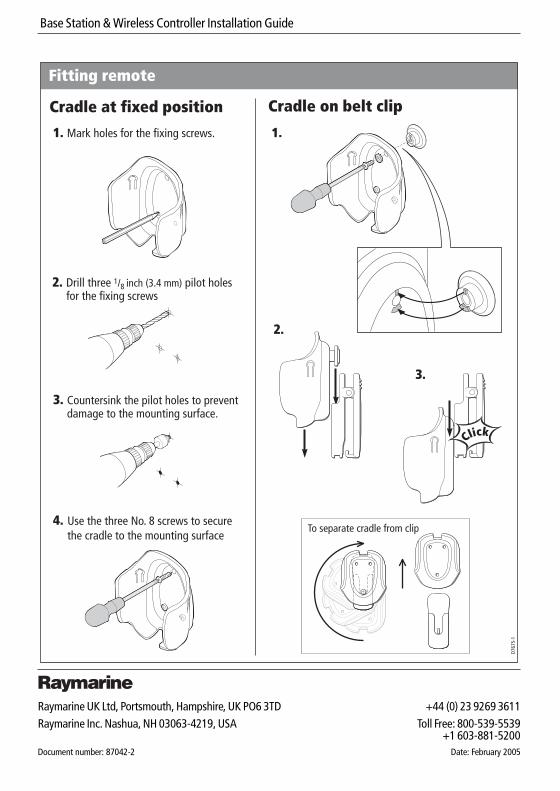
Mark holes for the fixing screws.
Drill three 1/8 inch (3.4 mm) pilot holes for the fixing screws
Fitting remote
Cradle at fixed position Cradle on belt clip
Countersink the pilot holes to prevent damage to the mounting surface.
To separate cradle from clip
Click
Use the three No. 8 screws to secure the cradle to the mounting surface

Base Station & Wireless Controller Installation Guide Base Station & Wireless Controller Installation Guide
2.1.
3. 4.
Mark holes for the fixing screws.
Drill two 7/64 inch (2.7 mm) pilot holes for the fixing screws
Countersink the pilot holes to preventdamage to the mounting surface
Remove cover
6.Replace cover
5. Use the two No. 6 screws to secure the Base Station to the mounting surface
Fitting Base Station
D767
6-1
1
2
Connecting Base Station
Base Station
Connect to Raymarine SeaTalk system
SeaTalk bus
SeaTalk bus
For example, connect to an
unused SeaTalk connector on an
instrument
Or use the SeaTalk connector block
supplied to connect to a SeaTalk bus
Connector block
If necessary, you can remove the SeaTalk connector from the Base Station cable, to make direct connections to SeaTalk, e.g. at a Raymarine course computer.
Before connecting the Base Station, ensure that the 12 V supply on the asscociated SeaTalk system is protected by a 5 A fuse.
SeaTalk color coding:
Note:
D768
1-2
Important:
Yellow : SeaTalk dataRed: +12 VScreen: 0 V
Fitting batteries to S100 Remote Connecting Smart Controller charging cable
Fit 2 x AAA batteries (supplied).
When replacing, use only high-quality alkaline, AAA size batteries.
Connect cable via 2 A fuse to 12 V supply
Clip ferrite onto cable, near to connector
D750
4-1
+12 V
0 V
2 A fuseRed
Black
Base Station & Wireless Controller Installation Guide Base Station & Wireless Controller Installation Guide
Document number: 87042-2 Date: February 2005
Raymarine UK Ltd, Portsmouth, Hampshire, UK PO6 3TD +44 (0) 23 9269 3611Raymarine Inc. Nashua, NH 03063-4219, USA Toll Free: 800-539-5539
+1 603-881-5200
Base Station & Wireless Controller Installation Guide
Self-tapping screws
Base Station
Pozidriv screwdriver
Power Drill
Parts supplied Tools Required
7/64 inch (2.7 mm) drill
1/8 inch (3.4 mm) drill
S100 REMOTE
MODE
STANDBY PILOT
S100 Remote Smart Controller
Belt clip assembly
Lanyard
OR
Cradles x2
Cradles x2
3 Way ConnectorBlock
SeaTalk Cable
Charging Cable
FerriteAAA batteries x2
STANDBY PILOT
MODE
D768
2-1
No. 6 size
No. 8 size
Min 3ft 3in (1m)
Locating Base Station
D767
8-1
Fit as high up as possible, in a dry location
1.
3.
2.
1.
2.
D767
5-1
3.
4.
Mark holes for the fixing screws.
Drill three 1/8 inch (3.4 mm) pilot holes for the fixing screws
Fitting remote
Cradle at fixed position Cradle on belt clip
Countersink the pilot holes to prevent damage to the mounting surface.
To separate cradle from clip
Click
Use the three No. 8 screws to secure the cradle to the mounting surface