barrel outdoor sauna - alpine spas · 1.amember of the high blood pressure, heart disease, high...
TRANSCRIPT
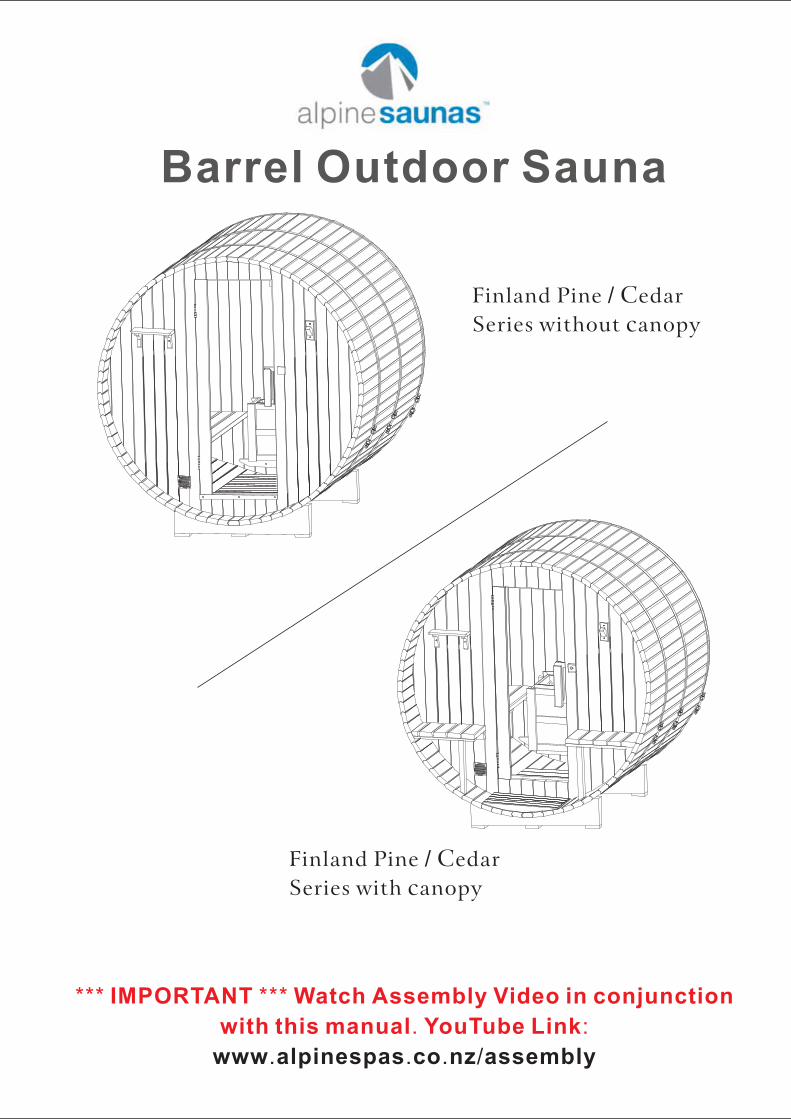
Barrel Outdoor Sauna
*** ***
. :
IMPORTANT Watch Assembly Video in conjunction
with this manual YouTube Link
www alpinespas co nz assembly. . . /
Finland Pine edar
Series with anopy
/ Cc
Finland Pine edar
Series without anopy
/ Cc
Contents
Instructions before use
Magazine rack /
Instructions
… … … … … … … … … … … … … … … … … … … … … … … … … …… … … … … … … … … … … … … … … … … … … … … … … … … … …
… … … … … … … … … … … … … … … … … … … … … … … … … …… … … … … … … … … … … … … … … … … … … … … … … … … … …
… … … … … … … … … … … … … … … … … … … … … … … … … … …… … … … … … … … … … … … … … … … … … … … … … … … … … …
………………………………………………………………… … … … … … … … … … … … … … … … … … … … … … … … …
… … … … … … … … … … … … … … … … … … … … … … … … … …… … … … … … … … … … … … … … … … … … … … … … …
… … … … … … … … … … … … … … … … … … … … … … … … …
-3--6--6--8--9-
-10-
-11--12-
-13-9. -14-10 -17-
…
234.5.
67
8
1.Base assembly.Front and back wall assembly.Stave assemblyStainless steel bands assemblyBench assembly
. Heater and lamp holder assembly
.Other
.
assembly
Bitumen-proof assembly.Recommendations and suggestions
Sequences and contents of sauna assembly Page
- 2 -

1. A member of the high blood pressure, heart disease, high blood pressure do notsauna.2. Who has a cold should not be sauna. because the sauna room hiddencryptococcus bacteria can enter human body through respiratory tract, such aseasy to cause pneumonia, etc.3. Do not sauna when overwork and can't sleep in sauna room. People with poormuscle tone when they are tired, reduce the stimulation of cold and hot resistanceability, easy to cause collapse when sauna.4. Do not sauna when on an empty stomach, lest cause cardiovascular collapse.Should not be sauna after overstrain brain or strenuous exercise, it can cause brainanemia or shock.5. It is not suitable for sauna not after half an hour feast, because the hightemperature make the skin vasodilation , blood backflow in great quantities, whichaffects the blood supply of the digestive organs, interfere with digestion andabsorption of food.6. Do not sauna after drinking. After heavy drinking, it can make the brain systemsat the mercy of the function to drop, at this time if sauna, under the effect of alcohol,a amount of sweat will make human body caused by rapid filtration syncope.7. Do not wear jewelry when sauna, like jade, necklaces, watches, etc are easyabsorption of heat may be burn the skin.8. Do not apply cosmetics, because it can block pore, prevent sweat evaporation.9. Sauna is not suitable for the elderly, sitting in a sauna room, the body sweatmore, the blood becomes sticky, it is easy to form thrombus, cause of variouscardiovascular diseases. Especially the elderly, their body temperature regulatingcenter not too sensitive, so not suitable for sauna.10. Sauna should not be too long, if too long, excessive sweating can make theperson to exhaustion; temperature is too high, can be difficulty breathing. Ingeneral, in the sauna room should be come out every 5-10 minutes. Settingtemperature personalized, it is recommended that the dry steam temperaturebetween 60 to 80 make the person feels more moderate.11. Do not immediately come with cold air after sauna, prevent big differencetemperature cause vascular contractions induced stroke.12. Go with partner sauna, should be timely supplement moisture, do not wait untilthirsty to drink.13. Keep awake when sauna, if have shortness of breath, dizziness and othersymptoms should immediately stop sauna, lie down in a better air circulation place,drink some cold boiled water, not drink too low water temperature .14. Do not get up too fast and too hard, be sure slow up and adequate rest.
℃ ℃
Instructions before use
- 3 -

Introduction:
1. Tools we provided
Plastic Hammer 1×
2. Tools you need to preparePower Drill 1× Adjustable Wrench 2× Tape 1× Bar Level 1×
3. All parts list
- 4 -
Instructions before assembly1.At least two people are required to assemble the sauna.2,Assembly location: check whether the ground or platform is horizontal, and slight slope will not affectthe assembly and use of sauna, but if the slope is evident, a pad is needed to keep the sauna level.3,All screw heads to assemble sauna must be completely inserted into wood toavoid scratching skinduring use. If you want to assemble accessories providedby other companies to the sauna, try to avoidmetal accessories, or insulate them.4,Please find qualified electricians to install the electrical elements in sauna.
1Sauna
HeaterPcs
2 Bucket 4L Pcs 1 1 1 1 1 1 1 1 1
3Sauna
Stoneskg 20 20 20 20 20 20 20 20 20
4
Thermometer
,
Hygrometer
Pcs 1 1 1 1 1 1 1 1 1
5Explosion-
proof LightPcs 1 1 1 1 1 1 1 1 1
6 Sand timer Pcs 1 1 1 1 1 1 1 1 1
7
glass
silicone
sealant
Pcs 3 3 3 3 3 3 3 3 3
8 Steel strip Pcs 2~4 2~4 2~4 2~4 2~4 2~4 2~4 2~4 2~4
9Decoration
boardPcs 20 20 20 20 20 20 20 20 20
3.0kw/4.5kw/6.0kw/8.0kw/9.0kw
Accessories package ListModel/ numbers
NO
.Component
Uni
t RWH300 Series/RWH310 Series
Glass Silicone Sealant Gun 1×
Pencil 1×

1
2
3
4
5
9
10
11
12
13
14
15
No. Name Quantity
1
2
3
4
5
6
Stave
Front Wall
Steel strip
Outside bench
Cup holder
Robe hook
66
1
1
1
2
2~4
No. Name Quantity
7
8
9
10
11
12
Heater fence
Backrest (Optional)
Inside bench
Inside floor
Back Wall
Sauna Heater (Optional)
1
2-8
1-3
1
3~9kw
2
- 5 -
13
Magazine rack 1
16
Wooden components of sauna
6
14Outside Floor 1
78
15
16Decoration board 20
Base 2-5
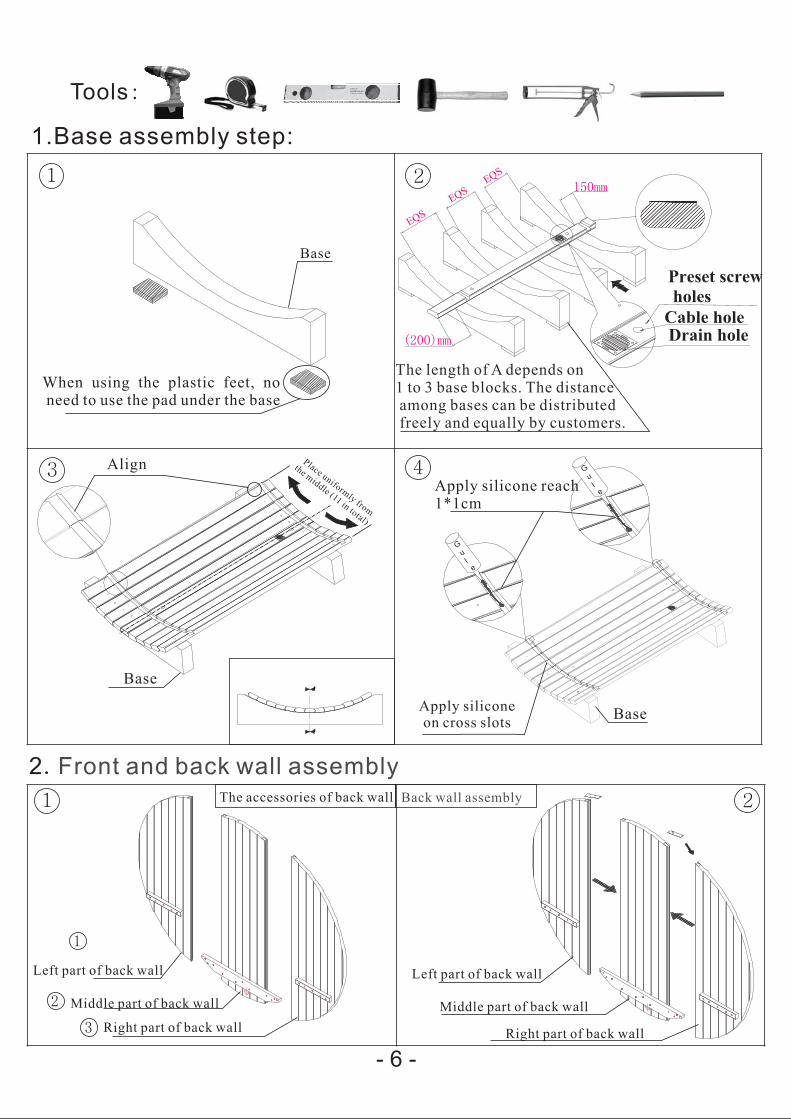
1.Base assembly step:
Tools:
- 6 -
Place uniformly
from
the middle (11
intotal)
When using the plastic feet, noneed to use the pad under the base
Apply siliconeon cross slots
2.Front and back wall assembly
1 2
1 2
3 4Align
Apply silicone reach1*1cm
The accessories of back wall
Base
Left part of back wall
Middle part of back wall
Right part of back wall
1
2
3
Left part of back wall
Middle part of back wall
Right part of back wall
Base
Base
The length of A depends on1 to 3 base blocks. The distanceamong bases can be distributedfreely and equally by customers.
Back wall assembly

ST5*30 Stainless
steel sheet
ST5x50
2
3
1
Middle part of
front wall
Left part of front
wall
Right part of
front wall
- 7 -
Bracket of
bench inside
The level bar shows
the levelness
Level bar
Air outlethole
Air intake hole
3 4
5 6
Left part of
front wall
Right part of
front wall Middle part of
front wall
7 8
The accessories of front wall
ST5 50*
ST5 50*
Back wall
Front wall assembly Front wall
Front and back wall assembly

Gu
Le
glasssiliconesealant
A1
Center line
Gu
Le
glasssiliconesealant
A1
- 8 -
1
3
4
3 Stave assembly.
Gu
Le
Gu
Le
A1
glas
s
silic
one
seal
ant
glasssiliconesealant
A1
Apply silicone reach 1*1cm
2
Apply silicone reach 1*1cm
Front wall(back wall)
Stave(30pcs with screwholes)
ST5*50
Center line
Stave with screw holes
Right
Wrong
1Pc x 95mm
(Bottom)
Stave without screw holes
2Pcsx80mm or75mm(x1)+85mm(x1)
60pcsx95mm(Total)
1pcx85mm(Top)
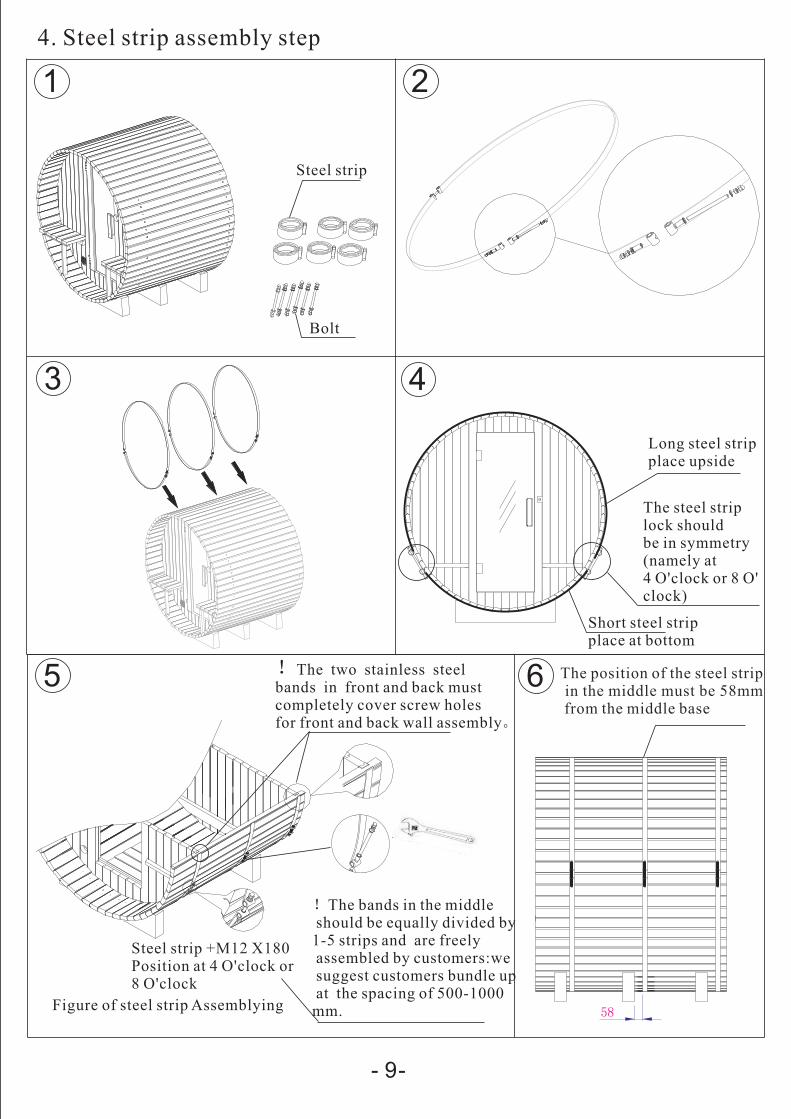
Figure of steel strip Assemblying
!The bands in the middleshould be equally divided by1-5 strips and are freelyassembled by customers:wesuggest customers bundle upat the spacing of 500-1000mm.
!The two stainless steelbands in front and back mustcompletely cover screw holesfor front and back wall assembly。
- 9-
The steel striplock shouldbe in symmetry(namely at4 O'clock or 8 O'clock)
Long steel stripplace upside
Short steel stripplace at bottom
4. Steel strip assembly step
58
1 2
3 4
5 6
Steel strip
Bolt
Steel strip +M12 X180Position at 4 O'clock or8 O'clock
The position of the steel stripin the middle must be 58mmfrom the middle base
- 10 -
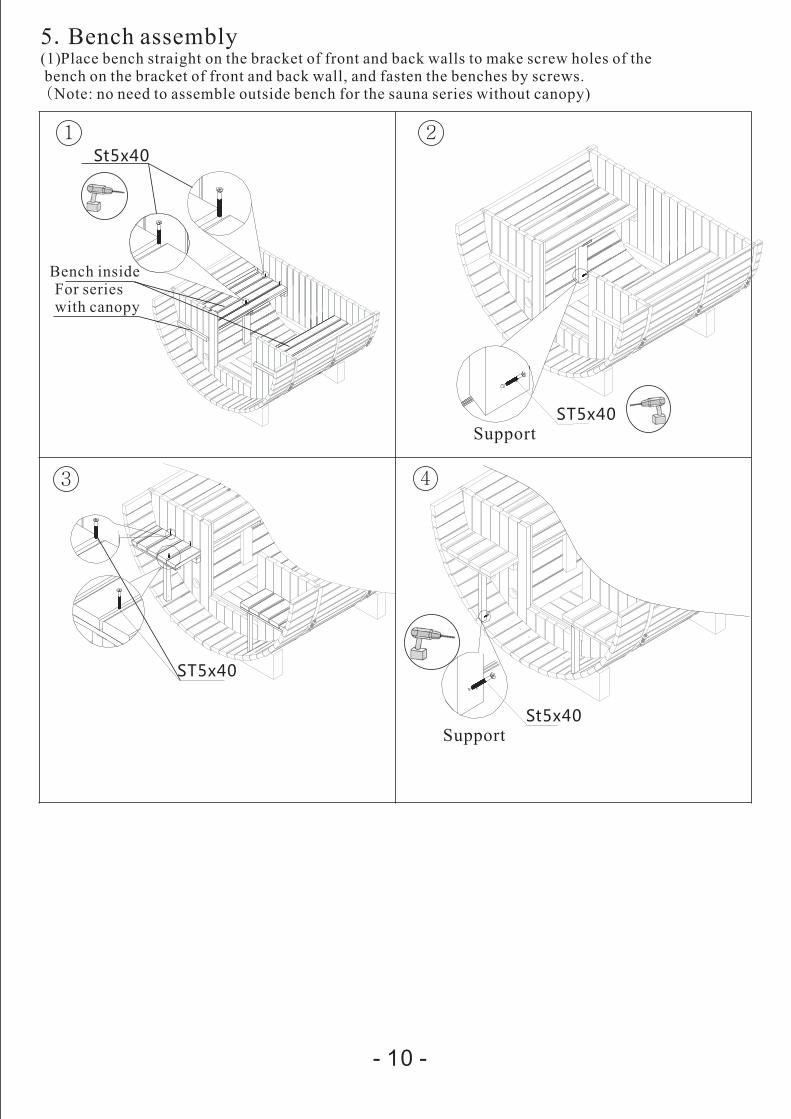
5 Bench assembly.(1)Place bench straight on the bracket of front and back walls to make screw holes of thebench on the bracket of front and back wall, and fasten the benches by screws.
Note: no need to assemble outside bench for the sauna series without canopy)(
1 2
3 4
SupportSt5x40
ST5x40
SupportST5x40
Bench insideFor serieswith canopy
St5x40
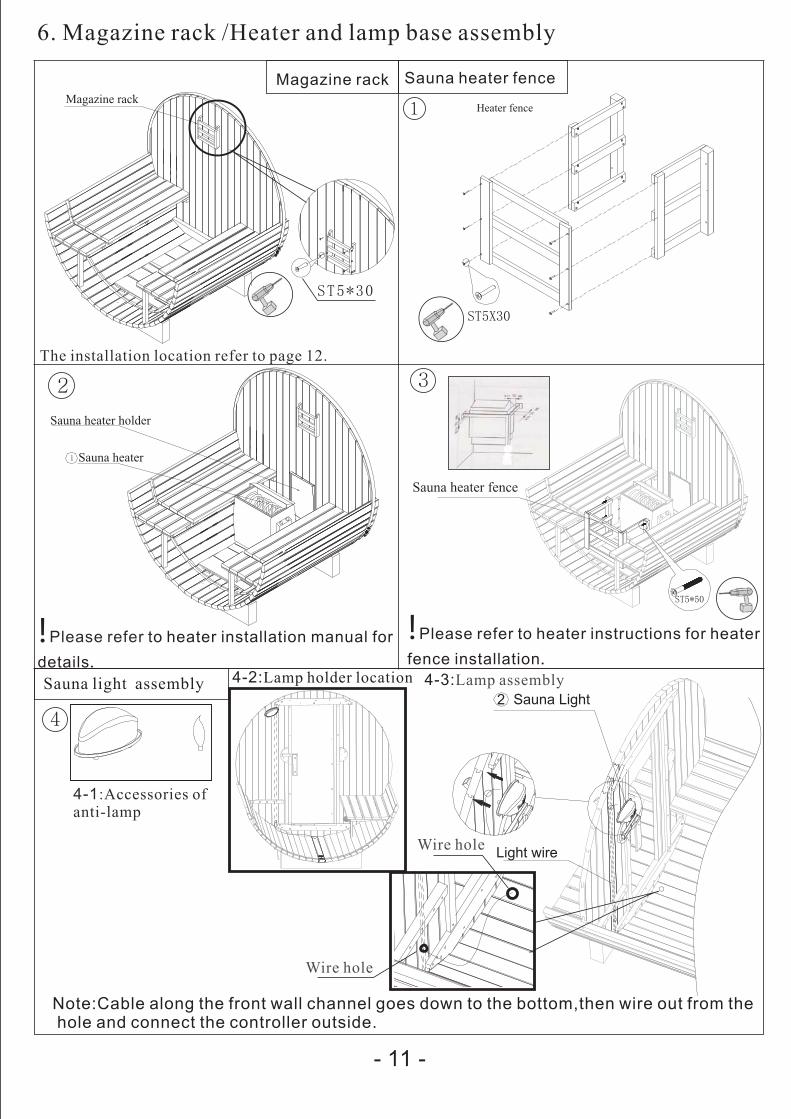
6. Magazine rack /Heater and lamp base assembly
- 11 -
ST5X30
Heater fence
Sauna Light2
Light wire
Note:Cable along the front wall channel goes down to the bottom,then wire out from thehole and connect the controller outside.
Magazine rack1
2
Sauna heater holder
Sauna heater1
3
Sauna heater fence
ST5*50
Sauna light assembly
! o heater installation manual for
details.
Please refer t ! heater
fence installation.
Please refer to heater instructions for
4
ST5 30*
Magazine rack
The installation location refer to page 12.
Sauna heater fence
4-1:Accessories ofanti-lamp
4-2:Lamp holder location 4-3:Lamp assembly
Wire hole
Wire hole
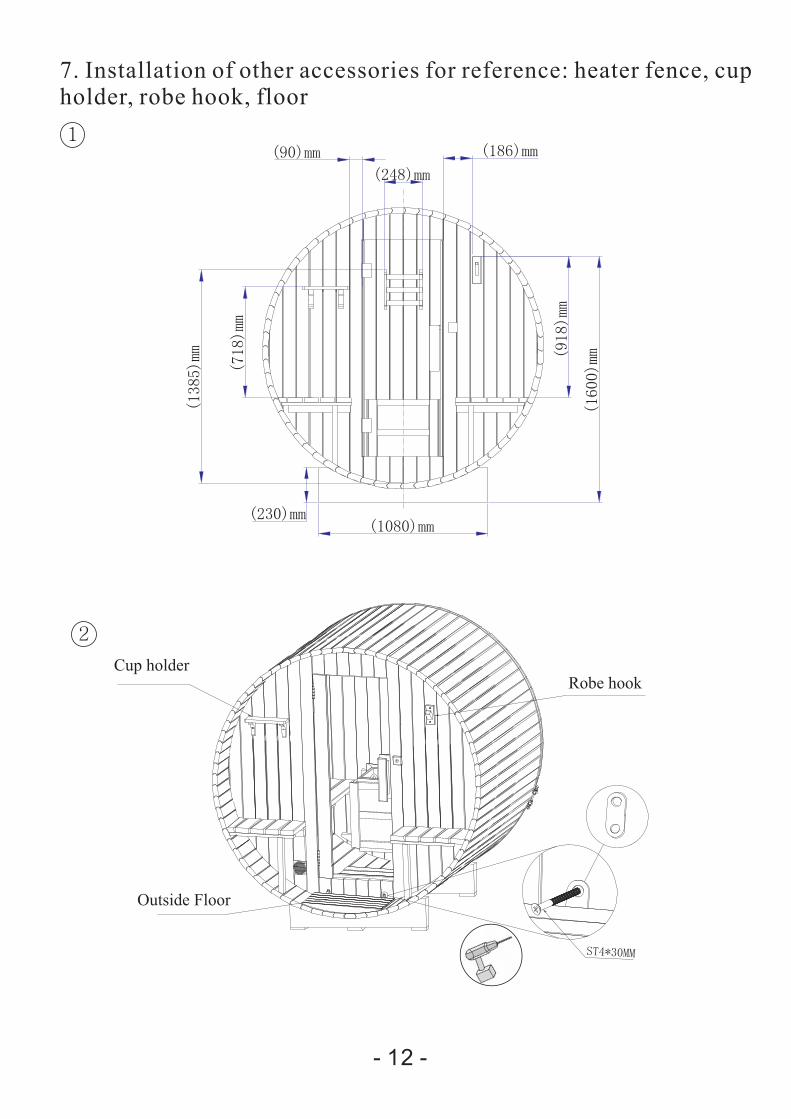
7. : heater fence, cupholder, robe hook, floor
Installation of other accessories for reference
ST4*30MM
Robe hookCup holder
Outside Floor
- 12 -
1
2
(1385)mm
(718)mm
(230)mm
(918)mm
(1600)mm

- 13 -
8. :Instructions
Maintenance instructions
(1) Turn on sauna heater, setting desired temperature, normally 60 -80 (in thearea between bench surface and your head). Start with low temperature andincrease it according to endurance of your body when you are in a sauna for the firsttime.
(2) Before the sauna, take off clothes, glasses, jewelries, cell phones and otherbelongings, and then take a simple shower or spa.
(3) The average sauna period for each time is around 5-15 minutes.(4) After a sauna, you can take a bath in a swimming pool or take a shower to cool your
body for 10-20 minutes.(5) After re-entering the sauna, you may find there are drops formed by vapor on
sauna stones. If water drops to the ground, it means you are overusing the sauna.(6) At least rest for 20 minutes after the last time in sauna. First take a shower with
soap and warm water, then with cool water to close skin pores. Put on clothes afteryour body temperature completely lowers. ( children must be companied byparents)
Suggestions:(1) Paint the surface of sauna annually. You can choose the wood wax coating service
provided by our company when purchasing the product.(2) Put a carpet before the door to keep the floor clean.(3) Brush obstinate stains on the sauna with sandpaper for daily maintenance.(4) Replace sauna stones after over 500 hours in normal use.
℃ ℃

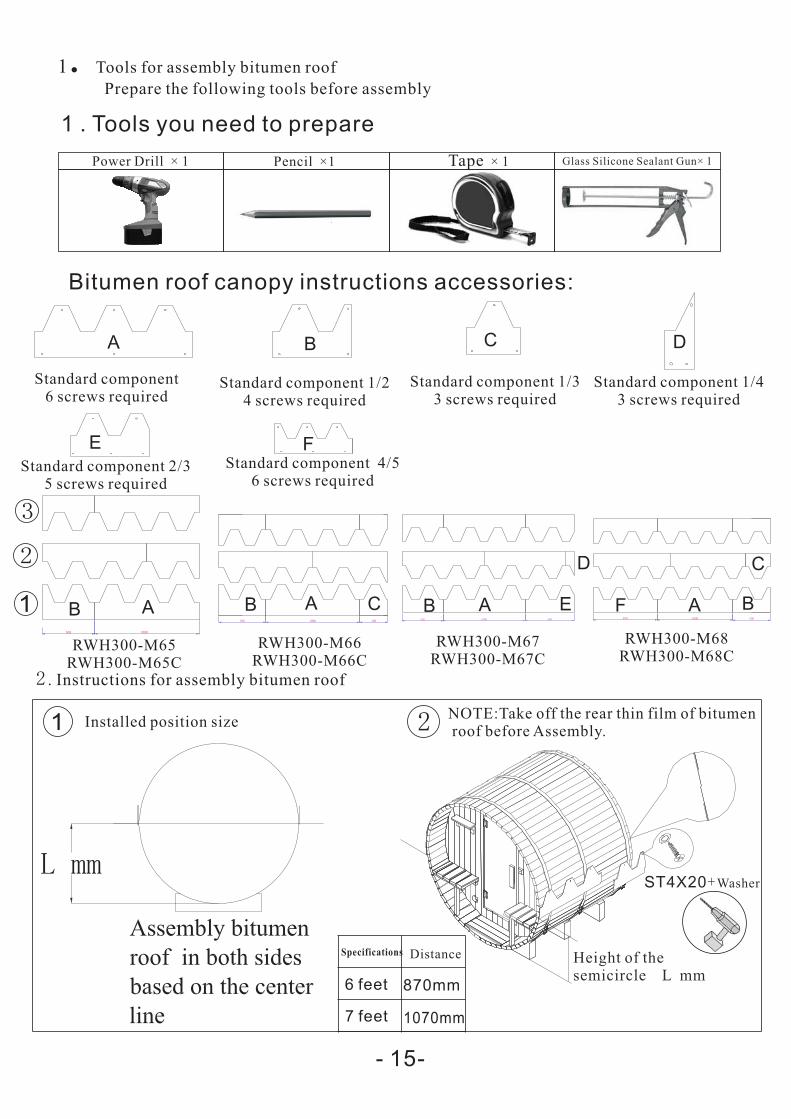
Instructions for Assembly Bitumen Roof Canopy on Sauna
- 14-
1000500
2 . Instructions for assembly bitumen roof
- 15-
1. Tools for assembly bitumen roof
Prepare the following tools before assembly
1 . Tools you need to prepare
Power Drill 1× Pencil ×1 Tape 1× Glass Silicone Sealant Gun× 1
Bitumen roof canopy instructions accessories:
Standard component6 screws required
Standard component 1/24 screws required
Standard component 1/33 screws required
Standard component 1/43 screws required
RWH300-M65RWH300-M65C
6 feet
7 feet 1070mm
870mm
DistanceSpecifications
21NOTE:Take off the rear thin film of bitumenroof before Assembly.
A B C D
AB300500 1000
RWH300-M66RWH300-M66C
AB C500 1000 600
B A
D
850 1000 500
A B
C
RWH300-M67RWH300-M67C
RWH300-M68RWH300-M68C
Standard component 2/35 screws required
E
E
FStandard component 4/5
6 screws required
F1
2
3
Installed position size
Height of thesemicircle L mm
ST4X20+Washer

- 16 -
3 4
5 6
7
A 1 Parts indicated- :
B 2 Parts indicated- :
Right
Wrong
ST4X20+ asherGap covered byoverlappingAsphaltShingles on the
W
Combinationof a hexagon
ST4X20+Washer
Linking partinstallation
ST4X20+Washer
ST3*30
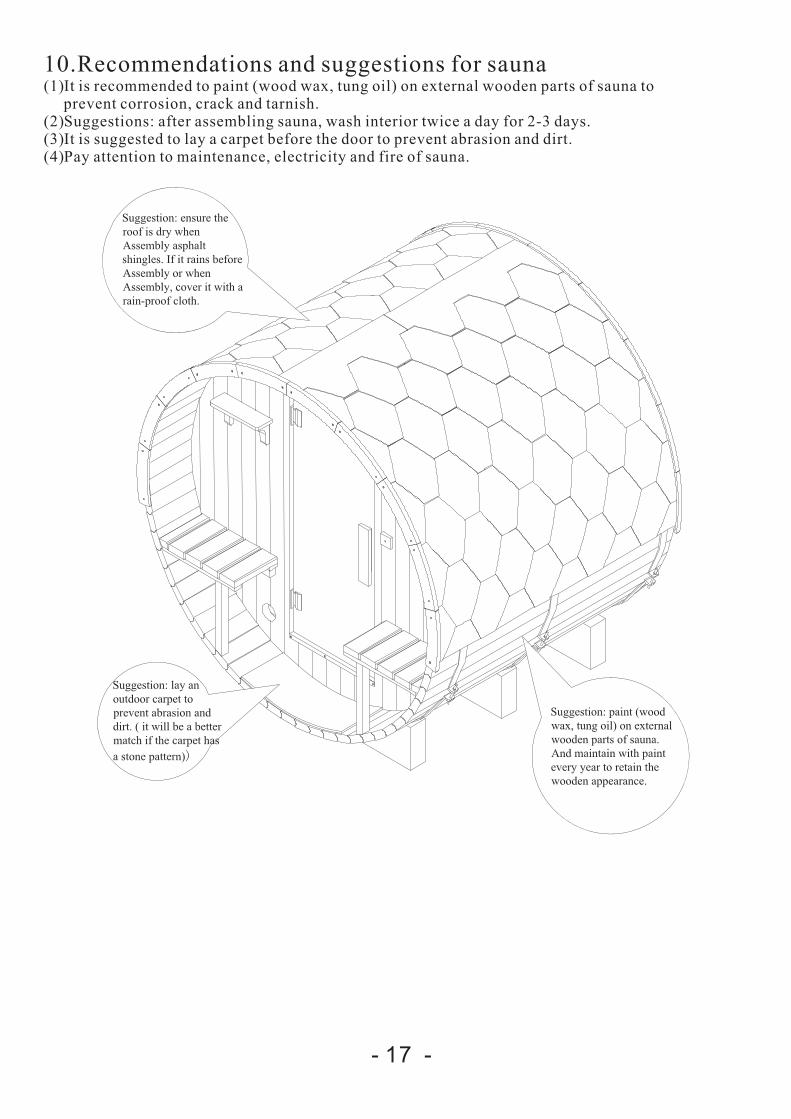
10.Recommendations and suggestions for sauna(1)It is recommended to paint (wood wax, tung oil) on external wooden parts of sauna to
prevent corrosion, crack and tarnish.(2)Suggestions: after assembling sauna, wash interior twice a day for 2-3 days.(3)It is suggested to lay a carpet before the door to prevent abrasion and dirt.(4)Pay attention to maintenance, electricity and fire of sauna.
- 17 -