baroque bass - musicmakers · pdf filebaroque bass musicmaker’s kits, inc. hwy 36 behind...
TRANSCRIPT

Baroque Bass
MUSICMAKER’S KITS, INC. Hwy 36 Behind Joseph’s Restaurant
P.O. BOX 2117 STILLWATER, MN 55082-3117
www.harpkit.com (651) 439-9120
email: [email protected]

Musicmaker's Kits, Inc, PO Box 2117, Stillwater, MN 651-439-9120 www.harpkit.com
2
BAROQUE BASS Wood Parts List:
a. 1 Curved Soundboard b. 1 Curved Back c. 2 Curved Sides d. 1 End Block (hardwood) e. 1 Top Block(walnut) f. 1 Tail Block (Padauk) g. 1 Neck (lam. walnut/maple) h. 1 Fingerboard (Padauk) i. 1 Bridge (Padauk) j. 1 Tail Piece (Padauk) k. 2 Carved Rings (walnut) l. 1 Nut (Padauk) m. 1 Soundpost (1/2" X 7") n. 4 Inlay stripes (walnut) o. 1 Bass Bar p. 1 Soundpost Pad (1/8”x4”x4”) q. 1 Half-moon for tailblock Hardware Parts:
4 Bass Geared Tuners 16 Tiny Screws for tuners 1 End Pin 1 T-nut (5/16 X 18) (in Top Block) 2 Wood screws (1-5/8") 2 Wood plugs, 3/8" for tailblock 1 Wood knob 1 Wood plug, 3/4" dia for knob 1 Carriage bolt (5/16" X 4-1/2") 2 Inches white delrin rod 1 Set of 4 bass strings 1 Steel cable with ferrules for tail gut 1 Ft wood veneer tape shim (walnut) 1 Leather scrap (1” X 3”) 1 Leather thong (18”) 1 Large Metal Washer 1 set assembly instructions SPOOL CLAMP MATERIALS: 10 Threaded rods (1/4-20 X 8”) 4 Threaded rods (1/4-20 X 10”) 1 Threaded rod (1/4-20 X 12”) 30 Wooden spools (or square blocks) 15 Wing nuts (1/4-20)
ASSEMBLY INSTRUCTIONS _____1. Check over the parts of your kit to familiarize yourself with the project and make sure we packed everything correctly. Call us if you have questions or need replacement pieces.

Musicmaker's Kits, Inc, PO Box 2117, Stillwater, MN 651-439-9120 www.harpkit.com
3
THE SIDES _____2 Begin by gluing and clamping the END BLOCK to one of the CURVED SIDES, aligning the large hole for the ENDPIN, as shown. Notice that the END BLOCK will hang over the SIDE halfway so you can glue it to the other SIDE after this dries. _____3. Test-fit the second SIDE to the END BLOCK, making sure the two SIDES come together for a tight seam. Take the time to clean away any excess glue that might interfere with a good joint here. When satisfied with the fit, glue and clamp the second CURVED SIDE in place too. Clean up excess glue by scrubbing with a wet rag until all residue is removed from the outer surface.
POINT OF INTEREST Many people wonder at the unusual size and shape of this bass. We designed it this way to make it easier for the amateur to build than the “hourglass” violin-shaped basses. This design also makes in possible to collapse the instrument for compact carrying and storing.
A NOTE ABOUT GLUE
DO NOT ASSEMBLE THIS PROJECT WITH EPOXY OR SUPERGLUE OR HOT MELT GLUE! Find a good woodworking glue. Many luthiers (guitar & violin makers) still use the natural hide glues that have been around for centuries, carrying on a fine old tradition, but that does not mean that you must do the same. We build this instrument with modern woodworking adhesives (such as Elmer's Carpenter's Wood Glue or Titebond) because they hold the parts even more securely than the old animal glues. The few advantages that some people claim with hide glue are more than offset by the strength, durability, ease of application, and availability of the modern woodworking adhesives. When gluing parts together, be sure to put enough glue on the joint to wet the entire surfaces to be joined. A good sign of proper gluing is that a little excess will squeeze out around the joint when clamping pressure is applied. Too little glue may cause the parts to separate later, whereas too much glue makes things messy. We always keep a damp rag handy for quick cleanup, as necessary. It is especially helpful to keep your fingers clean while gluing, because gluey fingerprints have the embarrassing tendency to appear on the finished product in places you never expected. Most woodworking adhesives "set" sufficiently after 30 minutes of clamping to allow you to proceed. Check your dispenser for recommended drying times.
Note that the END BLOCK comes short of covering the full width of the SIDE. You don’t want it to interfere with the fit of the SOUNDBOARD or BACK LATER on.
Hint: To avoid denting the SIDES with your clamps, use scraps of wood to pad the jaws of the clamps.

Musicmaker's Kits, Inc, PO Box 2117, Stillwater, MN 651-439-9120 www.harpkit.com
4
_____4. Use a hammer to pound the T-NUT into the underside of the thick walnut TOP piece, as shown. _____5. When the END BLOCK is dry, test fit the heavy walnut TOP piece to the narrow ends of the CURVED SIDES, as shown. Be careful not to break the thin wood at the grooves of the TOP. If these parts do not slide together easily, then you may sand the inside surface of the SIDES a little to make them thinner. Notice that the TOP is just slightly narrower than the SIDES to allow for the edges of the SIDES to fit into grooves in the SOUNDBOARD and BACK.
When the parts fit together well, squirt glue into the slots of the TOP and insert both SIDES at the same time, making sure that the SIDES protrude an equal amount at each corner. Use masking tape to hold the parts from sliding out of position before the glue sets.
THE SOUNDBOARD AND BACK
equal overhang
NOTE: There is no “front” or “back” to this part of the frame. It is symmetrical. No need to worry about which direction the END BLOCK or TOP block are facing.
Clean up excess glue by scrubbing with a wet rag until all residue is removed from the outer surface.
POINT OF INTEREST Many people ask why we use laminated wood instead of solid. The reason for this is that we get much more strength from cross-laminations than from solid grain all running the same direction, and no trouble with cracking. We laminate the SOUNDBOARD, SIDES and BACK at considerable trouble and expense, and we find that it is well worth it all. This is not some cheap plywood with hidden voids! You’ll be pleasantly surprised by the remarkable sound from this rather unusual soundchamber.

Musicmaker's Kits, Inc, PO Box 2117, Stillwater, MN 651-439-9120 www.harpkit.com
5
_____6. Glue and clamp the BASS BAR to the inside of the SOUNDBOARD, in the position outlined on the wood, as shown. Assemble the THREADED ROD CLAMPS before assembling the soundchamber. Here’s how to prepare these clamps: a) Use a hammer
to pound the tapered end of each THREADED ROD into a CLAMP BASE BLOCK, using a hex nut or wing nut (upside down) to protect the threads as you pound. b) Glue a scrap of coarse sandpaper (80-100 grit) to each BASE BLOCK and TOP BLOCK to help the blocks grip the instrument while clamping. Elmer’s glue should work fine for this. CAUTION: DO NOT ATTEMPT THIS NEXT PROCEDURE ALONE! PLEASE READ OVER THE INSTRUCTIONS CAREFULLY SO YOU UNDERSTAND THE SCOPE OF THE TASK AND HAVE ALL THE TOOLS AND ASSISTANCE YOU NEED FOR SUCCESS.
Tools needed: --Threaded rod clamps --Woodworker’s glue --2 clean wet rags _____7. Ask a friend to help you test-fit the SOUNDBOARD to the SIDE ASSEMBLY, without glue first, as follows: a) Carefully line up the centerline at the bottom of the SOUNDBOARD with the seam at the tail end of the body. b) Make sure the SIDE pieces drop into the groove of the SOUNDBOARD at that tail end first. Install the longest THREADED ROD CLAMP at this point to hold the parts together. c) Work your way around the edges of the SOUNDBOARD, in each direction (one person on each side of the instrument), pushing the SIDES into position so they snap into the grooves of the SOUNDBOARD. Install more CLAMPS to hold the parts together as you work your way toward the top of the soundchamber. You want to make sure everything snaps together all the way around.
tapered end
centerline

Musicmaker's Kits, Inc, PO Box 2117, Stillwater, MN 651-439-9120 www.harpkit.com
6
d) If the SIDES do not fit easily into the groove of the SOUNDBOARD, you may sand the inside edge of the SIDES to taper the thickness for an easier fit. Don’t sand the outer edge, because the walnut veneer is very thin and you might sand through it. You may also need to sand the edge of the SIDES if they protrude too far out from the TOP, holding the SOUNDBOARD from contacting the TOP piece. e) Once you are satisfied with the fit, remove the clamps and carefully arrange them in the positions where they fit (so you can install them again quickly), squirt a bead of glue into the groove of the SOUNDBOARD and spread some around where the TOP piece will contact the SOUNDBOARD. Replace the SIDES in the same position as before, carefully centering the tail end. Glue the parts together, proceeding from the tail end up each side toward the TOP, as before, using the CLAMPS to hold the parts together. f) Make sure the seams are tight, especially across the TOP of the soundchamber, because that seam will show plainly on the finished instrument. g) Use clean wet rags to scrub off excess glue from
the outer surface of the instrument now, before it hardens and has to be sanded off. Don’t leave a milky haze of watery glue on the wood. Rinse your rags and scrub again making sure to get all the glue residue off. Check for gluey fingerprints too. WHEW! That was the hardest part of this project. We hope it went well for you. Let the SOUNDBOARD dry overnight before proceeding with the BACK.
_____8. Glue the SOUNDPOST PAD inside the back, at the position marked.
_____9. Test ift the BACK to the instrument without glue. When satisfied with the fit of the BACK, install it the same way as you did the SOUNDBOARD.
DIVERSION: If you want to work on another part of the project while waiting for these big parts to dry, we recommend jumping ahead to the NECK & FINGERBOARD (step13) or the FINAL TOUCHES (step 17) as a good way to utilize your time.
NOTE: This would be a good time to autograph your workmanship. Sign and date the inside of the BACK where it can be seen through the soundhole.

Musicmaker's Kits, Inc, PO Box 2117, Stillwater, MN 651-439-9120 www.harpkit.com
7
____10. Now comes the most fun part: Installing the INLAY STRIPES around the circumference of the SOUNDBOARD. This is easier than it sounds. Just follow this sequence: a) Test fit one stripe in one channel, starting at the center near the tail end. (There will be a seam at that point where two stripes meet. If you trim the ends cleanly, nobody will ever notice the joint.)
b) just use finger pressure to push the INLAY STRIPE into its channel, working around the corner and up to the TOP of the instrument. It should be that easy. c) If the INLAY STRIPE does not push in easily, you may need to sand some parts a little narrower to fit the width of the channel. d) When you know the STRIPE will push in easily, squirt a small bead of glue in the channel and push the STRIPE in permanently. Use masking tape, if necessary, to hold the thin walnut down in the channel. e) Use a razor knife or sharp chisel to trim the end of the second INLAY STRIPE to fit tightly against the end of the first, and then install that piece in the same way. f) Allow at least a couple hours for these inlays to dry before sanding them flush. Then use an electric orbital sander or a wood sanding block to carefully sand the inlays flush and smooth with the surrounding surface.
Use wet rags to scrub off excess glue
CAUTION: DO NOT HOLD THE SANDPAPER IN YOUR HAND WITHOUT A FLAT BLOCK OF WOOD FOR THIS TASK, OR YOU RISK GOUGING DEPRESSIONS IN THE SOUNDBOARD. YOU MUST KEEP YOUR SANDPAPER PERFECTLY FLAT IN ORDER TO REMOVE THE HIGH POINTS OF THE INLAY STRIPES WHILE LEAVING THE SOFTER WOOD AROUND THEM ONLY LIGHTLY SANDED.

Musicmaker's Kits, Inc, PO Box 2117, Stillwater, MN 651-439-9120 www.harpkit.com
8
THE TAIL BLOCK
____11. Note that the TAIL BLOCK is already pre-drilled and countersunk for two mounting screws, slotted to fit around the SOUNDBOARD, and drilled for the END PIN. Be sure to orient this piece toward the SOUNDBOARD, not the BACK! Glue the HALF-MOON piece to the TAIL BLOCK, as shown, and then glue and screw the TAIL BLOCK into position.
____12. Glue a small WOOD PLUG over each screw head in the TAIL BLOCK, and then sand the plugs down flush with the surrounding surfaces. This will greatly enhance the finished look of your woodworking. THE NECK AND FINGERBOARD ____13. Glue the flat side of the FINGERBOARD to the NECK, using a few clamps, as shown.
Leave 1/2” space at this end for the NUT ____14. It is helpful to
POINT OF INTEREST We have engineered the TAIL BLOCK and TAIL PIECE in such a way that they can be detached from each other. That way, when you remove the NECK, the strings and TAIL PIECE can be “unhooked” from the bottom of the instrument.

Musicmaker's Kits, Inc, PO Box 2117, Stillwater, MN 651-439-9120 www.harpkit.com
9
shape the NUT before gluing it in place. We like to curve the top so it stands just 1/8” taller than the FINGERBOARD, as shown. We also like to round over the back side of the NUT so it has a profile like this: ____15. When the NUT is shaped to your liking, glue it in place against the end of the FINGERBOARD, using clamps or tape to hold it until dry. ____16. Now you are ready for final shaping of the NECK to suit your grip. Begin by sanding the edges of the FINGERBOARD flush with the NECK. We have rounded the backside of the NECK only roughly, so you should plan to take some time on this operation to make this an easy instrument to play. You need not worry too much about reducing the strength of this piece. It is laminated with many layers of hard maple in the center for lifelong strength. We use a belt sander to remove material, and an orbital sander for smoothing it out later. SOME FINAL TOUCHES ____17. We provide some optional decorative CARVED RINGS for enhancing each side of the PEGHEAD. Glue and clamp them in place, one at a time, taking care that they do not slide out of position under the clamps.

Musicmaker's Kits, Inc, PO Box 2117, Stillwater, MN 651-439-9120 www.harpkit.com
10
____18. Use a hammer to insert the CARRIAGE BOLT into the WOOD KNOB, tapping it all the way in so the squared portion of the shank is buried firmly into the wood.
It is important that the CARRIAGE BOLT be buried all the way into the countersink, so when you turn the WOOD KNOB, the bolt will turn with it. If the bolt ever loosens, your knob will be useless. ____19. Squirt a little glue into the hole in the WOOD KNOB and pound the large (3/4” diameter) WOOD PLUG all the way in until it contacts the top of the CARRIAGE BOLT. No need to wait before sanding the top of the WOOD PLUG so it matches the curve of the knob.
____20. If you are a beginner player, you might like to place some fingering guides on the edge of the FINGERBOARD. We have included a small piece of WHITE DELRIN ROD that you can inlay along the thin edge of the FINGERBOARD, or right down the center, whichever you prefer. We recommend placing marks at the distances from the NUT shown here: Use a 1/8" drill bit to bore shallow holes for the DELRIN. Push the rod into the hole and snip it off next to the wood. Then sand these plastic dots down flush with the surface of the FINGERBOARD. ____21. If you wish to decorate the BRIDGE and TAIL PIECE, we offer several designs of WOOD ROSETTES in our catalog that fit into the holes already drilled in these parts. Select our small size (2” diameter), and glue them in place so there is even spacing all around them in the predrilled holes. Sand the ROSETTES lightly to remove any smoke residue left by the laser cutter.
POINT OF INTEREST The wood knob is a simple way to eliminate the need for carrying a wrench for tightening and loosening the Neck. It also adds to the hand-made appearance of the instrument.
NOTE: The TAILPIECE has a “top side” with the outer holes countersunk deeply to receive the knurled nuts of the TAILGUT (see step 30-c)
Musicmaker's Kits, Inc, PO Box 2117, Stillwater, MN 651-439-9120 www.harpkit.com
11
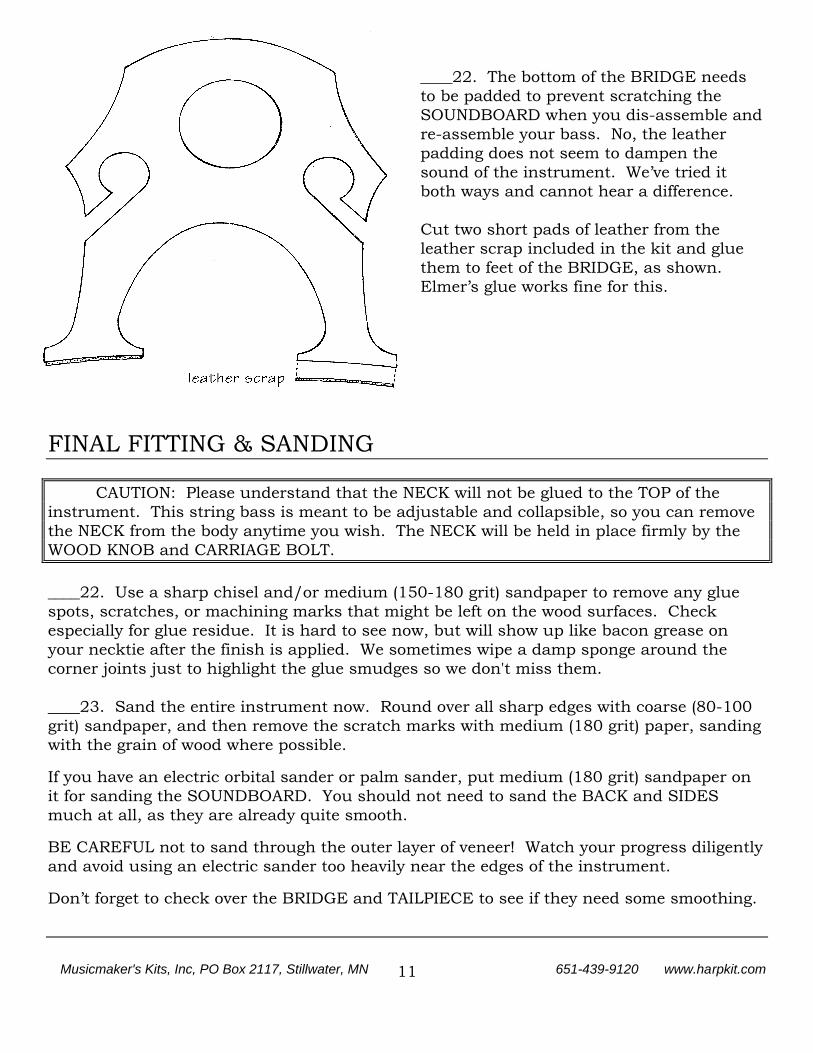
____22. The bottom of the BRIDGE needs to be padded to prevent scratching the SOUNDBOARD when you dis-assemble and re-assemble your bass. No, the leather padding does not seem to dampen the sound of the instrument. We’ve tried it both ways and cannot hear a difference. Cut two short pads of leather from the leather scrap included in the kit and glue them to feet of the BRIDGE, as shown. Elmer’s glue works fine for this.
FINAL FITTING & SANDING CAUTION: Please understand that the NECK will not be glued to the TOP of the instrument. This string bass is meant to be adjustable and collapsible, so you can remove the NECK from the body anytime you wish. The NECK will be held in place firmly by the WOOD KNOB and CARRIAGE BOLT. ____22. Use a sharp chisel and/or medium (150-180 grit) sandpaper to remove any glue spots, scratches, or machining marks that might be left on the wood surfaces. Check especially for glue residue. It is hard to see now, but will show up like bacon grease on your necktie after the finish is applied. We sometimes wipe a damp sponge around the corner joints just to highlight the glue smudges so we don't miss them. ____23. Sand the entire instrument now. Round over all sharp edges with coarse (80-100 grit) sandpaper, and then remove the scratch marks with medium (180 grit) paper, sanding with the grain of wood where possible.
If you have an electric orbital sander or palm sander, put medium (180 grit) sandpaper on it for sanding the SOUNDBOARD. You should not need to sand the BACK and SIDES much at all, as they are already quite smooth.
BE CAREFUL not to sand through the outer layer of veneer! Watch your progress diligently and avoid using an electric sander too heavily near the edges of the instrument.
Don’t forget to check over the BRIDGE and TAILPIECE to see if they need some smoothing.
Musicmaker's Kits, Inc, PO Box 2117, Stillwater, MN 651-439-9120 www.harpkit.com
12
APPLYING THE FINISH
____24. Before applying the finish, cover the playing surface of the FINGERBOARD and the inside of the large hole in the TAIL BLOCK with masking tape. The finish would interfere with gluing the END PIN into the TAIL BLOCK later. We also find that varnish or lacquer on the FINGERBOARD can become sticky under your fingers as you play. We recommend just a plain boiled linseed oil on there, but wait until you have completed the finish on the rest of the instrument. Here are some thoughts about finishing: STAIN -- STAINS are coloring agents and should only be used if you dislike the natural color of the wood. We usually do not apply stains to our projects, especially when they are made with naturally beautiful hardwoods such as cherry or walnut. These woods look very nice with just a clear finish. But, if you want to color the wood differently, your staining should be accomplished before applying a surface finish such as oil, varnish, or lacquer. We like ANILINE DYES for darkening the wood without osbcuring the grain. Our 3-color powdered dyes (code FINI-40) can be mixed with denatured alcohol to the desired shade. The advantage of these dyes are quick drying time, deep colors, even penetration, and the opportunity to create a "sunburst" shading effect. OIL -- An oil finish will give your wood a low luster appearance, bringing out the natural color of the grain, but it tends soak into the wood and appear dry and "thirsty" after awhile. The principal advantage of an oil finish is that it can be applied and wiped dry immediately, so you can proceed to installing hardware (and strings) right away. The disadvantages of oil are that it usually does not give much surface protection or sheen, although there are some brands that include waxes and/or varnishes to give more surface build-up and luster. VARNISH -- Any regular varnish will work fine on this project, but we recommend our wipe-on polyurethane called MUSICMAKER'S INSTRUMENT FINISH. Our complete finishing kit (code FINI-20) includes detailed instructions, sandpaper sheets, tack cloth, foam applicator, and lint-free wiping cloth, along with a 1/2 pint can of semi-gloss polyurethane varnish. The advantages of finish are its simple application, durability, and deep, soft luster. It also works well for protecting Heat Transfer decorations. LACQUER -- Many professional instrument makers still use lacquer for their finish. The most readily available lacquer is called Deft Clear Wood Finish. It is best to purchase a can of liquid to brush on as a sealer coat first, and then use an aerosol can of the same product to spray on the final coats. The advantage of this finish is its quick drying time, but the disadvantage is the strong odor of the toxic lacquer fumes. CAUTION: Lacquer finish will not work over Heat Transfer decorations -- it dissolves the toner. _____25. Now you may apply the finish of your choice and allow it to dry. Don't forget to apply finish to the BRIDGE, the TAILPIECE, and the WOOD KNOB _____26. When the finish is dry, remove the masking tape from the FINGERBOARD and apply a light coating of boiled linseed oil to that playing surface.
POINT OF INTEREST Some people ask about finishing the inside of the soundchamber. We do not recommend trying it. Guitars and violins are never finished on the inside, so this instrument need not be sealed on the inside either. We understand people’s concern about the effects of humidity on the wood, but even the best varnish or lacquer does not hermetically seal the wood. It blocks spilled milk from soaking in, but it does not prevent the wood from “breathing” moisture vapor from the surrounding air. This instrument is unlikely to warp or twist from humidity changes because 1) the wood is laminated with several thin layers, and 2) unlike some wood furniture, the parts of this instrument are glued firmly in place all around the circumference of the body, so they cannot move.

Musicmaker's Kits, Inc, PO Box 2117, Stillwater, MN 651-439-9120 www.harpkit.com
13
THE SOUNDPOST
____27. It is unprofessional (maybe even sinful) to glue the SOUNDPOST inside an instrument such as this, because you may wish to move it around a bit in the future to change the sound of the instrument. Here is how to install the post without glue: a) Test-fit the SOUNDPOST into the soundchamber so it stands vertically between the BACK and the SOUNDBOARD at a position about 12" up from the bottom and 3" to the right of center. Just reach in through the 4” sound hole in the front and try standing the dowel in place, so it wedges between the BACK and the SOUNDBOARD. b) If the dowel is too long to fit in the position mentioned, trim off a little length. If it is too short to reach, you may either cut a new dowel (available from any hardware store) or glue a small "pad" inside the BACK for the post to stand on. c) This may not be the final position you will choose for the SOUNDPOST, but it should be a good first try. After you string up the instrument, you may wish to move the post around a little to see how it affects the tone and volume. ____28. Remove the masking tape from the hole in the TAIL BLOCK and test fit the END PIN into the hole. We try to fit these parts before packing the kits, so you should not be able to push it all the way into the hole by hand. That’s good. Loosen the wing nut and pull the 12” shaft of the assembly (you may have to file the burr off the end). Put some glue on the tapered wood plug and use a hammer to drive the assembly all the way into the TAILPIECE hole.
POINT OF INTEREST The soundpost is a vital element in any violin-type instrument. It stands inside the chamber near the “treble” foot of the bridge and transmits the vibrations to the back of the bass so you get the benefit of sound from both the front and the back. In a string bass, it is also vital for supporting the soundboard under all the pressure of such thick strings. Normal basses have limited access for positioning the post (through the “f” holes), but this bass has a large enough soundhole to allow you to reach right into the chamber to set the soundpost.

Musicmaker's Kits, Inc, PO Box 2117, Stillwater, MN 651-439-9120 www.harpkit.com
14
ATTACHING HARDWARE & STRINGS ____29. Install the four GEARED TUNERS as follows: a) Note that two of the GEARED TUNERS are "left-handed" and two are "right". Take care to position them according to the drawing.
b) Use a 1/16" drill to bore pilot holes for the tiny screws that hold the GEARED TUNERS to the wood. Fasten the TUNERS firmly into position. ____30. Now you may assemble your bass!
a) Slide the LARGE METAL WASHER onto the CARRIAGE BOLT up against the WOOD KNOB, as shown.
b) Set the NECK into the slot and screw the WOOD KNOB down through the hole in the NECK and into the T-NUT hidden inside the body of the instrument to hold the parts together firmly.
narrow end of plate aims toward fingerboard

Musicmaker's Kits, Inc, PO Box 2117, Stillwater, MN 651-439-9120 www.harpkit.com
15
c) Thread the steel cable TAILGUT through the two outermost holes in the TAIL PIECE, as shown. Crimp the Ferrules to each end using either a hammer or a vise to flatten the ferrules against the cable so it holds firmly. If the Ferrules will not fit into the countersunk holes of the TAILPIECE after crimping, you may sand them enough to fit.
____31 Use a triangle file to cut four notches in the BRIDGE, 1" apart, as shown. These notches will keep the strings in place.
____32. Use the same triangle file to cut four "V"-grooves in the NUT 1/2" apart. Angle the file toward the GEARED TUNERS to make an easy path for the strings. File them until the bottoms of the grooves are almost even with the surface of the FINGERBOARD.
WARNING: IF YOU DO NOT SCREW THE KNURLED NUTS FAR ENOUGH ONTO THE TAILGUT, SO SOME THREADS SHOW ABOVE THE NUTS, THE PLASTIC GUT MAY STRIP OUT UNDER THE TENSION OF THE STRINGS.
Work the file at several angles, as shown, to create a smooth notch that will not damage the strings.
front view
side view

Musicmaker's Kits, Inc, PO Box 2117, Stillwater, MN 651-439-9120 www.harpkit.com
16
____33. Stringing your Bass is a bit tricky the first time because the BRIDGE is loose until held in place by the strings. You might ask a friend to help hold the parts while you install the first string. The strings are labeled according to their notes. The lowest string, Low E (2+ octaves below middle C), is the thickest. Install as follows: a) Thread the end through the first hole in the TAILPIECE until the "ball end" is pulled all the way up to the wood of the TAILPIECE b) Hook the TAILGUT over the end of the TAIL BLOCK. c) Place the other end of the first string into the slot of the first GEARED TUNER on the left side of the PEGHEAD. Leave enough slack in the string to allow for passing over the BRIDGE and winding around the pin a couple times. d) The string is longer than it needs to be, but before cutting it shorter, spread a thin coat of SUPERGLUE over the surface of the string where you will make the cut. This will prevent the string from coming unwrapped when cut. e) Begin winding the string onto the GEARED TUNER, keeping tension on it as you turn the gear. The string should wind over the top of the gear post as you turn the knob. f) Stand the BRIDGE in its place about 41” from the NUT and place the string into the first groove of the BRIDGE and the first groove of the NUT. You can slide the BRIDGE up or down the SOUNDBOARD to achieve the proper 41” vibrating length.
CAUTION: Do not over-tighten the strings! They are fragile and expensive! Turn the geared
tuners so the strings wind over the top of the posts. NOTE: Don't
accumulate too many windings around the post -- that makes an unnecessary mess. Shorten the string as necessary to keep from accumulating too much bulk on the GEARED TUNER.
PLEASE READ THE SMALL PRINT ON THE ILLUSTRATION!
Stand the bridge with the decora- tive rosette facing the fingerboard.
Note: The bridge does not stand exactly vertical to the soundboard. The feet are angled at the bottom to get it to lean slightly backward (toward the tail piece).

Musicmaker's Kits, Inc, PO Box 2117, Stillwater, MN 651-439-9120 www.harpkit.com
17
____34. Observe how this first string lies in relation to the FINGERBOARD. This relationship will vary depending on how the NECK is positioned in the slot on top of the body. You may loosen the WOOD KNOB and slide the NECK forward or back to achieve the string height, or "action", that you prefer (You’ll have to tip the BRIDGE down to release the string tension first). Just make sure the strings are high enough to eliminate any buzzing or rattling against the surface of the FINGERBOARD. ____35. Install the other three strings in the same manner. Once all strings are installed, tie the 18” leather thong around the NECK, just above the NUT. This not only adds a certain je ne sais quoi to the appearance of this crazy instrument, but it also helps keep the strings in place every time you loosen them to “bareak” down your Baroque Bass. (See, we think of everything!) CONGRATULATIONS! You have assembled the most unusual string bass in town! We hope you enjoyed the project and that you receive many years of pleasure from playing it.
TUNING Tune the strings beginning with the highest one. Some people have difficulty discerning the proper octave, and this highest string is the easiest to hear. Tune it to the G that is 1-1/2 octaves below middle C on the piano. Or, if you have a guitar handy, it would be the pitch of the lowest string on the guitar when fretted at the third fret. The other three strings are lower in pitch, by a musical fourth interval each. Compared to the guitar, your bass is tuned exactly one octave below the first four wound strings of the guitar (E, A, D, G).
POINT OF INTEREST Some bass players are accustomed to a slightly longer or shorter vibrating length than 41”. You may adjust the position of the BRIDGE to your liking, but you may then need to move the SOUNDPOST inside the body too. If you inlaid marking dots along the edge of the FINGER-BOARD, they will be most accurate when the BRIDGE is placed at the 41” vibrating length.

Musicmaker's Kits, Inc, PO Box 2117, Stillwater, MN 651-439-9120 www.harpkit.com
18
MINOR ADJUSTMENTS There may be some small adjustments to make on your instrument for improving tone or playability. Here are a few guidelines: a) Make sure the BRIDGE is centered so the strings follow the FINGERBOARD nicely. Check to see that the WOOD KNOB is tightened securely against the NECK. Then slide the BRIDGE one way or the other until the strings line up properly. If the NECK seems tilted toward one side slightly, use the VENEER TAPE SHIM stock to shim up one side. Just peel off the protective backing and stick the veneer to the top of the SOUNDCHAMBER or the underside of the NECK. b) You may experiment with different placements of the SOUNDPOST inside the instrument, but we recommend removing the BRIDGE each time you want to change the SOUNDPOST. That will reduce the pressure on the dowel so it will be easier to move. (See information below for collapsing the bass) It is simple to reach your hand right through the soundhole to adjust the SOUNDPOST. c) If you hear buzzing from strings against the FINGERBOARD as you play, you may want to raise the string action a little bit. Do this by loosening the WOOD KNOB and pushing the NECK a backwards a little in its slot (You’ll probably have to loosen the strings and tip the BRIDGE over to accomplish this). Then tighten the KNOB and test it again. d) If you hear buzzes or rattles from the soundchamber area, chances are that the little "ball" on the end of one of the strings may be loose in the TAILPIECE. Use a pair of pliers to squeeze the loop of wire around the ball until it quiets down.
Musicmaker's Kits, Inc, PO Box 2117, Stillwater, MN 651-439-9120 www.harpkit.com
19
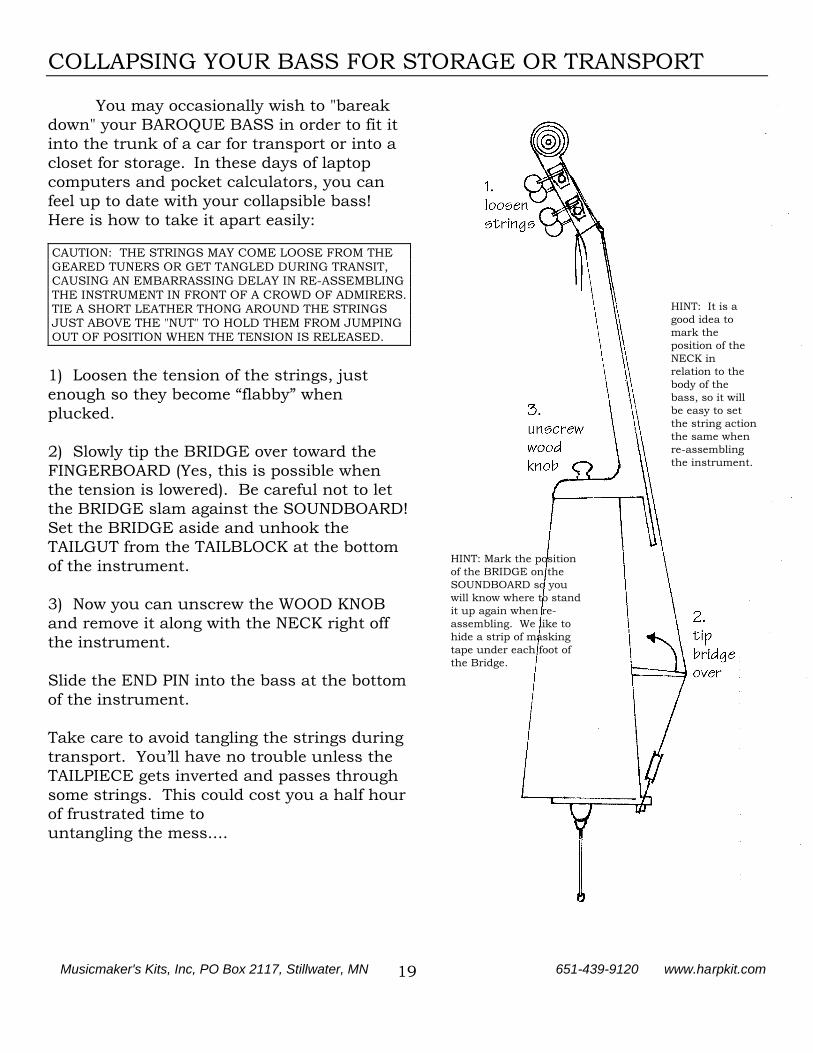
COLLAPSING YOUR BASS FOR STORAGE OR TRANSPORT You may occasionally wish to "bareak down" your BAROQUE BASS in order to fit it into the trunk of a car for transport or into a closet for storage. In these days of laptop computers and pocket calculators, you can feel up to date with your collapsible bass! Here is how to take it apart easily:
1) Loosen the tension of the strings, just enough so they become “flabby” when plucked. 2) Slowly tip the BRIDGE over toward the FINGERBOARD (Yes, this is possible when the tension is lowered). Be careful not to let the BRIDGE slam against the SOUNDBOARD! Set the BRIDGE aside and unhook the TAILGUT from the TAILBLOCK at the bottom of the instrument. 3) Now you can unscrew the WOOD KNOB and remove it along with the NECK right off the instrument. Slide the END PIN into the bass at the bottom of the instrument. Take care to avoid tangling the strings during transport. You’ll have no trouble unless the TAILPIECE gets inverted and passes through some strings. This could cost you a half hour of frustrated time to untangling the mess....
CAUTION: THE STRINGS MAY COME LOOSE FROM THE GEARED TUNERS OR GET TANGLED DURING TRANSIT, CAUSING AN EMBARRASSING DELAY IN RE-ASSEMBLING THE INSTRUMENT IN FRONT OF A CROWD OF ADMIRERS. TIE A SHORT LEATHER THONG AROUND THE STRINGS JUST ABOVE THE "NUT" TO HOLD THEM FROM JUMPING OUT OF POSITION WHEN THE TENSION IS RELEASED.
HINT: It is a good idea to mark the position of the NECK in relation to the body of the bass, so it will be easy to set the string action the same when re-assembling the instrument.
HINT: Mark the position of the BRIDGE on the SOUNDBOARD so you will know where to stand it up again when re-assembling. We like to hide a strip of masking tape under each foot of the Bridge.

Musicmaker's Kits, Inc, PO Box 2117, Stillwater, MN 651-439-9120 www.harpkit.com
20
RE-ASSEMBLING YOUR BASS Thankfully, it does not take all the king’s horses and all the king’s men to put the BAROQUE BASS back together again! Just follow this sequence: 1) Set the NECK back in its slot on top of the bass and install the WOOD KNOB with bolt. Tighten the bolt firmly to hold the NECK in position. 2) Hook the TAILGUT over the TAILBLOCK, making sure the strings are not tangled or twisted. Check the strings up at the NUT also to make sure they are in the proper notches. 3) Place the feet of the BRIDGE in position under the strings (check to be sure the BRIDGE is not backwards -- when standing, the decorative rosette should face the FINGERBOARD), and slowly tip the BRIDGE back up to a standing position, making sure the strings are arranged in order on the top of the BRIDGE. Slide the BRIDGE sideways, if necessary, to make sure the strings are centered over the FINGERBOARD. 4) Tune up the strings.

Musicmaker's Kits, Inc, PO Box 2117, Stillwater, MN 651-439-9120 www.harpkit.com
21
ACCESSORIES AVAILABLE FOR THE BAROQUE BASS Folding Stand kit for bass Finished Folding Stand Padded Gig Bag for Bass Please call for current pricing and availability NOTE: The Folding Stand holds the instrument upright in the middle of the room. It is also very helpful for holding the parts as you assemble and dis-assemble the instrument. The Gig Bag will cover the Bass when assembled or dis-assembled. It has a shoulder strap so you can carry the instrument like a bag of golf clubs. (The stand fits into the gig bag too!)
REPLACEMENT STRINGS If you break a string or wish to have spares on hand, you may order them from us in Minnesota, or you may look for suitable substitutes in your locality. We use standard 3/4 size upright bass strings.