barcode verifiers user guide - axicon auto i.d. · pdf fileimportant information introduction...
TRANSCRIPT

THE BARCODE EXPERTS
Church Road, Weston on the Green, Oxfordshire, OX25 3QP, UKTel: +44 (0)1869 351155 | Email: [email protected]
Web: www.axicon.com
user guide
Axicon linear barcode verifiers
Industry Partner

Contents
Axicon 6000, 6500, 7000 seriesAxicon 6000, 6500, 7000 series
Important information 4
Introduction 5
Installation 6
Holding the verifier 8
Getting started 10
Calibration 11
Software windows 12
Continuous scan 14
Selecting the verifier 15
Setup 16
Software licence 22
Warranty 24
Service contract 25
Factory re-calibration 26
Certificate of conformance 27
Contact us 28
Page 2 of 28 Page 3 of 28
Axicon Auto ID Limited | Linear verifier user guide | March 2016Axicon Auto ID Limited | Linear verifier user guide | March 2016

IntroductionImportant informationThe Axicon verifier is a high precision opto-electronic device and should be handled carefully. Please keep and use the case to protect the verifier when it is not in use.
Only use power and data cables supplied by Axicon as the use of non-approved accessories will invalidate the warranty. If the verifier is dropped (or subjected to similar misuse) the accuracy of the results may be affected and it should be returned to Axicon immediately for servicing.
We recommend that the verifier is factory recalibrated annually to ensure that it remains compliant to ISO/IEC 15426-1. The unit should be returned to Axicon or to your approved Axicon reseller for this servicing.
Software updates are always available free of charge, and can be downloaded from our website, www.axicon.com
What is in the case.
One of the following verifiers:
• Axicon 6000 series verifier with USB cable.• Axicon 6500 series verifier with USB cable.• Axicon 7000 series verifier with USB cable.• Software CD.• Wallet containing this user guide and calibration sheet
The Axicon verifier is designed to work with any PC running a version of Microsoft Windows currently supported by Microsoft.
Page 4 of 28 Page 5 of 28
Axicon Auto ID Limited | Linear verifier user guide | March 2016Axicon Auto ID Limited | Linear verifier user guide | March 2016
Axicon 6000, 6500, 7000 seriesAxicon 6000, 6500, 7000 series

When you reach the Select components to install window you will see the boxes alongside Drivers and Main Program have been preselected. If you want to use the Scan File data Extractor, select this option by ticking the box.
The Scan File Data Extractor enables you to summarise and record all the verifications made in a standalone database. It uses the data from the Axicon scan files (those with a .scn extension) to create a complete record of all the files that have been saved, either automatically or manually. More information about this is available via the website www.axicon.com.
Only tick the box alongside Inline Verifier if you know you will be using one of the Axicon S-range verifiers to check every barcode being printed on a production line.
InstallationSoftware installation. Insert the CD into the CD drive. The Install Program should run automatically (if not, open the CD using Windows Explorer and double-click the Autorun Program). Click Install Axicon Verifier and follow the installation instructions.
At the Select Components to Install window ensure that the boxes relating to Drivers and Main Program are both ticked. After installation is completed you will find the Axicon Verifier directory in Start Menu/Programs and a shortcut to the program on your desktop.
If you have downloaded the software from our website then simply click on the setup file and follow the instructions.
Hardware installationPlug the verifier into any available USB port on the computer. For Windows 7 and Windows 8 installations the drivers should be installed automatically.
Note: Please follow these installation instructions in the correct order, namely installing the software before the verifier is plugged into any USB port. If the verifier is plugged in before the software has been installed, Windows will attempt to find the correct drivers for the verifier via the internet, and choose an incorrect option. This then causes problems as the software is unable to install the correct driver.
Page 6 of 28 Page 7 of 28
Axicon Auto ID Limited | Linear verifier user guide | March 2016Axicon Auto ID Limited | Linear verifier user guide | March 2016
Axicon 6000, 6500, 7000 seriesAxicon 6000, 6500, 7000 series

Holding the verifierThe Axicon verifiers are all designed to be used with the verifier positioned so that it touches the barcode, as shown in the pictures opposite.
Each verifier can be controlled via the software, and they also have a button to take a scan. The button on the 6000 series is underneath the read head. The 6500 and 7000 series each have two buttons on the top. These have the same function so use whichever button is more convenient.
Wait for at least a minute after switching on the verifier (when the red LEDs will be illuminated) before using it. This allows the circuitry of the reader to stabilise.
It is important that the front flap of the 6500 or 7500 verifier is closed so that as much ambient light as possible is excluded from the verification process.
If the code you are verifying is printed around the circumference of a curved surface, the varying distance of the reader from the code may produce inconsistent results.
Press the trigger button. The reader will beep and the data from the first scan will be displayed in the software immediately. For full ISO/IEC verification you should scan the barcode ten times, moving through its height and avoiding the top 10% and bottom 10%.
The Axicon 6000 series - All four corners of the verifier are touching the surface. The 6000 series verifier cannot be used for symbols wider than 66mm, and this dimension includes the quiet zones.
The 6500 series can be operated either horizontally or vertically (on the side of a carton) but always in contact with the barcode. The 6500 series verifier cannot be used for symbols wider than 125mm, and this dimension includes the quiet zones.
The Axicon 7000 series is being placed flat onto the label with the barcode in the field of view. The 7000 series verifier cannot be used for symbols wider than 200mm, and this dimension includes the quiet zones.
Page 8 of 28 Page 9 of 28
Axicon Auto ID Limited | Linear verifier user guide | March 2016Axicon Auto ID Limited | Linear verifier user guide | March 2016
Axicon 6000, 6500, 7000 seriesAxicon 6000, 6500, 7000 series
Page 10 of 28 Page 11 of 28
Axicon Auto ID Limited | Linear verifier user guide | March 2016Axicon Auto ID Limited | Linear verifier user guide | March 2016
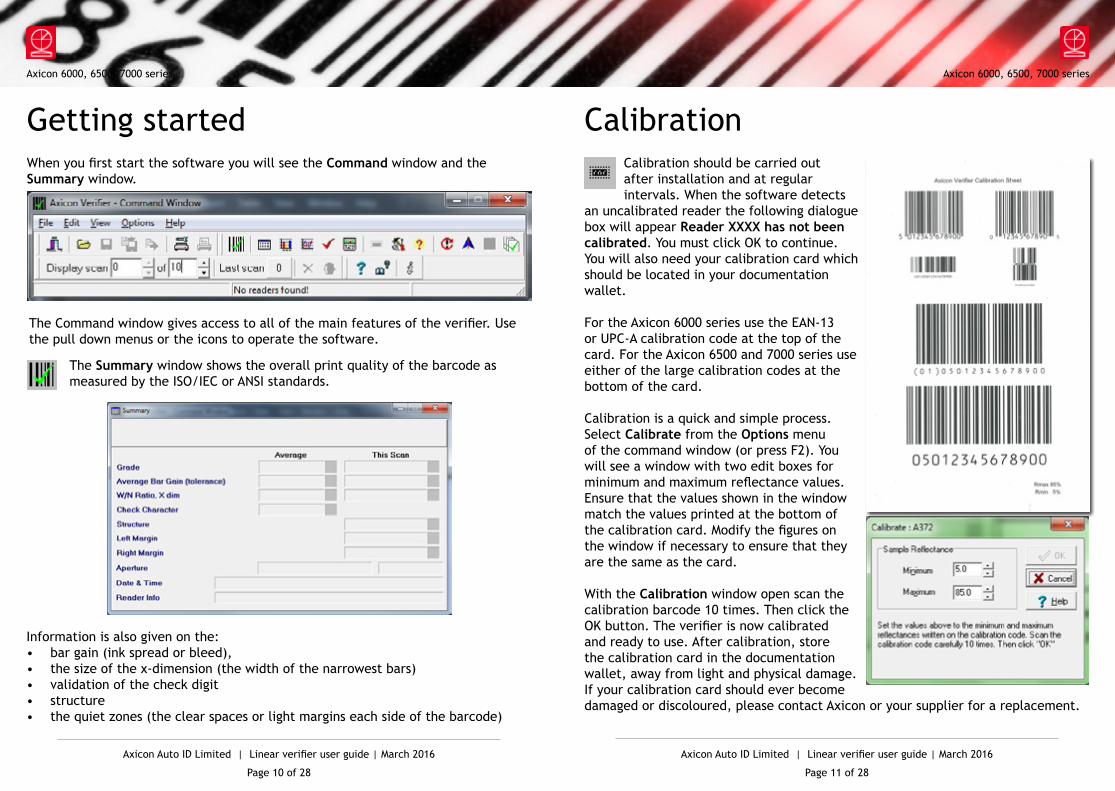
Getting startedWhen you first start the software you will see the Command window and the Summary window.
Information is also given on the: • bar gain (ink spread or bleed), • the size of the x-dimension (the width of the narrowest bars)• validation of the check digit• structure• the quiet zones (the clear spaces or light margins each side of the barcode)
The Command window gives access to all of the main features of the verifier. Use the pull down menus or the icons to operate the software.
The Summary window shows the overall print quality of the barcode as measured by the ISO/IEC or ANSI standards.
CalibrationCalibration should be carried out after installation and at regular intervals. When the software detects
an uncalibrated reader the following dialogue box will appear Reader XXXX has not been calibrated. You must click OK to continue. You will also need your calibration card which should be located in your documentation wallet.
For the Axicon 6000 series use the EAN-13 or UPC-A calibration code at the top of the card. For the Axicon 6500 and 7000 series use either of the large calibration codes at the bottom of the card.
Calibration is a quick and simple process. Select Calibrate from the Options menu of the command window (or press F2). You will see a window with two edit boxes for minimum and maximum reflectance values. Ensure that the values shown in the window match the values printed at the bottom of the calibration card. Modify the figures on the window if necessary to ensure that they are the same as the card.
With the Calibration window open scan the calibration barcode 10 times. Then click the OK button. The verifier is now calibrated and ready to use. After calibration, store the calibration card in the documentation wallet, away from light and physical damage. If your calibration card should ever become damaged or discoloured, please contact Axicon or your supplier for a replacement.
Axicon 6000, 6500, 7000 seriesAxicon 6000, 6500, 7000 series
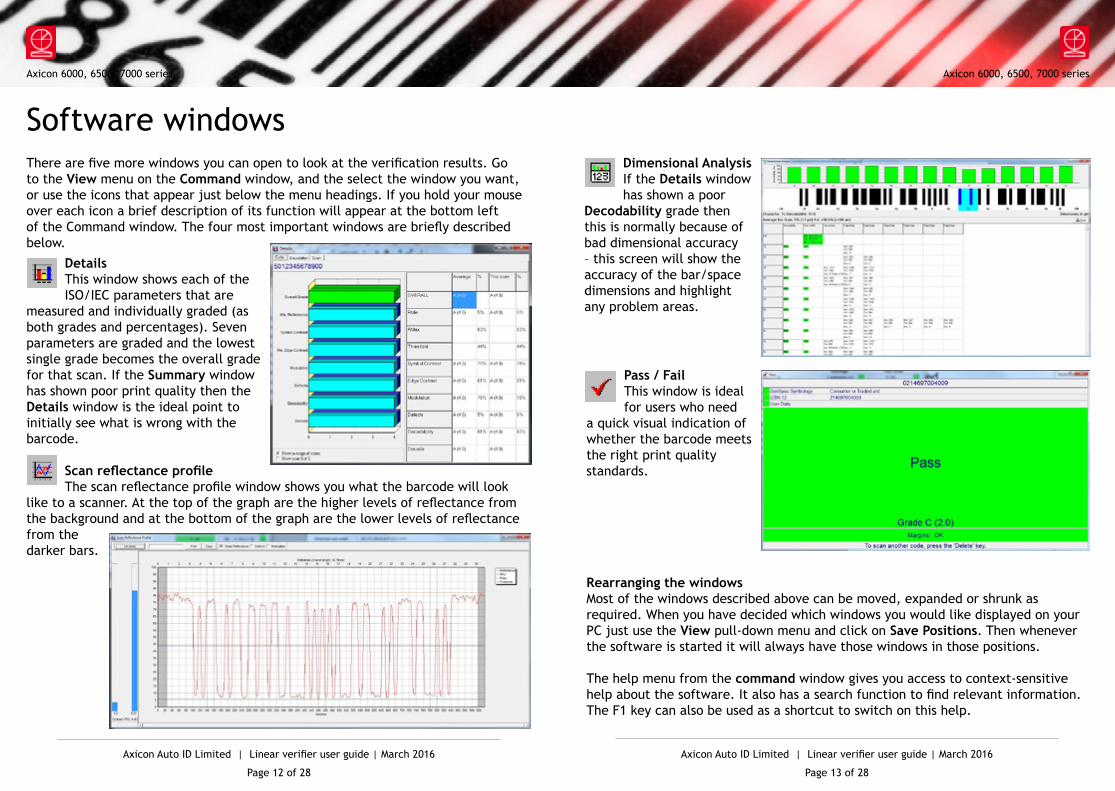
DetailsThis window shows each of the ISO/IEC parameters that are
measured and individually graded (as both grades and percentages). Seven parameters are graded and the lowest single grade becomes the overall grade for that scan. If the Summary window has shown poor print quality then the Details window is the ideal point to initially see what is wrong with the barcode.
Scan reflectance profileThe scan reflectance profile window shows you what the barcode will look
like to a scanner. At the top of the graph are the higher levels of reflectance from the background and at the bottom of the graph are the lower levels of reflectance from the darker bars.
Page 12 of 28 Page 13 of 28
Axicon Auto ID Limited | Linear verifier user guide | March 2016Axicon Auto ID Limited | Linear verifier user guide | March 2016
Software windowsThere are five more windows you can open to look at the verification results. Go to the View menu on the Command window, and the select the window you want, or use the icons that appear just below the menu headings. If you hold your mouse over each icon a brief description of its function will appear at the bottom left of the Command window. The four most important windows are briefly described below.
Dimensional AnalysisIf the Details window has shown a poor
Decodability grade then this is normally because of bad dimensional accuracy – this screen will show the accuracy of the bar/space dimensions and highlight any problem areas.
Pass / FailThis window is ideal for users who need
a quick visual indication of whether the barcode meets the right print quality standards.
Rearranging the windowsMost of the windows described above can be moved, expanded or shrunk as required. When you have decided which windows you would like displayed on your PC just use the View pull-down menu and click on Save Positions. Then whenever the software is started it will always have those windows in those positions.
The help menu from the command window gives you access to context-sensitive help about the software. It also has a search function to find relevant information. The F1 key can also be used as a shortcut to switch on this help.
Axicon 6000, 6500, 7000 seriesAxicon 6000, 6500, 7000 series

Continuous scanThe Axicon S range verifiers have a unique continuous scan feature.
When first installed this feature is automatically activated on start-up (but can be de-activated if required) and allows the user to get an assessment of the barcode quality in a fraction of the time that it would take with other linear verifiers.
The verifier should be placed either just above or just below the barcode and the trigger pressed. With the trigger still pressed, move the verifier down the height of the barcode. The verifier will scan at the rate of 100 verifications a second until it reaches the bottom of the barcode (or gets to the maximum number of scans).
The verifier will automatically calculate an average of the results of all of the scans to provide an overall quality grade based upon an assessment across the scanned bar height.
When verifying barcodes on awkward shaped packaging you may find it easier to switch off the Continuous scan mode. This feature can be activated or de-activated as required with a toggle switch on the Command window.
Page 14 of 28 Page 15 of 28
Axicon Auto ID Limited | Linear verifier user guide | March 2016Axicon Auto ID Limited | Linear verifier user guide | March 2016
6025-S
6525-S
7025-S
Selecting the verifierIf you have more than one verifier plugged into your computer at the same time (for example a 6015 and a 7015), you will need to choose which one you want to use. If the LEDs are not illuminated on the verifier you need, go to
the Options menu on the Command window, and then choose Show Reader Info (or use the shortcut F3).
A new window, Reader info, will appear.
At the bottom you see the button Enumerate. Click on this and in a few moments all the connected verifiers will be displayed as small icons. The first four characters are the serial number of each verifier which is clearly marked on each one. Double click on the icon for the particular verifier you wish to activate.
Axicon 6000, 6500, 7000 seriesAxicon 6000, 6500, 7000 series

SetupAll of the primary configuration of the verifier is done through the Setup section. From the Command window choose Options then Setup or press F5.
General
Standards: Click on ISO if you want only the numeric ISO result to be shown – or click on ANSI if you would prefer to be shown both results. The default is to track the Windows settings for metric or imperial measurements – alternatively you can set this as required.
Pass Grade: If you are working with GS1 barcodes then the Apply GS1 General Specifications should remain ticked. The user can select the pass/fail grade for other barcode types as specified either by an industry application specification or by their customer.
Check Characters
This tab allows the user to select the barcode types that have optional check digits. If these are being used then the verifier can be set to validate them.
Appearance
This tab can be used to adjust any display colours/shades for the pass, warning and fail messages – and can also be used to add Windows wave sounds to give an audible indication of quality.
Page 16 of 28 Page 17 of 28
Axicon Auto ID Limited | Linear verifier user guide | March 2016Axicon Auto ID Limited | Linear verifier user guide | March 2016
Axicon 6000, 6500, 7000 seriesAxicon 6000, 6500, 7000 series

SetupPrinting
This tab can be used to pre-select any particular reports that are required. This includes the option to have a personalised report generated through the built-in Report Generator. The verifier software can also be set to Autoprint to avoid forgetting to print a particular report. Tick Print graph in black & white if you are using a monochrome (black and white) printer, otherwise a scan reflectance profile will only show the outline and not the detail. Also, the standard printed report can be personalised if required using the Report header feature.
Logging
The Logging tab is used to set the saving of records and to run pre-configured external programs from the verifier.If the Enable box is ticked under the Auto Save Scan File section (at the top) then the software will auto save every scan file in the chosen directory.
The files saved through this process can be regarded as audit quality records of the verifications made and can also be used for remote diagnostics purposes. The files can be saved automatically with a filename comprising the decoded number, date and time and a sequential number, or by using a dialogue box.
Save File Log allows users to run any Windows program each time a file is saved. It is intended for use with RepGen or ScanDB, but could be used to perform any action on the saved file.
Simple CSV File allows a subset of the scan information to be automatically appended to the specified file in CSV format.
Calibration
The Calibration tab specifies the file and directory in which calibration data will be saved. This can be altered by clicking on the browse button and choosing the required directory and filename. If Allow scans after calibration has expired is not ticked, no scans will be allowed until the verifier has been calibrated. Within the Allowed Calibration Codes is a list of the data content of barcodes with which calibration is permitted
Page 18 of 28 Page 19 of 28
Axicon Auto ID Limited | Linear verifier user guide | March 2016Axicon Auto ID Limited | Linear verifier user guide | March 2016
Axicon 6000, 6500, 7000 seriesAxicon 6000, 6500, 7000 series
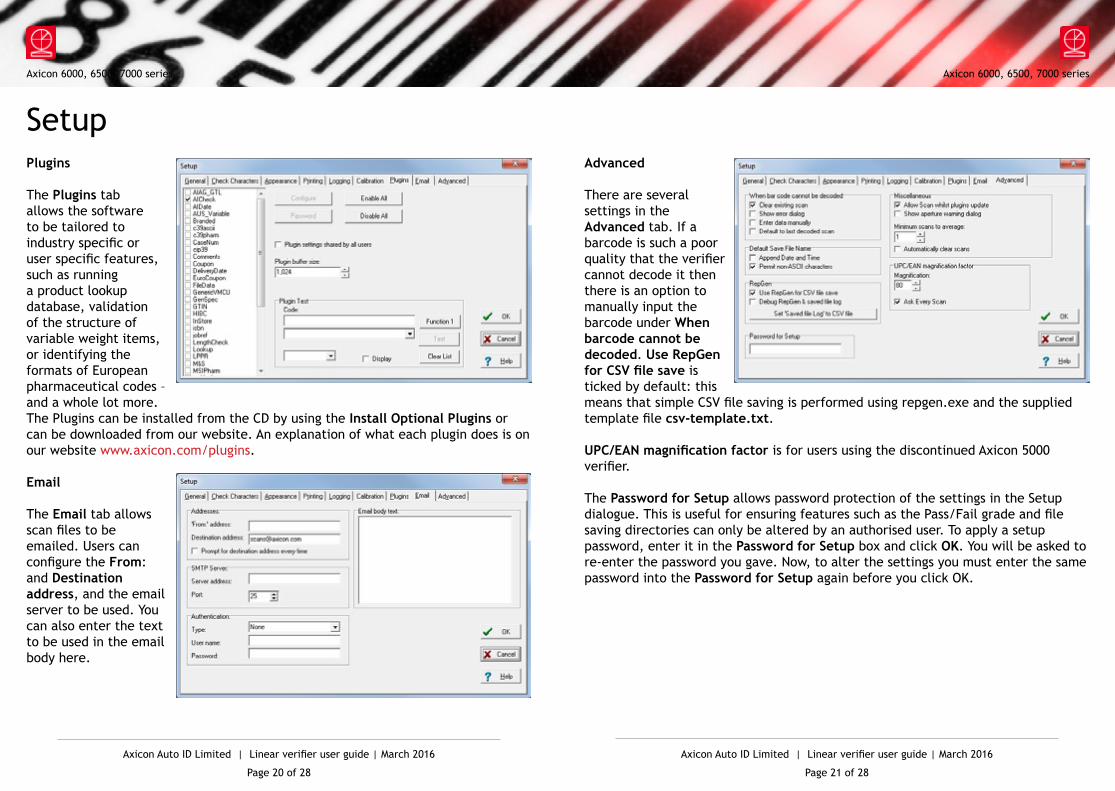
Advanced
There are several settings in the Advanced tab. If a barcode is such a poor quality that the verifier cannot decode it then there is an option to manually input the barcode under When barcode cannot be decoded. Use RepGen for CSV file save is ticked by default: this means that simple CSV file saving is performed using repgen.exe and the supplied template file csv-template.txt.
UPC/EAN magnification factor is for users using the discontinued Axicon 5000 verifier.
The Password for Setup allows password protection of the settings in the Setup dialogue. This is useful for ensuring features such as the Pass/Fail grade and file saving directories can only be altered by an authorised user. To apply a setup password, enter it in the Password for Setup box and click OK. You will be asked to re-enter the password you gave. Now, to alter the settings you must enter the same password into the Password for Setup again before you click OK.
SetupPlugins
The Plugins tab allows the software to be tailored to industry specific or user specific features, such as running a product lookup database, validation of the structure of variable weight items, or identifying the formats of European pharmaceutical codes – and a whole lot more.The Plugins can be installed from the CD by using the Install Optional Plugins or can be downloaded from our website. An explanation of what each plugin does is on our website www.axicon.com/plugins.
The Email tab allows scan files to be emailed. Users can configure the From: and Destination address, and the email server to be used. You can also enter the text to be used in the email body here.
Page 20 of 28 Page 21 of 28
Axicon Auto ID Limited | Linear verifier user guide | March 2016Axicon Auto ID Limited | Linear verifier user guide | March 2016
Axicon 6000, 6500, 7000 seriesAxicon 6000, 6500, 7000 series

Software licence agreementThis software is Copyright © 1995 - 2016 Use of the software is subject to the Axicon software licence terms set out below. Using the software indicates your acceptance of these licence terms. If you do not accept these within 14 days, you may return the entire unused product for a full refund.
Axicon grants you a licence to use any number of copies of the software, but only for use with an Axicon verifier. “Use” means storing, loading, installing, executing or displaying the software. You may not modify the software or disable any of its licensing or control features.
OwnershipThe software is owned and copyrighted by Axicon Auto ID Limited. Your licence confers no title or ownership in the software and is not a sale of rights in the software.
CopiesYou may only make copies of the software for archival purposes or when copying is an essential step in its use. You must reproduce all copyright notices in the original software on all copies. You may not copy the software onto a bulletin board or similar publicly accessible system.
No disassembly or decryptionYou may not disassemble or decompile the software without prior written consent from Axicon.
TransferYour licence will automatically terminate upon any transfer of the software. Upon transfer, you must deliver the software, including any copies and related documentation, to the transferee. The transferee must accept these licence terms as a condition of the transfer.
TerminationAxicon may terminate your licence upon notice of failure to comply with any of these terms. Upon termination, you must immediately destroy the software, together with all copies, adaptations and merged portions in any form.
Export requirementsYou may not export or re-export the software in contravention of any applicable laws or regulations.
This agreement should be construed in accordance with the laws of England.
DISCLAIMER In the following the expression “verifier” means the verifier hardware and the associated software. We have taken care to ensure that this verifier is free from defects. However since we have no control over the circumstances in which you might use it you must satisfy yourself that it is suitable for your needs. Neither Axicon Auto ID Limited nor the vendor of this verifier can accept any liability for any loss or damage (consequential or otherwise) which may be caused by its use.
If the verifier or any part of it is defective in any way, or in some other way does not meet your expectations, the liability of Axicon Auto ID Limited is limited to the cost of the product. You should bear this limitation in mind if you use this verifier in any situations where the acceptance or rejection of shipments of goods or your reputation may depend upon the quality of a barcode.
Page 22 of 28 Page 23 of 28
Axicon Auto ID Limited | Linear verifier user guide | March 2016Axicon Auto ID Limited | Linear verifier user guide | March 2016
Axicon 6000, 6500, 7000 seriesAxicon 6000, 6500, 7000 series

WarrantyAll Axicon products covered by this documentation (Axicon 6000, 6500 and 7000 series verifiers) are sold with a two year parts and labour warranty against manufacturing defects. This is a return to bench warranty with shipping costs in one direction being borne by the customer/distributor.
Should you need to return the unit to Axicon the original case (plus appropriate packaging) must be used. If the equipment is returned without the original case, we will automatically charge an additional sum for its replacement.
Axicon’s standard repair turnaround time is 7-10 working days. This standard warranty does not include the provision of a loan unit. Loan units can be supplied on request.
Axicon reserves the right to charge an inspection fee for any equipment returned under warranty for which no fault is found. Please contact us to obtain an RMA number before returning any equipment. This number must be quoted on all documentation. We cannot accept responsibility for equipment returned without an RMA number.
Maintenance agreementA service contract may be purchased within 30 days from the date of despatch. This allows you to return your verifier back to us at no extra cost for its annual VCAS (verifier calibration and alignment service) so that you can be sure it still measures barcode quality in accordance with the requirements of ISO/IEC 15426-1.
The service contract will also extend the warranty beyond two years, so that if it breaks down, all parts and labour will be provided free of any extra charges. The only exception is when the verifier has been misused, in which case labour costs will be covered, but not those of the parts.
Page 24 of 28 Page 25 of 28
Axicon Auto ID Limited | Linear verifier user guide | March 2016Axicon Auto ID Limited | Linear verifier user guide | March 2016
Axicon 6000, 6500, 7000 seriesAxicon 6000, 6500, 7000 series

Factory re-calibrationAll verifiers need servicing every year to ensure that they measure barcode quality in accordance with the relevant ISO/IEC standards. This verifier calibration and alignment service (VCAS) ensures that the verifier is internally dust-free, checks that it is focused correctly, and re-calibrates the hardware to account for any change in the brightness of the LEDs used to illuminate the barcodes.
This factory re-calibration is not the same as user calibration, as it looks at the output of the LEDs and corrects for any variance in their evenness of illumination across the whole field of view. Over time the LEDs will fade but they will not fade uniformly. User calibration ensures that the verifier is measuring the darkest and brightest reflectances correctly but it cannot correct for any variance in the illumination.
After your verifier has been serviced, we will return it you with the latest version of the software on CD together with a new calibration card, and a new user guide that will include the new certificate of ISO/IEC conformance. The latest software can always be downloaded free of charge from our website, www.axicon.com.
To arrange for your verifier to be serviced:
1. Contact us on Telephone: +44 (0) 1869 351155 | Fax +44 (0) 1869 352404 Email: [email protected]. We will provide you with an RMA number (Return to Manufacturer Authority) and an RMA form.3. Please fill in all details requested on the RMA form, including the RMA number.4. Return the verifier (including all cables) in its original case with the completed RMA form, purchase order and your payment details to us at Axicon Auto ID Ltd, Church Road, Weston on the Green, Oxfordshire OX25 3QP. We cannot take responsibility for units returned in alternative packaging.5. We will normally complete the service and re-calibration of your verifier within 7-10 days.
Certificate of ISO/IEC conformance
We, Axicon Auto ID Limited, of Church Road, Weston on the Green, Oxfordshire, OX25 3QP, UK, hereby declare, that the following barcode verifier(s):
Model number(s)
Serial number(s)
has been designed and manufactured at our address in the UK to verify barcode quality and to conform to: ISO/IEC 15426-1 Barcode verifier conformance specification - Part 1: Linear symbols.
The equipment has been tested and calibrated using primary reference test symbols traceable to the USA’s National Institute of Standards and Technology’s reflectance standards. We also state that this equipment, when used with the latest verifier software, and configured appropriately has the features to meet the requirements of the United States Food and Drug Administration regulation, Title 21 CFR Part 11.
This verifier has been quality assurance checked today, and conforms to this ISO/IEC standard. This declaration of conformity is valid for a year.
Issue date
Expiry date
Authorised signatory
Signatory Name
At or before the expiry date the verifier should be returned to Axicon for its annual servicing and factory re-calibration. This VCAS (verifier calibration and alignment service) will ensure that the verifier remains conformant to ISO/IEC 15426-1 for another year.
Page 26 of 28 Page 27 of 28
Axicon Auto ID Limited | Linear verifier user guide | March 2016Axicon Auto ID Limited | Linear verifier user guide | March 2016
Church Road, Weston on the Green, Oxfordshire, OX25 3QP, UK
Axicon 6000, 6500, 7000 series

Contact usAxicon Auto ID Ltd Church RoadWeston on the GreenOxfordshire OX25 3QPUK
Tel: +44 (0) 1869 351 155Fax: +44 (0) 1869 351 205Email: [email protected]: www.axicon.com
As Axicon continually improves its products, their specifications and features are subject to change without notice. All trademarks are acknowledged as belonging to their respective companies.
Your Axicon distributor