band saw work shop april 2010 - hhr woodworking clubhhrwoodworkingclub.org/band saw pictures/band...
TRANSCRIPT
C:\woodo working club\band saw work shop Page 1
Band Saw Work Shop
April 2010
Sources:
1. “Essential Band Saw Techniques” video produced by Woodworker’s Journal.
2. Woodsmith magazine and www.woodsmith.com.
3. Fine Wood Working magazine and www.finewoodworking.com.
4. Shop Notes magazine and www.shopnotes.com
5. Wood Craft stores and www.woodcraft.com
6. Rockler stores and www.rockler.com
7. Wood Workers Supply, Inc. at www.woodworker.com
8. The Bandsaw Book by Lonnie Bird, Taunton Press, 1999
Why Purchase a Band Saw
Cut irregular or curved shapes
Compound cuts (like a curved table leg)
Straight cuts (including ripping stock like a table saw)
Straight cuts to a stop point
Cut small parts (safer than table saw or miter saw)
Cut circles
Cut tenons
Re-saw boards
Slice logs up to six inches in diameter on a 14-inch band saw
Follow templates (patterns) to cut out parts
Trim chunks of wood for turning blanks on a lathe
Recommended 14-Inch Models to Purchase
Delta 28-276 - ¾ hp $500 from Woodcraft and $550 from Rockler
Jet JWBS-14C - $600 from Woodcraft and Rockler (same price)
Recommend a ¾ hp or 1 hp motor for a 14-inch band saw especially if you resaw
Recommended blades
Timber Wolf available from Woodcraft and www.woodcraft.com

C:\woodo working club\band saw work shop Page 2
Example: ½ inch X 105 inch, 3 tpi (teeth per inch) is $30.99 from Woodcraft
Use the widest possible blade that can follow the radius of a curve. A wide blade is easier to
control and has less tendency to wander.
½ inch wide blade 3-4 tpi is ideal for ripping thick stock and resawing
¼ inch wide general purpose blade handles curves (down to 3/8” radius) and straight cuts
A narrow 1/8 inch wide blade 14 tpi makes quick work of right curves and fine details
Replace Your Tires
Replace with urethane tires – original tires were likely rubber (dries out, cracks, loses its
elasticity, and starts to slip on the wheels)
Urethane tires are not glued to the wheel, last five times longer than rubber tires
Urethane tires:
o www.woodcraft.com, item # 144969, 14” band saw, $32.99 per pair
o www.rockler.com, item # 23860, 14” band saw, $30.99 per pair
Techniques to replace your tires:
o Remove upper and lower wheels from band saw
o Use screw driver to remove old rubber tire
o Soak new urethane tires five minutes very hot water to soften
o Stretch softened urethane tire over wheels
o Can use the following jig to stretch urethane tire around removable dowels
Clean Your Tires
Use mineral spirits to clean sawdust and pitch from the tire

C:\woodo working club\band saw work shop Page 3
Band Saw Jargon
“14-inch band saw” indicates the diameter of the wheels, not the throat distance between
the blade and the band saw arm
“width of blade” – means from the front of the teeth to the back of the blade
“105 inch blade” – means the distance around the circumference of the blade
“TPI” or “tooth per inch” – means the number of teeth in the blade in one inch
3 or 4 TPI – used for most general applications
A one-half inch wide, 3-tpi blade will handle general ripcuts, resawing, tenons, and cutting
curves in thin stock.
“guideblocks” – located on each side of the blades, both above and below the table
“thrust bearing” – located behind the blade, both above and below the table
There are a duplicate set of guideblocks and thrust bearings above and below the table
Installing the blade
Back off the guide blocks and the thrust bearings
Teeth on the blade point in downward direction toward the table
Add tension with the screw knob on the top wheel
A second screw at the back of the wheel housing pushes the bottom of the top wheel
forward and back
Position the blade slightly behind the center of the wheel
With six inches of the blade exposed above the table, increase the tension until there is a ¼
inch deflection as you push the blade with your finger
Position the thrust bearing with a 3/1000 inch behind the blade (thickness of paper)
Guide blocks are even with the bottom of the gullets in the blade
o Phenolic guide blocks can ride against the blades
Woodcraft: Cool Blocks, item # 49HO2, ½ X ½ inches, $14.99
Rockler: Ceramic Guide Blocks, item # 26687, 14” Delta band saw, $20
Woodworker’s Supply (www.woodworker.com): Ceramic Guide Blocks, item
108-443, 14 inch Delta Band saw, $19
o Steel guide blocks cannot touch the blade because steel generates heat with friction
o Put paper around the blade and close the guide blocks against the paper to properly
position the guide blocks.

C:\woodo working club\band saw work shop Page 4
Squaring The Blade In the Saw
Do not use a machinist’s square, instead square the blade in the saw when under pressure
of cutting with this technique:
o Nibble a line into a board as shown in the drawing below:
o Flip the board over, and nibble another line
o If the two lines are parallel, then the blade is square to the table
A “stop bolt” below the table can be adjusted to ensure the table returns to a 90 degree
square position.
To cut a square end on a board…
o Cut a nibble on the board as above
o Lay the board flat on the table and cut thru the board using the nibble line as a guide
C:\woodo working club\band saw work shop Page 5
Dust Collection
o Models sold today come with dust collection ports
o Otherwise, consider cutting a port in the lower cabinet near the lower blade guides, insert a
dust port available from Woodcraft or Rockler that fits the size of your dust collection system
Cutting Techniques
Free hand cutting requires practice
Cut 1/16th inch outside the line then sand to the line to remove the band saw makrs
Anchor hands on the table and guide the stock with your fingers
When making a turning cut, maintain the cutting pressure
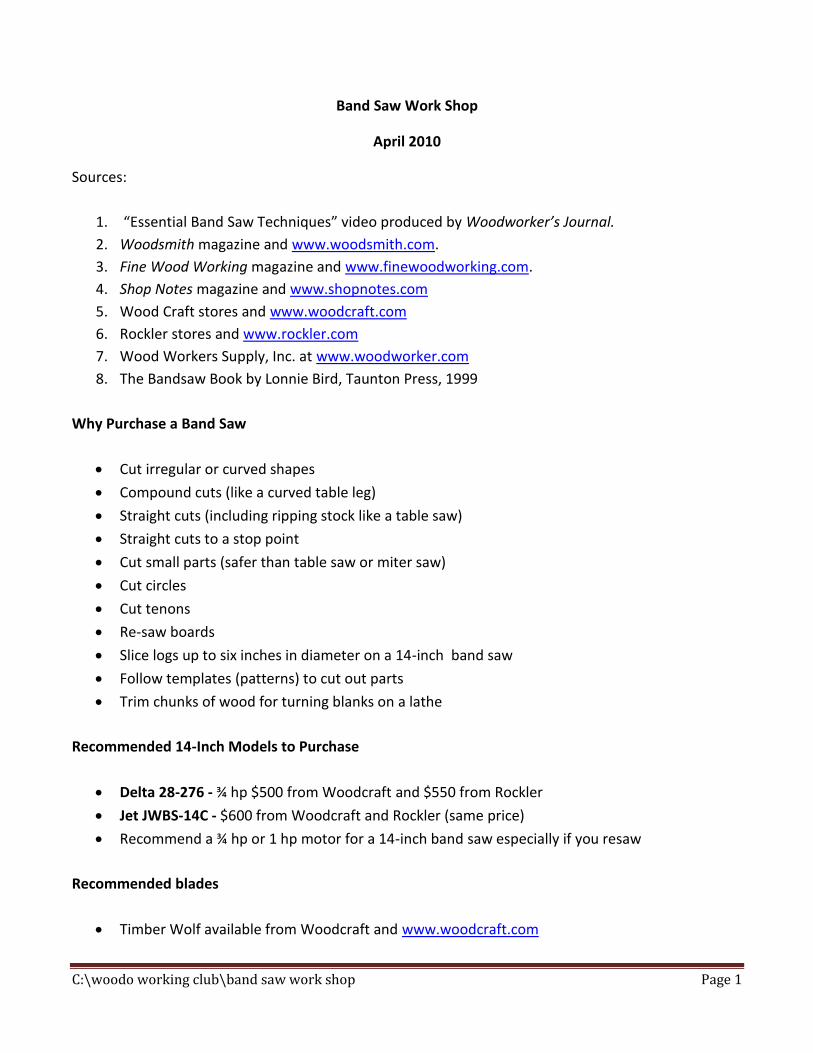
Relief Cuts
Used when cutting a tight radius
Make relief cuts along dotted lines shown in picture below, then cut curves.

C:\woodo working club\band saw work shop Page 6
Nibbling Square Cuts
Nibble into the square, then clean up the bottom of the cut with the blade like a “power
rasp”
Cutting Small Parts
Create a shop made sled to safely cut small parts and keep your fingers away from the blade
Dimensions of sled to fit comfortably on the table top.
Dimension for 14-inch band saw table shown above are:
o 11 inches deep (front to back) and 14 inches across the front
o ¾ inch boards
o Fence positioned 2.5 inches from end of sled
o Tracking board below sled to fit miter slot on table top

C:\woodo working club\band saw work shop Page 7
Use screw clamps to hold small parts
Cut round stock on the band saw with the jib shown above:
Pad Cutting Multiples
To cut duplicates from a pattern, use double sided tape to stick stock together, then make
one cut of the pattern.

C:\woodo working club\band saw work shop Page 8
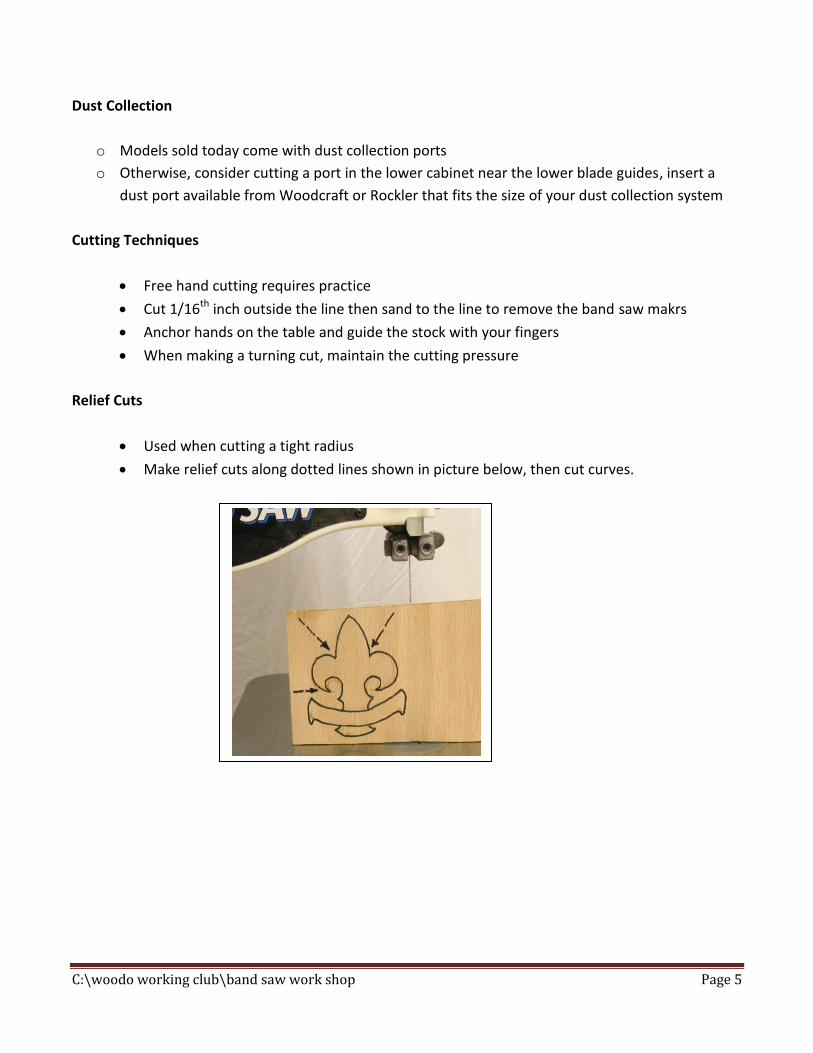
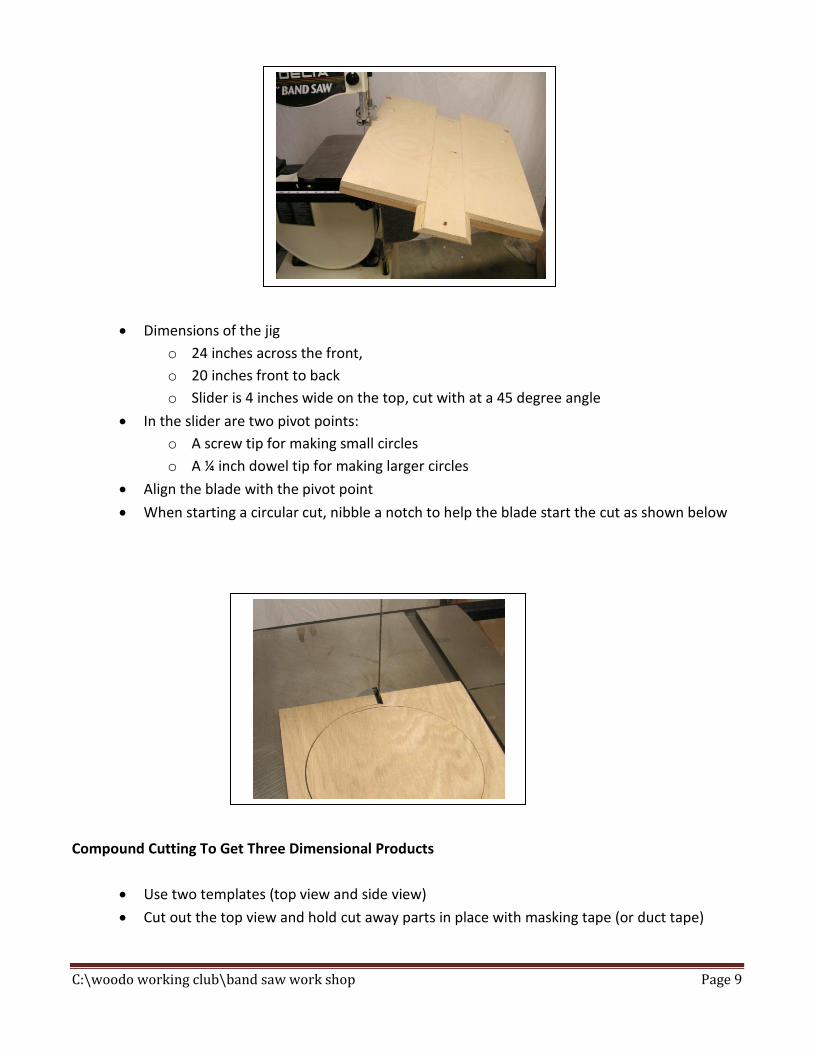
Cutting Perfect Circles
Make a circle cutting jig as shown in the picture below
C:\woodo working club\band saw work shop Page 9
Dimensions of the jig
o 24 inches across the front,
o 20 inches front to back
o Slider is 4 inches wide on the top, cut with at a 45 degree angle
In the slider are two pivot points:
o A screw tip for making small circles
o A ¼ inch dowel tip for making larger circles
Align the blade with the pivot point
When starting a circular cut, nibble a notch to help the blade start the cut as shown below
Compound Cutting To Get Three Dimensional Products
Use two templates (top view and side view)
Cut out the top view and hold cut away parts in place with masking tape (or duct tape)

C:\woodo working club\band saw work shop Page 10
Scroll Work On The Band Saw
Remove the guide blocks and thrust bearing above the table top
Back away the guide blocks and thrust bearing below the table top
Install a stabilizer (which is a thrust bearing with a groove), push the stabilizer against the
blade
o Woodworker’s Supply (www.pro.woodworker.com) No. 958-399 at $85
Use a 1/16 -inch wide blade with 24 TPI
Cuts are not as smooth as a scroll saw
Dove Tails On the Band Saw
Common handcut dovetails slope ratios and their corresponding angles:
o 1:9 = 6.5 degrees
o 1:8 = 7 degrees

C:\woodo working club\band saw work shop Page 11
o 1:7 = 8 degrees
o 1:6 = 9.5 degrees
The two most commonly used slopes are roughly 1:6 and 1:8
General rule of thumb: 1:6 ratio for softwoods and 1:8 for hardwoods where the steeper
angle with a 1:6 ratio provides a better mechanical joint for soft woods
Most dovetail jigs are designed to work with a 14 degree bit creating a steeper angle and a
stronger joint
Use a 3/16th inch blade with 10 TPI
Make a dovetail sled where the angle is 1:6 (meaning one inch up for every six inches)
o Most dovetail cuts have a dovetail slope of 1:6
Dimmensions of the sled are
o 8 inches wide and 10.5 inches long
Sled will cut “through” dovetails
Sled is turned to get the two angles of a dovetail
Steps using the sled:
o Use a marking gauge that is set slightly more than the thickness of the stock
o Use the marking gauge to score a line on the face of both boards that make up the
dovetail joint
o Design the layout of the pins and sockets
Use a square
Mark half pins on the ends
Put at least one full pin in the center

C:\woodo working club\band saw work shop Page 12
o Draw the angled cuts that form the dovetails on the end of the board
o Shown above are the angled cuts that form the dovetails. The picture is
taken from the rear of the sled and band saw showing the angle the blade
will cut.
o Once the sockets are cut, use the cut sockets to trace the sockets board onto the pin
board.

C:\woodo working club\band saw work shop Page 13
o Using the sled angled to the right, cut the right side of the socket
o Using the sled angled to the left, cut the left side of the socket
o Make cuts as square as possible
o Cut to the line marked by the marking gauge
o Stock being cut overhangs the sled
Rotate the sled to cut the other side of the dovetail angle
Cut out the waste area with the band saw…rock up the cut-out slightly to get the
inside corner
Trace cut sockets onto the pin board
When using poplar wood, leave the pencil lines and the joint will compress the
wood. With harder woods like maple, cut the pencil lines
Cut the pins
Assemble
The end grain will project beyond the face grain because the marking gauge was set
slightly more than the thickness of the stock (so sand the pins flush)
C:\woodo working club\band saw work shop Page 14
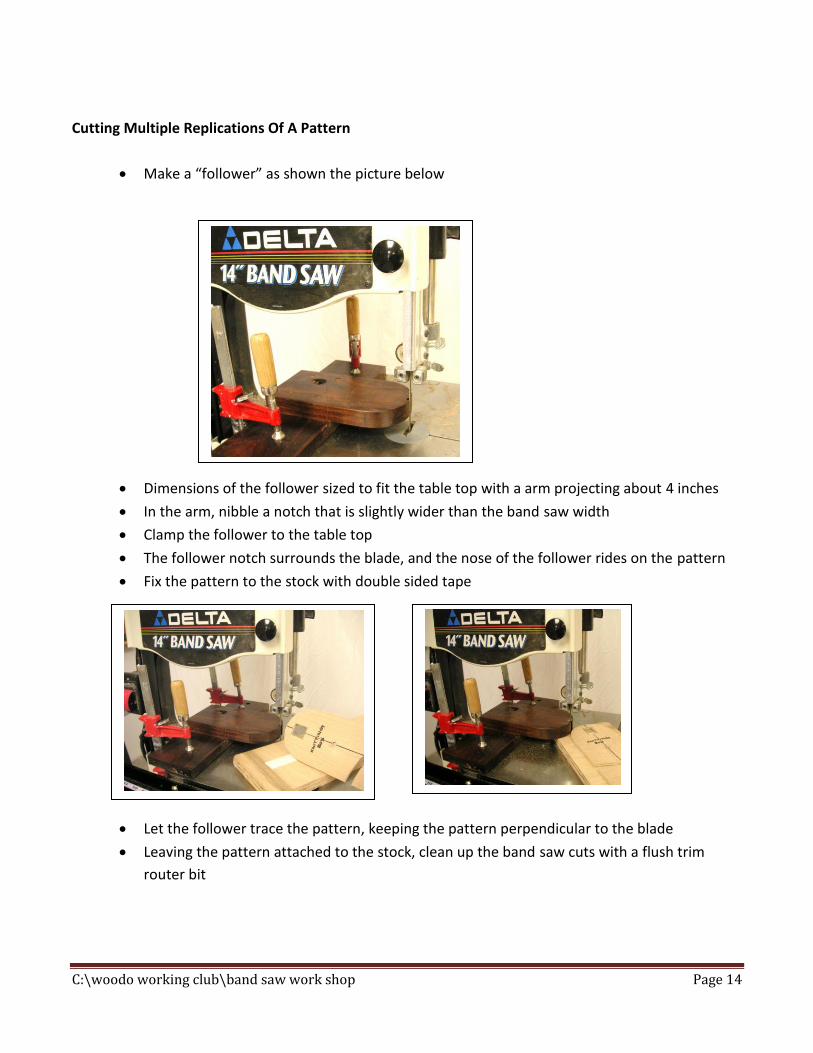
Cutting Multiple Replications Of A Pattern
Make a “follower” as shown the picture below
Dimensions of the follower sized to fit the table top with a arm projecting about 4 inches
In the arm, nibble a notch that is slightly wider than the band saw width
Clamp the follower to the table top
The follower notch surrounds the blade, and the nose of the follower rides on the pattern
Fix the pattern to the stock with double sided tape
Let the follower trace the pattern, keeping the pattern perpendicular to the blade
Leaving the pattern attached to the stock, clean up the band saw cuts with a flush trim
router bit

C:\woodo working club\band saw work shop Page 15
Single Point Resawing
The easiest set up is a single point fence for resawing; however, if resawing multiple boards,
then a fence aligned for blade drift would be faster (it just requires more set up time)
Build a jig fence
Mark edge of stock with a line down the center
Let the half-dowel lead the blade so the stock contacts the half-dowel before the blade
Make sure the blade and the single point half-dowel are parallel
Sight the blade on the dotted line
Camp the jig fence to the table
Control the end of the board to keep the blade centered on the cut

C:\woodo working club\band saw work shop Page 16
Keep the board against the half dowel with a push pad or a jig as shown in the right picture
below.
Drift Angle Compensation
The saw blade could pull left or right when cutting …this is called blade drift
To compensate for blade drift:
o Start with a board with one straight edge
o Mark a parallel line on the face of the board about one inch from the edge
o Put masking tape on the table top
o Cut the board along the line about halfway down the board
o Stop the cut
o Trace the edge of the board onto the masking tape
o The drift angle is the line on the masking tape
o Set the band saw fence (one that can be angled) along the draft angle line
o Now the fence can be moved for various width cuts
C:\woodo working club\band saw work shop Page 17
o Could place a tall fence against the band saw fence and cut thin veneers
o Peel veneer cuts off the outboard side of the board
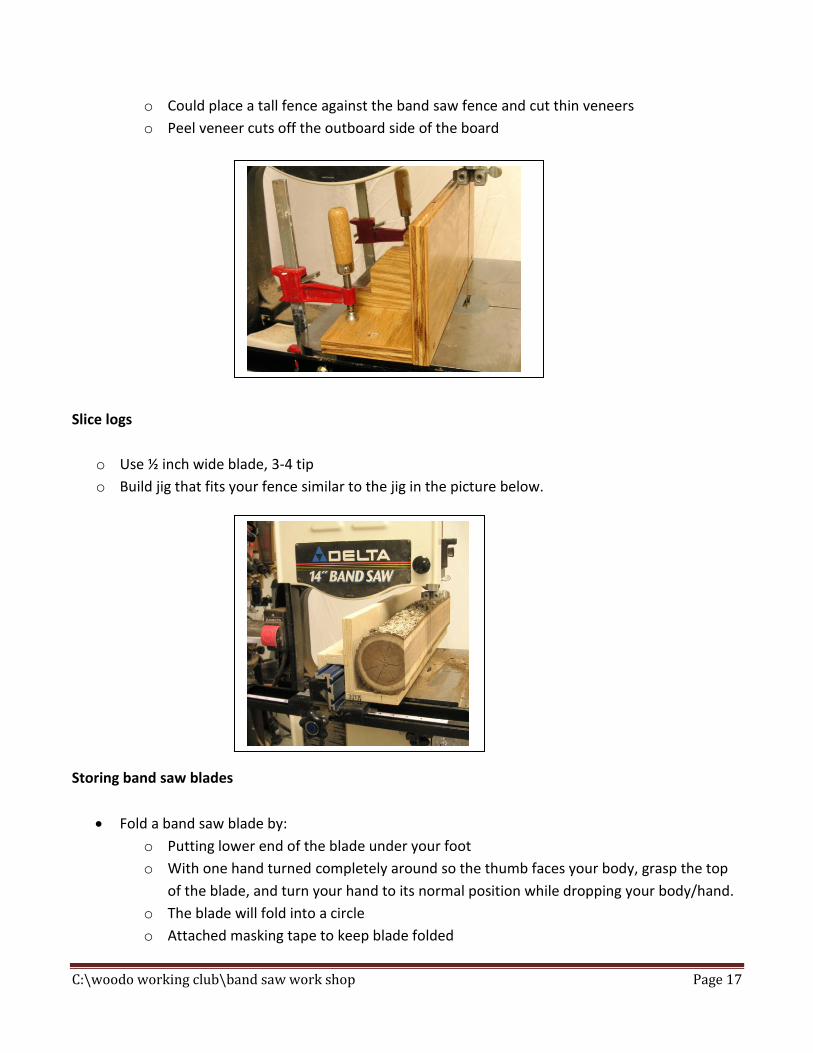
Slice logs
o Use ½ inch wide blade, 3-4 tip
o Build jig that fits your fence similar to the jig in the picture below.
Storing band saw blades
Fold a band saw blade by:
o Putting lower end of the blade under your foot
o With one hand turned completely around so the thumb faces your body, grasp the top
of the blade, and turn your hand to its normal position while dropping your body/hand.
o The blade will fold into a circle
o Attached masking tape to keep blade folded

C:\woodo working club\band saw work shop Page 18
Store a band saw blade by:
o Taping the folded bands aw blade (per above) in two places
o Mounting the blade on your wall in roughly the shape of the band saw when mounted
on the band saw
After-Market Band Saw Fences
Kreg Band Saw Fence
o Item # 146050 from www.woodcraft.com at $108
o Same as Woodcraft, but $115 from Rockler at www.rockler.com