baby pigbaby pig - university of missouri4h.missouri.edu/doc/cloth-pig-pattern.pdf · project...
TRANSCRIPT

This is a situation many project leaders and other educators face as they attempt to involve
members and producers in hands-on learn-by-doing activities instead of having everyone listen to a lecture or watch a slide set. The realistic model pig is one training aid which isn’t bothered with repeated dockings, several injections and many needle teeth being clipped. Nor is it bothered with cold weather, faulty techniques, or 4-H’ers who aren’t ready to experiment for the first time on the real thing.
Here are some examples of the swine project skills which 4-H’ers have successfully demonstrated during swine project meetings, skillathons, and project bowls using the model pig and puppet as a training aid:
Special thanks to the
More than just a stuffed pig!
The model pig can be instrumental in a leader’s efforts towards helping members develop life skills as well as project skills. How the learning activity is shaped will often make the difference in the extent either type of skills are developed.
This pattern serves as an important training aid for the four guides in the National 4-H Curriculum Swine Series.Swine 1 ..................................................Stock # 08065Swine 2 .............................................................. 08066Swine 3 ...............................................................08067Helper’s Guide ....................................................08068
Copyright 2004 National 4-H Council. All rights reserved. Reproduction without permission of National 4-H Council is strictly prohibited.
Find more about these and other National 4-H Curriculum at:
www.4-hcurriculum.org
• Identifying Parts• Constructing the Ideal Pig• Recognizing Faults• Identifying Breeds• Taking Temperature• Administering Medication & Iron• Assisting in Delivery• Caring For the Newborn• Identifying Location of Retail Meat Cuts• Measuring Backfat
Thickness• Restraining• Clipping Needle Teeth• Docking Tails• Castrating• Delivering• Preparing a Pig For Show• Fitting & Showing• Ear Notching
Baby PigBaby PigPattern for Realistic
Swine Project Training Aid
The baby pig management meeting of the Happy Squealers 4-H Project Group is tonight. Sure enough the sow that was scheduled to farrow yesterday was late. Even if she had farrowed I am not sure I would want nine 4-H’ers in my farrowing house giving iron shots for the first time.”
—4-H Swine Project Leader
• Working Together• Think Creatively• Provide Leadership• Express Themselves• Use Knowledge• Ask Questions
• Search Out Information• Develop Self-Esteem• Make Decisions• Set Goals• Take Risks• Develop Independence
Learning project skills is just one part of the 4-H program. The primary mission of 4-H is to help members develop important life skills so they can become self-directing, contributing members of society. Examples of these life skills include being able to do the following:
1www.4-hcurriculum.org
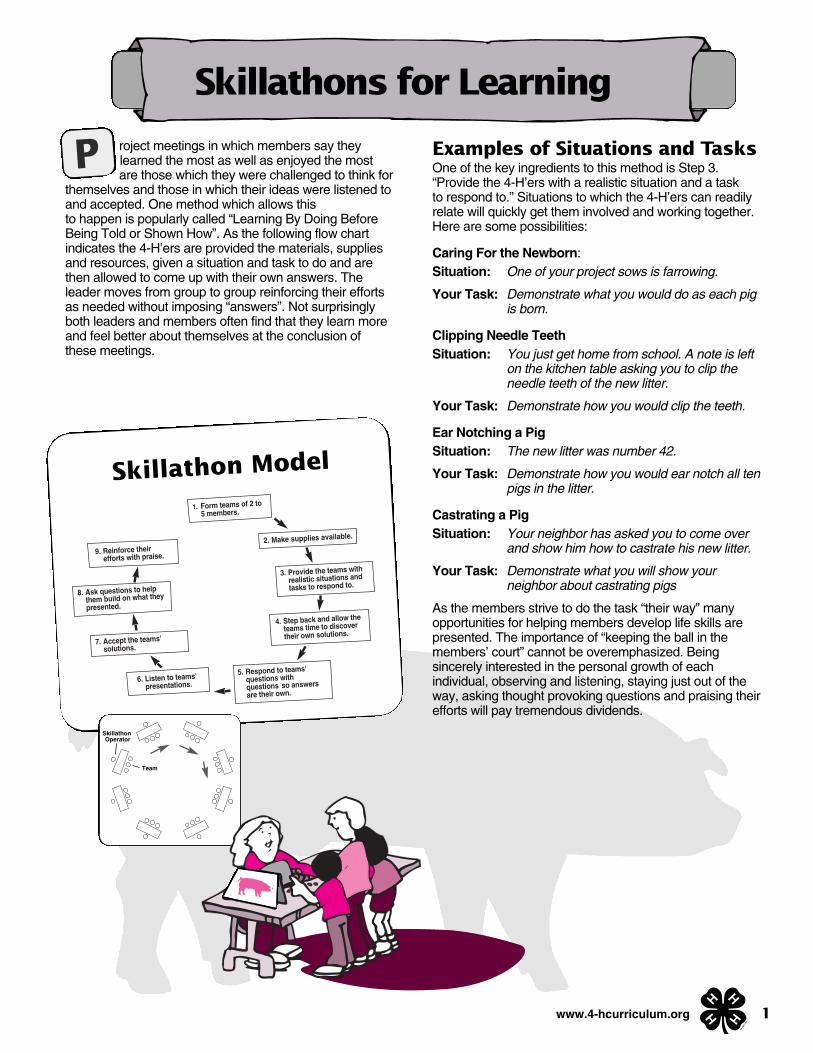
1. Form teams of 2 to 5 members.
8. Ask questions to help them build on what they
presented.
7. Accept the teams' solutions.
6. Listen to teams' presentations.
5. Respond to teams' questions with questions so answers are their own.
4. Step back and allow the
teams time to discover
their own solutions.
3. Provide the teams with
realistic situations and
tasks to respond to.
2. Make supplies available.
9. Reinforce their efforts with praise.
Skillathon Operator
Team
roject meetings in which members say theylearned the most as well as enjoyed the mostare those which they were challenged to think for
themselves and those in which their ideas were listened toand accepted. One method which allows this to happen is popularly called “Learning By Doing BeforeBeing Told or Shown How”. As the following flow chartindicates the 4-H’ers are provided the materials, suppliesand resources, given a situation and task to do and arethen allowed to come up with their own answers. Theleader moves from group to group reinforcing their effortsas needed without imposing “answers”. Not surprisinglyboth leaders and members often find that they learn moreand feel better about themselves at the conclusion ofthese meetings.
Examples of Situations and TasksOne of the key ingredients to this method is Step 3.“Provide the 4-H’ers with a realistic situation and a task to respond to.” Situations to which the 4-H’ers can readilyrelate will quickly get them involved and working together.Here are some possibilities:
Caring For the Newborn:Situation: One of your project sows is farrowing.
Your Task: Demonstrate what you would do as each pigis born.
Clipping Needle TeethSituation: You just get home from school. A note is left
on the kitchen table asking you to clip theneedle teeth of the new litter.
Your Task: Demonstrate how you would clip the teeth.
Ear Notching a PigSituation: The new litter was number 42.
Your Task: Demonstrate how you would ear notch all tenpigs in the litter.
Castrating a PigSituation: Your neighbor has asked you to come over
and show him how to castrate his new litter.
Your Task: Demonstrate what you will show yourneighbor about castrating pigs
As the members strive to do the task “their way” manyopportunities for helping members develop life skills arepresented. The importance of “keeping the ball in themembers’ court” cannot be overemphasized. Beingsincerely interested in the personal growth of eachindividual, observing and listening, staying just out of theway, asking thought provoking questions and praising theirefforts will pay tremendous dividends.
Skillathons for Learning
P
Skillathon Model
2 www.4-hcurriculum.org
Sewing Instructions
Use 3/8 inch seam allowance.
Use 1/4 inch seam allowance where indicated.
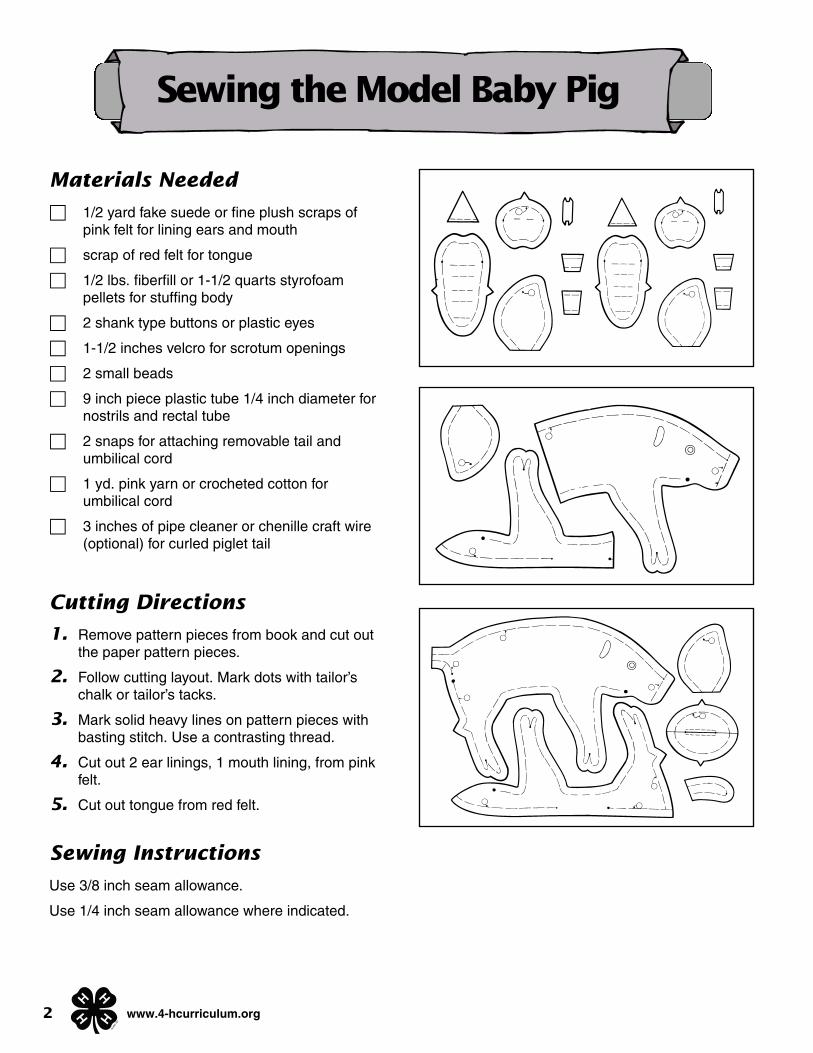
Materials Needed
□ 1/2 yard fake suede or fine plush scraps ofpink felt for lining ears and mouth
□ scrap of red felt for tongue
□ 1/2 lbs. fiberfill or 1-1/2 quarts styrofoampellets for stuffing body
□ 2 shank type buttons or plastic eyes
□ 1-1/2 inches velcro for scrotum openings
□ 2 small beads
□ 9 inch piece plastic tube 1/4 inch diameter fornostrils and rectal tube
□ 2 snaps for attaching removable tail andumbilical cord
□ 1 yd. pink yarn or crocheted cotton forumbilical cord
□ 3 inches of pipe cleaner or chenille craft wire(optional) for curled piglet tail
Cutting Directions
1. Remove pattern pieces from book and cut outthe paper pattern pieces.
2. Follow cutting layout. Mark dots with tailor’schalk or tailor’s tacks.
3. Mark solid heavy lines on pattern pieces withbasting stitch. Use a contrasting thread.
4. Cut out 2 ear linings, 1 mouth lining, from pinkfelt.
5. Cut out tongue from red felt.
Sewing the Model Baby Pig

3www.4-hcurriculum.org
Step 1. Body
1. Pattern piece 1. Pin right sides of fabrictogether.
2. Stitch along seam line (A) to small dot.
3. Stitch along seam line (B) to small dot.
4. Clip seam line (B) at clip mark.
Step 2. Scrotum
1. Pattern piece 3. Cut 1-1/2 inch slit in bothpattern pieces along solid heavy line.
2. Cut 1-1/2 inch piece of velcro.
3. Cut velcro piece in half, lengthwise.
4. Sew velcro to scrotum. On small dotted lines,attach velcro on inside of fabric.
5. Fold scrotum in half lengthwise with inside offabric together, matching notches. Gather byhand seam line (F) to 1-1/2 inches.
6. Join scrotum to seam line (C), pattern piece 2.Stitch scrotum into seam allowance one oneach side from seam line (C) to large dot.
7. Pattern piece 2. With right sides of fabrictogether, stitch seam line (C) and (D) to smalldots.
8. Join large dots, pattern piece 1 (body), to largedots, pattern piece 2 (body), at mouth opening.Stitch from large dot at head to large dot belowtail. This will provide space for rectal tube.
4 www.4-hcurriculum.org
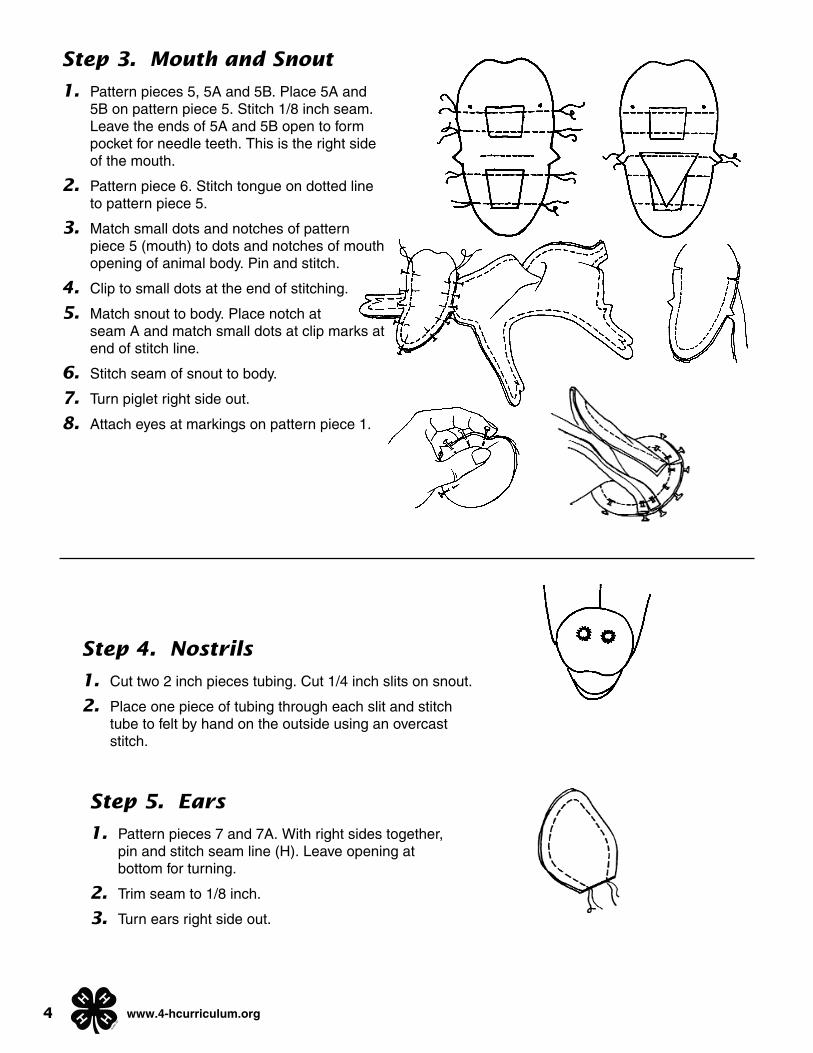
Step 4. Nostrils
1. Cut two 2 inch pieces tubing. Cut 1/4 inch slits on snout.
2. Place one piece of tubing through each slit and stitchtube to felt by hand on the outside using an overcaststitch.
Step 5. Ears
1. Pattern pieces 7 and 7A. With right sides together,pin and stitch seam line (H). Leave opening atbottom for turning.
2. Trim seam to 1/8 inch.
3. Turn ears right side out.
Step 3. Mouth and Snout
1. Pattern pieces 5, 5A and 5B. Place 5A and5B on pattern piece 5. Stitch 1/8 inch seam.Leave the ends of 5A and 5B open to formpocket for needle teeth. This is the right sideof the mouth.
2. Pattern piece 6. Stitch tongue on dotted lineto pattern piece 5.
3. Match small dots and notches of patternpiece 5 (mouth) to dots and notches of mouthopening of animal body. Pin and stitch.
4. Clip to small dots at the end of stitching.
5. Match snout to body. Place notch atseam A and match small dots at clip marks atend of stitch line.
6. Stitch seam of snout to body.
7. Turn piglet right side out.
8. Attach eyes at markings on pattern piece 1.
5www.4-hcurriculum.org
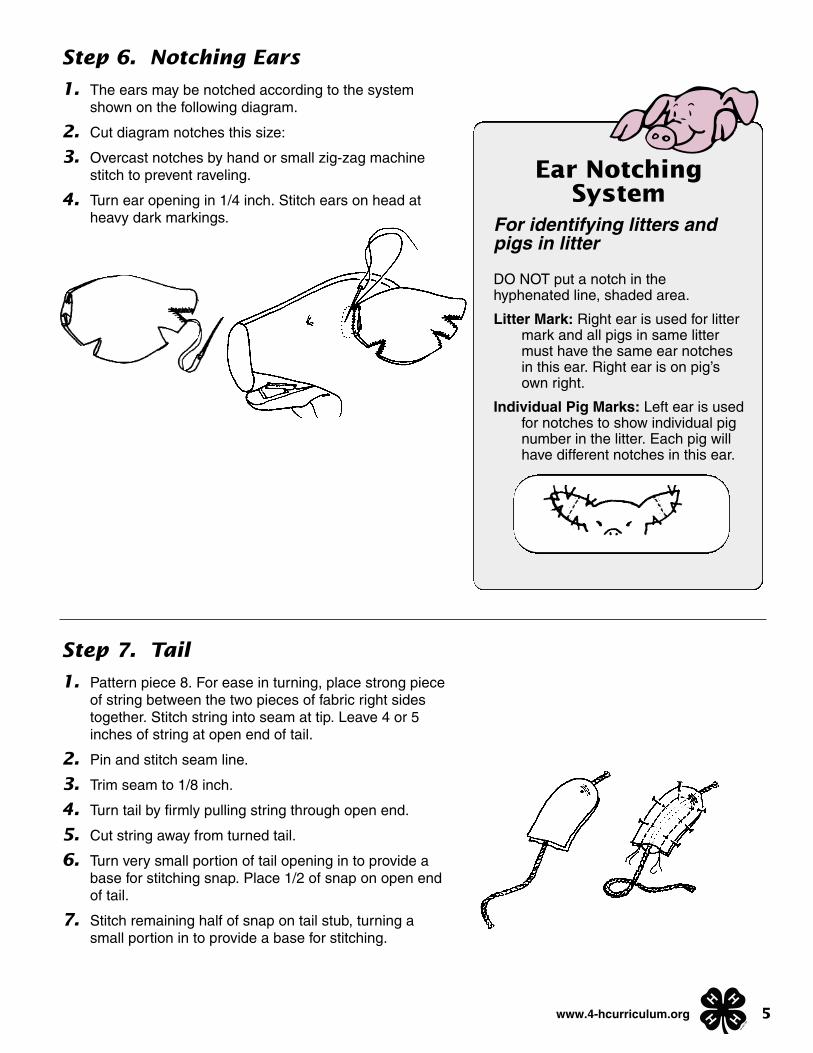
Step 7. Tail
1. Pattern piece 8. For ease in turning, place strong pieceof string between the two pieces of fabric right sidestogether. Stitch string into seam at tip. Leave 4 or 5inches of string at open end of tail.
2. Pin and stitch seam line.
3. Trim seam to 1/8 inch.
4. Turn tail by firmly pulling string through open end.
5. Cut string away from turned tail.
6. Turn very small portion of tail opening in to provide abase for stitching snap. Place 1/2 of snap on open endof tail.
7. Stitch remaining half of snap on tail stub, turning asmall portion in to provide a base for stitching.
Ear NotchingSystem
For identifying litters andpigs in litter
DO NOT put a notch in thehyphenated line, shaded area.
Litter Mark: Right ear is used for littermark and all pigs in same littermust have the same ear notchesin this ear. Right ear is on pig’sown right.
Individual Pig Marks: Left ear is usedfor notches to show individual pignumber in the litter. Each pig willhave different notches in this ear.
Step 6. Notching Ears
1. The ears may be notched according to the systemshown on the following diagram.
2. Cut diagram notches this size:
3. Overcast notches by hand or small zig-zag machinestitch to prevent raveling.
4. Turn ear opening in 1/4 inch. Stitch ears on head atheavy dark markings.

6 www.4-hcurriculum.org
Step 8. Rectal Tube
1. Place 5 inch piece of tubing in opening ofseam (E) and (C) at base of tail. Stitch inplace using an overcast stitch.
Step 9. Stuffing Pig
1. The head of the pig will be firm and theremainder of the pig should be stuffed to holdits shape but retain the flexible characteristicsof a newborn.
2. Stitch by hand between seam (C) and (D).
Step 10. Umbilical Cord
1. Using cord or cotton braid, twist or crochet anumbilical cord 5 inches long.
2. Sew 1/2 of snap to end of cord.
3. Sew 1/2 of the snap to 2 inches from scrotumdirectly on seam (C) and (D) closure.
Step 11. Needle Teeth
1. Pattern piece 9. Insert in tooth pockets andbend tooth.
2. When teeth are clipped remove plastic andinsert new sets.
7www.4-hcurriculum.org
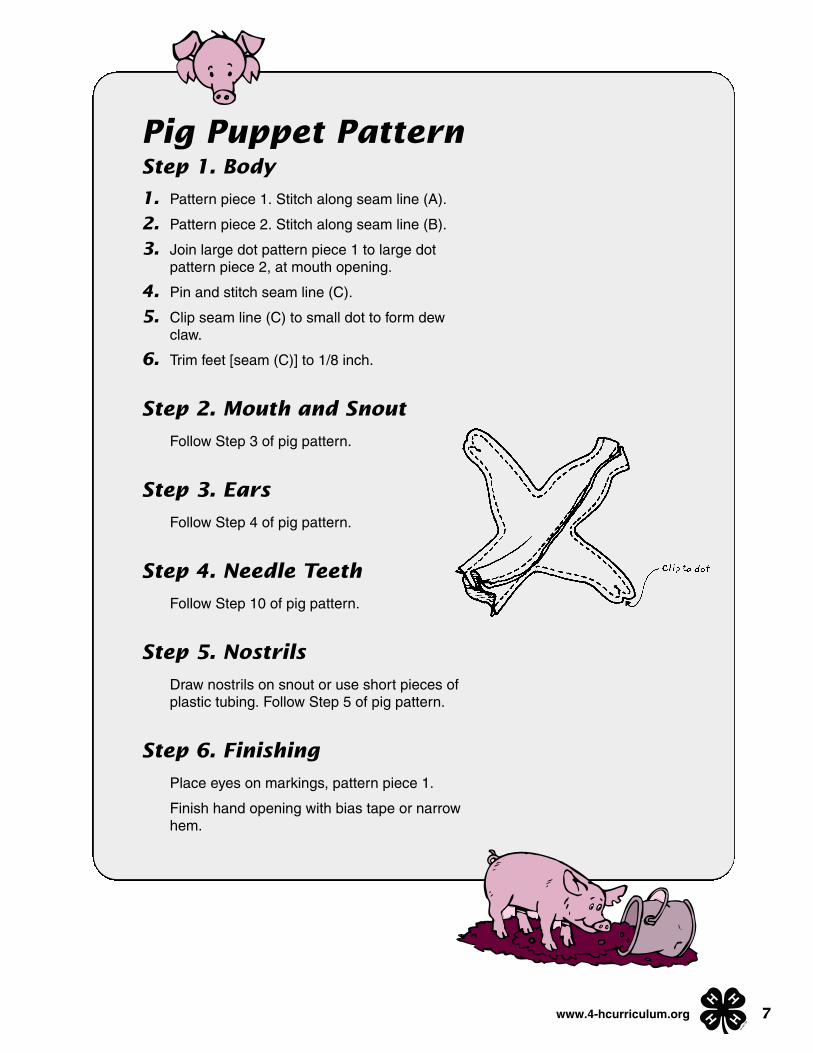
Pig Puppet PatternStep 1. Body
1. Pattern piece 1. Stitch along seam line (A).
2. Pattern piece 2. Stitch along seam line (B).
3. Join large dot pattern piece 1 to large dotpattern piece 2, at mouth opening.
4. Pin and stitch seam line (C).
5. Clip seam line (C) to small dot to form dewclaw.
6. Trim feet [seam (C)] to 1/8 inch.
Step 2. Mouth and Snout
Follow Step 3 of pig pattern.
Step 3. Ears
Follow Step 4 of pig pattern.
Step 4. Needle Teeth
Follow Step 10 of pig pattern.
Step 5. Nostrils
Draw nostrils on snout or use short pieces ofplastic tubing. Follow Step 5 of pig pattern.
Step 6. Finishing
Place eyes on markings, pattern piece 1.
Finish hand opening with bias tape or narrowhem.
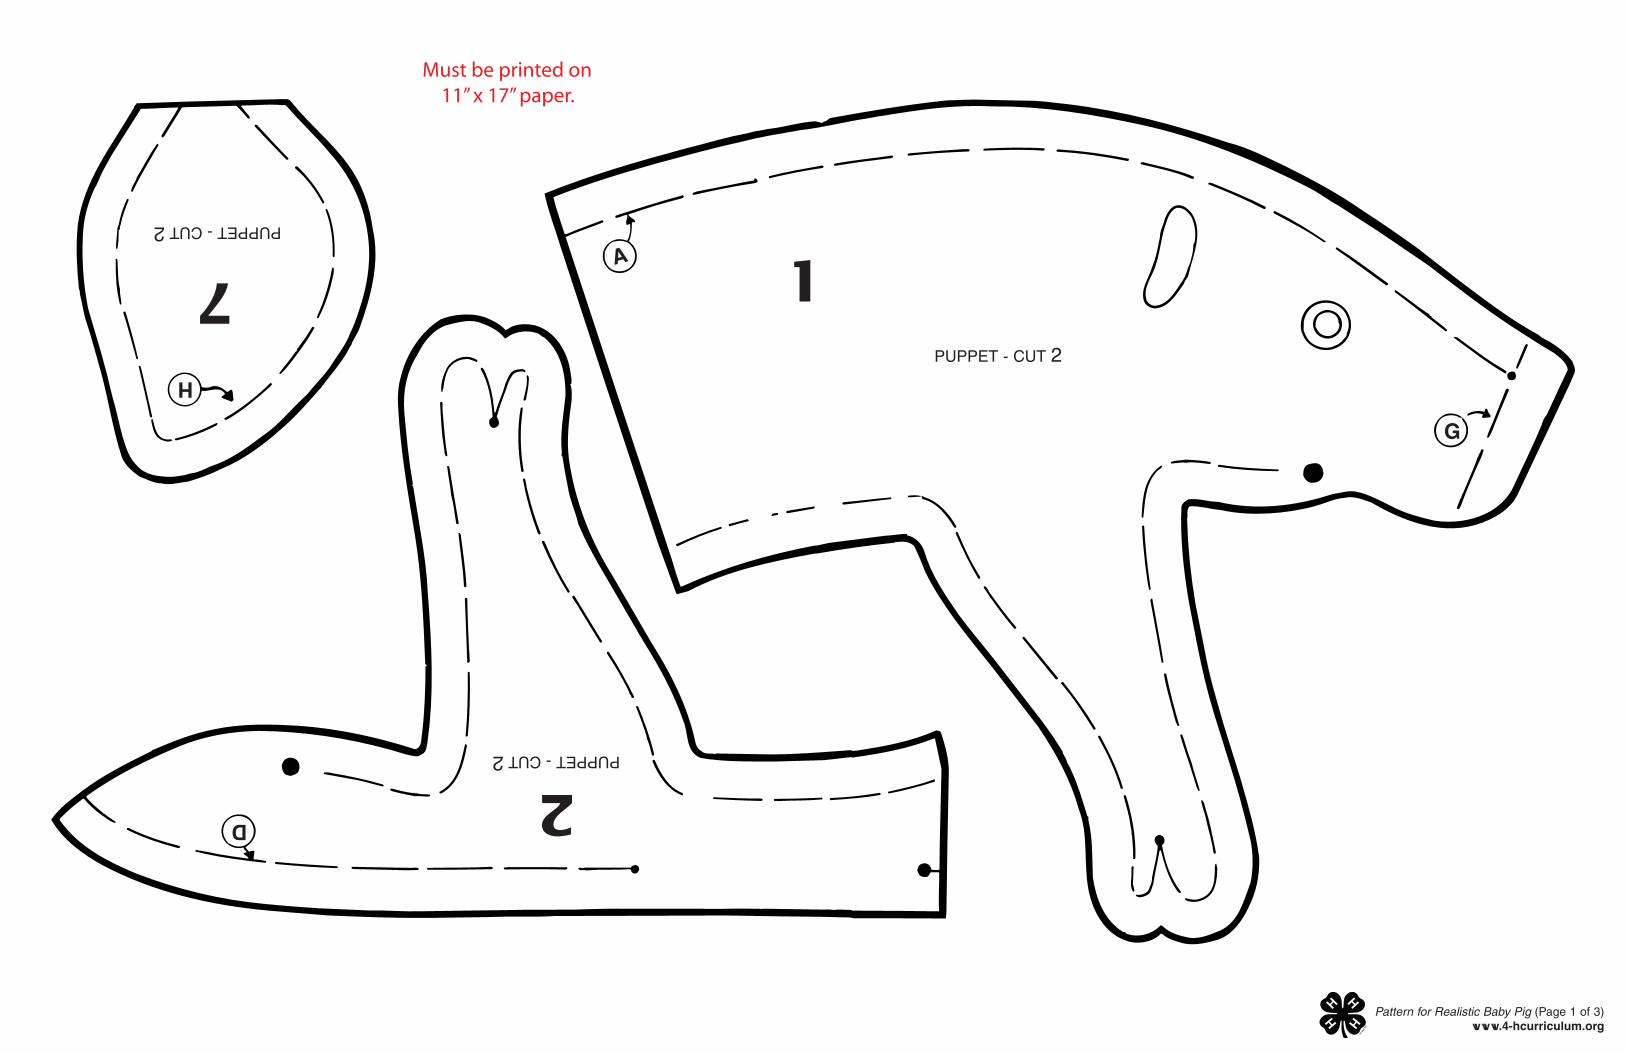
1PUPPET - CUT 2
A7PUPPET - CUT 2
H
2PUPPET - CUT 2
D
G
Pattern for Realistic Baby Pig (Page 1 of 3) www.4-hcurriculum.org

1CUT 2
2
3
7CUT 2
CUT 2
8CUT 2
CUT 2
A
B
E
DC
E
G
H
F
Pattern for Realistic Baby Pig (Page 2 of 3) www.4-hcurriculum.org

6PUPPETCUT 1
7aPUPPET
CUT 2
5aPUPPETCUT 1
5
PUPPET
CUT 1
5bPUPPETCUT 1
PU
PP
ET
CU
T 2
H
7aCUT 2
H
4PUPPETCUT 1
4CUT 1
GG6
PUPPETCUT 1
5
CUT 1
CU
T 2
5aCUT 1
5bCUT 1
99
Pattern for Realistic Baby Pig (Page 3 of 3) www.4-hcurriculum.org