bab technologie gmbh bab starter documentation
TRANSCRIPT

BAB TECHNOLOGIE GmbH
BAB STARTER Documentation
Version: 1.1.2 Type: Software
Manual version V As of 05/2021 Date: 26. May 2021
EN
Table of contents BABSTARTER documentation
2 BAB TECHNOLOGIE GmbH BABSTARTER
BAB TECHNOLOGIE GmbH
Hörder Burgstr. 18 44139 Dortmund
Tel.: +49 (0) 231 – 476 425 - 30 Fax: +49 (0) 231 – 476 425 - 59 www.bab-tec.de

BABSTARTER documentation Table of contents
BABSTARTER BAB TECHNOLOGIE GmbH 3
TABLE OF CONTENTS 1 Introduction..................................................................................................................................... 5
1.1 Range of functions ........................................................................................................................ 5 1.2 Important information on the operating instructions ................................................................. 6
2 Installation ....................................................................................................................................... 7
2.1 Microsoft Windows installation .................................................................................................... 7 2.2 MAC OS X installation ................................................................................................................... 9
3 Startscreen..................................................................................................................................... 13
3.1 Visited devices ........................................................................................................................... 13 3.2 Search for devices… .................................................................................................................. 14 3.3 Add devices manually… ............................................................................................................ 15 3.4 Test virtual devices…................................................................................................................. 15 3.5 Settings ...................................................................................................................................... 16
Speed up EIBPORT start ............................................................................................................. 16 Logs ............................................................................................................................................ 16
3.6 About BAB STARTER ................................................................................................................... 17
4 Devices menu ................................................................................................................................ 18
4.1 Device menu EIBPORT ............................................................................................................... 18 Default Start Page ...................................................................................................................... 18 Firmware Update ....................................................................................................................... 19
4.1.1 Java based Application of the EIBPORT................................................................................. 19 4.1.2 details for EIBPORT ................................................................................................................ 19
Change network settings .......................................................................................................... 19 Check settings ............................................................................................................................ 20 Clear cache ................................................................................................................................ 20 Autostart Settings ...................................................................................................................... 20 Deposit Credentials ................................................................................................................... 21
4.2 Device menu CUBEVISION MODULE ......................................................................................... 22 4.2.1 Details for CUBEVISIONMODULE ........................................................................................... 22
Clear cache ................................................................................................................................ 22 Change network settings .......................................................................................................... 23 Store registration data ............................................................................................................... 23
4.2.2 Device menu for CUBEVISION MODULE – Start… ................................................................ 23 4.3 Device menu for web-based BAB TECHNOLOGIE devices ...................................................... 24
Change network settings .......................................................................................................... 24 Store registration data ............................................................................................................... 24
List of figures BABSTARTER documentation
4 BAB TECHNOLOGIE GmbH BABSTARTER
LIST OF FIGURES Figure 1: Windows setup icon ..........................................................................................................................................7 Figure 2: Windows InstallShield Wizard ...........................................................................................................................7 Figure 3: Windows installation index ...............................................................................................................................8 Figure 4: Check and start Windows setup .......................................................................................................................8 Figure 5: Finish Windows installation ...............................................................................................................................9 Figure 6: Windows Start menu entry ...............................................................................................................................9 Figure 7: MAC OS X security settings ............................................................................................................................ 10 Figure 8: MAC OS X installation process – introduction ............................................................................................... 10 Figure 9: MAC OS X installation process – licence agreement ..................................................................................... 11 Figure 10: MAC OS X installation process – select place of installation ....................................................................... 11 Figure 11: MAC OS X installation process – start installation ....................................................................................... 12 Figure 12: MAC OS X – BAB STARTER program icon ..................................................................................................... 12 Figure 13: BAB STARTER Main menu ............................................................................................................................. 13 Figure 14: Delete visited devices .................................................................................................................................. 13 Figure 15: Search for devices ........................................................................................................................................ 14 Figure 16: Add device manually… ................................................................................................................................ 15 Figure 17: BAB STARTER settings ................................................................................................................................... 16 Figure 18: About BAB STARTER ...................................................................................................................................... 17 Figure 19: Device menu for EIBPORT ............................................................................................................................ 18 Figure 20: Device menu for EIBPORT – details ............................................................................................................. 19 Figure 21: Activate autostart ........................................................................................................................................ 21 Figure 22: Disable autostart .......................................................................................................................................... 21 Figure 23: Device menu for CUBEVISIONMODULE ....................................................................................................... 22 Figure 24: Device menu for CUBEVISIONMODULE – details ......................................................................................... 22 Figure 25: Device menu for web-based BAB TECHNOLOGIE devices ........................................................................... 24

BABSTARTER documentation Introduction
BABSTARTER BAB TECHNOLOGIE GmbH 5
1 INTRODUCTION
The BAB STARTER is a platform-independent program for central access to all BAB TECHNOLOGIE devic-es. Additionally, the java based editors of the products EIBPORT, CUBEVISIONMODULE, FACILITYMASTER and the EnOcean Editors of CUBEVISIONMODULE and LINKMODULE can be started independently of a local Java installation.
1.1 RANGE OF FUNCTIONS
The BAB STARTER offers the following functionalities (references to the relevant chapters in brackets):
Search for devices ("Search for devices…") Add devices manually ("Add devices manually…") Test virtual devices (“Test virtual devices…”) Display device details ("Devices menu") Changes to EIBPORT network settings ("Change network settings") Review of the most important EIBPORT parameters ("Check settings") Call up EIBPORT JAVA CONTROL view Call up EIBPORT CONTROL L view Call up EIBPORT CUBEVISION view Call up EIBPORT Editor Call up EIBPORT System Call up CUBEVISIONMODULE CUBEVISION view ("Device menu for CUBEVISION MODULE –
Start…") Call up CUBEVISIONMODULE Editor ("Device menu for CUBEVISION MODULE – Start…") Call up CUBEVISIONMODULE configuration ("Device menu for CUBEVISION MODULE – Start…") Accelerate EIBPORT Start Autostart for the EIBPORT JAVA CONTROL Visualisation
The following devices are displayed in the BAB STARTER:
EIBPORT CUBEVISIONMODULE APPMODULE DATALOGGER KNXEASY AUDIOMODULE AUDIOSERVER INTERCOMMODULE LINKMODULE ELMMODULE DUODMX GATEWAY FACILITYMASTER
Note (Tip 1): For the above mentioned devices, with firmware version since November 2019, it is now possible to carry out network configuration from other network areas. The DUODMX GATEWAY, AUDIOMODULE, DATALOGGER and the KNXCONVERTER are excluded from this. Now it isn’t necessary to adapt your configuration PC to the factory IP-settings of the respective devices in order to change them to the required IP address range. Note (Tip 2): For efficient and flexible work we recommend opening several applets at the same time. If an applet is accidentally closed, you have immediate access to your devices and don’t have to open the BAB STARTER again.

Introduction BABSTARTER documentation
6 BAB TECHNOLOGIE GmbH BABSTARTER
1.2 IMPORTANT INFORMATION ON THE OPERAT-ING INSTRUCTIONS
Please be aware that all the statements and illustrations in these operating instructions are non-binding. In the interests of our customers, the software described in these operating instructions is being con-stantly developed further. Therefore, the information provided in these operating instructions may no longer be accurate under certain circumstances. Information on the current BAB STARTER software and also on this description ("BAB STARTER documentation") can be found at https://www.bab-tec.de/index.php/bab-starter-en.html .

BABSTARTER documentation Installation
BABSTARTER BAB TECHNOLOGIE GmbH 7
2 INSTALLATION
Load the BAB STARTER setup file from our website. http://bab-tec.de/index.php/bab-starter-en.html For Microsoft Windows you receive a *.zip file to download. For MAC OS X, a *.mpkg file is available. If you use Linux, please contact us for installation advice ([email protected]).
2.1 MICROSOFT WINDOWS INSTALLATION
Extract the downloaded *.zip file into a folder of your choice and click on the "BAB_STARTER_[Version]_setup.exe" to start the installation.
Figure 1: Windows setup icon
The installation routine prepares the installation process and then displays the InstallShield Wiz-
ard. Follow the instructions and click on "Continue".
Figure 2: Windows InstallShield Wizard
Read the licence agreement and accept it using the appropriate button. Click on "Continue".

Installation BABSTARTER documentation
8 BAB TECHNOLOGIE GmbH BABSTARTER
Choose the correct installation index for the BAB STARTER.
Figure 3: Windows installation index
Review the setup settings and click on "Install".
Figure 4: Check and start Windows setup
The installation process starts. In some Windows systems, a user account management dialogue appears. Confirm the notification with "YES".
BABSTARTER documentation Installation
BABSTARTER BAB TECHNOLOGIE GmbH 9
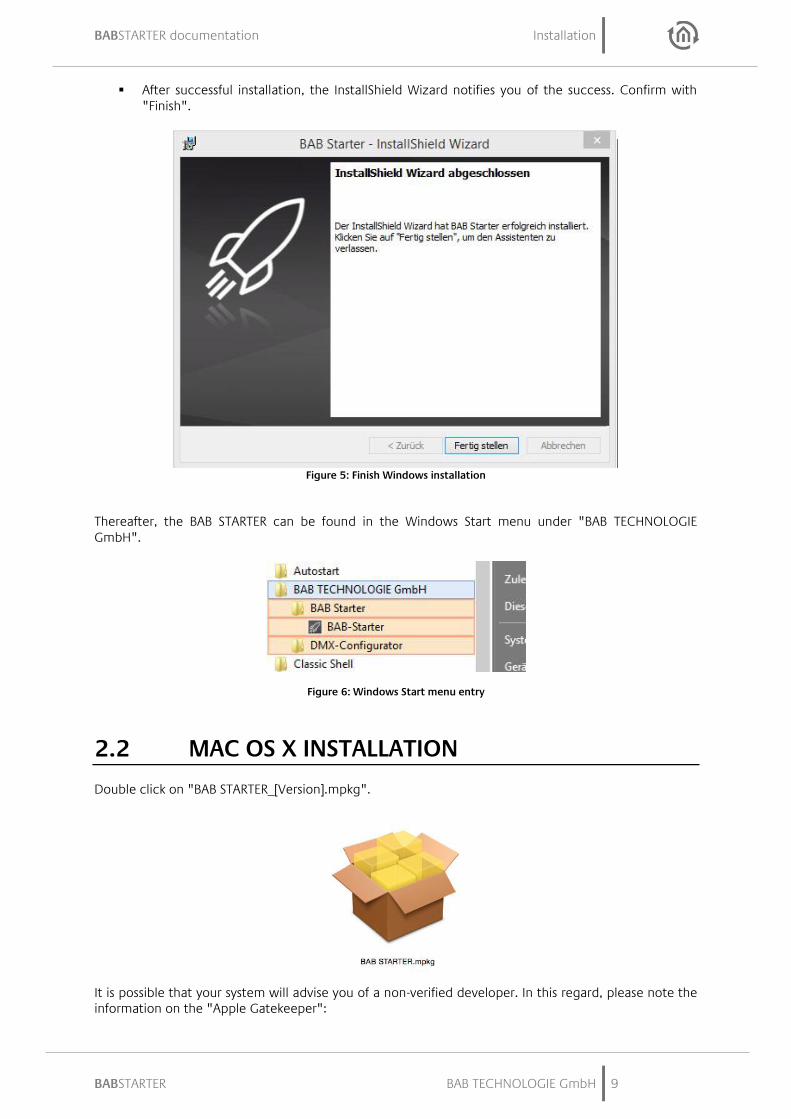
After successful installation, the InstallShield Wizard notifies you of the success. Confirm with "Finish".
Figure 5: Finish Windows installation
Thereafter, the BAB STARTER can be found in the Windows Start menu under "BAB TECHNOLOGIE GmbH".
Figure 6: Windows Start menu entry
2.2 MAC OS X INSTALLATION
Double click on "BAB STARTER_[Version].mpkg".
It is possible that your system will advise you of a non-verified developer. In this regard, please note the information on the "Apple Gatekeeper":
Installation BABSTARTER documentation
10 BAB TECHNOLOGIE GmbH BABSTARTER
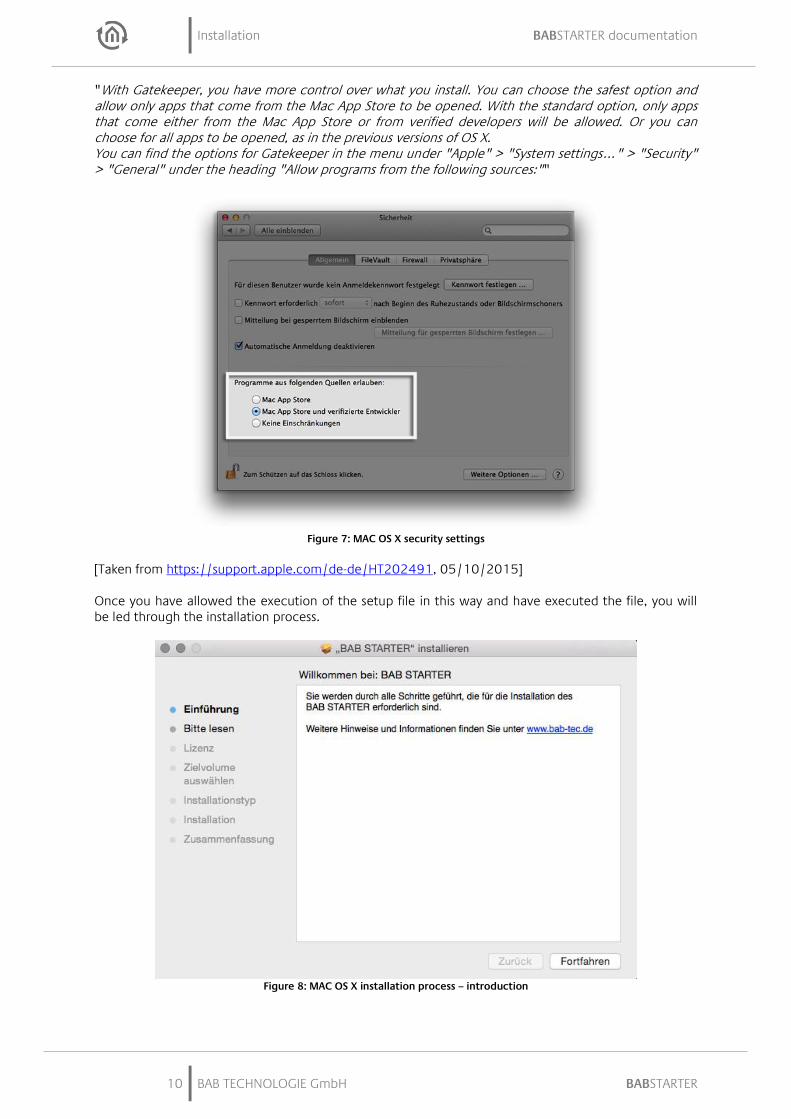
"With Gatekeeper, you have more control over what you install. You can choose the safest option and allow only apps that come from the Mac App Store to be opened. With the standard option, only apps that come either from the Mac App Store or from verified developers will be allowed. Or you can choose for all apps to be opened, as in the previous versions of OS X. You can find the options for Gatekeeper in the menu under "Apple" > "System settings…" > "Security" > "General" under the heading "Allow programs from the following sources:""
Figure 7: MAC OS X security settings
[Taken from https://support.apple.com/de-de/HT202491, 05/10/2015] Once you have allowed the execution of the setup file in this way and have executed the file, you will be led through the installation process.
Figure 8: MAC OS X installation process – introduction

BABSTARTER documentation Installation
BABSTARTER BAB TECHNOLOGIE GmbH 11
Click on "Continue" to continue the installation.
Figure 9: MAC OS X installation process – licence agreement
Please take note of the licence agreements and confirm them by clicking on "Accept". You can
then select a different place of installation if you wish:
Figure 10: MAC OS X installation process – select place of installation

Installation BABSTARTER documentation
12 BAB TECHNOLOGIE GmbH BABSTARTER
Click on "Install" and confirm the action with the user authentication.
Figure 11: MAC OS X installation process – start installation
The message "The installation was successful" confirms the successful installation. The BAB STARTER symbol now appears in the "Programs" folder.
Figure 12: MAC OS X – BAB STARTER program icon
BABSTARTER documentation Startscreen
BABSTARTER BAB TECHNOLOGIE GmbH 13
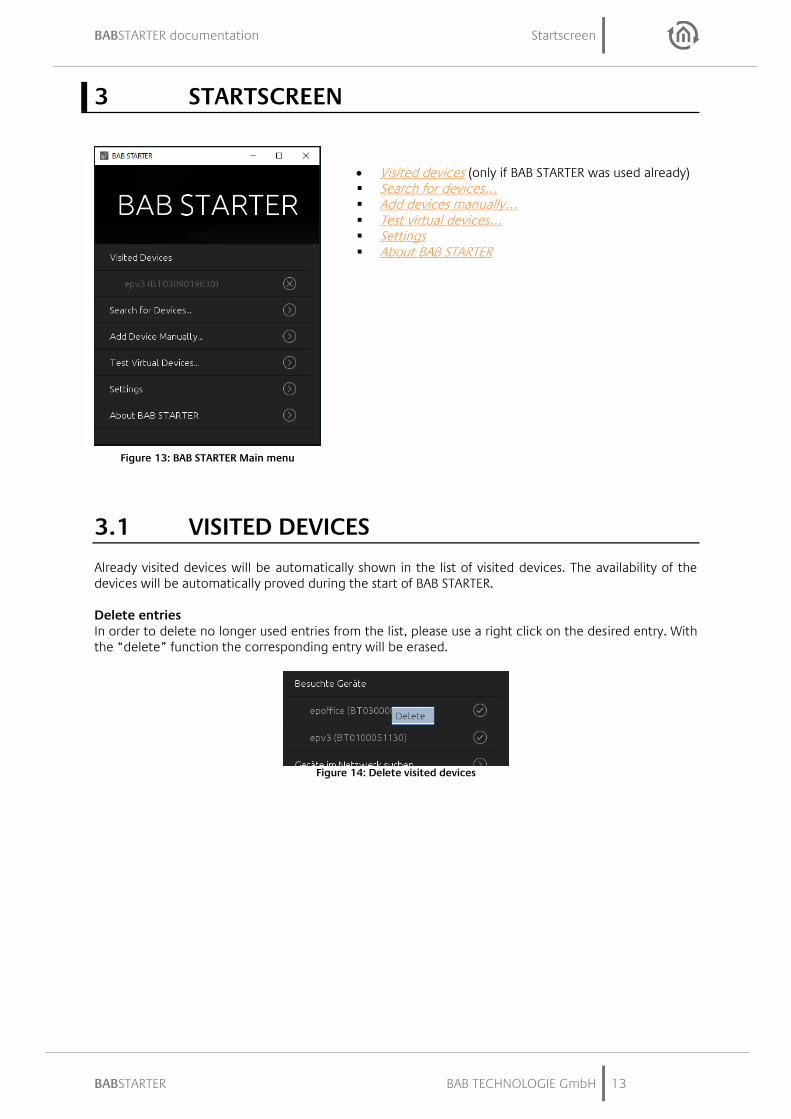
3 STARTSCREEN
Visited devices (only if BAB STARTER was used already) Search for devices… Add devices manually… Test virtual devices… Settings About BAB STARTER
3.1 VISITED DEVICES
Already visited devices will be automatically shown in the list of visited devices. The availability of the devices will be automatically proved during the start of BAB STARTER. Delete entries In order to delete no longer used entries from the list, please use a right click on the desired entry. With the “delete” function the corresponding entry will be erased.
Figure 14: Delete visited devices
Figure 13: BAB STARTER Main menu

Startscreen BABSTARTER documentation
14 BAB TECHNOLOGIE GmbH BABSTARTER
3.2 SEARCH FOR DEVICES…
The BAB STARTER is searching in local networks. Local networks devices which are connected to each other via a router. Other or virtual networks are not searched. The BAB TECHNOLOGIE devices available in the network are displayed with their serial number and individual device name ("Devices found"). Depending on the availability, the devices are marked.
All devices marked with this are accessible in the system and can be used further.
All devices with a cross marked are currently not accessible in the system. It can be devices that have already been registered but are currently not accessible. Or the devices have not yet been set up for access in the system, e.g. with incorrect IP address.
Figure 15: Search for devices
The devices marked as "unreachable" can still be selected to display the current network configuration, installed firmware version name and serial number under "Details". For new devices in the system that only have the wrong IP, you can make appropriate changes to the network settings. Note: The device name can be adapted individually in each device and does not have to corre-spond to the name of the device. For example, the EIBPORT device name can be "My home".

BABSTARTER documentation Startscreen
BABSTARTER BAB TECHNOLOGIE GmbH 15
3.3 ADD DEVICES MANUALLY…
If you would like to add a device to the list that was not found in the devices search (e.g. devices that are available via an internet connection), this is possible here. To this end, enter the host name (or per-manent IP address) and the http port of the device and click on "Connect". When using externally con-nected devices be more careful with the security of the system. In this respect, you should only inte-grate devices that are in a secure area, e.g. communicate via VPN. There is separate hardware docu-mentation for the use of VPN connections and their configuration. Please take care that entered IP address is without „http(s)://“, otherwise no connection will be established!
Figure 16: Add device manually…
3.4 TEST VIRTUAL DEVICES…
In order to be able to manage and test virtual devices in a separate environment, there is the "Test vir-tual devices ..." submenu. You will receive the required details of the virtual devices when they are acti-vated. On our WEB page you can e.g. request a virtual EIBPORT by email. There is separate documenta-tion for the device so that it is not dealt with in more detail here.
Startscreen BABSTARTER documentation
16 BAB TECHNOLOGIE GmbH BABSTARTER
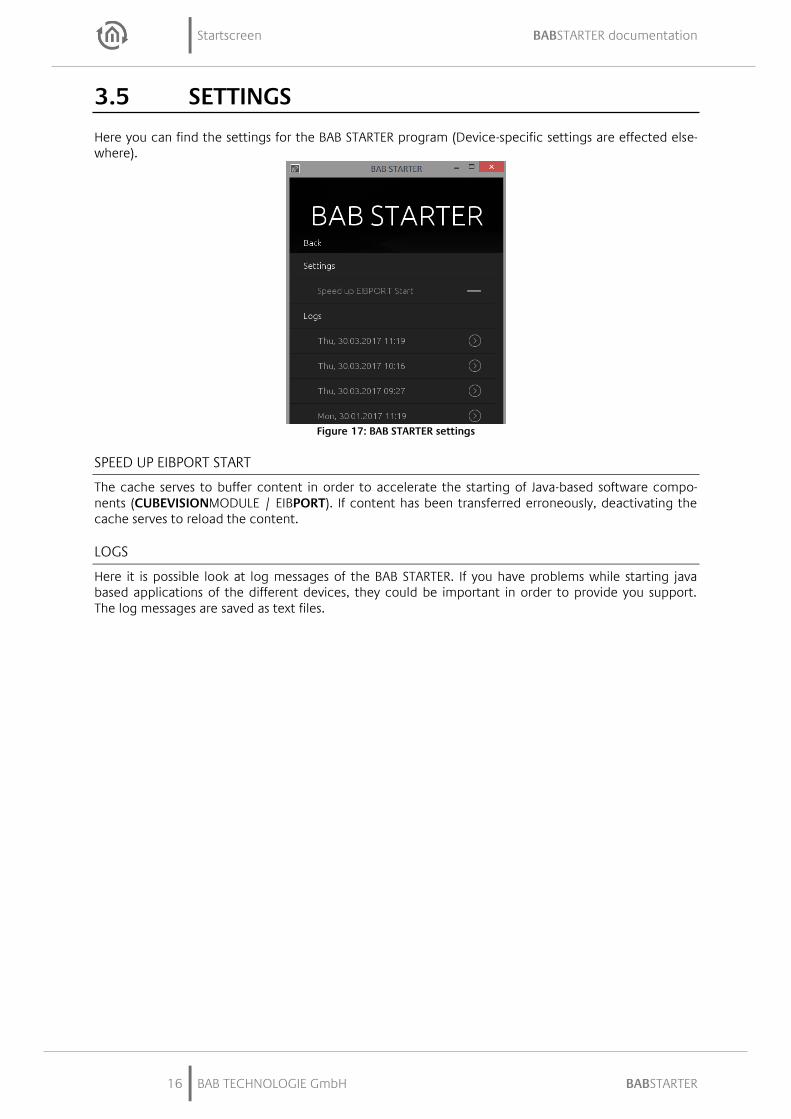
3.5 SETTINGS
Here you can find the settings for the BAB STARTER program (Device-specific settings are effected else-where).
Figure 17: BAB STARTER settings
SPEED UP EIBPORT START
The cache serves to buffer content in order to accelerate the starting of Java-based software compo-nents (CUBEVISIONMODULE / EIBPORT). If content has been transferred erroneously, deactivating the cache serves to reload the content.
LOGS
Here it is possible look at log messages of the BAB STARTER. If you have problems while starting java based applications of the different devices, they could be important in order to provide you support. The log messages are saved as text files.

BABSTARTER documentation Startscreen
BABSTARTER BAB TECHNOLOGIE GmbH 17
3.6 ABOUT BAB STARTER
In the menu item "About BAB STARTER", information about the software and the manufacturer is dis-played.
Figure 18: About BAB STARTER
Version Shows the current BAB STARTER version. Imprint Refers to the imprint of BAB TECHNOLOGIE GmbH. Licences Open-source licences used in BAB STARTER.

Devices menu BABSTARTER documentation
18 BAB TECHNOLOGIE GmbH BABSTARTER
4 DEVICES MENU
If the BAB STARTER finds devices in the network or if devices were added manually these appear in the device list with the individual device name and the series number under "Devices" (if a device has al-ready been called up) or under "Search for devices" > "Devices found" (if no device has been called up so far). To reach the desired device menu, simply click on the corresponding entry. Note: The available device settings differ depending on the device type accessed.
4.1 DEVICE MENU EIBPORT
When an EIBPORT entry is been clicked, the device menu opens. From here you have access to all EIBPORT areas. In case of browser based areas BAB STARTER forwards you towards the standard browser of your operating system. The java based applications are directly opened in BAB STARTER.
Figure 19: Device menu for EIBPORT
Note: If there is no connection to the device, the different software (software remodule or appli-cation) is not listed.
DEFAULT START PAGE
The selection of the same name can be used to conveniently call up the EIBPORT start page.

BABSTARTER documentation Devices menu
BABSTARTER BAB TECHNOLOGIE GmbH 19
FIRMWARE UPDATE
This selection calls up the necessary web interface for a firmware update.
4.1.1 JAVA BASED APPLICATION OF THE EIBPORT
Java CONTROL = Java visualisation of EIBPORT EDITOR = Access to the Editor window with Visualisation Editor, Job Editor, CUBEVISION Editor SYSTEM = Access to the “ConfigTool” of the EIBPORT to set up network, phys. Address and so
on.
4.1.2 DETAILS FOR EIBPORT
Under the individual device name, the series number, firmware, the host name / IP address ("Host") and the subnet mask are displayed.
Figure 20: Device menu for EIBPORT – details
CHANGE NETWORK SETTINGS
This menu is used to change the IP address settings of the EIBPORT. These include:
EIBPORT name (individual device name) DHCP active / not active IP address Subnet mask Gateway DNS server 1 – 3
To adopt the settings ("Adopt settings"), the EIBPORT string and the admin user password must be en-tered correctly.

Devices menu BABSTARTER documentation
20 BAB TECHNOLOGIE GmbH BABSTARTER
CHECK SETTINGS
Once the EIBPORT string and the admin password have been entered, the most important system-related settings of EIBPORT are reviewed. These include:
Gateway = It is checked whether the standard gateway entered is accessible from the EIBPORT (The gateway is required so that the EIBPORT can communicate externally and so that it can be accessed from outside).
DNS server #1 - #3 = It is checked whether the DNS server addresses can be reached (The DNS server addresses are required to enable a name dissolution; if this is not available, the EIBPORT cannot dissolve host names into IP addresses. Several services depend on this).
Ping external IP = An external IP address is addressed via PING command from the EIBPORT (Checks whether communication with an external address can take place).
Ping external host =An external host address is addressed from the EIBPORT via PING (Checks whether communication with an external address including a name dissolution can take place).
NTP server #1 - #3 = The accessibility of the NTP server entries is checked. At least 2 tunneling addresses = It is checked whether at least 2 addresses are set under "in-
div. address for KNXnet/IP tunneling" (Here, at least 2 addresses are required to allow a KNXnet/IP tunneling connection to be created from the ETS 5).
Job: date/time receiver = Checks whether jobs were created for the date and time synchroni-sation (This or the use of NTP time servers is important to ensure a correct system time).
Time synchronised = Synchronises the system time of the EIBPORT automatically.
CLEAR CACHE
With this menu item you have the possibility to delete the cache files of the device from your PC in the directory of the BAB STARTER. Otherwise you will find these files: Windows Search for "BAB STARTER" in Windows Explorer using the search function and then click on the entry "bab-starter" >C:\Users\Username\AppData\Local\Temp<. Open the "cached" folder. If only one device is managed with the BAB STARTER, this folder contains only one subfolder with the serial number of the device (BTxxxxxxxxxxxx) and the current log files. If multiple devices are managed, a subfolder is created for each device. Delete a folder in order to delete the cached files for this device. MAC OS X Clearing the cache of the BAB STARTER The BAB STARTER creates a folder "eibPort" in the user directory. In this folder the folders with the serial number of the device are created. Delete the folder with the corresponding serial number and cache files are deleted.
AUTOSTART SETTINGS
With the help of the Autostart Settings it is possible to access the EIBPORT java visualisation directly while starting BAB STARTER. In this way it is for instance possible to start the visualisation with the start of a Touch Panel at once. Note: The autostart setting creates a link between the BAB STARTER and the autostart folder, directory: C:\Users\<user name>\AppData\Roaming\Microsoft\Windows\Start Menu\Programs\Startup or directly available: shell:startup

BABSTARTER documentation Devices menu
BABSTARTER BAB TECHNOLOGIE GmbH 21
In order to set up the Autostart, please proceed as follows. Enable the Autostart with the Button “Autostart Active” Enter Username and Password of the visualisation user. If there should not be any selection of
visualisation projects no more, please use an user account which only has access to one visuali-sation project.
Figure 21: Activate autostart
Press on “Save”. The autostart function will be active with the next start of BAB STARTER. No move the BAB STARTER Icon into the Autostart folder of your computer (Windows: Autostart,
MAC “Login items” of the corresponding user).
Disable Autostart If BAB STARTER is started in the autostart mode, a display with the opportunity to abort the autostart procedure is been shown for 5 seconds. BAB STARTER will then proceed in its normal mode.
Figure 22: Disable autostart
DEPOSIT CREDENTIALS
The registration data stored here is stored locally in the BAB STARTER so that access can take place without the user data having to be entered again.

Devices menu BABSTARTER documentation
22 BAB TECHNOLOGIE GmbH BABSTARTER
4.2 DEVICE MENU CUBEVISION MODULE
If a CUBEVISIONMODULE is called up with the BAB STARTER, the menu appears as follows:
Figure 23: Device menu for CUBEVISIONMODULE
4.2.1 DETAILS FOR CUBEVISIONMODULE
Under the individual device name, the series number, firmware, the host name / IP address ("Host") and the subnet mask are displayed.
Figure 24: Device menu for CUBEVISIONMODULE – details
CLEAR CACHE
With this menu item you have the possibility to delete the cache files of the device from your PC in the directory of the BAB STARTER. Otherwise you will find these files:

BABSTARTER documentation Devices menu
BABSTARTER BAB TECHNOLOGIE GmbH 23
Windows Search for "BAB STARTER" in Windows Explorer using the search function and then click on the entry "bab-starter" >C:\Users\Username\AppData\Local\Temp<. Open the "cached" folder. If only one device is managed with the BAB STARTER, this folder contains only one subfolder with the serial number of the device (BTxxxxxxxxxxxx) and the current log files. If multiple devices are managed, a subfolder is created for each device. Delete a folder in order to delete the cached files for this device. MAC OS X Clearing the cache of the BAB STARTER The BAB STARTER creates a folder "eibPort" in the user directory. In this folder the folders with the serial number of the device are created. Delete the folder with the corresponding serial number and cache files are deleted.
CHANGE NETWORK SETTINGS
This menu is used to change the IP address settings of the CUBEVISIONMODULE. These include:
CUBEVISIONMODULE name (individual device name) DHCP active / not active IP address Subnet mask Gateway DNS server 1 – 3
To adopt the settings ("Adopt settings") the admin user password must be entered correctly.
STORE REGISTRATION DATA
Optional menu item in CUBEVISIONMODULE; the registration data stored here is stored locally in the BAB STARTER so that access can take place without the user data having to be entered again.
4.2.2 DEVICE MENU FOR CUBEVISION MODULE – START…
The "Start…" menu offers access to all the important CUBEVISIONMODULE functions. Functions that require a Java VM are started by the BAB STARTER directly without a Java VM having to be installed and specially configured. The following CUBEVISIONMODULE functionalities can be accessed.
CUBEVISION = The CUBEVISION view of the CUBEVISIONMODULE is opened in the browser Editor = Opens the CUBEVISIONMODULE Editor, WITHOUT a Java installation being required. Configuration = Opens the CUBEVISIONMODULE configuration in a browser window
Note: Please note that you require the relevant user data for the different CUBEVISIONMODULE levels.

Devices menu BABSTARTER documentation
24 BAB TECHNOLOGIE GmbH BABSTARTER
4.3 DEVICE MENU FOR WEB-BASED BAB TECHNOLOGIE DEVICES
For all web-based devices apart from EIBPORT and CUBEVISIONMODULE, the BAB STARTER displays the series number, the firmware version and the current (host / IP) address. A direct connection from the devices is not possible. To connect to such a device, simply enter the address indicated under "Host" in your browser address line. You must proceed in this manner with the following devices:
APPMODULE DATALOGGER KNXCONVERTER AUDIOMODULE AUDIOSERVER INTERCOMMODULE LINKMODULE PVMODULE ELMMODULE DUODMX GATEWAY FACILITYMASTER
Figure 25: Device menu for web-based BAB TECHNOLOGIE devices
CHANGE NETWORK SETTINGS
This menu is used to change the IP address settings of the MODULE. These include:
Name (individual device name) DHCP active / not active IP address Subnet mask Gateway DNS server 1 – 3
To adopt the settings ("Adopt settings") the admin user password must be entered correctly.
STORE REGISTRATION DATA
Optional menu item: The registration data stored here is stored locally in the BAB STARTER so that ac-cess can take place without the user data having to be entered again.