azure 209x practical exercises fileazure 209x – practical exercises overview this course includes...
TRANSCRIPT
Azure 209x – Practical Exercises
Overview
This course includes optional exercises where you can try out the techniques demonstrated in the course for yourself. This guide lists the steps for the individual exercises.
Step 1 – Create Azure Virtual Machines (VM)
Create a Windows virtual machine in the Azure Portal
In this task, you will create a Windows virtual machine in Azure. We use a Windows Server 2016 Datacenter image as an example, but that's just one of the many images Azure offers. Your image choices depend on your subscription. For example, some desktop images are available to MSDN subscribers.
1. Sign in to the Azure portal at https://portal.azure.com/ 2. On the hub menu, click New (+) > Compute > Windows Server 2016 Datacenter. 3. On the Windows Server 2016 Datacenter blade, in Select a deployment model, verify
that Resource Manager is selected. Click Create. 4. On the Basics blade, enter a Name for the virtual machine. The name must be 1-15
characters long and it cannot contain special characters. For this exercise, use the name:
• WS2016-VM1 5. Select the VM disk type. You have the choice between SSD and HDD. For this
exercise, make sure to select:
• HDD. 6. Enter a User name, and a strong Password that will be used to create a local account
on the VM. The local account is used to sign in to and manage the VM. For this exercise, use the following username and password:
• Student
• Pa55w0rd1234 7. Select an existing Resource group or type the name for a new one. (see terminology
in Module 2 for Resource group information). In this exercise, you will use the existing resource group that automatically appears in the Resource group drop down list.
8. Select an Azure Datacenter Location such as East US. Click OK. 9. Choose a VM size, and then click Select to continue. For this exercise, use:
• Standard_A1 10. On the Settings blade, you can change the storage and network options. For this
exercise, you will use managed disks and accept all other default settings. Once you're done applying the change, click OK.
11. Click Summary to review your choices. When you see, the Validation passed message, click OK.
12. Remember the Computer name, User name and, password for the Windows Server
13. While Azure creates the virtual machine, you can track the progress on the Virtual Machines blade accessible from the hub menu.
Connect to the Windows Server virtual machine
1. From the Virtual machines blade, click the entry representing the virtual machine you deployed earlier in this exercise. You will be automatically presented with the Overview > Essentials blade of that VM.
2. On the blade for the virtual machine, click Connect. This automatically generates and downloads a Remote Desktop Protocol file (.rdp file) that contains Remote Desktop session settings allowing you to establish connectivity to your machine. You will be prompted to open or save the file to your desktop for easy access. Click Save to save this file in the default location and then click Run to establish an RDP session to connect to your VM.
3. Accept the warning and, when prompted, enter the local admin user name and password and click OK.
Note: If you run in to trouble when you try to connect, see Troubleshoot Remote Desktop connections to a Windows-based Azure Virtual Machine
Note: Don’t do this now but, it is a good idea to stop the VM, so you don't incur charges when you aren't using it. Just click Stop in the toolbar on the VM blade in the Azure portal and then click Yes to confirm.
Create a Linux virtual machine in the Azure Portal
In this task, you will create a Linux virtual machine in Azure. We use an Ubuntu Server image as an example, but that's just one of the many images Azure offers. Your image choices depend on your subscription. For example, some desktop images are available to MSDN subscribers.
1. If you are not still signed in to the Azure portal from the previous task in this lab, sign in to the Azure portal now. https://portal.azure.com/
2. On the hub menu, click New (+) > Compute > and choose the featured version of Ubuntu Server.
3. On the Ubuntu Server blade, in Select a deployment model, verify that Resource Manager is selected. Click Create.
4. After you select the image, you can use the default settings and quickly create the virtual machine.
5. On the Basics blade, enter a Name for the virtual machine. The name must be 1-15 characters long and it cannot contain special characters. For this exercise, use the name:
• Ubuntu-VM1 6. Select the VM disk type. You have the choice between SSD and HDD. For this
exercise, make sure to select:
• HDD. 7. Enter a User name, and a strong Password that will be used to create a local account
on the VM. The local account is used to sign in to and manage the VM. For this exercise, use the following username and password:
• Student
• Pa55w0rd1234
Note: Alternatively, you can authenticate by using a combination of a user name and an OpenSSH key. In this case, you would need to provide the public key of an OpenSSH certificate, which you can generate by using keygen on Linux and OS X, or PuTTYGen on Windows.
8. Select an existing Resource group or type the name for a new one. (see terminology in Module 2 for Resource group information). In this exercise, you will use the existing resource group that automatically appears in the Resource group drop down list.
9. Select an Azure Datacenter Location such as East US. Click OK. 10. Choose a VM size, and then click Select to continue. For this exercise, use:
• Standard_A1 11. On the Settings blade, you can change the storage and network options. For this
exercise, you will use managed disks and accept all other default settings. Once you're done applying the change, click OK.
12. Click Summary to review your choices. When you see, the Validation passed message, click OK.
13. Remember the Computer name, User name and, password for the Windows Server 14. While Azure creates the virtual machine, you can track the progress on the Virtual
Machines blade accessible from the hub menu.
Note: If you are not familiar with Linux, for help, you can watch the video How to setup a Linux Server in Azure in the Practical Exercises panel.
Connect to the Linux virtual machine
1. From the Virtual machines blade, click the entry representing the virtual machine you deployed earlier in this exercise. You will be automatically presented with the Overview > Essentials blade of that VM.
2. On the blade for the virtual machine, take the note of the value appearing under the Public IP address/DNS name label entry.
3. Start Internet Explorer and browse to http://www.chiark.greenend.org.uk/~sgtatham/putty/download.html
4. Download the putty.exe to your computer and Run it from the download location. 5. In the PuTTY Configuration window, type the IP address you noted in step 2 in the
Host Name (or IP address) text box and click Open. 6. When prompted by the PuTTY Security Alert, click Yes. 7. In the PuTTY window, when prompted for the username and the corresponding
password, type in the values of you specified when creating the Linux virtual machine.
8. Verify that you managed to successfully authenticate.
Note: Don’t do this now but, it is a good idea to stop the VM, so you don't incur charges when you aren't using it. Just click Stop in the toolbar on the VM blade in the Azure portal and then click Yes to confirm.
Step 2 – Configure and Deploy Operations Management Suite
Create an Operations Management Suite workspace
In this task, you will create a new OMS Workspace
1. Sign in to the Azure portal at https://portal.azure.com/ 2. On the hub menu, click New (+) > Monitoring + Management > Log Analytics. 3. At this point, you will be prompted to either create a new OMS Workspace or link to an
existing one. In this exercise, create a new workspace in the existing resource group linked to your lab environment with the Free pricing tier in the East US Azure region. You will need to provide a unique workspace name. It should include 4-63 letters, digits or “-“.
Create and configure an Operations Management Suite workspace
In this task, you will create and configure an OMS workspace
1. In the Azure portal at https://portal.azure.com/, click More Services and, in the list of services, click Log Analytics.
2. In the Log Analytics blade, click the entry representing the OMS workspace you created in the previous step.
3. On the OMS workspace blade, click Solutions. Note that, at this point, the workspace does not contain any solutions.
4. On the OMS workspace blade, click OMS Workspace and next, click the OMS Portal link in the toolbar.
5. This will open another browser tab displaying the Microsoft Operations Management Suite portal home page.
6. On the Microsoft Operations Management Suite home page, click Solutions Gallery.
7. Review the available solutions (review this tab often, new solutions are added often),
and add Agent Health to your workspace. To accomplish this, click the Agent Health tile
and click Add on the Agent Health details page.
Deploy the Operations Management Suite Windows Agent
In this task, you will deploy the OMS Windows agent
1. On the Microsoft Operations Management Suite home page, click the house icon on the left side.
2. On the home page, click Settings.
3. Click Connected Sources; Ensure Windows Servers is selected. (Select Linux Servers
when configuring Linux systems)
4. On the Windows desktop, Click the Windows Start button.
5. Type Notepad and hit Enter.
6. Switch back to your browser, and you will see WORKSPACE ID and PRIMARY KEY in the
right pane. Click the copy icon and paste the IDs in Notepad. If prompted whether to
allow access to Clipboard, click Allow access.
7. Save the Notepad file as C:\WorkspaceID.txt in case you need it later.
8. Return to the browser and click Download Windows Agent (64 bit). This will download
MMASetup-AMD64.exe. Click Save and then click Run. Click Yes at the User Account
Control prompt.
9. In the Welcome to the Microsoft Monitoring Agent Setup Wizard, click Next.
10. Read the Microsoft Software License Terms, and then click I Agree.
11. Accept the default destination folder by clicking Next.
12. Select Connect the agent to Azure Log Analytics (OMS), and then click Next. Notice that
if you were running System Center Operations Manager on-premises, you can use the
same monitoring agent.
13. On the Azure Log Analytics page, enter the Workspace ID and Workspace Key. Use Ctrl-
V to paste the strings you copied earlier into Clipboard to each of the textboxes. Click
Next, accept the default I don’t want to use Microsoft Update, click Install, and then
click Finish.
14. Open Control Panel on your computer (Windows key -> select Control Panel), click
System and Security, and then click Microsoft Monitoring Agent.
15. Select the Azure Log Analytics (OMS) tab. Notice the green check mark in the Status
column.
16. Click OK.
17. Return to the Operations Management Suite website, and then refresh your browser.
18. Click Connected Sources, click Windows Servers, and then click 1 Windows Computer
Connected. Note that it might take a few minutes before this entry is updated and data
collected from the computer becomes available for analysis and viewing. Take the
walkthrough of the key features of OMS search and explore any results that you have.
19. If you are curious about Log Analytics, we suggest you deploy the OMS agent on your
own local system and gain some insight into your system.
Note: If you wanted to enable the OMS agent on the Windows Server from the command line, you could accomplish this by running: MMASetup-AMD64.exe /Q:A /R:N /C:"setup.exe /qn ADD_OPINSIGHTS_WORKSPACE=1 OPINSIGHTS_WORKSPACE_ID=<your workspace id> OPINSIGHTS_WORKSPACE_KEY=<your workspace key> AcceptEndUserLicenseAgreement=1"
Step 3 – Estimate your Azure costs
Azure Pricing Calculator - Price and configure Azure features for the following
scenario
In this exercise, you will price and configure an Azure infrastructure estimate by using the
Pricing Calculator for two virtual machines and a storage account with 500 GB of data.
1. From any browser, navigate to the Pricing Calculator at https://azure.microsoft.com/en-us/pricing/calculator/
The pricing for each service in Azure is different. Many Azure services provide Basic, Standard, and Premium tiers, usually with several price and performance levels in each tier, allowing you to select an appropriate performance level for your use of the service. As you change the selections, the pricing estimate is provided on the right side of the page. You can look at each feature separately or select several resources to estimate multiple features together.
2. Click + Add items 3. Click Compute > Virtual Machines. A message appears saying it has been added. Notice the
many compute options. 4. Click Storage > Storage. A message appears saying it has been added. Notice the various
storage options. 5. Click the X on the top right corner of the calculator. You should see it has added a Virtual
Machine and Storage. 6. On the Virtual Machines tile, set the REGION to the one closest to you and set TYPE to
Windows (other options include Linux). Next, set the PRICING TIER to Standard. Then, check the drop-down list on INSTANCE SIZE and select A7.
7. Set the storage REGION to the same as used in step 6 and, set the TYPE to File. 8. Set PRICING TIER to Standard – General Purpose Storage Account and, the Data
Redundancy to LRS (Locally Redundancy Storage - GRS is Geo-Redundant Storage) 9. Change the Capacity to 500 GB 10. Increase the number of Virtual Machines to 2. Notice the usage time is defaulted to 744
Hours or 31 days. 11. In the panel on the right labeled you will see Your Estimate monthly cost in the currency of
your choice. 12. If you click Export Estimate, it will export all the data to an Excel spreadsheet.

The pricing calculator can be helpful in estimating your Azure costs for new projects you want to add or for an entire infrastructure design.
We suggest you try a few different configurations to see the options and how they are priced.
View billing in the Azure portal
An important component of using Azure is being able to view your billing information. If you
have an account that allows you a certain amount of credit, it’s nice to know how much you
have left and to view where the costs are accumulating. To see your current usage;
1. Click the Billing tile in the hub menu of the Azure portal on the left-hand side of the
page.
2. In the Overview section of the Billing blade, select the Subscription you want to
examine. The Subscriptions blade is displayed.
3. At the bottom of that blade you will find a graph showing a high-lever breakdown of
current charges and another graph displaying the burn rate.
If you click the graphic, you will be presented with another blade that will display full list of
charges on per resource basis. The ability to view billing information is helpful when managing
costs you allocate to your Azure subscription.
Create a Windows Server 2016 Nano Server in Azure
In this task, you will create a Windows Nano virtual machine in Azure.
1. If you are not signed in to the Azure portal from the previous steps, navigate to https://portal.azure.com/ and, when prompted, sign in with the credentials provided to you for this lab.
2. In the hub menu, on the left-hand side of the portal page, click New (+) > Compute > See all
3. Select Windows Server. A scroll list of Windows Servers is displayed on the right side of the portal.
4. Scroll down and select Windows Server 2016 – Nano Server, then click Create. 5. On the Basics blade, enter a Name for the virtual machine. The name must be 1-15
characters long and it cannot contain special characters. For this exercise, use the name:
• Nano-VM1
6. Select the VM disk type. You have the choice between SSD and HDD. For this exercise, make sure to select:
• HDD. 7. Enter a User name, and a strong Password that will be used to create a local account
on the VM. The local account is used to sign in to and manage the VM. For this exercise, use the following username and password:
• Student
• Pa55w0rd1234 8. Select an existing Resource group or type the name for a new one. (see terminology
in Module 2 for Resource group information). In this exercise, you will use the existing resource group that automatically appears in the Resource group drop down list.
9. Select an Azure Datacenter Location such as East US. Click OK. 10. Choose a VM size, and then click Select to continue. For this exercise, use:
• Standard_A1 11. Select not to use managed disks. 12. To allow PowerShell Remoting, click on the Network Security Group (firewall) blade.
13. Select Create New. 14. On the Create network security group, remove the predefined default-allow-rdp
rule and replace it with a new rule with the following settings:
• Name: WinRM-https
• Priority: 1000
• Source: Any
• Service: WinRM
• Action: Allow 15. Make sure that the validation passes and, on the Summary blade, click OK.
On the Azure portal dashboard, you will see the Nano Server being deployed. Once it is up and running you will see the Overview > Essentials section of the blade of the new server.
Connect to Windows Server 2016 Nano Server in Azure
In this task, you will connect to a Windows Nano virtual machine in Azure.
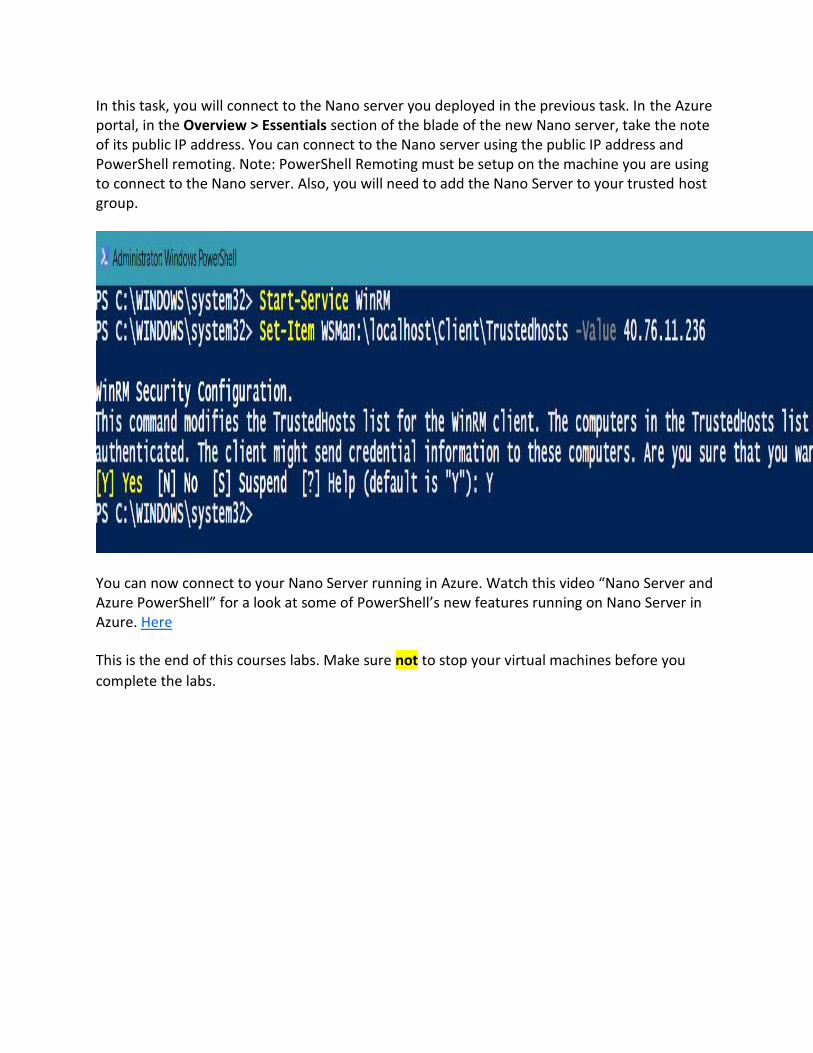
In this task, you will connect to the Nano server you deployed in the previous task. In the Azure portal, in the Overview > Essentials section of the blade of the new Nano server, take the note of its public IP address. You can connect to the Nano server using the public IP address and PowerShell remoting. Note: PowerShell Remoting must be setup on the machine you are using to connect to the Nano server. Also, you will need to add the Nano Server to your trusted host group.
You can now connect to your Nano Server running in Azure. Watch this video “Nano Server and Azure PowerShell” for a look at some of PowerShell’s new features running on Nano Server in Azure. Here
This is the end of this courses labs. Make sure not to stop your virtual machines before you
complete the labs.