axiocam mr installation + reference - 10 - webhome <...
TRANSCRIPT

Axio
Cam
MR
In
sta
llati
on +
Refe
rence - 1
0.2
00
3
000000-1246-948 Number of this manual: B 48-0021 e Date of issue: 03.2003 Date of the last revision/update: 10.2003

Carl Zeiss Vision draws the User's attention to the fact that the information and references contained in these documents may be subject to technical modifications, in particular due to the continuous further development of Carl Zeiss Vision's products. The documents enclosed do not contain any warranty by Carl Zeiss Vision with regard to the technical processes described in the documentation or to certain reproduced product characteristics. Furthermore, Carl Zeiss Vision shall not be held liable for any possible printing errors or other inaccuracies in this documentation, unless proof can be furnished that any such errors or inaccuracies are already known by Carl Zeiss Vision or that these are not known to Carl Zeiss Vision due to gross negligence and that furthermore Carl Zeiss Vision has for these reasons refrained from eliminating these errors or inaccuracies appropriately. Carl Zeiss Vision hereby explicitly draws the User's attention to the fact that this manual only contains a general description of the technical processes and information, the implementation of which in any individual case may not be appropriate in the form described here. In cases of doubt, we recommend the User to consult Carl Zeiss Vision.
This manual is protected by copyright. Carl Zeiss Vision has reserved all rights to this documentation. It is prohibited to make copies, partial copies, or to translate this manual into any other language. Carl Zeiss Vision explicitly draws attention to the fact that the information contained in this manual will be updated regularly in compliance with the technical modifications and supplements carried out in the products and furthermore that this manual only reflects the technical status of Carl Zeiss Vision's products at the time of printing.
© Copyright 2003 by Carl Zeiss Vision GmbH
Reproductions, copies, and even excerpts may only be made with explicit approval from
Carl Zeiss Vision GmbH Zeppelinstraße 4 85399 München-Hallbergmoos http://www.zeiss.de Germany [email protected]
References Microsoft, Windows, Windows 2000 Professional and Windows XP Professional are registered trademarks or trademarks of Microsoft Corporation in the U.S. and/or other countries.

Safety
Refer to the safety notes and instructions in the manuals of all necessary devices (e.g. microscope peripherals, cameras, computers, computer additionals, etc.) before installing and using the software.

Revision / Update Information
27.10.2003 Installation adapted from Product CD 03.2003 to the installation of the product CD number 15 of October 2003.
Table of Contents
AxioCam MR Installation + Reference i
Table of Contents
1 Installation of the AxioCam MR ........................................................... 1 1.1 Safety Regulations....................................................................... 1
General Notes.......................................................................... 3 Backup Copies ......................................................................... 4
1.2 System Requirements / Contents of Delivery ................................ 4 Minimum Hardware and Software Requirements ...................... 4 Recommended Hardware and Software.................................... 4 Contents of Delivery................................................................. 5
1.3 Setting up the Camera ................................................................ 6 Installing the PCI interface Board .............................................. 6 Connecting the Camera ........................................................... 7
Mounting the camera on the microscope ........................... 8 Connecting camera to PCI interface board.......................... 8 Power control .................................................................... 9 Extension connector........................................................... 9
Checking the Setup.................................................................. 9 1.4 Installing the Camera Driver ...................................................... 10
General.................................................................................. 10 Installing the Camera Driver with the Hardware Wizard .......... 11 Installing the Camera Driver with the Setup Program .............. 14
How to correct the driver entry in the device manager ...... 16 1.5 Notes on Maintenance .............................................................. 23
Camera Electronic .................................................................. 23 Optical System ....................................................................... 23 Cleaning the Infra-red Barrier Filter ......................................... 23 Important Note on the Use of C-Mount Objectives ................. 23
2 Image Acquisition with AxioCam MR ................................................ 24 2.1 General..................................................................................... 24 2.2 Quick Guide to the First Image with AxioVision.......................... 25
The Workflow Standard ......................................................... 26 Step by Step to the First Image ............................................... 27
2.3 Adjust Property Page................................................................. 32 Exposure................................................................................ 33
Exposure time measurement ............................................ 33 Weighting of exposure time measurement ....................... 33
Table of Contents
ii B 48-0021 e 10.2003
Automatic exposure ......................................................... 34 White Balance........................................................................ 35
Color adjustment ............................................................. 36 Histogram.............................................................................. 36
2.4 Frame Property Page ................................................................. 38 Camera Mode........................................................................ 38
Resolution of the AxioCam MR......................................... 39 Binning............................................................................ 41 Size of the resulting files .................................................. 41
Frame .................................................................................... 42 2.5 General Property Page............................................................... 43
Digital Gain............................................................................ 43 Image Orientation .................................................................. 44 Black Reference...................................................................... 44 White Reference .................................................................... 45 Shutter Control ...................................................................... 46 Filter Operations..................................................................... 47
2.6 Practical Notes on Operation in AxioVision................................. 48 Speed of the live image.......................................................... 48 Notes on Optimum Color Reproduction in AxioVision ............. 49
2.7 Information for Displaying 12 Bit Images in AxioVision ............... 50 Recommended Camera Settings............................................. 52 Recommended Monitor Settings ............................................ 52
2.8 Background Information............................................................ 53 Gamma Setting...................................................................... 53 Linearity................................................................................. 53 Configurable Toolbars for Operating the Camera.................... 53
3 Trouble Shooting ................................................................................ 54 3.1 Software................................................................................... 54 3.2 Image Quality ........................................................................... 55
4 Technical Data ..................................................................................... 56 4.1 AxioCam MRc (color version)..................................................... 56 4.2 AxioCam MRm, Vers. 2.0 and Later (black/white version) ........... 58 4.3 Spectral Sensitivity..................................................................... 60

Installation of the AxioCam MR
AxioCam MR Installation + Reference 1
1 Installation of the AxioCam MR
The AxioCam MR is a professional, high-resolution digital camera. It has been specially optimized for routine and research applications in the area of light microscopy.
There are two versions available: AxioCam MRc (color camera) and AxioCam MRm (b/w camera).
To make it easier for you to set up the camera, please follow the instructions in these chapters step by step.
If the camera is connected to the computer by the data cable the LED on the top of the camera is red, when the computer is started. After the first initialization (starting the software) the color of the LED changes from red to green. During continuous image acquisition the color of the LED changes between red (exposure) and green (ready).
NOTE: In the description that follows the term AxioCam MR is used for both the
color camera and the black/white camera. A distinction is only made where this is necessary for technical reasons.
1.1 Safety Regulations
Please read this chapter carefully and observe the regulations in order to ensure your safety and the intended operation of the system. Please observe the warnings and notes printed in this manual and on the unit.
The AxioCam MR CCD camera has been manufactured and tested by Carl Zeiss according to the regulations specified in TÜV, GS and cUL and has left the manufacturer’s premises in perfect working order.
In order to ensure that this condition is maintained and to avoid any risks when operating the system, the user must comply with any notes and warnings contained in this manual.

Installation of the AxioCam MR
2 B 48-0021 e 10.2003
Exemption from statutory liability for accidents
The manufacturer shall be exempt from statutory liability for accidents should the operator fail to observe the safety regulations.
Limitation of liability
No warranty shall be assumed by Carl Zeiss during the warranty period if the equipment is operated without observing the safety regulations. In any such case, Carl Zeiss shall be exempt from statutory liability for accidents resulting from such operation.
Exemption from warranty
Carl Zeiss shall be exempt from any warranty obligations should the user fail to observe the safety regulations. Carl Zeiss only guarantees the safety, reliability, and performance of the system if the following safety regulations are closely observed.
The electrical installations of the room where the system is to be set up must conform to IEC requirements.
Warning Any interruption of the PE conductor, either internally or externally, or removal of the earthed conductor will make the system unsafe to use. Any intentional interruption of the earthed conductor is illegal.
Attention To interrupt the power supply simply disconnect from the mains.
Setup, expansions, re-adjustments, alterations, and repairs must only be carried out by persons who have been authorized by Carl Zeiss.
Use only those cables supplied by Carl Zeiss.
Do not allow any cables, particularly power cords, to trail across the floor, where they can be snagged by people walking past.

Installation of the AxioCam MR
AxioCam MR Installation + Reference 3
General Notes
Please ensure the notes described below are adhered to when setting up and operating the AxioCam MR camera.
All connectors must be firmly and securely attached.
Please protect all camera cables from excessive heat (e.g. halogen lamps, microscope fluorescence illumination).
Only use the camera in a clean and dry location. If voltage is applied in an environment with over 70% humidity, the Piezo actuator insulating resistance may be reduced.
The camera must be protected against mechanical impact. External damage may affect the operation of inner components.
Keep chemicals and fluids away from the camera. To avoid the risk of fire, do not use near inflammable liquids or gases.
Make sure there is sufficient ventilation of the camera head. Avoid direct exposure to sunlight and locations near to heat sources (radiators, stoves). Overheating can cause noisy images.
The camera housing can be cleaned using normal microscope cleaning material.
If a repair is necessary send the camera including all cables with a detailed description of the fault to:
Carl Zeiss Service Mikroskopie Abt. MS-LO2 Tel.: (++49) 551 5060 428 Königsallee 9-21 Fax: (++49) 551 5060 325 D-37081 Göttingen eMail: [email protected]

Installation of the AxioCam MR
4 B 48-0021 e 10.2003
Backup Copies
We strongly recommend that all users save the data they create, such as images, measurement data, archives, reports, forms and documents, at regular intervals on an external medium. Otherwise it cannot be excluded that access to this data may be lost as a result of operational errors or hardware defects. Carl Zeiss accepts no liability for consequential damage resulting from insufficient data protection.
1.2 System Requirements / Contents of
Delivery
Minimum Hardware and Software Requirements
Pentium III processor 600 MHz or faster
256 MB RAM
20 GB hard disk (minimum)
1280 x 1024 bit graphics adapter for real color
CD-ROM drive
One free PCI slot (PCI Local Bus Specification Rev. 2.1 or higher)
17" Multisync monitor
Windows 2000 Professional SP3 or Windows XP Professional SP1
AxioVision software release 4.1 (or higher)
AxioCam MR camera driver
Microscope adapter 1x or 0.63x
Recommended Hardware and Software
Xeon workstation 2 GHz or faster
1 GB RAM
120 GB hard disk

Installation of the AxioCam MR
AxioCam MR Installation + Reference 5
1280 x 1024 bit graphics adapter for real color
CD-ROM drive
One free PCI slot (PCI Local Bus Specification Rev. 2.1 or higher)
17" Multisync monitor
Windows 2000 Professional SP3 or Windows XP Professional SP1
AxioVision software release 4.1 (or higher)
AxioCam MR camera driver
Microscope adapter 1x or 0.63x
Contents of Delivery
AxioCam MR camera head
PCI interface board
Data cable (data transfer between camera and PCI interface board)
CD-ROM with device driver for AxioVision
This Installation Guide
Camera, PCI interface board, data cable
Installation of the AxioCam MR
6 B 48-0021 e 10.2003
1.3 Setting up the Camera
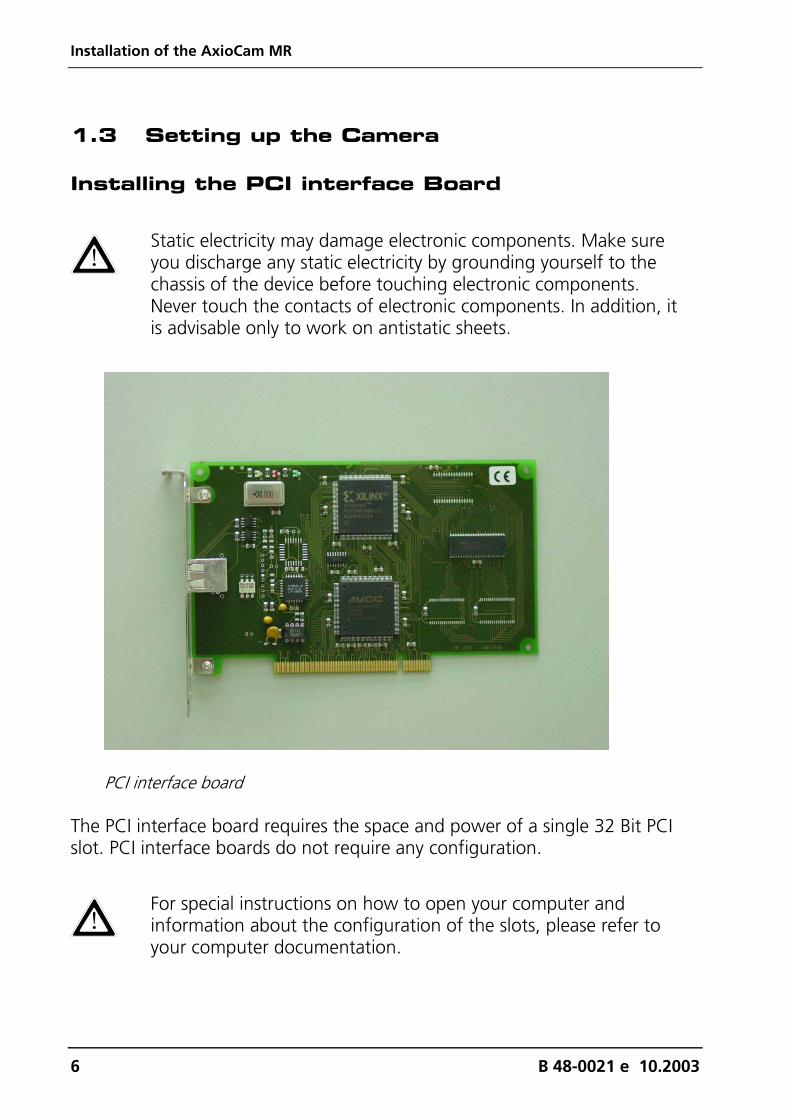
Installing the PCI interface Board
Static electricity may damage electronic components. Make sure you discharge any static electricity by grounding yourself to the chassis of the device before touching electronic components. Never touch the contacts of electronic components. In addition, it is advisable only to work on antistatic sheets.
PCI interface board
The PCI interface board requires the space and power of a single 32 Bit PCI slot. PCI interface boards do not require any configuration.
For special instructions on how to open your computer and information about the configuration of the slots, please refer to your computer documentation.

Installation of the AxioCam MR
AxioCam MR Installation + Reference 7
Connecting the Camera
After closing the computer please connect the AxioCam MR's data cable to the PCI interface board.
Connection of the AxioCam MR's components
The power supply of the camera is provided by the interface board. An additional power supply is not necessary. Switching off the PC switches off the camera automatically.
The camera and power supply are designed for continuous operation. The warming-up of the camera body during operation is harmless and does not in any way affect the function of the camera.

Installation of the AxioCam MR
8 B 48-0021 e 10.2003
Mounting the camera on the microscope
Please use a 1.0x or a 0.63x C-Mount adapter to mount the camera on the microscope's TV port.
Possible adapters (example):
Port 44 Port 60 1.0 x No. 452995 (44 C2/3" 1.0x) No. 456105 (60 C2/3" 1.0x) 0.63 x No. 452997 (44 C2/3" 0.63x) No. 1069-414 (60 C2/3" 0.63x) For the Axiovert 25 please use adapter 451268.
The adapters are not supplied with the camera.
For mounting on the microscope please remove the protection cap from the camera's C-Mount interface. Screw in the adapter until you reach the end of the thread. Then put the camera on the microscope's TV port. Please ensure that no dust drops into the camera's opening.
Never touch the surface of the IR barrier filter or the CCD sensor with your fingers. If you remove the camera from the microscope please close the C-Mount opening immediately using the protection cap supplied in order to avoid dust contamination.
Connecting camera to PCI interface board
Plug in the data cable until you hear an audible click.
Place the data cable in a suitable way from the camera to the PCI interface. Protect all cables from the microscope's hot light sources.
Plug in the data cable of the camera on PC side in the interface's connector and not in an network connector. The interface board is labeled with "AxioCam MR Interface".

Installation of the AxioCam MR
AxioCam MR Installation + Reference 9
Power control
After switching on the PC the LED on the top of the camera is red. After the first initialization the color of the LED changes from red to green.
During continuous image acquisition the color of the LED changes between red (exposure) and green (ready).
Extension connector
The camera has a data cable connector and also another wrep connection. This connector can be used to control an external shutter via the trigger output signals.
Checking the Setup
Please check the following connections:
The camera is mounted on the microscope and sufficiently illuminated.
The PCI interface board is installed in the computer.
The camera is connected to the PCI interface board via the data cable.
If the LED on the top of the camera is not now red, please check all the points above.
Please start your computer now.

Installation of the AxioCam MR
10 B 48-0021 e 10.2003
1.4 Installing the Camera Driver
In order to operate the AxioCam MR the AxioVision software is needed.
First insert the PCI interface board into your computer and then install the driver software.
General
Firstly we would like to emphasize a number of important points:
Allow sufficient time for installation. As a rule this will take just over five minutes, although in exceptional circumstances considerably more time may be necessary. The actual time you need will depend on the current status of your computer's Windows operating system.
Carl Zeiss's image processing products have been developed using the most up-to-date software tools and methods. This means that you must first update your computer's operating system to this same standard to ensure that things will run smoothly. The files to be installed are contained in the enclosed installation program and are standard Microsoft products or updates.
For some of the Microsoft update components the installation instructions are often only available in English. If you are installing a Carl Zeiss product in English then this presents no problems. If, however, you are installing a Carl Zeiss product in German or another language, then the language will change during installation if, for example, a Microsoft update component is installed.
During installation you will have to answer a sequence of questions with YES or NO. We have kept such questions to a minimum. Take sufficient time to read through the questions carefully and only then decide which answer applies.
When installing the components it is possible that some of the files to be installed may already exist. You are informed if this is the case. You are then asked if you want to retain or overwrite the existing files. Always select the answers suggested by the installation program.

Installation of the AxioCam MR
AxioCam MR Installation + Reference 11
Installing the Camera Driver with the Hardware Wizard
NOTE: For installation on a computer running under the operating system
Microsoft Windows 2000 Professional and Windows XP Professional, you need administrator rights. Enter the system using a user name with administrator rights, or consult your system administrator.
The installation procedure is the same for Windows 2000 Professional and Windows XP Professional, but is displayed in this Installation Guide with screenshots of Windows 2000 Professional.
Read this chapter when you have just entered a new PCI interface board in your computer. If you want to update the camera installation or if you have interrupted the driver wizard, follow the instructions in chapter "Installing the camera driver with the setup program".
After inserting the PCI interface board and restarting your PC, the following dialog box Found New Hardware Wizard will be displayed. Make sure that during all the steps described below, the CD-ROM containing the AxioCam MR driver remains inserted in the CD-ROM drive of your computer.
The wizard detects new hardware in the system and searches for new drivers.

Installation of the AxioCam MR
12 B 48-0021 e 10.2003
Select the option Search for a suitable driver for my device (recommended). Click Next.
Activate the check box CD-ROM drives. Click Next.
The following dialog window shows the actual path of the AxioCam MR driver. Click Next.

Installation of the AxioCam MR
AxioCam MR Installation + Reference 13
Under Windows 2000 Professional this dialog window is displayed.
Click Yes to continue.
Under Windows XP Professional the Hardware Installation dialog window is displayed. In this window click on Continue Installation.
The last dialog window of the hardware wizard is displayed.
Click Finish to complete the installation.

Installation of the AxioCam MR
14 B 48-0021 e 10.2003
Installing the Camera Driver with the Setup Program
NOTE: For installation on a computer running under the operating system
Microsoft Windows 2000 Professional and Windows XP Professional, you need administrator rights. Enter the system using a user name with administrator rights, or consult your system administrator.
In this chapter the correction of the driver entry is described with Windows 2000 Professional screen shots, but the procedure is similar under Windows 2000 Professional and Windows XP Professional.
After you have inserted the CD into the CD drive installation starts automatically.
If the automatic start function has been switched off on your system (Autorun) you must start the installation program manually in the following way:
Double-click on the desktop icon My Computer
Double-click on the CD-ROM Drive icon
Double-click on the entry setup.exe
After the start procedure (automatically resp. manually) this image will be displayed on your monitor:
Select the language you want to install (English or German) and click OK.

Installation of the AxioCam MR
AxioCam MR Installation + Reference 15
Follow the instructions of the setup program until the window, where you can customize your setup. In this window you can also choose to read the ReadMe files.
It is recommended that you carefully read the ReadMe file. This file provides complementary or up-to-the-minute information concerning AxioCam MR hard- and software. The text window can be closed by selecting this
Window's symbol.
Set the entry "Cameras and Framegrabbers" - "Carl Zeiss AxioCam" to This feature will be installed on local hard drive. Check the other settings and continue by clicking Next.
Under Windows 2000 Professional this dialog window will be displayed during the AxioCam installation.
Click Yes to continue.
Under Windows XP Professional the Hardware Installation dialog window is displayed. In this window click Continue Installation.
The system prompts for a restart, depending on the used operating system. After the restart the installed driver will be activated.

Installation of the AxioCam MR
16 B 48-0021 e 10.2003
Start the systems Device Manager to check the installation:
Click Start Settings Control Panel.
Double-click the System icon. The System Properties dialog will be displayed.
Select the property page Hardware and here the Device Manager button. Now double-click the entry Imaging devices to check the entry Carl Zeiss AxioCam MR.
How to correct the driver entry in the device manager
NOTE: In this chapter the correction of the driver entry is described with
Windows 2000 Professional screen shots, but the procedure is similar under Windows 2000 Professional and Windows XP Professional.
If the entry in the Device Manager must be corrected, i.e. if the PCI interface board was entered as Multimedia Video Controller, proceed as follows.

Installation of the AxioCam MR
AxioCam MR Installation + Reference 17
Please make sure that during all the steps described below, the CD-ROM containing the AxioCam MR driver remains inserted in the CD-ROM drive of your computer.
Start the systems Device Manager:
Click Start ⇒ Settings ⇒ Control Panel.
Double-click the System icon. The System Properties dialog will be displayed. Select the property page Hardware and click the Device Manager button.
Double-click on Other devices and select the entry Multimedia Video Controller.
The property page General opens.

Installation of the AxioCam MR
18 B 48-0021 e 10.2003
Click the Reinstall Driver... button.

Installation of the AxioCam MR
AxioCam MR Installation + Reference 19
The Upgrade Device Driver Wizard starts.
Click Next.
Select the option Search for a suitable driver for my device (recommended). Click Next.

Installation of the AxioCam MR
20 B 48-0021 e 10.2003
Activate the check box CD-ROM drives. Click Next.
The following dialog window shows the actual path of the AxioCam MR driver. Click Next.
Under Windows 2000 Professional this dialog window is displayed.
Answer the question by clicking Yes.

Installation of the AxioCam MR
AxioCam MR Installation + Reference 21
Under Windows XP Professional the Hardware Installation dialog window is displayed. In this window click Continue Installation.
The last dialog of the upgrade procedure will be displayed.
Click Finish to complete the installation.

Installation of the AxioCam MR
22 B 48-0021 e 10.2003
The last dialog of the installation will be displayed.
Click Close to complete the installation.
The entry in the Device Manager is now Imaging devices Carl Zeiss AxioCam MR.
The system will be restarted and the installed driver for the AxioCam MR will be activated.

Installation of the AxioCam MR
AxioCam MR Installation + Reference 23
1.5 Notes on Maintenance
Camera Electronic
Camera and interface are maintenance free. If necessary, cleaning of the camera can be performed with normal microscope cleaning material, but do never use compressed air or other
Optical System
The internal optical components of the camera should always be protected. If no lens or TV adapter incorporating optics is screwed into the camera's C-Mount thread, the camera's sensor and IR-filter must be protected by screwing the protective cap into the camera's C-Mount thread.
Cleaning the Infra-red Barrier Filter
Contamination of the infrared filter has an adverse effect on the quality of the resulting image (dark points, cloudy structures in the image). If there is dry dust on the front side of the infrared filter, you can remove it with a soft brush or with cotton (wool) after unscrewing the lens or TV adapter.
Important Note on the Use of C-Mount Objectives
The camera can be mounted onto microscopes with standard TV-adapters with C-mount connections. Carl Zeiss supplies the camera complete with a pre-mounted infrared barrier filter, which offers the optical advantage for use on microscopes of a lower sensitivity to dust.
The IR barrier filter is situated 5 mm behind the outer edge of the C-mount opening in the camera.
Due to this pre-mounted IR barrier filter, C-mount objectives that screw more than 5 mm into the thread cannot be screwed into the camera.

Image Acquisition with AxioCam MR
24 B 48-0021 e 10.2003
2 Image Acquisition with AxioCam MR
2.1 General
The AxioCam MR is a professional, high-resolution digital camera. It has been specially optimized for routine and research applications in the area of light microscopy. This is shown among other this by the fast live image, which is displayed on a PC monitor to allow the simple focusing and setting of the sample.
This extremely compact camera is connected using a single cable for the power supply, control information and image data, making it very simple to operate.
There are two versions available: AxioCam MRc (color camera) and AxioCam MRm (b/w camera).
The color camera is suitable for all situations where stained or naturally colored samples need to be acquired with very high levels of quality.
The black/white version of the camera has been optimized in particular for acquisition when light intensities are low. In these cases it is important for the widest possible spectral response and the highest possible sensitivity to be achieved. Due to the elimination of the color filter mask, there is no need for the IR filter usually required with color cameras.
The camera’s very low level of background noise (supported by active Peltier cooling of the sensor), and possible exposure times ranging from 1 ms up to several minutes, make it suitable for an extremely wide range of applications in the field of microscopy.

Image Acquisition with AxioCam MR
AxioCam MR Installation + Reference 25
2.2 Quick Guide to the First Image with AxioVision and AxioCam MR
If you are using several cameras on your system you must always make the AxioCam MR camera the active camera before proceeding.
Start AxioVision by double-clicking on the corresponding symbol.
Select from the Acquisition menu the Select AxioCam MR function.
The image acquisition can also be easily done via the toolbar. Open the
corresponding menu by clicking on .
The text below describes how to achieve your first image in AxioVision with just a few clicks of the mouse.
The Standard workflow is the easiest way to control image acquisition. If the workflows are not displayed, in the View menu select the Windows function, and there select the Workflow command.
NOTE: The workbar may in fact be open but covered by the work area. If that is
the case, simply click on the Workflow tab at the bottom edge of the
work area .
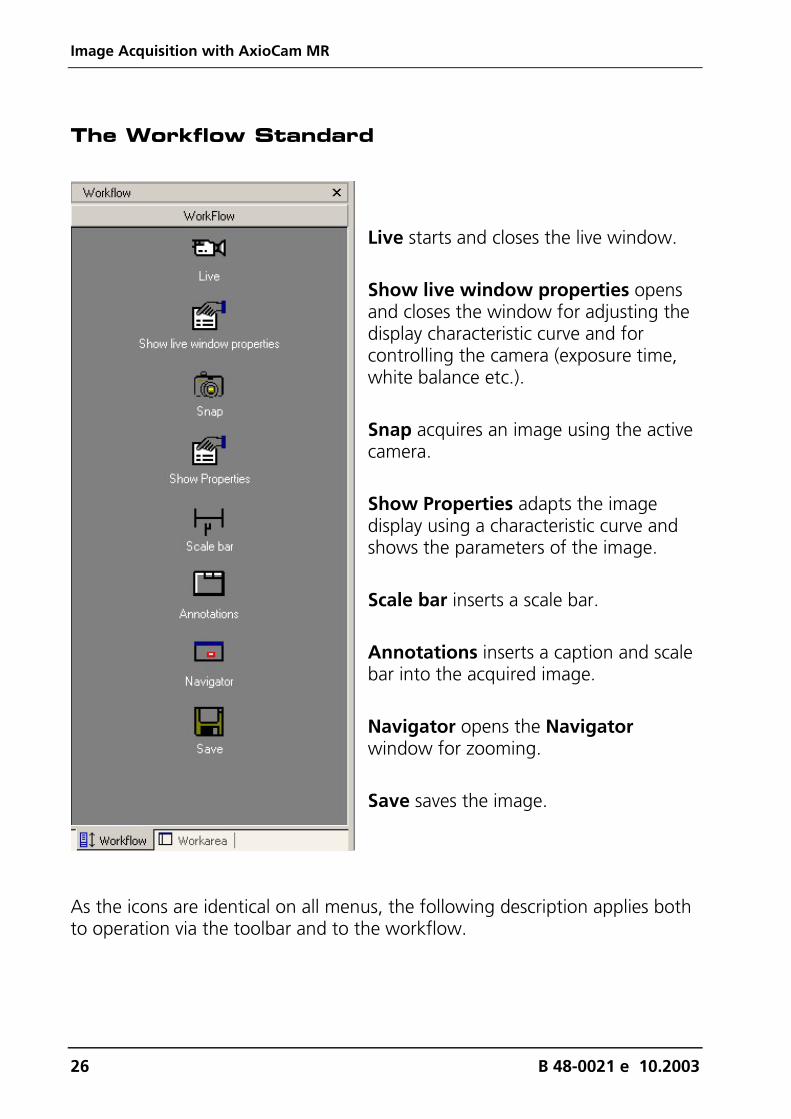
Image Acquisition with AxioCam MR
26 B 48-0021 e 10.2003
The Workflow Standard
Live starts and closes the live window.
Show live window properties opens and closes the window for adjusting the display characteristic curve and for controlling the camera (exposure time, white balance etc.).
Snap acquires an image using the active camera.
Show Properties adapts the image display using a characteristic curve and shows the parameters of the image.
Scale bar inserts a scale bar.
Annotations inserts a caption and scale bar into the acquired image.
Navigator opens the Navigator window for zooming.
Save saves the image.
As the icons are identical on all menus, the following description applies both to operation via the toolbar and to the workflow.

Image Acquisition with AxioCam MR
AxioCam MR Installation + Reference 27
Step by Step to the First Image
Select the camera you want to use (if only one camera is installed, this step is not necessary).
Set the light path to the camera. Then click on the live image icon. The live window is opened to display the camera image
This function can also be called up via the Acquisition ⇒ Live menu.
Now focus the camera image and select the frame you want to acquire.
In the footer you can select a suitable scaling for the objective you are using from the List of available scalings.
Clicking on the gamma icon in the bottom line of the live image accomplishes the optimum color reproduction.
Click on the icon Show live window properties to open the live properties.

Image Acquisition with AxioCam MR
28 B 48-0021 e 10.2003
Here you can see the settings for the display of the image like Brightness, Contrast and Gamma. Settings made here are passed on the acquired image.
NOTE: Only the display is adapted, the camera data remain unchanged.

Image Acquisition with AxioCam MR
AxioCam MR Installation + Reference 29
Make changes for the camera settings on the following controls:
The central element is the setting for the exposure time on a digital camera. The Measure button can be used to determine an optimum exposure time. Check the quality of the exposure in the live image.
The arrow keys and sliders can be used for fine adjustment of the exposure time.
If you are using a color camera, you need to perform a white balance for the image. If you select the automatic balance (Automatic button), the camera tries to determine an optimum value itself.
Enter further settings for the selected camera on the Adjust, Frame and General property pages.
Click on the camera icon to acquire an individual image, or in the Acquisition menu click on Snap.
Click on the Show Properties icon and activate the Display tab. Any changes you make here are displayed in real time in the image window.

Image Acquisition with AxioCam MR
30 B 48-0021 e 10.2003
Move the sliders Gamma
ContrastBrightness
up or down to adjust the image. Good color reproduction on a monitor is achieved with a gamma value of around 0.45.
To find the optimum setting for contrast and brightness, click on Min/Max.
To undo all your changes, click on Linear.
You can use this icon to insert a scale bar into your image. The appropriate scaling must have been generated and selected in advance.
This icon is used to open the window for generating annotations.
Using the Navigator you can magnify or reduce the image and position the displayed image area in the overview window.

Image Acquisition with AxioCam MR
AxioCam MR Installation + Reference 31
Captions and markings can be inserted using the Annotations window.
Click on this icon to save the image you have generated to the computer’s hard drive.
NOTES: Once you have found a good camera setting, you can save it with the
Settings Editor in the Tool menu and load it again automatically in the future. This allows you, for example, to acquire particular samples under the same conditions every time.
To allow correct scalings to be selected in the footer of the live image during acquisition, you need to have generated these before you start your work. If you are using a motorized or encoded microscope, the scalings can be allocated automatically. For further information see Chapt. 9 "Configuration".

Image Acquisition with AxioCam MR
32 B 48-0021 e 10.2003
2.3 Adjust Property Page
This property page contains a summary of the most important camera settings, which are constantly used during operation.
The property page is splitted in the fields Exposure, White Balance (with color settings) and Histogram (for the display of an image histogram).

Image Acquisition with AxioCam MR
AxioCam MR Installation + Reference 33
Exposure
The camera’s exposure time can be adjusted to the lighting conditions on the microscope using a slider or by entering an exposure time directly into the input field. When entering the exposure time manually you can state the value range directly using the abbreviations "ms" for milliseconds and "s" for seconds.
Exposure time measurement
The program supports you in calculating an optimum exposure time, at which the camera will be maximally saturated without being overexposed. To
perform this calculation, click on the button.
The exposure time calculated is available for subsequent images. It can be changed at any time by moving the slider or by entering a new exposure time manually.
This measurement function uses all the image information from the camera sensor for the exposure measurement as standard (integral measurement).
NOTE: More detailed information of the live image you can find in chapter 2.6
"Practical Notes on Operation in AxioVision" - " Speed of the live image".
Weighting of exposure time measurement
During an exposure time measurement an attempt is made to expose the camera in such a way that the sensor is not overexposed in any area of the image. The value calculated therefore corresponds to 100% of the camera’s maximum exposure range.
The exposure time measurement can also be adjusted to particular lighting conditions. If under certain acquisition conditions the exposure time measurement does not achieve satisfactory exposure of the areas of the image in which you are interested, it is possible to influence the result of this measurement by adjusting the weighting.

Image Acquisition with AxioCam MR
34 B 48-0021 e 10.2003
A setting of 200% means that 200% of the exposure time set in the display window or measured by pressing the appropriate button is used for actual acquisition.
A setting of 50% means that 50% of the exposure time set in the display window or measured by pressing the appropriate button is used for actual acquisition.
The setting range is between 5% to 500%.
EXAMPLE: A thick sample is acquired in bright field. The empty image background is much brighter than the darker sample. The measurement produced an exposure time of 50 ms, at which the background would not be overexposed during acquisition. Setting a correction factor of 200% extends the effective exposure time to 100 ms, which ensures that the darker area of the sample is exposed more brightly. The brightest area of the image, which is not of interest, is overexposed here by 200%.
Automatic exposure
The software sets the exposure automatically for each individual shot when the check box Automatic is activated. This makes it possible to generate acquisitions with the correct exposure without having to enter manual presettings. For each individual acquisition the correct exposure time is calculated and set in advance.
The exposure measurement button can be pressed at any time. This is useful if you want to update the exposure time for a current live image. If you deactivate Automatic, the program will continue to use the last setting calculated.
NOTE: In this mode it is not possible to edit the exposure times in the
multichannel mode for the individual channels.

Image Acquisition with AxioCam MR
AxioCam MR Installation + Reference 35
White Balance
In order to achieve a color display which is neutral and close to reality it is necessary to balance the individual color channels against one another. For this, you need to use the pointer to click in the live image on an area of the microscope’s specimen, which is white, neutral and illuminated as evenly as possible. The scene must not be overexposed.
It is important to set the exposure correctly before carrying out the white balance. This can be carried out via automatic exposure measurement, for example.
If the measurement cannot be performed because of unsuitable lighting conditions an error message is issued. In this case the amount of light must be reduced or increased accordingly.
The icon allows you to switch back to the basic white balance setting. This setting is optimized for a halogen light temperature at 3200 K.
NOTE: Setting the white balance to 3200 K generally leads to image
reproduction that is closest to the impression of the image in the microscope’s eyepiece. Note that it is recommended to set the gamma curve for the image display on a value of 0,45 (please find more information in Chapter 2.6 "Practical Notes on Operation in AxioVision" - "Display characteristic curve").
Clicking on the button starts an attempt to automatically adjust the white balance. This requires the presence of sufficient neutral-tint areas in the image.
NOTE: With fluorescence samples or image areas that are completely filled, this
automatic method can lead to color distortion. In this case use the 3200 K standard setting or the manual color adjustment function.
The color setting is only available for the color camera AxioCam MRc and not for the AxioCam MRm.

Image Acquisition with AxioCam MR
36 B 48-0021 e 10.2003
Color adjustment
Clicking on the buttons and allows you to change the weighting of the individual color channels manually. Using this method a white balance you have generated can be subsequently changed. Each click on the arrows shifts the weighting of the colors in the direction indicated. These changes can be observed immediately in the live image and in the histogram display.
NOTE: Further information on setting optimum color reproduction in AxioVision
can be found in Chapter 2.6 "Practical Notes on Operation in AxioVision" - "Notes on optimum color reproduction in AxioVision".
A setting found using this method can be saved as a setting with a name of your choice and subsequently reloaded. Activate the corresponding parameters (WhitebalanceWhiteRed, WhiteBalanceWhiteGreen, WhiteBalanceWhiteBlue) in the menu Tools - Settings Editor.
Histogram
A histogram indicates the intensity distribution of the image signal in the live image and the acquired image. It provides a clear representation of the brightness distribution in the current image. The horizontal axis corresponds to the scale of possible intensity values from dark to light and the vertical axis shows the number of pixels calculated from the current image which possess this intensity value on the x axis.
With the color camera the value distribution is displayed separately for each color channel in three lines (red, green and blue).
If an image is overexposed, at least one curve on the histogram is cut off at the right-hand edge of the display area, where it forms a maximum. Reduce the exposure time or insert gray density filters into the microscope’s beam path to reduce the amount of light. It is also possible to reduce the lamp voltage of the microscope illumination. However, this changes the basic color of the illumination (color temperature) and requires a new white balance.

Image Acquisition with AxioCam MR
AxioCam MR Installation + Reference 37
If an image is underexposed, the histogram does not reach the right-hand edge of the display area. As a result optimum use is not made of the camera’s resolvable gray value range. You should therefore increase the exposure time or the amount of light in the microscope.
Log: By clicking on this button it is possible to influence the histogram display. You can toggle between a linear scaling and a logarithmic display of the signals represented in the histogram.
The logarithmic display makes it possible to view small amplitudes and high peaks at the same time in a single overview. Otherwise, because of the automatic scaling of the display, small signal values are often not visible in the diagram.
Skip: This function can be used to influence the automatic scaling of the histogram. If an image contains an extremely bright glare or extremely dark features the result will be overexposure or underexposure of the image in these areas. All of these pixels possess the maximum / minimum numerical value which can be displayed (e.g. in an 8-bit image 255 for overexposure or 0 for underexposure). Consequently, for the gray value 255 the histogram has to display an extremely high number of pixels with the same value. As the scaling of the histogram curves is automatically adjusted to this high value, smaller values can no longer be resolved in the display.
By using the Skip function the maximum values at the upper and lower end of the histogram are omitted during the scaling of the display.

Image Acquisition with AxioCam MR
38 B 48-0021 e 10.2003
2.4 Frame Property Page
The Frame property page can be used to select a frame for the image acquisition and is splitted in the fields Camera Mode and Frame.
Camera Mode
RGB and B/W: Two types of AxioCam MR are produced; one with a CCD sensor with a color mask on the chip (AxioCam MRc), and the other with a black and white sensor (AxioCam MRm).

Image Acquisition with AxioCam MR
AxioCam MR Installation + Reference 39
With the color variant (AxioCam MRc), you can use these setting options (RGB or B/W) to determine whether the camera should supply a color or a black and white image. This may be desirable for fluorescence images, or to reduce the amount of data. The camera will always acquire a color image, which is then converted to a black and white image.
In RGB mode only odd Binning modes, in B/W mode only even Binning modes are available. This is caused by the structure of the color filters on the pixels.
AxioCam MRm works always in the b/w mode. All Binning modes are always available.
Resolution of the AxioCam MR
Optical adaption of the camera
The camera resolution can be selected between Binning and Standard.
The camera has a 2/3" CCD sensor with dimensions of 8.8 mm x 6.6 mm. This corresponds to an image diagonal of approx. 11 mm.
To optimize the size of the camera’s field of view a camera adapter with a magnification factor of 0.63x is recommended. In this case approx. 42% of the intermediate image is acquired with a microscopical field of view of 20 mm in diameter.
To adapt the camera in the best possible way to the resolution of the objectives a camera adapter with a magnification factor of 1.0x is recommended.
The color quality is comparable with that of 3-chip CCD video cameras, without the need for an expensive beam splitter.
In the color mode the following resolutions are available:
260 x 206 Binning mode 5x5 432 x 342 Binning mode 3x3 1300 x 1030 Single image, color interpolation

Image Acquisition with AxioCam MR
40 B 48-0021 e 10.2003
In the black and white mode of the AxioCam MRc only the following image resolutions are available:
1300 x 1030 Interpolated image 650 x 514 Binning mode 2x2 324 x 256 Binning mode 4x4
For the AxioCam MRm (black and white camera) the following image resolutions are available (camera version 2.0)
276 x 208 Binning mode 5x5 364 x 260 Binning mode 4x4 462 x 346 Binning mode 3x3 694 x 520 Binning mode 2x2 1388 x 1040 Single image
NOTE: With the AxioCam MRm the omission of the color filter mask on the CCD
sensor and the associated generation of monochrome images offers the following advantages:
• The acquisition speed in scanning modes is increased by a factor of four, as fewer positions have to be located.
• The light sensitivity is increased.
• The visible spectrum for the camera expands, because no IR barrier filter is required.
• Even single-frame exposures produce images with the full basic resolution of the CCD sensor.
• The quantity of image data is reduced by a factor of 3 with the same spatial resolution, as no RGB color channels are acquired.

Image Acquisition with AxioCam MR
AxioCam MR Installation + Reference 41
Binning
The process of Binning ensures that the information in neighboring pixels, in both a horizontal and vertical direction, is summarized on the camera's sensor. This increases image brightness in accordance with the number of pixels summarized.
However, this process also reduces the sensor's spatial resolution accordingly. Since the amount of data to be transferred is reduced, the potential image rate is increased.
EXAMPLE: In the case of 2 x 2 binning, out of 1400 x1000 pixels 700 x 500 pixels remain.
Size of the resulting files
The size of the resulting files depends on the choice of resolution and gray value scaling.
The following table gives an overview:
Image size 8 bit 12 bit
AxioCam MRc 1300 x 1030 4,0 MB 8,0 MB
AxioCam MRm 1300 x 1030 1,3 MB 2,6 MB In AxioVision, images in 12 bits per pixel or in 3 x 12 bits per pixel mode can be saved in ZVI image format. When exporting the images to other image formats, (TIF, BMP, JPG etc.) this option is not available. With these image formats the image data are converted from 12 bit to 8 bit data in accordance with the graduated display characteristic curve.

Image Acquisition with AxioCam MR
42 B 48-0021 e 10.2003
Frame
In this field you can specify whether the frame or the entire area of the sensor is used for the acquisition.
Refresh overview: This button makes it possible to insert an overview image into the area where the frame can be positioned. This makes it extremely easy to target your specific area of interest.
In the displayed overview image a frame can be positioned by using the mouse, which corresponds to the selected frame of the acquired image. The shape and size of the frame can be changed by clicking on and dragging the edges of the frame while holding down the left-hand mouse button. It is also possible to move the frame by clicking inside it and keeping the button pressed as you change its position.
Center: By clicking on Center you can automatically center the selected frame. This can be useful as interesting parts of the sample are usually moved to the center of the view area. In addition the center of the view area is the place of the highest optical quality.
Framestart / Framesize: The start point and the selected frame size will be displayed in these input fields. Alternatively you can enter the values manually. It is also possible to select default frame sizes from the drop-down list box and position it in the center of the image by using the Center button.
Memory used: Memory used shows the memory size of the acquired image, which depends on the camera resolution, the image size of the selected image frame and of the selected gray value scaling.

Image Acquisition with AxioCam MR
AxioCam MR Installation + Reference 43
2.5 General Property Page
On this property page you enter the basic settings for the camera.
Digital Gain
Using the slider it is possible to change the interpretation of the brightness of the image data received. This allows you to display dark images as very bright images, which means you can acquire images with very high contrast using short exposure times.

Image Acquisition with AxioCam MR
44 B 48-0021 e 10.2003
The disadvantage of this technique, however, is that noise is greatly intensified, and the potential dynamic range of the corresponding image data is reduced. You should therefore carefully weigh up the benefits of using digital signal gain before actually employing the technique. For this reason the recommended value is gain by a factor of 1.
From a technical viewpoint, this technique involves multiplying the data by a corresponding factor. The maximum numerical pixel value generated is always limited to the maximum value of the analog/digital converter you are using (12 bits per pixel per color channel in the case of the AxioCam MR).
NOTE: You can also achieve a bright image display with short exposure times by
making the display characteristic curve steeper.
Image Orientation
An AxioCam MR image is adjusted in such a way that the image orientation corresponds to the image in the eyepiece when mounted on an upright microscope with the front of the camera facing you.
This starting position can be adapted via this menu to suit your requirements. If, for example, the camera’s cable routing needs to be changed on an inverse microscope, the camera can be mounted at a different angle, without the correspondence between the image orientation and the eyepiece being lost.
Black Reference
Setting a black reference ensures that the image background retains a uniform darkness, even with exposure times in excess of several seconds. This setting is therefore particularly recommended for the acquisition of weak fluorescence or other images with weak light intensity and consequently long exposure times (starting from approx. 3 seconds).
NOTE: Perform this black-value calibration approx. 15 minutes after switching on
the camera, as the camera will then be in a thermally balanced condition.

Image Acquisition with AxioCam MR
AxioCam MR Installation + Reference 45
For this calibration process make sure that the camera is viewing a completely black image. For example, close the light path to the camera on the microscope. In exceptional cases it may be necessary to remove the camera from the microscope for this calibration process and to cover the sensor with the cap provided.
Calibration takes approx. 20 seconds. At the end of this period it will continue to be available even if the software is restarted. Under certain circumstances it may be necessary to repeat this calibration process from time to time.
NOTE: The black reference is needed to correct deviations in the dark current for
individual pixels. This measure is additional to the camera’s available Peltier cooling, and allows a uniformly dark and even image background to be achieved, even with long integration times.
Activating the black reference can reduce the maximum possible speed of the live image.
White Reference
Activate this setting to compensate a decrease of image brightness to the borders of the view area.
For this calibration process ensure that the camera is exposed to a completely empty image. To do so place the sample to a completely empty position of the slide.
NOTE: Use a clean slide, a clean objective and defocus your microscope in order
to avoid the footprint of dust particles. Ensure that the microscope is properly adjusted (Köhler illumination).
After changing the objective a white reference must be done.
Activating the white reference can reduce the maximal possible speed of the live image.

Image Acquisition with AxioCam MR
46 B 48-0021 e 10.2003
Shutter Control
Via a supplementary cable the AxioCam MR offers a TTL control pulse, which can be used, for example, to control a mechanical shutter (e.g. "Uniblitz") in synchronism with the camera’s exposure time.
As soon as this output is activated you can select the polarity that you want to set for this signal:
High active means that the Control Signal jumps from 0V to 5V when the camera’s exposure begins and returns to 0V when exposure is complete.
Low active means that the Control Signal jumps from 5V to 0V when the camera’s exposure begins and returns to 5V when exposure is complete.
Please carry out configuration for this procedure in accordance with the requirements of the device you have connected.
NOTE: Simultaneous control of the external Uniblitz shutter by AxioVision via a
serial interface and by the shutter control of the camera is resulting in the following behavior:
• Shutter closed via AxioVision → than AxioCam MR shutter control.
• Shutter open via AxioVision → than AxioCam MR shutter control does not work.
Acquisition Delay: Due to the inertia of the masses being moved, a mechanical shutter requires a certain amount of time to change from the closed to the open position after the control signal has been initialized. To make sure that when the sensor is exposed it does not record this transition state and is not thereby exposed unevenly it is possible to delay the start of actual acquisition. Please set a value here in accordance with the data for the device you have connected.

Image Acquisition with AxioCam MR
AxioCam MR Installation + Reference 47
Filter Operations
NIR-Mode: The designation "NIR" stands for "Near Infrared". If you activate this mode, it is possible to achieve a further increase of up to 20% in the light sensitivity of the sensor in the range of red and near infrared wavelengths (from approx. 650 nm). However, this makes the CCD sensors more susceptible to overexposure (so-called "blooming"). We recommend that you use this mode for particularly weak fluorescence samples in this wavelength range, to reduce the exposure times required.
NOTE: This mode is only available for the black/white versions of the AxioCam
from product version 2.0 onwards.
Enhance Color: Activating this check box enables you to switch the color optimization algorithm on or off. Under normal circumstances this check box should always be activated in order to obtain vivid color reproduction during image acquisition.
If it is deactivated the noise in the image is reduced and the speed of the live image increased.
NOTE: For the Gamma curve a value of approx. 0,45 is recommended as a
setting for the image display (please read also the Chapt. 2.6 "Practical Notes on Operation in AxioVision" – "Display characteristic curve").
Image Acquisition with AxioCam MR
48 B 48-0021 e 10.2003
2.6 Practical Notes on Operation in AxioVision
Below you will find a few practical notes on the speed of the live image, color adjustment, working with exposure times, fluorescence images and configurable toolbars.
Speed of the live image
There are three speed modes available for the AxioCam MR live image. If you
use the pointer to click on the icon at the bottom edge of the live image, a pop-up menu with the possible setting options appears. The current setting is displayed at the bottom edge of the live image. Each mode has its own particular compromises.
Live mode Description
Fast Greatly reduced resolution, fast frame rate
Medium Medium resolution, moderate frame rate
Slow High resolution, slow frame rate The image rate can be further increased by deactivating certain AxioVision features:
Deactivating the focus bar.
Deactivating the live image scaling (1:1 representation of the image).
Activating a frame for the live image (Size) on the Frame property page.
Set image orientation to original on the General property page (no rotation).
NOTE: Note that the above mentioned notes are only valid for short exposure
times, as for very long exposure times the speed of the acquisition is mainly dominated by the exposure time.
For very long exposure times, the live image will appear grainy, as automatic amplification is active. However, this will not influence the quality of the final image.

Image Acquisition with AxioCam MR
AxioCam MR Installation + Reference 49
Notes on Optimum Color Reproduction in AxioVision
Below you will find a detailed description of how best to set up AxioVision to achieve optimum color reproduction with the AxioCam MR.
NOTE: For an optimum color reproduction the monitor first has to be adjusted.
To do so please use a well-suited image.
Adjusting the display characteristic curve in AxioVision
In order to achieve optimum reproduction of color images of the AxioCam MRc data on a monitor, the display characteristic curve must be used to set "gamma compensation". The advantage here is that only the display is influenced and the actual data remain unchanged. Further details on this can be found below. The settings can be done as follows:
With the mouse click on the icon in the footer of the live image. This adjusts the display characteristic curve automatically for an optimum color reproduction of the monitor (gamma = 0.45).
In the Properties dialog window, set the gamma characteristic curve in the histogram image on the Display property page.
NOTE: This also influences the reproduction of the color saturation.
For fluorescence images, background correction can also be carried out simply by shifting the offset of the characteristic curve.
Clicking on this icon returns to a linear display of the data.

Image Acquisition with AxioCam MR
50 B 48-0021 e 10.2003
2.7 Information for Displaying 12 Bit AxioCam Images in AxioVision
A PC graphics card cannot display more than 3 x 8 bits per pixel. However, as we have already mentioned, the AxioCam MR is able to generate 3 x 12 bits per pixel. So that intelligent use can be made of this feature, the display's characteristic curve can be altered in AxioVision.
To do this, right-click in the image acquired and select from the context menu the Properties function. The dialog window Properties is displayed on the screen:

Image Acquisition with AxioCam MR
AxioCam MR Installation + Reference 51
You can now select the area to be displayed by dragging the black rectangles along the characteristic curve or carry out automatic optimization by clicking on the corresponding buttons.
A histogram of the gray and color values will be displayed which makes the gray and color distribution visible.
The Best Fit, Min/Max and Linear buttons can be used to quickly adjust the histogram display. You can influence the display by clicking on the Log or Skip buttons.
Best Fit calculates in the current histogram the values which exclude 1‰ of the pixels contained in the image. The color/color range calculated in this way is displayed on the screen. (You can adjust the value of 1‰ to suit your requirements).
Min/Max displays on the screen the smallest and largest color or color value present in the image.
Linear displays on the screen the total possible value range.
Log displays the histogram in a logarithmic scaling, allowing you to effectively evaluate histograms of images with high dynamics.
Skip: By using the Skip function the maximum values at the upper and lower end of the histogram are omitted during the scaling of the display.
The , and scrollbars can be used to change the brightness, contrast and gamma of the display. This can also be achieved by dragging the individual "handles" of the characteristic curve in the histogram. You can adjust the brightness and contrast by changing the left or right-hand end points of the characteristic curve individually or by shifting the entire line using the center "handle". The gamma value can be changed by shifting both "handles".
Click the Save button to store the current settings. You can use these settings when displaying another image by clicking the Restore button. This enables you to compare different images.

Image Acquisition with AxioCam MR
52 B 48-0021 e 10.2003
If you activate the Apply to all T check box the settings in all the acquired instants of exposure are applied to the relevant fluorescence channel.
NOTE: You can get the best display of colored objects, if the gamma setting is in
the range of approx. 0,45.
Recommended Camera Settings
Activate the Enhance Color check box on the General property page to improve the color reproduction quality (this slows down the live image rate slightly as additional calculations are required).
The standard setting installed for 3200 K (3200 K button on the Adjust property page) often offers the camera the most natural reproduction of the image situation on the microscope. Here the image background is reproduced as it appears on the microscope. This setting is also useful in acquisition situations where no neutral-tint area is available to carry out a balance manually, e.g.: fluorescence.
If the image background in the acquired image is to be displayed with a neutral tint (gray), a manual white balance is required. Click on the White Balance button; then click on an area in the image that has a neutral tint and is not overexposed.
If the lamp voltage selected on the microscope is too low, the color of the image background may have been shifted a long way into the red. If a white balance is carried out in this event, the result may be visible deviations in the display of the color of the current sample. Correct this situation by increasing the lamp voltage to achieve a more neutral background, and insert gray filters into the microscope’s illumination beam path to adjust the intensity.
Recommended Monitor Settings
The output medium has a significant influence on color perception!
Use a familiar specimen to adjust the brightness and contrast rendering. If possible also set the color temperature of the monitor to approx. 5000 K or 6500 K.

Image Acquisition with AxioCam MR
AxioCam MR Installation + Reference 53
2.8 Background Information
Gamma Setting
This setting is required to compensate for the inherently non-linear behavior of the image tube ("gamma"). It also influences the quality of the color display.
You can get the best display of colored objects, if the gamma setting is in the range of approx. 0,45.
Many video cameras have built-in gamma compensation, as they are intended for use on video monitors.
Linearity
All versions of AxioCam MR have been designed to determine linear, quantitative measurement data, as such data is frequently used for tasks in the field of image analysis. Consequently, internal gamma compensation has been deliberately omitted from the AxioCam MR.
Configurable Toolbars for Operating the Camera
AxioVision allows you to configure your own toolbars. This means that the procedure can be tailored to your own requirements, and thus optimized. The size of the toolbar buttons can also be adjusted, helping you to work quickly with the mouse. A detailed description of how to create toolbars can be found in Chapt. 9 "Configuration" - "Adapting Toolbars" in the AxioVision Manual.

Trouble Shooting
54 B 48-0021 e 10.2003
3 Trouble Shooting
If errors occur, check first the setup instructions of the camera.
3.1 Software
Please also pay attention to all the comments in the file ReadMe.TXT, which is displayed during the driver installation.
AxioCam MR does not appear in the menu of selectable cameras
Make sure that the AxioCam MR files have been installed in accordance with the installation of the software.
For Windows 2000 Professional and Windows XP Professional: Make sure that the camera drivers have been installed with administrator rights.
No camera image on your screen
Check the light setting of the microscope.
Is the green control light on the camera on? If not, check the cable connections between camera and computer.
Execute an automatic exposure measurement (Autoexposure).
Check display adjustments for the live image .
Check the aperture diaphragm of the microscope.
Check the position of the beam splitter between the ocular and the TV port.
The color of the image is green and not realistic coloring
Check white balance and, if necessary, repeat white balance.

Trouble Shooting
AxioCam MR Installation + Reference 55
3.2 Image Quality
Sudden jolt, vibration or moving objects
If the microscope is jolted whilst you are taking a shot, the image will show periodic interference.
Repeat the shot and take care to ensure the conditions remain calm.
An example of a shaky shot Compare: An error-free image
Fluctuations in illumination
If the light source has a fluctuating quality of light intensity, stripes or blotches will show up in the image.

Technical Data
56 B 48-0021 e 10.2003
4 Technical Data
4.1 AxioCam MRc (color version)
CCD Basic resolution 1300 x 1030 = 1,3 mega pixels
Pixel size 6,7 µm x 6,7 µm
Sensor size 8,7 mm x 6,9 mm, equivalent 2/3"
Spectral range Approx. 400 nm - 700 nm, BG 40 IR Barrier filter, Bayer color filter mask
Max. charge / pixel Full Well approx. 18.000 e
Selectable resolution Horizontal x Vertical 260 x 206 (Binning 5x5, RGB) 324 x 256 (Binning 4x4, S/W) 432 x 342 (Binning 3x3, RGB) 650 x 512 (Binning 2x2, S/W) 1300 x 1030 (Single Shot)
Live image frame rates (Binning in color mode)
Maximal values when using optimal hardware
Max. frame (@ 20 ms)
7 images / s 16 images / s 24 images / s
Binning factor / Mode
1 / slow 3 / middle 5 / fast
Horizontal x Vertical
1300 x 1030 432 x 342 260 x 206
Readout of sub frames Selectable-free random definition of regions of interest on the sensor ("ROI")
Digitization 12 bit / 18 Mhz pixel clock
Dynamic range Typical >1600 : 1 at <<12 e readout noise
Range of integration time 1 ms up to 20 s
Cooling No cooling
Signal output connector TTL signal output for control of external shutters

Technical Data
AxioCam MR Installation + Reference 57
Interface PCI interface card (32 bit / 5 V) with data cable for
data and control lines
Optical interface C-Mount (17,5 mm)
Max. file size per image Approx. 8 MB @ 1300 x 1030 @ 3 x 12 bit (36 bit color depth)
Operating systems Windows 2000 Professional and Windows XP Professional
Size / weight Approx. 11 cm x 8 cm x 4,5 cm / 370 g (camera head)
Housing Aluminum, with fins, ¼" connection for tripod
Registration GS, CE, cUL
Power supply 12 V DC, 350 mA The power supply of the camera is provided by the interface board (external power supply not necessary)
Ambient condition (operation)
0° ... +35° Celsius 10% ... 80% relative humidity, no condensation, free air circulation required
Ambient condition (storage)
-15° ... +60° Celsius 90% relative humidity at 40° Celsius 80% relative humidity at +20° Celsius no condensation
Above frame rates are supported by the camera electronics at 20 ms exposure time. Computer hardware, operating system and application software may decrease the frame rates. Selecting a part of the sensor area can increase the frame rate. All specifications are subject to change without notice.

Technical Data
58 B 48-0021 e 10.2003
4.2 AxioCam MRm, Vers. 2.0 and Later (black/white version)
CCD Basic resolution 1388 x 1040 = 1,4 mega pixel
Pixel size 6,45 µm x 6,45 µm
Sensor size 8,9 mm x 6,7 mm, equivalent 2/3"
Spectral range Approx. 350 nm - 1000 nm, with BK-7 protection glass without IR filter (BG40 can be inserted if necessary)
NIR Mode Mode for higher sensitivity in near IR
Max. charge / pixel Full Well 17.000 e
Selectable resolution Horizontal x Vertical 276 x 208 (Binning 5x5) 346 x 260 (Binning 4x4) 462 x 346 (Binning 3x3) 694 x 520 (Binning 2x2) 1388 x 1040 (Single Shot)
Live image frame rates (Binning in color mode)
Maximal values when using optimal hardware
Max. frame (@ 20 ms)
7 images / s 16 images / s 24 images / s
Binning factor / Mode
1 / slow 2 / middle 3 / fast
Horizontal x Vertical
1388 x 1040 694 x 520 462 x 346
Readout of sub frames Selectable-free random definition of regions of interest on the sensor ("ROI")
Digitization 12 bit / 18 Mhz pixel clock
Dynamic range Typical >1700 : 1 at <10 e readout noise
Range of integration time 1 ms up to 20 s
Cooling Single stage Peltier cooling
Signal output connector TTL signal output for control of external shutters
Interface PCI interface card (32 bit / 5 V) with data cable for data and control lines
Optical interface C-Mount (17,5 mm)

Technical Data
AxioCam MR Installation + Reference 59
Max. file size per image Ca. 2,8 MB @ 1388 x 1040 @ 12 bit
Operating systems Windows 2000 Professional and Windows XP Professional
Size / weight Approx. 11 cm x 8 cm x 4,5 cm / 370 g (camera head)
Housing Aluminum, with fins, ¼" connection for tripod
Registration GS, CE, cUL
Power supply 12 V DC, 350 mA The power supply of the camera is provided by the interface board (external power supply not necessary)
Ambient condition (operation)
0° ... +35° Celsius 10% ... 80% relative humidity, no condensation, free air circulation required
Ambient condition (storage)
-15° ... +60° Celsius 90% relative humidity at 40° Celsius 80% relative humidity at +20° Celsius no condensation
Above frame rates are supported by the camera electronics at 20 ms exposure time. Computer hardware, operating system and application software may decrease the frame rates. Selecting a part of the sensor area can increase the frame rate. All specifications are subject to change without notice.

Technical Data
60 B 48-0021 e 10.2003
4.3 Spectral Sensitivity
Normalized to maximum amplitude
The use of the AxioCam MRc (color version) without infrared barrier filter is not recommended as color is only defined for visual spectral range.
The AxioCam MRm (black/white version) is used without infrared barrier filter. If necessary, an additional infrared barrier filter can be inserted between the microscope adapter and the camera.
Index
AxioCam MR Installation + Reference I
Index
1
14-bit images 50
A
acquisition delay 46 automatic exposure 34 automaticalle adjust white balance 35 AxioCam software, intall 10
B
b/w sensor 38 backup copies 4 basic settings 43 binning 41 black reference 44 black/white camera 40 black/white mode 40 brightness, change 51
C
camera connection 7 camera data MRc 56 camera data MRm 2.0 58 camera electronic 23 camera mode 38 camera on microscope 8 camera settings 52 camera setup 6
checking 9 camera to PCI interface board 8 center frame 42 checking the setup 9 C-mount objectives 23 color adjustment 36, 47 color channel balance 35 color mode 39
color value, change 51 contents of delivery 4 contrast, change 51 control signal 46
D
delivery contents 5 digital gain 43 display characteristic curve 49
E
enhance color 47 ensure the notes 3 exposure 33 exposure time measurement 33 extension connector 9
F
file size 41 filter operations 47 Frame property page 38 frame selection 38
G
gamma settings 53 general notes 3 General Property Page 43
H
histogogram, influence 37 histogram 36, 37
I
image frame 42 image orientation 44 image properties 50 image quality 55

Index
II B 48-0021 e 10.2003
infra-red barrier filter 23 installing AxioCam software 10
L
limitation of liability 2 linearity 53 live image speed 48 logarithmic display 37
M
memory size for image 42 monitor settings 52
N
notes on maintenance 23
O
operating the camera 3 optical system 23 optimum color reproduction 49 overexposure 37
P
PCI interface board 6 power control 9 practical notes on operation 48
R
repair is necessary address 3
resolution 39
S
Safety Regulations 1 scaling histogram 37 seting up the camera 3
settings 32 shutter control 46 software problems? 54 spectral sensitivity 60 speed modes 48 starting AxioVision 25 statutory liability for accidents 2 step by step to the first image 27 system requirements 4
T
toolbars 53 trouble shooting 54
U
underexposure 37
W
warranty 2 weighting of exposure time
measurement 33 white balance 35 white reference 45 Workflow 26