avsim commercial aircraft review discus k glider · avsim commercial aircraft review discus k...
TRANSCRIPT

AVSIM Online - Flight Simulation's Number 1 Site!
AVSIM Commercial Aircraft Review
Discus K Glider
http://www.avsim.com/pages/0611/Aerosoft1/DiscusK.html (1 of 14)15/06/2011 7:12:36 AM

AVSIM Online - Flight Simulation's Number 1 Site!
Product Information
Publishers: Aerosoft
Description: Glider add-on.
Download Size: 43.5 MB
Format: Download
Simulation Type: FSX
Reviewed by: Angelique van Campen AVSIM Senior Staff Reviewer - June 14, 2011
Introduction A while ago, Aerosoft released their first commercial FSX glider, the “Discus X Gilder Collection”. Almost imediately, AVSIM published a review about the Discus X. More information about this review and the Discus X can be found via this link. The reason to bring this review to your attention is that the Discus K Glider X package is a glider based on the Discus X however, the “K” is the aerobatic version.
For those who don’t own Aerosoft’s Discus Glider X, the Discus K will cost you €13.95 and is worth it. It becomes even more interesting when the price drops to approximately €9.75, when you own a legal serial number of the Discus Glider X.
Without having seen anything, the Discus K Glider X offers aerobatic skills. This was possible due to slight “real” and “virtual” model changes. Furthermore, the virtual cockpit was modified as well, of course, in accordance to the real Schempp-Hirth Discus K glider.
According to Aerosoft, “Aerobatic gliding is perhaps the most complex and demanding of aviation sports. It’s hard enough with an engine but doing it all on kinetic energy demands a very high degree of skill. And a suitable aircraft and finally there is one for FS! The Discus is a Standard Class glider created by Schempp-Hirth. It was produced in Germany between 1984 and 1995 and around 850 aircraft are still flying. It is still produced in the Czech Republic in low numbers. With its distinctive swept back leading edge it was rather revolutionary when it was produced and it totally dominated the standard class sailplane racing throughout the 1980s and won the 1985, 1987 and 1989 World Gliding Championships.”
“Though it is no longer a top contender for the prices (the progress in gliders in the last 10 years is nothing short of amazing), it is still a high performance glider with a 42 to 1 glide ratio. The good natured flight characteristics made it a perfect club glider for the experienced gliders. The later models (though many are retrofitted) had winglets that made the performance and handling better. In Europe it is one of the most prolific gliders and it is very typical of gliders that the thousands of enthusiasts fly every weekend.”
“The K model was one of the last versions of the Discus and an attempt to create a capable aerobatic contest version. They used one of the prototypes and the Discus K flew for the first time in 1988. It was moderately successful, but for most FSX pilots it will be more than a handful!
http://www.avsim.com/pages/0611/Aerosoft1/DiscusK.html (2 of 14)15/06/2011 7:12:36 AM

AVSIM Online - Flight Simulation's Number 1 Site!
The Aerosoft Discus has been create with help from Schempp-Hirth and without a doubt it is the first true high end glider add-on for FS. From the flight model that is near perfect (do note we never used these words for any product before) to the high detail modeling, it’s a product without rivals and without precedent. Actually, the Discus K was only built as a single piece prototype for testing the semi aerobatic possibilities of a standard class glider (source last sentence from H.-G."Biggo" Berger from Schempp-Hirth Flugzeug-Vertriebs GmbH).”
For some reason, it’s very difficult to get real Discus K data, even at the Schempp-Hirth website. On the other hand, Aerosoft added some information in the manual about the extraordinary Discus K model. “The Discus K was made from a normal Discus in 1988 as an attempt to make the Discus suitable for full aerobatic flights. The wingspan was reduced to 13.70 meters and the outer wing sections got a symmetric aero foil and negative v-form, to increase maneuverability and to get acceptable inverted flight characteristics. Only the outer wings were redesigned and this proved to be a problem. The center section of the wing was highly effective for normal-, but unsuitable for inverted flight and the Discus K never lived up to its promise.”
It’s now my task to master Aerosoft’s Discus K – that will be a big challenge - and add some dedicated Discus K information to the previous Discus X review, written by colleague reviewer David Pike.
Test System
Intel Core Extreme i7-965 3.8Ghz 12GB Tri-Channel DDR3 1600Mhz EVGA GTX-285 For the Winner Triple WD VelociRaptor 300GB HDD Single WD 1TB HDD Windows 7 Ultimate X64 Flight Simulator FSX SP2 Saitek Pro Flight System TrackerIR Pro 4 TrackerClip Pro
Flight Test Time: 34 hours
Installation and documentation
Let’s assume you don’t own the Discus Gilder X package and therefore, you’re new to the Discus K. Since the Discus K software is only available as a download, the only thing you need to enter during the installation is your email address, used during the ordering process, and the supplied serial number. I could offer you some screenshots about this process, but since it’s straightforward, it doesn’t add anything. The FSX folder is automatically detected, so no worries about that either.
What is installed? Of course, the Discus K software model. More about that later. Via the Start button, All Programs, you’ll find an entry Aerosoft – Discus Glider K. This folder offers an Acrobat Manual about the Discus K, but that’s it. Unlike with the Discus Glider X, there’s no WinchX installed and no original Schempp-HirthDiscus K manual.
That WinchX is not supplied is not really a problem. Mentioned on page 9 of the manual, please download Peter Luerkens WinchX. Peter made this tiny, but highly useful piece of software. Additionally, Peter also offers CumulusX. You can download this freeware software from the same website as indicated in the previous sentence.
According to Peter, “WinchX is an add-on for Microsoft Flight Simulator X for the simulation of a winch launch of a glider aircraft. It allows you to use winch launch anywhere on the world with very little prerequisites. Only the input from reality is needed as length of the launch cable, desired airspeed, and force limitation. WinchX produces occasionally cable breaks as an additional element of realism and to prevent real glider pilots of becoming careless about launch interruptions.” “CumulusX is an add-on for Microsoft Flight Simulator X for the creation of a soaring environment. CumulusX! creates thermal lift with appropriate clouds either on the fly every time new in the environment of your glider with a wide variety of characteristics, or based on custom-tailored lists of thermals. Both allow joining in online sessions, with the guarantee of equal conditions for all participants. It adapts automatically and continuously to the FSX internal weather conditions even under real-weather-mode.
http://www.avsim.com/pages/0611/Aerosoft1/DiscusK.html (3 of 14)15/06/2011 7:12:36 AM

AVSIM Online - Flight Simulation's Number 1 Site!
In addition it scans the terrain of Flight Simulator X during flight in order to produce ridge lift and adjust the placement of thermals in mountain regions, according to sun irradiation and wind influence. Sunny slopes will also generate extra thermal lift, after being heated up by the sun over the day. Thermal and ridge soaring are experienced with a completely new quality. The user can choose the difficulty level according to his/her personal skills from very easy to realistic and difficult.”
Let’s have a closer look into FSX, and let’s check-out what the installer actually installed? Apart of a “Aerosoft’ folder in the root with the manual and a configuration file, you’ll find in SimObjects/Airplanes, an Aerosoft DiscusK folder. Important for now is the presence of only one glider texture lay-out with registration D-8111. Personally, I had hoped for more “liveries”, but the reality could be that there was no other Discus K built or existing. Whatever the texture lay-out is, flight characteristics should be the same, irrespective of additional liveries.
Documentation
I mentioned this before, the Discus K comes with only one Aerosoft created manual. Although it doesn’t come, like you have with the Discus Glider X, real operation manuals. This Aerosoft lookalike manual still offers enough information to get a good idea what you can do with the Discus K. Since we’re dealing with an aerobatic glider, there’s a lot of information on how to deal with this. It all starts on page 11 including a YouTube link that shows you all of the whole aerobatic program as explained in the manual.
What else does the manual offer? As stated before, I assume you don’t have Discus Glider X and therefore no knowledge of all those instruments; like a Total Energy Compensated Variometer, Airspeed Indicator, Altimeter and Yaw String. Therefore, the manual explains all those instruments in detail as if you’re new to this. The manual also offers some important FSX settings and mentioned in the previous section, the WinchX and CumulusX programs from Peter Luerkens. Finally, the last page of the manual helps you out with what’s inside the virtual cockpit. To get an idea of this manual, here are some screenshot pages.
Yaw string explanation
Aerobatic Program
Virtual Cockpit identificationA collection of three pages from the Discus K Acrobat manual. The overall manual is 15 pages
thick and offers that what is need to understand this aerobatic version. When you own already the Discus Glider X, then most of the pages are known except for the “Aerobatic Program”.
I started this review mentioning that I assume you don’t have the Discus Glider X package. Said that and mentioned in the previous paragraph, it’s highly advisable that you download and install Peter Luerkens
http://www.avsim.com/pages/0611/Aerosoft1/DiscusK.html (4 of 14)15/06/2011 7:12:36 AM

AVSIM Online - Flight Simulation's Number 1 Site!
WinchX and CumulusX software.
The supplied manuals offer the necessary details of how to install these programs and how to use them. When you’ve done this manual installation according to the books, they will automatically pop-up when FSX is fired up. In other words, it should not give any problems and are worth having them installed.
Walk-around Discus K
Although the Discus K can be seen as an extension of the Discus Glider X package, it’s worth to show some close-up screenshots of this K model. While doing my walk-around check, I’m impressed with what I see. It’s true, due to the real and simulated skin of wings, tail and fuselage, there’s not much to see there, but other tiny details are still there, so let’s go for it.
Starting at the FWD fuselage nose section, you’ll see a small hole of the TOST tow release mechanism, used for aero towing (tug aircraft). And difficult to see underneath the fuselage, the main wheel with directly in front of it, the winch/ground tow lug.
The skin is indeed glossy, no rivets or whatever is visible. Makes sense, since it’s a glider and any outside obstruction creates drag! The canopy itself is huge and reflects a nice shiny look. I should say; a realistic look! The transparent “Plexiglas canopy” gives, even with its round shape, a good inside view to the Virtual Cockpit. Via a red handle, just below the LH canopy side, it’s a matter of seconds to unlock and open the canopy. Via either wing, if selected, you’ve a good view of the extended speed brakes. Although these speed brakes are simple in design, they are well simulated. By the way, speed brakes are operated via the LH Virtual Cockpit located blue handle. One of the modifications to make this Discus an aerobatic glider, can be seen on the wing tips. The last part of each wing tip is bending downwards. What David Pike mentioned as well in his Discus Glider X review, the wings and fuselage are smooth and therefore, the other skin of the whole glider is one smooth surface.
Due to the glossy look, it all looks new. Normally I would like to see a weathered look, but in this case the “clean glossy” skin surface reflects reality. Most of the gliders are owned by clubs or private people and they try to keep it as new as possible.
Some nice tiny details are, at the near bottom of the rudder, the left and right rudder control brackets. In front of the vertical stabilizer you’ll see the pitot tube (below) and the Total Energy Compensator tube. More information about this TEC probe can be found via this link. You’ve probably noticed that the TEC probe from the supplied URL link, is mounted downwards, which is different than the simulated model. Ok, some background information, “The TEC probe for conventional and T tails should be fitted near the top of the fin. The long part should be aligned with the airflow, and the angled part can point up or down, though full size practice is for it to point down”.
Even though the Discus K model is primarily based on the previous Discus Glider X, it is and stays a gorgeous model. My walk-around quickly reaches the end, and I can only say, my overall impression is that we’re dealing with a sophisticated FSX glider. Just have a look at the following screenshots.
http://www.avsim.com/pages/0611/Aerosoft1/DiscusK.html (5 of 14)15/06/2011 7:12:36 AM

AVSIM Online - Flight Simulation's Number 1 Site!
Discus nose section overview, with, within the yellow circle, the winch/ground
tow lug
The hole in the nose (red circle) is
for the TOST tow release mechanism, used for aero towing
(tug aircraft). The green circle shows the red handle for canopy
opening
Top view of the canopy with the highly detailed virtual
cockpit
Canopy opened and close-up view of
the nose wheel assembly
Clearly visible are the rudder
control brackets at the bottom (red circle), the Pitot tube (orange circle and the Total Energy Compensator
tube (yellow circle)
Sliding window within the LH canopy side, looking towards the extended speed brakes.
Discus K overview I with extended
speed brakes
Another Discus K overview II
Close-up of the wing speed
brakes
Not directly related to this section, but worth bringing glider sounds forward otherwise I could forget it. This glider doesn’t have any motor to either bring it into the air or to assist it while in the air. Still, a glider produces a lot of surrounding sounds and therefore, the Discus K is, according to Aerosoft, “equipped with Aerosoft Sound Control (ASC) that enhances the sound options of this aircraft in FSX. Depending on the product up to 200 additional sounds can be added. ASC is based on a special gauge that is loaded from the PANEL.cfg and is controlled by an ASC.cfg file in the panel folder. The module is linked to the aircraft and we added it with an ID code.”
Ok, great, but what next? There’s no next. During the takeoff roll, initial climb, steep turns, slip, yaw and whatever you can think of, every condition produces its own sound. This is to give the virtual glider pilot an “as real as it gets sound” feeling!
Your Virtual Cockpit
Your working space for hours of fun, at least, when you’re in a good soaring environment. As a side note; to get a good soaring environment, you should install Peter’s CumulusX. Anyway, a quick look in the
http://www.avsim.com/pages/0611/Aerosoft1/DiscusK.html (6 of 14)15/06/2011 7:12:36 AM

AVSIM Online - Flight Simulation's Number 1 Site!
Virtual Cockpit and the instrument panel tells me that the area is full of tiny details, of which some are simulated and some are not.
When you want to know what is and what is not simulated, have a look at the last page of the supplied manual. It indicates what is what, and identifies the different handles, instruments and toggles the “pilot presence”. Since the amount of instruments is reduced to a minimum, and some of those instruments are typical for gliders, there’s a separate chapter explaining how to interpret these instruments.
The Virtual Cockpit is a mixture between photo-real stuff and created panels like the side walls. The VC extends beyond the instrument panel. Behind the instrument panel you’ll find two batteries and the control pedals. On the LH and RH sidewalls you’ll find some handles, of which some are not functional. Functional ones include the LH blue handle for speed brakes extension/retraction and the LH red knob/handle for canopy unlocking/locking. On the floor, just left of the control column, you’ll see a yellow handle. This handle is used to disconnect the towing cable.
On the RH side, integrated into the right hand side of the seat, you’ll find a large black handle. This is used for main wheel extension/retraction. As far as I figured out, retracting/extending the main wheel should be done either with the keyboard G (GEAR) command or an assigned switch on your yoke or joystick. I couldn’t operate the handle itself since the mouse pointer didn’t change into a “hand”.
All the other handles in the Virtual Cockpit are not simulated or programmed for a function. The instrument panel itself is simple, but as real as it should be. Compared to the Discus Glider X, you’ll see a large reduction of instruments except for the basic ones. Added, and you can’t miss it, is an aerobatic leaflet taped to the instrument panel. Right above the panel, close to the canopy, you find the compass and on the canopy itself, the yaw string.
Although the yaw string looks very simple, its function is extremely important. According to the manual “It’s rare that the most important instrument in an aircraft does not cost more than a simple piece of tuft or yarn. But many glider pilots will tell you that the yaw string (also called slip string) is the most important gauge they have and it is in fact considered part of the primary flight reference instruments. It is taped to the canopy and it simply moves in the airstream. If it is centered you are flying the glider as efficiently as possible (without any slip and a yaw angle as small as possible). However in many aerobatic maneuvers, you’ll have a significant slip angle. Don’t worry, you sometimes need a slipped plane.”
picture I
picture II
picture III
picture VI
picture V
picture IV
http://www.avsim.com/pages/0611/Aerosoft1/DiscusK.html (7 of 14)15/06/2011 7:12:36 AM

AVSIM Online - Flight Simulation's Number 1 Site!
Picture I: Within the blue circle you’ll find the speed brake or dive brake handle. The yellow circle is used to release the tow cable while the white circle is for main wheel retraction/extension. For clarity, I disabled the pilot. This is done by clicking the harness buckle. Picture II: The black knob/handle, situated below the microphone, is used for the water ballast. According to Wikipedia “Modern competition gliders carry jettison able water ballast (in the wings and sometimes in the vertical stabilizer). The extra weight provided by the water ballast is advantageous if the lift is likely to be strong, and may also be used to adjust the glider's center of mass. Moving the center of mass toward the rear by carrying water in the vertical stabilizer reduces the required down-force from the horizontal stabilizer and the resultant drag from that down-force. Although heavier gliders have a slight disadvantage when climbing in rising air, they achieve a higher speed at any given glide angle. This is an advantage in strong conditions when the gliders spend only little time climbing in thermals. The pilot can jettison the water ballast before it becomes a disadvantage in weaker thermal conditions. Another use of water ballast is to dampen air turbulence such as might be encountered during ridge soaring. To avoid undue stress on the airframe, gliders must jettison any water ballast before landing.” The water ballast on the Discus K is positioned in both wings and the vertical stabilizer. Picture III: A part of the instrument panel with on the left a possible “aerobatic program” and right vario meter with above the speed indicator. As you can see on the enlarged screenshot, the instruments are sharp, even from a close distance and slightly weathered to give it a realistic look. Picture IV: Looking in the FWD direction, right below the instrument panel. In the far front you can see battery I and just behind the wall, battery II. Furthermore, you can see the RH rudder pedal and the communication control panel on the mid console. Picture V: Just for clarity, see for yourself the opened window on the LH canopy side (white circle) and within the red circle, the canopy unlock/lock handle/release mechanism. Picture VI: Again a far FWD view to the front of the fuselage nose. This time it’s the LH rudder pedal with a nice look of battery I and in the front, just behind the panel, battery II. Here you’ve got also a nice view of the G-meter, mounted on the LH side of the instrument panel. As well here, the yellow “tow cable” release handle and of course, the control stick.
All the instruments are, even close up, well readable and sharp. Furthermore, some weathered look is introduced which makes the overall look even more realistic. Let’s have a look at the above screenshots. Almost forgotten; by default, a pilot is situated in the virtual cockpit. To get rid of him, just click the buckle of the belts and before you know, there’s no pilot in the seat anymore.
By the way; with the VC pilot activated in Virtual Cockpit view, you won’t see his head. The reason that his head is removed is simply because that’s where your viewpoint is, meaning that you can pan around and look down on "your" body. Having a head there would block your view. The option to click on the seatbelt buckle to toggle the body on/off is made, because some won’t like to have the body blocking their view to some of the controls.
That’s also why there is no synchronization between the external pilot model and that of the Virtual Cockpit. This means when you’ve disabled the VC pilot, you still see the pilot when viewing in the external mode.
Since some of the installed glider instruments are different then those in motorized airplanes, I would like to add some information about these. Let’s start with the Total Energy Compensated Variometer.
According to the manual “Variometers or, in short, varios are vertical speed indicators (VSI) which show
http://www.avsim.com/pages/0611/Aerosoft1/DiscusK.html (8 of 14)15/06/2011 7:12:36 AM

AVSIM Online - Flight Simulation's Number 1 Site!
change of altitude by measuring the change in air pressure (static pressure) as altitude changes. As the aircraft climbs or descends the pressure outside the aircraft changes. Inside the aircraft there is an isolated, airtight container, something like a thermos. When the aircraft climbs, outer pressure decreases, and the air in the thermos expands to the outside. The thermos is connected to the variometer. In the variometer there is a highly sensitive vane which is deflected by the flow in and out of the thermos. The vane is connected to a needle which indicates climb, when the outer pressure decreases and the air flows out of the thermos and vice versa.”
“The mechanical 'Winter' variometer in the Aerosoft Discus K has been configured to continuously display your 'Total Energy Compensated Climb Rate'. This is the traditional value that has been relied upon by glider pilots for over fifty years, giving the climb rate of the glider after removing the effects of the pilot pulling or pushing on the joystick. Pulling back on the stick causes the glider to climb, but also to decelerate, and by reading both the static air pressure (altitude) and the pitot pressure (airspeed), the effect of the joystick movement can be compensated for, hence "Total Energy Compensation". If your airspeed is not changing, the Total Energy climb rate will equal your true climb rate.”
Next there’s the Airspeed Indicator. Sounds familiar, but let’s see if there’s some additional information. “The 510 degree scale on the airspeed indicator allows for a precise reading of the indicated airspeed in km/h or knots depending on your FSX setting.” Seems not really different than you’re used to. This is more or less the same for the Altimeter. “The altimeter is rather standard and like the Airspeed indicator can be switched between metric and US settings. The gauge will automatically show the correct bitmap. Make sure you set the correct QFE before take-off.”
Not really an instrument, but extremely important for the glider pilot, is the yaw string. According to the manual “It is taped to the canopy and it simply moves in the airstream. If it is centered you are flying the glider as efficiently as possible (without any slip and a yaw angle as small as possible). Many glider pilots will tell you that the yaw string (also called slip string) is the most important gauge they have and it is in fact considered part of the primary flight reference instruments. However in many aerobatic maneuvers, you’ll have a significant slip angle. For pilots that are used to flying motorized aircraft it is often hard to stay fully coordinated in a glider, but the yaw string will help a lot.”
Then there’s on top of the instrument panel the magnetic compass. “The magnetic compass is of a simple construction. It contains two steel magnetized needles fastened to a float around which a compass card is mounted. The needles are parallel, with their north-seeking ends pointed in the same direction. The float assembly is housed in a bowl filled with acid-free white kerosene. A line (called the lubber line) is mounted behind the glass of the instrument that can be used for a reference line when aligning the headings on the compass card. The magnetic compass works on the principle of magnetism.”
Last, but not least, you’ve got the G-meter. “The G meter or accelerometer shows the G forces on the glider. Sitting on the ground we all experience the force of gravity, 1g, but during aerobatics or in turbulent air forces greater or less than 1g can be experienced. The meter has, again 3 needles. One moves in response to changes in the G experienced and pushes the others to show the maximum and minimum levels reached.” Time to move on and see if I’m a good glider pilot. I’m already happy when I can keep it in the air. Together with the downloaded and installed CumulusX software from Peter Luerkens, it should be a problem to find the correct soaring environment.
Aerobatic Flight Characteristics
Unless you’re a real or virtual glider pilot, don’t expect that the 1st flight will be successful, or at least, that’s what I experienced. It needs some practice to learn to fly a glider, learn to find thermal lifts and how to deal with them. I gave it a shot at two different locations, both of which with CumulusX activated. To get airborne, I used Peter’s WinchX.
Just follow his manual on how to make the necessary settings and of course, how to use it in combination
http://www.avsim.com/pages/0611/Aerosoft1/DiscusK.html (9 of 14)15/06/2011 7:12:36 AM
AVSIM Online - Flight Simulation's Number 1 Site!
to your Discus K. Finding thermals wasn’t always easy and keeping the yaw string in the middle during normal flight wasn’t easy either. But I can tell you, the moment you pick up a thermal lift, wow, that’s an awesome feeling. Instead of you’re glider having a low decent rate, suddenly it booms up. Still, mastering an aerobatic glider isn’t easy. In the beginning I didn’t come to the aerobatic program as taped to the instrument panel. Actually, I never got that far.
Does this mean the Aerosoft Discus K isn’t a flying replica? Absolutely out of the question! As stated on their website, in the supplied manual and confirmed by others; this Discus K glider from Aerosoft brings real gliding close to real thing and that means, it’s not always easy to fly, easy to find thermals etc. You need hours to practice, and even more practice before you understand how gliders fly.
When you really want to know all about gliders, have a look at and feel free to download this FAA Glider Flying Handbook. Although the handbook is from 2003, it’s still valid and offers you real glider inside information. This is, by the way, an example of glider handbooks. Google around and you’ll find much more glider specialized handbooks.
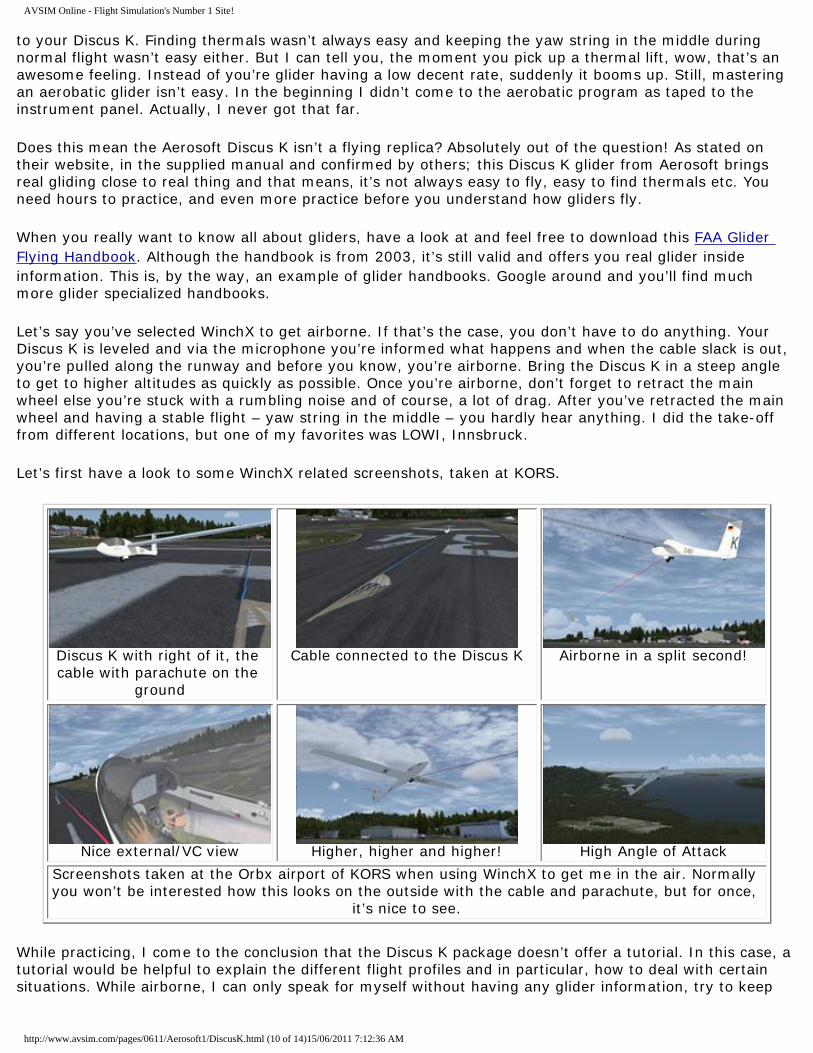
Let’s say you’ve selected WinchX to get airborne. If that’s the case, you don’t have to do anything. Your Discus K is leveled and via the microphone you’re informed what happens and when the cable slack is out, you’re pulled along the runway and before you know, you’re airborne. Bring the Discus K in a steep angle to get to higher altitudes as quickly as possible. Once you’re airborne, don’t forget to retract the main wheel else you’re stuck with a rumbling noise and of course, a lot of drag. After you’ve retracted the main wheel and having a stable flight – yaw string in the middle – you hardly hear anything. I did the take-off from different locations, but one of my favorites was LOWI, Innsbruck.
Let’s first have a look to some WinchX related screenshots, taken at KORS.
Discus K with right of it, the cable with parachute on the
ground
Cable connected to the Discus K
Airborne in a split second!
Nice external/VC view
Higher, higher and higher!
High Angle of Attack
Screenshots taken at the Orbx airport of KORS when using WinchX to get me in the air. Normally you won’t be interested how this looks on the outside with the cable and parachute, but for once,
it’s nice to see.
While practicing, I come to the conclusion that the Discus K package doesn’t offer a tutorial. In this case, a tutorial would be helpful to explain the different flight profiles and in particular, how to deal with certain situations. While airborne, I can only speak for myself without having any glider information, try to keep
http://www.avsim.com/pages/0611/Aerosoft1/DiscusK.html (10 of 14)15/06/2011 7:12:36 AM

AVSIM Online - Flight Simulation's Number 1 Site!
and maintain level flight and constantly monitor the yaw string. A slight decent rate is not really a problem as long as it is for a short time.
Try to prevent a too a high bank angle and thus keeping the roll rate within limits and never the RUDDER for AUTO control. When you want to master this highly sophisticated Discus K from Aerosoft, AUTO Rudder doesn’t belong here.
Not directly related to the Aerosoft software, but worth bringing forward. Reserve some time, if you installed CumulusX, to read Peter’s CumulusX manual. It’s not all about his software. It also explains a lot more about thermal lift, how and where it appears and how it works, but most important, how to get the benefit of it during your glider flight. And, I can’t say it enough, take your time!
It could be that your Discus K comes in an unusual flight situation and it seems to you that you can’t control it anymore. Don’t worry, look at your yaw string and act accordingly, but with care! I can tell you, the yaw string is awesomely simulated. It really operates/functions on your canopy as a piece of tuft or yarn would. It’s almost as real as it gets!
How elegant!
Have a close look to the outer wing
sections
Lovely overview
RH outside Virtual Cockpit look on
the Innsbruck mountains
LH Virtual Cockpit look to the
outside world
Straight and level flight with
yaw string in the middle
My Innsbruck (Austria near LOWI) adventure wasn’t all pleasure. I found myself in many flight situations not knowing what to do. Some ended in a crash, while others brought me back in a normal level flight. Ok, I lost some altitude, but I saw it as a challenge to get up in the air and find some thermals. Finally, I was able to make a 90° turn and keeping the Discus close to my intended altitude. Of course, I was descending, but let’s put it like this, a controlled descent. Find below some screenshots of that special moment.
But then there’s always that question; how real does it fly? Before doing anything, I decided to swap my Discus K with Microsoft’s default glider and found out a few things. First of all, the frame rates. The default glider reduces the FPS much more than Aerosoft’s Discus K. Figures are in this case not needed, because it was noticeable.
Furthermore, Microsoft’s glider instrument panel doesn’t look too bad, but is it close to a real glider? That’s something I don’t know, but I felt it too easy to fly compared to the Discus K. One thing is for sure, the Discus K flies differently, absolutely not like the Microsoft version.
http://www.avsim.com/pages/0611/Aerosoft1/DiscusK.html (11 of 14)15/06/2011 7:12:36 AM

AVSIM Online - Flight Simulation's Number 1 Site!
That the Discus K isn’t easy for me doesn’t say anything. Remember, the Discus K was an aerobatic prototype since they only build one. I hope I’m right, but in general, aerobatic airplanes and I think the same for gliders, aren’t easy models to fly. Instead, you want to challenge “aerobatic figures”.
Wow, that’s not bad
VC view during this maneuver
Returning the Discus K to a
normal bank angleOne of the possible aerobatic figures to fly. Lucky for me, within limits, I was able to maintain an
acceptable altitude during this extreme bank angle.
Difficult or not, I’ve seen this Aerosoft glider as a challenge. Mastering the Elements! That said, it’s not always easy and sometimes with a disappointing end. Sometimes I was able to recover from unusual flight situations and I slowly learned to understand how to interpret the yaw string and based on its deflection, what to do. I can tell you, it sounds so easy, but it’s not always the case.
When you’re a real or virtual glider pilot, I highly recommend you take the challenge and try this Discus K and probably also their previous Discus Glider X package. Its cockpit may look simple, but it’s as real as it is and anymore more than this, you don’t need. By the way, I missed the yaw string on the Microsoft model. Is there some other solution or was it just forgotten?
I can conclude this section with the word; gorgeous! But, you need time to master this Aerosoft’s Discus K.
Summary / Closing Remarks
What can I say, gorgeous! That was and still is, more or less, the same conclusion from the previous Aerosoft’s Discus Glider X review. It was and still is, the only commercial FSX add-on glider that offers high flight performances, an as real as possible external model with, although simple, a nice looking Virtual Cockpit.
There’s no need for a 2D cockpit since the Virtual Cockpit FPS are high. And because of this, Aerosoft didn’t add a 2D cockpit. High frame rates mean somewhere, based on my PC specifications with all sliders maximum, between 30 – 40 FPS. When I place my sliders back to a more normal position, the frame rates move up even past 50 FPS. Complaints? Not by me!
What was the price of this individual Discus K? Only available as a download, this Discus K costs €13.95 or approximately US$20.00. Suppose you own already the Discus Glider X package, you get a 30% discount on the Discus K. Expensive? Not at all, knowing what this model offers you. Ok, the Discus K comes only in one livery, but as said before; only one Discus K was build.
I would say go for it and try to master Aerosoft’s Discus K. See it as your next challenge!
I haven’t convinced you? Then it’s time to have a look at this YouTube movie. Without a doubt it shows you what’s possible and what you can expect from this Discus K.
http://www.avsim.com/pages/0611/Aerosoft1/DiscusK.html (12 of 14)15/06/2011 7:12:36 AM

AVSIM Online - Flight Simulation's Number 1 Site!
What I Like About Discus K
● Easy to install.● Informative manual.● Highly detailed Discus K external model with lots of tiny
details.● As real as it is Virtual Cockpit. There’s no 2D cockpit, but
there’s no need for that since VC Frame Rates are great to fly with.
● High quality and slightly weathered looking instruments.● Awesome simulated yaw string. It looks and functions
almost (99.99%) as real!● Flying means hours of fun due to realistic flight
characteristics.● Take some hours into account to master this aerobatic
Discus K Glider.● Lift Aerosoft’s Discus K Glider to even higher atmospheres
by installing WinchX and CumulusX from Peter Luerkens.● I would say; it’s more or less a must do!
What I Don't Like About Discus K
● I couldn’t find anything except for a possible tutorial..
PrintingIf you wish to print this review or read it offline at your leisure,
right click on the link below, and select "save as"
Discus K Glider X
(adobe acrobat required)
Comments?
Standard Disclaimer The review above is a subjective assessment of the product by the author.
There is no connection between the product producer and the reviewer, and we feel this review is unbiased and truly reflects the performance of the product in the simming environment as experienced by the reviewer. This disclaimer is posted here in order to provide you with background
information on the reviewer and any presumed connections that may exist between him/her and the contributing party.
Tell A Friend About this Review!
© 2011 - AVSIM Online
http://www.avsim.com/pages/0611/Aerosoft1/DiscusK.html (13 of 14)15/06/2011 7:12:36 AM

AVSIM Online - Flight Simulation's Number 1 Site!
All Rights Reserved
http://www.avsim.com/pages/0611/Aerosoft1/DiscusK.html (14 of 14)15/06/2011 7:12:36 AM