avaya communication manager configuration guide
TRANSCRIPT

AVAYA COMMUNICATION MANAGER CONFIGURATION GUIDE
Updated February 29, 2016

Table Of Contents
Section 1 – CM Configuration1.1 – Accessing Communication Manager...............................................................................11.2 – Adding a user profile ..........................................................................................................51.3 – Configure CM to send CDR data ...................................................................................131.4 – Exporting CM users and groups for CDR reporting ................................................171.5 – Configuring TSAPI CTI LINK (only require for installs with an AES server) .......191.6 – Configuring AES server (only require for installs with an AES server).................23
Section 2 – Install Chronicall2.1 - Installation Setup..................................................................................................................29

Section 1.1 – CM Configuration
Access the CM server and open the Avaya site administration (ASA) application.
Installing Chronicall for Avaya Communication Manager requires a few simple configuration changes.1. First, create login information for Chronicall to use on your CM server2. Next, configure CDR services (if applicable) to enable Chronicall to connect and log call events3. Next, configure your AES server (if applicable) to enable Chronicall to connect and log call events4. Finally, install Chronicall
1

Add a new Voice System by opening File > New > Voice System. Name this new system and press Next.
Make sure that Network Connection is selected, then press Next.
2

Make sure that Network Connection is selected, then press Next.
Accept the default options on the next few screens until you are asked for a login name and password. Enter the information of a privileged administrator account. Continue moving through the next few screens until the process is complete.
3

Once this is finished, click Start Emulation in the advanced section of the sidebar to the left.
This will bring up a blue command line screen. First, you will need to create a user profile. This profile will outline Chronicall's access privileges. Later, when you create a user, you will apply this user profile to it.
4

Step 1 - Enter list user-profiles into the command line. This will show you a list of user profiles that currently exist on the system. User profiles 0 through 19 are reserved by the system, so any user profile number you choose will need to be 20 or higher. Once you've chosen a number, enter add user-profile followed by the profile number. For example, add user-profile 20. This will bring up a new user profile screen.
Section 1.2 - Adding a User Profile
5

Step 2 - In the User Profile Name field, enter Chronicall. Next, you need to enable specific permissions for this user profile. Arrow down to the Enbl column and change n to y for Call Center (B), Features (C), Routing and Dial Plan (J), and Stations (M).
6

Step 3 - Move to the next page using Page Down. This section shows specific read and write functions in each of the categories listed before. Change the permissions for the categories listed above to --, meaning no access.
Step 4 - Next, give read (r-) access to the following functions:
page 3 agent-loginIDPage 14 hunt-groupPage 31 stationPage 37 uniform-dialplanPage 39 vdnPage 39 vector
Once this is finished, click the Enter button at the top of the screen.
7
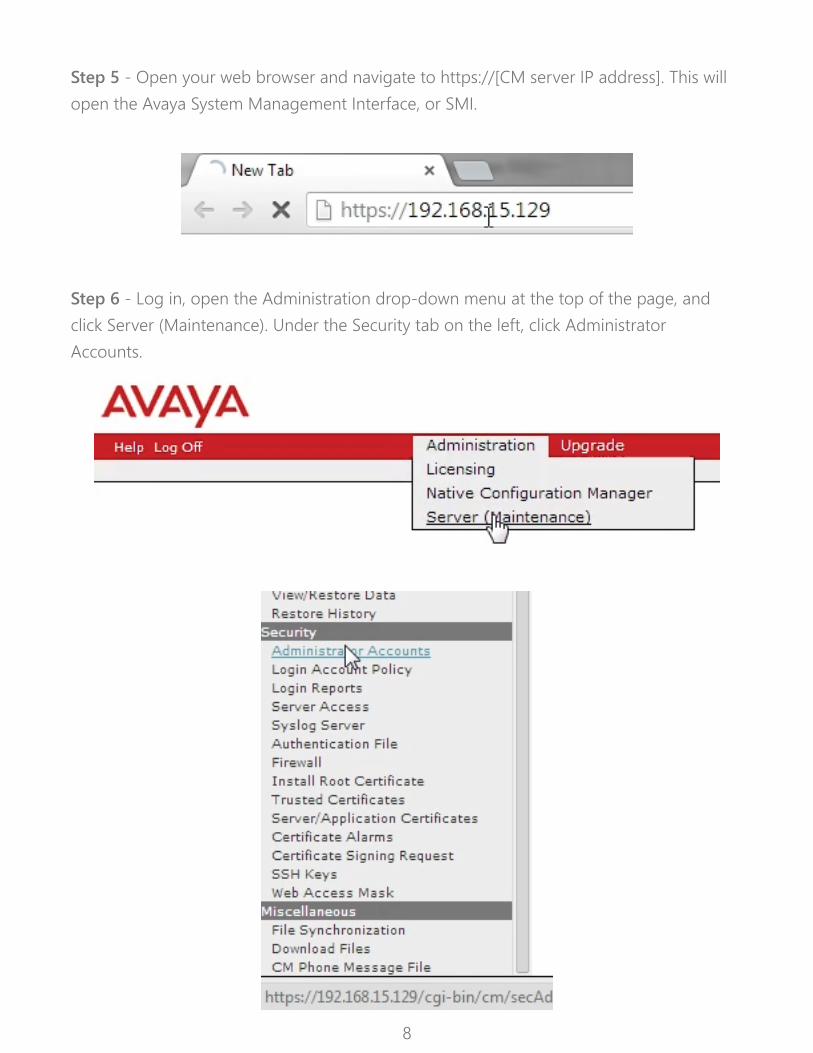
Step 5 - Open your web browser and navigate to https://[CM server IP address]. This will open the Avaya System Management Interface, or SMI.
Step 6 - Log in, open the Administration drop-down menu at the top of the page, and click Server (Maintenance). Under the Security tab on the left, click Administrator Accounts.
8

Step 7 - Choose Add Group and Submit.
9

Step 8 - In the Add a new access-profile group list, choose the profile number that matches the user profile you created earlier, then click Submit.
10
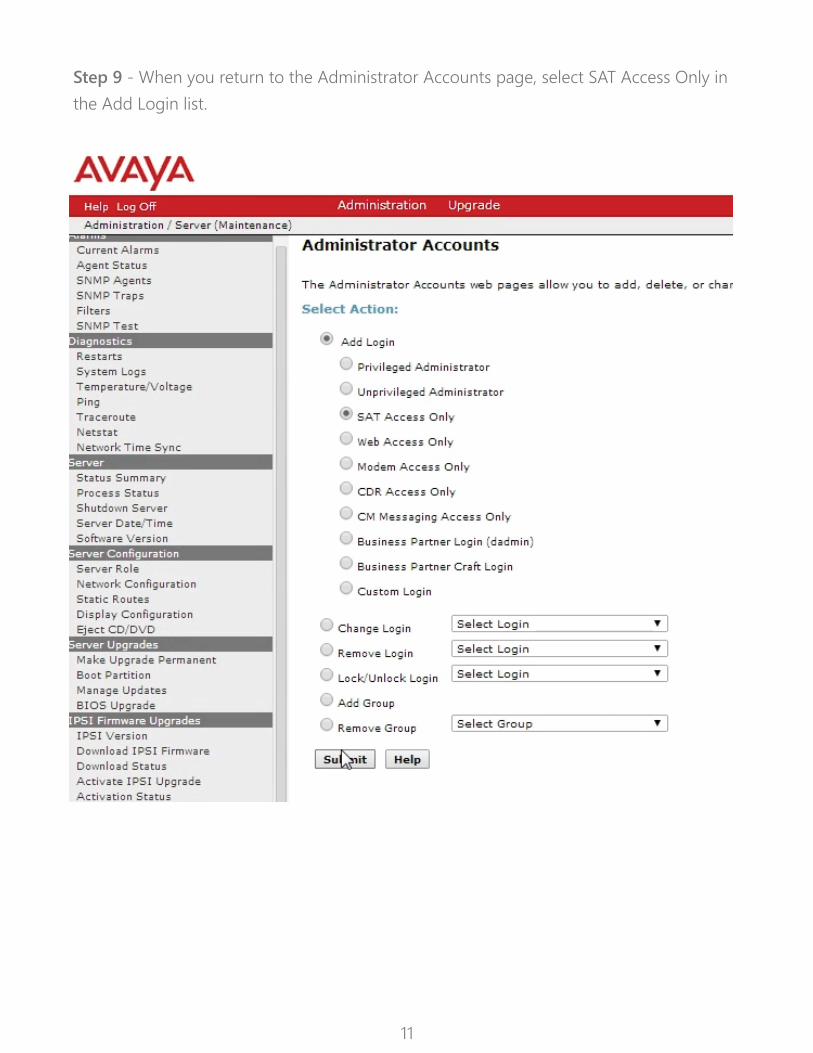
Step 9 - When you return to the Administrator Accounts page, select SAT Access Only in the Add Login list.
11
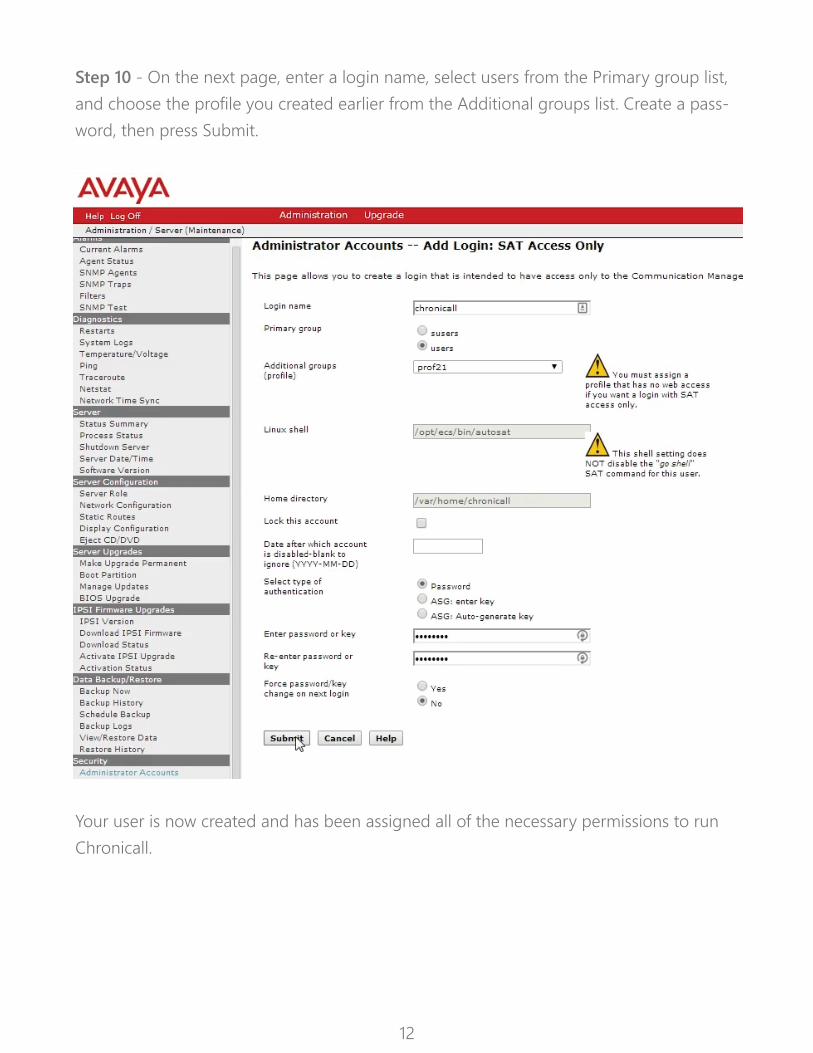
Step 10 - On the next page, enter a login name, select users from the Primary group list, and choose the profile you created earlier from the Additional groups list. Create a pass-word, then press Submit.
Your user is now created and has been assigned all of the necessary permissions to run Chronicall.
12

Step 1 - Add Chronicall CDR server to Node Names IPAdd the IP Address of the Chronicall server into the IP NODE NAMES. Type change node-names ip to access the node names and add the server Name and IP Address as shown below (example uses xxx.xxx.xxx.xxx - you will need to use an actual IP Address):
Step 2 - Setup CDR ServiceType change ip-services to setup a CDR link to the Chronicall Server using the following information. Note the following information may be needed when setting up the Chron-icall CDR service on the Chronicall server. •Local Node is procr •Remote Node: This is the Chronicall node you added in step 1. •Service Type is CDR1 •Remote Port: This is the only information you will need when installing Chronicall. number in this example is 9089 but can be any free port number (please make note of the port number that you use)
See example below:
**Special note - if you are not using CDR data you can skip section 1.3
Section 1.3 - Configure CM to send CDR data
13

Step 3 - Configure CDR ParametersType change system-parameters cdr. Ensure all the fields are as shown below on Page 1 of system-parameters cdr.
1. Note the Primary Output Endpoint is that of the service type added on Step 2.
2. Please change the CDR Date Format to: month/day Chronicall expects this date format to match this, and then you can change how it is presented to you on the reports within Chronicall.
3. Please ensure that all Data Item Length entries are the same as outlined below on Page 2 of system-parameters cdr. Items 35 – seq-num, and item 37 ucid are recommended but optional. In order to enable these features they need to be enabled by Avaya. Please open a ticket with Avaya and ask them to enable special application SA8702.
14

Step 4 - Enable Missed and Internal CallsTo allow missed calls to appear on the Chronicall CDR reports, set CDR Reports to r in the trunk group used for outgoing/incoming calls. 1. Type change trunk-group x where x is the number of the incoming/outgoing trunk group. ** Please ensure that CDR Reports is set to r
See example below:
15

Step 5 - To enable intra-switch calls to be reported, type change intra-switch-cdr and add the Extension numbers of the sets that are to be reported for internal calls.
See example below:
END
16

This section will show you how to export your stations, agents, groups, VDNs and vectors.
Step 1 - Please open a GEDI connection to your Communication Manager
Step 2 - Run a list command to query the data you want.
**Special note - if you are not using CDR for reporting, or if you have an AES Server you can skip section 1.4. The AES server can send Chronicall all the usernames and groups.
Section 1.4 - Exporting CM Users and Groups for CDR Reporting
17
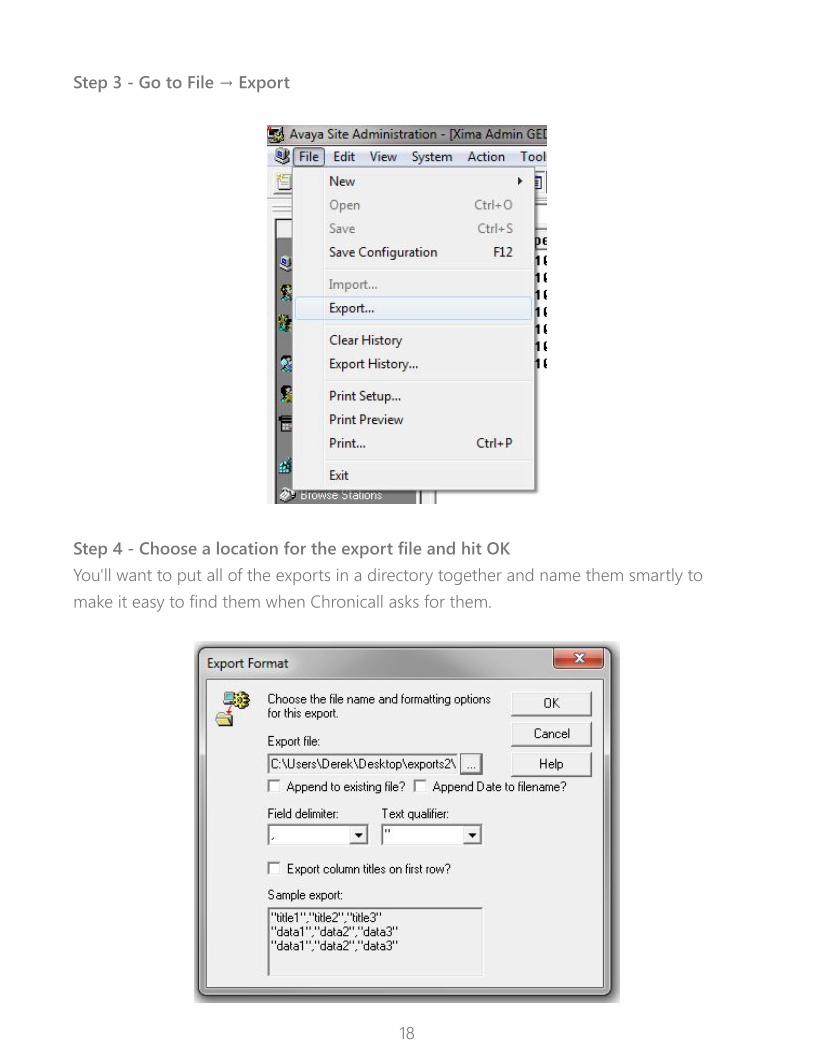
Step 3 - Go to File → Export
Step 4 - Choose a location for the export file and hit OK You'll want to put all of the exports in a directory together and name them smartly to make it easy to find them when Chronicall asks for them.
18

Step 5 - You'll need to repeat these steps for each of the following commands result-ing in the 5 files:list vdnlist vectorlist hunt-grouplist stationlist agent-loginID
Step 6: During the Chronicall installation you will be asked to import these files. Again you don't need these files if you are using an AES Server.
End
Step 1 - Add CTI LinkType add cti-link x command, where x is a number between 1 and 64. Enter a valid exten-sion number under the provisioned dial plan. Set the Typ Field to ADJ-IP and assign a descriptive Name to the CTI LINK. Defaul values may be used in the remaining fields.
Example Below:
**Special Note – If you are not using an AES Server you may skip this section
19
Section 1.5 - Configure TSAPI CTI LINK

Step 2 - Enter Node NameType change node-names ip In the compliance-tested configuration, the CLAN IP address was utilized for registering H.323 endpoints (Avaya IP Telephones, Avaya IP Agents, and Avaya AES DMCC stations). The CLAN-AES IP address was used for connectivity to the Avaya AES server. Please note if you are configuring the AES to connect to an S8300 the IP Address needs to be the same IP as your processor.
See example below:
Step 3 - Change IP ServicesType change ip-services On Page 1, configure the Service Type field to AESVCS and the Enabled field to y. The Local Node field should be pointed to the CLANAES board that was configured previously in the node-name ip form. During the compliance test, the default port was utilized for the Local Port field.
See example below:
20

Step 4 - Change IP ServicesType change ip-services On Page 3, configure the Service Type field to AESVCS and the Enabled field to y. The Local Node field should be pointed to the CLANAES board that was configured previously in the node-name ip form. During the compliance test, the default port was utilized for the Local Port field.
See example below:
Step 5 - Log into the AES web Interface See example below:
21

Step 6 - Add New ConnectionSelect Communication Manager Interface and add new connection. The next page will prompt you to enter a password. If your processor is already configured please proceed to next step.
See example below:
You will need to enter the switch password that you configured in step 4
22

Step 7 - Add CLAN to AESAfter returning to the Switch Connections page, select the radio button corresponding to the switch connection added previously, and click on Edit CLAN IPs. Enter the IP address of the CLAN used for Avaya AES connectivity from Section 3.6, and click on Add Name or IP.
See example below:
You will also need to set up an AES user. You can do this by accessing the Management Console on the AES server.
Step 1 - In a web browser, navigate to http://[AES server IP address] and log in.
From here your Communication Manager should be able to communicate with your AES Server.
END
23
Section 1.6 - Configure AES Server

Log in and expand the AE Services section at the top of the sidebar to the left, followed by TSAPI, then TSAPI Links. Make sure the TSAPI link is selected and select Edit. Change the ASAI Link Version to 5 and apply the changes.
24

Step 2 - Under User Management, open User Admin and select Add User. Give the new user a name and a password. Change the CT User option to Yes, then scroll down and press Apply.
** Special Note – for the password alphanumeric is accepted and the following special characters . , @ $
25

Step 3 - You may also need to enable SDB for TSAPI Service, JTAPI and Telephony Web Services under Security, Security Database, Control.
26

Step 4 - Expand the CTI Users section next to the Control Link and select List All Users. Select the Chronicall user and select Edit. Instead of giving this user specific access privi-leges, select the Unrestricted Access box. Chronicall itself will handle the appropriate access permissions.
For future reference, you will want to copy the first Tlink under Security, Security Database, Tlinks, and paste it somewhere it will be easy to access later.
27

Under Maintenance, open the Service Controller. Here, you will need to select TSAPI Service and click Restart Service.
END
28
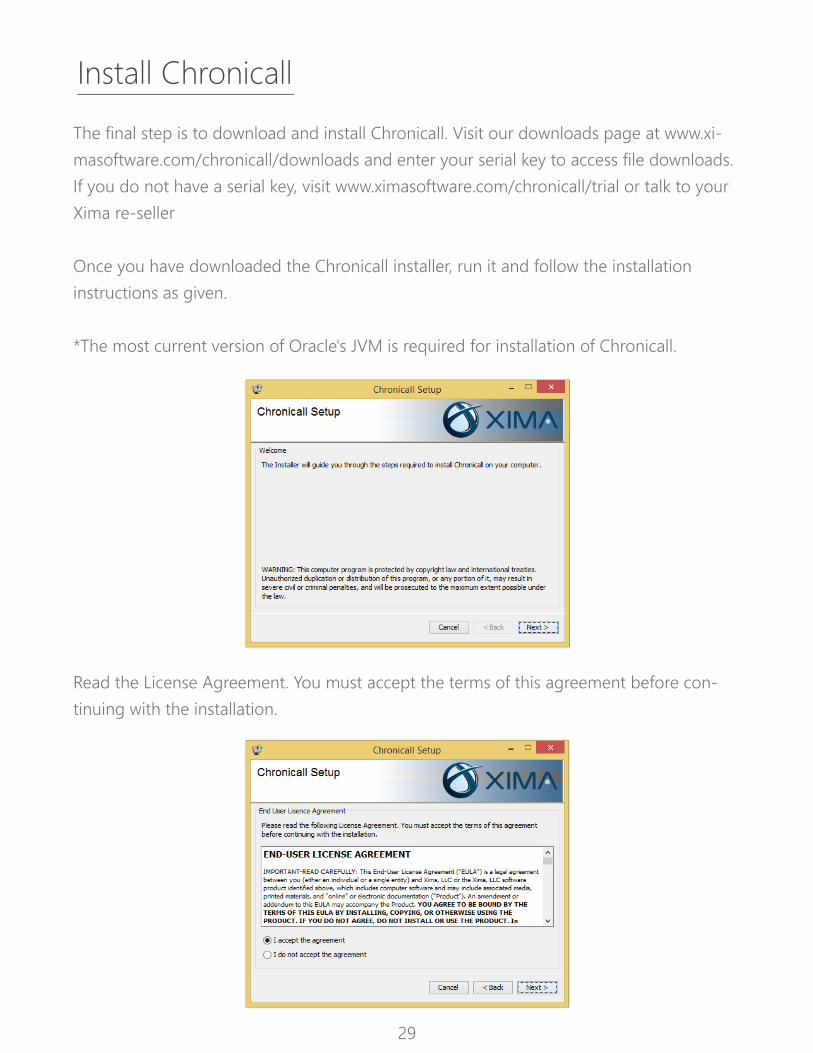
The final step is to download and install Chronicall. Visit our downloads page at www.xi-masoftware.com/chronicall/downloads and enter your serial key to access file downloads. If you do not have a serial key, visit www.ximasoftware.com/chronicall/trial or talk to your Xima re-seller
Once you have downloaded the Chronicall installer, run it and follow the installation instructions as given.
*The most current version of Oracle's JVM is required for installation of Chronicall.
Read the License Agreement. You must accept the terms of this agreement before con-tinuing with the installation.
29
Install Chronicall

Chronicall will be installed in the folder shown. To change where Chronicall is installed, enter the file path or click Browse.
Chronicall will only log when it is able to verify its registration with Xima Software. Please enter your serial key below to register Chronicall.
Chronicall can optionally be installed in Demo Mode, which allows you to use the soft-ware without a connection to a phone system. Demo Mode is used by authorized Xima Partners who need to demonstrate Chronicall without a phone system.
30

Chronicall stores its data in a PostgreSQL database. Indicate which port PostgreSQL should use to communication with other applications. A database user will be created with the credentials listed.
Chronicall is accessed through a web interface served by Apache Tomcat. Please make sure no other applications are using the Tomcat port as you will be unable to access Chronicall if this port is not free.
31

If your customer purchased Recording Library it will ask if you would like to Install the Recording Library Service. If this is the PC where the recordings will be stored please select “yes”.
If this is not the PC where the recordings will be stored it will ask you to copy a URL that you can use to install the Recording Library software on the storage PC.
32

Once you reach this screen, the installer has all of the information necessary to begin installation. To begin, click the Install button.
A progress bar will be displayed while Chronicall is installed.
33

When the installation is finished, copy or bookmark the web address given to you. This is how you will access Chronicall.
Open Chronicall. The default user login is Administrator, and the password is password. These can be changed later.
34

The first time you open the Chronicall web client, you will be presented with a short setup wizard that will help you connect your phone system and choose agents for Realtime and Agent Dashboards functions. You can skip this setup process by clicking Skip in the bottom right corner of the Chronicall window, but it will reappear the next time you use Chronicall.
Are you going to use TSAPI licenses to log additional details? If yes, select Use TSAPI. If no, select Do Not use TSAPI
35

If you Select yes, please follow the next step. If you selected no, please proceed to CDR only installation.The first time you open the Chronicall web client, you will be presented with a short setup wizard that will help you connect your phone system and choose agents for Realtime and Agent Dashboards functions. You can skip this setup process by clicking Skip in the bottom right corner of the Chronicall window, but it will reappear the next time you use Chronicall.
Enter your AES and CM server information. Hitting next will verify that your CM user is created and has necessary access. After your CM user is verified it will download informa-tion including your users and groups which may take a couple of minutes.
36

Enter the requested TSAPI and AES information. Hitting next will verify that your AES user is created and has necessary access.
Enter which stations, and agents you would like to log data for within Chronicall.
37

Set a number of max TSAPI licenses and check the boxes for the stations and skills you would like to monitor. Please note, that if you don't assign a TSAPI license to a station or agent, they will default to CDR logging. Logging both TSAPI and CDR is possible.
Select the hunt group you use for voicemail.
38

On this screen, you can enter information about your AUX Work states and reason codes. Select Add to add a new reason code.
Choose a code number and name for each reason code, then press OK.
39

On this screen, choose the users you would like to monitor with Realtime.
On this screen, choose the users you would like to monitor with Dashboards.
40

CDR Installation instructionsIf you are logging data with an AES server please select Do no use TSAPI.
Enter your AES and CM server information. Hitting next will verify that your CM user is created and has necessary access. After your CM user is verified it will download informa-tion including your users and groups which may take a couple of minutes. If you do not have an AES server, please click Import Configuration Manually to import your users and groups.
41

You will need to import each of the files listed below in order to categorize the database with the CDR records
Each file should be imported as a .txt file
42

Please select which users receive a Chronicall logging license
You have finished installing Chronicall.
Press Finish and you will be taken to the main Chronicall interface. Visit our support site at www.ximasoftware.com/support for additional information.
43
Copyright 2015 - Xima Software 888.944.XIMA