av-2 - aircraft spruce & specialty co · should your aircraft fly “nose up” or “nose...
TRANSCRIPT

IntroductionThe AV-2 is a 3 1/8” instrument that can be used as a display interface for an artificial horizon reference system (AHRS), an advanced digital compass, or both depending on which MGL Avionics sensor packages is connected to the AV-2.
The AV-2 can be setup to display the following:• Compass with five different displays (requires MGL Avionics SP-2 sensor package)• Horizon with or without slip indicator (requires MGL Avionics SP-3/4/5 sensor package)• Turn and bank indicator (requires MGL Avionics SP-3/4/5 sensor package)• Combined compass and horizon display with bank indicator and optional slip indicator (requires MGL Avionics
SP2 & SP-3/4/5 sensor package)
You can also share sensor packages between various different sizes of instrument e.g. Infinity 2 1/4” AV-1 units. For example you may want a 3 1/8” horizon display but a 2 1/4” compass/turn and bank indicator.
1 Features• Artificial horizon reference system (AHRS) display unit with slip indication as well as turn and bank
indication• Advanced magnetic compass with course steering feature• Can be setup as an individual compass display, artificial horizon or both• The AV-2 is connected to the sensor packages by a simple 2 wire communication link. This allows for the
optimum placement of the sensor package in the aircraft• More then one AV-2 can be connected onto an airtalk link. This allows the compass, artificial horizon and
the turn and bank indicator to be displayed on different AV-1/2 units• Standard 3 1/8” aircraft enclosure (can be front or rear mounted)• Rotary control plus 2 independent buttons for easy menu navigation and user input• A red LED illuminates when the artificial horizon sensor range has been exceeded• Large backlit graphic LCD with adjustable contrast• Wide input supply voltage range of 8 to 30V DC with built in voltage reversal and over voltage protection
for harsh electrical environments• Light weight design• Field upgradeable firmware• 1 year limited warranty
AV-2Artificial horizon and advanced magnetic compass indicator
Operating Manual – English 1.00

AV-2 Operating Manual Page 2
2 AV-2 Layout
3 Main DisplayThe AV-2 can be set up to show 3 different display screens. Turning the rotary control either clockwise or anti-clockwise allows you to select the operation of the AV-2 as an artificial horizon with mini compass and mini turn and bank indicator, turn and bank indicator, and a digital compass.
Note: If you have purchased the artificial horizon and compass sensor packages with two or three AV-1 or AV-2 displays, it is possible to setup either of the AV-2 units to display either the artificial horizon, turn and bank indicator or the compass. This allows you to use any combination of horizon, turn and bank or compass displays. You can connect further AV-2 or AV-2 units should you require this for a dual cockpit layout. Up to six AV units can be configured to give you 2 x horizon, 2 x turn and bank as well as 2 x compass displays.
LED alarm:The red LED will illuminate if the artificial horizon has exceeded its maximum rate of bank, pitch or yaw
Up/F1 Button:Up button in menu systemArtificial Horizon: Pitch level funtionCompass: Enable coursesteering display
RCA:RCA connects tosensor package(s)
Down/F2 Button:Down button in menusystemArtificial Horizon:Fast level functionCompass: Enable the reverse course display
Harness:Harness connectsto power
Rotary Control (Up/Down) & Enter Button:Press the rotary control during normal mode to access the menu system.Rotate anti/clockwise for up/down menu scrolling. During normal modeturning the rotary control anti/clockwise will scroll through the main displays(Artificial horizon, Artificial horizon with compass, compass, turn and bank indicator).

AV-2 Operating Manual Page 3
3.1 Artificial Horizon with Compass
Pitch level function
Should your aircraft fly “nose up” or “nose down” due to trim, then you can press the F1 key to level the pitch as displayed on the horizon.
3.2 Turn and Bank IndicatorThe slip indicator is always enabled, regardless of the slip on/off setting.
Slip indicator
A “step on the ball” slip indicator can be enabled to appear below the horizon display. The source of information for this indicator is derived from the accelerometer aligned with the pitch axis of the aircraft, i.e. the acceleration forces acting in the direction of the wings.
Fast level function
Should the horizon display be toppled (i.e. indicating incorrectly by a large amount) due to excessive maneuvering, exceeding maximum bank, pitch or yaw rates; pressing the F2 key will indicate to the instrument that you are flying straight and level and that gravity tracking may be accelerated to ensure rapid realignment of the horizon.
Estimated horizon
10 degree pitch bars
Slip indicator can be turned on or off in the menu system
Magnetic (M) or true heading (T) indicator
Magnetic or true heading reading (compass can be switched on or off in the menu system)
Slip indicator
Marker description
Mini turn and bank indicator (can be switched on or off in the menu system)

AV-2 Operating Manual Page 4
Extended range of operation
Bank operates over a full 360 degree range allowing unlimited use of the horizon for aerobatics, provided that maximum published bank, pitch and yaw rates are not exceeded. Maximum rates under normal operation are approximately 165 degrees per second, valid for all three axis simultaneously. Depending on conditions maximum rates may reach 180 degrees per second. No caging of the electronic gyro system is required during excessive maneuvering or aerobatics, unlike systems based on mechanical gyros. Simply correct the horizon when you are finished or let the horizon right itself which will happen during straight and level flight.
Message displayed when the maximum bank, pitch or yaw rates have been exceeded
3.3 Digital Compass
The digital compass can be displayed in 5 different ways. The way the compass is displayed can be setup in the menu system under “COMPASS SETUP”
3.3.1 Numeric compass displayThe heading tape shows headings as numbers in degrees
3.3.2 Mixed compass displayThe heading tape shows headings as number in degrees except for the four major cardinal points which are shown as N, S, E and W
Magnetic (M) or true (T) North indicator
Magnetic (M) or true (T) North indicator
Please see the table under section 4.4 for more information about this icon
Please see the table under section 4.4 for more information about this icon

AV-2 Operating Manual Page 5
3.3.3 Cardinal 1 compass displayThe heading tape shows headings as major and minor cardinal points: N, NNE, ENE, E, ESE, SSE, S, SSW, WSW, W, WNW, and NNW
3.3.4 Cardinal 2 compass displayThe heading tape shows headings as major and intermediate cardinal points: N, NE, E, SE, S, SW, W and NW
3.3.5 Rose compass displayThe display shows a graphic representation of a vertical compass card
3.3.6 Using the course steering indicatorTo activate the course steering indicator, steer the required heading and then press the F1 key. The compass will display:
The F1 key pressed at a heading of 83 degrees. Currently the heading equals the course to steer as shown below the heading. No course steering indicators are shown.
Magnetic (M) or true (T) North indicator
Magnetic (M) or true (T) North indicator
Magnetic (M) or true (T) North indicator
Please see the table under section 4.4 for more information about this icon
Please see the table under section 4.4 for more information about this icon
Please see the table under section 4.4 for more information about this icon

AV-2 Operating Manual Page 6
The current heading is 77 degrees; course steering indicators show the need to steer slightly to the right to intercept the course.
The current heading is 28 degrees; course steering indicators show that a large correction to the right is required to intercept the course.
Each “>” or “<” equals 2 degrees of heading error. To cancel the course steering function, simply press the F1 key again.
3.3.7 The reverse course (from heading) display
Press the F2 key to activate the reverse course display. This display remains active for about 4 seconds before reverting back to the normal heading display.
Heading stability issues
You may find short term fluctuations of the heading occurring. These tend to be very small and are typically less than one degree. This could still cause the heading to fluctuate occasionally by a single degree. These fluctuations occur naturally in the earth’s magnetic field and can also be caused by nearby electrical equipment such as radios, lamps, electronic instrumentation or computers, even the ignition systems of engines. The AV-2 is specifically designed for fast response and thus may show residual fluctuations of the magnetic field that are impossible to filter out without causing delays in the update of the heading information. Each measurement interval of 0.5 seconds consists of a computational evaluation of 12.000 individual measurements of the magnetic field at the magnetometer sensors.
3.4 Sensor communication errorShould the AV-2 lose communication with the SP-X instrument for the duration of 5 seconds or more, the AV-2 will display the following message:

AV-2 Operating Manual Page 7
4 Menu SystemPressing the rotary control button during the normal display mode will cause the AV-2 to enter the menu system. Use the up/down keys or the rotary control to navigate through the menu system.
4.1 Exit Menu
Pressing the rotary control on this menu item will cause the AV-2 to exit the menu system. All changes made during navigation of the menu system will be saved in non-volatile memory on exiting the menu system. If you remove power before exiting the menu the instrument will not save any changes.
4.2 Display Setup
Move the highlight over the “DONE” menu item and press the rotary control to return to the main menu
Select this menu option to adjust the display contrast
Select this menu option to turn the backlight on or off
4.3 Artificial Horizon Setup

AV-2 Operating Manual Page 8
Move the highlight over the “DONE” menu item and press the rotary control to return to the main menu
Select if you would like to enable the slip indicator to be shown underneath the horizon display. The slip indicator operates in the same fashion as the well known “step on the ball” indicator in traditional cockpits.Note: The slip indicator is always enabled in the turn and bank indicator mode
This function allows you to set your slip indicator to exactly zero even if your aircraft tends to fly slightly wing down. The procedure is to place the aircraft in a stable, straight and level attitude during calm flight conditions and then select this function. To cancel the correction, place your sensor absolutely horizontal (use a spirit level) and select the function again.
Select if you want the slip to have a high sensitivity or a low sensitivity setting
See corresponding SP-X documentation on using this feature
See corresponding SP-X documentation on using this feature
Select whether you want the turn and bank indicator’s information source to be the bank angle or actual turning information from the gyros (SP-X dependant)
Select whether you want the turn and bank indicators to show a 1min/rotation or 2min/rotation turn
Select whether you want the mini turn and bank indicator to be shown on the horizon display screen
4.4 Compass Setup
All compass related parameters are set up here
Move the highlight over the “DONE” menu item and press the rotary control to return to the main menu

AV-2 Operating Manual Page 9
Select whether you want the mini compass to be shown on the horizon display screen
Select the desired compass display mode as described in section 3.4 above
Select whether you would like the instrument to display magnetic or true heading. If you select true heading, you need to enter the correct magnetic variation for your location. You can find your local variation on aeronautical or maritime charts. The heading displays will be augmented with °M or °T depending on the mode you have selected.
Enter the magnetic variation of your location. This is only used if you would like the instrument to display true heading. True heading is the heading relative to the geographic North Pole. Magnetic heading is the heading relative to the magnetic North Pole. Variation is expressed in degrees east or west. Please note that should you move a long distance, you may have to update the variation setting. This setting may be ignored if you only use the magnetic heading display option.
Select the mode you would like your compass to operate under
2D: This mode selects a two axis compass system. This has no tilt compensation.3D A: This mode selects a three axis compass system. Tilt compensation by means of gravity vectoring via accelerometers.3D G: This mode selects a three axis compass system. Tilt compensation by means of information supplied by an artificial horizon.
SP-1 can only be used in 2D mode.SP-2 can be used in modes 2D or 3D A. 3D G is available if an external artificial horizon is connected.SP-3hc can be used with any of the above modes.
Each mode has advantages and disadvantages over other modes. Briefly, these are outlined in the table below:
Mode Advantages Disadvantages
2DMost accurate as long as the compass remains level. Not affected by turns or acceleration provided compass remains level during turns.
Large heading errors when compass is tilted.The magnitude of these errors is dependent on the heading, type of tilt (pitch and/or bank) as well as location on Earth.
3D-A Self-contained tilt compensated compass. Will compensate for most tilt errors up to 60 degrees of tilt.
Cannot correctly compensate for tilt during any form of turn due to centrifugal forces acting on the accelerometers.
3D-G Can provide for accurate heading even during turns as tilt compensation is based on gyro derived horizon.
Can show very large errors if the horizon information is invalid which could have a number of causes such as exceeding operational limitations of the horizon system.

AV-2 Operating Manual Page 10
Using the deviation calibration feature
When you install your compass sensor package, it may be surrounded by several items or materials that in some way change the strength and/or direction of the earth magnetic field that your sensors are measuring. If left unattended, this may contribute to considerable errors in the heading as indicated by your instrument.Due to the magnetic sensor not being based on a magnetic item (such as a magnetic needle) as in a normal compass, the effect of deviation is lessened a little. This is because the needle in a magnetic compass will be attracted by iron, even if the offending iron has no effect on the magnetic field (i.e. does not change the field direction or strength in a hypothetical case).
Deviation needs to be corrected if you intend using the compass for navigational purposes. The procedure for this is traditionally called a “compass swing”. Often, two small magnets are placed close to the compass in an effort to correct some of the larger errors. Smaller, remaining errors are then noted on a “deviation chart” and this is placed next to the compass for future reference.
With the SP-1, 2 and 3, a very simple method can be used to correct for most of the deviation that may be present in your aircraft or vehicle. However, before you start, ensure that the sensor package is installed as far away as possible from any of the following:
• Ferro magnetic materials such as iron, many steels and soft magnetic materials such as ferrites. Any magnets must be located as far away as possible from the sensor package. This includes electromagnets as used in solenoids, electrical motors and relays.
• Cables containing large electrical currents. DC currents will cause magnetic fields around the cables which will lead to deviation. AC currents cause fluctuating magnetic fields that may reduce your compass resolution.
• Be aware that some lower grades of stainless steel may be ferro magnetic.
If in any doubt, use a small magnet to test any metals surrounding the sensor package. We recommend mounting the sensor package using glued on strips of velcro material. This allows for easy alignment of the sensor package horizontal to the earth’s magnetic field.
Never perform the deviation compensation procedure or a compass swing if your aircraft is placed on a reinforced concrete apron or tarmac. The steel that may have been used to reinforce may have a very significant effect on the strength and direction of the magnetic field at your location.
To start the deviation compensation procedure, enter the menu and select “SET DEVIATION”. You will see the display on the right:
Place your aircraft in flight attitude. For example, if you own a tail-dragger, raise thetail. Some tricycle gear aircraft may need to raise the nose gear slightly. The object isto place the sensor package as close to horizontal attitude relative to the earth’ssurface as you possible. Press the F2 key or have an assistant do this for you if youare busy holding up your aircraft’s tail. You will get the display on the right:
Proceed as instructed and turn the aircraft through a full 360 degrees at least once. Allow this procedure to take some time, perhaps a minute. You can proceed to turn your aircraft though two or more turns, however you need to fully complete at least one full turn.If you like, you can press the F1 key during this procedure to see the actual numeric data obtained from the magnetometers. You will see the instrument tracking minimum and maximum values for each sensor and you can see the current values.
Once you have completed your turn(s), press the F2 key again to inform the instrument that you have finished. Your instrument will at this point calculate the best possible fit of the sensor data to a 360 degree arc taking the relative strengths and offsets of the magnetic field into account. This procedure can result in remarkably good overall performance of your compass.
Please note: After this procedure has been completed, you may have to verify the compass performance by performing a normal compass swing. Should any deviation remain, you need to note this on a deviation card and place this card next to

AV-2 Operating Manual Page 11
the compass. This may be a legally required procedure in your country for your aircraft class. Please check your relevant regulations. Deviation compensation and compass swing may need to be repeated from time to time as the magnetic properties of metals in your aircraft may change over time.
Clears any previous deviation compensation and returns the instrument to factory calibration
The purpose of this function is to cancel out the remaining errors on the main cardinal headings after a deviation compensation calibration has been done.
Align your aircraft exactly on a North/South heading, pointing North. Use another compass outside of the aircraft to ensure that you are aligned exactly on the North/South axis. Select the “SET NORTH” function.
Repeat the above calibration for the South, East and West cardinal headings.
This function, if used properly can lessen any remaining deviation that may be present after you have performed the prescribed compass swing. If you cannot find a successful setting using both methods, examine your installation location more closely. Perhaps you have an interfering metal part nearby. You may need to choose a different location to mount the compass sensor.
Note: In difficult circumstances it may not be possible to find a location for the sensor inside the fuselage of your aircraft. This may be particularly true for aircraft based on tubular steel frames. In this case you need to locate the compass sensor inside the wing (perhaps in a wing-tip).
5 Operating the Artificial horizonThe horizon is designed to erect itself rapidly whenever possible. This means that during ordinary flight you do not interact with the unit. The horizon may loose accuracy. This may have several causes:
• You have exceeded the maximum allowable turn rate on one or more axis (approximately 165 degrees/second)• Continuous maneuvering without giving the unit a chance to correct for errors. In this case gyro drift will eventually
cause a noticeable error in the horizon• The IMU is subject to vibration from the engine. Often you will find this will have an effect only at very specific
engine RPM• The IMU is subject to rapid temperature changes or is operating outside of the recommended temperature range
(consider re-setting offsets in this case)• The IMU bump factor is set incorrect for your aircraft. (SP-X dependant) Try a different setting
In order to correct the horizon display, you need to fly straight and level. The horizon will correct itself in this case given some time (about 15 seconds to a minute depending on severity of the error and your “slew” setting). You can also press the F2 key to force an immediate correction. You must fly straight and level for this to work correctly.
Power and trim changes will affect the pitch display of the horizon. You can set the horizon to zero by pressing the F1 key. To get back to the real horizon, press the F1 key again.

AV-2 Operating Manual Page 12
6 Using the IMU in flightThe pilot in command of the aircraft has to be aware of the following:The SP-X sensor packages are not certified by the FAA or any other agency for use during IFR (instrument flight rules). This implies that any such flight that uses the SP-X IMU as reference for either heading, turn and bank or horizon is illegal.
Do not do it!
Following is a set of guidelines should you choose to ignore the above statement. This is by no means to be seen as any form of recommendation by MGL Avionics or its appointed distributors to allow or recommend such flights.
• Flying in IMC (IFR) conditions requires practice and an understanding of the functions and limitations of all instruments used as reference for such flights. It is foolish to attempt to fly any aircraft blind without extensive training for such flights.
• Train yourself before attempting any IFR flights, even if this is illegal. Train in VFR (visual flight rules) conditions by flying only with reference to the instruments. Have a qualified co-pilot watch over your progress while you are training. Do not train for IFR flights without a second pilot that has visual contact to the Earth’s horizon on board.
• Only ever attempt to use the instruments in an emergency if you have no other option, and only if you are proficient in their use.
In order to fly though an area of limited visibility:
• Ensure that you will have visual airspace when exiting the area of limited visibility. It is of no use if a cloud extends to ground level or to a mountain.
• Maintain straight flight, slowly descending or level as required. Do not maneuver.• If you have to turn, turn shallow (25 degrees bank angle or rate one turn). Only turn 90 degrees at a time then
level out for a short time to allow the horizon to correct for any errors. Verify that you are not turning by looking at the compass heading.
• Be aware that turbulence may decrease the accuracy of your horizon display if maximum turn, bank or pitch rates have been exceeded or other factors have contributed to an error of the horizon display.
• If you have a digital compass from the MGL Avionics range, set it to 2D or 3D-A mode and use the course steering function to help you maintain a straight path. This way you have a backup should the horizon become invalid for whatever reason.
7 Loading Factory default settingsPressing and holding the F1 and F2 keys simultaneously on power up will cause the AV-2 to load preprogrammed factory default settings. The following screen will be displayed.
8 CleaningThe unit should not be cleaned with any abrasive substances. The screen is very sensitive to certain cleaning materials and should only be cleaned using a clean, damp cloth.
Warning: The AV-2 is not waterproof. Serious damage could occur if the unit is exposed to water and/or spray jets.

AV-2 Operating Manual Page 13
9 AV-2 SpecificationsOperating Temperature Range -10ºC to 50ºC (14ºF to 122ºF)
Storage Temperature Range -20ºC to 80ºC (-4ºF to 176ºF)
Humidity <85% non-condensing
Power Supply 8 to 30Vdc SMPS (Switch mode power supply) with built in 33V over voltage and reverse voltage protection
Current Consumption approx. 40mA @ 13.8V (backlight on) 11mA @13.8V (backlight off)
Display 128x64 graphic LCD display. Contrast and backlight is user configurable, green/yellow backlight
Dimensions see Velocity series dimensional drawingEnclosure 3 1/8” ABS, black in color, front or rear mountingWeight Approx. 164 gramsNon-volatile memory storage 100000 write cyclesAirtalk protocol 19200 baud, 8 data bits, no parity, 1 stop bit (TTL voltage levels)
10 Installation
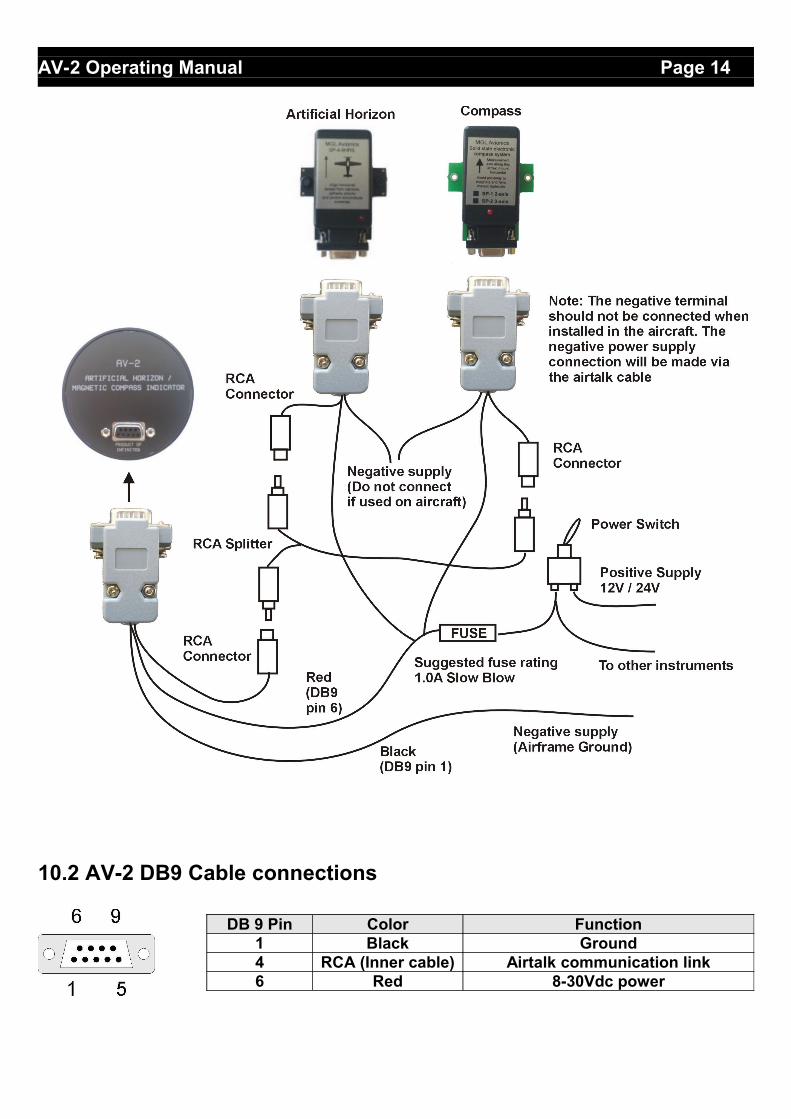
10.1 Connection Diagram
The use of an external 1A fuse is recommended. Connect the supply terminals to your aircrafts power supply. The AV-2 can be used on both 12V and 24V without the use of any pre-regulators. Ensure that the supply voltage will not drop below 8V during operation as this may result in incorrect displays. Should you be installing more than one AV-2 unit, use standard RCA splitter cables to create more nodes on the airtalk-cable.
Using RCA cables
The airtalk link uses easily available RCA video or audio cables. You can connect the SP-X sensor package to up to six AV-2/2 units. You can use ordinary RCA cables and splitter cables for this. You can also make up your own cables. However, use only suitable, shielded cable. Thin 75 ohm video cable are most suitable. The cable can be extended to a length of up to six meters, allowing convenient placement of the SP-X sensor package. Slightly bend the outside tabs on the RCA connectors inwards to ensure a tight fit of the connectors. For critical applications, use very high quality connectors and secure the connectors on cables so they cannot separate by accident.
Note: Please see corresponding sensor package manuals for more information about the installation and use of the artificial horizon and compass.
AV-2 Operating Manual Page 14
10.2 AV-2 DB9 Cable connections
DB 9 Pin Color Function1 Black Ground4 RCA (Inner cable) Airtalk communication link6 Red 8-30Vdc power
AV-2 Operating Manual Page 15
11 WarrantyThis product carries a warranty for a period of one year from date of purchase against faulty workmanship or defective materials, provided there is no evidence that the unit has been mishandled or misused. Warranty is limited to the replacement of faulty components and includes the cost of labour. Shipping costs are for the account of the purchaser.
12 Disclaimer
Operation of this instrument is the sole responsibility of the purchaser of the unit. The user must make themselves familiar with the operation of this instrument and the effect of any possible failure or malfunction.
This instrument is not certified by the FAA. Fitting of this instrument to certified aircraft is subject to the rules and conditions pertaining to such in your country. Please check with your local aviation authorities if in doubt. This instrument is intended for ultralight, microlight, homebuilt and experimental aircraft. Operation of this instrument is the sole responsibility of the pilot in command (PIC) of the aircraft. This person must be proficient and carry a valid and relevant pilot’s license. This person has to make themselves familiar with the operation of this instrument and the effect of any possible failure or malfunction. Under no circumstances does the manufacturer condone usage of this instrument for IFR flights.
Other instruments in the Stratomaster Velocity seriesALT-3 Encoding aviation altimeter and Vertical speed indicator (VSI)ALT-4 Encoding aviation altimeter with Serial RS232 & Parallel Gillham code outputASI-3 Airspeed indicator (ASI) with automatic flight logASX-2 Encoding aviation altimeter and Airspeed indicator (ASI)AV-2 Artificial horizon and magnetic compass indicatorE-1 Universal engine monitorFLIGHT-2 Primary Flight instrumentFF-3 Fuel Computer (single or dual fuel tanks)GF-2 +-10G tilt compensated dual range G-force meterMAP-2 Manifold pressure and RPM IndicatorROTOR-1 Dual Rotor / Engine tachometerRTC-1 Aviation real time clock (RTC), outside air temperature (OAT) and Voltage display RV-3 Universal engine / Rotor RPM IndicatorTC-2 4-Channel thermocouple (EGT/CHT) indicatorTC-3 12-Channel thermocouple (EGT/CHT) indicatorTP-2 Universal temperature and pressure gauge
Note: Product warranty excludes damages caused by unprotected, unsuitable or incorrectly wired electrical supplies and/or sensors, and damage caused by inductive loads.
The manufacturer reserves the right to alter any specification without notice.