automobile skills testing administration...cannot locate or operate one of the components, the...
TRANSCRIPT

Chapter A- Auto Testing (6-12-06)
Page 1
AUTOMOBILE SKILLS TESTING ADMINISTRATION
SECTION 1: PRETEST Greeting. Greet the applicant, review the documents and record the information on the scoring form. If all of the documents are in order the examiner then proceeds to the vehicle inspection. If present, any passenger(s) must remain outside of the vehicle and outside the 50’ x 100’ test course. An interpreter may assist with the instructions, but should then move away from the examiner and applicant. Vehicle Inspection. The purpose of the vehicle safety inspection is to determine whether or not the vehicle is safe to operate. The examiner must conduct a complete vehicle safety inspection before proceeding to the Basic Control Skills test. If the applicant cannot locate or operate one of the components, the examiner may offer assistance; however, such assistance must be noted in the comments section of the scoring form. Examiners should use the following safety equipment guidelines when administering the automobile road skills tests. For purposes of the inspection, safety equipment is divided into 2 categories, mandatory and discretionary. Mandatory equipment appears in bold print; discretionary equipment appears in regular print. If any mandatory safety equipment is missing or inoperable, the test must be terminated. If any discretionary safety equipment is missing or inoperable, the examiners may consider weather and general passenger safety, and then use their judgment to determine whether or not the vehicle is safe enough to be used for the skills test. Examiners should document the missing or inoperable discretionary item in the comments section of the scoring form and advise the applicant to have the item repaired after the test. Examiners should have the applicant pull the vehicle up to the basic control skills reference line. The examiner should begin the safety inspection at the applicant’s door and inspect every item listed while moving in a clockwise direction around the vehicle. The recommended order of the walk around inspection is as follows (with mandatory equipment in bold):
• Left outside and inside rearview mirrors • Horn • Left front tire (proper inflation, no cords showing, no more than one missing lug
nut) • Headlights • Left front turn signal • Right front turn signal • Right front tire (proper inflation, no cords showing, no more than one missing
lug nut)

Chapter A- Auto Testing (6-12-06)
Page 2 • Right rear tire (proper inflation, no cords showing, no more than one missing lug
nut) • Taillights • Right rear turn signal • Left rear turn signal • Brake lights • Center-mounted rear brake light (on 1986 and newer vehicle models) • Left rear tire (proper inflation, no cords showing, no more than one missing lug
nut) During the walk around of the vehicle inspection, the examiner also checks for obvious fluid leaks, damaged suspension and exhaust systems, etc. (the examiner is not expected to crawl under a vehicle). If the vehicle passes the inspection, the examiner proceeds to the basic control skills test.

Chapter A- Auto Testing (6-12-06)
Page 3 SECTION 2: BASIC CONTROL SKILLS EXERCISES The basis control skills test is designed to evaluate skills that are essential for the safe control of the vehicle. The basic control skills test consists of 3 maneuvers that evaluate the applicant’s ability to control a vehicle and judge its position in relation to other objects. The 3 maneuvers shall be conducted in the following order, forward stop, sight-side backing and blind-side backing. The ending position of one maneuver is the starting position for the next maneuver. The forward stop simulates a stop line or cross walk, sight-side backing simulates backing into a driveway and blind-side backing simulates curved path backing.
Refer to Appendix A-1 for diagram of the basic control skills course. Before reading the instructions to the applicant, the examiner shall set up the blind-side backing space by adjusting the position of the moveable 8-feet long cable that serves as a boundary. The examiner shall position the cable, along with cones/poles, in line with the rear of the vehicle (the front of the vehicle must be even with the reference line). Trailer hitches, rear-mounted spare tires and snowplows are considered to be part of a vehicle. After adjusting the moveable cable, the examiner should then evenly space the remaining cones/poles along the blind-side backing curbside line. The space must measure the vehicle length plus 6 feet. Before each exercise, the examiner shall read the instructions verbatim and show the illustration of the maneuver so that the applicant has a clear understanding of the exercise. If the applicant does not understand what is expected, the examiner must repeat or paraphrase the instructions. The applicant may walk around and examine the course before beginning the first exercise. After the exercises begin, the applicant must remain in the vehicle with the seatbelt fastened unless the examiner gives permission for the applicant to get out of the vehicle. The examiner may allow the applicant to get out of the vehicle between exercises to clarify instructions, or for any other reason (as determined by the examiner). The examiner shall not allow the applicant to get out of the vehicle during any exercise. During any exercise, if an examiner determines an applicant’s attempt at a maneuver indicates he or she did not understand, the examiner should clarify the instructions and allow the applicant to perform the exercise again. Errors from the initial attempt are not counted, but the incident must be documented on the scoring form in the comments section. The exercise must from restarted with the vehicle in the original starting position. If the examiner determines the applicant is purposely disobeying instructions, the examiner should advise him or her that the test would be stopped if the behavior continues. The examiner should document this warning in the comments section. If the examiner determines the driver continues to disregard instructions or fails to perform a maneuver in good faith, the examiner may stop the test. The examiner should mark the

Chapter A- Auto Testing (6-12-06)
Page 4 “Disregard Instructions” box in the space next to the “Automatic Failure” heading. A detailed explanation must be written in the comments section of the scoring form. Forward Stop exercise. The examiner shall read the instructions verbatim and show the illustration of the maneuver so that the applicant has a clear understanding of the exercise. If the applicant does not understand what is expected, the examiner must repeat or paraphrase the instructions. The examiner then moves to a position near (not at) the line and signals the applicant to begin the exercise. The applicant drives forward and attempt to stop the vehicle with front of the vehicle as close as possible to the line without going past it. The applicant may not back up the vehicle after beginning the exercise. The applicant must remain seated and may not lean out of the window. When the applicant is finished, he or she must put the vehicle in park and taps the horn. The examiner scores the applicant on the vehicle’s final position relative to the forward stop line. Before continuing to the next exercise, the examiner assists the applicant to get the vehicle into the proper position for the next exercise. The vehicle should be positioned with the forwardmost point of the vehicle at the forward stop line. This allows every applicant the same starting point and the full 30 feet for the sight-side backing exercise.
Refer to Appendix A-2 for an illustration of the forward stop exercise and examiner scoring position.
Sight side Backing exercise. The examiner shall read the instructions verbatim and show the illustration of the maneuver so that the applicant has a clear understanding of the exercise. If the applicant does not understand what is expected, the examiner must repeat or paraphrase the instructions. The examiner then moves into position and signals the applicant to begin the exercise. The applicant backs the vehicle into the simulated driveway. When the applicant is finished, he or she puts the vehicle in park and taps the horn. The examiner scores the applicant on any errors made when maneuvering into the space and then scores the vehicle’s final position.
Refer to Appendix A-3 for an illustration of the sight-side backing exercise and the proper examiner scoring position.
Blind side Backing exercise. The examiner shall read the instructions verbatim and show the illustration of the maneuver so that the applicant has a clear understanding of the exercise. If the applicant does not understand what is expected, the examiner must repeat or paraphrase the instructions. The examiner then moves into position and signals the applicant to begin the exercise. The applicant drives beyond the entrance of the space, stops and backs the vehicle into the space. The applicant tries to finish the exercise with the vehicle completely within the space. When the applicant is finished, he or she must put the vehicle in park and tap the horn. The examiner first scores the applicant on any errors made while backing and then scores the vehicle’s final position.
Refer to Appendix A-4 for an illustration of the blind-side backing exercise and proper examiner scoring position.

Chapter A- Auto Testing (6-12-06)
Page 5 SECTION 3: BASIC CONTROL SKILLS SCORING The applicant’s performance is scored on the number of repositions and encroachments committed during the exercises, as well as the vehicle’s final position relative to the exercise boundaries. Encroachments. An encroachment is scored when the applicant’s vehicle (excluding mirrors) touches or crosses over any part of the exercise boundary or cone(s). The base of the cone marks the boundary line. On the scoring form, “Y” corresponds to sight-side backing (“y-turn”) and “P” corresponds to blind-side backing (“parallel parking”). Each time an encroachment is observed, mark an “X” in the box of the corresponding exercise. If no error is observed leave the box blank. The boundary lines are to be treated as if they marked the position of vertical walls. An encroachment is scored if any part of the vehicle (excluding mirrors) would touch a wall or go through it. Repositions. A reposition is scored when the applicant stops and pulls forward during a backing exercise. On the scoring form, “Y” corresponds to sight-side backing and “P” corresponds to blind-side backing. Each time a reposition is observed, mark an “X” in the box. If no error is observed leave the box blank. Final Position. For the sight-side and blind-side backing exercises, the applicant is scored on the vehicle’s final position. The applicant is scored 1 point for a final position error if the vehicle is outside of the exercise boundaries. On the scoring form, the final position boxes are: “In Y-Turn space” which corresponds to the sight-side backing exercise and “In parallel parking space” which corresponds to the blind-side backing exercise. Forward Stop. A 2-feet clearance area is the reference for scoring the forward stop. On painted courses a painted dashed line marks the clearance area. On portable courses, the clearance area is marked with two 2-feet boards placed perpendicular to the forward stop line. To score, the examiner determines if the forwardmost part of the vehicle is inside or outside (over or short) of the clearance area. If the vehicle is over or short of the clearance area, 1 point is scored. The examiner places an “X” in the box on the scoring form. The box is left blank if the vehicle is within the clearance area.
Refer to Appendix A-5 for an illustration of the forward stop clearance area. Sight-side Backing. As the applicant backs the vehicle toward the simulated driveway entrance, the examiner moves to the left and right of the rear of the driveway and scores each encroachment and reposition. For examiner safety, he or she should always stand in the vision line of the applicant. The examiner should not become distracted or take their eyes off a vehicle until it has stopped and the applicant has tapped the horn to inform the examiner he or she finished the exercise.

Chapter A- Auto Testing (6-12-06)
Page 6 Continue Lines: An examiner determines if the applicant has to continue the exercise based on the final position of the vehicle in relation to the continue lines. The applicant is required to make a legitimate attempt at positioning the vehicle completely inside the simulated driveway. The applicant accomplishes a legitimate attempt when the vehicle has backed a curved path and is completely inside the sight-side backing lines and continue lines. On a painted course, the continue lines are parallel to the sidelines. On a portable course, the continue lines are perpendicular to the sidelines. If any part of the vehicle (excluding mirrors) is outside of the continue lines, the examiner shall instruct the applicant to, “Continue the exercise until the vehicle is completely inside the space.” When this occurs, the examiner writes “Continue SSB” in the comments section on the scoring form. The examiner continues scoring encroachments and repositions until the applicant has completed the exercise. Note: If the rearmost part of the vehicle is positioned beyond the furthest most base of the cones in the back of the sight-side backing, the examiner shall instruct the applicant to continue the exercise. Final Position: Once the applicant has backed completely into the simulated driveway, 1 final position error is scored if any one of 3 sides (both sides and rear) of the vehicle (excluding mirrors) is over a boundary line (front excluded); or if the rear most part of the vehicle is not within the rear clearance area. The vehicle may not be resting on or over the boundary lines.
Refer to Appendix A-6 for illustrations of the sight-side backing continue lines and clearance area.
Blind-side Backing. As the applicant backs the vehicle into the space the examiner moves up and down the curbside line of the space and scores each encroachment and reposition. For examiner safety, he or she should always be in a position to be seen by the applicant. The examiner should not become distracted or take their eyes off the moving vehicle until it has stopped and the applicant has tapped the horn.
Continue Lines: An examiner determines if the applicant has to continue the exercise based on the final position of the vehicle in relation to the continue lines. The applicant is required to make a legitimate attempt at positioning the vehicle completely inside the space. The applicant accomplishes a legitimate attempt when the vehicle has backed a curved path and is completely inside the blind-side backing lines and continue lines. On a painted course, the continue lines are parallel to the sidelines. On a portable course, the continue lines are perpendicular to the sidelines. If any part of the vehicle (excluding mirrors) is outside of the continue lines the examiner shall instruct the applicant to, “Continue the exercise until the vehicle is completely inside the space.” When this occurs, the examiner writes “Continue BSB” in the comments section on the scoring form. The examiner continues scoring encroachments and repositions until the applicant has completed the exercise. Note: If the front or rear of the

Chapter A- Auto Testing (6-12-06)
Page 7 vehicle is positioned beyond the base of the cones in the front or back of the blind-side backing space, the applicant is asked to continue the exercise. Final Position: Once the applicant has backed completely into the space, 1 final position error is scored if the vehicle (excluding mirrors) is not completely inside the exercise boundary lines. The vehicle may not be resting on or over the boundary lines.
Refer to Appendix A-7 for illustration of the blind-side backing lines.
Calculating the final BCS score. At the end of the basic control skills test, calculate the applicant's score by adding the number of repositions, encroachments, and final position points assessed during each of the exercises. A maximum of 5 errors is counted when calculating the Blind-Side Backing exercise even though the applicant may a have incurred more than 5 errors. The examiner records “Max 5 BSB” and the total raw score in the comments section when an applicant exceeds the maximum 5 errors on blind-side backing. This comment indicates the examiner has counted only 5 Blind-Side Backing errors when calculating the total Basic Control Skills score. Record the total Basic Control Skills score on the front of the scoring form in the test results area making sure that the total score does not include any more than 5 errors for the blind side backing exercise if more than five occurred. The applicant passes with a score of 6 or fewer errors. The applicant fails with a score of 7 errors or more. The examiner marks “P” or “F” in the basic control skills scoring area. Example: an applicant committed the following errors: Forward Stop: No error
Sight side backing: One reposition
Blind side backing: 3 repositions, 2 encroachments, and out of space The scoring form should have an “X” marked in the pass box, 06 written in the Basic Control Skills test results box and, in the comments section, “Max 5 BSB, raw score 7”. In this case the applicant has scored 6 errors on the Blind-Side Backing exercise but only 5 are counted for the total score plus the 1 error on the Side-Side Backing exercise for a total score of 6.

Chapter A- Auto Testing (6-12-06)
Page 8 SECTION 4: ON THE ROAD DRIVING TEST Driving Test Instruction Procedures. When the applicant is ready, read the standard verbal instructions (overview) for the driving test. Next, begin using approved driving test route sheet to recite the proper route instructions to the applicant. When giving instructions, location should always precede direction.
• "At the [location], [direction]." • "At the next intersection, turn right."
Slang should not be used, especially with foreign applicants. Examiners should avoid using phrases such as:
• "At the next street, hang a right." Avoid using traffic signs to give directions. For example, do not "cue" the applicant by saying, "At the next stop sign, turn left." By giving directions in this manner, you are prompting the applicant to stop. Avoid using commercial signs or buildings as landmarks for directions unless there is no alternative. Do not assume an applicant is familiar enough with the area that they would know such landmarks. Another example of this would be setting an applicant up to be in the proper lane for a turn. Do not set up an applicant by giving instruction for a lane change to set up for a turn. Designated lane changes instructions are given only in the urban straight section and the expressway or rural straight section of an approved route. Give directions well before the maneuver is to be performed, but not before reaching a point where the applicants can clearly see where they would execute the maneuver. For example, do not tell an applicant to turn at the next intersection if there is another intersection before the one where the applicant should turn. Before you give a direction, check traffic and make sure the applicant can pay attention to you. Try to give directions at the same locations each time the test is given. However, if the applicant is busy with traffic, delay the direction. Or, if it looks like the applicant would be busy when you planned give a direction, give it a little earlier. It is more important to give directions when the applicant can pay attention than to rigidly give directions at set locations. In general, give all directions in a way that avoids distracting the applicant and avoid unnecessary conversation or any personal conversation. Unsuccessful applicants that file complaints regarding a skills test frequently attempt to blame an examiner’s unnecessary conversation as a contributing factor to their failure. In addition to giving general route directions, examiners give special directions for expressway, urban straight, and rural sections as well as any simulated maneuvers. Examiners are required to read the standard instructions throughout the skills tests. Warning or Coaching. Examiners, particularly those who are driver training instructors, must remember that the applicant is taking a test. The examiner should not warn

Chapter A- Auto Testing (6-12-06)
Page 9 applicants about mistakes (except as described below). Warning applicants about their bad habits during the driving test can have one of 2 opposite effects: coaching an applicant towards a passing score or intimidating the applicant. For example, if an applicant is warned after the first turn to keep both hands on the wheel, the applicant is less likely to repeat this behavior during the remainder of the test. Or the applicant forms the perception the examiner has already decided to fail him or her. An examiner cannot objectively score an applicant’s performance if the examiner has influenced the applicant’s behavior during the testing process. Exceptions include warnings given for speeding, following too close, warnings to prevent traffic violations, traffic crashes, or entry into hazardous situations (refer to instructions found in “Marking the Scoring Form” later in this chapter). Any verbal warning administered during the skills test must be documented in the comments section of the scoring form. Otherwise, commentary regarding applicant performance during the driving test should be kept to a minimum.

Chapter A- Auto Testing (6-12-06)
Page 10 SECTION 5: DRIVING TEST SCORING STANDARDS The following pages describe the scoring standards for the driving test. Examiners should periodically review this section and use it as a reference when encountering a situation or driving behavior that does not seem to be covered on the scoring form. Often, something that does not seem to be covered on the scoring form is, in fact, covered by the scoring standards. 5.1- TURNS APPROACH
Traffic check: Look for any indication that the applicant is observing the traffic environment ahead, to the left, right, and rear including mirror checks, head movements to left and right, and eye contact with other drivers and pedestrians. The applicant should also check blind spots before merging into curb lane or center left turn lane.
Turn signal: The applicant should activate the correct turn signal approximately 100 feet ahead of the turn but not too early or late so as to mislead others about where he or she intends to turn.
Lane: The applicant should enter the turning lane at designated openings, not too early or late. The applicant should not straddle or cross over lane markings.
Braking: The applicant should brake gradually (not too early or late) and smoothly without skidding or jerking the vehicle. Under normal conditions, the applicant should not ride or pump the brakes. Applicants may brake with their left foot, however, they should never press the accelerator and brake pedal at the same time.
IF STOP
Necessary: Unless the applicant is yielding to traffic or pedestrians in an intersection, he or she should not stop for yield signs, flashing yellow lights, green traffic signals, etc.
Full stop: The vehicle must come to full stop without rolling forward or backward while stopped.
Stop line (or location): The applicant must come to a complete stop behind any stop line or crosswalk or, if there is no stop line or crosswalk, at point near, but not in, the intersecting roadway where the applicant has a view of approaching traffic. If an object is obstructing visibility, an applicant must, after stopping behind the stop line or crosswalk, roll forward and stop again at a point near, but not in, the intersecting roadway where the applicant has a view of approaching

Chapter A- Auto Testing (6-12-06)
Page 11 traffic. If there is no stop line or crosswalk, the applicant must stop at a point near, but not in, the intersecting roadway where the applicant has a view of approaching traffic. Note: a crosswalk may be unmarked; the Michigan Vehicle Code’s definition of crosswalk includes “that part of a roadway at an intersection included within the connections of the lateral lines of the sidewalks on opposite sides of the highway…” Gap: When stopping behind another vehicle, the applicant must stop at a safe distance where they can see, at a minimum, the rear tires of the vehicle in front. As a general rule, applicants should always “leave themselves an out.” Applicants should stop at a distance that allows them to pull out and around the vehicle ahead of them from a stopped position in the event that the vehicle ahead breaks down. Wheels straight (left): When paused for a left turn, the applicant should keep the front wheels of the vehicle aimed straight ahead.
TURNING
Traffic check: Look for any indication the applicant is observing the traffic environment ahead, to the left, right, and rear including mirror checks, head movements to left and right, and eye contact with other drivers and pedestrians. Yield: Applicant should yield to other traffic or pedestrians in the vehicle’s path before turning. Timing: The applicant should leave enough time to make the turn safely without causing other vehicles to adjust their speed or take evasive action. Hands on wheel: The applicant should not palm the wheel, shuffle the wheel or drive with only one hand on the wheel. Although an applicant may have to remove a hand to adjust heat or air controls, open a window, etc., it should not be done in the middle of a maneuver, such as an intersection, turn, lane change, etc., that requires the applicant’s full attention. Controlled Steering: The applicant must maintain proper control of the vehicle. While turning, they must be able to steer smoothly and control the vehicle within lane markings. Wide turn: The applicant should not cross over lane line markings while turning. Short turn: The applicant should not hit the curb while turning. Fast or slow: The applicant must turn a corner at a speed that is not too fast or slow for road conditions.

Chapter A- Auto Testing (6-12-06)
Page 12 COMPLETES TURN
Traffic check: At the completion of the turn, look for any indication the applicant is observing the traffic environment ahead, behind and to the sides. Correct lane: The applicant must turn into the correct lane. When turning left from a left turn lane, the vehicle should finish the turn in the lane that is directly to the right of the centerline. When turning right, the vehicle should finish the turn in the rightmost (curb) lane. Controlled steering: Upon completing the turn, the applicant must be able to recover easily, controlling the vehicle within lane markings. Acceleration/pacing: The applicant must adjust the vehicle speed to keep pace with the flow of traffic. Signal and move right if slow: If the applicant is traveling slower than other traffic and is traveling in the left lane, the applicant should signal and move to the right lane.
5.2- STOP INTERSECTIONS STOPPING
Traffic check: Look for any indication the applicant is observing the traffic environment ahead, to the left, right, and rear including mirror checks, head movements to left and right, and eye contact with other drivers and pedestrians. Braking: The applicant should brake gradually (not too early or late) and smoothly without skidding or jerking the vehicle. If the traffic light turns yellow as an applicant approaches, they should attempt to stop before entering the intersection. If the applicant cannot do so safely, they should not speed up, but drive cautiously through the intersection. Under normal conditions, the applicant should not ride or pump the brakes. The applicant should also never depress the accelerator and brake pedal at the same time. Full stop: The vehicle must come to full stop without rolling while “stopped.”
Stop line (or location): The applicant must come to a complete stop behind any stop line or crosswalk or, if there is no stop line or crosswalk, at point near, but not in, the intersecting roadway where the applicant has a view of approaching traffic. If an object is obstructing visibility, an applicant must, after stopping behind the stop line or crosswalk, roll forward and stop again at a point near, but not in, the intersecting roadway where the applicant has a view of approaching traffic. If there is no stop line or crosswalk, the applicant must stop at a point near, but not in, the intersecting roadway where the applicant has a view of approaching traffic. Note: a crosswalk may be unmarked; the Michigan Vehicle Code’s definition of crosswalk includes

Chapter A- Auto Testing (6-12-06)
Page 13 “that part of a roadway at an intersection included within the connections of the lateral lines of the sidewalks on opposite sides of the highway…”
Gap: When stopping behind another vehicle, applicants must stop at a safe distance where they can see, at a minimum, the rear tires of the vehicle in front. As a general rule, applicants should always “leave themselves an out.” Applicants should stop at a distance that allows them to pull out and around the vehicle ahead of them from a stopped position in the event that the vehicle ahead breaks down.
DRIVING THROUGH
Traffic check: Look for any indication the applicant is observing the traffic environment ahead, to the left and right including head movements and eye contact with other drivers and pedestrians. Yield: The applicant should yield to other traffic or pedestrians in the vehicle’s path. Timing: When proceeding from a stop intersection where cross traffic does not stop, the applicant should allow enough time to drive safely through the intersection without causing other vehicles to adjust their speed or take evasive action. Lane: An applicant should not change lanes in the middle of an intersection. Hands on wheel: Unless shifting, the applicant should keep both hands on the steering wheel. Acceleration/pacing: The applicant must adjust the vehicle speed to keep pace with the flow of traffic.
THROUGH INTERSECTIONS
Traffic check: Look for any indication the applicant is observing the traffic environment ahead, to the left and right including head movements and eye contact with other drivers and pedestrians. If the traffic light turns yellow as an applicant approaches, he or she should attempt to stop before entering the intersection. If that cannot be done safely, the applicant should not accelerate, but should drive cautiously through the intersection. Yield: The applicant should prepare to yield as he or she scans the intersection in all directions for possible hazards in the path of travel and then proceeds cautiously through the intersection.

Chapter A- Auto Testing (6-12-06)
Page 14 No unnecessary stopping: Unless the applicant is yielding to traffic or pedestrians in an intersection, he or she should not stop for green traffic lights. Lane: An applicant should not change lanes in the middle of an intersection. Hands on wheel: Unless shifting or operating necessary accessories (e.g., wipers), the applicant should keep both hands on the steering wheel. Acceleration/pacing: After yielding, the applicant must adjust the vehicle speed to keep pace with the flow of traffic.
5.3- HAZARD AWARENESS SIMULATION
To avoid a collision: The applicant must say he or she would drive towards the right shoulder or off the road to the right. If the applicant must hit an object: The applicant must say the best type of object to hit is a soft object. For example, a bush is softer than a tree, or a small tree is softer than a large tree, etc. The best way to hit object: The applicant must state he or she would hit the object with the side of their vehicle. Examples: sideswipe, glancing blow, side of the car.
5.4- RESIDENTIAL
Awareness: The applicant should check regularly for pedestrians, bicycles and moving or parked vehicles, especially near driveways. Space cushion: The applicant should maintain a “cushion of space” around the vehicle (i.e., should not crowd moving or parked vehicles or drive in a pack of vehicles). Speed: The applicant must select a safe, reasonable and prudent speed, and a speed that allows them to keep up with the flow of traffic without exceeding the speed limit. Tracking: The vehicle should remain centered in the lane. Lane lines: The vehicle should not drift over lane markings if they are present.
5.5- CURVE Traffic check: The applicant should watch to make sure the vehicle is tracking the curve within the lane lines. Also, the applicant should keep his or her head up

Chapter A- Auto Testing (6-12-06)
Page 15 and remain focused ahead of the curve and not just immediately in front of the vehicle. Speed (into and through): The applicant should maintain a vehicle speed in the curve that causes no strong lateral movement. As the vehicle exits the curve, the applicant should gently accelerate to speed. The applicant should not exceed a safe and reasonable speed or a posted speed limit (regulatory or advisory) in the curve. Stays in lane: The applicant must keep the vehicle within the lane markings.
5.6- RAILROAD CROSSING Search: The applicant should listen and look left and right for the presence of trains. Brake: The applicant should decelerate smoothly before crossing the tracks. Gears: The applicant should not shift gears while crossing the railroad tracks. Speed: The vehicle’s speed over the tracks should be appropriate for the condition of the tracks and the road surface. Lane: The applicant should not change lanes while crossing the railroad tracks. Hands: The applicant should keep both hands on the wheel while driving over the railroad tracks. Required stop: If required to stop for a train, the applicant should remain stopped behind the stop line until it is safe and legal to proceed.
5.7- TURN FAN (OR RADIO) ON/OFF
Eyes off road brief: If the applicant takes their eyes off the road to locate the fan (or radio) switch, they should do so briefly. The examiner should score an error if the applicant eyes are off the road for more than a few seconds. Stays in lane: The applicant should maintain his or her lane position during this exercise. The examiner scores an error if the vehicle weaves out of the lane or if the applicant caused a hazardous situation during the exercise. Controlled steering: The applicant must be able to maintain control of the vehicle while performing the maneuver.

Chapter A- Auto Testing (6-12-06)
Page 16 5.8- URBAN and EXPRESSWAY (OR RURAL) MERGE ON (Expressway only)
Traffic check: Applicants must check traffic to find an opening. Applicants must also check their blind spots before merging onto the expressway. Signal on: Applicants should activate the turn signal as soon as expressway traffic can see the signal. Speed: Applicants must adjust their speed to merge into the flow of traffic. Spacing: Applicants must allow proper spacing between their vehicle and the vehicles in front and in back. Smooth merge: The applicant should merge the vehicle smoothly (no hard, sharp steering) into the nearest expressway lane without stopping unnecessarily. Lane lines: When merging, the applicant must keep the vehicle within lane markings. Cancel signal: The applicant must cancel his or her turn signal as soon as the vehicle has merged completely into the lane.
LANE CHANGES (Urban and Expressway or rural):
Traffic check: The applicant must check to the front, rear, and the blind spots before changing lanes. Signal: Prior to moving the vehicle for the lane change, the applicant must use a turn signal. Yield: The applicant should yield to other traffic in his or her path of travel. Smooth: The applicant should maintain speed and change lanes smoothly, not abruptly. Controlled steering: The applicant should change lanes smoothly, not abruptly, recover easily, and keep the vehicle within lane markings. Spacing: The applicant must not tailgate when changing lanes and must maintain an adequate space to the front and rear after the lane change Cancel signal: Applicants must cancel their turn signal shortly after they have moved completely into the lane.
STRAIGHT SECTION (Urban and Expressway or rural):

Chapter A- Auto Testing (6-12-06)
Page 17
Traffic checks: The applicant should observe the traffic environment ahead, to the left, right, and rear indicated by mirror checks, head movements to left and right, and eye contact with other drivers and pedestrians. Awareness: The applicant should watch for hazards on the side of the road (e.g., movement in parked vehicles, movement in driveways, animals along the side of the roadway). Also, the applicant should look 12 seconds ahead of the vehicle to anticipate hazards, prepare for lane changes, etc. Space cushion: The applicant should maintain a “cushion of space” around the vehicle (i.e. should not follow too closely or drive in a pack of vehicles). The applicant should maintain a proper following distance of at least 2 seconds. An additional second should be added for each adverse traffic condition (e.g., following a truck, cycle or camper, inclement weather, darkness). Speed: The applicant should select a safe and legal speed that keeps up with the traffic flow without exceeding the speed limit or driving too slow (unless warranted by road or weather conditions). Proper lane: When driving on a multi-lane urban or rural roadway, the applicant should move to the right lane if he or she is traveling slower than other traffic or vehicles pass on the right. When driving on the expressway, the applicant should stay in the right lane unless passing another vehicle or moving left to allow others to merge. Tracking: The vehicle should be centered in the lane. Lane lines: The vehicle must not drift over the lane markings.
EXIT (Expressway only)
Traffic check: The applicant must check traffic, including the blind spot. Signal: Before merging into the exit lane, the applicant must activate the turn signal. Decelerate in exit lane: The applicant should exit the expressway at a speed appropriate for traffic and weather conditions. Under normal conditions, the vehicle’s speed should not drop below the posted minimum speed on the expressway. Once the vehicle is in the deceleration lane, the applicant may reduce his or her speed below the minimum posted expressway speed limit. Smooth exit: The applicant must merge smoothly into the deceleration lane without jerking or swaying the vehicle.

Chapter A- Auto Testing (6-12-06)
Page 18 Lane lines: The applicant must keep the vehicle within the lane markings while exiting. Spacing: The applicant must maintain proper spacing between the vehicle and vehicles ahead and behind as he or she moves the onto the exit ramp. Ramp speed: The applicant must not exceed the ramp speed (regulatory or advisory). There should be no noticeable lateral acceleration on the ramp curve. Cancel signal: The applicant may cancel his or her turn signal once the merge onto the ramp is complete.
5.9- SIMULATED MANEUVERS
In the event a simulated maneuver is necessary, the applicant must mention each of the following for credit.
RRX Slow down and cross at speed appropriate for the condition of the tracks Look left and right Listen Keep both hands on the wheel
LANE CHANGES Signal Check mirrors for traffic Check blind spot for traffic Maintain speed – do not slow Maintain proper spacing Cancel signal
5.10- GENERAL DRIVING HABITS SEARCH
Fails to check: The applicant must make traffic checks using head and eye movements and mirrors. The applicant must also check blind spots and conduct searches on railroad crossings. Small picture: The applicant should observe the “big picture” well ahead of their vehicle. Stops unnecessarily: The applicant should not stop for green traffic lights unless he or she is yielding to traffic or pedestrians in an intersection. Driver distracted: The applicant should not look at the instrument panel more than a quick glance to locate accessories or switches, or while verbalizing simulated exercises.

Chapter A- Auto Testing (6-12-06)
Page 19 Soft object: The applicant should say that the best type of object to hit is a soft object. For example, a bush is softer than a tree, or a small tree is softer than a large tree, etc. Sideswipe: The applicant should say the best way to hit an object is with a glancing blow, sideswipe or side of car.
SPEED AND BRAKE CONTROL
Fast/Slow: The applicant must turn the corner at a speed that is not too fast or slow. Speed on RRX: The vehicle’s speed over railroad tracks should be appropriate for the condition of tracks and road surface. Regulatory/basic/advisory: The applicant must not exceed the speed limit that is indicated by a regulatory (white) sign or the basic speed law as determined by prevailing weather, roadway and traffic conditions. Advisory speed limit signs are yellow and should be observed. All speeding errors observed by the examiner must be properly recorded on the scoring form, documented in the comments section and a verbal warning given and documented if speed is over the limit by 4 to 9 mph. Poor acceleration/pacing: The applicant must adjust the vehicle speed to keep pace with the flow of traffic. No full stop: The applicant must bring the vehicle to a complete stop and should not roll the vehicle through stops. Brakes hard/soft/rides/pumps: The applicant should brake the vehicle smoothly and evenly, not too hard or too soft. The applicant should not ride or pump the brakes. No decel in exit lane: The applicant should exit the expressway at a speed appropriate for traffic and weather conditions. Once the vehicle is in the deceleration lane, the applicant may reduce his or her speed below the minimum posted expressway speed limit. Improper clutch: When driving a vehicle equipped with a manual transmission, the applicant should not clash gears, rev or lug the engine. Also, the applicant must use the clutch properly to prevent choppy accelerating and decelerating. Wrong gear: The vehicle should be operated in a gear that is appropriate for vehicle speed, taking into consideration whether the vehicle is accelerating, slowing or maintaining speed. Coasts: The applicant must change gears smoothly as needed and not coast the vehicle to a stop with the gearshift lever in neutral.

Chapter A- Auto Testing (6-12-06)
Page 20 Shifts on RRX: The applicant should not change gears while crossing railroad tracks.
DIRECTION AND SPACE CONTROL
No turn signal: The applicant must use the turn signal when they turn or change lanes. Fails to cancel signal or use signal properly: The applicant must cancel the turn signal as soon as the turn, lane change or merge has been completed. Wide/Short: The applicant should not cross over the inside or outside lane markings (wide) nor hit any curbs (short). Poor lane tracking: The vehicle should be centered within the lane. Lane line: The applicant should not straddle or cross over lane line markings. Incorrect lane: The applicant must turn into the correct lane. For example, when turning left, the vehicle should finish the turn in the leftmost lane (unless lane markings or signs direct otherwise). When turning right, the vehicle should complete the turn in the rightmost lane (unless lane markings or signs direct otherwise). Fails to move right: During the Hazard Awareness maneuver, mark the phrase “fails to move right” if the applicant does not say that he or she would move right if an oncoming vehicle were approaching head-on in the applicant’s lane (simulated head-on collision). Bad Gap: The applicant must stop at a safe distance where he or she can see the rear tires of the vehicle in front. Space Cushion: The applicant should maintain a reasonable space cushion between the vehicle and other vehicles and should not crowd other vehicles or allow other vehicles to crowd his or her vehicle. Poor spacing: The applicant should maintain proper spacing in front and in back of the vehicle.
Beyond stop lines/signs, crosswalk, sidewalk or in intersection: The applicant must come to a complete stop behind any stop line or crosswalk or, if there is no stop line or crosswalk, at point near, but not in, the intersecting roadway where the applicant has a view of approaching traffic. If an object is obstructing visibility, an applicant must, after stopping behind the stop line or crosswalk, roll forward and stop again at a point near, but not in, the intersecting roadway where the applicant has a view of approaching traffic. If there is no stop line or crosswalk, the applicant must stop at a point near, but not in, the intersecting roadway where the applicant has a view of approaching traffic. Note: a crosswalk may be unmarked; the Michigan Vehicle Code’s definition of crosswalk includes “that part of a roadway at an intersection included within the connections of the lateral lines of the sidewalks on opposite sides of the highway…”

Chapter A- Auto Testing (6-12-06)
Page 21
STEERING CONTROL
Palming, Shuffling, One-Handed: The applicant should not palm the wheel, shuffle the wheel or drive with only one hand on the wheel. The applicant may remove a hand to operate the instrument panel or to open or close a window. The applicant should not execute these maneuvers in the middle of an intersection, while turning or during a lane change. Non-Controlled steering: The applicant must maintain proper control of the vehicle by steering smoothly, recovering easily from turns and staying within lane markings. Wheels not straight for left turn: The applicant must keep the front wheels of the vehicle pointed straight ahead. Non-smooth merge, exit or lane change: The applicant must smoothly merge on to or exit off of an expressway or when changing lanes.
TIMING
Brakes early/late/none: The applicant should not brake too early or late. Signals early/late: The applicant should activate the turn signal at least 100 feet ahead of a turn (approximately 3-4 seconds), but not so early as to mislead others as to where he or she intends to turn. Poor timing: The applicant must make sure he or she has enough time to complete any maneuver safely without causing other vehicles to adjust their speed or take evasive action. Too timid or aggressive: The applicant should not drive too timidly or aggressively. Overly timid driving may indicate a lack of necessary experience and skill, and overly aggressive driving may stretch the applicant beyond his or her ability to handle the vehicle safely.
LAW
Told to wear safety belt: An error should be assessed if the applicant has to be reminded to put on the safety belt. Only applicants with a physician's statement or waiver are exempt from wearing their safety belt. If an applicant refuses to wear the safety belt and does not have a physician’s statement, the refusal constitutes an automatic failure. Non-Failing Speeding Violations: The following speeding violations are driving test errors, and the examiner should record appropriate comments; however, there are no warnings or automatic failures associated with these violations:
• Speeding 1-3 mph over the regulatory speed limit or basic speed law. • Exceeding an advisory speed limit.

Chapter A- Auto Testing (12-19-06)
Page 22 SECTION 6: AUTOMATIC FAILURES Some driving behaviors warrant termination of a test before an applicant has accumulated enough errors to fail based on points. The following actions or traffic violations during the driving test constitute an immediate failure. They are listed in the order in which they appear on the scoring form test summary. Disregard instructions
• Unless the applicant has a physician's statement or waiver, they must wear a safety belt at all times during the driving test.
• Interpreter continued to provide applicant with unnecessary communication after one warning. The examiner should document a first warning in the comments section (e.g., “unnecessary communication by interpreter-warned”).
Dangerously inexperienced
• Applicant is unable to use accelerator, brake, clutch, or gear shift safely. • Sustained speeds of 10 mph under the regulatory speed limit after one warning
(unless traffic or weather conditions warrant such behavior). The examiner should record an error and verbally warn the applicant. The examiner should document the warning in the comments section (e.g., “10 mph under posted speed on [enter road or street name]-warned”).
• Uncontrolled steering resulting in travel off road or travel in opposing traffic lanes.
• Other losses of vehicle control requiring examiner intervention. Traffic violation – Disregard Traffic Control Device
• Runs a red light or stop sign. • Fails to stop for a railroad signal or drives around railroad gates. • Turns left or right on red when prohibited. • Turns from the wrong lane. • Drives the wrong way on a one-way street. • Drives on the wrong side of the street.
Traffic violations – Speed
• Speeds 4 to 9 mph over the regulatory speed limit (white regulatory sign) or the “basic speed limit” (reasonable and prudent) after one warning. After the applicant is verbally warned the examiner must document the warning in the comments section (e.g., “speed 30/25 on [enter road or street name] -warned”). All speeding errors must be documented in the proper area of the scoring form and recorded in the comments section.
• Speeds 10 mph or more over the regulatory speed limit (white regulatory sign) or the "basic speed limit” (reasonable and prudent) with no warning.
• Drives below required minimum speed on the expressway (unless traffic or weather conditions warrant such behavior).

Chapter A- Auto Testing (6-12-06)
Page 23 Traffic violation – Failed To Yield
• Fails to yield (adversely affecting traffic or pedestrians). • Fails to yield right-of-way to a funeral procession.
Hazardous Action
• Examiner, parent/guardian warns of, or prevents, a dangerous action or traffic violation.
• Examiner, parent/guardian, or other roadway user prevents traffic crash. • Driver creates a serious hazard for other traffic.
Crash
Any crash for which the applicant’s actions were contributory results in termination of the test. (Crashes for which the applicant’s actions were non-contributory may result in termination of the test depending upon applicant, examiner, and vehicle condition). All crashes must be reported in writing to Third Party Testing Section within 24 hours.
Other
• An offer of a bribe or gratuity at any time during the testing process should result in immediate termination of the test and must be reported in writing to Third Party Testing Section.
• Passes a stopped school bus with its red lights flashing. • Fails to stop for an emergency vehicle. • Passes improperly. • Follows another vehicle too closely (after one warning). The warning must be
documented in the comments section (e.g., “FTC on [enter road or street name]-warned”).
Do not tell the applicant that they have failed while you are on the test route. Continue to instruct the applicant in a normal fashion, taking the safest route back to your testing site. Once you are on site, provide constructive feedback as to why the applicant failed the test. Be sure to thoroughly document any test failure in the comments section and include any additional notes.

Chapter A- Auto Testing (6-12-06)
Page 24 SECTION 7: MARKING ERRORS Prior to any scoring, the examiner should mark the scoring form to reflect the route. If it was not possible to incorporate expressway driving into your route, “X” through the expressway entry on/exit off maneuver area. Then, depending on whether or not the railroad crossing is actual or simulated, make a hash mark through either the “a” or the “s”. Finally, in the scoring summary instructions, hash through the words “Non-designated” and “Designated” with the same type of marks to be used to record non-designated and designated errors. Each scoring category (traffic situation), required maneuvers, and observable behaviors are shown on the scoring form. Many maneuvers share observable behaviors. The scoring form is set up in a manner that places the maneuvers on the right and left with the observable behaviors to be scored sandwiched in between. When you score a maneuver, follow these steps:
• Find the maneuver on the scoring form so you are ready to score it. • Check the applicant and traffic then give directions for next maneuver. • Watch the applicant perform the maneuver. • Mark the scoring form.
It is important to mark the scoring form immediately after each maneuver. Do not try to remember what the applicant did, and then mark the form later in the route, or worse, back at the office. A scoring box is used for recording performance errors. When an applicant makes an error, enter the first letter of the word describing the error in the corresponding scoring box. For example, if the applicant turns wide, write a “W” in the corresponding scoring box. Make no mark if the applicant performs the behavior correctly. Many lines contain 2 or more scored behaviors. For example, the second line on the approach of a left or right turn reads "Signal, Brake". If the applicant failed to perform either of these behaviors correctly, enter the first letter of the incorrect behavior in the corresponding scoring box. For example, if the applicant braked late, enter the letter "B" in the corresponding scoring box. You may also add “L” for late as a further description of the error. If 2 words on a line begin with the same letter, record the first 2 letters of the behavior error in the scoring box. For example, enter “TC” for traffic check or “TI” for timing. Scoring at designated locations. Errors occurring at designated locations are marked within the appropriate category on the scoring form. For example:
• If an applicant exhibits poor steering control at scored right turn #1, enter the letters “CS” in the appropriate box within the “Turns” category,
• If an applicant makes a short turn at scored right turn #2, enter the letters "Sh" in the appropriate box within the "Turns" category.
• If an applicant failed to check traffic at through #4, enter the letters “TC” in the appropriate box within the “Through Intersection” category.

Chapter A- Auto Testing (6-12-06)
Page 25 • If, during the crash avoidance simulation, an applicant r failed to say that they
would “move right” to avoid a head on collision, enter the letter “MR” in the appropriate box within the “Crash Avoidance” category.
Scoring at non-designated locations. Errors occurring at non-designated locations are scored within the appropriate categories under the heading, "Scoring Summary". For example:
• If the applicant makes a wide turn at a "non-designated" location, mark a backwards slash through the word "wide" within the steering / shift control category.
• If an applicant was found to be speeding (46/40) in a non-designated area, mark a backwards slash through the words “Regulatory” within the speed control category and explain in the comments section.
Scoring 2 or more errors located on the same line at designated locations. If an applicant commits 2 or more errors that share the same line, only one error should be documented in the scoring box associated with that line. The other error should be scored within the appropriate scoring summary category. For example:
• If an applicant fails to make a traffic check and exhibits poor timing at Stop #3, the applicant has, in fact, committed 2 errors. Since there is only one scoring box that corresponds to both errors, you distribute the errors as follows:
• One error (examiner's choice, in this care Timing) is scored in the appropriate box within the “Stop” category box that corresponds to Stop #3:
• The other error (Traffic Check) is scored, using a forward slash, in the appropriate place within the appropriate scoring summary category.
Scoring summary. At the conclusion of the test, all errors occurring at designated locations are distributed to the appropriate categories within the scoring summary. To avoid confusion, circle the errors as they are brought down to the scoring summary.

Chapter A- Auto Testing (6-12-06)
Page 26 SECTION 8: POST TEST Calculating and Recording the Driving Test Score. Carefully count the number of errors marked at designated locations and the number of boxes marked with an “X” in the General Driving Habits area. This combined total is the driving test score. If the score is close to a failing score (passing score equals 25 errors or less), double check that you have added correctly. Record the driving test score in the appropriate box on the front side of the scoring form. If the driving test was passed, darken in the bubble to so indicate. Fill out the Skills Tests Certificate and enter the certificate number on the scoring form. Give the top copy to the applicant as proof of passing the test and retain the bottom copy for your records. Reviewing the Results and Providing Feedback. The best time for an examiner to provide feedback is after the entire skills test is finished. However, an examiner may choose to discuss a successful applicant’s performance on the basic control skills test before beginning the on-the-road test. However, the examiner should be careful to keep any such discussion short and should avoid discouraging the applicant. An examiner shall not discuss applicant performance on any basic control skills exercise between exercises. Examiners may, within reason, choose the method of review that they determine would be most beneficial to the applicant. After an unsuccessful skills test attempt, examiners should not provide feedback that includes behind-the-wheel instruction. Examiners should focus advice on an applicant’s driving and never provide tips on how to avoid scoring errors. Everything applicants and students need to know is published in the Road Skills Test Study Guide. Every applicant is entitled to an explanation of the examiner's assessment of his or her performance. Feedback should always be given privately, in a one-on-one situation (or in the presence of a parent or guardian, if the applicant is a minor). An examiner may not give the applicant a copy of the scoring form, but may give a written assessment (some organizations provide customers a feedback form). During the feedback process, the applicant may be listening for only one word: “PASSED.” It is important to keep his or her attention focused on your analysis of their performance. Once the applicant hears the word, “PASSED,” he or she ceases to listen. Likewise, if the applicant hears the word, “FAILED,” he or she may become upset and lose focus on the information you are trying to convey. The following guidelines have been established for providing beneficial feedback to an applicant.

Chapter A- Auto Testing (6-12-06)
Page 27
Feedback Guidelines
For every test, whether it was passed or failed, it is very important to review the information you have recorded on the scoring form before beginning to discuss the applicant's performance with him or her. Refer to any notes you may have made during the tests.
Failed Test Passed Test
Step 1 Select one satisfactory performance or behavior the applicant accomplished and discuss this with him/her.
Step 2 Review the applicant's weaknesses with the person and stress their importance.
Step 3 Identify the areas in which the person needs further improvement and practice.
Step 4 Ask the person how much time s/he spends practicing.
Step 5 Advise the applicant of the test results.
Step 1 Select one unsatisfactory performance or behaviors the applicant displayed and discuss this with him/her.
Step 2 Review the applicant's major strengths.
Step 3 Identify areas needing some improvement (if applicable) and offer suggestions.
Step 4 Advise the applicant of the test results.
Feedback Sample For Failed Applicant
"Mary, you are very good at lane changes. Most of the time though, you traveled too fast for conditions and didn't pay attention to what was going on around your vehicle. This is very dangerous because you might not be able to see a hazard in enough time to be able to stop or avoid an accident. Spend time practicing keeping a close watch on what is going on around your vehicle. Use your mirrors and move your head to look around you. Keep an eye on the speedometer. You should spend more time on the road practicing.
“I am not able to pass you because of the problems I observed today."
Feedback Sample For Passed Applicant
"Joe, you rely a little too much on your mirrors and you don't move your head to look around at what is going on. You do control your speed very well, and react to traffic situations satisfactorily. Try practicing moving your head when you scan traffic situations. You'll be surprised at how much more you see.
“Overall, you did a nice job today and you passed your test."
Retesting Applicants with Performance Failures. Applicants who fail to successfully complete the road skills test may not be tested again by an examiner from the same organization within a 24-hour time period unless the failure is due to:
• Faulty documents • Equipment defects, which can be repaired on the same day. • Other non-performance reasons
The examiner may advise the applicants on how much practice they need before retesting. For example, an applicant who fails the basic control skills tests by a narrow margin might be able to safely retest the following day. Conversely, an applicant who fails the driving test by a wide margin should be told to use several days (if not weeks) to improve skills before retesting. However, Michigan law does not provide for any certain waiting period and the applicant may choose to ignore the advice.

Chapter A- Auto Testing (6-12-06)
Page 28 SECTION 9: TESTING FOR OTHER PURPOSES Driver Evaluations for Non-Licensing Purposes. For a variety of reasons, a licensed driver may request a road test for “non-licensing purposes.” For example, a driver’s supervisor may recommend the driver be evaluated for job performance purposes. Third party testing organizations may offer this service, provided they follow these guidelines: • The examiner may use a copy of the scoring form, but not an original. The testing
organization should file copies of “performance evaluation” scoring forms separate from driver license skills tests. (Note: Performance evaluations should not be counted in your monthly totals, and copies should not be sent to Lansing with your monthly report. We do not want to inadvertently count these tests in the statistics we gather for statewide reporting purposes.)
• The examiner may give the driver a written evaluation of his or her performance, but the examiner shall not give the driver a copy of the scoring form.
• The examiner shall not issue a skills test certificate. Skills test certificates are only issued to driver license applicants. Examiners may provide a driver with a letter or evaluation typed on company stationary. Be sure the evaluation is composed of “objective” rather than “subjective” statements regarding the driver’s performance.
• If, after the evaluation process has been completed, the examiner believes the evaluated driver is unable to safely operate a motor vehicle, the examiner should so advise the person(s) requesting the evaluation. The examiner should also inform the person(s) requesting the evaluation that they should fill out the SOS form OC-88 (obtained from any SOS branch office) to request a Secretary of State review of driving privileges.

Appendix A-1 (6-12-06)
APPENDIX A-1
BASIC CONTROL SKILLS COURSE DIAGRAMS PAINTED COURSE The diagram below illustrates the layout and measurements for a combined (all-in-one) basic control skills course. By laying the course out according to this diagram, the finishing point of one exercise will begin the starting point of the next exercise.
12 ‘
2’
30’
3’
12’
20’10’
28’
These three cones should be placed, equally spaced, in accordance with the length of the vehicle.
Three dashed lines for measuring the length of the vehicle for the blind-side backing. (Vehicle length + 6 feet)
6’
3’
12’
2’
2’
“Continue-lines” are white (2” wide x 6”long); NOTE: the 2’ measurement should be from the inside of the Y-turn and BSB line.
This line is adjustable and placement is determined by the vehicle length plus 6’.
Cone with pole 8’

Appendix A-1 (6-12-06)
PORTABLE COURSE
12’
Clearance markings are two pieces of duct tape wrapped around cable at the two foot mark.
12’
30’
20’
3’
28’8’
“Continue lines” are white boards 2’ long x 2” wide x 1” thick. They can also be made with a rubber mat of the same dimensions.

Appendix A-2 (6-12-06)
APPENDIX A-2
FORWARD STOP – DIAGRAM AND EXAMINER POSITION
Examiner position END
B
START
6A
The applicant drives forward and stops the vehicle with the front bumper as close as possible to the “stop line” without going past the stop line. He or she may not lean out the window. You will score the applicant on their final position relative to the stop line. Once the examiner has scored the exercise, assist the applicant to position the vehicle with the front bumper at the solid forward stop line to begin the sight-side backing exercise. This will allow the full 30’ for backing and give every applicant the same starting point.

Appendix A-2 (6-12-06)
THIS PAGE LEFT BLANK INTENTIONALLY

APPENDIX A-3 (6-12-06)
APPENDIX A-3
SIGHT SIDE BACKING – DIAGRAM AND EXAMINER POSITION
START
Examiner position
The applicant backs the vehicle (from a 90-degree angle) into a simulated driveway. The examiner scores all encroachments and repositions until the applicant has completed the exercise. The examiner then scores the final position based on the vehicle’s placement within the space.
END

APPENDIX A-3 (6-12-06)
THIS PAGE LEFT BLANK INTENTIONALLY
APPENDIX A-4 (6-12-06)
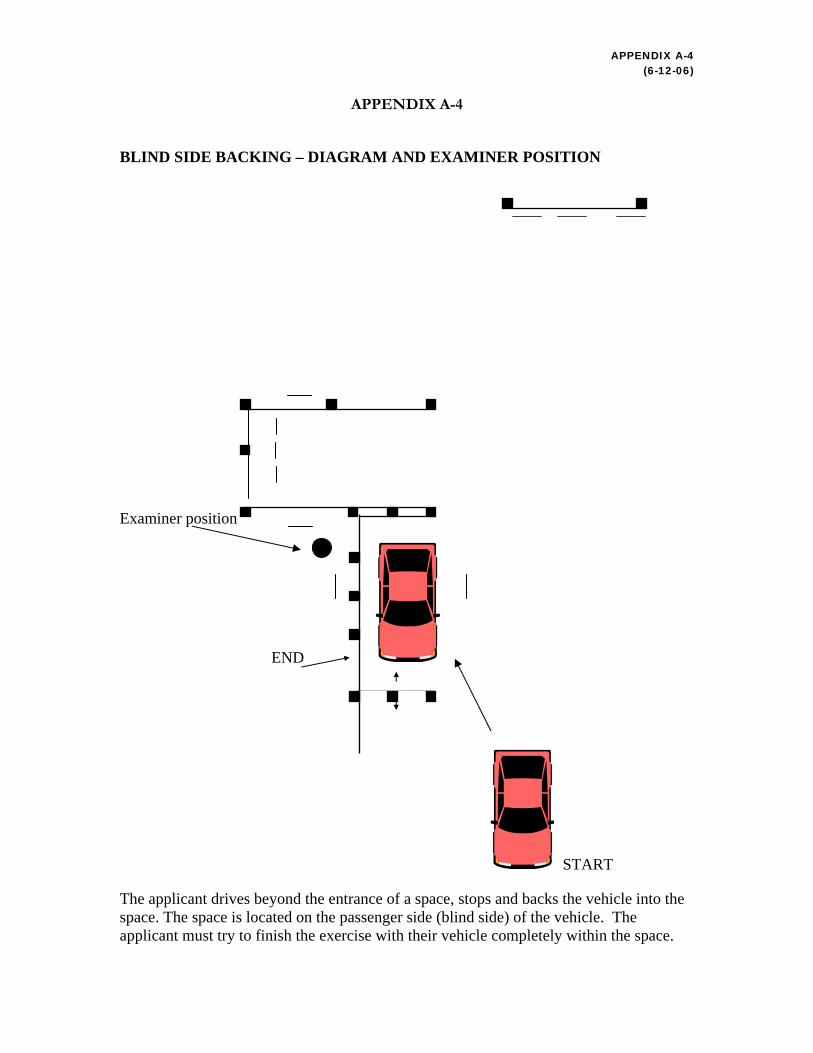
APPENDIX A-4
BLIND SIDE BACKING – DIAGRAM AND EXAMINER POSITION
Examiner position
END
START
The applicant drives beyond the entrance of a space, stops and backs the vehicle into the space. The space is located on the passenger side (blind side) of the vehicle. The applicant must try to finish the exercise with their vehicle completely within the space.

APPENDIX A-4 (6-12-06)
THIS PAGE LEFT BLANK INTENTIONALLY

APPENDIX A-5 (6-12-06)
APPENDIX A-5
FORWARD STOP CLEARANCE AREA PAINTED COURSE 4” yellow line
2’
12’
3 - 2” X 6” white lines
After the applicant performs the forward stop, and the examiner has scored the exercise, position the front bumper of vehicle between the white and yellow lines. All vehicles must be positioned with the front most point of the vehicle at the forward stop line.

APPENDIX A-5 (6-12-06)
THIS PAGE LEFT BLANK INTENTIONALLY

APPENDIX A-6 (6-12-06)
APPENDIX A-6
SIGHT SIDE BACKING CONTINUE LINES & CLEARANCE AREA
Indicates a cone with a 5-foot pole
2’
4” yellow lines
12’
20’
8’
10’
2’
Continue lines are white and 2” wide by 6” long. The lines are measured 2’ from the inside boundary line. Clearance lines are also white and 2” wide by 6” long

APPENDIX A-6 (6-12-06)
THIS PAGE LEFT BLANK INTENTIONALLY

(06-12-06)
APPENDIX A-7
BLIND SIDE BACKING LINES
28’
Vehicle length + 6-feet
2’
2” by 6” for continue lines
2’
8’
Blind-side backing length determined by vehicle length plus 6 feet. Indicates a cone with a 5-foot pole