authors how to build a plastic mesh deer exclusion fence · pdf filedeer exclusion fence ......
TRANSCRIPT

www.fnr.purdue.edu
AuthorsHardwood Tree Improvement
and Regeneration CenterJim McKenna, USDA-Forest Service, Northern Research Station, Brian Beheler, Don Carlson, and Lenny Farlee,
Purdue University Department of Forestry and Natural
Resources
FNR-486-W
AGRICULTUREEXTENSION
How to Build a Plastic Mesh Deer Exclusion Fence Deer Damage on Young TreesBrowsing by deer on planted and naturally regenerated hardwood seedlings is one of the greatest obstacles to seedling establishment in many parts of the central hardwood region (Figure 1, above). Research on tree plantings in Indiana shows that only 60% of planted trees survive to age five. Seedlings that are repeatedly browsed by deer can die due to the stress of repeated defoliation or can be out-competed by weeds or other trees and shrubs that are less palatable to the deer. Young trees that grow above browse height are still at risk of being destroyed during the fall rut as male deer rub their antlers on trunks and stems, a condition known as “buck-rub.”
Research on deer-browse preferences and a survey of foresters and wildlife biologists in Indiana indicate that oaks are a preferred tree species for browse by deer. Research
also indicates that other valuable tree species like black cherry and black walnut can be damaged by deer browse and buck rub. If you would like to protect your trees from deer damage and your planting has more than 250 trees on half an acre or more, a plastic-mesh, deer-exclusion fence is an effective, cost-efficient barrier to consider. When properly installed and maintained, these fences can reduce deer browse by 60% to 98%, leading to increases in height growth and improved survival during the 6- to 8-year effective lifespan of the fence (Figure 2).
An Effective, Cost-Efficient Deer DeterrentTree tubes, wire cages, electrified fences, and repellant sprays can all effectively deter deer browse. However, these techniques can be very expensive on a per-tree basis when
A hardwood planting of black walnut, black cherry, and red and white oak in its third season of growth with plastic mesh deer exclusion fence (left) and no fencing (right). Seedlings are still present in the unfenced area, but repeated deer browse has resulted in very little height growth.

PURDUE EXTENSION 1-888-EXT-INFO WWW.EXTENSION.PURDUE.EDU
2FNR-486-W • How to Build a Plastic Mesh Deer Exclusion Fence
Figure 2. Fencing increases both survival (left) and growth (right) of four hardwood species grown in mixed plantings at five locations across Indiana compared to unfenced control plots after five years. Lines at the tops of the bars represent 1 standard error of the mean.
plantings have several hundreds to thousands of trees. All methods require annual maintenance to remain effective. Tree tubes and cages can make early pruning and weed control difficult along with harboring rodents and wasps. Tree tubes and cages require additional hand labor to remove once the trees have grown beyond deer pressure. Individual tree tube or cage prices are fixed per tree, while the cost of an exclosure fence decreases on a per-tree basis as the acreage planted increases (Figure 3). Current pricing estimates are about $1.50 per linear foot for materials. Determining the cost per tree for individual tree protection techniques will help you determine at what number of trees a fence is cost-efficient.
Basic Steps for Constructing a Plastic Mesh Deer FenceResearchers at the Hardwood Tree Improvement & Regeneration Center (HTIRC) and other university and private foresters have found plastic mesh deer fences provide good deer protection during plantation establishment. This article provides step-by-step instructions for building your own durable and effective plastic mesh deer exclusion fence.
1. Determine Fence PlacementBefore setting up your fence, examine the site for major deer trails (Figure 4). If the fence is next to a woodland edge, deer may not see it in time to change direction, resulting in fence breaks. Provide a clear space on the outside of the fence for deer to walk around. HTIRC researchers have fenced plantings ranging from 0.5 to 60 acres under a variety of slope and vegetation conditions, and have found that larger fenced plots suffer from repeated deer breaks more than smaller fenced plantings. If a major deer trail runs through the middle of your tree planting, consider leaving that trail open and build two fenced areas instead of one. It is more effective to work with the natural movement of deer, rather than trying to block them out entirely. When you remove the fence, you will have access lanes surrounding your plantings to support future management activity.
2. Plan for and Install Posts and GatesPlan the location and size of gates, as this influences several aspects of fence construction. Examine the area for standing dead trees or other hazards that could damage the fence, and take appropriate actions to reduce those risks of fence damage.

PURDUE EXTENSION 1-888-EXT-INFO WWW.EXTENSION.PURDUE.EDU
3FNR-486-W • How to Build a Plastic Mesh Deer Exclusion Fence
Wooden posts are a practical and inexpensive option for mounting the mesh and can be purchased. Or, you may cut your own posts from a durable tree species such as eastern red cedar or black locust. Use at least 10-foot long by 4- to 6-inch diameter posts. Round or square posts show no difference in function or stability. If you are fencing a natural regeneration area or a planted forest opening, you can use standing trees for posts, but be aware that nails severely damage the timber quality of trees.
Fence posts should be installed at least 2 feet deep, but with more than 7 feet of post above ground to mount the plastic mesh. If you dig or auger holes, insert the wider end of the post into the hole and tamp the soil firmly, keeping the post plumb. Choose your largest diameter posts for the corner posts and make sure these are firmly set. If you use a post-pounder, insert the narrow end of each post in the ground and pound it as plumb as possible. Posts should be spaced no greater than 25 feet apart.
Figure 5 shows how you can use 45-degree angles at the corners of the fence rather than square corners. For this design, it is beneficial to place the corner posts 10 feet to 12 feet apart. An angled corner increases strength and makes it easier to mow vegetation in the inside corners. Tension on these plastic fences is much less than on high-tensile wire fence, so bracing is not typically necessary with pounded or well-tamped posts. Leave a 15- to 20-foot space between the fence and the planted tree rows for maneuvering equipment like mowers and sprayers. Set posts at the location and width desired for your gates. Make the span for the gate only as wide as needed to allow equipment through.
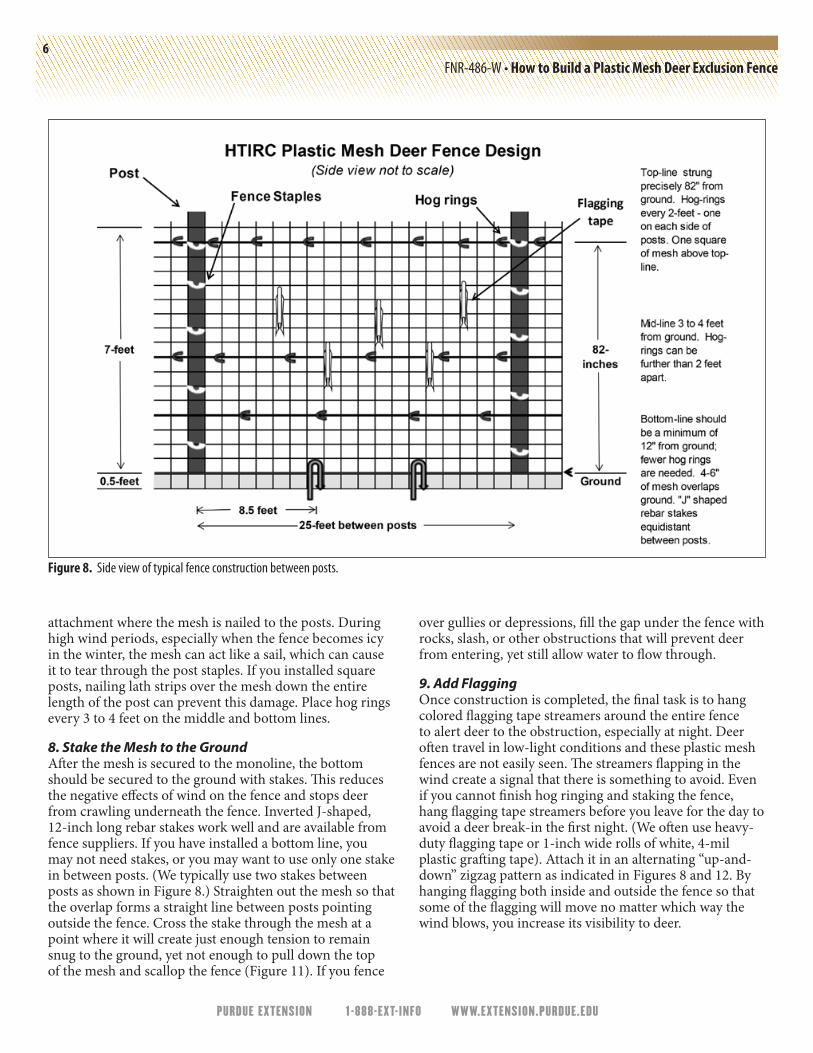
3. String Monoline at the PerimeterPlastic wire for supporting the mesh is called monoline and it is typically 1/8 to 3/16 inches in diameter and very strong. Three sections of monoline—top, middle, and bottom—are strung to support and reinforce the mesh. The top monoline is critical for supporting the mesh at the correct height and needs to be placed within 82 to 84 inches from the ground for standard 7.5-foot (90-inch) tall mesh. Keep the distance from the ground to the top line consistent so that you have 4 to 6 inches of netting to overlap on the ground and about 2 inches of mesh above the top-line.
As mentioned earlier, consider the locations and sizes of gates. Will the top line be in the way of a roll bar or exhaust pipe on your tractor? If running the top line across your gate does not conflict with equipment access, you can string it all the way around the perimeter; however, be sure the middle and bottom lines do not run across a gate.
Figure 3. The relationship between cost per tree and acreage fenced based on a density of 680 trees per acre spaced at 8’× 8’. Cost of fencing rapidly declines as the number of trees and area protected approaches one acre or more.
Figure 4. Scout for major deer trails prior to fence placement to determine the need for fence reinforcement or alternative placement. If a major deer trail runs through your planting, consider leaving an open travel corridor by constructing two fenced areas instead of one. This will minimize breaks and reduce browse damage should a break occur.

PURDUE EXTENSION 1-888-EXT-INFO WWW.EXTENSION.PURDUE.EDU
4FNR-486-W • How to Build a Plastic Mesh Deer Exclusion Fence
4. Attach Monoline to PostsTo install the monoline, begin by wrapping and tacking down one end at a corner post for the gate and run the spool all the way around the perimeter. Attach the top line first, since it is critical that you keep the height correct and consistent. Be careful to attach the monoline at 82 to 84 inches by nailing U-shaped fence staples (1 ¼-inch long) about halfway into every post, securing the monoline in place while leaving the line free to slip (Figure 6). When you get to the end at the other gatepost, cut the line and wrap it around the post several times and nail it firmly to the post with a few staples. After the top line is attached, string out and then attach the middle line. The middle line should be 3 or 4 feet above the ground. The bottom line should be placed at least 1 foot above the ground.
5. Tension the MonolineOnce all three lines are attached, they are tensioned. Loosen the monoline where you began and slip it through a gripple. Gripples are cam-locking devices that allow you to pull the line tight and keep it from slipping back (Figures 6 and 7). Take the free end and wrap it once around the post, then through the U-shaped staple, and then through the other channel of the gripple (Figure 6). Using pliers and gloves can make it easier to pull the line tight. Once you have tightened the monoline sufficiently, cut off excess
line, leaving some to grasp for re-tensioning in the future, if need be (Figure 7). For a fence longer than 1,000 feet, use several gripples to tension the line in sections of no more than 1,000 feet each. For the bottom line, once tensioned, it is best to hammer all staples firmly to the posts so that if a rodent chews through the bottom line, the fence will only lose tension in between those two posts. If you used a gripple to help tension the bottom line, you can cut it out and reuse it after nailing all the staples firmly.
Types of Plastic Mesh There are two types of plastic mesh fencing commercially available: standard-duty netting in 7.5-foot by 330-foot rolls, and heavy-duty netting that is 7.5-foot tall and 160-foot long, both with a mesh size of approximately 1 ¾ by 2 inches. The rolls will run about the same price, but the heavy-duty netting is twice the cost per unit length. In our HTIRC research, we typically utilize standard-duty fencing, installing an average of 10,000 feet of fence each year over the last decade. The standard-duty material will usually last from 6 to 8 years in the field. The heavy-duty mesh is much more durable and provides greater resistance to breaks from events like limb falls and deer collisions. If you would like to reuse the netting after 5 to 8 years for another planting, it may make sense to invest in the heavy-duty netting. The standard-duty fence has been a one-time use for our applications.
Figure 5. Top view diagram of a typical fence layout and placement of trees inside the perimeter.

PURDUE EXTENSION 1-888-EXT-INFO WWW.EXTENSION.PURDUE.EDU
5FNR-486-W • How to Build a Plastic Mesh Deer Exclusion Fence
6. Attach Mesh to Posts After the monoline is installed and tightened, you are ready to attach the mesh. Two people are needed to install the mesh. Start at a convenient corner or the edge of your gate. Unroll a few to a dozen feet of mesh and attach it squarely to the post using five 1 ¼ -inch, U-shaped fencing staples as indicated in (Figure 8). Keep about 2 inches of mesh above the top line and 4 to 6 inches of mesh overlapping the ground. Hammer through the cross of the mesh squares for extra strength and hammer the staples firmly, yet not too deeply, to avoid tearing the mesh. Once the roll is attached to the first post, proceed to the next post with one person functioning as the “toss-and-spinner” and the other person functioning as the “nailer” (Figure 9). The nailer should have a carpenter’s apron to hold plenty of fencing staples as you proceed around the fence. The toss-and-spinner tosses the roll up with a spinning motion to unroll some mesh, catches the roll, and repeats this motion several times as they proceed to the next post. The rolls weigh about 50 pounds, so make sure you have someone strong enough to perform this operation.
Once you reach the next post, the toss-and-spinner positions the netting square to the post and pulls the mesh tight, keeping the top of the mesh even and one square (about 2 inches) above the top line. The nailer also pulls the mesh tight while they set and hammer the staples (Figure 9). Continue on until the roll is finished. To join the next roll of fence, you can either use hog-rings to join a new roll to the old, if you are between two posts, or simply trim the excess net 1 to 2 feet from the last post and start a new roll on the same post. As with the original roll, make sure you start square and maintain the correct overlap on the top line and the ground.
When you reach the gate, simply attach the mesh to the post that the gate will swing from (the “hinge post”) with fence staples. Stretch the mesh out 1 foot or more beyond the next post and cut it off the roll. Drive at least five or six, 3.5-inch or longer nails evenly up the post leaving heads sticking out 1 to 2 inches. The loose end of mesh will be pulled tightly over these nails to secure the gate closed. You can double wrap the end of the mesh to reinforce it, or wrap the mesh around a pole or a pipe. Make sure that the gate can be pulled tight and doesn’t sag, if you have opted to not run the top monoline across the opening.
7. Attach Mesh to the Monoline A hog-ringer plier that crimps staples into a circle is the most efficient tool to attach the mesh netting to the monoline (Figure 10). Place hog rings every 2 feet between posts on the top line and as close as possible on each side of every post. This will help keep pressure off of the point of
Figure 6. Secure the top monoline through a fence staple and attach a gripple.
Figure 7. Tension and trim the middle monoline.
PURDUE EXTENSION 1-888-EXT-INFO WWW.EXTENSION.PURDUE.EDU
6FNR-486-W • How to Build a Plastic Mesh Deer Exclusion Fence
attachment where the mesh is nailed to the posts. During high wind periods, especially when the fence becomes icy in the winter, the mesh can act like a sail, which can cause it to tear through the post staples. If you installed square posts, nailing lath strips over the mesh down the entire length of the post can prevent this damage. Place hog rings every 3 to 4 feet on the middle and bottom lines.
8. Stake the Mesh to the GroundAfter the mesh is secured to the monoline, the bottom should be secured to the ground with stakes. This reduces the negative effects of wind on the fence and stops deer from crawling underneath the fence. Inverted J-shaped, 12-inch long rebar stakes work well and are available from fence suppliers. If you have installed a bottom line, you may not need stakes, or you may want to use only one stake in between posts. (We typically use two stakes between posts as shown in Figure 8.) Straighten out the mesh so that the overlap forms a straight line between posts pointing outside the fence. Cross the stake through the mesh at a point where it will create just enough tension to remain snug to the ground, yet not enough to pull down the top of the mesh and scallop the fence (Figure 11). If you fence
over gullies or depressions, fill the gap under the fence with rocks, slash, or other obstructions that will prevent deer from entering, yet still allow water to flow through.
9. Add FlaggingOnce construction is completed, the final task is to hang colored flagging tape streamers around the entire fence to alert deer to the obstruction, especially at night. Deer often travel in low-light conditions and these plastic mesh fences are not easily seen. The streamers flapping in the wind create a signal that there is something to avoid. Even if you cannot finish hog ringing and staking the fence, hang flagging tape streamers before you leave for the day to avoid a deer break-in the first night. (We often use heavy-duty flagging tape or 1-inch wide rolls of white, 4-mil plastic grafting tape). Attach it in an alternating “up-and-down” zigzag pattern as indicated in Figures 8 and 12. By hanging flagging both inside and outside the fence so that some of the flagging will move no matter which way the wind blows, you increase its visibility to deer.
Figure 8. Side view of typical fence construction between posts.

PURDUE EXTENSION 1-888-EXT-INFO WWW.EXTENSION.PURDUE.EDU
7FNR-486-W • How to Build a Plastic Mesh Deer Exclusion Fence
Figure 9. Position and nail the plastic mesh to the posts, being sure one square or about 2 inches of mesh are above the top monoline and 4 or 6 inches overlap the ground.
Figure 10. Use a hog-ring plier to attach the mesh to the monoline.
Figure 11. Stake the bottom of the fence once or twice between posts to reduce the pulling effects of the wind and to prevent deer from crawling under the fence.
Figure 12. A newly completed 6-acre fence protects rolling terrain.

PURDUE EXTENSION 1-888-EXT-INFO WWW.EXTENSION.PURDUE.EDU
8FNR-486-W • How to Build a Plastic Mesh Deer Exclusion Fence
Maintenance and Common ProblemsIf you placed your fence close to an existing woods or tree line, falling branches and trees can cause a break in the fence, especially after a severe storm. Deer may run through these fences, especially during the fall rut when bucks are focused on finding mates and less observant of obstructions. Keep extra pieces of netting on hand to patch any large breaks. Small tears or breaks can be repaired with any variety of string, zip ties, wire, etc. Rabbits will cut out little squares in the bottom of the fence to create pathways into plantings. These are not normally a problem, and you do not need to repair them unless a deer enlarges one and gains access. Signs of browse or buck rub on trees inside the fence is evidence that deer have gained entry. Walk the perimeter to find and repair breaks.
Depending on your overall objectives, you may want to keep the fence line weed-free, or you may allow weeds to grow through the fence, which will help secure it to the ground. (We often have less maintenance trouble when there is vegetation growing into the fence.) If you do allow weeds to grow through the bottom, you may want to periodically spray those with an herbicide such as glyphosate to keep them in check. However, when applying herbicides be careful to avoid drift and subsequent damage to your trees. Vines should never be allowed to grow unchecked on the fence. Vines such as morning glory, bindweed, Virginia creeper, wild grape, or trumpet creeper growing up the fence will increase wind resistance, which could cause that section of the fence to be pulled down and/or to blow over. Be aware of where and how water moves across your plot and clear any debris that could accumulate along a wall of the fence. After heavy rains or flooding, check for any new depressions or channels eroded from flowing water and fill those in to keep deer from gaining a new entry point. Areas with frequent floodwaters carrying debris are not suitable for this type of fence since debris moving under the pressure of the flowing water can pull the net down or, in severe cases, wash away sections of fence.
Yearly monitoring of the top line is important to check the tension and tighten, if need be. You may tension the lines with the gripples or tighten monoline between posts and hammer the staples firmly to secure the line between posts. Keep in mind that these are not permanent fences, they are intended only to provide temporary protection from deer browse and buck rub until the trees have gained enough size to avoid serious damage, typically 5 to 6 years. If you have bear, elk, or other free-ranging large animals
in your area, these fences will not prevent their entry. Metal-wire fencing or similar high-strength materials will be required to secure your fence perimeter. When the trees have outgrown the need for fencing, the mesh can be removed by hand or with the aid of a tractor. The mesh can be piled together and disposed of or potentially offered for recycling. If the fence posts are in good condition, they may be pulled and recycled.
A web search using the key words “deer fence” or “plastic deer fence” will yield numerous vendors of deer fencing supplies. Your local farm and garden store is also a resource to locate supplies and tools.
AcknowledgementsFunds from the Fred M. van Eck Forest Foundation, the Hardwood Forestry Fund, and the Indiana Chapter of the American Chestnut Foundation have supported this work. We thank Manfred Meilke (USDA Forest Service State & Private) and Bruce Wakeland (Wakeland Forestry Consultants, Inc.) for testing these instructions and providing feedback. Amanda Beheler, Shaneka Lawson, Ron Overton, and Ron Rathfon contributed valuable content critique and editorial review for this publication.
ReferencesJacobs D.F., A.L. Ross-Davis, and A. S. Davis. 2004. Establishment success of conservation tree plantations in relation to silvicultural practices in Indiana, USA. New Forests. 28: p. 23–36.
McCreedy, C.D. 1996. Sustainable management of a public resource: The white-tailed deer in Indiana. FNR-153, Dept. of Forestry and Natural Resources, Purdue University, West Lafayette, IN http://www.extension.purdue.edu/extmedia/FNR/FNR-153.pdf
McKenna, J., and K. Woeste. 2004. Diagnosing and controlling wildlife damage in hardwood plantations. FNR-216, Dept. of Forestry and Natural Resources, Purdue University, West Lafayette, IN http://www.extension.purdue.edu/extmedia/FNR/FNR-216.pdf
9FNR-486-W • How to Build a Plastic Mesh Deer Exclusion Fence
It is the policy of the Purdue University Cooperative Extension Service that all persons have equal opportunity and access to its educational programs, services, activities, and facilities without regard to race, religion, color, sex, age, national origin or ancestry, marital status, parental status, sexual orientation, disability or status as a veteran.
Purdue University is an Affirmative Action institution. This material may be available in alternative formats.
Mar 2014
Order or download materials from Purdue Extension • The Education Store
www.the-education-store.com
LOCAL FACESCOUNTLESS CONNECTIONS
1-888-EXT-INFO • www.extension.purdue.eduEXTENSIONAGRICULTURE
Miller, B.K., G.L. O’Malley, and R. K. Myers. 1992. Electric fences for preventing browse damage by white-tailed deer. FNR-136, Dept. of Forestry and Natural Resources, West Lafayette, IN http://www.extension.purdue.edu/extmedia/FNR/FNR-136.pdf
Purdue University Dept. of Forestry and Natural Resources, Coping with Wildlife Damage website: http://www.agriculture.purdue.edu/fnr/wildlife/landowners/wildlifedamage.html
Rathfon, R., Editor. 2009. Proceedings: Emerging issues in white-tailed deer management and conservation. FNR-416-W, Dept. of Forestry and Natural Resources, West Lafayette, IN http://www.extension.purdue.edu/extmedia/FNR/FNR-416-W.pdf
Stromayer, K.A.K., and R.J. Warren. 1997. Are Overabundant Deer Herds in the Eastern United States Creating Alternate Stable States in Forest Plant Communities? Wildlife Society Bulletin 25(2):227-234. http://www.jstor.org/stable/3783436?origin=JSTOR-pdf
University of Missouri Extension, Controlling Deer Damage in Missouri website: http://extension.missouri.edu/publications/DisplayPub.aspx?P=MP685
Wakeland, B., and R.K. Swihart. 2009. Ratings of white-tailed deer preferences for woody browse in Indiana. Proceedings of the Indiana Academy of Science 118(1):96-101 http://www.deerandforests.org/resources/ratings-of-white-tailed-deer-preferences-for-woody-browse-in-indiana