audio/video multi-channel receiver vsx-43tx · bass peak level ..... 86 dynamic range control ......
TRANSCRIPT

AUDIO/VIDEO MULTI-CHANNEL RECEIVER
VSX-43TX
Operating Instructions

2
IMPORTANT NOTICE H006AEn
The serial number for this equipment is located in therear panel. Please write this serial number on yourenclosed warranty card and keep it in a secure area. Thisis for your security.
Thank you for buying this Pioneer product.Please read through these operating instructionsso you will know how to operate your modelproperly. After you have finished reading theinstructions, put them away in a safe place forfuture reference.

3

54
PR
EPA
RA
TIO
NP
RE
PA
RA
TIO
NE
XP
ER
TE
AS
Y S
ET
UP
GU
IDE
SU
RR
OU
ND
SE
TU
PB
AS
IC
Table of Contents Table of Contents
Features ................................................. 6
Before You Start .................................... 7
Checking the Supplied Accessories ........................... 7Preparing the Remote Control .................................... 7
Loading the batteries ............................................. 7Operating range of remote control unit ............... 8
Installing the Receiver ................................................. 8Opening the Front Panel ............................................. 8
Easy Setup Guide Part 1 ....................... 9
Home Theater: The Basics .......................................... 91) Your Home System ............................................ 92) The Source Material ........................................... 93) The Listening Modes .......................................... 9Conclusion .............................................................. 9
1 Hooking Up Your DVD Player & TV ..................... 10Digital Connections .............................................. 10
2 Speaker Connections ........................................... 113 Setting up the Main Unit ...................................... 124 Assigning the Digital Inputs ................................ 12
Easy Setup Guide Part 2 ..................... 13
1 QUICK Setup ......................................................... 132 Playing a DVD with Surround Sound ................. 14
Connecting Your Equipment .............. 15
Connecting your TV ................................................... 15Component Video Input Default Settings ........... 15
Connecting Video Components ................................ 16Connecting a DVD player ..................................... 16Connecting VCRs or DVRs ................................... 17Connecting a Video Componentto the Front Panel ................................................. 17Connecting Satellite TV (SAT) Components ...... 18
Connecting Analog Audio Components .................. 19Connecting to the Multi Channel Analog Inputs(DVD-Audio or Super Audio CD (SACD) compatibleplayer) ............................................................................. 20
Connecting Digital Audio Components ................... 21Digital Input Default Settings .............................. 22
Connecting the Radio Antennas ............................... 23Using outdoor antennas ...................................... 23
Connecting Speakers ................................................. 24Speaker impedance .............................................. 25Bi-wiring your speakers ....................................... 25
Placing Your Speakers ............................................... 26Speaker placement ............................................... 26
AC Power Cord ........................................................... 26AC Outlet [switched 100W max] ............................... 26
Displays & Controls ............................ 27
Display ........................................................................ 27Front Panel ................................................................. 28Remote Control .......................................................... 30Back Panel .................................................................. 32
Setting Up for Surround Sound ........ 34
SURRBACK SYSTEM (Surround Back System) ...... 35NORMAL setup .......................................................... 36
SPEAKER SETTING .............................................. 37CHANNEL LEVEL (channel balance) ................... 39CHANNEL DELAY ................................................. 40
Basic Operation ................................... 41
Stereo and Multichannel Playback ........................... 41Switching ANALOG/DIGITAL Signal Input ......... 42
Listening Modes ........................................................ 43STEREO modes ..................................................... 43MOVIE modes (SURROUND mode) .................... 44MUSIC modes (SURROUND mode) .................... 45Adjusting the Effect of a Listening Mode ........... 46Adding/Adjusting the Effect inDolby Pro Logic II Music Mode ........................... 46
Listening with Acoustic Calibration EQ ................... 47Reducing Noise During Playback(DIGITAL NR Function) .............................................. 47Listening in MIDNIGHT Mode................................... 48Listening in LOUDNESS Mode ................................. 48Adjusting Bass and Treble (TONE CONTROL) ........ 49Listening in HI–BIT/SAMPLING Mode ...................... 50DVD-Audio/MULTI CHANNEL IN Playback .............. 50SB CH MODE button.................................................. 51
SB CH MODE ......................................................... 51VIRTUAL SURROUND BACK Mode..................... 51
DUAL MONO setting and Playback .......................... 52Using Headphones .................................................... 52Video Select ............................................................... 53Adjusting the Brightness of the Display(DIMMER) ................................................................... 53
Using the Tuner ................................... 54
Automatic and Manual Tuning ................................. 54MPX Mode ............................................................ 54
Direct Access Tuning ................................................. 55Memorizing Frequently Used Stations .................... 56Naming Memorized Stations .................................... 57Recalling Memorized Stations .................................. 58
Remote Control of Other
Components ........................................ 59
Setting Up the Remote Control to Control OtherComponents ............................................................... 59
Recalling Settings Stored in theRemote Control ..................................................... 59Programming Signals from Other RemoteControls (LEARNING Mode) ................................ 60
Using Remote Control with Other Components ..... 61CD/MD/CD-R/VCR/DVD/LD/DVD Recorder/Cassette Deck operations ..................................... 61Cable TV/ Satellite TV/Digital TV/ TV operations ..................................... 62
Setting up the DIRECT FUNCTION ........................... 63
Using Other Functions........................ 64
Recording from Audio/Video Components ............. 64SECOND ZONE (Speaker System B)/FRONT BI-AMPSetup ........................................................................... 65
Stereo playback in another room (SECONDZONE) .................................................................... 65Bi-amping the front speakers(FRONT BI-AMP) ................................................... 65A/B Speaker Button .............................................. 66
Connecting Additional Amplifiers ............................ 67Multi Operations ........................................................ 68
Performing Multi Operations ............................... 69SYSTEM OFF .............................................................. 70
Using SYSTEM OFF .............................................. 71The PIONEER SR System: Operating other PIONEERcomponents ............................................................... 71Resetting the Remote Control .................................. 72
Erasing Multi Operations ..................................... 72Erasing Learned Remote Control Commands ... 72Erasing All Remote Control settings ................... 72
Resetting the Main Unit ............................................ 73
Fine Tuning Your System ................... 74
Other System Settings .............................................. 74THX CINEMA Setup ................................................... 75Assigning the Digital Inputs ...................................... 76Assigning the Component Video Inputs .................. 77FUNCTION RENAME ................................................. 78Expert Setup ............................................................... 79
CROSSOVER NETWORK ...................................... 80FINE CHANNEL LEVEL ......................................... 81
FINE CHANNEL DELAY ........................................ 82 ACOUSTIC CAL EQ ............................................... 84
BASS PEAK LEVEL ............................................... 86DYNAMIC RANGE CONTROL .............................. 87
Techno Tidbits & Problem-solving..... 88
Dolby ........................................................................... 88Dolby Digital ......................................................... 88Dolby Pro Logic II ................................................. 88Dolby Digital Surround EX .................................. 89
DTS ............................................................................. 89DTS ........................................................................ 89DTS-ES .................................................................. 89DTS Neo:6 ............................................................. 89DTS 96/24 .............................................................. 89
THX ............................................................................. 90Speaker Placement Information ............................... 91Preset Code List ......................................................... 93Troubleshooting ......................................................... 95Schemata of Setup .................................................. 100Specifications ........................................................... 102

6
Features
High Quality, Balanced Multichannel Design
The VSX-43TX receiver is constructed with Pioneer’s industry-leading advanced and well balanced multichannelconcept. This means it is designed to reproduce music and movie soundtracks as close as possible to theintentions of the producer during mastering. The receiver uses a revolutionary 3-D Frame Constructiontechnique and a Symmetrical Power Train Design, with high-performance Advanced Direct Energy MOS-FEToutput devices, generating 100 watts of power for 7 independent channels.
Multichannel Acoustic Calibration EQ System (MCACC)
In order to make setting up as easy as possible for users we have created the MCACC system. This unique andconvenient way of getting good surround sound from the receiver makes trouble-free set up a snap. TheMCACC system creates a monitoring environment to establish the parameters of the sound in regards to eachspeaker for the specific room you are using. The Acoustic Calibration EQ feature makes sure each speaker isused to maximum effect in conjunction with the overall sound. The resulting settings finely attune the overallsurround sound for the space used.
Dolby Digital EX, DTS-ES, DTS 96/24 and the Latest Audio and Video
Formats
The VSX-43TX is equipped with Dolby Digital EX decoding, the very latest Dolby Digital contribution to hometheater with surround back speakers in addition to surround speakers. These additional speakers make hometheater even more realistic and powerful. Naturally, you can also play all existing audio formats, including therecently developed Dolby Pro Logic II and DTS-ES Extended Surround formats on the VSX-43TX as well. On thevideo side, the component video output is fully compatible with high definition, progressive-scan digital video(720p).
Universal Player Compatibility (DVD Audio/Super Audio CD [SACD])
This receiver incorporates the latest technology and is able to handle cutting edge audio formats, like DVD Audioand Super Audio CD (SACD) which are just hitting the market. Its high compatibility offers a variety of inputs todecode all types of sources at the highest possible quality. The receiver’s multichannel input connections lets youhook up eight discrete channels of audio.
Audio Scaler (HI BIT/HI SAMPLING)
This new technology enables the user to hear CD and DVD, as well as other soundtracks at a wider dynamicrange, allowing for finer audio reproduction. This Audio Scaler approximates the audio of high end formats justbecoming available now.
Easy-to-use Remote Control and Urushi Lacquer Aluminum Panel
This new remote control is extremely convenient to use. One button is dedicated to one task in the control of thereceiver, eliminating confusing buttons whose purpose are unclear. In addition, this remote can be used tooperate a variety of other components simply by recalling the appropriate setup codes. The smooth finish andleft-right symmetry of the stylish urushi lacquer aluminum panel is emblematic of the high quality of theequipment.
The Energy-saving Design
This unit is designed to use 0.6 W of energy when the receiver is in standby mode.
"DTS", "DTS-ES Extended Surround" and "Neo:6" aretrademarks of Digital Theater Systems, Inc.
Lucasfilm and THX are trademarks or registeredtrademarks of Lucasfilm, Ltd. & TM. Surround EXis a jointly developed technology of THX and DolbyLaboratories, and is a trademark of DolbyLaboratories. All rights reserved. Used underauthorization.
Manufactured under license from Dolby Laboratories.“Dolby”, “Pro Logic”, “Surround EX” and double-Dsymbol are trademarks of Dolby Laboratories.

7
PR
EPA
RA
TIO
NP
RE
PA
RA
TIO
NP
RE
PA
RA
TIO
N
AUDIO/VIDEO MULTI-CHANNEL RECEIVER
VSX-43TX
Operating Instructions
Before You Start
Checking the Supplied Accessories
Please check that you have received all of the following supplied accessories.
CAUTION!Incorrect use of batteries may result in such hazards as leakage and bursting. Observe the following precautions.• Never use new and old batteries together.• Insert the plus and minus sides of the batteries properly according to the marks in the battery case.• Batteries with the same shape may have different voltages. Do not use different batteries together.• When disposing of used batteries, please comply with governmental regulations or environmental public institution’s
rules that apply in your country or area.
“AA” IEC LR6batteries x 2
FM Wire AntennaAM Loop Antenna
Remote Control UnitOperating
Instructions
1 2 3“AA” IEC LR6batteries x 2
Preparing the Remote Control
Loading the batteries
Load the batteries into the remote control as shown below. Please use alkaline batteries. When you notice adecrease in the operating range, replace all batteries with new ones.
SOURCE
MULTI CONTROL
RECEIVER
MOVIEMUSIC
ENTER
MULTIOPERATION
SURROUNDMODE
STEREO/DIRECT
SYSTEMOFF
ACOUSTICEQ
SB CHMODE
INPUTMIDNIGHT
CHANNEL−
+−
CHANNEL+
DTV ON/OFF BANDDIMMER
TONE
LOUDNESS
EFFECT/CH SEL
SIGNAL SEL
BASS/TREBLE
DISC
DNR
VIDEO SEL
SUB TITLEREMOTESETUP
HI-BIT
D.ACCESS
MPX
TV CONTROL
CLASS
MUTE
MENU
TOP MENU
TUNER EDIT
GUIDE
SYSTEMSETUP
AUDIO
RETURN
CHANNELVOLUME
INPUTSELECT
+10
MULTI CHINPUT
RECEIVER
ST TUNE
MASTER
VOLUME
STTUNE
DVD/LD
ENTER
ENTER
VCR 2TV /SAT
CD VCR/DVR
TV CONT
TUNER
RECEIVER

8
Before You Start
8 inches (20 cm)
Receiver
Installing the Receiver
Opening the Front Panel
To open the front panel push gently on the lower third of thepanel with your finger.
Operating range of remote control unit
The area in which you can use the remote control to operate the VSX-43TX is fairly large. To use, point theremote control toward the remote sensor on the front panel of this unit while within the range shown below.
Remote control may not function properly if:• There are obstacles between the remote control and the
remote sensor.• Direct sunlight or fluorescent light is shining onto the
remote sensor.• The receiver located near a device emitting infrared rays.• Operated simultaneously with another remote control
which uses infrared rays.
CAUTION!• Do not cover this unit in any way, for exam-
ple with a sheet or piece of cloth. This wouldprevent proper heat dispersal.
• Do not any place object directly on top ofthis unit. This also would prevent proper heatdispersal.
• Be sure to leave adequate ventilation spacearound the amp! When installing in a rack,shelf, etc., be sure to leave more than 8inches of space above the receiver.
3030
23 feet (7m)

9
EA
SY
SE
TU
P G
UID
EP
RE
PA
RA
TIO
N
Easy Setup Guide Part1P
RE
PA
RA
TIO
N
Home Theater: The Basics
Most consumers are used to using stereo equipment to listen to music but many people are not used to home theatersystems that give you many more options when listening to soundtracks. In fact, home theater is not reallycomplicated and this little guide should give you an understanding of the basics. Home theater refers to the use ofmultiple audio tracks combined with multiple speakers to create a surround sound effect.There are three different factors involved in getting surround sound. Each contribute to what kind of sound you get.These factors are:1) The equipment you are using for your home theater setup. Particularly important is the number of speakers you areusing. We call this your speaker configuration.2) The 'source' material you are using. This is the actual product (like a DVD) or broadcast (like cable TV) you arelistening to/watching. We call this the source.3) The last factor is the listening mode you choose on the VSX-43TX receiver. These are explained below and insubsequent chapters but most likely the PRO LOGIC II MOVIE for moves and the PRO LOGIC II MUSIC for music willbe fine.Let's start with the home theater setup you have in your home.
1) Your Home System
The heart of your system is the VSX-43TX receiver and it is very flexible in getting you theater-like surround sound. Youcan use this receiver with anywhere from two to seven speakers (front left, front right, center, surround left and right,and surround back left and right) and a subwoofer to get home theater surround sound. We recommend you use sevenspeakers and a subwoofer. If this is not possible follow the instructions in "QUICK Setup" in the "Easy Setup Guide Part2" and you will still be able to get good surround sound. Also, a DVD player is essential for home theater and you canalso hook up satellite or cable TV tuner to this receiver and get a more home theater-like sound from these sources.
2) The Source Material
DVDs have become the basic source material for home theater because they are convenient to use and offer excellentsound and picture quality as well as allow users to enjoy home theater soundtracks with more than two channels ofaudio. For example, Dolby Pro Logic plays back four channels (front left, front right, center and a single channel for bothsurround speakers), Dolby Digital and DTS sources usually have six discrete channels (front left, front right, center,surround left and right and a channel that powers the subwoofer) of sound. Since the subwoofer channel is only forbass sounds it is expressed as .1 of a channel and this multichannel setup has been named 5.1 channel sound.It is important you consult the manual that came with your DVD player as well to make sure the player is outputting asurround soundtrack and all the other settings are appropriate for your home theater.
3) The Listening Modes
This receiver has many different listening modes and they are designed to cover all the speaker configurations andtypes of sources you might be using. In general, the PRO LOGIC II MOVIE listening mode is the easiest way to getrealistic surround sound for movies. For music the basic listening mode for music is PRO LOGIC II MUSIC.
To listen to music in stereo simply choose the STEREO listening mode. Other possibilities (like listening to a stereo CDwith all seven speakers or taking a stereo source and getting multichannel home theater-like sound) are explained inlistening modes (pages 43–45).
Conclusion
These are the three basic factors that contribute to your home theater sound. The easiest thing is to hook up sevenspeakers and a subwoofer and simply play your DVDs with PRO LOGIC II MOVIE listening mode. This will give yourealistic and enjoyable home theater sound. First hook up your equipment, like your DVD player, TV and speakers. Thenfollow the Easy Setup Guide instructions to set up your system for surround sound. It is very important you do one ofthe surround sound setups to get optimal sound from your receiver.For more details on any of the information presented here check the main section of the manual.

10
Before making or changing the connections, switch off the power and disconnect the power cord from
the AC outlet.
Easy Setup Guide Part1
11111 Hooking Up Your DVD Player & TV
In order to use Dolby Digital/DTS soundtracks, which are at the heart of home theater, you need to hook up yourDVD player with digital audio connections. You can do this by either a coaxial or an optical connection, you don’t
need to do both. The quality of these two types of connections is the same but since some DVD players onlyhave one type of digital terminal you need to figure out which yours has and hook it up to the appropriateterminal on the receiver. In order to do this you will need the proper cable. For coaxial connections you can use aregular RCA video cord or the specially-made coaxial cords, they have the same type of plugs. For opticalconnections you will need a special optical cable which you can buy at your local stereo store. For moreinformation on cords and cables see page 21. You should also hook up your DVD player with analog audioconnections. Use regular RCA stereo cords for these connections. Also hook up the video connection on yourDVD player, and your TV to this receiver. For your TV it's easiest to use a regular composite (RCA) video cord, asshown below. S Video and Component video cords are of higher quality than RCA video cords and may also beused with this unit.
Digital Connections
Some DVD players have both coaxial and optical terminals, but there is no need to connect both. If your DVDplayer has a coaxial terminal (not a PCM-only output) for the audio out hook it up using this terminal. Follow thediagram below. This is the best scenario, as you will be able to follow the default settings of this receiver andwon't need to assign the digital inputs (you should use DIGITAL IN 3).
If your DVD player only has an optical terminal for the audio output you can hook it up using one of the DIGITALIN terminals between 1-2 (for example, DIGITAL IN 2). In this case, you will need to assign the digital input(which means tell the receiver which input you used for your DVD digital audio). See page 12 for this.
(not a PCM-only output)
IN(TV/
SAT)
1
IN(CD-R/
TAPE1)
2
IN 3(DVD/LD)
IN 4
(CD)
DIGITAL
DVD player
OUTPUT
DIGITAL
AUDIO
L
R
ANALOG
VIDEOOUT
VIDEO
PCM/2DIGITAL /DTS
OUT1
OUT2
INR L
·
ª
·
ª
R L R RLL
(TV/ SAT)
1
IN 1
Åı
IN 2
IN(CD-R/
TAPE1)
2
IN 3(DVD/LD)
IN 4
(CD)
PLAY
PLAY
CD-R/ TAPE1
IN
OUT
IN
OUT
VCR1/DVR
TV/SAT IN
DVD/LD IN
SUR-ROUNDBACK
(DVD/LD)
(TV/SAT)
FRONT
CENTER
SUR-ROUND
SUBWOOFER
PRE OUTMONITOR OUT
FRONT CENTER SURROUNDSURROUND BACK /
PB
PR
PB
PR
Y
Y
Y
PB
PR
VCR2
CD
LINEDIGITAL
AUDIO AUDIO VIDEO
IN
IN
IN
OUT
IN
OUT
VIDEO S VIDEO
MD/ TAPE2
REC
REC
AC OUTLET
MULTI CH IN COMPONENT VIDEO
SPEAKERS
OUT
IN
MONITOR OUT
CONTROL
75Ω ANTENNAAM LOOPFM UNBAL
R L R L
LR
LR
LR
ASSIGNABLE ASSIGNABLE
SUR-ROUNDBACK
SUR-ROUND
FRONT
SUBWOOF-ER
LR
LR
LR
CEN- TER
(Single)
·
ª
L RRL LFRONT CENTERSURROUND SURROUNDBACK
AC OUTLET
VIDEO INPUT
DVD/LD IN
VIDEO S VIDEO
R L
L
R
RCA video cord
RCA video cord RCA stereo cord
coaxial cord
optical cord
MONITOR OUT
R L
You only need to makeone DIGITAL connection.
11
EA
SY
SE
TU
P G
UID
E
Easy Setup Guide Part1
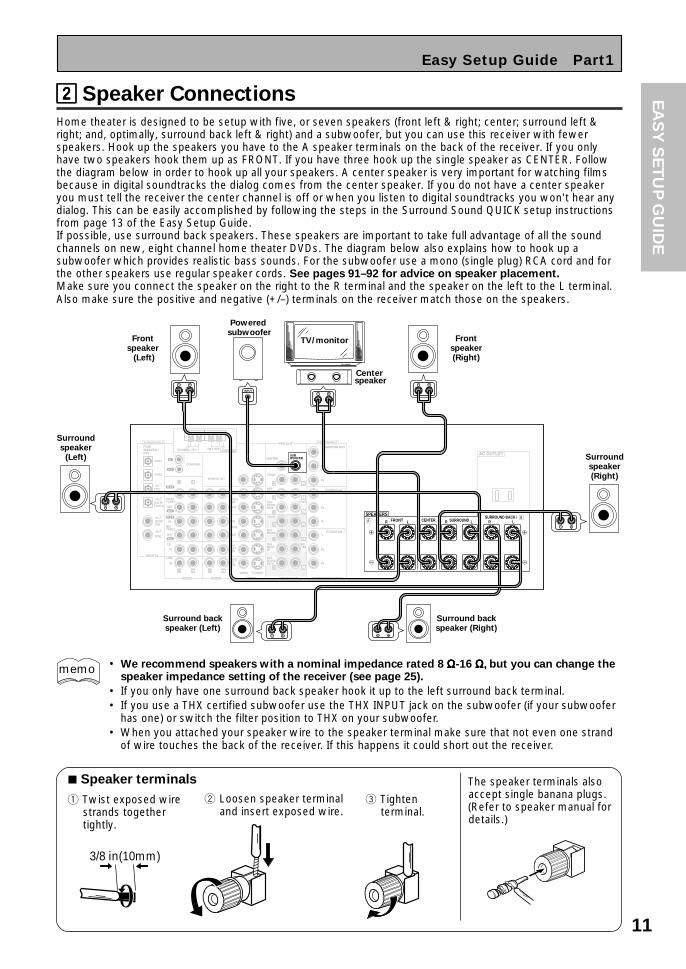
22222 Speaker Connections
Home theater is designed to be setup with five, or seven speakers (front left & right; center; surround left &right; and, optimally, surround back left & right) and a subwoofer, but you can use this receiver with fewerspeakers. Hook up the speakers you have to the A speaker terminals on the back of the receiver. If you onlyhave two speakers hook them up as FRONT. If you have three hook up the single speaker as CENTER. Followthe diagram below in order to hook up all your speakers. A center speaker is very important for watching filmsbecause in digital soundtracks the dialog comes from the center speaker. If you do not have a center speakeryou must tell the receiver the center channel is off or when you listen to digital soundtracks you won't hear anydialog. This can be easily accomplished by following the steps in the Surround Sound QUICK setup instructionsfrom page 13 of the Easy Setup Guide.If possible, use surround back speakers. These speakers are important to take full advantage of all the soundchannels on new, eight channel home theater DVDs. The diagram below also explains how to hook up asubwoofer which provides realistic bass sounds. For the subwoofer use a mono (single plug) RCA cord and forthe other speakers use regular speaker cords. See pages 91–92 for advice on speaker placement.Make sure you connect the speaker on the right to the R terminal and the speaker on the left to the L terminal.Also make sure the positive and negative (+/–) terminals on the receiver match those on the speakers.
7 Speaker terminals
1 Twist exposed wirestrands togethertightly.
2 Loosen speaker terminaland insert exposed wire.
The speaker terminals alsoaccept single banana plugs.(Refer to speaker manual fordetails.)
3/8 in(10mm)
• We recommend speakers with a nominal impedance rated 8 ΩΩΩΩΩ-16 Ω, Ω, Ω, Ω, Ω, but you can change thespeaker impedance setting of the receiver (see page 25).
• If you only have one surround back speaker hook it up to the left surround back terminal.• If you use a THX certified subwoofer use the THX INPUT jack on the subwoofer (if your subwoofer
has one) or switch the filter position to THX on your subwoofer.• When you attached your speaker wire to the speaker terminal make sure that not even one strand
of wire touches the back of the receiver. If this happens it could short out the receiver.
memo
3 Tightenterminal.
PCM/2DIGITAL /DTS
OUT1
OUT2
INR L
·
ª
·
ª
R L R RL L
(TV/ SAT)
1
IN 1
Åı
IN 2
IN(CD-R/
TAPE1)
2
IN 3(DVD/LD)
IN 4
(CD)
PLAY
PLAY
CD-R/ TAPE1
IN
OUT
IN
OUT
VCR1/DVR
TV/SAT IN
DVD/LD IN
SUR-ROUNDBACK
(DVD/LD)
(TV/SAT)
FRONT
CENTER
SUR-ROUND
SUBWOOFER
PRE OUTMONITOR OUT
FRONT CENTER SURROUNDSURROUND BACK /
PB
PR
PB
PR
Y
Y
Y
PB
PR
VCR2
CD
LINEDIGITAL
AUDIO AUDIO VIDEO
IN
IN
IN
OUT
IN
OUT
VIDEO S VIDEO
MD/ TAPE2
REC
REC
AC OUTLET
MULTI CH IN COMPONENT VIDEO
SPEAKERS
OUT
IN
MONITOR OUT
CONTROL
75Ω ANTENNAAM LOOPFM UNBAL
R L R L
LR
LR
LR
ASSIGNABLE ASSIGNABLE
SUR-ROUNDBACK
SUR-ROUND
FRONT
SUBWOOF-ER
LR
LR
LR
CEN- TER
(Single)
INPUT
Powered subwoofer
Front speaker
(Left)
Frontspeaker(Right)
TV/monitor
Center speaker
Surround backspeaker (Right)
Surround backspeaker (Left)
Surroundspeaker
(Left) Surroundspeaker(Right)
12
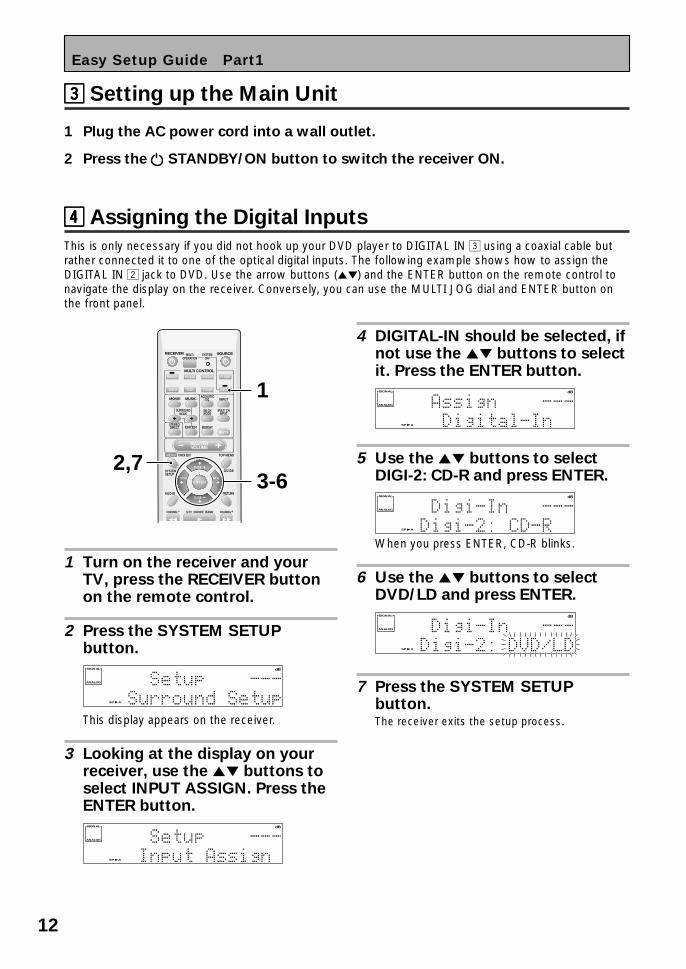
1 Turn on the receiver and yourTV, press the RECEIVER buttonon the remote control.
2 Press the SYSTEM SETUPbutton.
LOUDNESS MIDNIGHT TONE DNR ATT STEREOTUNEDRDSHi-BIT/
MULTI-ROOMSAMPLING
EONRF ATTMONONeo :6
DIGITALDTS ES EXMPEG AACSTEREO
PRO LOGIC
DSP
L C R LFE
AUTOSB CH
ON MOVIEMUSICOFF
LS S RS
AUTO
RFDIGITAL
dBSIGNAL
SP A B
ANALOG
This display appears on the receiver.
3 Looking at the display on yourreceiver, use the 5∞ buttons toselect INPUT ASSIGN. Press theENTER button.
LOUDNESS MIDNIGHT TONE DNR ATT STEREOTUNEDRDSHi-BIT/
MULTI-ROOMSAMPLING
EONRF ATTMONONeo :6
DIGITALDTS ES EXMPEG AACSTEREO
PRO LOGIC
DSP
L C R LFE
AUTOSB CH
ON MOVIEMUSICOFF
LS S RS
AUTO
RFDIGITAL
dBSIGNAL
SP A B
ANALOG
44444 Assigning the Digital Inputs
This is only necessary if you did not hook up your DVD player to DIGITAL IN 3 using a coaxial cable butrather connected it to one of the optical digital inputs. The following example shows how to assign theDIGITAL IN 2 jack to DVD. Use the arrow buttons (5∞) and the ENTER button on the remote control tonavigate the display on the receiver. Conversely, you can use the MULTI JOG dial and ENTER button onthe front panel.
33333 Setting up the Main Unit
1 Plug the AC power cord into a wall outlet.
2 Press the STANDBY/ON button to switch the receiver ON.
Easy Setup Guide Part1
2,7
SOURCE
MULTI CONTROL
RECEIVER
MOVIE MUSIC
ENTER
MULTIOPERATION
SURROUNDMODE
STEREO/DIRECT
SYSTEMOFF
ACOUSTICEQ
SB CHMODE
INPUT
MIDNIGHT
CHANNEL− CHANNEL+DTV ON/OFF BAND
MUTE
MENU TOP MENUTUNER EDIT
GUIDESYSTEMSETUP
AUDIO RETURN
MULTI CHINPUT
ST
TUNE
MASTER VOLUME
ST
TUNE
DVD/LD
ENTER
VCR 2
TV / SAT
C D
VCR/DVR TV CONT
TUNER RECEIVER
3-6
1
4 DIGITAL-IN should be selected, ifnot use the 5∞ buttons to selectit. Press the ENTER button.
LOUDNESS MIDNIGHT TONE DNR ATT STEREOTUNEDRDSHi-BIT/
MULTI-ROOMSAMPLING
EONRF ATTMONONeo :6
DIGITALDTS ES EXMPEG AACSTEREO
PRO LOGIC
DSP
L C R LFE
AUTOSB CH
ON MOVIEMUSICOFF
LS S RS
AUTO
RFDIGITAL
dBSIGNAL
SP A B
ANALOG
5 Use the 5∞ buttons to selectDIGI-2: CD-R and press ENTER.
LOUDNESS MIDNIGHT TONE DNR ATT STEREOTUNEDRDSHi-BIT/
MULTI-ROOMSAMPLING
EONRF ATTMONONeo :6
DIGITALDTS ES EXMPEG AACSTEREO
PRO LOGIC
DSP
L C R LFE
AUTOSB CH
ON MOVIEMUSICOFF
LS S RS
AUTO
RFDIGITAL
dBSIGNAL
SP A B
ANALOG
When you press ENTER, CD-R blinks.
6 Use the 5∞ buttons to selectDVD/LD and press ENTER.
LOUDNESS MIDNIGHT TONE DNR ATT STEREOTUNEDRDSHi-BIT/
MULTI-ROOMSAMPLING
EONRF ATTMONONeo :6
DIGITALDTS ES EXMPEG AACSTEREO
PRO LOGIC
DSP
L C R LFE
AUTOSB CH
ON MOVIEMUSICOFF
LS S RS
AUTO
RFDIGITAL
dBSIGNAL
SP A B
ANALOG
7 Press the SYSTEM SETUPbutton.The receiver exits the setup process.

13
EA
SY
SE
TU
P G
UID
E
Easy Setup Guide Part2
11111 QUICK setup
With this QUICK setup you can quickly and easily adjust the speakers settings so that you get enjoyablesurround sound with minimum effort.You must have front and surround speakers hooked up to use this setup.You only need to do these settings once (unless you change the placement of your current speaker system oradd new speakers, etc.).
SOURCE
MULTI CONTROL
RECEIVER
MOVIE MUSIC
ENTER
MULTIOPERATION
SURROUNDMODE
STEREO/DIRECT
SYSTEMOFF
ACOUSTICEQ
SB CHMODE
INPUT
MIDNIGHT
CHANNEL− CHANNEL+DTV ON/OFF BAND
MUTE
MENU TOP MENUTUNER EDIT
GUIDESYSTEMSETUP
AUDIO RETURN
MULTI CHINPUT
ST
TUNE
MASTER VOLUME
ST
TUNE
DVD/LD
ENTER
VCR 2
TV / SAT
C D
VCR/DVR TV CONT
TUNER RECEIVER
2,83-7
1
1 Press the RECEIVER button onthe remote control.
2 Press the SYSTEM SETUPbutton.
LOUDNESS MIDNIGHT TONE DNR ATT STEREOTUNEDRDSHi-BIT/
MULTI-ROOMSAMPLING
EONRF ATTMONONeo :6
DIGITALDTS ES EXMPEG AACSTEREO
PRO LOGIC
DSP
L C R LFE
AUTOSB CH
ON MOVIEMUSICOFF
LS S RS
AUTO
RFDIGITAL
dBSIGNAL
SP A B
ANALOG
This display appears on the receiver.
3 SURROUND SETUP should beselected, if not use the 5∞buttons to select it. Press theENTER button.
4 Use the 5∞ buttons to selectQUICK. Press the ENTER button.
LOUDNESS MIDNIGHT TONE DNR ATT STEREOTUNEDRDSHi-BIT/
MULTI-ROOMSAMPLING
EONRF ATTMONONeo :6
DIGITALDTS ES EXMPEG AACSTEREO
PRO LOGIC
DSP
L C R LFE
AUTOSB CH
ON MOVIEMUSICOFF
LS S RS
AUTO
RFDIGITAL
dBSIGNAL
SP A B
ANALOG
5 Use the 5∞ buttons to navigatethrough the QUICK setup menus.When you get a menu you wantto adjust press ENTER.
LOUDNESS MIDNIGHT TONE DNR ATT STEREOTUNEDRDSHi-BIT/
MULTI-ROOMSAMPLING
EONRF ATTMONONeo :6
DIGITALDTS ES EXMPEG AACSTEREO
PRO LOGIC
DSP
L C R LFE
AUTOSB CH
ON MOVIEMUSICOFF
LS S RS
AUTO
RFDIGITAL
dBSIGNAL
SP A B
ANALOG
When ENTER is pressed, the setting for eachselected menu blinks.
In each mode, the current settings are dis-played automatically. We suggest you adjust allthese settings when you first hook up thereceiver.SUBWOOFER setting:If you connected a subwoofer select YES, if youdidn’t select NO.CENTER SP setting:If you connected a CENTER speaker select YES,if you didn’t select NO.SURRBACK SP setting:If you connected a SURROUND speaker(s) selectYES, if you didn’t select NO.ROOM SIZE setting:Tell the receiver your room size so it can equalizethe speakers properly. Use the chart below for anapproximate definition of the settings.
S: 12 feet by 15 feetM: 18 feet by 20 feetL: 25 feet by 30 feet
LISTENING POSITION setting:
This setting establishes where your ideal listen-ing position is. Choose from the three possibili-ties following the guide below.
FRONT: your listening position is closer to thefront speakers.CENTER: your listening position is equidistantfrom the front and surround speakers.REAR: your listening position is closer to thesurround speakers.
6 In a menu use the 5∞ buttons toselect the different settings.When you have the setting youwant in a particular menu, pressENTER.
LOUDNESS MIDNIGHT TONE DNR ATT STEREOTUNEDRDSHi-BIT/
MULTI-ROOMSAMPLING
EONRF ATTMONONeo :6
DIGITALDTS ES EXMPEG AACSTEREO
PRO LOGIC
DSP
L C R LFE
AUTOSB CH
ON MOVIEMUSICOFF
LS S RS
AUTO
RFDIGITAL
dBSIGNAL
SP A B
ANALOG
7 Repeat steps 5 and 6 to changeother menus.
8 Press the SYSTEM SETUPbutton.The receiver exits the setup process.

14
22222 Playing a DVD with Surround Sound
1 Make sure the receiver, your TV, your subwoofer and your DVD player
are switched ON.
2 Press the DVD/LD button on the remote control.You should see DVD/LD in the display on the receiver.
3 Play a DVD then adjust the MASTER VOLUME.
Easy Setup Guide Part2
memo To get a more refined sound, make the sound settings in "Expert setup" (starting on page79).
If you're having trouble getting surround sound playback look at this FrequentlyAsked Questions (FAQ) guide:Q1: Even though I'm playing a DVD I'm not getting 5.1 channel playback.A1: Either the DVD is not set for digital output, or the Dolby Digital/DTS output settings are not
correct.Set the DVD player to output a digital signal and set the Dolby Digital and DTS output properly. If you areunsure how to do this check the DVD initial setup in the manual that came with your DVD player.
Q2: There is no sound from the subwoofer or it is very low.A2: There is a good possibility you haven't reached a part of the DVD that has an LFE channel
(which feeds the subwoofer) yet. The LFE channel only appears in selected parts of thesoundtrack. Continue playing and listen for the subwoofer.If you want to hear more sound from the subwoofer set it to PLUS (see page 37 for more information andconsult the memo on page 38).

15
PR
EPA
RA
TIO
NP
RE
PA
RA
TIO
N
Connecting Your Equipment
Connecting your TV
Before making or changing the connections, switch off the power and disconnect the power cord fromthe AC outlet.
Connect your TV to the jacks as shown below. Hook up with either component video, S video, or compos-ite video cords (the quality descends in this order) but you must use the same type of video cords to
hook up your DVD player (and all other video components) as you use to hook up your TV. If youplan to hook up your DVD player with component video cords hook up your TV with them as well. Com-posite video cords, which look just like regular RCA audio cords (see page 19) but have only one cable arethe most common.
Y
PB
PR
Green
Blue
Red
S Video Component videoThe video signal isdivided into theluminance (Y) signal andthe color (PB and PR)signals. In this way,interference betweenthe signals is avoided.
Component Video Input Default Settings
If you use component video cords to hook up your video equipment it is easiest to do so following thedefault settings, which are listed below. Remember you must use component video cords from yourvideo source (for example, a DVD player) to the receiver and from the receiver to your TV (or monitor). Ifyou don't follow the default settings below you must assign the inputs you used with the "Assigning theComponent Video Inputs" procedure. See page 77 to do this.
The default settings are:
COMPONENT VIDEO IN 1: DVD/LDCOMPONENT VIDEO IN 2: TV/SAT
S VIDEO
S video cables produceclearer picturereproduction by sendingseparate signals for theluminance and the color.
Composite VideoComposite video cords are the most common or standard video cord but alsothe lowest quality. The color on the connector is yellow to distinguish it fromregular RCA audio cords which have white and red connectors (see page 19).It is important to use a true composite video cord and not an audio cord(though they look exactly the same) because the impedance is different andthis will affect the picture quality.
PCM/2DIGITAL /DTS
OUT1
OUT2
INR L
(TV/ SAT)
1
IN 1
IN 2
IN(CD-R/
TAPE1)
2
IN 3(DVD/LD)
IN 4
(CD)
PLAY
PLAY
CD-R/ TAPE1
IN
OUT
IN
OUT
VCR1/DVR
TV/SAT IN
DVD/LD IN
SUR-ROUNDBACK
(DVD/LD)
(TV/SAT)
FRONT
CENTER
SUR-ROUND
SUBWOOFER
PRE OUTMONITOR OUT
PB
PR
PB
PR
Y
Y
Y
PB
PR
VCR2
CD
LINEDIGITAL
AUDIO AUDIO VIDEO
IN
IN
IN
OUT
IN
OUT
VIDEO S VIDEO
MD/ TAPE2
REC
REC
MULTI CH IN COMPONENT VIDEO
OUT
IN
MONITOR OUT
CONTROL
75Ω ANTENNAAM LOOPFM UNBAL
R L R L
LR
LR
LR
ASSIGNABLE ASSIGNABLE
SUR-ROUNDBACK
SUR-ROUND
FRONT
SUBWOOF-ER
LR
LR
LR
CEN- TER
(Single)
TV/monitor
COMPO-NENT
VIDEO
VIDEO IN
S-VIDEO
Y
PB
PR
*The arrowsindicate thedirection ofthe signal.

16
Connecting Your Equipment
Connecting Video Components
Before making or changing the connections, switch off the power and disconnect the power cord fromthe AC outlet.
Connect your video components as shown on this and the following page. For video components (forexample, a DVD player) there are two types of connections to make, video and audio.Hook up your video signal with either component video, S video or composite video cords (the
quality descends in this order) but you must use the same type of cord as you used to hook up
your TV.
For the audio signal, in order to use digital soundtracks like Dolby Digital or DTS you must hook up a digitalinput, with either a coaxial or optical cord (see page 21). It is also a good idea to hook up yourcomponents with analog audio connections as well.
If you want to record from your DVD player composite (or S video) cord connections and analog audioconnections are necessary.
Connecting a DVD player
Before making or changing the connections, switch off the power and disconnect the power cord fromthe AC outlet.
Hook up your audio signal with either a coaxial or optical digital cords (you don't need to do both). If youhook up your DVD/LD player using component video cable connections you might need to setup yourDVD player for component video output as well. See your DVD manual for details. If you have a DVD-Audio or Super Audio CD (SACD) compatible player, see "Connecting to the Multi Channel Analog Inputs"on page 20.
You need to hook up your audio with analog connections as well.
memo • Be sure to make either a digital coaxial or digital optical connection (pictured as DIGITALjack 3 or DIGITAL jack 2 in this diagram) but you DON'T need to make both.
• If your digital connections are different than the default settings you will need to assignthe digital jacks to the proper component(s) with the "Assigning the Digital Inputs"procedure. See page 76 to do this.
• If your component video connections are different from the default settings, you willneed to assign them with "Assigning the Component Video Inputs". See page 77 for howto do this.
(not a PCM-only output)
*The arrows indicate the direction of the signal.
PCM/2DIGITAL /DTS
OUT1
OUT2
INR L
(TV/ SAT)
1
IN 1
IN 2
IN(CD-R/
TAPE1)
2
IN 3(DVD/LD)
IN 4
(CD)
PLAY
PLAY
CD-R/ TAPE1
IN
OUT
IN
OUT
VCR1/DVR
TV/SAT IN
DVD/LD IN
SUR-ROUNDBACK
(DVD/LD)
(TV/SAT)
FRONT
CENTER
SUR-ROUND
SUBWOOFER
PRE OUTMONITOR OUT
PB
PR
PB
PR
Y
Y
Y
PB
PR
VCR2
CD
LINEDIGITAL
AUDIO AUDIO VIDEO
IN
IN
IN
OUT
IN
OUT
VIDEO S VIDEO
MD/ TAPE2
REC
REC
MULTI CH IN COMPONENT VIDEO
OUT
IN
MONITOR OUT
CONTROL
75Ω ANTENNAAM LOOPFM UNBAL
R L R L
LR
LR
LR
ASSIGNABLE ASSIGNABLE
SUR-ROUNDBACK
SUR-ROUND
FRONT
SUBWOOF-ER
LR
LR
LR
CEN- TER
(Single)
DVD player
1
2 3
DIGITAL OUT
COMPO-NENT
VIDEOOUT
VIDEO
S-VIDEOPB
Y
PR
AUDIO
L
R
ANALOG

17
PR
EPA
RA
TIO
NP
RE
PA
RA
TIO
N
PCM/2DIGITAL /DTS
OUT1
OUT2
INR L
(TV/ SAT)
1
IN 1
IN 2
IN(CD-R/
TAPE1)
2
IN 3(DVD/LD)
IN 4
(CD)
PLAY
PLAY
CD-R/ TAPE1
IN
OUT
IN
OUT
VCR1/DVR
TV/SAT IN
DVD/LD IN
SUR-ROUNDBACK
(DVD/LD)
(TV/SAT)
FRONT
CENTER
SUR-ROUND
SUBWOOFER
PRE OUTMONITOR OUT
PB
PR
PB
PR
Y
Y
Y
PB
PR
VCR2
CD
LINEDIGITAL
AUDIO AUDIO VIDEO
IN
IN
IN
OUT
IN
OUT
VIDEO S VIDEO
MD/ TAPE2
REC
REC
MULTI CH IN COMPONENT VIDEO
OUT
IN
MONITOR OUT
CONTROL
75Ω ANTENNAAM LOOPFM UNBAL
R L R L
LR
LR
LR
ASSIGNABLE ASSIGNABLE
SUR-ROUNDBACK
SUR-ROUND
FRONT
SUBWOOF-ER
LR
LR
LR
CEN- TER
(Single)
VCR 1/DVRS-VIDEO
VIDEOVIDEO
S-VIDEO
AUDIO(PLAY)
L
R
AUDIO(REC)
L
R
OUT IN
OUT IN
VCR 2
VIDEO
S-VIDEO
VIDEO
S-VIDEO
AUDIO(PLAY)
L
R
AUDIO(REC)
L
R
S-VIDEO VIDEOVIDEO INPUT
AUDIOL R
SELECTCLASSBANDTUNEREDIT
MULTI JOG/ENTER
STATION TUNING
AUDIO-IN/OUT VIDEO-IN/OUTDIGITAL OUT (OPTICAL)
PHONES HOLDON/OFF
COLOR BRIGHT MONITOR
Connecting Your Equipment
Connecting VCRs or DVRs
Before making or changing the connections, switch off the power and disconnect the power cord fromthe AC outlet.
Connect the video out of your VCR/DVR using either S video or composite video cords, depending on howyou connected the receiver to your TV (see page 15). Use analog audio cords for the audio signal. Torecord, you also need to connect a set of audio/video outputs from the receiver to the audio/video inputson your VCR/DVR. Note that to record video from a source component, the video connection from thesource to the receiver and from the receiver to the recorder must be the same type.
Be careful! For portable DVD players you will need aspecialized cord (for the audio) that has a mini plug onone end and a regular plug on the other.
Connecting a Video Component to the Front Panel
Before making or changing the connections, switch off the power and disconnect the power cord fromthe AC outlet.
Connect a portable DVD player, video game console or any video component to the front panel as showhere. Front video connections are accessed via the front panel input selector as VIDEO
*The arrows indicate the direction of the signal.
*The arrows indicate the direction of the signal.

18
Connecting Satellite TV (SAT) Components
Before making or changing the connections, switch off the power and disconnect the power cord fromthe AC outlet.
Hook up the video signal with either component video, S video, or composite video cords, depending onhow you connected the receiver to your TV (see page 15).For the audio signal, in order to use digital soundtracks broadcast you must hook up a digital input. Useeither a coaxial or optical cable, it doesn't matter which (see page 21). We recommend hooking up youraudio with analog cables as well (see below).
*The arrows indicate the direction of the TV signal.
memo • If your component video connections are different from the default settings, you willneed to assign them with "Assigning the Component Video Inputs". See page 77 to dothis.
• If your digital connections are different than the default settings you will need to assignthe digital jacks to the proper component(s) with the "Assigning the Digital Inputs"procedure. See page 76 to do this.
PCM/2DIGITAL /DTS
OUT1
OUT2
INR L
(TV/ SAT)
1
IN 1
IN 2
IN(CD-R/
TAPE1)
2
IN 3(DVD/LD)
IN 4
(CD)
PLAY
PLAY
CD-R/ TAPE1
IN
OUT
IN
OUT
VCR1/DVR
TV/SAT IN
DVD/LD IN
SUR-ROUNDBACK
(DVD/LD)
(TV/SAT)
FRONT
CENTER
SUR-ROUND
SUBWOOFER
PRE OUTMONITOR OUT
PB
PR
PB
PR
Y
Y
Y
PB
PR
VCR2
CD
LINEDIGITAL
AUDIO AUDIO VIDEO
IN
IN
IN
OUT
IN
OUT
VIDEO S VIDEO
MD/ TAPE2
REC
REC
MULTI CH IN COMPONENT VIDEO
OUT
IN
MONITOR OUT
CONTROL
75Ω ANTENNAAM LOOPFM UNBAL
R L R L
LR
LR
LR
ASSIGNABLE ASSIGNABLE
SUR-ROUNDBACK
SUR-ROUND
FRONT
SUBWOOF-ER
LR
LR
LR
CEN- TER
(Single)
Satellite tuner
COMPO-NENT
VIDEOOUT
VIDEO
AUDIO
L
R
DIGITALANALOGDIGITAL
S-VIDEO
Y
PB
PR
Connecting Your Equipment
19
PR
EPA
RA
TIO
NP
RE
PA
RA
TIO
N
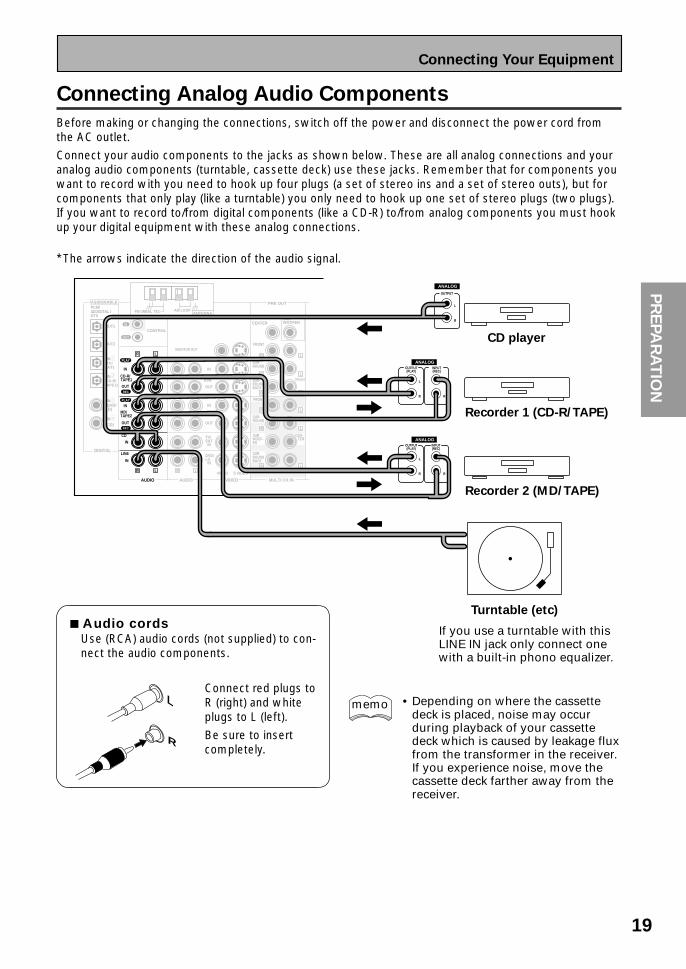
Connecting Analog Audio Components
Before making or changing the connections, switch off the power and disconnect the power cord fromthe AC outlet.
Connect your audio components to the jacks as shown below. These are all analog connections and youranalog audio components (turntable, cassette deck) use these jacks. Remember that for components youwant to record with you need to hook up four plugs (a set of stereo ins and a set of stereo outs), but forcomponents that only play (like a turntable) you only need to hook up one set of stereo plugs (two plugs).If you want to record to/from digital components (like a CD-R) to/from analog components you must hookup your digital equipment with these analog connections.
*The arrows indicate the direction of the audio signal.
If you use a turntable with thisLINE IN jack only connect onewith a built-in phono equalizer.
7 Audio cordsUse (RCA) audio cords (not supplied) to con-nect the audio components.
Connect red plugs toR (right) and whiteplugs to L (left).
Be sure to insertcompletely.
L
R
PCM/2DIGITAL /DTS
OUT1
OUT2
INR L
(TV/ SAT)
1
IN(CD-R/
TAPE1)
2
IN 3(DVD/LD)
IN 4
(CD)
PLAY
PLAY
CD-R/ TAPE1
IN
OUT
IN
OUT
VCR1/DVR
TV/SAT IN
DVD/LD IN
SUR-ROUNDBACK
FRONT
CENTER
SUR-ROUND
SUBWOOFER
PRE OUT
VCR2
CD
LINEDIGITAL
AUDIO AUDIO VIDEO
IN
IN
IN
OUT
IN
OUT
VIDEO S VIDEO
MD/ TAPE2
REC
REC
MULTI CH IN
OUT
IN
MONITOR OUT
CONTROL
75Ω ANTENNAAM LOOPFM UNBAL
R L R L
LR
LR
LR
ASSIGNABLE
SUR-ROUNDBACK
SUR-ROUND
FRONT
SUBWOOF-ER
LR
LR
LR
CEN- TER
(Single)
CD player
OUTPUT
L
R
ANALOG
Recorder 1 (CD-R/TAPE)
OUTPUT(PLAY)
L
R
INPUT(REC)
L
R
ANALOG
Recorder 2 (MD/TAPE)
OUTPUT(PLAY)
L
R
INPUT(REC)
L
R
ANALOG
Turntable (etc)
Connecting Your Equipment
• Depending on where the cassettedeck is placed, noise may occurduring playback of your cassettedeck which is caused by leakage fluxfrom the transformer in the receiver.If you experience noise, move thecassette deck farther away from thereceiver.
memo

20
Connecting to the Multi Channel Analog Inputs (DVD-Audio or SuperAudio CD (SACD) compatible player)
Before making or changing the connections, switch off the power and disconnect the power cord fromthe AC outlet.
If you have a DVD-Audio or Super Audio CD (SACD) compatible player, or are using an external DolbyDigital/DTS decoder, connect it to the multichannel analog inputs as shown below.
If you use only one surround back input, be sure to hook up to the SURROUND BACK Òjack.
memo
PCM/2DIGITAL /DTS
OUT1
OUT2
INR L
(TV/ SAT)
1
IN 1
IN 2
IN(CD-R/
TAPE1)
2
IN 3(DVD/LD)
IN 4
(CD)
PLAY
PLAY
CD-R/ TAPE1
IN
OUT
IN
OUT
VCR1/DVR
TV/SAT IN
DVD/LD IN
SUR-ROUNDBACK
(DVD/LD)
(TV/SAT)
FRONT
CENTER
SUR-ROUND
SUBWOOFER
PRE OUTMONITOR OUT
PB
PR
PB
PR
Y
Y
Y
PB
PR
VCR2
CD
LINEDIGITAL
AUDIO AUDIO VIDEO
IN
IN
IN
OUT
IN
OUT
VIDEO S VIDEO
MD/ TAPE2
REC
REC
MULTI CH IN COMPONENT VIDEO
OUT
IN
MONITOR OUT
CONTROL
75Ω ANTENNAAM LOOPFM UNBAL
R L R L
LR
LR
LR
ASSIGNABLE ASSIGNABLE
SUR-ROUNDBACK
SUR-ROUND
FRONT
SUBWOOF-ER
LR
LR
LR
CEN- TER
(Single)
Components equipped with5.1 (7.1) channel analog output jack
SUBWOOFER
SURR-OUND BACK
L
R
CENTERSURR-OUND
L
R
FRONT
L
R
ANALOG
Connecting Your Equipment

21
PR
EPA
RA
TIO
NP
RE
PA
RA
TIO
N
Connecting Digital Audio Components
Before making or changing the connections, switch off the power and disconnect the power cord fromthe AC outlet.
Connect your digital components as shown below. The VSX-43TX has two coaxial, two optical inputs for atotal of four digital inputs. In order to use digital soundtracks like Dolby Digital or DTS (among others) youneed to make digital audio connections. You can do this by either a coaxial or an optical connection (youdon’t need to do both). The quality of these two types of connections is the same but since some digitalcomponents only have one type of digital terminal, it is a matter of matching like with like (for example,the coaxial out from the component to coaxial in on the receiver).Hook up your digital equipment in accordance with this receiver's default settings (see next page) unlessyou want to, or need to, change them. To do this see "Assigning the Digital Inputs" on page 76.
There are two optical digital out jacks (the CD recorder is connected to one in the diagram below). If youconnect this to the optical input on a digital recorder (currently these include MD, DAT and CD-R) you canmake direct digital recordings with this unit.
We also recommend hooking up your digital components to analog audio jacks (see page 19) in order tomake recordings because some digital sources may be protected against making digital copies.
*The arrows indicate the direction of the audio signal.
(not a PCM-only output)
PCM/2DIGITAL /DTS
OUT1
OUT2
INR L
(TV/ SAT)
1
IN(CD-R/
TAPE1)
2
IN 3(DVD/LD)
IN 4
(CD)
PLAY
PLAY
CD-R/ TAPE1
IN
OUT
IN
OUT
VCR1/DVR
TV/SAT IN
DVD/LD IN
SUR-ROUNDBACK
FRONT
CENTER
SUR-ROUND
SUBWOOFER
PRE OUT
VCR2
CD
LINEDIGITAL
AUDIO AUDIO VIDEO
IN
IN
IN
OUT
IN
OUT
VIDEO S VIDEO
MD/ TAPE2
REC
REC
MULTI CH IN
OUT
IN
MONITOR OUT
CONTROL
75Ω ANTENNAAM LOOPFM UNBAL
R L R L
LR
LR
LR
ASSIGNABLE
SUR-ROUNDBACK
SUR-ROUND
FRONT
SUBWOOF-ER
LR
LR
LR
CEN- TER
(Single)
CD recorder
OUTPUT(PLAY)
INPUT(REC)
DIGITAL
Satellite tuner
DVD player
OUTPUT
DIGITAL DIGITAL
OUTPUT
DIGITAL
CD player
OUTPUT
DIGITAL
Connecting Your Equipment
7 Coaxial cords/Optical cablesCommercially available digital audio coaxialcords (standard video cords can also be used) oroptical cables (not supplied) are used to connectdigital components to this receiver.
Be sure to insert completely and in the case ofthe optical cable, right-side up. If it is insertedimproperly it can break the shutter on theoptical terminal (this won't, however, affect theconnection or insertion of an optical cable).
Coaxial cord
(or standard [composite]
video cord)
Optical cable

22
Connecting Your Equipment
Digital Input Default Settings
Unlike analog connections, the jacks for digital connections are not dedicated to one type of component,they can be used freely. Thus you must tell the receiver what digital component is connected to whichjack so your components will be in sync with the names on the remote control buttons and the like. Toavoid having to assign the digital inputs you can hook up your equipment in accordance with the receiver'sdefault settings.
The default settings are:
DIGITAL IN 1 (optical): TV/SATDIGITAL IN 2 (optical): CD-R/TAPE1DIGITAL IN 3 (coaxial): DVD/LDDIGITAL IN 4 (coaxial): CD
See "Assigning the Digital Inputs" on page 76 if the way you hook up your equipment is different from thedefault settings listed above.

23
PR
EPA
RA
TIO
NP
RE
PA
RA
TIO
N
Connecting the Radio Antennas
Before making or changing the connections, switch off the power and disconnect the power cord fromthe AC outlet.
Connect the supplied FM wire antenna and the AM loop antenna to the ANTENNA terminals as shownbelow. These antennas should provide adequate reception quality in most cases, but connecting outdoorantennas should noticeably improve sound quality.
Using outdoor antennas
7 To improve AM receptionConnect a 15 to 18 feet (5 – 6 meter) length of vinyl-coatedwire to the AM LOOP ANTENNA terminal in addition to thesupplied AM loop antenna.
For best possible reception, suspend horizontally outdoors.
7 To improve FM receptionConnect an external FM antenna.
7 AM loop antenna
1 Assemble the antenna. 2 Twist exposed wire strandstogether and insert.
3 Attach to a wall, etc. (ifdesired) and face towardthe direction providingthe best reception.
3/8 in. (10 mm)
Outdoor antenna
15–18 ft. (5–6 m)
Indoor antenna
(vinyl-coated wire)
AM loop antenna
PCM/2DIGITAL /DTS
OUT1
OUT2
INR L
(TV/ SAT)
1
IN 1
IN(CD-R/TAPE1)
2
PLAY
CD-R/ TAPE1
IN
OUT
VCR1/DVR SUR-
ROUND
(DVD/LD)
FRONT
CENTER
SUR-ROUND
SUBWOOFER
PRE OUTMONITOR OUT
PB
PR
Y
Y
IN
OUT
AC OUTLET
OUT
IN
MONITOR OUT
CONTROL
75Ω ANTENNAAM LOOPFM UNBAL
LR
LR
ASSIGNABLE ASSIGNABLE
(Single)
FM wire
antennaAM loop
antenna
Connecting Your Equipment
24
Connecting Speakers
Before making or changing the connections, switch off the power and disconnect the power cord fromthe AC outlet.
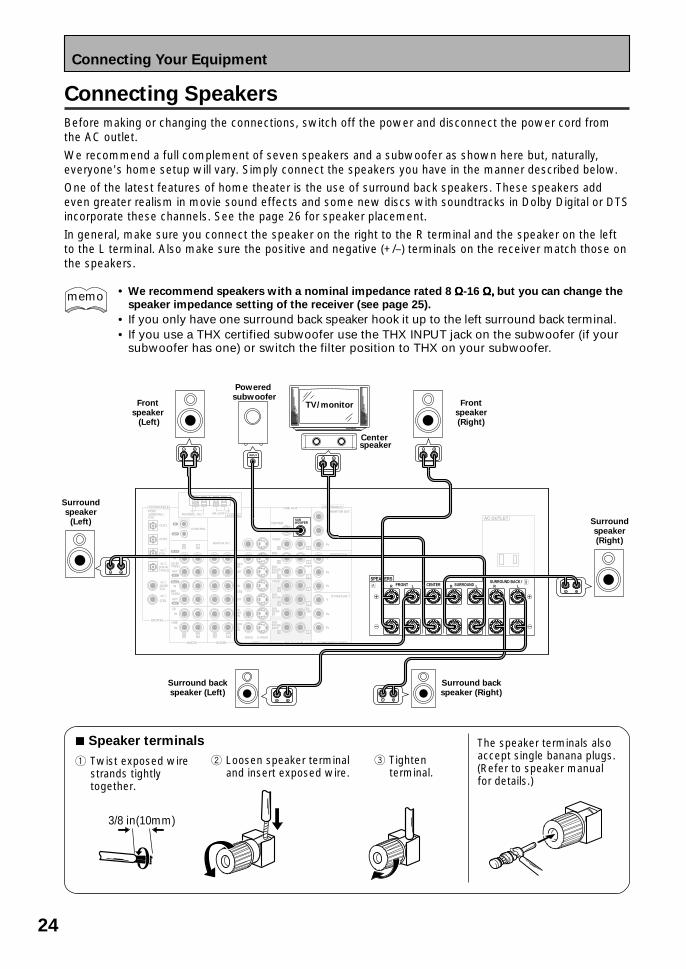
We recommend a full complement of seven speakers and a subwoofer as shown here but, naturally,everyone's home setup will vary. Simply connect the speakers you have in the manner described below.One of the latest features of home theater is the use of surround back speakers. These speakers addeven greater realism in movie sound effects and some new discs with soundtracks in Dolby Digital or DTSincorporate these channels. See the page 26 for speaker placement.
In general, make sure you connect the speaker on the right to the R terminal and the speaker on the leftto the L terminal. Also make sure the positive and negative (+/–) terminals on the receiver match those onthe speakers.
• We recommend speakers with a nominal impedance rated 8 ΩΩΩΩΩ-16 Ω, Ω, Ω, Ω, Ω, but you can change the
speaker impedance setting of the receiver (see page 25).
• If you only have one surround back speaker hook it up to the left surround back terminal.• If you use a THX certified subwoofer use the THX INPUT jack on the subwoofer (if your
subwoofer has one) or switch the filter position to THX on your subwoofer.
memo
7 Speaker terminals
1 Twist exposed wirestrands tightlytogether.
2 Loosen speaker terminaland insert exposed wire.
3 Tightenterminal.
The speaker terminals alsoaccept single banana plugs.(Refer to speaker manualfor details.)
3/8 in(10mm)
PCM/2DIGITAL /DTS
OUT1
OUT2
INR L
·
ª
·
ª
R L R RL L
(TV/ SAT)
1
IN 1
Åı
IN 2
IN(CD-R/
TAPE1)
2
IN 3(DVD/LD)
IN 4
(CD)
PLAY
PLAY
CD-R/ TAPE1
IN
OUT
IN
OUT
VCR1/DVR
TV/SAT IN
DVD/LD IN
SUR-ROUNDBACK
(DVD/LD)
(TV/SAT)
FRONT
CENTER
SUR-ROUND
SUBWOOFER
PRE OUTMONITOR OUT
FRONT CENTER SURROUNDSURROUND BACK /
PB
PR
PB
PR
Y
Y
Y
PB
PR
VCR2
CD
LINEDIGITAL
AUDIO AUDIO VIDEO
IN
IN
IN
OUT
IN
OUT
VIDEO S VIDEO
MD/ TAPE2
REC
REC
AC OUTLET
MULTI CH IN COMPONENT VIDEO
SPEAKERS
OUT
IN
MONITOR OUT
CONTROL
75Ω ANTENNAAM LOOPFM UNBAL
R L R L
LR
LR
LR
ASSIGNABLE ASSIGNABLE
SUR-ROUNDBACK
SUR-ROUND
FRONT
SUBWOOF-ER
LR
LR
LR
CEN- TER
(Single)
INPUT
Powered subwoofer
Front speaker
(Left)
Frontspeaker(Right)
TV/monitor
Center speaker
Surround backspeaker (Right)
Surround backspeaker (Left)
Surroundspeaker
(Left) Surroundspeaker(Right)
Connecting Your Equipment

25
PR
EPA
RA
TIO
NP
RE
PA
RA
TIO
N
Connecting Your Equipment
Speaker impedance
You can change the speaker impedance for VSX-43TX but we recommend using speakers with an imped-ance of 8 Ω-16 Ω (the default setting). If you are using 6 Ω- less than 8 Ω impedance speakers, you needto change the impedance setting. Use any speaker rated between 6 Ω-16 Ω.
First put the receiver in STANDBY mode, then
press the power button while holding down the
SPEAKERS button.
The receiver will reset to the new impedancesetting. With this method you can choose the 8 Ω-16 Ω setting or the 6 Ω-8 Ω setting.
To check which impedance settingto hold down the SPEAKERSbutton for 2-3 seconds. You'll geta display like these telling you thespeaker impedance setting.
(This display indicates a 6Ω-less than 8Ω impedancesetting.)
(This display indicates an8Ω-16Ω impedance setting.)
LOUDNESS MIDNIGHT TONE DNR ATT STEREOTUNEDRDSHi-BIT/
MULTI-ROOMSAMPLING
EONRF ATTMONONeo :6
DIGITALDTS ES EXMPEG AACSTEREO
PRO LOGIC
DSP
L C R LFE
AUTOSB CH
ON MOVIEMUSICOFF
LS S RS
AUTO
RFDIGITAL
dBSIGNAL
SP A B
ANALOG
LOUDNESS MIDNIGHT TONE DNR ATT STEREOTUNEDRDSHi-BIT/
MULTI-ROOMSAMPLING
EONRF ATTMONONeo :6
DIGITALDTS ES EXMPEG AACSTEREO
PRO LOGIC
DSP
L C R LFE
AUTOSB CH
ON MOVIEMUSICOFF
LS S RS
AUTO
RFDIGITAL
dBSIGNAL
SP A B
ANALOG
Bi-wiring your speakers
This high quality but difficult method of wiring speakers will beunnecessary for most users. In order to do this your speakers must bebi-wireable (that is they must have separate terminals for the high andlow frequencies).
To bi-wire a speaker, connect two sets of speaker cords to eachspeaker terminal on the receiver. The easiest way to do this is toconnect one wire in the normal way, and use a banana plug for theother one. Make sure you use a parallel (not series) connection whendoing so. Don't connect different speakers from the same terminal inthis way.
STANDBY/ON
MOVIE MUSIC
MULTI JOG
ENTER
STANDBY
AUDIO/V
PHONESSPEAKERS
SIGNALSELECT
SB CHMODE
S-VIDEO VIDEOVIDEO INPUT
AUDIOL R
SET UP RETURN
TONETONE CONTROL
BASS/TREBLE
CLASSBANDFL DIMMER MIDNIGHT LOUDNESSSTATION TUNING
MULTI JOG/ENTER
MULTI JOG CONTROL
SELECTTUNEREDIT
SPEAKERS
STANDBY/ON

26
Placing Your Speakers
Proper speaker placement is essential to realize the best sound from your system. The diagram and tipsgiven here are just a rough guide, for more information see pages 91 & 92. Also, it is very important forspeaker placement to read the instructions that come with your speakers so please be sure to do so.
Speaker placement
If you have a multiple speaker arrangement the placement of the speakers is extremely important. Toachieve the best possible surround sound, install your speakers as shown below. Make sure all speakersare installed securely to prevent accidents and improve sound quality. Some speakers are designed to befloor-standing but others benefit greatly from speaker stands which raise them off the floor. Be sure toread your speaker manuals for the best placement of the speakers.
memo • When installing speakers near theTV, we recommend usingmagnetically shielded speakers toprevent distortion in the color ofthe TV screen. If you do not havemagnetically shielded speakersand notice discoloration of the TVscreen, place the speakers fartheraway from the TV.
• Install the center speaker above orbelow the TV so that the sound ofthe center channel is localized atthe TV screen.
• THX recommends that if you havetwo surround back speakers placethem close together.
Front Speaker(L)
SurroundSpeaker (L)
Surround BackSpeaker (L)
Surround BackSpeaker (R)
SurroundSpeaker (R)
Front Speaker(R)
Subwoofer
Center Speaker
Connecting Your Equipment
AC Power Cord
Plug in the power cord to a wall outlet after you have finished hooking up the rest of your equipment.
AC Outlet [switched 100 W max]
Power supplied through this outlet is turned on and off by this unit’s STANDBY/ON button. Total electricalpower consumption of connected equipment should not exceed 100 W.
CAUTION!• Do not connect appliances with high power consumption such as heaters, irons, or television sets to the
AC OUTLET in order to avoid overheating or fire risk. This can cause the amplifier to malfunction.• DO NOT CONNECT A MONITOR OR TV SET TO THIS UNIT’S AC OUTLET.
• The equipment should be disconnected by removing the mains plug from the wall socket when not inregular use, e.g. when on vacation.
CAUTION!
CAUTION:
When installing the center speaker on top of the TV, be sure to secure it with suitable means.

27
PR
EPA
RA
TIO
NP
RE
PA
RA
TIO
N
Displays & Controls
Display
All the display information is explained and/or referenced here.
DIGITALDTS ES EXMPEG AACSTEREO
PRO LOGIC LOUDNESS MIDNIGHT TONE DNR ATT STEREOTUNEDRDSHi-BIT/
MULTI-ROOMSAMPLING
EONRF ATT dBMONONeo :6
L C R LFE
LS S RS
SIGNALAUTO
AUTO
RFDIGITAL
SB CH DSPON MOVIE
MUSICOFF
SP A B
ANALOG
1
12 11 10
2 73 4 5 6
9 8
9 Hi-BIT/SAMPLING indicatorLights when a HI-BIT/SAMPLING mode is on.
10 DSP indicatorsMOVIE: Lights when a MOVIE mode isselected. When a DSP MOVIE mode is select-ed DSP will light with a box around it.
MUSIC: Lights when a MUSIC mode isselected. When a DSP MUSIC mode is select-ed DSP will light with a box around it.
11 Program Format indicators
For Dolby Digital or DTS sources : Theseindicators change according to which channelsare active in the source. When all three LS (leftsurround), S (surround) and RS (right surround)light at the same time it means a source with a6.1 channel playback flag is being used.L – Left front channel.C – Center channel.R – Right front channel.LS – Left surround channel.S – Surround channel or Surround back channel.RS – Right surround channel.LFE – Low Frequency Effects channel.
‡ – Lights when LFE signal is input.
12 SB CH indicatorsLight to indicate the status of the surroundback channels.
AUTO – Lights when the SB CH MODE orVIRTUAL SURROUND BACK mode is set toAUTO.
ON – Lights when the SB CH MODE orVIRTUAL SURROUND BACK mode is set toON.
OFF – Lights when the SB CH MODE orVIRTUAL SURROUND BACK mode is set toOFF.
1 SIGNAL SELECT indicatorsLight to indicate the input signal you selected.AUTO: Lights when the receiver is set to selectthe audio input signal automatically.DIGITAL: Lights when digital audio signals areselected.ANALOG: Lights when analog audio signals areselected.
2 Digital format indicatorsPRO LOGIC II: Lights during Dolby Pro Logic,Dolby Pro Logic II processing.NEO:6: Lights during NEO:6 processing.2 DIGITAL: Lights when a Dolby Digital signal isdetected.DTS: Lights when a DTS signal is detected.ES: Lights when playing back a DTS ES signal.EX: Lights when playing back a Dolby Digital EXsignal.STEREO: Lights during two-channel playback.
3 LOUDNESS indicatorLights when LOUDNESS is on.
4 MIDNIGHT indicatorLights when MIDNIGHT is on.
5 TONE indicatorLights when the TONE control is on.
6 DNR indicatorLights when DIGITAL NR is on.
7 TUNER indicatorsSTEREO: Lights when an FM stereo broadcastis received in the auto stereo mode.
MONO: Lights when the tuner is set to receiveFM broadcasts and when MPX mode is selected.
TUNED: Lights when a broadcast is received.
8 Volume level indicator

28
Displays & Controls
Front Panel
All the controls on the front panel are explained and/or referenced here. To open the front panel pushgently on the lower third of the panel.
1 MULTI JOG dialYou can use this dial for many purposes. Whenyou press the SET UP button (12), you can useit to perform SYSTEM SETUP operations;select a function (like a DVD) or a listeningmode (like Dolby Pro logic ll) or do TUNER EDITfunctions (in TUNER mode).
2 STANDBY/ON buttonPress to switch the receiver ON or intoSTANDBY mode.
3 Listening mode buttons (see pages 43-45)There are two types of SURROUND modes:
MOVIE: Press to put the receiver into MOVIElistening mode (see page 44).
MUSIC: Press to put the receiver into MUSIClistening mode (see page 45).
STEREO/DIRECT (see page 43): Switchesthe receiver into STEREO mode if it was in adifferent sound mode or toggles betweenDIRECT and STEREO mode.
DIRECT playback bypasses the tone controlsand channel level for the most accuratereproduction of a program source.
4 ENTER buttonUse this button to enter information concerningthe SYSTEM SETUP, listening mode or thetuner.
5 STANDBY indicatorLights when the receiver is in STANDBY mode.(Please note that this receiver consumes asmall amount of power [0.6 W] in the standbymode.)
6 Remote sensorReceives the signals from the remote control.
7 Display (See page 27)
8 MCACC indicator (see page 47)Lights when the ACOUSTIC CAL EQ is on.
STANDBY/ON
MOVIE MUSIC
MULTI JOG
ENTER STEREO/DIRECT MULTI CH IN
MASTER VOLUME
ACOUSTIC EQ
STANDBY
VSX-43TXAUDIO/VIDEO MULTI-CHANNEL RECEIVER
PHONESSPEAKERS
SIGNALSELECT
HI-BITHI-SAMPLING
SB CHMODE
S-VIDEO VIDEOVIDEO INPUT
AUDIOL R
SET UP RETURN
TONETONE CONTROL
BASS/TREBLE
CLASSBANDMIDNIGHT LOUDNESSSTATION TUNING
MULTI JOG/ENTER
MULTI JOG CONTROL
SELECTTUNEREDIT
PHONESSPEAKERS
SIGNALSELECT
HI-BITHI-SAMPLING
SB CHMODE
S-VIDEO VIDEOVIDEO INPUT
AUDIOL R
SET UP RETURN
TONETONE CONTROL
BASS/TREBLE
LOUDNESSMIDNIGHTSTATION TUNING
MULTI JOG/ENTER
MULTI JOG CONTROL
BAND CLASS SELECTTUNEREDIT
12
222019 21
13 14 15 16 17 18
1 9 10 1123
4 5 6 7 8

29
PR
EPA
RA
TIO
NP
RE
PA
RA
TIO
N
Displays & Controls
9 MULTI CH IN buttonUse this button to select the component youhave hooked up to the MULTI CH IN terminals(for example, a DVD-Audio player).
10 ACOUSTIC EQ button (see page 47)Use to switch on and off the Acoustic Calibra-tion EQ.
11 MASTER VOLUME dialUse to raise or lower the volume of the receiver.
12 MULTI JOG CONTROL buttons
SET UPPress to switch the SYSTEM SETUP mode.
RETURNPress to move back one step in the SYSTEMSETUP process.
13 SIGNAL SELECT button (see page 42)Press SIGNAL SELECT repeatedly to select oneof the following:
AUTO – If there are analog and digital signalsinput, the receiver automatically selects thedigital signal.
DIGITAL – To select an optical or coaxialdigital signal.ANALOG – To select an analog signal.
14 HI-BIT HI-SAMPLING button (see page50)Use this button to switch the HI-BITHI-SAMPLING on or off. Use to hear CD andDVD, as well as other digital soundtracks at awider dynamic range, allowing for finer audioreproduction.
15 SB CH MODE button (see pages 51)Use this button to turn the surround backchannels ON/OFF/AUTO or switch the VIRTU-AL SURROUND BACK mode between ON/OFF/AUTO.
16 MIDNIGHT button (See page 48)Switches the MIDNIGHT mode on or off(cannot be used in THX CINEMA mode).
17 LOUDNESS button (see page 48)Switches the LOUDNESS mode on or off (forall modes except THX CINEMA and MULTI CHIN).
18 TUNER CONTROL buttons (See page54-58)
BANDPress to select the AM or FM band.
CLASSPress repeatedly to switch the preset stationclasses.
SELECTSwitches the –/+ buttons between stationmemory and frequency select modes.
–/+Selects station memories or frequencies whenusing the tuner.
TUNER EDITPress to memorize and name a station for recallusing the MULTI JOG and ENTER buttons.
19 PHONES jackConnect headphones for private listening (nosound will be heard through the speakers).
20 SPEAKERS (A/B) buttonThe use of this button depends on how theSURRBACK SYSTEM (see page 35) are set. IfNORMAL SYSTEM is chosen this buttontoggles between A and OFF. If SECOND ZONEis chosen this button toggles between A, B,A+B and OFF (see page 66). If FRONT BI-AMPis chosen this button toggles between A+B andOFF (see page 66).
21 TONE CONTROL buttons (see page 49)
TONE buttonThis button switches between TONE ON andTONE BYPASS, which bypasses the tonecircuitry.
BASS/TREBLE buttonUse to select whether the bass or treble will beadjusted.
–/+ buttonsUse to adjust the frequency levels.
22 VIDEO INPUT jacks (see page 17)
S-VIDEOVideo input for connecting a portable DVDplayer, video camera (etc.), that has an S videoout.
RCA VIDEO / AUDIO (L/R)Video input for connecting a portable DVDplayer, video camera, etc., that has standardRCA video/audio outputs.

30
Remote Control
This page describes the buttons on the remote control used to operate the receiver.
1 RECEIVER (STANDBY/ON) buttonPress to turn power of the receiver on or tostandby (off).
2 MULTI CONTROL buttonsThese buttons are the basic controls thatswitch the mode of the receiver and theremote control, which allows you to controlyour other components.TV CONT: Press so that the remote control canoperate the TV control commands.
3 Listening mode buttons (see page 43-45)SURROUND buttons (MOVIE, MUSIC, ||||| \\\\\& ENTER):
MOVIE: Press to put the receiver into MOVIElistening mode (see page 44).MUSIC: Press to put the receiver into MUSIClistening mode (see page 45).
||||| \\\\\: Use to select the MOVIE or MUSIClistening mode.
ENTER: Use this button to enter informationconcerning the listening modes.
STEREO/DIRECT: Switches the receiver intoSTEREO mode if it was in a different listeningmode or toggles between DIRECT and STE-REO mode (see page 43).
4 SYSTEM SET UP buttonUse for all system setups, including thespeaker and sound systems. For more informa-tion see. “Setting up for Surround Sound“starting on page 34. When in TUNER controlmode this functions as TUNER EDIT, and inDVD control mode, MENU functions.
5 AUDIO buttonUse to switch the audio tracks of a DVD whenin DVD mode.
6 Command button for other components(see pages 61–62)Use these buttons to control other componentsyou selected with the MULTI CONTROLbuttons. You must input the preset code inorder use this function (see page 59).
7 Number buttonsThese can be used for many purposes depend-ing on the mode of the remote control.
When the RECEIVER button is pressed, youenter the receiver mode and the buttonsoperate as below:
DIMMER (see page 53)Use to adjust the brightness of the receiver'sdisplay.
LOUDNESS button (see page 48)Switches the LOUDNESS mode on or off (forall modes except THX CINEMA and MULTI CHIN).
TONE buttons (see page 49)This button switches between TONE ON andTONE BYPASS, which bypasses the tonecircuitry.
SIGNAL SEL button (see page 42)Press SIGNAL SEL repeatedly to select one ofthe following:
AUTO – If there are analog and digital signalsinput, the receiver automatically selects thedigital signal.
DIGITAL – To select an optical or coaxialdigital signal.ANALOG – To select an analog signal.
SOURCE
MULTI CONTROL
RECEIVER
MOVIE MUSIC
ENTER
MULTIOPERATION
SURROUNDMODE
STEREO/DIRECT
SYSTEMOFF
ACOUSTICEQ
SB CHMODE
INPUT
MIDNIGHT
CHANNEL−
+−
CHANNEL+DTV ON/OFF BAND
DIMMER TONELOUDNESS EFFECT/CH SEL
SIGNAL SEL BASS/TREBLE DISCDNR
VIDEO SEL
SUB TITLE
REMOTESETUP
HI-BIT
D.ACCESS MPX
TV CONTROL
CLASS
MUTE
MENU TOP MENUTUNER EDIT
GUIDESYSTEMSETUP
AUDIO RETURN
CHANNEL VOLUMEINPUTSELECT
+10
MULTI CHINPUT
RECEIVER
ST
TUNE
MASTER VOLUME
ST
TUNE
DVD/LD
ENTER
ENTER
VCR 2
TV / SAT
C D
VCR/DVR TV CONT
TUNER RECEIVER
1
4
5
6
7
8
9
3
=
0
-
!
$
%
^
~
@
#
2
Displays & Controls

31
PR
EPA
RA
TIO
NP
RE
PA
RA
TIO
N
Displays & Controls
DNR (DIGITAL NR) button (see page 47)Switches the DIGITAL NR on or off (for allmodes except THX CINEMA and MULTI CH IN).
BASS/TREBLE button (see page 49)Use to select whether the bass or treble will beadjusted.
VIDEO SEL button (see page 53)Use to toggle between the different video inputpossibilities.
HI-BIT button (see page 50)Use this button to switch the HI-BITHI-SAMPLING on or off. Use to hear CD andDVD, as well as other digital soundtracks at awider dynamic range, allowing for finer audioreproduction.
(+/–) buttonsUse to adjust the TONE level, effect level andchannel level as well as make Dolby Pro LogicII MUSIC parameter settings.
EFFECT/CH SEL buttonSwitches between the different channels soyou can add volume individually to eachchannel with the + and – buttons. Also selectsEFFECT mode of Pioneer original sound modesand Dolby Pro Logic II MUSIC parametersettings. You can then use the + and – buttonsto make these adjustments.
8 TV CONTROL buttonsThe following buttons are used to control the TVonly and can be used once they are preset tocontrol your TV.
: This is a dedicated TV button. Use it to turn on/off your TV.INPUT SELECT: Press to select the inputsource for the TV.CHANNEL +/– : Use these buttons to changethe channel of the TV.VOLUME +/– : Press to control the volume ofthe TV.
9 MULTI OPERATION buttonUse this button to start the MULTI OPERATIONmode. See pages 68–69 for how to programand use the MULTI OPERATION mode.
0 LED DISPLAYThis display flashes when a command is sentfrom the remote control to the receiver. It alsoflashes at other times, for example whenteaching the receiver preset codes.
- SOURCE buttonUse this button to turn on or off other compo-nents. You must input the preset code in orderto use this function (see page 59).
= RECEIVER buttonUse this button to switch the remote controlinto receiver mode in order to get certainreceiver functions or do receiver setups.
~ RECEIVER control buttons
ACOUSTIC EQ button (see page 47)Use to switch on and off the Acoustic Calibra-tion EQ.
SB CH MODE button (see pages 51)Use this button to turn the surround backchannels ON/OFF/AUTO or switch the VIRTU-AL SURROUND BACK mode between ON/OFF/AUTO.
MIDNIGHT button (see page 48)Switches the MIDNIGHT listening mode on oroff (for all modes except THX CINEMA andMULTI CH IN).
INPUT buttonPress to select an input source. The button willcycle through all the possible sources.
MULTI CH INPUT button (see page 50)Use this button to select the component youhave hooked up to the MULTI CH IN terminals(for example, a DVD-Audio player).
MUTE buttonPress to mute or restore the volume.
! MASTER VOLUME (–/+) buttonsUse to raise or lower the volume of the receiver.
@ TOP MENU/GUIDE buttonUse to find stations or menus on a digital TVtuner. For a DVD player use this button to bringup the DVD menu.
# 5˜∞˜2˜3˜ENTER buttonsThese buttons can be used for a variety ofoperations in the SYSTEM SETUP menu.
These buttons are used to control the menusfor other components when in those modes(DVD, digital TV tuner, satellite tuner, cabletuner, etc.). In TUNER mode, they can select astation and/or a frequency.
$ RETURN buttonWhen you are in a receiver setup operation thisbutton will go back one step in the SYSTEMSETUP procedure. When you are using yourDVD menu screen this button acts the same asthe DVD player's "Return" button. When youare using cable tuners, satellite tuners or digitalTV tuners this button will either exit you fromthe menu screen or act like a "Return" buttonabove, depending on the maker of the unit.
% SUBTITLE buttonUse to switch the subtitles on a DVD player ordisc.
^ REMOTE SETUP button.Use to customize the remote control functionsand the remote control itself. (See “Setting UpRemote Control to Control Other Components“starting on page 59).

32
Displays & Controls
Back Panel
All the terminals on the back panel are explained and/or referenced here.
1 DIGITAL IN terminals (see page 21–22)Use these terminals to input the signal from aDVD, CD player or any other kind of digitalplayer. To be able to play Dolby Digital andother surround soundtracks you need to makedigital connections. To do this use the digitalterminals here. If you don't connect as per thedefault settings (see page 22) you need tocomplete "Assigning the Digital Inputs" (seepage 76).
2 DIGITAL OUT terminals (see page 21)Use these terminals to output a digital signal toa DVD-R, CD-R, MD recorder or any other kindof digital recorder.
3 CONTROL IN/OUT terminal (see page71)You can use this jack to hook up otherPIONEER equipment, that has a CONTROLterminal, so that you can control them all bypointing the remote control(s) at one remotesensor.
4 Radio antenna terminals (see page 23)Hook up antennas for the radio tuner built intothe receiver here.
5 MONITOR OUT terminals (connect a TVor monitor here, see page 15)Use these terminals to output a video signal toa TV or monitor.
6 PRE OUT analog terminals (connect anamplifier here, see page 67)Use these terminals to output the audio signalfrom this amplifier to a different amplifier ifthat's how you choose to set up your system.
7 COMPONENT VIDEO MONITOR OUTterminals (connect a TV or monitorhere, see page 15)Use these terminals to output the video signalfrom the COMPONENT VIDEO IN terminals toyour TV. See #13 for more information.
PCM/2DIGITAL /DTS
OUT1
OUT2
INR L
(TV/ SAT)
1
IN(CD-R/
TAPE1)
2
IN 3(DVD/LD)
IN 4
(CD)
PLAY
PLAY
CD-R/ TAPE1
IN
OUT
IN
OUT
VCR1/DVR
TV/SAT IN
DVD/LD IN
SUR-ROUNDBACK
FRONT
CENTER
SUR-ROUND
SUBWOOFER
PRE OUT
VCR2
CD
LINEDIGITAL
AUDIO AUDIO VIDEO
IN
IN
IN
OUT
IN
OUT
VIDEO S VIDEO
MD/ TAPE2
REC
REC
MULTI CH IN
OUT
IN
MONITOR OUT
CONTROL
75Ω ANTENNAAM LOOPFM UNBAL
R L R L
LR
LR
LR
ASSIGNABLE
SUR-ROUNDBACK
SUR-ROUND
FRONT
SUBWOOF-ER
LR
LR
LR
CEN- TER
(Single)
2
10
4 51 6
11 12
3

33
PR
EPA
RA
TIO
NP
RE
PA
RA
TIO
N
Displays & Controls
8 SPEAKERS terminals (see page 24)Use these terminals to connect speakers to thereceiver. The FRONT, CENTER and SUR-ROUND terminals are for the main speakersystem and the SURROUND BACK speakerscan be set to either the main system, theSECOND ZONE or the FRONT BI-AMP setting.See page 65 to set the SURROUND BACKspeakers.
9 AC OUTLET (switced 100 W max)Hook up an external component to the powersupply of this receiver. Only do this with audioor video components being used in this systemand never hook up heavy equipment (like TVs,heaters, air conditioners, refrigerators, etc.) tothis receiver.
10 Audio input/output terminals (connectanalog components here, see page 19)Use these terminals to input/output the audiosignal from analog components (like a cassettedeck or turntable). These are analog jacks.
11 Video components input/outputterminalsInput/output signals from your video compo-nents (DVD, VCR, TV tuners, SAT tuners, etc.)here. (see page 16–18).
12 MULTI CH IN terminals (see page 20)Use these terminals to input a multichannelsurround signal (for example, a DVD-Audiosignal) in an analog fashion. These are analogjacks.
13 COMPONENT VIDEO IN terminals (seepage 15–18)Use these terminals to hook up the videoconnections of your video components withthis high quality method. Your components willhave to have the terminals as well to takeadvantage of this kind of connection. If youdon't connect as per the default settings (seepage 15) you need to complete "Assigning theComponent Video Inputs" (see page 77).
·
ª
·
ª
R L R RL L
IN 1
Åı
IN 2
(DVD/LD)
(TV/SAT)
MONITOR OUT
FRONT CENTER SURROUNDSURROUND BACK /
PB
PR
PB
PR
Y
Y
Y
PB
PR
AC OUTLET
COMPONENT VIDEO
SPEAKERS
ASSIGNABLE
7 98
13

34
To ensure the best possible surround sound, complete the following setup operations. Some of these are thesame (and take precedence over) the settings you made in the Easy Setup Guide, so consider if the ones youmade at that time were adequate. If you feel they were, move on to the next setting here.Use the arrow buttons (5∞) and the ENTER button on the remote control to navigate the display on thereceiver. Conversely, you can use the MULTI JOG dial and ENTER button on the front panel.
1 Turn on the receiver and pressthe RECEIVER button on theremote control.
2 Press the SYSTEM SETUPbutton.
LOUDNESS MIDNIGHT TONE DNR ATT STEREOTUNEDRDSHi-BIT/
MULTI-ROOMSAMPLING
EONRF ATTMONONeo :6
DIGITALDTS ES EXMPEG AACSTEREO
PRO LOGIC
DSP
L C R LFE
AUTOSB CH
ON MOVIEMUSICOFF
LS S RS
AUTO
RFDIGITAL
dBSIGNAL
SP A B
ANALOG
This display appears on the receiver.
3 SURROUND SETUP should beselected. If it isn’t use the 5∞
buttons to select it. Press theENTER button.
LOUDNESS MIDNIGHT TONE DNR ATT STEREOTUNEDRDSHi-BIT/
MULTI-ROOMSAMPLING
EONRF ATTMONONeo :6
DIGITALDTS ES EXMPEG AACSTEREO
PRO LOGIC
DSP
L C R LFE
AUTOSB CH
ON MOVIEMUSICOFF
LS S RS
AUTO
RFDIGITAL
dBSIGNAL
SP A B
ANALOG
This display appears on the receiver.
Setting Up for Surround Sound
SOURCE
MULTI CONTROL
RECEIVER
MOVIE MUSIC
ENTER
MULTIOPERATION
SURROUNDMODE
STEREO/DIRECT
SYSTEMOFF
ACOUSTICEQ
SB CHMODE
INPUT
MIDNIGHTMUTE
MENU TOP MENUTUNER EDIT
GUIDESYSTEMSETUP
AUDIO RETURN
MULTI CHINPUT
ST
TUNE
MASTER VOLUME
ST
TUNE
DVD/LD
ENTER
VCR 2
TV / SAT
C D
VCR/DVR TV CONT
TUNER RECEIVER
23-4
1
4 Use the 5∞ buttons to navigatethrough the menus. When youhave the setting you want in aparticular menu, press ENTER.In each mode, the current settings are displayed.We suggest you do a basic system setup forsurround sound when you first hook up thereceiver. That gets it out of the way and you won'tneed to do it again unless you change your homeset up (by adding new speakers, etc.). To do abasic setup use SURRBACK and NORMAL setupsbelow.To do a more advanced setup for surround soundsee EXPERT setup starting on page 79.
SURRBACK (Surround Back) SYSTEM (See
page 35)
Use to choose options for your surround backspeakers.
LOUDNESS MIDNIGHT TONE DNR ATT STEREOTUNEDRDSHi-BIT/
MULTI-ROOMSAMPLING
EONRF ATTMONONeo :6
DIGITALDTS ES EXMPEG AACSTEREO
PRO LOGIC
DSP
L C R LFE
AUTOSB CH
ON MOVIEMUSICOFF
LS S RS
AUTO
RFDIGITAL
dBSIGNAL
SP A B
ANALOG
QUICK setup (see page 13)
Use to setup your surround sound system in theminimum amount of time.
LOUDNESS MIDNIGHT TONE DNR ATT STEREOTUNEDRDSHi-BIT/
MULTI-ROOMSAMPLING
EONRF ATTMONONeo :6
DIGITALDTS ES EXMPEG AACSTEREO
PRO LOGIC
DSP
L C R LFE
AUTOSB CH
ON MOVIEMUSICOFF
LS S RS
AUTO
RFDIGITAL
dBSIGNAL
SP A B
ANALOG
NORMAL setup (see pages 36–40)
Use this method to manually adjust all thesurround sound functions.
LOUDNESS MIDNIGHT TONE DNR ATT STEREOTUNEDRDSHi-BIT/
MULTI-ROOMSAMPLING
EONRF ATTMONONeo :6
DIGITALDTS ES EXMPEG AACSTEREO
PRO LOGIC
DSP
L C R LFE
AUTOSB CH
ON MOVIEMUSICOFF
LS S RS
AUTO
RFDIGITAL
dBSIGNAL
SP A B
ANALOG
EXPERT setup (see page 79–87)
Use these settings to fine tune your surroundsound and make it more personalized.
LOUDNESS MIDNIGHT TONE DNR ATT STEREOTUNEDRDSHi-BIT/
MULTI-ROOMSAMPLING
EONRF ATTMONONeo :6
DIGITALDTS ES EXMPEG AACSTEREO
PRO LOGIC
DSP
L C R LFE
AUTOSB CH
ON MOVIEMUSICOFF
LS S RS
AUTO
RFDIGITAL
dBSIGNAL
SP A B
ANALOG
STANDBY/ON
MOVIE MUSIC
MULTI JOG
ENTER
STANDBY
PHONESSPEAKERS
SIGNALSELECT
HI-BITHI-SAMPLING
SB CHMODESET UP RETURN
TONETONE CONTROL
BASS/TREBLE
BANDMIDNIGHT LOUDNESSMULTI JOG CONTROL
3-4 2
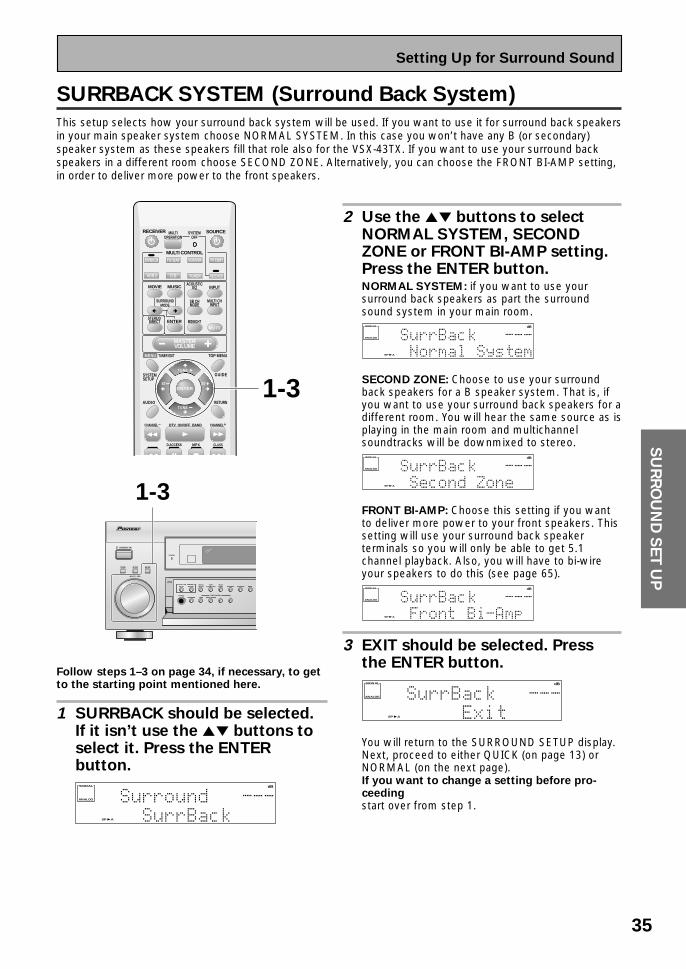
35
SU
RR
OU
ND
SE
T U
P
Setting Up for Surround Sound
SURRBACK SYSTEM (Surround Back System)
This setup selects how your surround back system will be used. If you want to use it for surround back speakersin your main speaker system choose NORMAL SYSTEM. In this case you won’t have any B (or secondary)speaker system as these speakers fill that role also for the VSX-43TX. If you want to use your surround backspeakers in a different room choose SECOND ZONE. Alternatively, you can choose the FRONT BI-AMP setting,in order to deliver more power to the front speakers.
Follow steps 1–3 on page 34, if necessary, to getto the starting point mentioned here.
1 SURRBACK should be selected.If it isn’t use the 5∞ buttons toselect it. Press the ENTERbutton.
LOUDNESS MIDNIGHT TONE DNR ATT STEREOTUNEDRDSHi-BIT/
MULTI-ROOMSAMPLING
EONRF ATTMONONeo :6
DIGITALDTS ES EXMPEG AACSTEREO
PRO LOGIC
DSP
L C R LFE
AUTOSB CH
ON MOVIEMUSICOFF
LS S RS
AUTO
RFDIGITAL
dBSIGNAL
SP A B
ANALOG
SOURCE
MULTI CONTROL
RECEIVER
MOVIE MUSIC
ENTER
MULTIOPERATION
SURROUNDMODE
STEREO/DIRECT
SYSTEMOFF
ACOUSTICEQ
SB CHMODE
INPUT
MIDNIGHT
CHANNEL− CHANNEL+DTV ON/OFF BAND
D.ACCESS MPX CLASS
MUTE
MENU TOP MENUTUNER EDIT
GUIDESYSTEMSETUP
AUDIO RETURN
MULTI CHINPUT
ST
TUNE
MASTER VOLUME
ST
TUNE
DVD/LD
ENTER
VCR 2
TV / SAT
C D
VCR/DVR TV CONT
TUNER RECEIVER
1-3
2 Use the 5∞ buttons to selectNORMAL SYSTEM, SECONDZONE or FRONT BI-AMP setting.Press the ENTER button.NORMAL SYSTEM: if you want to use yoursurround back speakers as part the surroundsound system in your main room.
LOUDNESS MIDNIGHT TONE DNR ATT STEREOTUNEDRDSHi-BIT/
MULTI-ROOMSAMPLING
EONRF ATTMONONeo :6
DIGITALDTS ES EXMPEG AACSTEREO
PRO LOGIC
DSP
L C R LFE
AUTOSB CH
ON MOVIEMUSICOFF
LS S RS
AUTO
RFDIGITAL
dBSIGNAL
SP A B
ANALOG
SECOND ZONE: Choose to use your surroundback speakers for a B speaker system. That is, ifyou want to use your surround back speakers for adifferent room. You will hear the same source as isplaying in the main room and multichannelsoundtracks will be downmixed to stereo.
LOUDNESS MIDNIGHT TONE DNR ATT STEREOTUNEDRDSHi-BIT/
MULTI-ROOMSAMPLING
EONRF ATTMONONeo :6
DIGITALDTS ES EXMPEG AACSTEREO
PRO LOGIC
DSP
L C R LFE
AUTOSB CH
ON MOVIEMUSICOFF
LS S RS
AUTO
RFDIGITAL
dBSIGNAL
SP A B
ANALOG
FRONT BI-AMP: Choose this setting if you wantto deliver more power to your front speakers. Thissetting will use your surround back speakerterminals so you will only be able to get 5.1channel playback. Also, you will have to bi-wireyour speakers to do this (see page 65).
LOUDNESS MIDNIGHT TONE DNR ATT STEREOTUNEDRDSHi-BIT/
MULTI-ROOMSAMPLING
EONRF ATTMONONeo :6
DIGITALDTS ES EXMPEG AACSTEREO
PRO LOGIC
DSP
L C R LFE
AUTOSB CH
ON MOVIEMUSICOFF
LS S RS
AUTO
RFDIGITAL
dBSIGNAL
SP A B
ANALOG
3 EXIT should be selected. Pressthe ENTER button.
LOUDNESS MIDNIGHT TONE DNR ATT STEREOTUNEDRDSHi-BIT/
MULTI-ROOMSAMPLING
EONRF ATTMONONeo :6
DIGITALDTS ES EXMPEG AACSTEREO
PRO LOGIC
DSP
L C R LFE
AUTOSB CH
ON MOVIEMUSICOFF
LS S RS
AUTO
RFDIGITAL
dBSIGNAL
SP A B
ANALOG
You will return to the SURROUND SETUP display.Next, proceed to either QUICK (on page 13) orNORMAL (on the next page).If you want to change a setting before pro-ceedingstart over from step 1.
STANDBY/ON
MOVIE MUSIC
MULTI JOG
ENTER
STANDBY
PHONESSPEAKERS
SIGNALSELECT
HI-BITHI-SAMPLING
SB CHMODESET UP RETURN
TONETONE CONTROL
BASS/TREBLE
BANDMIDNIGHT LOUDNESSMULTI JOG CONTROL
1-3

36
Setting Up for Surround Sound
NORMAL setup
This is the manual method to setup your sound parameters for surround sound. It is more exact than the QUICKset up and should give you finer surround sound.You only need to do these settings once (unless you change the placement of your current speaker system oradd new speakers, etc.).
Follow steps 1–3 on page 34, if necessary, to get tothe starting point mentioned here.
1 Use the 5∞ buttons to selectNORMAL. Press the ENTERbutton.
LOUDNESS MIDNIGHT TONE DNR ATT STEREOTUNEDRDSHi-BIT/
MULTI-ROOMSAMPLING
EONRF ATTMONONeo :6
DIGITALDTS ES EXMPEG AACSTEREO
PRO LOGIC
DSP
L C R LFE
AUTOSB CH
ON MOVIEMUSICOFF
LS S RS
AUTO
RFDIGITAL
dBSIGNAL
SP A B
ANALOG
2 Use the 5∞ buttons to navigatethrough the NORMAL setupmenus. When you have thesetting you want in a particularmenu, press ENTER.In each mode the current settings are displayed.We suggest you adjust all these settings whenyou first hook up the receiver. That gets them outof the way and you won't need to return to thissetting mode unless you change your home set upby adding new speakers (etc.).
SOURCE
MULTI CONTROL
RECEIVER
MOVIE MUSIC
ENTER
MULTIOPERATION
SURROUNDMODE
STEREO/DIRECT
SYSTEMOFF
ACOUSTICEQ
SB CHMODE
INPUT
MIDNIGHT
CHANNEL− CHANNEL+DTV ON/OFF BAND
MUTE
MENU TOP MENUTUNER EDIT
GUIDESYSTEMSETUP
AUDIO RETURN
MULTI CHINPUT
ST
TUNE
MASTER VOLUME
ST
TUNE
DVD/LD
ENTER
VCR 2
TV / SAT
C D
VCR/DVR TV CONT
TUNER RECEIVER
1-2
SPEAKER SET (See pages 37–38)
Use to specify the type and number of speakersyou connected.
LOUDNESS MIDNIGHT TONE DNR ATT STEREOTUNEDRDSHi-BIT/
MULTI-ROOMSAMPLING
EONRF ATTMONONeo :6
DIGITALDTS ES EXMPEG AACSTEREO
PRO LOGIC
DSP
L C R LFE
AUTOSB CH
ON MOVIEMUSICOFF
LS S RS
AUTO
RFDIGITAL
dBSIGNAL
SP A B
ANALOG
CHANNEL LEVEL (See page 39)
Use to balance the volumes of your different speak-ers. This is also necessary for the most realisticsurround sound.
LOUDNESS MIDNIGHT TONE DNR ATT STEREOTUNEDRDSHi-BIT/
MULTI-ROOMSAMPLING
EONRF ATTMONONeo :6
DIGITALDTS ES EXMPEG AACSTEREO
PRO LOGIC
DSP
L C R LFE
AUTOSB CH
ON MOVIEMUSICOFF
LS S RS
AUTO
RFDIGITAL
dBSIGNAL
SP A B
ANALOG
CHANNEL DELAY (See page 40)
Use to select the distance settings for each setof speakers. You must add distance settings toall your speakers for the most realistic surroundsound. Adding a slight delay to some speakersenhances sound separation and is particularlyimportant for achieving a surround sound effect.You need to figure out the distance from yourlistening position to your speakers to add theproper delay.
LOUDNESS MIDNIGHT TONE DNR ATT STEREOTUNEDRDSHi-BIT/
MULTI-ROOMSAMPLING
EONRF ATTMONONeo :6
DIGITALDTS ES EXMPEG AACSTEREO
PRO LOGIC
DSP
L C R LFE
AUTOSB CH
ON MOVIEMUSICOFF
LS S RS
AUTO
RFDIGITAL
dBSIGNAL
SP A B
ANALOG
See the next four pages for more information onthese settings.
STANDBY/ON
MOVIE MUSIC
MULTI JOG
ENTER
STANDBY
PHONESSPEAKERS
SIGNALSELECT
HI-BITHI-SAMPLING
SB CHMODESET UP RETURN
TONETONE CONTROL
BASS/TREBLE
BANDMIDNIGHT LOUDNESSMULTI JOG CONTROL
1-2

37
SU
RR
OU
ND
SE
T U
P
SPEAKER SETTING
The information below shows you how to select the correct settings for the type and number of speakers youconnected. Most importantly, you need to decide how to route the sound for all the speakers you connected. Todo this select the size of the front, center, surround and surround back speakers (if you hooked them up). It isimportant to make these settings as accurately as possible or, in some cases, you may not get the fullsoundtrack from a disc.Use the information below to complete the steps that follow and set up the receiver to match the speakers youhave hooked up. If starting fresh, complete steps 1-2 in page 36.
FRONT (default setting is SMALL)Select SMALL to send bass frequencies to the subwoofer. Select LARGE if your speakers will reproduce bassfrequencies effectively or if you did not connect a subwoofer. (If you select SMALL for the front speakers thesubwoofer will automatically be switched YES. Also, the center and surround speakers cannot be set toLARGE if the front speakers are set to SMALL. In this case, all bass frequencies are sent to the subwoofer.)
CENTER (default setting is SMALL)• Select LARGE if your speaker will reproduce bass frequencies effectively.• Select SMALL to send bass frequencies to the other speakers or subwoofer.• If you did not connect a center speaker, choose NO. In this case, the center channel is output from the
front speakers.
SURROUND (default setting is SMALL)• Select LARGE if your speakers will reproduce bass frequencies effectively.• Select SMALL to send bass frequencies to the other speakers or subwoofer.• If you did not connect surround speakers choose NO. In this case, the sound of the surround channels is
output from the front and center speakers.• If the front speakers are set to SMALL, the surround speakers will automatically be set to SMALL.
SURROUND BACK (default setting is SMALL X2)
If you chose FRONT BI-AMP or SECOND ZONE in SURRBACK SYSTEM on page 35, or if you chose
NO for SURROUND SPEAKERS, you won’t be able to choose this setting.• Select the number of surround back speakers you have. You can choose one speaker, two, or none.• If you select one, make sure that speaker if hooked up to the left surround back terminal.• Select LARGE if your speakers will reproduce bass frequencies effectively.• Select SMALL to send bass frequencies to the other speakers or subwoofer.• If you did not connect surround back speakers choose NO.• If the front speakers or the surround speakers are set to SMALL, the surround back speakers will automati-
cally be set to SMALL.• If you choose THX in step 2 then the surround back speakers can only be set to SMALL (X1 or X2), or NO.SUBWOOFER (default setting is YES)• Leave it selected if you connected a subwoofer.• If you selected SMALL for the front speakers the subwoofer will automatically be set to on (you won’t be
able to choose NO or PLUS).• If you did not connect a subwoofer choose NO. In this case, the bass frequencies are output from the front
or surround speakers.• Choose the PLUS setting if you want stronger reproduction of deep bass sounds.• If you select PLUS the bass frequencies that would normally come out the front and center speakers are all
routed to the subwoofer.
Setting Up for Surround Sound

38
Follow steps 1-3 on page 34, if necessary, to get tothe starting point mentioned here.
1 Use the 5∞ buttons to selectNORMAL. Press the ENTERbutton.
LOUDNESS MIDNIGHT TONE DNR ATT STEREOTUNEDRDSHi-BIT/
MULTI-ROOMSAMPLING
EONRF ATTMONONeo :6
DIGITALDTS ES EXMPEG AACSTEREO
PRO LOGIC
DSP
L C R LFE
AUTOSB CH
ON MOVIEMUSICOFF
LS S RS
AUTO
RFDIGITAL
dBSIGNAL
SP A B
ANALOG
2 SPEAKER SET should be selected.If it isn’t use the 5∞ buttons toselect it. Press the ENTER button.
LOUDNESS MIDNIGHT TONE DNR ATT STEREOTUNEDRDSHi-BIT/
MULTI-ROOMSAMPLING
EONRF ATTMONONeo :6
DIGITALDTS ES EXMPEG AACSTEREO
PRO LOGIC
DSP
L C R LFE
AUTOSB CH
ON MOVIEMUSICOFF
LS S RS
AUTO
RFDIGITAL
dBSIGNAL
SP A B
ANALOG
3 Use the 5∞ buttons to selectFREE or THX speaker systemsetting. Press the ENTER button.FREE: To set all the speakers.
LOUDNESS MIDNIGHT TONE DNR ATT STEREOTUNEDRDSHi-BIT/
MULTI-ROOMSAMPLING
EONRF ATTMONONeo :6
DIGITALDTS ES EXMPEG AACSTEREO
PRO LOGIC
DSP
L C R LFE
AUTOSB CH
ON MOVIEMUSICOFF
LS S RS
AUTO
RFDIGITAL
dBSIGNAL
SP A B
ANALOG
THX: All speakers are set to SMALL and theSUBWF to YES. You can select the number ofsurround back speakers.
LOUDNESS MIDNIGHT TONE DNR ATT STEREOTUNEDRDSHi-BIT/
MULTI-ROOMSAMPLING
EONRF ATTMONONeo :6
DIGITALDTS ES EXMPEG AACSTEREO
PRO LOGIC
DSP
L C R LFE
AUTOSB CH
ON MOVIEMUSICOFF
LS S RS
AUTO
RFDIGITAL
dBSIGNAL
SP A B
ANALOG
For FREE, select FREE and press ENTER. Then goto step 4.For THX, select THX and press ENTER. Then goto step 5 but you only need to set the number ofsurround back speakers.
If you have a subwoofer and like lots of bass, it mayseem logical to select LARGE for your front speakersand leave the subwoofer selected. This may not,however, yield the best bass results. Depending onthe size and shape of your room you may actuallyexperience a decrease in the amount of bass due towhat is called low frequency cancellations. If youhave a subwoofer, listen to the bass response withthe front speakers set to LARGE and SMALLalternately and let your ears judge which sounds best.If you have a subwoofer, the safest option is to routeall the bass sounds to it by selecting SMALL for thefront speakers.
memo
Setting Up for Surround Sound
CHANNEL− CHANNEL+DTV ON/OFF BAND
D.ACCESS MPX CLASS
MENU TOP MENUTUNER EDIT
GUIDESYSTEMSETUP
AUDIO RETURN
ST
TUNE
MASTER VOLUME
ST
TUNE
ENTER 1-7
4 With the 5∞ buttons choose thespeakers that you want to set.Press the ENTER button.
LOUDNESS MIDNIGHT TONE DNR ATT STEREOTUNEDRDSHi-BIT/
MULTI-ROOMSAMPLING
EONRF ATTMONONeo :6
DIGITALDTS ES EXMPEG AACSTEREO
PRO LOGIC
DSP
L C R LFE
AUTOSB CH
ON MOVIEMUSICOFF
LS S RS
AUTO
RFDIGITAL
dBSIGNAL
SP A B
ANALOG
You can select from FRONT, CENTER, SUR-ROUND or SURROUND BACK. The selectedsetting blinks.
5 Use the 5∞ buttons to choosethe number (YES or NO, X1 orX2) and the size (LARGE orSMALL) for each set of speakers.Press the ENTER button.
LOUDNESS MIDNIGHT TONE DNR ATT STEREOTUNEDRDSHi-BIT/
MULTI-ROOMSAMPLING
EONRF ATTMONONeo :6
DIGITALDTS ES EXMPEG AACSTEREO
PRO LOGIC
DSP
L C R LFE
AUTOSB CH
ON MOVIEMUSICOFF
LS S RS
AUTO
RFDIGITAL
dBSIGNAL
SP A B
ANALOG
PLUS is also a possibility for the SUBWF.If you selected THX in step 2, you only need toset the number of surround back speakers.
6 Repeat steps 3 & 4 for allspeakers channels.
7 Use the 5∞ buttons to selectEXIT and press ENTER.
LOUDNESS MIDNIGHT TONE DNR ATT STEREOTUNEDRDSHi-BIT/
MULTI-ROOMSAMPLING
EONRF ATTMONONeo :6
DIGITALDTS ES EXMPEG AACSTEREO
PRO LOGIC
DSP
L C R LFE
AUTOSB CH
ON MOVIEMUSICOFF
LS S RS
AUTO
RFDIGITAL
dBSIGNAL
SP A B
ANALOG
Next, proceed to CHANNEL LEVEL below.If you want to change a setting beforeproceedingstart over from step 2.
STANDBY/ON
MOVIE MUSIC
MULTI JOG
ENTER
STANDBY
PHONESSPEAKERS
SIGNALSELECT
HI-BITHI-SAMPLING
SB CHMODESET UP RETURN
TONETONE CONTROL
BASS/TREBLE
BANDMIDNIGHT LOUDNESSMULTI JOG CONTROL
1-7

39
SU
RR
OU
ND
SE
T U
P
Follow steps 1-3 on page 34, if necessary, to getto the starting point mentioned here.
1 Use the 5∞ buttons to selectNORMAL. Press the ENTER button.
2 CHANNEL LEVEL should beselected. If it isn’t use the 5∞
buttons to select and press ENTER.LOUDNESS MIDNIGHT TONE DNR ATT STEREO
TUNEDRDSHi-BIT/
MULTI-ROOMSAMPLING
EONRF ATTMONONeo :6
DIGITALDTS ES EXMPEG AACSTEREO
PRO LOGIC
DSP
L C R LFE
AUTOSB CH
ON MOVIEMUSICOFF
LS S RS
AUTO
RFDIGITAL
dBSIGNAL
SP A B
ANALOG
3 There are two ways to set theCHANNEL LEVEL: MANUAL orAUTO. Select a setting modewith the 5∞ buttons and pressENTER.Test tones will be output.WARNING : Be prepared! The test tones areoutput at a high volume level.MASTER VOLUME rotates to the referenceposition (0 dB) and the display on the receiverflashes TEST TONE. After a few seconds thetest tone is output.MANUAL: move the test tone manually andadjust the channel level.
LOUDNESS MIDNIGHT TONE DNR ATT STEREOTUNEDRDSHi-BIT/
MULTI-ROOMSAMPLING
EONRF ATTMONONeo :6
DIGITALDTS ES EXMPEG AACSTEREO
PRO LOGIC
DSP
L C R LFE
AUTOSB CH
ON MOVIEMUSICOFF
LS S RS
AUTO
RFDIGITAL
dBSIGNAL
SP A B
ANALOG
AUTO: the test tone moves by itself and youadjust the levels.
LOUDNESS MIDNIGHT TONE DNR ATT STEREOTUNEDRDSHi-BIT/
MULTI-ROOMSAMPLING
EONRF ATTMONONeo :6
DIGITALDTS ES EXMPEG AACSTEREO
PRO LOGIC
DSP
L C R LFE
AUTOSB CH
ON MOVIEMUSICOFF
LS S RS
AUTO
RFDIGITAL
dBSIGNAL
SP A B
ANALOG
CHANNEL LEVEL (channel balance)
The following steps show you how to balance the sound output level of your speakers. Proper speaker balanceis essential for obtaining high quality surround sound. If continuing from SPEAKER SETTING go to step 2.
Setting Up for Surround Sound
MENU TOP MENUTUNER EDIT
GUIDESYSTEMSETUP
AUDIO RETURN
ST
TUNE
ST
TUNE
ENTER 1-6
• If your subwoofer has a volume control, set it to themiddle position before doing these operations.
• If you are using a Sound Pressure Level (SPL) metertake the readings from your main listening position andadjust the level of each speaker to 75dB SPL (C-weight-ing/slow reading).
• The volume of the subwoofer test tone tends to soundlower than it actually is. You may need to adjust thelevel after testing your system with an actualsoundtrack.
memo
4 Adjust the speaker level with thebelow instructions for themethod you chose.Adjust the channel level from –10 dB to +10 dB in0.5 dB increments.The default setting is 0 dB.In MANUAL (manual test tone) modeTo switch the test tone between each speaker usethe 5∞ buttons and push ENTER. Adjust the levelof each speaker using the 5∞ buttons andENTER. When done go to step 5.
In AUTO (automatic test tone) modeThis mode switches the test tone between eachspeaker automatically. The test tone output cyclesthrough the speakers in the following order:
FRONT L
FRONT R
SURROUND R
SURROUND L
SURRBACK R
SURRBACK L
CENTER
SUBWOOFER
Adjust the level of each speaker using the 5∞
buttons as the test tone is emitted and wait for itto move to the next speaker. When done go tostep 6.If you want to change a setting before pro-ceedingyou need to complete the procedure and startover from step 1.
5 When you have the levels youwant press ENTER. EXIT shouldbe selected (if it isn’t select itwith the 5∞ buttons).
6 Press ENTER.Next, proceed to CHANNEL DELAY next page.If you want to change a setting before pro-ceedingstart over from step 2.
STANDBY/ON
MOVIE MUSIC
MULTI JOG
ENTER
STANDBY
PHONESSPEAKERS
SIGNALSELECT
HI-BITHI-SAMPLING
SB CHMODESET UP RETURN
TONETONE CONTROL
BASS/TREBLE
BANDMIDNIGHT LOUDNESSMULTI JOG CONTROL
1-6

40
Follow steps 1-3 on page 34, if necessary, to get tothe starting point mentioned here.
1 Use the 5∞ buttons to selectNORMAL. Press the ENTERbutton.
LOUDNESS MIDNIGHT TONE DNR ATT STEREOTUNEDRDSHi-BIT/
MULTI-ROOMSAMPLING
EONRF ATTMONONeo :6
DIGITALDTS ES EXMPEG AACSTEREO
PRO LOGIC
DSP
L C R LFE
AUTOSB CH
ON MOVIEMUSICOFF
LS S RS
AUTO
RFDIGITAL
dBSIGNAL
SP A B
ANALOG
2 The CHANNEL DELAY should beselected. If it isn’t use the 5∞
buttons to select it. Press theENTER button.
LOUDNESS MIDNIGHT TONE DNR ATT STEREOTUNEDRDSHi-BIT/
MULTI-ROOMSAMPLING
EONRF ATTMONONeo :6
DIGITALDTS ES EXMPEG AACSTEREO
PRO LOGIC
DSP
L C R LFE
AUTOSB CH
ON MOVIEMUSICOFF
LS S RS
AUTO
RFDIGITAL
dBSIGNAL
SP A B
ANALOG
3 Select each speaker channel withthe 5∞ buttons and pressENTER.
LOUDNESS MIDNIGHT TONE DNR ATT STEREOTUNEDRDSHi-BIT/
MULTI-ROOMSAMPLING
EONRF ATTMONONeo :6
DIGITALDTS ES EXMPEG AACSTEREO
PRO LOGIC
DSP
L C R LFE
AUTOSB CH
ON MOVIEMUSICOFF
LS S RS
AUTO
RFDIGITAL
dBSIGNAL
SP A B
ANALOG
You can select from L, C, R, RS, SBR, SBL, LS andSW. The selected setting blinks.
CHANNEL DELAY
Adding a slight delay to some speakers is necessary to achieve proper sound depth, separation as well as aneffective surround sound effect. You need to figure out the distance from your listening position to yourspeakers to add the proper delay. The following steps show you how to set the delay time for each channel byspecifying the distances from your listening position to each speaker. If continuing from CHANNEL LEVEL go tostep 2.
Setting Up for Surround Sound
CHANNEL− CHANNEL+DTV ON/OFF BAND
MENU TOP MENUTUNER EDIT
GUIDESYSTEMSETUP
AUDIO RETURN
ST
TUNE
MASTER VOLUME
ST
TUNE
ENTER 1-67
4 Use the 5∞ buttons to add orsubtract the distance in feet thatthe speaker is from your normallistening position. Press theENTER button.
LOUDNESS MIDNIGHT TONE DNR ATT STEREOTUNEDRDSHi-BIT/
MULTI-ROOMSAMPLING
EONRF ATTMONONeo :6
DIGITALDTS ES EXMPEG AACSTEREO
PRO LOGIC
DSP
L C R LFE
AUTOSB CH
ON MOVIEMUSICOFF
LS S RS
AUTO
RFDIGITAL
dBSIGNAL
SP A B
ANALOG
Adjust the speaker distance in half footincrements from 0.5 to 45 feet.The default setting is 10 feet.
5 Repeat steps 3 & 4 for allspeaker channels.
6 Use the 5∞ buttons to selectEXIT and press ENTER.
LOUDNESS MIDNIGHT TONE DNR ATT STEREOTUNEDRDSHi-BIT/
MULTI-ROOMSAMPLING
EONRF ATTMONONeo :6
DIGITALDTS ES EXMPEG AACSTEREO
PRO LOGIC
DSP
L C R LFE
AUTOSB CH
ON MOVIEMUSICOFF
LS S RS
AUTO
RFDIGITAL
dBSIGNAL
SP A B
ANALOG
If you want to change a setting beforeproceedingstart over from step 2.
7 Press the SYSTEM SETUPbutton to leave the SYSTEMSETUP mode.
1-6
STANDBY/ON
MOVIE MUSIC
MULTI JOG
ENTER
STANDBY
PHONESSPEAKERS
SIGNALSELECT
HI-BITHI-SAMPLING
SB CHMODESET UP RETURN
TONETONE CONTROL
BASS/TREBLE
MIDNIGHT LOMULTI JOG CONTROL
7

41
BA
SIC
Stereo and Multichannel Playback
The following instructions show you how to play Dolby Digital or DTS sound sources with the VSX-43TX.Before doing so be sure to complete the setup procedures described in QUICK setup in the Easy Setup GuidePt. 2 (starting on page 13) or Setting Up for Surround Sound (starting on page 34). This is particularly importantto achieve a surround sound effect with Dolby Digital or DTS sources.
1 Turn on the power of the playbackcomponent.
2 Press the RECEIVERbutton ( STANDBY/ONon the front panel) to turnon the receiver.Be sure that the STANDBY indicatorturns off on the front panel.
3 Press the MULTI CONTROL (orINPUT) on the remote control toselect the source you want toplayback.Choose the type of signal input with the SIGNALSELECT button.See the next page for more details, if necessary.
4 Choose a LISTENING MODE one oftwo ways.For SURROUND modes: press MOVIE or MUSIC, usethe | \ buttons to select the mode you want andpress ENTER.For STEREO/DIRECT: for press the button for thatmode.
On the front panel, use the MOVIE or MUSIC buttonsand the MULTI JOG dial. Press the button of the modetype you want and then use the dial to cycle throughthe possibilities. Press ENTER.See “SURROUND Modes,” on pages 44–45 fordetails on which modes are available and in whichsituations they are designed to be used.
5 Start playback of the componentyou selected in step 3.
6 Adjust the volume by using theMASTER VOLUME –/+ buttons onthe remote control. On the frontpanel use the MASTER VOLUMEdial.
Basic Operation
STANDBYindicator
2
6
STANDBY/ON
MOVIE MUSIC ENTER
STANDBY
4 4
SOURCE
MULTI CONTROL
RECEIVER
MOVIE MUSIC
ENTER
MULTIOPERATION
SURROUNDMODE
STEREO/DIRECT
SYSTEMOFF
ACOUSTICEQ
SB CHMODE
INPUT
MIDNIGHT
CHANNEL−
+−
CHANNEL+DTV ON/OFF BAND
DIMMER TONELOUDNESS EFFECT/CH SEL
SIGNAL SEL BASS/TREBLE DISCDNR
VIDEO SEL
SUB TITLE
REMOTESETUP
HI-BIT
D.ACCESS MPX
TV CONTROL
CLASS
MUTE
MENU TOP MENUTUNER EDIT
GUIDESYSTEMSETUP
AUDIO RETURN
CHANNEL VOLUMEINPUTSELECT
+10
MULTI CHINPUT
RECEIVER
ST
TUNE
MASTER VOLUME
ST
TUNE
DVD/LD
ENTER
ENTER
VCR 2
TV / SAT
C D
VCR/DVR TV CONT
TUNER RECEIVER32
3
6
4
STANDBY/ON
MOVIE MUSIC
MULTI JOG
ENTER STEREO/DIRECT MULTI CH IN
MASTER VOLUME
ACOUSTIC EQ
STANDBY
VSX-43TXAUDIO/VIDEO MULTI-CHANNEL RECEIVER
REFERENCE AUDIO/VIDEO MULTI-CHANNEL RECEIVER

42
Switching ANALOG/DIGITAL Signal Input
This button selects the type of input signal, ANALOG or DIGITAL, sent to the receiver. You need to take specialcare to switch to the appropriate input when necessary. For example, the switch would have to be on DIGITALto hear Dolby Digital or DTS surround sound material but it would have to be on analog to record from theANALOG out jacks on the receiver. The default setting is AUTO (which chooses digital over analog when bothare available but goes with whatever is available) for: DVD/LD, TV/SAT, VIDEO, CD, CDR/TAPE1. The defaultsetting is ANALOG for: VCR1/DVR, VCR2, MD/TAPE2, TUNER and LINE.
1 Press RECEIVER.
2 Press the SIGNAL SEL (SIGNALSELECT on the front panel) button toselect the input signal correspondingto the format of the sourcecomponent.Each press switches the signal in the order below:
AUTO ANALOG DIGITAL
memo
• When DIGITAL signal is selected, 2 DIGITAL lightswhen a Dolby Digital signal is input; DTS lights when aDTS signal is input.
• If no digital inputs are assigned (see page 76) you canonly choose ANALOG in the SIGNAL SELECT.
• Because the audio signal from a karaoke microphoneand LDs are recorded with analog audio only, they arenot output from the digital outputs. Set SIGNALSELECT to ANALOG to listen to these formats.
• When an LD with DTS is played back with the SIGNALSELECT set in ANALOG, digital noise caused by playingback the DTS signal directly (with no decoding) isoutput. To prevent noise, you need to make digitalconnections (See pages 21 & 22) and set SIGNALSELECT to AUTO or DIGITAL.
• Some DVD players don’t output DTS signals. For moredetails, refer to the instruction manual supplied withyour DVD player.
• This receiver can only play back Dolby Digital, PCM (32kHz, 44.1 kHz, 48 kHz, 88.2 kHz and 96 kHz samplingfrequency), and DTS digital signal formats. If yoursource is not one of these select ANALOG for playback.
2
Basic Operation
SOURCE
MULTI CONTROL
RECEIVER
MOVIE MUSIC
ENTER
MULTIOPERATION
SURROUNDMODE
STEREO/DIRECT
SYSTEMOFF
ACOUSTICEQ
SB CHMODE
INPUT
MIDNIGHT
CHANNEL−
+−
CHANNEL+DTV ON/OFF BAND
DIMMER TONELOUDNESS EFFECT/CH SEL
SIGNAL SEL BASS/TREBLE DISCDNR
VIDEO SEL
SUB TITLE
REMOTESETUP
HI-BIT
D.ACCESS MPX
TV CONTROL
CLASS
MUTE
MENU TOP MENUTUNER EDIT
GUIDESYSTEMSETUP
AUDIO RETURN
CHANNEL VOLUMEINPUTSELECT
+10
MULTI CHINPUT
RECEIVER
ST
TUNE
MASTER VOLUME
ST
TUNE
DVD/LD
ENTER
ENTER
VCR 2
TV / SAT
C D
VCR/DVR TV CONT
TUNER RECEIVER
2
1
PHONESSPEAKERS
SIGNALSELECT
HI-BITHI-SAMPLING
SB CHMODE
S-VIDEO VIDEOVIDEO INPUT
AUDIOL R
SET UP RETURN
TONETONE CONTROL
BASS/TREBLE
CLASSBANDMIDNIGHT LOUDNESSSTATION TUNING
MULTI JOG/ENTER
MULTI JOG CONTROL
SELECTTUNEREDIT
43
BA
SIC
Listening Modes
The three listening mode types on the receiver are explained here (to select listening modes see page 41).The kind of playback you can get in the three modes depends on what kind of a source (DVD, etc.) you areusing. The basic distinction is between 2 channel sources and multichannel sources. The MOVIE and MUSICmodes that are available to you will also differ according to your source and which SB CH MODE you choose.This is explained below as well.
For home theater the MOVIE and MUSIC listening modes are designed to deliver realistic and powerfulmultichannel surround sound that recreates the movie theater or concert experience. The first four MOVIEmodes (THX CINEMA, 2PRO LOGIC II MOVIE, 2PRO LOGIC, NEO:6 CINEMA) and first two MUSIC modes(2PRO LOGIC II MUSIC, NEO:6 MUSIC) incorporate pure decoding of the signal. That is they present it just asit was recorded in the sound studio. With these modes the receiver will automatically employ the format of thesound source (for example, Dolby Digital or DTS) and display it on screen. The other modes are DSP modes.They add some type of effect to the signal.You may need to experiment with these modes to see which suit your home system and personal tastes.The MUSIC and STEREO modes are designed to be used with music sources but some MUSIC modes are alsosuitable for film soundtracks. Again, try different modes with various soundtracks to see which you like but youmust choose one of the MOVIE and MUSIC listening modes in order to get surround sound.Depending on your setup, in STEREO mode only the front two speakers, and sometimes the subwoofer (if youhave one), are used.
STEREO modes
When a source is played in this mode, it plays through just the front left and right speakers (and possibly yoursubwoofer depending on your speaker settings). Dolby Digital and DTS multichannel sources are downmixedto stereo.
STEREOIn STEREO mode the audio plays according to the surround setup settings and you can still use ACOUSTICCALIBRATION EQ, DIGITAL NR, MIDNIGHT, LOUDNESS, HI-BIT HI-SAMPLING mode and TONE CONTROLfunctions.
DIRECTIn DIRECT mode, the audio bypasses all types of signal processing to remain as close to the source audioquality as possible.
Basic Operation
memo If you switch on ACOUSTIC CALIBRATION EQ, DIGITAL NR, MIDNIGHT, LOUDNESS, HI-BIT HI-SAMPLING mode and TONE CONTROL functions when DIRECT is selected, the receiver automati-cally switches to STEREO.

44
Basic Operation
MOVIE modes (SURROUND mode)
The MOVIE mode is a newly designed system for enhancing movie soundtracks and other audio-visual sourcesthat optimizes its effects in accordance with your source, SB CH MODE and speaker configuration. The first fourmodes (THX CINEMA, 2PRO LOGIC II MOVIE, 2PRO LOGIC, NEO:6 CINEMA) are for pure decoding ofmultichannel sound sources (for example, Dolby Digital or DTS). With these modes the receiver willautomatically employ the format of the sound source (for example, Dolby Digital or DTS) and display it onscreen. With two channel sources these first four modes will create surround channels. Next, there are sixPIONEER original sound modes that use DSP (Digital Signal Processing) to create different types of soundenvironments as described below.
THX CINEMATHX is a set of technical standards created by Lucasfilm Ltd. These standards were designed to emulate afilm sound stage and thus reproduce, with the greatest possible accuracy, the soundtrack intended by thefilmmakers.
2PL II MOVIE (2PRO LOGIC II MOVIE)*This mode gives 5.1 channel surround sound. It is suitable for movies, especially those recorded in DolbySurround. The channel separation and movement of surround effects is comparable to Dolby Digital 5.1.With sources other than stereo (5.1, etc.) the display will automatically show the type of decoding beingemployed (Dolby Digital, DTS-ES, etc.).
2PRO LOGIC*This mode gives 4.1 channel surround sound. It is less sensitive to the quality of the source material, somay be useful when 2 PRO LOGIC II MOVIE or 2 PRO LOGIC II MUSIC modes do not give goodresults. With sources other than stereo (5.1, etc.) the display will automatically show the type of decodingbeing employed (Dolby Digital, DTS-ES, etc.).
NEO:6 CINEMA*This mode gives 6.1 channel surround sound and is suitable for movies. The NEO:6 Cinema mode deliversgood channel separation for movie soundtracks. With sources other than stereo (5.1, etc.) the display willautomatically show the type of decoding being employed (Dolby Digital, DTS-ES, etc.).
ACTIONThis mode is designed for action movies, which generally use lots of sound effects. The mode enriches thesound to make it more realistic and extends the parameters to pick up high and low sound effects.
SCI-FIThis mode is designed for science fiction movies. It creates a broad sound space, separating dialog fromsound effects to heighten the overall impact of the soundtrack.
DRAMAThis mode is designed for movies with a lot of dialog. The elements of dialog are enhanced, making thecharacters seem more real. The mode also compresses the dynamic range somewhat so loud sounds donot overpower softer ones (compare this with the MIDNIGHT listening mode explained on page 48).
MUSICALThis mode is primarily for music and adds a spacious feeling to the sound. A long delay time of reflectedsounds provides resonant tones which emulate a concert hall.
MONOFILMThis mode is designed for older movies which are recorded with mono soundtracks. The special soundprocessing of this mode will allow you to experience these movies in surround sound even though theywere not recorded that way originally.
5/7-D THEATERThis mode is especially designed to give sound depth to stereo sources. The overall effect builds adynamic and broad sound space, allowing two-channel (stereo) signals to faithfully imitate a five speakersound. The mode should be used in conjunction with Dolby Pro Logic for sources bearing the
DOLBY SURROUND mark. The display will show either 5-D THEATER or 7-D THEATER according to the source,SB CH MODE and speaker configuration.
*When you input a multichannel signal the decoding is done automatically so you cannot choose thesemodes.

45
BA
SIC
MUSIC modes (SURROUND mode)
The MUSIC modes allow you to transform your living room into a variety of different sonic environments whenplaying either two-channel or multichannel sources. It optimizes its effects in accordance with your source, SBCH MODE and speaker configuration. The first two modes are for pure decoding of multichannel sound sources.With these modes the receiver will automatically employ the format of the sound source (for example, DolbyDigital or DTS). With two channel sources these first four modes will create surround channels. Then there arefive PIONEER original sound modes that use DSP (Digital Signal Processing) to create different types of soundenvironments as described below. Lastly, the 5/7-CH STEREO mode simply outputs a stereo signal through allof your speakers.
2PL II MUSIC (2PRO LOGIC II MUSIC)*This mode gives 5.1 channel surround sound and is suitable for music. Compared to the Movie Mode PROLOGIC, the surround effect is more enveloping. With sources other than stereo (5.1, etc.) the display willautomatically show the type of decoding being employed (Dolby Digital, DTS-ES, etc.).
NEO:6 MUSIC*This mode gives 6.1 channel surround sound and is suitable for music. The NEO:6 Music mode plays thestereo source as is through the front left/right speakers, and generates a natural, ambient surround andcenter sound. With sources other than stereo (5.1, etc.) the display will automatically show the type ofdecoding being employed (Dolby Digital, DTS-ES, etc.).
CLASSICALSimulates the acoustic effects of a large concert hall. Suitable for classical music. A long delay time ofreflected sounds, coupled with reverb effects, let the listener experience the dynamic and rich soundscharacteristic of concert halls and powerful orchestral performances.
CHAMBERSimulates the acoustic environment of a very resonant concert hall. Rich reverberation and a full soundcreate the impression of a lively performance space.
JAZZSimulates the acoustic effects of a jazz club. Reflected sound is virtually below 100 msec so that thelistener can experience a live band effect.
ROCKSimulates the acoustic effects of a mid-sized concert hall. The listener can experience a live band effectwith good separation of the instruments, a strong bass and the vivid feeling of a live performance.
DANCESimulates the acoustic effects of a dance club. Features a strong bass sound.Reflected sound delay time is virtually below 50 msec, for the listener to experience the visceral power ofdance music.
5/7-CH STEREOSimulates the acoustic environment of a regular stereo while using all the speakers in the system to inducea rich, all-around sound. The display will change to 5-CH STEREO or 7-CH STEREO according to the SB CHMODE and speaker configuration.
Basic Operation
*When you input a multichannel signal the decoding is done automatically so you cannot choosethese modes.

46
Basic Operation
memo
1 Press RECEIVER.
2 Press the EFFECT/CH SEL buttonrepeatedly until you see EFFECT in thereceiver’s display.
3 Use the +/– buttons to add or subtractthe amount of effect.
• The amount of effect can be adjusted ranging from 10to 90 (the default setting value is 50) by pressing +/–.
• 5/7CH STEREO modes cannot be adjusted.
Adjusting the Effect of a Listening Mode
The DSP (Digital Signal Processing) listening modes have sound processing added to accentuate a certain kindof atmosphere or effect (see the preceding pages for explanation). You can choose if you want to strengthen orweaken this effect in the given mode. The DSP MOVIE modes are: ACTION, SCI-FI, DRAMA, MUSICAL,MONOFILM, 5/7-D THEATER. The DSP MUSIC modes are: CLASSICAL, CHAMBER, JAZZ, ROCK, DANCE.The following instructions show you how to adjust the amount of effect.
Adding/Adjusting the Effect in Dolby ProLogic II Music Mode
The Dolby Pro Logic II Music mode has three settings you canchoose from which adjust the spatial feeling of the surround sound.These settings are best matched to each individual source insteadof one setting being left on for all sources. The three settings andhow to apply them are explained here.
1 Press RECEIVER.
2 Press the EFFECT/CH SEL buttonrepeatedly and select the setting youwant. They appear in the receiver’sdisplay.CENTER WIDTH : With Pro Logic decoding center channelsignals can come only from the center speaker. If no centerspeaker is present this channel is split between the two frontspeakers, creating a "phantom" channel. The CENTER WIDTHfeature lets you adjust the center channel so it can heard onlyfrom the center speaker, only as a "phantom" channel or invarying degrees of both.DIMENSION: This allows you to adjust the soundfieldtowards the front or towards the rear of your room.PANORAMA: This gives the music a wraparound surroundfeel.
3 Use the +/– buttons to add or subtractthe amount of effect or turn on/off.CENTER WIDTH : Strengthen or weaken the effect between0–7. The default is 3.DIMENSION: Move soundfield backward or forward with -3being the furthest back and +3 being the furthest forward.The default is 0.PANORAMA: Turn on or off. The default is off.
SOURCE
MULTI CONTROL
RECEIVER
MOVIE MUSIC
ENTER
MULTIOPERATION
SURROUNDMODE
STEREO/DIRECT
SYSTEMOFF
ACOUSTICEQ
SB CHMODE
INPUT
MIDNIGHT
CHANNEL−
+−
CHANNEL+DTV ON/OFF BAND
DIMMER TONELOUDNESS EFFECT/CH SEL
SIGNAL SEL BASS/TREBLE DISCDNR
VIDEO SEL
SUB TITLE
REMOTESETUP
HI-BIT
D.ACCESS MPX
TV CONTROL
CLASS
MUTE
MENU TOP MENUTUNER EDIT
GUIDESYSTEMSETUP
AUDIO RETURN
CHANNEL VOLUMEINPUTSELECT
+10
MULTI CHINPUT
RECEIVER
ST
TUNE
MASTER VOLUME
ST
TUNE
DVD/LD
ENTER
ENTER
VCR 2
TV / SAT
C D
VCR/DVR TV CONT
TUNER RECEIVER
2
3
1

47
Basic Operation
BA
SIC
Reducing Noise During Playback (DIGITAL NR Function)
To reduce extraneous noise switch on DIGITAL NR. This feature is effective with sources containing a lot ofbackground noise like cassette and video tape
1 Press RECEIVER.
2 Press the DNR button on the remotecontrol.Each press switches DIGITAL NR on or off.When on, DNR lights in the display.
• In cases described below, noise may not be reduced evenif DIGITAL NR is on.· Sudden noise· Extremely loud noise· Signals that contain too many high frequencies
Signals which are very clean to begin with.• DIGITAL NR is effective at levels shown below for each
source.STEREO· Analog input ..................................................... 10-18 dB· Digital input ...................................................... 10-15 dB· AM/FM tuner ................................................... 10-15 dBMOVIE/MUSIC ...................................................... 6-10 dB
• Depending on the condition of the source, there may notbe a noticeable improvement in the quality of the sound.
• You can’t use the DIGITAL NR mode with the THXCINEMA or MULTI CH IN modes, or a 96 kHz signal.
• If you set the DIGITAL NR on in DIRECT mode thereceiver will switch to STEREO mode.
memo
1 Press the ACOUSTIC EQ button onthe remote control or ACOUSTIC EQbutton on the front panel.Each press switches ACOUSTIC CALIBRATION EQmode on or off.When ACOUSTIC EQ is being applied the MCACCindicator lights.
• You can’t turn on ACOUSTIC CALIBRATION EQmode on in MULTI CH IN mode.
• If you turn ACOUSTIC CALIBRATION EQ modeon in DIRECT mode, the receiver automaticallyswitches to STEREO mode.
Listening with ACOUSTIC CALIBRATION EQ
You can listen to the soundtrack with the ACOUSTIC CALIBRATION EQ if you have adjusted ACOUSTIC CALEQ in the EXPERT Setup menu (see page 79). To do so follow the instructions below. For information aboutACOUSTIC CALIBRATION EQ mode, see page 84.
memo
1
SOURCE
MULTI CONTROL
RECEIVER
MOVIE MUSIC
ENTER
MULTIOPERATION
SURROUNDMODE
STEREO/DIRECT
SYSTEMOFF
ACOUSTICEQ
SB CHMODE
INPUT
MIDNIGHTMUTE
MULTI CHINPUT
MASTER VOLUME
DVD/LD
VCR 2
TV / SAT
C D
VCR/DVR TV CONT
TUNER RECEIVER
1
STEREO/DIRECT MULTI CH IN
MASTER VOLUME
ACOUSTIC EQ
VSX-43TXAUDIO/VIDEO MULTI-CHANNEL RECEIVER
SOURCE
MULTI CONTROL
RECEIVER
MOVIE MUSIC
ENTER
MULTIOPERATION
SURROUNDMODE
STEREO/DIRECT
SYSTEMOFF
ACOUSTICEQ
SB CHMODE
INPUT
MIDNIGHT
CHANNEL−
+−
CHANNEL+DTV ON/OFF BAND
DIMMER TONELOUDNESS EFFECT/CH SEL
SIGNAL SEL BASS/TREBLE DISCDNR
VIDEO SEL
SUB TITLE
REMOTESETUP
HI-BIT
D.ACCESS MPX
TV CONTROL
CLASS
MUTE
MENU TOP MENUTUNER EDIT
GUIDESYSTEMSETUP
AUDIO RETURN
CHANNEL VOLUMEINPUTSELECT
+10
MULTI CHINPUT
ST
TUNE
MASTER VOLUME
ST
TUNE
DVD/LD
ENTER
ENTER
VCR 2
TV / SAT
C D
VCR/DVR TV CONT
TUNER RECEIVER 1
2
MCACC indicator

48
Basic Operation
Listening in MIDNIGHT Mode
This useful feature makes it possible to get excellent surround sound effects even when listening at lowvolumes. It can be used with any surround sound source and play soundtracks so that the quieter sounds areaudible even while playing a soundtrack at low volumes. This feature is applicable only when the master volumeis under –20 dB.
1 Press the MIDNIGHT button on theremote control.Each press switches MIDNIGHT mode on or off.When on, MIDNIGHT lights in the display.
• The surround effect adjusts itself automaticallyin accordance with the volume level.
• You can’t use the MIDNIGHT mode with the THXCINEMA, MULTI CH IN, LOUDNESS modes.
• If you set MIDNIGHT on when in DIRECT modethe receiver switches to STEREO mode.
memo
Listening in LOUDNESS Mode
The LOUDNESS mode boosts the bass and treble in a signal. It is useful for listening to music at low volumes.This feature is applicable only when the master volume is under –20 dB.
1 Press RECEIVER.
2 Press the LOUDNESS button on theremote control.Each press switches LOUDNESS mode on or off.When on, LOUDNESS lights in the display.
• You can’t use the LOUDNESS mode with the THXCINEMA, MULTI CH IN, MIDNIGHT modes.
• If you set LOUDNESS on in DIRECT mode thereceiver will switch to STEREO mode.
memo
SOURCE
MULTI CONTROL
RECEIVER
MOVIE MUSIC
ENTER
MULTIOPERATION
SURROUNDMODE
STEREO/DIRECT
SYSTEMOFF
ACOUSTICEQ
SB CHMODE
INPUT
MIDNIGHTMUTE
MENU TOP MENUTUNER EDIT
GUIDESYSTEMSETUP
MULTI CHINPUT
ST
TUNE
MASTER VOLUME
ST
DVD/LD
ENTER
VCR 2
TV / SAT
C D
VCR/DVR TV CONT
TUNER RECEIVER
1
SOURCE
MULTI CONTROL
RECEIVER
MOVIE MUSIC
MULTIOPERATION
SYSTEMOFF
ACOUSTICEQ INPUT
DVD/LD
VCR 2
TV / SAT
C D
VCR/DVR TV CONT
TUNER RECEIVER 1
PHONESSPEAKERS
SIGNALSELECT
HI-BITHI-SAMPLING
SB CHMODE
S-VIDEO VIDEOVIDEO INPUT
AUDIOL R
SET UP RETURN
TONETONE CONTROL
BASS/TREBLE
CLASSBANDMIDNIGHT LOUDNESSSTATION TUNING
MULTI JOG/ENTER
MULTI JOG CONTROL
SELECTTUNEREDIT
1
+−
DIMMER TONELOUDNESS EFFECT/CH SEL
SIGNAL SEL BASS/TREBLE DISCDNR
VIDEO SEL
SUB TITLE
REMOTESETUP
HI-BIT
D.ACCESS MPX
TV CONTROL
CLASS
CHANNEL VOLUMEINPUTSELECT
+10
RECEIVER
ENTER
2
PHONESSPEAKERS
SIGNALSELECT
SB CHMODE
S-VIDEO VIDEOVIDEO INPUT
AUDIOL R
SET UP RETURN
TONETONE CONTROL
BASS/TREBLE
CLASSBANDMIDNIGHT LOUDNESSSTATION TUNING
MULTI JOG/ENTER
MULTI JOG CONTROL
SELECTTUNEREDIT
HI-BITHI-SAMPLING
2

49
Basic Operation
BA
SIC
Adjusting Bass and Treble (TONE CONTROL)
You can adjust the low (bass) and high (treble) frequencies. The TONE button can also be used to bypass thetone circuitry.
memo
• The TONE CONTROL can be adjusted in a range of ±6dB.
• The TONE CONTROL cannot be set on in THXCINEMA, MULTI CH IN modes.
• If you set TONE CONTROL on in DIRECT mode thereceiver will switch to STEREO mode.
1 Press RECEIVER.
2 Press the TONE button on theremote control or the front panel toput the receiver in tone adjust mode.There are two tone modes TONE: ON and TONE:BYPASS. The first means the tone functions are activeand also lets you adjust these functions. The secondmeans the tone controls are being bypassed, and thushave no effect on the sound.
3 Press the BASS/TREBLE buttonrepeatedly to select BASS orTREBLE.If TONE: BYPASS appears, press the TONE button toget TONE: ON.
4 Use the +/– buttons to adjust the lowor high frequency levels.A few seconds after you finish adjusting the tone thereceiver will revert to the sound mode it was in at thebeginning of the process.
42 3
SOURCE
MULTI CONTROL
RECEIVER
MOVIE MUSIC
ENTER
MULTIOPERATION
SURROUNDMODE
STEREO/DIRECT
SYSTEMOFF
ACOUSTICEQ
SB CHMODE
INPUT
MIDNIGHT
CHANNEL−
+−
CHANNEL+DTV ON/OFF BAND
DIMMER TONELOUDNESS EFFECT/CH SEL
SIGNAL SEL BASS/TREBLE DISCDNR
VIDEO SEL
SUB TITLE
REMOTESETUP
HI-BIT
D.ACCESS MPX
TV CONTROL
CLASS
MUTE
MENU TOP MENUTUNER EDIT
GUIDESYSTEMSETUP
AUDIO RETURN
CHANNEL VOLUMEINPUTSELECT
+10
MULTI CHINPUT
RECEIVER
ST
TUNE
MASTER VOLUME
ST
TUNE
DVD/LD
ENTER
ENTER
VCR 2
TV / SAT
C D
VCR/DVR TV CONT
TUNER RECEIVER
2
3
1
4
PHONESSPEAKERS
SIGNALSELECT
HI-BITHI-SAMPLING
SB CHMODE
S-VIDEO VIDEOVIDEO INPUT
AUDIOL R
SET UP RETURN
TONETONE CONTROL
BASS/TREBLE
CLASSBANDMIDNIGHT LOUDNESSSTATION TUNING
MULTI JOG/ENTER
MULTI JOG CONTROL
SELECTTUNEREDIT
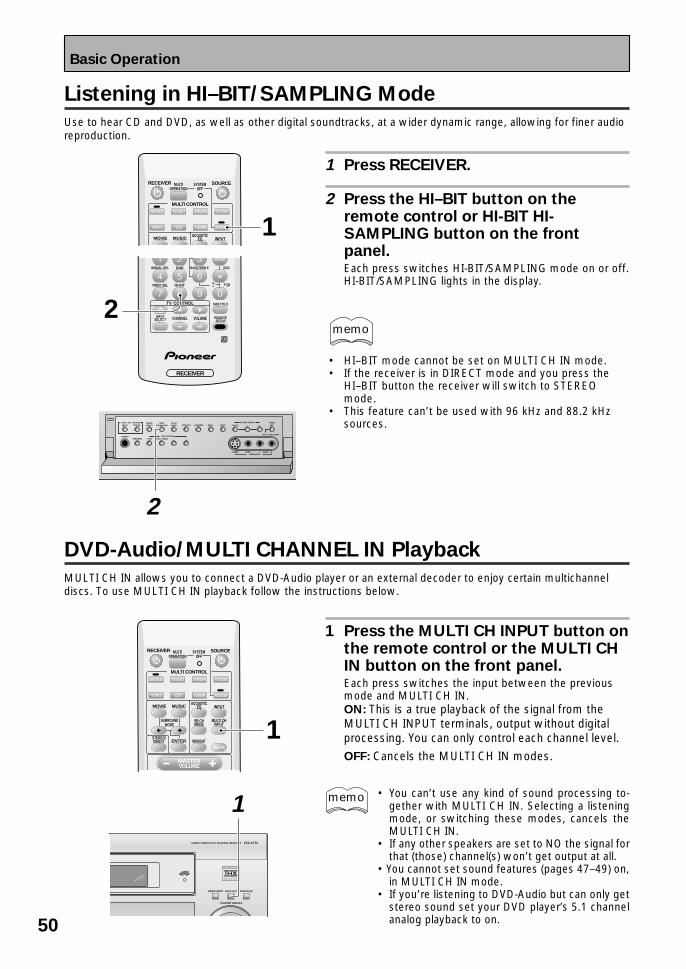
50
Basic Operation
memo
DVD-Audio/MULTI CHANNEL IN Playback
MULTI CH IN allows you to connect a DVD-Audio player or an external decoder to enjoy certain multichanneldiscs. To use MULTI CH IN playback follow the instructions below.
• You can’t use any kind of sound processing to-gether with MULTI CH IN. Selecting a listeningmode, or switching these modes, cancels theMULTI CH IN.
• If any other speakers are set to NO the signal forthat (those) channel(s) won’t get output at all.
• You cannot set sound features (pages 47–49) on,in MULTI CH IN mode.
• If you’re listening to DVD-Audio but can only getstereo sound set your DVD player’s 5.1 channelanalog playback to on.
1 Press the MULTI CH INPUT button onthe remote control or the MULTI CHIN button on the front panel.Each press switches the input between the previousmode and MULTI CH IN.ON: This is a true playback of the signal from theMULTI CH INPUT terminals, output without digitalprocessing. You can only control each channel level.
OFF: Cancels the MULTI CH IN modes.
1
SOURCE
MULTI CONTROL
RECEIVER
MOVIE MUSIC
ENTER
MULTIOPERATION
SURROUNDMODE
STEREO/DIRECT
SYSTEMOFF
ACOUSTICEQ
SB CHMODE
INPUT
MIDNIGHTMUTE
MULTI CHINPUT
MASTER VOLUME
DVD/LD
VCR 2
TV / SAT
C D
VCR/DVR TV CONT
TUNER RECEIVER
1
STEREO/DIRECT MULTI CH IN
MASTER VOLUME
ACOUSTIC EQ
VSX-43TXAUDIO/VIDEO MULTI-CHANNEL RECEIVER
Listening in HI–BIT/SAMPLING Mode
Use to hear CD and DVD, as well as other digital soundtracks, at a wider dynamic range, allowing for finer audioreproduction.
1 Press RECEIVER.
2 Press the HI–BIT button on theremote control or HI-BIT HI-SAMPLING button on the frontpanel.Each press switches HI-BIT/SAMPLING mode on or off.HI-BIT/SAMPLING lights in the display.
SOURCE
MULTI CONTROL
RECEIVER
MOVIE MUSIC
MULTIOPERATION
SYSTEMOFF
ACOUSTICEQ INPUT
DVD/LD
VCR 2
TV / SAT
C D
VCR/DVR TV CONT
TUNER RECEIVER 1
+−
SIGNAL SEL BASS/TREBLE DISCDNR
VIDEO SEL
SUB TITLE
REMOTESETUP
HI-BIT
TV CONTROL
CHANNEL VOLUMEINPUTSELECT
+10
RECEIVER
ENTER
2
PHONESSPEAKERS
SIGNALSELECT
HI-BITHI-SAMPLING
SB CHMODE
S-VIDEO VIDEOVIDEO INPUT
AUDIOL R
SET UP RETURN
TONETONE CONTROL
BASS/TREBLE
CLASSBANDMIDNIGHT LOUDNESSSTATION TUNING
MULTI JOG/ENTER
MULTI JOG CONTROL
SELECTTUNEREDIT
2
memo
• HI–BIT mode cannot be set on MULTI CH IN mode.• If the receiver is in DIRECT mode and you press the
HI–BIT button the receiver will switch to STEREOmode.
• This feature can’t be used with 96 kHz and 88.2 kHzsources.

51
Basic Operation
BA
SIC
1
SOURCE
MULTI CONTROL
RECEIVER
MOVIE MUSIC
ENTER
MULTIOPERATION
SURROUNDMODE
STEREO/DIRECT
SYSTEMOFF
ACOUSTICEQ
SB CHMODE
INPUT
MIDNIGHTMUTE
MULTI CHINPUT
MASTER VOLUME
DVD/LD
VCR 2
TV / SAT
C D
VCR/DVR TV CONT
TUNER RECEIVER
1
PHONESSPEAKERS
SIGNALSELECT
HI-BITHI-SAMPLING
SB CHMODE
S-VIDEO VIDEOVIDEO INPUT
AUDIOL R
SET UP RETURN
TONETONE CONTROL
BASS/TREBLE
CLASSBANDMIDNIGHT LOUDNESSSTATION TUNING
MULTI JOG/ENTER
MULTI JOG CONTROL
SELECTTUNEREDIT
SB CH MODE button
SB CH MODE
The SB CH MODE makes available surround back channels through your surround back speakers. You musthave chosen NORMAL SYSTEM in the SURRBACK SYSTEM setting (see page 35) and have SURROUND andSURROUND BACK speakers set to something other than NO (see pages 37–38) to use this feature.
PHONESSPEAKERS
SIGNALSELECT
HI-BITHI-SAMPLING
SB CHMODE
S-VIDEO VIDEOVIDEO INPUT
AUDIOL R
SET UP RETURN
TONETONE CONTROL
BASS/TREBLE
CLASSBANDMIDNIGHT LOUDNESSSTATION TUNING
MULTI JOG/ENTER
MULTI JOG CONTROL
SELECTTUNEREDIT
1
SOURCE
MULTI CONTROL
RECEIVER
MOVIE MUSIC
ENTER
MULTIOPERATION
SURROUNDMODE
STEREO/DIRECT
SYSTEMOFF
ACOUSTICEQ
SB CHMODE
INPUT
MIDNIGHTMUTE
MULTI CHINPUT
MASTER VOLUME
DVD/LD
VCR 2
TV / SAT
C D
VCR/DVR TV CONT
TUNER RECEIVER
1
VIRTUAL SURROUND BACK Mode
The VIRTUAL SURROUND BACK mode emulates surround back channels through your surround speakers. Youmust have chosen NORMAL SYSTEM in the SURRBACK SYSTEM setting (see page 35); have SURROUNDspeakers set to something other than NO, and have chosen NO for the SURROUND BACK speakers inSPEAKER SETTING (see page 37-38) to use this mode.
1 Press the SB CH MODE button on theremote control.Each press switches between VIRTL SB ON, VIRTL SBOFF and VIRTL SB AUTO.
For each choice you can createVIRTUAL SURROUND BACK channels under theconditions listed below.VIRTL SB ON: virtual surround back sound is availablewith all SURROUND modes except THX CINEMA; for astereo signal you must choose the NEO:6 MOVIE/MUSICSURROUND mode or a Pioneer original sound mode (seepages 44–45).VIRTL SB AUTO: same as above except whether virtualsurround back sound is available with any of the PROLOGIC II (or PRO LOGIC) modes depends on whether thesource has an EX or ES flag or not.With the NEO:6 modes virtual surround back sound willalways be available.VIRTL SB OFF: virtual surround back sound will not beheard.
memo
1 Press the SB CH MODE button on theremote control.Each press switches between ON, OFF and AUTO.
For each choice you can create SURROUND BACKchannels under the conditions listed below.ON: surround back channels are available with allSURROUND modes.AUTO: same as above except whether SURROUND BACKchannels are available with any of the PRO LOGIC II (orPRO LOGIC) modes depends on whether the source hasan EX or ES flag or not.With the NEO:6 modes surround back channels willalways be available.OFF: SURROUND BACK channels will not be heard.
• You can’t use the SB CH MODE with MULTI CH INor STEREO/DIRECT modes.
memo
• You can’t use the VIRTUAL SURROUND BACKmode with the THX CINEMA, MULTI CH IN,STEREO/DIRECT modes.
OFF
ON AUTO
VIRTL SB OFF
VIRTL SB ON VIRTL SB AUTO

52
Basic Operation
DUAL MONO setting and playback
The dual mono setting can only be used when listening to Dolby Digital or homemade discs that have dual monosoftware encoded in them. Dual mono software usually is used to put two different mono soundtracks, that youcan listen to together or separately, on one DVD. With this setting you can choose which dual mono setting youwant to listen to. Remember this setting is only applicable if you are using Dolby Digital software with dualmono and want to isolate one of the channels therein.
1 Press the RETURN button for morethan three seconds to put thereceiver in DUAL MONO mode.Hold down the RETURN button to cycle through thedifferent DUAL MONO settings. When you find theone you want release the button. The L (ch1) and R(ch2) indicators in the display light to indicate theplayback channel.
DUAL : ch2DUAL : ch1
DUAL: ch1/ch2
The different settings are: DUAL ch1, where you onlyhear channel 1; DUAL ch2, where you only hear channel2; and DUAL ch1/ch2, where you hear both channels,but independently from different speakers.
• The default setting is DUAL ch1.• You can only use this function with Dolby Digital
sources that have this function
memo
1
Using Headphones
1 Plug headphones into the PHONESjack on the front of the receiver.No sound will be audible from the speakers whenheadphones are plugged in.
• All SURROUND modes will be downmixed to 2channels.
• If you’re listening to a 2 channel source there willbe no matrix decoding (i.e. you will not be able toget surround sound decoding).
• For MULTI CH IN mode, only the signal input fromthe MULTI CH IN FRONT L and R channels canbe heard.
memo1 PHONES jack
PHONESSPEAKERS
SIGNALSELECT
HI-BITHI-SAMPLING
SB CHMODE
S-VIDEO VIDEOVIDEO INPUT
AUDIOL R
SET UP RETURN
TONETONE CONTROL
BASS/TREBLE
CLASSBANDMIDNIGHT LOUDNESSSTATION TUNING
MULTI JOG/ENTER
MULTI JOG CONTROL
SELECTTUNEREDIT
PHONESSPEAKERS
SIGNALSELECT
HI-BITHI-SAMPLING
SB CHMODE
S-VIDEO VIDEOVIDEO INPUT
AUDIOL R
SET UP RETURN
TONETONE CONTROL
BASS/TREBLE
CLASSBANDMIDNIGHT LOUDNESSSTATION TUNING
MULTI JOG/ENTER
MULTI JOG CONTROL
SELECTTUNEREDIT

53
Basic Operation
BA
SIC
Video Select
This function allows you to listen to one sound source while you watch a different video source on your TV. Thesound source is set in the normal fashion as explained on page 41. You then change the video input with theVIDEO SEL button.
1 Press RECEIVER.
2 Press the VIDEO SEL button on theremote control to cycle through thedifferent possible video inputs.The first press shows the video input you are currentlyusing. After that pressing VIDEO SELECT cycles thoughthe possibilities in the following order:
The OFF setting means you are listening without avideo signal. (Also, when you select CD, CD-R/TAPE1,MD/TAPE2, TUNER or LINE functions the VIDEOSELECT will be set to off.)
After choosing a video input the display on the receiverwill show that input for about 5 seconds and thenrevert to showing the listening mode the receiver is in.
• The VIDEO SELECT remains set to the input youchose until you change the audio input.
• If you change functions the receiver will reset it-self to make the video and audio inputs corre-spond.Also, if you switch the power of the receiver offwhen you turn it back on the video and audio in-puts will reset so that they correspond.
memo
Adjusting the Brightness of the Display (DIMMER)
Use the display DIMMER button to adjust the brightness of the fluorescent display.
1 Press RECEIVER.
2 Use the display DIMMER button onthe remote control to alternatebetween the different levels ofbrightness for the display.Four levels of brightness ranging from very dim to verybright can be selected. Each press changes thebrightness of the display. When cycling through theoptions, the default brightness can also be selected.
• Please note: It is a feature of this unit that thefluorescent display will be brighter for a few sec-onds after you choose a function (like DVD/LD,CD, etc.) and then get softer. This will still hap-pen when you adjust the brightness but the newsetting will be the one the display softens to.
memo
SOURCE
MULTI CONTROL
RECEIVER
MOVIE MUSIC
ENTER
MULTIOPERATION
SURROUNDMODE
STEREO/DIRECT
SYSTEMOFF
ACOUSTICEQ
SB CHMODE
INPUT
MIDNIGHT
CHANNEL−
+−
CHANNEL+DTV ON/OFF BAND
DIMMER TONELOUDNESS EFFECT/CH SEL
SIGNAL SEL BASS/TREBLE DISCDNR
VIDEO SEL
SUB TITLE
REMOTESETUP
HI-BIT
D.ACCESS MPX
TV CONTROL
CLASS
MUTE
MENU TOP MENUTUNER EDIT
GUIDESYSTEMSETUP
AUDIO RETURN
CHANNEL VOLUMEINPUTSELECT
+10
MULTI CHINPUT
RECEIVER
ST
TUNE
MASTER VOLUME
ST
TUNE
DVD/LD
ENTER
ENTER
VCR 2
TV / SAT
C D
VCR/DVR TV CONT
TUNER RECEIVER
2
1
+−
DIMMER TONELOUDNESS EFFECT/CH SEL
SIGNAL SEL BASS/TREBLE DISCDNR
VIDEO SEL
SUB TITLE
REMOTESETUP
HI-BIT
D.ACCESS MPX
TV CONTROL
CLASS
CHANNEL VOLUMEINPUTSELECT
+10
ENTER2
SOURCE
MULTI CONTROL
RECEIVER
MOVIE MUSIC
ENTER
MULTIOPERATION
SURROUNDMODE
STEREO/DIRECT
SYSTEMOFF
ACOUSTICEQ
SB CHMODE
INPUT
MIDNIGHTMUTE
MULTI CHINPUT
DVD/LD
VCR 2
TV / SAT
C D
VCR/DVR TV CONT
TUNER RECEIVER 1
DVD/LD TV/SAT
OFF VCR2
VIDEO
VCR1/DVR

54
Using the Tuner
Automatic and Manual Tuning
The following steps show you how to tune in FM and AM radio broadcasts using the automatic (search) andmanual (step) tuning functions. If you already know the exact frequency of the station you want, see “DirectAccess Tuning“ on the following page.
1 Press the TUNER button.On the remote, this selects the tuner function on thereceiver and sets the remote to the tuner operationmode.
LOUDNESS MIDNIGHT TONE DNR ATT STEREOTUNEDRDSHi-BIT/
MULTI-ROOMSAMPLING
EONRF ATTMONONeo :6
DIGITALDTS ES EXMPEG AAC
PRO LOGIC
DSP
L C R LFE
AUTOSB CH
ON MOVIEMUSICOFF
LS S RS
AUTO
RFDIGITAL
dBSIGNAL
SP A B
ANALOG STEREO
2 Press the BAND button to select theband (FM or AM).Each press switches the band: FM j AM
LOUDNESS MIDNIGHT TONE DNR ATT STEREOTUNEDRDSHi-BIT/
MULTI-ROOMSAMPLING
EONRF ATTMONONeo :6
DIGITALDTS ES EXMPEG AAC
PRO LOGIC
DSP
L C R LFE
AUTOSB CH
ON MOVIEMUSICOFF
LS S RS
AUTO
RFDIGITAL
dBSIGNAL
SP A B
ANALOG STEREO
3 Tune in the station.
For Automatic TuningPress and hold TUNE –/+ for about one second, thenrelease.The tuner starts searching the selected band and stopautomatically at the first station it locates. Repeat tolocate other stations.
For Manual Tuning• To change frequencies one step at a time, press
TUNE –/+ repeatedly.• To change frequencies quickly, hold down TUNE –/+
and release when you reach the frequency youdesire.
MPX Mode
If the TUNED or STEREO indicators do not light whentuning an FM station, because the station is too far away orthe broadcast signal is weak, press MPX on the remotecontrol to switch to MONO reception. This should improvereception enough for you to enjoy the broadcast.
MPXbutton
SOURCE
MULTI CONTROL
RECEIVER
MOVIE MUSIC
ENTER
MULTIOPERATION
SURROUNDMODE
STEREO/DIRECT
SYSTEMOFF
ACOUSTICEQ
SB CHMODE
INPUT
MIDNIGHT
CHANNEL−
+−
CHANNEL+DTV ON/OFF BAND
DIMMER TONELOUDNESS EFFECT/CH SEL
SIGNAL SEL BASS/TREBLE DISCDNR
VIDEO SEL
SUB TITLE
REMOTESETUP
HI-BIT
D.ACCESS MPX
TV CONTROL
CLASS
MUTE
MENU TOP MENUTUNER EDIT
GUIDESYSTEMSETUP
AUDIO RETURN
CHANNEL VOLUMEINPUTSELECT
+10
MULTI CHINPUT
RECEIVER
ST
TUNE
MASTER VOLUME
ST
TUNE
DVD/LD
ENTER
ENTER
VCR 2
TV / SAT
C D
VCR/DVR TV CONT
TUNER RECEIVER
3
2
1
STANDBY/ON
MOVIE MUSIC
MULTI JOG
ENTER STEREO/DIRECT MULTI CH IN
MASTER VOLUME
ACOUSTIC EQ
STANDBY
VSX-43TXAUDIO/VIDEO MULTI-CHANNEL RECEIVER
PHONESSPEAKERS
SIGNALSELECT
HI-BITHI-SAMPLING
SB CHMODE
S-VIDEO VIDEOVIDEO INPUT
AUDIOL R
SET UP RETURN
TONETONE CONTROL
BASS/TREBLE
CLASSBANDMIDNIGHT LOUDNESSSTATION TUNING
MULTI JOG/ENTER
MULTI JOG CONTROL
SELECTTUNEREDIT
1
2 3
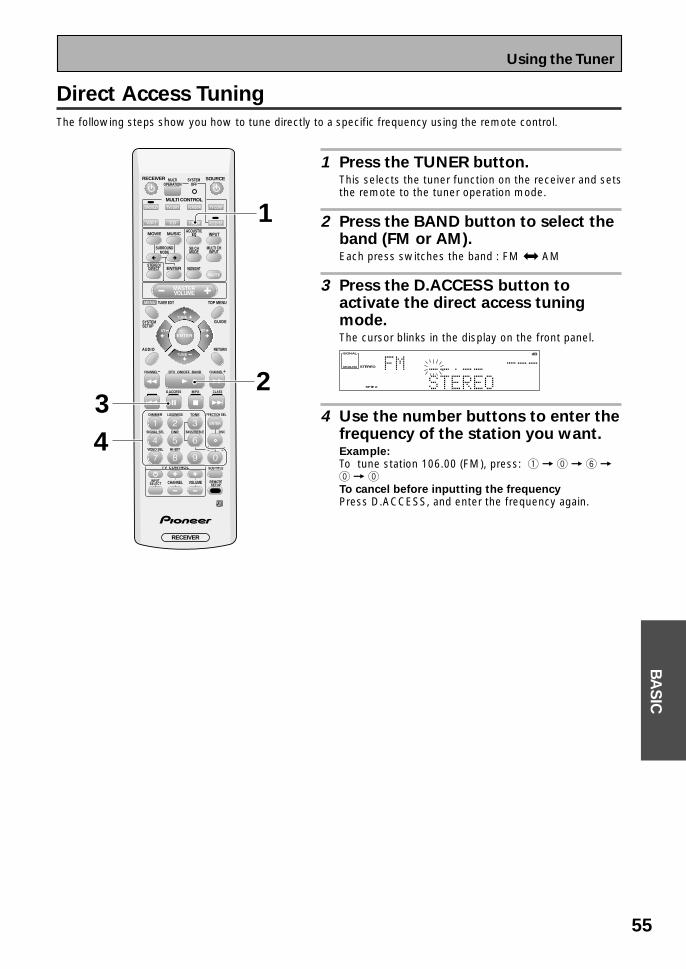
55
Using the Tuner
BA
SIC
1 Press the TUNER button.This selects the tuner function on the receiver and setsthe remote to the tuner operation mode.
2 Press the BAND button to select theband (FM or AM).Each press switches the band : FM j AM
3 Press the D.ACCESS button toactivate the direct access tuningmode.The cursor blinks in the display on the front panel.
LOUDNESS MIDNIGHT TONE DNR ATT STEREOTUNEDRDSHi-BIT/
MULTI-ROOMSAMPLING
EONRF ATTMONONeo :6
DIGITALDTS ES EXMPEG AAC
PRO LOGIC
DSP
L C R LFE
AUTOSB CH
ON MOVIEMUSICOFF
LS S RS
AUTO
RFDIGITAL
dBSIGNAL
SP A B
ANALOG STEREO
4 Use the number buttons to enter thefrequency of the station you want.Example:To tune station 106.00 (FM), press: 1 = ` = 6 =` = `To cancel before inputting the frequencyPress D.ACCESS, and enter the frequency again.
Direct Access Tuning
The following steps show you how to tune directly to a specific frequency using the remote control.
SOURCE
MULTI CONTROL
RECEIVER
MOVIE MUSIC
ENTER
MULTIOPERATION
SURROUNDMODE
STEREO/DIRECT
SYSTEMOFF
ACOUSTICEQ
SB CHMODE
INPUT
MIDNIGHT
CHANNEL−
+−
CHANNEL+DTV ON/OFF BAND
DIMMER TONELOUDNESS EFFECT/CH SEL
SIGNAL SEL BASS/TREBLE DISCDNR
VIDEO SEL
SUB TITLE
REMOTESETUP
HI-BIT
D.ACCESS MPX
TV CONTROL
CLASS
MUTE
MENU TOP MENUTUNER EDIT
GUIDESYSTEMSETUP
AUDIO RETURN
CHANNEL VOLUMEINPUTSELECT
+10
MULTI CHINPUT
RECEIVER
ST
TUNE
MASTER VOLUME
ST
TUNE
DVD/LD
ENTER
ENTER
VCR 2
TV / SAT
C D
VCR/DVR TV CONT
TUNER RECEIVER 1
4
23

56
Using the Tuner
Memorizing Frequently Used Stations
The following steps show you how to memorize up to 30 radio stations in 3 classes (each holding 10 stations).When memorizing FM frequencies, the receiver also memorizes the MPX mode (STEREO or MONO).
1 Tune in the station you want.See "Automatic and Manual Tuning" or "Direct AccessTuning" on page 54 and 55.
2 Press the TUNER EDIT button toactivate the memory function.
dBSIGNAL
SP A B
ANALOG STEREO
dBSIGNAL
SP A B
ANALOG STEREO
«
3 Press the CLASS button repeatedlyto select a class number.Each press switches the display:
CLASS A CLASS B CLASS C
4 Press the ST –/+ buttons (or thenumber buttons) repeatedly toselect a channel (0~9) within therespective class.
LOUDNESS MIDNIGHT TONE DNR ATT STEREOTUNEDRDSHi-BIT/
MULTI-ROOMSAMPLING
EONRF ATTMONONeo :6
DIGITALDTS ES EXMPEG AAC
PRO LOGIC
DSP
L C R LFE
AUTOSB CH
ON MOVIEMUSICOFF
LS S RS
AUTO
RFDIGITAL
dBSIGNAL
SP A B
ANALOG STEREO
5 Press the ENTER button to inputyour choice.
SOURCE
MULTI CONTROL
RECEIVER
MOVIE MUSIC
ENTER
MULTIOPERATION
SURROUNDMODE
STEREO/DIRECT
SYSTEMOFF
ACOUSTICEQ
SB CHMODE
INPUT
MIDNIGHT
CHANNEL−
+−
CHANNEL+DTV ON/OFF BAND
DIMMER TONELOUDNESS EFFECT/CH SEL
SIGNAL SEL BASS/TREBLE DISCDNR
VIDEO SEL
SUB TITLE
REMOTESETUP
HI-BIT
D.ACCESS MPX
TV CONTROL
CLASS
MUTE
MENU TOP MENUTUNER EDIT
GUIDESYSTEMSETUP
AUDIO RETURN
CHANNEL VOLUMEINPUTSELECT
+10
MULTI CHINPUT
RECEIVER
ST
TUNE
MASTER VOLUME
ST
TUNE
DVD/LD
ENTER
ENTER
VCR 2
TV / SAT
C D
VCR/DVR TV CONT
TUNER RECEIVER
4
5
2
3
STANDBY/ON
MOVIE MUSIC
MULTI JOG
ENTER STEREO/DIRECT MULTI CH IN
MASTER VOLUME
ACOUSTIC EQ
STANDBY
VSX-43TXAUDIO/VIDEO MULTI-CHANNEL RECEIVER
PHONESSPEAKERS
SIGNALSELECT
SB CHMODE
S-VIDEO VIDEOVIDEO INPUT
AUDIOL R
SET UP RETURN
TONETONE CONTROL
BASS/TREBLE
CLASSBANDMIDNIGHT LOUDNESSSTATION TUNING
MULTI JOG/ENTER
MULTI JOG CONTROL
SELECTTUNEREDIT
HI-BITHI-SAMPLING
4
2
5

57
Using the Tuner
BA
SIC
Naming Memorized Stations
You can input a name of up to four characters for each preset station in the receiver’s memory (see the previouspage). This name can be anything you choose. For example, you could input JAZZ for that station and when youlisten to it the name, rather than the frequency number, will appear on your display.
1 Press the TUNER button on theremote control.
2 Press CLASS repeatedly to select theclass.Repeatedly pressing this button cycles through thethree available classes, A, B and C.
3 Press ST –/+ to select the presetchannel.
4 Press TUNER EDIT to select thestation name mode.
dBSIGNAL
SP A B
ANALOG STEREO
dBSIGNAL
SP A B
ANALOG STEREO
«
5 Enter the station name you want.Names can be up to four characters long.• Use the MULTI JOG dial (front panel) or the ST +/–
buttons (remote) to select characters.• Press ENTER to confirm a character. If no character
is input, a space is input.
The possible selections are shown below.
ABCDEFGHIJKLMNOPQRSTUVWXYZ
abcdefghijklmnopqrstuvwxyz
0123456789
!”#$%&’()*+,–./:;<=>?@[ \ ]ˆ_| [space]To erase a station name, simply repeat steps 1-4 andinput four spaces instead of a name.
6 Press ENTER when you have got thecharacters you want to enter.Repeat steps 2 to 5 to memorize up to 30 presetbroadcast station names.
• To change a station name, enter a new name over thetop of the existing one.
memo
SOURCE
MULTI CONTROL
RECEIVER
MOVIE MUSIC
ENTER
MULTIOPERATION
SURROUNDMODE
STEREO/DIRECT
SYSTEMOFF
ACOUSTICEQ
SB CHMODE
INPUT
MIDNIGHT
CHANNEL−
+−
CHANNEL+DTV ON/OFF BAND
DIMMER TONELOUDNESS EFFECT/CH SEL
SIGNAL SEL BASS/TREBLE DISCDNR
VIDEO SEL
SUB TITLE
REMOTESETUP
HI-BIT
D.ACCESS MPX
TV CONTROL
CLASS
MUTE
MENU TOP MENUTUNER EDIT
GUIDESYSTEMSETUP
AUDIO RETURN
CHANNEL VOLUMEINPUTSELECT
+10
MULTI CHINPUT
RECEIVER
ST
TUNE
MASTER VOLUME
ST
TUNE
DVD/LD
ENTER
ENTER
VCR 2
TV / SAT
C D
VCR/DVR TV CONT
TUNER RECEIVER
3,5
5,6
1
4
2
STANDBY/ON
MOVIE MUSIC
MULTI JOG
ENTER STEREO/DIRECT MULTI CH IN
MASTER VOLUME
ACOUSTIC EQ
STANDBY
VSX-43TXAUDIO/VIDEO MULTI-CHANNEL RECEIVER
PHONESSPEAKERS
SIGNALSELECT
SB CHMODE
S-VIDEO VIDEOVIDEO INPUT
AUDIOL R
SET UP RETURN
TONETONE CONTROL
BASS/TREBLE
CLASSBANDHI-BIT
HI-SAMPLING MIDNIGHT LOUDNESSSTATION TUNING
MULTI JOG/ENTER
MULTI JOG CONTROL
SELECTTUNEREDIT
1,5
2 3 4
5,6

58
Using the Tuner
Recalling Memorized Stations
1 Press the TUNER button.This selects the TUNER function on the receiver andsets the remote to the TUNER operation mode.
LOUDNESS MIDNIGHT TONE DNR ATT STEREOTUNEDRDSHi-BIT/
MULTI-ROOMSAMPLING
EONRF ATTMONONeo :6
DIGITALDTS ES EXMPEG AAC
PRO LOGIC
DSP
L C R LFE
AUTOSB CH
ON MOVIEMUSICOFF
LS S RS
AUTO
RFDIGITAL
dBSIGNAL
SP A B
ANALOG STEREO
2 Press the CLASS button repeatedlyto select a class number.Each press switches the display:
3 Use the NUMBER buttons to selectthe channel you desire.To select channel 7, press 7.To select channel 0, press `.For example : If 99.50 MHz (FM) was memorized inclass B at channel 7.
LOUDNESS MIDNIGHT TONE DNR ATT STEREOTUNEDRDSHi-BIT/
MULTI-ROOMSAMPLING
EONRF ATTMONONeo :6
DIGITALDTS ES EXMPEG AAC
PRO LOGIC
DSP
L C R LFE
AUTOSB CH
ON MOVIEMUSICOFF
LS S RS
AUTO
RFDIGITAL
dBSIGNAL
SP A B
ANALOG STEREO
To step through each channel in orderPress the ST –/+ buttons repeatedly.
CLASS A CLASS B CLASS C
32
SOURCE
MULTI CONTROL
RECEIVER
MOVIE MUSIC
ENTER
MULTIOPERATION
SURROUNDMODE
STEREO/DIRECT
SYSTEMOFF
ACOUSTICEQ
SB CHMODE
INPUT
MIDNIGHT
CHANNEL−
+−
CHANNEL+DTV ON/OFF BAND
DIMMER TONELOUDNESS EFFECT/CH SEL
SIGNAL SEL BASS/TREBLE DISCDNR
VIDEO SEL
SUB TITLE
REMOTESETUP
HI-BIT
D.ACCESS MPX
TV CONTROL
CLASS
MUTE
MENU TOP MENUTUNER EDIT
GUIDESYSTEMSETUP
AUDIO RETURN
CHANNEL VOLUMEINPUTSELECT
+10
MULTI CHINPUT
RECEIVER
ST
TUNE
MASTER VOLUME
ST
TUNE
DVD/LD
ENTER
ENTER
VCR 2
TV / SAT
C D
VCR/DVR TV CONT
TUNER RECEIVER 1
3
2
STANDBY/ON
MOVIE MUSIC
MULTI JOG
ENTER
STANDBY
PHONESSPEAKERS
SIGNALSELECT
HI-BITHI-SAMPLING
SB CHMODE
S-VIDEO VIDEOVIDEO INPUT
AUDIOL R
SET UP RETURN
TONETONE CONTROL
BASS/TREBLE
CLASSBANDMIDNIGHT LOUDNESSSTATION TUNING
MULTI JOG/ENTER
MULTI JOG CONTROL
SELECTTUNEREDIT
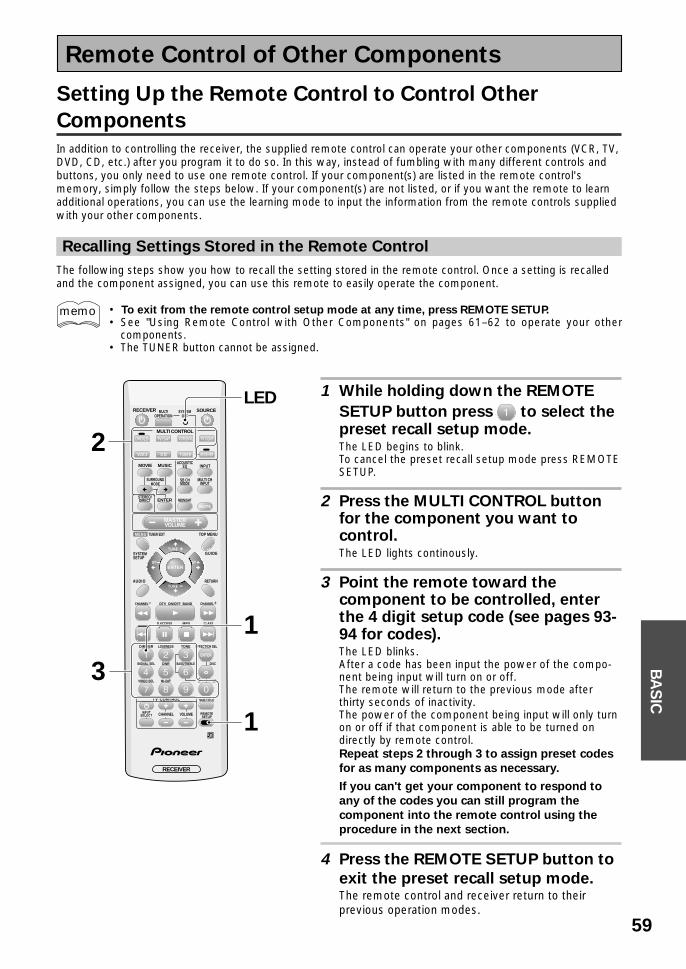
59
BA
SIC
Remote Control of Other Components
1 While holding down the REMOTE
SETUP button press to select thepreset recall setup mode.The LED begins to blink.To cancel the preset recall setup mode press REMOTESETUP.
2 Press the MULTI CONTROL buttonfor the component you want tocontrol.The LED lights continously.
3 Point the remote toward thecomponent to be controlled, enterthe 4 digit setup code (see pages 93-94 for codes).The LED blinks.After a code has been input the power of the compo-nent being input will turn on or off.The remote will return to the previous mode afterthirty seconds of inactivity.The power of the component being input will only turnon or off if that component is able to be turned ondirectly by remote control.Repeat steps 2 through 3 to assign preset codes
for as many components as necessary.
If you can't get your component to respond to
any of the codes you can still program the
component into the remote control using the
procedure in the next section.
4 Press the REMOTE SETUP button to
exit the preset recall setup mode.The remote control and receiver return to theirprevious operation modes.
Setting Up the Remote Control to Control Other
Components
In addition to controlling the receiver, the supplied remote control can operate your other components (VCR, TV,DVD, CD, etc.) after you program it to do so. In this way, instead of fumbling with many different controls andbuttons, you only need to use one remote control. If your component(s) are listed in the remote control'smemory, simply follow the steps below. If your component(s) are not listed, or if you want the remote to learnadditional operations, you can use the learning mode to input the information from the remote controls suppliedwith your other components.
Recalling Settings Stored in the Remote Control
The following steps show you how to recall the setting stored in the remote control. Once a setting is recalledand the component assigned, you can use this remote to easily operate the component.
• To exit from the remote control setup mode at any time, press REMOTE SETUP.• See "Using Remote Control with Other Components" on pages 61–62 to operate your other
components.• The TUNER button cannot be assigned.
memo
SOURCE
MULTI CONTROL
RECEIVER
MOVIE MUSIC
ENTER
MULTIOPERATION
SURROUNDMODE
STEREO/DIRECT
SYSTEMOFF
ACOUSTICEQ
SB CHMODE
INPUT
MIDNIGHT
CHANNEL−
+−
CHANNEL+DTV ON/OFF BAND
DIMMER TONELOUDNESS EFFECT/CH SEL
SIGNAL SEL BASS/TREBLE DISCDNR
VIDEO SEL
SUB TITLE
REMOTESETUP
HI-BIT
D.ACCESS MPX
TV CONTROL
CLASS
MUTE
MENU TOP MENUTUNER EDIT
GUIDESYSTEMSETUP
AUDIO RETURN
CHANNEL VOLUMEINPUTSELECT
+10
MULTI CHINPUT
RECEIVER
ST
TUNE
MASTER VOLUME
ST
TUNE
DVD/LD
ENTER
ENTER
VCR 2
TV / SAT
C D
VCR/DVR TV CONT
TUNER RECEIVER
1
1
LED
3
2

60
Remote Control of Other Components
Programming Signals from Other Remote Controls (LEARNING Mode)
If preset codes are not available for your component(s), or the available preset codes do not operate correctly,you can use this procedure to program in signals from the remote control(s) of your other component(s). Thesesteps can also be used to add further operations to the remote control that were successfully set with thestored settings (see page 59).
1 While holding down the REMOTE
SETUP button press to select thelearning setup mode.The LED begins to blink.To cancel the learning setup mode press REMOTE SETUP.
2 Press the MULTI CONTROL buttonfor the component you want tocontrol.The LED lights continously.
3 Press the button to be programmed.For example DVD/LDThe LED blinks rapidly.• The TV , TV INPUT SELECT, TV CHANNEL +/–
and TV VOLUME +/– buttons are only available forlearning when programming TV CONTROLoperations.
4 Point the remote controls at eachother and press the button on theother remote control for theoperation you wish to program .
1 Point the remote controls toward each other.
2 Press the button on the other remote controlcorresponding to the operation you wish toprogram.
The LED will turn off and then light again.
To program additional operations for the current
component, repeat steps 3 and 4.
To program operations for another component,
repeat steps 2 through 4.
5 Press the REMOTE SETUP button to
exit the learning setup mode.The remote control and receiver return to theirprevious operation modes.
memo • To exit from the remote control setup mode at any time, press REMOTE SETUP.• You can also program the 5˜∞˜2˜3 and ENTER buttons with the LEARNING mode.• The TUNER button cannot be assigned.• Some commands cannot be learned.
SOURCE
MULTI CONTROL
RECEIVER
MOVIE MUSIC
ENTER
MULTIOPERATION
SURROUNDMODE
STEREO/DIRECT
SYSTEMOFF
ACOUSTICEQ
SB CHMODE
INPUT
MIDNIGHT
CHANNEL−
+−
CHANNEL+DTV ON/OFF BAND
DIMMER TONELOUDNESS EFFECT/CH SEL
SIGNAL SEL BASS/TREBLE DISCDNR
VIDEO SEL
SUB TITLE
REMOTESETUP
HI-BIT
D.ACCESS MPX
TV CONTROL
CLASS
MUTE
MENU TOP MENUTUNER EDIT
GUIDESYSTEMSETUP
AUDIO RETURN
CHANNEL VOLUMEINPUTSELECT
+10
MULTI CHINPUT
RECEIVER
ST
TUNE
MASTER VOLUME
ST
TUNE
DVD/LD
ENTER
ENTER
VCR 2
TV / SAT
C D
VCR/DVR TV CONT
TUNER RECEIVER
1
1
3
2
LED
2-8 inchesSO
UR
CE
MU
LTI CO
NTR
OL
RE
CE
IVE
R
MO
VIE
MU
SIC
EN
TER
MULTIOPERATION
SURROUNDMODE
STEREO/DIRECT
SYSTEMOFF
ACOUSTICCAL
SB CHMODE
INPUT
MIDNIGHT
CHANNEL−
+−
CHANNEL+D
TV O
N/O
FF BA
ND
RF ATT
DIM
ME
RTO
NE
LOUDNESSEFFECT/CH SEL
SIGNAL SEL
BASS/TREBLEDISC
DN
R
VIDEO SEL
SUB TITLE
REMOTE
SETUP
HI-B
IT
D.ACCESSM
PX
TV
CO
NTR
OL
CLASS
MU
TE
ME
NU
TOP M
ENUTUNER EDIT
GU
IDE
SYSTEMSETUP
AU
DIO
RETURN
CHANNELVOLUME
INPUTSELECT
+10
MULTI CHINPUT
RE
CE
IVE
R
ST
TUN
E
MA
STER VO
LUME
ST
TUN
E
DVD/LD
ENTER
EN
TE
R
VCR
2
TV/SAT
CD
VCR/DVRTV CONT
TUNERRECEIVER
Buttonsthat areable tolearn newcommands

61
Remote Control of Other Components
BA
SIC
Using Remote Control with Other Components
CD/MD/CD-R/VCR/DVD/LD/DVD recorder/Cassette Deck operations
• The following operations are available from the receiver's remote control after you program it(see “Setting Up the Remote Control to Control Other Components,“ page 59).
• To perform these operations, press the MULTI CONTROL button for the component you want tocontrol.
• For more information on individual commands consult the manual that came with the component.
memo
)s(nottuB noitcnuF stnenopmoC
ECRUOS neewtebstnenopmocehthctiwsotsserP YBDNATS YBDNATS YBDNATS YBDNATS YBDNATS dna NONONONONO ./DL/DVD/RCV/R-DC/DM/DC
kcedettessaC/redrocerDVD
sesserpdetaepeR.retpahcrokcarttnerrucehtfotratsehtotnruterotsserP.retpahcroskcartsuoiverpfotratsehtotspiks
/DL/DVD/R-DC/DM/DC
4 lennahc(slennahckcaboG − .) redrocerDVD/RCV
.kcedelbisreveranoepatehtfoedisesreverehtyalP kcedettessaC
¢sesserpdetaepeR.retpahcrokcarttxenehtfotratsehtotecnavdaotsserP
.retpahcroskcartgniwolloffotratsehtotspiks/DL/DVD/R-DC/DM/DC
.)+lennahc(slennahcdrawrofoG redrocerDVD/RCV
8 .gnidrocerrokcabyalpesuaP/DL/DVD/RCV/R-DC/DM/DC
kcedettessaC/redrocerDVD
¡ .kcabyalpdrawroftsafrofnwoddloH/DL/DVD/RCV/R-DC/DM/DC
kcedettessaC/redrocerDVD
1 .kcabyalpesrevertsafrofnwoddloH/DL/DVD/RCV/R-DC/DM/DC
kcedettessaC/redrocerDVD
3 .kcabyalptratS/DL/DVD/RCV/R-DC/DM/DC
kcedettessaC/redrocerDVD
7ydaerlasicsidehtnehwsihtgnisserp,sledomemosno(kcabyalppotS
.)nepootyartcsidehtesuaclliwdeppots/DL/DVD/RCV/R-DC/DM/DC
kcedettessaC/redrocerDVD
ELTITBUSnottuB
.sDVDlaugnilitlumnoseltitbusehtsegnahc/syalpsiD redrocerDVD/DVD
rebmuN .ecruosmargorpanoskcartsseccayltceriD DL/R-DC/DM/DC
snottuB .ecruosmargorpanoretpahcsseccayltceriD redrocerDVD/DVD
.lennahcatcelesyltceriD redrocerDVD/RCV
nottuB01+gniniamerehtdnanottubsihtsserP.01nahtrehgihretpahcroskcarttceleS
.)31retpahcrokcart=3+nottuB01+(retpahcrokcartehttegotrebmun.yltnereffidetarepoyamstnenopmocemoS
/DL/DVD/R-DC/DM/DCredrocerDVD
CSID/RETNEnottuB
.edomhcraeStratsotsserP DVD
.rotagivancsidehtotuoysekaT redrocerDVD
.csidehtfoB&AsedisneewtebsegnahC DL
.lennahcdetcelesehtretneotsserP RCV
.reyalpDCcsid-itlumanicsidastceleS DC
UNEM .gnisuerauoyRCVroRVD,DVDtnerrucehtgninrecnocsunemsyalpsiD RCV/redrocerDVD/DVD
OIDUA .kcartoiduaenonahteromhtiwscsidfokcartoiduaehtsegnahC redrocerDVD/DL/DVD
.RCVehtnirenutehtdnaVTehtnirenutehtneewtebsegnahC RCV
.kcedelbisreveranoepatehtfoedisesreverehtyalP kceddn2ettessacelbuoD
UNEMPOTEDIUG/
nottub.gnisuerauoyRVDroDL,DVDtnerrucehtfounempotehtsyalpsiD redrocerDVD/DL/DVD
.metsystahtfounemediugehtotuoysekaT RCV
kcartatcelesotsserP DC
NRUTERnottub
.unemsuoiverpehtotuoysekaT redrocerDVD/RCV/DL/DVD
«»\| &RETNE
.snoitpo/sunemetagivaN RCV/redrocerDVD/DL/DVD
.snoitpokcabyalpcisaB kceddn2ettessacelbuoD

62
Remote Control of Other Components
Cable TV/Satellite TV/Digital TV/TV operations
• The following operations are available from the receiver's remote control after you program it(see “Setting Up the Remote Control to Control Other Components,“ page 59).
• To perform these operations, press the MULTI CONTROL button for the component you want tocontrol.
• For more information on individual commands consult the manual that came with the component.
memo
• The first four buttons are dedicated to control the TV assigned to the TV CONT button. Thus if youonly have one TV hooked up to this system, assign it to the TV CONT button. If you have two TVs,assign the main TV to the TV CONT button. If you hook up your system this way, the first four TVcontrols will always be accessible.For example, if you connect your TV to TV monitor, then use TV CONT for your TV. If you connect yourTV to input source then use TV.
• Depending on the maker and individual model, there are some buttons that may not be able operatesome equipment or may operate it in a different way.
memo
)s(nottuB noitcnuF stnenopmoCVT neewtebVTelbaCroVTetilletaS,VTehthctiwsotsserP YBDNATS YBDNATS YBDNATS YBDNATS YBDNATS dna NONONONONO . VT/VTetilletaS/VTelbaC
TUPNITCELES
.tupniVTehthctiwsotsserP VT
VTLENNAHC
/+( )−.slennahctceleS VT/VTetilletaS/VTelbaC
EMULOVVT/+( )− .emulovVTehttsujdA VT
UNEM .metsystahtfounemVTehtotuoysekaT/VT/VTetilletaS/VTelbaC
VTlatigiD
EDIUG .metsystahtfounemediugehtotuoysekaT/VT/VTetilletaS/VTelbaC
VTlatigiD
NRUTER .gniweiverauoyunemehtstixElatigiD/VTetilletaS/VTelbaC
VT
¶ EULB/A VTlatigiD/VTetilletaS
8 .NOVTDehthctiwsotsserP/B VTlatigiD/VTetilletaS
1 NEERG/C VTlatigiD/VTetilletaS
.unemehtniegapakcabevomotesU VTelbaC
3 DER/D VTlatigiD/VTetilletaS
¡ WOLLEY/E VTlatigiD/VTetilletaS
.unemehtniegapadrawrofevomotesU VTelbaC
4 .slennahckcabevomotesU VTelbaC/VT/VTlatigiD
.unemehtniegapakcabevomotesU VTetilletaS
¢ .slennahcdrawrofevomotesU VTelbaC/VT/VTlatigiD
.unemehtniegapadrawrofevomotesU VTetilletaS
7 .unamVTDehtwohsotesU VT/VTlatigiD
rebmuNsnottuB
.lennahcVTcificepsatcelesotesU/VT/VTetilletaS/VTelbaC
VTlatigiD
CSID/RETNEnottub
.lennahcwenaretneyletaidemmiotnottubsihtesU VTlatigiD/VT/VTelbaC
«»\| &RETNE
.neercsunemehtnosmetietagivandnatsujdarotcelesotsserP/VT/VTetilletaS/VTelbaC
VTlatigiD

63
Remote Control of Other Components
BA
SIC
Setting up the DIRECT FUNCTION
The direct function will not be necessary for most users. It is designed in case you have an external videosource connected to your TV (a video source that is not going through the VSX-43TX). For this explanation we'llcall this the external video deck. You'd like to control external video deck with this unit's remote control soyou've assigned it a function button (for example purposes, the VCR 2 button). Yet, if you put the receiver inVCR 2 mode you'll get no picture on your TV because the external video deck signal is not going through theVSX-43TX. To get around this problem you set the DIRECT FUNCTION for VCR 2 to OFF. Now when you pressVCR 2 function button you can control the external video deck with the remote but the receiver does not go intoVCR 2 mode.
memo • To exit from the remote control setup mode at any time, press REMOTE SETUP.• The default setting for all DIRECT FUNCTIONs is ON.
1 While holding down the REMOTE
SETUP button press to select thedirect function setup mode.The LED begins to blink.To cancel the direct function setup mode pressREMOTE SET UP.
2 Press the MULTI CONTROL button ofthe component whose directfunction you want to turn on or off.The LED lights and remains lit.For example, if you want to turn off direct function forVCR 2, you would press VCR 2.
3 Set the DIRECT FUNCTION of each
external source to OFF by pressing
, ON by pressing .The LED blinks.ON: The direct function is on.OFF: The direct function is off.For example, if you want to turn off direct function forVCR 2, you would press .
4 Repeat steps 2-3 to set the directfunction for as many components asyou want.
5 Press the REMOTE SETUP button to
exit the direct function setup mode.
SOURCE
MULTI CONTROL
RECEIVER
MOVIE MUSIC
ENTER
MULTIOPERATION
SURROUNDMODE
STEREO/DIRECT
SYSTEMOFF
ACOUSTICEQ
SB CHMODE
INPUT
MIDNIGHT
CHANNEL−
+−
CHANNEL+DTV ON/OFF BAND
DIMMER TONELOUDNESS EFFECT/CH SEL
SIGNAL SEL BASS/TREBLE DISCDNR
VIDEO SEL
SUB TITLE
REMOTESETUP
HI-BIT
D.ACCESS MPX
TV CONTROL
CLASS
MUTE
MENU TOP MENUTUNER EDIT
GUIDESYSTEMSETUP
AUDIO RETURN
CHANNEL VOLUMEINPUTSELECT
+10
MULTI CHINPUT
RECEIVER
ST
TUNE
MASTER VOLUME
ST
TUNE
DVD/LD
ENTER
ENTER
VCR 2
TV / SAT
C D
VCR/DVR TV CONT
TUNER RECEIVER
1
1
2
33
LED
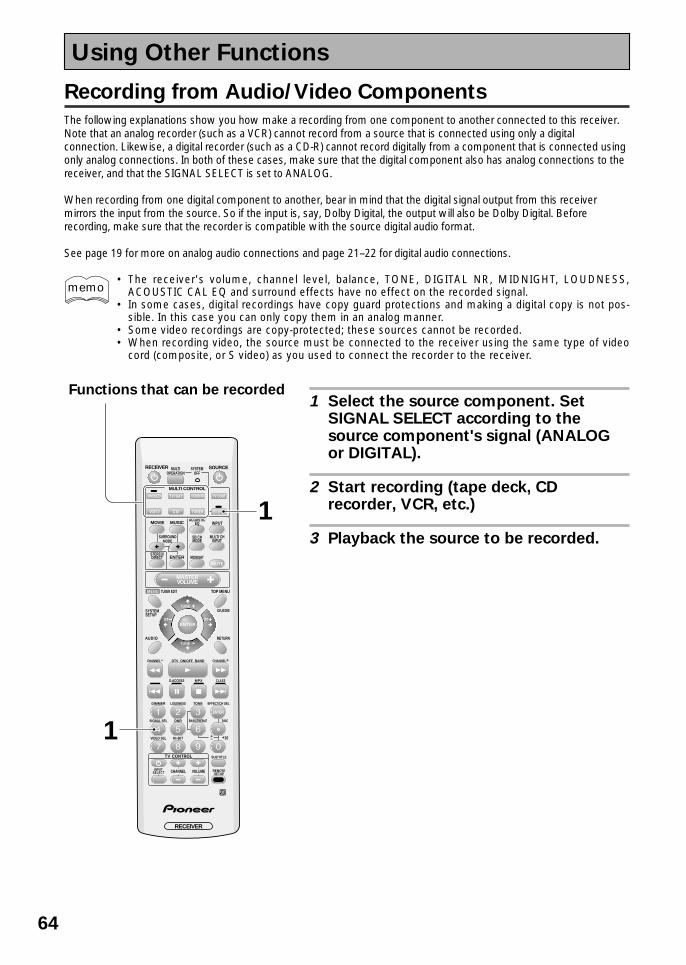
64
Using Other Functions
Recording from Audio/Video Components
The following explanations show you how make a recording from one component to another connected to this receiver.Note that an analog recorder (such as a VCR) cannot record from a source that is connected using only a digitalconnection. Likewise, a digital recorder (such as a CD-R) cannot record digitally from a component that is connected usingonly analog connections. In both of these cases, make sure that the digital component also has analog connections to thereceiver, and that the SIGNAL SELECT is set to ANALOG.
When recording from one digital component to another, bear in mind that the digital signal output from this receivermirrors the input from the source. So if the input is, say, Dolby Digital, the output will also be Dolby Digital. Beforerecording, make sure that the recorder is compatible with the source digital audio format.
See page 19 for more on analog audio connections and page 21–22 for digital audio connections.
• The receiver's volume, channel level, balance, TONE, DIGITAL NR, MIDNIGHT, LOUDNESS,ACOUSTIC CAL EQ and surround effects have no effect on the recorded signal.
• In some cases, digital recordings have copy guard protections and making a digital copy is not pos-sible. In this case you can only copy them in an analog manner.
• Some video recordings are copy-protected; these sources cannot be recorded.• When recording video, the source must be connected to the receiver using the same type of video
cord (composite, or S video) as you used to connect the recorder to the receiver.
1 Select the source component. SetSIGNAL SELECT according to thesource component's signal (ANALOGor DIGITAL).
2 Start recording (tape deck, CDrecorder, VCR, etc.)
3 Playback the source to be recorded.
memo
Functions that can be recorded
SOURCE
MULTI CONTROL
RECEIVER
MOVIE MUSIC
ENTER
MULTIOPERATION
SURROUNDMODE
STEREO/DIRECT
SYSTEMOFF
ACOUSTICEQ
SB CHMODE
INPUT
MIDNIGHT
CHANNEL−
+−
CHANNEL+DTV ON/OFF BAND
DIMMER TONELOUDNESS EFFECT/CH SEL
SIGNAL SEL BASS/TREBLE DISCDNR
VIDEO SEL
SUB TITLE
REMOTESETUP
HI-BIT
D.ACCESS MPX
TV CONTROL
CLASS
MUTE
MENU TOP MENUTUNER EDIT
GUIDESYSTEMSETUP
AUDIO RETURN
CHANNEL VOLUMEINPUTSELECT
+10
MULTI CHINPUT
RECEIVER
ST
TUNE
MASTER VOLUME
ST
TUNE
DVD/LD
ENTER
ENTER
VCR 2
TV / SAT
C D
VCR/DVR TV CONT
TUNER RECEIVER
1
1

65
Using Other Functions
EX
PE
RT
Stereo playback in another room (SECOND ZONE)
This setup enables you to listen to a pair of stereo speakers independently of the main speaker systemhooked up to the receiver. The VSX-43TX has two possibilities for playback in another room. You canchoose SECOND ZONE, and use the speakers hooked up to the surround back terminals as a B speakersystem, that is, playing the same source as the main speaker system but from independent stereospeakers.
Please use speakers with a nominal impedance rated 8 Ω-16 Ω.memo
1 Connect a pair of speakers to the surround back speaker terminals.
2 Select SECOND ZONE in the SURRBACK SYSTEMS setup (see page 35)setup.
Bi-amping the front speakers (FRONT BI-AMP)
For bi-amp playback you can connect both the A and B speaker terminals to your front speakers. To do thisyour speakers must be bi-wireable (that is they must have separate terminals for the high and lowfrequencies).Bi-amping delivers more power to the front speakers, but disables the surround back speakers, so you willbe limited to 5.1 channel playback.
1 Connect your speakers as shown.Since both Front A and B speaker terminals outputthe same audio, it doesn’t matter which set (A orB) is powering which part (HI or LOW) of thespeaker.
2 Select FRONT BI-AMP in theSURRBACK SYSTEMS setup (seepage 35).The surround back channel amplifier is now usedto power the B set of speaker terminals and theA+B (SP3AB) speaker setting is automaticallyselected. The speaker setting in this case can onlybe A+B or OFF.
Caution!Do not allow any speaker wire from anyterminal to touch a wire from a differentterminal.
Caution!Most speakers with bothHi and Low terminalshave two metal platesthat connect the Hi tothe Low terminals.These must be removedwhen you are bi-ampingthe speakers or youcould severely damagethe amplifier. See yourspeaker manual for moreinformation.
·
ª
·
ª
R L R RL LÅıFRONT CENTER SURROUND
SURROUND BACK /SPEAKERS
· ª
· ª
Hi
Lo
FRONT Speaker rear side
SECOND ZONE (Speaker System B)/FRONT BI-AMP Setup

66
Using Other Functions
memo • What is output from the subwoofer depends on the SPEAKER SETTING and the type of source.• Depending on the settings in SPEAKER SETTING and the MULTI CH IN SELECT, output from the
SURROUND BACK PRE OUT terminals may change.• When using headphones the speakers are switched off.• Please use speakers with a nominal impedance rated 8 Ω-16 Ω.
A/B Speaker Button
If you selected NORMAL SYSTEM in the SURRBACK SYSTEM setup (see page 35) your surround backspeakers will be used was part of your of main speaker systems and this button will simply switch if off or on.If you selected SECOND ZONE in the SURRBACK SYSTEM setup (see page 35) this button will cycle throughthe A (main) speaker system, the B speaker system (the surround back speakers acting as a separate secondzone), both speaker systems, and off.
1 Press the SPEAKERS button (on thefront panel) to switch speakers on/off or cycle through the differentspeaker systems if SECOND ZONEor FRONT BI-AMP has been selectedin the SURRBACK SYSTEM setup.
PHONESSPEAKERS
SIGNALSELECT
HI-BITHI-SAMPLING
SB CHMODE
S-VIDEO VIDEOVIDEO INPUT
AUDIOL R
SET UP RETURN
TONETONE CONTROL
BASS/TREBLE
CLASSBANDMIDNIGHT LOUDNESSSTATION TUNING
MULTI JOG/ENTER
MULTI JOG CONTROL
SELECTTUNEREDIT
1
A(SP3A): Sound is output from speaker system A and the same signal is output from the pre outterminals.
B(SP3B): Sound is output from the two speakers in speaker system B (the surround back speakers).Multichannel sources will be downmixed to these two speakers.
A&B(SP3AB): Sound is output from speaker system A speakers and the B speakers. Also, for FRONT BI-AMP playback.
OFF(SP3 ): No sound is output from the speakers. Depending on the input signal and settings inSPEAKER SYSTEMS sound may be output from the subwoofer. The same sound is outputfrom the pre out terminals as when selecting speaker system A (above).

67
Using Other Functions
EX
PE
RT
PCM/2DIGITAL /DTS
OUT1
OUT2
INR L
(TV/ SAT)
1
IN(CD-R/
TAPE1)
2
IN 3(DVD/LD)
IN 4
(CD)
PLAY
PLAY
CD-R/ TAPE1
IN
OUT
IN
OUT
VCR1/DVR
TV/SAT IN
DVD/LD IN
SUR-ROUNDBACK
FRONT
CENTER
SUR-ROUND
SUBWOOFER
PRE OUT
VCR2
CD
LINEDIGITAL
AUDIO AUDIO VIDEO
IN
IN
IN
OUT
IN
OUT
VIDEO S VIDEO
MD/ TAPE2
REC
REC
MULTI CH IN
OUT
IN
MONITOR OUT
CONTROL
75Ω ANTENNAAM LOOPFM UNBAL
R L R L
LR
LR
LR
ASSIGNABLE
SUR-ROUNDBACK
SUR-ROUND
FRONT
SUBWOOF-ER
LR
LR
LR
CEN- TER
(Single)
Front channel amplifier
Surround channel amplifier
Center channel amplifier (mono)
Surround back channel amplifier
Powered subwoofer
INPUTL R
ANALOG
INPUTL R
ANALOG
INPUTL R
ANALOG
INPUTANALOG
INPUTANALOG
• You can use the additional amplifier on the surround back channels for a single speaker as well. In thiscase plug the amplifier into the L (SINGLE) terminal only.
• The sound from the surround back terminals will depend on how you have set up the SURRBACKSYSTEM (see pages 35).
Connecting Additional Amplifiers
This receiver has more than sufficient power for any home use, but it is possible to add additional amplifiers toevery channel of your system. Make the connections shown below to add amplifiers to power your speakers.Before making or changing the connections, switch off the power and disconnect the power cord fromthe AC outlet.
memo

68
Using Other Functions
Multi Operations
Multi operations allow you to tell the receiver and your other components to do a number of things with thepush of only two buttons on the remote control (see "Performing Multi Operations" on the next page). Forexample, you can program the unit to turn on your TV, turn on your DVD player and start playing the loadedDVD. This allows you to freely decide which operations you want performed as well as the order in which youwant them performed. The steps below show you how to program a string of up to 5 different operations foreach MULTI CONTROL button. You don't need to program the power of this receiver (or any Pioneercomponent used) to go on, it (or they) will do so automatically when multi operations are performed.
memo
1 While holding down the REMOTE
SETUP button press to select themulti operation setup mode.The LED begins to blink.To cancel the multi operation setup mode pressREMOTE SET UP.
2 Select a MULTI CONTROL button forthis multi operation.The LED lights and remains lit.Each MULTI CONTROL button can be used for onemulti operation. If a multi operation relates to using aDVD player, for example, it makes sense to select theDVD/LD button.
3 Press the operation button. for example 3 (play), you want to input.
• Be sure to set up each component before programming multi operations (see “Setting Up the
Remote Control to Control Other Components", pages 59–60).• To exit from the REMOTE SETUP mode at anytime press the REMOTE SETUP button.
SOURCE
MULTI CONTROL
RECEIVER
MOVIE MUSIC
ENTER
MULTIOPERATION
SURROUNDMODE
STEREO/DIRECT
SYSTEMOFF
ACOUSTICEQ
SB CHMODE
INPUT
MIDNIGHT
CHANNEL−
+−
CHANNEL+DTV ON/OFF BAND
DIMMER TONELOUDNESS EFFECT/CH SEL
SIGNAL SEL BASS/TREBLE DISCDNR
VIDEO SEL
SUB TITLE
REMOTESETUP
HI-BIT
D.ACCESS MPX
TV CONTROL
CLASS
MUTE
MENU TOP MENUTUNER EDIT
GUIDESYSTEMSETUP
AUDIO RETURN
CHANNEL VOLUMEINPUTSELECT
+10
MULTI CHINPUT
RECEIVER
ST
TUNE
MASTER VOLUME
ST
TUNE
DVD/LD
ENTER
ENTER
VCR 2
TV / SAT
C D
VCR/DVR TV CONT
TUNER RECEIVER
1
1
2
Buttons that can beprogrammed withMulti Operations

69
Using Other Functions
EX
PE
RT
You don't need to program power on for PIONEERcomponents (except for the first generation of PioneerDVRs), they will go on automatically if a command forthat unit is entered in the multi operations settings.Also, your TV will go on automatically if a TV relatedcommand is entered in the multi operations.
Performing Multi Operations
Do the following to use the MULTI OPERATIONS.
1 Press the MULTI OPERATIONbutton.
2 Press the MULTI CONTROL buttonfor the component that has been setup with multi operations.The power of the receiver (and any Pioneer compo-nents use in the program) goes on and the pro-grammed multi operations are performed automati-cally.
memo
4 Repeat steps 2 and 3 to input multioperations to the MULTI CONTROLbutton you pressed in step 3.
You can repeat this process for up to fivecommands.For example : you could enter the following threeoperations using the preceding steps 2 and 3.1 Press the TV CONTROL button and TV (POWER)
to turn on your TV (as explained above).2 Press the DVD/LD button then (POWER) to turn
on your DVD player (if it is not a PIONEER product).3 Press the DVD/LD button then 3 (play) to start
playing the DVD player.When you employ multi operations (see below), thesethree tasks will be performed in the same order.
5 Press the REMOTE SETUP button toexit the multi operation setup mode.The remote control return to their previous operationmodes.
SOURCE
MULTI CONTROL
RECEIVER
MOVIE MUSIC
ENTER
MULTIOPERATION
SURROUNDMODE
STEREO/DIRECT
SYSTEMOFF
ACOUSTICEQ
SB CHMODE
INPUT
MIDNIGHT
CHANNEL−
+−
CHANNEL+DTV ON/OFF BAND
DIMMER TONELOUDNESS EFFECT/CH SEL
SIGNAL SEL BASS/TREBLE DISCDNR
VIDEO SEL
SUB TITLE
REMOTESETUP
HI-BIT
D.ACCESS MPX
TV CONTROL
CLASS
MUTE
MENU TOP MENUTUNER EDIT
GUIDESYSTEMSETUP
AUDIO RETURN
CHANNEL VOLUMEINPUTSELECT
+10
MULTI CHINPUT
RECEIVER
ST
TUNE
MASTER VOLUME
ST
TUNE
DVD/LD
ENTER
ENTER
VCR 2
TV / SAT
C D
VCR/DVR TV CONT
TUNER RECEIVER
5
4-14-2
4-3
SOURCE
MULTI CONTROL
RECEIVER
MOVIE MUSIC
ENTER
MULTIOPERATION
SURROUNDMODE
STEREO/DIRECT
SYSTEMOFF
ACOUSTICEQ
SB CHMODE
INPUT
MIDNIGHTMUTE
MULTI CHINPUT
MASTER VOLUME
DVD/LD
VCR 2
TV / SAT
C D
VCR/DVR TV CONT
TUNER RECEIVER
1
2

70
Using Other Functions
SYSTEM OFF
The SYSTEM OFF feature allows you to tell the receiver and your other components to stop and/or turn off withthe push of only one button on the remote control. For example, you can program the unit to turn off your TVand turn off your DVD player, etc. You don't need to program power off for PIONEER components, they will gooff automatically in this mode. The receiver itself will go off automatically as well.The steps below show you how to program a string of up to 5 different SYSTEM OFF operations.
memo • Be sure to set up each component before programming SYSTEM OFF operations (see “Setting
Up the Remote Control to Control Other Components", pages 59–60).• To exit from the REMOTE SETUP mode at anytime press the REMOTE SETUP button.
1 While holding down the REMOTE
SETUP button press to select theSYSTEM OFF setup mode.The LED begins to blink.To cancel the SYSTEM OFF setup mode press RE-MOTE SET UP.
2 Press the RECEIVER button.The LED lights and remains lit.
3 Select a MULTI CONTROL button forSYSTEM OFF.Each MULTI CONTROL button can be used forSYSTEM OFF. If a SYSTEM OFF command relates tousing a DVD player, for example, it makes sense toselect the DVD/LD button.
4 Press the SOURCE button of thecomponent to be set with SYSTEMOFF operations.
5 Press the REMOTE SETUP button toexit the SYSTEM OFF setup mode.The remote control return to their previous operationmodes.
SOURCE
MULTI CONTROL
RECEIVER
MOVIE MUSIC
ENTER
MULTIOPERATION
SURROUNDMODE
STEREO/DIRECT
SYSTEMOFF
ACOUSTICEQ
SB CHMODE
INPUT
MIDNIGHT
CHANNEL−
+−
CHANNEL+DTV ON/OFF BAND
DIMMER TONELOUDNESS EFFECT/CH SEL
SIGNAL SEL BASS/TREBLE DISCDNR
VIDEO SEL
SUB TITLE
REMOTESETUP
HI-BIT
D.ACCESS MPX
TV CONTROL
CLASS
MUTE
MENU TOP MENUTUNER EDIT
GUIDESYSTEMSETUP
AUDIO RETURN
CHANNEL VOLUMEINPUTSELECT
+10
MULTI CHINPUT
RECEIVER
ST
TUNE
MASTER VOLUME
ST
TUNE
DVD/LD
ENTER
ENTER
VCR 2
TV / SAT
C D
VCR/DVR TV CONT
TUNER RECEIVER
1,5
2
4
1
3

71
Using Other Functions
EX
PE
RT• You can also control PIONEER components (and those made by other manufacturers) by pointing the
receiver's remote control directly at the respective component. This type of operation does not re-quire control cords. All you have to do is recall the appropriate stored settings (see page 59).
• If you use a remote control hooked up via the CONTROL IN jack with a control cord, you won't be ableto use this unit's remote control.
• If you use this feature make sure an analog (audio and/or video) connection has been made betweenthe units.
The PIONEER SR System: Operating other PIONEER
components
Connecting an optional control cord allows you to operate other PIONEER components simply by pointing thereceiver's remote control at the remote sensor on the front panel of the receiver. The receiver then sends theremote control signals to the other devices via the CONTROL OUT terminal.
Remote Control
Receiver
To CONTROL INterminal of anotherPIONEER componentwith an CONTROLterminals.
PIONEER componentwith an CONTROL
terminals.
memo
1 Press the MULTI OPERATION buttonand within 5 seconds press theRECEIVER button.All the Pioneer components connected to the receiverand the receiver will stop and/or go off.
Using SYSTEM OFF
Do the following to use the SYSTEM OFF function.The SYSTEM OFF feature allows you to tell the receiver and your other components to stop and/or turn off withthe remote control. Most Pioneer components will automatically turn off. The receiver itself will go offautomatically as well.The following Pioneer components can be turned off using the SYSTEM OFF function:DVD, DVD-Recorder, LD, CATV, CD, CD-R, MD, Satellite Tuner, Tape, Tuner, VCR, and TV.
SOURCE
MULTI CONTROL
RECEIVER
MOVIE MUSIC
ENTER
MULTIOPERATION
SURROUNDMODE
STEREO/DIRECT
SYSTEMOFF
ACOUSTICEQ
SB CHMODE
INPUT
MIDNIGHTMUTE
MULTI CHINPUT
DVD/LD
VCR 2
TV / SAT
C D
VCR/DVR TV CONT
TUNER RECEIVER
1
1
memo • Be sure to set up each component before programming multi operations (see “Setting Up the
Remote Control to Control Other Components“, pages 59–60).• To exit from the REMOTE SETUP mode at anytime press the REMOTE SETUP button.
OUT
IN
CONTROL
OUT
IN
CONTROL
SOURCE
MULTI CONTROL
RECEIVER
MOVIE MUSIC
ENTER
MULTIOPERATION
SURROUNDMODE
STEREO/DIRECT
SYSTEMOFF
ACOUSTICEQ
SB CHMODE
INPUT
MIDNIGHT
CHANNEL-
+-
CHANNEL+DTV ON/OFF BAND
RF ATT
DIMMER TONELOUDNESS EFFECT/CH SEL
SIGNAL SEL BASS/TREBLE DISCDNR
VIDEO SEL
SUB TITLE
REMOTESETUP
HI-BIT
D.ACCESS MPX
TV CONTROL
CLASS
MUTE
MENU TOP MENUTUNER EDIT
GUIDESYSTEMSETUP
AUDIO RETURN
CHANNEL VOLUMEINPUTSELECT
+10
MULTI CHINPUT
RECEIVER
ST
TUNE
MASTER VOLUME
ST
TUNE
DVD/LD
ENTER
ENTER
VCR 2
TV / SAT
C D
VCR/DVR TV CONT
TUNER RECEIVER

72
Using Other Functions
1 Press and hold both the REMOTE
SETUP button and for morethan 3 seconds.LED lights will blink 3 times and all multi operationsettings will be erased.
Resetting the Remote Control
The following operations allow you to erase the settings stored in the remote control.
Erasing Multi Operations
Erasing Learned Remote Control Commands
1 Press and hold both the REMOTE
SETUP button and for morethan 3 seconds.LED lights will blink 3 times and all learned remotecontrol commands will be erased.
+−
DIMMER TONELOUDNESS EFFECT/CH SEL
SIGNAL SEL BASS/TREBLE DISCDNR
VIDEO SEL
SUB TITLE
REMOTESETUP
HI-BIT
TV CONTROL
CHANNEL VOLUMEINPUTSELECT
+10
RECEIVER
ENTER
1
1
+−
DIMMER TONELOUDNESS EFFECT/CH SEL
SIGNAL SEL BASS/TREBLE DISCDNR
VIDEO SEL
SUB TITLE
REMOTESETUP
HI-BIT
TV CONTROL
CHANNEL VOLUMEINPUTSELECT
+10
RECEIVER
ENTER
1
1
Erasing All Remote Control settings
1 Press and hold both the REMOTE
SETUP button and for morethan 3 seconds.LED lights will blink 3 times and all remote controlsettings will be erased.
+−
DIMMER TONELOUDNESS EFFECT/CH SEL
SIGNAL SEL BASS/TREBLE DISCDNR
VIDEO SEL
SUB TITLE
REMOTESETUP
HI-BIT
TV CONTROL
CHANNEL VOLUMEINPUTSELECT
+10
RECEIVER
ENTER
1
1

73
EX
PE
RT
Using Other Functions
Resetting the Main Unit
The following operations allow you to reset the unit to the default settings.
1 While holding down the TONEbutton press the STANDBY/ONbutton for about three seconds.
2 When you see RESET? appear inthe display, press the TONE –button. OK? appears in thedisplay, press TONE +.When OK appears in the display all the settings,including the speaker, surround sound settingsand tuner settings, will be reset in the unit to thefactory default settings.
STANDBY/ON
MOVIE MUSIC
MULTI JOG
ENTER STEREO/DIRECT MULTI CH IN
MASTER VOLUME
ACOUSTIC EQ
STANDBY
VSX-43TXAUDIO/VIDEO MULTI-CHANNEL RECEIVER
PHONESSPEAKERS
SIGNALSELECT
HI-BITHI-SAMPLING
SB CHMODE
S-VIDEO VIDEOVIDEO INPUT
AUDIOL R
SET UP RETURN
TONETONE CONTROL
BASS/TREBLE
CLASSBANDMIDNIGHT LOUDNESSSTATION TUNING
MULTI JOG/ENTER
MULTI JOG CONTROL
SELECTTUNEREDIT
1 1
PHONESSPEAKERS
SIGNALSELECT
HI-BITHI-SAMPLING
SB CHMODE
S-VIDEO VIDEOVIDEO INPUT
AUDIOL R
SET UP RETURN
TONETONE CONTROL
BASS/TREBLE
CLASSBANDMIDNIGHT LOUDNESSSTATION TUNING
MULTI JOG/ENTER
MULTI JOG CONTROL
SELECTTUNEREDIT
2 2

74
Fine Tuning Your System
Other System Settings
These settings are more advanced. Some could add depth or listenability to your sound (like the THX CINEMAsetup) and others are for your convenience (like the FUNCTION RENAME). You can decide if you want to makethese settings or not. They are not crucial to good surround sound. You only need to make these settings once(unless you change the placement of your current speaker system, add new speakers or components to yoursystem, etc.). Use the arrow buttons (5∞) and the ENTER button on the remote control to navigate thedisplay on the receiver. Conversely, you can use the MULTI JOG dial and ENTER button on the front panel.
2 Press the SYSTEM SETUPbutton.
LOUDNESS MIDNIGHT TONE DNR ATT STEREOTUNEDRDSHi-BIT/
MULTI-ROOMSAMPLING
EONRF ATTMONONeo :6
DIGITALDTS ES EXMPEG AACSTEREO
PRO LOGIC
DSP
L C R LFE
AUTOSB CH
ON MOVIEMUSICOFF
LS S RS
AUTO
RFDIGITAL
dBSIGNAL
SP A B
ANALOG
This display appears on the receiver.
3 Follow the order below to makeadvance settings. Use the 5∞
buttons to choose a menu. Whenyou have the setup you wantpress ENTER.In each mode, the current settings are dis-played automatically.THX CINEMA Setup (page 75)
LOUDNESS MIDNIGHT TONE DNR ATT STEREOTUNEDRDSHi-BIT/
MULTI-ROOMSAMPLING
EONRF ATTMONONeo :6
DIGITALDTS ES EXMPEG AACSTEREO
PRO LOGIC
DSP
L C R LFE
AUTOSB CH
ON MOVIEMUSICOFF
LS S RS
AUTO
RFDIGITAL
dBSIGNAL
SP A B
ANALOG
This setup lets you choose which multichanneldecoding method, from stereo sources, thereceiver will use for THX CINEMA.
INPUT ASSIGN (page 76–77)LOUDNESS MIDNIGHT TONE DNR ATT STEREO
TUNEDRDSHi-BIT/
MULTI-ROOMSAMPLING
EONRF ATTMONONeo :6
DIGITALDTS ES EXMPEG AACSTEREO
PRO LOGIC
DSP
L C R LFE
AUTOSB CH
ON MOVIEMUSICOFF
LS S RS
AUTO
RFDIGITAL
dBSIGNAL
SP A B
ANALOG
If you hook up your digital components in adifferent way than the default settings you needto tell the receiver how you hooked them up sothe names on the remote control and front panelmatch your home setup. Do this with theDIGITAL–IN SELECT setup. Also, if you hookedup video devices with component video cable youneed to tell the receiver which devices are hookup in this way. Do this with the COMPONENT–INSELECT setup.
FUNCTION RENAME (page 78)LOUDNESS MIDNIGHT TONE DNR ATT STEREO
TUNEDRDSHi-BIT/
MULTI-ROOMSAMPLING
EONRF ATTMONONeo :6
DIGITALDTS ES EXMPEG AACSTEREO
PRO LOGIC
DSP
L C R LFE
AUTOSB CH
ON MOVIEMUSICOFF
LS S RS
AUTO
RFDIGITAL
dBSIGNAL
SP A B
ANALOG
This feature allows you to change the names thatappear in the receiver display to reflect what youhave connected.1 Turn on the receiver, press the
RECEIVER button on the remotecontrol.
SOURCE
MULTI CONTROL
RECEIVER
MOVIE MUSIC
ENTER
MULTIOPERATION
SURROUNDMODE
STEREO/DIRECT
SYSTEMOFF
ACOUSTICEQ
SB CHMODE
INPUT
MIDNIGHT
CHANNEL−
+−
CHANNEL+DTV ON/OFF BAND
DIMMER TONELOUDNESS EFFECT/CH SEL
SIGNAL SEL BASS/TREBLE DISCDNR
VIDEO SEL
SUB TITLE
REMOTESETUP
HI-BIT
D.ACCESS MPX
TV CONTROL
CLASS
MUTE
MENU TOP MENUTUNER EDIT
GUIDESYSTEMSETUP
AUDIO RETURN
CHANNEL VOLUMEINPUTSELECT
+10
MULTI CHINPUT
RECEIVER
ST
TUNE
MASTER VOLUME
ST
TUNE
DVD/LD
ENTER
ENTER
VCR 2
TV / SAT
C D
VCR/DVR TV CONT
TUNER RECEIVER
23
1
STANDBY/ON
MOVIE MUSIC
MULTI JOG
ENTER
STANDBY
PHONESSPEAKERS
SIGNALSELECT
HI-BITHI-SAMPLING
SB CHMODESET UP RETURN
TONETONE CONTROL
BASS/TREBLE
BANDMIDNIGHT LOUDNESSMULTI JOG CONTROL
3 2 RETURN button

75
Fine Tuning Your System
EX
PE
RT
THX CINEMA Setup
This setup lets you choose which decoding method for 2 channel sources the receiver will use for THXCINEMA. The three THX CINEMA decoding methods are; PRO LOGIC II MOVIE, PRO LOGIC and NEO:6CINEMA. For more information on the decoding (playback) formats see "Techno Tidbits" on page 88.
2 Press the SYSTEM SETUPbutton.
LOUDNESS MIDNIGHT TONE DNR ATT STEREOTUNEDRDSHi-BIT/
MULTI-ROOMSAMPLING
EONRF ATTMONONeo :6
DIGITALDTS ES EXMPEG AACSTEREO
PRO LOGIC
DSP
L C R LFE
AUTOSB CH
ON MOVIEMUSICOFF
LS S RS
AUTO
RFDIGITAL
dBSIGNAL
SP A B
ANALOG
This display appears on the receiver.
3 Looking at the display on yourreceiver, use the 5∞ buttons toselect THX CINEMA SETUP.Press the ENTER button.
LOUDNESS MIDNIGHT TONE DNR ATT STEREOTUNEDRDSHi-BIT/
MULTI-ROOMSAMPLING
EONRF ATTMONONeo :6
DIGITALDTS ES EXMPEG AACSTEREO
PRO LOGIC
DSP
L C R LFE
AUTOSB CH
ON MOVIEMUSICOFF
LS S RS
AUTO
RFDIGITAL
dBSIGNAL
SP A B
ANALOG
4 Use the 5∞ buttons to choose aTHX CINEMA decoding method.Press the ENTER button.PRO LOGIC II MOVIE is selected.
LOUDNESS MIDNIGHT TONE DNR ATT STEREOTUNEDRDSHi-BIT/
MULTI-ROOMSAMPLING
EONRF ATTMONONeo :6
DIGITALDTS ES EXMPEG AACSTEREO
PRO LOGIC
DSP
L C R LFE
AUTOSB CH
ON MOVIEMUSICOFF
LS S RS
AUTO
RFDIGITAL
dBSIGNAL
SP A B
ANALOG
PRO LOGIC is selected.LOUDNESS MIDNIGHT TONE DNR ATT STEREO
TUNEDRDSHi-BIT/
MULTI-ROOMSAMPLING
EONRF ATTMONONeo :6
DIGITALDTS ES EXMPEG AACSTEREO
PRO LOGIC
DSP
L C R LFE
AUTOSB CH
ON MOVIEMUSICOFF
LS S RS
AUTO
RFDIGITAL
dBSIGNAL
SP A B
ANALOG
NEO:6 CINEMA is selected.LOUDNESS MIDNIGHT TONE DNR ATT STEREO
TUNEDRDSHi-BIT/
MULTI-ROOMSAMPLING
EONRF ATTMONONeo :6
DIGITALDTS ES EXMPEG AACSTEREO
PRO LOGIC
DSP
L C R LFE
AUTOSB CH
ON MOVIEMUSICOFF
LS S RS
AUTO
RFDIGITAL
dBSIGNAL
SP A B
ANALOG
5 EXIT should be selected (if not,use the 5∞ buttons to select it).Press ENTER.
6 Use the 5∞ buttons to selectEXIT and press ENTER, again.This exits the SYSTEM SETUP mode and returnsto normal operation.
SOURCE
MULTI CONTROL
RECEIVER
MOVIE MUSIC
ENTER
MULTIOPERATION
SURROUNDMODE
STEREO/DIRECT
SYSTEMOFF
ACOUSTICEQ
SB CHMODE
INPUT
MIDNIGHT
CHANNEL−
+−
CHANNEL+DTV ON/OFF BAND
DIMMER TONELOUDNESS EFFECT/CH SEL
SIGNAL SEL BASS/TREBLE DISCDNR
VIDEO SEL
SUB TITLE
REMOTESETUP
HI-BIT
D.ACCESS MPX
TV CONTROL
CLASS
MUTE
MENU TOP MENUTUNER EDIT
GUIDESYSTEMSETUP
AUDIO RETURN
CHANNEL VOLUMEINPUTSELECT
+10
MULTI CHINPUT
RECEIVER
ST
TUNE
MASTER VOLUME
ST
TUNE
DVD/LD
ENTER
ENTER
VCR 2
TV / SAT
C D
VCR/DVR TV CONT
TUNER RECEIVER
23-6
1
(If you are continuing from page 74 you can skipthe first two steps.)
1 Turn on the receiver, press theRECEIVER button on the remotecontrol.
STANDBY/ON
MOVIE MUSIC
MULTI JOG
ENTER
STANDBY
PHONESSPEAKERS
SIGNALSELECT
HI-BITHI-SAMPLING
SB CHMODESET UP RETURN
TONETONE CONTROL
BASS/TREBLE
BANDMIDNIGHT LOUDNESSMULTI JOG CONTROL
3-5 2
memo
The default is PRO LOGIC ll MOVIE.
RETURN button

76
Fine Tuning Your System
5 Use the 5∞ buttons to movethrough the different digital inputsettings and press the ENTERbutton.
LOUDNESS MIDNIGHT TONE DNR ATT STEREOTUNEDRDSHi-BIT/
MULTI-ROOMSAMPLING
EONRF ATTMONONeo :6
DIGITALDTS ES EXMPEG AACSTEREO
PRO LOGIC
DSP
L C R LFE
AUTOSB CH
ON MOVIEMUSICOFF
LS S RS
AUTO
RFDIGITAL
dBSIGNAL
SP A B
ANALOG
The available digital input settings are:DIGI-1: TV/SAT, DIGI-2: CD-R,DIGI-3: DVD/LD, DIGI-4: CDThe selected setting will blink.
6 Use the 5∞ buttons select thecomponent that you hooked upto that digital in. Press theENTER button.
LOUDNESS MIDNIGHT TONE DNR ATT STEREOTUNEDRDSHi-BIT/
MULTI-ROOMSAMPLING
EONRF ATTMONONeo :6
DIGITALDTS ES EXMPEG AACSTEREO
PRO LOGIC
DSP
L C R LFE
AUTOSB CH
ON MOVIEMUSICOFF
LS S RS
AUTO
RFDIGITAL
dBSIGNAL
SP A B
ANALOG
If you're not sure which component is connectedto which digital in, look on the back of thereceiver and check the cables you connected.
7 Repeat steps 5-6 to change otherdigital input settings.
8 When you're finished use the 5∞
buttons to select EXIT and pressENTER.This exits the DIGITAL-IN SELECT mode.
9 Use the 5∞ buttons to selectEXIT and press ENTER, again.Then, use the 5∞ buttons toselect EXIT and press ENTER.This exits the SYSTEM SETUP mode and returnsto normal operation.
memo
• The possible digital inputs that can be assigned are:DVD/LD, TV/SAT, VCR1, VCR2, CD, CD-R, MD.
• If you assign a digital input to a certain function (forexample DVD/LD) then any digital inputs previouslyassigned to that function will automatically be set toOFF. This is because one function cannot be assignedto two different places.
(If you are continuing from page 74 you can skipthe first two steps.)
1 Turn on the receiver, press theRECEIVER button on the remotecontrol.
2 Press the SYSTEM SETUPbutton.
3 Looking at the display on yourreceiver, use the 5∞ buttons toselect INPUT ASSIGN. Press theENTER button.
LOUDNESS MIDNIGHT TONE DNR ATT STEREOTUNEDRDSHi-BIT/
MULTI-ROOMSAMPLING
EONRF ATTMONONeo :6
DIGITALDTS ES EXMPEG AACSTEREO
PRO LOGIC
DSP
L C R LFE
AUTOSB CH
ON MOVIEMUSICOFF
LS S RS
AUTO
RFDIGITAL
dBSIGNAL
SP A B
ANALOG
4 DIGITAL-IN should be selected, ifnot use the 5∞ buttons to selectit. Press the ENTER button.
LOUDNESS MIDNIGHT TONE DNR ATT STEREOTUNEDRDSHi-BIT/
MULTI-ROOMSAMPLING
EONRF ATTMONONeo :6
DIGITALDTS ES EXMPEG AACSTEREO
PRO LOGIC
DSP
L C R LFE
AUTOSB CH
ON MOVIEMUSICOFF
LS S RS
AUTO
RFDIGITAL
dBSIGNAL
SP A B
ANALOG
MOVIE MUSIC
ENTER
SURROUNDMODE
STEREO/DIRECT
ACOUSTICEQ
SB CHMODE
INPUT
MIDNIGHTMUTE
MENU TOP MENUTUNER EDIT
GUIDESYSTEMSETUP
AUDIO RETURN
MULTI CHINPUT
ST
TUNE
MASTER VOLUME
ST
TUNE
DVD/LD
ENTER
VCR 2
TV / SAT
C D
VCR/DVR TV CONT
TUNER RECEIVER
23-9
1
Assigning the Digital Inputs
If you did not hook up your digital equipment in accordance with the default settings for the digital inputs(see page 16,18 & 21) you need to complete the procedure below. You have to do this in order to tell thereceiver what digital equipment is hooked up to which terminal so the buttons on the remote correspondto what you have hooked up.
STANDBY/ON
MOVIE MUSIC
MULTI JOG
ENTER
STANDBY
PHONESSPEAKERS
SIGNALSELECT
HI-BITHI-SAMPLING
SB CHMODESET UP RETURN
TONETONE CONTROL
BASS/TREBLE
BANDMIDNIGHT LOUDNESSMULTI JOG CONTROL
3-9 2 RETURN button

77
Fine Tuning Your System
EX
PE
RT
Assigning the Component Video Inputs
This receiver has two component video inputs. Their default settings are video inputs for the DVD/LD(COMPONENT VIDEO IN 1) and TV/SAT (COMPONENT VIDEO IN 2) functions, but you can reassignthem if you want to use them as video inputs for other receiver functions (for example a VCR).
See pages 15–18 for more on connecting equipment using component video cords.
5 Use the 5∞ buttons to select thecomponent video input youwant to reassign. Press theENTER button.
LOUDNESS MIDNIGHT TONE DNR ATT STEREOTUNEDRDSHi-BIT/
MULTI-ROOMSAMPLING
EONRF ATTMONONeo :6
DIGITALDTS ES EXMPEG AACSTEREO
PRO LOGIC
DSP
L C R LFE
AUTOSB CH
ON MOVIEMUSICOFF
LS S RS
AUTO
RFDIGITAL
dBSIGNAL
SP A B
ANALOG
The available component video inputs are:COMPO-1: DVD/LD, COMPO-2: TV/SATIn the example above, we would select Compo-1.The selected component video input blinks.
6 Use the 5∞ buttons to assign areceiver function.
LOUDNESS MIDNIGHT TONE DNR ATT STEREOTUNEDRDSHi-BIT/
MULTI-ROOMSAMPLING
EONRF ATTMONONeo :6
DIGITALDTS ES EXMPEG AACSTEREO
PRO LOGIC
DSP
L C R LFE
AUTOSB CH
ON MOVIEMUSICOFF
LS S RS
AUTO
RFDIGITAL
dBSIGNAL
SP A B
ANALOG
Choose between DVD/LD, TV/SAT, VCR1 andVCR2.In the example above, we would select VCR1.
7 When you‘re finished use the5∞ buttons to select EXIT andpress ENTER.You will leave the "COMPONENT-IN SELECT"mode.
8 Use the 5∞ buttons to selectEXIT and press ENTER, again.Then, use the 5∞ buttons toselect EXIT and press ENTER.This exits the SYSTEM SETUP mode and returnsto normal operation.
memo
If you connect any source component to thereceiver using a component video input, youshould also have your TV connected to thisreceiver's component video output.
MOVIE MUSIC
ENTER
SURROUNDMODE
STEREO/DIRECT
ACOUSTICEQ
SB CHMODE
INPUT
MIDNIGHTMUTE
MENU TOP MENUTUNER EDIT
GUIDESYSTEMSETUP
AUDIO RETURN
MULTI CHINPUT
ST
TUNE
MASTER VOLUME
ST
TUNE
DVD/LD
ENTER
VCR 2
TV / SAT
C D
VCR/DVR TV CONT
TUNER RECEIVER
23-8
1
(If you are continuing from page 74 you can skipthe first two steps.)
1 Turn on the receiver, press theRECEIVER button on the remotecontrol.
2 Press the SYSTEM SETUPbutton.
3 Looking at the display on yourreceiver, use the 5∞ buttons toselect INPUT ASSIGN. Press theENTER button.
LOUDNESS MIDNIGHT TONE DNR ATT STEREOTUNEDRDSHi-BIT/
MULTI-ROOMSAMPLING
EONRF ATTMONONeo :6
DIGITALDTS ES EXMPEG AACSTEREO
PRO LOGIC
DSP
L C R LFE
AUTOSB CH
ON MOVIEMUSICOFF
LS S RS
AUTO
RFDIGITAL
dBSIGNAL
SP A B
ANALOG
4 Use the 5∞ buttons to selectCOMPONENT-IN then pressENTER.
LOUDNESS MIDNIGHT TONE DNR ATT STEREOTUNEDRDSHi-BIT/
MULTI-ROOMSAMPLING
EONRF ATTMONONeo :6
DIGITALDTS ES EXMPEG AACSTEREO
PRO LOGIC
DSP
L C R LFE
AUTOSB CH
ON MOVIEMUSICOFF
LS S RS
AUTO
RFDIGITAL
dBSIGNAL
SP A B
ANALOG
STANDBY/ON
MOVIE MUSIC
MULTI JOG
ENTER
STANDBY
PHONESSPEAKERS
SIGNALSELECT
HI-BITHI-SAMPLING
SB CHMODESET UP RETURN
TONETONE CONTROL
BASS/TREBLE
BANDMIDNIGHT LOUDNESSMULTI JOG CONTROL
3-8 2 RETURN button

78
Fine Tuning Your System
FUNCTION RENAME
Use the FUNCTION RENAME capability to rename the display on the receiver for different functions (DVD, etc.).For example, you could rename DVD/LD as DVR-7000. For this setup in particular using the controls on the frontpanel is more convenient than using the remote control. Use the MULTI JOG dial instead of the 5∞ buttons anduse the ENTER button on the front panel.
5 Use the MULTI JOG to cycle thecursor through the letters,numbers and symbols. Use theENTER button to enter one of thepossibilities or move forward aspace.
LOUDNESS MIDNIGHT TONE DNR ATT STEREOTUNEDRDSHi-BIT/
MULTI-ROOMSAMPLING
EONRF ATTMONONeo :6
DIGITALDTS ES EXMPEG AACSTEREO
PRO LOGIC
DSP
L C R LFE
AUTOSB CH
ON MOVIEMUSICOFF
LS S RS
AUTO
RFDIGITAL
dBSIGNAL
SP A B
ANALOG
The possible selections are shown below.
ABCDEFGHIJKLMNOPQRSTUVWXYZ
abcdefghijklmnopqrstuvwxyz
0123456789
!”#$%&’()*+,–./:;<=>?@[ \ ]ˆ_| [space]
6 Repeat step 5 until you get thename as you want it.
LOUDNESS MIDNIGHT TONE DNR ATT STEREOTUNEDRDSHi-BIT/
MULTI-ROOMSAMPLING
EONRF ATTMONONeo :6
DIGITALDTS ES EXMPEG AACSTEREO
PRO LOGIC
DSP
L C R LFE
AUTOSB CH
ON MOVIEMUSICOFF
LS S RS
AUTO
RFDIGITAL
dBSIGNAL
SP A B
ANALOG
You can input up to ten characters.
7 Press ENTER repeatedly to exitthe name. The new functionname is set.
LOUDNESS MIDNIGHT TONE DNR ATT STEREOTUNEDRDSHi-BIT/
MULTI-ROOMSAMPLING
EONRF ATTMONONeo :6
DIGITALDTS ES EXMPEG AACSTEREO
PRO LOGIC
DSP
L C R LFE
AUTOSB CH
ON MOVIEMUSICOFF
LS S RS
AUTO
RFDIGITAL
dBSIGNAL
SP A B
ANALOG
8 Repeat steps 4-7 to change otherfunction names. Use the MULTIJOG to select EXIT and pressENTER.
9 Use the MULTI JOG to selectEXIT and press ENTER.This exits the SYSTEM SETUP mode and returnsto normal operation.
(If you are continuing from page 74 you can skipthe first two steps.)
1 Turn on the receiver. (If youwant to use the remote controlfor this setup, press theRECEIVER button.)
2 Press the SET UP button.LOUDNESS MIDNIGHT TONE DNR ATT STEREO
TUNEDRDSHi-BIT/
MULTI-ROOMSAMPLING
EONRF ATTMONONeo :6
DIGITALDTS ES EXMPEG AACSTEREO
PRO LOGIC
DSP
L C R LFE
AUTOSB CH
ON MOVIEMUSICOFF
LS S RS
AUTO
RFDIGITAL
dBSIGNAL
SP A B
ANALOG
This display appears on the receiver.
3 Looking at the display on yourreceiver, use the MULTI JOG toselect FUNCTION RENAME.Press the ENTER button.
LOUDNESS MIDNIGHT TONE DNR ATT STEREOTUNEDRDSHi-BIT/
MULTI-ROOMSAMPLING
EONRF ATTMONONeo :6
DIGITALDTS ES EXMPEG AACSTEREO
PRO LOGIC
DSP
L C R LFE
AUTOSB CH
ON MOVIEMUSICOFF
LS S RS
AUTO
RFDIGITAL
dBSIGNAL
SP A B
ANALOG
4 Use the MULTI JOG to select thename of the function (forexample, DVD/LD) you want tochange. Press ENTER.
LOUDNESS MIDNIGHT TONE DNR ATT STEREOTUNEDRDSHi-BIT/
MULTI-ROOMSAMPLING
EONRF ATTMONONeo :6
DIGITALDTS ES EXMPEG AACSTEREO
PRO LOGIC
DSP
L C R LFE
AUTOSB CH
ON MOVIEMUSICOFF
LS S RS
AUTO
RFDIGITAL
dBSIGNAL
SP A B
ANALOG
Either the cursor underline bar or a character(depending on which is selected) will blink.The functions are divided into three different on-screen displays so you may have to movethrough them to find the function you want torename.
STANDBY/ON
MOVIE MUSIC
MULTI JOG
ENTER
STANDBY
PHONESSPEAKERS
SIGNALSELECT
HI-BITHI-SAMPLING
SB CHMODESET UP RETURN
TONETONE CONTROL
BASS/TREBLE
BANDMIDNIGHT LOUDNESSMULTI JOG CONTROL
3-9 2
memo Use the RETURN button to move thecursor back one character when enteringa name.
RETURN button

79
EX
PE
RT
Fine Tuning Your System
Expert Setup
The settings here can only be done if you've performed the more basic preliminary setups. Thus, before doingthese settings do either QUICK setup (page 13) or NORMAL setup (page 36-40).These settings are to further heighten your enjoyment of surround sound. They are not absolutely necessary butmay give more defined and enjoyable surround sound. You can decide if you want to make these settings ornot. You only need to make these settings once (unless you change the placement of your current speakersystem, add new speakers or components to your system, etc.). View these settings on the receiver display.Use the arrow buttons (5∞) and the ENTER button on the remote control to navigate the display on thereceiver. Conversely, you can use the MULTI JOG dial and ENTER button on the front panel.
1 Turn on the receiver and pressthe RECEIVER button on theremote control.
2 Press the SYSTEM SETUPbutton.
3 Select SURROUND SETUP withthe 5∞ buttons. Press the ENTERbutton.
LOUDNESS MIDNIGHT TONE DNR ATT STEREOTUNEDRDSHi-BIT/
MULTI-ROOMSAMPLING
EONRF ATTMONONeo :6
DIGITALDTS ES EXMPEG AACSTEREO
PRO LOGIC
DSP
L C R LFE
AUTOSB CH
ON MOVIEMUSICOFF
LS S RS
AUTO
RFDIGITAL
dBSIGNAL
SP A B
ANALOG
4 Select EXPERT with the 5∞
buttons. Press the ENTER button.LOUDNESS MIDNIGHT TONE DNR ATT STEREO
TUNEDRDSHi-BIT/
MULTI-ROOMSAMPLING
EONRF ATTMONONeo :6
DIGITALDTS ES EXMPEG AACSTEREO
PRO LOGIC
DSP
L C R LFE
AUTOSB CH
ON MOVIEMUSICOFF
LS S RS
AUTO
RFDIGITAL
dBSIGNAL
SP A B
ANALOG
2
MOVIE MUSIC
ENTER
SURROUNDMODE
STEREO/DIRECT
ACOUSTICEQ
SB CHMODE
INPUT
MIDNIGHTMUTE
MENU TOP MENUTUNER EDIT
GUIDESYSTEMSETUP
AUDIO RETURN
MULTI CHINPUT
ST
TUNE
MASTER VOLUME
ST
TUNE
DVD/LD
ENTER
VCR 2
TV / SAT
C D
VCR/DVR TV CONT
TUNER RECEIVER
3-5
15 Follow the order below to make
expert settings. Use the 5∞
buttons to navigate through themenus. When you have thesetting you want in particularmenu, press ENTER.In each mode the current settings are displayedby the receiver.
CROSSOVER NETWORK (page 80)LOUDNESS MIDNIGHT TONE DNR ATT STEREO
TUNEDRDSHi-BIT/
MULTI-ROOMSAMPLING
EONRF ATTMONONeo :6
DIGITALDTS ES EXMPEG AACSTEREO
PRO LOGIC
DSP
L C R LFE
AUTOSB CH
ON MOVIEMUSICOFF
LS S RS
AUTO
RFDIGITAL
dBSIGNAL
SP A B
ANALOG
This feature determines which frequencies willbe sent to the subwoofer (or large speakers).
FINE CHANNEL LEVEL (page 81)LOUDNESS MIDNIGHT TONE DNR ATT STEREO
TUNEDRDSHi-BIT/
MULTI-ROOMSAMPLING
EONRF ATTMONONeo :6
DIGITALDTS ES EXMPEG AACSTEREO
PRO LOGIC
DSP
L C R LFE
AUTOSB CH
ON MOVIEMUSICOFF
LS S RS
AUTO
RFDIGITAL
dBSIGNAL
SP A B
ANALOG
This feature balances the sound output level of yourspeakers more finely than in the NORMAL setup.
FINE CHANNEL DELAY (page 82–83)LOUDNESS MIDNIGHT TONE DNR ATT STEREO
TUNEDRDSHi-BIT/
MULTI-ROOMSAMPLING
EONRF ATTMONONeo :6
DIGITALDTS ES EXMPEG AACSTEREO
PRO LOGIC
DSP
L C R LFE
AUTOSB CH
ON MOVIEMUSICOFF
LS S RS
AUTO
RFDIGITAL
dBSIGNAL
SP A B
ANALOG
This feature adjusts the delay level of your speak-ers more finely than in the NORMAL setup.
ACOUSTIC CAL EQ (page 84–85)LOUDNESS MIDNIGHT TONE DNR ATT STEREO
TUNEDRDSHi-BIT/
MULTI-ROOMSAMPLING
EONRF ATTMONONeo :6
DIGITALDTS ES EXMPEG AACSTEREO
PRO LOGIC
DSP
L C R LFE
AUTOSB CH
ON MOVIEMUSICOFF
LS S RS
AUTO
RFDIGITAL
dBSIGNAL
SP A B
ANALOG
This feature allows you to adjust the amount of acertain frequency in a soundtrack, acting as akind of room equalizer for your speakers.
BASS PEAK LEVEL (page 86)LOUDNESS MIDNIGHT TONE DNR ATT STEREO
TUNEDRDSHi-BIT/
MULTI-ROOMSAMPLING
EONRF ATTMONONeo :6
DIGITALDTS ES EXMPEG AACSTEREO
PRO LOGIC
DSP
L C R LFE
AUTOSB CH
ON MOVIEMUSICOFF
LS S RS
AUTO
RFDIGITAL
dBSIGNAL
SP A B
ANALOG
Dolby Digital and DTS audio sources includeultra-low bass tones. Set the bass peak level asneeded to prevent the ultra-low bass tones fromdistorting the sound from the speakers.
DYNAMIC RANGE CONTROL (page 87)LOUDNESS MIDNIGHT TONE DNR ATT STEREO
TUNEDRDSHi-BIT/
MULTI-ROOMSAMPLING
EONRF ATTMONONeo :6
DIGITALDTS ES EXMPEG AACSTEREO
PRO LOGIC
DSP
L C R LFE
AUTOSB CH
ON MOVIEMUSICOFF
LS S RS
AUTO
RFDIGITAL
dBSIGNAL
SP A B
ANALOG
This feature makes possible excellent surroundsound effects when listening to Dolby Digital andDTS sources at low volumes.
STANDBY/ON
MOVIE MUSIC
MULTI JOG
ENTER
STANDBY
PHONESSPEAKERS
SIGNALSELECT
HI-BITHI-SAMPLING
SB CHMODESET UP RETURN
TONETONE CONTROL
BASS/TREBLE
BANDMIDNIGHT LOUDNESSMULTI JOG CONTROL
3-5 2

80
Fine Tuning Your System
CROSSOVER NETWORK
Crossover frequency is the point where the receiver divides the high and low sounds (the frequencies) betweenthe speakers. Certain bass sounds will play back from the subwoofer if you selected it as YES (or PLUS) or fromthe front speakers if you selected them as LARGE. This setting decides where the cutoff will be between thosebass sounds playing back from the speaker selected as above and the bass sounds for the entire soundtrack,which play back from all speakers used.If all speakers are set to LARGE (see pages 37–38) this setup is unnecessary.
Follow steps 1-5 on page 79, if necessary, to getto the starting point mentioned here.
1 CROSSOVER should be selected,if it isn’t use the 5∞ buttons toselect it. Press ENTER.
LOUDNESS MIDNIGHT TONE DNR ATT STEREOTUNEDRDSHi-BIT/
MULTI-ROOMSAMPLING
EONRF ATTMONONeo :6
DIGITALDTS ES EXMPEG AACSTEREO
PRO LOGIC
DSP
L C R LFE
AUTOSB CH
ON MOVIEMUSICOFF
LS S RS
AUTO
RFDIGITAL
dBSIGNAL
SP A B
ANALOG
SOURCE
MULTI CONTROL
RECEIVER
MOVIE MUSIC
ENTER
MULTIOPERATION
SURROUNDMODE
STEREO/DIRECT
SYSTEMOFF
ACOUSTICEQ
SB CHMODE
INPUT
MIDNIGHT
CHANNEL− CHANNEL+DTV ON/OFF BAND
D.ACCESS MPX CLASS
MUTE
MENU TOP MENUTUNER EDIT
GUIDESYSTEMSETUP
AUDIO RETURN
MULTI CHINPUT
ST
TUNE
MASTER VOLUME
ST
TUNE
DVD/LD
ENTER
VCR 2
TV / SAT
C D
VCR/DVR TV CONT
TUNER RECEIVER
1-3
2 Use the 5∞ buttons to selectfrequency cut off point. PressENTER.50 Hz: Sends bass frequencies below 50 Hz tothe subwoofer (or large speakers).
LOUDNESS MIDNIGHT TONE DNR ATT STEREOTUNEDRDSHi-BIT/
MULTI-ROOMSAMPLING
EONRF ATTMONONeo :6
DIGITALDTS ES EXMPEG AACSTEREO
PRO LOGIC
DSP
L C R LFE
AUTOSB CH
ON MOVIEMUSICOFF
LS S RS
AUTO
RFDIGITAL
dBSIGNAL
SP A B
ANALOG
80 Hz: Sends bass frequencies below 80 Hz tothe subwoofer (or large speakers).
LOUDNESS MIDNIGHT TONE DNR ATT STEREOTUNEDRDSHi-BIT/
MULTI-ROOMSAMPLING
EONRF ATTMONONeo :6
DIGITALDTS ES EXMPEG AACSTEREO
PRO LOGIC
DSP
L C R LFE
AUTOSB CH
ON MOVIEMUSICOFF
LS S RS
AUTO
RFDIGITAL
dBSIGNAL
SP A B
ANALOG
100 Hz: Sends bass frequencies below 100 Hz tothe subwoofer (or large speakers).
LOUDNESS MIDNIGHT TONE DNR ATT STEREOTUNEDRDSHi-BIT/
MULTI-ROOMSAMPLING
EONRF ATTMONONeo :6
DIGITALDTS ES EXMPEG AACSTEREO
PRO LOGIC
DSP
L C R LFE
AUTOSB CH
ON MOVIEMUSICOFF
LS S RS
AUTO
RFDIGITAL
dBSIGNAL
SP A B
ANALOG
150 Hz: Sends bass frequencies below 150 Hz tothe subwoofer (or large speakers).
LOUDNESS MIDNIGHT TONE DNR ATT STEREOTUNEDRDSHi-BIT/
MULTI-ROOMSAMPLING
EONRF ATTMONONeo :6
DIGITALDTS ES EXMPEG AACSTEREO
PRO LOGIC
DSP
L C R LFE
AUTOSB CH
ON MOVIEMUSICOFF
LS S RS
AUTO
RFDIGITAL
dBSIGNAL
SP A B
ANALOG
200 Hz: Sends bass frequencies below 200 Hz tothe subwoofer (or large speakers).
LOUDNESS MIDNIGHT TONE DNR ATT STEREOTUNEDRDSHi-BIT/
MULTI-ROOMSAMPLING
EONRF ATTMONONeo :6
DIGITALDTS ES EXMPEG AACSTEREO
PRO LOGIC
DSP
L C R LFE
AUTOSB CH
ON MOVIEMUSICOFF
LS S RS
AUTO
RFDIGITAL
dBSIGNAL
SP A B
ANALOG
3 EXIT should be selected (if it'snot use the 5∞ buttons to selectit). Press ENTER.Next, proceed to FINE CHANNEL LEVEL.If you want to change a setting before pro-ceedingstart over from step 1.
STANDBY/ON
MOVIE MUSIC
MULTI JOG
ENTER
STANDBY
PHONESSPEAKERS
SIGNALSELECT
HI-BITHI-SAMPLING
SB CHMODESET UP RETURN
TONETONE CONTROL
BASS/TREBLE
BANDMIDNIGHT LOUDNESSMULTI JOG CONTROL
1-3
The default is 80Hz.memo

81
EX
PE
RT
Fine Tuning Your System
FINE CHANNEL LEVEL
The following steps show you how to balance the sound output level of your speakers more finely than in theNORMAL setup (see page 36). Proper speaker balance is essential for obtaining high quality surround sound andthe better the speaker balance the better surround sound you can get. Do this procedure if you want to try andget even finer surround sound.The main difference with this setup method and the CHANNEL LEVEL setup method in NORMAL setup is thathere the test tone alternates between the front left speaker (which is used as the reference channel) and thetarget speaker (that is, the speaker whose level you want to adjust). Listen to the two tones and try to makethem the same volume.
Follow steps 1-5 on page 79, if necessary, to getto the starting point mentioned here.
1 FINE CH LEVEL should beselected, if it isn’t use the 5∞
buttons to select it. Press ENTER.LOUDNESS MIDNIGHT TONE DNR ATT STEREO
TUNEDRDSHi-BIT/
MULTI-ROOMSAMPLING
EONRF ATTMONONeo :6
DIGITALDTS ES EXMPEG AACSTEREO
PRO LOGIC
DSP
L C R LFE
AUTOSB CH
ON MOVIEMUSICOFF
LS S RS
AUTO
RFDIGITAL
dBSIGNAL
SP A B
ANALOG
2 Use the 5∞ buttons to select thechannel you want to adjust.Press ENTER.
LOUDNESS MIDNIGHT TONE DNR ATT STEREOTUNEDRDSHi-BIT/
MULTI-ROOMSAMPLING
EONRF ATTMONONeo :6
DIGITALDTS ES EXMPEG AACSTEREO
PRO LOGIC
DSP
L C R LFE
AUTOSB CH
ON MOVIEMUSICOFF
LS S RS
AUTO
RFDIGITAL
dBSIGNAL
SP A B
ANALOG
Test tones will be output.WARNING : Be prepared! The test tones areoutput at a high volume level.MASTER VOLUME rotates to the referenceposition (0 dB) and the display on the receiverflashes TEST TONE. After a few seconds the testtone is output.
CHANNEL− CHANNEL+DTV ON/OFF BAND
D.ACCESS MPX CLASS
MENU TOP MENUTUNER EDIT
GUIDESYSTEMSETUP
AUDIO RETURN
ST
TUNE
MASTER VOLUME
ST
TUNE
ENTER 1-5
The adjustable channels are:R (Front right), C (Center), LS (Surround left), RS(Surround right), SBL (Surround back left), SBR(Surround back right) and SW (Subwoofer).
3 Adjust the level of the channelusing the 5∞ buttons.
LOUDNESS MIDNIGHT TONE DNR ATT STEREOTUNEDRDSHi-BIT/
MULTI-ROOMSAMPLING
EONRF ATTMONONeo :6
DIGITALDTS ES EXMPEG AACSTEREO
PRO LOGIC
DSP
L C R LFE
AUTOSB CH
ON MOVIEMUSICOFF
LS S RS
AUTO
RFDIGITAL
dBSIGNAL
SP A B
ANALOG
Try to get the volume level of the target speakerto match that of the front left speaker, which isthe reference in this setup. The levels can be setwithin a range of –10 dB to +10 dB in 0.5 dBsteps.When you press ENTER you will automatically goto the next channel.
4 Press ENTER to select a newchannel. Repeat step 3 for everychannel.If you want to change a setting beforeproceedingUse the 5∞ buttons to go back to the channelyou want to adjust and press ENTER. Thenfollow step 3.
5 When done select EXIT (if it's notalready selected) and pressENTER.
LOUDNESS MIDNIGHT TONE DNR ATT STEREOTUNEDRDSHi-BIT/
MULTI-ROOMSAMPLING
EONRF ATTMONONeo :6
DIGITALDTS ES EXMPEG AACSTEREO
PRO LOGIC
DSP
L C R LFE
AUTOSB CH
ON MOVIEMUSICOFF
LS S RS
AUTO
RFDIGITAL
dBSIGNAL
SP A B
ANALOG
Next, if you want, proceed to FINE CHANNELDELAY.
STANDBY/ON
MOVIE MUSIC
MULTI JOG
ENTER
STANDBY
PHONESSPEAKERS
SIGNALSELECT
HI-BITHI-SAMPLING
SB CHMODESET UP RETURN
TONETONE CONTROL
BASS/TREBLE
BANDMIDNIGHT LOUDNESSMULTI JOG CONTROL
1-5

82
Fine Tuning Your System
Follow steps 1-5 on page 79, if necessary, to getto the starting point mentioned here.
1 FINE CH DELAY should beselected, if it isn’t use the 5∞
buttons to select it. Press ENTER.LOUDNESS MIDNIGHT TONE DNR ATT STEREO
TUNEDRDSHi-BIT/
MULTI-ROOMSAMPLING
EONRF ATTMONONeo :6
DIGITALDTS ES EXMPEG AACSTEREO
PRO LOGIC
DSP
L C R LFE
AUTOSB CH
ON MOVIEMUSICOFF
LS S RS
AUTO
RFDIGITAL
dBSIGNAL
SP A B
ANALOG
2 Use the 5∞ buttons to adjustthe distance of the FRONT Lchannel. Press ENTER.
LOUDNESS MIDNIGHT TONE DNR ATT STEREOTUNEDRDSHi-BIT/
MULTI-ROOMSAMPLING
EONRF ATTMONONeo :6
DIGITALDTS ES EXMPEG AACSTEREO
PRO LOGIC
DSP
L C R LFE
AUTOSB CH
ON MOVIEMUSICOFF
LS S RS
AUTO
RFDIGITAL
dBSIGNAL
SP A B
ANALOG
Test tones will be output.This channel will be the target distance whichyou use to measure the other channels.
CHANNEL− CHANNEL+DTV ON/OFF BAND
D.ACCESS MPX CLASS
MENU TOP MENUTUNER EDIT
GUIDESYSTEMSETUP
AUDIO RETURN
ST
TUNE
MASTER VOLUME
ST
TUNE
ENTER 1-6
3 Use the 5∞ buttons to select thechannel you want to adjust.Press ENTER.
LOUDNESS MIDNIGHT TONE DNR ATT STEREOTUNEDRDSHi-BIT/
MULTI-ROOMSAMPLING
EONRF ATTMONONeo :6
DIGITALDTS ES EXMPEG AACSTEREO
PRO LOGIC
DSP
L C R LFE
AUTOSB CH
ON MOVIEMUSICOFF
LS S RS
AUTO
RFDIGITAL
dBSIGNAL
SP A B
ANALOG
Test tones will be output.The adjustable channels are:R (Front right), C (Center), LS (Surround left), RS(Surround right), SBL (Surround back left), SBR(Surround back right) and SW (Subwoofer).
4 Adjust the level of each channelusing the 5∞ buttons.
LOUDNESS MIDNIGHT TONE DNR ATT STEREOTUNEDRDSHi-BIT/
MULTI-ROOMSAMPLING
EONRF ATTMONONeo :6
DIGITALDTS ES EXMPEG AACSTEREO
PRO LOGIC
DSP
L C R LFE
AUTOSB CH
ON MOVIEMUSICOFF
LS S RS
AUTO
RFDIGITAL
dBSIGNAL
SP A B
ANALOG
Listen to the reference channel and use it tomeasure the target channel. Stand facing the twospeakers with your arms outstretched pointing ateach speaker. Try to make the two tones soundas if they are arriving simultaneously at a postionslightly in front of you and between your armspan.
The distance can be set within a range of 0.5 to45 feet in 0.5 foot steps.When you press ENTER you will automatically goto the next channel.
STANDBY/ON
MOVIE MUSIC
MULTI JOG
ENTER
STANDBY
PHONESSPEAKERS
SIGNALSELECT
HI-BITHI-SAMPLING
SB CHMODESET UP RETURN
TONETONE CONTROL
BASS/TREBLE
BANDMIDNIGHT LOUDNESSMULTI JOG CONTROL
1-6
FINE CHANNEL DELAY
The following steps show you how to adjust the delay level of your speakers more finely than in the NORMALsetup (see page 36). Adding a slight delay to some speakers is necessary to achieve proper sound depth,separation as well as an effective surround sound effect. Do this procedure if you want to try and get even finersurround sound.The main difference with this setup method and the CHANNEL DELAY setup method in NORMAL setup is thathere the test tone sounds from a reference channel and you use that to measure the target speaker (that is, thespeaker whose level you want to adjust).
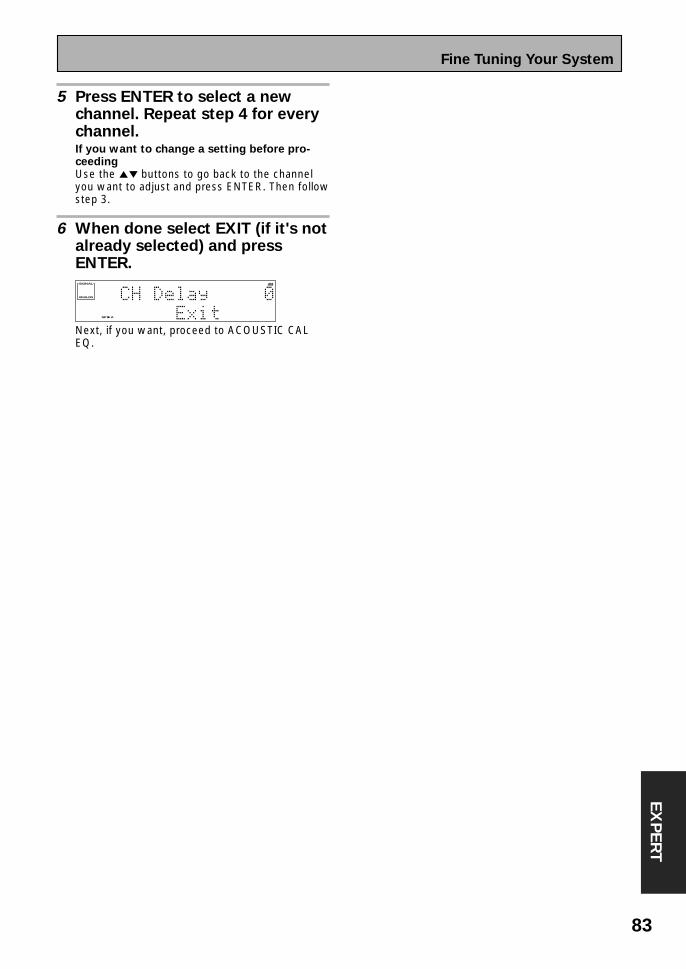
83
EX
PE
RT
Fine Tuning Your System
5 Press ENTER to select a newchannel. Repeat step 4 for everychannel.If you want to change a setting before pro-ceedingUse the 5∞ buttons to go back to the channelyou want to adjust and press ENTER. Then followstep 3.
6 When done select EXIT (if it's notalready selected) and pressENTER.
LOUDNESS MIDNIGHT TONE DNR ATT STEREOTUNEDRDSHi-BIT/
MULTI-ROOMSAMPLING
EONRF ATTMONONeo :6
DIGITALDTS ES EXMPEG AACSTEREO
PRO LOGIC
DSP
L C R LFE
AUTOSB CH
ON MOVIEMUSICOFF
LS S RS
AUTO
RFDIGITAL
dBSIGNAL
SP A B
ANALOG
Next, if you want, proceed to ACOUSTIC CALEQ.

84
Fine Tuning Your System
ACOUSTIC CAL EQ
This setting is a kind of room equalizer for your speakers. This receiver let's you equalize the speakers inaccordance with the front speakers.The front left speaker will serve as the reference tone. The front left tone and the target speaker (the one youare trying to adjust) will sound in turns, so you can judge which needs to be louder.
Follow steps 1-5 on page 79, if necessary, to getto the starting point mentioned here.
1 ACOUSTIC CAL should beselected, if it isn’t use the 5∞
buttons to select and pressENTER.
LOUDNESS MIDNIGHT TONE DNR ATT STEREOTUNEDRDSHi-BIT/
MULTI-ROOMSAMPLING
EONRF ATTMONONeo :6
DIGITALDTS ES EXMPEG AACSTEREO
PRO LOGIC
DSP
L C R LFE
AUTOSB CH
ON MOVIEMUSICOFF
LS S RS
AUTO
RFDIGITAL
dBSIGNAL
SP A B
ANALOG
Test tones will be output.WARNING: the test tones are very loud!!
Make sure there are no infants or small childrenin the room and that no one who will be scared,upset or damaged by loud noise is present. Youyourself may want to wear earplugs.
ACOUSTIC CAL EQ: All speakers (except forthe subwoofer) are set in accordance with thesettings of the FRONT speakers. You can adjusteach speaker individually to suit your taste. Thissetting allows the listener to enjoy a soundbalance defined by the front speakers (the mainspeakers for home theater). The front leftspeaker will serve as the reference tone. Thefront left tone and the target speaker (the oneyou are trying to adjust) will sound in turns, soyou can judge which needs to be louder.
CHANNEL− CHANNEL+DTV ON/OFF BAND
D.ACCESS MPX CLASS
MENU TOP MENUTUNER EDIT
GUIDESYSTEMSETUP
AUDIO RETURN
ST
TUNE
MASTER VOLUME
ST
TUNE
ENTER 1-10
2 Use the 5∞ buttons to select thechannel that you want to adjust.Press ENTER.
LOUDNESS MIDNIGHT TONE DNR ATT STEREOTUNEDRDSHi-BIT/
MULTI-ROOMSAMPLING
EONRF ATTMONONeo :6
DIGITALDTS ES EXMPEG AACSTEREO
PRO LOGIC
DSP
L C R LFE
AUTOSB CH
ON MOVIEMUSICOFF
LS S RS
AUTO
RFDIGITAL
dBSIGNAL
SP A B
ANALOG
The adjustable channels are:Center, Surround L, Surround R, Surr Back(surround back) L, Surr Back (surround back) R.
3 Use the 5∞ buttons to select thefrequency you want to adjust.Press ENTER.
LOUDNESS MIDNIGHT TONE DNR ATT STEREOTUNEDRDSHi-BIT/
MULTI-ROOMSAMPLING
EONRF ATTMONONeo :6
DIGITALDTS ES EXMPEG AACSTEREO
PRO LOGIC
DSP
L C R LFE
AUTOSB CH
ON MOVIEMUSICOFF
LS S RS
AUTO
RFDIGITAL
dBSIGNAL
SP A B
ANALOG
The adjustable frequencys are:63Hz, 125Hz, 250Hz, 4kHz, 11.3kHz.For the speakers you set to SMALL (see pages37–38) you won't be able to adjust the 63 Hzsetting.
4 Use the 5∞ buttons to adjustthe frequency. When you have itat the level you want pressENTER.
LOUDNESS MIDNIGHT TONE DNR ATT STEREOTUNEDRDSHi-BIT/
MULTI-ROOMSAMPLING
EONRF ATTMONONeo :6
DIGITALDTS ES EXMPEG AACSTEREO
PRO LOGIC
DSP
L C R LFE
AUTOSB CH
ON MOVIEMUSICOFF
LS S RS
AUTO
RFDIGITAL
dBSIGNAL
SP A B
ANALOG
Set the frequencies within the –6 dB to +6 dBrange in steps of 0.5 dB. If OVER appears in thedisplay you have set the levels too high. Reducethem until OVER disappears.
5 The cursor automatically goes tothe next frequency. Press ENTERand repeat steps 4 & 5 to adjustall the frequencies.
LOUDNESS MIDNIGHT TONE DNR ATT STEREOTUNEDRDSHi-BIT/
MULTI-ROOMSAMPLING
EONRF ATTMONONeo :6
DIGITALDTS ES EXMPEG AACSTEREO
PRO LOGIC
DSP
L C R LFE
AUTOSB CH
ON MOVIEMUSICOFF
LS S RS
AUTO
RFDIGITAL
dBSIGNAL
SP A B
ANALOG
STANDBY/ON
MOVIE MUSIC
MULTI JOG
ENTER
STANDBY
PHONESSPEAKERS
SIGNALSELECT
HI-BITHI-SAMPLING
SB CHMODESET UP RETURN
TONETONE CONTROL
BASS/TREBLE
BANDMIDNIGHT LOUDNESSMULTI JOG CONTROL
1-10

85
EX
PE
RT
Fine Tuning Your System
6 TRIM should be selected (if itisn’t use the 5∞ buttons toselect it) and press ENTER.
LOUDNESS MIDNIGHT TONE DNR ATT STEREOTUNEDRDSHi-BIT/
MULTI-ROOMSAMPLING
EONRF ATTMONONeo :6
DIGITALDTS ES EXMPEG AACSTEREO
PRO LOGIC
DSP
L C R LFE
AUTOSB CH
ON MOVIEMUSICOFF
LS S RS
AUTO
RFDIGITAL
dBSIGNAL
SP A B
ANALOG
7 Use the 5∞ buttons to adjustthe TRIM and press ENTER.
LOUDNESS MIDNIGHT TONE DNR ATT STEREOTUNEDRDSHi-BIT/
MULTI-ROOMSAMPLING
EONRF ATTMONONeo :6
DIGITALDTS ES EXMPEG AACSTEREO
PRO LOGIC
DSP
L C R LFE
AUTOSB CH
ON MOVIEMUSICOFF
LS S RS
AUTO
RFDIGITAL
dBSIGNAL
SP A B
ANALOG
TRIM will balance the volume level of eachfrequency in the overall volume of that speaker.
8 EXIT should be selected (if it isn’tuse the 5∞ buttons to select it)and press ENTER.
LOUDNESS MIDNIGHT TONE DNR ATT STEREOTUNEDRDSHi-BIT/
MULTI-ROOMSAMPLING
EONRF ATTMONONeo :6
DIGITALDTS ES EXMPEG AACSTEREO
PRO LOGIC
DSP
L C R LFE
AUTOSB CH
ON MOVIEMUSICOFF
LS S RS
AUTO
RFDIGITAL
dBSIGNAL
SP A B
ANALOG
9 The cursor automatically goes tothe next channel. Press ENTERand repeat steps 3–8 to adjust allthe channels.
LOUDNESS MIDNIGHT TONE DNR ATT STEREOTUNEDRDSHi-BIT/
MULTI-ROOMSAMPLING
EONRF ATTMONONeo :6
DIGITALDTS ES EXMPEG AACSTEREO
PRO LOGIC
DSP
L C R LFE
AUTOSB CH
ON MOVIEMUSICOFF
LS S RS
AUTO
RFDIGITAL
dBSIGNAL
SP A B
ANALOG
10 EXIT should be selected (if it isn’tuse the 5∞ buttons to select it)and press ENTER.
LOUDNESS MIDNIGHT TONE DNR ATT STEREOTUNEDRDSHi-BIT/
MULTI-ROOMSAMPLING
EONRF ATTMONONeo :6
DIGITALDTS ES EXMPEG AACSTEREO
PRO LOGIC
DSP
L C R LFE
AUTOSB CH
ON MOVIEMUSICOFF
LS S RS
AUTO
RFDIGITAL
dBSIGNAL
SP A B
ANALOG
Next, if you want, proceed to BASS PEAK LEVEL.

86
Fine Tuning Your System
Follow steps 1-5 on page 79, if necessary, to getto the starting point mentioned here.
1 BASSPEAK LEVEL should beselected, if it isn’t use the 5∞
buttons to select it. PressENTER.
LOUDNESS MIDNIGHT TONE DNR ATT STEREOTUNEDRDSHi-BIT/
MULTI-ROOMSAMPLING
EONRF ATTMONONeo :6
DIGITALDTS ES EXMPEG AACSTEREO
PRO LOGIC
DSP
L C R LFE
AUTOSB CH
ON MOVIEMUSICOFF
LS S RS
AUTO
RFDIGITAL
dBSIGNAL
SP A B
ANALOG
2 Use the 5∞ buttons to selectSETTING START or SETTINGCANCEL. Press ENTER.SETTING START: The MASTER VOLUME is setto MIN (----dB), a test tone plays back and youmake the setting (go to step 3).
LOUDNESS MIDNIGHT TONE DNR ATT STEREOTUNEDRDSHi-BIT/
MULTI-ROOMSAMPLING
EONRF ATTMONONeo :6
DIGITALDTS ES EXMPEG AACSTEREO
PRO LOGIC
DSP
L C R LFE
AUTOSB CH
ON MOVIEMUSICOFF
LS S RS
AUTO
RFDIGITAL
dBSIGNAL
SP A B
ANALOG
SETTING CANCEL: This setting won't limit thepeak level of the LFE channel.
LOUDNESS MIDNIGHT TONE DNR ATT STEREOTUNEDRDSHi-BIT/
MULTI-ROOMSAMPLING
EONRF ATTMONONeo :6
DIGITALDTS ES EXMPEG AACSTEREO
PRO LOGIC
DSP
L C R LFE
AUTOSB CH
ON MOVIEMUSICOFF
LS S RS
AUTO
RFDIGITAL
dBSIGNAL
SP A B
ANALOG
If you selected SETTING CANCEL go to step 4.
BASS PEAK LEVEL
The LFE (Low Frequency Effect) channel in Dolby Digital and DTS program sources can produce heavilyconcentrated ultra-low bass tones that may exceed the capabilities of your speaker system. The following stepsshow you how to set the peak level for the LFE channel. If continuing from the preceding page the BASS PEAKLEVEL should be selected.
CHANNEL− CHANNEL+DTV ON/OFF BAND
D.ACCESS MPX CLASS
MENU TOP MENUTUNER EDIT
GUIDESYSTEMSETUP
AUDIO RETURN
ST
TUNE
MASTER VOLUME
ST
TUNE
ENTER 1-5
3 Use the 5∞ buttons to adjust thetest tones and specify the basspeak level.
LOUDNESS MIDNIGHT TONE DNR ATT STEREOTUNEDRDSHi-BIT/
MULTI-ROOMSAMPLING
EONRF ATTMONONeo :6
DIGITALDTS ES EXMPEG AACSTEREO
PRO LOGIC
DSP
L C R LFE
AUTOSB CH
ON MOVIEMUSICOFF
LS S RS
AUTO
RFDIGITAL
dBSIGNAL
SP A B
ANALOG
If you set this level before the receiverwill have that level input but it will not appear onthis setup screen. (The screen will always openwith the level showing [- - -].)
1 Raise the level gradually.2 Set the bass peak level at the point just before
the tone starts to distort.Be careful! Test tones play back at loudvolumes . Make sure there are no infants orsmall children in the room at distortion level.
You can leave this setup any time by pressingENTER.
If the YES or PLUS setting on the subwoofer isselected the test tone will only play back from thesubwoofer. If not, the test tone will play backfrom all speakers set to LARGE except for thesubwoofer.
4 Press ENTER.The display on the receiver will show RESUMEand the MASTER VOLUME will return to itsoriginal position.
5 EXIT should be selected (if it isn’tuse the 5∞ buttons to select it)and press ENTER.Next, if you want, proceed to DYNAMIC RANGECONTROL
STANDBY/ON
MOVIE MUSIC
MULTI JOG
ENTER
STANDBY
PHONESSPEAKERS
SIGNALSELECT
HI-BITHI-SAMPLING
SB CHMODESET UP RETURN
TONETONE CONTROL
BASS/TREBLE
BANDMIDNIGHT LOUDNESSMULTI JOG CONTROL
1-5

87
EX
PE
RT
Fine Tuning Your System
DYNAMIC RANGE CONTROL
This feature makes it possible to enjoy full surround sound effects on Dolby Digital and DTS sources even at lowvolumes. It does this by compressing the dynamic range. Dynamic range is the difference between the loudestand the softest sounds in any given signal. Compressing the range plays sounds so the quieter ones are audibleand the louder ones don’t get distorted or become overpowering. This feature only applies to Dolby Digital andDTS sources but the MIDNIGHT mode (explained on page 48) accomplishes the same end for a variety ofsources. If continuing from BASS PEAK LEVEL, DYNAMIC RANGE CONTROL should be selected.
Follow steps 1-5 on page 79, if necessary, to getto the starting point mentioned here.
1 D-RANGE CTRL should beselected, if it isn’t use the 5∞
buttons to select it. Press ENTER.LOUDNESS MIDNIGHT TONE DNR ATT STEREO
TUNEDRDSHi-BIT/
MULTI-ROOMSAMPLING
EONRF ATTMONONeo :6
DIGITALDTS ES EXMPEG AACSTEREO
PRO LOGIC
DSP
L C R LFE
AUTOSB CH
ON MOVIEMUSICOFF
LS S RS
AUTO
RFDIGITAL
dBSIGNAL
SP A B
ANALOG
2 Use the 5∞ buttons to chooseeither OFF, MID or MAX. PressENTER.
LOUDNESS MIDNIGHT TONE DNR ATT STEREOTUNEDRDSHi-BIT/
MULTI-ROOMSAMPLING
EONRF ATTMONONeo :6
DIGITALDTS ES EXMPEG AACSTEREO
PRO LOGIC
DSP
L C R LFE
AUTOSB CH
ON MOVIEMUSICOFF
LS S RS
AUTO
RFDIGITAL
dBSIGNAL
SP A B
ANALOG
OFF: No Dynamic Range Control.MID: A moderate amount of Dynamic RangeControl.MAX: The most Dynamic Range Control availableis applied.
CHANNEL− CHANNEL+DTV ON/OFF BAND
D.ACCESS MPX CLASS
MENU TOP MENUTUNER EDIT
GUIDESYSTEMSETUP
AUDIO RETURN
ST
TUNE
MASTER VOLUME
ST
TUNE
ENTER 1-6
3 EXIT should be selected (if itisn’t use the 5∞ buttons toselect it) and press ENTER.
LOUDNESS MIDNIGHT TONE DNR ATT STEREOTUNEDRDSHi-BIT/
MULTI-ROOMSAMPLING
EONRF ATTMONONeo :6
DIGITALDTS ES EXMPEG AACSTEREO
PRO LOGIC
DSP
L C R LFE
AUTOSB CH
ON MOVIEMUSICOFF
LS S RS
AUTO
RFDIGITAL
dBSIGNAL
SP A B
ANALOG
Dynamic Range Control is set. Go on to the nextsetting.You may need to experiment with different DolbyDigital and DTS sources before you can use theDYNAMIC RANGE CONTROL setting to suit yourlow volume listening needs.
4 You are now finished withEXPERT SETUP, EXIT should beselected (if it isn’t use the 5∞
buttons to select it), pressENTER.
LOUDNESS MIDNIGHT TONE DNR ATT STEREOTUNEDRDSHi-BIT/
MULTI-ROOMSAMPLING
EONRF ATTMONONeo :6
DIGITALDTS ES EXMPEG AACSTEREO
PRO LOGIC
DSP
L C R LFE
AUTOSB CH
ON MOVIEMUSICOFF
LS S RS
AUTO
RFDIGITAL
dBSIGNAL
SP A B
ANALOG
5 EXIT should be selected (if itisn’t use the 5∞ buttons toselect it), press ENTER.
6 Use the 5∞ buttons to selectEXIT, press ENTER.The receiver returns to normal operation.
STANDBY/ON
MOVIE MUSIC
MULTI JOG
ENTER
STANDBY
PHONESSPEAKERS
SIGNALSELECT
HI-BITHI-SAMPLING
SB CHMODESET UP RETURN
TONETONE CONTROL
BASS/TREBLE
BANDMIDNIGHT LOUDNESSMULTI JOG CONTROL
1-6
The default is OFF.memo

88
Dolby Pro Logic II
Dolby Pro Logic II is an improved version of Dolby Pro Logic technology with extended matrix decodingtechnology that can create 5.1 channel sound from two channel sources. Dolby Pro Logic II creates basic 5channel sound by using the innovative "steering logic" circuit. Therefore when listening to typical two-channelsources like CD, the listener can enjoy a richer spatial effect. When using software encoded with DolbySurround, this decoding system affords the listener an improved surround experience with greater sound detail.
Chart Comparing Dolby Pro Logic and Dolby Pro Logic II
This unit has a three Dolby Pro Logic II functions. The first is "MOVIE Mode" (suitable for film soundtracks);"MUSIC Mode" (suitable for music); "Pro Logic Mode" (this mode is less sensitive to the quality of the sourcematerial, so may be useful when Movie Mode or Music Mode do not give good results). One can select one ofthem depending on your soundtrack of choice.
Techno Tidbits & Problem-solving
5.1 channel 4 channel analog
DolbyDigital
Dolby Digital for movie
memo
Surround Sound Mono Stereo
Pro Logic Pro Logic II
Effective sound source Dolby Surround encoded sources All two channel stereo sources
Frequency Range Surround within 7kHz All Channels/Full Range
Soundtracks using linear PCM audio generate too muchdata for multichannel use. Dolby Digital technology wasdeveloped in response to the need for efficientmultichannel digital sound. It uses masking technology andAdaptive Transform Coding, resulting in no audible loss ofsound quality. In the present age of digital sound DolbyDigital is a standard audio format for DVD and has beenadopted by HDTV broadcasts throughout the USA.
Dolby
Dolby Digital
Dolby Digital is a discrete digital surround format used for multichannel surround sound. It was developed afterthe Dolby Surround System and Dolby Pro Logic Surround System. Dolby Digital is a high quality digital soundformat that is used by many theatrical film releases.
Other features include:1) Downmixing on playback for compatibility with mono,stereo, Dolby Pro Logic and 5.1 channel audio.2) A wide range of bitrates and channels.3) Decoding dynamic range information and adjusting thedialog level in the soundtrack (called Dialog Normalization,see below for more information).
The advantages of the Dolby Digital system of encodingallow it to maintain its high quality sound while at the sametime being very flexible, with the ability to handle manydifferent types of soundtracks.
Dialog NormalizationWhen a Dolby Digital soundtrack is played back the Dialog Normalization function of the receiver activates auto-matically. Dialog Normalization is a Dolby Digital function that establishes the average dialog level for the programsource being played. If the receiver's level does not match the average dialog level, first you see "DIAL NORM" and"OFFSET +4 dB" (as an example) appear in the receiver's display. In this example, the number +4 dB is the differ-ence between the receiver's gain structure and the Dolby Digital average dialog level. To match the average dialoglevel, subtract or add the OFFSET level. For example, if the OFFSET level is +4 dB, the amplifier's output is 4 dBover the average recorded level.
• For receivers and components other than the VSX-43TX Dolby Pro Logic II may not have the abovementioned functions.

89
Techno Tidbits & Problem-solving
EX
PE
RT
Dolby Digital Surround EX
This new recording technology is able to play 6.1 channel sound and was developed in a collaboration betweenDolby Laboratories and Lucasfilm, Ltd. for the film "Stars Wars: The First Episode", the first movie ever to bemade with Dolby Digital Surround EX technology. In a movie theater this format affords the listener vividsurround sound experience replete with the effect of sounds flying overhead, even for those seated towards thesides of the theater.Dolby Digital Surround EX contains surround back channels which are dubbed into the soundtrack in the studio.The channels are encoded into the left and right channels of the soundtrack so this format can be compatiblewith Dolby Digital 5.1 channel decoding. For a list of movies that contain Dolby Digital Surround EX soundtrackssee Dolby website at: http://www.dolby.comTHX Surround EX technology was developed for movie theater use originally but has been extended for hometheater use and consumers can no benefit from this excellent, realistic sound format. (For more details see "THXSurround EX" on the next page.) This unit is equipped with a THX Surround EX decoder.
DTS
DTS
DTS has been adopted as a sound recording format in the movie theaters since the release of “JURASSICPARK” in 1993, and has a good reputation for high quality sound and dynamic surround effects.In this system, 6 channels of digital sound are recorded on CD-ROM. DTS adopts a simultaneous playbackformat. With a low rate of compression of sound signals and a high rate of transmittance, a higher sound qualityformat is produced. For this reason, the format is being introduced in more and more movie theaters, and isbeing adopted for home use as DTS Digital Surround. When used with movies it's called DTS-LD DVD and formusic software (5.1 channel CD) as DTS-CD.
DTS-ES
DTS launched a new surround format in November 2000. This has come to be known as DTS ExtendedSurround or simply DTS-ES. The technology has been advanced to include two new home formats DTS-ESDiscrete 6.1 format, and DTS-ES Matrix 6.1 ch format, both are able to playback discrete, 6.1-channel contentfrom DVDs and CDs. Both of these formats are compatible with a conventional DTS 5.1 ch decoder. In thissystem each channel is encoded and decoded individually, adding to the separation of the channels. Since DTSadds a third surround channel, the surround back channel, the realism and all-encompassing nature of the soundreaches levels not seen before in home theater. This unit is equipped with a DTS-ES decoder.
DTS Neo:6
This is a matrix decoding technology that transforms two-channel sources into 6.0 channel surround sound.There are two modes, CINEMA MODE and MUSIC MODE.
DTS 96/24
This high-quality format will be used for software which will be available from November, 2001. For compatibilitywith equipment that was produced before this format was made, DVD players can play this software using aconventional DTS 5.1ch decoder. This unit is equipped with a DTS 96 kHz/24 bit decoder to take advantage ofthe higher sound quality available.

90
Techno Tidbits & Problem-solving
THX
THX is a Lucasfilm, Ltd. program dedicated to maximum accuracy in movie presentation. Movie sound tracks arerecorded in large movie dubbing stages using movie theater equipment. For a sound track to be presentedaccurately in your home, special technologies are required. In your home the room is much smaller and has abright sound, the speakers are very different and there are only six-eight of them, plus, you sit much closer toeach one of those speakers. Because of these differences we often miss the power and emotion that thrills usin a good movie. Now Pioneer and THX have teamed up to bring the full glory of accurate cinema sound to thecomfort and convenience of your home.
Re-Equalization™ : In a theater the room is very large and dead sounding, you sit a long way back from thespeakers and the speakers themselves are very specialized. Because a sound track recorded in this deadsounding space when it is played at home it sounds overbright. THX Re-Equalization adjusts for this difference ina very precise way.
Adaptive Decorrelation™ : When a sound track sends mono sound to the surround speakers it often seems tobe coming come from one side instead of from all around you as it would in a theater. Adaptive Decorrelationhelps to correct this inaccuracy.
Timbre Matching™ : When recording a sound track it is very important that the surround sounds movesmoothly and seamlessly around the theater. It is very distracting when sounds seem to jump from speaker tospeaker. Timbre Matching helps to smooth the movement of the surround sounds even though you are usingonly two speakers.
Bass Peak Level Manager™ : Some Dolby Digital sound tracks can produce bass peaks that are undesirable ina home theater environment. The Bass Peak Level Manager allows you to set the maximum peak levelsappropriate to your system. (Set this function according to the Bass Peak Level instructions on page 86.)
Loudspeaker Position Time Synchronization™ : This feature allows you to adjust for the difference in thedistance from each individual loudspeaker to the listening position. Doing this ensures that all the speakersoperate in precise synchronization improving the seamless nature of the soundfield. (Set this function accordingto the Channel Delay instructions on page 40 and the Fine Channel Delay instructions on page 82–83.)
THX Surround EX™ : THX Surround EX–Dolby Digital Surround EX is a joint development of Dolby Laboratoriesand the THX division of Lucasfilm Ltd.
In a movie theater, film soundtracks that have been encoded with Dolby Digital Surround EX technology are ableto reproduce an extra channel which has been added during the mixing of the program. This channel, calledSurround Back, places sounds behind the listener in addition to the currently available front left, front center,front right, surround right, surround left and subwoofer channels. This additional channel provides theopportunity for more detailed imaging behind the listener and brings more depth, spacious ambience and soundlocalization than ever before.
When released to the home consumer market, movies that were created using the Dolby Digital Surround EXtechnology, may have a note to that effect on the packaging. A list of movies created using this technology canbe found on the Dolby web site at http://www.dolby.com.
Only receiver and controller products bearing the THX Surround EX logo, when in the THX Surround EX mode,faithfully reproduce this new technology in the home.
This product may also engage the "THX Surround EX" mode during the playback of 5.1 channel material that isnot Dolby Digital Surround EX encoded. In such case the information delivered to the Surround Back channel willbe program dependent and may or may not be very pleasing depending on the particular soundtrack and thetastes of the individual listener.

91
Techno Tidbits & Problem-solving
EX
PE
RT
Speaker Placement InformationPlacement of your speakers is a crucial aspect of attaining accurate and realistic surround sound.Certain pointers concerning speakers stands, direction, angle and distance of speakers will be usefulin this regard.Firstly, it is best not to put your speakers directly on the floor. If you do this some of the sound vibra-tion (especially bass) will go directly into the flooring and be lost. Instead we recommend using ex-tremely hard objects (like cinder blocks) or designated speaker stands to support your speakers. Avoidplacing the speakers on soft (like cushions or sofas) as these will also lead to sound loss and unstablesurfaces (like flimsy shelving) as they may cause speaker accidents. In order to achieve a surroundsound effect, make sure the speakers are a reasonable distance from your main listening position.Follow the diagrams and instructions below for optimum placement of each set of speakers.
If you're using a CENTER speakerset the FRONT speakers to a widerangle. If not, set them to a narrowerangle.
Surround speakers should bepositioned a foot and a half to threefeet higher than your ears and titledslight downward. Make sure thespeakers don't face each other. ForDVD Audio the speakers should bemore directly behind the listener thanfor home theater playback.
Make sure the CENTER speakerdoes not cross the forward planeof the FRONT speakers.
It is best to angle the speakerstowards the listening position.The angle depends on the sizeof the room. Use less angle forbigger rooms.
Surround back speakers should also be positioned a foot and a half tothree feet higher than your ears and titled slight downward. Make surethe speakers don't face each other. For DVD Audio the speakers shouldbe more directly behind the listener than for home theater playback.
F LC
F R
45~60
F LC
F RF L
C
F R
S L
S L
S R
S R
90~120 90~120
S L
S L
S R
S R
S B
S L S R
0~60
SBL SBL SBRSBR
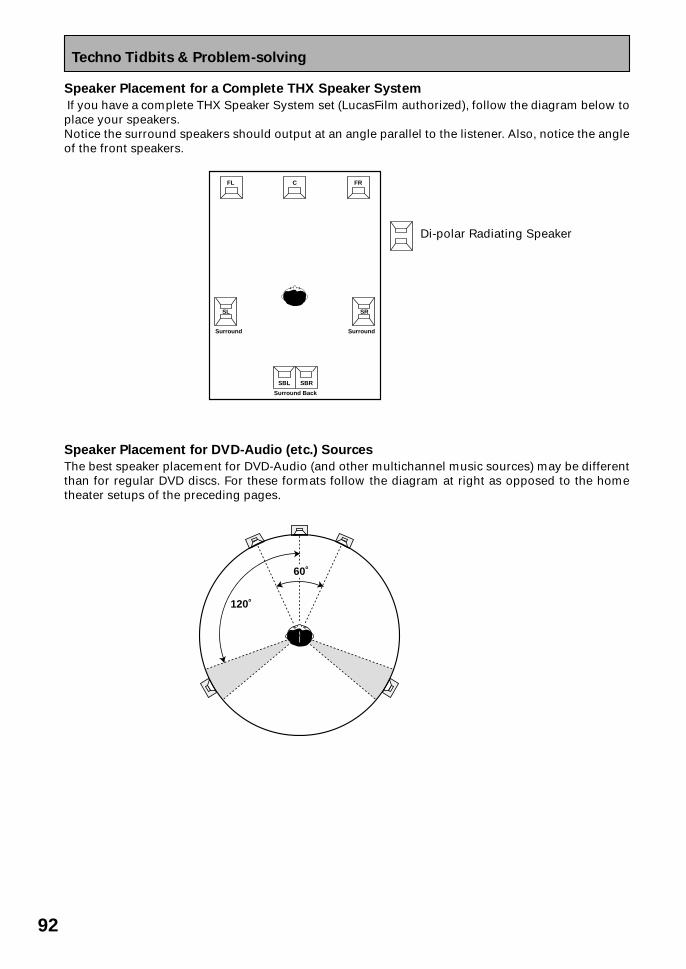
92
Techno Tidbits & Problem-solving
Speaker Placement for a Complete THX Speaker System
If you have a complete THX Speaker System set (LucasFilm authorized), follow the diagram below toplace your speakers.Notice the surround speakers should output at an angle parallel to the listener. Also, notice the angleof the front speakers.
Speaker Placement for DVD-Audio (etc.) Sources
The best speaker placement for DVD-Audio (and other multichannel music sources) may be differentthan for regular DVD discs. For these formats follow the diagram at right as opposed to the hometheater setups of the preceding pages.
60˚
120˚
FL
SL
Surround
Surround Back
Surround
SBL SBR
SR
C FR
Di-polar Radiating Speaker

93
Techno Tidbits & Problem-solving
EX
PE
RT
Preset Code List
DVD
Manufacturer CodeTOSHIBA 1010PANASONIC 1002SONY 1009JVC 1005SAMSUNG 1008RCA 1007DENON 1004PHILIPS 1006TOSHIBA 1010YAMAHA 1011, 1012PIONEER 1001, 1002, 1003
LD
Manufacturer CodeSONY 2008PHILIPS 2006, 2007PANASONIC 2005KENWOOD 2004DENON 2003YAMAHA 2009PIONEER 2001, 2002
TV
Manufacturer CodePIONEER 5001, 5002, 5003,
5004, 5005, 5006,5007, 5008, 5009,5010
ADMIRAL 5011, 5012, 5013AIWA 5014, 5015AKAI 5016ALBA 5017AOC 5018BESTAR 5019BLAUPUNKT 5020BLUE SKY 5021BRANDT 5022BROCSONIC 5023BUSH 5024CLATRONIC 5025CRAIG 5026, 5027, 5028,
5029CROSLEX 5030CURTIS MATHIS 5031, 5032, 5033DAEWOO 5034, 5035, 5036,
5037, 5038, 5039DAYTRON 5040DUAL 5041EMERSON 5042, 5043, 5044,
5045, 5046, 5047,
5045, 5046, 5047,5048
FERGUSON 5049, 5050FIRST 5051FISHER 5052FUJITSU 5053FUNAI 5054, 5055, 5056GE 5057, 5058, 5059,
5060GOLDSTAR 5061, 5062, 5063,
5064GOODMANS 5065, 5066HITACHI 5067, 5068, 5069,
5070, 5071ICE 5072IRRADIO 5073ITT/NOKIA 5074, 5075JC PENNY 5076, 5077, 5078,
5079JVC 5080, 5081KENDO 5082KTV 5083, 5084LOEWE 5085LXI 5086, 5087, 5088,
5089, 5090MAGNAVOX 5091MARK 5092MATSUI 5093, 5094MATSUSHITA 5095, 5096MED I ON 5097MITSUBISHI 5098, 5099MIVAR 5100NEC 5101, 5102NOKIA OCEANIC 5103NORDMENDE 5104, 5105OKANO 5106ONWA 5107PANASONIC 5108, 5109, 5110,
5111PHILCO 5112, 5113, 5114PHILLIPS 5004PHONOLA 5115PORTLAND 5116, 5117PROSCAN 5118QUASAR 5119, 5120RADIO 5121, 5122RADIO SHACK 5123, 5124, 5125RADIOLA 5126RCA/PROSCAN 5127, 5128, 5129SABA 5130SAMSUNG 5131, 5132SANYO 5133, 5134, 5135SCHNE I DER 5136SCOTT 5137, 5138SHARP 5139, 5140SIEMENS 5141
SIGNATURE 5142, 5143SONY 5144, 5145SYLVANIA 5146, 5147SYMPHONIC 5148TATUNG 5149TELEFUNKEN 5150, 5151THORN 5152TOSHIBA 5153, 5154UNIVERSUM 5155VIDECH 5156, 5157W. WHOUSE 5158WARDS 5159, 5160, 5161WATSON 5162ZENITH 5163, 5164
VCR
PIONEER 3001, 3002, 3003,3004, 3005
ADMIRAL 3006AIWA 3007, 3008, 3009AKAI 3010, 3011ALBA 3012AUDIO DYNAMIC 3013, 3014BELL&HOWELL 3015BLAUPUNKT 3016, 3017BROCSONIC 3018, 3019BUSH 3020CANON 3021CGM 3022, 3023CITIZEN 3024CLATRONIC 3025CRAIG 3026CURTIS MATHIS 3027, 3028, 3029DAEWOO 3030, 3031, 3032DBX 3033, 3034DIMENSIA 3035EMERSON 3036, 3037, 3038,
3039, 3040, 3041FERGUSON 3042FISHER 3043, 3044, 3045,
3046FUNAI 3047, 3048GE 3049, 3050, 3051GOLDSTAR 3052GOODMANS 3053, 3054GRUNDIG 3055HITACHI 3056, 3057, 3058,
3059, 3060INSTANT REPLAY 3061, 3062ITT/NOKIA 3063JC PENNY 3064, 3065, 3066,
3067, 3068, 3069JVC 3070, 3071, 3072KENDO 3073KENWOOD 3074, 3075, 3076
You should have no problem controlling a component if you find the manufacturer in this list, but you can onlyset these codes for the button that is assigned to that component. So, for example, the TV codes can only beset to the TV or TVC button. Please note that there are cases where only certain functions may be controllableafter assigning the proper preset code, or the codes for the manufacturer in the listwill not work for the model that you are using. If you can’t find a preset code that matches the component youwant to control, you can still teach the remote individual commands from another remote control (page 60).

94
Techno Tidbits & Problem-solving
SCOTT 3141, 3142, 3143,3144, 3145, 3146,3147
SEG 3148SELECO 3149SHARP 3150, 3151, 3152SIEMENS 3153, 3154, 3155SIGNATURE 3156, 3157SONY 3158, 3159, 3160,
3161, 3162, 3163SYLVANIA 3164, 3165, 3166,
3167SYMPHONIC 3168TANDBERG 3169TASHIRO 3170TATUNG 3171, 3172TEAC 3173, 3174, 3175TECHNICS 3176, 3177TELEFUNKEN 3178, 3179THORN 3180, 3181TOSHIBA 3182, 3183, 3184UNIVERSUM 3185, 3186, 3187W. WHOUSE 3188WARDS 3189, 3190, 3191,
3192, 3193YAMAHA 3194, 3195, 3196ZENITH 3197
STB
PIONEER 6001, 6002, 6003,6004, 6005, 6006
BELL 6049BLAUPUNKT 6007ECHOSTAR 6047GENERAL INSTRUMENT
6008GOLDSTAR 6009GRUNDIG 6010, 6011HAMLIN 6012, 6013HNS/HUGHES 6014HITACHI 6015ITT/NOKIA 6016JERROLD 6017, 6018, 6019
6020, 6021NEC 6022, 6023OAK 6024, 6025, 6026PANASONIC 6027, 6028, 6029PHILIPS 6030, 6031PRIMESTAR 6048RADIO SHACK 6032RCA 6033SAMSUNG 6034, 6035SCIENTIFIC ATLANTA
6036, 6037, 6038SIEMENS 6039, 6040SONY 6041STAR CHOICE 6048TOSHIBA 6042, 6043TOCOM 6044ZENITH 6045, 6046
CD/CD-R
PIONEER 7001, 7002DENON 7003, 7004, 7005FISHER 7006, 7007JVC 7008, 7009, 7010,
7011KENWOOD 7012, 7013, 7014,
7015, 7016MAGNAVOX 7017, 7018MARANTZ 7019ONKYO 7020, 7021PANASONIC 7022, 7023PHILIPS 7024, 7025RCA 7026, 7027SANYO 7028SHARP 7029SONY 7030TEAC 7031, 7032, 7033TECHNICS 7034, 7035YAMAHA 7036, 7037, 7038,
7039DENON 7040, 7041JVC 7042KENWOOD 7043PHILIPS 7044SONY 7045
LOEWE 3077, 3078LUXOR 3079LXI 3080, 3081, 3082,
3083, 3084, 3085,3086
MARANTZ 3087, 3088MARTA 3089MATSUI 3090MEMOREX 3091, 3092MINOLTA 3093, 3094MITSUBISHI 3095, 3096, 3097,
3098, 3099MULTITECH 3100, 3101, 3102NEC 3103NOKIA OCEANIC 3104NOKIA 3105, 3106NORDMENDE 3107OKANO 3108OLYMPIC 3109, 3110ORION 3111PANASONIC 3112, 3113, 3114,
3115, 3116, 3117PENTAX 3118, 3119PHILCO 3120, 3121PHILIPS 3122PHONOLA 3123QUASAR 3124, 3125RCA/PROSCAN 3126REALISTIC 3127, 3128, 3129,
3130, 3131, 3132SABA 3133SAMSUNG 3134, 3135SANSUI 3136SANYO 3137, 3138SCHNE I DER 3139, 3140
DVR
PIONEER 4001
MD
PIONEER 8001, 8002, 8003DENON 8004JVC 8005KENWOOD 8006SONY 8007SHARP 8002YAMAHA 8008, 8009
TAPE
PIONEER 9001, 9002DENON 9003, 9004FISHER 9005, 9006JVC 9007, 9008KENWOOD 9009, 9010, 9011NAKAMICHI 9012ONKYO 9013, 9014, 9015PHILIPS 9016, 9017SONY 9018, 9019TEAC 9020, 9021TECHNICS 9022YAMAHA 9023, 9024, 9025,
9026

95
Techno Tidbits & Problem-solving
EX
PE
RT
TroubleshootingIncorrect operations are often mistaken for trouble and malfunctions. If you think that there is something wrong withthis component, check the points below. Sometimes the trouble may lie in another component. Investigate the othercomponents and electrical appliances being used. If the trouble cannot be rectified even after exercising the checkslisted below, ask your nearest PIONEER authorized service center or your dealer to carry out repair work.
Power
The power does not turn on.
During loud playback thepower suddenly switchesoff.
The unit does not respondwhen the buttons arepressed.
During operation, the unitsuddenly switches off.
AMP ERR blinks in thedisplay and the unit turnsoff. The STANDBY indicatorwill blink and the unitcannot be turned on.
FAN STOP blinks in thedisplay and the unit turnsoff.
OVERHEAT blinks in thedisplay and no sound isoutput.
THDCT NG blinks in thedisplay and the unit turnsoff.
Setup
After the proper settingshave been made, there stillseems to be somethingwrong with the sound.
No audio
No sound is output when afunction is selected.
• The power plug is disconnected.• The protection circuit may have beenactivated.
• The protection circuit has been activatedbecause the lowest actual impedance ofthe speakers (as opposed to the speakers’rated impedance) is dangerously low.
• Static electricity caused by dry air.
• The speaker wires are frayed or stickingout of the jack, and are touching the back ofthe receiver or another set of wires.
• The receiver probably has a seriousproblem.
• Something is stuck in the fan and/or thefan is broken.
• The receiver has gotten too hot.
• The thermistor (temperature sensor) isbroken.
• The speakers have been incorrectlyconnected (+/- connections are reversed).
• Improper connections.
• Sound is muted.• The volume is turned down.• Speakers are turned off.
• DIGITAL/ANALOG setting is incorrect.
• MULTI CH IN mode is on.
• Connect the power plug to the wall outlet.• Disconnect the power plug from theoutlet, and insert again.
• Turn down the volume.• When it’s convenient go to ACOUSTICCALIBRATION EQ (page 84–85) and lowerthe 63 Hz and 125 Hz equalizer levels usingMANUAL setting.
• Switch the unit off, then on again.• Disconnect the power plug from theoutlet, and insert again.
• Reinsert the speaker wires, making surethere are no stray strands of wire and thatthey are inserted fully (see page 24)
• Don't try to turn on the receiver. Call aPioneer-accredited repair center to look atthe problem.
• Remove the foreign object from the fan.If you can't do this and/or the fan is brokencall a Pioneer-accredited repair center tolook at the problem.
• Turn the receiver off and allow it to cooldown with good ventilation. It is very likelythat you have a heat dispersal and ventilationproblem so please follow the instructions in“Installing the Receiver” (page 8) carefully.
• Turn the receiver off, unplug from walland call a Pioneer-accredited repair centerto look at the problem.
• Check all connections (see page 24).
• Make sure the component is connectedcorrectly (see pages 15–22).• Press MUTING on the remote control.• Adjust MASTER VOLUME.• Press SPEAKERS (A/B) to select thespeakers you connected (see page 66).• Select the proper signal with the SIGNALSELECT button (see page 42).• Turn MULTI CH IN mode off (see page50).
Symptom Cause Remedy

96
Techno Tidbits & Problem-solving
No sound output from thefront speakers.
No sound output fromsurround or center speakers.
No sound output from thesubwoofer.
No sound output from thesurround back speakers.
No sound output from one(set of) speaker(s).
Sound is produced fromsome components, but notfrom digital components.
• The front speakers are connected to theB speaker system jack.
• Speaker settings are incorrect.
• The surround and/or center speakers aredisconnected.• The listening mode is STEREO.
• The subwoofer setting is NO.
• The subwoofer output setting is too low.
• The bass peak level setting is too low.
• There is very little low frequencyinformation in your source.
• The crossover frequency is set too low.
• There is a problem with the subwoofer.
• The subwoofer isn't connected properly.
• The SB CH MODE is set to OFF.
• The source is not a 6.1 channel playbacksource.
• The surround back speakers aren'tconnected properly.• The surround back channel is set to 1speaker setting only, and the speaker isconnected to the right channel output.
• The speaker system setting is NO.
• The speaker isn't connected properly.• The source has no sound output for thatchannel.
• The speaker output level is set too small.
• SIGNAL SELECT is set incorrectly.
• The digital inputs are assignedincorrectly, or not at all.
• The digital components aren't connectedproperly.• The player is not compatible with thesource you're using, or the player settingsare incorrect.• The MULTI CH IN mode has beenselected.
• The digital output level has been turneddown on a CD player or other componentequipped with digital output leveladjustment capability.
• Connect the front speakers to the Aspeaker system jacks (see page 24).
• See SPEAKER SETTING on pages 37–38to check the speaker settings.• Connect the speakers (see page 24).
• Choose a surround listening mode (seepages 43–45).
• Change the setting to YES or PLUS (see page37–38).• Adjust the output setting to the level youwant (see pages 39, 81).• Adjust the peak level setting to the levelyou want.• Change your subwoofer setting to one ofthe following (see pages 37–38):
Front: SMALL Subwoofer:YESFront:LARGE Subwoofer:PLUS
• Raise the frequency level to match yourspeakers' characteristics (see page 80)• Check the three following points:
• Check the power.• Check the subwoofer volume control .• Check the subwoofer hasn't
automatically switched to standby mode(check the subwoofer manual)• Check all connections.
• Set the SB CH MODE to ON or AUTO(see page 51).• Set the SB CH MODE to ON or AUTOand choose one of the SURROUNDlistening modes (see pages 44–45, 51).• Check all connections (see pages 15–22).
• Connect the speaker to the surroundback left channel output (see page 24).
• Change the speaker setting to YES (seepages 37–38).• Check all connections.• If you choose one of the SURROUNDlistening modes, a channel may be createdfor the speaker (see pages 44–45).• Increase the speaker output level.
• Set SIGNAL SELECT to AUTO oraccording to the type of connections made(see page 42).• Set the digital input settings correctly(see page 76).
• Check all connections (see page 24).
• Choose a compatible source, or checkthe player's manual for the correct settings.
• Choose one of the listening modes (seepage 41). The MULTI CH IN switches offautomatically.• Set the digital volume level of the playerto full, or to the neutral position.
Symptom Cause Remedy

97
Techno Tidbits & Problem-solving
EX
PE
RT
Other audio problems
Subwoofer output is verylow.
During multi channelplayback, there is no soundoutput from one speaker.
A multi channel DVD sourceappears to be downmixedfrom 2 channels duringplayback.
Considerable noise in radiobroadcasts.
Broadcast stations cannotbe selected automatically.
Noise or hum can be heardeven when there is no soundbeing input.
When a search is performedby a DTS compatible CDplayer during playback,noise is output.
When playing a DTS formatLD there is noise audible onthe soundtrack.
Audio doesn't record (insome cases, even if videodoes).
• Settings route signal away fromsubwoofer.
• That speaker is set to NO.
• The source is coming from somethingother than the MULTI CH IN jacks (forexample, digital PCM output, etc.)
• Incorrect frequency.• The antenna is not connected.• Digital cables are near the antennaterminals and wires.
• The antenna is poorly positioned.
• Interference caused by other equipment(fluorescent lamp, motor, etc.).
• Weak radio signals.
• There is electrical interference fromanother component or appliance.
• The search function performed by theplayer interferes with the reading of digitalinformation.
• The SIGNAL SELECT is on ANALOG.
• You are trying to make an analogrecording from a digital signal, or a digitalrecording of an analog source.
• The digital source is copy protected.
• The jacks for recording have not beenconnected properly.
• To get more signal to the subwoofer setit to PLUS or choose SMALL for the frontspeakers (see pages 37–38).
• Set the speaker to YES.
• Check the MULTI CH IN connection (seepage 20) and select the type of playbackwith the MULTI CH IN button (see page 50).
• Tune in the correct frequency.• Connect the antenna (see page 23).• Route digital cables away from theantenna terminals and wires.
• Adjust the direction and position for bestreception.• Turn off the equipment causing the noiseor move it away from the receiver.• Place the antenna farther away from theequipment causing the noise.• Connect an outdoor AM or FM antenna(see page 23).
• Check that personal computers or otherdigital components connected to the samepower source are not causing interference.
• This is not a malfunction, but be sure toturn the volume down to prevent the outputof loud noise from your speakers.
• Set the SIGNAL SELECT to DIGITAL (seepage 42).
• You can only record analog to analog, ordigital to digital. Make sure the playbackand recording components are hooked upwith the same kind of connections.• You can't record digital sources that havebeen copy protected.• Check connections (see pages 19 & 21).
Symptom Cause Remedy

98
Techno Tidbits & Problem-solving
Video
No image is output when afunction is selected.
There is no image comingfrom the selectedcomponent video jacks.
Can't record video.
Input/display
The display is dark.
You can't get DIGITAL tocome up when using theSIGNAL SELECT button.
The digital format indicatordoesn't light up even whenplaying a non-PCM digitalsource.
A compressed digital sourceis being played, but thedigital format indicatorsdon't light up.
During playback of acompressed digital source,the PRO LOGIC ll or NEO:6indicators show in thedisplay.
During playback of aSurround EX or DTS ESsource on the AUTO setting,the EX and ES indicatorswon't light.
• Improper connections.
• The input source is not properly selected.• The video input selected on the TVmonitor is incorrect.• The TV or monitor is hooked up with cordthat is different than that used for the videoplayer.• The component video setting isincorrect.
• The type of cord connected to the TVdoesn't match your video input settings.
• The source is copy protected.
• You are trying to record a sourceconnected to the component video jacks.• The recorder's video input is hooked upusing a different type of cord to the sourcevideo output.
• The display DIMMER button is pushed.
• Either the digital connections or theDIGITAL IN SELECT is incorrect.
• MULTI CH IN mode is on.
• The player is paused or stopped.• There is a mistake in the player settingsfor audio output.
• Although it's a non-PCM digital sourcethere is a possibility the present track is notthe proper format (5.1, 6.1, or 7.1 channel).
• The digital signal is not being sent withthe source.• The audio is in two channel format.• It has already been Dolby surroundencoded.
• The source may be 6.1 playbackcompatible, but there is no signal from thesource to indicate this.
• Make sure the component is connectedcorrectly (see pages 15,16–18).• Press the correct function button.• Please read the TV monitor manual andchange the settings accordingly.• Use the same cable to connect to yourTV and all your video equipment (see pages15–22).• Select the correct COMPONENT-INSELECT setting (see page 77).
• Change the settings to match the cordconnected (see pages 15–22).
• You can't record sources that have beencopy protected.• Connect the component with S video orcomposite video cords (see pages 16–18).• Hook up the source and the recorderusing the same type of video cord (seepages 16–18).
• Press DIMMER on the remote controlrepeatedly to return to the default setting(see page 53).
• Make sure the digital connections (seepage 16–18 & 21) and the DIGITAL-INSELECT (see page 76) are done correctly.• Turn MULTI CH IN mode off (see page50) .
• Play the source.• Fix the audio settings (check the manualthat came with your DVD player).
• There is no problem. The indicator won'tlight when the track is not a compresseddigital source.
• Choose DIGITAL or AUTO with the signalselect button (see page 42).• This is not a malfunction. Check themanufacturer information for the source.
• Switch the SB CH MODE to ON (seepage 51).
Symptom Cause Remedy

99
Techno Tidbits & Problem-solving
EX
PE
RT
During playback of a DVDaudio source, the playershows a transfer rate of96kHz, but the receiver doesnot.
During playback of a 96kHzsource, the display doesn'tshow 96kHz
Remote control
Cannot be remotecontrolled.
Other components can't beoperated with the systemremote.
The SR cable is connected,but the connectedcomponents can't beoperated with the remote.
• The multichannel connections are analog,so there is no digital transfer.
• The receiver may be on a different modethan STEREO.• One of the DIGITAL NR, MIDNIGHT,LOUDNESS, or TONE features is switchedon.
• The remote control batteries have wornout.• Too far away or improper angle ofoperation.
• There is an obstacle between thereceiver and the remote control.• Strong light such as fluorescent light isshining onto the unit's remote control signallight-receiving window.• A cord is connected to the CONTROL INterminal on this unit.• The IR Receiver type is mismatched withthe setting.
• The preset code settings are wrong.• The batteries wore out and the systemsettings were cleared.
• The SR cable hasn't been connectedproperly.• The rest of the component connectionhave not been made.• The component you have hooked up isnot SR compatible.
• This is not a malfunction. See theplayer's manual for more details.
• Switch to STEREO mode (see page 43).
• Turn it/them off (see page 47–49).
• Replace the batteries (see page 7).
• Operate within 25 feet and a 30° angle ofthe remote sensor on the front panel (seepage 8).• Remove the obstacle or operate fromanother position (see page 8).• Avoid exposing the remote sensor on thefront panel to direct light.
• Connect cord to the correct jack.
• Disconnect the IR Receiver from the rearpanel, and set to the other IR Receiver typeusing the remote control.
• Input the correct preset code.• Reset the proper system settings.
• Reinsert the SR cable, making sure it isthe right jack (see page 71).• Make sure an analog connection hasbeen made between the units.• This is not a malfunction.
Symptom Cause Remedy
If the unit does not operate normally due to external effects such as static electricityDisconnect the power plug from the outlet and insert again to return to normal operating conditions.

100
Techno Tidbits & Problem-solving
Schemata of Setup
1
2
3
4(4. Function Rename)
System Setup
[1. Surround Setup[2. THX CINEMA Setup[3. Input Assign[4. Function Rename[Exit
]]]]]
1.Surround Setup
[ SurrBack System ][ Quick ][ Normal ][ Expert ][ Exit ]
2. THX CINEMA Setup
[ PRO LOGIC II MOVIE ][ PRO LOGIC ][ Neo:6 CINEMA ][ Exit ]
3.Input Assign
[ Digital-In Select ][ Component-In Select ]
[Exit]
DVD/LD [ DVD/LD ]TV/SAT [ TV/SAT ]VCR1/DVR [ VCR1/DVR ]VCR2 [ VCR2 ]VIDEO [ VIDEO ]LINE [ LINE ]CD [ CD ]CD-R/TAPE1 [ CDR/TAPE1 ]MD/TAPE2 [ MD/TAPE2 ]
[Exit ]
Component-In Select
Component-1 [DVD/LD ] Component-2 [ TV/SAT ] [Exit ]
Digital-In Select
Digital-1 [ TV/SAT ]Digital-2 [ CD-R ]Digital-3 [ DVD/LD ]Digital-4 [ CD ]
[Exit]
SurrBack System
[ Normal System[ Secound Zone[ Front Bi-Amp[ Exit
]]]]
QUICK
Subwoofer [ YES Center SP [ YES
SurrBack SP [ YES Room size Medium ]
Listening Position [ Center ]
]]]
[
[Exit]
[ Speaker Setting ][ Channel Level ][ Channel Delay ] [ Exit ]
Normal
Expert
[Crossover Network ][Fine Channel Level ][Fine Channel Delay ][Acoustic Cal EQ ][Bass Peak Level ][D-Range Control ][Exit ]
Speaker Setting
Front [SMALL] Center [SMALL] Surround [SMALL] SurrBack [SMALLX2] Subwoofer [ YES ] [Exit]
[ Free ] [ THX ]
Channel Level Test Tone [Manual]
[Auto] [Exit ]
Channel Delay
Front [ ] Center [ ] Front [ ] Surround [ ] SurrBack [ ] SurrBack [ ] Surround [ ] Subwoofer [ ] [Exit ]
L
RRRLL
1 0 . 5 f t9 . 0 f t
1 0 . 0 f t8 . 5 f t7 . 0 f t6 . 5 f t8 . 0 f t
1 1 . 5 f t
50Hz80Hz
100Hz150Hz200HzExit
Crossover Network
Frequency [ ] [ ] [ ] [ ] [ ] [ ]
(THX Speaker = 80Hz)
+1. 5dB+1. 5dB+2. 0dB-1. 5dB+3. 0dB+2. 0dB
+10. 0dB
Front [ ] Center [ ] Surround [ ] Surround [ ] SurrBack [ ] SurrBack [ ] Subwoofer [ ] [Exit ]
Fine Channel LevelSTD:Front L +1. 5dB
R
R
RL
L
1 0 . 5 f t1 0 . 0 f t
8 . 5 f t7 . 0 f t6 . 5 f t8 . 0 f t
1 1 . 5 f t
Fine Channel DelaySTD:Front L 1 0 . 5 f t
Front [ ] Center [ ] Surround [ ] Surround [ ] SurrBack [ ] SurrBack [ ] Subwoofer [ ] [Exit ]
R
R
RL
L
Center EQSurround EQSurrBack EQSurrBack EQSurround EQ
[ ] [ ] [ ] [ ] [ ] [Exit ]
Acoustic Cal EQ
R
L
R
L
Bass Peak Level
[Setting Start ] [Setting Cancel ]
[Exit ]
Dynamic Range Control
Select Mode [OFF] dts [MID]
[MAX][Exit ]

101
Techno Tidbits & Problem-solving
EX
PE
RT
Selecting fine audio equipment such as the unit you’vejust purchased is only the start of your musical enjoyment.Now it’s time to consider how you can maximize the funand excitement your equipment offers. This manufacturerand the Electronic Industries Association’s ConsumerElectronics Group want you to get the most out of yourequipment by playing it at a safe level. One that lets thesound come through loud and clear without annoyingblaring or distortion-and, most importantly, withoutaffecting your sensitive hearing.
Sound can be deceiving. Over time your hearing“comfort level” adapts to higher volumes of sound. Sowhat sounds “normal” can actually be loud and harmfulto your hearing. Guard against this by setting yourequipment at a safe level BEFORE your hearing adapts.
To establish a safe level:• Start your volume control at a low setting.• Slowly increase the sound until you can hear it
comfortably and clearly, and without distortion.
Once you have established a comfortable sound level:• Set the dial and leave it there.
Taking a minute to do this now will help to preventhearing damage or loss in the future. After all, we wantyou listening for a lifetime.
EST 1924
EIAEL
EC
TR
ONIC INDU
ST
RIE
S
•A
SS O C I A T I O
N•
WeWant You
LISTENINGFor A Lifetime
We Want You Listening For ALifetime
Used wisely, your new sound equipment will provide alifetime of fun and enjoyment. Since hearing damage fromloud noise is often undetectable until it is too late, thismanufacturer and the Electronic Industries Association’sConsumer Electronics Group recommend you avoidprolonged exposure to excessive noise. This list of soundlevels is included for your protection.
DecibelLevel Example
30 Quiet library, soft whispers40 Living room, refrigerator, bedroom away from
traffic50 Light traffic, normal conversation, quiet office60 Air conditioner at 20 feet, sewing machine70 Vacuum cleaner, hair dryer, noisy restaurant80 Average city traffic, garbage disposals, alarm clock
at two feet.
THE FOLLOWING NOISES CAN BEDANGEROUS UNDER CONSTANT EXPOSURE
90 Subway, motorcycle, truck traffic, lawn mower100 Garbage truck, chain saw, pneumatic drill120 Rock band concert in front of speakers, thunderclap140 Gunshot blast, jet plane180 Rocket launching pad
Information courtesy of the Deafness Research Foundation.
EST 1924
EIAEL
EC
TR
ONIC INDU
ST
RIE
S
•A
SS O C I A T I O
N•
WeWant You
LISTENINGFor A Lifetime
Maintenance of External Surfaces• Use a polishing cloth or dry cloth to wipe off dust
and dirt.• When the surfaces are dirty, wipe with a soft
cloth dipped in some neutral cleanser diluted fiveor six times with water, and wrung out well, andthen wipe again with a dry cloth. Do not usefurniture wax or cleaners.
• Never use thinners, benzine, insecticide spraysor other chemicals on or near this unit, sincethese will corrode the surfaces.
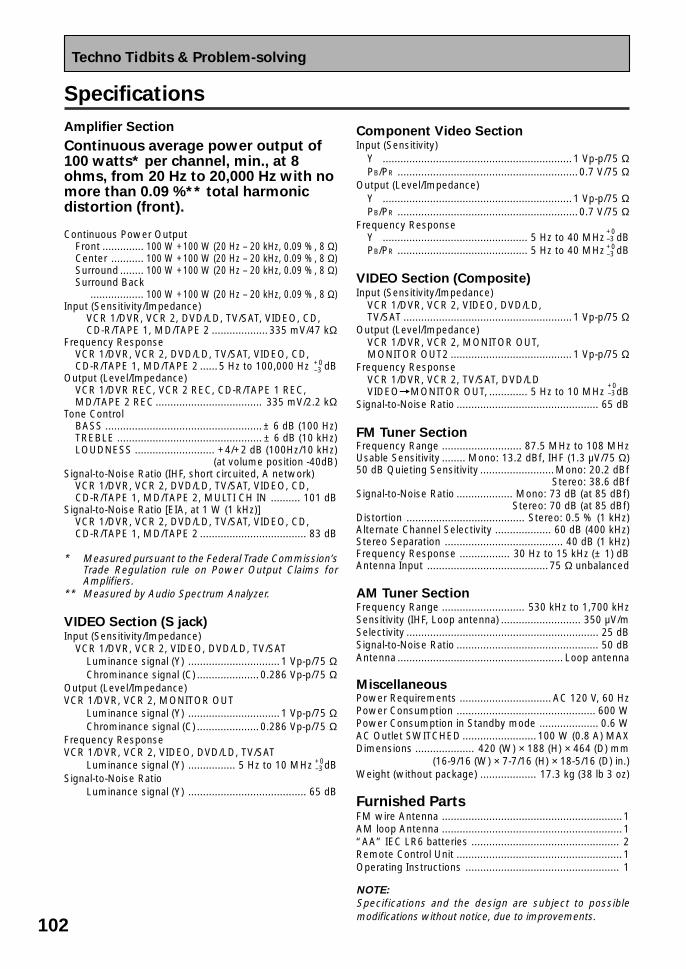
102
Techno Tidbits & Problem-solving
Specifications
Continuous average power output of100 watts* per channel, min., at 8ohms, from 20 Hz to 20,000 Hz with nomore than 0.09 %** total harmonicdistortion (front).
Continuous Power OutputFront .............. 100 W +100 W (20 Hz – 20 kHz, 0.09 %, 8 Ω)Center ........... 100 W +100 W (20 Hz – 20 kHz, 0.09 %, 8 Ω)Surround ........ 100 W +100 W (20 Hz – 20 kHz, 0.09 %, 8 Ω)Surround Back
.................. 100 W +100 W (20 Hz – 20 kHz, 0.09 %, 8 Ω)Input (Sensitivity/Impedance)
VCR 1/DVR, VCR 2, DVD/LD, TV/SAT, VIDEO, CD,CD-R/TAPE 1, MD/TAPE 2 ................... 335 mV/47 kΩ
Frequency ResponseVCR 1/DVR, VCR 2, DVD/LD, TV/SAT, VIDEO, CD,CD-R/TAPE 1, MD/TAPE 2 ......5 Hz to 100,000 Hz dB
Output (Level/Impedance)VCR 1/DVR REC, VCR 2 REC, CD-R/TAPE 1 REC,MD/TAPE 2 REC .................................... 335 mV/2.2 kΩ
Tone ControlBASS .....................................................± 6 dB (100 Hz)TREBLE ................................................. ± 6 dB (10 kHz)LOUDNESS ........................... +4/+2 dB (100Hz/10 kHz)
(at volume position -40dB)Signal-to-Noise Ratio (IHF, short circuited, A network)
VCR 1/DVR, VCR 2, DVD/LD, TV/SAT, VIDEO, CD,CD-R/TAPE 1, MD/TAPE 2, MULTI CH IN .......... 101 dB
Signal-to-Noise Ratio [EIA, at 1 W (1 kHz)]VCR 1/DVR, VCR 2, DVD/LD, TV/SAT, VIDEO, CD,CD-R/TAPE 1, MD/TAPE 2 .................................... 83 dB
* Measured pursuant to the Federal Trade Commission’sTrade Regulation rule on Power Output Claims forAmplifiers.
** Measured by Audio Spectrum Analyzer.
VIDEO Section (S jack)Input (Sensitivity/Impedance)
VCR 1/DVR, VCR 2, VIDEO, DVD/LD, TV/SATLuminance signal (Y) ............................... 1 Vp-p/75 ΩChrominance signal (C) ..................... 0.286 Vp-p/75 Ω
Output (Level/Impedance)VCR 1/DVR, VCR 2, MONITOR OUT
Luminance signal (Y) ............................... 1 Vp-p/75 ΩChrominance signal (C) ..................... 0.286 Vp-p/75 Ω
Frequency ResponseVCR 1/DVR, VCR 2, VIDEO, DVD/LD, TV/SAT
Luminance signal (Y) ................ 5 Hz to 10 MHz dBSignal-to-Noise Ratio
Luminance signal (Y) ........................................ 65 dB
+0–3
+0–3
Component Video SectionInput (Sensitivity)
Y ................................................................ 1 Vp-p/75 ΩPB/PR ............................................................. 0.7 V/75 Ω
Output (Level/Impedance)Y ................................................................ 1 Vp-p/75 ΩPB/PR ............................................................. 0.7 V/75 Ω
Frequency ResponseY ................................................. 5 Hz to 40 MHz dBPB/PR ............................................ 5 Hz to 40 MHz dB
VIDEO Section (Composite)Input (Sensitivity/Impedance)
VCR 1/DVR, VCR 2, VIDEO, DVD/LD,TV/SAT ......................................................... 1 Vp-p/75 Ω
Output (Level/Impedance)VCR 1/DVR, VCR 2, MONITOR OUT,MONITOR OUT2 ......................................... 1 Vp-p/75 Ω
Frequency ResponseVCR 1/DVR, VCR 2, TV/SAT, DVD/LDVIDEO=MONITOR OUT, ............. 5 Hz to 10 MHz dB
Signal-to-Noise Ratio ................................................ 65 dB
FM Tuner SectionFrequency Range ........................... 87.5 MHz to 108 MHzUsable Sensitivity ........ Mono: 13.2 dBf, IHF (1.3 µV/75 Ω)50 dB Quieting Sensitivity .........................Mono: 20.2 dBf
Stereo: 38.6 dBfSignal-to-Noise Ratio ................... Mono: 73 dB (at 85 dBf)
Stereo: 70 dB (at 85 dBf)Distortion ........................................ Stereo: 0.5 % (1 kHz)Alternate Channel Selectivity ................... 60 dB (400 kHz)Stereo Separation ........................................ 40 dB (1 kHz)Frequency Response ................. 30 Hz to 15 kHz (± 1) dBAntenna Input .........................................75 Ω unbalanced
AM Tuner SectionFrequency Range ............................ 530 kHz to 1,700 kHzSensitivity (IHF, Loop antenna) ........................... 350 µV/mSelectivity ................................................................. 25 dBSignal-to-Noise Ratio ................................................ 50 dBAntenna ........................................................ Loop antenna
MiscellaneousPower Requirements ............................... AC 120 V, 60 HzPower Consumption ............................................... 600 WPower Consumption in Standby mode .................... 0.6 WAC Outlet SWITCHED ......................... 100 W (0.8 A) MAXDimensions .................... 420 (W) × 188 (H) × 464 (D) mm
(16-9/16 (W) × 7-7/16 (H) × 18-5/16 (D) in.)Weight (without package) ................... 17.3 kg (38 lb 3 oz)
Furnished PartsFM wire Antenna .............................................................1AM loop Antenna .............................................................1“AA” IEC LR6 batteries .................................................. 2Remote Control Unit ........................................................1Operating Instructions .................................................... 1
NOTE:
Specifications and the design are subject to possiblemodifications without notice, due to improvements.
Amplifier Section
+0–3+0–3
+0–3
103
Techno Tidbits & Problem-solving
EX
PE
RT

Published by Pioneer Corporation.Copyright © 2002 Pioneer Corporation.All rights reserved.
<ARB7261-A>
PIONEER CORPORATION 4-1, Meguro 1-Chome, Meguro-ku, Tokyo 153-8654, Japan
PIONEER ELECTRONICS [USA] INC. P.O. BOX 1540, Long Beach, California 90801-1540, U.S.A.PIONEER ELECTRONICS OF CANADA, INC. 300 Allstate Parkway, Markham, Ontario L3R OP2, CanadaPIONEER EUROPE NV Haven 1087, Keetberglaan 1, B-9120 Melsele, Belgium TEL: 03/570.05.11PIONEER ELECTRONICS AUSTRALIA PTY. LTD. 178-184 Boundary Road, Braeside, Victoria 3195, Australia, TEL: [03] 9586-6300PIONEER ELECTRONICS DE MEXICO S.A. DE C.V. San Lorenzo 1009 3er Piso Desp. 302 Col. Del Valle Mexico D.F. C.P. 03100
TEL: 55-5688-5290
<TNGZF/02E00001> Printed in