audi s4 b8 boost cooler kit - amsperformance.com · audi s4 b8 boost cooler kit . ... the radiator...
TRANSCRIPT

Audi S4 B8
Boost Cooler Kit

The goal of Alpha Performance is to provide the highest quality, best
performing products available. By utilizing research and development, and
rigorous testing programs Alpha Performance will never compromise the
quality or performance of our products. In addition, Alpha Performance will
only provide the finest customer service offering only parts and advice that
are in the best interests of the customer. Alpha Performance was built on a
foundation of integrity. This is who we are; this is what you can count on.
A vehicle modified by the use of performance parts may not meet the legal
requirements for use on public roads. Federal and state laws prohibit the
removal, modification, or rendering inoperative of any part or element of
design affecting emissions or safety on motor vehicles used for transporting
persons or property on public streets or highways. Use or installation of
performance parts may adversely affect the drivability and reliability of your
vehicle, and may also affect or eliminate your insurance coverage, factory
warranty, and/or new OEM part warranty. Performance parts are sold as-is
without any warranty of any type. There is no warranty stated or implied
due to the stresses placed on your vehicle by performance parts and our
inability to monitor their use, tuning, or modification.
These instructions are provided as a guide only as there are many variables
that cannot be accounted for concerning your particular vehicle, including
but not limited to model year differences, model differences, the presence of
non-OEM parts, and modifications that may already be or were previously
installed. A basic knowledge of automotive parts and systems is helpful but
a better understanding of the parts and systems on your particular vehicle
may be required.
If you have any questions or issues at any time during the installation of
your Alpha Performance product(s) please call us for technical assistance.
The Alpha Performance tech line can be reached during business hours at
847-709-0530 for Alpha Performance products only.

Disassembly
1) Remove front wheels, fender wells, and under trays.
2) Remove the front bumper

3) Drain the coolant. The radiator drain is on the passenger side of the radiator.
4) Remove the factory heat exchanger. It is held in place by 1 T30 Torx screw on
the driver’s side and a clip on the passenger side. There will still be coolant in
the heat exchanger so put a drain pan under the 2 lines when disconnecting.

5) B8 cars, remove both heat exchanger hoses from the car. Both will not be
reused. The passenger side hose runs around the radiator core support to the
pipe assembly that routes up to the super charger. Remove this hose. The
driver’s side hose of the heat exchanger routes to a tee. This tee is connected
to the IC pump inlet and the reservoir. In order the remove this hose, you will
need to cut the permanent clamp off. The best way to do this is to use a
Dremel with a cutting wheel. You will have to be very cautious when doing so
not to cut the plastic tee fitting. This part will need to be reused. This
procedure can be done in the car but if need be, the entire hose assembly can
be removed and done on the bench.
6) B8.5 cars, the same applies. Remove both heat exchanger hoses from the car,
they will not be reused. Both hoses route around to the driver’s side. The
lower hose runs around the core support to the lower hard line that runs up to
the super charger. The upper hose routes to a tee just like the B8. This tee is
connected to the IC pump inlet and the reservoir. In order the remove this
hose, you will need to cut the permanent clamp off. The best way to do this is
to use a Dremel with a cutting wheel. You will have to be very cautious when
doing so not to cut the plastic tee fitting. This part will need to be reused. This
procedure can be done in the car but if need be, the entire hose assembly can
be removed and done on the bench.

Cut this permanent clamp off
here.

7) B8.5 cars, the hose that routes to the upper hard pipe on the driver’s side that
leads up to the super charger will remain in the car. This is the factory IC
pump outlet hose. Disconnect this hose from the hard pipe but do not remove
from the vehicle. This hose will be trimmed in a later step.
Reuse this hose
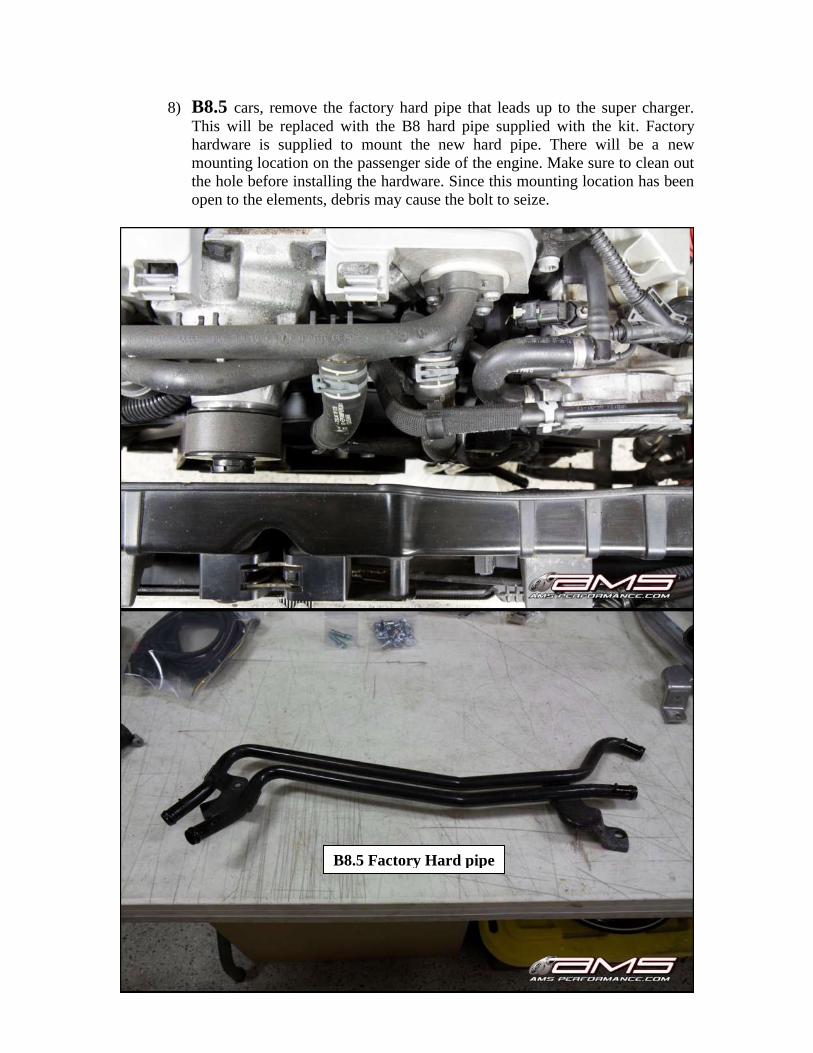
8) B8.5 cars, remove the factory hard pipe that leads up to the super charger.
This will be replaced with the B8 hard pipe supplied with the kit. Factory
hardware is supplied to mount the new hard pipe. There will be a new
mounting location on the passenger side of the engine. Make sure to clean out
the hole before installing the hardware. Since this mounting location has been
open to the elements, debris may cause the bolt to seize.
B8.5 Factory Hard pipe
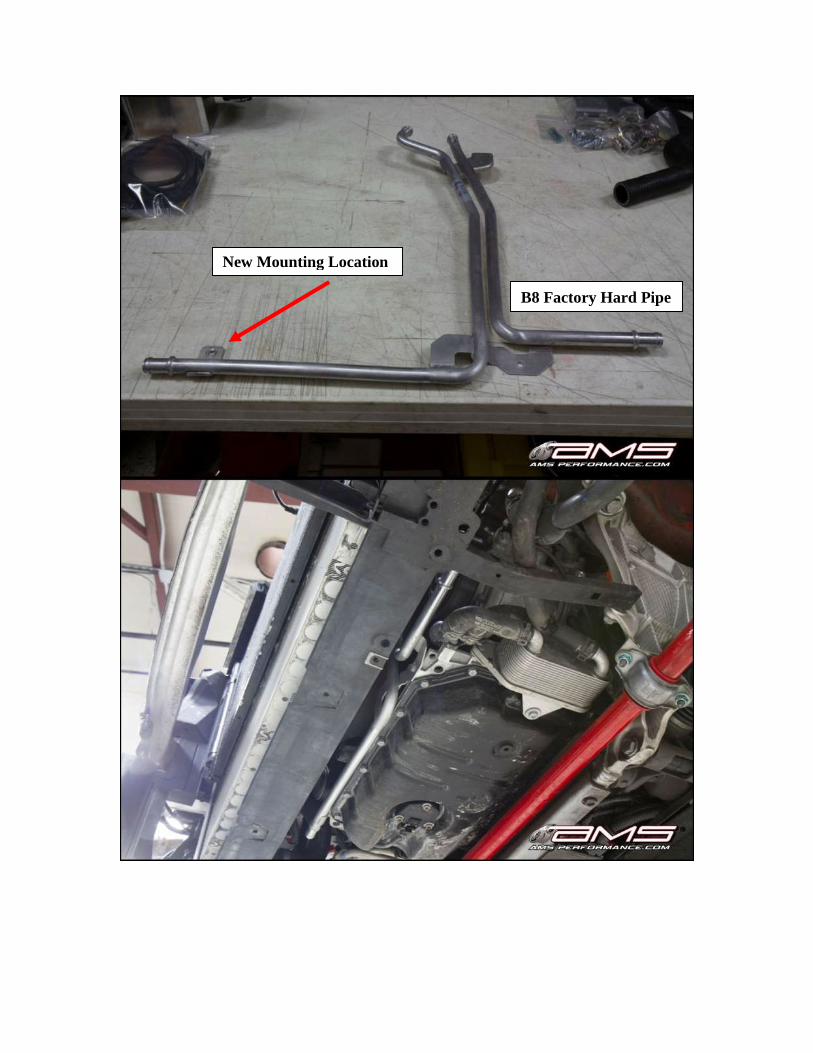
B8 Factory Hard Pipe
New Mounting Location
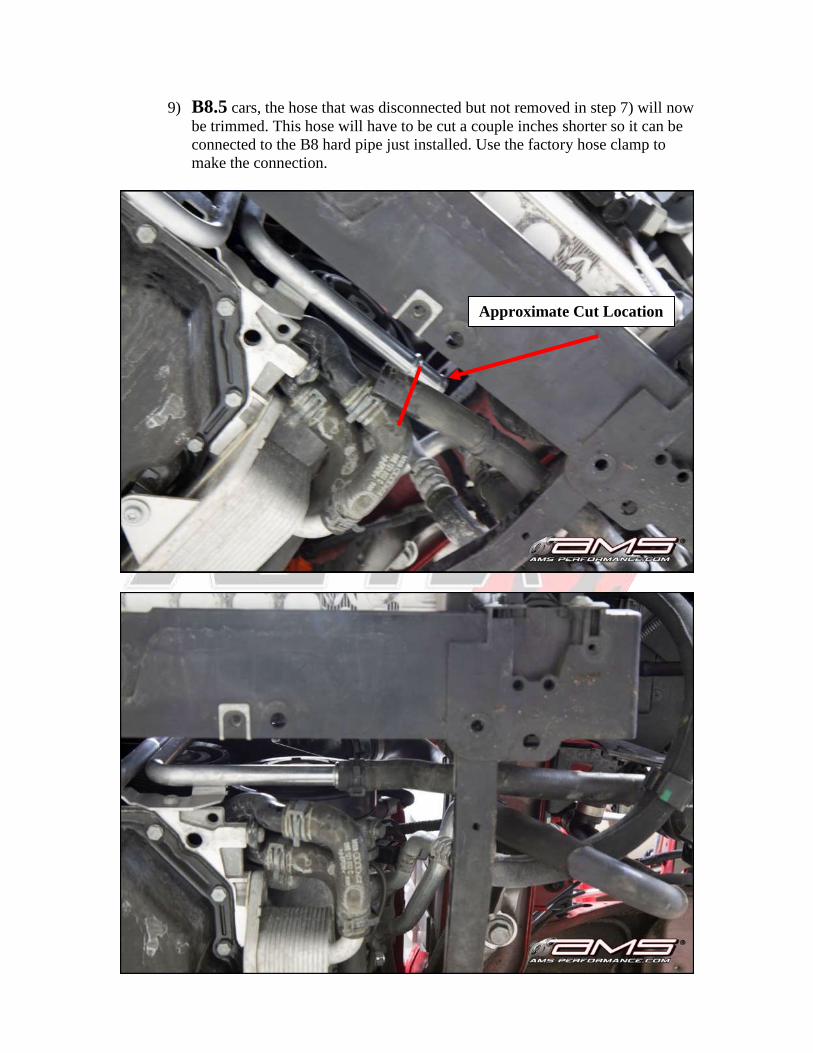
9) B8.5 cars, the hose that was disconnected but not removed in step 7) will now
be trimmed. This hose will have to be cut a couple inches shorter so it can be
connected to the B8 hard pipe just installed. Use the factory hose clamp to
make the connection.
Approximate Cut Location

Boost Cooler Installation
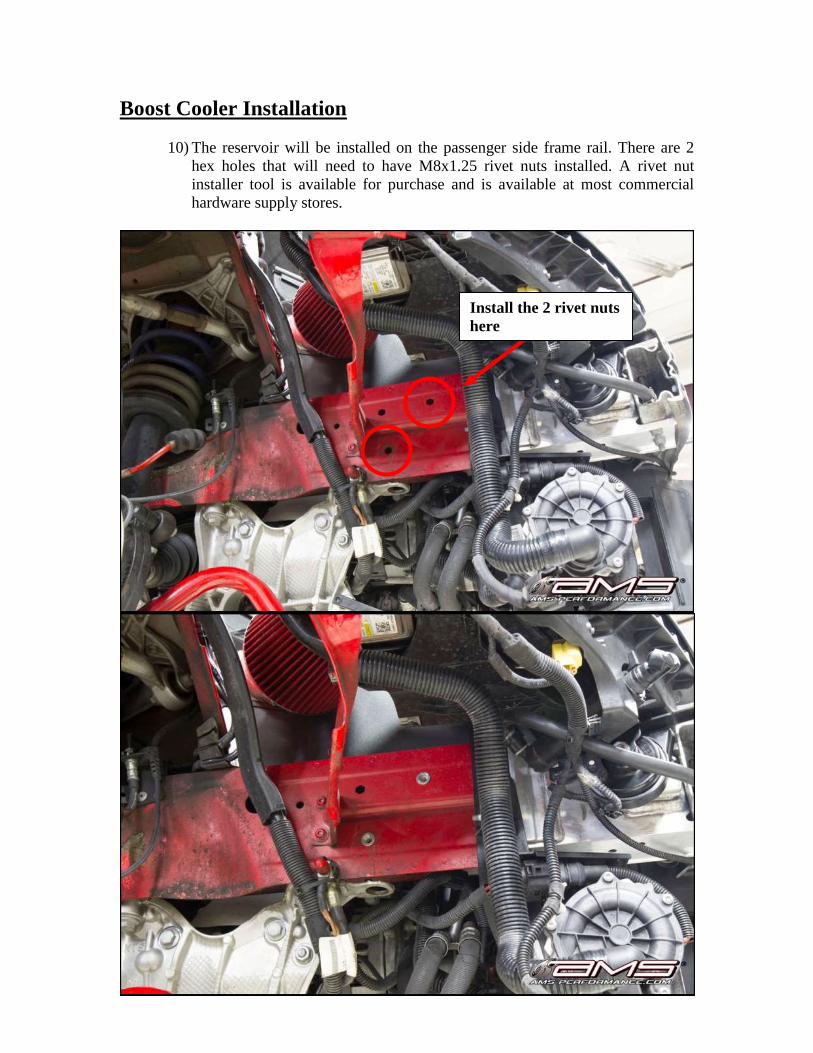
10) The reservoir will be installed on the passenger side frame rail. There are 2
hex holes that will need to have M8x1.25 rivet nuts installed. A rivet nut
installer tool is available for purchase and is available at most commercial
hardware supply stores.
Install the 2 rivet nuts
here

11) The reservoir tank bolts to the rivet nuts just installed and the uses a M6
through bolt at the fender support bracket.
12) Install the assembled reservoir tank using the 2 M8 bolts, 1 M6 bolt, and M6
nut.
13) B8.5 There will be 2 offset spacers and a M6 button head Allen bolt. The
Allen bolt will replace the through bolt. Install the thicker spacer between the
reservoir and the fender support bracket so all the surfaces are flat against
each other. Install the thinner spacer on the outside of the bracket so the
through bolt has a flat surface to tighten on.
14) Before tightening the reservoir bolt, make sure you have clearance at the core
support. You should have a little bit of movement to allow for adjustment.
M6 through bolt

15) Locate the straight silicone hose

16) Install the hose with the larger end on the reservoir and the smaller end to the
factory pipe assembly that routes up to the super charger. Use a #16 hose
clamp on the larger end and a #12 hose clamp on the smaller end. Rotate and
adjust for clearance.

17) Assemble the heat exchanger. Locate the mounting brackets and rubber
isolator pads. The rubber isolator pads will need to be installed on the
brackets. See the next several pictures as a reference as to how they assemble.

- These are the lower brackets
- These are the upper brackets

18) Install the lower brackets to the heat exchanger as shown. Leave the bolts
loose for latter adjustment.
19) Remove the small factory T 25 Torx bolt for the receiver drier bracket.

20) The heat exchanger mounts to the A/C condenser by clamping around it.
Slide the heat exchanger into place and hook the lower mounts first. Install the
upper mounts loosely. Adjust the heat exchanger so the small bracket on the
passenger side lines up. Install the new supplied M5 allen head bolt. First
tighten the upper brackets, followed by the M5 allen bolt, then the lower
brackets. This is done to allow some movement of the heat exchanger and A/C
condenser.

21) Install the silicone hose in the picture from the Alpha reservoir pump to the
passenger side of the heat exchanger. The smaller end installs on the pump
outlet and the larger end on the heat exchanger. Use a #16 hose clamp on the
larger and a #12 hose clamp on the smaller end.

22) Install the supplied silicone hose pictured from the driver’s side of the heat
exchanger to the factory plastic tee where the permanent clamp was cut off.
Use #16 hose clamps on both ends.
Install the 1-1/2” vinyl coated
clamp here to support the
silicone hose with m6 bolt and
nut. There is already a hole
but may need to be drilled out
slightly. Use ¼” drill bit.

Wiring Harness Install
23) Remove the cowl panel.

24) Locate the wire harness. The harness has 2 legs that lead out from the relay.
The relay and fuse will mount right next to the fuse panel using the supplied
M6 bolt and nut. There are a couple unused holes in the engine firewall panel
that will be used to bolt the relay into place. The relay and fuse hold can be
bolted together using the same bolt. See pictures as a reference.
25) Open the fuse panel cover. Locate the open terminal. The power lead of the
harness will attach here and get power. Use the supplied M6 nut to attach the
ring terminal to the fuse panel.
Open terminal
Relay and fuse holder
mounting

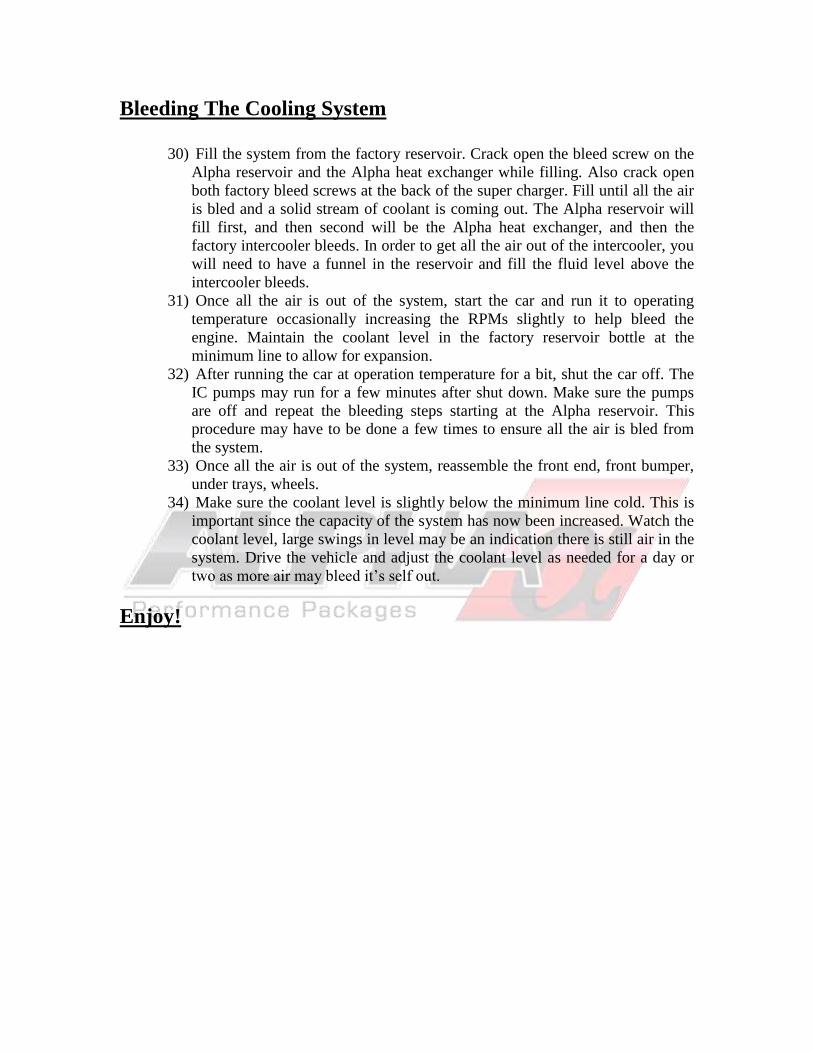
26) Route the harness end with the ground ring terminal and the 4 pin connector
to the Alpha reservoir and pump. Route the harness through the opening in the
firewall where the harness runs through. Run the harness down along the
frame rail and around the reservoir to the pump as shown. Attach the ground
ring terminal to the factory ground located on the frame rail. Once all
attachments are made, secure the harness with zip ties starting at the pump and
working up to the relay.
Route harness through here,
follow the factory harness.
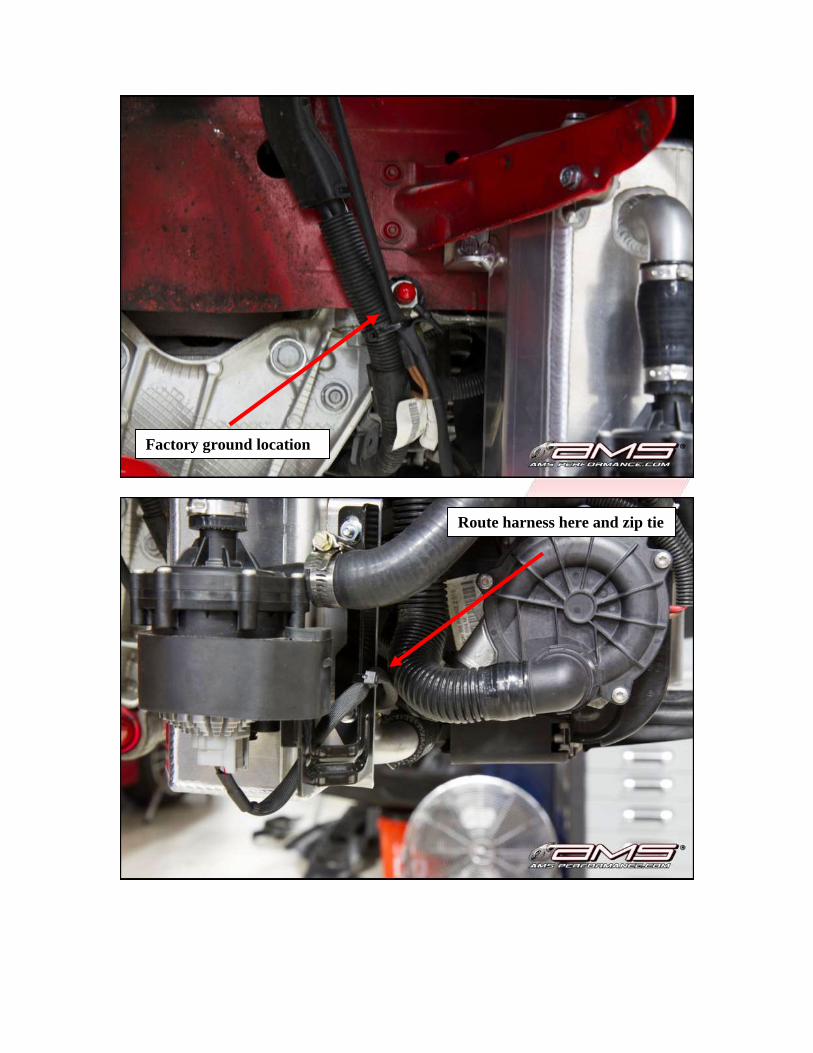
Factory ground location
Route harness here and zip tie

27) Route the other side of the harness with the 2 open wires down to the factory
IC pump. Route the harness through the firewall along with the brake lines.
Route the harness down under the ABS modulator down to the pump.
Route harness here
Route harness down

28) Locate and disconnect the factory IC pump connector.
29) A plug and play adapter harness is included so there are no wiring connections
that need to be made. Just plug in and go!
Bleeding The Cooling System
30) Fill the system from the factory reservoir. Crack open the bleed screw on the
Alpha reservoir and the Alpha heat exchanger while filling. Also crack open
both factory bleed screws at the back of the super charger. Fill until all the air
is bled and a solid stream of coolant is coming out. The Alpha reservoir will
fill first, and then second will be the Alpha heat exchanger, and then the
factory intercooler bleeds. In order to get all the air out of the intercooler, you
will need to have a funnel in the reservoir and fill the fluid level above the
intercooler bleeds.
31) Once all the air is out of the system, start the car and run it to operating
temperature occasionally increasing the RPMs slightly to help bleed the
engine. Maintain the coolant level in the factory reservoir bottle at the
minimum line to allow for expansion.
32) After running the car at operation temperature for a bit, shut the car off. The
IC pumps may run for a few minutes after shut down. Make sure the pumps
are off and repeat the bleeding steps starting at the Alpha reservoir. This
procedure may have to be done a few times to ensure all the air is bled from
the system.
33) Once all the air is out of the system, reassemble the front end, front bumper,
under trays, wheels.
34) Make sure the coolant level is slightly below the minimum line cold. This is
important since the capacity of the system has now been increased. Watch the
coolant level, large swings in level may be an indication there is still air in the
system. Drive the vehicle and adjust the coolant level as needed for a day or
two as more air may bleed it’s self out.
Enjoy!