au 2015: enterprise, beam me up: inphi's enterprise plm solution (tech paper)
TRANSCRIPT

PL11521 Enterprise, Beam Me Up: Inphi’s Enterprise PLM Solution Dr. Robb Johnson Inphi Corporation Rodney Coffey Razorleaf Corporation
Learning Objectives Discover how to use Autodesk PLM 360 to capture diverse business processes and bridge a global
organization
Learn how to manage product development processes among suppliers, vendors, and all departments within your organization
Learn how to capitalize on Autodesk PLM 360 to accommodate complicated approval processes
Discover the benefits of integrating Autodesk PLM 360 with other business systems such as Oracle EBS and Salesforce.com
Description In this course you will learn how Inphi Corporation has capitalized on the Autodesk PLM 360 tool to manage its enterprise business processes; including new product introduction, items and BOMs, change management, quality management, supplier management and much more. Share Inphi’s excitement about improved visibility of organizational performance to project managers, executives, and indeed the entire global organization by incorporating all of these business applications onto a single platform. Understand how Inphi has improved compliance to their NPI and Quality processes by implementing task management with workflow validation and a tiered approval process. Learn how Inphi tracks their development process through the use of connected, but dedicated, workspaces for Engineering, Marketing and Operations. See how Inphi leverages Jitterbit to integrate with several other business systems such as salesforce.com, Oracle EBS, and Autodesk Vault. By attending this class, you will go on a tour of how Autodesk PLM 360 has transformed Inphi’s business and could potentially transform yours as well.

Enterprise, Beam Me Up: Inphi’s Enterprise PLM Solution
2
Your AU Experts
Dr. Robb Johnson has over 15 years of experience in semiconductor process development and the management of semiconductor manufacturers, covering a wide range of process technologies including InP HBT, GaAs pHEMT, SiGe and CMOS. As Inphi's Director of Technology, he is responsible for new supplier and process selection, as well as yield improvement and serves as the primary contact to Inphi's semiconductor suppliers. In addition he is responsible for the development and support of Inphi's enterprise business solutions such as SharePoint and Product Lifecycle Management.
Rodney Coffey is a product lifecycle management consultant for Razorleaf Corporation. He has spent the last 10 years of his career in the Autodesk Manufacturing channel, where he is responsible for training, implementation, migration, and solution building. Rodney has extensive experience around the Autodesk, Inc., manufacturing products, including not only Autodesk PLM 360 software, but also AutoCAD, Inventor, and Vault software. In his current role, his primary focus is Autodesk PLM 360 software. He and his team have partnered with Autodesk Consulting to provide customers with a better understanding of how Autodesk PLM 360 software can solve their business problems. Services that he and his team provide include Autodesk PLM 360 scripting, training, implementation, development, and integration.

Enterprise, Beam Me Up: Inphi’s Enterprise PLM Solution
3
Introduction
About Inphi Inphi Corporation is a leading provider of high-speed, mixed signal semiconductor solutions for the communications, data center and computing markets. Inphi’s end-to-end data transport platform delivers high signal integrity at leading-edge data speeds, addressing performance and bandwidth bottlenecks in networks, from fiber to memory.
Our Optical interconnect products which include amplifiers and drivers, are our planes, working across 3,000 kilometers in the long haul and metro markets. Inphi enables carriers and other service providers to move massive data streams to where they need to be, whether on legacy 10G networks, today's 100G networks or tomorrow's lightning fast 400G next-generation networks. Our leading edge optical products are designed into routing, switching, and optical transport equipment for the long haul and metro markets, delivering data with high signal integrity wherever it needs to go.
Our Networking interconnect products, which include CDRs (clock data recovery chipsets) and SERDES (serializer- deserializer), are our trains, working across hundreds of meters in data centers. These products, both for the Enterprise and Cloud Data Center markets, serve the needs of customers building routing and switching systems designed for the ever-growing volumes of data moving through cloud-based architectures for software as a service (SaaS) and web services. These network to CPU products offer full 10G/40G/100G data rate transitions, improved margins and deliver the highest on-chip signal integrity.

Enterprise, Beam Me Up: Inphi’s Enterprise PLM Solution
4
Finally, our Memory interconnect products, which include buffers and registers, serve as our trucks, working across millimeters or centimeters, connecting CPUs to memory. These products speed the movement of data for server memory and storage equipment within the enterprise and Cloud data center. These products address the growing need for in-memory databases, which has never been greater and continues to accelerate. Our memory buffer and memory register customers count on Inphi products to reliably deliver best in class signal integrity at high signaling rates. With our solutions, customers can operate at higher speeds, with greater memory capacity, and better power efficiency, thereby providing more cost-effective and energy-efficient operations.
Our focus on fast data movement and customer success in our core markets has enabled us to grow the company fast. Revenue has been growing rapidly. Our employee base has been growing fast as well, and we are rapidly adding the best and brightest analog, mixed-signal, and DSP talent to our ranks. We are focused on customer success, enabling them to move fast to deliver differentiated solutions in the markets they serve.
Our story is simple: We move data fast. We allow our customers to move fast. As a result, our company is growing fast.
New Product Introduction
Introduction One of the primary reasons Inphi decided to use PLM was to better manage our New Product Introduction (NPI). Inphi uses a phased gate process similar to what other companies do. Inphi’s process consists of a Concept phase, Investigation phase, Development phase, Sampling phase, Pre-production phase, Manufacturing phase and finally End of Life as show below.
Concept
Phase
Investigation
PhaseDevelopment
Phase
Engineering
Sample
Phase
Pre-
production
Phase
Mass
Production
Phase
End-of-Life
Phase
C-Exit
Checkpoint
I-Exit
Checkpoint
D-Exit
Checkpoint
S-Exit
Checkpoint
P-Exit
Checkpoint
M-Exit
Checkpoint
In order to move from one phase to the next, there is an exit checkpoint. At these checkpoints, there are many requirements from Marketing, Engineering and Operations to complete in order to move to the next phase. These various requirements help ensure the quality and financial validity of the product as it moves through its lifecycle. Prior to PLM, Inphi tracked these requirements in PowerPoint presentations and a Microsoft Word document that was circulated for signature approval at each phase. Both of these made it difficult to verify completeness of the requirements and became increasingly difficult to manage as Inphi grew into a multi-national organization.
Besides a place to track the deliverables, we also needed a place for the various organizations to manage their work being done to satisfy their NPI exit requirements. This was especially true for the Engineering and Operations organizations as they have the bulk of the work in the Development, Sampling and Pre-production phases. Prior to PLM, this work was saved in a SharePoint document library.

Enterprise, Beam Me Up: Inphi’s Enterprise PLM Solution
5
While this worked for many years, it did not meet our needs for lifecycle management, workflow, approval and reporting; and also relied on support and maintenance of SharePoint.
We needed a better way to manage the NPI and PLM was our answer as you will see in this handout.
Workspace Architecture A simplified list of workspaces used for managing our product development is below. Is consists of a top level workspace, Products – NPI, for tracking the NPI lifecycle of the product. Below that there are three departmental workspaces: NPI Marketing, NPI Engineering and NPI Operations, all of which are used to track NPI phase exit requirements. As mentioned before, Engineering and Operations both have additional workspaces to perform and track all their work being done to satisfy their exit requirements. Additionally, there is also an Items and BOMs workspace to manage the product’s components and bills of materials and various document libraries to manage the many documents created during the product development.
Products - NPI
NPI Marketing NPI Engineering
Enginering Projects
NPI Operations
Operations Projects
Items and BOMsDocument Libraries

Enterprise, Beam Me Up: Inphi’s Enterprise PLM Solution
6
Document Control Before we dive into the NPI workspaces, let’s discuss the document libraries and Inphi’s customized approval process.
During product development, many documents are created. These include customer-facing documents such as datasheets, application notes and product qualification reports, but also include many documents created for internal consumption such as development plans, design specifications, design reviews, qualification plans, and much more. Furthermore, these documents require various levels of revision control. Documents such as datasheets require very stringent revision control as they go to customers. Internal documents like plans and specifications require approval but don’t require all the strict controls around revision control. Finally, a large portion of documents require no control or approval as they are collaborative in nature and change frequently. To manage all of these documents, we created two types of document library workspaces. We use a revision controlled workspace and document change order (DCO) workspace for the revision controlled documents and a workspace with workflow for the internal documents that require approval or no approval. For documents that do not require approval, we simply put them in a workflow state called “No Approval Required”. Furthermore, we created two sets of these workspaces: one set for engineering documents and another set for all other departments. This was done in order to control access permissions to the various libraries.
As you can imagine, there are many different document types to manage. We wanted a system that would allow us to classify documents by department, type and sub-type to allow for easy searching. Also, each of these different document types needed unique numbering systems. As a result, we created several admin workspaces to control the document types and numbering. During the presentation we will discuss these admin workspaces as well as more on the business logic.
Our users also wanted to simplify their document creation. Often when creating other items there will be related documents that need to be created and approved. As such, we heavily utilize the notion of “spawning” item creation. During spawning, items are created in other workspaces and then linked to each other via linking picklists. This eliminates extra pick and click for the users and ensures items are properly linked and related to one another. Some of the scripting necessary to perform these actions can be found in the appendix of this handout and will be discussed during the presentation.
Document Libraries
Revision Controlled
DocumentsDocuments
Enginering Docs -
Rev. Controlled
Document
Change Order
Enginering
Documents

Enterprise, Beam Me Up: Inphi’s Enterprise PLM Solution
7
Document and Item Approval The approve documents as well as other items in PLM may require going through an approval process. In SharePoint we left it up to the individual user to select who should approve an item. Often the user did not pick the correct people and others were uninformed of the change or release of a document or item. We wanted to rectify this in PLM so for every document / item type in PLM, we created a pre-set list of approvers. However, this was not a simple list of approvers. The approval lists and groups we created were based on the product line and individuals involved in the project (e.g. Program Manager, Design Lead). Another requirement of our approval process was a tiered approach with 4 approval tiers and one or many approvers in each tier. In general, as you move from one tier to the next, you are moving higher up the company organizational chart to the executives and CEO.
Due to the complex requirements, our approval procedure could not be done with out of the box approvals in PLM and resulted in the creation of several admin workspaces and development of workflow triggered scripts. As a feature, all items in PLM that require approval all have the same approval process so the users have the same experience as they move from one workspace to the next. An example of what our approval process looks like is shown below.
NPI Task Management As mentioned previously there are many requirements that must be completed by Marketing, Engineering and Operations prior to moving through an exit checkpoint during our NPI process. When implementing Autodesk PLM 360, we wanted a better way to track these requirements and ensure they were completed rather than relying on someone marking them completed in a PowerPoint or Word document. To do this, we created the tasks as lines in a grid tab in the departmental NPI workspaces. Each line in the grid tab represents one of the tasks that is necessary to be completed prior to moving to the next NPI phase. For each task, we indicate who is responsible for the task, a description of the task, from which Quality Service Procedure (Inphi’s business process ISO documents) the task came from, a link to the item or document in Autodesk PLM 360 (if applicable) and a checkbox to mark when the task is completed. An example of the Engineering tasks for one product are shown below. You can see that it includes two tasks for the Concept (“C”) phase, and seven tasks for the Investigation (“I”) phase. You will also see several tasks for the Development (“D”) phase.

Enterprise, Beam Me Up: Inphi’s Enterprise PLM Solution
8
The various tasks are created via scripting and copying grid items from an admin workspace. We chose to use this method rather than directly in scripting as it is easier to maintain in the future as the admin items can be easily edited to create new tasks or edit existing ones as required. The admin workspace will be discussed during the presentation and some of the scripting used to copy the grid items can be found in the appendix of this handout.
Furthermore, users wanted to be reminded when they needed to complete their tasks. If the tasks were individual items in a separate task workspace, they could have a workflow with reminders and escalation turned on. However, since we made the decision to keep the tasks more tightly coupled to the NPI item by putting them on the grid tab, we needed a method to notify users. We settled on scripting that will e-mail users every week if they have not completed their task and only when the task is due within the next 30 days of the “Due Date”. This last feature is important as some of the NPI phases such as Development may take 6 to 12 months to complete and users do not want to receive weekly e-mails for this entire period.
The departmental tasks are only one piece of the puzzle. In order to ensure everything has been completed, we added conditional scripting to the workflow of the Product – NPI item. When a user submits an item for checkpoint approval, we validate whether or not all the tasks for the relevant phase being approved have been completed. If not, an error message is shown and the user is not able to submit the item for approval. Only once all tasks have been completed, can the item be submitted for approval.

Enterprise, Beam Me Up: Inphi’s Enterprise PLM Solution
9
An example is shown below where the Operations task C3 and Engineering task C2 have not been completed so the user is unable to perform the “Submit for Approval” workflow transition. During our presentation we will dive deeper into the business logic and functionality. Again, some of the scripting used for this validation can be found in the appendix of this handout.
Engineering and Operations Projects A single checkbox in the NPI tasks may require much work behind it. For example, “Final Design Reviews completed for all projects” in Engineering may have tens of design projects being done for the overall product design. To track these projects as well as development projects in Operations, we created two workspaces called Engineering Projects and Operations Projects. The two are very similar in nature and we’ll just discuss Engineering Projects for simplicity.
During development, many types of “projects” are done to support the overall product development. For Engineering these include analog circuit design, digital circuit design, hardware design, firmware design and product validation to name a few. Each of these different projects have different documentation requirements but often have similar workflow going through various stages of development until being released. For each product being developed there may be ten to twenty different Engineering projects. We needed a way to track these project’s deliverables and lifecycle. We also needed to be able to see how they all related to each other and to the overall product development.
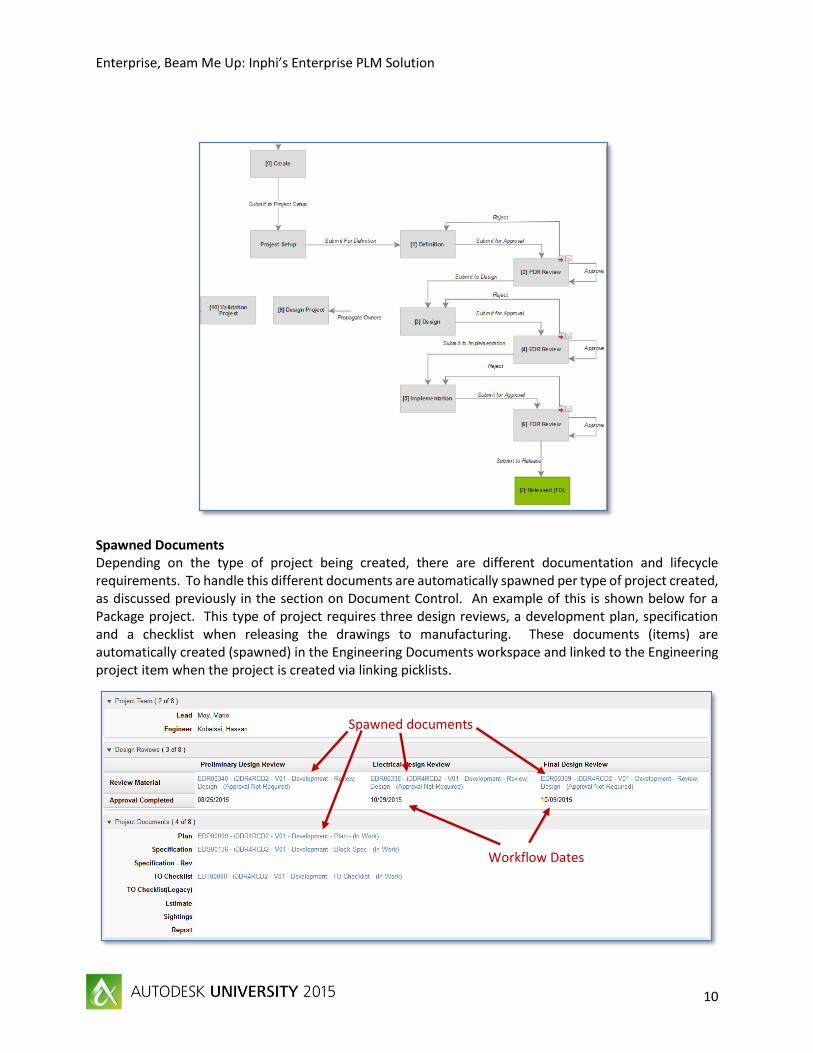
Workflow Depending on the type of project, the workflow will follow different paths. Most projects follow the workflow below going through three phases of design reviews (Preliminary, Electrical and Final). The standard tiered approval process discussed previously is used to move on to each phase in the development cycle until the Released state is reached.
Enterprise, Beam Me Up: Inphi’s Enterprise PLM Solution
10
Spawned Documents Depending on the type of project being created, there are different documentation and lifecycle requirements. To handle this different documents are automatically spawned per type of project created, as discussed previously in the section on Document Control. An example of this is shown below for a Package project. This type of project requires three design reviews, a development plan, specification and a checklist when releasing the drawings to manufacturing. These documents (items) are automatically created (spawned) in the Engineering Documents workspace and linked to the Engineering project item when the project is created via linking picklists.
Spawned documents
Workflow Dates

Enterprise, Beam Me Up: Inphi’s Enterprise PLM Solution
11
Another feature we add to the Engineering project are fields for the project team and the dates the design reviews are completed via the workflow. The dates are automatically added to the item details by a script that runs on the workflow transition. By doing this, the user’s view can be configured (or a report run) to quickly show the status of all projects being worked for a given NPI. This allows the program manager to quickly see where to focus resources if needed. An example is shown below.
Related Projects Since there can be many projects all being done for a product development, and some can be dependent on others, we wanted a way to visualize the project hierarchy. We initially tried using the Project Management tab but this was only able to link items and see their schedule. We wanted a better way to visualize the projects, their workflow state, and the status of their spawned documents. To do this, we decided to use the Bill of Material (BOM) tab (renamed Sub Items) and the Where Used tab (renamed Parent Items). Whenever a project is created, the user can specify a parent project. When the project is saved, it is automatically added to the BOM tab of the parent project. Also, when the various documents are spawned as discussed above, they are also added to the BOM tab of the project. This allows us to easily see related projects, documents and their attachments as shown below.

Enterprise, Beam Me Up: Inphi’s Enterprise PLM Solution
12
Items and BOMs Besides the project tracking and all associated collateral documents being created, we also create components (Items) and Bill of Materials (BOMs) for our products in order to manufacture them. Prior to PLM, the creation and tracking of these items and BOMs was not well managed. Item numbers were manually assigned in Oracle E-Business Suite (EBS) and given to the engineer. The engineer would create drawings or assign components (e.g. resistor or capacitors) to these items and also create the BOM for the product. There was not much formal review process and items were “released” by e-mailing the information or BOM spreadsheet to someone to input into Oracle EBS. As you can image, this created many opportunities for mistakes and did not keep people well informed of the changes being made.
Having moved to PLM, engineers now create items in Autodesk PLM 360. A Change Order process is used to release or revise items and BOMs. The workflow for this Change Order process is shown below.

Enterprise, Beam Me Up: Inphi’s Enterprise PLM Solution
13
This change order process addressed the issue of change control and keeping people informed as to who changed an item when and why, but it did not address the issue of the manual entry into Oracle EBS. To remedy this, we added an integration to Oracle EBS with Jitterbit (aka PLM Connect). When the workflow reaches the planning state (this is the managed state in the workflow map), the item is released in Autodesk PLM 360 and it is also sent to Oracle to either be created or updated as appropriate. An example is shown below for a capacitor (CAP-0074). You can see the item’s lifecycle and release date in both Autodesk PLM 360 and Oracle EBS. In a similar way, bills of materials are also created. During the presentation we will discuss more details on the Oracle EBS integration.

Enterprise, Beam Me Up: Inphi’s Enterprise PLM Solution
14
Besides managing the item’s lifecycle, we needed a better way to manage our CAD drawings. Drawings were stored on a network drive and were effectively uncontrolled. It was hard to determine which drawing went with what revision of an item. Therefore we decided to introduce Autodesk Vault to manage our CAD data. However, we did not want a standalone repository so we decided to integrate with Autodesk PLM 360 to control the creation of items in Vault and to control the lifecycle and release process of items in Autodesk PLM 360. Again we turned to Jitterbit for this integration.
When an item is created in Autodesk PLM 360, a CAD item is created in the Vault repository via scripts and integration, and a link is also added to the record in Autodesk PLM 360. This allows editors and viewers to quickly find drawings associated with the item.

Enterprise, Beam Me Up: Inphi’s Enterprise PLM Solution
15
Besides providing a convenient link, the integration solution also controls the lifecycle of the Vault item via the same Change Order that releases the item to Oracle EBS. To do this, the workflow in Vault was disabled and controlled through the integration with Autodesk PLM 360. When the item reaches the Planning state (the managed state) in the workflow, not only is the item sent to Oracle EBS for creation / update, the lifecycle is set in Vault as well. This keeps all three systems in sync with the latest information.
Conclusion Inphi’s Autodesk PLM 360 implementation is truly an enterprise solution. It is in use by over 300 users per month accessing from all of our worldwide locations. Through the use of PLM 360, we have been able to: improve compliance to ISO procedures, improve visibility for development status, improve visibility to document and bill of material changes, and improve efficiency and accuracy by integration with other business applications all of which lead to improved time to market and quality of our products.

Enterprise, Beam Me Up: Inphi’s Enterprise PLM Solution
16
Appendix
Document Spawning and Linking Scripts As discussed prior, different types of projects have different documentation requirements. Below is an example of a “Die” project that has three documents (Plan, Specification and Tapeout Checklist). The three items are “spawned” when the die project is created. The three items are created in the document libraries and then links are created in the die project and the respective document items in order for the users to get back and forth easily between the items.
Item Details of EDP00092:
Below is the code used to spawn the three documents. Note that we use a library script which contains the function used to create the items and add the linking picklist. A library script was chosen as we use this spawning function throughout our tenant.
if (projType == 'Die')
{
newProperties.DOCUMENT_TITLE = 'Micro-Arch Specification';
newProperties.DOCUMENT_TYPE_SUB = 'Spec';
newProperties.DOCUMENT_PREFIX = 'EDS';
newProperties.APPROVAL_REQUIRED = 'Yes';
newProperties.DOCUMENT_TYPE = newProperties.DOCUMENT_TYPE1 + " - " +
newProperties.DOCUMENT_TYPE_SUB;
newProperties.APPROVAL_LISTS = newProperties.PRODUCT_LINE + " - " +
newProperties.DOCUMENT_TYPE;
newProperties.PREFIX_SEQUENCER = newProperties.DOCUMENT_PREFIX;

Enterprise, Beam Me Up: Inphi’s Enterprise PLM Solution
17
spawDocAndAddToPicklist(item, "SPECIFICATION", "WS_ENGINEERING_DOCUMENTS",
newProperties, true, "ASSOCIATED_PROJECT");
newProperties.DOCUMENT_TITLE = 'Die Development Plan';
newProperties.DOCUMENT_TYPE_SUB = 'Plan';
newProperties.DOCUMENT_PREFIX = 'EDP';
newProperties.APPROVAL_REQUIRED = 'Yes';
newProperties.DOCUMENT_TYPE = newProperties.DOCUMENT_TYPE1 + " - " +
newProperties.DOCUMENT_TYPE_SUB;
newProperties.APPROVAL_LISTS = newProperties.PRODUCT_LINE + " - " +
newProperties.DOCUMENT_TYPE;
newProperties.PREFIX_SEQUENCER = newProperties.DOCUMENT_PREFIX;
spawDocAndAddToPicklist(item, "PLAN_ENG", "WS_ENGINEERING_DOCUMENTS",
newProperties, true, "ASSOCIATED_PROJECT");
newProperties.DOCUMENT_TITLE = 'Tapeout Checklist';
newProperties.DOCUMENT_TYPE_SUB = 'TO Checklist';
newProperties.DOCUMENT_PREFIX = 'EDT';
newProperties.APPROVAL_REQUIRED = 'Yes';
newProperties.DOCUMENT_TYPE = newProperties.DOCUMENT_TYPE1 + " - " +
newProperties.DOCUMENT_TYPE_SUB;
newProperties.APPROVAL_LISTS = newProperties.PRODUCT_LINE + " - " +
newProperties.DOCUMENT_TYPE;
newProperties.PREFIX_SEQUENCER = newProperties.DOCUMENT_PREFIX;
spawDocAndAddToPicklist(item, "TO_CHECKLIST1", "WS_ENGINEERING_DOCUMENTS",
newProperties, true, "ASSOCIATED_PROJECT");
}
The library function spawDocAndAddToPicklist is defined below:
function spawDocAndAddToPicklist(baseItem, pickListFieldName, spawnItemToCreate,
spawnItemProperties, twoWayLink, spawnedPickListField)
{
var newItem = createItem(spawnItemToCreate);
for (var propKey in spawnItemProperties)
{
newItem[propKey] = spawnItemProperties[propKey];
}
baseItem[pickListFieldName] = newItem;
if (twoWayLink === true)
{
if (spawnedPickListField !== null)
{
newItem[spawnedPickListField] = baseItem;
}
}
if (spawnItemToCreate == "WS_ENGINEERING_DOCUMENTS" || spawnItemToCreate ==
"WS_DOCUMENT_LIBRARY")
{
setApprovalProjectTeam(newItem);
}
}
Adding Items to the Bill of Materials Tab In addition to adding the spawned documents to the item details, as discussed prior, we also add them to the items’ BOM tab. Note that you must have a quantity when adding to a BOM so we add items with quantity equal to 1 and then configure the BOM view to not display the quantity.

Enterprise, Beam Me Up: Inphi’s Enterprise PLM Solution
18
Item Details of the project:
Bill of Materials tab showing the same three items as in the Item Details:
Script code used to add the items to the BOM tab:
if(item.PLAN_ENG!==null)
{
i++;
item.boms.addBOM(item.PLAN_ENG, 1, null, i, null);
}
if(item.SPECIFICATION!==null)
{
i++;
item.boms.addBOM(item.SPECIFICATION, 1, null, i, null);
}
if(item.SPECIFICATION_REV!==null)
{
i++;
item.boms.addBOM(item.SPECIFICATION_REV, 1, null, i, null);
}
if(item.TO_CHECKLIST1!==null)
{
i++;
item.boms.addBOM(item.TO_CHECKLIST1, 1, null, i, null);
}
if(item.TO_CHECKLIST!==null)
{
i++;
item.boms.addBOM(item.TO_CHECKLIST, 1, null, i, null);
}
if(item.ESTIMATE!==null)
{
i++;

Enterprise, Beam Me Up: Inphi’s Enterprise PLM Solution
19
item.boms.addBOM(item.ESTIMATE, 1, null, i, null);
}
if(item.SIGHTINGS!==null)
{
i++;
item.boms.addBOM(item.SIGHTINGS, 1, null, i, null);
}
if(item.REPORT!==null)
{
i++;
item.boms.addBOM(item.REPORT, 1, null, i, null);
}
Furthermore, in order to create the project hierarchy, we also add the current project to the BOM of the parent project as defined in the Item Details using these simple lines of code.
if(item.PARENT_PROJECT!==null)
{
item.PARENT_PROJECT.boms.addBOM(item, 1, null, item.PARENT_PROJECT.boms.length + 1,
null);
}
Item Details of current project:

Enterprise, Beam Me Up: Inphi’s Enterprise PLM Solution
20
Bill of Materials of the “Parent Project”:

Enterprise, Beam Me Up: Inphi’s Enterprise PLM Solution
21
NPI Task Checking and Validation Scripts To move through the NPI, on a submit for approval, we validate whether all of the NPI tasks have been completed by Operations, Engineering and Marketing. The Item Details has links to the three respective departmental items which is used in the validation script.
To perform the validation, we look at the grid tab of the three respective items and ensure that the “Completed” field has been checked off. Since there can be many tasks from different phases being worked on, we only check tasks for the current phase being submitted for approval.

Enterprise, Beam Me Up: Inphi’s Enterprise PLM Solution
22
Below is the code used to check the tasks:
function validateNPICheckpoint(phase) {
var messages = [];
var msg;
if (phase !== "") {
var opGrid = item.OPERATIONS_NPI.grid;
var engGrid = item.ENGINEERING_NPI.grid;
var markGrid = item.MARKETING_NPI.grid;
if (opGrid.length === 0) {
messages.push("Operations NPI task list has not been populated.");
}
for (var i in opGrid) {
if (opGrid[i].NPI_PHASE === phase) {
if (opGrid[i].COMPLETED === false) {
msg = "Operations code " + opGrid[i].CODE + " - " +
opGrid[i].DESCRIPTION + " must be completed.";
messages.push(msg.toString());
}
}
}
if (engGrid.length === 0) {
messages.push("Engineering NPI task list has not been populated.");
}
for (var j in engGrid) {
if (engGrid[j].NPI_PHASE === phase) {
if (engGrid[j].COMPLETED === false) {
msg = "Engineering code " + engGrid[j].CODE + " - " +
engGrid[j].DESCRIPTION + " must be completed.";
messages.push(msg.toString());
}
}
}
if (markGrid.length === 0) {
messages.push("Marketing NPI task list has not been populated.");
}
for (var k in markGrid) {
if (markGrid[k].NPI_PHASE === phase) {
if (markGrid[k].COMPLETED === false) {
msg = "Marketing code " + markGrid[k].CODE + " - " +
markGrid[k].DESCRIPTION + " must be completed.";
messages.push(msg.toString());
}
}
}
}
return messages;
}