atrio crm for m&a user guide - microsoft azure · this document is designed as an introductory...
TRANSCRIPT

ATRIO CRM FOR M&A 2016
USER GUIDE

1 2 Atrio CRM for M&A
User Guide
TABLE OF CONTENTS
Table of Contents .......................................................................................................................................................2
Introduction ................................................................................................................................................................5
1 The Basics ...........................................................................................................................................................5
1.1 Accessing Atrio CRM for M&A ....................................................................................................... 5
1.1.1 Browser ...............................................................................................................................................5
1.1.2 Outlook (CRM for Outlook Add-In) .....................................................................................................5
1.1.3 Mobile .................................................................................................................................................5
1.2 Navigation ...................................................................................................................................... 6
1.3 Viewing Records (views) ................................................................................................................ 7
1.4 Types of Records ............................................................................................................................ 8
1.4.1 Leads ...................................................................................................................................................8
1.4.2 Companies and Contacts ....................................................................................................................8
1.4.3 Opportunities, Transactions, and Prospects ......................................................................................9
1.5 Tracking Conversations in CRM ................................................................................................... 10
1.5.1 Tasks ................................................................................................................................................ 10
1.5.2 Phone Calls ...................................................................................................................................... 11
1.5.2.1 Immediate Call ................................................................................................................................. 12
1.5.2.2 Future Call ........................................................................................................................................ 12
1.5.3 Emails – Tracking through Outlook ................................................................................................. 13
1.5.4 Appointments .................................................................................................................................. 15
1.6 Social Insights .............................................................................................................................. 17
1.6.1 Identifying your Target .................................................................................................................... 17
1.6.2 Understanding your Target ............................................................................................................. 18
1.6.3 Engaging your Buyer ........................................................................................................................ 19
2 Lead Management ........................................................................................................................................... 21
2.1 Adding a Lead .............................................................................................................................. 21
2.2 Importing a List of Leads ............................................................................................................. 21
2.3 Lead Qualification Process .......................................................................................................... 22
2.3.1 Qualifying a Lead ............................................................................................................................. 22
2.3.2 Disqualifying a Lead ......................................................................................................................... 23
3 Company/Contact Management ..................................................................................................................... 24
1 3 Atrio CRM for M&A
User Guide
3.1 Adding a Company ...................................................................................................................... 24
3.2 Adding a Contact ......................................................................................................................... 24
4 Opportunity Management .............................................................................................................................. 27
4.1 Creating a New Opportunity ....................................................................................................... 27
4.2 Managing the Sales Process ........................................................................................................ 28
4.2.1 Tracking Opportunity Progress ........................................................................................................ 28
4.2.2 Won Opportunity (Convert to Transaction) .................................................................................... 29
4.2.3 Lost Opportunity .............................................................................................................................. 29
Opportunity Lost .............................................................................................................................................. 30
5 Transaction Management ............................................................................................................................... 31
5.1 Creating Prospects on a Transaction ........................................................................................... 31
5.1.1 Creating Prospects through the Wizard .......................................................................................... 31
5.1.2 Creating Prospects Manually ........................................................................................................... 34
5.2 Managing the Transaction Process ............................................................................................. 37
5.2.1 Tracking Prospect Progress ............................................................................................................. 37
5.2.2 Tracking Prospect Interactions ........................................................................................................ 38
5.2.3 Reporting ......................................................................................................................................... 40
5.2.4 Close Transaction............................................................................................................................. 40
5.3 Expense and Payment Tracking ................................................................................................... 40
6 Marketing Management .................................................................................................................................. 42
6.1 Marketing Lists ............................................................................................................................ 42
6.1.1 Creating a Marketing List ................................................................................................................. 42
6.2 Quick Campaigns ......................................................................................................................... 43
6.2.1 Creating a Quick Campaign.............................................................................................................. 43
6.2.2 Managing a Quick Campaign ........................................................................................................... 44
6.3 Campaigns ................................................................................................................................... 45
6.4 Social Engagement ...................................................................................................................... 45
7 Dashboards: Business at a Glance ................................................................................................................... 47
7.1 CRM for M&A – Overview ........................................................................................................... 47
7.2 M&A Transaction Dashboard ...................................................................................................... 48
7.3 M&A Marketing Dashboard ........................................................................................................ 48
8 Tips and Tricks ................................................................................................................................................. 49
8.1 Global Search............................................................................................................................... 49

1 4 Atrio CRM for M&A
User Guide
8.2 Filtering/Sorting Views ................................................................................................................ 49
8.3 Advanced Find ............................................................................................................................. 51
8.4 Deactivating Records ................................................................................................................... 52
8.5 Counting Records in a View ......................................................................................................... 53
Compatibility ........................................................................................................................................................... 54
Support .................................................................................................................................................................... 55
Disclaimer ................................................................................................................................................................ 56

1 5 Atrio CRM for M&A
User Guide
INTRODUCTION
This document is designed as an introductory guide for CRM users to learn the basics of using Atrio CRM for M&A (CRM for Mergers and Acquisitions). It describes how to manage a firm better through best practices, process flows, and consolidating data into one central location.
This solution provides a streamlined process for importing lists into CRM and sending them through a lead qualification process before converting them into Opportunities. From there, users can track conversations and information regarding an Opportunity before converting it into a Transaction. The guide will walk through these stages and then show how to manage Prospective Buyers/Sellers on a transaction. CRM also has the ability to quickly generate dynamic content such as e-mail templates, NDAs, and ticklers for specific transactions. Users can even send these out through e-mail blasts or bulk print letters to connect with key decision makers quickly and efficiently.
Once firms begin using CRM, they can utilize dashboards and reports to get an overview on important deals and to make informed strategic decisions. This document is written from the perspective of a user who has CRM Online and is using a browser. If you are using CRM On-premise or if you’re accessing Outlook, the screens may slightly differ.
1 THE BASICS
1.1 ACCESSING ATRIO CRM FOR M&A
1.1.1 Browser
CRM can be accessed directly through your browser of choice meaning that you can access it from anywhere in the world. This supports efficient data access and collaboration. Users can be assured that their data integrity and privacy is protected through Microsoft’s security model. It is recommended to use the browser as your main source of access to CRM for ease of use, additional functionality, and performance reasons.
1.1.2 Outlook (CRM for Outlook Add-In)
When working with CRM from Outlook, users are never too far from their e-mail and calendars, which helps keeps them stay focused on the business. Users can access CRM records and functionality directly through CRM for Outlook if they want to work in one system. CRM for Outlook also allows users to track e-mails and appointments created in Outlook so that they flow automatically into CRM.
1.1.3 Mobile
Dynamics CRM is supported on all mobile platforms and is available from your platform’s app store. Usage on different devices might vary slightly but it supports the majority of features that are available with your browser version. It is recommended to use the mobile version as a data consumption and activity creation tool.

1 6 Atrio CRM for M&A
User Guide
1.2 NAVIGATION
The navigation bar in CRM is at the top of the browser. By clicking , you can open up a list of the available sections in CRM. A majority of user’s time is spent in the Sales section of CRM. By clicking Sales, you can see all the available areas you can navigate to.
On the right of the navigation bar is also the Global Search. You can enter a search word in this location and it will search all of CRM for any relevant records.
The Advanced Find button is to the right of the global search and will display a pop-up which allows users to build advanced queries to pull data out of CRM.
If a user ever needs help with CRM, they can always navigate to the question mark on the far right of the screen. This will open the help area which contains all types of guides from basic usage to administrative tasks.

1 7 Atrio CRM for M&A
User Guide
1.3 VIEWING RECORDS (VIEWS)
Views in CRM are filtered lists of records (Companies, Contacts, Transactions, etc). The purpose of them is to show specific subsets of data such as all Companies that haven’t been contacted in the last 60 days or all Transactions that a user own. There are a number of views that come pre-built with the Atrio M&A Feature Pack and users can create personal views tailored to them.
1. For example, to see a list of Transactions, go to Sales area and click on Transactions.
2. A default view of Transactions will appear on the screen. If you want to switch views to see a different subset of Transactions, click on the down arrow next to the current view and select one of the pre-built Views.

1 8 Atrio CRM for M&A
User Guide
Note: All areas in CRM will have some views prefixed with “My” (ex. “My Active Transactions”). This means that the view is filtered to only show records that the logged in user owns.
3. Double clicking on a record will open up additional information about the record.
1.4 TYPES OF RECORDS
There are a few different record types within CRM and it’s important to know the distinction between them and how to best utilize the built in architecture of Dynamics CRM.
1.4.1 Leads
In Microsoft Dynamics CRM, Leads are suspects or unqualified individuals that can be created from many different
sources. Examples of leads include inquiries from a website, a list of potential prospects generated from data sources
like Insights or Cap IQ, and a stack of business cards collected from a trade show. Leads differ than Contacts or
Companies because they aren’t actual clients yet and they still require nurturing and/or a qualification process. Keeping
suspects as Leads in your CRM until they are qualified helps to prevent cluttering the Contacts and Accounts in your
CRM system with junk records that you no longer communicate with.
Leads can be managed by individuals at a firm for immediate follow-up or as part of a call center where salespeople
make cold calls against target lists to identify potential clients and find business. Over time, Leads can either be qualified
or disqualified. Disqualifying them will remove them from your views whereas qualifying a lead will convert the record
into an Opportunity, Contact, and Company record automatically.
1.4.2 Companies and Contacts
In Microsoft Dynamics CRM, Companies represent the organizations users are currently doing business with or are an Opportunity. A company record will contain every interaction with that company and its associated Contacts. It contains a historical record of all communication and activities that are related to that Company which allows users to track conversations and see the status of current Opportunities and Transactions. By consolidating this information into one place of truth, all employees can be on the same page and can avoid duplicating their efforts.

1 9 Atrio CRM for M&A
User Guide
Companies and Contacts can be added in the following ways:
• Importing CSV or Excel Files
• From Outlook contacts
• By qualifying leads in CRM which creates a Company
• By manually entering in new records
1.4.3 Opportunities, Transactions, and Prospects
Opportunities and Transactions are highly customized within the Atrio M&A solution and will serve as the primary focus in CRM. In CRM, Opportunities and Transactions are both stored in the “Transaction” entity. A transaction record can represent a future Opportunity with different sales stages or it can represent an ongoing transaction.
Once the record has become a Transaction, users can begin adding Prospects that are competing for the sale/buy of the current target company. Each Prospect is a different record and users can track activities and progress for each individual potential buyer/seller. They can be entered manually if there are a handful or there is a Transaction Wizard that can automatically add hundreds of prospects (this process is described in a later section). It is important to note that Prospects (transaction companies) are linked to existing Companies within CRM but they are different records. Refer to the illustrations below for more information:
CRM Companies Transaction Companies Transaction
Company A
Company B
Company C
Company D
Transaction Company B1
Transaction Company C1
Transaction Company C2
Transaction A
(Regarding company A)
Transaction D
(Regarding company D)
The Illustration below demonstrates that company B and C are interested in buying company A. While company C is also interested in buying Company D.

1 10 Atrio CRM for M&A
User Guide
1.5 TRACKING CONVERSATIONS IN CRM
CRM Activity records keep track of the interactions between individuals (Contacts) at your clients/prospects. As best practice, Activities should always be regarded to Contacts and not to Companies. An Activity in CRM can be either an e-mail message, phone call, appointment, or a task.
1.5.1 Tasks
CRM Tasks are used to identify work items that need to be completed in the future for a specific Contact, Lead, or Transaction in CRM. These are useful activities because they will create reminders in Outlook for users to follow up and complete tasks before a given date. Users can also assign tasks to other colleagues to delegate work efficiently and create reminders for them.
1.5.1.1 Creating a Task
1. Navigate to the record in CRM you want to create a task for (could be a Contact, Company or Transaction). On the social pane under the Activities section, click the Add Task button.
2. Fill in the Subject, Due Date field, and any additional notes if necessary. You can also change the owner if you want to assign the task to another colleague.
3. Click OK. This task will sync to your Outlook if you have CRM for Outlook installed. It will display an alert in Outlook and also appear on your M&A dashboards.
1 11 Atrio CRM for M&A
User Guide
1.5.1.2 Completing a Task
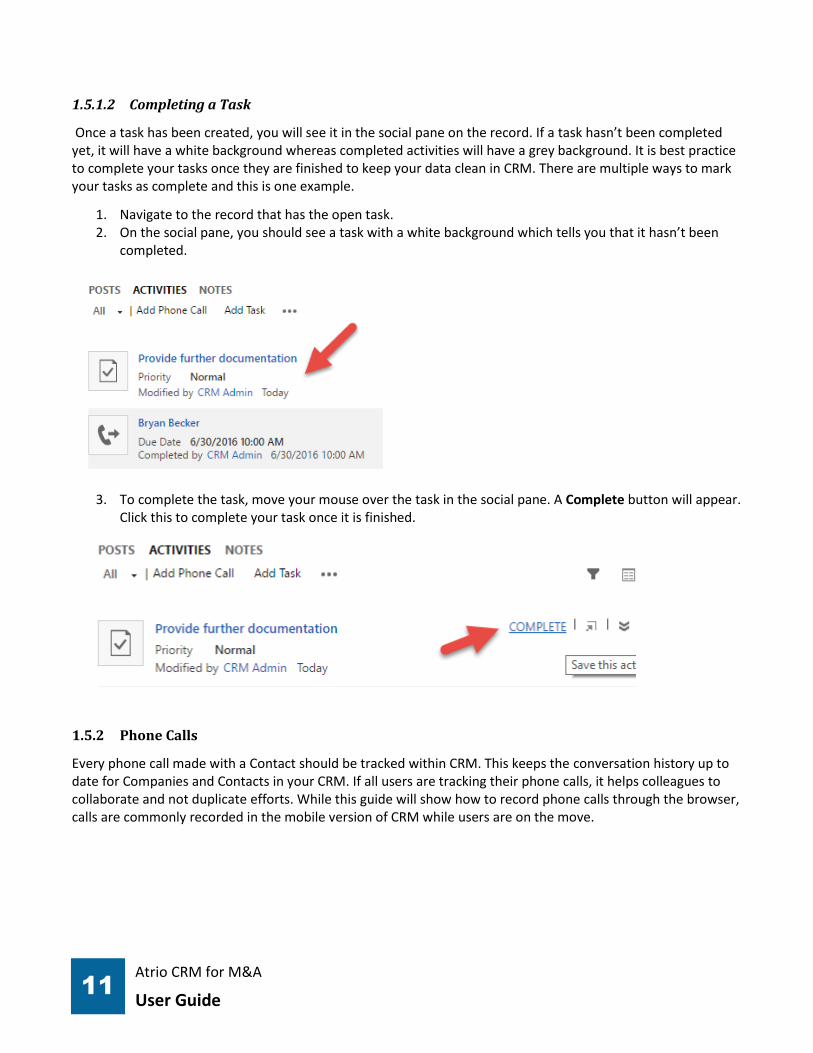
Once a task has been created, you will see it in the social pane on the record. If a task hasn’t been completed yet, it will have a white background whereas completed activities will have a grey background. It is best practice to complete your tasks once they are finished to keep your data clean in CRM. There are multiple ways to mark your tasks as complete and this is one example.
1. Navigate to the record that has the open task. 2. On the social pane, you should see a task with a white background which tells you that it hasn’t been
completed.
3. To complete the task, move your mouse over the task in the social pane. A Complete button will appear. Click this to complete your task once it is finished.
1.5.2 Phone Calls
Every phone call made with a Contact should be tracked within CRM. This keeps the conversation history up to date for Companies and Contacts in your CRM. If all users are tracking their phone calls, it helps colleagues to collaborate and not duplicate efforts. While this guide will show how to record phone calls through the browser, calls are commonly recorded in the mobile version of CRM while users are on the move.

1 12 Atrio CRM for M&A
User Guide
1.5.2.1 Immediate Call
These are the steps to take for recording a call in progress or one that has just been completed.
1. Within CRM, navigate to the associate record you want to attach a Phone Call to. On the social pane under the Activities section, click the Add Phone Call button.
2. Enter a description, who the call was with, and whether the call was outgoing or incoming.
3. Click OK. This call will now appear as a completed activity in the social pane.
1.5.2.2 Future Call
These are the steps to schedule a future phone call and how to close it after it has been completed.
1. Click the sign on the navigation bar. 2. From there, select Phone Call.
3. This will open up a new phone call form which contains additional information. Enter a recipient, subject, and any additional information needed. If you want to link this call to a Transaction, set the Regarding to the transaction.

1 13 Atrio CRM for M&A
User Guide
4. Modify the start and due date to a future time. 5. Click Save. 6. Once the phone call has been completed in the future, navigate back to the phone call record and click
Mark Complete button at the top.
1.5.3 Emails – Tracking through Outlook
With the CRM for Outlook plugin, users can use Outlook to create e-mails as they always have. To have new e-mails populated into CRM so they appear on the social pane with the other activities, users simply have to track the e-mails as they come in. By tracking your e-mails in Outlook, it will create a copy of your e-mail in CRM under the record it’s regarded to (most often they will be tracked to a Contact or Transaction). When you are tracking e-mails, you have the option of clicking Track or Set Regarding.
1.5.3.1 Track
One option to track e-mails is to click Track. This will automatically try to link your e-mail to any Accounts or Contacts based on the e-mail addresses of those on the e-mail chain.
1. Once an e-mail comes into Outlook that you want to track, click on the e-mail. 2. With CRM for Outlook, a new section for CRM is visible under the Home Tab. Click the Track button.

1 14 Atrio CRM for M&A
User Guide
3. Once the e-mail is tracked, a box will appear underneath the e-mail showing which related records it associated the e-mail to in CRM.
1.5.3.2 Set Regarding
Another option for tracking e-mails is to use Set Regarding. This is a more granular method of tracking because you choose a specific record to link the e-mail to. Often times, users use this method to track e-mails to an ongoing Transaction.
1. Once an e-mail comes into Outlook that you want to track, click on the e-mail. 2. With CRM for Outlook, a new section for CRM is visible under the Home Tab. Click the Set Regarding
button.
3. This will open a popup box where you can choose a specific record to track the e-mail to. Choose which record type you want to link it to (Contact, Lead, Transaction).

1 15 Atrio CRM for M&A
User Guide
4. Search for the record you want using the search box. When you find the record, select the row and click Add.
5. A box will appear underneath the e-mail showing which record you regarded it to.
Note: Once you track an e-mail in Outlook, all other responses within that e-mail chain will automatically be tracked to the same record.
1.5.4 Appointments
Users can continue to use Outlook as their primary calendar for scheduling their day. With CRM for Outlook, they now have the option to track the appointments on their Outlook calendar so that they flow into CRM. Any change to the Appointment in CRM will also reflect in the user’s Outlook and vice versa.
1.5.4.1 Creating an Appointment
When creating an appointment in Outlook, there is one additional step to track it to a record in CRM.
1. Navigate to the calendar section in Outlook and click New Appointment.
2. Enter in a subject, location, start time, and end time along with any other relevant information. You can also invite attendees if needed.

1 16 Atrio CRM for M&A
User Guide
3. With CRM for Outlook, there is a new section for CRM under the Appointment Tab. Click Track or Set Regarding depending on how you want to track your appointment in CRM.
4. Once tracked, a box will appear under the appointment that shows the related records the appointment is tracked to.
NOTE: Alternatively, you can open a Contact, Lead, or Transaction in CRM and create an appointment from the social pane. Select the “…” button and then click Appointment to setup an appointment. If a record is created from CRM, Outlook will automatically sync and pull the appointment into your calendar.
1.5.4.2 Completing an Appointment
It is best practice to complete an appointment in CRM after it is finished. If an appointment needs to be rescheduled, simply change the Start and End times on an existing appointment or drag and drop it to a new slot on the Outlook calendar. It is important to enter any additional information in the description before completing it because the record becomes read-only. There are multiple ways to complete appointments.
Outlook Calendar
1. Double click an appointment on the Outlook Calendar. 2. In the CRM section on the Appointment tab, click View in CRM.
3. Click the Mark Complete button on the top of the record

1 17 Atrio CRM for M&A
User Guide
Outlook Activity View
1. Navigate to the Activity view in CRM for Outlook Sales -> My Work -> Activities. 2. By default, your view should display My Activities. Select the appointments that you want to Mark
Complete.
3. Click Mark Complete. It will then be removed from the open list of activities.
1.6 SOCIAL INSIGHTS
Social Insights is a free add-on for CRM that can help you identify, understand, and engage your buyers/sellers. It provides high quality company information instantly which can help you tailor your pitch and increase your win rate. Furthermore, it provides up-to-the-minute company news and social media buzz to keep you ahead of the game.
It also allows users to leverage their professional networks on linked-in as well as their colleague’s. This can help establish a foot in the door with target clients by noting mutual acquaintances, past employers, or common schools attended. A section for Social Insights can be found on Leads, Contacts, Companies, and Transactions in CRM.
1.6.1 Identifying your Target
When on a record in CRM, you can navigate to the Insights section to see relevant information regarding the Contact or Company you’re working with.

1 18 Atrio CRM for M&A
User Guide
An overview will be displayed containing basic information like industry, revenue, employees, contact information, and a description. Users can even bring in this information directly into CRM by clicking the Sync button on the upper right.
This will provide a general overview of your target company.
1.6.2 Understanding your Target
After getting an overview of your target, users can navigate to the Buzz section.
This section displays news articles, feeds, and social media posts that are relevant to the target. If you want to be informed any time “buzz” is generated about your target, you can create a Watch list by clicking the Follow button and selecting Watch list on the upper right.

1 19 Atrio CRM for M&A
User Guide
The Industry Profile section is another area to find more relevant information about your target’s challenges, trends, and company structure. Insights even provides a number of call prep questions that are relevant to the target’s industry.
1.6.3 Engaging your Buyer
Once users have information about their target company and know the right questions to ask, Insights helps to start a conversation by finding network connections with employees at the company. Users can add personal connections from Outlook, LinkedIn, and G-mail along with reference customers, work history, and education. Insights will take all this information from you and your colleagues and find related connections to help you get your foot in the door with a target company. By navigating to the People section, you can see a list of all known employees for an organization along with any connections you may have.

1 20 Atrio CRM for M&A
User Guide
Users can even strategically target an employee at a certain job level (ex. VP). By highlighting a person and clicking Sync, it will automatically create linked Contacts in CRM. Each employee also shows whether you have a connection directly to them or through a colleague that can help start a conversation.
If you click on the Connection link, you can see the exact connection that was made to the employee.
From here, users can start a conversation by clicking Start Conversation. Insights will provide contact information, mutual connections to name drop in a conversation, and even compelling events that are likely to be a hot topic of discussion.
Note: If you don’t see Social Insights in your CRM, please contact your Atrio consultant and they will install it for you.

1 21 Atrio CRM for M&A
User Guide
2 LEAD MANAGEMENT
2.1 ADDING A LEAD
If a user just received some contact information (ex. business card) from someone they might potentially do business with, it should be entered into CRM as a lead.
1. In CRM, navigate to Sales->Leads 2. On the top left, click the New button to create a new Lead record.
3. Enter in the name of the new contact along with along with any additional contact information or where they work. Setting a rating (ex. hot, warm, cold) for the lead also helps users to prioritize the leads they’re working on.
4. Click Save & Close.
2.2 IMPORTING A LIST OF LEADS
More often than not, users end up with a stack of leads (ex. business cards, generated lists, etc…) and entering them all by hand is tedious. Dynamics CRM provides an out of the box import process to make this easier.
1. If you are an administrator, navigate to Settings->Data Management and click Templates for Data Import. Then click, Templates for Data Import. If you do not have access, contact your administrator and they can provide you the template.
2. Select Lead for the template type and click Download.

1 22 Atrio CRM for M&A
User Guide
3. A lead template file will be downloaded. Open this file in Excel. 4. This template will contain columns for each field that exists on the Lead record in CRM. Copy and paste
your lead details from your other source into this template.
5. Save the template once it’s complete. 6. Navigate to Sales->Leads. And click the Import Data button.
7. A pop-up will appear where you can browse for your saved template. 8. Click Next. 9. Then click Submit. Your leads will be automatically imported into CRM.
Note: The import isn’t instantaneous but it can import up to a few hundred records per minute.
2.3 LEAD QUALIFICATION PROCESS
At the top of the lead form, you will see a process flow that can be used for qualifying leads. Each organization has a slightly different qualification process and this can be modified within CRM. As users work on qualifying leads, they should update the process to the correct stage so that colleagues will know the current status of the lead and what steps are remaining. Once the lead reaches the final closure stage, a user can Qualify the lead or they can disqualify it at any time.
2.3.1 Qualifying a Lead
Once a user has gathered enough information and has determined that the lead should become an Opportunity, they can qualify it.
1. Navigate to the Lead Section Sales->Leads and search for the record to qualify.
2. Click the Qualify button.
3. This will de-activate the lead and automatically create a Contact, Account, and Opportunity record from the information you entered on the lead. CRM will also bring over any tracked activities to the new records so that your conversation history is not lost.

1 23 Atrio CRM for M&A
User Guide
2.3.2 Disqualifying a Lead
At any time in the lead qualification process a user determines that the lead isn’t a good fit, they can disqualify them.
1. Navigate to the Lead Section Sales->Leads and search for the record to disqualify.
2. Click the Disqualify button. An additional drop down will appear where a user can choose why the lead was disqualified.
3. The lead will be de-activated.
Note: A de-activated lead can be re-activated any time in the future in case a potential opportunity arises with the same contact again.

1 24 Atrio CRM for M&A
User Guide
3 COMPANY/CONTACT MANAGEMENT
3.1 ADDING A COMPANY
If a company is part of a new Opportunity, and existing client, or a Prospective buyer/seller on a transaction, they should be entered into CRM as a Company.
1. In CRM, navigate to Sales->Companies.
2. On the top left, click the New button to create a new Company record.
3. Enter the Company’s name and any relevant information. There is also an Alert field on the form where users can enter information they want to be highlighted on the record.
4. Click Save and Close. Whenever a user opens the record, they will see an Alert at the top of the form if once was entered.
3.2 ADDING A CONTACT
Contact records are the individuals who work at the target companies. It is best practice to create Contact records from the Company form because it will automatically populate some data. It is also possible to add Contacts from CRM for Outlook.
4. Navigate to the Company Section Sales->Companies and search for the record you want to add a Contact to.
Note: When searching for records, you can use the asterisk (*) as a wildcard when searching for partial text.

1 25 Atrio CRM for M&A
User Guide
5. Open the selected Company record by double clicking it. To add the contact, go to the Contacts sub grid
on the right side of the form. Click the to add a new Contact.

1 26 Atrio CRM for M&A
User Guide
6. A form will drop down from the top of the screen where you can enter in Contact information including the name, job title, e-mail, and contact information.
Note: You can go back into the Contact later to add additional information. This is a condensed form that provides a quick and easy process for creating Contacts while entering minimal amounts of information.
7. Click Save.
Note: All required fields will have a red asterisk (*) and all recommended fields will have a blue plus (+).

1 27 Atrio CRM for M&A
User Guide
4 OPPORTUNITY MANAGEMENT
Atrio CRM for M&A has two phases for the Transaction Record: Opportunity and Transaction. Initially, the record starts out as an Opportunity which is where the conversation with a target company begins. While the record is in the Opportunity phase, it permits forecasting of future business which is shown as a sales pipeline on the M&A dashboard. Once an Opportunity reaches its last defined stage (e.g. contract signed), it becomes a Transaction, permitting the firm to now manage the process of buying or selling the target company.
4.1 CREATING A NEW OPPORTUNITY
Once a potential client has been identified and qualified, an Opportunity should be created in CRM. If a user is utilizing Leads in CRM, qualifying a lead will automatically create an Opportunity record with pre-populated information. However, this guide will cover how to create an Opportunity manually.
1. Navigate to Sales->Transactions. On the upper left, click the New button.
2. Enter in the Transaction Name, Target Company, and type (e.g. Buy-Side Advisory, Sell-Side Advisory, etc…). By default, the Opportunity checkbox will be checked. This means that the record is currently in the Opportunity phase. When this box is checked, it displays additional fields such as estimated revenue and close date.
3. Add a referral source if relevant.
4. Click Save.

1 28 Atrio CRM for M&A
User Guide
4.2 MANAGING THE SALES PROCESS
4.2.1 Tracking Opportunity Progress
Each Opportunity is dependent on its sales pipeline stage defined in the firm’s sales process. This process is tracked on the top of the form and users should update the stage to reflect the current status of the Opportunity.
1 29 Atrio CRM for M&A
User Guide
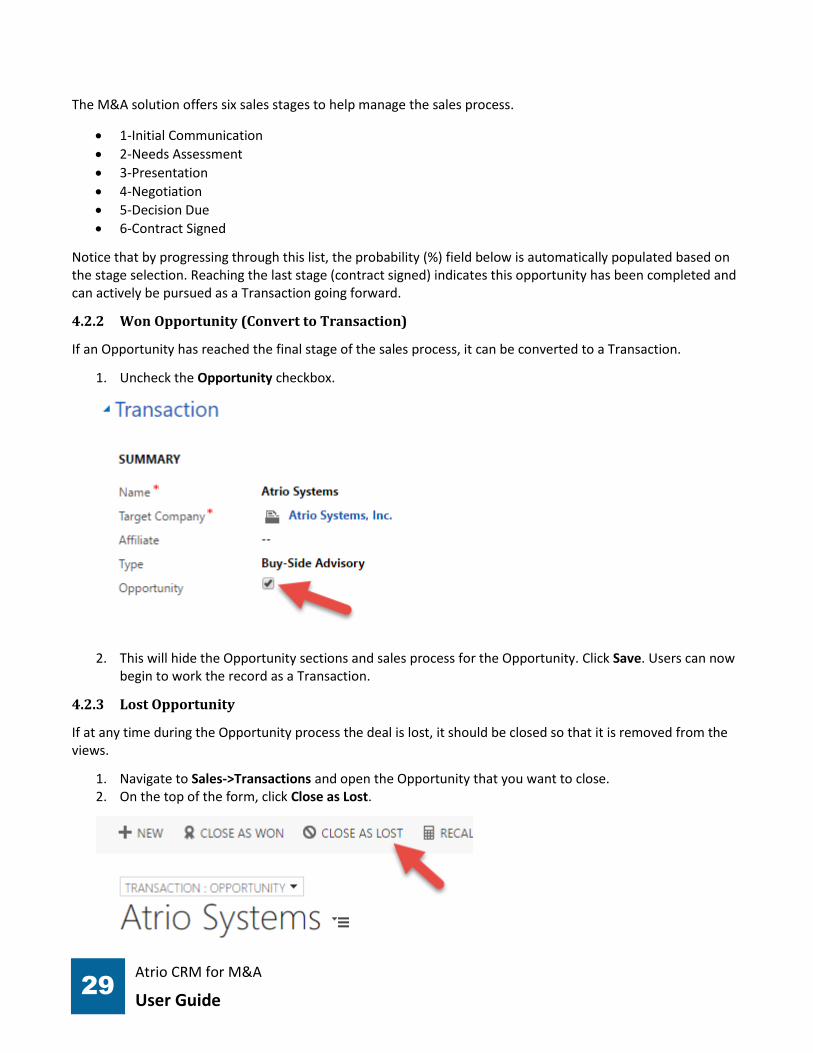
The M&A solution offers six sales stages to help manage the sales process.
• 1-Initial Communication
• 2-Needs Assessment
• 3-Presentation
• 4-Negotiation
• 5-Decision Due
• 6-Contract Signed
Notice that by progressing through this list, the probability (%) field below is automatically populated based on the stage selection. Reaching the last stage (contract signed) indicates this opportunity has been completed and can actively be pursued as a Transaction going forward.
4.2.2 Won Opportunity (Convert to Transaction)
If an Opportunity has reached the final stage of the sales process, it can be converted to a Transaction.
1. Uncheck the Opportunity checkbox.
2. This will hide the Opportunity sections and sales process for the Opportunity. Click Save. Users can now begin to work the record as a Transaction.
4.2.3 Lost Opportunity
If at any time during the Opportunity process the deal is lost, it should be closed so that it is removed from the views.
1. Navigate to Sales->Transactions and open the Opportunity that you want to close. 2. On the top of the form, click Close as Lost.

1 30 Atrio CRM for M&A
User Guide
3. An additional pop-up will appear where you can enter information about why the Opportunity was lost, lost revenue, and the close date.
4. The Opportunity will be de-activated.
Opportunity Lost
If pursuit of the new client is unsuccessful the Opportunity can be closed by clicking on the Close as Lost button.
1. Navigate to the transactions page. Now select the name of the opportunity to be closed as lost.
2. Select Close as Lost from the top panel.

1 31 Atrio CRM for M&A
User Guide
5 TRANSACTION MANAGEMENT
Once an Opportunity has been won and converted to a Transaction, users can begin to manage the process of buying or selling the target company. This section will describe how to create prospects, understand the transaction summary, connect buying influences, and creating E-mail phone and appointment activities directly from CRM.
5.1 CREATING PROSPECTS ON A TRANSACTION Prospects represent your potential buyers or sellers associated with the transaction. They are created as separate records linked to the Transaction. There is a sub-grid on the Transaction that shows you a list of all Transaction prospects and a chart of what stages they are currently in.
This guide will walk through how to add them manually or how to create them in bulk using the wizard.
5.1.1 Creating Prospects through the Wizard
Sometimes, there can be hundreds of Prospects associated with a Transaction. Users may generate lists from Insights or Cap IQ and want all the companies brought onto a Transaction as Prospects. In this case, it is best to

1 32 Atrio CRM for M&A
User Guide
use the Transaction Wizard to automatically add them. This process will walk through how to take a list of companies from Cap IQ and bring them into CRM as Prospects on a Transaction.
5.1.1.1 Import Company Records
Before we can use the Wizard to create Prospects, we need to bring them in as Company records into CRM using the import process.
1. Download or use the Company template for data importing (section 2.2 describes how to retrieve the template).
2. Transfer data from the Cap IQ list into the template. 3. The last column in the template is the Import Name. Create a unique name for this import (ex. 8/24
Alpha Prospects) and insert that value in for every row. This step is important because it will be used to specifically create these Companies as Prospects on a Transaction.
4. Save the template. 5. Navigate to Sales->Companies and click Import Data
6. Browse to find the saved template. Click Next. 7. Click Submit. Wait until the import completes before proceeding to the next steps.
5.1.1.2 Import Contact Records
If you have contacts associated with your list of Companies as well, use the same process described above except for Contacts.
1. Download or use the Company template for data importing (section 2.2 describes how to retrieve the template).
2. Transfer contact data from the Cap IQ list into the template. 3. Make sure to enter in values for the Company to link it to the Company record in CRM. The Company
name should match exactly to the one on the Company list imported previously.

1 33 Atrio CRM for M&A
User Guide
4. Save the template. 5. Navigate to Sales->Contacts and click Import Data 6. Browse to find the saved template. Click Next. 7. Click Submit. Wait until the import completes before proceeding to the next steps
5.1.1.3 Transaction Wizard
1. Navigate to Sales->Companies.
2. To use the Transaction Wizard, open Advanced Find in CRM by clicking the button on the navigation bar.
3. A pop-up will appear. Choose Companies for the Look for:.
4. Click the Clear and Details button to set new filters. 5. Create one filter where the Import Name equals the same value as you entered on your Company
template (ex. 8/24 Alpha Prospects).
6. Click the Results button to get a list of filtered Companies.
7. You should see a list of all Companies with that specific import name. For the Companies you want to create as Prospects on a Transaction, select them. You can select individual Company rows or select all
of them by clicking on the upper left of the grid.

1 34 Atrio CRM for M&A
User Guide
8. Once your Companies are selected, click the Add to Transaction button.
9. A pop-up will appear which asks what Transaction to create the Prospects for. Select the appropriate Transaction.
10. Click Ok. Behind the scenes, it will automatically create the Prospects and their Contacts on the Transaction record. You can verify by navigating to the Transaction and viewing the list of Prospects.
Note: There are 3 options for the contacts that get added to a Prospect during the Wizard process. A majority of the time, users will use Add all contacts. For information on the other options, contact your Atrio consultant.
5.1.2 Creating Prospects Manually
If there are only a handful of Prospects to add to an existing Transaction, it may be easier to add them manually.
1. Navigate to Sales->Transaction and select the Transaction you want to add Prospects to.
2. Click the button on the upper right of the Prospects sub-grid to add a new Transaction Company record.
3. This will open a new form. Enter in the existing Company and any additional information about the Prospect.

1 35 Atrio CRM for M&A
User Guide
4. Click Save & Close.
If there are specific Contacts you are communicating with from your Prospect, add them using the following steps.
1. Navigate to Sales->Transaction and select the Transaction record. Scroll down to the Prospects and select the Transaction Company record.
2. On the record, click the above the sub-grid.

1 36 Atrio CRM for M&A
User Guide
3. This will take you to another screen. Click the Connect button.
4. This will open a pop-up. Find the Contact lookup you want to add to your Prospect. If relevant, give them a role for what type of stakeholder they represent.
5. Click Save & Close.

1 37 Atrio CRM for M&A
User Guide
5.2 MANAGING THE TRANSACTION PROCESS Once your Prospects have been added to your Transaction, each record will be in a different stage and will have different activities being tracked to them. The Transaction Summary chart on the Transaction record provides a visual representation of the number of Prospects engaged in a particular transaction and what stage they are in. Users should keep each Prospect record up to date and track any activities that were had with the Prospect to make it easy for colleagues to collaborate and work efficiently on a Transaction.
5.2.1 Tracking Prospect Progress
Each Prospect record has a process flow at the top of the form which represents the current status. Users can click Next Stage to move the Prospect forward in the process. The M&A solution provides a number of default stages for Prospects to go through but they can be modified from within CRM to match your business needs.
Keeping the process status up to date will update the Transaction Summary and allow other users to see an accurate visual of where the Transaction Stands
Note: Only transaction companies with the type “Prospect” display on this chart.

1 38 Atrio CRM for M&A
User Guide
5.2.2 Tracking Prospect Interactions
While following up on a Transaction, it may be useful to record/track a phone call, e-mail, or appointment with one of the Contacts on a Prospect. These activities are tracked slightly differently than the ones described in section 1.5.
1. Navigate to Sales->Transaction and scroll down to the Prospect section. Select a Transaction Company that you had a conversation with.
2. Verify that the Contact you had the conversation with is added to the Prospect. Add the Contact to the Prospect if needed (follow steps 5.1.1).
3. Select the relevant Contact row in the list and click Phone Call or Appointment.

1 39 Atrio CRM for M&A
User Guide
4. In this example, we will select Phone Call. Another form will open for a new phone call which is pre-populated with information from the Contact. Enter any additional notes or information if needed.
5. Click Mark Complete if the Phone Call was already completed. 6. On the Prospect record, the Activities sub-grid will update and display the new Phone Call in the list.
It will also appear in the social pane on the Transaction record.
Note: If you’re tracking an e-mail, users only have to track it to the Transaction. Behind the scenes, the M&A solution will also track it to the correct Prospect and display it in the Activities sub-grid on the record.

1 40 Atrio CRM for M&A
User Guide
5.2.3 Reporting
In addition to creating custom views CRM for M&A includes the following reports:
•
5.2.4 Close Transaction
Once the target company has been bought/sold depending on the Transaction type, a user can close the record as won.
1. Navigate to Sales->Transaction and select the Transaction record to close. 2. At the top of the form, click the Close as Won button.
3. This will open a pop-up where users can define the revenue won, close date, and any additional information before closing the Transaction.
5.3 EXPENSE AND PAYMENT TRACKING The M&A solution also contains an Expense Allocation module which permits an M&A administrator to track and allocate expenses to individual Transactions. Expense Allocation requires an M&A Administrator role and is only available on the Transaction Administrator form. Please contact your CRM Administrator for access if necessary.
1. Navigate to Sales->Transactions and select the Transaction record. Verify that you are on the Administrator form.

1 41 Atrio CRM for M&A
User Guide
2. Scroll down to the Fees section of the Transaction. Enter the relevant Retainer or Contingency if it applies to your Transaction. This will update the Retainer/Contingency balance fields.
3. As you receive payments from the target company, you can click the button on the Payments sub-grid to track them to a Transaction.
4. This will open a drop down from the top of the form where you can enter in information about the payment including date, retainer/contingency amounts, and whether it was prior year accrual.
5. Click Save. 6. The total fields will auto-calculate and allow the administrator to keep track of balances and payments
to be received.

1 42 Atrio CRM for M&A
User Guide
6 MARKETING MANAGEMENT
6.1 MARKETING LISTS A marketing list are the core of running any successful marketing campaign in CRM. Essentially, it is a list of Leads, Accounts or Contacts in CRM with which you can create Campaigns or Quick Campaigns from. These lists can be used to automatically send e-mails and other marketing material to a group of individuals.
6.1.1 Creating a Marketing List
A marketing list can be created for Leads, Accounts, or Contacts within CRM. The list can either be set as Static or Dynamic. A static list means that records are added to the list manually and it will never change once the members are set. The dynamic list on the other hand is defined by filter criteria and the list is automatically updated as new records are added/removed from CRM.
1. Navigate to Sales->Marketing List 2. Click the New button. 3. A new form will open where you can enter the name, list type, and record type for the list. In this
example, we will use a Static list. 4. Click Save.
5. Once the record is saved, members can be added to the list. Click the button above the member sub-grid.
6. A pop-up will appear and ask you how you would like to add members to the list. You can add individual members using a lookup. Most commonly, the easiest way to add members is through the Advanced Find option. Select Add using Advanced Find and click Continue.
7. Define the criteria you want to use. In this example, we will look for all Michigan based Contacts. Click Find once you have defined your criteria.

1 43 Atrio CRM for M&A
User Guide
8. A list of results will appear using your criteria. Choose to add selected members or all members on the bottom left of the pop-up. Once you’ve chosen your members, click Add to Marketing List. They will be automatically added to the list.
6.2 QUICK CAMPAIGNS Once a marketing list has been created, Quick campaigns can be used to automatically create activities for members on the list. Quick campaigns were designed for when a firm wants to send out a sales promotion to a group of customers and collect their responses without doing all the planning required for a full campaign. They are most often used for e-mail blasts but they can also be used to create phone call, appointment or letter records in CRM. If you are planning on doing an e-mail blast to customers, Dynamics CRM allows you to compose personalized e-mail messages with dynamic data using a template. The quick campaign will track who received the marketing material and the responses that were sent back.
For example, if it is the tenth week of the quarter and a salesperson might not reach the end-of-quarter sales goals, a quick campaign can be created to help meet the quota. Setting up a phone-call quick campaign to a select group of contacts that were interested in a particular product can help end-of-year quotas. The quick campaign will automatically create phone-call activities for all members on the list and allow the user to track and complete them to make sure any interested parties result in actual sales.
6.2.1 Creating a Quick Campaign
In this example, we will create a simple e-mail blast to a marketing list. To create a Quick Campaign, use the out of the box Wizard.
1. Navigate to Sales->Marketing List and select the Marketing List you want to send an e-mail blast to.
2. On the bottom right of the form is a Quick Campaign sub-grid. Click the button to create a new Quick Campaign.
3. This will open up the Wizard. Click Next. 4. Enter the name of your Quick Campaign (ex. Sales Promotion Q3-2016, Thanksgiving Holiday Hours
2016). Click Next. 5. Select the type of activity to create (E-mail in this case). You can also choose who the newly created
activities will be assigned to. Click Next.

1 44 Atrio CRM for M&A
User Guide
6. The next screen will allow you to either enter in the body and subject for the e-mail or use an existing template. It is recommended to use an e-mail template because it will allow users to have dynamic fields populated in your e-mail. The e-mail template will also allow you to have an attachment on the e-mail. Click Next
Note: You cannot copy/paste images into an e-mail template. Instead, you need to insert a hyperlink for an image that is hosted from an external site.
7. Click Create. The e-mail will be automatically generated and sent out to each member on the list.
6.2.2 Managing a Quick Campaign
Once your Quick Campaign has been created, you can monitor the results. On the left side of the form, you can
see the number of successful and failed activities. From the previous example, one e-mail was sent out
successfully.
On the right side of the form, you can see sub-grids for the selected members and the excluded members.
Members will appear in the excluded category if they have opted out of the marketing list or if they didn’t have
a valid e-mail address to send to. Finally, at the bottom of the record,

1 45 Atrio CRM for M&A
User Guide
you will see a sub-grid for the list of responses. Any contact that responds to your e-mail will appear in this sub-
grid so you can track them.
6.3 CAMPAIGNS
Campaigns are more extensive than Quick Campaigns and can be used to manage the end-to-end process of completing a marketing campaign. Users can track budgets and expenses along with activities that need to be performed before or after launching the campaign. They also include extensive tracking features and reports for marketing. Activities can be manually distributed to users and the Campaign can be linked to multiple marketing lists instead of just one.
Note: With the M&A solution, Quick Campaigns are used most commonly and Campaigns tend to be much more in depth. Campaigns tend to be used by firms with independent marketing users. For more information, contact your Atrio Consultant.
6.4 SOCIAL ENGAGEMENT In a world of social media, your customer and stakeholders are communicating on Facebook, Twitter, or blogs. Social Engagement is a tool that collects data from social media websites and presents it in charts and graphs that can spot emerging trends in people’s comments, whether they’re positive or negative. Users can even drill down into the data and see the specific posts about their firm and who posted it. This helps organizations to pinpoint what they are doing right and to address potential issues before they become larger problems. With CRM 2016, social engagement forms can even be embedded directly into dashboards and forms.
Social Engagement helps businesses:
• Listen everywhere and understand how people really feel about their products and business as well as how it stacks up against competitors.
• Analyze sentiment to determine share of voice across social channels and know who key influencers are.
• Drive engagement to foster conversations about your brand and gain insight to shape messaging and sales strategy more effectively.

1 46 Atrio CRM for M&A
User Guide
This product is free with the purchase of 10+ Dynamics CRM Professional licenses.
Note: Please contact your Atrio consultant for setup.

1 47 Atrio CRM for M&A
User Guide
7 DASHBOARDS: BUSINESS AT A GLANCE
Atrio CRM for M&A includes three dashboards to allow a quick overview of your business including Transaction progress and Marketing initiatives. These can be access from the Dashboards area underneath Sales. Additional dashboards are also provided by Microsoft and can be personally configured to match your business’s needs.
7.1 CRM FOR M&A – OVERVIEW The CRM for M&A Overview dashboard gives managers at a glance an overview of future business coming down the pipeline and the existing status of ongoing Transactions. There is a chart on the left that contains a Sales Funnel which shows the amount of potential revenue coming down the pipeline within each stage. Another chart exists in the middle to show the number of active Transactions and what stages they are currently in. Other sub-grids for activities and opportunities are on the dashboard to make it easy for users to access their relevant records.

1 48 Atrio CRM for M&A
User Guide
7.2 M&A TRANSACTION DASHBOARD The M&A Transaction dashboard is targeted more specifically at active Transactions in CRM rather than open Opportunities. There is a sub grid to display Prospects on Transactions that are awaiting a discussion to be initiated. This helps users to get the ball rolling on these Prospects and move them along the sell/buy side process. Another sub-grid exists to show the user their active transactions for them to keep an eye on. Another chart on the right also contains a sales funnel which shows the amount of revenue coming in from open Transactions.
7.3 M&A MARKETING DASHBOARD The M&A Marketing dashboard is tailored more towards users performing marketing tasks at a firm. It contains a sales funnel on the left similar the M&A overview dashboard. In the center, it shows marketing campaigns that have been created for nurturing purposes. It also displays a list of neglected Contacts that haven’t been contacted recently to ensure that they are strategically targeted in the future.

1 49 Atrio CRM for M&A
User Guide
8 TIPS AND TRICKS
8.1 GLOBAL SEARCH With CRM 2015, a new feature was introduced called Global Search. A new Search box is now available on the navigation bar.
Entering in search terms here will allow users to search all of CRM for related records.
Remember to use wild cards (*) when searching in CRM or enable Relevance Search (Settings>Administration>System Settings)
8.2 FILTERING/SORTING VIEWS Whenever users are on a view in CRM, they can do additional filtering and sorting on the list to get the desired records they’re looking for.
1. Navigate to a view in CRM. In this example, we will look for all Companies in Washington.
2. Click the button on the upper right corner of the view. This will enable additional options for sorting and filter on the columns.

1 50 Atrio CRM for M&A
User Guide
3. You will see a new down arrow available on each column in the view. Click on the arrow. A drop down list of options will appear.
1. You can choose to sort based on that specific column or add additional filters. In this case, we will select
Custom Filter. 2. Choose an Operator. In this scenario, we will choose Equals and enter in a specific value.
4. Click Ok. 5. The view is now filtered to only show Companies that are located in Washington.

1 51 Atrio CRM for M&A
User Guide
8.3 ADVANCED FIND Dynamics CRM also has an easy to use query tool built into the system to do more advanced filtering and searching. In this scenario, we will use Advanced Find to find Opportunities over $50,000 in estimated revenue.
1. On the top navigation bar, click the button.
2. Choose the Look for: for the type of record you want to search for (Transaction in this case). 3. Each filter a user enters will need a field and an operator. In this case, we will add filters to look for
Opportunities with over $50,000 of estimated revenue.
Users can use Group AND and Group OR to combine filters in different ways. By default, our advanced find will return results that are an Opportunity and have revenue over $50,000. But if we select both rows and click Group OR, it changes the criteria.
Now it would show records which are an Opportunity or have a revenue over $50,000.
4. Once you’ve defined your filters, click the Results button. This will display all records that meet your specific criteria.

1 52 Atrio CRM for M&A
User Guide
5. Users can even take their Advanced Find results and export them into an excel file to be e-mailed to other colleagues. After clicking results, there will be an Export button on the top right. Click the Export drop down and select Static Worksheet. This will download your CRM results into an excel file for you to manipulate.
8.4 DEACTIVATING RECORDS
Best practice in CRM is to deactivate records instead of deleting them in order to maintain accurate record history. For example, if a Contact no longer works at a Company, a user should deactivate the record. This is because if we delete the record it will also erase all history of that Contact including any activities associated with that record.
1. To deactivate a record, select the record within the CRM view. Click the Deactivate button from the ribbon.
Note: Deactivated records can always be re-activated in case they become relevant again.

1 53 Atrio CRM for M&A
User Guide
8.5 COUNTING RECORDS IN A VIEW
To see the number of records in a view, you can view the count at the bottom. Unfortunately, all counts over 5000 will read 5000+.

1 54 Atrio CRM for M&A
User Guide
COMPATIBILITY
Atrio CRM for M&A is available for most of today’s platforms. It can be used with Outlook 2010, Outlook 2013, and Outlook 2016 as well as through multiple browsers for laptops and desktops. Apps are also readily available to provide access to mobile phones and tablets.
Compatible Browsers:
• Internet Explorer on Windows
• Firefox on Windows
• Safari on Mac OS X
• Chrome on Windows or Google Nexus 10
Mobile Devices with a CRM App:
• Microsoft Dynamics CRM for iPad
• Microsoft Dynamics CRM for Windows 8
• Dynamics CRM for Android Tablets
Supported Phone OS:
• iOS 7.x and 8.x
• Android 4.4
• Windows Phone 8.1
For a full list of supported hardware visit; https://technet.microsoft.com/en-us/library/dn531131.aspx

1 55 Atrio CRM for M&A
User Guide
SUPPORT
Please send any product issues or suggestions to [email protected].
Atrio Systems, Inc.
6001 N. Adams Rd, Suite 285
Bloomfield Hills, MI 48304
248-594-1500

1 56 Atrio CRM for M&A
User Guide
DISCLAIMER
THIS SOFTWARE IS PROVIDED "AS IS", AND ATRIO SYSTEMS, INC. DISCLAIMS ALL WARRANTIES WITH REGARD TO THIS SOFTWARE INCLUDING ALL IMPLIED WARRANTIES OF MERCHANTABILITY AND FITNESS FOR A PARTICULAR PURPOSE. IN NO EVENT SHALL ATRIO SYSTEMS, INC. BE LIABLE FOR ANY SPECIAL, INDIRECT, OR CONSEQUENTIAL DAMAGES OR ANY DAMAGES WHATSOEVER RESULTING FROM LOSS OF USE, DATA OR PROFITS, WHETHER IN ACTION OF CONTRACT, NEGLIGENCE, OR OTHER TORTIOUS ACTION, ARISING OUR OF OR IN CONNECTION WITH THE USE OR PERFORMANCE OF THIS SOFTWARE.