atlas pt - data radio modems · rv-m7 diagnostic provisions ... the atlas pt also has a radio modem...
TRANSCRIPT
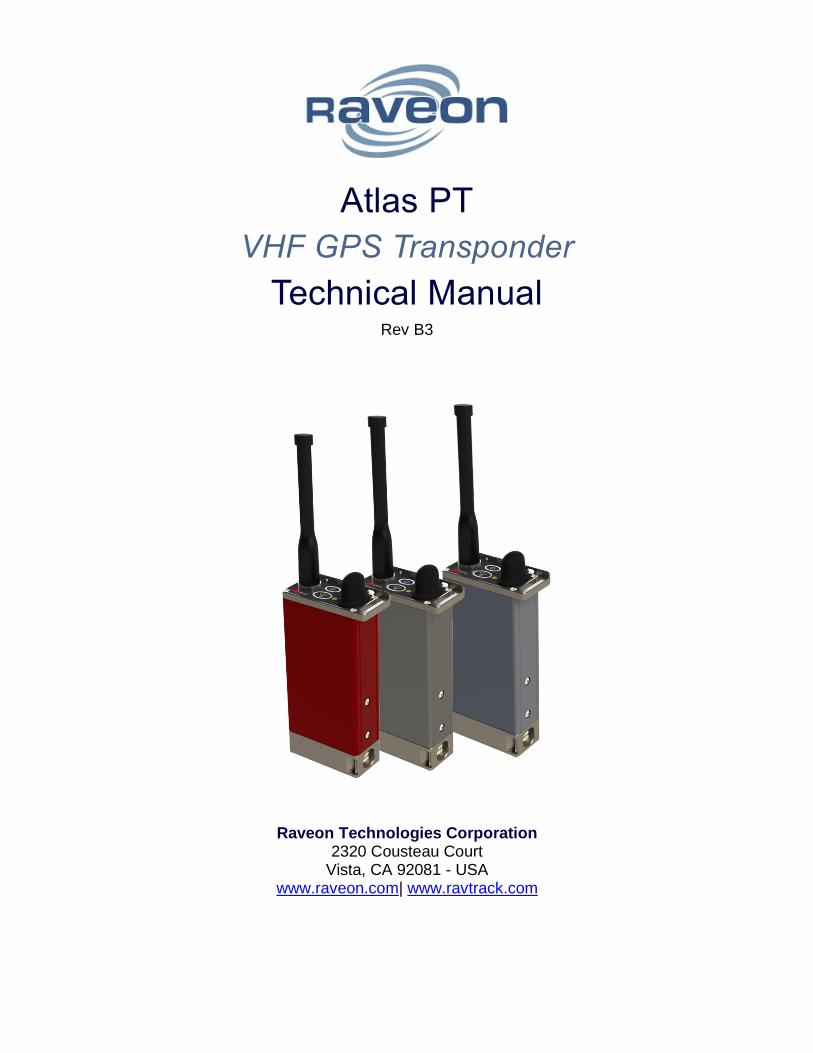
Atlas PT
VHF GPS Transponder
Technical Manual Rev B3
Raveon Technologies Corporation 2320 Cousteau Court
Vista, CA 92081 - USA www.raveon.com| www.ravtrack.com

Atlas PT Technical Manual
2
Table of Contents 1. General Information about the RV-PT ..................................................................... 5
1.1 Congratulations! ................................................................................................ 5
1.2 NOTICE ............................................................................................................ 5
1.3 Safety / Warning Information ............................................................................. 5
Blasting Caps and Blasting Areas ........................................................................... 5
Potentially Explosive Atmospheres .......................................................................... 5
1.4 Lithium-Ion Battery Notice ................................................................................. 5
1.5 Safety Training information ............................................................................... 6
2. Overview ................................................................................................................. 7
2.1 Features ........................................................................................................... 7
3. Specifications .......................................................................................................... 7
3.1 General ............................................................................................................. 7
3.2 Transmitter ........................................................................................................ 8
3.3 Receiver ........................................................................................................... 8
3.4 Batteries and Charger ....................................................................................... 9
3.5 User Input and Output Signals .......................................................................... 9
3.6 GPS and Transponder ...................................................................................... 9
3.7 Model Numbers................................................................................................. 9
4. Electrical Inputs and Outputs ................................................................................. 10
4.1 Buttons ........................................................................................................... 11
Power .................................................................................................................... 11
Alert ....................................................................................................................... 11
4.2 LEDs ............................................................................................................... 11
Status LED ............................................................................................................ 11
Power LED ............................................................................................................ 11
Alert LED ............................................................................................................... 12
4.3 DC Power ....................................................................................................... 12
4.4 External Battery Port ....................................................................................... 12
4.5 Serial I/O Connector ....................................................................................... 13
4.6 I/O Cable Options ........................................................................................... 14
5. Configuring the Atlas SM ....................................................................................... 15
5.1 Overview ......................................................................................................... 15

Atlas PT Technical Manual
3
5.2 Command Mode ............................................................................................. 15
5.3 Setting a Parameter ........................................................................................ 16
5.4 Reading a Parameter ...................................................................................... 16
5.5 Configuration Commands ............................................................................... 17
5.6 Additional Personal-Locator Related Commands ............................................ 19
5.7 Software Upgrades ......................................................................................... 23
5.8 Factory RV–SM Default Settings ..................................................................... 24
6. Setup and Initial Configuration ............................................................................... 25
6.1 Position Transmission ..................................................................................... 26
6.2 Set the Transmission Report rate .................................................................... 26
6.3 Battery Life and Power Savings Options ......................................................... 28
Deep Sleep ........................................................................................................... 28
Listen-slot Mode .................................................................................................... 28
Serial Sleep Mode ................................................................................................. 29
6.4 Data Transmission .......................................................................................... 29
6.5 Data Reception ............................................................................................... 29
Serial Port Data ..................................................................................................... 29
GPS Position and Status ....................................................................................... 29
6.6 Device Addressing .......................................................................................... 30
Security Key .......................................................................................................... 30
ID Addressing Basics ............................................................................................ 31
Time Slots ............................................................................................................. 31
6.7 Local NMEA data from the internal GPS ......................................................... 32
7. Operation .............................................................................................................. 33
7.1 Battery Life ...................................................................................................... 33
8. RV-M7 Diagnostic Provisions ................................................................................ 34
8.1 Status and Statistics Command ...................................................................... 34
8.2 ATST Command ............................................................................................. 34
8.3 ATST1 Command (GPS Statistics) ................................................................ 35
8.4 ATST3 Command ........................................................................................... 35
8.5 ATST4 Command ........................................................................................... 35
9. Troubleshooting ..................................................................................................... 36
9.1 Symptom: Unit will not receive ....................................................................... 36
9.2 Symptom: Unit will not transmit ...................................................................... 36

Atlas PT Technical Manual
4
9.3 Symptom: Receive light blinks, but no data is received .................................. 36
9.4 Symptom: Long delay before transmitting ...................................................... 37
9.5 Symptom: Cannot enter Command Mode ...................................................... 37
9.6 Symptom: Repeater will not repeat. ............................................................... 37
9.7 Symptom: Transmits position, but no data. .................................................... 37
9.8 Symptom: Radio does not turn on or does not charge .................................... 38
10. Mechanical ......................................................................................................... 39
11. ATLAS PT Messages ......................................................................................... 40
11.1 $GPGSV Satellites In View ......................................................................... 40
11.2 $GPWPL Waypoint Location ...................................................................... 40
11.3 $PRAVE Raveon Proprietary Message, Location-Status ............................ 41
12. Maintenance ...................................................................................................... 43
12.1 Antenna ....................................................................................................... 44
12.2 Battery ......................................................................................................... 44
12.3 External Battery Port .................................................................................... 44
12.4 Serial I/O Connector .................................................................................... 44
12.5 Bottom DC Power Port ................................................................................ 44

Atlas PT Technical Manual
5
1. General Information about the RV-PT
1.1 Congratulations!
Congratulations on your purchase of the ATLAS PT GPS transponder– the most advanced UHF/VHF GPS transponder available today.
Please take a few minutes to read this manual carefully. The information presented here will allow you to derive maximum performance from your radio modem. After reading it, keep the manual handy for quick reference, in case questions arise later on.
1.2 NOTICE
There are no user-serviceable points inside this transceiver. All service work must be referred to your Authorized Service Center or Raveon Technologies Service Department.
1.3 Safety / Warning Information
Blasting Caps and Blasting Areas
To avoid possible interference with blasting operations, turn off this radio or remove the battery pack when you are near electrical blasting caps, in a blasting area, or in areas posted: “Turn off two-way radio.” Obey all signs and instructions.
Potentially Explosive Atmospheres
Turn off your radio prior to entering any area with a potentially explosive atmosphere. Do not install this product for use in areas with potentially explosive atmospheres. Do not remove, install, or charge batteries in such areas. Sparks in a potentially explosive atmosphere can cause an explosion or fire resulting in bodily injury or even death.
Note: The areas with potentially explosive atmospheres referred to above include fueling areas such as
below decks on boats, fuel or chemical transfer or storage facilities, areas where the air contains chemicals or particles, such as grain, dust or metal powders, and any other area where you would normally be advised to turn off your vehicle engine. Areas with potentially explosive atmospheres are often but not always posted.
1.4 Lithium-Ion Battery Notice
This product contains two Lithium Ion battery cells.
U.S. Postal regulations, Federal Regulations, and other common carriers restrict the shipment of products containing Lithium-Ion batteries. Consult your carrier before shipping this product.
When sending the product by US mail, it should be mailed using surface carriers, and the outside of the shipping container should have a notice:
Package Contains Primary Lithium Batteries
Never mail or ship damaged batteries.

Atlas PT Technical Manual
6
When shipping this product, properly label the shipping container per current regulations. Regulations regarding shipment of products containing Li-Ion batteries changes frequently, so consult your carrier and regulatory bodies. USPS requires a "Surface Mail Only" label in addition to DOT's "Primary Lithium Batteries--Forbidden for Transportation aboard Passenger Aircraft" label.
1.5 Safety Training information
Always use this radio with the antenna supplied with it. This radio is restricted to occupational use. Work related operations are permitted only when the radio operator has the knowledge to control the exposure conditions of its passengers and bystanders by maintaining the minimum separation distance. Failure to observe these restrictions may result in exceeding the FCC RF exposure limits.
Atlas PT Technical Manual
7
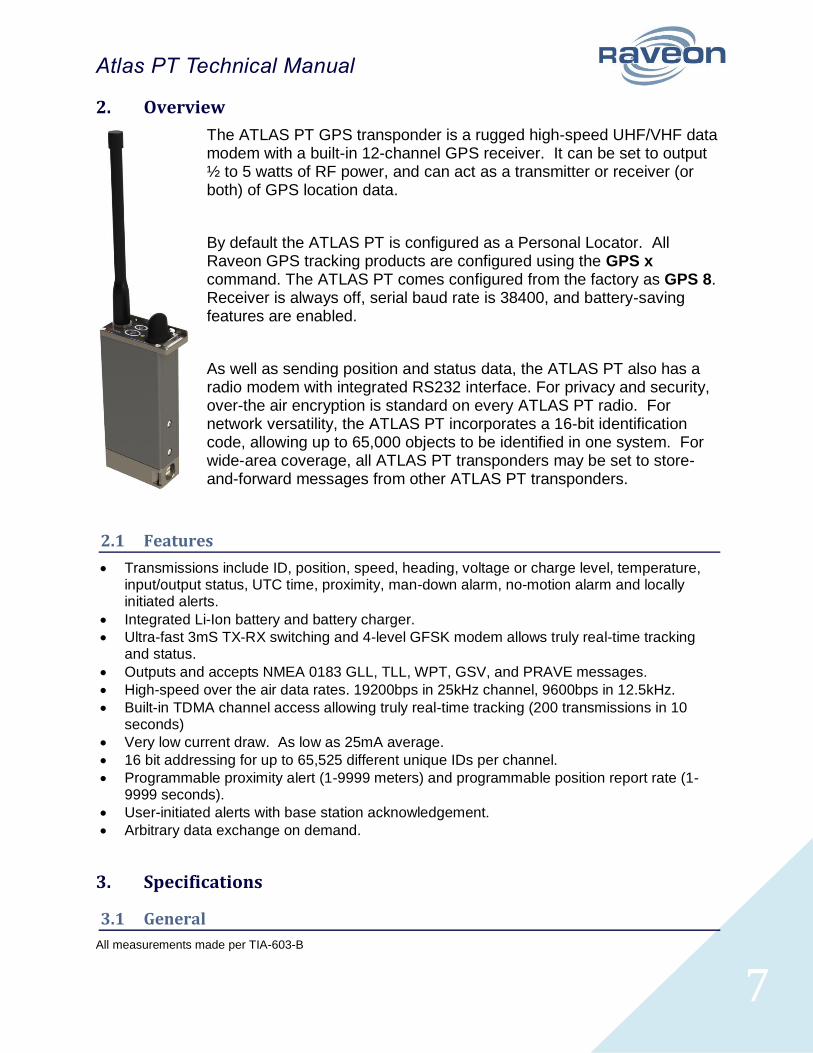
2. Overview
The ATLAS PT GPS transponder is a rugged high-speed UHF/VHF data modem with a built-in 12-channel GPS receiver. It can be set to output ½ to 5 watts of RF power, and can act as a transmitter or receiver (or both) of GPS location data.
By default the ATLAS PT is configured as a Personal Locator. All Raveon GPS tracking products are configured using the GPS x command. The ATLAS PT comes configured from the factory as GPS 8. Receiver is always off, serial baud rate is 38400, and battery-saving features are enabled.
As well as sending position and status data, the ATLAS PT also has a radio modem with integrated RS232 interface. For privacy and security, over-the air encryption is standard on every ATLAS PT radio. For network versatility, the ATLAS PT incorporates a 16-bit identification code, allowing up to 65,000 objects to be identified in one system. For wide-area coverage, all ATLAS PT transponders may be set to store-and-forward messages from other ATLAS PT transponders.
2.1 Features
• Transmissions include ID, position, speed, heading, voltage or charge level, temperature, input/output status, UTC time, proximity, man-down alarm, no-motion alarm and locally initiated alerts.
• Integrated Li-Ion battery and battery charger.
• Ultra-fast 3mS TX-RX switching and 4-level GFSK modem allows truly real-time tracking and status.
• Outputs and accepts NMEA 0183 GLL, TLL, WPT, GSV, and PRAVE messages.
• High-speed over the air data rates. 19200bps in 25kHz channel, 9600bps in 12.5kHz.
• Built-in TDMA channel access allowing truly real-time tracking (200 transmissions in 10 seconds)
• Very low current draw. As low as 25mA average.
• 16 bit addressing for up to 65,525 different unique IDs per channel.
• Programmable proximity alert (1-9999 meters) and programmable position report rate (1-9999 seconds).
• User-initiated alerts with base station acknowledgement.
• Arbitrary data exchange on demand.
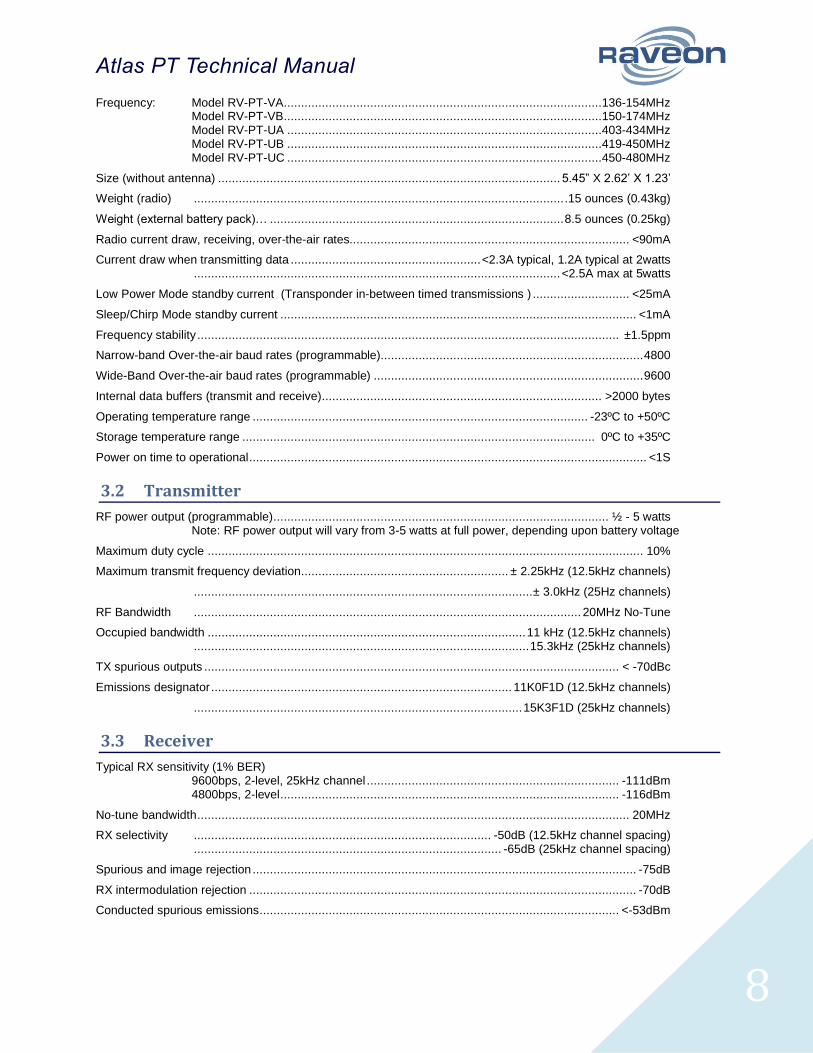
3. Specifications
3.1 General
All measurements made per TIA-603-B
Atlas PT Technical Manual
8
Frequency: Model RV-PT-VA ............................................................................................136-154MHz Model RV-PT-VB ............................................................................................150-174MHz Model RV-PT-UA ...........................................................................................403-434MHz Model RV-PT-UB ...........................................................................................419-450MHz Model RV-PT-UC ...........................................................................................450-480MHz
Size (without antenna) ................................................................................................... 5.45” X 2.62’ X 1.23’
Weight (radio) ........................................................................................................... .15 ounces (0.43kg)
Weight (external battery pack)… ..................................................................................... 8.5 ounces (0.25kg)
Radio current draw, receiving, over-the-air rates................................................................................. <90mA
Current draw when transmitting data ....................................................... <2.3A typical, 1.2A typical at 2watts .......................................................................................................... <2.5A max at 5watts
Low Power Mode standby current (Transponder in-between timed transmissions ) ............................ <25mA
Sleep/Chirp Mode standby current ....................................................................................................... <1mA
Frequency stability .......................................................................................................................... ±1.5ppm
Narrow-band Over-the-air baud rates (programmable)............................................................................ 4800
Wide-Band Over-the-air baud rates (programmable) .............................................................................. 9600
Internal data buffers (transmit and receive) ................................................................................. >2000 bytes
Operating temperature range ................................................................................................. -23ºC to +50ºC
Storage temperature range ...................................................................................................... 0ºC to +35ºC
Power on time to operational ................................................................................................................... <1S
3.2 Transmitter
RF power output (programmable) ................................................................................................. ½ - 5 watts Note: RF power output will vary from 3-5 watts at full power, depending upon battery voltage
Maximum duty cycle .............................................................................................................................. 10%
Maximum transmit frequency deviation ............................................................ ± 2.25kHz (12.5kHz channels)
.................................................................................................. ± 3.0kHz (25Hz channels)
RF Bandwidth ................................................................................................................ 20MHz No-Tune
Occupied bandwidth ............................................................................................ 11 kHz (12.5kHz channels) ................................................................................................. 15.3kHz (25kHz channels)
TX spurious outputs ........................................................................................................................ < -70dBc
Emissions designator ....................................................................................... 11K0F1D (12.5kHz channels)
............................................................................................... 15K3F1D (25kHz channels)
3.3 Receiver
Typical RX sensitivity (1% BER) 9600bps, 2-level, 25kHz channel ......................................................................... -111dBm 4800bps, 2-level .................................................................................................. -116dBm
No-tune bandwidth ............................................................................................................................. 20MHz
RX selectivity ...................................................................................... -50dB (12.5kHz channel spacing) ......................................................................................... -65dB (25kHz channel spacing)
Spurious and image rejection ............................................................................................................... -75dB
RX intermodulation rejection ................................................................................................................ -70dB
Conducted spurious emissions ........................................................................................................ <-53dBm

Atlas PT Technical Manual
9
3.4 Batteries and Charger
DC input voltage .......................................................................................................................... 9-15V DC
Current draw when charging (internal or external) battery ........................................................................ <2A
Internal Battery Capacity .................................................................................................................2200mAh
External Battery Capacity ................................................................................................................4200mAh
Capacity at 0C .................................................................................................................................. 80%
Capacity at -20C .................................................................................................................................. 50%
Charge/discharge cycles for >70% capacity ............................................................................................. 500
Charge time (90%) ........................................................................................................................... <3 hours
Self-discharge rate .......................................................................................................................... <400uA
Maximum time between charges ..................................................................................................... 2 months
3.5 User Input and Output Signals
Serial port baud rates ............................................. 1200, 2400, 4800, 9600, 19200, 38400, 57600*, 115200*
Voltage levels .................................................................................................... RS-232 complaint levels
RS232 handshake signals ...................................................................................................................... none
Transceiver RF ...................................................................................................................... 50 ohm TNC
GPS Antenna ........................................................................................................... Amplified Geo-Helix
Power Connector ........................................................................................................ LEMO B-Series 5-Pin
External Battery Port .......................................................................................... Sealed pogo spring contacts
* only with ATCM setting disabled
3.6 GPS and Transponder
Number of channels ...................................................................................................................................12
Horizontal accuracy (24 hour static) ............................................................................ <2.5m 50%, <5m 90%
Acquisition (-130dBm, 50%) ..................................................................... <40sec cold start, <15sec hot start
Sensitivity ........................................................................... Tracking -150dBm, Acquisition -142dBm
NMEA Output sentences ................................................................................. WPL, TLL, GLL, GSV, PRAVE
Position report rate, programmable ................................................................................... 1 to 9999 seconds
Position report resolution....................................................................................................... 0.0001 degrees
Voltage report resolution/accuracy ................................................................................................. 0.1V/10%
Temperature resolution and accuracy (enclosure temperature) ................................ 2 degrees C/4 degrees C
Velocity resolution and accuracy ......................................................................................1km / 1km per hour
3.7 Model Numbers
The model number of the internal radio modem board identifies its operating frequency band, RF power level, and bandwidth. The models are:
RV-PT-xy where:
x = The band (V=136-174MHz, U=403-480MHz)

Atlas PT Technical Manual
10
y = Sub band (A,B,C)
Other frequency bands, power levels, and channel spacing are available. Contact the factory for your specific needs.
Sub-Bands
Sub-Band Letter VHF (RV-PT-V…) UHF (RV-PT-U…)
A 136-154MHz 403-434MHz
B 150-174MHz 419-450MHz
C 450-480MHz
4. Electrical Inputs and Outputs
The top of the ATLAS PT modem has these features:
RF connector for UHF/VHF antenna
Power Button/LED
Alert Button/LED
Status LED (Receive data = green, TX = red)
Sealed GPS Antenna

Atlas PT Technical Manual
11
4.1 Buttons
Power
Press this button to turn the power on. Press and hold it for two seconds to turn the power off.
The ATLAS PT can be configured to disable the ability to power off via the power button (see the POWER command). This can also be achieved over-the-air.
Alert
Press this button to generate an alert. Press and hold it for two seconds to generate a Critical Alert. Press and hold it for more than 5 seconds to clear all wearer-initiated alert conditions.
Alerts may be acknowledged over-the-air or via a serial connection. See the command section for more details. Alerts have many configurable parameters. See the ALERTCAN and ALERTLEVELS command.
4.2 LEDs
The status LEDs visually show the current status of the radio.
Status LED
This LED is green for two seconds when first powered on. For the first ten minutes of operation, the LED indicates GPS lock and carrier detect status, in the following manner:
Flashing Orange – Looking for GPS lock
Red Blink – Transmitting position
Green – GPS lock attained and carrier detected
Off – GPS lock attained; no carrier detected
After ten minutes of operation, this LED is off. If the power button is pressed briefly, the status LED will operate as above for five seconds.
Power LED
If the there is a charger plugged into the Atlas SM, the Power LED will blink green shortly every three seconds to indicate that the unit is working. If no charger is plugged in, the Power LED is off. The ATLAS PT has many power savings options which may modify the operation of the Power LED. See the section on battery and power saving for more information.

Atlas PT Technical Manual
12
POWER LED Charger plugged in Battery Charged Battery Low
Unit is OFF No OFF
YES Solid green Solid Orange
Unit is ON No Green blink
10 second rate
Red blink
3 second rate
YES Green blink
3 second rate
Orange blink
3 second rate
Battery failure detected
(See the Maintenance Section)
No Radio will not turn on
YES Red Blink @Half second rate
Alert LED
While off during typical operation, this LED turns orange when an Alert condition is being transmitted. When the alert is acknowledged over-the-air, this Alert LED will turn green. This LED can only be turned off over-the-air to disable the alert alarm.
4.3 DC Power
• DC power for the SM is connected to the 5-pin Lemo connector near the bottom-side of the unit. Use the supplied cable to connect the DC power. The red wire is positive (+) and the black wire is negative (-).
The internal smart-battery electronics will charge and keep the battery charged as long as DC is supplied. The DC input range is 10-15VDC and the charging supply should be able to handle at least 2A.
The SM also has the ability to connect to a gang charger by means of three contacts on the bottom of the radio shown below.
4.4 External Battery Port
The ATLAS PT has the ability to connect to an external battery pack for extended operation. The SM connects to this battery

Atlas PT Technical Manual
13
pack through a 5 pin POGO interface, 6 pins are used on the connector for ruggedness and alignment but the middle pin in the bottom row is unused. This port is potted with a sealant for waterproofing purposes and the SM has internal short-circuit protection but can be damaged if an external voltage is applied to the wrong pins. Please use only Raveon supplied assemblies for connection to this port.
4.5 Serial I/O Connector
The I/O connector is a LEMO B-Series 5-pin circular waterproof connector. It is used for RS232 connection and for the DC input for the charger. This is a locking connector and is released by simply pulling outward from the center of the connector.
The 5-pin I/O connector has the following pin-out:
Number Function Notes
1 Charger Input (DC-IN) 10-15VDC input for charging battery.
2 Internal Battery Output
5-8.5V output, 200mA max current draw. This line is switched and is only on when specifically configured
3 GND System Ground
4 TxD Data into the SM. Also used as digital input IN2 for exception reporting. GND or floating for a 0, >3V for digital 1. If enabled for digital inputs, the serial data entering this pin is ignored (except in the command mode). Use the TRIGBITS command to set which bits are used as inputs.
5 RxD Receive data output. In command mode, serial data output. If ATIO 6 mode is enabled, then the proximity alert is output on this pin. Active high for proximity alert. Negative voltage for no alert.
Pin
1
Pin 1 Marker
Front view radio side
Front view cable side

Atlas PT Technical Manual
14
4.6 I/O Cable Options
There are 5 basic types of interface cables available for the Atlas SM. They are shown below.

Atlas PT Technical Manual
15
5. Configuring the Atlas SM
5.1 Overview
The RS-232 serial port on the unit is used to send and receive data over the air, as well as to configure the RF modem. In normal operation, the user sends serial data into the TxD pin of the user port, and this data is transmitted over the air. Received data from another RF modem is output to the user via the RxD pin of the user port. This is the default operating condition of the RF modem. No special characters, hardware control lines, or timing is required to operate the RV-M7 modem.
If the ATLAS PT is configured as a Personal Locator (GPS 8 mode), the serial port need not be connected to anything. The internal GPS will initiate the transmissions of position and status.
There is also a Command Mode used to program and configure the Atlas SM. In the Command Mode, the ATLAS PT modem accepts commands via the serial port TxD pin. The commands can be used to change certain internal parameters of the ATLAS PT modem as well as to read-out the current configuration and diagnostic statistics.
The ATLAS PT also supports Raveon’s Wireless Modem Exchange (WMX) protocol for commanding and messaging. WMX is ideal for fully automated control and tighter integration. For more information, see the WMX Protocol Description document and the Raveon Tech Note “Rapid Radio Configuration using WMX”.
5.2 Command Mode
The ATLAS PT modem may be put into a Command Mode, by entering a sequence of three plus characters +++. To keep the ATLAS PT modem from unintentionally entering the Command Mode because of the +++ pattern occurring in a stream of data entering the modem, there must be a pause in the data stream before the +++ as well as a pause after the +++ is sent. If either pause is missing, the modem will not enter the command mode.
Using serial communications software such as HyperTerminal, send the 3-character command sequence +++.

Atlas PT Technical Manual
16
When the ATLAS PT modem first enters the Command Mode, it sends the phrase RV-M7-SM out it serial port, and then an OK sequence. The OK sequence is a sequence of 4 characters:
“O”, “K”, <CR>, and <LF>characters (<CR> = ASCII 0D, <LF>= ASCII 0A)
Note that the internal power-management function may turn the product off to save power. The LEDs on the unit will continue to blink, but all internal circuits are off. This only happens if the TXRATE is greater than 60 seconds. The Power LED will blink at a 4-second rate if the radio is off. When the radio powers on, it will send an OK.
To ensure the internal radio is on, and able to be put into Command Mode, you may turn the unit off, and then back on.
For configuration and other communication in a machine-to-machine environment, Raveon recommends the WMX protocol instead of command mode. See the WMX specification for usage information. The ATLAS PT fully implements the WMX protocol.
5.3 Setting a Parameter
To set a parameter in the ATLAS PT modem, enter the Command Mode as described above. Then enter the proper command, a space, the parameter, and then a carriage return. For Example, to set the destination address of the ATLAS PT modem to 1234, enter the following command:
ATDT 1234<CR>.
Once a Parameter is changed, it will be permanently saved and the modem will begin using the new parameter.
5.4 Reading a Parameter
To read the value of a particular setting, issue the command with no parameter. The modem will return the value followed by an “OK”.
For example, if the user enters the command to read the ATLAS SM’s destination address and its address was 1234, the user would issue the following command:
ATDT<CR>
and the modem will respond with:
1234<CR><LF>
OK<CR><LF>
To get on-line help with a command, enter the command and put a question mark in for the parameter. For example, to see what the ATDT command is used for, type ATDT ?. The modem will respond by listing a brief description of the command. To see a list of all commands, type HELP.

Atlas PT Technical Manual
17
5.5 Configuration Commands
The following commands are implemented by the Atlas SM.
Command Command Description Parameters Factory Default
ATBD
Baud Rate – Sets serial com port baud rate (bps). Over-the-air (throughput) baud rate is set with ATR2 command. If a PC’s serial baud rate is set higher than the fixed over-the-air baud rate of the module, hardware handshaking may be required.
Range: 0 – 7 0 = 1200 5= 38400 1 = 2400 6=57600 2 = 4800 7=115200 3 = 9600 4 = 19200
5
ATDT Destination Address– Sets address of the modem to send data to.
Range: 0-9999 0001
ATF Display frequencies – Display all of the frequencies programmed into all of the channel memories.
N/A
ATFT
Transmit Frequency – Program the transmit frequency for this channel. Enter in Hz or in MHz. The frequency will automatically be saved in non-volatile memory (flash) for this current channel number.
Range: See product data
sheet. For MURS products, frequency cannot be changed.
See product
data sheet.
ATFR
Receive Frequency – Program the receive frequency for this channel. Enter in Hz or MHz. The frequency will automatically be saved in non-volatile memory (flash) for this current channel number.
Range: See product data
sheet. For MURS products, frequency cannot be changed.
See product
data sheet.
ATFX
TX and RX Frequency – Program the receive and transmit frequency for this channel. Enter in Hz or MHz. Same as issuing an ATFR and an ATFT command. The frequency will automatically be saved in non-volatile memory (flash) for this current channel number.
Range: See product data
sheet. N/A
ATGP
Group Number – Set or read the unit’s Group Number. 0 means this feature is not used. If GP is set to any number other than 0, then all radios communicating with this unit must have the same group number programmed into them.
Range 0-255 0
ATHP Channel Number – Select separate channels to minimize interference between multiple sets of modules operating in the same vicinity.
Range: 1 - 6 1
ATIC Read Current Draw Read the current draw in mA. Accuracy is within 20% of actual current draw.
Range: 0-9999 N/A
ATMK Address Mask – Configures local and global address space. Each digit may be a 0,1,2,3,4,5,6,7,8,9,A,B,C,D,E,or F. In most applications, this is kept at FFFF.
Range: 0000 - FFFF FFFF
ATMY Unit Address – Configures the individual; address for this unit. Each digit may be a 0,1,2,3,4,5,6,7,8,9,A,B,C,D,E,or F. Note: FF is interpreted as a group. See addressing section.
Range: 0000 - FFFF 0001
ATNB
Parity – Selects parity format. Settings 0-4 transfer 8-bits over antenna port and generate the parity bit on the RF receiving side.
Range: 0 – 5 0 = none 1 = Odd 2 = Even 3 = Mark (1) 4 = Space (0)
0
ATNS Stop Bits – Selects the number of stop bits. Range: 1-2 1
ATPO
RF Power Output. Set or show the RF power output setting.
Value is in percent, from 0% to 100%. Use and RF wattmeter to confirm the power setting, and adjust the % accordingly to obtain the desired RF power level.
0-100 100

Atlas PT Technical Manual
18
ATPC Read TX Current. Read the device’s current draw during the
last transmission, in mA. 0-9999 -
ATR2 Over-The-Air bit rate - This is the data rate the radio uses to send data over the air. All RF modems in the network must use the same over-the-air baud rate.
Range: 0 = 800 5 = 9600 2L 1 = 1200 6 = 19200 4L 2 = 2400 7 = 5142 2L 3 = 4800 8 = 9600 4L 4 = 8000 4L 9 = 2000 2L 10=14.4k 4L
3
ATRQ Receiver Signal Level – Reads the Receiver Signal strength this instant, and returns the level in dBm.
Range: -40 to –130 (dBm) -
ATRS
RSSI (Receive Signal Strength Indicator) – Returns the signal level of last received packet. The reading is in dBm. Usable for relative comparison of signals, but absolute value is within10dB at -90dBm.
No parameters. Returns a number: -50 to –140 (dBm) varies by model.
none
ATRV Disable Remote Access – When enabled (set to a 0), the modem will respond to over-the-air RPR requests, Pings, and over-the-air commands. Default is OFF (1).
0= Remote Access on 1=Remote Access off
1
ATSL Serial Number – Reads and returns a unique serial number for this unit.
Read Only
1 - 999999999 unique
ATSH Show – Display the configuration of the modem. This will return a page of ASCII characters, showing the main configuration parameters.
none None
ATSM
Power Savings Options – When set to 0, the internal radio receiver will be ON. When set to 4 (default for the Atlas SM), the internal radio receiver will always be OFF and the radio will not receive over-the-air messages.
Range: 0, 1, 2, 3, 4, 5 4
(RX OFF)
ATST Statistics – Show the unit’s operational statistics. See Statistics section of user manual.
0, 1,2, 3, 4, or 5 None
ATTE Read product temperature – Read the internal temperature of the unit’s circuit board in degrees Celsius.
-40 to +99 -
ATTT Max Packet Size – Set the maximum number of bytes in an over-the-air packet.
1 - 512 500
ATVB Read DC input Voltage– Returns the DC input voltage reading, in mV (12500 = 12.5VDC input).
None none
ATVR Firmware Version – Returns firmware version currently loaded on the module.
Read Only, 3 characters none
ATXn Show or Configure the Repeat Table – Set the addresses that this unit will store-and-forward data to/from. n = 1, 2, 3, or 4 designating the entry in the table to show or edit..
Four parameters aaaabbbbccccdddd where
aaaa=Source Address bbbb = S.A. Mask
cccc = Destination Address dddd = D.A. Mask
ATXR Enable/Disable Store and Forward Repeating – 0=disabled, 1 – enabled.
0 or 1 0 (Off)
ATHX Enable/Disable single-hop repeating – 0=any number of repeats, 1 – unit will not repeat a packet that was already repeated.
0 or 1 0 (multi-hop
OK)
AT&F Restore Factory – Restore the factory default values. This command will not erase the calibration values. none
PING Ping another modem. Format is PING xxxx, where xxxx is the ID of the modem to ping. If remote access is enabled on xxxx, it will respond.
XXXX -
RPR Remote Procedure Request. Used to request execution of a command on a remote mode (over the air). See RV-M7 System Protocol manual for information on using this feature.

Atlas PT Technical Manual
19
SHOW Show/display an overview of the radio’s configuration. None -
BAND
Show/display the radio band. Displays the frequency band that the radio is configured for, along with the upper and lower frequency, in MHz. BB is the band code, lll is the lower frequency in MHz, and uuu is the upper frequency in MHz.
None BB, lll, uuu
CONFIG
Show Configuration. Display the settings of every parameter in the unit. If the parameter is 1, then the help text is not displayed, If the parameter is 2, the configuration is output in strictly the format used to program another unit.
None, 1, 2 -
** indicates values that are calibrated in the factory and are unit-specific. If the “Radio Type” is changed, these will need to be re-calibrated.
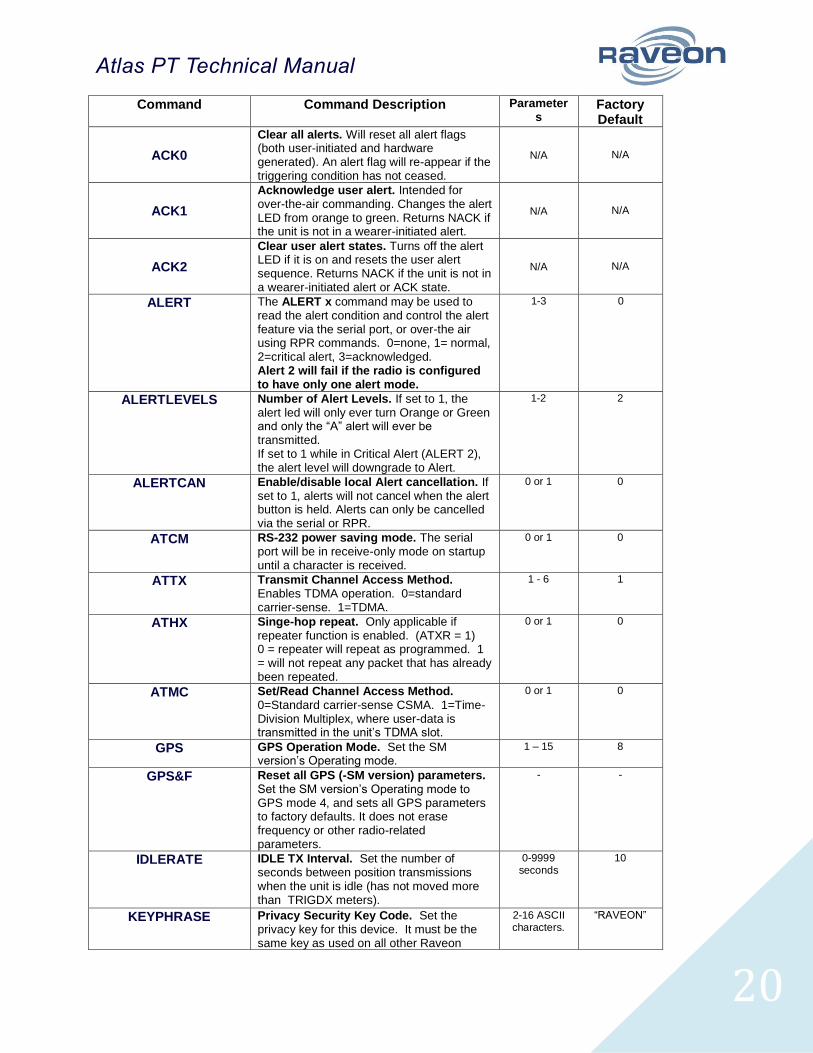
5.6 Additional Personal-Locator Related Commands
The following commands are also implemented in the Atlas SM. Many of these commands will appear in other Raveon products as well.
Atlas PT Technical Manual
20
Command Command Description Parameters
Factory Default
ACK0
Clear all alerts. Will reset all alert flags (both user-initiated and hardware generated). An alert flag will re-appear if the triggering condition has not ceased.
N/A N/A
ACK1
Acknowledge user alert. Intended for over-the-air commanding. Changes the alert LED from orange to green. Returns NACK if the unit is not in a wearer-initiated alert.
N/A N/A
ACK2
Clear user alert states. Turns off the alert LED if it is on and resets the user alert sequence. Returns NACK if the unit is not in a wearer-initiated alert or ACK state.
N/A N/A
ALERT The ALERT x command may be used to read the alert condition and control the alert feature via the serial port, or over-the air using RPR commands. 0=none, 1= normal, 2=critical alert, 3=acknowledged. Alert 2 will fail if the radio is configured to have only one alert mode.
1-3 0
ALERTLEVELS Number of Alert Levels. If set to 1, the alert led will only ever turn Orange or Green and only the “A” alert will ever be transmitted. If set to 1 while in Critical Alert (ALERT 2), the alert level will downgrade to Alert.
1-2 2
ALERTCAN Enable/disable local Alert cancellation. If set to 1, alerts will not cancel when the alert button is held. Alerts can only be cancelled via the serial or RPR.
0 or 1 0
ATCM RS-232 power saving mode. The serial port will be in receive-only mode on startup until a character is received.
0 or 1 0
ATTX Transmit Channel Access Method. Enables TDMA operation. 0=standard carrier-sense. 1=TDMA.
1 - 6 1
ATHX Singe-hop repeat. Only applicable if repeater function is enabled. (ATXR = 1) 0 = repeater will repeat as programmed. 1 = will not repeat any packet that has already been repeated.
0 or 1 0
ATMC Set/Read Channel Access Method. 0=Standard carrier-sense CSMA. 1=Time-Division Multiplex, where user-data is transmitted in the unit’s TDMA slot.
0 or 1 0
GPS GPS Operation Mode. Set the SM version’s Operating mode.
1 – 15 8
GPS&F Reset all GPS (-SM version) parameters. Set the SM version’s Operating mode to GPS mode 4, and sets all GPS parameters to factory defaults. It does not erase frequency or other radio-related parameters.
- -
IDLERATE IDLE TX Interval. Set the number of seconds between position transmissions when the unit is idle (has not moved more than TRIGDX meters).
0-9999 seconds
10
KEYPHRASE Privacy Security Key Code. Set the privacy key for this device. It must be the same key as used on all other Raveon
2-16 ASCII characters.
“RAVEON”
Atlas PT Technical Manual
21
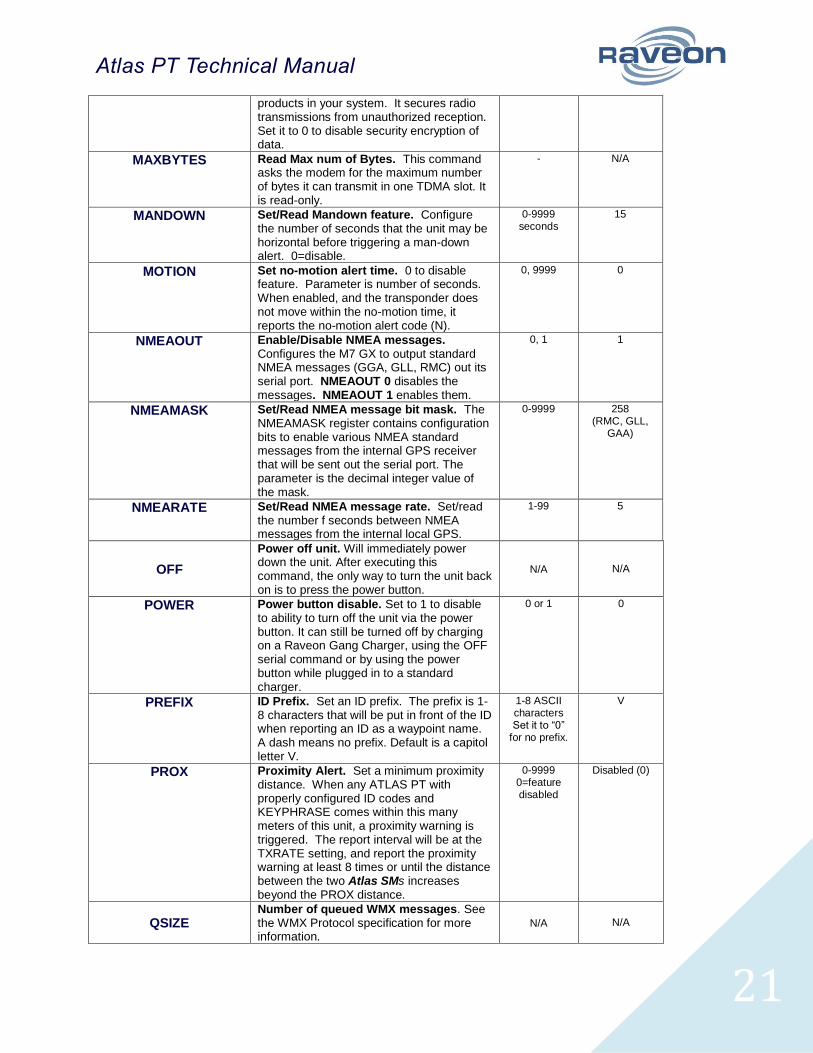
products in your system. It secures radio transmissions from unauthorized reception. Set it to 0 to disable security encryption of data.
MAXBYTES Read Max num of Bytes. This command asks the modem for the maximum number of bytes it can transmit in one TDMA slot. It is read-only.
- N/A
MANDOWN Set/Read Mandown feature. Configure the number of seconds that the unit may be horizontal before triggering a man-down alert. 0=disable.
0-9999 seconds
15
MOTION Set no-motion alert time. 0 to disable feature. Parameter is number of seconds. When enabled, and the transponder does not move within the no-motion time, it reports the no-motion alert code (N).
0, 9999 0
NMEAOUT Enable/Disable NMEA messages. Configures the M7 GX to output standard NMEA messages (GGA, GLL, RMC) out its serial port. NMEAOUT 0 disables the messages. NMEAOUT 1 enables them.
0, 1 1
NMEAMASK Set/Read NMEA message bit mask. The NMEAMASK register contains configuration bits to enable various NMEA standard messages from the internal GPS receiver that will be sent out the serial port. The parameter is the decimal integer value of the mask.
0-9999 258 (RMC, GLL,
GAA)
NMEARATE Set/Read NMEA message rate. Set/read the number f seconds between NMEA messages from the internal local GPS.
1-99 5
OFF
Power off unit. Will immediately power down the unit. After executing this command, the only way to turn the unit back on is to press the power button.
N/A N/A
POWER Power button disable. Set to 1 to disable to ability to turn off the unit via the power button. It can still be turned off by charging on a Raveon Gang Charger, using the OFF serial command or by using the power button while plugged in to a standard charger.
0 or 1 0
PREFIX ID Prefix. Set an ID prefix. The prefix is 1-8 characters that will be put in front of the ID when reporting an ID as a waypoint name. A dash means no prefix. Default is a capitol letter V.
1-8 ASCII characters Set it to “0”
for no prefix.
V
PROX Proximity Alert. Set a minimum proximity distance. When any ATLAS PT with properly configured ID codes and KEYPHRASE comes within this many meters of this unit, a proximity warning is triggered. The report interval will be at the TXRATE setting, and report the proximity warning at least 8 times or until the distance between the two Atlas SMs increases beyond the PROX distance.
0-9999 0=feature disabled
Disabled (0)
QSIZE Number of queued WMX messages. See the WMX Protocol specification for more information.
N/A N/A

Atlas PT Technical Manual
22
REPEAT Enable -SM Repeating. This simple command enables the repeater feature of the Atlas SM, and configures it for standard operation. The user may alternately use the ATX and ATRX commands, but they are more complicated to use. This command enables the unit to repeat all messages it receives, as long as the first digit of the 4-digit ID matches its first digit. (It repeats IDs 0001 thru 0999).
0 off 1 configure repeater.
0
RESPOND Response slots. Configures special slots that can be used only in response to over-the-air commands or data acknowledgement. See the Raveon tech note “High Performance TDMA Systems Engineering” for more information
Use RESPOND 0 to disable.
Disabled
SLOTQTY Quantity of TDMA Slots. Normally this parameter is set to 1. Each unit gets one slot. To facilitate data transmission, it is possible to set this to a number other than 1. For example, if set to 3, and the ID of the unit is 0008, the unit will be allowed to transmit in slots 8, 9, and 10.
1-9999 1
SLOTTIME TDMA Slot duration. Configure the width of a TDMA slot. 50mS increments.
50 - 1000 200
SMLISTEN Set Listen Slots. Used in Sleep Mode 5 to set the slots that data will be received on. See the section on Battery Life and Power Savings for more information.
Disabled
SUM
Send Update Message. Immediately sends a position report to the configured TOID. Will wait for a response slot if configured to do so.
N/A N/A
TDMATIME Set/read TDMA Frame time. The length of one TDMA time frame, in seconds.
0-3599 10
TRIGBITS I/O Change Reporting. Which bits are used as transmission triggers. This is a HEX number. Bit 0 is IN0, bit 1 is IN1…. IN2 is the serial data input, so if the unit is used to send data, do not set TRIGBITS to a number greater than 3.
0-7 0
TRIGPOL Polarity of the input bits. 0 = normal active high operation(causes unit to transmit when it goes high), 1 = Inverted, active low. This is a HEX number. Bit 0 is IN0, bit 1 is IN1….
0-FF 0
Active high
TRIGEX Report on change. Sets which input bits cause a report on change. If a particular bit is a 1, then it will trigger a report when it changes. The input bit must also be enable with the TRIGBITS. This is a HEX number. Bit 0 is IN0, bit 1 is IN1…
0-FF 0
TRIGDX Distance trigger. Set a distance (in meters) threshold beyond-which the unit will transmit its position and status. If set to 0, the unit always reports at the TXRATE. If set to an distance greater than zero, then the unit reports at the TXRATE intervals if it has moved this distance since the last report. If it has not moved, it will still report
0-999 0

Atlas PT Technical Manual
23
its position, but at the rate set by IDLERATE. If IDLERATE is set t 0, then the unit will not report its position when not moving.
TRIGSPEED Speeding Report. Set a speed (in kilometers/hour) threshold above-which the unit will begin reporting its position and status. Set to 0 to disable this feature.
0-999 0
TXRATE GPS Report Rate. Set number of seconds between GPS reports. This is also the rate at which the internal GPS will measure position, speed, etc. Even if the unit is not moving, the GPS periodically measures position and speed to determine if it has triggered a speed or position transmission.
1 - 9999 10
TLLPARM $GPTLL Message parameters. This command sets flags that tell the ATLAS PT which internal parameters to append to the target “Name” when it outputs the TLL message. Bit 0 = temperature, Bit 1= velocity, Bit 2=RSSI, Bit 3 = voltage. Enter the number in decimal: 10 sets bits 3 and 1, 8 sets bit 3, 9 sets bits 3 and 0
0-15 0
5.7 Software Upgrades
Raveon is always adding new features to its radios. If you see a feature listed in this manual that was added after your purchase, it may be possible to upgrade your radio software to the latest version to enable the new feature. Contact your radio dealer for information on whether you can receive the upgrade and instructions on how to do so.

Atlas PT Technical Manual
24
5.8 Factory RV–SM Default Settings
For the VHF ATLAS PT model RV-PT-VA, the factory defaults GPS settings are:
Radio channel 1 : 144.100 MHz
GPS Mode : 8
Serial port output message: PRAVE
Over-the-air baud rate: 9600 baud, 2-level
Serial port RS-232 : 38400baud, N/8/1
Hardware flow control: Off
RF Power Output: 100% (Full power)
Channel number selected: 1
Position/Status report interval: 30 seconds
Minimum movement distance to report: 9998
Transmission trigger inputs: 0 (digital inputs disabled)
Security KEY (KEYPHRASE): RAVEON
Proximity Alert: 0, off
I/O Change reporting: 0, off
ID Prefix: V
Slot Quantity: 1
Mandown: 15 seconds

Atlas PT Technical Manual
25
6. Setup and Initial Configuration
Charge the battery
Connect the supplied antenna (if not affixed)
Connect a computer terminal, or PC computer running a terminal program, to the 5-pin I/O connector. The factory default serial ports settings are 38400 bps, 8 data bits, 1 stop, no parity.
Put the ATLAS PT into command mode by entering +++.
Enter +++to enter command mode.
Program the modem’s operating frequency to your desired operating frequency. This is done with the ATFX xxx.xxxxx command. In most applications, the default settings from the factory will work fine.
With the unit in the command mode, change any of the default operating parameters that must be modified. From the factory, the modems are configured and delivered ready-to-use. Out of the box, they will communicate on the default radio channel using the factory defaults. Raveon highly recommends you test them first with the factory defaults and see how they work before reprogramming them. In general, the parameters you may want to modify will be:
ATFX Frequency for this channel. Set to your frequency.
ATMY The individual ID of this unit. Default is 0001. Number all of your ATLAS PT transponders with a different MYID. Raveon recommends sequentially numbering them, starting at number 1.
SLOTNUM Set the TDMA slot number for this radio to use. Typically, this is set to the same as the ID of the radio as set with the MYID command.
ATDT The ID address of the unit this modem will talk to. Default is 0001.
ATMK The network address mask. Default is FFFF. This means this unit will only receive transmissions from another unit addressed directly to the units ID (MYID) or the listen address (ATLA).
KEYPHRASE Enter a security key code. Use any word or phrase 1-16 characters long. It is case-sensitive. DO NOT FORGET WHAT YOU SET IT TO! The KEYPHRASE is the only parameter that cannot be read out of the Atlas SM. It must be the same as the KEYPHRASE programmed into all the other ATLAS PT transponders in your system. The factory default KEYPHRASE is RAVEON, all capitals.
ATSM If you want the unit to receive also, you must issue the ATSM 0 command. The default is receiver disabled, ATSM 4, and the receiver will be off. ATSM 0 turns the receiver on and allows the unit to receive messages from other transponders, both ATLAS PT type and Raveon’s M7 series.
Remember, that from the factory, all ATLAS PT modems are configured to simply work. Plug in power and connect to the serial port at 38400 baud, and the modems will

Atlas PT Technical Manual
26
communicate on the default channel. Change the channel frequency to your specific frequency, and they will be ready to work on your channel.
6.1 Position Transmission
When the ATLAS PT transmits its position, it also reports other status information such as voltage, input bits, temperature, velocity, and heading. All of these parameters are compressed into a short data packet, and sent over the air in the proper TDMA time slot. Each ATLAS PT is assigned a time slot, based upon its ID. ID 1 is slot 1, ID 2 is slot 2…
Position/status reporting can be set to any rate in the range of 30 seconds to 5 minutes.
At the TXRATE setting. This is the transmit frequency interval setting. The user configures TXRATE to be shortest acceptable interval between reports. The factory default is 10 seconds. At the IDLERATE setting. This is the idle reporting interval, usually the longest acceptable time between position reports.
IDLERATE is used as a slow-reporting rate for parked vehicles, vehicles that have no active trigger inputs, no proximity alerts, and that the user has programmed them to require a minimum movement distance before they will report.
6.2 Set the Transmission Report rate
Using the TXRATE xx command to set the report rate, in seconds, for the ATLAS PT transponder. For example, if you wish the RV-M7 to report every 5 minutes, set the report rate to 300 seconds (TXRATE 300).
If you only want the ATLAS PT to report position and status when it is moving, set the TXRATE xx to the desired time between position transmissions. Then, program the IDLERATE xx to the desired number of seconds between reports when the unit is not moving (idle).
IMPORTANT!: If IDLERATE operation is desired, set the minimum distance the unit must move before a transmission occurs with the TRIGDX xx command. If TRIGDX is set to zero, then the unit will always report at the interval set with the TXRATE xx command.
For example, to transmit every 2 minutes when idle, and every 10 seconds when moving more than 500 meters, use these commands:
IDLERATE 120 (to set the idle moving update interval to 2 minutes.)
TRIGDX 500 (tells it to report at the IDLERATE if it does not move this far)
TXRATE 10 (configures it to report every 10 seconds whenever it is moves more than TRIGDX meters)
The following diagram illustrates the logic behind the various programmable parameters that can be used to configure the ATLAS PT to trigger position transmission. The logic inside of the ATLAS PT shown is tested at a user-programmable rate, called the TXRATE. The TXRATE is the time interval between ATLAS PT position/status radio transmissions.

Atlas PT Technical Manual
27
The diagram clearly shows that if TRIGDX is set to 0, the unit will always transmit when it is supposed to, at the interval programmed into the TXRATE.
ATLAS PT Transmission Trigger Diagram
Atlas PT Technical Manual
28
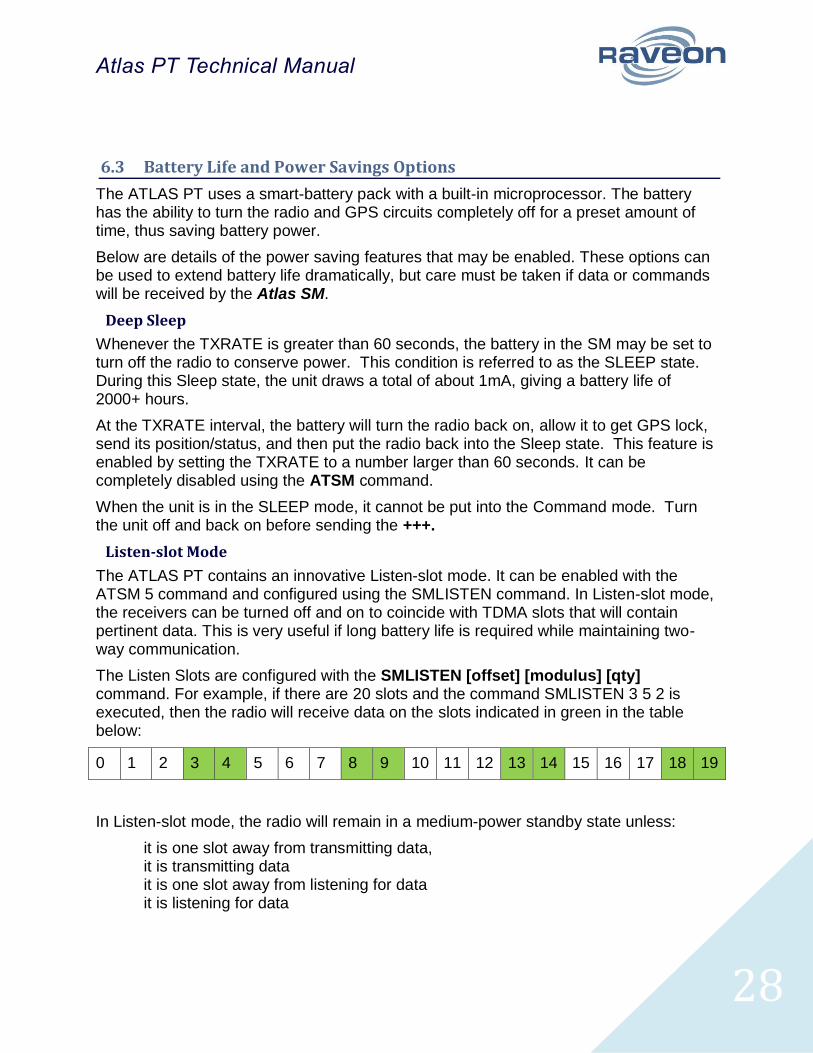
6.3 Battery Life and Power Savings Options
The ATLAS PT uses a smart-battery pack with a built-in microprocessor. The battery has the ability to turn the radio and GPS circuits completely off for a preset amount of time, thus saving battery power.
Below are details of the power saving features that may be enabled. These options can be used to extend battery life dramatically, but care must be taken if data or commands will be received by the Atlas SM.
Deep Sleep
Whenever the TXRATE is greater than 60 seconds, the battery in the SM may be set to turn off the radio to conserve power. This condition is referred to as the SLEEP state. During this Sleep state, the unit draws a total of about 1mA, giving a battery life of 2000+ hours.
At the TXRATE interval, the battery will turn the radio back on, allow it to get GPS lock, send its position/status, and then put the radio back into the Sleep state. This feature is enabled by setting the TXRATE to a number larger than 60 seconds. It can be completely disabled using the ATSM command.
When the unit is in the SLEEP mode, it cannot be put into the Command mode. Turn the unit off and back on before sending the +++.
Listen-slot Mode
The ATLAS PT contains an innovative Listen-slot mode. It can be enabled with the ATSM 5 command and configured using the SMLISTEN command. In Listen-slot mode, the receivers can be turned off and on to coincide with TDMA slots that will contain pertinent data. This is very useful if long battery life is required while maintaining two-way communication.
The Listen Slots are configured with the SMLISTEN [offset] [modulus] [qty] command. For example, if there are 20 slots and the command SMLISTEN 3 5 2 is executed, then the radio will receive data on the slots indicated in green in the table below:
0 1 2 3 4 5 6 7 8 9 10 11 12 13 14 15 16 17 18 19
In Listen-slot mode, the radio will remain in a medium-power standby state unless:
it is one slot away from transmitting data, it is transmitting data it is one slot away from listening for data it is listening for data

Atlas PT Technical Manual
29
Serial Sleep Mode
Using the ATCM 1 command, the ATLAS PT can be set to disable the RS-232 port until a character is received. Combined with other power saving modes, this can result in many additional hours of operations if the serial power is not needed.
In Serial Sleep Mode, the RS-232 will not output any data and will remain in a low power mode until any character is received. One a single character is received; the serial port will wake up permanently until the unit is power cycled.
6.4 Data Transmission
To transmit data, send one or more bytes of data into the serial port of the modem. When a full packet of data has been collected into the internal buffer of the modem, or when there is a pause in the data, the modem will automatically key its transmitter, and send the data over the air when the unit’s TDMA time slot is available.
The ATLAS PT will send position/status as well as transmit and receive serial data.
For advanced, tighter integrations, all communication to the radio may be performed using the Wireless Modem Exchange (WMX) protocol. Refer to the protocol specification for more information. The ATLAS PT is fully WMX enabled.
6.5 Data Reception
Serial Port Data
When the ATLAS PT receives RS232 data over the air, it checks it for errors, and if it is error-free, it will send it out the serial port. Again, the serial port may be set to any baud rate the user wishes, and the radio receiver and transmitter will continue to operate independently of the baud rate.
GPS Position and Status
When the ATLAS PT receives a position report and status from another Atlas SM, it will send this information out its RS232 port, formatted as configured with the GPS x command. The ATLAS PT is GPS mode 8 (GPS 8). The default output message format is Raveon’s $PRAVE message.
Change the position report output format with the OUTPUT x command. Enable/disable the local GPS NMEA data with the NMEAOUT x command (0 off, 1 on)
The position/status messages that the ATLAS PT is able to send out of its serial port are:
Message Format
Description OUTPUT x Parameter/setting
$GPWPL NMEA WayPoint List. This message is commonly used to share waypoint locations among GPS units. The ATLAS PT can output this message when it receives a position report from other ATLAS PT transponders. A GPS
OUTPUT 3

Atlas PT Technical Manual
30
connected to it, should put a waypoint on its screen, and in its database, at the location specified by the RV-M7.
$PRAVE Raveon Position & Status. This message is sent out of the ATLAS PT when it is operating in the GPS 2 mode. This message is used by third-party and PC applications for tracking location and status information.
OUTPUT 1
$GPTLL NMEA Target Lat Long. This message is commonly sent by marine RADAR receivers to notify plotting devices of the location of a RADAR target. The ATLAS PT can output this message when it receives a position report from other ATLAS PT transponders. A plotter or display connected to it that supports the TLL message, should put an icon on its screen at the location specified by the RV-M7. The icon name is the MYID of the RV-M7 that transmitted its position over the air.
OUTPUT 2
$GPGGA NMEA GPS Position Fix Data. This message is the standard position message from a GPS receiver.
NMEAOUT 1
$GPGSV NMEA Satellites in view. This message is the standard message to indicate the number of satellites in view, and their signal quality.
NMEAOUT 1
6.6 Device Addressing
Security Key
The security KEY programmed into every ATLAS PT transponder ensures that only ATLAS PT transponders with the exact same security code can receive position and status information. The security key is case sensitive, so “Raveon” and “RAVEON” are two different keys.
The security code may be from 2 to 16 characters long. The longer the code, the more secure it is and the less likely anyone could guess what it is. It is up to the user to select and set this code. If the ATLAS PT is not used in a system where security and privacy are a concern, then it is OK to leave the factory-set code.
If it is important that the ATLAS PT transmissions and system be secure, Raveon suggest you program the KEY to be a random sequence of letters and numbers at least 8 characters long.

Atlas PT Technical Manual
31
When you program your own security code into your ATLAS PT transponders, write it down in a secure place. This parameter cannot be read out of the Atlas SM. If you forget what it is set to, you will have to reset all the security codes in all of your ATLAS PT Transponders.
Use the KEYPHRASE command to set the key phrase. For example, to set the key phrase to Jkl53hhp type:
KEYPHRASE Jkl53hhp <enter>
ID Addressing Basics
ID addressing is used to differentiate one RV-M7 Transponder from another. Each must have a unique number programmed into them, so that when a position report is received, the ATLAS PT that sent the message can be identified. This is called the MYID of the unit that sent the message.
Each ATLAS PT has a MYID programmed into it, and is represented as a 4 digit decimal number. ATLAS PT IDs may be any number between 0001 and 9999. The Unit Address is programmed with the MYID xxxx command, and the ID of the destination modem it sends its messages to (the Destination Address) is configured with the ATDT xxxx command.
The factory default MYID in all ATLAS PT modem is 0001, and 0001 is also the default for the Destination ID also. The ID of your particular ATLAS PT may have been configured by your dealer or distributor. If so, it is labeled on the rear of the unit. If it is not labeled with an ID, the factory default ID is in it.
The default Address Mask is FFFF, This means this unit will only receive transmissions from another unit addressed directly to the units ID (MYID) or the listen address (ATLA).
Make sure you set the MYID of each ATLAS PT in your system to a different number.
For example, to set the ID of your ATLAS PT to 17, enter:
MYID 17 <enter>
To set your RV-M7 to send its position and status data to RV-M7 number 1, enter:
ATDT 1 <enter>
To set your address mask to receive all messages from units with IDs 1-999, and exclude 1000-9999, enter
ATMK F000 <enter>
Time Slots
The ATLAS PT uses a transmission scheme popular in mobile-telephones called TDMA (Time Division Multiple Access). Each ATLAS PT is allocated a time-slot to use for sending and receiving radio messages.
Refer to the Raveon website for detailed explanation of the TDMA scheme. The important point to understand is that for optimum efficiency in an ATLAS PT system, begin sequentially numbering the MYID of the ATLAS PT transponders at ID 0001. The second RV-M7 should be ID 0002, and so on.

Atlas PT Technical Manual
32
The ATLAS PT transponders have internal clocks with 100 ticks-per-second. They can measure time and initiate transmissions 100 times every second (every 10mS). The TDMA time slot is configured to be some number of these ticks. The factory default allocation is 200mS long TDMA slots, and thus in 10 seconds, up to 50 ATLAS PT transponders may report position. These parameters are programmable, and may be re-configured based upon the type of system they are used in.
Normally, the time slot is the same as the radio’s ID. But, the user may modify the time slot without affecting the ID of the unit by using the SLOTNUM command. SLOTNUM xx will set the slot number to xx without affecting the ID. Once the SLOTNUM command is used, the slot number will not change when the ID is changed.
6.7 Local NMEA data from the internal GPS
The ATLAS PT personal locator may be configured to output standard NMEA 0183 GPS messages from its internal GPS receiver. For GPS tracking, these GPS transponders can receive GPS position reports from other radios, and they may also be configured to output their own GPS location via their serial port.
Following is a list of the NMEA messages that are available (as of revision C2 of the Firmware).
NMEA Message Bit Number (zero based)
Bit Mask (hex format / decimal)
GGA 0 0×001 / 1
GLL 1 0×002 / 2
RMC 9 0×100 / 256
Once you set the “GPS Mode” of the radio using the GPS X command, you can change the NMEAMASK parameter to modify with of the NMEA sentences will come out the serial port.
For example, to have only the RMC sentences come out the serial port, use the following command”
NMEAMASK 256
To have the GGA and GLL come out the serial port use this command:
NMEAMASK 3
The NMEAMASK parameter is the sum of all of the decimal values of the individual bits corresponding to the NMEA messages.

Atlas PT Technical Manual
33
7. Operation
Once the ATLAS PT is turned on by pressing the power button, the internal GPS will begin to try to lock onto the GPS satellites.
The Status LEDs on the front of the RV-M7 will begin to blink orange.
After 10 to 60 seconds, depending upon the satellite strength, orange blinking will stop. This indicates the internal GPS receiver is locked onto GPS satellite signals, and has a position fix.
The ATLAS PT will only transmit if it has GPS lock. If the GPS antenna is broken or obscured, the unit will not report position or status.
When it is locked to GPS, the unit will transmit its position and status at the interval programmed into the TXRATE parameter.
7.1 Battery Life
The ATLAS PT can report its charge percentage which can be used to determine how much life is left in the battery. Set TXBATPCT to 1 to have battery charge percentage transmitted in the PRAVE messages instead of the voltage. Use the ATBC command to read the percentage manually.
If an external battery is connected, the reported percentage will be the charge percentage of the total capacity of all batteries (internal and external taken together).
Atlas PT Technical Manual
34
8. RV-M7 Diagnostic Provisions
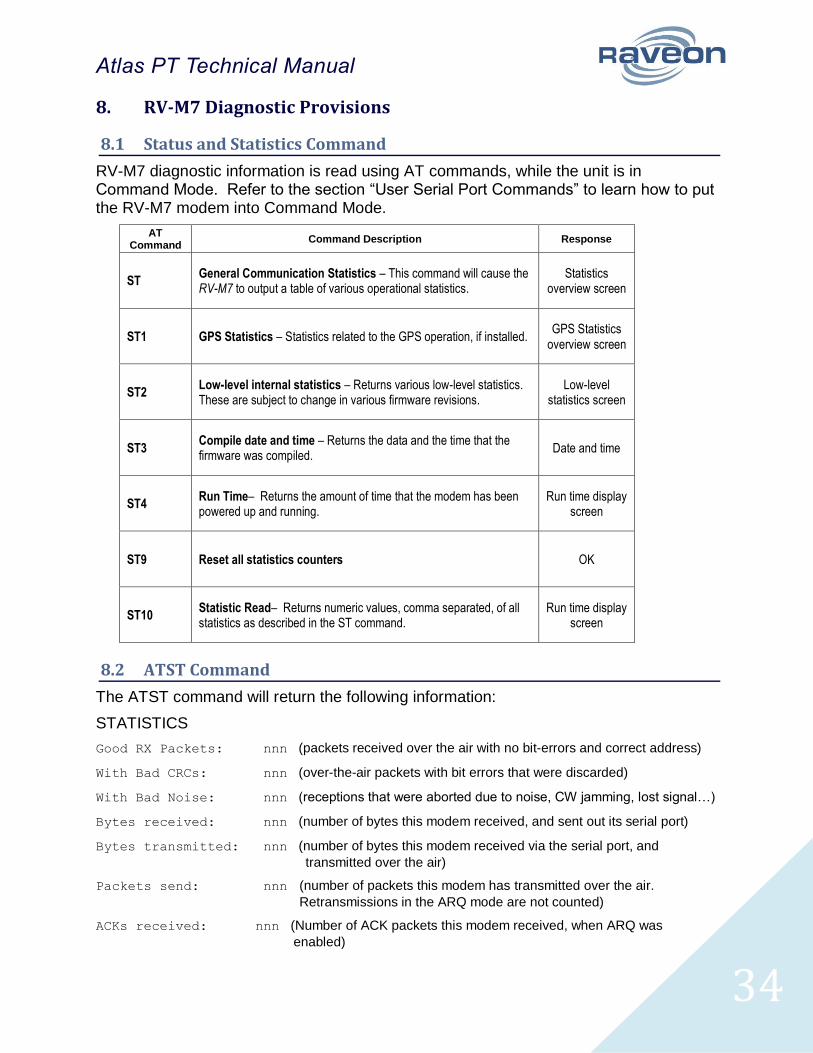
8.1 Status and Statistics Command
RV-M7 diagnostic information is read using AT commands, while the unit is in Command Mode. Refer to the section “User Serial Port Commands” to learn how to put the RV-M7 modem into Command Mode.
AT Command
Command Description Response
ST General Communication Statistics – This command will cause the RV-M7 to output a table of various operational statistics.
Statistics overview screen
ST1 GPS Statistics – Statistics related to the GPS operation, if installed. GPS Statistics
overview screen
ST2 Low-level internal statistics – Returns various low-level statistics. These are subject to change in various firmware revisions.
Low-level statistics screen
ST3 Compile date and time – Returns the data and the time that the firmware was compiled.
Date and time
ST4 Run Time– Returns the amount of time that the modem has been powered up and running.
Run time display screen
ST9 Reset all statistics counters OK
ST10 Statistic Read– Returns numeric values, comma separated, of all statistics as described in the ST command.
Run time display screen
8.2 ATST Command
The ATST command will return the following information:
STATISTICS
Good RX Packets: nnn (packets received over the air with no bit-errors and correct address)
With Bad CRCs: nnn (over-the-air packets with bit errors that were discarded)
With Bad Noise: nnn (receptions that were aborted due to noise, CW jamming, lost signal…)
Bytes received: nnn (number of bytes this modem received, and sent out its serial port)
Bytes transmitted: nnn (number of bytes this modem received via the serial port, and
transmitted over the air)
Packets send: nnn (number of packets this modem has transmitted over the air.
Retransmissions in the ARQ mode are not counted)
ACKs received: nnn (Number of ACK packets this modem received, when ARQ was
enabled)

Atlas PT Technical Manual
35
ACKs transmitted: nnn (Number of ACK packets sent over-the-air in the ARQ mode)
Pkts last minute: nnn (Number of packets received during the last minute)
UART errors: nnn (serial port framing and overrun errors. Usually these are caused by
incorrect serial port settings)
OK
If there is a hardware problem, there may be one or more hardware error messages listing the error types (CPU Exceptions, OS Rebooted, or Fatal OS failures). Consult the factory if any of these messages ever appear.)
8.3 ATST1 Command (GPS Statistics)
The ATST 1 command, will return various information regarding the operation of the GPS features in the ATLAS PT.
8.4 ATST3 Command
The ATST3 command, will return the time and date the firmware in the RV-M7 was compiled.
8.5 ATST4 Command
The ATST4 command will return internal timers that tell how long the modem has been powered up and running. All of these timers restart a 0 upon power up.
Run time:
Years: nnn (number of years running)
Days: nnn (number of days running, resets to 0 after one year)
Hours: nnn (number of hours running, resets to 0 after 23 hours, 59 minutes, 59 seconds)
Min: nnn (number of minutes running, resets to 0 after 59 minutes, 59 seconds)
Sec: nnn (number of seconds running, resets to 0 after 59 seconds)
Uptime: nnn (number of seconds running. Does not reset.
OK

Atlas PT Technical Manual
36
9. Troubleshooting
9.1 Symptom: Unit will not receive
Solution #1: Verify that the unit is on the correct RF channel. If it is, the Status LED should blink green every time another modem tries to transmit to it. If the Status LED does not blink when it should be receiving, it is on the wrong RF frequency.
Solution #2: If the Status LED blinks green, verify that the Unit Address of the sending modem matches the unit address of the receiving modem. If this is OK, verify that the over-the-air baud rate of all modems is the same (ATR2 command).
Solution #3: Verify the KEYPHRASE is correct. If encryption is used, the KEYPHRASE is set to a unique word, and must be the same in all radios in the system. If it is not used in the radio system, then the KEYPHRASE in all units must be disabled or left at the factory default. To disable encryption, use the KEYPHRASE 0 command. The factory default KEYPHRASE is RAVEON, in all capital letters.
Solution #4: Verify the Receiver circuits are powered. The receiver circuitry by default is disabled (ATSM 4). If you wish to receive data with the ATLAS PT, you must enable the receiver circuits, increasing the current draw a little bit. ATSM 0 enables the receiver circuits.
9.2 Symptom: Unit will not transmit
Solution #1: Verify that the GPS is locked. If the Status LED is blinking twice per second, the internal GPS is not receiving a signal from the GPS satellites, and thus, the unit will not transmits. Locate the ATLAS PT in a place where it can receive a GPS signal.
Solution #2: Verify that the radio channel is clear or BCL is off. The ATBC 1 command enables Busy Channel Lockout. If BCL is on, the modem will not transmit on a busy channel. The ATBC 0 command turns it off, and thus the modem will transmit when it needs to, regardless if the channel is busy. The Status led on the front of the modem is illuminated green whenever the radio channel is busy (RF present).
9.3 Symptom: Receive light blinks, but no data is received
Solution #1: Verify the serial port baud rate. This is difficult if it is set wrong, because you cannot enter the command mode to check it. Try all possible baud rates, and see if one of them works with the modem. Alternately, remove the rear cover of the modem, and press the CONFIG button. This will force the modem into Command Mode, as well as set the serial port to 9600 baud, 8 data bits, one stop, and no parity. If the baud-rate was OK, verify the AT, BT and CT times, that they are long enough for you to enter the +++ string.
Solution #2: Verify the KEYPHRASE is correct. If encryption is used, the KEYPHRASE is set to a unique word, and must be the same in all radios in the system. If it is not used in the radio system, then the KEYPHRASE in all units must be disabled or left at the factory default. To disable encryption, use the KEYPHRASE 0 command. The factory default KEYPHRASE is RAVEON, in all capitol letters.

Atlas PT Technical Manual
37
9.4 Symptom: Long delay before transmitting
Solution #1: Verify that serial port timeout is OK. The ATR3 command sets the number of milliseconds that the RV-M7 will look for in the serial input data stream. If a pause greater than this value happens, the modem will transmit. If the ATG0 parameter is set very large, say 2000, this means 2 seconds, and the modem may simply be waiting a long time. Typical settings for this parameter are 20 (20mS).
Solution #2: This is normal. A TDMA radio will wait until its assigned TDMA slot is ready before it will send data. A delay in transmission of the TDMATIME is normal.
9.5 Symptom: Cannot enter Command Mode
Solution #1: Verify the serial port baud rate. This is difficult if it is set wrong, because you cannot enter Command mode to check it. Try all possible baud rates, and see if one of them works with the modem. Alternately, remove the rear cover of the modem, and press the CONFIG button. This will force the modem into Command mode, as well as set the serial port to 9600 baud, 8 data bits, one stop, and no parity. If the baud-rate was OK, verify the AT, BT and CT times, that they are long enough for you to enter the +++ string.
Solution #2: Handshaking. You may have hardware handshaking enabled on your terminal program, but the hardware or cable may not support it. Disable hardware handshaking on your terminal program to verify this is the issue.
Solution #3: Deep Sleep. If the TXRATE is greater than 60 seconds, the unit may be put into a very deep sleep mode, and will not enter the command mode. You must first turn the unit off, and back on to put it into Command mode.
9.6 Symptom: Repeater will not repeat.
Solution #1: Verify the repeater’s Unit ID is unique. An RV-M7 configured to be a repeater will not repeat messages it originated. If other units in the system have the same ID as the repeater, the repeater will not repeat them because it thinks that it originated the transmission. Set the MYID of the repeater to a unique ID number.
Solution #2: Verify the KEYPHRASE is correct. If encryption is used, the KEYPHRASE is set to a unique word, and must be the same in all radios in the system. If it is not used in the radio system, then the KEYPHRASE in all units must be disabled or left at the factory default. To disable encryption, use the KEYPHRASE 0 command. The factory default KEYPHRASE is RAVEON, in all capital letters.
9.7 Symptom: Transmits position, but no data.
Solution #1: Verify DATAMUTE is not enabled. DATAMUTE disables data transmission. It must be set to 0 for serial port data transmission or WMX transmit data.
Solution #2: Verify SLOTTIME is long enough. The TDMA slot time must be long enough for data to be transmitted in. Adjust the system slot time (SLOTTIME), or give the particular unit an extra slot using the SLOTQTY command.
Atlas PT Technical Manual
38
9.8 Symptom: Radio does not turn on or does not charge
Solution #1: Verify the battery is charged by plugging in to a charger. The power LED will display orange while charging and green when fully charged
Solution #2: If the radio’s LEDs are blinking red when plugged in to the charger, a battery fault condition has been detected. The radio may have been exposed to extreme temperatures or the battery may just be overused. Unplug the radio and do not attempt to use or charge it again. Send the radio to your dealer for service.

Atlas PT Technical Manual
39
10. Mechanical
Note: The GPS connector is TNC. The GPS antenna is enclosed and inaccessible to the user.

Atlas PT Technical Manual
40
11. ATLAS PT Messages
The ATLAS PT sends and receives messages in the PRAVE format. PRAVE is a proprietary protocol developed by Raveon. Use 38400 bps, 8 data bits, no parity and one stop bit (8N1) for standard PRAVE data. See below for PRAVE formatting.
11.1 $GPGSV Satellites In View
When this message comes out of the Atlas SM, it identifies the number of satellites its internal GPS has in view. Up to 3 satellites may be reported in one message. The ATLAS PT typically does not report any satellite information other than the Number of Satellites in view.
$GPGSV,1,2,3,4,5,6,7 * cks
Field Usage Comments
$ GPGSV Number of SVs in view, PRN numbers, elevation, azimuth & SNR values.
1 Count Total number of messages of this type in this cycle
2 Message number This message’s number
3 Number of sats The total number of satellites in view.
4 PRN Satellite number.
5 Elevation Elevation in degrees, 90 maximum
6 Azimuth Azimuth, degrees from true north, 000 to 359
7 SNR Signal-to-noise ratio for this sat.
cks NMEA checksum
11.2 $GPWPL Waypoint Location
The waypoint location sentence is used by GPS receivers and plotters in different ways, often to share waypoint data or to show waypoints on-screen.
$GPWPL,1,2,3,4,5,6 * cks
Field Usage Comments
$GPWPL Waypoint Location Message Header
1 Lat Latitude of the point.
2 N/S North or South. One character.

Atlas PT Technical Manual
41
3 Lon Longitude of the position
4 E/W East or west. One character.
5 WP Name The ID of the unit that transmitted its position plus any user-set prefix.
cks NMEA checksum
When the ATLAS PT is set to GPS 4 mode of operation, it will output this message every time it receives a position report from another ATLAS PT transponder. Within the WPL message, is the latitude, longitude, and “waypoint ID”. In the waypoint ID field, the ATLAS PT puts the ID of the RV-M7 that transmitted its position.
For example, if an ATLAS PT receives a position report from ID 0003 located at 4917.16N, 12310.64W it sends out the following message.
$GPWPL,4917.16,N,12310.64,W,3*65
The lat/lon is sent using the dddmm.mm format, where ddd is the degrees, and mm.mmmm is the decimal minutes. There is no sign to these numbers.
GPS 4 mode with the $GPWPL message is the most common way of using the ATLAS PT with a hand-held or mobile GPS. Most any GPS with a serial-data input will accept the $GPWPL message, and put an icon on its screen, with a label showing the ID of the RV-M7 at that position.
Some GPS displays have an issue when a new position report is received. Most will move the waypoint to the new location, but some re-draw a new waypoint at the new position, and leave the old waypoint in place.
To help make the waypoints easier to read, the ATLAS PT may be programmed with an ID prefix, using the PREFIX vvvv command. The default is a capitol letter V. Set it to a dash (-) to disable the prefix string. If a prefix is programmed into the RV-M7, it will add the prefix characters whenever it outputs the ID in a $GPWPL message. For example, if the prefix is set to the phrase “Car”, the ATLAS PT will output the following message when it receives a position report from RV-M7 Transponder with ID 0003.
$GPWPL,4917.16,N,12310.64,W,Car3*65
And on a GPS display connected to the RV-M7, the waypoint will show up at the correct lat/lon with the waypoint name “Car3”. In most all GPS receivers, this waypoint will also be added to its internal database of waypoints.
11.3 $PRAVE Raveon Proprietary Message, Location-Status
The $PRAVE message is sent out the ATLAS PT when it is configured for GPS 2 mode of operation. This mode is typically used with the RavTrack PC program, or other computer programs that can process position and status information. It is sent at 38.4K bytes/second out the serial port.

Atlas PT Technical Manual
42
Along with ID and position information, it contains a host of other status information. The length of this message may exceed he standard NMEA limit of 79 characters. Any product or software that uses this message must take this into account.
Following is a list of the fields sent in this message
Field Usage Comments
1 $PRAVE Raveon Proprietary Header
2 From ID The ID of the transponder that transmitted its position over the air. It is a decimal number, 0 – 9999.
3 To ID The ID that this position report was sent to. It is a decimal number, 0 – 9999.
4 Latitude dddmm.mmmm format. It is signed. + is north, - is south. No sign means north. Note: typically there are 4 decimal places, but as few as 0 decimal places are possible. Null field if no GPS lock. Leading zeros may be suppressed in the ddd field.
5 Longitude dddmm.mmmm format. It is signed. + is east, - is west. No sign means east. Note: typically there are 4 decimal places, but as few as 0 decimal places are possible. Null field if no GPS lock. Leading zeros may be suppressed in the ddd field.
6 UTC time The UTC time at the time the transmission was made. Hhmmss format. Null field if no GPS lock.
7 GPS Status 0=not valid position. 1=GPS locked and valid position. 2=WAAS operation.
8 Num Satellites
The number of satellites in view
9 Altitude The altitude in meters. Null field if no GPS lock.
10 Temperature The internal temperature of the RV-M7 in degrees C. Typically this is 5-20 degrees above ambient.
11 Battery Percentage
Percent charge of all batteries currently attached to the system. Multiply this field by 10 to get the percentage (10.0 = 100%, 8.6 = 86%, 0.1 = 1%)
12 IO status A decimal number representing the binary inputs.
13 RSSI The signal-strength of this message as measured by the receiver, in dBm. Note, if the message went through a

Atlas PT Technical Manual
43
repeater, it is the signal lever of the repeated message.
14 Speed The speed of the device in km/hour, 0-255
15 Heading The heading of the device 0-360 degrees
16 Status Status flags received from the device. Not all products support generating all status flag codes.
NULL means no alerts.
“P” means a proximity alert.
“N” No motion alert.
“M” means man-down alert
“A” General alert, usually due to pressing an alert button
“C” Critical alert, usually due to pressing and holding alert button
“D” Alert acknowledge, set by the ACK1 command after the unit enters alert
“T” External battery removed flag, indicating that a battery was attached but was removed for longer than five minutes
“I” Impact alert
“V” Vibration
“S” Service required on product
17 Spare A spare field. May be used for UTC date in the future. Typically NULL.
18 * The “*” NMEA end-of-message identifier.
19 Checksum The NMEA 0183 checksum.
Example Sentence:
$PRAVE,0001,0001,3308.9051,-11713.1164,195348,1,10,168,31,8.1,3,-83,0,0,,*66
This example shows a unit at 33° 8.9051 north latitude and 117° 13.1164 east longitude. It is not moving (0 speed). Its signal strength was -83dBm. Its altitude is 168 meters.
12. Maintenance
The following maintenance precautions are required to keep the GPS transponder under manufacturer’s warranty.

Atlas PT Technical Manual
44
12.1 Antenna
A broken antenna can cause severe damage to the GPS transponder. Before use, verify the antenna is intact. Immediately after turning on, verify that the RSSI at a nearby base station is strong, poor signal strength indicates a failed antenna and which must be replaced before resuming operation of the unit.
12.2 Battery
Lithium-Ion battery packs are susceptible to damage on sudden impact, extreme heat or cold. Do not exceed the specifications laid out in the document or battery failure will occur.
Batteries must be stored at least 80% charged and should not be stored without charging for longer than three months.
The radio is equipped to detect many battery failure conditions. If one of these is detected, the radio LEDs will blink red when charging is attempted. If this occurs, stop use of the radio immediately and contact your local dealer for repair or disposal information. Not all battery failures can be detected. If the specifications of the radio are violated, discontinue use and contact your dealer for repair as above.
To ensure safe and proper operation of your radio, batteries should be replaced after 500 charge-discharge cycles or 30 months of ownership, whichever comes first. The batteries are not user-replaceable. Contact your dealer for battery replacement pricing and instructions.
When shipping any potentially damaged batteries, surface-only (non-air) carriers must be used.
12.3 External Battery Port
The External Battery Port must be cleaned after every use. If not cleaned, dirt build-up will occur and cause damage to the port. Use a cotton swab or compressed air to remove any dust and debris immediately following use.
When not in use, the port cover must be in place. Using the radio without the port cover in place will cause damage to the external battery port.
12.4 Serial I/O Connector
The Serial I/O Connector must be cleaned after every use. If not cleaned, dirt build-up will occur and cause damage to the port. Use compressed air to blow any dust and debris out of the connector immediately following use.
When not in use, the connector cover must be in place. Using the radio without the cover in place will cause damage to the connector.
12.5 Bottom DC Power Port
The Bottom DC Power Port will accumulate dirt, dust and debris during use. Before charging the unit with the bottom port, it must be cleaned out using a cotton swab and

Atlas PT Technical Manual
45
compressed air.
Atlas PT Technical Manual
46
Limited One Year Warranty
If within 12 months from date of purchase, this Product fails conforms to Raveon Technologies Corporation’s (the Company) published specifications for the model purchased due to a defect in material or workmanship, Raveon Technologies Corporation will repair or replace it, at Raveon’s sole discretion. This warranty is extended to the original purchasing end user only and is not transferable. Any claim for breach of warranty must be brought to the Company’s attention within such twelve (12) month period and the Product must be returned for action on any such claim within twelve (12) months from the date of purchase Within a reasonable period of time after a claim, the Company will correct any failure of the Product to conform to specifications or any defect in materials or workmanship, or replace the Product, or at its option provide a full refund of the purchase price. A repaired or replaced Product is warranted for 90 days from the date of return shipment to the buyer, or for the balance of the original warranty period, whichever is longer. These remedies are the buyer’s exclusive remedies for breach of warranty.
This warranty does not apply to: (a) product damage caused by accident, dropping or abuse in handling, acts of God or any negligent use; (b) units which have been subject to unauthorized repair, opened, taken apart or otherwise modified; (c) units not used in accordance with instructions; (d) damages exceeding the cost of the product; (e) batteries; (f) the finish on any portion of the product, such as surface and/or weathering, as this is considered normal wear and tear; (g) transit damage, initial installation costs, removal costs, or reinstallation costs; (h) damage due to lighting, floods, fire, or earthquakes (i) any product, components or parts not manufactured by the Company (j) defects caused by failure to provide a suitable installation environment for the Radio; (k) damage during shipment; (l) that the Product will be free from any claim for infringement of any patent, trademark, copyright or other proprietary right, including trade secrets.
RAVEON TECHNOLOGIES INCORPORATED WILL NOT BE LIABLE FOR INCIDENTAL OR CONSEQUENTIAL DAMAGES ARISING DIRECTLY OR INDIRECTLY OUT OF THE OWNERSHIP, USE OR OPERATION OF THE RADIO REGARDLESS OF WHETHER SUCH DAMAGES ARE PREDICATED OR BASED UPON BREACH OF WARRANTY, BREACH OF CONTRACT, NEGLIGENCE, STRICT TORT, OR ANY OTHER LEGAL THEORY. SUCH DAMAGES INCLUDE, BUT ARE NOT LIMITED TO, LOSS OF PROFITS, LOSS OF SAVINGS OR REVENUE, LOSS OF USE OF THE RADIO OR ANY ASSOCIATED EQUIPMENT, COST OF CAPITAL, COST OF ANY SUBSTITUTE EQUIPMENT, FACILITIES OR SERVICES, THE CLAIMS OF THIRD PARTIES, INCLUDING
CUSTOMERS AND INJURY TO PROPERTY. SOME STATES DO NOT ALLOW THE EXCLUSION OR
LIMITATION OF INCIDENTAL OR CONSEQUENTIAL DAMAGES, SO THE ABOVE LIMITATION OR EXCLUSION MAY NOT APPLY TO YOU. THIS WARRANTY IS IN LIEU OF ALL OTHER EXPRESS OR IMPLIED WARRANTIES. ALL IMPLIED WARRANTIES, INCLUDING THE WARRANTY OF MERCHANTABILITY AND THE WARRANTY OF FITNESS FOR A PARTICULAR PURPOSE, ARE HEREBY MODIFIED TO EXIST ONLY AS CONTAINED IN THIS LIMITED WARRANTY, AND SHALL BE OF THE SAME DURATION AS THE WARRANTY PERIOD STATED ABOVE. SOME STATES DO NOT ALLOW LIMITATIONS ON THE DURATION OF AN IMPLIED WARRANTY, SO THE ABOVE LIMITATION MAY NOT APPLY TO YOU.
This warranty gives you specific legal rights and you may also have other rights which vary from state
to state.
No employee of the Company, or any other party is authorized to make any warranty in addition to those made in this document. This warranty limits the Company’s risk and allocates the risks of product failure between the Company and the buyer. This allocation is recognized by both parties and is reflected in the price of the goods. The buyer acknowledges that it has read this warranty, understands it, and is bound by its terms. This limited warranty is governed by the laws of the State of California, without reference to its conflict of law provisions or the U.N. Convention on Contracts for the International Sale of Goods.

Atlas PT Technical Manual
47
Warranty service is available by mailing postage prepaid to:
Raveon Technologies Corporation
2320 Cousteau Court
Vista, CA 92081 - USA
To obtain warranty service, include a copy of the original sales receipt or invoice showing the date, location, and price of purchase. Include a written description of the problem with the product, a phone number and name of person who may be contacted regarding the problem, and the address to where the product should be returned.
Products repaired under warranty will typically have their program memories erased and reset to factory default settings.