astro –pop 16 & 20 oz. - yahoolib.store.yahoo.net/lib/yhst-81132447584496/41474.pdf ·...
TRANSCRIPT

Part No. 41474 Revised 8/89
ASTRO –POP 16 & 20 OZ. Instruction Manual
Model #2022,#2023, #2024, #2026, #2026T #2023EX, #2024EX, #2026EX
Cincinnati, OH 45241-4807 USA

ASTRO-POP 16 & 20 OZ
2022,2023,2024,2023EX,2024EX,2026,2026EX,2026T 2
SAFETY SHEET
INSTALLATION INSTRUCTIONS

ASTRO-POP 16 & 20 OZ
2022,2023,2024,2023EX,2024EX,2026,2026EX,2026T 3
CHECKING SHIPMENT The popcorn machine is shipped in a corrugated carton. If you purchased a floor model machine, the base is shipped in another carton. If you purchased a bucket seasoning pump, it too is in a separate carton. Unpack all cartons and check thoroughly for any damage, which may have occurred during transit. Damage claims should be filed immediately with the transportation company.
SPECIFICATIONS
ASTRO POP – 16OZ
#2022, 2023 , 2024 ASTRO POP – 16OZ # 2023EX , 2024EX
ASTRO POP – 20OZ #2026, 2026T
ASTRO POP – 20 OZ #2026EX
HEIGHT
* 46 IN ^ 74IN.
46 IN. 74 IN.
46 IN. 74 IN.
46 IN. 74 IN.
DEPTH 28 IN. 28 IN. 28 IN. 28 IN. WIDTH 28 IN 28 IN. 28 IN. 28 IN.
SHIPPING WEIGHT * 220 LBS. ^ 398 LBS
* 220 LBS. ^ 398 LBS
* 220 LBS. ^ 398 LBS
* 220 LBS. ^ 398 LBS
CORN DRAWER CAPACITY
(FLOOR MODEL ONLY)
50 LBS. 50 LBS. 50 LBS. 50 LBS.
SIZE OF SEAS. BUCKET (FLOOR MODEL ONLY)
50 LBS. 50 LBS. 50 LBS. 50 LBS.
QUANTITY OF OIL 0-10 OZ. 0-10 OZ. 0-10 OZ. 0-10 OZ. KETTLE HEAT
ELEMENTS (WATTS)
1750 1750 2800 2800
BLOWER WARMER IIT. ELE.
(WATTS(
400 400 400 400
WARMER MOTOR (AMPS)
1.12 .59 1.12 .59
AGITATOR MOTOR (AMPS)
.87 .40 2 .40
LIGHTS, FLOOD (WATTS) 75 75 75 75 SEASONING PUMP HEAT
ELEMENTS (WATTS) 500 500 500 500
PUMP MOTOR (AMPS) 1.8 .75 2.8 .75 LIGHTS, FLOURESCENT
(WATTS) 20 20 20 20
CORN PAN HEAT ELE. (WATTS) 2024, 2024EX
75 75
*Counter Model ^ Floor Model
OPERATING INSTRUCTIONS
CONTROLS AND THEIR FUNCTIONS LIGHT SWITCH Flipping this lever to the “ON” position lights all the lights on your popper. WARMER SWITCH Flipping the lever of this switch to the “ON” position energizes the blower, which will freshen any prepopped corn you may have left over. KETTLE HEAT SWITCH Moving the lever of this switch to the “ON” position starts the exhaust blower and the agitator in the kettle. The purpose of this agitator is to keep the raw kernels on the bottom of the kettle and to prevent the popped corn from jamming. FUSES The ASTRO POP is equipped with two 20-amp fuses. These protect the entire machine. If a fuse blows out continually, check for loose wires, short circuits, etc. NOTE: THE FOLLOWING CONTROLS ARE ON FLOOR MODEL ASTRO POP POPPERS ONLY FOR SPECIAL COUNTER MODEL POPPERS EQUIPPED WITH THE BUCKET SEASONING PUMP. OIL SYSTEM MASTER SWITCH Moving the lever of this switch to the “ON” position energizes the electrical circuit of the bucket-seasoning pump. It also supplies the heat element of the pump with 40 watts of electrical power. This “LOW HEAT” will usually keep the oil liquid at average room temperatures. When this switch is in the “ON” position, the red pilot light next to it will be on. OIL PUMP BUTTON After the oil has melted, pressing the red “OIL PUMP BUTTON” for a few seconds will start an automatic pumping cycle, which delivers the proper amount of oil to the kettle. The oil pump pilot light will come on, and remain on while the automatic pumping cycle takes place. When the pilot light comes on, you may release the “OIL PUMP BUTTON”. TIMER SWITCH This switch on the bucket seasoning pump control box determines the length of time the heat element of the bucket pump is at “HIGH HEAT”. This “HIGH HEAT” is produced by 500 watts of electrical power. Its purpose is to melt the oil quickly. Whenever the timer switch is “ON”, the pilot light above it will be on. POPPING CORN (FLOOR MODELS)
1. Turn “LIGHTS SWITCH” AND “WARMER SWITCH” ON.

ASTRO-POP 16 & 20 OZ
2022,2023,2024,2023EX,2024EX,2026,2026EX,2026T 6
2. Turn “OIL SYSTEM MASTER SWITCH” on. 3. Set the timer switch on the bucket seasoning pump control box for the desired HIGHT HEAT melting
time. The length of time you choose depends of the temperature of the oil. Colder oil takes longer to reach 76� F., the melting point. After you have melted the oil, the automatic low heat (energized by having the OIL SYSTEM MASTER SWITCH ON) will usually keep the oil liquid at most room temperatures. Coconut oil will congeal at temperatures below approximately 76�F. In cold areas, turn on the “HIGH HEAT” occasionally for about 5-10 minutes to keep the oil liquid.
4. Turn “KETTLE HEAT” switches on approximately five minutes before you estimate the oil will be melted sufficiently to begin pumping.
5. When the kettle is up to heat, and the oil has melted, press red oil pump button for a few seconds until oil pump pilot light comes on. Proper amount of oil is automatically pumped into the kettle.
6. Turn “KETTLE MOTOR & EXHAUST SWITCH” on. 7. Lift kettle lid and pour in 16 ounces of corn and 4 teaspoons of flavacol (for 16 oz. Astro Pop ). Close
lid. ( for 20 oz. Astro Pop, use 20 ounces of corn and 5 teaspoons of Flavacol.) 8. After the corn has popped, rotate the dump handle counterclockwise to disengage the agitator. Keep
rotating the handle in this direction to dump the popcorn. There is a stop to prevent the kettle from being rotated too far.
9. Return the kettle to the upright position. 10. Repeat the cycle starting with Item #5 to pop another kettle of corn. 11. On the final kettle of corn, it is a good idea to turn the “KETTLE HEAT’ switch off, just as the lids are
coerced open by the popping corn. This saves electricity, since there is plenty of heat in the kettle, and also helps eliminate smoke and odor after you have stopped popping.
POPPING CORN (COUNTER MODEL) 1. Turn the “LIGHT SWITCH” and ‘WARMER SWITCH” on. 2. Turn the “ KETTLE HEAT” switch on approximately five minutes before you are ready to pop corn.

ASTRO-POP 16 & 20 OZ
2022,2023,2024,2023EX,2024EX,2026,2026EX,2026T 7
3. Turn “KETTLE MOTOR & EXHAUST SWITCH” on. 4. Open the lid and place the oil, the corn, and the salt in the kettle. Close lid.
The popper comes equipped with an 18-ounce corn measure cup. We recommend a flavored and colored coconut oil, as popcorn in coconut oil stays fresher longer. Coconut oil does not leave the black deposits in your kettle like other oils. TASTEE-POP bars, being mostly coconut oil are very handy to use.
5. After the corn has popped, rotate the dump handle counterclockwise to dump the popcorn. There is a stop to prevent the kettle from being rotated too far.
6. Return the kettle to the upright position and rotate the handle clockwise to engage the agitator drive. 7. Repeat the cycle starting with item #4 to pop another kettle of corn. 8. On the final kettle of corn, it is a good idea to turn the “KETTLE HEAT” SWITCH OFF, JUST AS THE
LIDS ARE CORCED OPEN BY THE POPPING CORN. This saves electricity, since there is plenty of heat in the kettle, and also helps eliminate smoke and odor after you have stopped popping.
CAUTION: TO AVOID SERIOUS BURNS DO NOT TOUCH KETTLE WHILE IT IS HOT.
When you are finished popping, make sure ‘KETTLE HEAT” and “KETTLE MOTOR” switches are turned “OFF”. NEVER LEAVE THE HEAT ON WHEN YOU ARE NOT POPPING. If you place oil in a hot kettle, remember to finish that popping cycle, or turn off the kettle. Exposure to heat starts to break down color and flavor of popcorn oils. Always wipe the complete exterior of your kettle with a heavy cloth immediately after you finish popping. Oil drippings will come off quite easily at this time, but will burn on and stain if not removed. The sales appeal of a clean and gleaming machine must not be over-looked. Your customers expect it of you.
CARE AND CLEANING
CAUTION: UNPLUG YOUR MACHINE BEFORE CLEANING.
GLASS PANEL AND CASE A clean looking, well kept machine is one of the best ways of advertising your popcorn. Take a clean cloth and first wipe excess oil from the glass. Wipe the outside, too. Then, use any glass cleaner this is recommended for cutting grease. We find a wax cleaner such as Johnson’s Shine-Up to be good for cleaning the aluminum exterior of your machine.
ASTRO POP 16 -- 16 OZ. CORN 5 1/3 oz. Oil charge or 1 1/3 Bars 4 Teaspoons Flavacol ASTRO POP 20 -- 20 oz. Corn 6 2/3 oz. Oil charge or 1 2/3 Bars 5 Teaspoons Flavacol

ASTRO-POP 16 & 20 OZ
2022,2023,2024,2023EX,2024EX,2026,2026EX,2026T 8
Special care should be used when cleaning the Plexiglas doors to prevent scratching them. Use a very soft cloth and a mild soap. Never use a gritty type cleaner or detergent. Special Plexiglas cleaners are available to clean and make the Plexiglas static free. Using a damp cloth, wipe the exposed exterior and interior surfaces at the close of operations for the day. OLD MAID DRAWER Empty the old maid drawer and wipe clean daily or when it becomes filled. BLOWER WARMER UNIT Every few weeks, remove the corn pan and wash it with hot soapy water. Rinse with clear water and dry before replacing it. Clean out all trash corn from the BLOWER-WARMER assembly, as well as the frame of the machine. Your must keep this BLOWER-WARMER Unit clean and free from trash corn for maximum efficiency and long motor life. KETTLE When you are finished popping for a while, wipe the oil off the outside of the kettle and lids. Although the kettle shell is chrome plated, it will become blackened if you allow the oil to bake on. When not popping corn, always turn the ‘KETTLE HEAT” switch “OFF”. CAUTION: NEVER IMMERSE THE ENTIRE KETTLE IN WATER. THIS WILL AUTOMATICALLY VOID THE GUARANTEE AND RUIN THE ELECTRICAL COMPONENTS. A clean kettle sells more popcorn and makes more profit. If you did not follow our directions and your kettle has become really black and messy, it is going to require some serious effort on your part to bring it back to like new condition. We recommend the use of Gold Medal “OLD SOAK” cleaner. This is a specially formulated USDA Food approved cleaner used in bakeries for removing burned material from baking pans. You can clean the inside of the kettle by making a solution of OLD SOAK as directed, turn on the kettle heat until it boils, and then let is soak. If you are careful, you may be able to remove the black deposits from the kettle shell without disassembling the kettle. BUT, BE CAREFUL. Remember, do not immerse kettle. EXHAUST FILTER The purpose of the exhaust filter is to trap the hot oil from the popping operation, while allowing the steam and delicious aroma of the corn to pass. To do this efficiently, the filter must be kept clean. IT SHOULD BE REMOVED AND WASHED IN HOT SOAPY WATER AT LEAST ONCE A WEEK. Remember, to remove all excess water from the filter before reinstalling. If filter is too clogged, soak in “OLD SOAK” or replace. A clogged filter will stall exhaust blower motor and ruin it. BUCKET SEASONING PUMP We recommend cleaning the bucket-seasoning pump by cycling a cleaning solution through it. Use a clean, empty seasoning bucket and fill it with hot water and “OLD SOAK” cleaner available from Gold Medal. Use one ounce of OLD SOAK per gallon of hot water. Make sure the “OIL SYSTEM MASTER” switch is OFF. Disconnect the oil line by means of the quick disconnect coupling. Slide the pump and the bucket of seasoning oil to which it is attached from the cabinet. Remove the pump from the seasoning oil and let excess oil drain off. You must do this when the oil is in the liquid state and not congealed. Wipe as much of the oil from the pump as much you can, and then mount the pump on the bucket containing the cleaning solution. Slide the pump and bucket into the cabinet and reconnect the oil line. CAUTION: AVOID TURNING THE PUMP UPSIDE DOWN!!!
TO REMOVE KETTLE FOR CLEANING: FIRST UNSCREW LOCK RINGDO NOT USE PLIERS OR VISE GRIPS. THEN PULL DOWN TO UNPLUG.

ASTRO-POP 16 & 20 OZ
2022,2023,2024,2023EX,2024EX,2026,2026EX,2026T 9
Disconnect the kettle lead in cord and remove the kettle from the cabinet. Place a suitable container inside the popper to catch the cleaning solution after it is cycled through the oil delivery system. Turn the ‘OIL SYSTEM MASTER” switch on cycle the pump by means of red “OIL PUMP” button. Continue to cycle until the pump and delivery system are clean. Turn “OIL SYSTEM MASTER” switch off. Remove the pump from the cleaning solution with plain hot water and recycle the pump to flush out the cleaning solution. Remove the pump from the hot water, allow it to drain for a few minutes, then wipe all exposed surfaces dry. Place the pump into the bucket seasoning oil immediately. Cycle the pump several times to remove any water, which may be inside the internal parts of the pump or delivery system. REPLACING BROKEN GLASS Should you accidentally break a panel of glass, it can be replaced very easily without disassembling the popper.
1. Remove all loose pieces of glass. 2. Remove all vinyl strips from around the glass to be replaced. To do this, start the vinyl
strips out of the channels with a knifepoint or similar tool. Always start at a corner. When enough vinyl protrudes, grasp it with the fingers and carefully pull it out. Set it aside as it must be reused.
3. Carefully remove the rest of the broken glass. 4. Apply decals to the new glass panel. 5. Maneuver the new glass into position. Try not to let the glass slip down into the opening in
the extrusion from which the vinyl was removed. The glass should set on the illustration. If the glass does slip down into the opening, it will be necessary to raise the glass. Use suction cups, or a similar device.
6. Replace the vinyl, starting at the bottom edge of the glass. Starting at one corner and working it into the channel inch by inch easily install the vinyl. Apply pressure to the vinyl at point “A” as shown on illustration to force it into the channel. A dull blunt object such as the eraser end of a pencil or a small round piece of wood is an excellent tool.
NOTE: WE DO NOT SHIP GLASS, OBTAIN FROM LOCAL GLASS SHOP OR HARDWARE STORE. ALWAYS PURCHASE DOUBLE STRENGTH TYPE GLASS.
Glass sizes: 23 1/16 x 32 3/16 x 1/8 (2022, 2023, 2023EX, 2016)
23 1/16 X 28 3/16 X 1/8 (2024, 2024EX)
MAINTENANCE INSTRUCTIONS

ASTRO-POP 16 & 20 OZ
2022,2023,2024,2023EX,2024EX,2026,2026EX,2026T
10
ORDERING SPARE PARTS
1. Identify the worn or broken part by checking it with the illustrations and parts list. 2. When ordering parts, include part number, part name, and quantity required. 3. Include you model name and machine serial number (found on nameplate) with your order. 4. Address orders to:
Parts Department
Gold Medal Products Co. 10700 Medallion Drive
Cincinnati, Ohio 45241-4807
or, place orders at:
(800) 543-0862 (513) 769-7676
Fax: (513) 769-8500 E-mail: [email protected]
www.gmpopcorn.com LUBRICATION GEAR BOX The gearbox is of heavy-duty construction. It has been filled and sealed at the factory. It should be checked every three months. To check the level of the lubricant in the gearbox, unscrew the cap from the oil level gauge. The gearbox should be maintained at a level 1/16” below the top of the oil level gauge. To refill, lift hinged lid of oil hole cover and pour lubricant in until it reaches the proper level as observed in the oil level gauge. Then replace the cap on the oil level gauge. Refill with a multi-purpose gear lubricant, S.A.E. 90 weight. KETTLE DRIVE MOTOR, BLOWER WARMER MOTOR AND BUCKET SEASONING PUMP MOTOR Follow manufacturers lubrication instructions as shown on the motor. ADJUSTING HEIGHT OF HEATING ELEMENT TO FIT OTHER PAILS

ASTRO-POP 16 & 20 OZ
2022,2023,2024,2023EX,2024EX,2026,2026EX,2026T
11
The bucket lid assembly of the pump can be raised or lowered on the Pump mount tube to accommodate buckets of various heights. To do this, loosen the (2) setscrews in the hub of the bucket lid assembly and slide the lid up or down as required. Then retighten the setscrews. The intake port is on the underside of the pump, thus allowing the maximum quantity of oil to be removed from the bucket. The pump is equipped with a filter screen over the intake port to prevent foreign material from being pulled in to the pump. This will protect the pump vanes from any possible damage. PLASTIC PAIL – CAUTION A word of CAUTION is in order with respect to the new plastic oil pails now appearing on the market. DO NOT Adjust the lid assembly so the heating element is too close to the bottom of the pail as the elements could melt a hole in the bottom of the pail, be at least one inch from bottom of plastic pails. TO MELT BUCKET PUMP INTO A CONGEALED PAIL OF SEASONING OIL OUTSIDE OF MACHINE CABINET, DISCONNECT OIL LINE ONLY, BY MEANS OF QUICK DISCONNCT COUPLING AND PROPERLY OR OIL WILL LEAK. ADJUSTING QUANTITY OF OIL DELIVERED The oil pump can be adjusted to deliver various quantities of oil up to a maximum of ten ounces per cycle to the kettle. It has been set at the factory to deliver the approximate quantity of oil necessary for the popper it is installed on. To prevent the oil from congealing in the tubing, the line is drained back into the pail between each cycle. Before you make any changes in the oil settings, first measure the oil that pump is delivering. For best results you should have 1/3 oil to corn. For instance, a twelve-ounce measure of corn requires four ounces of oil – a 14-ounce kettle –4 2/3 ounces of oil; and 18-ounce kettle – 6 ounces of oil; and 36-ounce kettle requires 12 ounces of oil. Any reduction from these amounts will seriously affect the top quality of you popcorn. The secret to good popcorn is plenty of oil and FLAVACOL salt for more color and flavor. Top quality always pays back more profits. Caution: When measuring the quantity of oil delivered to the kettle, you must allow the oil in the line to drain back into the pail between cycle. You can observe this through the clear plastic oil line tubing. It should take approximately one minute for the oil line to drain. Should you find it necessary to vary the amount of oil delivered to the kettle to meet your particular needs, the following instructions should be followed:
1. Disconnect the electrical power from the machine to the bucket seasoning pump by means of the special disconnect plug.
2. Take out the two screws and remove the lid from the control box of the pump. 3. The oil timer assembly consists of a timer motor, one nylon cycle carm, one nylon
ingredient cam, two slotted head nylon adjustment screws, two switch housings and two switches.
4. The time motor limit switch should not be adjusted, as it has been se at the factory and should require no additional adjustment.
5. The pump motor limit switch controls the length of the time the pump motor runs, and thus the amount of oil delivered to the kettle.
6. To get more oil to the kettle, turn nylon adjustment screw clockwise. This permits the pump motor to run longer, thus pumping more oil.

ASTRO-POP 16 & 20 OZ
2022,2023,2024,2023EX,2024EX,2026,2026EX,2026T
12
To get less oil to he kettle, turn the nylon adjustment screw counterclockwise. This shortens the time the pump motor runs, thus pumping less oil. CAUTION: When adjusting the quantity of oil delivered, never turn the adjusting screw more than 1/8 turn at one time. Then, run through a cycle and measure the quantity of oil delivered and readjust it necessary.
TROUBLE SHOOTING LONG POPPING CYCLES:
If you ASTRO POP is slow to attain a decent popping cycle, or never reaches one, it can be the result of several things:
A. HEATING ELEMENTS-- One of the heating elements in the kettle may be burned out. This would result in the kettle never reaching the proper operating temperature.
B. THERMOSTAT-- A defective thermostat could cause the kettle not to attain the proper operating temperature.
C. LOW VOLTAGE-- If the machine is operated on low voltage, this could cause the kettle not to reach the proper operating temperature
D. INADEQUATE SUPPLY LINES-- Inadequately sized electrical supply lines, in addition to being a fire hazard, would also prevent the kettle from properly reaching operating temperature. You should have at least #12 wires running to the wall receptacle into which your ASTRO POP is plugged.
E. INFERIOR CORN--Inferior quality corn would result in longer popping cycles. Use only top quality hybrid popcorn from reputable suppliers. Even then, if you let your corn pick up moisture or dry out, your popping cycles will be slow.

ASTRO-POP 16 & 20 OZ
2022,2023,2024,2023EX,2024EX,2026,2026EX,2026T
13
KETTLE DOES NOT HEAT If the kettle does not heat at all, it can be the result of several things. Before you go any further, make sure the kettle lead-in cord is plugged in, and that the fuses are not blown. Make sure all electrical connections are tight.
A. KETTLE HEAT SWITCH – Check the current to and from the “KETTLE HEAT” switch, and if the switch is defective and should be replaced. You can also check the thermostat by checking the current to and from it.
B. THERMOSTAT—A defective thermostat would cause the kettle no6t to heat. A good check is to bypass the thermostat and see if the heating elements will produce heat. If they do, the thermostat is defective and should be replaced. You can also check the thermostat by checking the current to and from it.
C. HEATING ELEMENTS—Normally the heating elements should last through several tons of popcorn, however, elements do burn out. Visual inspection might show a hole burned through the metal sheath in some cases. If no defect is apparent, check the current to the heating elements. If defective, new elements are available from our local Gold Medal Dealer or directly from the factory.
MOTOR WILL NOT TURN AGITATOR If the kettle drive motor will not turn the agitator shaft, when it is engaged, disengage the agitator shaft by turning the dump handle counterclockwise. Look at the drive dog on the gear box output shaft to see if it turns when the “KETTLE MOTOR” switch is “ON”. If the drive dog is turning, there is probably a kernel of popped or unpopped corn wedged between the stir blade and the kettle bottom. If there is more than 1/32” clearance between the kettle bottom and the stir blades, they should be adjusted. To do this, loosen the set screw in the collar at the top of the crossbar and lower the agitator shaft as necessary. Then re-tighten the set screw in the collar. Now, take up the end play in the agitator shaft by repositioning the collar on the bottom of the kettle crossbar. In some very remote cases a drive pin in the gear box can be sheared. If the agitator shaft will not rotate under a load, this is probably your trouble. A quick way to check this is to engage the agitator shaft and then manually try to turn the shaft. If the shaft turns manually, a drive pin in the gear box is sheared. We suggest you return the entire gear box to the factory for repair.
OIL PUMP DOES NOT DELIVER OIL TO KETTLE If the oil pump does not deliver oil to the kettle, it could be the result of several things. However, the first thing to do is check the oil in the bucket to be sure it is liquid. Perhaps you did not allow enough melting time at high heat, or the heating element is defective. The limit switch on the manual high heat timer could also be defective. If the oil is liquid, check the following:
A. ELECTRICAL CONNECTIONS—Check all electrical connections to see that they are clean and tight.

ASTRO-POP 16 & 20 OZ
2022,2023,2024,2023EX,2024EX,2026,2026EX,2026T
14
B. OIL PUMP PUSH BUTTON SWITCH—Check the current to and from the ‘OIL PUMP PUSH BUTTON SWITCH” with the button depressed, and if the switch is defective, replace it.
C. TIMER MOTOR LIMIT SWITCH—Check the current to an from the “TIMER MOTOR LIMIT SWITCH”, and if the switch is defective, replace it.
D. TIMER MOTOR—Check the current to the timer motor, and if the motor is defective, replace it. E. PUMP MOTOR LIMIT SWITCH—Check the current to and from the “Pump Motor Limit Switch”
and if the switch is defective, replace it. F. PUMP MOTOR-- Check the current to the pump motor, and if the motor is defective, replace it. G. LOW VOLTAGE-- You must have a properly sized electrical line to the machine to handle the
ampere draw. If the line is properly sized, in some remote cases, the voltage supplied by the electric company could be extremely low. If the voltage is found to be low, contact your local electric company. Some symptoms of low voltage are long popping cycles, and pump not cycling with kettle heat on.
PARTS LIST

ASTRO-POP 16 & 20 OZ
2022,2023,2024,2023EX,2024EX,2026,2026EX,2026T
15
CABINET ASSEMBLY 16 OZ
REF# ITEM 2022 2023 2023EX 2024 2024EX 1 HANGER ARM 47262 47262 47262 47262 47262 2 GEAR BLOCK 47065 47065 47065 47065 47065 3 GEAR 47059 47059 47059 47059 47059 4 HANGER ARM 47263 47263 47263 47263 47263 5 KETTLE RECEPTACLE 41160 41160 41160 49219 49219 6 KETTLE ASSY. 2162 2163 2163EX 2163 2163EX 7 DOME 41001 41001 41001 41002 41002 8 DRIVE MOTOR 47183 47183 47028 47183 47028 9 LIGHT ASSY. 41159 41159 41159 41159 41159
10 BALLAST ONLY 41022 41022 41022 41022 41022 11 LIGHT ONLY 39016 39016 39016 39016 39016 12 STARTER FOR LIGHT 41023 41023 41023 41023 41023 13 LIGHT BRACKET 41643 41643 41643 41643 41643 14 LAMP HOLDER 47047 47047 47047 47047 47047 15 LIGHT BULB 41671 41671 41671 41671 41671 16 OIL TUBE 41047 41047 41047 N/A N/A 17 MOTOR PLATE 41005 41005 41005 41175 41175 18 TOP FRAME ASSY. 41045 41045 41045 41045 41045 19 TERMINAL BLOCK 47208 47208 47208 47208 47208 20 CONTROL BOX COVER 41107 41107 41107 41107 41107 21 CON. BOX TOP COVER 41108 41108 41108 41108 41108 22 DOME SPACER 41184 41184 41184 41184 41184 23 OIL TUBE COLLAR 47225 47225 47225 N/A N/A 24 SWITCH BOX PUMP 41106 41106 41106 N/A N/A 25 BUTTON OIL PUMP 41031 41031 41031 N/A N/A

ASTRO-POP 16 & 20 OZ
2022,2023,2024,2023EX,2024EX,2026,2026EX,2026T
16
26 SWITCH OIL PUMP 47201 47201 47201 N/A N/A 27 PILOT LIGHT 41033 41033 41032 41033 41032 28 SWITCH 47202 47202 74087 47202 74087 29 SWITCH 47201 47201 47201 47201 47201 30 SWITCH BOX 41004 41004 41004 41004 41004 31 CATCH BRACKET 77089 77089 77089 77089 77089 32 MAGNETIC CATCH 47561 47561 47561 47561 47561 33 DOOR STRIKER 47237 47237 47237 47237 47237 34 KNOB 41013 41013 41013 41013 41013 35 SWITCH BOX COVER 41109 41109 41109 N/A N/A 36 LATCH SPACER 47335 47335 47335 N/A N/A 37 LIGHT CORD 41704 41704 41704 41704 41704 38 BLOWER MOTOR 41015 41015 41015 N/A N/A 39 CARBON FILTER 41096 41096 41096 41096 41096 40 GREASE FILTER 41095 41095 41095 41095 41095 41 BLOWER BOX 41006 41006 41006 41006 41006 42 AIR CHUTE 41527 41527 41527 41527 41527 43 DECAL REPLACEMENT 41362 41362 41362 41362 41362 44 FRONT CORNER POST 41870 41870 41870 41171 41171 45 RIGID CHANNEL SIDE 41858 41858 41858 47697 47697 46 GLASS RETAINER FR 41765 41765 41765 47598 47598 47 GLASS SLIDE 41190 41190 41190 47421 47421 48 LIGHT ANGLE 47799 47799 47799 47799 47799
49 RIGID CHANNEL BOT 47694 47694 47694 47694 47694 50 CORNER POST LH R 41871 41871 41871 41172 41172 51 GLASS RETAINER R 41766 41766 41766 47592 47592 52 CORNER POST RH R 41872 41872 41872 41173 41173 53 LONG HINGE RIGHT 41351 41351 41351 41351 41351 54 SHORT HINGE RIGHT 41349 41349 41349 41349 41349 55 LONG HINGE LEFT 41352 41352 41352 41352 41352 56 SHORT HINGE LEFT 41350 41350 41350 41350 41350 57 PLEXIGLASS DOOR 41014 41014 41014 41014 41014 58 PAN LATCH ASSY. 47370 47370 47370 N/A N/A 59 CORN PAN 41102 41102 41102 47721 47721EX 60 PLUG 41717 -------- -------- -------- -------- 61 LEAN-IN CORD 41422 47601 42362 47580 42362 62 CORNER COVER 41879 41879 41879 41879 41879 63 DROP PANEL ASSY 41017 41017 41017 41017 41017 64 OLD MAID PAN 41838 41838 41838 41838 41838 65 OLD MAIN GUIDES 77535 77535 77535 77535 77535 66 BOTTOM FROM ASSY 41025 41025 41025 41025 41025 67 RUBBER FEET 41282 41282 41282 41282 41282 68 WARMER ASSY 41062 41062 41062EX N/A N/A 69 LIGHT TUBE HOLDER 41020 41020 41020 41020 41020 70 LIGHT TUBE HLDR ST 41021 41021 41021 41021 41021 71 # 6-32 FL. HD. X 3/8 47772 47772 47772 47772 47772 72 # 6-32 ACORN NUT 47701 47701 47701 47701 47701 73 # 6-32 RD. D. X ½ 47516 47516 47516 47516 47516 74 # 6 IN TOOTH WASHER 76188 76188 76188 76188 76188 75 # 6 – 32 HEX NUT 38005 38005 38005 38005 38005 76 #8 – 32 HEX NUT 49177 49177 49177 49177 49177 77 #8 – 32 PH. HD, X ¾ 74147 74147 74147 74147 74147 78 #8 – 32 PH. X ½ ST 89128 89128 89128 89128 89128

ASTRO-POP 16 & 20 OZ
2022,2023,2024,2023EX,2024EX,2026,2026EX,2026T
17
79 #8 IN TOOTH WASHER 74150 74150 74150 74150 74150 80 #8 – 32 HEX NUT 74149 74149 74149 74149 74149 81 #8 – 32 ACORN NUT 47702 47702 47702 47702 47702 82 #8 – 32 HX X 3/8 ST 74141 74141 74141 74141 74141 83 #8 – 32 HX X X STAP 74153 74153 74153 74153 74153 84 #8 LOCK NUT 74146 74146 74146 74146 74146 85 #10 X 1 PH. HD. 76022 76022 76022 76022 76022 86 #10 LOCK WASHER 42302 42302 42302 42302 42302 87 ¼ -20 X ¾ L.W. 74520 74520 74520 74520 74520 88 TRUSS HD 5/16 X ½ 46638 46638 46638 46638 46638 89 RUBBER WASHER 47279 47279 47279 47279 47279 90 STRAIN RELIEF 47236 47236 47236 47236 47236 91 STRAIN RELIEF 47282 47282 47282 47282 47282 92 STRAIN RELIEF 41456 41456 41456 41456 41456 93 RIVETS 15123 15123 15123 15123 15123
REF# ITEM 2026 2026EX 2026T 1 HANGER ARM 41886 41886 41886 2 GEAR BLOCK 41432 41432 41432 3 GEAR 41380 41380 41380 4 HANGER ARM 41886 41886 41886 5 KETTLE RECEPTACLE 41160 41967 41160 6 KETTLE ASSY. 2153 2153 2153 7 DOME 41209 41500 41209T 8 DRIVE MOTOR 41449 41449 41449 9 LIGHT ASSY. 41159 41159 41159
10 BALLAST ONLY 41022 41022 41022 11 LIGHT ONLY 39016 39016 39016 12 STARTER FOR LIGHT 41023 41023 41023 13 LIGHT BRACKET 41643 41643 41643 14 LAMP HOLDER 47047 47047 47047 15 LIGHT BULB 41671 41671 41671 16 OIL TUBE 41047 41047 41047 17 MOTOR PLATE 41161 41161 41161 18 TOP FRAME ASSY. 41045 41045 41045 19 TERMINAL BLOCK 47208 47208 47208 20 CONTROL BOX COVER 41107 41107 41107 21 CON. BOX TOP COVER 41108 41108 41108 22 DOME SPACER 41431 41431 41431 23 OIL TUBE COLLAR 47225 47225 47225 24 SWITCH BOX PUMP 41106 41106 41106 25 BUTTON OIL PUMP 41031 41031 41031 26 SWITCH OIL PUMP 47201 47201 47201 27 PILOT LIGHT 41033 41033 41033 28 SWITCH 47202 74087 47202 29 SWITCH 47201 47201 47201

ASTRO-POP 16 & 20 OZ
2022,2023,2024,2023EX,2024EX,2026,2026EX,2026T
18
30 SWITCH BOX 41004 41004 41004 31 CATCH BRACKET 77089 77089 77089 32 MAGNETIC CATCH 47561 47561 47561 33 DOOR STRIKER 47237 47237 47237 34 KNOB 41013 41013 41013 35 SWITCH BOX COVER 41109 41109 41109 36 LATCH SPACER 47335 47335 47335 37 LIGHT CORD 41704 41704 41704 38 BLOWER MOTOR 41015 41015 41015 39 CARBON FILTER 41096 41096 41096 40 GREASE FILTER 41095 41095 41095 41 BLOWER BOX 41006 41006 41006 42 AIR CHUTE 41527 41527 41527 43 DECAL REPLACEMENT 41362 41362 41362 44 FRONT CORNER POST 41870 41870 41870 45 RIGID CHANNEL SIDE 41858 41858 41858 46 GLASS RETAINER FR 41765 41765 41765 47 GLASS SLIDE 41190 41190 41636T 48 LIGHT ANGLE 47799 47799 47799 49 RIGID CHANNEL BOT 47694 47694 47694
50 CORNER POST LH R 41871 41871 41871 51 GLASS RETAINER R 41766 41766 41766 52 CORNER POST RH R 41872 41872 41872 53 LONG HINGE RIGHT 41351 41351 41351 54 SHORT HINGE RIGHT 41349 41349 41349 55 LONG HINGE LEFT 41352 41352 41352 56 SHORT HINGE LEFT 41350 41350 41350 57 PLEXIGLASS DOOR 41014 41014 41014 58 PAN LATCH ASSY. 47370 47370 47370 59 CORN PAN 41102 41102 41102 60 PLUG 41717 41717 41717 61 LEAN-IN CORD 41471 41471 41471 62 CORNER COVER 41879 41879 41879 63 DROP PANEL ASSY 41017 41017 41017 64 OLD MAID PAN 41838 41838 41838 65 OLD MAIN GUIDES 77535 77535 77535 66 BOTTOM FROM ASSY 41025 41025 41025 67 RUBBER FEET 41282 41282 41282 68 WARMER ASSY 41062 41062EX 41062 69 LIGHT TUBE HOLDER 41020 41020 41020 70 LIGHT TUBE HLDR ST 41021 41021 41021 71 # 6-32 FL. HD. X 3/8 47772 47772 47772 72 # 6-32 ACORN NUT 47701 47701 47701 73 # 6-32 RD. D. X ½ 47516 47516 47516 74 # 6 IN TOOTH WASHER 76188 76188 76188 75 # 6 – 32 HEX NUT 38005 38005 38005 76 #8 – 32 HEX NUT 49177 49177 49177 77 #8 – 32 PH. HD, X ¾ 74147 74147 74147 78 #8 – 32 PH. X ½ ST 89128 89128 89128 79 #8 IN TOOTH WASHER 74150 74150 74150 80 #8 – 32 HEX NUT 74149 74149 74149 81 #8 – 32 ACORN NUT 47702 47702 47702 82 #8 – 32 HX X 3/8 ST 74141 74141 74141
ASTRO-POP 16 & 20 OZ
2022,2023,2024,2023EX,2024EX,2026,2026EX,2026T
19
83 #8 – 32 HX X 1 STAP 74153 74153 74153 84 #8 LOCK NUT 74146 74146 74146 85 #10 X 1 PH. HD. 76022 76022 76022 86 #10 LOCK WASHER 42302 42302 42302 87 ¼ -20 X ¾ L.W. 74520 74520 74520 88 TRUSS HD 5/16 X ½ 46638 46638 46638 89 RUBBER WASHER 47279 47279 47279 90 STRAIN RELIEF 47236 47236 47236 91 STRAIN RELIEF 47282 47282 47282 92 STRAIN RELIEF 41456 41456 41456 93 RIVETS 15123 15123 15123
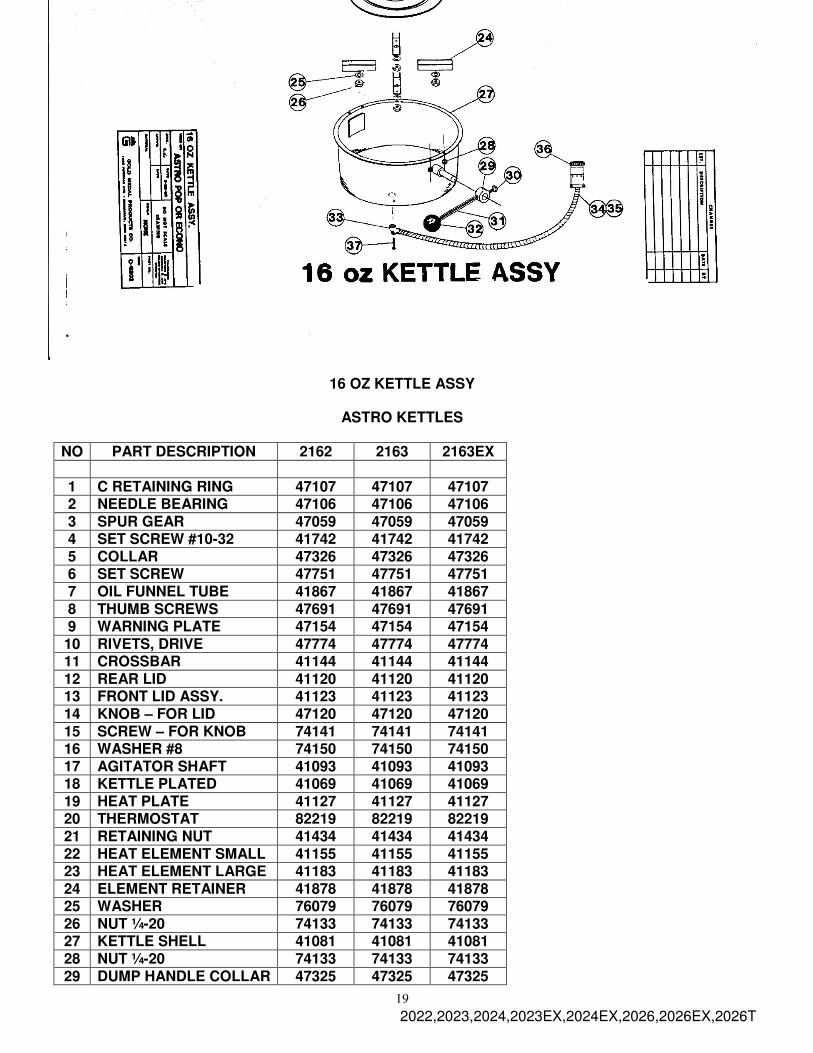
16 OZ KETTLE ASSY
ASTRO KETTLES
NO PART DESCRIPTION 2162 2163 2163EX
1 C RETAINING RING 47107 47107 47107 2 NEEDLE BEARING 47106 47106 47106 3 SPUR GEAR 47059 47059 47059 4 SET SCREW #10-32 41742 41742 41742 5 COLLAR 47326 47326 47326 6 SET SCREW 47751 47751 47751 7 OIL FUNNEL TUBE 41867 41867 41867 8 THUMB SCREWS 47691 47691 47691 9 WARNING PLATE 47154 47154 47154 10 RIVETS, DRIVE 47774 47774 47774 11 CROSSBAR 41144 41144 41144 12 REAR LID 41120 41120 41120 13 FRONT LID ASSY. 41123 41123 41123 14 KNOB – FOR LID 47120 47120 47120 15 SCREW – FOR KNOB 74141 74141 74141 16 WASHER #8 74150 74150 74150 17 AGITATOR SHAFT 41093 41093 41093 18 KETTLE PLATED 41069 41069 41069 19 HEAT PLATE 41127 41127 41127 20 THERMOSTAT 82219 82219 82219 21 RETAINING NUT 41434 41434 41434 22 HEAT ELEMENT SMALL 41155 41155 41155 23 HEAT ELEMENT LARGE 41183 41183 41183 24 ELEMENT RETAINER 41878 41878 41878 25 WASHER 76079 76079 76079 26 NUT ¼-20 74133 74133 74133 27 KETTLE SHELL 41081 41081 41081 28 NUT ¼-20 74133 74133 74133 29 DUMP HANDLE COLLAR 47325 47325 47325

ASTRO-POP 16 & 20 OZ
2022,2023,2024,2023EX,2024EX,2026,2026EX,2026T
20
30 DUMP HANDLE SCREW 47725 47725 47725 31 DUMP HANDLE SHAFT 47707 47707 47707 32 DUMP HANDLE KNOB 47110 47110 47110 33 90 DEGREE EL 46241 46241 46241 34 CONDUIT 82107-24 82107-24 82107-24 35 CONDUIT BUSHING 82135 82135 82135 36 PLUG 41145 41145 41145 37 SCREW LONG 74153 74153 74153

ASTRO-POP 16 & 20 OZ
2022,2023,2024,2023EX,2024EX,2026,2026EX,2026T
21

ASTRO-POP 16 & 20 OZ
2022,2023,2024,2023EX,2024EX,2026,2026EX,2026T
22