asteroid user manual - roy morgan...
TRANSCRIPT

ASTEROID – Installation Instructions Page 1
Roy Morgan Research Update: 9 November 2016
ASTEROID Installation
Before launching ASTEROID, the software and database/s have to be installed on your system. We have used the latest installation technology to make this as easy as possible. The installation procedure is described in this chapter.
If you are in a corporate environment and a system administrator or technical support person normally installs your software, you should pass on these instructions to that person.
Preparing for installation from a downloaded zip file
If you have downloaded the ASTEROID software from a web link, you will have a zip file with a name in this format.
ASTEROID_5_x_y_z.ZIP
The x, y and z will be numbers indicating the version of the ASTEROID software.
Before proceeding with the installation, you should extract all the files contained in the zip archive to an empty folder on your hard disk. The files can be extracted using one of the following methods.
In Windows Explorer, use the ‘Extract All…’ command to start the zip file extraction wizard.
Zip archiving utilities such as Winzip or 7-Zip can also be used to extract the files.
The software installer is the extracted file called ‘SETUP.EXE’.
Preparing for installation from a CD or DVD
All ASTEROID CDs/DVDs supplied by Roy Morgan Research have a menu program called ‘Browser.exe’. The menu allows you access the software installer, the database installer and any other functions contained on the CD/DVD.

ASTEROID – Installation Instructions Page 2
Roy Morgan Research Update: 9 November 2016
To start the CD browser, use one of the following methods.
If the CD is set to “autorun”, the CD browser will start automatically when you insert the
CD into your CD drive. Note that most CDs are not set to “autorun” so they may be conveniently used as database archive CDs.
If the CD does not “autorun”, browse to the root directory of the CD and double-click ‘Browser.exe’ to run the CD browser.
To select an item from the browser menu, move the mouse cursor over the item. Click to run the item.
When ‘Install Software’ is selected, a second menu appears with software installation options. You may choose to install ASTEROID locally on your PC or read the resources about Network installation.
Alternatively, you can run the software installer directly without using the CD browser menu. The location is: D:\ASTERIOD\SETUP.EXE (substitute your CD-ROM drive letter for D:).

ASTEROID – Installation Instructions Page 3
Roy Morgan Research Update: 9 November 2016
Software Installation
The ASTEROID SETUP program (SETUP.EXE) is used to install ASTEROID program files on your hard disk or network and performs all necessary configuration tasks.
Quick Start
To install ASTEROID on a single PC for the first time, see page 4.
To install ASTEROID on a network for the first time, see page 12.
To upgrade a single PC (from a previous revision of ASTEROID), see page 9.
To upgrade a network image installation, see page 15.
System Requirements
Personal computer using an Intel Pentium 4 class processor or later model (including Intel Xeon and Intel Core family) or compatible. Processor must support SSE2 instructions.
Microsoft Windows 7, Windows 8 or 8.1, or Windows 10 (or Windows Server 2008 R2 or later).
Memory: 4GB. Depending on the Windows version, less may work but will limit the complexity of tasks that ASTEROID is able to run.
Hard disk space required: Approx 60MB (for software only).
VGA or higher resolution monitor (minimum recommended resolution is 1280 x 1024 pixels).
CD-ROM drive (or network access to CD-ROM) for software and data installation. (Not required if installation files have been provided as web link downloads).
Mouse
Component Software
Some of the functionality in ASTEROID is built from industry standard 3rd party software components. These components are provided in the form of DLL files that are installed into the ASTEROID Program directory. The following components are supplied.
ChartFX 7, charting support, copyright © 2007 Software FX Inc.
Formula One, spreadsheet control, copyright © 1994-1997 Tidestone Technologies Inc.
All licence requirements for components have been met by Roy Morgan Research.
Pre-Requisites
ASTEROID 5 requires the following pre-requisites to run successfully. The SETUP program will offer to install these if they do not exist on your system.
Microsoft .NET Framework 4.5.

ASTEROID – Installation Instructions Page 4
Roy Morgan Research Update: 9 November 2016
Installing ASTEROID on a single PC
Follow this procedure to install ASTEROID on a single PC.
If you want multiple users to access a shared copy of ASTEROID in a network environment, see page 12.
To install the ASTEROID software you must run the SETUP program.
To run the SETUP program from a CD/DVD:
1. Close any other user applications that are open.
2. Place the ASTEROID CD in your CD-ROM drive.
3. Run the CD browser (Browser.exe).
4. Select “Install Software” from the menu.
5. On the “Installation Options” menu click “Run Asteroid Setup”.
Alternatively, to run SETUP from a download or directly from a CD/DVD:
1. Close any other user applications that are open.
2. Run SETUP by double-clicking SETUP.EXE.
Setup Modes
SETUP will run in different modes, depending on the current status of ASTEROID on your PC.
If ASTEROID is not currently installed (or the existing version is old enough that it does not qualify for upgrade), SETUP will perform a Full Setup (see below).
If a recent version of ASTEROID is installed and qualifies for upgrade, SETUP will perform an Upgrade Setup (see page 9).
If the current version of ASTEROID has already been installed, SETUP will perform a Maintenance Setup (see page 11).
Full Setup
SETUP performs a Full Setup if ASTEROID is not currently installed, the installed version is old enough that it does not qualify for upgrade, or the previous version was un-installed.
The user interface for SETUP is a “wizard” which guides you through the various options. Default options are provided which will be correct in most cases.
These buttons are used to step through the SETUP wizard dialogs. Click Next to proceed or Back to go back to the previous step.

ASTEROID – Installation Instructions Page 5
Roy Morgan Research Update: 9 November 2016
1. Welcome dialog
The Welcome dialog identifies the version of ASTEROID about to be installed.
Click Next to proceed.
2. Customer Information dialog
The Customer Information dialog lets you enter your name and company name. Default values are supplied from your Windows configuration.
You can also elect to install the application:
For all users who logon to the computer; or:
Only for the current user.
ASTEROID – Installation Instructions Page 6
Roy Morgan Research Update: 9 November 2016
The default of “all users” should be used unless you are a system administrator and you have a specific requirement to limit usage of the application.
Click Next to proceed.
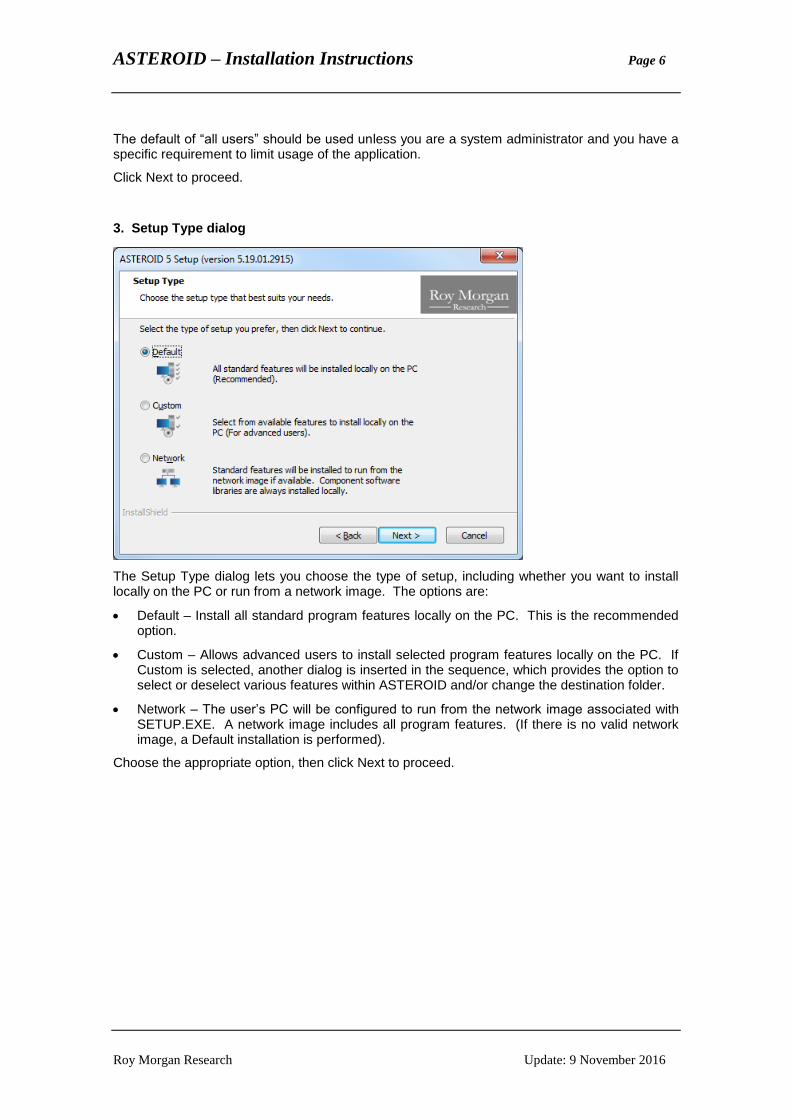
3. Setup Type dialog
The Setup Type dialog lets you choose the type of setup, including whether you want to install locally on the PC or run from a network image. The options are:
Default – Install all standard program features locally on the PC. This is the recommended option.
Custom – Allows advanced users to install selected program features locally on the PC. If Custom is selected, another dialog is inserted in the sequence, which provides the option to select or deselect various features within ASTEROID and/or change the destination folder.
Network – The user’s PC will be configured to run from the network image associated with SETUP.EXE. A network image includes all program features. (If there is no valid network image, a Default installation is performed).
Choose the appropriate option, then click Next to proceed.
ASTEROID – Installation Instructions Page 7
Roy Morgan Research Update: 9 November 2016
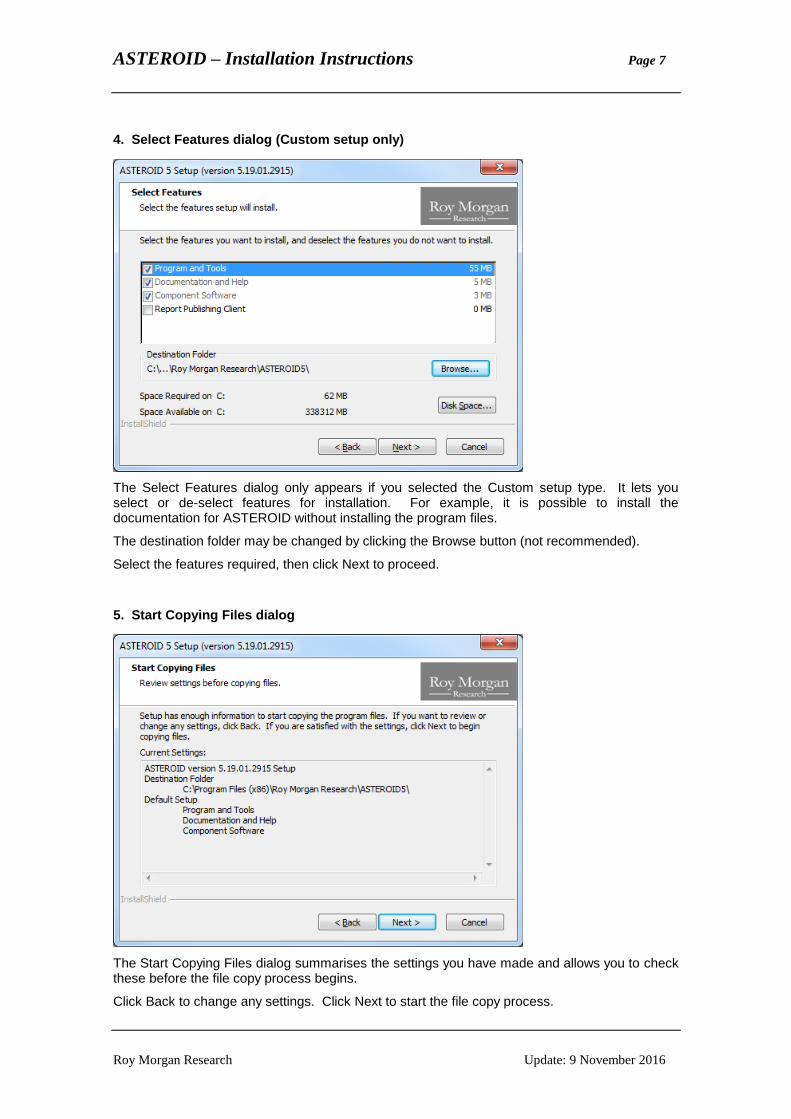
4. Select Features dialog (Custom setup only)
The Select Features dialog only appears if you selected the Custom setup type. It lets you select or de-select features for installation. For example, it is possible to install the documentation for ASTEROID without installing the program files.
The destination folder may be changed by clicking the Browse button (not recommended).
Select the features required, then click Next to proceed.
5. Start Copying Files dialog
The Start Copying Files dialog summarises the settings you have made and allows you to check these before the file copy process begins.
Click Back to change any settings. Click Next to start the file copy process.

ASTEROID – Installation Instructions Page 8
Roy Morgan Research Update: 9 November 2016
6. Setup Status dialog
The Setup Status dialog is displayed while file copying and configuration is in progress.
7. Wizard Complete dialog
The Wizard Complete dialog is displayed when file copying and configuration is complete.
Depending on the status of your computer before SETUP was run, the Wizard Complete dialog may request that the computer is re-booted at this point. You must re-boot before using ASTEROID if the Wizard Complete dialog asks you to do so.
Click Finish to exit from Setup.

ASTEROID – Installation Instructions Page 9
Roy Morgan Research Update: 9 November 2016
Upgrade Setup
SETUP performs an Upgrade Setup if a recent version of ASTEROID is installed and qualifies for upgrade.
If SETUP determines that it is able to do an upgrade, the following message is displayed.
Click Yes to proceed with the upgrade.
N.B. An upgrade uses the settings from the original ASTEROID setup, therefore most of the wizard dialogs from the full setup do not appear. The upgrade wizard consists of only 3 dialogs.
1. Welcome dialog
The Welcome dialog identifies that this is an upgrade and shows the version of ASTEROID that will be installed.
Click Next to proceed and apply the upgrade.

ASTEROID – Installation Instructions Page 10
Roy Morgan Research Update: 9 November 2016
2. Setup Status dialog
The Setup Status dialog is displayed while file upgrading and configuration is in progress.
3. Wizard Complete dialog
The Wizard Complete dialog is displayed when file upgrading and configuration is complete.
Click Finish to exit from Setup.

ASTEROID – Installation Instructions Page 11
Roy Morgan Research Update: 9 November 2016
Maintenance Setup
SETUP performs a Maintenance Setup if the current version of ASTEROID has already been installed.
The maintenance dialog lets you:
Modify the features installed during a custom setup (for advanced users only).
Repair a previous installation. This is useful if you accidentally deleted files or shortcuts installed with ASTEROID.
Remove ASTEROID completely.

ASTEROID – Installation Instructions Page 12
Roy Morgan Research Update: 9 November 2016
Installing ASTEROID on a Network
ASTEROID is designed to install and run in a network environment if required. ASTEROID program files (and databases) may be held in a central location on a network file server and shared by many users.
If you wish to run ASTEROID in a network environment and you are not the system administrator or technical support person responsible for the network, you should pass on these instructions to that person.
There are two steps required to set up the ASTEROID software on a network:
1. The “network image” of ASTEROID has to be created. The network image is an uncompressed copy of all the ASTEROID setup, program and other files residing on a network file server.
2. ASTEROID has to be configured on every user workstation, by running SETUP.EXE from the network image and selecting the “Network” setup type.
When user workstations are installed in this way, the program file shortcuts are configured to “Run from Source” (a MSI concept), which simply means that all users share the same program files under the network image folder.
Establishing the Network Image (Administrative Setup)
The network image is created by running SETUP in administrative mode. To run an administrative
setup, the argument /a has to be included on the SETUP command line. For example, to run an administrative setup from the ASTEROID CD in drive D:, type the following command at the Run command or Windows command prompt.
D:\ASTEROID\SETUP.EXE /a
1. Welcome dialog
The Welcome dialog identifies that this is an administrative setup and shows the version of ASTEROID.
Click Next to proceed.

ASTEROID – Installation Instructions Page 13
Roy Morgan Research Update: 9 November 2016
2. Network Location dialog
The Network Location dialog lets you specify a destination location for the network image. Enter or browse for a location.
Note: For Windows with UAC enabled, mapped drive letters may not be available here (due to the Windows security model). For these platforms, enter a UNC path, or output to a local disk then copy the network image to the desired location.
3. Setup Status dialog
The Setup Status dialog is displayed while writing the network image.

ASTEROID – Installation Instructions Page 14
Roy Morgan Research Update: 9 November 2016
4. Wizard Complete dialog
The Wizard Complete dialog is displayed when the network image is completed.
Click Finish to exit from Setup.
A pre-built network image is also included on some ASTEROID CDs in the following location (depending on space available):
D:\ASTEROID\Network_Image
If you prefer to use the pre-built network image, simply copy the contents of the folder above to your network file server.
Installing User Workstations
To configure a user workstation to run ASTEROID from the network image, follow this procedure.
Log on to the workstation.
Run SETUP.EXE from the root of the network image. (N.B. Do not run SETUP from the CD,
you must use SETUP in the network image to enable ASTEROID to be run from that image).
Follow the instructions for running Full Setup, see page 4. At the Setup Type dialog choose
the option “Network”. (N.B. If ASTEROID was previously installed on the workstation, SETUP may invoke an Upgrade Setup, see page 9. See the next section, Upgrading a Network Image.).

ASTEROID – Installation Instructions Page 15
Roy Morgan Research Update: 9 November 2016
Upgrading a Network Image
If a previous version of ASTEROID has been installed as a network image, with all workstations running from the network image, you can upgrade ASTEROID using the following procedure.
Install the new network image by running an administrative setup (SETUP.EXE /a) from the new CD. It’s recommended that you don’t overwrite the older network image, i.e. use a new folder as the destination.
Re-install the workstations by running SETUP.EXE from the root of the new network image. This will invoke an Upgrade Setup on each workstation, see page 8.
Setting Network Default Directory Paths
The factory default setting for the ASTEROID User & Data directories is:
<My Documents>\ASTEROID\
where <My Documents> is the virtual root established in the Windows configuration for the logged on user. Any paths established by a previous ASTEROID installation are used in preference.
In a network environment, the system administrator may change the default path settings for all users by editing the file <Defaults.ini> in the ASTEROID Program directory (within the network image). In particular, it may be useful to change the default Data path to indicate the network folder where ASTEROID databases are stored.
The original content of <Defaults.ini> is as follows.
[Directories]
Data=%MYDOCS%\ASTEROID\
User=%MYDOCS%\ASTEROID\
;
; (N.B. %MYDOCS% is a placeholder for “My Documents”)
Changes to <Defaults.ini> will only be effective for new users who have not yet run ASTEROID. Once ASTEROID is run, the user’s path configuration is stored in their private registry key.
Automatic Deployment on a Corporate Network
ASTEROID Setup is a fairly standard Windows Installer (MSI) setup which should be compatible with common automatic deployments methods, e.g.
Scripted deployment using Silent Installation. See the additional resources on the CD at \ASTEROID\Scripted_Install.
Active Directory Group Policy. (N.B. A Windows Installer transform (.mst) is required to deploy the ASTEROID5.msi file via Group Policy). See the additional resources on the CD at \ASTEROID\Group_Policy.
The development team welcomes any comments or suggestions you may have on this subject, and will provide all assistance possible.

ASTEROID – Installation Instructions Page 16
Roy Morgan Research Update: 9 November 2016
Silent Installation
ASTEROID Setup is built using InstallShield and fully supports the ability to do “Silent” installations. If you are a system administrator, you have probably used this when installing other products.
First step is to create a response file that contains the responses normally entered to the dialog
interface. The response file is created by running SETUP with the /r argument.
SETUP.EXE /r
Step through the dialogs, choosing the responses you would expect the user to choose. Output from this step is a response file “Setup.iss” in the Windows folder. To specify an alternative
response file name or location use the argument /f1.
SETUP.EXE /r /f1”<path>\network_setup.iss”
The Setup can now be run silently by running SETUP with the /s argument.
SETUP.EXE /s
Additional arguments may be required.
/f1 is used to indicate a response file other than the default Setup.iss.
/f2 is used to indicate the location of an output log file. Any errors encountered are logged in this file, rather than interrupting the user.
The final command would then be similar to this:
SETUP.EXE /s /f1”<path>\network_setup.iss” /f2”C:\Asteroid.log”

ASTEROID – Installation Instructions Page 17
Roy Morgan Research Update: 9 November 2016
Installing ASTEROID in Thin Client environments
ASTEROID fully supports running under Windows 2008 R2 (and later) Terminal Services and Citrix XenApp/Metaframe family.
The application should be installed on the server using the normal procedure for your environment and following the general instructions for running ASTEROID Setup, see page 4. Generally, the thin-client server can be regarded like a stand-alone PC for the purposes of installing ASTEROID. In the case of multiple servers on a network, the servers may be installed to a common ASTEROID network image.
Configuration of Data directory and User directory requires particular attention to ensure reliable operation.
The Data directory can be set using one of the following methods.
Edit the <Defaults.ini> file to set the path to the shared Data directory. See page 15 for more information on the <Defaults.ini> file.
The Data directory path can also be established by setting the following registry value in a login script. This will override any effect of the <Defaults.ini> file. Key: HKCU\Software\Roy Morgan Research\ASTEROID MDI\Directories;
Value: Data (REG_SZ)
The User directory can be set using one of the following methods.
For a very simple setup consisting of a single server and where the User directory can be described in terms of a drive letter path (e.g. user specific home drive), the User path may be set in the <Defaults.ini> file. This must be done before any users attempt to login to the application. To ensure a robust installation, we recommend you also set the User directory using one of the methods below.
The User directory path can be established by setting the following registry value in a login script. This will override any effect of the <Defaults.ini> file. Key: HKCU\Software\Roy Morgan Research\ASTEROID MDI\Directories;
Value: User (REG_SZ)
N.B. For a Citrix Published application, the login script must complete before the ASTEROID application is started to ensure the paths are set in time. There are options in the Citrix configuration to achieve this.
Alternatively, the User directory path can be supplied as a parameter on the ASTEROID command line. You can configure the “Command Line” value in the Citrix or Terminal Services properties to include the User directory path as a parameter. Using this method, Windows environment variables such as USERNAME can be used as an aid in specifying a unique path for the user. For example.
“C:\Program Files…\ASTEROID5.exe” “” “” “H:\ASTEROID\%USERNAME%\”
N.B. The user path is the 3rd command line parameter, note the 2 empty parameters between the executable path and the user path.
ASTEROID – Installation Instructions Page 18
Roy Morgan Research Update: 9 November 2016
Directory Configuration Overview
The ASTEROID Program & Reference Files directory is set at software installation time and should not be changed.
The ASTEROID Data Files directory indicates the default location for ASTEROID databases and is used as the home location when browsing on the Open Database dialog.
Every ASTEROID user requires a User directory to store personal files such as saved tasks, report manager files, temporary working files, output listings and CSV files. The User directory must be private to each user. ASTEROID will not run if you try to share a directory with another user.
The factory default setting for the User & Data directories is:
<My Documents>\ASTEROID\
where <My Documents> is the virtual root established in the Windows configuration for the logged on user. Any paths established by a previous ASTEROID installation are used in preference.
In a network environment, the system administrator may change the default path settings for all users by editing the file <Defaults.ini> in the Program directory.
The Data & User directories may subsequently be changed from the Directories dialog within ASTEROID, or the configuration editor.
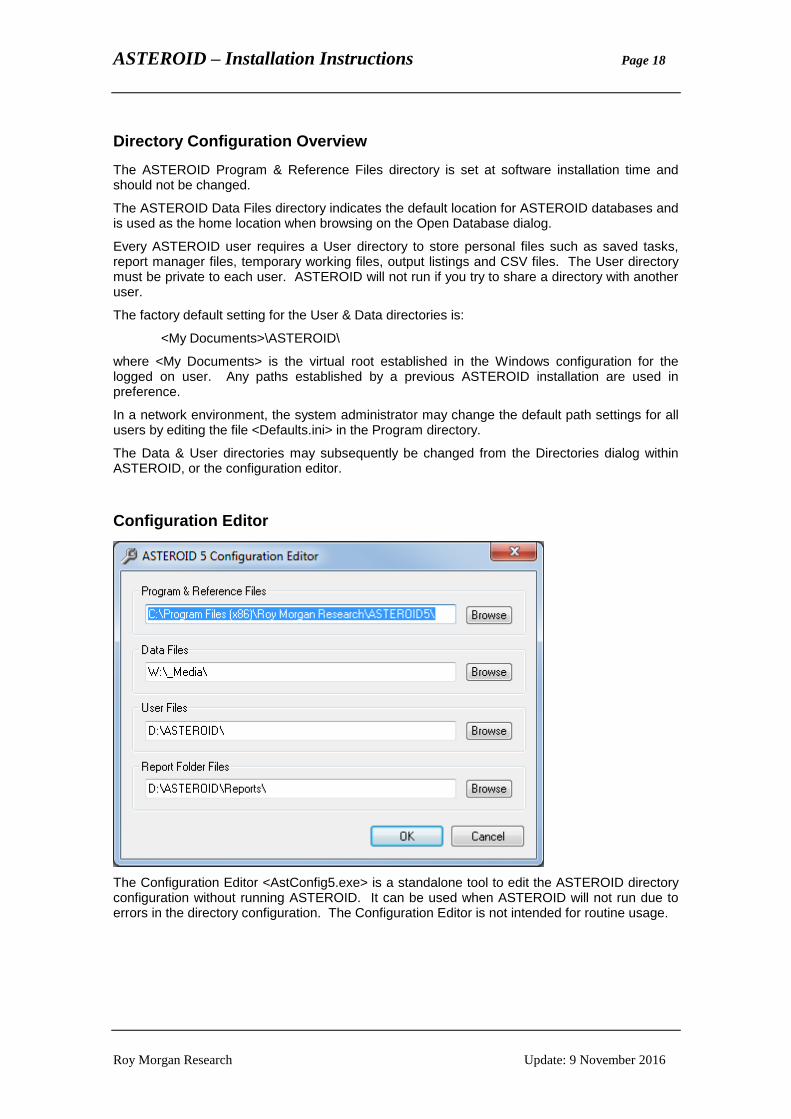
Configuration Editor
The Configuration Editor <AstConfig5.exe> is a standalone tool to edit the ASTEROID directory configuration without running ASTEROID. It can be used when ASTEROID will not run due to errors in the directory configuration. The Configuration Editor is not intended for routine usage.

ASTEROID – Installation Instructions Page 19
Roy Morgan Research Update: 9 November 2016
Data Installation
Databases on CD/DVD may be installed to your hard disk or network using the following procedure.
Decide on a directory to hold the database. This may be the default Data Directory or any other directory accessible to the intended user(s).
Place the ASTEROID CD/DVD in your ROM drive.
Run the CD browser (Browser.exe).
Select “Install Database” from the menu.
Choose from the drop down list or Browse for a Database folder (Copy From).
Browse for a destination folder (Copy To). The Asteroid Data directory is provided as a default.
Click Start Copy.
The progress bars will indicate when the copying process has been completed.
Database files on CD/DVD are not compressed and may also be copied to your hard disk or network using Windows Explorer.
The ASTEROID software is able to access a database residing on CD/DVD if you wish. This feature is useful for infrequently used databases. From the ASTEROID Open Database dialog, simply browse to the appropriate folder on your CD/DVD drive.

ASTEROID – Installation Instructions Page 20
Roy Morgan Research Update: 9 November 2016
The ASTEROID.LOC file
A text file named ASTEROID.LOC may be used to indicate databases stored outside the ASTEROID data directory. This is a conventional ASCII text file containing one record per database. The record contains the name of the database, followed by a comma and/or space(s), followed by the full pathname of the directory in which the database is stored. For example:
BSURVEY, F:\ASTEROID\Test\
MAR99VIC, C:\Surveys\VIC\
The ASTEROID.LOC file is stored in the ASTEROID user directory.
In this version of ASTEROID, the Open Database dialog is used to maintain the ASTEROID.LOC file and keep a list of your recently used or favourite databases. The file may still be created externally (for example, by the system administrator when installing databases) providing it conforms to the format above.