a*star srdb user guide · raghuveer jeremias added workflow for update profile module. added forum...
TRANSCRIPT

User Guide
Version 5.0
Document name: ASTAR_UserGuide_5.0.doc Page 1 of 43 Category: Documentation
A*STAR SRDB User Guide
Document Version: 5.0
Revised Date: 23rd March 2010
User Guide
Version 5.0
Document name: ASTAR_UserGuide_5.0.doc Page 2 of 43 Category: Documentation
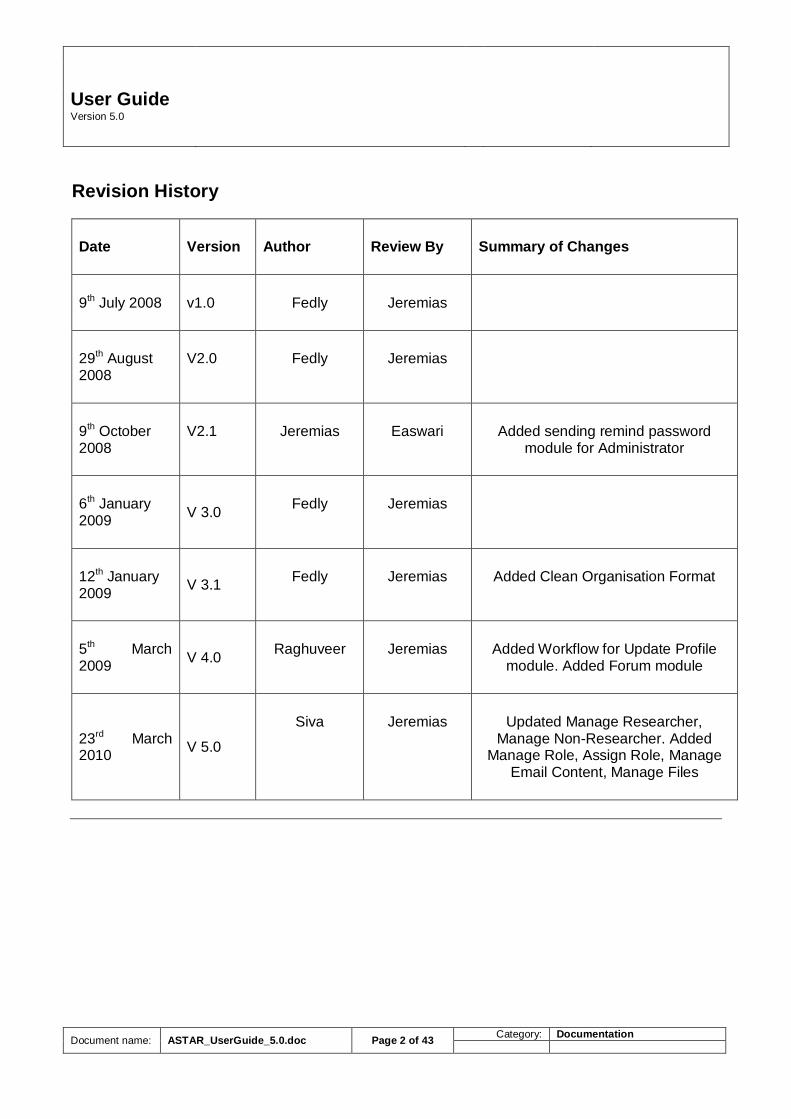
Revision History
Date Version Author Review By Summary of Changes
9th July 2008 v1.0 Fedly Jeremias
29th August 2008
V2.0 Fedly Jeremias
9th October 2008
V2.1 Jeremias Easwari Added sending remind password module for Administrator
6th January 2009
V 3.0 Fedly Jeremias
12th January 2009
V 3.1 Fedly Jeremias Added Clean Organisation Format
5th March 2009
V 4.0 Raghuveer Jeremias Added Workflow for Update Profile
module. Added Forum module
23rd March 2010
V 5.0
Siva Jeremias Updated Manage Researcher, Manage Non-Researcher. Added
Manage Role, Assign Role, Manage Email Content, Manage Files

User Guide
Version 5.0
Document name: ASTAR_UserGuide_5.0.doc Page 3 of 43 Category: Documentation
Table of Contents
1 Introduction .................................................................................................................. 5
2 System Modules ........................................................................................................... 6
2.1 Login Module................................................................................................................................ 7 2.1.1 Logging in................................................................................................................................................ 7 2.1.2 Register a New User ................................................................................................................................. 7 2.1.3 Retrieving Password ................................................................................................................................. 9
Unlocking Accounts ......................................................................................................................................... 9
2.2 Search Researchers Module ....................................................................................................... 10
2.3 Update User Profile .................................................................................................................... 12 2.3.1 Main (Edit User Profile) ..........................................................................................................................13 2.3.2 Enabling and Disabling Collaboration ......................................................................................................14 2.3.3 User Account Password Change ..............................................................................................................15 2.3.4 Research Area .........................................................................................................................................16 2.3.5 Education ................................................................................................................................................17
Add Education Record .....................................................................................................................................17 Edit Education Record .....................................................................................................................................18 Delete Education Record .................................................................................................................................18
2.3.6 Appointment ...........................................................................................................................................19 Add Appointment Record ................................................................................................................................19
2.3.7 Employment ............................................................................................................................................20 Add Employment.............................................................................................................................................20 Edit Employment Record .................................................................................................................................21 Delete Employment Record .............................................................................................................................22
2.3.8 Publication ..............................................................................................................................................22 Add Publications .............................................................................................................................................22 Edit Publication Record ...................................................................................................................................23 Delete Publication Record................................................................................................................................24
2.3.9 Accomplishment .....................................................................................................................................24 Add Accomplishment ......................................................................................................................................24 Edit Accomplishment Record...........................................................................................................................25 Delete Accomplishment Record .......................................................................................................................26
2.3.10 Collaboration ......................................................................................................................................26 Add Collaboration ...........................................................................................................................................26 Edit Collaboration Record................................................................................................................................27 Delete Collaboration Record ............................................................................................................................28
2.3.11 Grant ..................................................................................................................................................28 Add Grant .......................................................................................................................................................28 Edit Grant Record ............................................................................................................................................29 Delete Grant Record ........................................................................................................................................30
2.3.12 My Page..............................................................................................................................................30 2.3.13 Manage Files.......................................................................................................................................32
2.4 Dashboard................................................................................................................................... 33 2.4.1 Adding Collaborator ................................................................................................................................33 2.4.2 Approving Add Collaborator Request ......................................................................................................34
2.5 Forum User Guide ...................................................................................................................... 36 2.5.1 Add New Topic .......................................................................................................................................36 2.5.2 Reply Topic ............................................................................................................................................37
User Guide
Version 5.0
Document name: ASTAR_UserGuide_5.0.doc Page 4 of 43 Category: Documentation
2.5.3 Links .......................................................................................................................................................38 2.5.4 My Profile ...............................................................................................................................................39

User Guide
Version 5.0
Document name: ASTAR_UserGuide_5.0.doc Page 5 of 43 Category: Documentation
1 Introduction This User Guide will give you detailed explanation and step-by-step guides on using the portal. It covers an overall scope of getting to know the portal and its functionalities and modules.

User Guide
Version 5.0
Document name: ASTAR_UserGuide_5.0.doc Page 6 of 43 Category: Documentation
2 System Modules In the following sections we will guide you through the process of using SRDB modules.
User Guide
Version 5.0
Document name: ASTAR_UserGuide_5.0.doc Page 7 of 43 Category: Documentation
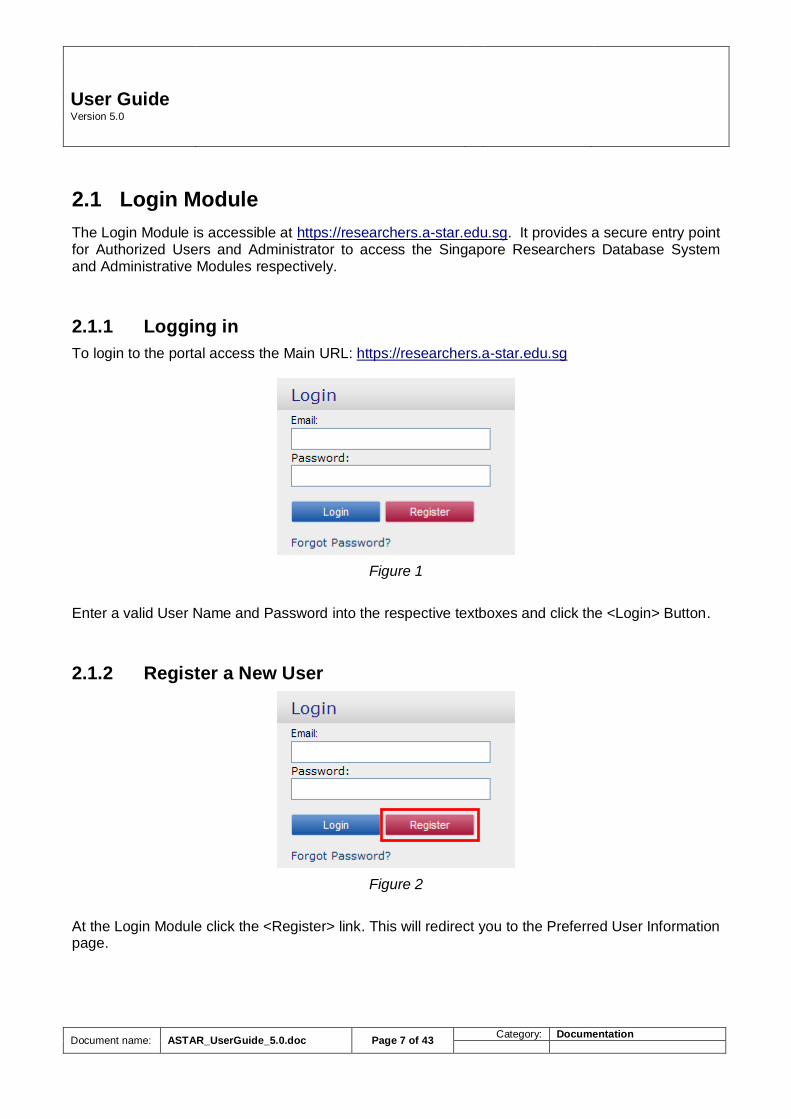
2.1 Login Module
The Login Module is accessible at https://researchers.a-star.edu.sg. It provides a secure entry point for Authorized Users and Administrator to access the Singapore Researchers Database System and Administrative Modules respectively.
2.1.1 Logging in
To login to the portal access the Main URL: https://researchers.a-star.edu.sg
Figure 1
Enter a valid User Name and Password into the respective textboxes and click the <Login> Button.
2.1.2 Register a New User
Figure 2
At the Login Module click the <Register> link. This will redirect you to the Preferred User Information page.

User Guide
Version 5.0
Document name: ASTAR_UserGuide_5.0.doc Page 8 of 43 Category: Documentation
Figure 3

User Guide
Version 5.0
Document name: ASTAR_UserGuide_5.0.doc Page 9 of 43 Category: Documentation
Fill in all the fields with your preferred User Information and key a new password twice into the Password fields. Click <Register> link. The system saves the new user registration and awaits authorization/approval by the System Administrator
Note: * indicates a Mandatory Field.
2.1.3 Retrieving Password
Figure 4
At the Login Module click the <Forgot Password?> link. This will redirect you to the Retrieve Password page.
Figure 5
Enter your Email Address and click <Submit>. The password will be sent via email to the email address you specified.
UNLOCKING ACCOUNTS
The Forgot Password feature can also be used to unlock locked accounts. For users who have exceeded 5 tries to login, the system will automatically lock the account as a security feature. In this case the user can Unlock the account and have the correct password sent to them via the above feature.

User Guide
Version 5.0
Document name: ASTAR_UserGuide_5.0.doc Page 10 of 43 Category: Documentation
2.2 Search Researchers Module
The Search Research Module as the name implies provides an easy-to-use search engine function for users to search for researchers. Search input can be given in the following 5 categories:
o Researcher Name o Keyword o Appointment o Organisation o Area of Research ( 2 Areas – Biomedical Science and Science and Engineering)
Figure 6 Search Researchers Module

User Guide
Version 5.0
Document name: ASTAR_UserGuide_5.0.doc Page 11 of 43 Category: Documentation
Figure 7 Search Results
Mousing over the Researcher picture will reveal a pop up showing more information on the researcher.
User Guide
Version 5.0
Document name: ASTAR_UserGuide_5.0.doc Page 12 of 43 Category: Documentation
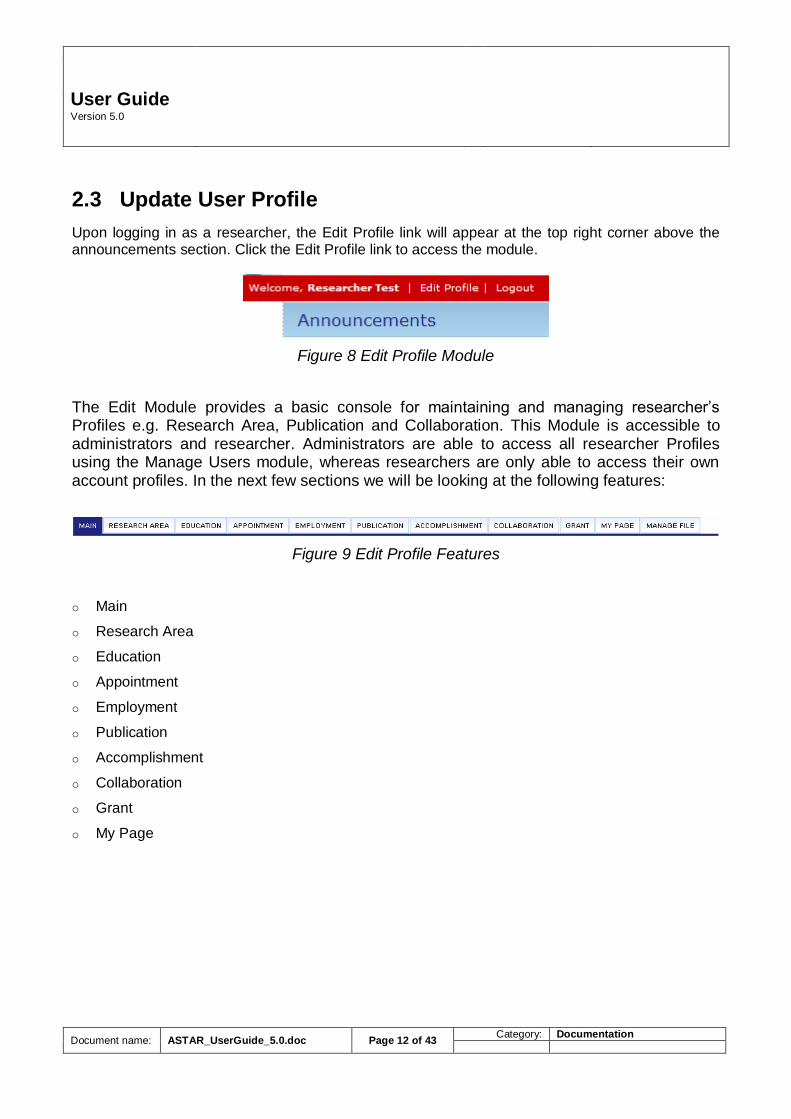
2.3 Update User Profile
Upon logging in as a researcher, the Edit Profile link will appear at the top right corner above the announcements section. Click the Edit Profile link to access the module.
Figure 8 Edit Profile Module
The Edit Module provides a basic console for maintaining and managing researcher’s Profiles e.g. Research Area, Publication and Collaboration. This Module is accessible to administrators and researcher. Administrators are able to access all researcher Profiles using the Manage Users module, whereas researchers are only able to access their own account profiles. In the next few sections we will be looking at the following features:
Figure 9 Edit Profile Features
o Main
o Research Area
o Education
o Appointment
o Employment
o Publication
o Accomplishment
o Collaboration
o Grant
o My Page

User Guide
Version 5.0
Document name: ASTAR_UserGuide_5.0.doc Page 13 of 43 Category: Documentation
2.3.1 Main (Edit User Profile)
The Main tab of the edit user profile module provides a console to edit the basic information on the researcher such as his/her email address, contact information, account password & photo.
Figure 10 Main Tab

User Guide
Version 5.0
Document name: ASTAR_UserGuide_5.0.doc Page 14 of 43 Category: Documentation
Here’s how to edit user profile information:
1. In the Edit User Profile Module Main Tab, make changes to the user profile information.
2. Click Update, to save the changes. This saves the new information into the database.
2.3.2 Enabling and Disabling Collaboration
The researchers are allowed to enable or disable the collaboration feature of their own account. Enabling collaboration, allows other researchers to search, communicate and add him/her as a collaborator and vice versa. Enabling collaboration activates the Dashboard tab to appear on the navigation bar. Disabling collaboration, on the other hand removes the dashboard and he/she will not be able to receive messages or collaborate with other researchers. Here’s how to Enable/Disable Collaboration:
1. In the Edit User Profile Module Main Tab, enable or disable the “Enable Collaboration”
checkbox. 2. Click Update, to save the changes.
This saves the change to the profile into the database.
Figure 11 Enable Collaboration

User Guide
Version 5.0
Document name: ASTAR_UserGuide_5.0.doc Page 15 of 43 Category: Documentation
2.3.3 User Account Password Change
Here’s how to change password to current researcher account.
1. Enter the Old Password.
This is the password that is currently being used.
2. Enter the New Password.
This is the password that you want to change to.
3. Verify the New Password by entering it a second time in the Verify Password textbox.
This is to ensure that you have entered the password correctly, as the password fields are masked and you may not detect an error whilst keying in the new password.
4. Finally, click Change Password.
A message pops up saying Password Changed. You will have to subsequently log in with your New Password.
Figure 12 Password change

User Guide
Version 5.0
Document name: ASTAR_UserGuide_5.0.doc Page 16 of 43 Category: Documentation
2.3.4 Research Area
The Research Area tab allows researchers to add the discipline and research areas they are in. Researchers are allowed to add more than 1 research areas to their own account via this console.
Here’s how to add/remove a new research area:
1. In the Research Area tab choose and click a discipline.
This will refresh the page and load the Research Area box with related areas of research.
2. Click the Area and Sub-Area.
This will refresh the page and load the Research Area box with related areas of research. This will filter further the research areas according to your choice.
3. Click the respective checkbox Research Area of you choice.
This will refresh the page and display under Selected Research Area it will also add the research areas to your account.
4. To remove a selected Research Area, just uncheck its respective checkbox.
Figure 13 Adding Research Area

User Guide
Version 5.0
Document name: ASTAR_UserGuide_5.0.doc Page 17 of 43 Category: Documentation
2.3.5 Education
The Education tab of the edit user profile module provides a console to add, edit and delete researcher’s education background.
Figure 14 Education History
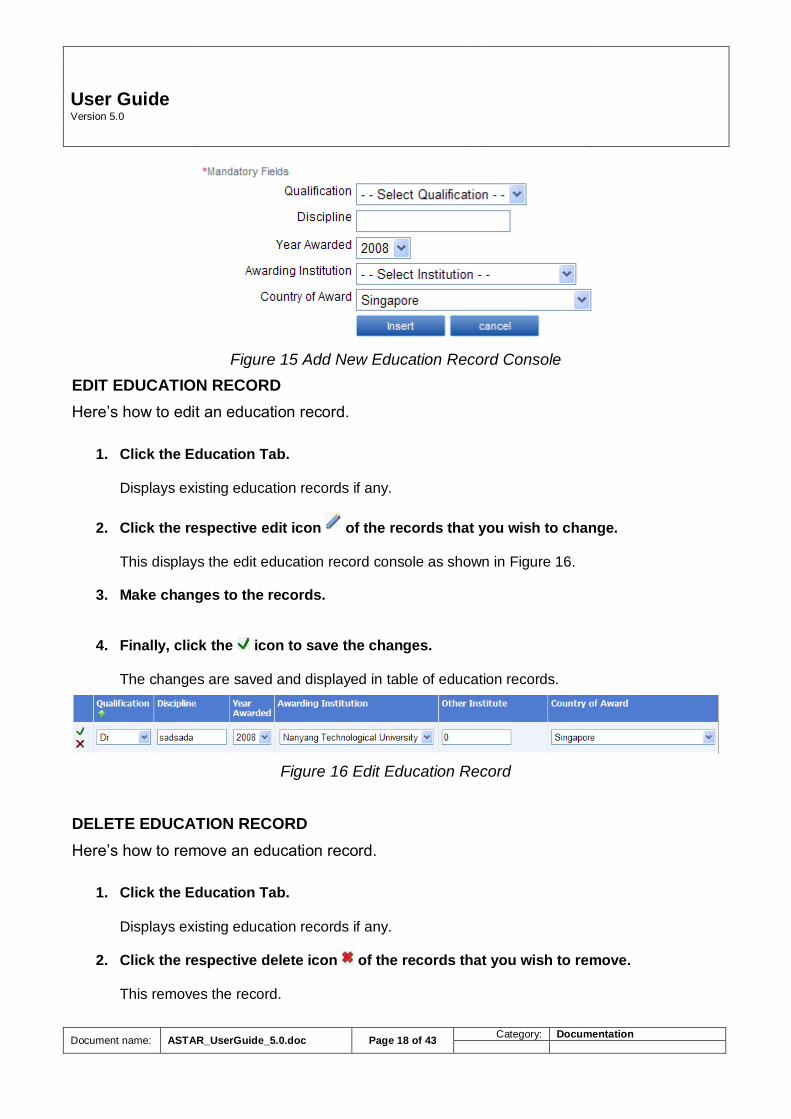
ADD EDUCATION RECORD
Here’s how to add a new education record.
1. Click the Education Tab.
Displays existing education records if any.
2. Click the Add New button.
This displays the Add new education record console as shown in Figure 15.
3. Fill in the Education details.
4. Finally, click Insert. The new record is added to the table of education records.
User Guide
Version 5.0
Document name: ASTAR_UserGuide_5.0.doc Page 18 of 43 Category: Documentation
Figure 15 Add New Education Record Console
EDIT EDUCATION RECORD
Here’s how to edit an education record.
1. Click the Education Tab.
Displays existing education records if any.
2. Click the respective edit icon of the records that you wish to change.
This displays the edit education record console as shown in Figure 16.
3. Make changes to the records.
4. Finally, click the icon to save the changes. The changes are saved and displayed in table of education records.
Figure 16 Edit Education Record
DELETE EDUCATION RECORD
Here’s how to remove an education record.
1. Click the Education Tab.
Displays existing education records if any.
2. Click the respective delete icon of the records that you wish to remove.
This removes the record.
User Guide
Version 5.0
Document name: ASTAR_UserGuide_5.0.doc Page 19 of 43 Category: Documentation
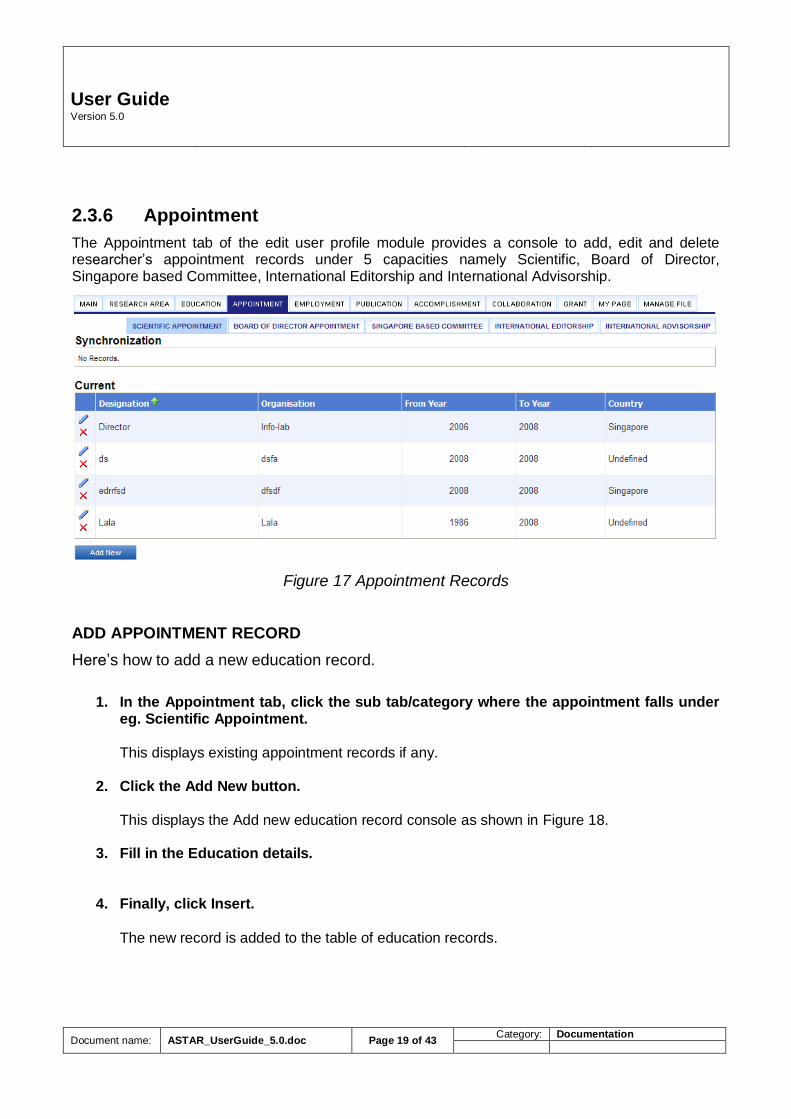
2.3.6 Appointment
The Appointment tab of the edit user profile module provides a console to add, edit and delete researcher’s appointment records under 5 capacities namely Scientific, Board of Director, Singapore based Committee, International Editorship and International Advisorship.
Figure 17 Appointment Records
ADD APPOINTMENT RECORD
Here’s how to add a new education record.
1. In the Appointment tab, click the sub tab/category where the appointment falls under
eg. Scientific Appointment. This displays existing appointment records if any.
2. Click the Add New button.
This displays the Add new education record console as shown in Figure 18.
3. Fill in the Education details.
4. Finally, click Insert.
The new record is added to the table of education records.

User Guide
Version 5.0
Document name: ASTAR_UserGuide_5.0.doc Page 20 of 43 Category: Documentation
Figure 18 Add New Education Record Console
2.3.7 Employment
The Employment tab of the edit user profile module provides a console to add, edit and delete researcher’s employment records.
Figure 19 Employment Records
ADD EMPLOYMENT
Here’s how to add a new education record.
1. In the Employment tab, add new button.
This displays the Add New Employment Record console as shown in Figure 20. 2. Fill in the Employment details in the fields.

User Guide
Version 5.0
Document name: ASTAR_UserGuide_5.0.doc Page 21 of 43 Category: Documentation
3. Finally, click Insert.
The new record is added to the table of education records.
Figure 20 Add New Employment Record Console
EDIT EMPLOYMENT RECORD
Here’s how to edit an employment record.
1. Click the Employment Tab.
Displays existing employment records if any.
2. Click the respective edit icon of the records that you wish to change.
This displays the edit employment record console as shown in Figure 21.
3. Make changes to the records.
4. Finally, click the icon to save the changes.
The changes are saved and displayed in table of education records.
Figure 21 Edit Employment Record

User Guide
Version 5.0
Document name: ASTAR_UserGuide_5.0.doc Page 22 of 43 Category: Documentation
DELETE EMPLOYMENT RECORD
Here’s how to remove an education record.
1. Click the Employment Tab.
Displays existing employment records if any.
2. Click the respective delete icon of the records that you wish to remove.
This removes the record.
2.3.8 Publication
The Publication tab of the edit user profile module provides a console to add, edit and delete researcher’s publication records.
Figure 22 Publication Records
ADD PUBLICATIONS
Here’s how to add a new publication record.
1. In the Publication tab, add new button.
This displays the Add New Publication Record console as shown in Figure 23.
2. Fill in the Publication details in the fields.
3. Finally, click Insert.
The new record is added to the table of Publication records.

User Guide
Version 5.0
Document name: ASTAR_UserGuide_5.0.doc Page 23 of 43 Category: Documentation
Figure 23 Add New Publication Console
EDIT PUBLICATION RECORD
Here’s how to edit a publication record.
1. Click the Publication Tab.
Displays existing publication records if any.
2. Click the respective edit icon of the records that you wish to change.
This displays the edit publication record console as shown in Figure 24.
3. Make changes to the records.
4. Finally, click the icon to save the changes.
The changes are saved and displayed in table of publication records.
Figure 24 Edit Publication Record

User Guide
Version 5.0
Document name: ASTAR_UserGuide_5.0.doc Page 24 of 43 Category: Documentation
DELETE PUBLICATION RECORD
Here’s how to remove a publication record.
1. Click the Publication Tab.
Displays existing publication records if any.
2. Click the respective delete icon of the records that you wish to remove.
This removes the record.
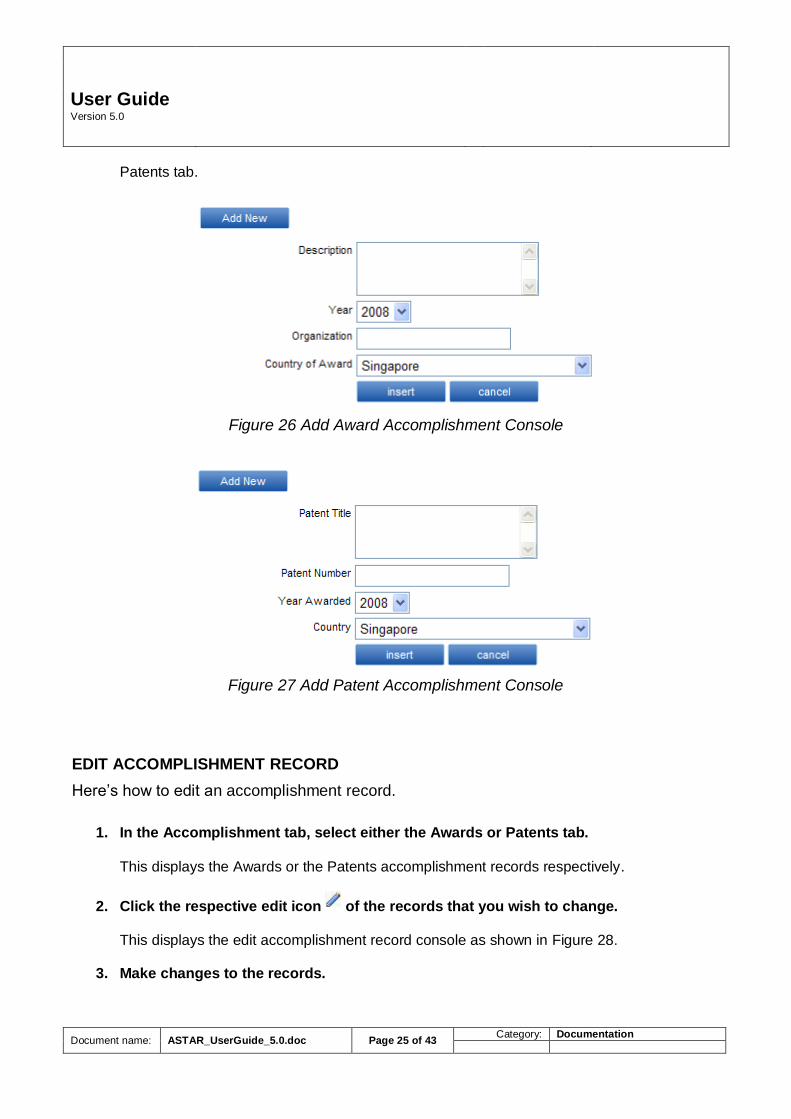
2.3.9 Accomplishment
The Accomplishment tab of the edit user profile module provides a console to add, edit and delete researcher’s accomplishment records, categorized into 2 sections: Awards and Patents.
Figure 25 Accomplishment Records
ADD ACCOMPLISHMENT
Here’s how to add a new accomplishment record.
1. In the Accomplishment tab, select either the Awards or Patents tab.
This displays the Awards or the Patents accomplishment records respectively.
2. Click the Add New button.
This displays the add Accomplishment console as shown in Figure 26 and Figure 27.
3. Fill up the fields
4. Finally, click Insert.
The new record is added to the table of accomplishment records, to either the Awards or
User Guide
Version 5.0
Document name: ASTAR_UserGuide_5.0.doc Page 25 of 43 Category: Documentation
Patents tab.
Figure 26 Add Award Accomplishment Console
Figure 27 Add Patent Accomplishment Console
EDIT ACCOMPLISHMENT RECORD
Here’s how to edit an accomplishment record.
1. In the Accomplishment tab, select either the Awards or Patents tab.
This displays the Awards or the Patents accomplishment records respectively.
2. Click the respective edit icon of the records that you wish to change.
This displays the edit accomplishment record console as shown in Figure 28.
3. Make changes to the records.

User Guide
Version 5.0
Document name: ASTAR_UserGuide_5.0.doc Page 26 of 43 Category: Documentation
4. Finally, click the icon to save the changes.
The changes are saved and displayed in table of accomplishment records.
Figure 28 Edit Accomplishment Record
DELETE ACCOMPLISHMENT RECORD
Here’s how to remove an accomplishment record.
1. Click the Accomplishment Tab.
Displays existing accomplishment records if any.
2. Click the respective delete icon of the records that you wish to remove.
This removes the record.
2.3.10 Collaboration
The Compilation tab of the edit user profile module provides a console to add, edit and delete researcher’s collaboration records, categorized into 5 sections: Company, Hospital, Industry, University, Research Institute and Others.
Figure 29 Collaboration Records
ADD COLLABORATION
Here’s how to add a new collaboration record.
User Guide
Version 5.0
Document name: ASTAR_UserGuide_5.0.doc Page 27 of 43 Category: Documentation
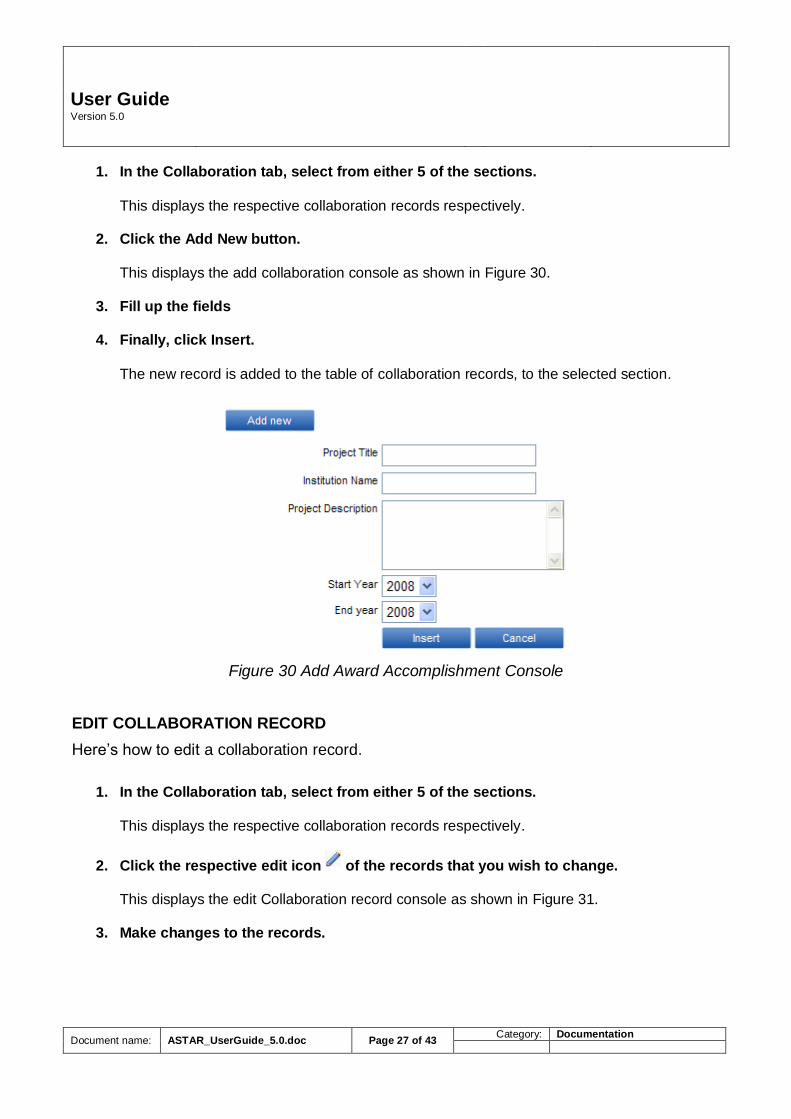
1. In the Collaboration tab, select from either 5 of the sections.
This displays the respective collaboration records respectively. 2. Click the Add New button.
This displays the add collaboration console as shown in Figure 30.
3. Fill up the fields
4. Finally, click Insert.
The new record is added to the table of collaboration records, to the selected section.
Figure 30 Add Award Accomplishment Console
EDIT COLLABORATION RECORD
Here’s how to edit a collaboration record.
1. In the Collaboration tab, select from either 5 of the sections.
This displays the respective collaboration records respectively.
2. Click the respective edit icon of the records that you wish to change. This displays the edit Collaboration record console as shown in Figure 31.
3. Make changes to the records.
User Guide
Version 5.0
Document name: ASTAR_UserGuide_5.0.doc Page 28 of 43 Category: Documentation
4. Finally, click the icon to save the changes.
The changes are saved and displayed in table of collaboration records.
Figure 31 Edit Collaboration
DELETE COLLABORATION RECORD
Here’s how to remove a collaboration record.
1. In the Collaboration tab, select from either 5 of the sections.
This displays the respective collaboration records respective. 2. Click the respective delete icon of the records that you wish to remove.
This removes the record.
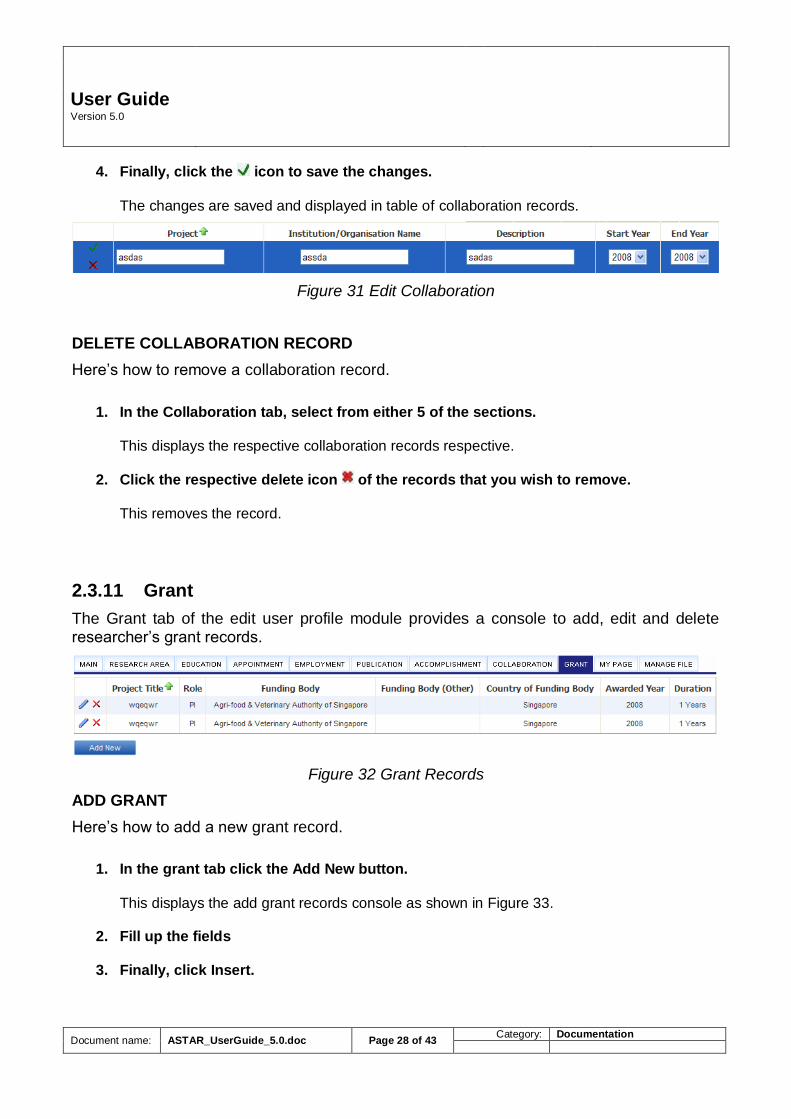
2.3.11 Grant
The Grant tab of the edit user profile module provides a console to add, edit and delete researcher’s grant records.
Figure 32 Grant Records
ADD GRANT
Here’s how to add a new grant record.
1. In the grant tab click the Add New button.
This displays the add grant records console as shown in Figure 33.
2. Fill up the fields
3. Finally, click Insert.

User Guide
Version 5.0
Document name: ASTAR_UserGuide_5.0.doc Page 29 of 43 Category: Documentation
The new record is added to the table of collaboration records, to the selected section.
Figure 33 Add Grant Console
EDIT GRANT RECORD
Here’s how to edit a grant record.
1. In the Grant tab, click the respective edit icon of the records that you wish to change.
This displays the edit Grant record console as shown in Figure 34.
2. Make changes to the records.
3. Finally, click the icon to save the changes.
The changes are saved and displayed in table of collaboration records.
Figure 34 Edit Grant

User Guide
Version 5.0
Document name: ASTAR_UserGuide_5.0.doc Page 30 of 43 Category: Documentation
DELETE GRANT RECORD
Here’s how to remove a grant record.
1. In the Grant tab click the respective delete icon of the records that you wish to
remove.
This removes the record.
2.3.12 My Page
The My Page tab provides a Rich Text Editor for researchers to insert information on themselves and their work. The Rich Text editor works as in MS Office, allowing text formatting, inserting images, movies, attachments, and flash, linking to URLs (blogs or external websites) etc.
Figure 35 Grant Records
The information entered here will appear on the My Page of the researchers profile page as shown in Figure 36.

User Guide
Version 5.0
Document name: ASTAR_UserGuide_5.0.doc Page 31 of 43 Category: Documentation
Figure 36 My Page

User Guide
Version 5.0
Document name: ASTAR_UserGuide_5.0.doc Page 32 of 43 Category: Documentation
2.3.13 Manage Files
The Manage Files Tab displays a console to create folder, delete folder, upload file and delete file. There is maximum 5 MB limitation for file size for upload.
Here’s how to upload file: 1. Click Browse button in Upload File Panel. 2. Choose the file to be uploaded. 3. Click Upload button.
Here’s how to delete file:
1. Click beside empty file.

User Guide
Version 5.0
Document name: ASTAR_UserGuide_5.0.doc Page 33 of 43 Category: Documentation
2.4 Dashboard
Upon logging in as a researcher, the Dashboard link will appear in the top navigation bar.
Figure 37 Dashboard Page
Researcher can use the dashboard module to search and view other researchers’ profiles and also add them as collaborators.
2.4.1 Adding Collaborator
Researchers may search other collaborators and view
Here’s how to add a researcher as your collaborator.
1. In the Dashboard Module page, use the search engine (refer to Section 2.2 Search
Researchers Module for instructions) to find other researchers. This will retrieve all researchers that match your search criteria as shown in Figure 37.
2. Click the Add Collaborator icon of the respective researcher that you wish to add as your collaborator.
3. Click ok on the message box that appears.
The selected researcher will be sent a notification of request to add as collaborator. He / She will either approve or reject the request for collaboration.

User Guide
Version 5.0
Document name: ASTAR_UserGuide_5.0.doc Page 34 of 43 Category: Documentation
Figure 38 Search Collaborator
2.4.2 Approving Add Collaborator Request
Researchers may search other collaborators and view
Here’s how to approve an add collaborator request, when you get a collaboration request from another researcher.
1. In the Dashboard Module page, under the Updates section, click the Collaborator
Request link as shown in figure 68.
Figure 39 Collaborator Request notification
This will take you to the Collaborators request page.

User Guide
Version 5.0
Document name: ASTAR_UserGuide_5.0.doc Page 35 of 43 Category: Documentation
2. Click the approve icon of the Collaborator request and click ok on the confirmation message that appears.
The researcher is added as a collaborator to your account.
User Guide
Version 5.0
Document name: ASTAR_UserGuide_5.0.doc Page 36 of 43 Category: Documentation
2.5 Forum User Guide
2.5.1 Add New Topic
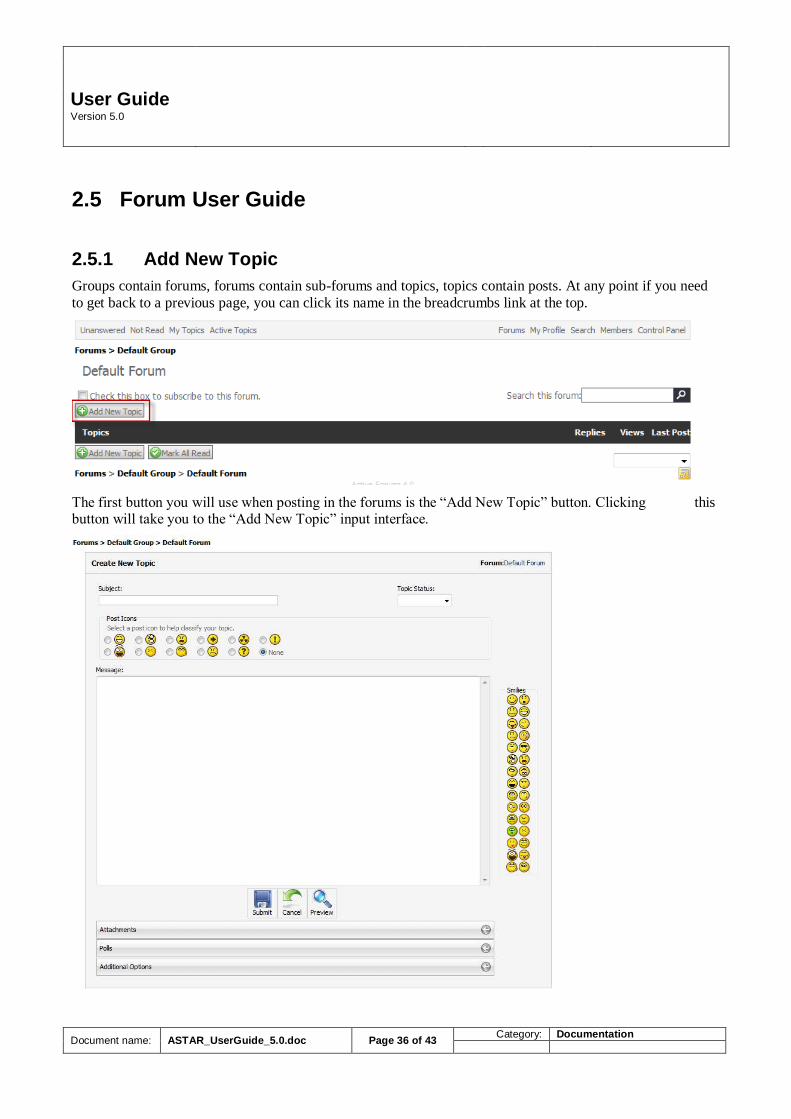
Groups contain forums, forums contain sub-forums and topics, topics contain posts. At any point if you need
to get back to a previous page, you can click its name in the breadcrumbs link at the top.
The first button you will use when posting in the forums is the “Add New Topic” button. Clicking this button will take you to the “Add New Topic” input interface.

User Guide
Version 5.0
Document name: ASTAR_UserGuide_5.0.doc Page 37 of 43 Category: Documentation
The “Subject” is simply a short description of your post.
The Topic Status is an optional method of further describing your post.
Choosing a “Post Icon” can set your post apart from others in the forum listing. The “Message” box contains no character limit, so this is where you type the body of your post. Expanding
the “Attachments” will allow you to browse and upload attachments to your post.
Clicking the “Create Thumbnail” button will create a smaller version of the same picture. Clicking “Insert Image” will input a text placeholder for your image. The image will appear in that position after you hit submit. The display link option will simply add a hyperlink to your file at the foot of your post. Files you have uploaded previously will be on the “My Files” tab, and can be added to your current post, without re-uploading. Adding a “Poll” is achieved by naming it, choosing the answer type, and providing the choices in the “Poll Options” box. Each option must be on a separate line. Polls require that you have entered text into the body of your message, but if you wish to only have a poll, you can enter a blank character such as and it will still allow you to submit your post. Under Additional Options, The author of the post can decide to lock, pin, or announce the post. An announcement will appear in a section above the rest of your topics. It will only appear up there during the dates specified. Many of these options will only be available to certain security roles. After your post is completed, click “Submit” and it will appear in the forum.
2.5.2 Reply Topic
Now other users can view and reply to it. There are two types of replies: standard and quick. A quick reply is accomplished by simply using the form at the bottom of the screen when viewing a post. Quick replying does
not allow the user access to advanced formatting options.

User Guide
Version 5.0
Document name: ASTAR_UserGuide_5.0.doc Page 38 of 43 Category: Documentation
To use a standard reply, click the “Add Reply” button. This form is very similar to the Add New Topic
interface. You can add Smilies, or if HTML is enabled, format your post however you desire. Attachments can
be added to any reply; however, a poll can only be in the original topic post.
There are several options once a message has been posted. Editing, Deleting, and Moving can all be accomplished by clicking the respective buttons. Locking a topic disables all replies. Pinning a topic will
make it stay at the top of the topic list no matter how active it is. The replies and views count are a fast way to
determine how active a particular topic is.
Then viewing a post, there are two buttons in the top right corner. The printer will allow you to view a simplified version for printing. The Envelope Button will allow you to send a link to that post to any email
address. When browsing the forums, there are a few quick link buttons that will take you to the last post you
read or the last post in the topic.
2.5.3 Links
There are a number of links above the forums. The links will change depending on what options you have enabled in the control panel and what type of account you are logged in under.

User Guide
Version 5.0
Document name: ASTAR_UserGuide_5.0.doc Page 39 of 43 Category: Documentation
2.5.4 My Profile
Another very important link is the “My Profile” link. If profiles are enabled, this will take the user to an interface where they can edit their user information. Basic profiles are included and they contain the following information:
Profile: Member Since
– The date the user account was created.
Last Visit
– When the user last logged in.
Posts
– This number is the amount of posts and replies the user has made.
Website
– The user’s website, this can link to any website, not necessarily a private homepage.
Occupation, Location, Interests, Contact Info
– User defined text.
Avatar
– This is a small picture uploaded or linked by the user that will display beneath their user name.
Signature

User Guide
Version 5.0
Document name: ASTAR_UserGuide_5.0.doc Page 40 of 43 Category: Documentation
– This text or HTML will show up under every post the user makes.
My Preferences:
Sort Order
– This option will change whether posts are listed in forward or reverse chronological order.
Items per Page
– Determines the number of posts and topics shown on a single page.
Show Replies
– This option will show other posts when a user is drafting a response.
Jump To First Unread Post
– This option makes the browser skip over previously read posts.
Subscribe to Topics
– If enabled, a user will receive emails when topics are updated.
Subscription Type
– Different options depending on forum settings.

User Guide
Version 5.0
Document name: ASTAR_UserGuide_5.0.doc Page 41 of 43 Category: Documentation
Use AJAX
– Improves interaction with forums. Recommended.
Hide Avatars and Signatures
– This option will block other users Avatars and Signatures.
Forum Tracking
This section allows you to manage your forum subscriptions and sharing options.
Administrator Settings:

User Guide
Version 5.0
Document name: ASTAR_UserGuide_5.0.doc Page 42 of 43 Category: Documentation
Only Administrators can view this page.
Reward Points
– Use this to change a user’s rank based on the point system.
User Caption
– This short description will display beneath a user’s name on their posts.
Disable Signature or Avatar
– Use this if the signature or avatar is inappropriate.
Trusted User
– Check to give a user certain access
Monitor Activity
– Sends email notifications whenever this user posts.
Disable Attachments
– Stops this user from attaching any files to posts or topics.
User Account
This read-only tab allows administrators to view the user accounts associated with each forum user.

User Guide
Version 5.0
Document name: ASTAR_UserGuide_5.0.doc Page 43 of 43 Category: Documentation
Search
The Search interface is a tool for finding a particular post based on keywords or a username. There are also a few links for quick searches. Unanswered, Not Read, My Topics and Active Topics will all go to separate lists
of topics depending on what the user has viewed previously.