assembly/installation_bi-fold -...
TRANSCRIPT
USA / CANADA 1 866 580 0112 raumplusna.com 1
V2018.1
FOLDING DOOR SYSTEMS: ASSEMBLY AND INSTALLATION/INSTRUCTIONFOLDING DOOR SYSTEM S300 BI-FOLD (S34)
General information and tools_ page 03
Contents_ page 04
Detail drawings_ page 05
Assembly instruction_ page 06 - 08
Installation instruction_ page 09 – 11
USA / CANADA 1 866 580 0112 raumplusna.com2
GENERAL INFORMATION / TOOLS
USA / CANADA 1 866 580 0112 raumplusna.com 3
GENERAL INFORMATION
TOOLS:
cross tip screwdriver (Phillips)straightedge (optional)allen wrench 4mm allen wrench 5mm cordless drill and bits; 2.5mm, 6.5mm, 10mmpencil and / or masking tapewhite rubber malletaluminum sawlevel
GENERAL INFORMATION / TOOLS
Preparation:We recommend reading these instructions before starting.Carefully unpack and check all items before beginning assembly. When transporting assembled doors; always lift at corners and lean doors on their side – never stand them upright as this may damage the bottom roller.
The high quality raumplus family of sliding door systems offer a wide range of possibilities. Systems with or without bottom track, ceiling or wall mounted systems, corner solutions, locks, applied and true divided panels.The “HOW TO ASSEMBLE/INSTALL A FOLDING DOOR (S34)” describes the process of assembling an S34 folding door.
For other instructions, please see:HOW TO INSTALL A SLIDING DOOR (S34 + S42)ASSEMBLY INSTRUCTIONS_S34/S42 STOPPER FOR TOP TRACK + END CAPINSTALLATION INSTRUCTIONS_S34/S42 WALL-MOUNT END CAPS + L-BRACKETINSTALLATION INSTRUCTIONS_S34/S42 TOP AND BOTTOM TRACK CONNECTORSINSTALLATION INSTRUCTIONS_TRUE DIVIDING RAILHOW TO ASSEMBLE A SLIDING DOOR (AIR)HOW TO INSTALL A SLIDING DOOR (AIR)For additional instructions see website www.raumplusna.com
Technical details are subject to change
INFORMATION: It is assumed that you have exactly identified all cutting dimensions according tothe measurement instruction for raumplus-products. max. door weight: 60kg [130 lbs] per bi-fold (2 panel). Ceiling or header must be able to carry
weight of doors.Door panels ship unattached for ease of installation

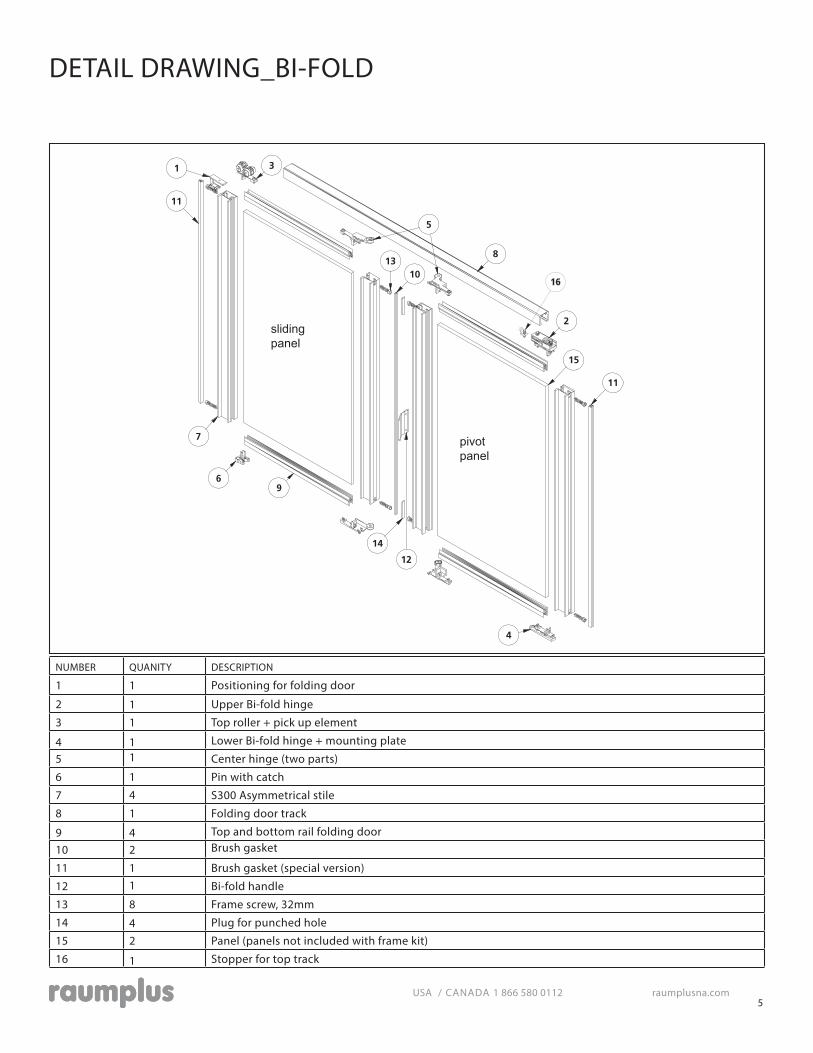
1_ Positioning for folding door_ acts as a door stop in the top track to keep door in closed position.
2_ Upper Bi-fold hinge_ sits in top track and allows door to fold.
3_ Top roller (includes pick-up element)_ guides door in top track.
4_ Lower Bi-fold hinge set + mounting plate_ allows door to fold.
5_ Center Bi-fold hinge_ hinge between door elements.
6_ Pin with catch_ bottom door stop.
7_ Stile S300 asymmetrical_ vertical frame of door.
8_ Folding door track for bi-fold_ guides door, ceiling-mounted only.
9_ Top + bottom rail_ horizontal top and bottom frame of door.
10_ Stopper for top track_ brake for top track.
11_ Brush gasket for bi-fold_ cushions door against wall and between the sliding and pivot panels.
12_ Handle_ center handle, included with door.
1_10.02.250
5_10.02.300
9_15.54.020
2_10.02.220
6_10.02.255
10_10.05.060
3_10.02.210
7_15.51.020
11_10.07.520
4_10.02.230
8_15.55.020
12_10.01.807
USA / CANADA 1 866 580 0112 raumplusna.com4
CONTENTS_BI-FOLD
DESCRIPTIONPART NUMBEROBJECTpositioning for folding door10.02.2501pick-up element set10.02.2202top roller incl. pick up element10.02.2103mounting plate set10.02.2304hinge set S30010.02.3005pin with snapper10.02.2556stile S300a15.51.0xx7folding door track15.55.0xx8top + bottom rail folding door15.54.0xx9dust excluding brush10.07.02010dust excluding brush (special version)10.07.52011handle S34, angled10.01.80712frame screw 32mm10.07.01213plug for punching hole10.07.05114
stopper for top track10.05.06016panel-15
1 3
11
6
4
2
12
5
7
13
slide wing
swing wing
8
9
10
11
15
14
16
slidingpanel
pivotpanel
NUMBER QUANITY DESCRIPTION
1 1 Positioning for folding door
2 1 Upper Bi-fold hinge
3 1 Top roller + pick up element
4 1 Lower Bi-fold hinge + mounting plate
5 1 Center hinge (two parts)
6 1 Pin with catch
7 4 S300 Asymmetrical stile
8 1 Folding door track
9 4 Top and bottom rail folding door
10 2 Brush gasket
11 1 Brush gasket (special version)
12 1 Bi-fold handle
13 8 Frame screw, 32mm
14 4 Plug for punched hole
15 2 Panel (panels not included with frame kit)
16 1 Stopper for top track
USA / CANADA 1 866 580 0112 raumplusna.com 5
DETAIL DRAWING_BI-FOLD
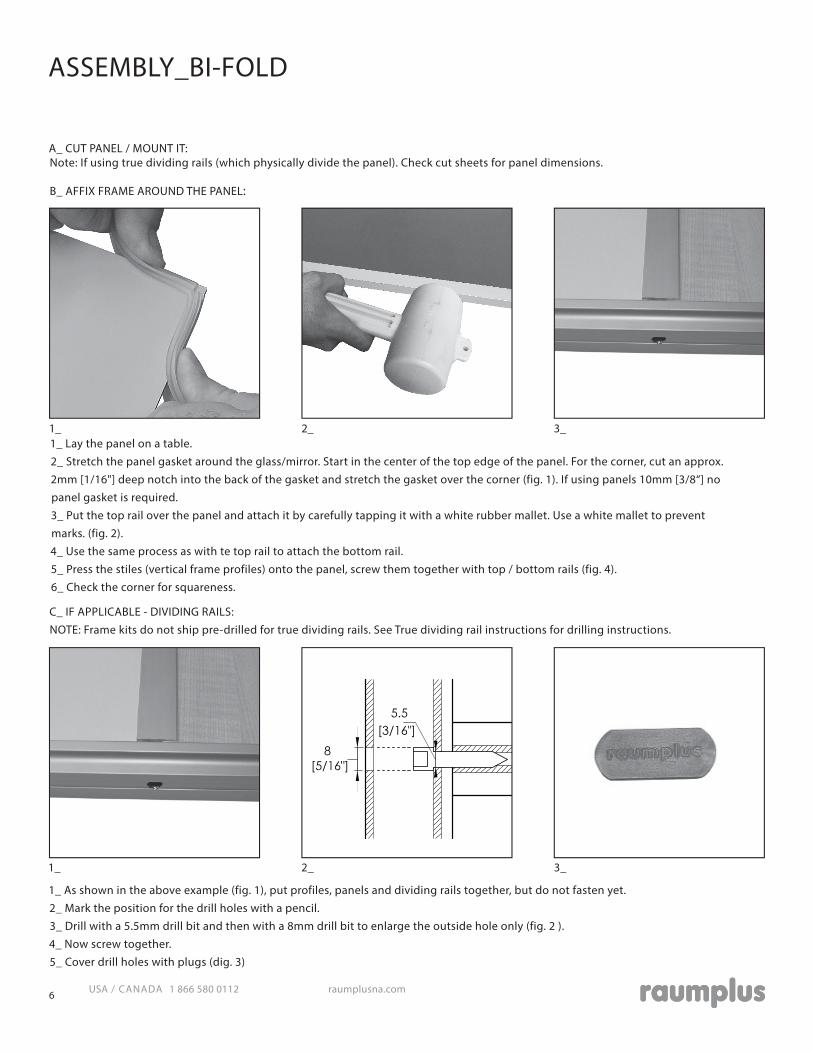
Note: If using true dividing rails (which physically divide the panel). Check cut sheets for panel dimensions.A_ CUT PANEL / MOUNT IT:
ASSEMBLY_BI-FOLD
1_ Lay the panel on a table.2_ Stretch the panel gasket around the glass/mirror. Start in the center of the top edge of the panel. For the corner, cut an approx. 2mm [1/16"] deep notch into the back of the gasket and stretch the gasket over the corner (fig. 1). If using panels 10mm [3/8“] no panel gasket is required.3_ Put the top rail over the panel and attach it by carefully tapping it with a white rubber mallet. Use a white mallet to prevent marks. (fig. 2).4_ Use the same process as with te top rail to attach the bottom rail.5_ Press the stiles (vertical frame profiles) onto the panel, screw them together with top / bottom rails (fig. 4).6_ Check the corner for squareness.
B_ AFFIX FRAME AROUND THE PANEL:
1_ 2_ 3_
1_ As shown in the above example (fig. 1), put profiles, panels and dividing rails together, but do not fasten yet.2_ Mark the position for the drill holes with a pencil.3_ Drill with a 5.5mm drill bit and then with a 8mm drill bit to enlarge the outside hole only (fig. 2 ).4_ Now screw together.5_ Cover drill holes with plugs (dig. 3)
C_ IF APPLICABLE - DIVIDING RAILS:NOTE: Frame kits do not ship pre-drilled for true dividing rails. See True dividing rail instructions for drilling instructions.
1_ 2_ 3_
USA / CANADA 1 866 580 0112 raumplusna.com6
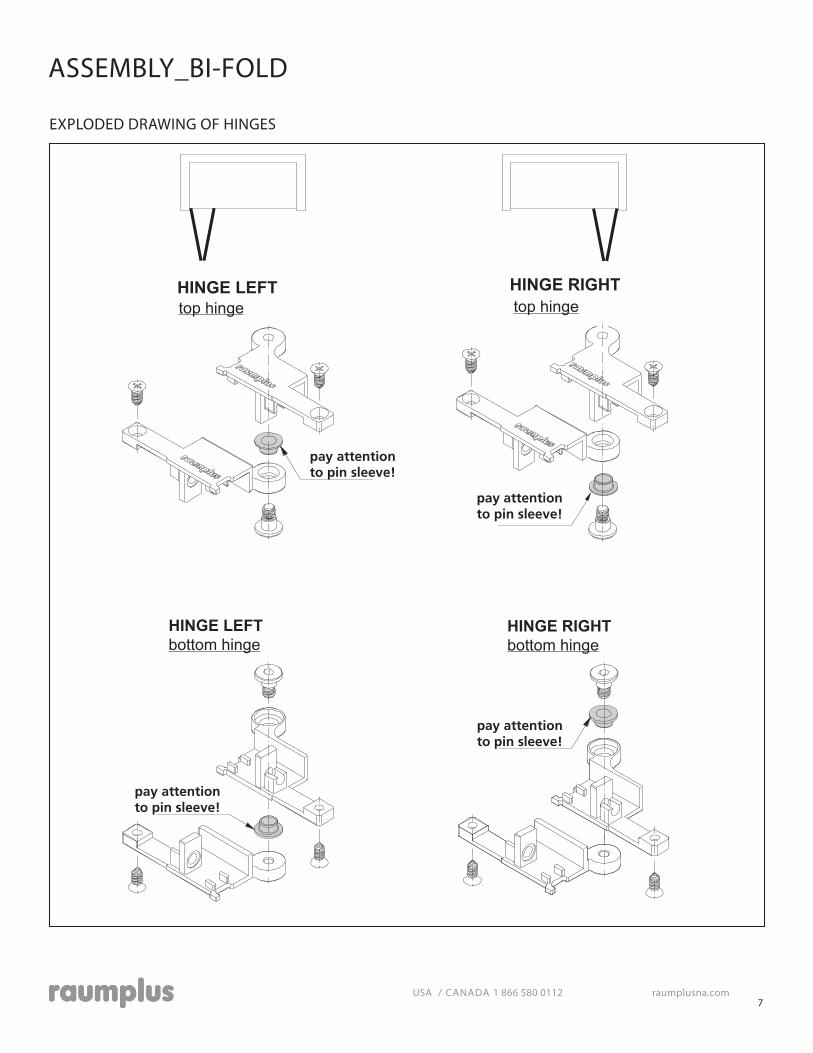
DIN LEFTtop hinge
DIN LEFTbottom hinge
DIN RIGHTbottom hinge
DIN RIGHTtop hinge
pay attentionto pin sleeve!
pay attentionto pin sleeve!
pay attentionto pin sleeve!
pay attentionto pin sleeve!
OPEN LEFT OPEN RIGHT
HINGE LEFT HINGE RIGHT
LEFT HINGEtop hinge
RIGHT HINGEtop hinge
HINGE LEFTbottom hinge
HINGE RIGHTbottom hinge
HINGE LEFT HINGE RIGHT
ASSEMBLY_BI-FOLD
USA / CANADA 1 866 580 0112 raumplusna.com 7
EXPLODED DRAWING OF HINGES
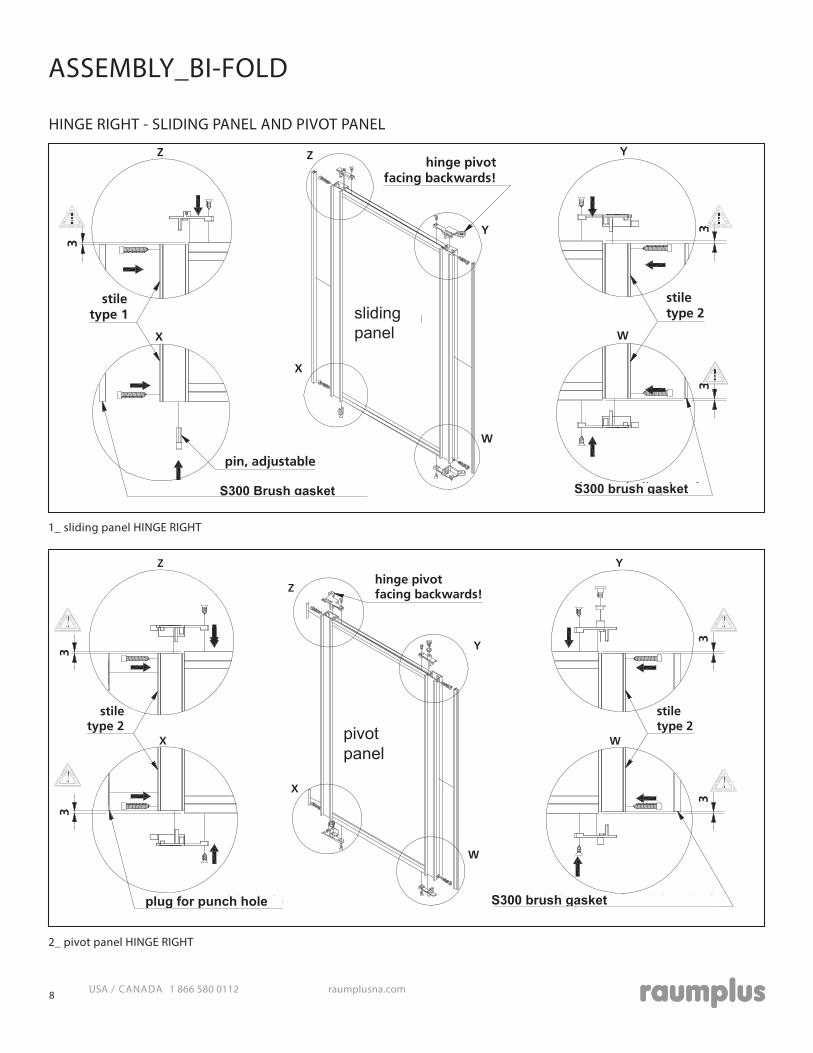
1_ sliding panel HINGE RIGHT
2_ pivot panel HINGE RIGHT
X
Z Y
W
Z
Y
X
W
3
33
slide wingstile
type 1stiletype 2
dust excluding brush (special version)
pin, adjustable
dust excluding brush
hinge pivotfacing backwards!
S300 Brush gasket S300 brush gasket
pivotpanelslidingpanel
Z Y
X W
Z
Y
X
W
33
33
swing wing
stiletype 2
stiletype 2
dust excluding brush (special version)plug for punching hole
hinge pivotfacing backwards!
plug for punch hole S300 brush gasket
pivotpanel
HINGE RIGHT - SLIDING PANEL AND PIVOT PANEL
ASSEMBLY_BI-FOLD
USA / CANADA 1 866 580 0112 raumplusna.com8

3_ screw together pivot panel with sliding panel (fig. backside HINGE RIGHT)
4_ drill holes in ceiling/top of closet and mount folding door track horizontally (fig. w/o ceiling/top of closet)
Pay attention to orientation and position of pin sleeve! (see page 8)
Before mounting folding door track insert accessories numbers 1, 2, 3,10!
mount catch
fix upper hinge (temporarily only in long hole).
Z
Y
Z
Y
pin sleeve
pin sleeve
swing wing
slide wing
slidingpanel
pivotpanel
X W
Z Y
X
W
Z
Y
ca. 2316ca.
75ca.
wallor
corpus
center of folding door track center of folding door track
water level
ca 16mm [5/8"]
ca 75 mm [2 15/16"]
ca 23mm [7/8"]
wall
Distance to Interior system 40 mm [1 9/16“], from the top track to outer edge of Interior system.
INSTALLATION_BI-FOLD
HINGE RIGHT
Alternate installation: install
piviot panel, then sliding and
connect together as shown below.
*IMPORTANT*
Make sure ceiling or header can carry
weight of doors. Additional blocking may be needed before installing.
USA / CANADA 1 866 580 0112 raumplusna.com 9
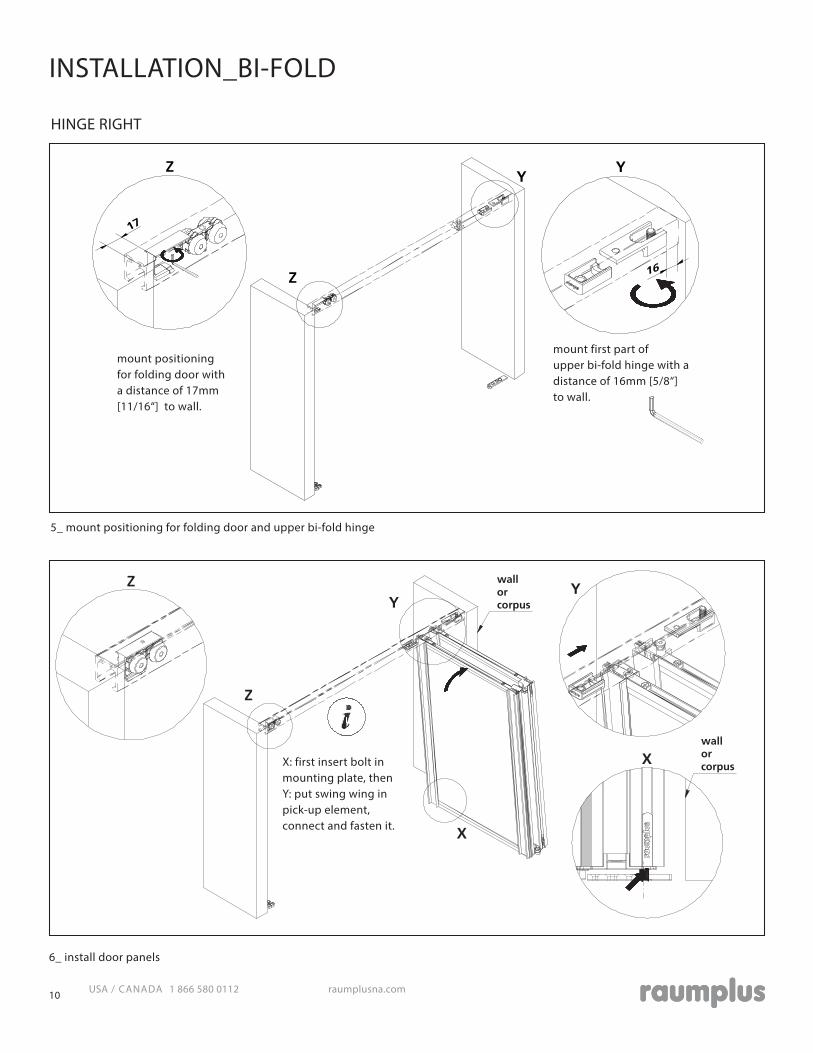
5_ mount positioning for folding door and upper bi-fold hinge
6_ install door panels
mount positioning for folding door with a distance of 17mm [11/16“] to wall.
mount first part of upper bi-fold hinge with a distance of 16mm [5/8“] to wall.
X: first insert bolt in mounting plate, then Y: put swing wing in pick-up element, connect and fasten it.
Z Y
Z
Y
16
17
Z
X
Y
Z
X
Y
wallorcorpus
wallorcorpus
INSTALLATION_BI-FOLD
HINGE RIGHT
USA / CANADA 1 866 580 0112 raumplusna.com10
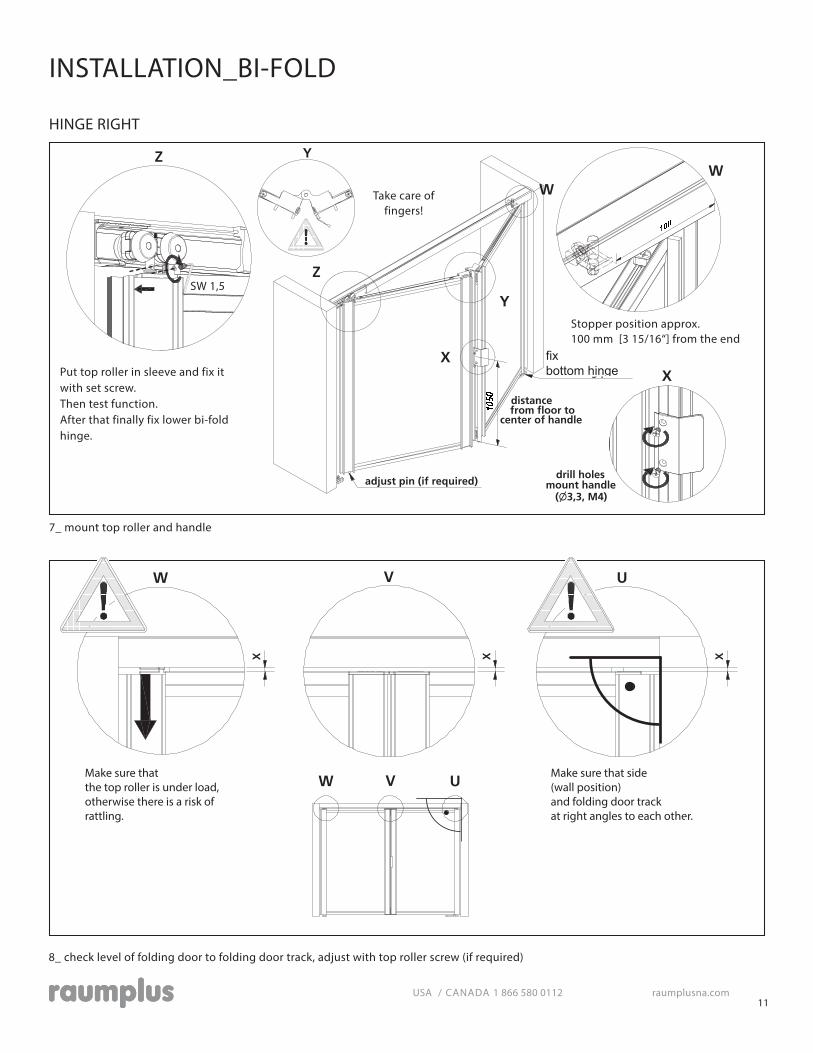
7_ mount top roller and handle
8_ check level of folding door to folding door track, adjust with top roller screw (if required)
SW 1,5
Put top roller in sleeve and fix it with set screw. Then test function. After that finally fix lower bi-fold hinge.
Take care of fingers!
Make sure that side(wall position) and folding door track at right angles to each other.
Make sure thatthe top roller is under load, otherwise there is a risk of rattling.
Stopper position approx. 100 mm [3 15/16“] from the end
Y Z
X
Z
Y
X finally fixmounting plate
adjust pin (if required)
distancefrom floor to
center of handle
drill holesmount handle
(�3,3, M4)
WW
fixbottom hinge
INSTALLATION_BI-FOLD
HINGE RIGHT
W V U
W V U
X X X
USA / CANADA 1 866 580 0112 raumplusna.com 11