assembly instructions - stewmac · page 4 the fingerboard has 24 fret slots, more than are needed...
TRANSCRIPT

Resonator Guitar KitAssembly Instructions
www.stewmac.com

page 1
Getting started. . . . . . . . . . . . . . . . . . . . . . . . . . . . . . . . . . . . . . . . . . . . . . . . 1Installing the truss rod. . . . . . . . . . . . . . . . . . . . . . . . . . . . . . . . . . . . . . . . . 3Shaping the fingerboard . . . . . . . . . . . . . . . . . . . . . . . . . . . . . . . . . . . . . . 4Inlaying the fingerboard . . . . . . . . . . . . . . . . . . . . . . . . . . . . . . . . . . . . . . . 4Installing side dots . . . . . . . . . . . . . . . . . . . . . . . . . . . . . . . . . . . . . . . . . . . . 5Fretting the fingerboard . . . . . . . . . . . . . . . . . . . . . . . . . . . . . . . . . . . . . . . 5Preparing the body for the neck . . . . . . . . . . . . . . . . . . . . . . . . . . . . . . . 7Fitting the neck to the body . . . . . . . . . . . . . . . . . . . . . . . . . . . . . . . . . . . 8Check the fit . . . . . . . . . . . . . . . . . . . . . . . . . . . . . . . . . . . . . . . . . . . . . . . . . . 8The neck heel sets the neck angle. . . . . . . . . . . . . . . . . . . . . . . . . . . . . . 9Shaping the neck “cheeks” . . . . . . . . . . . . . . . . . . . . . . . . . . . . . . . . . . . . . 9Neck angle check . . . . . . . . . . . . . . . . . . . . . . . . . . . . . . . . . . . . . . . . . . . . 10Neck adjustment: side-to-side . . . . . . . . . . . . . . . . . . . . . . . . . . . . . . . . 11Neck adjustment: tilting the neck back . . . . . . . . . . . . . . . . . . . . . . . . 12Neck adjustment: tilting the neck up . . . . . . . . . . . . . . . . . . . . . . . . . . 12Understanding neck angle geometry . . . . . . . . . . . . . . . . . . . . . . . . . 13Intonation check . . . . . . . . . . . . . . . . . . . . . . . . . . . . . . . . . . . . . . . . . . . . 13Installing the fingerboard. . . . . . . . . . . . . . . . . . . . . . . . . . . . . . . . . . . . . 14Installing the peghead overlay . . . . . . . . . . . . . . . . . . . . . . . . . . . . . . . . 15Drilling the tuning machine holes. . . . . . . . . . . . . . . . . . . . . . . . . . . . . 16Shaping the neck . . . . . . . . . . . . . . . . . . . . . . . . . . . . . . . . . . . . . . . . . . . . 17Mounting the coverplate . . . . . . . . . . . . . . . . . . . . . . . . . . . . . . . . . . . . . 17Mounting the fingerboard support . . . . . . . . . . . . . . . . . . . . . . . . . . . 18Install the tailpiece . . . . . . . . . . . . . . . . . . . . . . . . . . . . . . . . . . . . . . . . . . 18
Mount the biscuit to the cone . . . . . . . . . . . . . . . . . . . . . . . . . . . . . . . . 19Find the cone’s “sweet spot” . . . . . . . . . . . . . . . . . . . . . . . . . . . . . . . . . . 19Rough-shape the nut height . . . . . . . . . . . . . . . . . . . . . . . . . . . . . . . . . 19Rough-in the saddle height. . . . . . . . . . . . . . . . . . . . . . . . . . . . . . . . . . . 19Double-check the neck alignment . . . . . . . . . . . . . . . . . . . . . . . . . . . . 20Align the neck to the cone . . . . . . . . . . . . . . . . . . . . . . . . . . . . . . . . . . . 20A quick action check . . . . . . . . . . . . . . . . . . . . . . . . . . . . . . . . . . . . . . . . . 21Install the remaining strings . . . . . . . . . . . . . . . . . . . . . . . . . . . . . . . . . . 21Cut the saddle notches. . . . . . . . . . . . . . . . . . . . . . . . . . . . . . . . . . . . . . . 21Finish the nut slots . . . . . . . . . . . . . . . . . . . . . . . . . . . . . . . . . . . . . . . . . . . 22Drilling for fingerboard mounting screws. . . . . . . . . . . . . . . . . . . . . . 22Reinstalling the neck and leveling the frets . . . . . . . . . . . . . . . . . . . . 23Finishing the neck . . . . . . . . . . . . . . . . . . . . . . . . . . . . . . . . . . . . . . . . . . . 24Do’s and don’ts . . . . . . . . . . . . . . . . . . . . . . . . . . . . . . . . . . . . . . . . . . . . . . 24Filling fret ends and sanding the neck . . . . . . . . . . . . . . . . . . . . . . . . . 25Making hangers and masking the neck . . . . . . . . . . . . . . . . . . . . . . . 25Staining . . . . . . . . . . . . . . . . . . . . . . . . . . . . . . . . . . . . . . . . . . . . . . . . . . . . . 25Applying a wash coat sealer . . . . . . . . . . . . . . . . . . . . . . . . . . . . . . . . . . 26Filling the wood grain . . . . . . . . . . . . . . . . . . . . . . . . . . . . . . . . . . . . . . . . 26Lacquer spraying schedule . . . . . . . . . . . . . . . . . . . . . . . . . . . . . . . . . . . 26Wet-sanding and rubbing-out the finish. . . . . . . . . . . . . . . . . . . . . . . 27Quick, easy finish. . . . . . . . . . . . . . . . . . . . . . . . . . . . . . . . . . . . . . . . . . . . . 27Final assembly . . . . . . . . . . . . . . . . . . . . . . . . . . . . . . . . . . . . . . . . . . . . . . . 27
Welcome to guitar building! You are about to build a greatresonator guitar, patterned in many respects after the metal-bodied National guitar introduced in 1934 which had 14 fretsclear of the body.
We designed this kit with the small shop builder and a mod-est tool budget in mind. For power tools, we used a smalllaminate router and an electric hand drill. With the exceptionof a few specialty guitarmaking tools, such as several nut-slotting files, we used standard woodshop hand tools. Theseincluded a chisel, rasp, half-round bastard file, small razor saw,a sharp knife, C-clamps, cam clamps or small bar clamps, acouple of rulers, and a long straightedge.
Please read these instructions before building your guitar. It’simportant for you to “dry run” the fitting, gluing, clampingand finishing operations before trying them for real.
Be safe when using tools, glues, and chemicals. Weareye protection and gloves when needed, and alwaysuse proper ventilation.
Table of Contents
Getting started
© 2003 Stewart-MacDonald

page 2
1. Coverplate, and screws (12)2. Cone3. Truss rod cover, and screws (2)4. Metal guitar body5. Tailpiece6. Rosewood overlay7. Biscuit bridge8. Rubber band9. Neck block
10. Tailblock11. Hot-Rod truss rod12. Rosewood fingerboard13. Mahogany neck14. Fingerboard supports (2 parts)15. Truss rod filler block16. Instructions17. Pearl dots (10)18. Bone nut19. Side dot material20. Strap button and screw21. Fretwire (3)
Kit parts list
1 2
3
4
5
6
7
8
9
1011
12 17
13
14 15
16
18
19
21
20

page 3
The truss rod is installed so that it adjusts at the peghead endof the neck. This makes it easy to adjust the truss rod understring tension.
Roll the rods simultaneously between your thumb and fin-gers to adjust them, until the thread in the upper half of thebrass lug (the rod without the adjusting nut welded to it) isflush with the face of the lug, and not protruding excessively.
Align the back edge of the adjusting nut with the break lineof the peghead angle (1). This locates the front edge of thetruss rod’s brass lug just under the end of the fretboard. A flatarea of approximately 7/32" will remain between the end ofthe fretboard and the break angle of the peghead — this iswhere the bone string nut will be installed.
The adjusting nut is slightly wider than the slot machinedinto the neck. Chisel a slight clearance in the slot walls untilthe adjusting nut fits to the bottom of the channel.
Install the rod, adjusting nut facing down. Glue in a piece ofthe supplied filler strip over the adjusting nut (2) and theexposed truss rod threads, between the brass lug and therear of the adjusting nut. The filler strip will support the bonestring nut which will be installed later. Of course, keep glueoff the truss rod threads. When the glue is dry, chisel the fillerstrip flush with the surface of the neck. Glue a filler strip at theopposite end of the rod too, to fill the remaining emptychannel, and trim it flush (3).
1. Align the back edge of the adjusting nut with the break line ofthe peghead angle.
Installing the truss rod
2. The filler strip will support the bone nut, which will be installedlater.
3. Glue a filler strip at the opposite end of the rod too, to fill theremaining empty channel, and trim it flush.

page 4
The fingerboard has 24 fret slots, more than are needed for aresonator guitar. Trim off the fingerboard at the 20th fret slot.
Draw a pencil line across the back of the fingerboard to markthe location of the 14th fret slot. The end of the neck’s fin-gerboard gluing surface, at the top of the heel, will line upwith this mark when the fingerboard is glued on. Align theheel with the mark, center the neck on the fingerboard, anddraw the profile of the neck onto the fingerboard (4). Extendthe lines using a straightedge and white or yellow-leadpencil.
Trim the fingerboard profile close to the pencil lines using aband saw, coping saw, or a hand plane.
The edges of the fingerboard must be smoothed afterthey’re trimmed. On your flat work surface, rest the finger-board, backside down, on a spacer block approximately 1/4"thick and as long and wide as the fingerboard. Slide the fin-gerboard slightly off the edge of the spacer block so that onelong edge overhangs.
With a long flat sanding block, sand the overhanging fret-board edge lengthwise to remove any trimming marks. Weused a carpenter’s level with 100-grit sandpaper double-sticktaped to its thin edge. Clamped and sanded in this fashion,the fretboard will not only be straight end-to-end, but theedge will be sanded at 90° to the work surface. (5). Reversethe procedure for the other edge of the fingerboard.
Traditionally, single dot inlays are installed behind frets 5, 7, 9,12, 15, 17, and 19. Frets 15 and 19 get two inlays each. Thesewill cover the four mounting screws that hold the finger-board to the top. You won’t inlay frets 15 and 19 until later,after the guitar is finished.
Lightly draw a centerline down the fingerboard in pencil. Usean awl to mark for drilling along this centerline, measuringhalfway between the appropriate frets.
Drill 1/4" holes for each inlay, using a brad-point drill bit. Goslightly deeper than the thickness of the dots. Be extremelycareful to keep the drill bit from “hogging” into the wood andaccidentally drilling completely through the fingerboard(practice on scrap)!
As mentioned, frets 15 and 19 are drilled for double inlays.They’re spaced 1-3/8" apart (11/16" to each side of the cen-terline), and should be centered between the frets.
Shaping the fingerboard
Inlaying the fingerboard
4. Draw the profile of the neck’s taper onto the fingerboard using awhite pencil.
5. Clamped and sanded in this fashion, the fretboard will not onlybe straight end-to-end, but the edge will be sanded at 90°.

page 5
difficult to drill without overdoing it, so practice on scrap!This chamfering is very delicate; the slightest turn of the drillbit will produce the desired shape.
Next, drill 1/8" holes through these chamfered holes at frets15 and 19 for the four mounting screws to pass through thefingerboard during final assembly after finishing.
Put on your protective safety glasses! Then, one at a time,place a drop of medium-viscosity superglue in each drilledhole, and set the dot inlay in place. By using a piece of light-ly waxed clear acrylic as a caul, you can apply pressurewithout sticking to the superglue, and still be able to seewhen the inlay is flush. Remember not to inlay at frets 15 and19! You may need to tap gently on the caul with a hammerto seat the dot inlays. Don’t overdo the superglue, and youwon’t have a messy fretboard to clean up. Flush the inlays tothe fingerboard using a smooth mill file and a sanding block.Sand equally from end to end so you don’t change the flatsurface of the fretboard.
A 1/16"-diameter plastic dowel is included with your kit formaking side dot fret position markers along the bass edge ofthe fingerboard (for right-handed players, that is). Installthem now at frets 5, 7, 9, 12, 15, 17, and 19. The 12th fret oftengets two dots, spaced evenly between the 11th and 12thfrets; however some makers use only one. Often, side dotsare not used past the 12th fret — the choice is yours.
Clamp the fretboard on edge, mark the centers of each holewith an awl, and carefully drill the holes with a sharp 1/16"drill bit. Drill square to the fingerboard edge at all times.
Nip short lengths from the plastic inlay dowel and supergluethem into the drilled holes. They should extend slightlyabove the surface. When dry, file and sand the dots smooth.
TIP: Clamp the fingerboard back on the spacerblock used earlier for truing the edge of the finger-board, and re-sand the edges lightly with thecarpenter’s level and 220-grit sandpaper.
Installing side dots
6. Create chamfers within the four 1/4" holes using a 7/32" twistdrill.
Within the four 1/4" holes, just barely start a secondary holewith a 7/32" twist drill (not a brad-point) (6). These secondaryholes bevel the bottom of the 1/4" holes to form the rightshape for the fingerboard mounting screws. These holes are
A scrap piece of slotted fretboard has been included withyour kit, as well as enough fretwire to practice fretting on thispiece. Measure out the frets you will actually use on your fret-board, and use the leftover fretwire to test your skills onscrap.
Drill 19 holes in a block of scrap wood to keep the frets inorder as you cut them to length. Using flush-cutting fret nip-
pers, cut the pre-radiused fretwire to length, allowing anoverhang of 1/8" on each side of the fingerboard.
Clamp the fretboard flat to a solid surface. We fretted on aflat, 1-1/4" thick chunk of marble. A piece of plywood restingon a cement floor would work well, too. Set the fretwire onthe slot; since it’s curved, only the ends will enter the slot.With your finger, balance the wire to keep it from tipping and
Fretting the fingerboard

page 6
prying up a chunk of wood as you tap the two ends into thefret slot with a hammer (7). Once the two fret ends areembedded in the fret slot, the fret is unlikely to tip as youhammer it home.
Hammer back and forth across the fretboard in short, sharpblows. Use the face of the hammer, not an edge, and try notto hit the fretboard on either side of a fret. The fret tang, withits diamond-shaped barbs, embeds itself into the finger-board as the fret straightens end-to-end from the hammerblows.
To see that the frets are seated, use your fingernail to tug attheir overhanging ends. Loose frets can be firmed up withsuperglue run into one end of the fret slot. Keep the fret-board tilted at an angle to keep the glue from getting ontothe fretboard. Or, you can tape off the fretboard on each sideof a slot and run a bead of Titebond into the slot before ham-mering in the fret. If you use Titebond, let the frets dryovernight before nipping and filing their ends.
When the frets are firm and the glue is dry, nip them almostflush with the fingerboard edge. Do not nip right up to theedge, or the nippers will pull into the fingerboard and possi-bly unseat a fret end.
Use a smooth mill file to flush the fret ends to the edge of thefingerboard. Then use the same file, held at an angle, to filethe fret end bevels (8). Choose a bevel that suits you — per-haps between 45° and 60°. Stop when the file hits the wood.
Blunt the top edges of the fingerboard on the bass and tre-ble sides with a single-edge razor blade (9). Later, when youglue on the fingerboard with a rubber band clamp, there willbe no sharp edge to break the rubber band.
The fingerboard is now ready to be glued to the neck.However, you must first prepare the body to accept the neck,since you will be fitting the neck to the body before the fin-gerboard is glued on.
7. Keep the wire from tipping and prying up a chunk of wood asyou tap the two ends into the fret slot with a hammer.
8. Use a smooth mill file, held at an angle, to bevel the fret ends.
9. Blunt the top edges of the fingerboard on the bass and treblesides with a single-edge razor blade.

page 7
Before you can bolt the neck on to check its fit, you must pre-pare the metal body. First, find the centerline of the body.From scrap wood make a “centering stick” measuring 9-5/8"long and 1-1/16" tall. Round the ends so that the stick dropsinto the soundwell flush with the top, and centered in thewell (10). Once you mark its center, you will have an impor-tant reference point to find the top’s centerline.
To mark the centerline at various points on the metal body,put masking tape on the guitar. This will provide a temporarysurface to mark on. Place the masking tape at three points onthe guitar top: 1) above the neck opening in the sides at thefront shoulders; 2) between the large circles of the F-holesclosest to the soundwell; 3) the “centering stick” in thesoundwell. Lay a straightedge along these points (11), andmark the centerline on the masking tape.
Put masking tape on the metal sides at the tail block end ofthe body and transfer the centerline onto the tape there(12). Using the tailpiece as a template, mark its mountinghole on the tape — then centerpunch and drill a 5/32" holethrough the metal.
Also on the centerline, mark, centerpunch, and drill two9/64" holes in the soundwell lip for the screws which fastenthe fretboard extension support stick. These holes should be3/8" away from the soundwell side wall (13) to guaranteethat the outer edge of the cone will not come into contactwith them.
Bevel and radius the ends of the tail block so that it fits intothe radiused corners of the body, and snugs up tight to themetal. Locate the tail block in the body (it will be snug), markit through the 5/32" clearance hole, and drill a 1/16" hole into
Preparing the body for the neck
10. From scrap wood make a “centering stick” 9-5/8" x 1-1/16". 11. With a straightedge, mark the centerline on masking tape.
12. Place a piece of masking tape on the sides at the tail block endof the body and transfer the centerline onto the metal sides there.
13. Drill screw holes for fastening the fretboard extension supportstick 3/8" away from the soundwell side wall.

page 8
the tail block for the strap button mounting screw that holdsthe tailpiece. If the tail block is quite snug, leave it installedfrom now on. If it is on the loose side, which is OK, it mightrattle around. In that case remove it until you mount thetailpiece.
The neck block also must be radiused at the front top andbottom edges so that it fits exactly into the rolled corners
where the sides meet the top and back. It must have a 1/4"tall, 3/32" deep channel cut into the top front edge to allowit to rest over the folded solder joint of the top and sides.
The body tapers slightly, getting narrower at the neck end. Tofit the neck block, stand it upright at the soundwell and pushit into place.
The neck joint is a bolt-on mortise-and-tenon joint. Thetenon is the precision-cut extension on the end of the neck,and the mortise is the neck block recess which fits it. Theneck’s tenon needs to be trimmed to fit into the neck open-ing in the metal body. It’s a simple task:
Along the sides of the tenon, mark down from the top edgeapproximately 5/16" and draw a pencil line square to thecheeks (the “cheeks” are described below). Measure thelip of metal in the body’s neck-mounting hole and give a lit-
tle extra for clearance). Also make a pencil line about 3/8" upfrom the bottom (again, match the hole plus a bit extra forclearance).
Saw in from the back of the tenon on each penciled line (14).Avoid touching the cheeks with the saw — stop short, andclean up later with a sharp chisel. Then saw squarely downfrom the top, and up from the bottom, to each sawed lineand the piece will break out. The tenon is now shaped (15)and will fit through the rectangular hole in the body.
Fitting the neck to the body
14. Saw in from the back of the tenon on each penciled line. 15. The tenon will now fit through the rectangular hole in thebody.
Before gluing the fingerboard onto the neck, it’s best tocheck the fit of the neck to the body, for two reasons: 1) It’seasier to fit the heel without the fretboard getting in the way;2) The fretboard can be placed most accurately, with regardto correct intonation, after any slight adjustments of the heelhave been made.
The neck is machined with the correct “set,” or angle to thebody, but as with any guitar — wood or metal — some handfitting may be required. Also, when you shape the heel of theneck, we suggest that you leave it “chunky” — almost as itcomes out of the box. Just round off the hard edges. This pro-vides plenty of wood for the neck bolts to hold into, and addsstrength to the neck/body joint. (It’s also the vintage look.)
Check the fit
page 9
The neck angle is controlled by the shape of the neck heel asit contacts the sides of the body. It is not determined by thefit of the mortise-and-tenon joint. Removing wood from thetop or bottom of the neck heel tips the neck forward or back.Removing wood from either the bass or treble side changesthe neck’s angle in relation to the center of the bridge.
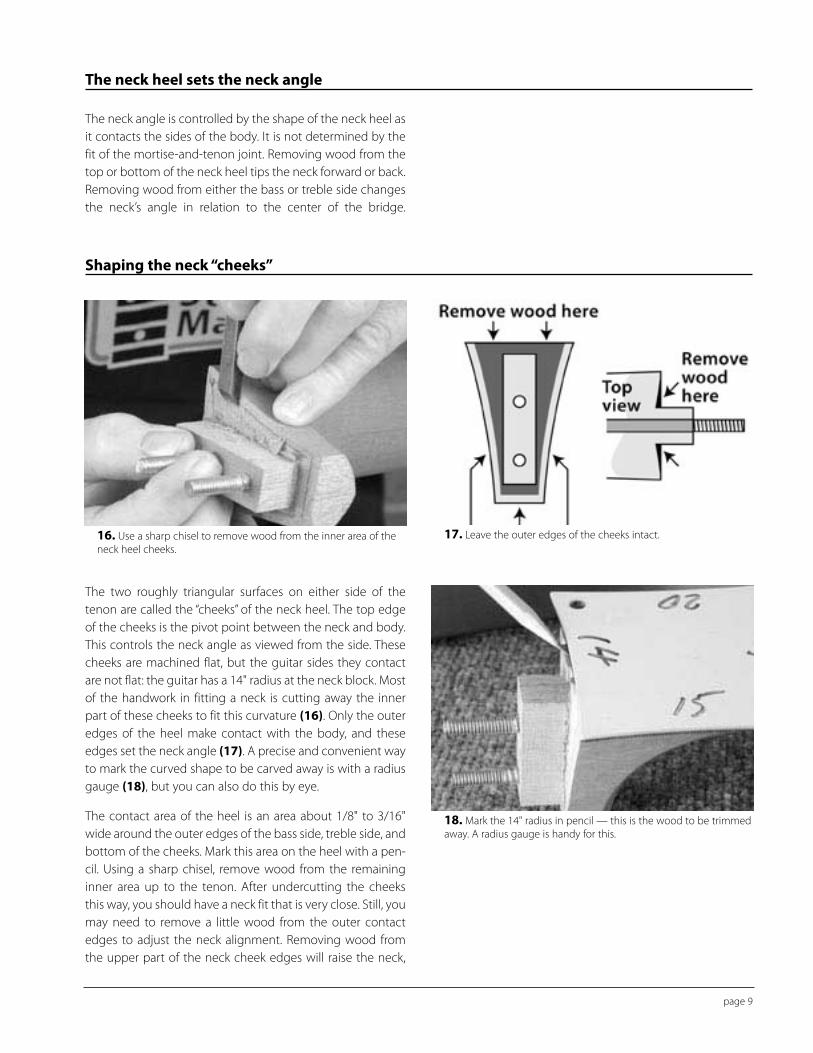
The two roughly triangular surfaces on either side of thetenon are called the “cheeks” of the neck heel. The top edgeof the cheeks is the pivot point between the neck and body.This controls the neck angle as viewed from the side. Thesecheeks are machined flat, but the guitar sides they contactare not flat: the guitar has a 14" radius at the neck block. Mostof the handwork in fitting a neck is cutting away the innerpart of these cheeks to fit this curvature (16). Only the outeredges of the heel make contact with the body, and theseedges set the neck angle (17). A precise and convenient wayto mark the curved shape to be carved away is with a radiusgauge (18), but you can also do this by eye.
The contact area of the heel is an area about 1/8" to 3/16"wide around the outer edges of the bass side, treble side, andbottom of the cheeks. Mark this area on the heel with a pen-cil. Using a sharp chisel, remove wood from the remaininginner area up to the tenon. After undercutting the cheeksthis way, you should have a neck fit that is very close. Still, youmay need to remove a little wood from the outer contactedges to adjust the neck alignment. Removing wood fromthe upper part of the neck cheek edges will raise the neck,
The neck heel sets the neck angle
Shaping the neck “cheeks”
17. Leave the outer edges of the cheeks intact.
18. Mark the 14" radius in pencil — this is the wood to be trimmedaway. A radius gauge is handy for this.
16. Use a sharp chisel to remove wood from the inner area of theneck heel cheeks.
page 10
removing wood from the bottom will lower it. Taking woodfrom either side will move the neck in that direction.
It’s important to note that removing wood from the upperpart of the neck cheek edges will not only raise the neck, butmove the neck toward the bridge slightly. If the 12th fretmoves toward the bridge the intonation will be sharp: this isthe reason for checking the neck’s fit before installing the fin-gerboard.
TIP: Chisel carefully near the two neck bolts —don’t push your best chisel toward the bolts!Remove the last bit of wood around the bolts usinga throw-away item such as a razor knife blade (orsharpen an old screwdriver to use as a temporarychisel).
Up until now you have only removed wood from the cheeksup to the 1/8" remaining “factory edge.”Therefore the neck fitwill be quite close, or even perfect, during this check. Placethe neck into the body with the two mounting bolts throughthe neck block holes and press the heel against the body.Hold the neck in place as you install the two hex nuts; tight-en them just snug enough to hold the neck. You may needto move the neck a little.
Don’t use a socket wrench with a right angle drive to tightenthe nuts onto the neck bolts — you could get too muchtorque and possibly crack the heel, or pull a bolt out of theheel!
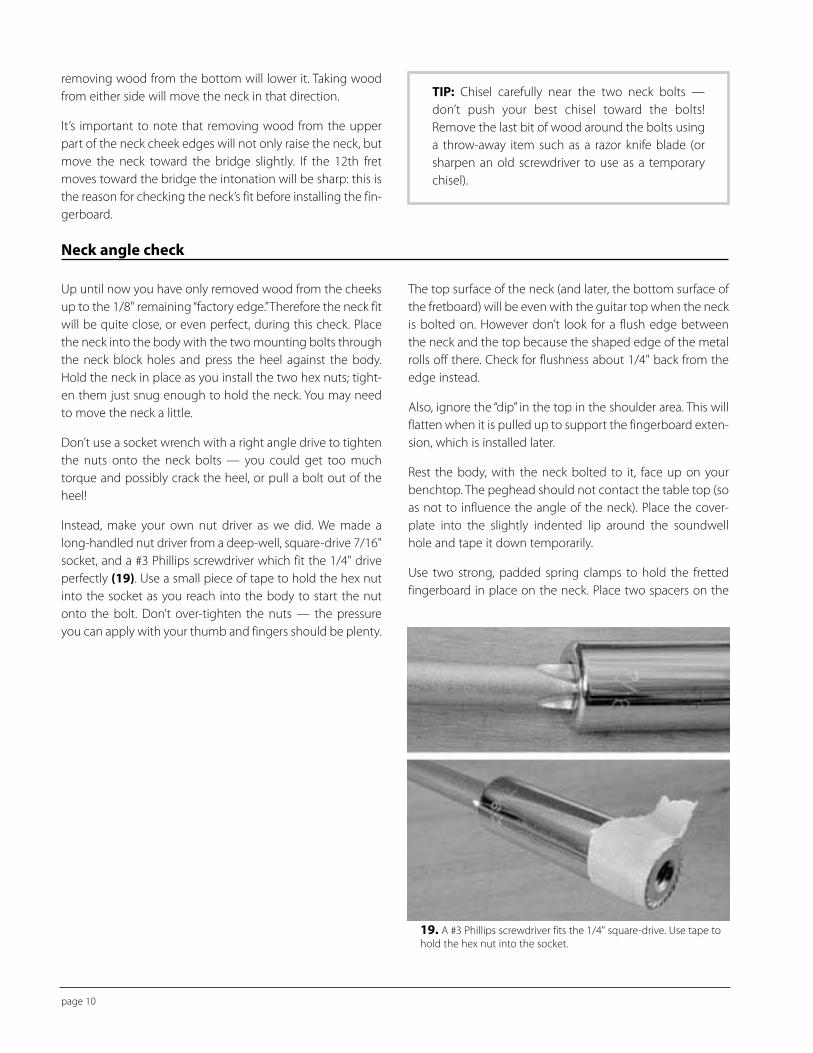
Instead, make your own nut driver as we did. We made along-handled nut driver from a deep-well, square-drive 7/16"socket, and a #3 Phillips screwdriver which fit the 1/4" driveperfectly (19). Use a small piece of tape to hold the hex nutinto the socket as you reach into the body to start the nutonto the bolt. Don’t over-tighten the nuts — the pressureyou can apply with your thumb and fingers should be plenty.
The top surface of the neck (and later, the bottom surface ofthe fretboard) will be even with the guitar top when the neckis bolted on. However don’t look for a flush edge betweenthe neck and the top because the shaped edge of the metalrolls off there. Check for flushness about 1/4" back from theedge instead.
Also, ignore the “dip” in the top in the shoulder area. This willflatten when it is pulled up to support the fingerboard exten-sion, which is installed later.
Rest the body, with the neck bolted to it, face up on yourbenchtop. The peghead should not contact the table top (soas not to influence the angle of the neck). Place the cover-plate into the slightly indented lip around the soundwellhole and tape it down temporarily.
Use two strong, padded spring clamps to hold the frettedfingerboard in place on the neck. Place two spacers on the
Neck angle check
19. A #3 Phillips screwdriver fits the 1/4" square-drive. Use tape tohold the hex nut into the socket.

page 11
fingerboard to hold a long accurate straightedge up off thefingerboard, simulating string height. For these two spacerswe used drill bits: a 5/64" bit at the nut, and an 11/64" bit atthe 12th fret. This gave a very close approximation to the finalaction.
When laid on these string height spacers, the bottom edgeof the straightedge should point to a spot just above centerin the coverplate’s hand rest opening (20). If it doesn’t, asmall amount of wood must be removed from either the topor bottom of the cheeks to adjust the neck angle. Woodremoved at the bottom of the heel tips the neck down andraises the straightedge; wood removed at the top tips theneck up and lowers the straightedge.
The first area that may need to have a small amount of woodremoved is the treble or bass cheek. Wood removed herecontrols the side-to-side alignment of the neck to the cen-terline. If the neck is misaligned side-to-side, one of theoutside strings will be too close to the edge of the fretboard.The removal of a tiny amount of wood is all it takes to makean adjustment here. Remove this bit of wood uniformlyacross the contact area on one cheek to tip the neck in theproper direction (this won’t change the neck angle whenviewed from the side of the body). Use a straightedge laidagainst both the treble and bass sides of the fretboard (21)to check the alignment: it should extend the same distancefrom center on either side at the centering stick in thesoundwell.
You may not need to make an adjustment at this stage. If theneck is off-center by only 1/32" or less, don’t try to correct it.Remember that a tiny bit of wood removal makes a big dif-ference in the neck’s relationship to the centerline!
Neck adjustment: side-to-side
20. A long straightedge is laid on two drill bits which approximatestring height: a 5/64" bit at the nut, and an 11/64" bit at the 12thfret. The straightedge should indicate a point just above center inthe coverplate’s hand rest opening.
21. Use a straightedge laid against both the treble and bass sidesof the fretboard to check neck alignment to the body centerline.
page 12
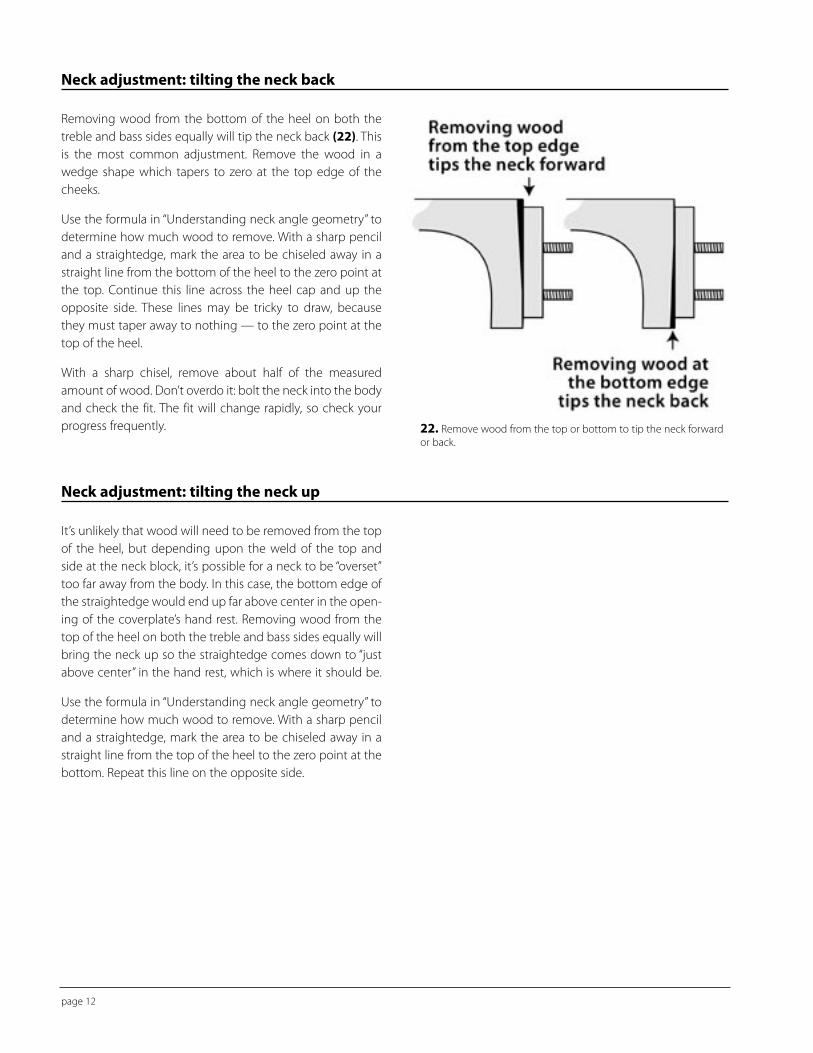
Removing wood from the bottom of the heel on both thetreble and bass sides equally will tip the neck back (22). Thisis the most common adjustment. Remove the wood in awedge shape which tapers to zero at the top edge of thecheeks.
Use the formula in “Understanding neck angle geometry” todetermine how much wood to remove. With a sharp penciland a straightedge, mark the area to be chiseled away in astraight line from the bottom of the heel to the zero point atthe top. Continue this line across the heel cap and up theopposite side. These lines may be tricky to draw, becausethey must taper away to nothing — to the zero point at thetop of the heel.
With a sharp chisel, remove about half of the measuredamount of wood. Don’t overdo it: bolt the neck into the bodyand check the fit. The fit will change rapidly, so check yourprogress frequently.
It’s unlikely that wood will need to be removed from the topof the heel, but depending upon the weld of the top andside at the neck block, it’s possible for a neck to be “overset”too far away from the body. In this case, the bottom edge ofthe straightedge would end up far above center in the open-ing of the coverplate’s hand rest. Removing wood from thetop of the heel on both the treble and bass sides equally willbring the neck up so the straightedge comes down to “justabove center” in the hand rest, which is where it should be.
Use the formula in “Understanding neck angle geometry” todetermine how much wood to remove. With a sharp penciland a straightedge, mark the area to be chiseled away in astraight line from the top of the heel to the zero point at thebottom. Repeat this line on the opposite side.
Neck adjustment: tilting the neck back
Neck adjustment: tilting the neck up
22. Remove wood from the top or bottom to tip the neck forwardor back.

page 13
Here’s the way to determine how much wood must beremoved from the bottom of the heel for the correctneck angle at the bridge. Always remove wood gradual-ly and check your progress frequently. A littleadjustment goes a long way! Our example measure-ments below are based on the scale length of this guitar:25 inches.
The measurement we want is X — the amount of woodto remove from the heel to change the neck angle sothat a straightedge laid on the frets will be flush with thetop of the bridge. Must install the cone and biscuitbridge here first.
A = How far the straightedge falls below the top of thebridge. In this example: 1/8" (.125").
B = The height from the bottom of the fretboard to thebottom of the heel. In this example: 2-11/16" (2.687").
C = The distance from the neck/body joint to the saddle.In this example, that’s at the 14th fret, and C = 11-5/16"(11.312").
X = A x B (÷) C
In this case, those numbers are .125" x 2.687" ÷ 11.312" =.030". So in our example, X = .030" which is almost 1/32".This is the amount to remove at the bottom of the heel.
When you build a standard acoustic guitar the bridge isglued on last, so you can move it to position the saddle forgood intonation. Resonator guitars are different because thesaddle position is determined by the fixed location of thecone resting in the soundwell. The cone — and saddle withit — can be moved forward or backward about 1/16" withinthe soundwell, but that’s it. You can guarantee good intona-tion, however, by careful placement of the fingerboard.
When the neck angle passes inspection, leave the neck bolt-ed into the body to check the lengthwise placement of thefingerboard — specifically the location of the 12th (octave)fret in relation to the saddle. This relationship makes for goodor bad intonation.
Since you haven’t glued the fingerboard on yet, you can slideit forward or backward a little, to control the distancebetween the 12th fret and the saddle. (You also have a littleadjustment at the saddle, since the cone will slide forward orback about 1/16".)
If you slide the fingerboard, the flat area where the string nutis located will become wider or narrower, and you’ll need tofit the nut accordingly. Also, the fingerboard edges may nolonger be perfectly flush with the sides of the neck. (Simply
shape the edges of the fingerboard and neck to match, usinga file and sandpaper.)
If minimal wood was removed at the cheeks, locate the fin-gerboard so that the 12th fret lines up with the point wherethe neck cheeks join the body (24). At the peghead endthere should be approximately 3/16" of flat area left betweenthe end of the fingerboard and the break angle of the peg-head. This is where the bone nut will rest. It may be as largeas 1/4" or as small as 1/8", if the fingerboard is moved forwardor backward for intonation adjustment.
Understanding neck angle geometry
Intonation check
24. Locate the fingerboard so that the 14th fret lines up with theouter top edges of the cheeks where they join the body.

page 14
To get accurate intonation, the distance from the 12th fret tothe saddle should be approximately 1/8" longer than the dis-tance from the 12th fret to the nut. Since your guitar’s scalelength is 25", the distance from the 12th fret to the nut is 12-1/2". Add 1/8" to get the desired distance from the 12th fretto the saddle: 12-5/8".
This extra 1/8" compensation makes up for the slightlylonger string length caused by the strings as they rise up tothe saddle, and for the fact that strings tend to go sharpwhen they are pressed down to the fret. If you located thesaddle at the uncompensated distance from the 12th fret,the intonation would be sharp.
Center the cone in the soundwell. Locate the 12th fret byloosening the spring clamps, and slide the fingerboard for-
ward or backward until the 12th fret measures the compen-sated 12-5/8" distance from the center of the saddle. This willprobably produce perfect intonation when the string heightis set. It is possible that you will need to move the saddlebackward, and you can do that by sliding the cone backward.When the 12th fret is where you want it, and with the springclamps holding the fingerboard on, place a piece of maskingtape on the neck surface at the nut end of the fingerboard —use this tape as an index for fingerboard placement whenyou glue it on.
When all the neck fitting and fingerboard-locating tasks arecomplete, unbolt the neck from the body and glue on thefingerboard.
Clamp the peghead to your workbench with the neck hang-ing out over the floor. Butt the nut end of the fingerboard upto the indexing tape that you placed on the neck’s gluingsurface earlier.
There should be a flat area approximately 3/16" to 7/32" wideleft between the end of the fingerboard and the break angleof the peghead. This is where the bone nut will rest (25).
Install the fingerboard with Titebond glue. To get just theright glue coverage, spread it with a flux brush. Inexpensiveacid-flux brushes are available at hardware stores, and theymake great glue spreaders. Spread glue up to the edge of thetruss rod channel, and then draw it away from the edge withthe flux brush to keep glue squeeze-out from getting intothe channel.
Installing the fingerboard
25. The bone nut will rest on the flat area approximately 3/16" to7/32" wide, left between the end of the fingerboard and the breakangle of the peghead.
26. Hold the fingerboard in place with a spring clamp as you startto wrap with the rubber bands.

page 15
TIP: Prop the heel of the neck with anything handy(28) to force a slight upbow into the neck (here wehave .012" of upbow). The upbow matches the .012"of backbow which the fret compression created inthe fingerboard, and the two bows cancel eachother out, producing a perfectly straight neck whendry. Later, the string tension will pull the neck intosome amount of upbow and the truss rod can beengaged to straighten the neck. It’s good to havesome tension on the truss rod like this in order to beable to loosen the rod slightly to introduce “relief,”(controlled upbow in the fretboard). Relief is need-ed for players with a heavy attack that causesbuzzing. The relief offers clearance for the ellipticalmotion of plucked strings as they vibrate. Not allplayers want or need relief, though.
When the fingerboard’s dry, remove the rubber band clamp.
The bone nut blank should be smooth-walled, square-bot-tomed, and of uniform thickness. If it needs smoothing orthicknessing, sand it with 100- and 220-grit sandpaper, dou-ble-stick taped to a flat surface.
Place the nut blank on the flat ledge between the end of thefingerboard and the break angle of the peghead. File or sanda 14° angle on one end of the peghead overlay so that itbutts flush to the back edge of the nut (29). When the over-lay is glued on, the space between the overlay and thefingerboard will be a perfectly-sized channel for the nut.
Dry-clamp the overlay in place. With a pencil, mark a point 1-9/16" from the back edge of the nut, centered on the
Installing the peghead overlay
27. Get plenty of wraps on the heel.
28. Prop the heel of the neck to force a slight upbowinto the neck.
Place the fingerboard onto the evenly-glued neck surfaceand center the 14th fret slot directly over the edge of theneck heel. Hold the fingerboard in place temporarily with aspring clamp (26) as you start to wrap with the rubber bandssupplied with your kit. Tie the rubber band at the pegheadand wrap from end-to-end and back again. Get plenty ofwraps on the heel (27). You may find that one rubber bandis all that’s needed for the job. You can shift the fingerboardslightly from side-to-side as you wrap, but usually the boardwill center itself nicely.
29. File or sand a 14° angle on one end of the overlay so that it fitsflush to the nut.

page 16
peghead’s width. Drill a 1/4" hole at that point. This is theaccess hole for the truss rod.
Remove the clamps from the overlay. Hold the overlay in onehand and elongate the hole by slowly tilting the overlayagainst a running drill bit (30). You may want to practice thison a piece of scrap (there’s plenty of excess overlay that getstrimmed away, so practice on that). You’ll end up with anelongated access hole for the 1/8" Allen wrench that adjuststhe peghead.
Mark the peghead shape on the overlay. Trim away most ofthe excess, to within 1/8" all around the peghead. Use caulson the face and rear of the peghead (notice the V-shapedcaul on the rear, to clear the diamond shape on the neck),and glue on the overlay. Keep the overlay pressed tightlyagainst the nut during alignment.
Carve and file away the overhanging peghead overlay, andthen sand the peghead face and sides smooth with 150-gritFre-Cut® sandpaper.
Next, layout the tuning machine holes as shown (31). Locatethe two E-tuners 2-1/16" from the rear edge of the nut. Theother holes are located 1-3/8" apart, on centers, from the firstline. All the tuning machine holes are spaced 7/16" in fromthe peghead edge. For the ‘3-on-plate’ tuners that we used, a7/32" bit was the right size for the bushing. When drilling, usea backer board on the rear of the peghead to avoid splinter-ing the wood, and keep the drill bit square. A drill press ishandy for this job, if you have one.
Press the bushings into the holes in the peghead overlay,using a clamp to apply firm, even pressure (32). Use a pro-tective caul on the rear of the peghead to avoid clamp marks.The bushings will center the tuning machine posts in theirrespective holes while you lay out and drill the tuningmachine mounting screws.
The mounting screw holes in the tuning machine plate are3/32" in diameter. Use them as a drill guide. Use a 3/32" diam-eter drill bit to create shallow chamfered centers (the drill bitwill self-align in the plate’s holes). Run the drill in reverse tocreate the chamfer, and don’t drill into the peghead. Removethe tuners and use a 1/16" bit, centered on the chamferedholes, to drill the actual mounting screw holes. A piece ofmasking tape on the drill bit will provide a depth guide soyou won’t drill through the peghead.
Drilling the tuning machine holes
30. Hold the overlay in one hand and elongate the hole by slowlytilting the overlay against the running drill bit.
31. Laying out the tuning machine holes.
32. Press the bushings into the holes in the peghead overlay usinga clamp to apply firm, even pressure.
page 17
The neck has been machined to the basic shape, but leftoversize for custom shaping. Any sharp edges left by themachining process will be removed as you shape the neck tosuit your tastes. Eliminate the “diamond” on the rear of thepeghead, if you wish to do so, with a chisel, a half-round bas-tard file, and sandpaper.
A great way to bring the neck to shape quickly and accu-rately is to “strap sand” it — like shining shoes — using alength of 2"-wide 80- to 100-grit sandpaper with a strongbacking. Use emery cloth, Mylar-backed sandpaper, or evenregular sandpaper with a reinforcing backing double-sticktaped to it. This sanding technique follows the machinedshape of the neck, and if you work smoothly from end-to-end, you can round the neck perfectly. Don’t stop in any oneplace, and check your progress often.
Use the half-round bastard file to shape the heel, then cutyour “strap sander” to a narrower width, and “shoe shine” theheel to shape as well. When the neck has taken a roundshape, switch to hand sanding, using a flexible rubber sand-ing pad and finer grit sandpapers, and remove the harsher80-grit marks. Be sure when you shape or sand on the heelthat you don’t alter the 1/8" areas that control the neck angle!
Use the same half-round bastard file and sandpaper to shapethe rear of the peghead and to smooth the area near the nutwhere the neck contour meets the peghead. Lay out a peg-head shape that pleases you, then cut, file, and sand it toshape.
Remove the tailpiece, and set the coverplate into the inden-tation around the soundwell with the hand restperpendicular to the centerline. The double set of perforateddiamond-shaped holes should face toward the tailpiece endof the guitar. Place several pieces of masking tape around theedge of the coverplate to hold it in place while you drill thescrew holes in the soundwell.
When drilling metal, it’s hard to keep the drill bit on centerwithout walking. Don’t try to drill all the holes at once. If youget off-center to the screw clearance holes, mounting thecoverplate will be tough. Start with one hole, and make itexactly concentric with the hole in the coverplate. Install thatone screw, then count four holes to either side and drill a sec-ond hole. Install that screw, then count four holes from that,and install the third screw. You’ll end up with three screwsmounted and spaced equally around the coverplate. Nowthe coverplate will hold fast while you work on the remain-ing holes.
Mark each one by pressing an awl or other sharp tool into themetal exactly on center. You can give the awl a slight tap tocreate a slight centerpunch mark, but don’t hit hard enoughto dent the metal.
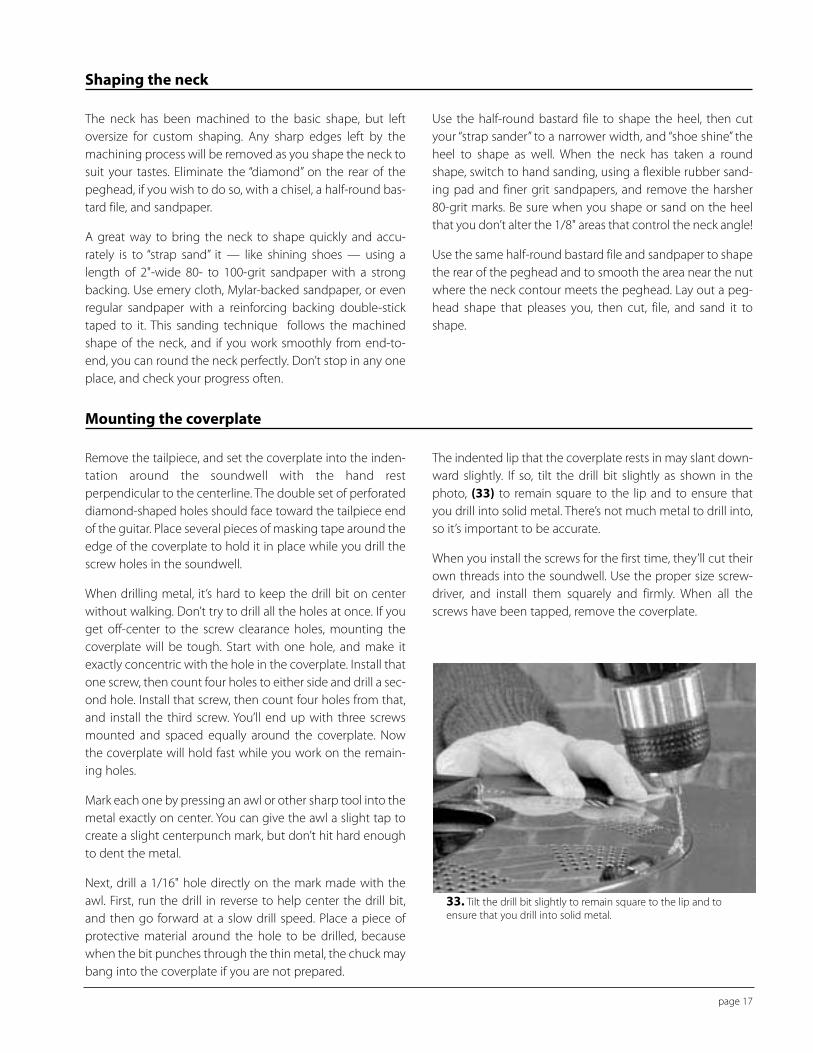
Next, drill a 1/16" hole directly on the mark made with theawl. First, run the drill in reverse to help center the drill bit,and then go forward at a slow drill speed. Place a piece ofprotective material around the hole to be drilled, becausewhen the bit punches through the thin metal, the chuck maybang into the coverplate if you are not prepared.
The indented lip that the coverplate rests in may slant down-ward slightly. If so, tilt the drill bit slightly as shown in thephoto, (33) to remain square to the lip and to ensure thatyou drill into solid metal. There’s not much metal to drill into,so it’s important to be accurate.
When you install the screws for the first time, they’ll cut theirown threads into the soundwell. Use the proper size screw-driver, and install them squarely and firmly. When all thescrews have been tapped, remove the coverplate.
Shaping the neck
Mounting the coverplate
33. Tilt the drill bit slightly to remain square to the lip and toensure that you drill into solid metal.

page 18
We chose the modern bolt-on method of fastening the neckto the body because it works well, is relatively easy to fit, andsounds great. Another equally important reason is that itoffers easy neck angle adjustment over the years. (Vintageresonator guitars, with their fixed banjo style neck stick con-struction, are notorious for developing high action over theyears. Resetting these old necks to a proper action is not a“user friendly” situation!
The L-shaped fingerboard extension support supplies sup-port for the top in the upper front shoulders. This L-shapedsupport must be turned flat on its side to slide through thesoundwell. Then the support is turned so the leg of the Lfaces up, to support the rectangular piece of plywood it willbe fastened to with four wood screws (34).
Install the L-support so that the tail block end of the supportis flush with the back edge of the soundwell — giving thesoundwell lip full support. Center the support to the center-line of the body and hold it in place while you mark the twoholes for the support mounting screws. Remove the supportand drill those two holes (35).
Replace the support and install the mounting screws. Don’ttighten the screws completely. Instead, draw the supportupwards within 1/8" of the well, then slide the plywood blockin between the L and the underside of the top beneath thefingerboard extension. Use a mirror to center the plywoodblock, and then slowly tighten the two screws. The L-supportwill push the spacer block snug against the top, and lift themetal in that area. The L-support is supplied slightly oversize,so you may need to remove it and use a file to remove woodwhere the support contacts the soundwell, at both contactpoints, to allow the support to pull upward.
Expect to remove the L-support several times — filing notch-es to clear the soundwell accordingly — until thefingerboard extension has solid support and doesn’t showtoo much dropoff when you sight down the neck. Someamount of dropoff is expected. You will not have a dead-flatfretboard where it meets the body because of the relation-ship of the neck to the cone. Also, the fingerboard extensionshould not run uphill — that would cause fret/string buzzingin the upper register.
Fasten the tailpiece to the tailpiece block using the strap but-ton and mounting screw provided.
Mounting the fingerboard support
Install the tailpiece
34. The support is turned with the leg of the L facing upward tosupport the rectangular piece of plywood under the fingerboardextension.
35. Remove the support and drill two mounting holes.

page 19
Use the supplied small screw and washer to fasten the bis-cuit to the cone. First, be sure to thread the hole in the biscuitwith the screw before actually connecting the cone to thebiscuit.
Mark a concentric ring around the screw hole in the under-side of the cone; this will help you be certain that the screwand washer are centered on the hole as you tighten the coneto the biscuit. Gently tighten the biscuit until snug. (Youshould still be able to turn the biscuit on the cone at thispoint.)
Repeat the process you did earlier during the initial neckalignment. This time the fingerboard is glued on, not justspring-clamped in place. Measure to the cone and saddle —not to the handrest clearance of the coverplate. This will be amore accurate measurement toward final setup.
Rest a long, accurate straightedge on the two drill bit “actionsimulators” you used earlier (a 5/64" bit at the nut, and an11/64" bit at the 12th fret), and project the end of thestraightedge to the face of the saddle. If the loose fretboardextension over the body gets in the way of the straightedge,tape it to the top. The bottom of our straightedge was 3/8"off the face of the biscuit (36). On masking tape we made amark at 3/8", then a second mark 1/16" above it. The secondmark will be the approximate final height of the saddle, andthe 3/8" mark will be the approximate bottom of the V-shaped string slots you’ll cut into the saddle. Remove thebiscuit from the cone, and saw off the saddle material abovethe top line.
Mount the biscuit to the cone
Rough-in the saddle height
Round the backside (peghead side) of the nut with a file, andshape it to a “rough-in” height that’s tall enough to accom-modate filing and fitting later. Set the nut in the slot with alittle extra length over-hanging each side, and the top of theblank measuring a little over 1/8" from the fingerboard.
Rough-shape the nut height
36. On our guitar, the bottom of our straightedge was 3/8" off theface of the biscuit.
Place the cone in the soundwell and tap on the outer bot-tom edges where the cone seats. Rotate the cone in the welland tap until you find the sweet spot, or area where the conerocks the least and seems to seat firmly all around. Then puta little downward pressure on the cone by pressing on thebiscuit and double checking the fit. You’ll always have a littlerocking — the slight pressure will tell you if the cone is seat-
ing well. With a dark marker, mark the cone with an arrowpointing at the peghead, so you can locate the cone in thissweet spot in the future. Rotate the biscuit until the saddle isperpendicular to the arrow on the cone, and then removethe cone and tighten the biscuit snugly. Only tighten the bis-cuit until it stops moving on the cone. Too much tighteningcan dimple the cone.
Find the cone’s “sweet spot”

At this stage, install the two outside strings to check twothings: that the neck is well aligned to the tailpiece; and todetermine the approximate string height at the nut andsaddle.
Install the two outside strings in the tailpiece (use medium-gauge bronze strings), run them across the saddle and totheir respective tuning machines. Tighten them enough sothat they aren’t slack, but not to pitch, and will hold theirposition when spread apart at the nut and saddle.
Center the two strings 2-3/16" apart on the saddle, and cutslight starter notches for them.
Space the two outside strings approximately 1-17/64" apartat the nut, put pencil marks on each side of the strings, andcut starter nut slots. The two outside strings will now hold inplace at both the nut and saddle when the strings arebrought to a higher tension.
page 20
The cone has a little more than 1/16" of movement foradjustment within the well, both side-to-side and front-to-back. The front-to-back adjustment is important forintonation, and the side-to-side allows for slight alignment ofthe saddle to the neck and tailpiece.
The cone should be centered in the soundwell when the twooutside strings are spaced correctly at the nut and on thesaddle. As for side-to-side cone location, if the cone sitsslightly more toward one side than another — 1/32" or less— that isn’t a great problem.
When the two outside strings are lightly tensioned, if the sad-dle is slightly off center with the neck and tailpiece — pullingtoo far toward the bass or treble side — you have severaloptions for minor alignment of 1/32" or less:
• Loosen the neck mounting bolts and force the neck in theproper direction to bring the strings in line when the cone iscentered.
• Further enlarge the two holes in the neck block to move theneck more than the holes would normally allow. The neckblock holes are factory-drilled 1/32" oversize to allow forslight adjustment.
• Move the tailpiece slightly to either side, if that will bring thecone, strings, and tailpiece into alignment.
To move the tailpiece, first pencil a locating mark on the topor side of the guitar outlining the shape of the tailpiece.Remove the screw and endpin from the tailpiece (the slightstring pressure will keep it snug, but you will need to holdthe tailpiece against the body), and slide the tailpiece to oneside or another. It’s doubtful that you would ever need tomove the tailpiece more than 1/16". Plug the tailpiece screwhole with a small dowel and glue, and then drill a new hole.
None of these minor adjustments should be necessary if allthe neck-fitting procedures described earlier are performedaccurately.
Double-check the neck alignment
Align the neck to the cone

page 21
With starter notches cut at both the nut and saddle, you cannow lower the strings at each end, until you reach the correctaction height.
First eliminate the string height at the nut as a factor, so youcan deal only with the saddle height. Do this by installing acapo at the first fret and tightening it just enough to pull thestrings down to a virtually correct string clearance at the firstfret. Look for a clearance between the bottom of the stringsand the top of the first fret of 1/32" under the treble string,and 3/64" under the bass string. This is a relatively stiff actionat the nut end, and it will be lowered more after the saddle isclose to the correct height.
With the capo on, measure the clearance between the bot-tom of the two outside strings and the top of the 12th fret.Our strings measured almost 3/16" at the 12th fret, whichwas approximately 1/16" more than we wanted. We werelooking for a 12th fret action clearance of 1/8” to 5/32".
To lower the strings 1/16" at the 12th fret, you must removetwice that amount at the saddle. Our saddle measured 7/16".
We needed to lower the strings until the bottom of thestrings dropped 1/8” (not the top of the saddle). The top ofthe saddle must remain approximately 1/16" higher than thestring bottom, to provide a deep notch to hold the strings inplace. Do not lower the strings the full 1/8”at this stage, how-ever, because all the strings are not installed and tuned topitch. Err on the high side, and reach your final depth in sev-eral stages: a rough-in stage now with two strings installed,then two more stages with all the strings installed. Drop3/32" right now instead 1/8".
Thanks to the capo trick, you can lower the two outsidestrings the required amount quickly at the saddle using razorsaws or nut files, and return to the nut end.
At the nut end, remove the capo, and lower the outsidestrings to what feels like a proper action by measuring theclearance between the bottom of the strings and the top ofthe first fret. We ended up with a clearance of .014" under thehigh treble string, and .025" under the low bass string.
Install the remaining strings and repeat the abovenut/capo/saddle operation. Rough-in the strings at the nutso they’ll hold their place under tension. A good startingpoint for string spacing at the nut is to divide the spacebetween the centers of the two outside strings by 5 and pen-cil that measurement four times across the top of the nut.These four lines are the rough locations of the four middlestrings.
This is just a starting point, so make slight starter cuts onthese four marks — just enough to hold the strings in place
temporarily. You can position the string slots from side-to-side (as you move them downward as well) by using razorsaws and nut files held at an angle or on their sides to movethe slots around until you get a spacing that looks right toyou. We prefer to spread the wound strings a little furtherfrom each other to make up for their thicker diameter, and tosqueeze the unwound strings a little closer together. The endproduct is a proportional spacing that takes into account thediameters of the strings, and has a uniform look. As you work,create plenty of notch to hold the strings, but don’t lowerthem to their final depth yet.
A quick action check
Install the remaining strings
Tune the strings to pitch, and then put the capo back on tosimulate a realistic action at the first fret. Go to the saddle andspace the strings as you did at the nut (divide by five, markout four lines, cut starter slots, then move the slots arounduntil the spacing looks right). Lower all the strings at the sad-dle to match the depth of the two outside strings. Since youare tuned to pitch, you will need to de-tune each string to liftit free so you can work.
A small sharp triangle file is good for cutting the correctnotch in the saddle, but we prefer to finish the job with asharp knife.
Lower the strings at the saddle until they all measure 1/8"over the 12th fret, and shape the saddle slots to look like thephoto. You can lower the strings more, or leave them higher,if you choose. Notice that the string contacts the saddle at
Cut the saddle notches

page 22
the rear edge, leaving a distinct V-groove dropping awayfrom the strings in front of the contact point (37). This movesthe intonation point toward the back edge (which is usuallyneeded), but more importantly it offers a clear, bright tone tothe “speaking length” of the string, unimpeded by more sad-dle than is necessary to hold the string in place. (This is atrademark setup for this style of guitar.)
When we reached our final action of 1/8", the top of the sad-dle was a little over 11/32" tall, and the bottoms of the stringslots were approximately 9/32" from the top of the biscuit.This is a normal final string height at the saddle for a biscuit-style resonator guitar. Each of those measurements left roomfor going even lower later on after the guitar had settled infor a couple of weeks.
TIP: Feeling that the black paint on the biscuit andsaddle might rob some brightness from our guitar,we used paint stripper to remove the paint from thesaddle and biscuit. The tone did seem to jump outafterwards, and we didn’t mind the vintage look —with the paint removed, it was also easier to cutreally clean notches in the saddle. When the guitarwas complete, we colored the bare wood withblack marker pen and sprayed one thin coat ofaerosol lacquer on the biscuit.
When the saddle slots are cut, producing 1/8” clearance atthe 12th fret under all the strings, remove the capo and lowerthe nut slots to a comfortable action. Leave the string depthswith a clearance of .025" under the 6th (low) string, and .014"under the 1st (treble) string. The rest of the string clearancesshould graduate between these two across the width of thenut. You may wish to lower the strings more than this after asettling in period.
When the nut slots are finished, and the strings are holdingthe nut centered in its slot, use a sharp pencil to mark theoverhang on each end of the nut for trimming. Remove thestrings, remove the nut from its slot, and file off the excess.Shape the ends round, and then sand the nut smooth to
remove any file marks. The ends of the nut should be flushwith the fingerboard and neck on both the bass and treblesides. Replace the nut, but don’t glue it in yet (you’ll need toremove it during fret leveling). When approximately 1/2 to2/3 of each string’s diameter rests in the slot, the depths arecorrect.
When you are satisfied with your final action, let the guitarsettle in for a few days. Try not to play it, to keep the neckclean for finishing — it will get dirty fast! You may notice thatwhen tuned to pitch, the cone will compress downward asmall amount (that is why we leave the action slightly on thehigh side during the settling-in period). At pitch, the saddlemay lower from 1/64" to 1/32".
Finish the nut slots
37. The string contacts the saddle at the rear edge, leaving a dis-tinct V-groove.
With the guitar settled in and tuned to pitch (to create fulltension on the neck and fingerboard extension over the top),the L-support firmly in place, and the plywood fingerboardsupport located snugly and accurately, drill the four holesneeded for fastening the fingerboard extension to the fin-gerboard support. Two of these holes are drilled into the topof the neck block, and the other two into the plywood sup-port block.
First, use a 1/8" drill bit through the holes you drilled earlierat the centers of the four inlay holes in the fingerboard, inwhich the mounting screws are inserted. The holes are just toguide the bit for accuracy. Run the drill in reverse to start acenter point in the metal, then stop. Don’t drill through themetal yet.
Drilling for fingerboard mounting screws

page 23
Switch to a 1/16" bit and, centering on the point just created,drill through the top and into the plywood support blockand the neck block. These are the holes for the mountingscrews. Remove the strings, the L-support, and the neck.
Remove the neck and fingerboard and enlarge the four holesin the metal top with the 1/8”bit. De-burr the inside and out-side of the holes drilled in the metal, and also de-burr theunderside of the fingerboard extension, so that all the piecesscrew together firmly without gaps. Install the four finger-board mounting screws. Don’t install the dot inlays over thescrews yet.
Note: Depending upon how deep you drilled the flat bot-tom 1/4" holes for the dot inlays, and depending upon thehardness of the fingerboard, you may need to drill a smallersecondary hole — using a standard twist drill bit with abeveled face — as a slight countersink for the screw head. A7/32" drill bit works well. Be careful! Drilling these holes inthe fingerboard with a hand drill is tricky. It’s easy to drillthrough the fingerboard by mistake. Practice on scrap, andbe alert.
Re-install the neck and all the other parts, and then string theguitar to pitch. Under string tension, fasten the fingerboardextension to the top using the four screws and plywood fin-gerboard support on the inside. Remove the strings so youcan level the frets.
With masking tape and heavy paper, tape off the top aroundthe fretboard to protect it from your fret leveling tools. Withthe peghead resting on the tabletop for gentle support,adjust the neck perfectly straight (38), until a straightedgerests on all the frets (don’t expect it to rest on the fingerboardextension over the body, because it will fall away slightly).
If you happen to find a high fret, tap it down before leveling.Support the back of the neck under the fret that you arehammering on.
TIP: You can use masking tape on each side of thefrets to protect the fretboard from sanding. Use awide tip blue felt marker to color the tops of all thefrets. This allows you to follow your levelingprogress and know when the sandpaper has hit thetops of all the frets evenly.
Use 320-grit sandpaper double-stick taped to the narrowedge of a long flat surface (39) (we used a carpenter’s level).You’ll need to lightly sand the fingerboard extension sepa-rately with a smaller sanding block, since it falls away fromthe level plane of the main fingerboard.
When all of the tops have been dulled by sanding (the bluemarks will disappear), round the tops of the frets. As a sand-ing tool, find a 1/2"-thick foam rubber sanding pad, or otherpiece of resilient material and round over one edge with arasp. Wrap 320-grit sandpaper around the edge and work thesandpaper lengthwise from along the fingerboard, with evenpressure. Hold the sander on edge to shape the fret ends andsmooth the edges of the fretboard.
Change grits, working up to at least 800. You will end up withround fret tops that are nicely polished. Vacuum off the metaldust.
The neck is ready to be removed, final-sanded, and finished.Glue in the nut now.
Reinstalling the neck and leveling the frets
38. Adjust the neck perfectly straight, until a straightedge rests onall the frets.
39. Use 240-grit or finer sandpaper double-stick taped to the nar-row edge of a long flat surface.

page 24
At this point you should apply the neck finish of your choice.We present two recipes — the first produces a more “profes-sional” high gloss finish, and the second produces an easiersatin finish.
The quality of your finish work is certainly important to theappearance of your guitar. A thin “non-professional” finishwon’t necessarily harm the sound of your guitar, however. Ifthe following instructions seem beyond your skills (they’reprobably not), or if they seem to be more work than you’dlike, you can simply apply a low-gloss wipe-on finish by hand,consisting of a couple of coats of waterbase lacquer or fresh-ly-mixed shellac. This will seal the wood and protect it fromthe elements, and you’ll be playing your new guitar a lotsooner.
The following instructions, for spraying an aerosol nitrocellu-lose lacquer finish, are pretty close to foolproof and don’tinvolve an investment in shop spraying equipment.
For your convenience, we have included wood scraps thatmatch the wood your guitar is built with, so you can practicestaining and pore-filling. You can practice applying your clearcoats on these scraps as well.
There’s a lot of finishing information in our book, GuitarFinishing Step-By-Step, and many customers are glad theystudied the book before finishing their first guitar. In briefthough, here are some pointers and a finishing schedule tofollow.
Do practice on scrap wood until your finishing technique hasbeen perfected. If you’d like your guitar to look as good as itsounds, don’t rush!
Do use a backing block or pad when sanding flat surfaces. Ithelps maintain a level surface. On round surfaces, use a flex-ible rubber backing pad, a thick piece of felt or leather, or foldthe sandpaper three or four times to give it firmness withflexibility.
Don’t apply more than three coats of lacquer per day. Sprayan initial light misting or “tack” coat, followed several minuteslater by a heavier wet coat. The tack coat gives the wet coatbetter adherence and lessens the chance of a run or sag inthe finish.
Do let the finish cure for 10-14 days or longer prior to finalsanding and buffing.
Do have thinner around for cleanup. Aerosol lacquers requireno thinner, of course, but it’s nice to have it on hand. If youdecide to use spray equipment, always thin nitrocelluloselacquers with nitrocellulose thinner only.
Do wipe the aerosol tip often. Aerosol lacquers have a ten-dency to spit if the tip gets clogged. Also, you can clean thetip by turning the can upside down and spraying until thespray stream stops. It’s recommended that you do this eachtime you are done spraying.
Do buy a can of aerosol blush eraser for lifting the bluishhaze which can occur when moisture is trapped in the lac-quer finish. Blushing can result from humid conditions, or ifthe coat is sprayed too heavily.
Do let the surface dry for 24 hours if you get a run in the fin-ish. Then level-sand the problem area. If you touch wetlacquer, you’ll leave a deep impression which will be muchmore difficult to fix.
Finishing the neck
Dos and don’ts

page 25
Before sanding the neck, “drop-fill” the small fret slot spacesunder the ends of the frets. Use fine rosewood sawdustmixed in either Titebond or superglue. We used a toothpickto apply the mixture, and filed the small mounds of driedglue flush before sanding the neck. If you don’t fill the endsof the fret slots, holes will remain which the lacquer finishwon’t fill.
The neck needs extra sanding and grain-raising in the endgrain areas of the heel, and the “ears” and the end of the peg-
head. Sand up to 320-grit, dampening to raise the grain. Dothis several times, so the end grain pores will absorb stainmore uniformly for a better appearance.
Finish the wood preparation by wiping the neck with a rag,dampened (not soaked) with naphtha, to degrease all thesurfaces to be finished. Handle the unfinished wood partswith clean gloves from now on.
To fasten a spraying handle to the bolt-on neck, drill twoholes in a scrap wood handle to match the bolt spacing (40).Tape over the exposed nuts to protect them from lacquer. Or,as an alternative, simply hold the neck at the center, spray thepeghead, the heel, and a good portion of the neck up towhere you are holding it. Loop an S-shaped wire hangerthrough a tuner hole and hang the neck for spraying the cen-ter area. You can also rest the neck fretboard-down on a riserblock and spray it in the horizontal position.
Apply masking tape to cover the areas that won’t be stainedor finished: the fretboard playing surface, the sides of thefretboard (to be unmasked after staining), the nut, the neckjoint surfaces of the cheeks, and the underside of the fret-board extension.
Filling fret ends and sanding the neck
Making hangers and masking the neck
Wear plastic gloves when handling stains. The mahoganyneck (and the rosewood peghead overlay, if you wish) shouldbe stained. We recommend our ColorTone liquid stains in anequal mix of tobacco brown and red mahogany. Add 25drops of each color to each ounce of water to produce awarm dark stain. For a lighter, redder color, you can use justthe red mahogany at 50 drops per ounce of water. Test thesestains on sanded scrap mahogany first.
TIP: You can also use waterbase paste filler to colorthe bare mahogany while filling the pores, and skipthe stain entirely. Test this on scrap mahogany andsee if you like the somewhat lighter appearance.
One or two ounces of mixed stain is plenty for a neck. Pourthe stain into a shallow bowl. Wet a soft clean cloth with stainand apply it in long uniform strokes in the direction of thewood grain. It shouldn’t take more than a minute to stain theneck. Stain the peghead veneer, too: it’s easier than trying tomask it.
Let the stain dry for half a day, and then unmask the sides ofthe fretboard. The fretboard’s playing surface, neck jointareas, the nut, and the underside of the fretboard extensionshould remain masked.
Staining
40. Scrap wood handle to hold the neck while spraying.

page 26
Remember to wear clean cotton gloves whenever you touchthe wood. Lacquer is highly flammable, so always work in adry, well-ventilated area, away from open flames or sparks. Besure to wear an appropriate respirator while spraying.
Spray one uniform “wash coat” of clear lacquer on the neck.A wash coat is a very light coat, so it won’t cause runs. Thewash coat seals the stain or the natural color in the wood,and keeps the upcoming coat of paste filler from producinga smudged look. Sealed in this fashion, only the open poresof the wood accept the filler. Let the wash coat dry overnight.
Day One: Spray three wet (not runny!) clear coats on theneck, an hour between coats, and let them dry overnight.
Day Two: Lightly “scuff-sand” the neck with 320-grit Fre-Cut®paper to knock off the high spots in the finish (on flat areas,be sure to use a backing pad on the sandpaper). Sand justenough to “open” the finish; don’t try to sand out every shinyspot or sunken area in the lacquer. Clean off all the sandingresidue. Now spray the neck with three uniform coats of clearlacquer, one hour between coats. You now have six coats. Letthe neck dry overnight.
Day Three: Lightly scuff-sand the finish with 320-grit paperagain, and clean off all the residue. You can be slightly moreaggressive in flattening the sprayed surface now, but becareful on the curves of the neck, and on any of the edges ofthe neck and peghead (it’s easy to sand through the edges).Don’t try to sand out all the shiny spots yet. This sanding willrelease solvent from the finish and help it to cure. Let the fin-ish dry for two more days.
Day Six: Once again, spray three wet clear coats, one hourapart, on the neck and peghead. The neck now has ninecoats. Let the finish dry overnight.
Day Seven: Scuff-sand the finish with 320-grit again. Thistime most of the shiny spots will disappear, leaving a uni-formly dull look. Spray three more clear coats, one hour apart.You now have twelve coats. Allow overnight drying.
Day Eight: Lightly scuff-sand the finish with 600-grit Fre-Cut® paper, to help the solvent escape. The neck should nowbe left in a warm dry location for two weeks to let the finishharden and shrink.
Applying a wash coat sealer
Lacquer spraying schedule
We recommend our ColorTone waterbase brown paste fillerfor filling and leveling the open grain pores of the rosewoodpeghead overlay and the mahogany neck. Because it driesfast, you won’t be able to fill all the neck’s surfaces at once, sowork in stages. Practice on scrap pieces before starting onthe guitar. The wet filler should be packed into the pores witha rubber squeegee held at a 45° angle across the grain (anold credit card makes a great squeegee). Within minutes thefiller will start to harden and look hazy. Wipe off the excess,working across the grain, with a clean lint-free cloth. At any
time during the grain-filling process, you can use a rag light-ly dampened with water to soften any filler that’s hardeningtoo quickly. When the wood pores have been filled andwiped level, a bit of blotchy, hazy residue will probablyremain on the surface. Let the wood dry overnight. Lightsanding with 320-grit Fre-Cut® may be required to removeany remaining buildup of filler on the wood surface. Try toavoid sanding through the wash coat into the stainedmahogany. If you do sand through an area, wipe a little stainon it and wipe off the excess.
Filling the wood grain

page 27
Dry-sand the neck and body to a flat, dull sheen using 800-grit Fre-Cut® sandpaper. Clean the residue off the sandpaperoften by rubbing it against a scrap of carpet. Any “orange-peel” texture (caused by lacquer shrinkage as the solventscure out of the finish) should be removed, but don’t over-sand. When all the little shiny low spots in the lacquer havebeen removed, you’re ready to go to the next step.
Wet-sand using 1200-grit micro-finishing paper and water.This will create a smooth satin surface that’s ready for finalpolishing. Excess water and residue should be wiped off thefinish with a clean dry soft cloth as you work. Rinse the sand-
paper in soapy water often, to remove hard specks that canscratch the finish. (Note: Soak the micro-finishing paper inwater overnight before use. It will scratch less and lastlonger.)
Using soft cloths, or an electric hand drill with foam polishingpads (a separate pad for each compound), rub out the finewet-sanding scratches to a final gloss with medium and finepolishing compounds. You can follow this with swirl removerif desired. Clean off the residue left by the polishes, removethe remaining masking tape from the neck, and remove thesoundhole masking materials from the body.
If the above finishing schedule seems to be too much work,you can apply a much simpler finish, as follows.
1) Sand the neck and peghead with 220-grit Fre-Cut® sand-paper.
2) Tape off as above.
3) Fill the neck and peghead with the waterbase paste woodfiller, and the technique mentioned above. It will color and fillin one process.
4) Spray as described above, but quit after the sixth day (9coats).
5) Let the finish dry one week, and wet-sand with 800-gritUnigrit sandpaper to remove the majority of shiny spots.
6) Skip the rub-out. Instead, use 0000 steel-wool to producea simple, flat, satin sheen.
Wet-sanding and rubbing-out the finish
Quick, easy finish
When the neck is finished, put the guitar together, but leavethe coverplate off for final adjustment of the setup. Tune theguitar to pitch, and then fasten the screws through the fin-gerboard extension but don’t put the inlays in yet. After theguitar has settled in for a week or two, remove the strings,install the coverplate, and install the dot inlays in the finger-board extension.
If you compare the thickness of the pearl dots to the depthof the holes down to the heads of the mounting screws —then thickness the pearl dots accordingly — you will be ableto press the dots in dry (making it easier to remove themshould you ever need to). (The lone center dot inlay at the17th fret in the fingerboard extension can be glued in). Youcan glue all the dots if you prefer.
Restring with new strings and enjoy your new DeltaResomaster! The old blues guys from the Mississippi Deltawould’ve loved a kit like this, to be sure!
TIP: You may find yourself removing and re-installing the coverplate and strings often duringsetup. To save time, you can slacken the strings untiljust taut, hold the tailpiece against the body, andremove the tailpiece mounting screw. Then lift thetailpiece free and thread it — with strings intact —through the coverplate hand rest.
Final assembly