assembly guide | guide d’assemblage premium … · assembly guide | guide d’assemblage premium...
TRANSCRIPT

ASSEMBLY GUIDE | GUIDE D’ASSEMBLAGE
PREMIUM TIRE CART DIABLE À PNEUS DELUXE
# MPTC
1.866.409.RACKWWW.MARTINSINDUSTRIES.COM | [email protected]
TIRE EQUIPMENT MANUFACTURER

ASSEMBLY STEPS | ÉTAPES D’ASSEMBLAGE
Align the support bracket with the clamping holes, and place the M6 screws into the holes. Aligner le support étrier avec les trous de fixations et assembler avec les vis M6.
1
HARDWARE | QUINCAILLERIE

Align the rotating frames with the hinges, and lock them in place with the clevis and hitch pin clips provided. Aligner les cadres rotatifs avec les charnières et les bloquer avec les goupilles fournies.
Fit the nylon shims onto the load bearing shaft. Insérer les cales de nylon sur l’axe.
2
Place the anti-perforation rubber wheels and lock them using the studs provided. Use a rubber hammer to fit in the studs correctly. Now the cart can be placed on the ground, with the frame open at an angle of 45°. Placer les roues et les bloquer avec les écrous autobloquants fournis. Utiliser un marteau de caoutchouc pour insérer correctement les cales de nylons. Maintenant, vous pouvez déposez le cart au sol avec le cadre ouvert à un angle de 45°.
3
4
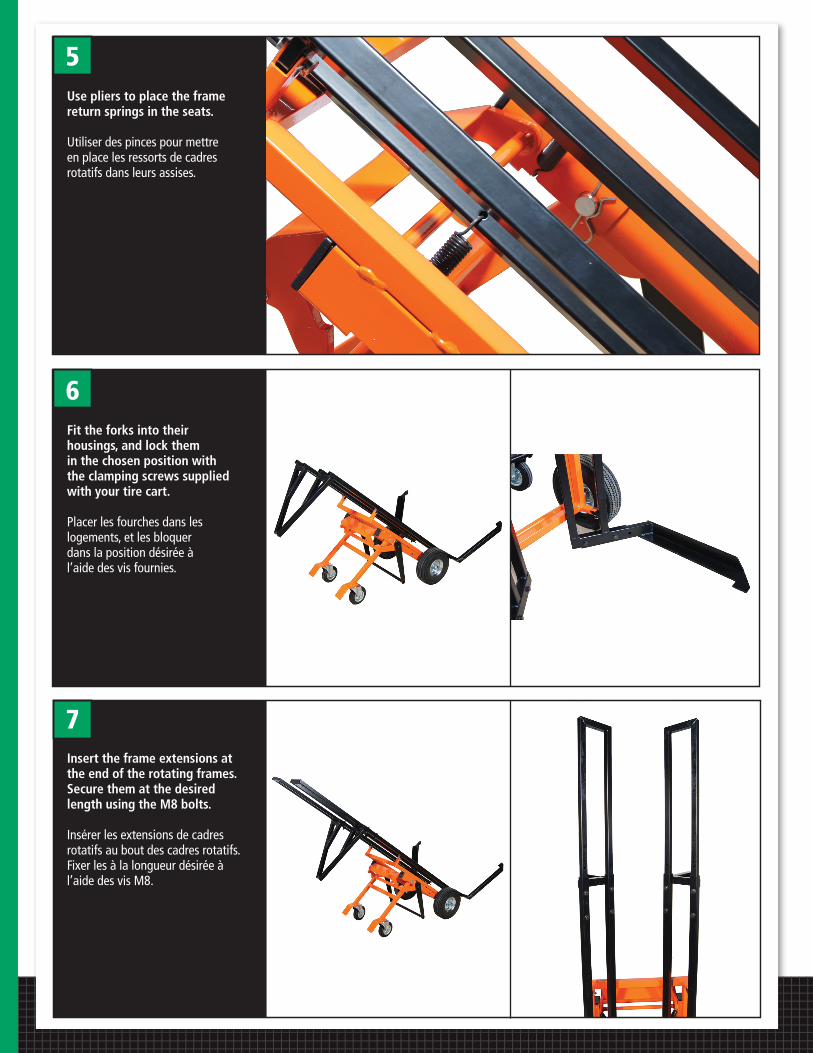
Insert the frame extensions at the end of the rotating frames. Secure them at the desired length using the M8 bolts. Insérer les extensions de cadres rotatifs au bout des cadres rotatifs. Fixer les à la longueur désirée à l’aide des vis M8.
Use pliers to place the frame return springs in the seats. Utiliser des pinces pour mettre en place les ressorts de cadres rotatifs dans leurs assises.
5
Fit the forks into their housings, and lock them in the chosen position with the clamping screws supplied with your tire cart. Placer les fourches dans les logements, et les bloquer dans la position désirée à l’aide des vis fournies.
6
7
Fit in the release rod, and lock it in place using the cotter pin. Insérer la tige de décrochage et la bloquer à l’aide de la goupille fendue.
8
INSTRUCTIONS FOR USE | INSTRUCTIONS D’UTILISATION
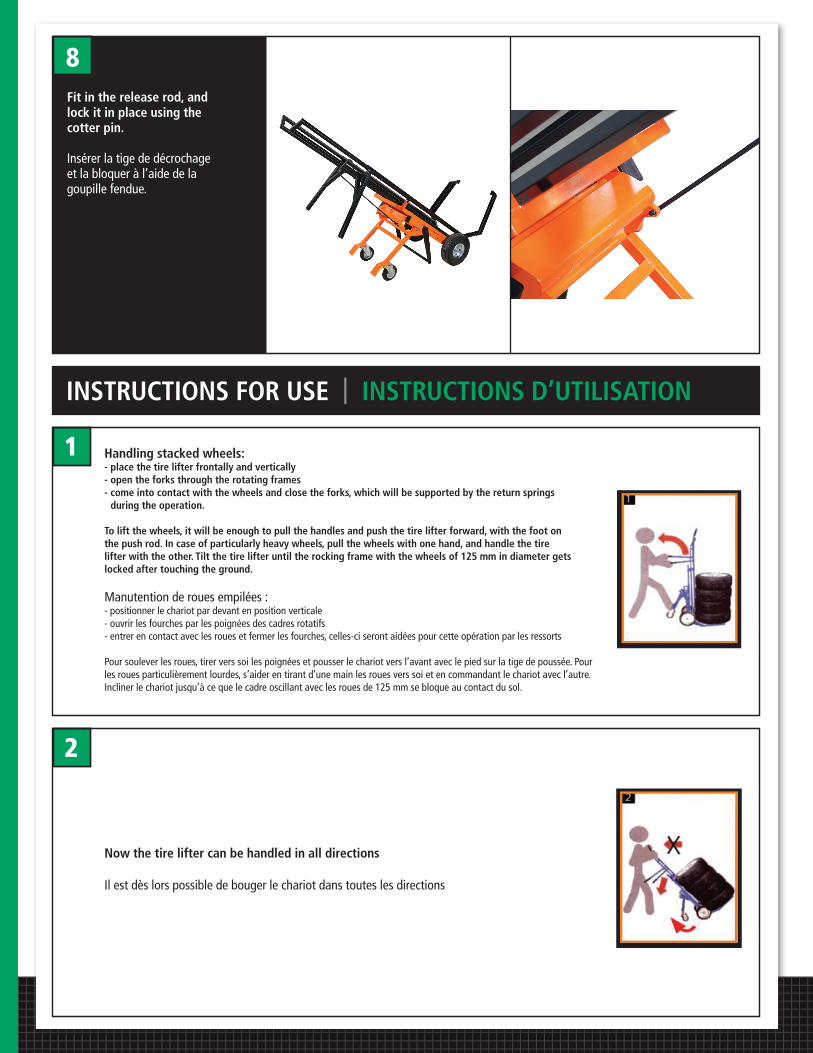
Handling stacked wheels: - place the tire lifter frontally and vertically - open the forks through the rotating frames - come into contact with the wheels and close the forks, which will be supported by the return springs during the operation. To lift the wheels, it will be enough to pull the handles and push the tire lifter forward, with the foot on the push rod. In case of particularly heavy wheels, pull the wheels with one hand, and handle the tire lifter with the other. Tilt the tire lifter until the rocking frame with the wheels of 125 mm in diameter gets locked after touching the ground.
Manutention de roues empilées : - positionner le chariot par devant en position verticale - ouvrir les fourches par les poignées des cadres rotatifs - entrer en contact avec les roues et fermer les fourches, celles-ci seront aidées pour cette opération par les ressorts Pour soulever les roues, tirer vers soi les poignées et pousser le chariot vers l’avant avec le pied sur la tige de poussée. Pour les roues particulièrement lourdes, s’aider en tirant d’une main les roues vers soi et en commandant le chariot avec l’autre.Incliner le chariot jusqu’à ce que le cadre oscillant avec les roues de 125 mm se bloque au contact du sol.
1
Now the tire lifter can be handled in all directions Il est dès lors possible de bouger le chariot dans toutes les directions
2

To place the tire lifter horizontally, it is enough to push it downwards, levering the upper parts of the fork rotating frames. The frame will be automatically locked, thereby allowing the wheels to be safely handled. Pour mettre le chariot en position horizontale, le pousser vers le bas en faisant levier sur la partie supérieure des cadres de rotation des fourches. La structure se bloquera automatiquement de façon à permettre le mouvement des roues en toute sécurité.
3
To go back to an angle of 45° or to a vertical position, pull the release lever and raise the tire lifter. Pour revenir à la position à 45° ou verticale, tirer le levier de déverrouillage vers soi et soulever le chariot
- Handle the tire lifter on smooth and flat surfaces only, to prevent it from overturning. - Do not leave the lifter loaded with tires, placed horizontally or at an angle of 45 degrees, for too long, this could cause the wheels of the cart to flatten. - Déplacer le chariot uniquement sur des surfaces lisses et horizontales afin d’éviter tout risque de renversement. - Ne jamais laisser trop longtemps le chariot chargé de pneus, à l’horizontale ou à 45°, ceci peut aplatir les roues du chariot.
4
WARNINGS | AVERTISSEMENTS

1.866.409.RACKWWW.MARTINSINDUSTRIES.COM [email protected]
1.866.409.RACKWWW.MARTINSINDUSTRIES.COM [email protected]