assay applications guide · pdf file68‐608235/r2 february 2015 front matter version 2.0. ......
TRANSCRIPT

Assay Applications GuideL/N 08N63‐001
For in vitro diagnostic use
© Copyright 2014 ‐ 2015
Abbott Molecular Inc.1300 E. Touhy AveDes Plaines, IL 6001868‐608235/R2
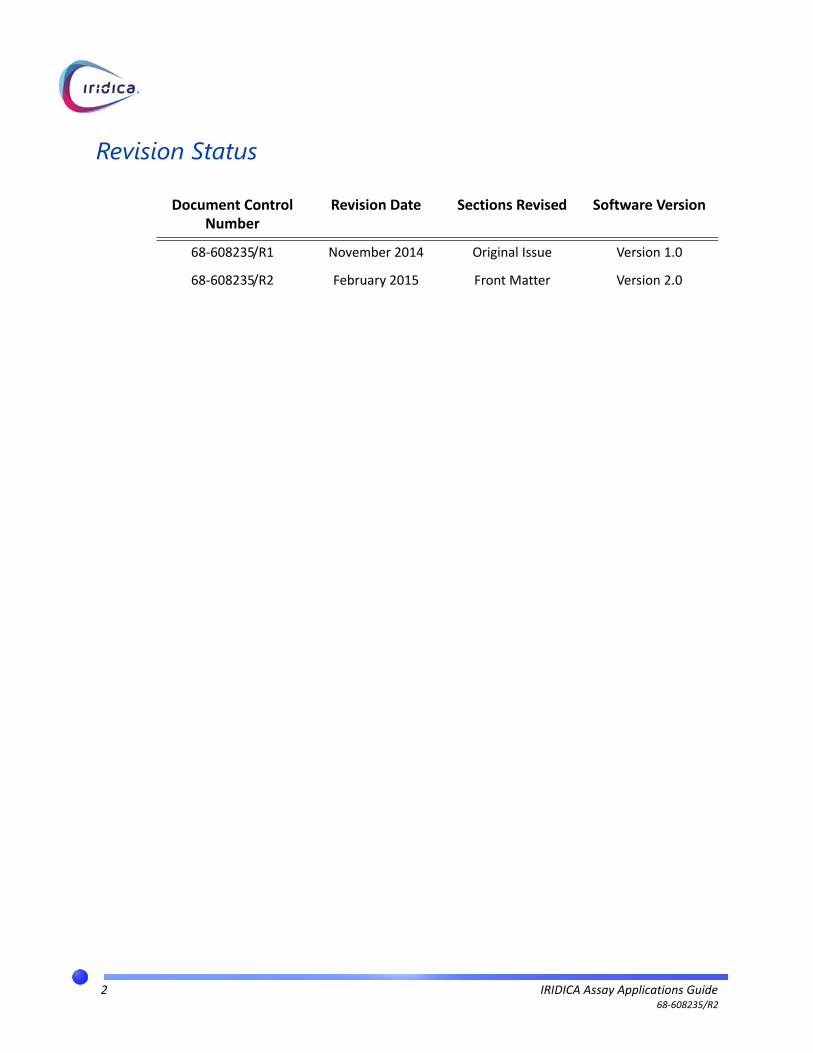
Revision Status
Document Control Number
Revision Date Sections Revised Software Version
68‐608235/R1 November 2014 Original Issue Version 1.0
68‐608235/R2 February 2015 Front Matter Version 2.0
2 IRIDICA Assay Applications Guide68‐608235/R2
Proprietary Statement
The IRIDICA programs and System documentation are protected by copyright. All rights reserved. Printed in the United States of America. No part of this media may be reproduced, stored, retrieved, or transmitted in any form or by any means without the prior written permission of Abbott.
The information, documents, and related graphics published herein (the “Information”) are the sole property of Abbott. Permission to use the Information is granted, provided that:
• the copyright notice appears on all copies
• use of the Information is for the operation of Abbott products by Abbott‐trained personnel or informational use only
• the Information is not modified in any way
• no graphics are used separate from accompanying text
Each person assumes full responsibility and all risks arising from use of the Information. The Information is presented “as is” and may include technical inaccuracies or typographical errors. Abbott reserves the right to make additions, deletions, or modifications to the Information at any time without any prior notification.
ABBOTT LABORATORIES MAKES NO REPRESENTATIONS OR WARRANTIES OF ANY KIND OR NATURE WITH RESPECT TO THE INFORMATION. ABBOTT LABORATORIES HEREBY DISCLAIMS ALL REPRESENTATIONS AND WARRANTIES, WHETHER EXPRESS OR IMPLIED, CREATED BY LAW, CONTRACT, OR OTHERWISE, INCLUDING WITHOUT LIMITATION, ANY WARRANTIES OF MERCHANTABILITY, FITNESS FOR A PARTICULAR PURPOSE, TITLE OR NON‐INFRINGEMENT. IN NO EVENT SHALL ABBOTT LABORATORIES BE LIABLE FOR ANY DAMAGES OF ANY KIND OR NATURE, INCLUDING, WITHOUT LIMITATION, DIRECT, INDIRECT, SPECIAL (INCLUDING LOSS OF PROFIT) CONSEQUENTIAL OR INCIDENTAL DAMAGES ARISING FROM OR IN CONNECTION WITH THE EXISTENCE OR USE OF THE INFORMATION, REGARDLESS OF WHETHER ABBOTT LABORATORIES HAS BEEN ADVISED AS TO THE POSSIBILITY OF SUCH DAMAGES.
3 IRIDICA Assay Applications Guide68‐608235/R2
Disclaimers
PictorialDisclaimer
All samples (printouts, graphics, displays, screens, etc.) are for information and illustration purposes only, and not to be used for clinical or maintenance evaluations. Data shown in sample printouts and screens do not reflect actual patient names or test results.
Abbott is not engaged in rendering medical advice or services.
Due to incremental software and hardware changes, samples are only intended to provide information or to illustrate the point discussed at the particular place in the manual where the sample is placed. Do not take the samples out of context when comparing to the actual software or hardware.
TableofContentsDisclaimer
Incremental manual updates may cause the Table of Contents or Index page numbering to change.
4 IRIDICA Assay Applications Guide68‐608235/R2

Intended Use
Intended Use
The intended use of the IRIDICA System is to execute Abbott‐branded IRIDICA IVD assays. IRIDICA assays are molecular diagnostic assays that use polymerase chain reaction (PCR) to amplify nucleic acids (NA), or amplicons, of interest. The IRIDICA system consists of Pre‐Amp and Post‐Amp processing instrument modules. The Pre‐Amp modules extract nucleic acids and load them on IRIDICA assay strips. The Post‐Amp modules amplify and detect nucleic acids of interest. For in vitro diagnostic use.
5 IRIDICA Assay Applications Guide68‐608235/R2

Intended Use
Warranty Information
Abbott warrants the IRIDICA System (“the System”) to be free from defects in workmanship and materials during normal use by the original purchaser. This warranty shall continue for a period of one (1) year from the date of delivery to the original purchaser, or until title is transferred from Abbott to the original purchaser, whichever occurs first (the “Warranty Period”).
If any defects occur during the Warranty Period, contact your Area Abbott Customer Service Representative immediately, and be prepared to furnish information including the serial number, the model number, and pertinent details concerning the defect.
This Warranty does not cover defects or malfunctions which: (1) are not reported to Abbott during the Warranty Period and within one week of occurrence; (2) result from chemical decomposition or corrosion; (3) are caused primarily by failure to comply with any requirements or instruction contained in the applicable Abbott Operations Manual; or (4) result from maintenance, repair, or modification performed without Abbott’s authorization.
Abbott’s liability for all matters arising from the supply, installation, use, repair, and maintenance of the Instrument whether arising under this Warranty or otherwise, shall be limited solely to the repair or (at Abbott’s sole discretion) replacement of the Instrument or of components thereof. Replaced parts shall become the property of Abbott.
THE FOREGOING IS THE SOLE WARRANTY MADE BY ABBOTT LABORATORIES REGARDING THE SYSTEM, AND ABBOTT SPECIFICALLY DISCLAIMS ALL OTHER WARRANTIES, EXPRESSED OR IMPLIED, BY OPERATION OF LAW OR OTHERWISE, INCLUDING, WITHOUT LIMITATION, THE WARRANTIES OF MERCHANTABILITY, FITNESS FOR A PARTICULAR PURPOSE, OR ANY WARRANTY OF NONINFRINGEMENT. NO REPRESENTATION OR OTHER AFFIRMATION OF FACT, INCLUDING, BUT NOT LIMITED TO, STATEMENTS REGARDING CAPACITY, SUITABILITY FOR USE OR PERFORMANCE OF INSTRUMENT, WHETHER MADE BY ABBOTT EMPLOYEES OR OTHERWISE, THAT IS NOT CONTAINED IN THIS MANUAL, OR EXPRESSLY AGREED TO AS A WARRANTY BY ABBOTT IN WRITING, WILL BE DEEMED TO BE A WARRANTY BY ABBOTT FOR ANY PURPOSE. IN NO EVENT SHALL ABBOTT BE LIABLE FOR ANY CONSEQUENTIAL, INDIRECT, INCIDENTAL OR SPECIAL DAMAGES OR LOSSES OF ANY NATURE WHATSOEVER (INCLUDING, WITHOUT LIMITATION, LOST REVENUE, LOST PROFITS, OR LOST BUSINESS) ARISING OUT OF THE USE OF THE INSTRUMENT.
6 IRIDICA Assay Applications Guide68‐608235/R2

Instrument Labeling
Instrument Labeling
The following warning symbols may be used on IRIDICA instrumentation:
Symbol Definition
Pinch point hazardIRIDICA instrumentation has moving parts and tight spaces that can cause pinching or puncture injuries. Use care reaching into the instrument space.
BiohazardIRIDICA instrumentation utilizes and processes biological sample material which is potentially bio‐hazardous and can contaminate both the instrument and consumable waste spaces. Use proper precautions.
Hot surfaceIRIDICA instrumentation employs the use of heated block materials, including those that are metal, which can exceed the tolerance of some glove types and can burn skin. Exercise caution.
Electrical shock hazardIRIDICA instrumentation employs the use of high‐powered electrical systems which may present potentially injurious or lethal injury if proper care is not taken.
Caution – Risk of DangerConsult instructions for use.
7 IRIDICA Assay Applications Guide68‐608235/R2

Symbols Used on IRIDICA Assay Materials
Symbols Used on IRIDICA Assay Materials
List Number
In Vitro Diagnostic Medical Device
Lot Number
Global Trade Item Number
Serial Number
Temperature Storage Limits
Manufactured By
Use By
Amount Per Container
Product of United States
Product of Taiwan
Product of Japan
Product of United Kingdom
Product of Germany
Date of Manufacture
Voltage, Frequency
Power
Fuse
DS Reagent Cartridges
DS Reagent Tips
8 IRIDICA Assay Applications Guide68‐608235/R2
Symbols Used on IRIDICA Assay Materials
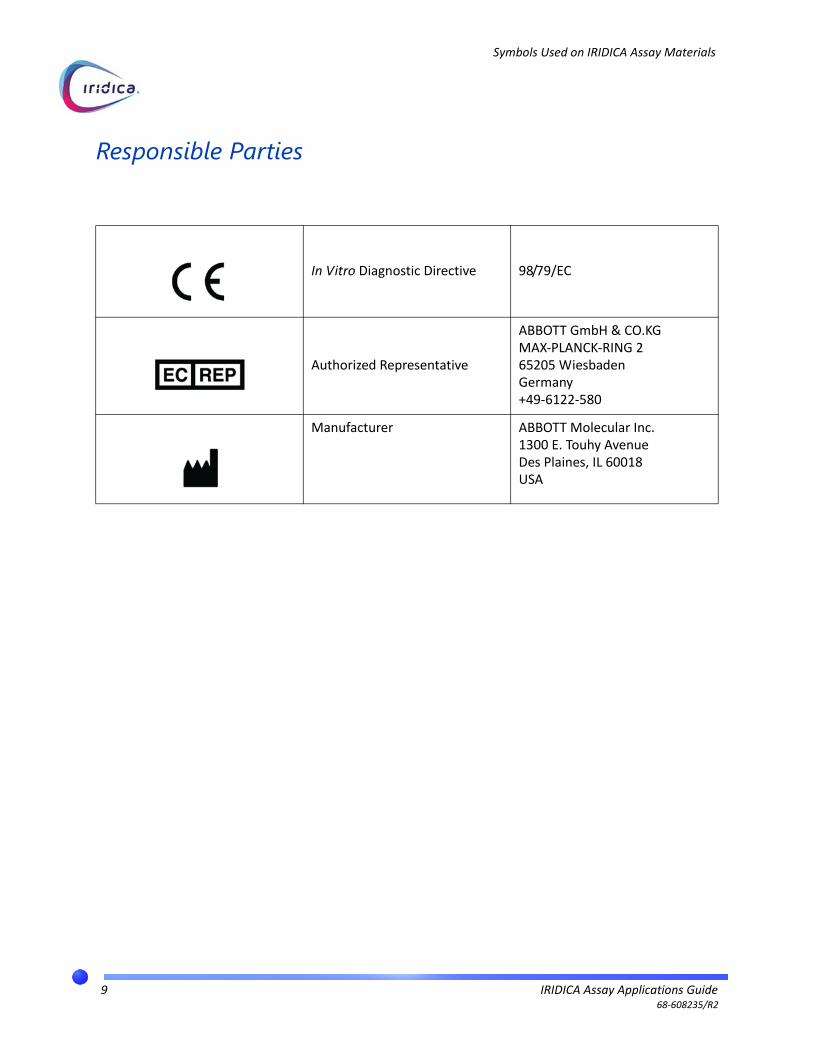
Responsible Parties
In Vitro Diagnostic Directive 98/79/EC
Authorized Representative
ABBOTT GmbH & CO.KGMAX‐PLANCK‐RING 265205 WiesbadenGermany+49‐6122‐580
Manufacturer ABBOTT Molecular Inc.1300 E. Touhy AvenueDes Plaines, IL 60018USA
9 IRIDICA Assay Applications Guide68‐608235/R2

Symbols Used on IRIDICA Assay Materials
Trademark Statements
All Abbott Laboratories product names and trademarks are owned by or licensed to Abbott Laboratories, its subsidiaries, or affiliates. No use of any Abbott trademark, trade name, trade dress, or product name may be made without the prior written authorization of Abbott Laboratories, except to identify the product or services of Abbott Laboratories. All other trademarks, brands, product names, and trade names are the property of their respective companies. All rights reserved.
Except as permitted above, no license or right, express or implied, is granted to any person under any patent, trademark, or other proprietary right of Abbott Laboratories.
IRIDICA is a trademark of the Abbott Group of Companies in various jurisdictions. All other trademarks are the property of their respective owners.
Patents: http://www.abbott.com/patents.html
10 IRIDICA Assay Applications Guide68‐608235/R2
Notices in This Manual
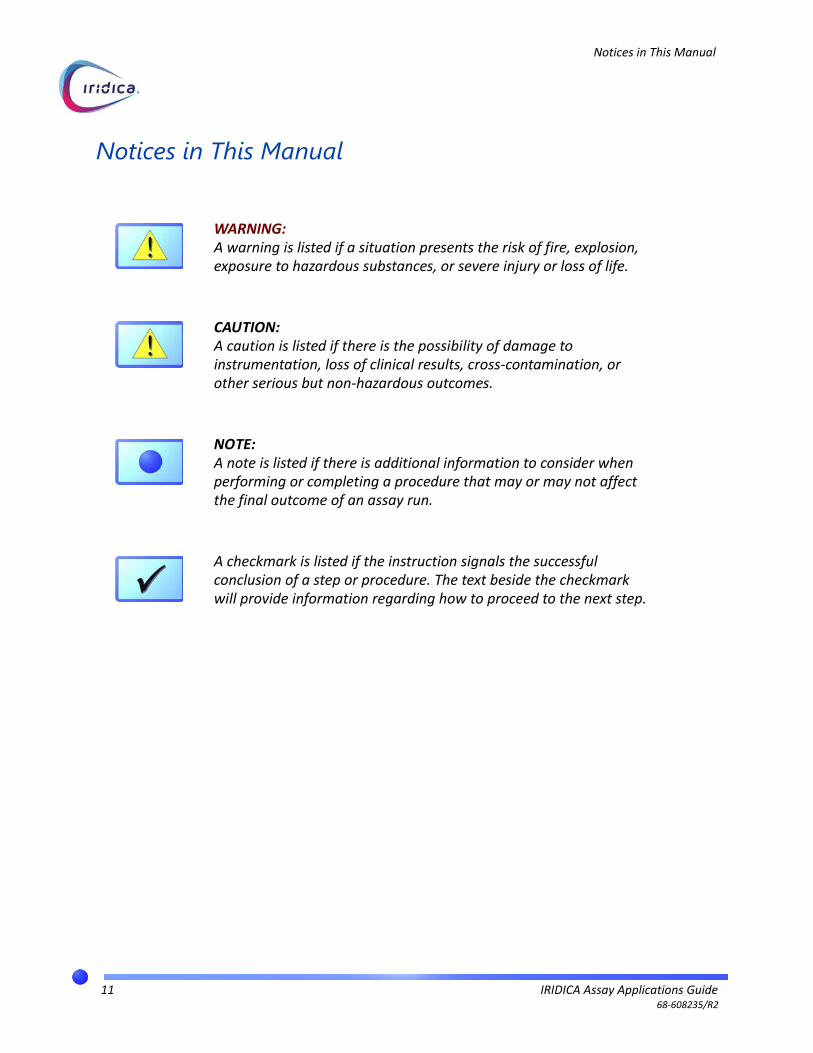
Notices in This Manual
WARNING: A warning is listed if a situation presents the risk of fire, explosion, exposure to hazardous substances, or severe injury or loss of life.
CAUTION: A caution is listed if there is the possibility of damage to instrumentation, loss of clinical results, cross‐contamination, or other serious but non‐hazardous outcomes.
NOTE: A note is listed if there is additional information to consider when performing or completing a procedure that may or may not affect the final outcome of an assay run.
A checkmark is listed if the instruction signals the successful conclusion of a step or procedure. The text beside the checkmark will provide information regarding how to proceed to the next step.
11 IRIDICA Assay Applications Guide68‐608235/R2
A Note About This Guide
A Note About This Guide
This guide provides instructions for operating the instrument controller software on IRIDICA Workstation PCs and the reporting functions of the Analysis Computer within the context of performing IRIDICA assays on IRIDICA instrumentation.
This guide is not intended to replace IRIDICA operations manuals or assay package inserts.
For specific instructions on how to set up and perform maintenance on IRIDICA instrumentation, refer to the appropriate IRIDICA instrumentation operations manual.
For specific instructions on how to perform IRIDICA assays, refer to the assay‐specific package insert.
This guide does not include instructions for removal of used and/or waste components on instrumentation after completion of a run, or contain complete decontamination instructions. Such activities are described in IRIDICA operations manuals and are determined by individual laboratory guidelines.
This guide assumes that the performer of the assay and/or the operator of the instrumentation has been trained and is knowledgeable about the IRIDICA family of products.
12 IRIDICA Assay Applications Guide68‐608235/R2

Table of Contents
Intended Use . . . . . . . . . . . . . . . . . . . . . . . . . . . . . . . . . . . . . . . . . . . . . . . . . . . . . . . . . . . 5
Instrument Labeling . . . . . . . . . . . . . . . . . . . . . . . . . . . . . . . . . . . . . . . . . . . . . . . . . . . . . 7
Symbols Used on IRIDICA Assay Materials . . . . . . . . . . . . . . . . . . . . . . . . . . . . . . . . . . . 8
Notices in This Manual . . . . . . . . . . . . . . . . . . . . . . . . . . . . . . . . . . . . . . . . . . . . . . . . . . 11
A Note About This Guide. . . . . . . . . . . . . . . . . . . . . . . . . . . . . . . . . . . . . . . . . . . . . . . . . 12
Section 1System Overview . . . . . . . . . . . . . . . . . . . . . . . . . . . . . . . . . . . . . . . . . . . . . 15
Instrumentation. . . . . . . . . . . . . . . . . . . . . . . . . . . . . . . . . . . . . . . . . . . . . . . . . . . . . . . . 15
Software Overview . . . . . . . . . . . . . . . . . . . . . . . . . . . . . . . . . . . . . . . . . . . . . . . . . . . . . 16
Section 2Operating Instructions . . . . . . . . . . . . . . . . . . . . . . . . . . . . . . . . . . . . . . . . . 22
Workstation PC Software Login . . . . . . . . . . . . . . . . . . . . . . . . . . . . . . . . . . . . . . . . . . . 24
Pre‐Amplification. . . . . . . . . . . . . . . . . . . . . . . . . . . . . . . . . . . . . . . . . . . . . . . . . . . . . . . 25
Using the BB Instrument . . . . . . . . . . . . . . . . . . . . . . . . . . . . . . . . . . . . . . . . . . . . . . . . . 30
Using the SP Instrument for Non‐Viral Assays . . . . . . . . . . . . . . . . . . . . . . . . . . . . . . . 34
Using the SP Instrument for Viral Assays. . . . . . . . . . . . . . . . . . . . . . . . . . . . . . . . . . . . 38
Post‐Amplification . . . . . . . . . . . . . . . . . . . . . . . . . . . . . . . . . . . . . . . . . . . . . . . . . . . . . . 42
Using the TC Instrument . . . . . . . . . . . . . . . . . . . . . . . . . . . . . . . . . . . . . . . . . . . . . . . . . 43
Using the DS Instrument . . . . . . . . . . . . . . . . . . . . . . . . . . . . . . . . . . . . . . . . . . . . . . . . . 46
Using the MS Instrument . . . . . . . . . . . . . . . . . . . . . . . . . . . . . . . . . . . . . . . . . . . . . . . . 51
Reporting . . . . . . . . . . . . . . . . . . . . . . . . . . . . . . . . . . . . . . . . . . . . . . . . . . . . . . . . . . . . . 55
Section 3IRIDICA Browser . . . . . . . . . . . . . . . . . . . . . . . . . . . . . . . . . . . . . . . . . . . . . . 57
System Dashboard. . . . . . . . . . . . . . . . . . . . . . . . . . . . . . . . . . . . . . . . . . . . . . . . . . . . . . 59
Test Orders. . . . . . . . . . . . . . . . . . . . . . . . . . . . . . . . . . . . . . . . . . . . . . . . . . . . . . . . . . . . 61
View Logs . . . . . . . . . . . . . . . . . . . . . . . . . . . . . . . . . . . . . . . . . . . . . . . . . . . . . . . . . . . . . 65
Section 4Administration . . . . . . . . . . . . . . . . . . . . . . . . . . . . . . . . . . . . . . . . . . . . . . . 66
User Administration . . . . . . . . . . . . . . . . . . . . . . . . . . . . . . . . . . . . . . . . . . . . . . . . . . . . 67
13 IRIDICA Assay Applications Guide68‐608235/R2

System Setting Administration . . . . . . . . . . . . . . . . . . . . . . . . . . . . . . . . . . . . . . . . . . . . 71
Assay File Administration . . . . . . . . . . . . . . . . . . . . . . . . . . . . . . . . . . . . . . . . . . . . . . . . 72
Protocol File Administration . . . . . . . . . . . . . . . . . . . . . . . . . . . . . . . . . . . . . . . . . . . . . . 73
Device Script Administration . . . . . . . . . . . . . . . . . . . . . . . . . . . . . . . . . . . . . . . . . . . . . 74
Lab Items . . . . . . . . . . . . . . . . . . . . . . . . . . . . . . . . . . . . . . . . . . . . . . . . . . . . . . . . . . . . . 75
Section 5Reports and Interpretation . . . . . . . . . . . . . . . . . . . . . . . . . . . . . . . . . . . . . 77
Selecting Data for Reports . . . . . . . . . . . . . . . . . . . . . . . . . . . . . . . . . . . . . . . . . . . . . . . 78
Summary Reports . . . . . . . . . . . . . . . . . . . . . . . . . . . . . . . . . . . . . . . . . . . . . . . . . . . . . . 79
Workflow Reports . . . . . . . . . . . . . . . . . . . . . . . . . . . . . . . . . . . . . . . . . . . . . . . . . . . . . . 81
Results Interpretation . . . . . . . . . . . . . . . . . . . . . . . . . . . . . . . . . . . . . . . . . . . . . . . . . . . 82
Section 6Troubleshooting . . . . . . . . . . . . . . . . . . . . . . . . . . . . . . . . . . . . . . . . . . . . . . 85
Error Conditions. . . . . . . . . . . . . . . . . . . . . . . . . . . . . . . . . . . . . . . . . . . . . . . . . . . . . . . . 85
Error Messages . . . . . . . . . . . . . . . . . . . . . . . . . . . . . . . . . . . . . . . . . . . . . . . . . . . . . . . . 86
Section 7Maintenance and Service Procedures. . . . . . . . . . . . . . . . . . . . . . . . . . . . . 87
Preparing the DS Cleanup Reagents. . . . . . . . . . . . . . . . . . . . . . . . . . . . . . . . . . . . . . . . 87
Preparing the MS Reagents . . . . . . . . . . . . . . . . . . . . . . . . . . . . . . . . . . . . . . . . . . . . . . 89
Running a DS/MS Check Strip . . . . . . . . . . . . . . . . . . . . . . . . . . . . . . . . . . . . . . . . . . . . . 90
Mass Collapse Bias Adjustment . . . . . . . . . . . . . . . . . . . . . . . . . . . . . . . . . . . . . . . . . . . 96
As‐Needed SP Maintenance Service Actions. . . . . . . . . . . . . . . . . . . . . . . . . . . . . . . . . 97
Weekly or As‐Needed DS Maintenance Service Actions . . . . . . . . . . . . . . . . . . . . . . . 99
Weekly or As‐Needed DS Waste Bottle Maintenance . . . . . . . . . . . . . . . . . . . . . . . . 105
As‐Needed MS Maintenance Service Actions . . . . . . . . . . . . . . . . . . . . . . . . . . . . . . . 106
Monthly Maintenance. . . . . . . . . . . . . . . . . . . . . . . . . . . . . . . . . . . . . . . . . . . . . . . . . . 109
Barcode Scanner Beep Volume . . . . . . . . . . . . . . . . . . . . . . . . . . . . . . . . . . . . . . . . . . 110
Addendum AParts List . . . . . . . . . . . . . . . . . . . . . . . . . . . . . . . . . . . . . . . . . . . . . . . . . . . 111
14 IRIDICA Assay Applications Guide68‐608235/R2

Instrumentation
Section 1System Overview
IRIDICA System instrumentation is for use with IRIDICA in‐vitro diagnostic assays.
Instrumentation
IRIDICA assays have two stages, and require the use of two laboratory areas, Pre‐Amplification and Post‐Amplification.
Pre‐Amplification
Pre‐Amplification consists of sample preparation, extraction, and dispense into IRIDICA assay strips. Pre‐Amp involves one or both of the following instruments:
• BB
• SP
Bead Beater (BB)
Sample Prep(SP)
Thermal Cycler (TC)
Desalter (DS)
Mass Spectrometer(MS)
15 IRIDICA Assay Applications Guide 68‐608235/R2

Software Overview
Post‐Amplification
Post‐Amplification consists of amplification, desalting into DS Plates, and molecular analysis. Post‐amp involves the following instruments:
• TC
• DS
• MS
Software Overview
IRIDICAInstrumentControllerSoftware
Instrument Controller Software resides on the three Workstation PCs that control the IRIDICA instrumentation. Controller software is used to operate the instruments, enter test orders, and register assay materials.
• The SP Workstation PC controls the BB and SP.
• The DS Workstation PC controls the TC and DS.
• The MS Workstation PC controls the MS and sends data to the Analysis Computer
The Workstation PCs communicate with one another and with the Analysis Computer to track samples throughout the assay process to ensure they are processed accurately and are associated with the correct collected data.
16 IRIDICA Assay Applications Guide 68‐608235/R2

Software Overview
ControllerSoftwareInterface
Content Pane
• Title Bar: Displays page name, user signed in, current time and date, and the Sign Out button.
• System Status Bar: Indicates which services are connected and available, and which are offline and unavailable.
17 IRIDICA Assay Applications Guide 68‐608235/R2

Software Overview
• Instrument Status: Displays the status of individual instruments connected to the workstation.
• Bottom Option Menu: The Details button will display details about the selected instrument. This menu is always visible, and buttons will vary depending on the screen. The Shutdown button is only available to Administrative users.
18 IRIDICA Assay Applications Guide 68‐608235/R2

Software Overview
Left Sidebar
The Left Sidebar contains navigation buttons for registering samples and instrument components, controlling instrumentation, and viewing sample status. Instruments can be accessed from the Workstation PCs they are directly connected to. Instruments that are not directly connected will have grayed‐out buttons and must be accessed from the appropriate Workstation PC. For example, the BB and SP buttons are active while using the SP Workstation PC. This sidebar is always visible.
• Alert Center: View any new errors, warnings, or notifications. Small icons will indicate how many of each notices there are.
• Home: Return to the Home page.
• Sample Status: Review the status of a sample or create a new order.
• Bead Beater: Register BB components and control the BB (SP Workstation PC).
• Sample Prep: Register SP components and control the SP for non‐viral assays (SP Workstation PC).
• Sample Prep (Viral): Register SP components and control the SP for viral assays (SP Workstation PC).
• Thermal Cycler: Register TC components and control the TC (DS Workstation PC).
• Desalter: Register DS components and control the DS (DS Workstation PC).
• Mass Spec: Register MS components and control the MS (MS Workstation PC).
• Message History: View system messages.
• IRIDICA Browser: Open the IRIDICA Browser and System Dashboard.
19 IRIDICA Assay Applications Guide 68‐608235/R2

Software Overview
IRIDICASoftwareIcons
IRIDICAAnalysisSoftware
The Analysis Software resides on the Analysis Computer. It tracks samples and collects data from the Workstation PCs, interprets results, and generates reports. These reports are available to be viewed from the IRIDICA System Dashboard available on instrument Workstation PCs, or if configured, through a web browser interface using a computer on the customer’s network.
The Analysis Software works in the background and does not have a user interface. Use the System Dashboard in the IRIDICA Browser to generate reports from data that has been processed by the Analysis Software.
The orange circle on the Sample Status button indicates that there is at least one run timer for a sample currently in an assay run. See Run Timers on page 23 for details. Click on the Sample Status button to view timers.
The red triangle above the Alert Center menu indicates that there are error messages that require attention. The number next to it will indicate the number of errors. Click on the Alert Center button to view the messages.
The blue circle next to a Test Order on the Sample Status screen indicates that the sample has been entered as a STAT priority.
The blue cross next to a Test Order on the Sample Status screen indicates that the sample is a Positive Control.
The green circle with a checkmark next to modules such as the Analysis Server indicates that communication is established. If this icon is missing, the module is not connected.
20 IRIDICA Assay Applications Guide 68‐608235/R2
Software Overview
SystemDashboard
The System Dashboard is a web interface that can be accessed through instrument Workstation PCs or from any computer on the network, using a site‐specific web address. It works with the Analysis Software to query data from assay runs and generate reports from the results. It can also be used for administrative functions and for batch entering test orders. For more information on how to navigate and use the System Dashboard, see System Dashboard on page 59.
User Roles
Functional capabilities for users can be assigned by an Administrator via the System Dashboard. Depending on the roles assigned, users can be allowed to view reports, enter and export test orders, and view system logs. See Role Administration on page 68 for a list of privileges available for assignment. Administrative functions can be accessed from the System Administration tab on the System Dashboard.
21 IRIDICA Assay Applications Guide 68‐608235/R2

Section 2Operating Instructions
Prior to using the software for an assay run:
• Ensure all necessary maintenance has been performed and that all instruments and software are in working order.
• Perform all of the required pre‐software assay steps as indicated in the assay‐specific package insert, such as sample prep and reagent prep.
NOTE: This guide contains instructions for using the IRIDICA Controller software while performing IRIDICA assays. Refer to the individual operations manuals for details on the operation of a specific instrument and to the assay‐specific package insert for detailed steps required to run an entire assay.
CAUTION: Workstation touchscreens and barcode scanners should be considered possible sources of contamination. Wear appropriate gloves while performing assays and using IRIDICA Workstation PC touchscreens and barcode scanners. Always change gloves between workstations even if no assay materials have been handled. Do not go back to a previous workstation touchscreen without changing gloves. Failure to follow these guidelines may result in loss of clinical data and invalidation of subsequent runs.
See the individual instrumentation manuals for procedures on cleaning the workstation monitor screens.
22 IRIDICA Assay Applications Guide 68‐608235/R2

RunTimers
There are several steps in an IRIDICA assay when certain procedures must be performed within a specific amount of time. See the assay‐specific package insert for details.
Active timers for the steps listed below can be viewed on the Sample Status screen.
SP Load Timer After a BB run, the SP must be loaded and a run started within a set amount of time. If this timer expires, it will be annotated on the Summary Report.
PCR Seal Timer After an SP run, the Assay Strip Carrier must be sealed within a set amount of time. If this timer expires, it will be annotated on the Summary Report.
TC Load Timer After the Assay Strip Carrier is sealed, the TC must be loaded and a run started within a set amount of time. If this timer expires, it will be annotated on the Summary Report.
MS Load Timer After a DS run and the DS Plate is sealed, the plate must be run within a set amount of time. If this timer expires, it will be annotated on the Summary Report.
23 IRIDICA Assay Applications Guide 68‐608235/R2

Workstation PC Software Login
Workstation PC Software Login
All users must have a user ID and password to operate IRIDICA Workstation PC software. Users must log in to each Workstation PC through the assay process.
LoggingintoaWorkstationPC
1. Open/Activate the software.
2. Enter your ID and password, then click the Log On button.
24 IRIDICA Assay Applications Guide 68‐608235/R2

Pre‐Amplification
Pre-Amplification
Pre‐Amp consists of registering samples, sample prep, bead beating on the BB instrument (if applicable), and eluate transfer into IRIDICA assay strips on the SP. One Workstation PC controls both the BB and the SP instruments.
Prior to performing an assay run, samples must be registered and Test Orders must be created using the controller software or the Web interface. Test Order data is used to track samples from the beginning of the assay run to the end.
RegisterSamplestoCreateTestOrders
• Log on to the SP Workstation PC, if not already logged on.
• Click on the Sample Status button on the Sidebar.
For each sample in the run:
1. Click on New Order in the bottom option menu.
NOTE: Test Orders must be created separately and prior to attempting to operate the instrumentation. Instructions for entering Test Orders individually are listed below. See “Test Orders” on page 61 for importing multiple Test Orders using a spreadsheet‐type template.
25 IRIDICA Assay Applications Guide 68‐608235/R2

Pre‐Amplification
2. Scan or enter the Sample ID.
3. Select the appropriate Test.
4. Depending on the IRIDICA assay protocol selected, an additional screen may prompt for the sample type. Click on the appropriate sample type in the right pane. Sample types will vary by assay. See the assay‐specific package insert for details.
5. Select the desired Sample Priority. Select STAT to flag the sample as a priority.
6. Select the sample Type: Specimen, Positive Control, or Negative Control, as appropriate for the assay in use. See the assay‐specific package insert for appropriate sample types.
7. Click Submit.
The Sample Status page shows an updated list of all entered samples.
NOTE: The STAT priority designation will move a sample to the top of the selection list, and it will be analyzed ahead of other samples on the MS instrument when a plate that contains the sample is loaded. It will not automatically be selected for the next run.
26 IRIDICA Assay Applications Guide 68‐608235/R2

Pre‐Amplification
Click New Order to enter additional samples, as necessary.
NOTE: Multiple test orders may be imported using the Test Order Web Template with the System Dashboard. Test Orders on page 61.
Once all samples are entered, they are ready for the assay‐specific processing steps as described in the assay‐specific package insert.
• For viral assays skip to Using the SP Instrument for Viral Assays on page 38
• For non‐viral assays, continue with Using the BB Instrument on page 30
27 IRIDICA Assay Applications Guide 68‐608235/R2

Pre‐Amplification
AddAnnotations(Optional)
Add optional annotations or comments to individual Test Orders by using the Details feature. These annotations will appear on reports.
1. Select a Test Order on the Sample Status page and click the Details button.
2. On the Details screen, click the Add Annotations button on the bottom option menu.
3. Enter the comment for the Test Order exactly as it should appear, up to 255 characters. Click OK.
NOTE: Annotations may be entered for Test Orders at any time during the assay process up until they have been sprayed on the MS instrument.
Once an annotation is entered, it cannot be edited or deleted. Additional annotations may be entered for clarification purposes, if necessary.
28 IRIDICA Assay Applications Guide 68‐608235/R2
Pre‐Amplification
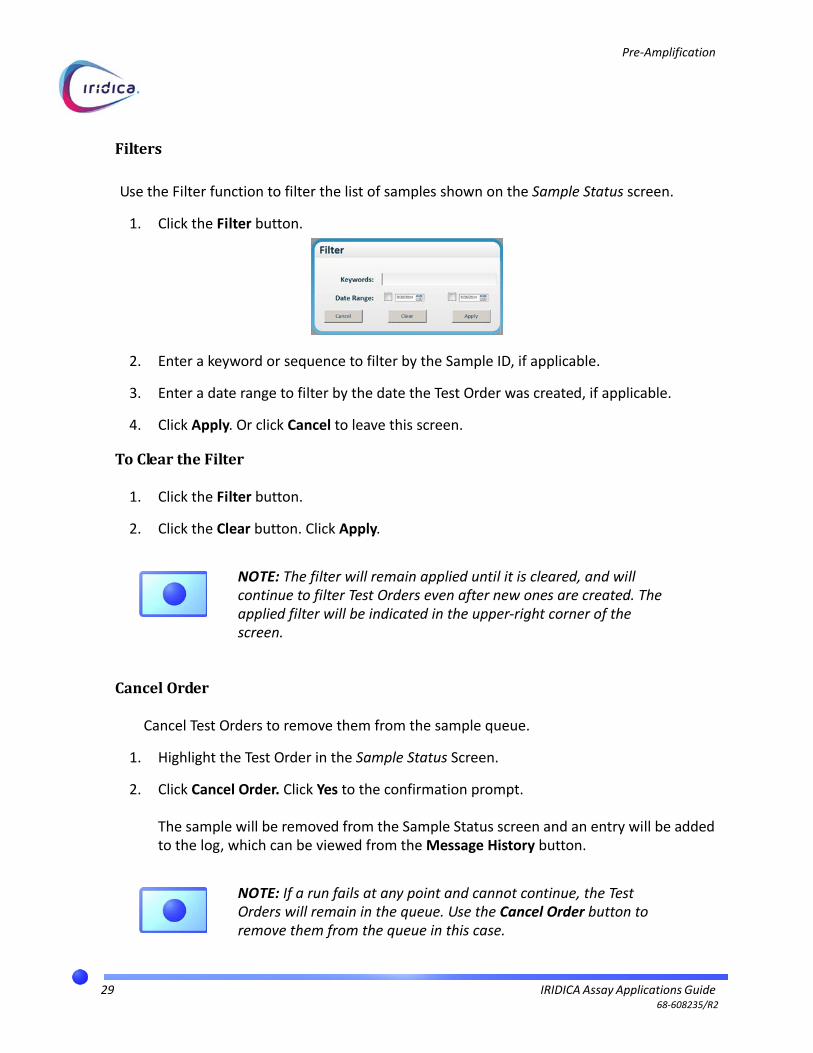
Filters
Use the Filter function to filter the list of samples shown on the Sample Status screen.
1. Click the Filter button.
2. Enter a keyword or sequence to filter by the Sample ID, if applicable.
3. Enter a date range to filter by the date the Test Order was created, if applicable.
4. Click Apply. Or click Cancel to leave this screen.
ToCleartheFilter
1. Click the Filter button.
2. Click the Clear button. Click Apply.
CancelOrder
Cancel Test Orders to remove them from the sample queue.
1. Highlight the Test Order in the Sample Status Screen.
2. Click Cancel Order. Click Yes to the confirmation prompt.
The sample will be removed from the Sample Status screen and an entry will be added to the log, which can be viewed from the Message History button.
NOTE: The filter will remain applied until it is cleared, and will continue to filter Test Orders even after new ones are created. The applied filter will be indicated in the upper‐right corner of the screen.
NOTE: If a run fails at any point and cannot continue, the Test Orders will remain in the queue. Use the Cancel Order button to remove them from the queue in this case.
29 IRIDICA Assay Applications Guide 68‐608235/R2

Using the BB Instrument
Using the BB Instrument
Bead beating is the process of breaking up a sample to release genetic material. The IRIDICA BB instrument can process up to six samples at one time.
ScanBBMaterials
• Select the Bead Beater button on the Sidebar.
1. Transfer sample material and additional assay components to the Bead Beating Tubes according to the assay‐specific package insert.
NOTE: Viral assays do not require the use of the BB instrument. See the assay‐specific package insert for details.
NOTE: Retain all relevant tubes used in the sample prep process for scanning.
30 IRIDICA Assay Applications Guide 68‐608235/R2

Using the BB Instrument
For each sample in the run:
2. On the Barcode Input screen, scan sample tube. The software matches the sample with an existing Test Order.
If the sample barcode cannot be scanned, use the Select button on the bottom option menu to select the sample tube from a list of existing Test Orders.
3. Scan the Bead Beating Tube.
4. Scan the Lysis Buffer.
5. Scan the Extraction Control.
6. Scan the Negative Control (Sample Diluent), if used, for certain sample types. See the assay‐specific package insert for details.
Continue scanning until all samples in the run are accounted for.
NOTE: For the first test order, the operator can either scan the next sample tube (down) or start scanning the assay components for the first sample tube (across). Once the operator chooses a direction, the scanning must continue in that direction.
For example, if the operator chooses to scan the next sample tube (down), then all the rest of the sample tubes will need to be scanned in prior to any assay components. Similarly, if the operator chooses to scan assay components (across), then the scanning will continue across when it comes time to scan in the next sample tube.
31 IRIDICA Assay Applications Guide 68‐608235/R2

Using the BB Instrument
Add Lab Items (Optional)
Users have the option to associate selected Lab Items with the run that have been entered by an administrator. Examples of Lab Items to associate with a run might be:
• Centrifuges
• Pipettes
• Ethanol lots or containers
These Lab Items will be indicated on a Workflow Report that is generated for the run.
1. On the Barcode Input screen, click the Lab Items button.
2. Click the green circle next to a Lab Item in the left pane in order to associate it with the run. It will appear in the right pane. Click the red circle next to a Lab Item in the right pane to remove it from the run.
3. Click the Save button when done. Click Exit to leave this screen without saving changes.
NOTE: Lab Items may be added at any step in the assay run up until the MS instrument starts processing the samples.
32 IRIDICA Assay Applications Guide 68‐608235/R2
Using the BB Instrument
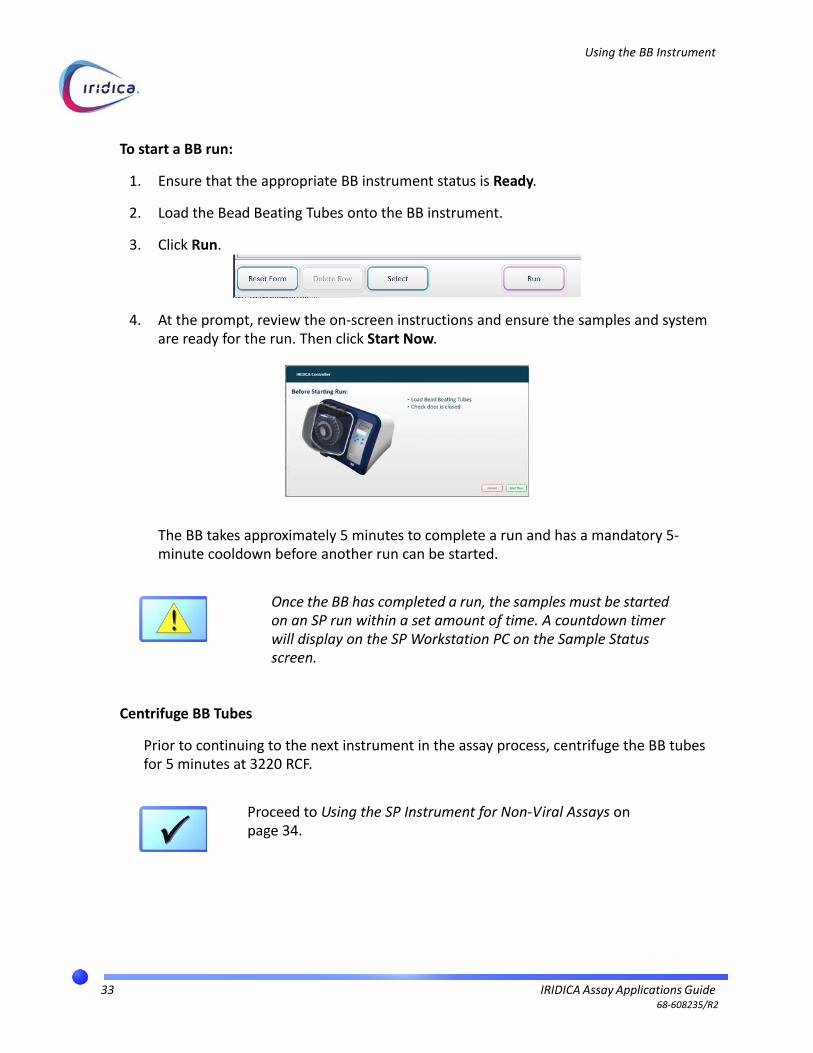
To start a BB run:
1. Ensure that the appropriate BB instrument status is Ready.
2. Load the Bead Beating Tubes onto the BB instrument.
3. Click Run.
4. At the prompt, review the on‐screen instructions and ensure the samples and system are ready for the run. Then click Start Now.
The BB takes approximately 5 minutes to complete a run and has a mandatory 5‐minute cooldown before another run can be started.
Centrifuge BB Tubes
Prior to continuing to the next instrument in the assay process, centrifuge the BB tubes for 5 minutes at 3220 RCF.
Once the BB has completed a run, the samples must be started on an SP run within a set amount of time. A countdown timer will display on the SP Workstation PC on the Sample Status screen.
Proceed to Using the SP Instrument for Non‐Viral Assays on page 34.
33 IRIDICA Assay Applications Guide 68‐608235/R2

Using the SP Instrument for Non‐Viral Assays
Using the SP Instrument for Non-Viral Assays
This section contains instructions for non‐viral IRIDICA assays. For viral assays, see Using the SP Instrument for Viral Assays on page 38.
The SP takes sample material and mixes it with wash reagents to help isolate genetic material, then dispenses it into assay strip wells for further processing.
To Prepare the Assay Strip Carrier:
1. Load Assay Strip Carrier with Assay Strips as described in the assay‐specific package insert.
2. Centrifuge the Assay Strip Carrier and handle the loaded Assay Strip Carrier according to the assay‐specific package insert.
LoadAssayMaterials
1. Load Bellows Tips on the SP and lock in place.
2. Load 50 uL PCR Tip Strips onto the SP and lock in place.
3. Click the Sample Prep button in the Sidebar.
NOTE: For detailed instructions on how to load consumables, reagents, and tubes onto the SP instrument, refer to the IRIDICA SP Operations Manual.
34 IRIDICA Assay Applications Guide 68‐608235/R2

Using the SP Instrument for Non‐Viral Assays
The Sample Prep screen highlights the current item to be scanned and also its intended location in a diagram of the SP deck.
4. Transfer the supernatant from the Bead Beating Tubes into corresponding Process Tubes according to the assay‐specific package insert.
For each sample in the run:
5. Scan the Bead Beating Tube. If the barcode cannot be scanned, use the Select button to choose the Bead Beating Tube from a list.
6. Scan the corresponding Process Tube.
7. Scan the Elution Tube, Reagent Cartridges, and Assay Strips and load into the correct locations on the SP deck. Ensure the first two wells of the Reagent Cartridges are filled with 18 mL ethanol.
To start a run:
1. Ensure the bellows lock is fully engaged and the door is closed.
NOTE: Retain the Bead Beating tubes for scanning.
35 IRIDICA Assay Applications Guide 68‐608235/R2

Using the SP Instrument for Non‐Viral Assays
2. On the SP Workstation PC, click Run.
3. At the prompt, review the on‐screen instructions and ensure the samples and system are ready for the run. Then click Start Now.
The SP takes approximately 110 minutes to complete a run.
36 IRIDICA Assay Applications Guide 68‐608235/R2

Using the SP Instrument for Non‐Viral Assays
4. After the run has completed, a prompt will appear for sealing the Assay Strip Carrier. The door will unlock and operation will cease.
5. Click the Resume Run button. Open the SP main door, lift the latch, and apply a PCR Foil Seal to the Assay Strip Carrier while it is still on the instrument, according to the assay‐specific package insert.
6. Remove the sealed Assay Strip Carrier from the SP deck and centrifuge according to the assay‐specific package insert.
NOTE: This prompt will start a PCR Seal timer. If this prompt is not acknowledged within a set amount of time, an annotation will be added to the Summary Report that the PCR Seal timer had expired during the run. See the assay‐specific package insert for details.
Proceed to Post‐Amplification on page 42.
NOTE: The samples must be loaded onto the TC within a set amount of time after sealing the Assay Strip Carrier. If the TC is not started within this time, an annotation will be added to the Summary Report that the TC Load timer had expired during the run. See the assay‐specific package insert for details.
37 IRIDICA Assay Applications Guide 68‐608235/R2

Using the SP Instrument for Viral Assays
Using the SP Instrument for Viral Assays
This section contains instructions for viral IRIDICA assays on the SP Instrument. For non‐viral assays, see Using the SP Instrument for Non‐Viral Assays on page 34.
The SP dispenses sample with PCR reagents into assay strip wells for further processing.
PreparetheViralAssayMaterials
1. Prepare the viral assay strips and place them on the Assay Strip Carrier.
2. Centrifuge the Assay Strip Carrier according to the assay‐specific package insert, then place the Assay Strip Carrier onto the SP deck and latch in place.
3. Prepare Elution Tubes and Enzyme Mix vials according to the assay‐specific package insert.
4. Load 50 uL PCR Tip Strips onto the SP and lock in place.
NOTE: For detailed instructions on how to load consumables, reagents, and tubes onto the SP instrument, refer to the IRIDICA SP Operations Manual.
NOTE: For detailed instructions on how to prepare reagent materials for viral assays, including amounts, thawing instructions, and vortexing, refer to the assay‐specific package insert. General steps are included below for convenience.
Retain all assay reagent vials, including those used to prepare samples, in order to scan their barcodes for the run.
NOTE: For detailed instructions on how to load consumables, reagents, and tubes onto the SP instrument, refer to the IRIDICA SP Operations Manual.
38 IRIDICA Assay Applications Guide 68‐608235/R2
Using the SP Instrument for Viral Assays
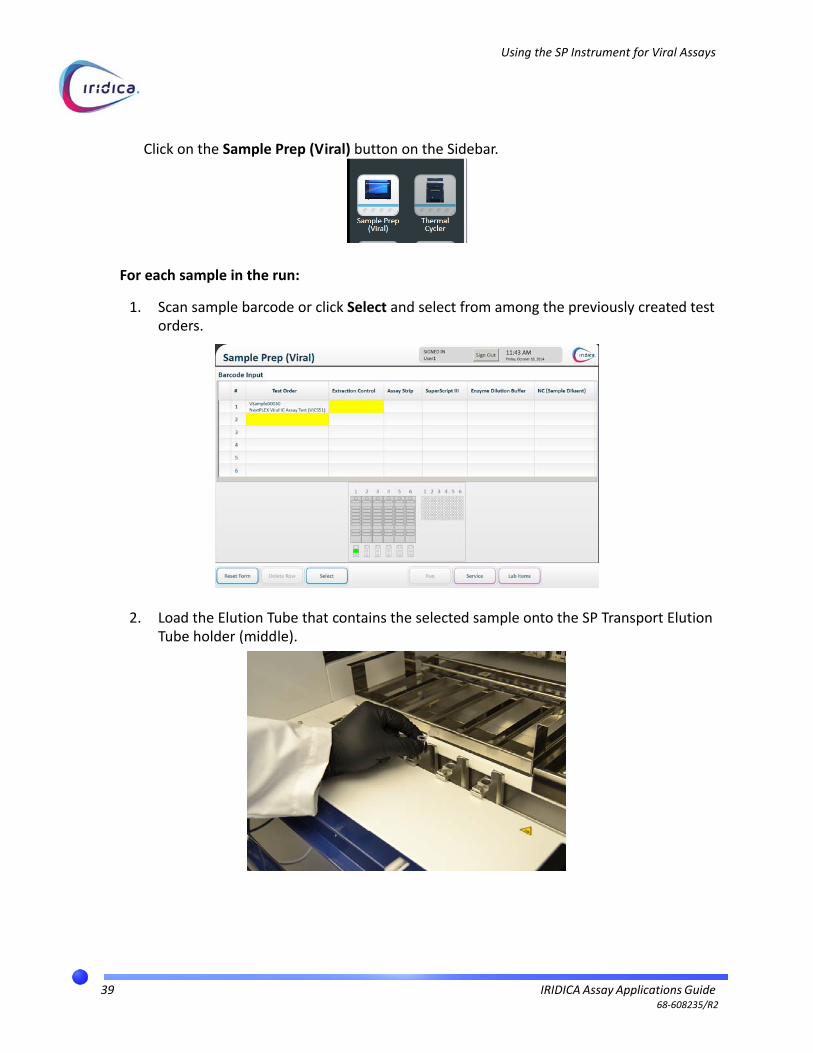
Click on the Sample Prep (Viral) button on the Sidebar.
For each sample in the run:
1. Scan sample barcode or click Select and select from among the previously created test orders.
2. Load the Elution Tube that contains the selected sample onto the SP Transport Elution Tube holder (middle).
39 IRIDICA Assay Applications Guide 68‐608235/R2

Using the SP Instrument for Viral Assays
3. Load an Enzyme Mix vial into the SP Transport tube holder (front).
4. Scan the Extraction Control associated with that sample.
5. Scan the assay strip associated with that sample.
6. For the first sample in the run only: Scan the SuperScript III vial, the Enzyme Dilution Buffer vial, and the Negative Control vial.
To start a run:
1. Ensure the Bellows lock is engaged.
2. On the SP Workstation PC click Run.
3. At the prompt, review the on‐screen instructions and ensure the samples and system are ready for the run. Then click Start Now.
The SP takes approximately 10 to 15 minutes to complete a run.
NOTE: The back SP Transport tube holders are not used for Viral assays and are left empty.
NOTE: These three barcodes will auto‐populate for subsequent samples selected for the run. The Extraction Control will not auto‐populate.
NOTE: Lab Items may be added prior to the run by clicking the Lab Items button. See Add Lab Items (Optional) on page 32 for details.
40 IRIDICA Assay Applications Guide 68‐608235/R2
Using the SP Instrument for Viral Assays
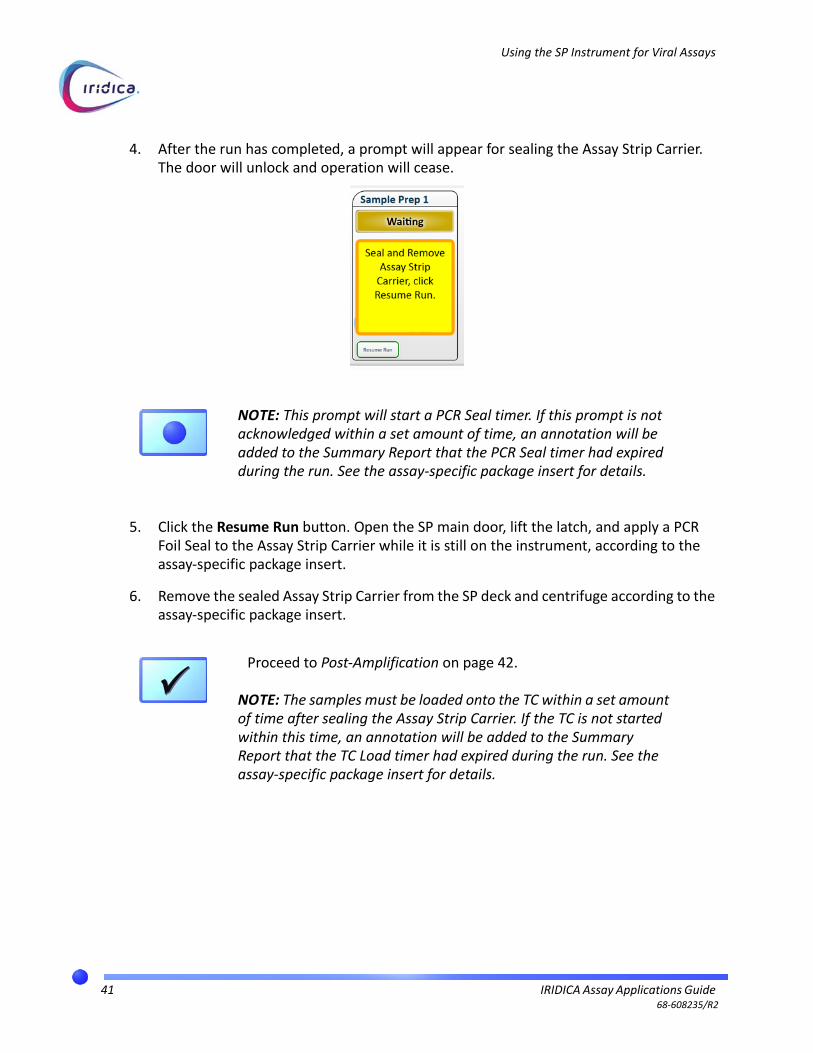
4. After the run has completed, a prompt will appear for sealing the Assay Strip Carrier. The door will unlock and operation will cease.
5. Click the Resume Run button. Open the SP main door, lift the latch, and apply a PCR Foil Seal to the Assay Strip Carrier while it is still on the instrument, according to the assay‐specific package insert.
6. Remove the sealed Assay Strip Carrier from the SP deck and centrifuge according to the assay‐specific package insert.
NOTE: This prompt will start a PCR Seal timer. If this prompt is not acknowledged within a set amount of time, an annotation will be added to the Summary Report that the PCR Seal timer had expired during the run. See the assay‐specific package insert for details.
Proceed to Post‐Amplification on page 42.
NOTE: The samples must be loaded onto the TC within a set amount of time after sealing the Assay Strip Carrier. If the TC is not started within this time, an annotation will be added to the Summary Report that the TC Load timer had expired during the run. See the assay‐specific package insert for details.
41 IRIDICA Assay Applications Guide 68‐608235/R2

Post‐Amplification
Post-Amplification
Post‐Amp consists of thermal cycling on the TC, desalting on the DS, and molecular analysis on the MS. The DS Workstation PC controls both the TC and the DS. The MS Workstation PC controls the MS.
42 IRIDICA Assay Applications Guide 68‐608235/R2

Using the TC Instrument
Using the TC Instrument
The TC provides a heat‐cycling environment to enable PCR reactions within the assay strip wells.
1. Click on the Thermal Cycler button in the Left Sidebar.
2. Scan the barcode for each assay strip in the carrier. The Test Order fields will auto‐populate. Alternatively, use the Select button to select from available Test Orders.
To remove an Assay Strip from the list, select it, then click Delete Row. If the entire list needs to be removed, click Reset Form.
NOTE: For detailed instructions on how to operate the TC instrument, refer to the IRIDICA TC Operations Manual.
NOTE: Scan all of the assay strips in the carrier at once by holding down the button and sliding the scanner across all barcodes in a sweeping motion.
43 IRIDICA Assay Applications Guide 68‐608235/R2
Using the TC Instrument
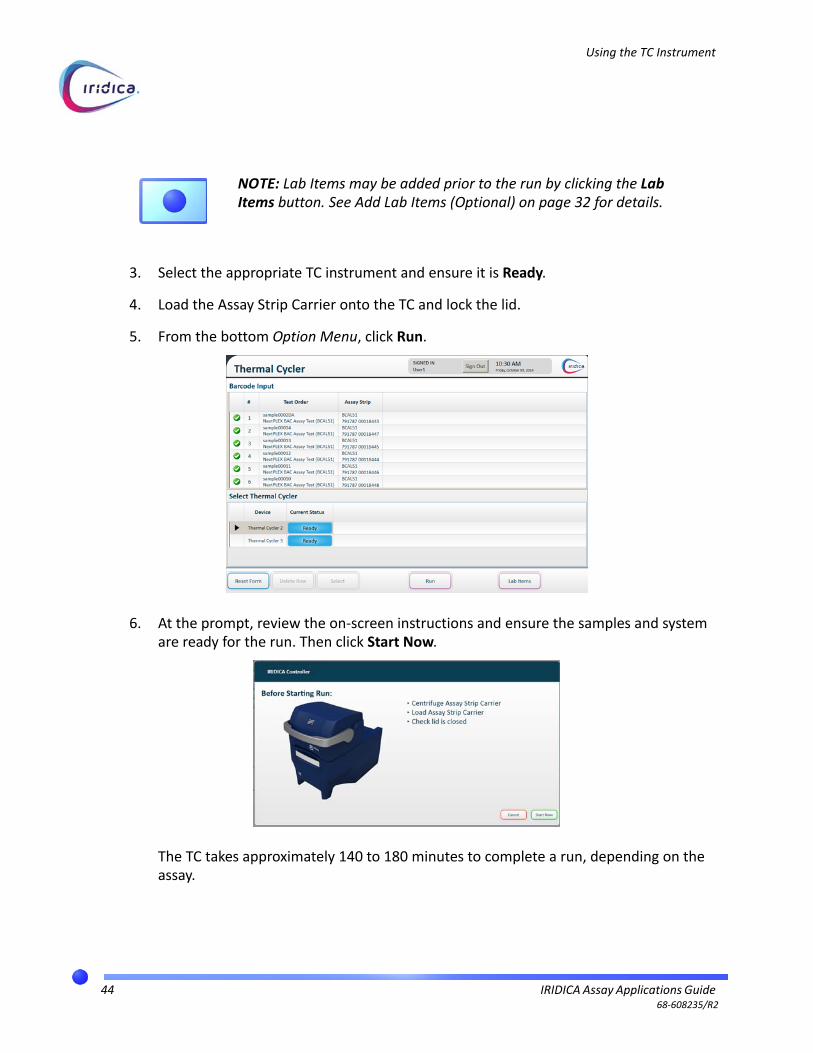
3. Select the appropriate TC instrument and ensure it is Ready.
4. Load the Assay Strip Carrier onto the TC and lock the lid.
5. From the bottom Option Menu, click Run.
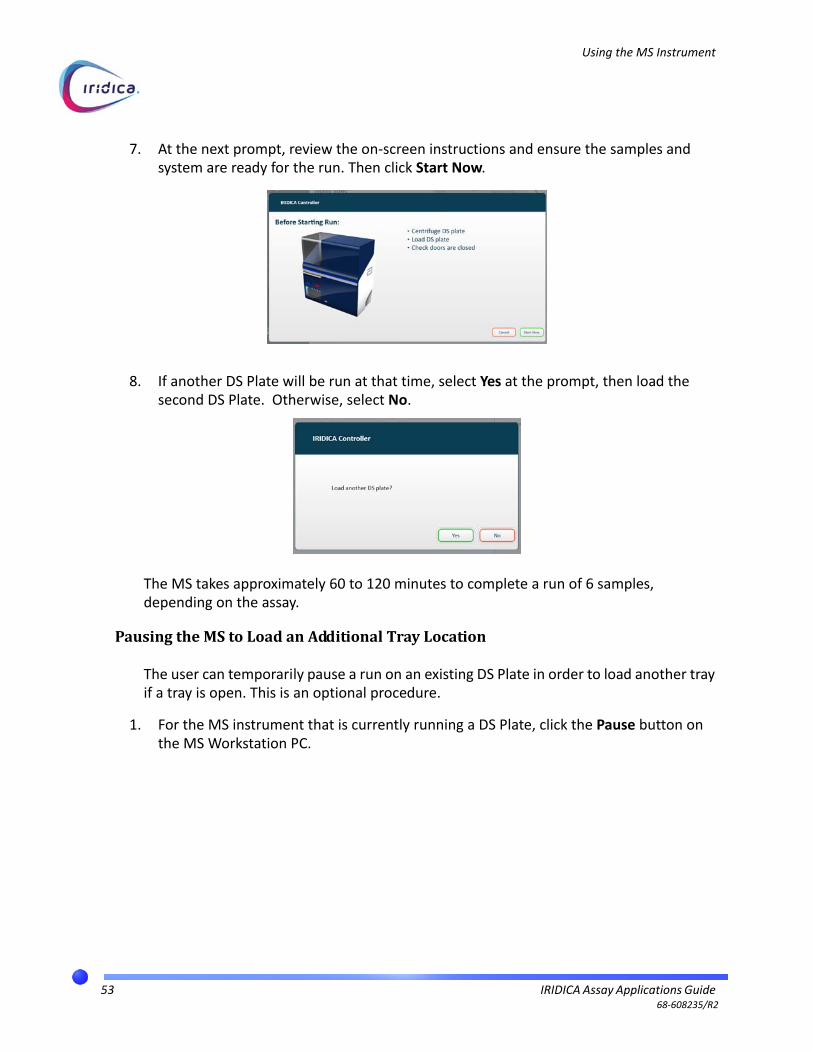
6. At the prompt, review the on‐screen instructions and ensure the samples and system are ready for the run. Then click Start Now.
The TC takes approximately 140 to 180 minutes to complete a run, depending on the assay.
NOTE: Lab Items may be added prior to the run by clicking the Lab Items button. See Add Lab Items (Optional) on page 32 for details.
44 IRIDICA Assay Applications Guide 68‐608235/R2
Using the TC Instrument
7. The TC will enter a Holding state after the run completes. Click End Hold prior to continuing to the DS.
CentrifugeAssayStripCarrier
Centrifuge the Assay Strip Carrier according to the assay‐specific package insert .
NOTE: The completion of the TC run will start a DS Load timer. If the Assay Strip Carrier is not loaded on the DS within a set amount of time, an annotation will be added to the Summary Report that the DS Load timer had expired during the run. See the assay‐specific package insert for details.
Proceed to Using the DS Instrument on page 46.
45 IRIDICA Assay Applications Guide 68‐608235/R2

Using the DS Instrument
Using the DS Instrument
The DS desalts, or purifies, the amplified PCR target material for analysis on the MS instrument.
1. Click on the Desalter button in the Left Sidebar.
2. Prepare DS reagents and register them, if needed. See Preparing the DS Cleanup Reagents on page 87 for details.
• Click Reagents.
• Scan reagent barcodes.
• Click Save.
• Load 8 new DS Reagent Tips upon registering new DS reagents.
• Run a DS/MS Check Strip on the DS and the MS, upon registering new DS reagents. Refer to Running a DS/MS Check Strip on page 90.
3. Transfer the appropriate amount of DS reagents into the corresponding reagent cartridge reservoirs, then carefully set it into the reagent well.
NOTE: For detailed instructions on how to load consumables, reagents, and plates onto the DS instrument, refer to the IRIDICA DS Operations Manual.
46 IRIDICA Assay Applications Guide 68‐608235/R2

Using the DS Instrument
4. Scan a new DS Plate.
5. Scan each assay strip in the thermalcycled Assay Strip Carrier. Visually confirm that the assay strips match the order and quantity on the Assay Strip Carrier.
LoadAssayMaterials
1. Load the Master Tip carrier with tips and set on the DS deck.
2. Load the DS Plate and latch in place.
3. Load the Assay Strip Carrier and latch in place.
To start a run:
1. Ensure all doors and compartments are closed.
NOTE: To remove an Assay Strip from the list, select it, then click Delete Row. If the entire list needs to be removed, click Reset Form.
NOTE: Lab Items may be added prior to the run by clicking the Lab Items button. See Add Lab Items (Optional) on page 32 for details.
47 IRIDICA Assay Applications Guide 68‐608235/R2

Using the DS Instrument
2. Click Run.
3. At the prompt, review the on‐screen instructions then move to the next page by clicking the >> button.
4. At the prompt on the second page, review the on‐screen instructions and ensure the samples and system are ready for the run, then click Start Now.
The DS takes approximately 38 minutes to complete a run.
48 IRIDICA Assay Applications Guide 68‐608235/R2

Using the DS Instrument
5. Towards the end of the run, a message will appear on‐screen that the plate will be ready to seal in 30 seconds. Click Resume Run to continue the run.
6. After the final elution step, an additional prompt will appear for sealing the Desalting plate. The door will unlock and operation will cease.
7. Open the DS main door, lift the latch, and apply a DS foil seal to the plate while it is still on the instrument, according to the assay‐specific package insert.
8. Remove the sealed DS Plate from the DS deck. Close the DS Plate latch.
9. Close the main door, then click Resume Run to complete the run. The instrument will perform a finalization step and will home all axes. This step takes about a minute to complete.
NOTE: The DS instrument will perform a final elution step after Resume Run is clicked. This final elution step takes less than a minute to complete and then the plate must immediately be sealed.
49 IRIDICA Assay Applications Guide 68‐608235/R2

Using the DS Instrument
10. Centrifuge the sealed DS Plate according to the assay‐specific package insert.
NOTE: The DS Plate may begin centrifugation while the DS instrument is finalizing the run.
Proceed to Using the MS Instrument on page 51.
50 IRIDICA Assay Applications Guide 68‐608235/R2
Using the MS Instrument
Using the MS Instrument
The MS injects amplified PCR material from the DS Plate wells into a TOF chamber, where it is processed and measured to determine its contents.
1. Click on the Mass Spec button in the Left Sidebar.
LoadAssayMaterials
1. Prepare MS reagents and register them, if needed. See Preparing the MS Reagents on page 89 for details.
• Select Reagents.
• Scan reagent barcodes.
• Transfer the appropriate amount of methanol into the new Reagent A and Reagent B bottles.
• Transfer the contents of the Peptide vial into the Reagent B bottle.
• Install the bottles for Reagent A and Reagent B, and a new empty waste bottle.
• Select Save. The instrument will begin Autotune and Reagent Prime protocols with the new reagents, a total of approximately 5 minutes.
2. Ensure the MS is Ready.
NOTE: For detailed instructions on how to load plates and reagents, onto the MS instrument, refer to the IRIDICA MS Operations Manual.
51 IRIDICA Assay Applications Guide 68‐608235/R2

Using the MS Instrument
3. Scan the DS Plate. The software will match Test Orders to the plate.
4. Select an open Tray position under Select Tray.
5. Load the DS Plate onto the selected Tray position on the MS Loading Tray. Ensure the plate is oriented so that the barcode faces to the front of the instrument.
6. Click Run.
NOTE: Lab Items may be added prior to the run by clicking the Lab Items button. See Add Lab Items (Optional) on page 32 for details. Once the MS starts processing the DS Plate, Lab Items can no longer be added to the run.
52 IRIDICA Assay Applications Guide 68‐608235/R2
Using the MS Instrument
7. At the next prompt, review the on‐screen instructions and ensure the samples and system are ready for the run. Then click Start Now.
8. If another DS Plate will be run at that time, select Yes at the prompt, then load the second DS Plate. Otherwise, select No.
The MS takes approximately 60 to 120 minutes to complete a run of 6 samples, depending on the assay.
PausingtheMStoLoadanAdditionalTrayLocation
The user can temporarily pause a run on an existing DS Plate in order to load another tray if a tray is open. This is an optional procedure.
1. For the MS instrument that is currently running a DS Plate, click the Pause button on the MS Workstation PC.
53 IRIDICA Assay Applications Guide 68‐608235/R2
Using the MS Instrument
The MS will finish spraying all wells in the current sample (up to 20 minutes), and then cease movement and unlock the door for the empty Plate Loading Tray.
2. Load another DS Plate into the open position and click Run.
3. At the prompt, review the on‐screen instructions and ensure the samples and system are ready for the run. Then click Start Now.
4. The MS will continue to process the existing DS Plate and complete it before switching to the new one.
NOTE: Once the user initiates a Pause, the MS instrument will finish all wells in the current sample, and then enter an indefinite Waiting state.
To resume the run without loading another tray, click the Resume Run button on the Home screen while the MS is in this Waiting state.
NOTE: If more than 30 minutes have passed after the start of the Waiting state, the MS will automatically run a Reagent Prime upon re‐starting.
After the run completes, the samples have completed processing.
Continue to Reporting on page 55 to generate reports.
54 IRIDICA Assay Applications Guide 68‐608235/R2

Reporting
Reporting
The reporting functions can accessed through from any IRIDICA Workstation PC by clicking on the IRIDICA Browser button. If configured, they can also be accessed from separate computer on the customer network using a web browser.
1. Click the IRIDICA Browser button to access the Reporting function from an instrument workstation PC.
Alternatively, if configured, navigate to the IRIDICA Reporting web portal using a web browser. The web address should have already been provided. If not, contact a company site Administrator for the IRIDICA software.
Use the same login information as for the Instrument Controller Software.
2. Drag the samples for the report from the top table to the bottom table. All samples listed in the bottom table will be represented in the report.
3. Ensure PDF and Summary Report are both selected in the bottom reporting menus. Then click View Report to create the report.
NOTE: Users must have the ViewReports role to access reporting functions of the IRIDICA assay software.
55 IRIDICA Assay Applications Guide 68‐608235/R2
Reporting
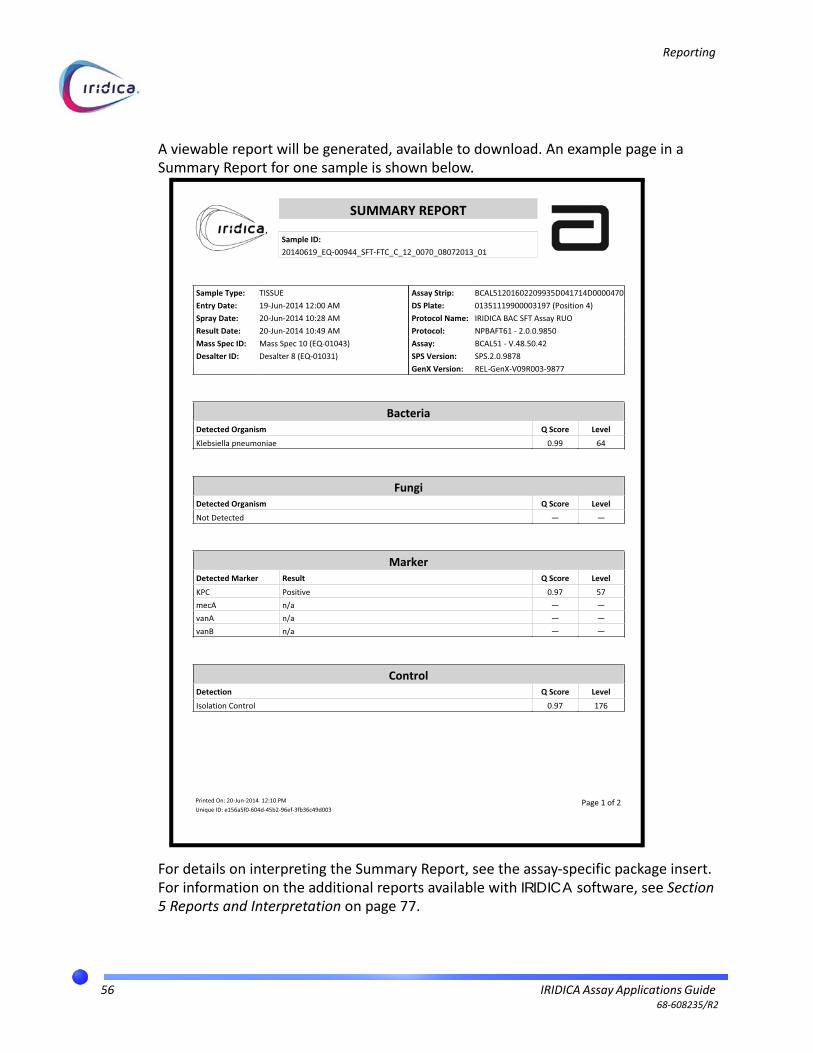
A viewable report will be generated, available to download. An example page in a Summary Report for one sample is shown below.
For details on interpreting the Summary Report, see the assay‐specific package insert. For information on the additional reports available with IRIDICA software, see Section 5 Reports and Interpretation on page 77.
SUMMARY REPORT
Sample ID:20140619_EQ-00944_SFT-FTC_C_12_0070_08072013_01
Printed On: 20-Jun-2014 12:10 PMUnique ID: e156a5f0-604d-45b2-96ef-3fb36c49d003
Page 1 of 2
Sample Type: TISSUE Assay Strip: BCAL51201602209935D041714D0000470Entry Date: 19-Jun-2014 12:00 AM DS Plate: 01351119900003197 (Position 4)Spray Date: 20-Jun-2014 10:28 AM Protocol Name: IRIDICA BAC SFT Assay RUOResult Date: 20-Jun-2014 10:49 AM Protocol: NPBAFT61 - 2.0.0.9850Mass Spec ID: Mass Spec 10 (EQ-01043) Assay: BCAL51 - V.48.50.42Desalter ID: Desalter 8 (EQ-01031) SPS Version: SPS.2.0.9878
GenX Version: REL-GenX-V09R003-9877
BacteriaDetected Organism Q Score Level
Klebsiella pneumoniae 0.99 64
FungiDetected Organism Q Score Level
Not Detected — —
MarkerDetected Marker Result Q Score Level
KPC Positive 0.97 57mecA n/a — —vanA n/a — —vanB n/a — —
ControlDetection Q Score Level
Isolation Control 0.97 176
56 IRIDICA Assay Applications Guide 68‐608235/R2

Section 3IRIDICA Browser
The IRIDICA Browser can be used to view details about the IRIDICA system, including the IRIDICA System Dashboard.
Click the IRIDICA Browser button to access reporting functions, the System Dashboard, and other administrative functions from an instrument Workstation PC.
Alternatively, if configured, navigate to the IRIDICA Reporting web portal using a web browser. The web address should have already been provided. If not, contact a company site Administrator for the IRIDICA software.
Use the same login information as for the Instrument Controller Software.
The following can be accomplished from the IRIDICA Browser, depending on assigned role:
• Checking sample status via the System Dashboard
• Checking device status via the System Dashboard
• Creating, importing, and exporting Test Orders
57 IRIDICA Assay Applications Guide 68‐608235/R2

• Viewing and exporting system logs
• Administrative tasks, such as creating users and assigning rolesSee Section 4 Administration on page 66
• Viewing and exporting system logsSee View Logs on page 65
• Generating reportsSee Section 5 Reports and Interpretation on page 77 for details
By default, the system will display the View Reports screen.
Use the filter symbol next to a column heading to filter the list of samples based on selected criteria.
58 IRIDICA Assay Applications Guide 68‐608235/R2

System Dashboard
System Dashboard
The IRIDICA System Dashboard is a general overview of the IRIDICA system. View samples in progress and current instrument status from this screen.
SamplesInProgressandDeviceStatus
View the current list of samples registered with the system and IRIDICA devices. Use the
filter symbol next to a column heading to filter the list of samples based on selected criteria.
ManageProfile
Under Manage Profile, a user can view assigned roles.
Click on the username in the upper right hand corner to get to the Manage Profile link.
ViewAssignedRoles
1. Select Manage Profile from the dropdown menu on the current username.
59 IRIDICA Assay Applications Guide 68‐608235/R2
System Dashboard
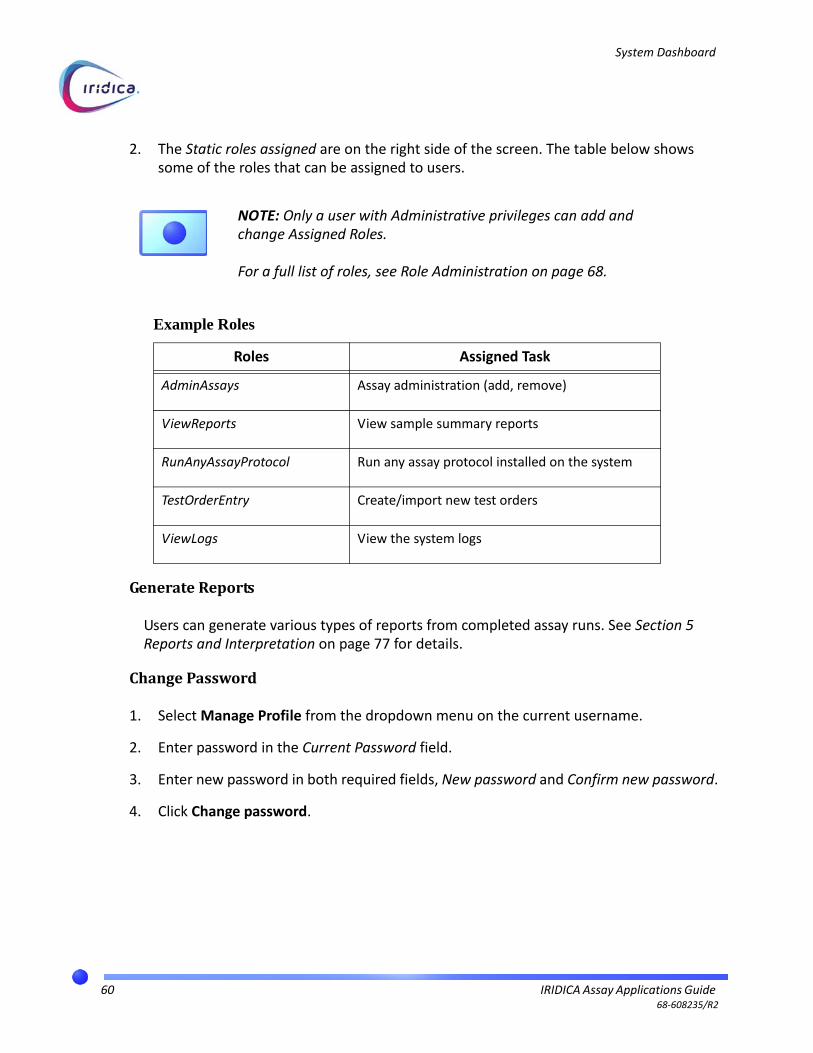
2. The Static roles assigned are on the right side of the screen. The table below shows some of the roles that can be assigned to users.
GenerateReports
Users can generate various types of reports from completed assay runs. See Section 5 Reports and Interpretation on page 77 for details.
ChangePassword
1. Select Manage Profile from the dropdown menu on the current username.
2. Enter password in the Current Password field.
3. Enter new password in both required fields, New password and Confirm new password.
4. Click Change password.
NOTE: Only a user with Administrative privileges can add and change Assigned Roles.
For a full list of roles, see Role Administration on page 68.
Example Roles
Roles Assigned Task
AdminAssays Assay administration (add, remove)
ViewReports View sample summary reports
RunAnyAssayProtocol Run any assay protocol installed on the system
TestOrderEntry Create/import new test orders
ViewLogs View the system logs
60 IRIDICA Assay Applications Guide 68‐608235/R2

Test Orders
Test Orders
CreateTestOrders
To reach the Create Test Orders window and perform the following tasks, hover over the Test Orders menu, and select Create Test Orders.
Users must have TestOrderEntry privileges to import test orders from a file.
1. Download the appropriate template.
2. Fill out the template using spreadsheet software or a text editor on another computer. Enter the data points below for each test order, one test order per row. Do not change any of the header row information.
• Sample ID
• Sample type
• Control Type
• Protocol Code
• Protocol Version
.CSV Example File in a spreadsheet editor
NOTE: If accessing the IRIDICA Browser on an IRIDICA Workstation PC, the template will be downloaded to a USB drive. Ensure that a USB drive is plugged in prior to attempting the download.
The template cannot be filled out on an IRIDICA Workstation PC.
61 IRIDICA Assay Applications Guide 68‐608235/R2

Test Orders
3. Save file as .csv or .xml.
4. Click the Select new test order files... to browse for the test order file or drag and drop the file into the box.
5. Click Upload new test order files.
ExportTestOrderArchives
Use this function to create an export file for test orders that have already been run.
Users must have TestOrderExport privileges to export test order archives.
1. Drag‐and‐drop completed test orders from the top table to the bottom table.
2. Click Download exported test orders.
NOTE: Ensure all information is accurate and complete prior to import. Do not leave any data point blank. There will not be an opportunity to correct or update it once it is imported.
NOTE: Test Order archive files only contain meta‐information about the Test Orders, such as the Sample ID and the Assay Strip barcode used for the sample. Results cannot be exported using this function.
62 IRIDICA Assay Applications Guide 68‐608235/R2

Test Orders
ImportTestOrderArchives
Users must have TestOrderImport privileges to import test order archives.
1. Click Select test order export files... or drag the files into the box.
2. Files will automatically upload.
63 IRIDICA Assay Applications Guide 68‐608235/R2

Test Orders
SystemInformation
An Abbott Service Representative may ask for general information about the system. Use the System Information screen to view a general state of the system, and to identify the assay files and device scripts installed at the site location.
• Hover over the System tab and click on System Information.
64 IRIDICA Assay Applications Guide 68‐608235/R2
View Logs
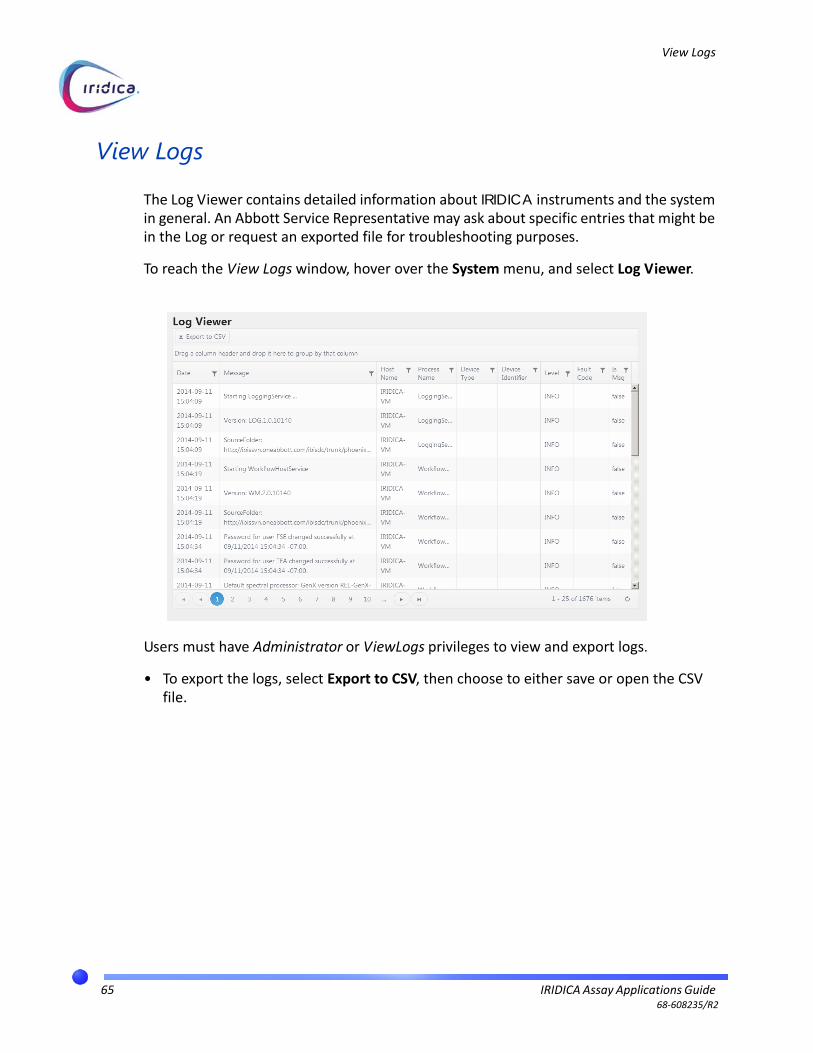
View Logs
The Log Viewer contains detailed information about IRIDICA instruments and the system in general. An Abbott Service Representative may ask about specific entries that might be in the Log or request an exported file for troubleshooting purposes.
To reach the View Logs window, hover over the System menu, and select Log Viewer.
Users must have Administrator or ViewLogs privileges to view and export logs.
• To export the logs, select Export to CSV, then choose to either save or open the CSV file.
65 IRIDICA Assay Applications Guide 68‐608235/R2

Section 4Administration
Administrator‐level users may perform administrative tasks such as:
• configuring, adding, and removing users
• adding assay files and protocol files
• adding and changing device script files
• adding Lab Items data
These functions can be found under the System Administration drop‐down menu on the IRIDICA Browser.
Users must have Administrator privileges or admin‐level privileges associated with the above tasks to perform the tasks listed in this section.
See the Assignable Roles table on page 68 for a list of roles available for assignment to users.
66 IRIDICA Assay Applications Guide 68‐608235/R2

User Administration
User Administration
To reach the User Administration window and perform the following tasks, hover over the System Administration menu, and select User Administration.
CreateUsers
1. Click Add new user account.
2. Enter the new Username and Full Name of the user.
3. If necessary, check or uncheck the following boxes:
4. Enter the Administrative password in the Confirm Password field.
5. Click Save changes, then OK in the prompt.
Enabled This box should be checked for all active users.Unchecked this box to disable account access for that user.
Locked If checked, the user is locked out of the system and cannot login until either the set time has elapsed or an administrator manually unlocks the account.
Change Password If checked, user will be required to change password upon the next login.
67 IRIDICA Assay Applications Guide 68‐608235/R2
User Administration
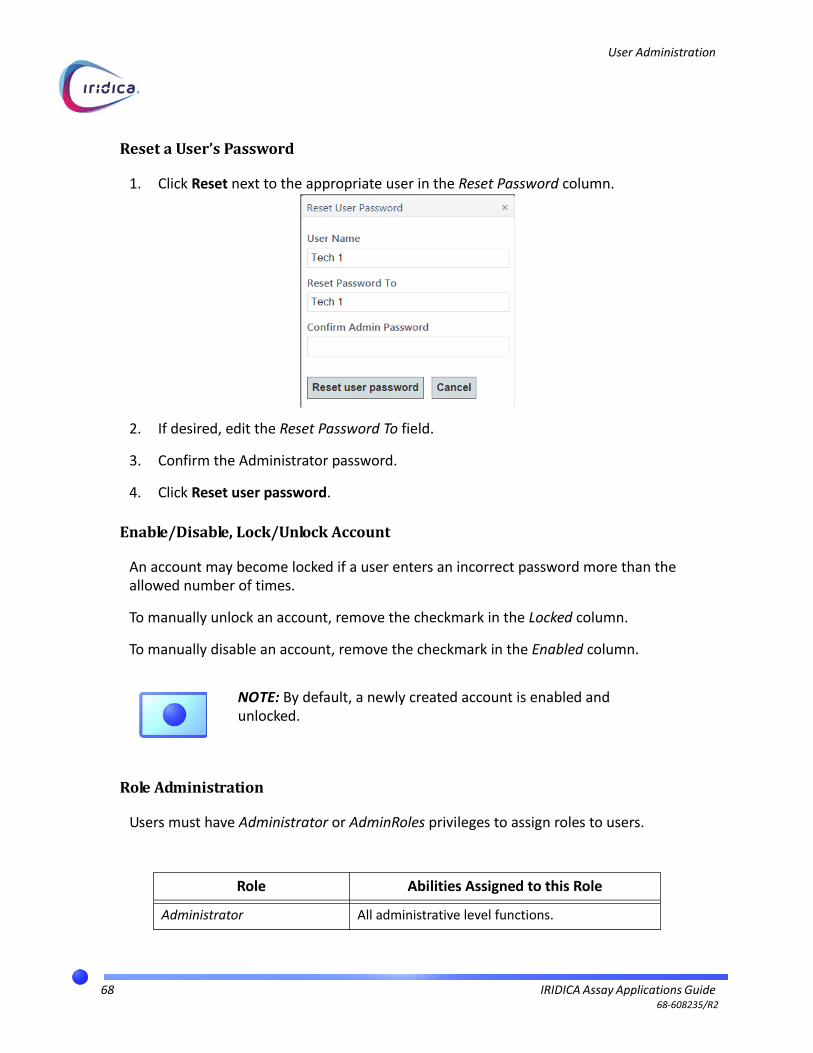
ResetaUser’sPassword
1. Click Reset next to the appropriate user in the Reset Password column.
2. If desired, edit the Reset Password To field.
3. Confirm the Administrator password.
4. Click Reset user password.
Enable/Disable,Lock/UnlockAccount
An account may become locked if a user enters an incorrect password more than the allowed number of times.
To manually unlock an account, remove the checkmark in the Locked column.
To manually disable an account, remove the checkmark in the Enabled column.
RoleAdministration
Users must have Administrator or AdminRoles privileges to assign roles to users.
NOTE: By default, a newly created account is enabled and unlocked.
Role Abilities Assigned to this Role
Administrator All administrative level functions.
68 IRIDICA Assay Applications Guide 68‐608235/R2

User Administration
AdminRoles Can perform role administration for all users (grant, revoke)
AdminUsers Can perform user administration for all users (add, edit, enable/disable, lock/unlock, password reset)
AdminDataRetention Can perform data retention tasks (on‐demand backup, restore from backup, delete backups)
AdminSettings Can modify system settings on the IRIDICA System Dashboard
AdminAssays Can perform Assay administration (add, remove)
AdminProtocols Can perform Protocol administration (add, remove)
AdminScripts Can perform Script administration (add)
AdminLabItems Can perform Lab Item administration (create, edit, enable/disable, delete)
PublishToLis Can publish/export results to an external Library Information System (LIS)
ViewReports Can view sample summary reports
ViewReportExtras Can view additional types of reports
RunAnyAssayProtocol Can run any assay protocol installed on the system
[Assay Protocol Name and Version]
Can run the specified assay protocol. Used to define limited assay protocol rights per user and per protocol
TestOrderEntry Can create/import new test orders
ViewLogs Can view the system logs
TestOrderImport Can import an exported test order
TestOrderExport Can export a test order
SystemMaintenance Can view and perform maintenance actions listed on the System Maintenance tab
Role Abilities Assigned to this Role
69 IRIDICA Assay Applications Guide 68‐608235/R2

User Administration
ToAssignaRole:
1. Hover over the System Administration menu, and select Role Administration.
2. Click in the Roles column next to the user and begin typing the name of a role or click again to choose from a list.
3. After all the desired roles are added, enter your administrative password in the Confirm Password field.
4. Click Save changes.
70 IRIDICA Assay Applications Guide 68‐608235/R2

System Setting Administration
System Setting Administration
To reach the System Setting Administration window and perform the following tasks, hover over the System Administration menu, and select System Setting Administration.
Users must have Administrator or AdminSettings privileges to change the system settings.
1. Make changes to settings as necessary.
2. Enter the Administrator password.
3. Click Save Changes.
71 IRIDICA Assay Applications Guide 68‐608235/R2

Assay File Administration
Assay File Administration
To reach the Assay Administration window and perform the following tasks, hover over the System Administration menu, and select Assay Administration .
Users must have Administrator or AdminAssays privileges to add or remove assays.
AddAssay
1. Enter the Administrator password.
2. Click Select assay files..., browse to file, and open. Or drag and drop the assay file to the box.
RemoveAssay
1. Enter the Administrator password.
2. Click the X next to the assay.
3. Click OK in following prompt.
72 IRIDICA Assay Applications Guide 68‐608235/R2

Protocol File Administration
Protocol File Administration
To reach the Protocol Administration window and perform the following tasks, hover over the System Administration menu, and select Protocol Administration.
Users must have Administrator or AdminProtocols privileges to add or remove protocols.
AddProtocol
1. Enter the Administrator password.
2. Click Select protocol files..., browse to file, and open. Or drag and drop the protocol file to the box.
RemoveProtocol
1. Enter the Administrator password.
2. Click the X next to the protocol.
3. Click OK in following prompt.
73 IRIDICA Assay Applications Guide 68‐608235/R2

Device Script Administration
Device Script Administration
To reach the Device Script Administration window and perform the following tasks, hover over the System Administration menu, and select Device Script Administration.
Users must have Administrator or AdminScripts privileges to add device scripts.
AddDeviceScript
1. Enter the Administrator password.
2. Click Select device script files..., browse to file, and open. Or drag and drop the protocol file to the box.
NOTE: Once added, a Device Script file cannot be removed.
74 IRIDICA Assay Applications Guide 68‐608235/R2

Lab Items
Lab Items
Lab Items can be defined by a site Administrator as equipment or materials associated with assay runs. Using the Lab Items feature of IRIDICA software is optional.
An operator that initiates an assay run on an IRIDICA instrument can select from these Lab Items to associate with the run, which will then be indicated in reports for that run. Examples of Lab Items to associate with a run might be:
• Centrifuges
• Pipettes
• Ethanol lots or containers
To get to the Lab Items Administration screen, select the System Administration menu, then Lab Item Administration.
Users must have Administrator or AdminLabItems privileges to add and edit Lab Items.
75 IRIDICA Assay Applications Guide 68‐608235/R2

Lab Items
CreatingLabItems
1. Enter the Administrator password.
2. Click Create Lab Item. The Lab Item Administration screen displays a list of available Lab Items
3. Enter the Item ID and Description. Click the checkmark to save.
Element Purpose
“Available” If this box is checked, the item will be available for operators to select in an assay run.
Edit the item’s ID or Description.
Permanently delete this Lab Item.
Confirm entry of a new lab item.
Cancel entry of a new lab item.
NOTE: It is not possible to edit or delete a Lab Item that has already been associated with an assay run.
76 IRIDICA Assay Applications Guide 68‐608235/R2

Section 5Reports and Interpretation
This section provides examples of the reporting functions available using the IRIDICA software.
• Summary ReportsProvide a summary of the results of assay runs
• Workflow ReportsProvide information about the instrumentation and equipment used in assay runs
• Results InterpretationHow to read the reports
Users may select either a CSV (comma separated values) or PDF format for the reports, which are viewable and downloadable for use in other applications.
IdentificationandAnalysis
The IRIDICA System identifies organisms by matching the measured base compositions of PCR products generated from a specimen with a reference database of base compositions of the organisms to be reported. The IRIDICA System database includes base composition entries computed from completely sequenced genomes and supplemented with base composition measurements from characterized isolates obtained from reference collections.
77 IRIDICA Assay Applications Guide68‐608235/R2
Selecting Data for Reports
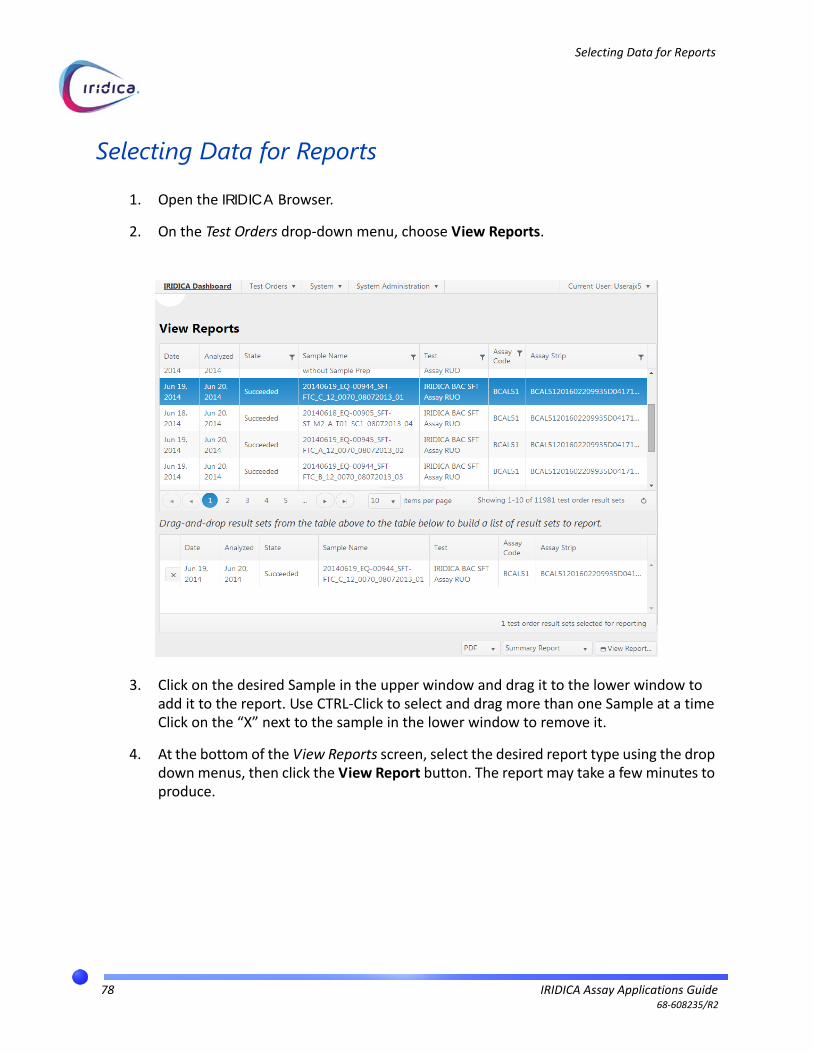
Selecting Data for Reports
1. Open the IRIDICA Browser.
2. On the Test Orders drop‐down menu, choose View Reports.
3. Click on the desired Sample in the upper window and drag it to the lower window to add it to the report. Use CTRL‐Click to select and drag more than one Sample at a time Click on the “X” next to the sample in the lower window to remove it.
4. At the bottom of the View Reports screen, select the desired report type using the drop down menus, then click the View Report button. The report may take a few minutes to produce.
78 IRIDICA Assay Applications Guide68‐608235/R2
Summary Reports
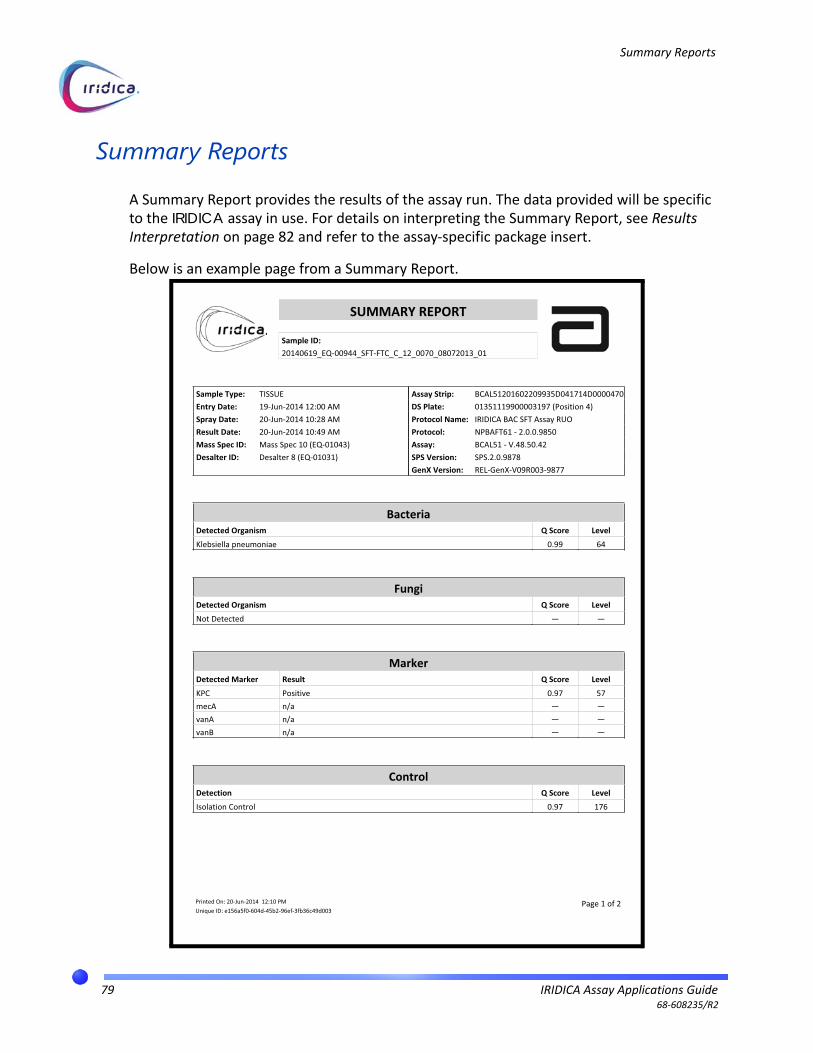
Summary Reports
A Summary Report provides the results of the assay run. The data provided will be specific to the IRIDICA assay in use. For details on interpreting the Summary Report, see Results Interpretation on page 82 and refer to the assay‐specific package insert.
Below is an example page from a Summary Report.
SUMMARY REPORT
Sample ID:20140619_EQ-00944_SFT-FTC_C_12_0070_08072013_01
Printed On: 20-Jun-2014 12:10 PMUnique ID: e156a5f0-604d-45b2-96ef-3fb36c49d003
Page 1 of 2
Sample Type: TISSUE Assay Strip: BCAL51201602209935D041714D0000470Entry Date: 19-Jun-2014 12:00 AM DS Plate: 01351119900003197 (Position 4)Spray Date: 20-Jun-2014 10:28 AM Protocol Name: IRIDICA BAC SFT Assay RUOResult Date: 20-Jun-2014 10:49 AM Protocol: NPBAFT61 - 2.0.0.9850Mass Spec ID: Mass Spec 10 (EQ-01043) Assay: BCAL51 - V.48.50.42Desalter ID: Desalter 8 (EQ-01031) SPS Version: SPS.2.0.9878
GenX Version: REL-GenX-V09R003-9877
BacteriaDetected Organism Q Score Level
Klebsiella pneumoniae 0.99 64
FungiDetected Organism Q Score Level
Not Detected — —
MarkerDetected Marker Result Q Score Level
KPC Positive 0.97 57mecA n/a — —vanA n/a — —vanB n/a — —
ControlDetection Q Score Level
Isolation Control 0.97 176
79 IRIDICA Assay Applications Guide68‐608235/R2

Summary Reports
If the assay run was for a DS/MS Check Plate, the Summary Report will include a note about whether the Plate has passed.
Below is an example page from a DS/MS Check Plate Summary Report.
SUMMARY REPORT
Sample ID:ACHK04201510010000D45429500001923
Printed On: 01-Aug-2014 10:13 AMUnique ID: 0e9df5c6-b8e2-47ec-b123-22f0b2d63219
Page 1 of 1
Summary reportforACHK04201510010000D45429500001923
Sample Type: QC Positive Control Assay Strip: ACHK04201510010000D45429500001923Entry Date: 28-Jul-2014 11:11 AM DS Plate: EB140538700007935 (Position 5)Spray Date: 01-Aug-2014 9:27 AM Protocol Name: Analyzer Check ProtocolResult Date: 01-Aug-2014 10:11 AM Protocol: NPACHK04 - 1.0.5Mass Spec ID: Mass Spec 10 (EQ-01043) Assay: ACHK04 - G.472.509.398Desalter ID: Desalter 8 (EQ-01031) SPS Version: SPS.2.0.0
GenX Version: REL-GenX-V09R003-9877
System Health Pass
AnnotationsDate User Message
28-Jul-201412:01 PM
ONEABBOTT\ibislab Assay strip ACHK04201510010000D45429500001923 in position 5 of desalterplate 0B140538700007935 associated with virtual desalter plateEB140538700007935 by user.
01-Aug-20149:58 AM
heldlc Protocol altered from NPACHK04 1.0.3.10012 to NPACHK04 1.0.5.
80 IRIDICA Assay Applications Guide68‐608235/R2
Workflow Reports
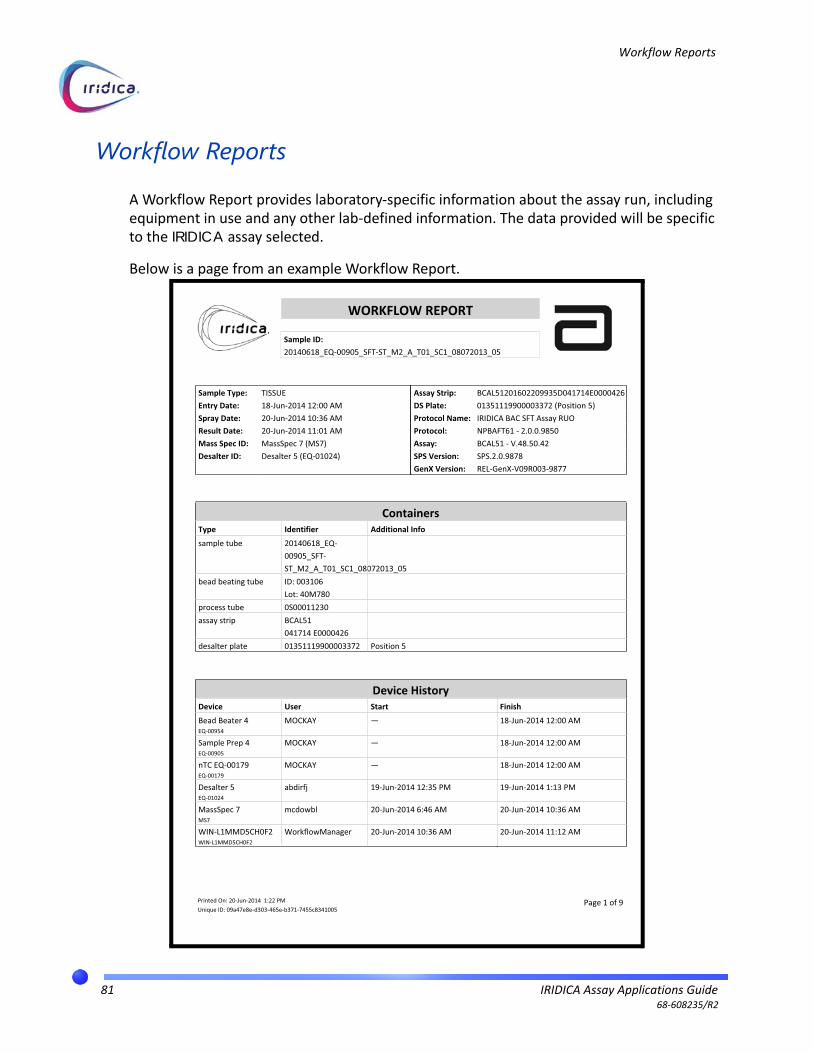
Workflow Reports
A Workflow Report provides laboratory‐specific information about the assay run, including equipment in use and any other lab‐defined information. The data provided will be specific to the IRIDICA assay selected.
Below is a page from an example Workflow Report.
WORKFLOW REPORT
Sample ID:20140618_EQ-00905_SFT-ST_M2_A_T01_SC1_08072013_05
Printed On: 20-Jun-2014 1:22 PMUnique ID: 09a47e8e-d303-465e-b371-7455c8341005
Page 1 of 9
Sample Type: TISSUE Assay Strip: BCAL51201602209935D041714E0000426Entry Date: 18-Jun-2014 12:00 AM DS Plate: 01351119900003372 (Position 5)Spray Date: 20-Jun-2014 10:36 AM Protocol Name: IRIDICA BAC SFT Assay RUOResult Date: 20-Jun-2014 11:01 AM Protocol: NPBAFT61 - 2.0.0.9850Mass Spec ID: MassSpec 7 (MS7) Assay: BCAL51 - V.48.50.42Desalter ID: Desalter 5 (EQ-01024) SPS Version: SPS.2.0.9878
GenX Version: REL-GenX-V09R003-9877
ContainersType Identifier Additional Info
sample tube 20140618_EQ-00905_SFT-ST_M2_A_T01_SC1_08072013_05
bead beating tube ID: 003106Lot: 40M780
process tube 0S00011230assay strip BCAL51
041714 E0000426desalter plate 01351119900003372 Position 5
Device HistoryDevice User Start Finish
Bead Beater 4EQ-00954
MOCKAY — 18-Jun-2014 12:00 AM
Sample Prep 4EQ-00905
MOCKAY — 18-Jun-2014 12:00 AM
nTC EQ-00179EQ-00179
MOCKAY — 18-Jun-2014 12:00 AM
Desalter 5EQ-01024
abdirfj 19-Jun-2014 12:35 PM 19-Jun-2014 1:13 PM
MassSpec 7MS7
mcdowbl 20-Jun-2014 6:46 AM 20-Jun-2014 10:36 AM
WIN-L1MMD5CH0F2WIN-L1MMD5CH0F2
WorkflowManager 20-Jun-2014 10:36 AM 20-Jun-2014 11:12 AM
81 IRIDICA Assay Applications Guide68‐608235/R2

Results Interpretation
Results Interpretation
The Summary Report is split into categories of detection metrics.
• Sources Found
• Marker types for sources found
• Control sources detected
Metrics
Q‐Score
The Q‐Score is a quality metric associated with the relative strength of the data supporting identification of any given source. The Q‐Score is calculated as an indicator value between 0 (lowest) and 1 (highest), based on multiple metrics comprised from the Principal Component Analysis of data reported from a sample. The software will only report detections that have a Q‐Score of ≥ 0.85.
Level
The Level is imputed as the relative abundance of target material from the source, adjusted for known competitive PCR standards for input quantity. The Level is reported with reference to an internal calibrant construct and has an approximate working range of 2 to 200. Depending on the organism detected, the level must reach a certain threshhold value in order to be reported by the software.
ReportComponents
Organism Types
Depending on the assay in use, the report will contain sections for detected “Bacterial”, “Fungal”, and/or “Viral” sources of genetic material.
Markers
Lists any antibiotic resistance marker(s) found for the detected organism (KPC, macA, vanA, and vanB). The presence of these standard diagnostic markers indicates that the specific organism found in the Sources section of the report matches the genetic profile for known antibiotic resistant varieties.
Control
Lists the controls found for the assay. Detection of assay controls is required to verify the efficacy of the assay run. The types of controls listed will vary with the assay in use.
82 IRIDICA Assay Applications Guide68‐608235/R2

Results Interpretation
DetectionTaggingPerSample
Tags are reported on a per‐sample basis.
Organisms will be reported individually at either the species, genus, or group level. Due to the breadth of coverage from organisms commonly found in certain specimen types, IRIDICA software will tag certain non‐primary results as indicated in the table below. Specimen collection and routine laboratory procedures may result in the detection of an non‐primary source. The presence of such detections in addition to detections of primary organisms, will not impact the validity of a sample.
Tag Meaning
potential contaminant Organisms commonly seen in a laboratory results setting as sample contaminants; may or may not have clinical relevance — other criteria should be used in combination with this result.
normal respiratory flora(respiratory samples only)
Organism detected that is normally found within the respiratory tract.
no identification can be provided Organism or contaminant detected that is outside existing detection profiles — this is not a negative result but is an indication that the assay is not able to name a clinically relevant organism.
83 IRIDICA Assay Applications Guide68‐608235/R2
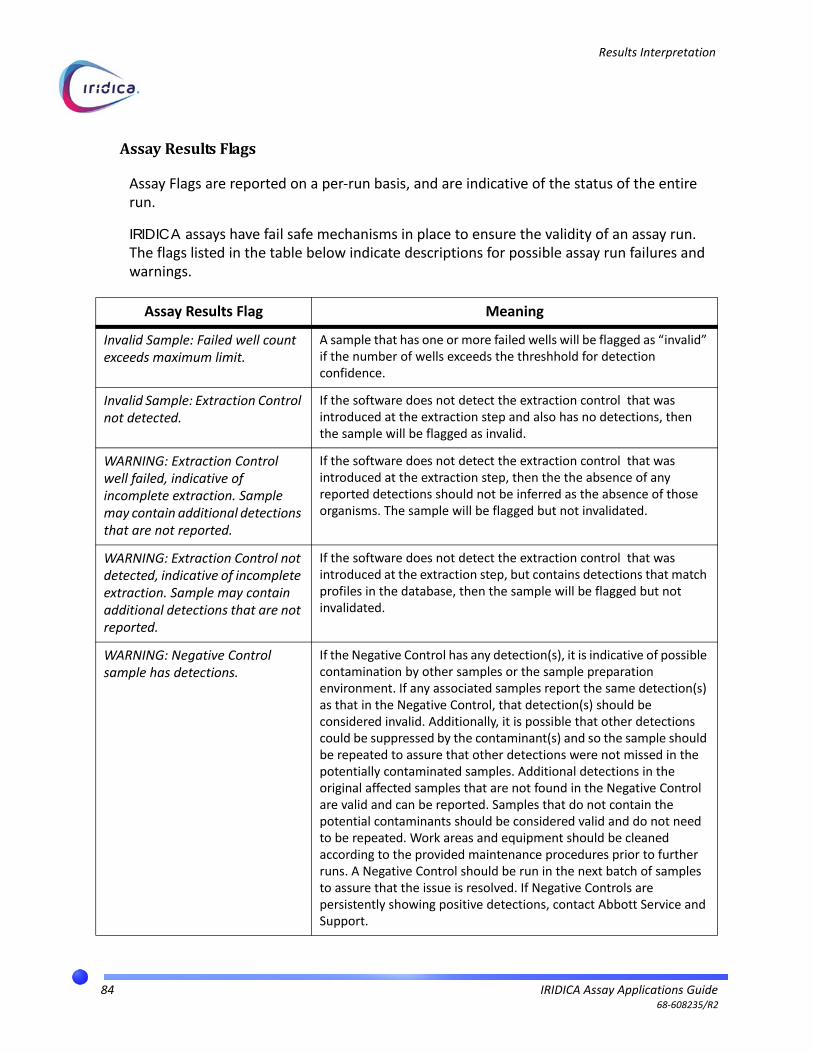
Results Interpretation
AssayResultsFlags
Assay Flags are reported on a per‐run basis, and are indicative of the status of the entire run.
IRIDICA assays have fail safe mechanisms in place to ensure the validity of an assay run. The flags listed in the table below indicate descriptions for possible assay run failures and warnings.
Assay Results Flag Meaning
Invalid Sample: Failed well count exceeds maximum limit.
A sample that has one or more failed wells will be flagged as “invalid” if the number of wells exceeds the threshhold for detection confidence.
Invalid Sample: Extraction Control not detected.
If the software does not detect the extraction control that was introduced at the extraction step and also has no detections, then the sample will be flagged as invalid.
WARNING: Extraction Control well failed, indicative of incomplete extraction. Sample may contain additional detections that are not reported.
If the software does not detect the extraction control that was introduced at the extraction step, then the the absence of any reported detections should not be inferred as the absence of those organisms. The sample will be flagged but not invalidated.
WARNING: Extraction Control not detected, indicative of incomplete extraction. Sample may contain additional detections that are not reported.
If the software does not detect the extraction control that was introduced at the extraction step, but contains detections that match profiles in the database, then the sample will be flagged but not invalidated.
WARNING: Negative Control sample has detections.
If the Negative Control has any detection(s), it is indicative of possible contamination by other samples or the sample preparation environment. If any associated samples report the same detection(s) as that in the Negative Control, that detection(s) should be considered invalid. Additionally, it is possible that other detections could be suppressed by the contaminant(s) and so the sample should be repeated to assure that other detections were not missed in the potentially contaminated samples. Additional detections in the original affected samples that are not found in the Negative Control are valid and can be reported. Samples that do not contain the potential contaminants should be considered valid and do not need to be repeated. Work areas and equipment should be cleaned according to the provided maintenance procedures prior to further runs. A Negative Control should be run in the next batch of samples to assure that the issue is resolved. If Negative Controls are persistently showing positive detections, contact Abbott Service and Support.
84 IRIDICA Assay Applications Guide68‐608235/R2

Error Conditions
Section 6Troubleshooting
Do not attempt to troubleshoot the IRIDICA System in a manner other than discussed in this manual. For any issue that is unsuccessfully corrected using this manual, please contact your Abbott Representative.
For errors that are specific to IRIDICA instrumentation, see the individual instrument Operations Manuals.
Error Conditions
Condition Probable Causes Corrective Actions
The Select button is not active on the barcode input screen for any IRIDICA instrument Workstation PC.
No samples currently in the queue are available for this step.
Ensure that the sample has been added as a Test Order and has undergone the previous steps in the IRIDICA Assay process.
When placing a plate on the MS tray, user inadvertently selects “Yes” to loading another plate.
Recoverable user error. Return to MS Home screen and select the Resume button.
A Test Order that was just created does not show up on the Sample Status screen.
A filter may be applied to the Sample Status screen which does not include the parameters in the entered Test Order.
1. Click the Filters button on the bottom option menu.
2. Click the Clear button.
85 IRIDICA Assay Applications Guide 68‐608235/R2

Error Messages
Error Messages
If the corrective actions described do not address the error condition or if there are any conditions or messages not listed here, contact Abbott Service and Support.
Error Code
Message Probable Causes Corrective Actions
N/A Warning: Position of assay strips in the carrier has changed since last registration. Proceed with starting run?
The operator may have removed one or more assay strips from the carrier and reseated them differently or in another carrier.
The software will determine the correct strips to assign for analysis, however the user is advised to keep track of the Assay Strip location for tracking and reporting purposes because, for example, individual Assay Strips are associated with specific reagent positions on the SP instrument.
3003 Specimen identifiers must be less than or equal to X characters in length.
The name chosen for the specimen is too long. “X” is the maximum length, defined by the System Administrator.
Enter a different or truncated specimen name.
3004 Specimen identifiers can not have leading or trailing spaces.
The name chosen has a leading or trailing space.
Re‐enter the specimen name without leading or trailing spaces.
3005 Specimen identifier [ID] has invalid symbols. Valid symbols are...
The name chosen has symbols that the system will not accept. The list of acceptable symbols will be displayed with this error message.
Re‐enter the specimen name without the unacceptable symbols.
86 IRIDICA Assay Applications Guide 68‐608235/R2

Section 7Maintenance and Service Procedures
This section contains maintenance and service instructions for various procedures required when performing IRIDICA assays on the SP, DS, and MS instruments.
Refer to the appropriate instrument‐specific Operations Manual for full maintenance, cleaning, and decontamination procedures.
Preparing the DS Cleanup Reagents
Prepare a new set of Cleanup Reagents if necessary, as directed by the software.
1. DS1 bottle — add 125mL methanol and recap (250 mL final volume). Invert bottle several times gently to mix.
2. DS2 bottle — add 125mL methanol and recap (250 mL final volume). Invert bottle several times gently to mix.
3. DS3 bottle — add 52.5mL methanol and entire contents of peptide vial (1.5mL), then recap (~150 mL final volume). Mix bottle several times vigorously.
WARNING: Substance hazard — DS reagents are prepared with methanol, which is flammable and a toxic irritant that can permeate skin. Always handle carefully and wear appropriate personal protective equipment. See the SDS for details.
CAUTION: Do not mix or top off new reagent bottles using reagent left over from a previous reagent kit. This can result in the loss of lot information and clinical information, and can invalidate a run.
CAUTION: The software will not allow registration of previously used bottles. Do not reuse reagent bottles or mix reagents from other kits.
87 IRIDICA Assay Applications Guide68‐608235/R2

4. Mix microparticles several times vigorously or vortex for a minimum of 30 s to ensure microparticles are fully suspended.
5. Invert DS Microparticle Diluent (M) bottle several times gently to mix.
6. Add 6 mL microparticles to 54 mL M and invert bottle several times gently to mix.
7. Repeat for second M and microparticle bottles (when first bottle is empty).
8. Refrigerate at 2°C to 8°C any prepared reagent that will not be used immediately.
9. Upon preparing a new reagent kit, also ensure the following:
• Dispose of the existing DS Reagent Tips according to laboratory guidelines and install eight new ones.
• Empty the contents of the waste container and decontaminate.
• Run a DS/MS Check Strip on both the DS and the MS after a fresh reagent preparation, and ensure it passes before desalting clinical samples. See Running a DS/MS Check Strip on page 90.
CAUTION: Risk of loss of clinical results — Ensure all reagent bottles are mixed/agitated properly prior to use on the DS instrument.
Previously prepared and refrigerated reagents also require mixing and/or agitation prior to use.
88 IRIDICA Assay Applications Guide68‐608235/R2
Preparing the MS Reagents
Prepare new MS reagents as necessary.
1. MS Reagent A bottle — add 100mL methanol and cap (200 mL total volume). Gently invert to mix.
2. MS Reagent B bottle — add 70mL methanol, and the entire contents of the MS Peptide vial (2.0 mL), then cap (202 mL total volume). Mix vigorously.
3. Register the 2 MS Reagent bottles and the waste bottle with the MS Workstation PC. Refer to the Using the MS Instrument on page 51 for details on how to operate the MS Workstation software.
4. Following new reagent registration, the system will perform a Reagent Prime and an AutoTune sequence that will internally calibrate the instrument’s detection settings. This sequence takes approximately 5 minutes.
5. After successfully installing new Reagents, run a DS/MS check strip, starting with the DS instrument. Refer to Running a DS/MS Check Strip on page 90.
WARNING: Substance hazard — MS reagents are prepared with methanol, which is flammable and a toxic irritant that can permeate skin. Always handle carefully and wear appropriate personal protective equipment. See the SDS for details.
CAUTION: Do not mix or top off new reagent bottles using reagent leftover from a previous reagent kit. This can result in the loss of lot information, clinical information, and can invalidate a run.
CAUTION: The software will not allow registration of previously used bottles. Do not reuse reagent bottles or mix reagents from other kits.
NOTE: When reagent prep has been completed, retain all reagent bottles and reagent additive bottles in order to register them with the MS Workstation PC. Once registered, empty bottles and vials may be discarded appropriately.
89 IRIDICA Assay Applications Guide68‐608235/R2

Running a DS/MS Check Strip
Run a DS/MS check strip:
• as a general system health check or troubleshooting procedure
• after a reagent change on the DS or the MS
AfteraReagentChange
Once a week or after a DS or MS reagent change, run an IRIDICA DS/MS Check Strip by itself to confirm that the IRIDICA DS/MS reagents have been prepared correctly and that the IRIDICA DS and MS instruments are functioning correctly. The summary report generated by running a DS/MS Check Strip must indicate that the System Health has Passed prior to running any additional samples. Refer to the IRIDICA MS Operations Manual to confirm and identify status of the system since the last System Health check.
DS/MS Check Strips are required to be stored at ‐20°C upon receipt. See the package insert for details.
An outline of the steps required for this procedure is below. For specific details on the Test Order entry procedure, refer to Register Samples to Create Test Orders on page 25. For details on the general DS run procedure, refer to the IRIDICA DS Operations Manual. For details on the general MS run procedure refer to the IRIDICA MS Operations Manual.
1. Remove one IRIDICA DS/MS Check Strip from the freezer and insert into the first loading position of a new Assay Strip Carrier.
2. Thaw the frozen strip at room temperature for 5 minutes until the contents are completely thawed. If necessary, complete the daily/weekly maintenance cleaning for the DS and MS instruments prior to proceeding.
3. Centrifuge the Assay Strip Carrier for 1 minute at 130 RCF.
4. Log on to the IRIDICA software on the DS Workstation PC. Select Sample Status from the left sidebar.
5. Click on New Order in the bottom option menu.
90 IRIDICA Assay Applications Guide68‐608235/R2

6. Scan the Sample ID of the DS/MS Check Strip that will be used.
7. Select the DS/MS Check Strip Protocol for the Test.
8. Leave Sample Priority as Routine and Type as Specimen.
9. Click Submit.
10. Click on the Desalter button in the Left Sidebar.
11. Scan a new DS Plate into the highlighted field and set the DS Plate into place in the front plate holder and latch into place.
91 IRIDICA Assay Applications Guide68‐608235/R2

12. Scan the DS/MS Check Strip barcode into the Assay Strip field. Load the Assay Strip Carrier on the IRIDICA DS in the sample plate position and close the latch.
13. Load the Master Tip rack on the DS instrument with one Master Tip strip in the first position and ensure that tips and rack are seated properly.
14. Load 8 DS Reagent Tips (if needed).
15. As listed below, transfer the DS reagents to their designated reagent reservoir position in a new DS cartridge.
a. Gently agitate and transfer 8 mL of reagent M to reservoir M.
b. Gently invert and transfer 20 mL of reagent DS1 to reservoir 1.
c. Gently invert and transfer 20 mL of reagent DS2 to reservoir 2.
WARNING: Substance hazard — DS reagents are prepared with methanol, which is flammable and a toxic irritant that can permeate skin. Always handle carefully and wear appropriate personal protective equipment. See the SDS for details.
CAUTION: The magnetic particles tend to settle and accumulate quickly to the bottom of the M bottle. Be sure to fully re‐suspend any particle settling by gently mixing the bottle prior to the transfer into the DS cartridge.
92 IRIDICA Assay Applications Guide68‐608235/R2
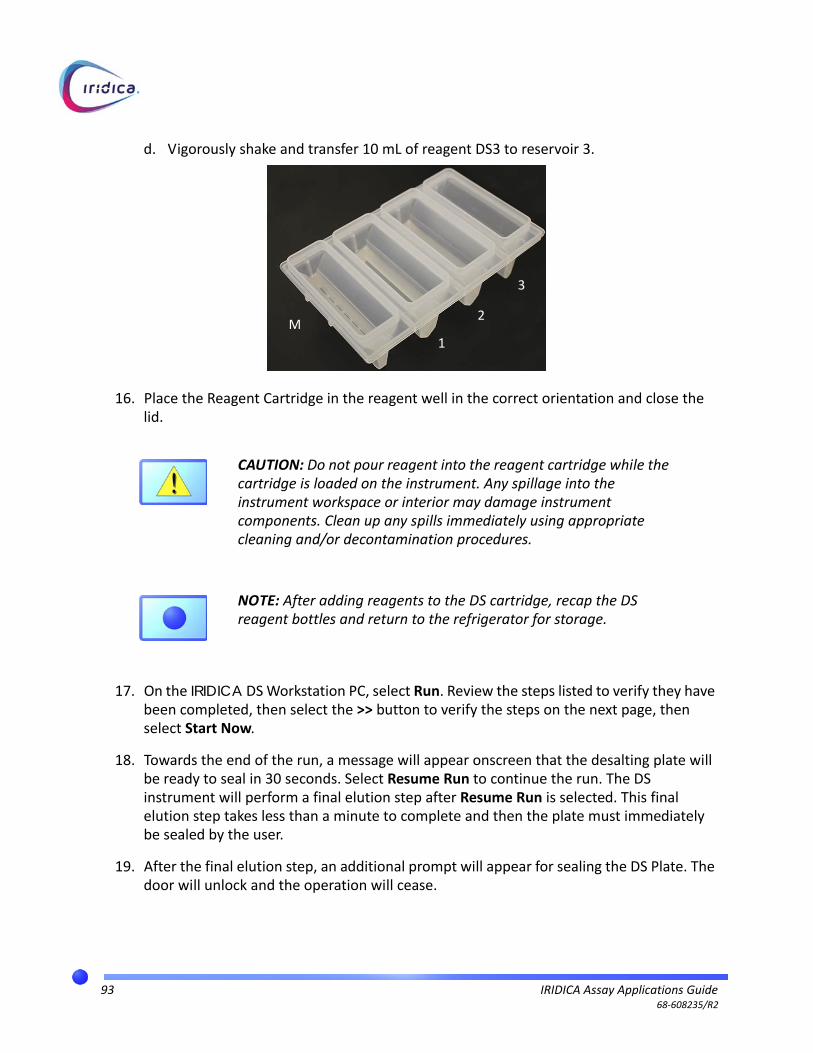
d. Vigorously shake and transfer 10 mL of reagent DS3 to reservoir 3.
16. Place the Reagent Cartridge in the reagent well in the correct orientation and close the lid.
17. On the IRIDICA DS Workstation PC, select Run. Review the steps listed to verify they have been completed, then select the >> button to verify the steps on the next page, then select Start Now.
18. Towards the end of the run, a message will appear onscreen that the desalting plate will be ready to seal in 30 seconds. Select Resume Run to continue the run. The DS instrument will perform a final elution step after Resume Run is selected. This final elution step takes less than a minute to complete and then the plate must immediately be sealed by the user.
19. After the final elution step, an additional prompt will appear for sealing the DS Plate. The door will unlock and the operation will cease.
CAUTION: Do not pour reagent into the reagent cartridge while the cartridge is loaded on the instrument. Any spillage into the instrument workspace or interior may damage instrument components. Clean up any spills immediately using appropriate cleaning and/or decontamination procedures.
NOTE: After adding reagents to the DS cartridge, recap the DS reagent bottles and return to the refrigerator for storage.
M
1
2
3
93 IRIDICA Assay Applications Guide68‐608235/R2
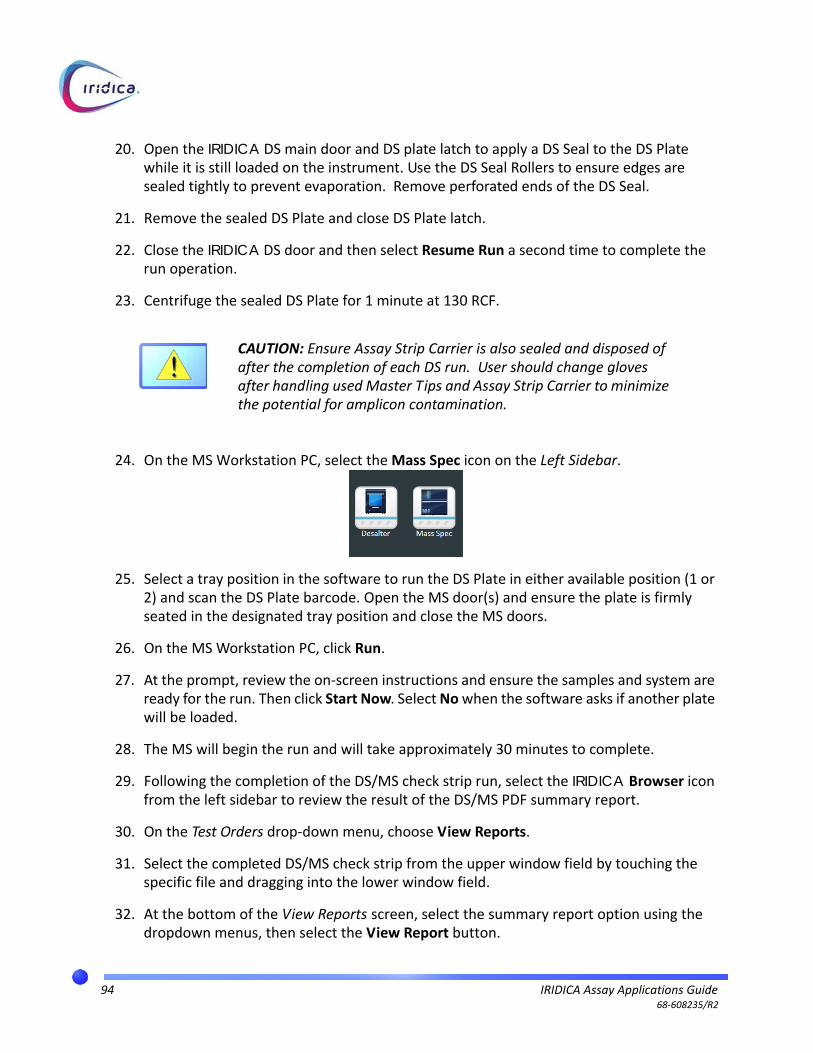
20. Open the IRIDICA DS main door and DS plate latch to apply a DS Seal to the DS Plate while it is still loaded on the instrument. Use the DS Seal Rollers to ensure edges are sealed tightly to prevent evaporation. Remove perforated ends of the DS Seal.
21. Remove the sealed DS Plate and close DS Plate latch.
22. Close the IRIDICA DS door and then select Resume Run a second time to complete the run operation.
23. Centrifuge the sealed DS Plate for 1 minute at 130 RCF.
24. On the MS Workstation PC, select the Mass Spec icon on the Left Sidebar.
25. Select a tray position in the software to run the DS Plate in either available position (1 or 2) and scan the DS Plate barcode. Open the MS door(s) and ensure the plate is firmly seated in the designated tray position and close the MS doors.
26. On the MS Workstation PC, click Run.
27. At the prompt, review the on‐screen instructions and ensure the samples and system are ready for the run. Then click Start Now. Select No when the software asks if another plate will be loaded.
28. The MS will begin the run and will take approximately 30 minutes to complete.
29. Following the completion of the DS/MS check strip run, select the IRIDICA Browser icon from the left sidebar to review the result of the DS/MS PDF summary report.
30. On the Test Orders drop‐down menu, choose View Reports.
31. Select the completed DS/MS check strip from the upper window field by touching the specific file and dragging into the lower window field.
32. At the bottom of the View Reports screen, select the summary report option using the dropdown menus, then select the View Report button.
CAUTION: Ensure Assay Strip Carrier is also sealed and disposed of after the completion of each DS run. User should change gloves after handling used Master Tips and Assay Strip Carrier to minimize the potential for amplicon contamination.
94 IRIDICA Assay Applications Guide68‐608235/R2

33. Verify that the summary report generates a “System Health Pass”. If the system health fails, immediately contact a member of the Abbott Service and Support organization to further troubleshoot setup before running any additional samples through the IRIDICA DS and MS instruments.
95 IRIDICA Assay Applications Guide68‐608235/R2

Mass Collapse Bias Adjustment
An Abbott Service Representative may direct the user to perform a Mass Collapse Bias Adjustment to recover from a DS/MS Check Plate failure in the event of an Amplicon Mass error.
The Abbott Service Representative will work with users to determine the cause of the DS/MS Check Plate failure, and may view service‐related reports and instrument logs in order to determine the best course of action. If a Mass Collapse Bias Adjustment is determined to be an appropriate action, then perform this procedure under guidance.
Users must have the SystemMaintenance role in order to perform this action. Temporary ServiceMaintenance access may be provided to the user if applicable.
1. Under the System Maintenance menu, choose Mass Collapse Bias Adjustment.
2. Provide the login password.
3. Enter or scan the DS/MS Check Strip barcode that failed.
4. Click Submit.
The Analysis Computer will adjust its internal Mass Bias metric and re‐analyze the DS/MS Check Strip according to the new metric. This step will take approximately 5 to 10 minutes.
5. Once the new analysis has completed, go to View Reports and generate a new report for the DS/MS Check Strip. See Section 5 Reports and Interpretation on page 77.
96 IRIDICA Assay Applications Guide68‐608235/R2

As-Needed SP Maintenance Service Actions
The following Service Actions can be run from the The IRIDICA SP Controller software via the Service button. An Abbott Service Representative may direct that one or more of these actions be performed by the user.
1. To initate a Service Action, click the Service button on the bottom menu bar.
2. Click Yes to the dialog “Service Device Now?”
3. Choose from the available options as shown in the above Service Action window.
97 IRIDICA Assay Applications Guide68‐608235/R2

InitDevice
Use the Init Device procedure to return all of the axes in the SP instrument to their home states. An Init Device procedure is typically not required to be performed by a user except in special circumstances.
1. Ensure all doors are closed. Under Select a Service Action, choose Init Device.
2. The system will initialize and home all axes within the instrument (approximately 2 minutes). During this time, the instrument will display a “Running” message and will be unavailable.
SterilizeDevice
Use the Sterilize Device procedure to activate UV light exposure inside the instrument workspace. The length of exposure can be determined by the user.
1. Ensure all doors are closed. Under Select a Service Action, choose Sterilize Device.
2. Select the desired length of exposure in hours and minutes at the prompt. Maximum length is 12 hours, minimum length is 1 minute.
3. Review the instructions at the prompt, then select Start. The UV light will switch on. The instrument will enter a Running state and be unavailable for the selected length of time.
NOTE: This procedure should not be equated with or substituted for other decontamination procedures. Abbott makes no claims or guarantees towards the efficacy of exposure to the on‐board UV light with regards to sterilization within the instrument. This procedure must be validated by the customer.
98 IRIDICA Assay Applications Guide68‐608235/R2

Weekly or As-Needed DS Maintenance Service Actions
The following maintenance actions are completed with automated service actions, which are accessed from the Service button. The cleaning procedures listed below should be done weekly.
Use the Service button for the following maintenance procedures:
• Init Device
• Sterilize Device
• Clean the Master Tip splash guard (weekly)
• Clean the Piercer Tips (weekly)
• Clean the Reagent Tip Reservoir (weekly)
NOTE: Cleaning the Reagent Tip Reservoir does not require initiation of a service function, but should be performed with Cleaning the Piercer Tips.
99 IRIDICA Assay Applications Guide68‐608235/R2

1. To initate a Service Action, click the Service button on the bottom menu bar.
2. Click Yes to the dialog “Service Device Now?”
3. Choose from the available options as shown in the above Service Action window.
InitDevice
Use the Init Device procedure to return all of the axes in the DS instrument to their home states. An Init Device procedure may be performed at the end of a service procedure to ensure that all axes are in their home positions.
1. Ensure all doors are closed. Under Select a Service Action, choose Init Device.
2. The system will initialize and home all axes within the instrument (approximately 2 minutes). During this time, the instrument will display a “Running” message and will be unavailable.
SterilizeDevice
Use the Sterilize Device procedure to activate UV light exposure inside the instrument workspace. The length of exposure can be determined by the user.
1. Ensure all doors are closed. Under Select a Service Action, choose Sterilize Device.
2. Select the desired length of exposure in hours and minutes at the prompt. Maximum length is 12 hours, minimum length is 1 minute.
3. Review the instructions at the prompt, then select Yes. The UV light will switch on. The instrument will enter a Running state and be unavailable for the selected length of time.
NOTE: This procedure should not be equated with or substituted for other decontamination procedures. Abbott makes no claims or guarantees towards the efficacy of exposure to the on‐board UV light with regards to sterilization within the instrument. This procedure must be validated by the customer.
100 IRIDICA Assay Applications Guide68‐608235/R2
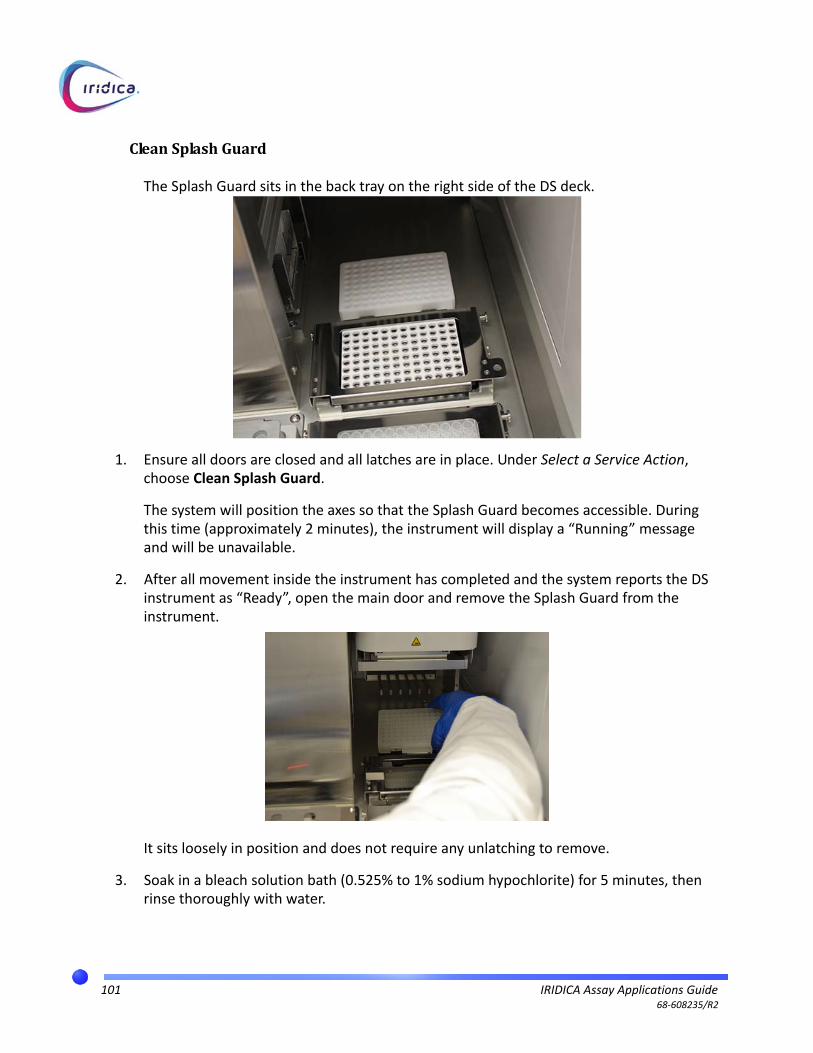
CleanSplashGuard
The Splash Guard sits in the back tray on the right side of the DS deck.
1. Ensure all doors are closed and all latches are in place. Under Select a Service Action, choose Clean Splash Guard.
The system will position the axes so that the Splash Guard becomes accessible. During this time (approximately 2 minutes), the instrument will display a “Running” message and will be unavailable.
2. After all movement inside the instrument has completed and the system reports the DS instrument as “Ready”, open the main door and remove the Splash Guard from the instrument.
It sits loosely in position and does not require any unlatching to remove.
3. Soak in a bleach solution bath (0.525% to 1% sodium hypochlorite) for 5 minutes, then rinse thoroughly with water.
101 IRIDICA Assay Applications Guide68‐608235/R2
4. Soak in a 70% alcohol solution for 5 minutes.
5. Wipe dry, then set the Splash Guard back on the DS deck.
6. Close main door.
7. On the bottom menu bar, click the Service button.
8. Click Yes to the dialog “Service Device Now?”
9. Under Select a Service Action, choose Init Device. The system will initialize and home all axes within the instrument (approximately 2 minutes). During this time, the instru‐ment will display a “Running” message and will be unavailable.
CleanPiercerTips
The Piercer Tips are red and point downward from the Master Tip module.
1. Ensure all doors are closed and all latches are in place. Under Select a Service Action, choose Clean Piercers. The system will move the Master Tip module forward so that the Piercing Tips are accessible. During this time (approximately 2 minutes), the instru‐ment will display a “Running” message and will be unavailable.
NOTE: As an alternative to soaking, the splash guard may be wiped down as described in the IRIDICA DS Operations Manual.
102 IRIDICA Assay Applications Guide68‐608235/R2
2. After all movement inside the instrument has completed and the system reports the DS instrument as “Ready”, open the main door.
3. Spray a lint‐free cloth or wipe with bleach solution (0.525% to 1% sodium hypochlorite) and wipe the Piercing Tips.
4. Let stand for at least 5 minutes, then wipe dry.
5. Repeat with a 70% alcohol solution.
6. Proceed to Cleaning the Reagent Tip Reservoir below
CleaningtheReagentTipReservoir
The Reagent Tip Reservoir sits underneath the Reagent tips on the left side of the DS deck. Clean the Reagent Tip Reservoir at the same time as the Piercer Tips.
1. Set a dry dustless cloth on a work surface. Remove the Reagent Tip holder, carefully ensuring none of the tips fall out of the holder, and set on the cloth. It sits loosely in its position on the deck and does not require any unlatching to remove.
WARNING: Risk of injury — The Piercing Tips have sharp edges designed to cut through the foil seals of assay components, and they can pierce gloves and skin. Use extreme caution when wiping them down.
CAUTION: Do not spray any liquids directly onto instrument components.
103 IRIDICA Assay Applications Guide68‐608235/R2

2. Remove the Reagent Tip Reservoir. It sits loosely in its position and does not require any unlatching to remove.
3. Spray a lint‐free cloth or wipe with bleach solution (0.525% to 1% sodium hypochlorite) and wipe the inside of the Reagent Tip Reservoir.
4. Let stand for at least 5 minutes, then wipe dry.
5. Repeat with a 70% alcohol solution.
6. Replace the Reagent Tip Reservoir and Reagent Tip Holder, ensuring that none of the tips fall out of the holder.
7. Close main door.
8. On the bottom menu bar, click the Service button.
9. Click Yes to the dialog “Service Device Now?”
10. Under Select a Service Action, choose Init Device. The system will initialize and home all axes within the instrument (approximately 2 minutes). During this time, the instrument will display a “Running” message and will be unavailable.
CAUTION: Do not spray any liquids directly onto instrument components.
104 IRIDICA Assay Applications Guide68‐608235/R2
Weekly or As-Needed DS Waste Bottle Maintenance
Empty the contents of the waste bottle weekly, upon preparing a new reagent kit, or as‐needed when directed by the software.
1. Open the spill bottle compartment and remove the bottle tray.
2. Dispose of the contents of the bottle according to laboratory practices and local, state, federal, and country guidelines.
3. Decontaminate the tray as necessary.
4. Replace the waste bottle and tray and close the compartment door.
105 IRIDICA Assay Applications Guide68‐608235/R2
As-Needed MS Maintenance Service Actions
The following Service Actions can be run from the The IRIDICA MS Controller software via the Service button. An Abbott Service Representative may direct that one or more of these actions be performed by the user.
1. To initate a Service Action, click the Service button on the bottom menu bar.
2. Click Yes to the dialog “Service Device Now?”
3. Choose from the available options as shown in the above Service Action window.
NOTE: A Reagent Prime and an AutoTune sequence will automatically be performed by the instrument upon registering and installing new MS Reagents.
106 IRIDICA Assay Applications Guide68‐608235/R2

ReagentPrime
A Reagent Prime is automatically performed by the system upon registering new reagents. A Reagent Prime procedure is typically not required to be performed by a user except in special circumstances. An Abbott Service Representative may ask a user to perform a Regent Prime as part of troubleshooting.
1. Ensure all doors are closed. Under Select a Service Action, choose Reagent Prime.
2. The system will prime the reagents so that they are distributed evenly thoughout the system, ensuring there are no air pockets. During this time (approximately 5 minutes), the instrument will display a “Running” message and will be unavailable.
RunAutoTune
An AutoTune is automatically performed by the system upon registering new reagents. An AutoTune procedure is typically not required to be performed by a user except in special circumstances. An Abbott Service Representative may ask a user to perform An AutoTune as part of troubleshooting.
1. Ensure all doors are closed. Under Select a Service Action, choose Run AutoTune.
2. The system will calibrate its detection mechanism. During this time (less than 5 minutes), the instrument will display a “Running” message and will be unavailable.
ChangeInjectionPort
The IRIDICA MS has a backup injection port if the main one fails. The backup injection port can be activated temporarily while the main port is out of service. The injection port should not be changed under normal usage.
Contact Abbott Service and Support if the main injection port fails and activating the backup injection port becomes necessary.
1. Ensure all doors are closed. Under Select a Service Action, choose Change Injection Port.
107 IRIDICA Assay Applications Guide68‐608235/R2

2. Click Yes to the dialog “Switch to Injector Port 2?”
3. The system will activate Injector Port 2, and then automatically run an AutoTune. During this time (less than 5 minutes), the instrument will display a “Running” message and will be unavailable.
Pumpdown
A Pumpdown procedure is performed after a service operation when the TOF has been vented or when the vacuum pressure is low. A Pumpdown procedure is typically not required to be performed by a user except in special circumstances. An Abbott Service Representative may ask a user to perform a Pumpdown as part of troubleshooting or procedure prior to a service call.
1. Ensure all doors are closed. Under Select a Service Action, choose Pumpdown.
2. The system will perform a pumpdown procedure, which increases vacuum pressure within the TOF module. The MS instrument will be unavailable while it is in a Pumpdown state, which can typically take up to 12 hours depending on the initial vacuum pressure state.
Vent
A Vent procedure is performed when the internal TOF components of the MS instrument require service. A Vent procedure is typically not required to be performed by a user except in special circumstances. An Abbott Service Representative may ask a user to perform a vent procedure prior to a service call.
1. Ensure all doors are closed. Under Select a Service Action, choose Vent.
2. The system will perform a vent procedure, during which time the vacuum pressure will be released and the system will shut down.
CAUTION: A vent procedure will likely render the MS instrument unavailable for at least 12 hours if not longer. Do not initiate a vent procedure without instruction from an Abbott Service Representative.
108 IRIDICA Assay Applications Guide68‐608235/R2

3. During this time (less than 5 minutes), the instrument will display a “Running” message and will be unavailable.
SyringeStrokeCounterReset
1. Under Select a Service Action, choose Syringe Stroke Counter Reset.
2. The system will reset the Syringe Stroke counter.
Standby
The Standby feature is currently not available with the existing implementation of the IRIDICA Controller software on the MS.
Monthly Maintenance
WorkstationMonitors
Clean all Workstation monitors used in the IRIDICA System monthly or as‐needed.
1. Ensure the Workstation Monitor is powered off.
2. Spray a lint‐free cloth or wipe with bleach solution and wipe down the monitor screen, back and sides, removing all smudges as necessary.
3. Let stand for at least 5 minutes, then wipe dry.
4. Repeat with a 70% alcohol solution.
CAUTION: Do not spray any liquids directly onto the monitor screen or allow any liquids to spill into internal components, as this can lead to component damage.
109 IRIDICA Assay Applications Guide68‐608235/R2

Barcode Scanner Beep Volume
Scan the following barcodes to program the barcode scanner for beep volume.
\
CAUTION: Risk of instrument damage — The Workstation monitor touch screen is extremely sensitive. Do not wipe down the monitor surface with too much force. Take care when cleaning not to scratch or dent the surface.
CAUTION: Ensure the IRIDICA Assay software is not waiting for barcode input for samples, reagents, or other assay items while attempting to program the barcode scanner.
110 IRIDICA Assay Applications Guide68‐608235/R2

Addendum AParts List
Order IRIDICA accessories and consumables directly from Abbott. When ordering, state the part name and list number.
Refer to the assay‐specific package insert for the required consumables and kits to run any specific IRIDICA assay. Some IRIDICA assays may require additional components not provided by Abbott.
Some components listed require an Abbott Service and Support representative for installation. An Abbott Representative will have more details.
IRIDICAAccessories
List Number Module
08N26‐020 IRIDICA Barcode scanner
08N26‐021 IRIDICA Barcode scanner Monitor Mount
08N26‐081 IRIDICA Touchscreen Monitor
08N26‐001 IRIDICA Viral Tube Rack
08N26‐002 IRIDICA DNA Prep Tube Rack
08N26‐039 IRIDICA SP Cart
08N26‐079 IRIDICA DS Cart
08N26‐089 IRIDICA MS Cart
08N26‐075 IRIDICA DS Seal Roller
9K32‐01 PCR Seal Applicator/Applicator, Abbott Adhesive Cover
111 IRIDICA Assay Applications Guide 68‐608235/R2

IRIDICAConsumables
IRIDICAReagents
IRIDICAModules
List Number Part
08N26‐031 IRIDICA Bellows Tips
08N26‐032 IRIDICA PCR Tips
08N26‐072 IRIDICA Master Tips
08N26‐003 IRIDICA Assay Strip Carriers
08N26‐071 IRIDICA DS Seals
08N26‐051 IRIDICA PCR Seals
08N26‐073 IRIDICA DS Plates
08N26‐074 IRIDICA DS Reagent Cartridges and Tips
List Number Part
08N25‐020 IRIDICA DS Reagent Kit
08N25‐030 IRIDICA MS Reagent Kit
08N26‐099 IRIDICA DS/MS Check Kit
List Number Module
08N26‐010 IRIDICA BB
08N26‐030 IRIDICA SP
08N26‐050 IRIDICA TC
08N26‐070 IRIDICA DS
08N26‐080 IRIDICA AC
08N26‐090 IRIDICA MS Module 1
08N26‐091 IRIDICA MS Module 2
08N26‐092 IRIDICA MS Module 3
112 IRIDICA Assay Applications Guide 68‐608235/R2

Sample Processing
Add sample to BB tube + diluent as necessary
DNA
*Bacterial and Fungal assays require different assay kits
Sample Type
Sample Amount
Diluent Amount
Whole Blood BSI
5 ml (± 500 μl)
-
Sterile Fluid SFT
500 μl (± 50 μl)
4.5 ml
Tissue SFT
35mg (± 10 mg)
4.97 ml
BAL LRT
100 μl (± 10 μl)
4.9 ml
ETA LRT
100 μl (± 10 μl) predigested, diluted sample
4.9 ml
BAL Fungal*
5 ml
Fungal* 1mm Biopsy punch
5.0 ml
1 of 8

Viral
Sample Processing Viral
Prepare samples with separate kit — Add 15.5 µl RNA Extraction Control per sample to the Lysis Buffer/Carrier mix and invert gently to mix.
CENTRIFUGE tubes 5 sec @ full speed
Thaw Negative Control and RNA Extraction Control
Add 60 µl Negative Control to each eluted sample and vortex
Thaw Enzyme Dilution Buffer
Put Superscript III on ice
Prepare Master Mix in Enzyme Mix Prep Tube — For six samples, use 178 µl Enzyme Dilution Buffer and 2 µl SuperScript III (total 180 µl)
Pipette Master Mix into Enzyme Mix Vials — 28 μl per sample
Reminder: Retain Negative Control, Enzyme Dilution Buffer and Superscript III tubes for registration on the SP
2 of 8

BB Instrument
Add assay kit reagents to BB tubes — 665 µl Lysis Buffer — 145 µl Extraction Control
Create Test Orders
Add sample to BB tubes – Cap
Run BB*
Unload BB tubes
CENTRIFUGE tubes 5min @ 3220 RCF
*While BB is running, you can prepare assay strips and SP instrument consumables:
• Thaw assay strips for 10 min • Load strips onto Assay Strip Carrier and centrifuge
for 1 minute at 130 RCF • Load SP tips (Bellows and PCR)
Load tubes on BB
DNA
Register samples and assay kit lot
Transfer lysate to Process Tubes Reminder: Retain BB tubes for registration on the SP
3 of 8

SP Instrument
Thaw Assay Strips 10 min — Load Assay Strip Carrier with Assay Strips
Register tubes and assay kit
Uncap, load Process Tubes and Elution Tubes
Run SP
CENTRIFUGE Assay Strip Carrier 1 min @ 130 RCF
Load SP tips (Bellows and PCR)
Fill the front two wells on each Reagent Cartridge with 18 ml ethanol each and load onto SP
Load Assay Strip Carrier onto SP— Remove Seals
Seal Assay Strip Carrier (White Backing Seals)
CENTRIFUGE Assay Strip Carrier 1 min @ 130 RCF
– Proceed to the Post-Amplification area –
DNA
4 of 8

SP Instrument
Create Test Orders
Load Assay Strips onto Assay Strip Carrier and thaw for 10 min
Seal Assay Strip Carrier (White Backing Seals)
– Proceed to the Post-Amplification area –
Viral
Load Assay Strip Carrier onto SP
Load PCR Tips
Uncap/Load Elution Tubes, Enzyme Mix Vials
Run SP
CENTRIFUGE Assay Strip Carrier 1 min @ 130 RCF
CENTRIFUGE Assay Strip Carrier 1 min @ 130 RCF
Register assay materials
5 of 8

Register Assay Strips
Load Assay Strip Carrier
Run TC*
CENTRIFUGE Assay Strip Carrier 1 min @ 130 RCF
*While TC is running, you can prepare DS reagents and consumables
TC Instrument DNA & Viral
When complete, END Hold
6 of 8
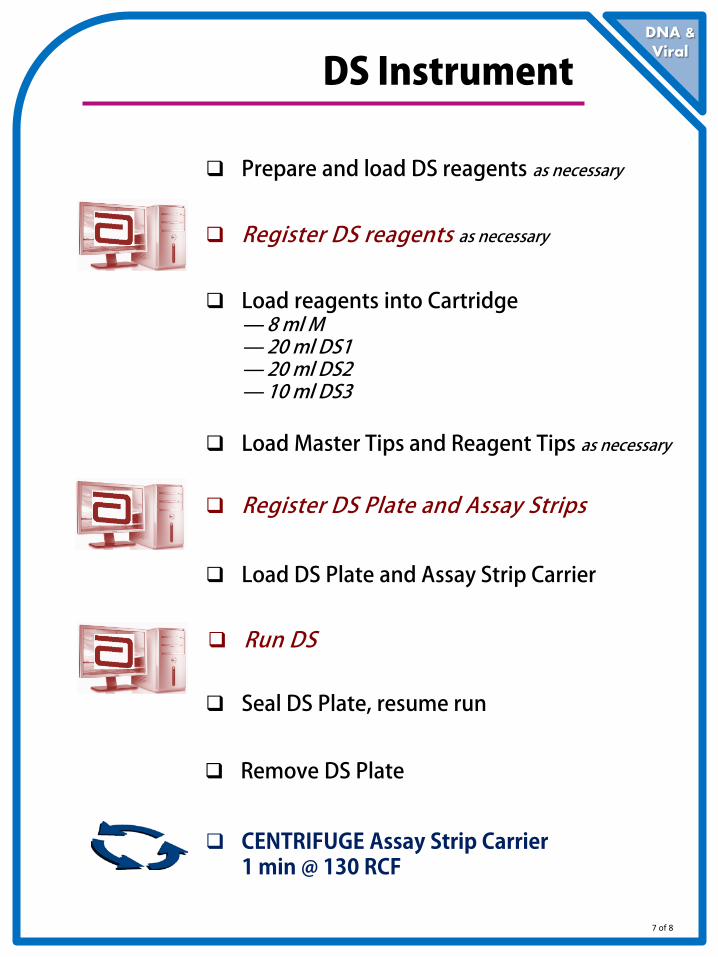
Register DS reagents as necessary
Run DS
Prepare and load DS reagents as necessary
Load Master Tips and Reagent Tips as necessary
Seal DS Plate, resume run
CENTRIFUGE Assay Strip Carrier 1 min @ 130 RCF
Register DS Plate and Assay Strips
DS Instrument DNA & Viral
Load reagents into Cartridge — 8 ml M — 20 ml DS1 — 20 ml DS2 — 10 ml DS3
Load DS Plate and Assay Strip Carrier
Remove DS Plate
7 of 8

Register MS reagents as necessary
Run MS
Prepare and load MS reagents as necessary
Load DS Plate
Register DS Plate
– Access the results of the assay via the IRIDICA Browser –
MS Instrument DNA & Viral
8 of 8