ascet-se v6.3 ehooks target user guide en - etas€¦ · ecu or a value calculated by a bypass...
TRANSCRIPT

ASCET-SE V6.3EHOOKS Target User Guide

ETAS Copyright
Copyright
The data in this document may not be altered or amended without special notificationfrom ETAS GmbH. ETAS GmbH undertakes no further obligation in relation to this docu-ment. The software described in it can only be used if the customer is in possession of ageneral license agreement or single license. Using and copying is only allowed in concur-rence with the specifications stipulated in the contract. Under no circumstances may anypart of this document be copied, reproduced, transmitted, stored in a retrieval system ortranslated into another language without the express written permission of ETAS GmbH.
©Copyright 2014 ETAS GmbH, Stuttgart.
The names and designations used in this document are trademarks or brands belongingto the respective owners.
Document EC015301 V6.3 R01 EN - 11.2014
ASCET-SE V6.3 EHOOKS Target User Guide 2

ETAS CONTENTS
Contents
1 Introduction 51.1 Safety Advice . . . . . . . . . . . . . . . . . . . . . . . . . . . . . . . . . . . . . . . . 5
1.1.1 Correct Use . . . . . . . . . . . . . . . . . . . . . . . . . . . . . . . . . . . 51.1.2 Labeling of Safety Instructions . . . . . . . . . . . . . . . . . . . . . 51.1.3 Demands on the Technical State of the Product . . . . . . . . . 6
1.2 About You . . . . . . . . . . . . . . . . . . . . . . . . . . . . . . . . . . . . . . . . . . . 61.3 Document Conventions . . . . . . . . . . . . . . . . . . . . . . . . . . . . . . . . . 6
2 Installation 82.1 Prerequisites . . . . . . . . . . . . . . . . . . . . . . . . . . . . . . . . . . . . . . . . . 82.2 Installation . . . . . . . . . . . . . . . . . . . . . . . . . . . . . . . . . . . . . . . . . . 82.3 After Installation . . . . . . . . . . . . . . . . . . . . . . . . . . . . . . . . . . . . . . 8
3 Understanding ASCET/EHOOKS Integration 93.1 Typical Workflow . . . . . . . . . . . . . . . . . . . . . . . . . . . . . . . . . . . . . . 93.2 On-Target Bypass Concepts . . . . . . . . . . . . . . . . . . . . . . . . . . . . . . 9
3.2.1 ASCET Models as Bypass Functions . . . . . . . . . . . . . . . . . . 103.3 Key Features of the EHOOKS Target . . . . . . . . . . . . . . . . . . . . . . . . . 113.4 Summary . . . . . . . . . . . . . . . . . . . . . . . . . . . . . . . . . . . . . . . . . . . 12
4 Getting Started with an EHOOKS Project 134.1 Project Administration . . . . . . . . . . . . . . . . . . . . . . . . . . . . . . . . . . 13
4.1.1 Creating an ASCET/EHOOKS Project . . . . . . . . . . . . . . . . . 134.1.2 Specifying the Configuration File Location . . . . . . . . . . . . . 154.1.3 Configuring ASCET-EHOOKS Interaction Settings . . . . . . . . 15
EHOOKS Build Options . . . . . . . . . . . . . . . . . . . . . . . . . . . 16Global Name Space Prefix . . . . . . . . . . . . . . . . . . . . . . . . 16Cont Implementation Type . . . . . . . . . . . . . . . . . . . . . . . . 18
4.1.4 Basic EHOOKS Configuration . . . . . . . . . . . . . . . . . . . . . . 194.2 Integrating Bypass Functions . . . . . . . . . . . . . . . . . . . . . . . . . . . . . 20
4.2.1 Preparing the Project . . . . . . . . . . . . . . . . . . . . . . . . . . . . 204.2.2 Connecting Inputs and Outputs to ECU Variables . . . . . . . . 21
"Input" Tab . . . . . . . . . . . . . . . . . . . . . . . . . . . . . . . . . . . 21"Output" Tab . . . . . . . . . . . . . . . . . . . . . . . . . . . . . . . . . . 27Mapping Messages and ECU Variables . . . . . . . . . . . . . . . . 29Auto-Mapping . . . . . . . . . . . . . . . . . . . . . . . . . . . . . . . . . 36
4.2.3 Configuring the Scheduling . . . . . . . . . . . . . . . . . . . . . . . 38"Scheduling" Tab . . . . . . . . . . . . . . . . . . . . . . . . . . . . . . . 39Mapping Processes to Dispatch Points . . . . . . . . . . . . . . . . 40
4.2.4 Exporting and Importing Mappings . . . . . . . . . . . . . . . . . . 444.3 Building the ECU Code . . . . . . . . . . . . . . . . . . . . . . . . . . . . . . . . . . 46
4.3.1 Generating ECU Code Only . . . . . . . . . . . . . . . . . . . . . . . . 464.3.2 Viewing the ASCET Build Log . . . . . . . . . . . . . . . . . . . . . . 47
5 Calibrating Bypass Functions 48
6 Interacting with EHOOKS Control Variables 51
ASCET-SE V6.3 EHOOKS Target User Guide 3

ETAS CONTENTS
7 Arithmetic Services and Interpolation Routines 547.1 Arithmetic Services . . . . . . . . . . . . . . . . . . . . . . . . . . . . . . . . . . . . 54
7.1.1 Preparing a Service Set . . . . . . . . . . . . . . . . . . . . . . . . . . 547.1.2 Using a Service Set . . . . . . . . . . . . . . . . . . . . . . . . . . . . . 57
7.2 Interpolation Routines . . . . . . . . . . . . . . . . . . . . . . . . . . . . . . . . . . 597.2.1 Understanding Interpolation Routine Use in ASCET . . . . . . . 60
Definition Files . . . . . . . . . . . . . . . . . . . . . . . . . . . . . . . . 60Mapping Files . . . . . . . . . . . . . . . . . . . . . . . . . . . . . . . . . 62Header Files . . . . . . . . . . . . . . . . . . . . . . . . . . . . . . . . . . 62Library . . . . . . . . . . . . . . . . . . . . . . . . . . . . . . . . . . . . . . 62
7.2.2 Using the Default Routines . . . . . . . . . . . . . . . . . . . . . . . . 627.2.3 Using Custom Routines . . . . . . . . . . . . . . . . . . . . . . . . . . 63
Modifying an Existing Interpolation Scheme . . . . . . . . . . . . 63Creating a New Interpolation Scheme . . . . . . . . . . . . . . . . 63
7.3 Callbacks to Existing ECU Code . . . . . . . . . . . . . . . . . . . . . . . . . . . . 657.3.1 Arithmetic Services . . . . . . . . . . . . . . . . . . . . . . . . . . . . . 687.3.2 Interpolation Routines . . . . . . . . . . . . . . . . . . . . . . . . . . . 687.3.3 Mixing Callbacks to Off-ECU and On-ECU Code . . . . . . . . . . 68
8 Using Libraries 708.1 Model Libraries . . . . . . . . . . . . . . . . . . . . . . . . . . . . . . . . . . . . . . . 718.2 Service Libraries . . . . . . . . . . . . . . . . . . . . . . . . . . . . . . . . . . . . . . 71
8.2.1 Controlling Method Names in Generated Code . . . . . . . . . . 718.2.2 Optimizing Data Structure Accesses . . . . . . . . . . . . . . . . . 728.2.3 Using Services Routines on the ECU . . . . . . . . . . . . . . . . . 73
8.3 Working with Formulas . . . . . . . . . . . . . . . . . . . . . . . . . . . . . . . . . . 738.3.1 Using the Same Formulas as the ECU . . . . . . . . . . . . . . . . 73
9 Using EHOOKS-DEV V3.0 759.1 Updating Projects from EHOOKS-DEV V2.0 to EHOOKS-DEV V3.0 . . . . 759.2 Using the Code Generator: Object Based Controller Physical . . . . . . . 76
9.2.1 Arithmetic Services . . . . . . . . . . . . . . . . . . . . . . . . . . . . . 789.2.2 Interpolation Routines . . . . . . . . . . . . . . . . . . . . . . . . . . . 789.2.3 Interacting with EHOOKS Control Variables . . . . . . . . . . . . 78
9.3 Calibrating Bypass Functions . . . . . . . . . . . . . . . . . . . . . . . . . . . . . 789.3.1 Global Name Space Prefix . . . . . . . . . . . . . . . . . . . . . . . . 79
9.4 Building the ECU . . . . . . . . . . . . . . . . . . . . . . . . . . . . . . . . . . . . . . 79
10 Using EHOOKS-DEV V3.1 81
11 Contacting ETAS 8311.1 Technical Support . . . . . . . . . . . . . . . . . . . . . . . . . . . . . . . . . . . . . 8311.2 General Enquiries . . . . . . . . . . . . . . . . . . . . . . . . . . . . . . . . . . . . . 83
11.2.1 ETAS Global Headquarters . . . . . . . . . . . . . . . . . . . . . . . . 8311.2.2 ETAS Local Sales & Support Offices . . . . . . . . . . . . . . . . . . 83
Bibliography 84
ASCET-SE V6.3 EHOOKS Target User Guide 4

ETAS Introduction
1 Introduction
Welcome to the EHOOKS Target for ASCET!
The EHOOKS Target allows you to use ASCET to build software for on-target bypass hooksand integrated it with existing ECU software using ETAS’ EHOOKS tools.
This guide explains:
• how to install the EHOOKS Target
• the basic concepts behind ASCET and EHOOKS interaction
• how to configure an ASCET project to use the EHOOKS Target
• how to map ASCET messages onto hooks and processes into bypass containers pro-vided by EHOOKS
• how to use services provided by external libraries and/or the ECU itself in ASCET-generated code
1.1 Safety Advice
Please adhere to the Product Liability Disclaimer (ETAS Safety Advice) and to the follow-ing safety instructions to avoid injury to yourself and others as well as damage to thedevice.
1.1.1 Correct Use
ETAS GmbH cannot be made liable for damage which is caused by incorrect use and notadhering to the safety instructions.
1.1.2 Labeling of Safety Instructions
The safety instructions contained in this manual are shown with the standard dangersymbol shown below:
The following safety instructions are used. They provide extremely important informa-tion. Read this information carefully.
WARNING
Indicates a possible medium-risk danger which could lead to serious or even fatalinjuries if not avoided.
CAUTION
Indicates a low-risk danger which could result in minor or less serious injury ordamage if not avoided.
ASCET-SE V6.3 EHOOKS Target User Guide 5
ETAS Introduction
NOTICE
Indicates behavior which could result in damage to property.
1.1.3 Demands on the Technical State of the Product
The following special requirements are made to ensure safe operation:
• Take all information on environmental conditions into consideration before setup andoperation; see the documentation your computer, hardware, etc.
CAUTION
Wrong word size and/or compiler division lead to wrong compilable code.Wrong compilable code may lead to unpredictable behavior of a vehicleor test bench, and thus to safety-critical situations.To avoid wrong compilable code, users must ensure that word size and and compilerdivision match the selected EHOOKS-DEV backend.
• Read, and adhere to, the safety advice given in the EHOOKS documentation.
• Further safety advice is given in the ASCET V6.3 safety manual (ASCET SafetyManual.pdf) available at ETAS upon request.
1.2 About You
You are a trained function developer who wants to do on-target prototyping using theECU as the prototyping platform. You have knowledge of software development usingASCET and the use of the EHOOKS tools.
You should also be familiar with common use of the Microsoft XP or later operating sys-tems, including installing software, selecting menu items, clicking buttons, navigatingfiles and folders.
1.3 Document Conventions
The following conventions are used in this guide:
Select File Ô Open. Menu options are printed in bold, blue characters.
Click OK. Button labels are printed in bold characters
Press <Enter>. Key commands are enclosed in angle brackets.
The "Save" dialogwindow appears.
The names of program windows, dialog windows, fields, etc. areenclosed in double quotes.
ASCET-SE V6.3 EHOOKS Target User Guide 6

ETAS Introduction
Function(P1,P2)Select the setup.exefile.
Text in drop-down lists on the screen, program code, as well aspath and file names are printed in a monospaced typeface.
A distribution is aone-dimensional tableof sample points.
General emphasis and new terms are set in italics.
See section 1.3. Hyperlinks through the document are shown in blue letters.
. . . available atwww.autosar.org . . .
Hyperlinks to Web addresses are shown inmagenta, underlined letters.
Tip
Important note to the user.
Tip
Notes that appear like this contain important information that you needto be aware of. Make sure that you read them carefully and that you followany instructions that you are given.
Tip
Good practice! Sections marked with a "thumbs up" logo are recommendedpractice that will make your use of the product easier.
ASCET-SE V6.3 EHOOKS Target User Guide 7

ETAS Installation
2 Installation
2.1 Prerequisites
This version of the EHOOKS Target requires the following products:
Product Version
EHOOKS Dev Front End V2.0 Build 242
EHOOKS Dev MEDC17 V2.0 Build 242
ASCET V6.3.0
You must install the EHOOKS Front End and ECU Back Ends for each ECU you want to usefor on-target prototyping.
2.2 Installation
The EHOOKS Target is part of ASCET-SE. When you install ASCET-SE, you must select theEHOOKS-enabled ECU target to install EHOOKS Target.
2.3 After Installation
Unlike other ASCET targets, the EHOOKS Target does not need to know which compilerand operating system are required. Compilation and OS integration issues for the targetECU are handled by EHOOKS.
Furthermore, ASCET does not need to be told where EHOOKS is installed on your system- the EHOOKS Target will find the EHOOKS tools automatically.
It is possible to have more than one EHooks Versions installed on the same host PC asASCET-SE for the EHOOKS Target to work correctly. As default ASCET will use V2.0 forusage with the EHOOKS Target.
ASCET-SE V6.3 EHOOKS Target User Guide 8

ETAS Understanding ASCET/EHOOKS Integration
3 Understanding ASCET/EHOOKS Integration
The ASCET EHOOKS Target provides a special ASCET-SE target that generates code foruse as on-target bypass functions suitable for integration with an EHOOKS-prepared ECU.The EHOOKS Target can also transparently run the EHOOKS-DEV tool chain to integratethe generated code with ECU software with access to only the ECU hex and A2L files.
3.1 Typical Workflow
Figure 3.1 shows the standard workflow when using the EHOOKS Target:
Figure 3.1: Workflow for ASCET/EHOOKS Development
1. You design ASCET models for your bypass functionality and integrate them into anASCET project.
2. You configure the EHOOKS target for your ASCET project. ASCET will interact withEHOOKS to create a *.ehcfg configuration file.
3. ASCET stores the information about which parts of the ASCET model are hookedonto which ECU variables in the database or workspace.
4. ASCET generates code from the model as normal, but also the code and configura-tion files (SCOOP-IX) necessary to interface ASCET code with EHOOKS.
5. ASCET runs the EHOOKS build process to automatically generate new .hex and.a2l files that include your bypass functionality.
3.2 On-Target Bypass Concepts
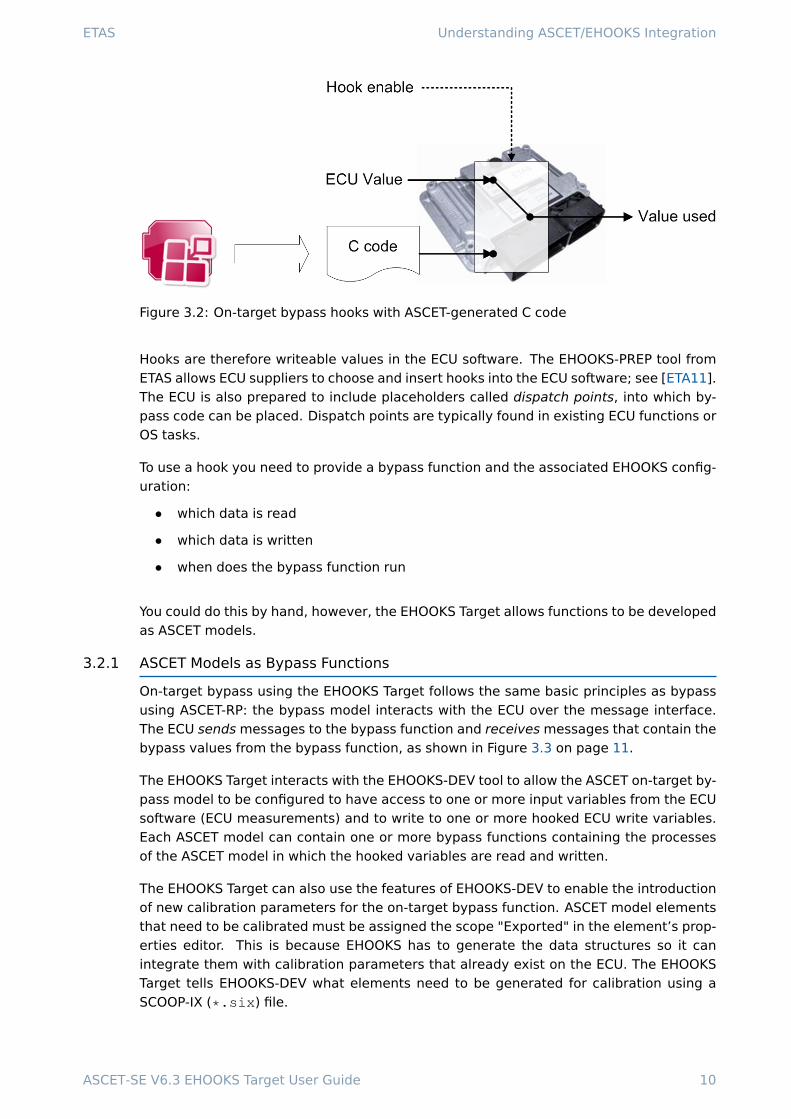
On-target bypass allows run-time control of whether the original value calculated by theECU or a value calculated by a bypass function running on the ECU is used for subsequentcalculations as shown in Figure 3.2.
When the ECU is built, the ECU supplier decides which values can be switched betweenthe ECU value and the bypass value, and creates a hook to allow the choice to be made.
ASCET-SE V6.3 EHOOKS Target User Guide 9
ETAS Understanding ASCET/EHOOKS Integration
Figure 3.2: On-target bypass hooks with ASCET-generated C code
Hooks are therefore writeable values in the ECU software. The EHOOKS-PREP tool fromETAS allows ECU suppliers to choose and insert hooks into the ECU software; see [ETA11].The ECU is also prepared to include placeholders called dispatch points, into which by-pass code can be placed. Dispatch points are typically found in existing ECU functions orOS tasks.
To use a hook you need to provide a bypass function and the associated EHOOKS config-uration:
• which data is read
• which data is written
• when does the bypass function run
You could do this by hand, however, the EHOOKS Target allows functions to be developedas ASCET models.
3.2.1 ASCET Models as Bypass Functions
On-target bypass using the EHOOKS Target follows the same basic principles as bypassusing ASCET-RP: the bypass model interacts with the ECU over the message interface.The ECU sends messages to the bypass function and receives messages that contain thebypass values from the bypass function, as shown in Figure 3.3 on page 11.
The EHOOKS Target interacts with the EHOOKS-DEV tool to allow the ASCET on-target by-pass model to be configured to have access to one or more input variables from the ECUsoftware (ECU measurements) and to write to one or more hooked ECU write variables.Each ASCET model can contain one or more bypass functions containing the processesof the ASCET model in which the hooked variables are read and written.
The EHOOKS Target can also use the features of EHOOKS-DEV to enable the introductionof new calibration parameters for the on-target bypass function. ASCET model elementsthat need to be calibrated must be assigned the scope "Exported" in the element’s prop-erties editor. This is because EHOOKS has to generate the data structures so it canintegrate them with calibration parameters that already exist on the ECU. The EHOOKSTarget tells EHOOKS-DEV what elements need to be generated for calibration using aSCOOP-IX (*.six) file.
ASCET-SE V6.3 EHOOKS Target User Guide 10

ETAS Understanding ASCET/EHOOKS Integration
Figure 3.3: ECU sending and receiving messages from the bypass function
3.3 Key Features of the EHOOKS Target
Key features of the EHOOKS Target are:
No special modeling required. It is not necessary to modify your models to work withthe EHOOKS target. Models can be used unmodified with EHOOKS for complexinternal bypass. It is only necessary to configure an EHOOKS target for a projectand hook model messages onto hooks provided by the ECU.
No changes to generated code. ASCET generates identical C code from the model asit would when generating code for an embedded ECU. This means that the code formodules and classes is not modified in any way for the EHOOKS target. ASCETinterfaces to EHOOKS by generating bypass functions that set up the context forASCET on entry and tear down the context on exit.
No special memory configuration needed. EHOOKS does not have the notion of dif-fering memory sections - there is simply code space, variable space and parameterspace. ASCET ignores any memory sections definitions declared in model configu-ration.
No need to know the target ECU or compiler. ASCET does not need to know whatmicro-controller is being used in the ECU or what compiler needs to be used forbuilding the bypass functions for integration - ASCET just sees a special EHOOKS
ASCET-SE V6.3 EHOOKS Target User Guide 11

ETAS Understanding ASCET/EHOOKS Integration
target. Any EHOOKS-supported ECU can be used as an EHOOKS target. Details ofsupported ECUs can be obtained by contacting ETAS.
CAUTION
Wrong word size and/or compiler division lead to wrong compilablecode. Wrong compilable code may lead to unpredictable behavior ofa vehicle or test bench, and thus to safety-critical situations.To avoid wrong compilable code, users must ensure that word size and andcompiler division match the selected EHOOKS-DEV backend.
Automatic conversion between ECU types and model types. ASCET automati-cally converts between ECU types and model types.
One-click ECU rebuild. ASCET generates code, the EHOOKS configuration, and runsthe EHOOKS build process with a single mouse click.
3.4 Summary
ASCET automatically
• adds configuration information to the EHOOKS configuration file to integrate thebypass function, including telling EHOOKS-DEV what file to include in the ECU build;
• creates a SCOOP-IX file defining all global data, measurements and calibration pa-rameters required for the bypass functions;
• generate code that implements the ASCET model. The code is identical in structureand content to the code generated for all other ASCET-SE targets;
• generates bypass functions that integrate ASCET-generated code with theEHOOKS-generated interface;
• runs the EHOOKS-DEV tool to integrate the bypass functions with the ECU.
EHOOKS-DEV automatically
• uses the SCOOP-IX (.six) file to generate ASCET-compatible data structures for allparameters;
• uses the EHOOKS (.ehcfg) configuration file to generate an interface to the ECUdata for the ASCET-generated bypass functions;
• integrates all the source generated by both ASCET and EHOOKS-DEV with the ex-isting ECU hex file.
ASCET-SE V6.3 EHOOKS Target User Guide 12

ETAS Getting Started with an EHOOKS Project
4 Getting Started with an EHOOKS Project
You are now ready to create an ASCET project that uses an EHOOKS target.
Before you start, you must have the following mandatory items from your ECU supplier:
1. the ECU *.hex file, pre-prepared for EHOOKS use, for the ECU you want to use foron-target prototyping
2. the *.a2l file, pre-prepared for EHOOKS use, for the ECU you want to use for on-target prototyping
3. the password for the *.a2l file (if is it password-protected)
Use of advanced capabilities of the EHOOKS Target, for example use of external or on-ECU services, requires some or all of the following optional items from your ECU supplier:
1. a services.ini from your ECU supplier defining the services available on theECU
2. a *.ini file from your ECU supplier defining the interpolation routines available foruse on the ECU
3. an ASCET workspace (or database) from your ECU supplier defining the model in-terface for library functions that are available for use on the ECU
4. C source code files and/or pre-compiled libraries for your ECU that implement ser-vice routines
Further information about what is required and when can be found in chapters 7 and 8.
4.1 Project Administration
A new EHOOKS project is created with the following steps:
1. in ASCET: create an ASCET project for an EHOOKS target (section 4.1.1)
2. in ASCET: specify which EHOOKS *.ehcfg configuration file ASCET will use (sec-tion 4.1.2)
3. in ASCET: configure ASCET-EHOOKS interaction (section 4.1.3)
4. in EHOOKS: select the *.hex and *.a2l files EHOOKS will use (section 4.1.4)
The following sections explain these steps in more detail.
4.1.1 Creating an ASCET/EHOOKS Project
You must create an ASCET project in which to build your bypass functionality. You canuse an existing project or create a new one.
ASCET-SE V6.3 EHOOKS Target User Guide 13

ETAS Getting Started with an EHOOKS Project
To define an EHOOKS project:
The project needs to be configured to target an EHOOKS prepared ECU as follows:
• Create and open a project as described in the ASCET onlinehelp.
• In the project editor, select File Ô Properties (or use<Ctrl> + <p>) to open the "Project Properties" window.
• Go to the "Build" node and select EHOOKS as the target forthe build as shown in Figure 4.1 on page 14.
• In the "Code Generator" combo box, select a code genera-tor.
Two code generators are available, Object BasedController Implementation and Object BasedController Physical.
Tip
Do not select Object Based ControllerPhysical when you are using EHOOKS V2.0.Object Based Controller Physical canonly be used with EHOOKS V3.0.0 or higher.
Figure 4.1: Configuring a project to use an EHOOKS target
ASCET-SE V6.3 EHOOKS Target User Guide 14

ETAS Getting Started with an EHOOKS Project
When you set up the project to use the EHOOKS target, a new tab appears in the projecteditor (see Figure 4.2 on page 15). This new tab replaces the "OS" tab; here you do allthe configuration that is specific to EHOOKS projects in ASCET.
Figure 4.2: "EHOOKS" tab in the project editor (no configuration file selected)
4.1.2 Specifying the Configuration File Location
Each project that uses the EHOOKS target must be associated with an EHOOKS configu-ration file (*.ehcfg).
Tip
You must associate your ASCET project with an EHOOKS configuration file beforeyou can do any further configuration.
You can choose an existing EHOOKS configuration file or create a new one. If you usean existing EHOOKS configuration file, any pre-existing configuration items will be pre-served. When ASCET generates EHOOKS configuration information in the file, only theparts owned by ASCET are modified. Non-ASCET-generated EHOOKS configuration is un-changed.
To select an EHOOKS configuration file:
• In the project editor, go to the "EHOOKS" tab.
• In the "EHOOKS" tab, click the Change File button.
The Windows file selection window opens. The file extension
*.ehcfg is preselected.
• Select your EHOOKS configuration file and click Open.
Path and name of the EHOOKS configuration file are shownin the "Configuration file" field at the top of the "EHOOKS"tab. The sub-tabs "Scheduling", "Input" and "Output" ap-pear.
4.1.3 Configuring ASCET-EHOOKS Interaction Settings
When you have associated an EHOOKS configuration file with the ASCET project, youneed to configure how ASCET interacts with EHOOKS.
ASCET-SE V6.3 EHOOKS Target User Guide 15

ETAS Getting Started with an EHOOKS Project
Figure 4.3: "EHOOKS" tab with EHOOKS configuration file(In the "Input" and "Output" tabs, another button Open EHOOKS functionsis available between Change File and Open EHOOKS.)
EHOOKS Build Options
The EHOOKS Target uses the EHOOKS toolchaindriver program to re-build the ECU.
Any options that you want ASCET to pass to the toolchaindriver can be entered in theASCET options window, "Targets\EHOOKS\Build" node (see Figure 4.4 on page 17), "BuildTool Options" field. The values are passed directly to the toolchaindriver withoutany modification and must be valid EHOOKS options.
Permitted options are listed in the EHOOKS-DEV user’s guide, section "EHOOKS-DEVCommand Line Usage".
Global Name Space Prefix
Global names generated by ASCET will not clash with names used by the ECU becauseEHOOKS works with a compiled HEX image.
However, the names that you use in your project may clash with the symbolic names ofelements used on the ECU and stored in the *.a2l file.
To prevent this, ASCET automatically adds a user-defined prefix to all global data ele-ments generated. The prefix is defined in the ASCET options window, "Targets\EHOOKS\Name Templates" node (see Figure 4.5 on page 17); it is added to the element name andthe element display name in the *.a2l file.
ASCET-SE V6.3 EHOOKS Target User Guide 16

ETAS Getting Started with an EHOOKS Project
Figure 4.4: Build options for the EHOOKS target
Figure 4.5: Name Templates options for the EHOOKS target
ASCET-SE V6.3 EHOOKS Target User Guide 17

ETAS Getting Started with an EHOOKS Project
Cont Implementation Type
The code generator (Object Based Controller *; see "To define an EHOOKSproject:" on page 14), in combination with the EHOOKS target option "Cont Implementa-tion Type" (see Figure 4.4 on page 17), controls how ASCET generates bypass functioncode for continuous (real number) elements in the model.
The following combinations are available:
Code Generator Cont Implemen-tation Type
effect
Object BasedControllerImplementation
* Use the implementations specified in themodel.
When a variable is read from the ECU, theEHOOKS Target will automatically convertthe value to the type defined in themodel.When a variable is written to the ECU, theEHOOKS Target will automatically convertthe value to type used by the ECU.
Object BasedControllerPhysical
(not available forEHOOKS-DEVV2.0)
Phys. SinglePrecision
Generate all continuous elements assingle precision floating point values.
When a variable is read from the ECU theEHOOKS Target will automatically convertthe value to single precision floatingpoint.When a variable is written to the ECU theEHOOKS Target will automaticallyre-quantize the value to use thequantization defined by the ECU.
Phys. DoublePrecision
Generate all continuous elements asdouble precision floating point values.
When a variable is read from the ECU theEHOOKS Target will automatically convertthe value to double precision floatingpoint.When a variable is written to the ECU theEHOOKS Target will automaticallyre-quantize the value to use thequantization defined by the ECU.
Table 4.1: Effects of "Code Generator" and "Cont Implementation Type" combinations
ASCET-SE V6.3 EHOOKS Target User Guide 18

ETAS Getting Started with an EHOOKS Project
4.1.4 Basic EHOOKS Configuration
If you decided to create a new EHOOKS *.ehcfg configuration file, then you need tostart EHOOKS and configure the locations of the *.hex and *.a2l files.
Figure 4.6: EHOOKS-DEV window: Choosing EHOOKS files
To configure input and output files:
• In the "EHOOKS" tab, click on Start EHOOKS (see Fig-ure 4.3 on page 16).
If EHOOKS is not running, it is started now. The *.ehcfgfile is opened in the EHOOKS-DEV window.
• In the EHOOKS-DEV window, use the first and third Browsebuttons (I in Figure 4.6 on page 19) to select input *.a2land *.hex files.
ASCET-SE V6.3 EHOOKS Target User Guide 19

ETAS Getting Started with an EHOOKS Project
If you access a password-protected *.a2l file for the firsttime, you are asked for a password.
• Enter the password and click OK.
• Activate the Save Password in Project option to store thepassword in the *.ehcfg file.
• In the EHOOKS-DEV window, use the second and fourthBrowse buttons (O in Figure 4.6 on page 19) to enter output
*.a2l and *.hex files.
• In the EHOOKS-DEV window, select File Ô Save to save the
*.ehcfg file.
ASCET will generate the warning shown in Figure 4.7 on page 20 if you do not specify anyfiles in EHOOKS.
Figure 4.7: Warning if no EHOOKS files are selected
4.2 Integrating Bypass Functions
Bypass functions are created as normal ASCET models, and integrated in an ASCETproject in the same way as any other ASCET model. Please consult the ASCET onlinehelp if you are unsure about how to create ASCET models.
The project can be an arbitrarily complex ASCET model.1
4.2.1 Preparing the Project
When you integrate a normal ASCET project for series production, the code generatorchecks that:
• every sent message has a receiver
• every received message has a sender
ASCET will generate warnings if these checks fail.
When you build a bypass function, however, your model will typically have "uncon-nected" messages because they will be sent from or received by the ECU.
ASCET needs to know that these "loose ends" will be joined up. You can do this byselecting Extras Ô Resolve Globals in the project editor, as shown in Figure 4.8. Inthe EHOOKS Target this creates "virtual" messages that can then be hooked onto ECUvariables.
1 Not all functionality is currently supported. See the ASCET-SE release notes for known limita-tions in this release.
ASCET-SE V6.3 EHOOKS Target User Guide 20

ETAS Getting Started with an EHOOKS Project
Figure 4.8: Resolving globals
4.2.2 Connecting Inputs and Outputs to ECU Variables
Messages that are sent or received by the project technically have no sender or receiveras the project context is passive. These messages represent the unconnected parts ofthe ASCET model. To connect them to ECU variables, you need to do the following things:
1. select ECU measurements and ECU write hooks
2. map messages that have no sender to ECU measurements (the message will beread from the ECU)
3. map messages that have no receiver to ECU write hooks (the messages will bewritten to the ECU)
The "Input" and "Output" sub-tabs of the "EHOOKS" tab in the ASCET project editor allowmapping ASCET messages to ECU variables.
Tip
To make sure that the view in these tabs is up to date, click the Updatebutton to refresh the tab.
The "Input" and "Output" tabs are described in section "Input" Tab on page 21 andsection "Output" Tab on page 27. Section "Mapping Messages and ECU Variables" onpage 29 contains detailed instructions for manual mapping, and section "Auto-Mapping"on page 36 describes automatic mapping.
"Input" Tab
The "Input" tab contains the following GUI elements:
1. top bar
(a) information field
Shows whether message mapping is complete ( ), incomplete ( ), or containsinvalid mappings ( ).
ASCET-SE V6.3 EHOOKS Target User Guide 21

ETAS Getting Started with an EHOOKS Project
Figure 4.9: "Input" tab
ASCET-SE V6.3 EHOOKS Target User Guide 22

ETAS Getting Started with an EHOOKS Project
(b) Update button
Updates the instances of the modules, i.e. imports changes in these compo-nents into the project.
(c) Auto-Mapping button
This button maps all unmapped messages to ECU variables with identicalname and type.
(d) / button
Shows ( ) or hides ( ) the upper table.
2. upper table (hidden by default)
(a) "Messages" column
This column lists all receive and send&receive messages from all modules di-rectly or indirectly used in the project. The messages are displayed as follows:
exported/importedmessages:
<message>
local messages: <module_inst>2[.<nested module_inst>...].<message>
Tip
Receive messages with an external Set method are not shown.
If one module contains a send message <name>, and another modulecontains a receive message with identical <name>, the receive message<name> is not shown.
* input field and button above the column
You can enter a text string in the input field and then click on to filter thelist of available messages by name. The filter is case-insensitive; it findsall messages whose names contain the text string.
* properties filter above the column
Opens the "Filter Criteria" dialog window (see Figure 4.17 on page 35),which allows filtering the list by selected properties.
An active type filter is indicated by a green overlay icon on both filter buttons:
An active filter is indicated by a green overlay icon: Click the button toremove the filter.
(b) "ECU Variables" column
This column lists all unmapped ECU measurement variables that are availablefor mapping. The elements are displayed the same way as in the EHOOKSvariable selection dialog window (see Figure 4.13 on page 30).
* input field, properties filter and button above the column
The same as in the "Messages" column.
(c) context menu
2 <module_inst> is the module instance name
ASCET-SE V6.3 EHOOKS Target User Guide 23

ETAS Getting Started with an EHOOKS Project
* Get ECU Labels
Opens the EHOOKS variable selection dialog window (see Figure 4.13 onpage 30). Variables you select there will be available in the "ECU Variables"columns when you close the window with OK.
See also To select ECU variables: on page 29.
* Get ECU Backup Copy Labels
Opens the EHOOKS backup copy selection dialog window (see Figure 4.15on page 31). This allows to map a message to a backup copy of an ECUwrite hook (i.e. the value calculated by the original ECU before the ECUvariable was hooked and bypassed by EHOOKS).
* Get ECU Labels and Map (overwrite existing mappings)
Opens the EHOOKS variable selection dialog window (see Figure 4.13. Vari-ables you select there will be mapped automatically to messages with iden-tical names. Existing mappings are overwritten.
See also To use the Get ECU Labels and Map commands: on page 38.
* Get ECU Labels and Map (keep existing mappings)
Opens the EHOOKS variable selection dialog window (see Figure 4.13 onpage 30). Variables you select there will be mapped automatically to mes-sages with identical names. Existing mappings are kept.
See also To use the Get ECU Labels and Map commands: on page 38.
3. button
Maps a message selected in the "Message" column to an ECU variable selected inthe "Variables" column.
Tip
In the "Input" tab, one message can be mapped to one ECU variable. How-ever, you can map several messages to the same ECU variable.
4. "Mapping" field - lower table
(a) input field, properties filter and button
The same as in the "Messages" column of the upper table; see page 23.
(b) "Messages" column
This column lists the same messages as the "Messages" column in the uppertable; see page 23.
(c) icon column
This column contains icons that represent the mapping status.
The message is unmapped.Mapping is valid: the message is mapped to a suitable ECU variableMapping is invalid
(d) "ECU Variables" column
This column shows the ECU variables mapped to the messages in the "Mes-sages" column of the "Mapping" field. The elements are displayed as in theupper "ECU Variables" column.
If no mapping exists (---; see Figure 4.10 on page 25, 3rd row), the "ECUVariables" column can be used to perform mapping. A double-click in a tablecell opens a list of all suitable ECU variables (see Figure 4.10, 4th row).
ASCET-SE V6.3 EHOOKS Target User Guide 24

ETAS Getting Started with an EHOOKS Project
Unsaved changed mappings are indicated by blue font (see Figure 4.10, 2nd
row).
Figure 4.10: "Mapping" field in the "Input" tab
(e) context menu
* Edit
Opens the list of available ECU variables for selection.
* Remove
Removes an existing mapping.
* Revert Changes
Reverts unsaved mapping changes.
Tip
Edit, Remove and Revert Changes work the same way as therespective commands described in the ASCET online help for messageand parameter mapping in AUTOSAR software components.
* Get ECU Labels
Opens the EHOOKS variable selection dialog window (see Figure 4.13 onpage 30). Variables you select there will be available in the "ECU Variables"columns.
See also To select ECU variables: on page 29.
* Get ECU Backup Copy Labels
Opens the EHOOKS backup copy selection dialog window (see Figure 4.15on page 31). This allows to map a message to a backup copy of an ECUwrite hook (i.e. the value calculated by the original ECU before the ECUvariable was hooked and bypassed by EHOOKS).
See also To connect a message to an backup copy of an ECU variable: onpage 30.
* Get ECU Labels and Map (overwrite existing mappings)
Opens the EHOOKS variable selection dialog window (see Figure 4.13 onpage 30). Variables you select there will be mapped automatically to mes-sages with identical names. Existing mappings are overwritten.
ASCET-SE V6.3 EHOOKS Target User Guide 25
ETAS Getting Started with an EHOOKS Project
See also To use the Get ECU Labels and Map commands: on page 38.
* Get ECU Labels and Map (keep existing mappings)
Opens the EHOOKS variable selection dialog window (see Figure 4.13 onpage 30). Variables you select there will be mapped automatically to mes-sages with identical names. Existing mappings are kept.
See also To use the Get ECU Labels and Map commands: on page 38.
* Export
Opens the "Export Settings" dialog window where you can export mappingsto an *.xml or *.csv file.
* Import
Imports mappings from an *.xml or *.csv file.
Tip
Instructions for Export and Import are given in section 4.2.4 "Ex-porting and Importing Mappings" on page 4.2.4.
The Mapping menu contains the same options as the context menu in thelower table.
5. Without Send/Receive Messages option
If activated, no send&receive messages appear in the upper and lower "Messages"columns.
The state of this option is not stored when the project editor is closed; the option isalways deactivated when the project editor is opened.
ASCET-SE V6.3 EHOOKS Target User Guide 26

ETAS Getting Started with an EHOOKS Project
"Output" Tab
Figure 4.11: "Output" tab
The "Output" tab contains the following GUI elements:
1. top bar
Contains the same elements as the top bar in the "Input" tab; see page 21.
2. upper table (hidden by default)
(a) "Messages" column
This column lists all send and send&receive messages from all modules di-rectly or indirectly used in the project. The messages are displayed as follows:
exported / importedmessages:
<message>
local messages: <module>[.<nested module>...].<message>
Tip
Send messages with an external Get method are shown.If one module contains a send message <name>, and another modulecontains a receive message with identical <name>, the send message<name> is shown.
ASCET-SE V6.3 EHOOKS Target User Guide 27

ETAS Getting Started with an EHOOKS Project
* input field, properties filter and button above the column
The same as in the "Input" tab, "Messages" column of the upper table; seepage 23.
(b) "ECU Variables" column
This column lists all unmapped ECU Write Hook variables that are availablefor mapping. The elements are displayed the same way as in the EHOOKSvariable selection dialog window (see Figure 4.13 on page 30).
* input field, properties filter and button above the column
The same as in the "Input" tab, "Messages" column of the upper table; seepage 23.
(c) context menu
The same as the context menu in the upper table of the "Input" tab (seepage 23), except that Get ECU Backup Copy Labels is deactivated.
3. button
Maps a message selected in the "Message" column to an ECU variable selected inthe "Variables" column.
Tip
In the " Output" tab, one message can be mapped to several ECU variables.
4. "Mapping" field - lower table
(a) input field, properties filter and button
The same as in the "Input" tab, "Messages" column of the upper table; seepage 23.
(b) "Messages" column
This column lists the same messages as the "Messages" column in the uppertable; see page 27. If a message is mapped more than once, each mapping isshown in a separate row.
(c) icon column
The same as in the "Input" tab; see page 24.
(d) "ECU Variables" column
This column shows the ECU variables mapped to the messages in the "Mes-sages" column of the "Mapping" field. The elements are displayed as in theupper "ECU Variables" column.
If no mapping exists (---; see Figure 4.12 on page 29, 3rd row), the "ECUVariables" column can be used to perform mapping. A double-click in a tablecell opens a list of all suitable ECU variables (see Figure 4.12, 4th row).
Unsaved changed mappings are indicated by blue font (see Figure 4.12, 2nd
row).
(e) context menu
The same as the context menu in the lower table of the "Input" tab (seepage 25), except that Get ECU Backup Copy Labels is deactivated.
5. Without Send/Receive Messages option
Works the same way as in the "Input" tab; see page 26.
ASCET-SE V6.3 EHOOKS Target User Guide 28

ETAS Getting Started with an EHOOKS Project
Figure 4.12: "Mapping" table in the "Output" tab
Mapping Messages and ECU Variables
This section contains step-by-step instructions for selecting ECU variables and mappingthem to messages.
To select ECU variables:
• In the project editor, go to the "EHOOKS" tab.
• Do one of the following:
– To select ECU Measurement variables, go to the "Input"tab (Figure 4.9 on page 22).
– To select ECU Write Hook variables, go to the "Output"tab (Figure 4.11 on page 27).
• To open the EHOOKS variable selection dialog window (seeFigure 4.13 on page 30), do one of the following:
– Right-click in the tab and select Get ECU Labels fromthe context menu.
– Select Mapping Ô Get ECU Labels.
– Click on the Open EHOOHS functions button and se-lect Get ECU Labels.
• In the EHOOKS variable selection dialog window, select therequired EHOOKS variables, then click OK.
The selected ECU variables appear in the "ECU Variables"column in the upper table of the "Input" or "Output" tab.
Tip
It is recommended that you leave the EHOOKS option Convert All acti-vated. This will cause EHOOKS to generate the conversion functions from ECUtypes to floating-point types. ASCET uses these functions when generatingcode for the Object Based Controller Physical code generator (seesection 4.1.3).
ASCET-SE V6.3 EHOOKS Target User Guide 29

ETAS Getting Started with an EHOOKS Project
Figure 4.13: EHOOKS variable selection dialog window(see the EHOOKS-DEV user’s guide for further information)
To connect a message to an backup copy of an ECU variable:
Tip
Backup copies are only available for ECU measurement variables whose "CreateBackup Copy" property is set to Yes; see Figure 4.14 on page 30.
Figure 4.14: Activating backup copies in the "Variable Bypass" tab of the EHOOKSwindow (see the EHOOKS-DEV user’s guide for further information)
• In the project editor, go to the "Input" sub-tab of the"EHOOKS" tab.
• Do one of the following:
– Right-click in the tab and select Get ECU Backup CopyLabels from the context menu.
ASCET-SE V6.3 EHOOKS Target User Guide 30

ETAS Getting Started with an EHOOKS Project
– Select Mapping Ô Get ECU Backup Copy Labels.
– Click on the Open EHOOHS functions button and se-lect Get ECU Backup Copy Labels.
The "Hook Selection" window (see Figure 4.15 on page 31)opens. The left table lists all ECU variables with backup copyenabled.
Figure 4.15: EHOOKS "Hook Selection" window
• In the left column of the "Hook Selection" window, select theEHOOKS variables whose backup copies you want to con-nect to ASCET messages.
• Click the button to shift the selected ECU variables tothe right column.
• Click OK to close the "Hook Selection" window.
Backup copies (named EH_copy_<ecu variable>) of theselected ECU variables are now available for mapping (seeFigure 4.16 on page 32).
• Map the backup copies to ASCET messages.
Tip
Note that when selecting a backup copy, the GUI presented by EHOOKSsupports multiple selection. ASCET can only use a single selection. If youselect more than one backup variable per message using the dialog, ASCETwill only use the first item you select.
ASCET-SE V6.3 EHOOKS Target User Guide 31

ETAS Getting Started with an EHOOKS Project
Figure 4.16: Backup copies of ECU measurement variables available for mapping
ASCET-SE V6.3 EHOOKS Target User Guide 32

ETAS Getting Started with an EHOOKS Project
To map messages and ECU variables in the "Mapping" field:
Tip
You cannot use the "Mapping" field in the "Output" tab for multiple mappings ofthe same message.
• In the project editor, go to the "EHOOKS" tab.
• Do one of the following:
– To map ECU Measurement variables, go to the "Input"tab (Figure 4.9 on page 22).
– To map ECU Write Hook variables, go to the "Output"tab (Figure 4.11 on page 27).
• If desired, filter the columns (see also "To filter thecolumns:" on page 35).
• In the "Mapping" field, double-click in a cell in the "ECU Vari-ables" column.
A list with all ECU variables available for mapping opens.
• Select an ECU variable.
The mapping is performed. The results are shown in the"Mapping" field.
The mapped ECU variable is removed from the "ECU Vari-ables" column of the upper table.In the "Input" tab, the mapped message is removed fromthe "Messages" column of the upper table.
Changed mappings are indicated by blue font in the "ECUVariables" column of the "Mapping" field.
The icon column in the "Mapping" field shows the mappingstatus; see page 24.
To map messages and ECU variables in the upper table:
• In the project editor, go to the "EHOOKS" tab.
• Do one of the following:
– To map ECU Measurement variables, go to the "Input"tab (Figure 4.9 on page 22).
– To map ECU Write Hook variables, go to the "Output"tab (Figure 4.11 on page 27).
• If necessary, click on to show the upper table.
ASCET-SE V6.3 EHOOKS Target User Guide 33

ETAS Getting Started with an EHOOKS Project
• If desired, filter the columns (see also "To filter thecolumns:" on page 35).
• In the "Messages" column of the upper table, select a mes-sage.
• In the "ECU Variables" column of the upper table, select anECU variable.
The button becomes available if the selectedelements can be mapped.
• Click on to map the selected elements.
Tip
As an alternative to these steps, you can drag a messagefrom the "Messages" column and drop it onto a suitableelement in the "ECU Variables" column.
The mapping is performed. The results are shown in the"Mapping" field.
The mapped ECU variable is removed from the "ECU Vari-ables" column of the upper table.In the "Input" tab, the mapped message is removed fromthe "Messages" column of the upper table.
Changed mappings are indicated by blue font in the "ECUVariables" column of the "Mapping" field.
The icon column in the "Mapping" field shows the mappingstatus; see page 24.
To remove a message/ECU variable mapping
• In the project editor, go to the "EHOOKS" tab.
• Go to the "Input" (Figure 4.9 on page 22) or "Output" (Fig-ure 4.11 on page 27) tab.
• In the "Mapping" field, "Messages" or "ECU Variables" col-umn, select a mapped element.
• Do one of the following:
– Open the context menu or the Mapping menu and se-lect Remove.
– Press <Delete>.
– In the "Mapping" field, double-click a cell in the "ECUVariables" column and select <None>.
The mapping is removed. If it was the 1+nth mapping of aSend or SendReceive message, the entire line is removedfrom the "Mapping" field.
The ECU variable reappears in the upper table.
If the message is a Receive message, it reappears in theupper table, too.
Changed mappings are indicated by blue font in the "ECUVariables" column of the "Mapping" field.
ASCET-SE V6.3 EHOOKS Target User Guide 34

ETAS Getting Started with an EHOOKS Project
The icon in the icon column is reset to .
To filter the columns:
You can filter the columns in the "Input" or "Output" tabs for more clearness. You canfilter for element names or for element properties.
• To filter for element properties, do the following:
– In the column you want to filter, click on the button.
The respective "Filter Criteria" dialog window (Fig-ure 4.17 on page 35) opens.
– In the combo boxes of the "Filter Criteria" dialog win-dow, select the properties you want to show in the col-umn.
– Click OK to apply the filter.
Only elements with all of the selected properties areshown in the list. The active type filter is indicated by agreen overlay icon on both filter buttons:
(A) (B) (C)
Figure 4.17: "Filter Criteria" windows(A): upper table, "Messages" column; (B): upper table, "ECU Variables"column; (C): lower table
• To filter for element name, do the following:
– In the column you want to filter, enter a text string inthe input field.
– Click on or press <Enter> to apply the filter.
Only elements whose names contain the text string areshown in the list. The filter is case-insensitive, i.e. asearch term Msg will also find msg, MSG, etc. The activename filter is indicated by a green overlay icon on the
second filter button:
In the "Mapping" field (lower table), the filter is appliedto both columns (see also Figure 4.18 on page 36). Anentry is displayed if at least one name contains the textstring.
• If desired, combine both filters.
• To deactivate all filters in a list, click on the button of therespective list.
ASCET-SE V6.3 EHOOKS Target User Guide 35

ETAS Getting Started with an EHOOKS Project
(A) (B)
Figure 4.18: Example: Name filter in the "Mapping" field(A): no name filter; (B): active name filter
The filter is deactivated, all entries of the respective list areshown. The filter settings, i.e. the text string in the inputfield and the settings in the "Filter Criteria" dialog window,are kept until you delete or overwrite them.
Auto-Mapping
Mapping each individual message can be time-consuming if you have a lot of variables.To simplify the task, the EHOOKS Target provides an auto-mapping function.
Auto-mapping automatically maps unconnected ASCET messages in the project to ECUmeasurements or write hooks with an identical name according to the following heuristic:
• If a message has no sender (or is sent only by the project itself) and is received byone or more modules, then it will be automatically mapped to an ECU Measurementwith an identical name.
• If a message has no receiver (or is only received by the project itself) and is sentby one module, then it will be automatically mapped to an ECU Write Hook with anidentical name.
Tip
There is no guarantee that a message and an ECU variable with the samename represent the same concept. For example, a message named Speed inthe model representing speed in km/h is not the same as a message namedSpeed on the ECU that represents speed in miles/h. You must thereforeverify that any auto-mappings represent valid connections by using the ECUinformation provided by your ECU supplier.
Auto-mapping is accessed via the Mapping menu, the Open EHOOKS functions buttonor the Auto-Mapping button ((A) – (C) in Figure 4.19 on page 37).
Auto-mapping has the following modes:
Overwrite existing mappings replaces any mappings you have done with the map-pings that are automatically detected.
ASCET-SE V6.3 EHOOKS Target User Guide 36

ETAS Getting Started with an EHOOKS Project
Figure 4.19: Accessing auto-mapping(A): via the Mapping menu, (B): via the Get ECU Labels and Mapfunctions in the Open EHOOKS functions button, (C): via theAuto-Mapping button
ASCET-SE V6.3 EHOOKS Target User Guide 37

ETAS Getting Started with an EHOOKS Project
Keep existing mappings adds automatically detected mappings only if a mapping isnot already defined.
Tip
This is the mode used by the Auto-Mapping button.
ASCET will show the changes that auto-mapping has made by highlighting the mappingsin blue text. The highlighting is removed when you save the project.
To use the Auto-Mapping button:
Automatic mapping via the Auto-Mapping button uses only ECU variables that are al-ready present in the "ECU Variables" columns.
• Go to the "Input" or "Output" tab.
• Click on the Auto-Mapping button.
Unmapped Messages and ECU variables with identical ele-ment name are mapped. Module names in labels of localmessages (see page 23 and page 27) are not considered.The results are shown in the "Mapping" field.
Existing mappings are kept; messages with no matchingcounterpart remain unmapped.
The mapped ECU variable is removed from the "ECU Vari-ables" column of the upper table. A mapped receive mes-sage is removed from the "Messages" column of the uppertable.
To use the Get ECU Labels and Map commands:
• Go to the "Input" or "Output" tab.
• Do one of the following:
– Select Mapping Ô Get ECU Labels and Map (*3).
– Click on the Open EHOOKS functions button andselect Get ECU Labels and Map Ô *3.
If it is not yet running, EHOOKS is started. Matching ECUvariables are selected automatically and mapped to mes-sages with identical names.
4.2.3 Configuring the Scheduling
To map the processes of your ASCET model to dispatch points on the ECU, you first needto map the processes into a "virtual" task called a bypass function, and then associate thebypass function with a dispatch point provided by the ECU. This is done in the "Schedul-ing" sub-tab of the "EHOOKS" tab.
The "Scheduling" sub-tab is described in section ""Scheduling" Tab" on page 39.
ASCET-SE V6.3 EHOOKS Target User Guide 38

ETAS Getting Started with an EHOOKS Project
Figure 4.20: "Scheduling" tab
"Scheduling" Tab
The "Scheduling" tab contains the following GUI elements:
1. "Processes" field
Lists all modules included in the project. Each module can be expanded to displayits processes.
2. Unused processes only option
If activated, only processes not assigned to any bypass function are shown in the"Processes" field.
3. and buttons
These buttons are used to map/unmap processes to bypass functions. At least oneprocess in the "Processes" field and one bypass function in the "Bypass function"field must be selected.
4. "Bypass function" field
Lists all bypass functions in the project. Each bypass function can be expanded todisplay its assigned processes.
The "Bypass function" field offers a context menu with the following functions:
– Create from operating system
Creates bypass functions according to the task list of an existing OS configura-tion.See also "To copy an existing OS configuration:" on page 41.
– Add (<Insert>)
Creates a bypass function.See also "To create a bypass function:" on page 40.
3 * is either overwrite existing mappings or keep existing mappings
ASCET-SE V6.3 EHOOKS Target User Guide 39

ETAS Getting Started with an EHOOKS Project
– Rename (<F2>)
Renames a bypass function.
– Delete (<Delete>)
Deletes a bypass function.
– Move Up (<Ctrl> + <↑>) and Move Down (<Ctrl> + <↓>)
Moves a process upwards/downwards within the bypass function.
– Open Module
Opens a suitable component editor and edits the module that contains the se-lected process.
– Remove undefined processes
Removes undefined processes from the bypass functions.
– Export
Opens the "Export Settings" dialog window where you can export mappings toan *.xml or *.csv file.See also To export all mappings of one or more tabs: on page 45.
– Import
Imports mappings from an *.xml or *.csv file.See also "To import message/ECU variable mappings:" on page 45.
5. "Settings" field
This field allows to set properties for a selected bypass function.
– "Dispatch point" combo box
Used to associate a bypass function with an ECU dispatch point.See also "To associate a bypass function with a dispatch point:" on page 42.
– "Period" input field
Used to specify a period in seconds. ASCET will use this period for dT for allprocesses mapped to the bypass function.
Possible selections: <None>, <Select>, previously selected dispatch points
Mapping Processes to Dispatch Points
To create a bypass function:
• In the project editor, go to the "EHOOKS" tab and the"Scheduling" sub-tab.
• In the "Scheduling" sub-tab, right-click in the "Bypass func-tion" field and select Add from the context menu.
A new bypass function is created. Its name is highlightedfor editing.
• Enter a name and press <Return>.
To map a process to a bypass function:
• In the project editor, go to the "EHOOKS" tab and the"Scheduling" sub-tab.
ASCET-SE V6.3 EHOOKS Target User Guide 40

ETAS Getting Started with an EHOOKS Project
Figure 4.21: Mapping processes to bypass functions
• In the "Processes" field, select one or more processes ((1)in Figure 4.21 on page 41).
• In the "Bypass function" field, select one or more bypassfunctions ((2) in Figure 4.21 on page 41).
• Click the button ((3) in Figure 4.21 on page 41).
The selected processes are assigned to the bypass func-tion(s).
To copy an existing OS configuration:
You can copy a process-to-task mapping from other target/OS combinations (e.g. yourPC experiment) to a process-to-bypass function mapping for the EHOOKS Target. To doso, proceed as follows.
• In the project editor, go to the "EHOOKS" tab and the"Scheduling" sub-tab.
• In the "Scheduling" sub-tab, right-click in the "Bypass func-tion" field and select Create from operating system fromthe context menu (see Figure 4.22 on page 42).
The "Selection Required" window opens.
ASCET-SE V6.3 EHOOKS Target User Guide 41

ETAS Getting Started with an EHOOKS Project
• Select the combination of target and operating system youwant to copy and click OK.
For each task in the copied mapping, a bypass function iscreated, and the respective processes are assigned.
Figure 4.22: Copying an existing configuration from another target
To associate a bypass function with a dispatch point:
• In the project editor, go to the "EHOOKS" tab and the"Scheduling" sub-tab.
• In the "Scheduling" sub-tab, select a bypass function.
The "Dispatch Point" combo box is now available.
• Open the "Dispatch Point" combo box and select <Select>.
If EHOOKS is not already running, it is started now. A con-figuration dialog (see Figure 4.23 on page 43) that lists allavailable dispatch points opens.
• In the configuration dialog, select the dispatch point youwant to associate with the bypass function.
• Close the configuration dialog with OK.
The selected dispatch point is now shown in the "DispatchPoint" combo box.
To access dT:
The EHOOKS Target does not currently provide a way to use a dT value from the ECU.If your model needs a notion of time, then you have to specify a period in seconds thatASCET will use for dT for all processes mapped into the bypass function. To do so, proceedas follows.
• In the "Scheduling" sub-tab, select a bypass function.
• If necessary, associate a dispatch point (see page 42).
The "Period" field is now available.
ASCET-SE V6.3 EHOOKS Target User Guide 42

ETAS Getting Started with an EHOOKS Project
Figure 4.23: Selecting a Bypass Container Dispatch Point
ASCET-SE V6.3 EHOOKS Target User Guide 43

ETAS Getting Started with an EHOOKS Project
• In the "Period" field, enter the desired time in seconds.
Tip
If you do not specify a period, ASCET will use anundefined value for dT.
4.2.4 Exporting and Importing Mappings
You can export selected message/ECU variable mappings from the "Input" or "Output"sub-tab of the "EHOOKS" tab, or you can export all mappings of one to three sub-tabs.
To export selected message/ECU variable mappings:
• Go to the tab that contains the mappings you want to ex-port.
– "Input" tab
– "Output" tab
Tip
You cannot export selected mappings from the "Schedul-ing" tab.
• In the "Mapping" field of that tab, select one or more map-pings.
• Do one of the following:
– Select Mapping Ô Export.
– Right-click in the "Mapping" field and select Exportfrom the context menu.
If your project contains unsaved mapping changes, you areasked if you want to store the changes.
• Click Save or Revert to continue.
The "Export Selections" dialog window opens. The optionOnly Selected Elements in Mapping Table is prese-lected.
Tip
You cannot combine the export of selected mappingsand the export of all mappings in a tab. If you activateone of the other options, Only Selected Elements inMapping Table is deactivated.
• Click OK to continue.
A file selection window opens.
• Select the export format and path and name for the exportfile.
You can select either XML (*.XML) or CSV (*.CSV).
• Click Save to export the selected mappings.
The export file is created. When you selected the CSV for-mat, you are informed that the export file is not compatiblewith ASCET V6.2.0.
ASCET-SE V6.3 EHOOKS Target User Guide 44

ETAS Getting Started with an EHOOKS Project
• Read the message carefully, then confirm with OK.
To export all mappings of one or more tabs:
Tip
In this instruction, the term mapping refers to message/ECU variable mapping inthe "Input" and "Output" tabs and to the mapping of processes to ECU dispatch pointsin the "Scheduling" tab.
• Go to the "Scheduling", "Input" or "Output" tab.
• Do one of the following:
– Select Mapping Ô Export.
– Right-click in the "Mapping" field or in the "Bypass func-tion" field and select Export from the context menu.
If your project contains unsaved mapping changes, you areasked if you want to store the changes.
• Click Save or Revert to continue.
The "Export Selections" dialog window opens. The optionsin the "Mapping Types" area are preselected.
Tip
You cannot combine the export of all mappings in atab and the export of selected mappings. If you activateOnly Selected Elements in Mapping Table, the otheroptions are deactivated.
• In the "Export Selections" dialog window, select one or moremapping tabs in the "Mapping Types" area.
• Click OK to continue.
A file selection window opens.
• Select the export format and path and name for the exportfile.
You can select either XML (*.XML) or CSV (*.CSV).
• Click Save to export the selected mappings.
The export file is created.
You can import mappings from a mapping export file.
To import message/ECU variable mappings:
• Go to the "Scheduling", "Input" or "Output" tab.
• Do one of the following:
– Select Mapping Ô Import.
– Right-click in the "Mapping" field or in the "Bypass func-tion" field and select Import from the context menu.
If your project contains unsaved mapping changes, you areasked if you want to store the changes.
ASCET-SE V6.3 EHOOKS Target User Guide 45

ETAS Getting Started with an EHOOKS Project
• Click Save or Revert to continue.
A file selection window opens. You can filter the display ei-ther for XML (*.XML) or CSV (*.CSV).
• Select the mapping export file you want to import.
Tip
All mappings in the export file will be imported. There isno check if the imported mappings are valid or invalid.Existing mappings in the "Mapping" fields are overwrit-ten.
• Click Open to import the mappings in the selected file.
• Check the "Scheduling", "Input" and "Output" tabs and cor-rect invalid mappings.
4.3 Building the ECU Code
To rebuild the ECU hex image, update the ASAM-MCD-2MC file, and generate theSCOOP-IX file4, select Build Ô Build All or Build Ô Rebuild All from the project editormenu. Alternatively, you can use the keyboard shortcuts: <F7> to build; and <Shift> +<F7> to re-build.
ASCET will generate code for your bypass function(s) and call EHOOKS to rebuild the ECUimage and generate a new *.a2l file.
The *.a2l and *.hex files will be located in the places you specified in EHOOKS foroutput configuration (see section 4.1.4 on page 19).
4.3.1 Generating ECU Code Only
You can generate C code and the *.ehcfg file from ASCET by selecting Build Ô Gener-ate Code from the project editor menu or pressing <Ctrl> + <F7>.
Tip
ASCET does not update the EHOOKS configuration until the GenerateCode step is executed. If you have ASCET and EHOOKS open simultaneously,you must perform Generate Code to see the ASCET-configured parts of theconfiguration in EHOOKS.
The SCOOP-IX file is not generated in the Generate Code step.
ASCET generates all bypass functions in a single C source file calledasd_bypass_func.c. This file is located in the directory specified in the ASCEToptions, "Build\Paths" node, "Code Generation Path" field (see the ASCET online help fordetails)5.
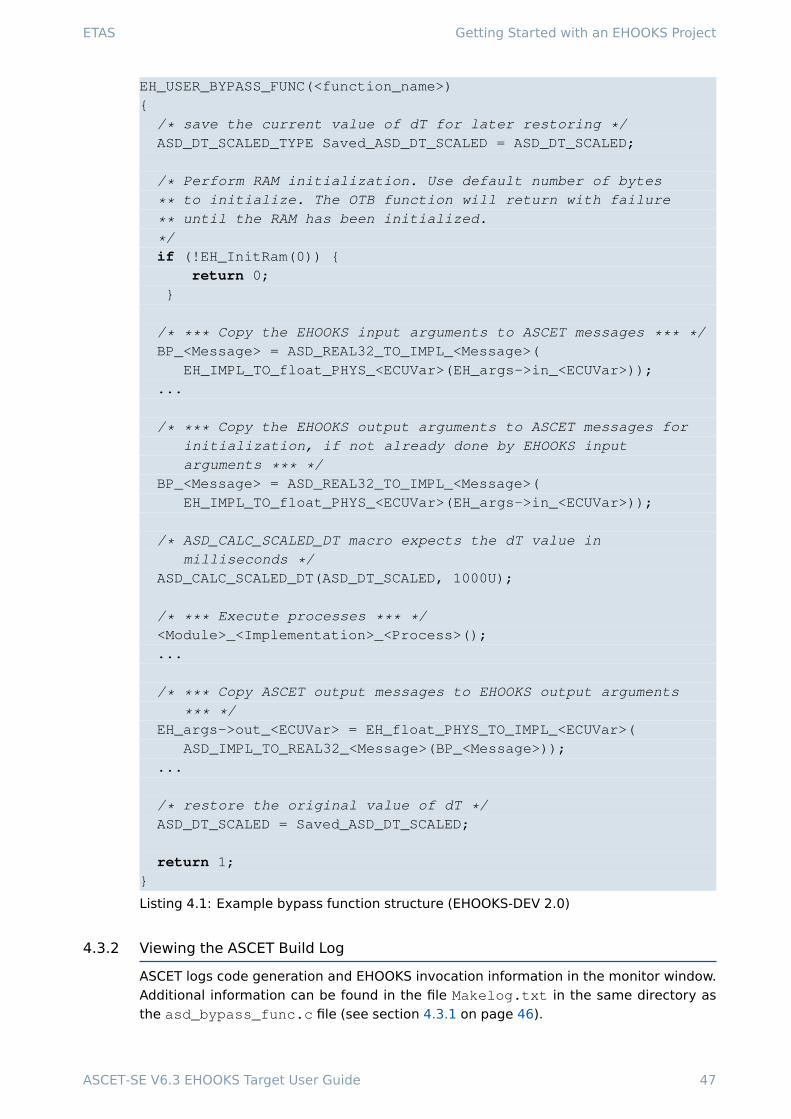
In combination with EHOOKS-DEV V2.0, each generated bypass function has the struc-ture shown in Listing 4.1 on page 47. The structure for bypass functions generated incombination with EHOOKS-DEV V3.0 is shown in Listing 9.1 on page 79.
4 EHOOKS-DEV V2.0 and V3.0 generate *.six files with SCOOP-IX V1.3, EHOOKS-DEV V3.1generates *.six files with SCOOP-IX V1.4.
5 By default, "Code Generation Path" is set to <ASCET installation_directory>\CGen.
ASCET-SE V6.3 EHOOKS Target User Guide 46
ETAS Getting Started with an EHOOKS Project
EH_USER_BYPASS_FUNC(<function_name>){/* save the current value of dT for later restoring */ASD_DT_SCALED_TYPE Saved_ASD_DT_SCALED = ASD_DT_SCALED;
/* Perform RAM initialization. Use default number of bytes
** to initialize. The OTB function will return with failure
** until the RAM has been initialized.
*/if (!EH_InitRam(0)) {
return 0;}
/* *** Copy the EHOOKS input arguments to ASCET messages *** */BP_<Message> = ASD_REAL32_TO_IMPL_<Message>(
EH_IMPL_TO_float_PHYS_<ECUVar>(EH_args->in_<ECUVar>));...
/* *** Copy the EHOOKS output arguments to ASCET messages forinitialization, if not already done by EHOOKS inputarguments *** */
BP_<Message> = ASD_REAL32_TO_IMPL_<Message>(EH_IMPL_TO_float_PHYS_<ECUVar>(EH_args->in_<ECUVar>));
/* ASD_CALC_SCALED_DT macro expects the dT value inmilliseconds */
ASD_CALC_SCALED_DT(ASD_DT_SCALED, 1000U);
/* *** Execute processes *** */<Module>_<Implementation>_<Process>();...
/* *** Copy ASCET output messages to EHOOKS output arguments
*** */EH_args->out_<ECUVar> = EH_float_PHYS_TO_IMPL_<ECUVar>(
ASD_IMPL_TO_REAL32_<Message>(BP_<Message>));...
/* restore the original value of dT */ASD_DT_SCALED = Saved_ASD_DT_SCALED;
return 1;}
Listing 4.1: Example bypass function structure (EHOOKS-DEV 2.0)
4.3.2 Viewing the ASCET Build Log
ASCET logs code generation and EHOOKS invocation information in the monitor window.Additional information can be found in the file Makelog.txt in the same directory asthe asd_bypass_func.c file (see section 4.3.1 on page 46).
ASCET-SE V6.3 EHOOKS Target User Guide 47

ETAS Calibrating Bypass Functions
5 Calibrating Bypass Functions
Calibration on bypass functions requires a slightly different approach when usingEHOOKS to using other embedded targets.
For non-EHOOKS targets, ASCET itself must generate all data structures, export all mea-surement and calibration labels to an A2L file and then, after the build stage, extractaddress information for all symbols from the executable image and patch them into theA2L file.
With the EHOOKS target, ASCET is not in control of the build process; this is managedtransparently by EHOOKS-DEV. This means that EHOOKS-DEV is responsible for all datalocation and the extraction of addresses to generate the updated ECU *.a2l file.
The impact of this is that any elements in an ASCET bypass model that need to be avail-able for calibration in the re-built ECU image must be generated by EHOOKS itself andnot by ASCET. This can be trivially configured by placing any element that needs to beavailable for calibration in the global scope. The following global elements for calibrationare supported:
• scalar elements
• characteristic lines (1D characteristic tables): fixed, normal and group
• characteristic maps (2D characteristic tables): fixed, normal and group
• arrays
• matrices
Restriction exits that only parameter characteristic tables and distributions are supportedfor calibration. Variable elements of characteristic tables and distribution types are notshown in the generated ECU *.a2l file. Global elements of the type Record are notsupported and therefore will not be shown in the generated ECU *.a2l file.
The easiest way to do this is to set the element scope to Exported1.
To set the element scope to Exported:
• Open the component that contains the desired element in acomponent editor.
• In the "Outline" tab of the component editor, right-click theelement and select Properties from the context menu toopen the "Properties Editor".
• Set the "Scope" of the element to Exported.
• Set the "Calibration Access" to Read and – for parameters –additionally to Write.
For variables, it is only possible to set the Read flag.
• Click OK.
Figure 5.1 on page 49 shows how a curve called MyFixedCurve is marked for calibrationwhen working with the EHOOKS Target.
1 You can also set the scope to Imported (where this is permitted by normal ASCET modelingconventions), but you must then ensure that a corresponding export exists, for example by doinga Resolve Globals action in the project.
ASCET-SE V6.3 EHOOKS Target User Guide 48

ETAS Calibrating Bypass Functions
Figure 5.1: Exporting an element
ASCET-SE V6.3 EHOOKS Target User Guide 49

ETAS Calibrating Bypass Functions
EHOOKS is responsible for generating any exported element and must do so us-ing exactly the same data structures expected by ASCET (their format is describedin the ASCET-SE User’s Guide [ETA12]). ASCET generates a SCOOP-IX file that tellsEHOOKS-DEV which data structures are required and how they need to be generated.
Tip
You should ensure that for parameters both options in the "CalibrationAccess" area of the element’s properties editor are set, to ensure thatEHOOKS generates the data structures correctly. Otherwise an error will beissued during code generation.
ASCET-SE V6.3 EHOOKS Target User Guide 50

ETAS Interacting with EHOOKS Control Variables
6 Interacting with EHOOKS Control Variables
EHOOKS configurations can define enablers that allow calibration-time and/or run-timecontrol of hooked variables (see Figure 3.2 on page 10).
When an enabler is configured, EHOOKS generates a C variable with the name you spec-ify that acts as a switch to control whether or not the hook is active.
Tip
Give your EHOOKS hook control variables names that are valid C names.
For more details on EHOOKS control variables, see the EHOOKS-DEV user’sguide ([ETA11]), sections "EHOOKS-DEV Hook Configuration Properties" and"Configuring Properties of a Variable Hook".
The hook can be enabled and disabled at run-time by writing the following values:
Function Write Value
Enable 0x12 (18 in decimal)Disable Any other value
You can access this capability from your ASCET bypass function by creating a C codeclass that writes to the EHOOKS-generated variable. Figure 6.1 shows an example modelthat disables a hook when a value reaches a specific threshold:
Figure 6.1: Using C code classes to access control variables
To write a C code class to access control variables:
You will need to write the C code class(es) to write to the control variables as follows1:
• Create a C code class to store your control methods.
1 There are alternative ways of building this functionality – you are only limited by the capabil-ities of the C programming language!
ASCET-SE V6.3 EHOOKS Target User Guide 51

ETAS Interacting with EHOOKS Control Variables
• Add a method for each variable you need to enable or dis-able.
The method can use any valid ASCET method name.
• At the bottom of the C code editor pane, do the following:
– Set "Target" to EHOOKS.
– Set "Arithmetic" to Object Based ControllerImplementation.
– Leave "Implementation" set to the default.
• Click on the "Header" tab (in any method or in main – head-ers are shared across all methods in C code classes) andenter the following code:
#include "UserBypassFuncs.h"
This header file defines all the available control variables. Itis automatically generated by EHOOKS and included in thebuild process.
• For each method, if the method must enable the hook, addthis code:
control_variable_name = 18;
• If the method must disable the hook, add this code:
control_variable_name = 0;
Figure 6.2 shows a method called enableSpeedHook that writes to a control variablecalled B_srfdke__control.
Figure 6.2: C code to enable a hook
ASCET-SE V6.3 EHOOKS Target User Guide 52

ETAS Interacting with EHOOKS Control Variables
Tip
The control variable name used by your configured C code class must beidentical to the C name of the EHOOKS hook control variable you declare inthe EHOOKS configuration.
It is important to remember the following: If a configured hook controlvariable name is not a valid C identifier then EHOOKS will automaticallyconvert the name into a valid C identifier by replacing all characters that arenot permitted in a C identifier with double underscores (__).
For example, if you call a control variable MyVariable.control thenEHOOKS will automatically convert the name to MyVariable__control. Youmust use the converted C name when building C code classes that write toEHOOKS hook control variables.
ASCET-SE V6.3 EHOOKS Target User Guide 53

ETAS Arithmetic Services and Interpolation Routines
7 Arithmetic Services and Interpolation Routines
ASCET can interact with user code that is provided outside of ASCET’s own code genera-tion process. To do this, ASCET needs to know what code exists and when to use it. Thisinformation is provided by *.ini files.
During code generation, ASCET uses the information in the *.ini files to generate call-backs to user code. At compile time you must provide the implementation of the call-backs you have told ASCET to use. These callbacks are sometimes called service routinesbecause they provide services to ASCET.
ASCET uses callbacks in the following cases:
Arithmetic services are used to override the compiler’s and/or ASCET’s default arith-metic operations. Arithmetic services are optional and are disabled by default.
Interpolation routines are used to interpolate between axis points in curves (1D chartables) or maps (2D char tables). Interpolation routines are mandatory if yourmodel uses curves or maps.
Further information about these topics is provided in the ASCET online help.
The EHOOKS Target handles callbacks using exactly the same mechanisms as all otherASCET embedded targets. This means that the classic use-case, where callbacks aremade to access code you provide to the project, works with EHOOKS as well. However,another possibility is available with EHOOKS - using callbacks to access functionality thatis already available in the ECU.
Tip
Your ECU supplier must have prepared the ECU to support this use case.
You can also combine both approaches, using callbacks that you provide as C code atbuild time together with callbacks to services provided by the ECU as shown in Figure 7.1on page 55.
The following sections explain how to configure your bypass functions for use within thecontext of an EHOOKS project.
7.1 Arithmetic Services
This section provides a brief introduction to principles behind arithmetic services andtheir use in ASCET. It is not intended to be a comprehensive tutorial; further details aredescribed in the ASCET online help system.
7.1.1 Preparing a Service Set
To use arithmetic services with the EHOOKS Target, you need the following:
• A services.ini file that defines which operator signature should be replaced bywhich arithmetic service routines. This must be located in ASCET’s EHOOKS targetdirectory. The default location is <install_dir>1\targets\trg_eHooks.
• The source code and/or libraries for the service routines defined in theservices.ini file
1 <install_dir> is the ASCET installation directory, e.g., C:\ETAS\ASCET6.3
ASCET-SE V6.3 EHOOKS Target User Guide 54

ETAS Arithmetic Services and Interpolation Routines
Figure 7.1: Providing callbacks and accessing them in ASCET generated code
The services.ini file uses Windows INI file format to define one or more service sets.Each service set appears in a uniquely named section:
[MyServiceSet]+|*|*|*=Add_NOLIMIT_%t1%%t2%_%tr%(%i1%, %i2%)-|*|*|*=Sub_NOLIMIT_%t1%%t2%_%tr%(%i1%, %i2%)...[MyOtherServiceSet]+|*|*|*=ADD_%t1%%t2%_%tr%(%i1%, %i2%)-|*|*|*=SUB_%t1%%t2%_%tr%(%i1%, %i2%)...
Each un-commented line in the file defines a mapping rule as follows:
<operator>|<type-signature>=[<return-type>]<function>(<parameters>)
For example, the rule for + defined in MyServiceSet will cause the replacement ofevery plus with a call to function Add_NOLIMIT_%t1%%t2%_%tr%() where %t1% and%t2% are the types of the input parameters and %tr% is the type of the return value.
When ASCET generates code, each time the operator is required in the context definedby the type signature, a call to the function is generated instead of the normal ASCETcode.
For example, Figure 7.2 on page 56 shows a model that uses four numerical operations.The inputs are both signed 16-bit integers, and the outputs are signed 32-bit integers.Listing 7.1 shows the code generated by ASCET when no arithmetic service set is se-
ASCET-SE V6.3 EHOOKS Target User Guide 55

ETAS Arithmetic Services and Interpolation Routines
lected. Listing 7.2 on page 56 shows the code generated by ASCET when the arithmeticservice set MyServiceSet is selected2.
Figure 7.2: ASECT model using arithmetic operators
void SERVICES_IMPL_process (void){
/* process: sequence call #5 */out1 = (sint32)(in1 + in2);/* process: sequence call #10 */out2 = (sint32)(in1 - in2);/* process: sequence call #15 */out3 = (sint32)(in1 * in2);/* process: sequence call #20 */out4 = (sint32)(((in2 == (sint16)0) ? in1 : in1 / in2));
}
Listing 7.1: Code generation without services
void SERVICES_IMPL_process (void){
/* process: sequence call #5 */out1 = Add_NOLIMIT_s16s16_s32(in1, in2);/* process: sequence call #10 */out2 = Sub_NOLIMIT_s16s16_s32(in1, in2);/* process: sequence call #15 */out3 = Mul_NOLIMIT_s16s16_s32(in1, in2);/* process: sequence call #20 */out4 = (sint32)(((in2 == (sint16)0) ? in1 :
Div_NOLIMIT_s16s16_s16(in1, in2)));}
Listing 7.2: Code generation with services from MyServiceSet
You must provide an implementation for every function referenced by services.ini.The implementation can use any valid C code, including macro definitions. The following
2 The code shown has been simplified for clarity. Comments and variable prefixes have beenremoved.
ASCET-SE V6.3 EHOOKS Target User Guide 56

ETAS Arithmetic Services and Interpolation Routines
C code examples show the header and source files that would be required to implementthe functions in Listing 7.2 on page 56.
#include "a_basdef.h"sint32 Add_NOLIMIT_s16s16_s32(sint16 x, sint16 y);sint32 Sub_NOLIMIT_s16s16_s32(sint16 x, sint16 y);sint32 Mul_NOLIMIT_s16s16_s32(sint16 x, sint16 y);sint16 Div_NOLIMIT_s16s16_s16(sint16 x, sint16 y);
Listing 7.3: Header File: services.h
#include "services.h"uint32 Add_NOLIMIT_s16s16_s32(sint16 x, sint16 y){
...return ...;
}uint32 Sub_NOLIMIT_s16s16_s32(sint16 x, sint16 y{
...return ...;
};uint32 Mul_NOLIMIT_s16s16_s32(sint16 x, sint16 y){
...return ...;
}uint32 Div_NOLIMIT_s16s16_s16(sint16 x, sint16 y){
...return ...;
}
Listing 7.4: Source File: services.c
7.1.2 Using a Service Set
Figure 7.3 on page 58 shows the interaction between ASCET, EHOOKS and you whenintegrating arithmetic services.
Tip
The casting strategies named MISRA-compliant and Target Optimizedare not permitted when using arithmetic services. See the ASCET online helpfor details on casting.
The following step-by-step guide explains what you need to do.
To use an arithmetic service set:
• Open the "Project Properties" window and go to the "Build/Code Generation/Integer Arithmetic" node.
• In the "Arithmetic Service Set" combo box (see also Fig-ure 7.4 on page 58), select the service set you want to use.
• Go to the "Build/Code Generation" node and selectthe Arithmetic services strategy from the "Casting"combo box.
• Close the "Project Properties" window with OK.
ASCET-SE V6.3 EHOOKS Target User Guide 57

ETAS Arithmetic Services and Interpolation Routines
Figure 7.3: Using external arithmetic services with EHOOKS
Figure 7.4: Selecting the service set in ASCET
ASCET-SE V6.3 EHOOKS Target User Guide 58

ETAS Arithmetic Services and Interpolation Routines
• #include the header file(s) for the service implementationin proj_def.h in the targets\trg_eHooks\includedirectory.
• Add the path(s) to the include directories and the namesof the source files and/or library files for your arithmeticservices to the EHOOKS build as shown in Figure 7.5 onpage 59.
Figure 7.5: Adding a source file to the EHOOKS build
When you re-build, ASCET will generate code that includes the calls to your servicesat the appropriate places using services.ini, and EHOOKS will compile and link theservice implementations with the ASCET-generated code.
7.2 Interpolation Routines
When your model uses characteristic lines (1D tables) or maps (2D tables), ASCET makescallbacks to C functions called interpolation routines to calculate interpolated values.
The following discussion provides some basic information. You can find out more in theASCET online help: select the Help Ô Contents menu option and – in the help viewer –open the book "Introduction/Basics/Types and Elements/User-defined Interpolation Rou-tines".
Tip
You must use Help Ô Contents to open the entire online help. <F1>opens only a part of the online help, and the "Introduction" book may beinvisible.
ASCET-SE V6.3 EHOOKS Target User Guide 59

ETAS Arithmetic Services and Interpolation Routines
7.2.1 Understanding Interpolation Routine Use in ASCET
Interpolation routine use in ASCET has both model-specific and target-specific parts. Fig-ure 7.6 shows how the various parts of ASCET that influence the use of interpolationroutines interact in an "out-of-the-box" installation of ASCET.
Figure 7.6: From model to code with interpolation routines
The following sections explain the contents of these files in more detail.
Definition Files
Interpolation definition files tell ASCET what interpolation schemes exist so they can beselected in the model. These definitions allow ASCET to use different interpolation rou-tines for different elements in the same project.
The definitions are located in XML files in <install_dir>\Tools\InterpolationRoutine. You can see which definition has been configured for a characteristic line ora map by opening the properties editor for the line or map as shown in Figure 7.7 onpage 61.
Each interpolation definition specifies the search path to the *.ini mapping file thatASCET will use at code generation time. By default, the search path is configured withthe following search order:
1. target\trg_<target>\intpol\Intpol<name>.ini
2. target\common\interpolation\Intpol<name>.ini
ASCET-SE V6.3 EHOOKS Target User Guide 60

ETAS Arithmetic Services and Interpolation Routines
Figure 7.7: Characteristic line using the Linear interpolation model
ASCET-SE V6.3 EHOOKS Target User Guide 61

ETAS Arithmetic Services and Interpolation Routines
This forces ASCET to look in the target directory first and then in the common directory.ASCET will use the first matching definition file it finds.
Tip
ASCET only installs definitions into the common directory by default.
Mapping Files
Mapping files are *.ini files, referenced by interpolation definition files, that define themapping between logical access functions (e.g. getAt1, getAt2 etc.) and the interpo-lation routines that must be used in the generated code. The file is similar in principle toa services.ini file.
There are two sections – [Experiment] and [Production] –, and each section de-fines a complete set of mappings. The following example shows the start of the[Production] section of the standard IntpolLinear.ini file.
[Production]; One D Char TablesgetAt1|*|*=CharTable1_getAt_%tx%%tv%(%ct%,%x%)getAtFixed1|*|*=CharTableFixed1_getAt_%tx%%tv%(%ct%,%x%)getX1|*=%ct%->xDist[%i%]setX1|*=%ct%->xDist[%i%]=%x%getValue1|*=%ct%->values[%i%]setValue1|*=%ct%->values[%i%]=%v%getValueFixed1|*=%ct%->values[%i%]setValueFixed1|*=%ct%->values[%i%]=%v%...
Note that EHOOKS is classified as a Production target as it is an ASCET-SE target.
Header Files
Header files declare the interpolation routines and must be included by ASCET codethat uses interpolation. Every function named in the .ini files must be declared inthe header file(s).
Library
The interpolation routine library provides the implementation of the interpolation rou-tines declared in the header file(s).
7.2.2 Using the Default Routines
The EHOOKS Target (like all ASCET-SE targets) is supplied with example source code anda pre-compiled library that includes routines for linear and rounded interpolation.
The ASCET EHOOKS Target will automatically use the example routines when generatingcode. ASCET will add the include file path and the library path to the EHOOKS build forthe example library.
ASCET-SE V6.3 EHOOKS Target User Guide 62

ETAS Arithmetic Services and Interpolation Routines
Tip
In this release of the EHOOKS Target, the library (intpol_ehooks_hitec.a)is built for the Infineon TriCore device using the HighTecs C compiler. Ifyou need these routines to work with another microcontroller and/or com-piler, follow the instructions in ReadMe_Interpolation.html in the<install_dir>\target\trg_eHooks\intpol directory or contact ETASfor further assistance.
7.2.3 Using Custom Routines
Using your own interpolation routines in ASCET code generated for the EHOOKS targetis possible in the same way as for all ASCET-SE targets. You can either choose to modifythe supplied mapping files for linear and rounded interpolation (IntpolLinear.ini orIntpolRounded.ini) or you can create new definition and mapping files.
Modifying an Existing Interpolation Scheme
You can modify an existing interpolation scheme to use your own interpolation routines.The following list explains how:
1. For each interpolation type you use, you will need entries in the interpolation rou-tine mapping file (IntpolLinear.ini or IntpolRounded.ini as appropriate)that call your routines. The EHOOKS target is an embedded target and entries mustbe created in the [Production] section.
2. Define a C header file that declares every function in your mapping file.
Tip
If you replace the ASCET-supplied header file a_intpol.h intrg_eHooks\intpol, then ASCET will use the file because it isalways #included in a_basdef.h).
If you want to use a different file name then you must ensure that it is visibleto ASCET generated code. This can be done by #includeing the header filein ASCET’s standard location for custom header files: the proj_def.h file intrg_eHooks\include.
3. Implement your interpolation routines and build a library.
4. Add the include path, source files and/or library files for your interpolation routinesto the EHOOKS build as shown in Figure 7.5 on page 59.
Creating a New Interpolation Scheme
You can create an entirely new interpolation scheme to use with your models. The fol-lowing step-by-step guide explains how to create a new set of routines called "Custom-Interpolation":
ASCET-SE V6.3 EHOOKS Target User Guide 63

ETAS Arithmetic Services and Interpolation Routines
To create a new interpolation scheme:
• Create a copy of the file etas.aid.xml.template in<install_dir>\Tools\Interpolation Routine,delete the .template suffix and replace etas withthe name of your interpolation routine definition, e.g.CustomInterpolation.aid.xml.
• Open the file in a text/XML editor of your choice and set the<DefaultValue> of the Identifier and the Label tothe name of your interpolation routine.
The name you specify will be used in the "Interpolation"combo box in the properties editor for a characteristic lineor map.
<!-- mandatory, fixed options --><OptionDeclaration optionCategory="FIXED"
xmlCategory=""optionClass="EtasStringOption"attributeName="Identifier">
<Group/><Label>Identifier</Label><Description>Unique name for ASCET
internal management of thisinterpolation routine.</Description>
<Tooltip>Identifier for the interpolationroutine</Tooltip>
<DefaultValue>CustomInterpolation</DefaultValue>}
</OptionDeclaration><!-- required, variable options --><OptionDeclaration optionCategory="FILE"
xmlCategory=""optionClass="EtasStringOption"attributeName="Label">
<Group/><Label>Label</Label><Description>Unique name to display the
interpolation routine inASCET.</Description>
<Tooltip>Name of the interpolationroutine</Tooltip>
<DefaultValue>ETAS Interpolation</DefaultValue>
</OptionDeclaration>
Tip
It is recommended that the file name andthe <DefaultValue>s of Identifier andLabel are the same - this makes it easy for youto identify which description file contains whichinterpolation scheme.
ASCET-SE V6.3 EHOOKS Target User Guide 64

ETAS Arithmetic Services and Interpolation Routines
• Save and close the file.
• Start or re-start ASCET and select Tools Ô Options to openthe ASCET options dialog window.
• In the ASCET options dialog window, go to the "Options/Build/Interpolation Routine/CustomInterpolation" node anddo the following:
– In the "Interpolation Header" field, enter the header filename you want to use.
– In the "Interpolation Library" field, enter the libraryname you want to use.
– Add a "Mapping File" entry, e.g.,%P_TARGET%\CustomInterpolation.ini.
– If desired, set other options.
– Click OK.
• Create the file CustomInterpolation.ini in thetrg_eHooks directory.
For each interpolation type you use, you will need entriesin the interpolation routine mapping file that call your rou-tines. The EHOOKS target is an embedded target, and en-tries must be created in the [Production] section.
• Create the C header file with the same name you specifiedin the "Interpolation Header" and declare every function inyour mapping file.
• Implement your interpolation routines and build a library.
• Add the include path, source files and/or library files for yourinterpolation routines to the EHOOKS build as shown in Fig-ure 7.5 on page 59.
To use the new interpolation routine, open the properties editor for your characteristicline or map and select the interpolation routine in the "Interpolation" combo box (seeFigure 7.8 on page 66).
7.3 Callbacks to Existing ECU Code
ASCET can use callbacks to arithmetic services or interpolation routines that are al-ready present in the ECU. Figure 7.9 on page 67 shows the interaction between ASCET,EHOOKS, the ECU supplier and you when using services provided by the ECU.
Neither ASCET nor EHOOKS can work out what routines are available in the ECU. YourECU supplier, however, can optionally make routines available when they prepare theECU using the EHOOKS-PREP tool. They can do this by providing a header file that de-fines function pointers with the names of the service routines that you can use and thenplacing the header file in the ECU_INTERNALS section of the *.a2l file.
For example, the following code shows how to create a function pointer to an arithmeticservice called Div_limit_s32s32_u16 on the ECU:
ASCET-SE V6.3 EHOOKS Target User Guide 65

ETAS Arithmetic Services and Interpolation Routines
Figure 7.8: Selecting a user-defined interpolation routine
ASCET-SE V6.3 EHOOKS Target User Guide 66

ETAS Arithmetic Services and Interpolation Routines
Figure 7.9: Making callbacks to ECU provided functions
typedef uint16 (*FPtr_Div_limit_s32s32_u16) (sint32 x, sint32 y);#define Div_limit_s32s32_u16
((Fptr_Div_limit_s32s32_u16)(0x1234ABCD))
Tip
It is only possible to make callbacks to services that the ECU suppliermakes available to you.
The EHOOKS Target can use callbacks to ECU routines at code generation time instead of(or in combination with) normal externally provided routines. The mechanism is identicalto accessing routines that you provide, i.e.:
1. Define *.ini files that tell ASCET which routines to use and when.
2. Ensure the header files for the routines are included by ASCET.
You therefore need the following information to use these routines in ASCET-generatedcode:
• The *.ini file mappings for the ECU routines made available by the ECU supplier.
• The name of the header file(s) that declare the C function names for routines. AS-CET needs to #include these files 3.
The only difference is where the implementation of the routines is found – in the ECUinstead of in a C source file or pre-built library.
3 You only need the name of the file(s) - not the files themselves. Your ECU supplier will embedthe header files in the *.a2l file when preparing the ECU for EHOOKS. When EHOOKS rebuildsthe ECU it will automatically extract the header files and use them in the build process so theASCET-generated code will compile correctly.
ASCET-SE V6.3 EHOOKS Target User Guide 67

ETAS Arithmetic Services and Interpolation Routines
7.3.1 Arithmetic Services
To use arithmetic services from the ECU:
• Define a service set in the services.ini file.
• Select the service set in the "Project Properties" window,"Build/Code Generation/Integer Arithmetic" node.
• Select a suitable casting strategy in the "Project Properties"window, "Build/Code Generation" node.
Tip
The casting strategies MISRA-compliant andTarget Optimized are not permitted whenusing arithmetic services.
• #include the header file(s) for your service implementa-tion in the ASCET proj_def.h header file.
When you re-build, ASCET will generate code that includes the calls to the ECU servicesat the appropriate places, and EHOOKS will compile and link the service implementationswith the ASCET-generated code.
7.3.2 Interpolation Routines
Using interpolation routines from the ECU is very similar to using interpolation routinesin other case. You need to do the following:
1. Create or modify (see section 7.2.3 on page 63) an interpolation routine signaturemapping file that maps routine signatures to the routines provided by the ECU. Forthe EHOOKS target, you must create entries in the [Production] section.
2. #include the header file(s) for your service implementation in ASCET’sproj_def.h header file.
When you re-build, ASCET will generate code that includes the calls to the ECU interpo-lation routines at the appropriate places.
7.3.3 Mixing Callbacks to Off-ECU and On-ECU Code
You can freely mix callbacks to both Off-ECU and On-ECU code by defining a mapping file(services.ini and/or IntPol*.ini as appropriate) that include mappings to bothECU functions and functions you will provide as external code and/or libraries. You mustthen include appropriate header files.
It may be the case that you do not know which services will be on the ECU and which willneed to exist externally at the point you decide to write your header files. You will havetwo header files, one for the Off-ECU functions that declares a C function, and one for theOn-ECU functions that defines a function pointer for the C function. For example, in theOff-ECU header you might have the following code:
uint32 SomeFunction (uint32 x, uint32 y);
In the On-ECU header file, you might have a C function pointer to access the same func-tion on the ECU:
ASCET-SE V6.3 EHOOKS Target User Guide 68
ETAS Arithmetic Services and Interpolation Routines
typedef uint32 (*SomeFunction_Ptr) (uint32 x, uint32 y);#define SomeFunction ((SomeFunction_Ptr)(0xABCD1234))
This is not a problem if you include the header files for On-ECU functions after those forOff-ECU functions (because this ordering will ensure that the On-ECU functions are usedin preference to the Off-ECU functions). For example, assume that there are two headerfiles:
• OFF_ECU_Services.h that declares the function prototypes for Off-ECU func-tions; and
• ON_ECU_Services.h that includes the function pointer definitions for On-ECUfunctions.
The correct include file ordering would be:
...#include "OFF_ECU_Services.h"#include "ON_ECU_Services.h"...
Tip
The On-ECU services must be included after all header files defining Off-ECU services. The application may not compile if you reverse the includeorder.
This structure exploits the fact that the On-ECU functions are declared as#defines in the ON_ECU_Services.h header file. While a function namecan appear in both files, it is only a #define to a function pointer in theON_ECU_Services.h header file. The C programming language is permis-sive enough to allow this type of construct, and the C pre-processor will usethe last definition, the On-ECU function, in preference to the Off-ECU function.Most modern C compilers will generate a warning when this occurs, which canbe safely ignored.4
4 Note, however, that these warnings provide an easy way to check which functions are actuallybeing called on the ECU!
ASCET-SE V6.3 EHOOKS Target User Guide 69

ETAS Using Libraries
8 Using Libraries
You can use ASCET libraries with the EHOOKS Target in exactly the same way as all otherASCET-SE targets.
There are typically two types of library:
Model libraries typically provide ASCET class models that implement common func-tionality. Model libraries contain pre-defined, complete ASCET models that can bere-used across multiple projects. Each library is self-contained – everything thatASCET needs to generate code is contained in the library itself.
Service libraries also provide ACSET class models, but typically with methods imple-mented as services as shown in Figure 8.1 on page 70. This means that a servicelibrary defines only the interface between ASCET and some externally provided im-plementation of the functionality. The library is therefore not self-contained. If youwant to use a service library, you will need both the ASCET model and the externalimplementation of the library (either as C source code or a pre-compiled library).
Figure 8.1: Class configured for methods to be implemented as service routines
ASCET-SE V6.3 EHOOKS Target User Guide 70

ETAS Using Libraries
Tip
Any given library may contain some classes that are complete models (i.e. thoseclasses are a model library) and some other classes that define the interface toservices (i.e. those classes are a service library).
8.1 Model Libraries
Use of model libraries is straight-forward: import the library into your workspace (ordatabase), and then use the models in your project in exactly the same way you woulduse models you have built yourself.
ETAS supplies ASCET with two model libraries as standard:
• the ETAS_SystemLib
• the ETAS_MBFS_Library
The libraries can be found in the <install_dir>1\export directory. More informationabout the functionality of the libraries can be found in the ASCET online help (opened withthe Help Ô Contents menu option) and in the System_Libraries.pdf document in...\ETAS\ETASManuals\ASCETx.y.
8.2 Service Libraries
When working with service libraries you will need the following:
• the ASCET library (as an .axl workspace file or .exp database export file accord-ing to the data model format you are using for your ASCET model)
• one (or more) C header files that define the C interface to the library
• the library itself (either as a pre-compiled library compatible with your ECU orsource code)
To use the library you need to do the following steps:
1. Import the ASCET library into ASCET using File Ô Import....
2. #include the header file(s) for the service library in ASCET’s proj_def.h headerfile in the targets\trg_eHooks\include directory.
3. Add the path(s) to the include directories and the names of the source files and/orlibrary files to the EHOOKS build (see Figure 7.5 in section 7.1).
8.2.1 Controlling Method Names in Generated Code
By default, ACSET generates method names of the following form in the C code2:
CLASSNAME_IMPLEMENTATIONNAME_MethodName
1 <install_dir> is the ASCET installation directory, e.g., C:\ETAS\ASCET6.32 Note that ASCET capitalizes the module and implementation names by default, so a module
with model name MyClass will become MYCLASS.
ASCET-SE V6.3 EHOOKS Target User Guide 71
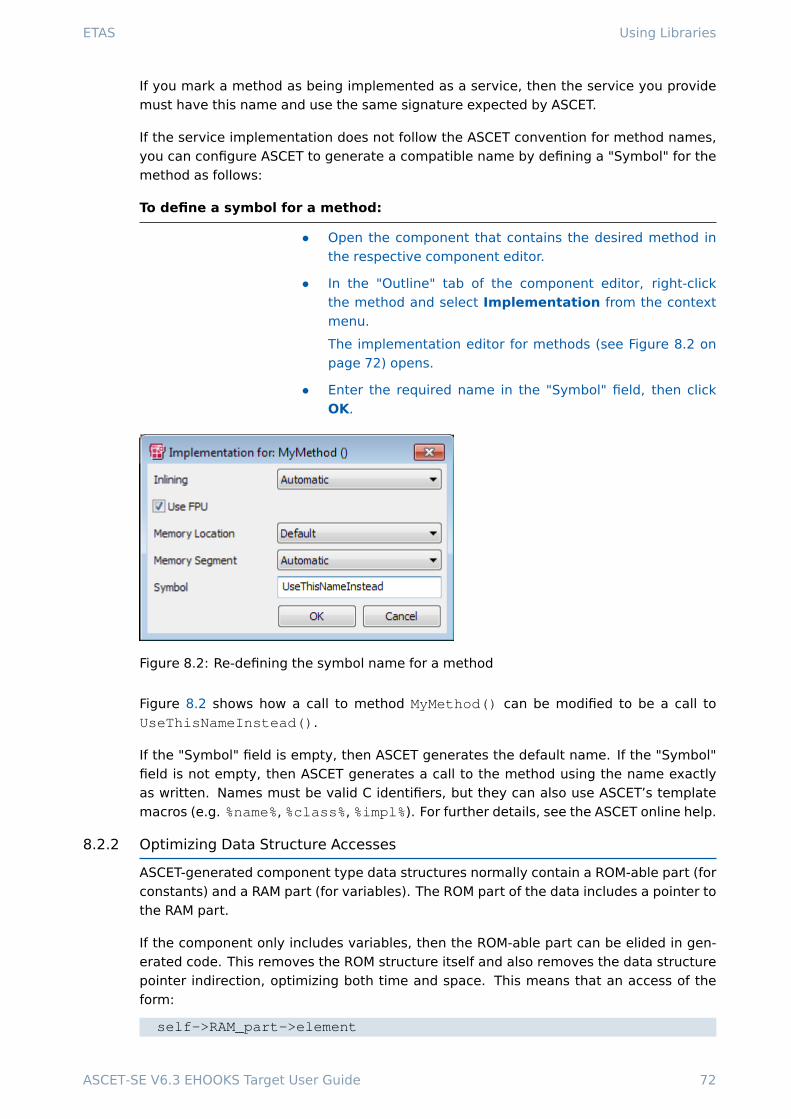
ETAS Using Libraries
If you mark a method as being implemented as a service, then the service you providemust have this name and use the same signature expected by ASCET.
If the service implementation does not follow the ASCET convention for method names,you can configure ASCET to generate a compatible name by defining a "Symbol" for themethod as follows:
To define a symbol for a method:
• Open the component that contains the desired method inthe respective component editor.
• In the "Outline" tab of the component editor, right-clickthe method and select Implementation from the contextmenu.
The implementation editor for methods (see Figure 8.2 onpage 72) opens.
• Enter the required name in the "Symbol" field, then clickOK.
Figure 8.2: Re-defining the symbol name for a method
Figure 8.2 shows how a call to method MyMethod() can be modified to be a call toUseThisNameInstead().
If the "Symbol" field is empty, then ASCET generates the default name. If the "Symbol"field is not empty, then ASCET generates a call to the method using the name exactlyas written. Names must be valid C identifiers, but they can also use ASCET’s templatemacros (e.g. %name%, %class%, %impl%). For further details, see the ASCET online help.
8.2.2 Optimizing Data Structure Accesses
ASCET-generated component type data structures normally contain a ROM-able part (forconstants) and a RAM part (for variables). The ROM part of the data includes a pointer tothe RAM part.
If the component only includes variables, then the ROM-able part can be elided in gen-erated code. This removes the ROM structure itself and also removes the data structurepointer indirection, optimizing both time and space. This means that an access of theform:
self->RAM_part->element
ASCET-SE V6.3 EHOOKS Target User Guide 72

ETAS Using Libraries
becomes:
self->element
This optimization is controlled by the option optimizeCompTypeDescriptor incodegen_ehooks.ini. It is enabled by default in the EHOOKS Target.
8.2.3 Using Services Routines on the ECU
Section 7.3 on page 65 explained how to make callbacks to arithmetic services and in-terpolation routines that are already present in the ECU hex file.
You can also use the same technique to access service routines that already exist on theECU.
8.3 Working with Formulas
ASCET allows you to define named formulas that specify a fixed-point quantization asshown in Figure 8.3 on page 73. Formulas are defined by projects, and module or classimplementations can optionally declare that they use a formula with a given name.
Figure 8.3: Formula definitions in a project
The problem with using formulas in this way is that the portability of those implementa-tions can be broken: When the module or class is used in another project, the formulamay be undefined. ASCET will report an error at build time for all formulas that are usedby modules and/or classes, but are not defined in the project.
Missing formula definitions can be created in the "Formulas" tab of the project editor; seethe ASCET online help for details.
8.3.1 Using the Same Formulas as the ECU
Formula definitions have project scope, and projects are independent. This means thatformulas with identical names in different projects represent logically different formulas.
When you define missing formulas, it is not required that the fixed-point quantizations arethe same as found on the ECU. The EHOOKS Target will automatically convert betweenECU and model quantizations.
If you need to use the same quantizations for data as used by the ECU, then it is yourresponsibility to enter the correct data. You can avoid errors by requesting that your ECUsupplier provides an ASCET-compatible formula definition file (for example, generatedfrom the COMPU-METHODS in the ECU’s A2L file) that you can import into ASCET.
ASCET-SE V6.3 EHOOKS Target User Guide 73

ETAS Using Libraries
The formula definition file is an XML file that satisfies the formulas.xsd XML schemadefinition found in <install_dir>3\Schemas.
3 ASCET installation directory, e.g., C:\ETAS\ASCET6.3
ASCET-SE V6.3 EHOOKS Target User Guide 74

ETAS Using EHOOKS-DEV V3.0
9 Using EHOOKS-DEV V3.0
If you are using EHOOKS-DEV V3.0, there are differences to using EHOOKS-DEV V2.0.These differences are described in this chapter.
• An additional code generator Object Based Controller Physical is avail-able, which functions analog to Physical Experiment for the PC target.
• Local variables and parameters of modules in the Bypass project can be put in the
*.a2l file for later usage with INCA.
• Local variables or parameters of single instance classes of the Bypass project canbe put in the *.a2l file for later usage with INCA.
• The "Global Name Space Prefix" configured in project target settings is valid forglobal and local generated data elements.
All other things described in the previous chapters for usage with EHOOKS-DEV V2.0 arestill valid for EHOOKS-DEV V3.0. For specific changes in options of EHOOKS-DEV3.0, youcan check [ETA13].
9.1 Updating Projects from EHOOKS-DEV V2.0 to EHOOKS-DEV V3.0
If you already have an EHOOKS configuration file (*.ehcfg) for your project andEHOOKS-DEV 2.0, you can just use that file.
To adapt the *.ehcfg file to EHOOKS-DEV V3.0:
• Open the ASCET options window.
• In the ASCET options window, go to the "Targets\EHOOKS\Build" node and select EHooks-DEV V3.0 as External BuildTool.
Tip
This setting applies to all projects that usethe EHOOKS target.
• Close the ASCET options window.
• In the "EHOOKS" tab of the project editor, click the StartEHOOKS button (see Figure 4.2 on page 15) to openEHOOKS-DEV.
• If desired, modify your output locations for the *.hex and
*.a2l files in EHOOKS-DEV.
• Even if nothing needs to be modified, force EHOOKS to savethe EHOOKS configuration file (*.ehcfg).
You can do so, e.g., by adding or modifying the version in the"Project Information" field shown in Figure 9.1 on page 76.
• Close EHOOKS-DEV and save the modified EHOOKS config-uration file (*.ehcfg).
• In the project editor, select Build Ô Build All or Build Ô
Rebuild All to re-build the project with EHOOKS-DEV V3.0.
Alternatively, you can use the keyboard shortcuts <F7> tobuild and <Shift> + <F7> to rebuild.
ASCET-SE V6.3 EHOOKS Target User Guide 75

ETAS Using EHOOKS-DEV V3.0
Figure 9.1: Configuring the Version information in the "Project Information" field (whichis not relevant for the EHOOKS-DEV Build)
If you do not have an EHOOKS configuration file (*.ehcfg) for your project, proceed asdescribed in chapter 4 "Getting Started with an EHOOKS Project" on page 13.
9.2 Using the Code Generator: Object Based Controller Physical
In the "Build" node of the "Project Properties" window, two Code Generators are availablefor EHOOKS-DEV V3.0: Object Based Controller Physical and Object BasedController Implementation, see Figure 9.2 on page 77.
If Object Based Controller Physical is selected as code generator, the imple-mentation information in the ASCET Bypass project is ignored, all ASCET udisc and sdiscdata type values are implemented as uint32 and sint32, and the ASCET log data type isimplemented as uint8. The ASCET generated code behaves like the generated code forthe physical PC target. When a variable is written to the ECU, the EHOOKS Target willautomatically limit the value to the min and max values defined by the ECU.
The min and max values of all Bypass elements in the generated ECU *.a2l file are-9.9995e+36 and 9.9995e+36.
All cont values are implemented as real32 or real64 (single or double precision values),depending on the setting of the "Cont Implementation Type" option in the ASCET options,"Targets\EHOOKS\Build" node.
ASCET-SE V6.3 EHOOKS Target User Guide 76

ETAS Using EHOOKS-DEV V3.0
Figure 9.2: Choosing the Code Generator in the project properties, "Build" node
ASCET-SE V6.3 EHOOKS Target User Guide 77

ETAS Using EHOOKS-DEV V3.0
The following settings are available for "Cont Implementation Type" (see also Table 4.1on page 18):
Phys. Single Precision - Generate all continuous elements as single precision floatingpoint values.
Phys. Double Precision - Generate all continuous elements as double precision float-ing point values.
Tip
This setting applies to all projects that use the EHOOKS target.
9.2.1 Arithmetic Services
As for the Physical Experiment code generator and the PC target, arithmetic ser-vices cannot be used for the Object Based Controller Physical code generator.
9.2.2 Interpolation Routines
Interpolation routines can be used with Object Based Controller Physical as de-scribed in section 7.2 "Interpolation Routines" on page 59.
9.2.3 Interacting with EHOOKS Control Variables
For the Object Based Controller Physical code generator, the same methodsfor interacting can be used as described in chapter 6 "Interacting with EHOOKS ControlVariables" on page 51. For the C code classes, you have to select Object BasedController Physical in the "Arithmetic" combo box (see Figure 6.2 on page 52).
9.3 Calibrating Bypass Functions
With EHOOKS-DEV 3.0, the usage of calibration elements has been extended from onlyglobal elements as described in chapter 5 "Calibrating Bypass Functions" on page 48 tolocal elements. Both can now be used as calibration elements. This includes:
• local elements of all modules in the Bypass project
• local elements of single-instance classes contained in the Bypass project
For local elements, the same ASCET types are supported for calibration as described forglobal elements in chapter 5 on page 48.
Each global or local calibration element can be specified for calibration by using the"Properties Editor" of the element. To do so, activate the Read and – for parameters– Write options in the "Calibration Access" area of the properties editor, as shown inFigure 5.1 on page 49.
Tip
If – for parameters – only the Read option is set in the "Calibration Ac-cess" area, but the Write option is not, the element’s data location and theextraction of addresses will not be generated in the updated ECU *.a2l file.
ASCET-SE V6.3 EHOOKS Target User Guide 78

ETAS Using EHOOKS-DEV V3.0
9.3.1 Global Name Space Prefix
The Global Name Space Prefix described in section 4.1.3 on page 16 is generated forglobal and local elements. For local elements, the name consists of the prefix followedby the element instance path. Therefore the module and class instance names are com-bined like in the following example.
Example for variable generation with Prefix BP_:
• global variable:
BP_<varname>
• local variable in module:
BP_<varname>.<module_inst_name>.<project_name>
• local variable in single instance class in module:
BP_<varname>.<class_inst_name>.<module_inst_name>.<project_name>
For parameters, names are generated the same way. The element name and the elementdisplay name in the *.a2l file are the same.
9.4 Building the ECU
ASCET generates all bypass functions in a single C source file calledasd_bypass_func.c. The file generated for EHOOKS-DEV 3.0 has only slightlychanged from the file which has been generated with EHOOKS-DEV 2.0 (see Listing 4.1on page 47).
In EHOOKS-DEV 3.0, each generated bypass function has the structure shown in List-ing 9.1. Instead of direct access to the EHOOKS variable structures, the methodsEH_ARG_PUT_<ECUVar> and EH_ARG_SET_<ECUVar> are generated for the access.
EH_USER_BYPASS_FUNC(<function_name>){/* Perform RAM initialization. Use default number of bytes
** to initialize. The OTB function will return with failure
** until the RAM has been initialized.
*/if (!EH_InitRam(0)) {return 0;
}
/* *** Copy the EHOOKS input arguments to ASCET messages *** */BP_<Message> = ASD_REAL32_TO_IMPL_<Message>(
EH_IMPL_TO_float_PHYS_<ECUVar>(EH_ARG_GET_<ECUVar>(EH_context)));
...
/* *** Copy the EHOOKS output arguments to ASCET messages forinitialization, if not already done by EHOOKS inputarguments *** */
BP_<Message> = ASD_REAL32_TO_IMPL_<Message>(EH_IMPL_TO_float_PHYS_<ECUVar>(EH_ARG_GET_<ECUVar>(EH_context)));
ASCET-SE V6.3 EHOOKS Target User Guide 79

ETAS Using EHOOKS-DEV V3.0
/* ASD_CALC_SCALED_DT macro expects the dT value inmilliseconds */
ASD_CALC_SCALED_DT(ASD_DT_SCALED, 1000U);
/* *** Execute processes *** */<Module>_<Implementation>_<Process>();...
/* *** Copy ASCET output messages to EHOOKS output arguments
*** */EH_ARG_PUT_<ECUVar>(EH_float_PHYS_TO_IMPL_<ECUVar>(
ASD_IMPL_TO_REAL32_<Message>(BP_<Message>)));...
/* restore the original value of dT */ASD_DT_SCALED = Saved_ASD_DT_SCALED;
return 1;}
Listing 9.1: Example bypass function structure (EHOOKS-DEV 3.0)
Anything else regarding the build of the ECU stays the same as described in section 4.3"Building the ECU Code".
ASCET-SE V6.3 EHOOKS Target User Guide 80

ETAS Using EHOOKS-DEV V3.1
10 Using EHOOKS-DEV V3.1
Using EHOOKS-DEV V3.1 is very similar to using EHOOKS-DEV V3.0. The new featurerelevant for EHOOKS Target in EHOOKS-DEV V3.1 is support of non-volatile RAM (NVRAM);everything else works the same way as for EHOOKS-DEV V3.0; see chapter 9 on page 75.
In ASCET, parameters are automatically set to non-volatile; other elements can be placedin the NVRAM memory via the Non-Volatile option in the element’s properties editor.
To assign the Non-Volatile Attribute to an element:
• Open the component that contains the desired element in acomponent editor.
• In the "Outline" tab of the component editor, right-click theelement and select Properties from the context menu toopen the "Properties Editor".
• In the "Attributes" area, activate the Non-Volatile option(see Figure 10.1 on page 81).
• Click OK to close the "Properties Editor".
Figure 10.1: Assigning the Non-Volatile attribute to an element
During the Build process, ASCET generates a *.six file in the SCOOP-IX V1.4 format,which contains a new attribute nonVolatile for <dataElement>s; see Listing 10.1 onpage 82.
ASCET-SE V6.3 EHOOKS Target User Guide 81

ETAS Using EHOOKS-DEV V3.1
...<dataElement>...
<usage measurement="true"virtual="false"variant="false"nonVolatile="false">
</usage>...
<dataElement>...
Listing 10.1: SCOOP-IX V1.4 extract with nonVolatile attribute
ASCET-SE V6.3 EHOOKS Target User Guide 82

ETAS Contacting ETAS
11 Contacting ETAS
11.1 Technical Support
Technical support is available to all ASCET-SEusers with a valid support contract. If youdo not have a valid support contract, please contact your regional sales office (see sec-tion 11.2.2).
The best way to get technical support is by email. Any problems or questions about theuse of ASCET-SEshould be sent to:
If you prefer to discuss your problem with the technical support team, you call the ASCET-SEsupport hotline on:
+49 711 3423-2311
The hotline is available during normal office hours.
In either case, it is helpful if you can provide technical support with the following infor-mation:
• your support contract number
• the version of the ETAS tools you are using
• the version of 3rd party tools you are using, e.g. compiler tool, version managementsystem etc..
• your .exp, .axl or .amd configuration files
• a description of how to reproduce the error
• the error message you received (if any)
11.2 General Enquiries
11.2.1 ETAS Global Headquarters
ETAS GmbHBorsigstrasse 14 Phone: +49 711 3423-070469 Stuttgart Fax: +49 711 3423-2106Germany WWW: www.etas.com
11.2.2 ETAS Local Sales & Support Offices
Contact details for your local sales office and local technical support team (where avail-able) can be found on the ETAS web site:
ETAS subsidiaries www.etas.com/en/contact.phpETAS technical support www.etas.com/en/hotlines.php
ASCET-SE V6.3 EHOOKS Target User Guide 83

ETAS BIBLIOGRAPHY
Bibliography
[ETA11] ETAS GmbH. EHOOKS V2.0 User Guide, r2.0.0 en edition, 2011. 10, 51
[ETA12] ETAS GmbH. ASCET-SE V6.2 Users Guide, 6.2.1 edition, 2012. 50
[ETA13] ETAS GmbH. EHOOKS V3.0 User Guide, r3.0.0 en edition, 2013. 75
ASCET-SE V6.3 EHOOKS Target User Guide 84
ETAS Index
Index
Arithmetic services, 54
mix on-ECU/off-ECU, 68
Object Based Controller Physical, 78
on ECU, 65
prepare service set, 54
use on-ECU service, 68
use service set, 57
ASCET
automatic actions, 12
build log, 47
EHOOKS tab, 15
interpolation routines, 60
libraries, 70
ASCET model
bypass function, 10
ASCET/EHOOKS integration, 9–12
key features, 11
On-target bypass, 9
workflow, 9
asd_bypass_func.c, 46
Auto-mapping, 36
Auto-Mapping button, 38
Get ECU Labels and Map, 38
Basic EHOOKS configuration, 19
build, 46
Bypass
calibration, 78
function, see Bypass function
on-target, 9
Bypass function, 48
ASCET model, 10
associate with dispatch point, 42
create, 40
dT, 42
integrate, 20
map process, 40
Calibration, 48–50
supported elements, 48
Code generator
Object Based ControllerImplementation, 14
Object Based Controller Physical, 14,76
connect message/ECU variable, 21
manually, 33, 34
Cont Implementation Type, 18
Control variable, 51
access via C code class, 51
Object Based ControllerImplementation, 51
Object Based Controller Physical, 78
Create bypass function, 40
create project, 13
Dispatch point, 10
associate with Bypass function, 42
dT, 42
ECU supplier, 9, 13, 73
ECU variable
backup copy, 30
export mapping, 45
export selected mapping, 44
import mapping, 45
map to message, 33
remove mapping, 34
select, 29
EHOOKS build options, 16
EHOOKS control variable, see Controlvariable
EHOOKS Functionality
access dT, 42
key features, 11
EHOOKS project, 13–47
administration, 13
auto-map messages/ECU variables, 36
basic configuration, 19
build, 46
build log, 47
configuration file, 15
configure, 14
configure ASCET-EHOOKS interaction,15
connect message/ECU variable, 21
create, 13
create ASCET project, 13
dT, 42
existing OS configuration, 41, 44
generate code, 46
input files, 19
integrate Bypass function, 20
mandatory items, 13
optional items, 13
output files, 19
prepare, 20
scheduling, 38
select target, 14
EHOOKS tab, 15
ASCET-SE V6.3 EHOOKS Target User Guide 85

ETAS Index
EHOOKS target, 14build options, 16Cont Implementation Type, 18global name space prefix, 16select, 14
EHOOKS-DEV toolautomatic actions, 12
EHOOKS-DEV V3.0, 75–80Bypass calibration, 78Object Based Controller Physical, 76update from V2.0, 75
EHOOKS-DEV V3.1, 81–82EHOOKS-PREP tool, 10
Formula, 73same as on-ECU, 73
generate code, 46Global Name Space Prefix, 16
Input tab, 21auto-mapping, 38export all mappings, 45export selected mapping, 44filter column, 35import mapping, 45
installation, 8Interpolation routines, 54, 59
create new, 63definition file, 60header file, 62in ASCET, 60library, 62mapping file, 62mix on-ECU/off-ECU, 68modify existing, 63Object Based Controller Physical, 78on ECU, 65use custom routine, 63use on-ECU routine, 68
key features, 11
Libraries, 70–74model, 70, 71service, 70, 71
messageexport mapping, 45export selected mapping, 44import mapping, 45
map to ECU variable, 33remove mapping, 34
Model library, 71
Object Based Controller Implementationcode generator, 14
Object Based Controller Physical codegenerator, 14, 76
arithmetic services, 78EHOOKS control variable, 78interpolation routines, 78
On-target bypass, 9OS configuration
use existing, 41, 44Output tab, 27
auto-mapping, 38export all mappings, 45export selected mapping, 44filter column, 35import mapping, 45
Processmap to bypass function, 40
project filelocation, 15
Project propertiesBuild node, 14
resolve globals, 20
Scheduling tab, 39export mappings, 45import mapping, 45
select backup copy, 30select ECU variable, 29Service library, 71
control method name, 71data structure access, 72use, 71use on-ECU routine, 73
Typical workflow, 9
User interfaceEHOOKS Build options, 17EHOOKS tab, 16EHOOKS-DEV window, 19Input tab, 21Name Templates options, 17Output tab, 27Scheduling tab, 39
ASCET-SE V6.3 EHOOKS Target User Guide 86