art of asana - light of the heart yogalightoftheheartyoga.com/images/ramaintarticle.pdfart of asana....
TRANSCRIPT

!nilill
:><:
~
0
[!3:
>-<
Q
0
0:1
'"aaN!J:J"Q]Z2,
84
art of asana
.
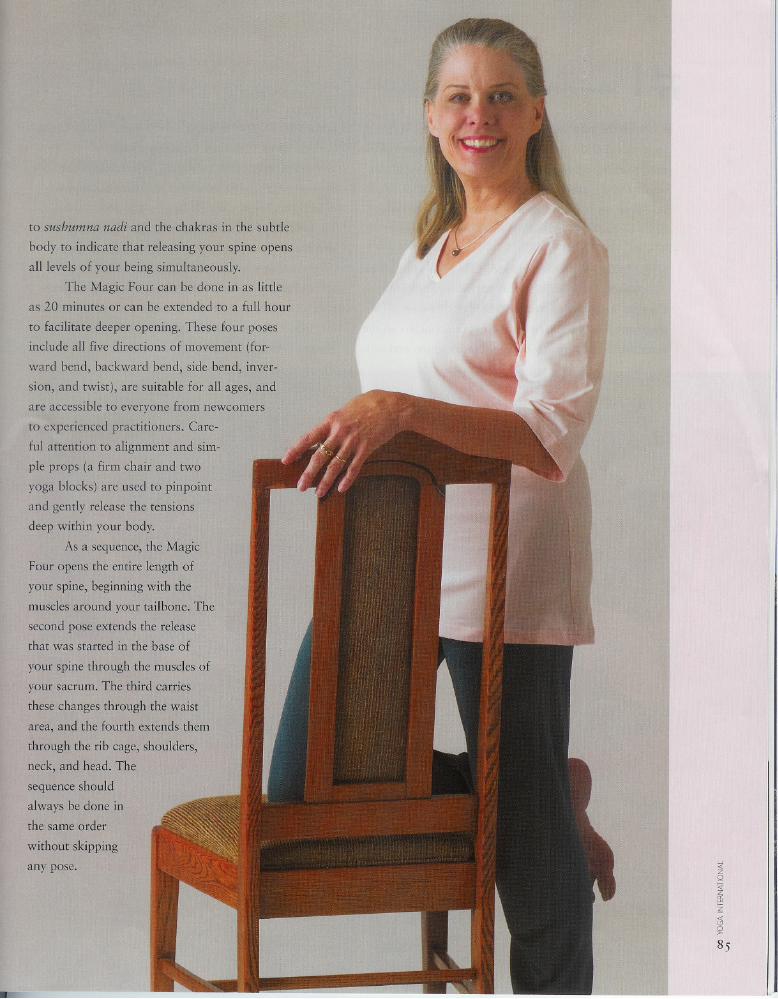
Svaroopa@Yoga is a technique for
opening your body (roapa) to find your Self
(sva). It has a radically different approach than
most modern styles of yoga and can give you a
new way to think about asana practice. The
practice creates a core opening by releasing the
tensions in the deepest layers of your body.
Dissolving these tensions allows you to live with
ease, both in your body and in your deeper self.
That ease is your birthright. This all happens
without sweat or strain because Svaroopa Yoga
is not exercise but a scientific maximization of
the body's natural capacities. When practicing
Svaroopa Yoga, we delve into our body as if
opening a precious gift carefully wrapped in
many layers.
This powerfully transformative practice
can be experienced with just four asanas, called
the Magic Four. They're simple and amazingly
effective. They begin by releasing the muscles
connected to your tailbone-the pivot point of
your body. With enough release in your tailbone,
your whole body will realign from the inside
outward. The changes will automatically extend
down your legs through your hips, knees, ankles,
and feet. Simultaneously, a domino effect of
release will climb your spine through your
sacrum, waist area (lumbar vertebrae), rib cage,
shoulders, neck, and skull.
This spinal release opens more space for
the intervertebral discs and delicate nerve roots
that coordinate every muscle, bone, artery,
organ, and gland in your body. This opening
also lifts mechanical compression off the internal
organs, improving their functioning immediately.
With less tension throughout the body, your vital
systems find their natural balance. Your breath-
ing also opens up easily and immediately with
the first pose.
The Magic Four will enhance your vitality
and physical stamina while improving your state
of mind and helping your emotions to rest in joy
and compassion. The most important aspect of
working with your body in Svaroopa Yoga is
discovering the deeper dimensions of your being.
This is the culmination of yoga's promise: you
truly are more than you think you are.
The inner spaciousness opened by the
Magic Four is a genuine physical reality, but it is
more than that. In the full sequence of Svaroopa
Yoga, the inner opening goes much deeper as
your life energy (prana) starts moving through the
central channel of your spine unimpeded. The
poses prepare your physical and subtle body for
the more powerful opening that yoga promises.
You gradually learn to surrender into a grace that
is ever present, though the tendency is to hold
yourself tight and resist that flow. The outer prac-
tice of these asanas leads you to recognize that the
source of grace is deep within your own being.
This approach to the body is based in
the tantra of Kashmir Shaivism. The Pratya-
bhijnahridayam describes the goal of Svaroopa
Yoga in sutra 17: madhyavikasac cidananda
labhaha, "the bliss of consciousness is acquired
by the expansion of the central energy channel."
The author, Kshemaraja, explains that this
means the spine must be opened in order for
you to experience the truth of your own being
as Consciousness itself. He refers specifically
~
m
I
IillII
m
R
u
a~,e
1\'0
I'
'"Z0~zffif-;:«lj\2
85
u
Im
I
Im
I
"IIli.1
"i
IIII!
Ill,i'"
III!I
inward gently. Stay in Stage 1 for a minimum of 45 sec-
onds or up to 3 minutes, breathing easily.
You might feel a softening or tingling in the base
of your pelvis as the tension in the seven coccygeus
muscles begins to unravel. Or you may feel nothing.
Those layers of muscle have been tight for a long time
and may be completely numb. This pose engenders a
deep opening whether you can feel it or not.
Remain in Stage 1 if you have high blood pres-
sure (even if it is controlled by medication), hiatal her-
nia, glaucoma, or a history of detached retina, or if
Stage 2 is uncomfortable for any reason.
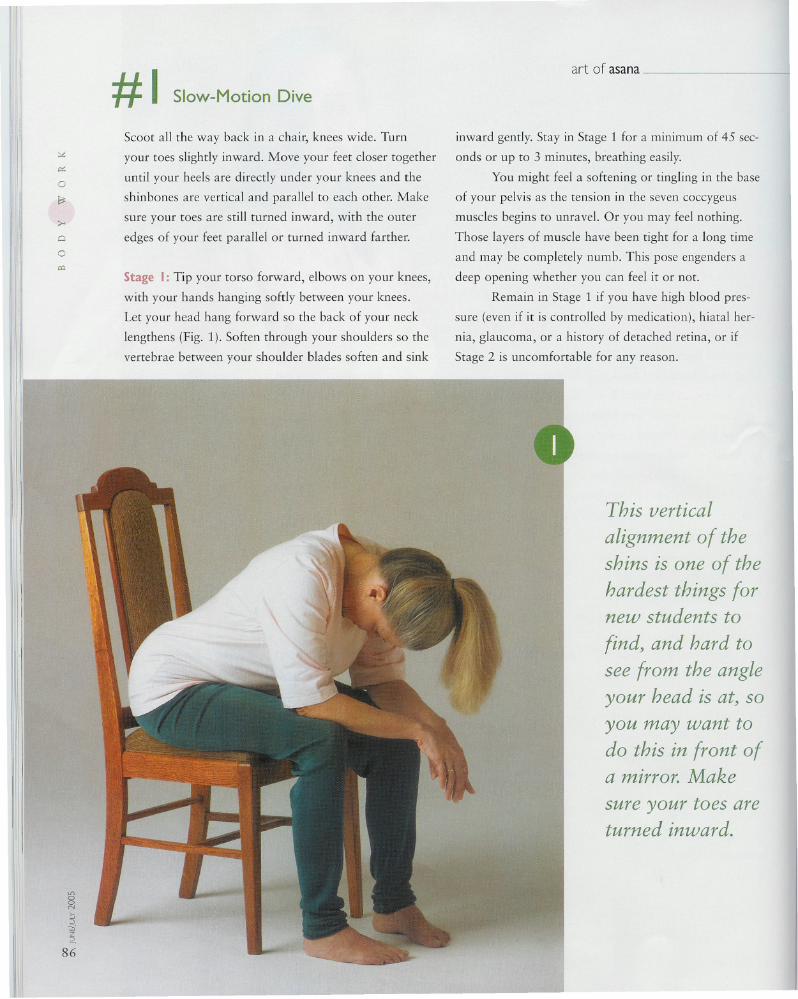
#1 Slow-Motion Dive
:.::<>::
Scoot all the way back in a chair, knees wide. Turn
your toes slightly inward. Move your feet closer together
until your heels are directly under your knees and the
shinbones are vertical and parallel to each other. Make
sure your toes are still turned inward, with the outer
edges of your feet parallel or turned inward farther.
0
~
>-<
0
0
""
Stage I: Tip your torso forward, elbows on your knees,
with your hands hanging softly between your knees.
Let your head hang forward so the back of your neck
lengthens (Fig. 1). Soften through your shoulders so the
vertebrae between your shoulder blades soften and sink
m
enaaNb:J"~2.
86
art of asana
This vertical
alignment of theshins is one of thehardest things fornew students to
find, and hard to
see from the angleyour head is at, soyou may want todo this in front ofa mirror. Make
sure your toes areturned inward.
,
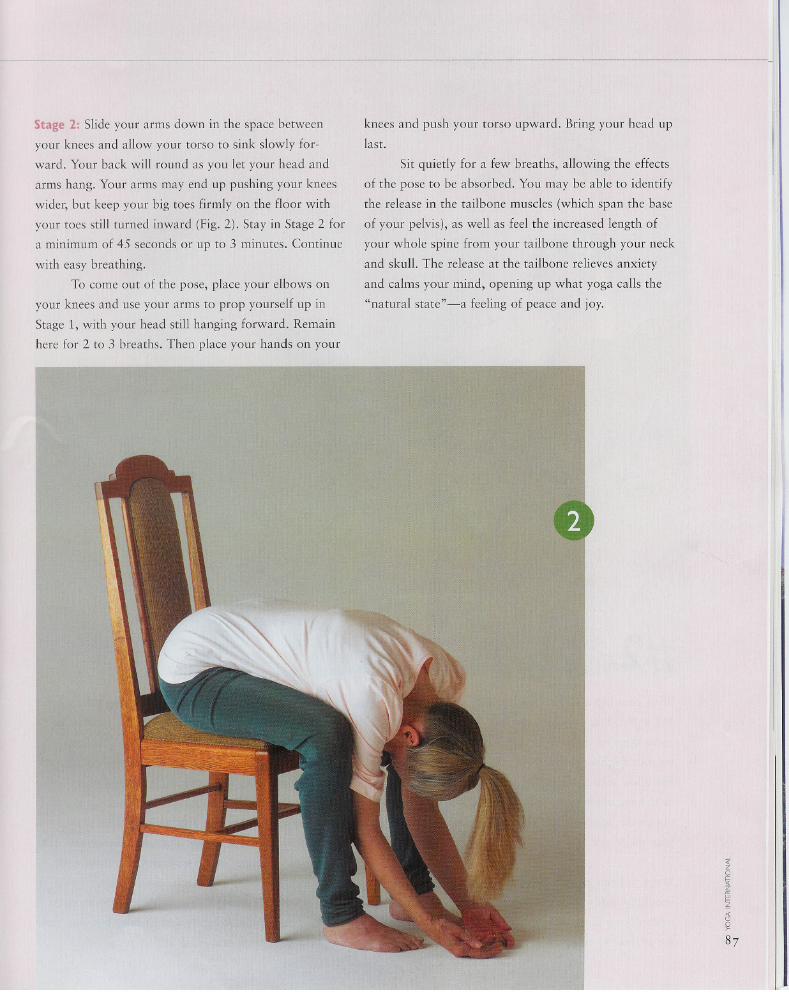
Stage 2: Slide your arms down in the space between
your knees and allow your torso to sink slowly for-
ward. Your back will round as you let your head and
arms hang. Your arms may end up pushing your knees
wider, but keep your big toes firmly on the floor with
your toes still turned inward (Fig. 2). Stay in Stage 2 for
a minimum of 45 seconds or up to 3 minutes. Continue
with easy breathing.
To come out of the pose, place your elbows on
your knees and use your arms to prop yourself up in
Stage 1, with your head still hanging forward. Remain
here for 2 to 3 breaths. Then place your hands on your
IIIII
I
I
r
knees and push your torso upward. Bring your head up
last.
Sit quietly for a few breaths, allowing the effects
of the pose to be absorbed. You may be able to identify
the release in the tailbone muscles (which span the base
of your pelvis), as well as feel the increased length of
your whole spine from your tailbone through your neck
and skull. The release at the tailbone relieves anxiety
and calms your mind, opening up what yoga calls the
"natural state"-a feeling of peace and joy.
<Iz0
~z'"i=';;;<:l'J\2
87
..
~
~
0
~
;..Q
0
~
II
i;;I
88
'1111
en00N"::J=':!I~
~~
~~
s
I
I iI
~
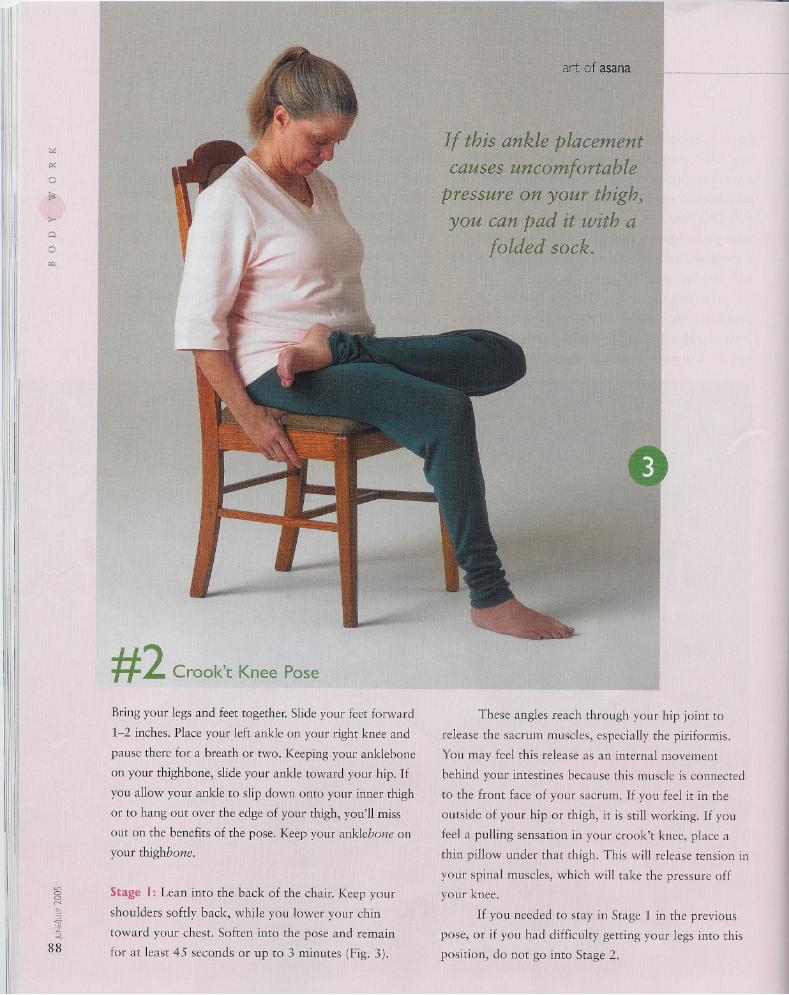
# 2 Crook't IJ
Bring your legs and feet together. Slide your feet forward
1-2 inches. Place your left ankle on your right knee and
pause there for a breath or two. Keeping your anklebone
on your thighbone, slide your ankle toward your hip. If
you allow your ankle to slip down onto your inner thigh
or to hang out over the edge of your thigh, you'll miss
out on the benefits of the pose. Keep your anklebone on
your thighbone.
These angles reach through your hip joint to
release the sacrum muscles, especially the piriformis.
You may feel this release as an internal movement
behind your intestines because this muscle is connected
to the front face of your sacrum. If you feel it in the
outside of your hip or thigh, it is stilt working. If you
feel a !pulling sensation in your crook't knee, place a
thin ,pvllow under tbatthigh. This will release tension in
your spinal muscles, which will take the pressure off
your knee.
If'you needed to stay in Stage 1 in the previous
pose, or if you had difficulty getting your legs into this
position, do not go into Stage 2.
Stage I: Lean into the back of the chair. Keep your
shoulders softly back, while yoU',loweryour chin
toward your chest. Soften into the pose and remain
for at least 45 seconds or up to 3 minutes (Fig. 3).
III
----
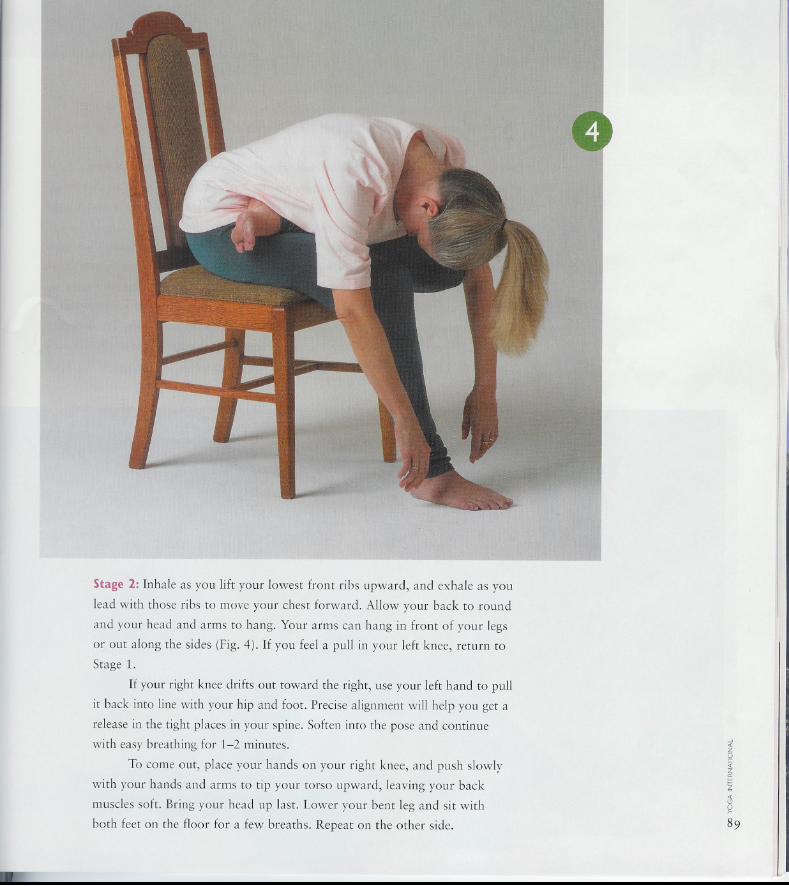
Stage 2: Inhale as you lift your lowest front ribs upward, and exhale as you
lead with those ribs to move your chest forward. Allow your back to round
and your head and arms to hang. Your arms can hang in front of your legs
or out along the sides (Fig. 4). If you feel a pull in your left knee, return to
Stage 1.
If your right knee drifts out toward the right, use your left hand to pull
it back into line with your hip and foot. Precise alignment will help you get a
release in the tight places in your spine. Soften into the pose and continue
with easy breathing for 1-2 minutes.
To come out, place your hands on your right knee, and push slowly
with your hands and arms to tip your torso upward, leaving your back
muscles soft. Bring your head up last. Lower your bent leg and sit with
both feet on the floor for a few breaths. Repeat on the other side.
;I.z0~zffit-;;;'"CJ\2
89
lie::
--"'---
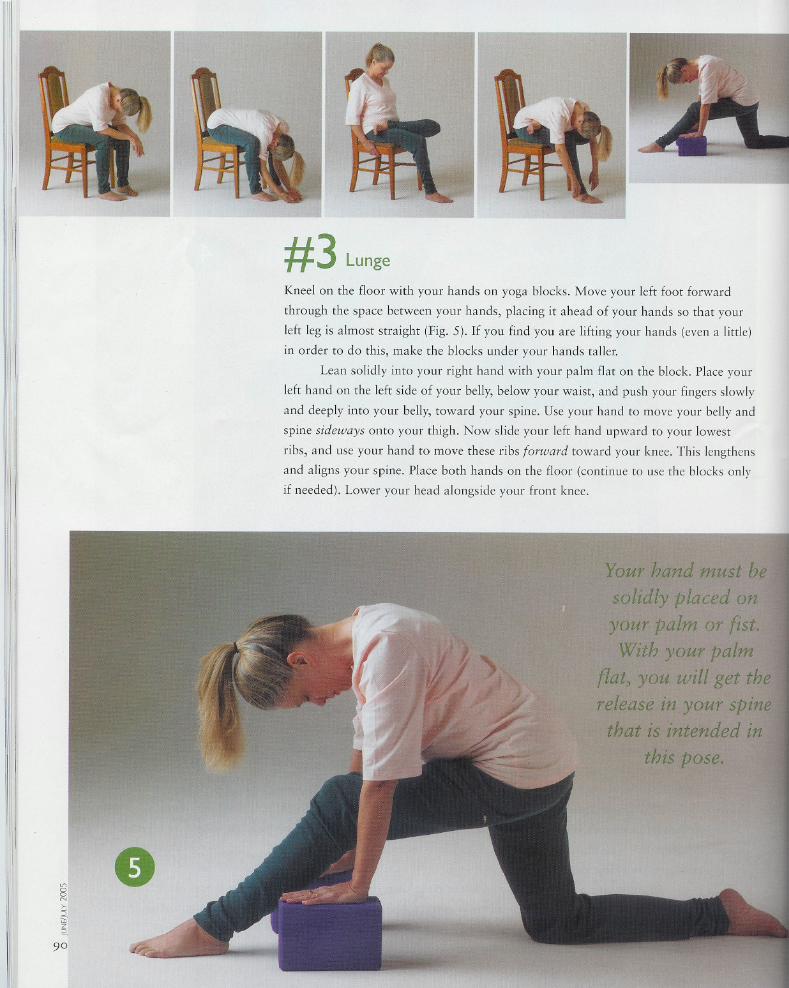
#3 LungeKneel on the floor with your hands on yoga blocks. Move your left foot forward
through the space between your hands, placing it ahead of your hands so that your
left leg is almost straight (Fig. 5). If you find you are lifting your hands (even a little)
in order to do this, make the blocks under your hands taller.
Lean solidly into your right hand with your palm flat on the block. Place your
left hand on the left side of your belly, below your waist, and push your fingers slowly
and deeply into your belly, toward your spine. Use your hand to move your belly and
spine sideways onto your thigh. Now slide your left hand upward to your lowest
ribs, and use your hand to move these ribs forward toward your knee. This lengthens
and aligns your spine. Place both hands on the floor (continue to use the blocks only
if needed). Lower your head alongside your front knee.
en,8,N~.:)~..2.
90I''11'1ill
""'-'
- 1--- ,"~ ""
~",~,
i
,
. .'
,
'. '
,
" .
'j!i.;", " ,"
~J~,::.
,.~
r~ r
..
l'
~ ,.
---'
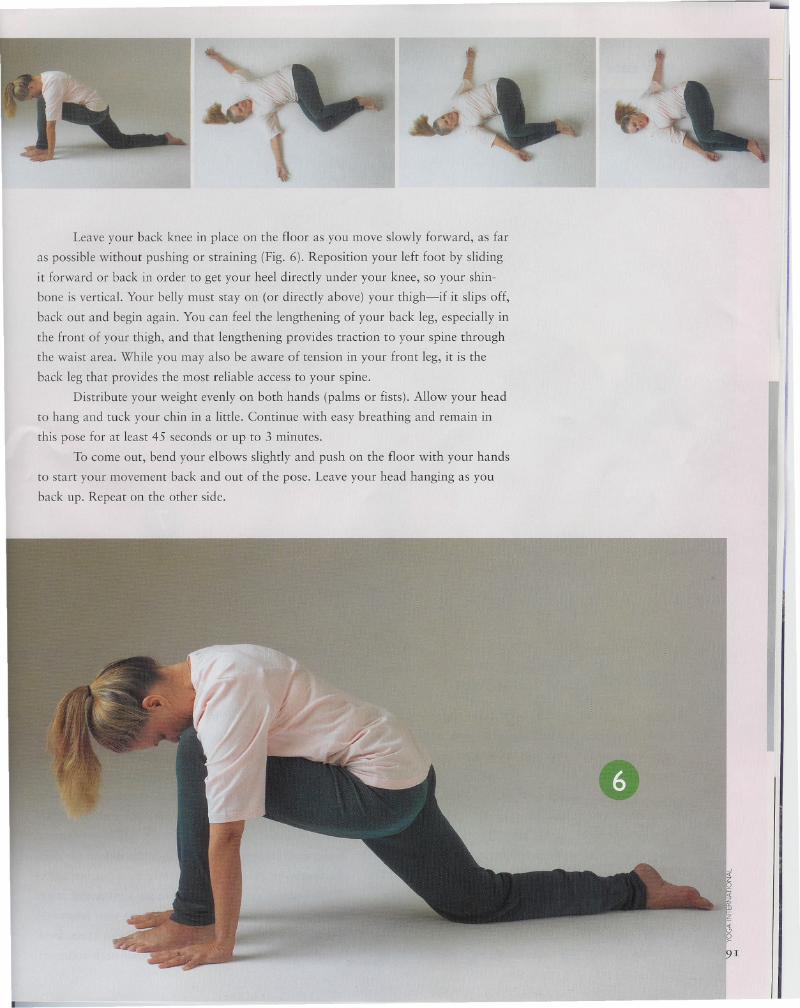
Leave your back knee in place on the floor as you move slowly forward, as far
as possible without pushing or straining (Fig. 6). Reposition your left foot by sliding
it forward or back in order to get your heel directly under your knee, so your shin-
bone is vertical. Your belly must stay on (or directly above) your thigh-if it slips off,
back out and begin again. You can feel the lengthening of your back leg, especially in
the front of your thigh, and that lengthening provides traction to your spine through
the waist area. While you may also be aware of tension in your front leg, it is the
back leg that provides the most reliable access to your spine.
Distribute your weight evenly on both hands (palms or fists). Allow your head
to hang and tuck your chin in a little. Continue with easy breathing and remain in
this pose for at least 45 seconds or up to 3 minutes.
To come out, bend your elbows slightly and push on the floor with your hands
to start your movement back and out of the pose. Leave your head hanging as you
back up. Repeat on the other side. i
I
II
~
..
I
~
e
,u
191
r-----
I...J

~IIII
ii:!'I
~i
'1
art of asana
.....
'"
./
(('
#4 Reclining Spinal Twist
U")
aaN~:J""~2.
Lying on your back, bring both knees toward your
chest. Your knees are touching. Use your hands to hold
your knees and let your legs relax. Rest here for a few
preparatory breaths.
Extend your arms out to your sides along the
floor, with your palms facing up. Roll your legs and
hips to your right and lay your bent legs and feet on the
floor (Fig. 7). Allow your left shoulder blade to come
up off the floor if needed, so you can get your right leg
and foot fully on the floor. If your top knee does not
land on your lower knee, place a small pillow in the
space between them.
Slide your legs toward your right arm and move92
8
---
your arm toward your legs until the kneecap of your
right leg touches your right wristbone. This will decom-
press your spine through your waist and farther down.
Slide your left arm down into a similar angle, so your
arms form an A-frame with your palms facing the ceiling
(Fig. 8). If your left elbow does not reach the floor, bend
your elbow and lay your palm on the side of your waist,
while allowing your elbow and shoulder to lean toward
the floor.
Move your feet outward to get a 90-degree angle
at your knees, and rest your top foot on your lower
foot. Turn your neck and head toward your knees for a
lengthening through the left side of your neck and into
-.J
m_- - -~-
I ..------..------~ !o
M~
.
II
m
~ --- -
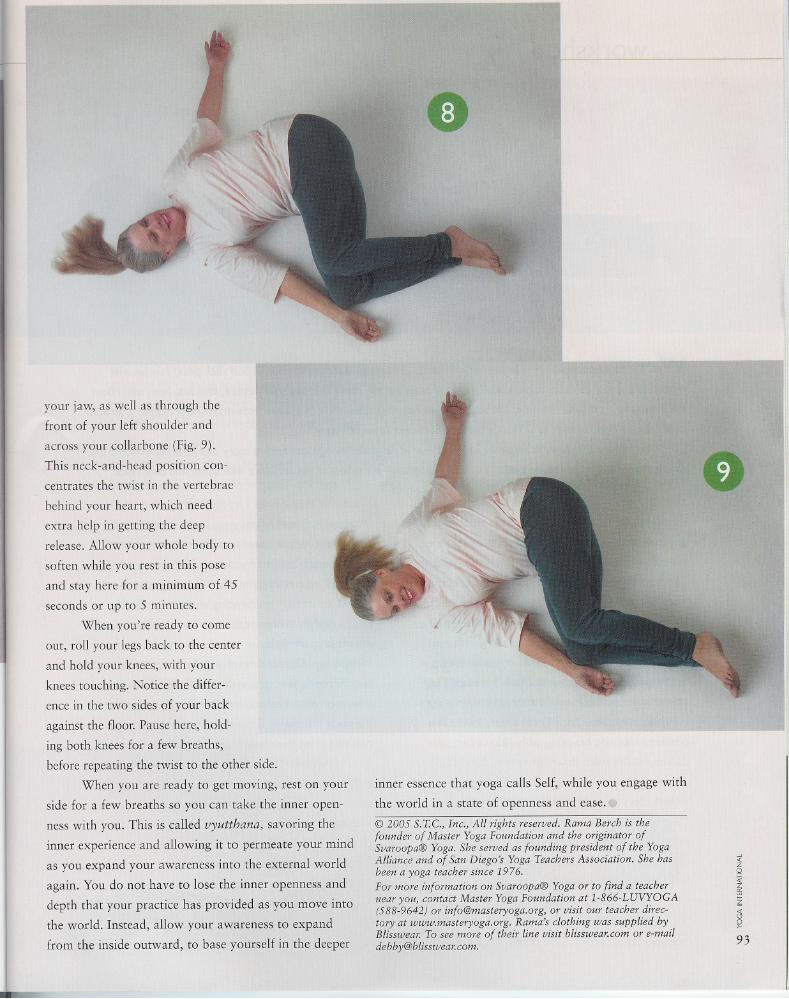
Ryour jaw, as well as through the
front of your left shoulder and
across your collarbone (Fig. 9).
This neck-and-head position con-
centrates the twist in the vertebrae
behind your heart, which need
extra help in getting the deep
release. Allow your whole body to
soften while you rest in this pose
and stay here for a minimum of 45
seconds or up to 5 minutes.
When you're ready to come
out, roll your legs back to the center
and hold your knees, with your
knees touching. Notice the differ-
ence in the two sides of your back
against the floor. Pause here, hold-
ing both knees for a few breaths,
before repeating the twist to the other side.
When you are ready to get moving, rest on your
side for a few breaths so you can take the inner open-
ness with you. This is called vyutthana, savoring the
inner experience and allowing it to permeate your mind
as you expand your awareness into the external world
again. You do not have to lose the inner openness and
depth that your practice has provided as you move into
the world. Instead, allow your awareness to expand
from the inside outward, to base yourself in the deeper
III
I II
D
. .g
:
inner essence that yoga calls Self, while you engage with
the world in a state of openness and ease.
@ 2005 S.T.c., Inc., All rights reserved. Rama Berch is thefounder of Master Yoga Foundation and the originator ofSvaroopa@ Yoga. She served as founding president of the YogaAllianceand of San Diego's Yoga TeachersAssociation. She hasbeen a yoga teacher since 1976.For more information on Svaroopa@ Yoga or to find a teachernear you, contact Master Yoga Foundation at 1-866-LUVYOGA(588-9642) or [email protected], or visit our teacher direc-tory at www.masteryoga.org. Rama's clothing was supplied byBlisswear. To see more of their line visit blisswear.com or [email protected].
.0«z0~~f-;;l3\2
93
-