arcturus empower embedded. how to setup asterisk on the mcf54451 draft – version 0.5 january 6/08
TRANSCRIPT

Arcturusempower embedded.
How To Setup AsteriskHow To Setup Asterisk
On the MCF54451On the MCF54451
DRAFT – VERSION 0.5DRAFT – VERSION 0.5January 6/08January 6/08

Arcturusempower embedded.
Starting AsteriskStarting Asterisk
1. Log into board:freescale login: userPassword: user
2. Change to super user$su rootPassword: root
4. Start Asterisk#asterisk -vvvvvvv
Asterisk debug verbosity
3. Run following (manual)# modprobe mcf_wcfxs# ztcfg
Autostart Note:For convenience a script example has been created:/etc/rc.d/init.d/asteriskd
Page: Page: 22
Arcturusempower embedded.
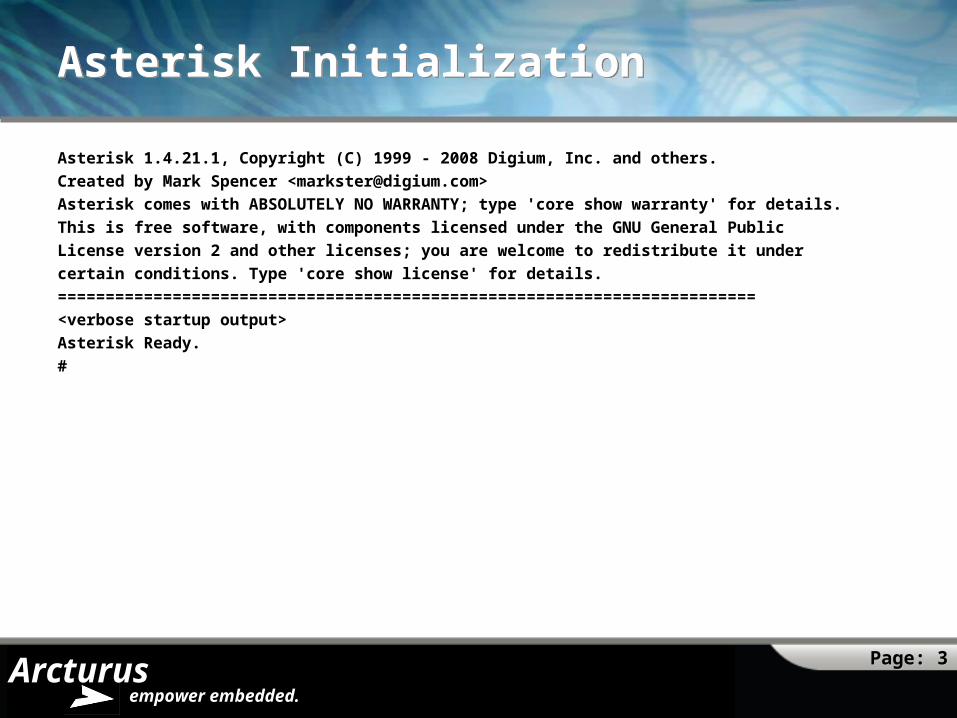
Asterisk InitializationAsterisk Initialization
Asterisk 1.4.21.1, Copyright (C) 1999 - 2008 Digium, Inc. and others.Created by Mark Spencer <[email protected]>Asterisk comes with ABSOLUTELY NO WARRANTY; type 'core show warranty' for details.This is free software, with components licensed under the GNU General PublicLicense version 2 and other licenses; you are welcome to redistribute it undercertain conditions. Type 'core show license' for details.==============================================================
===========<verbose startup output>Asterisk Ready.#
Page: Page: 33
Arcturusempower embedded.
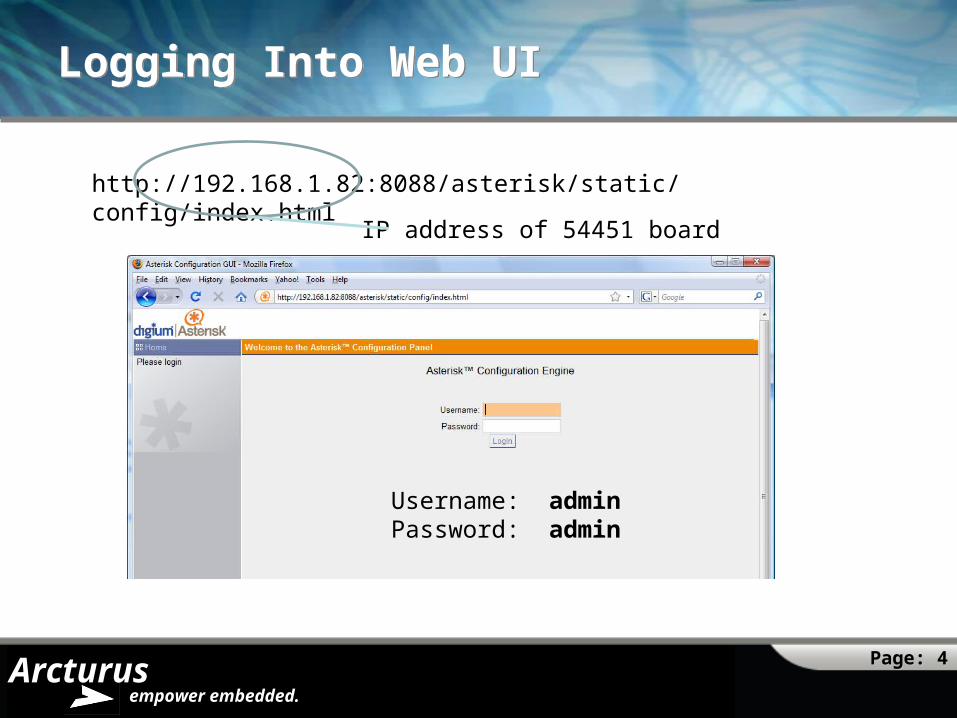
Logging Into Web UILogging Into Web UI
http://192.168.1.82:8088/asterisk/static/config/index.html
Username: adminPassword: admin
IP address of 54451 board
Page: Page: 44
Arcturusempower embedded.
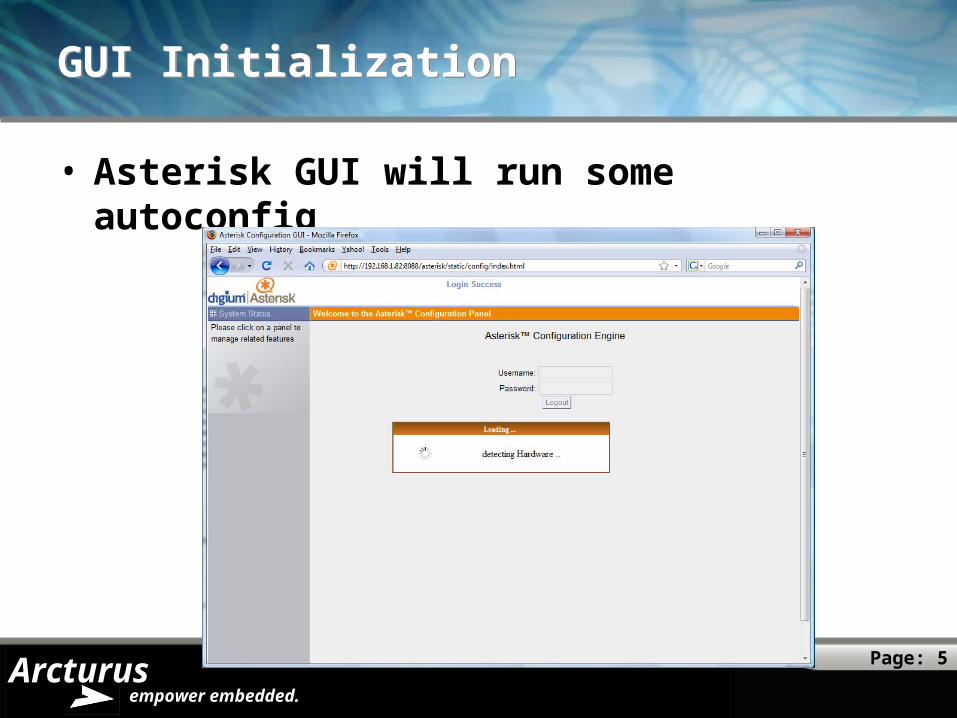
GUI InitializationGUI Initialization
• Asterisk GUI will run some autoconfig
Page: Page: 55
Arcturusempower embedded.
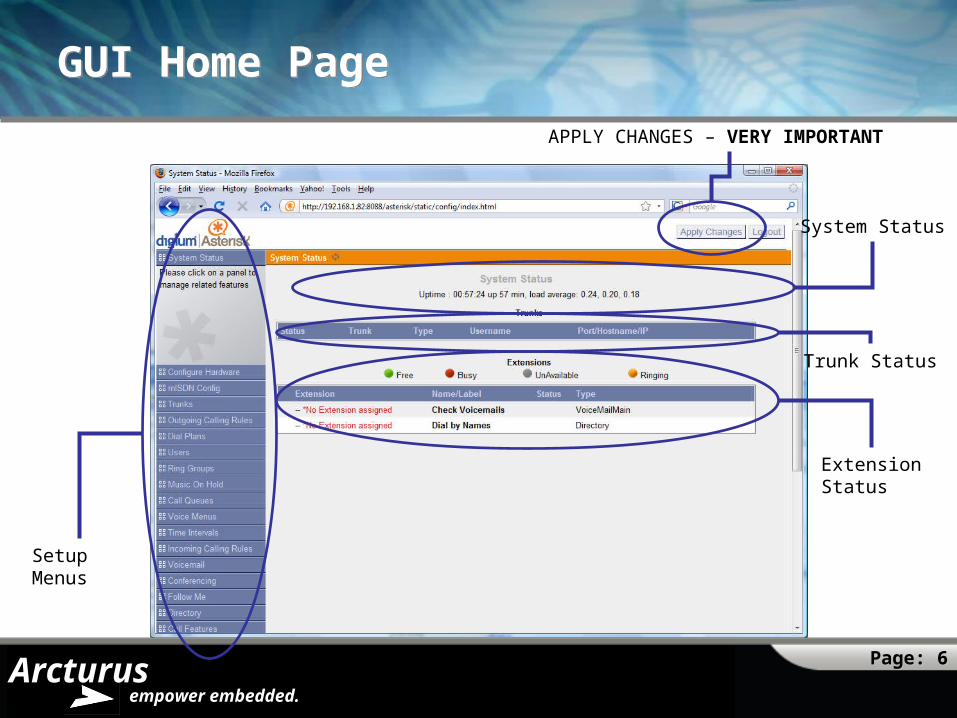
GUI Home PageGUI Home Page
Trunk Status
System Status
ExtensionStatus
SetupMenus
APPLY CHANGES – VERY IMPORTANT
Page: Page: 66
Arcturusempower embedded.
Trunks and ExtensionsTrunks and Extensions
• Trunks– Connect with external telephony elements– FXO port (Si3050) is an analog trunk that
connects with PSTN
• Extensions– Act like users on the phone system– May be digital or analog– Digital may be IAX / SIP or Analog– FXS (Si3210) is an analog extension that connect
to a POTS (plain old telephone service) phone
Page: Page: 77
Arcturusempower embedded.
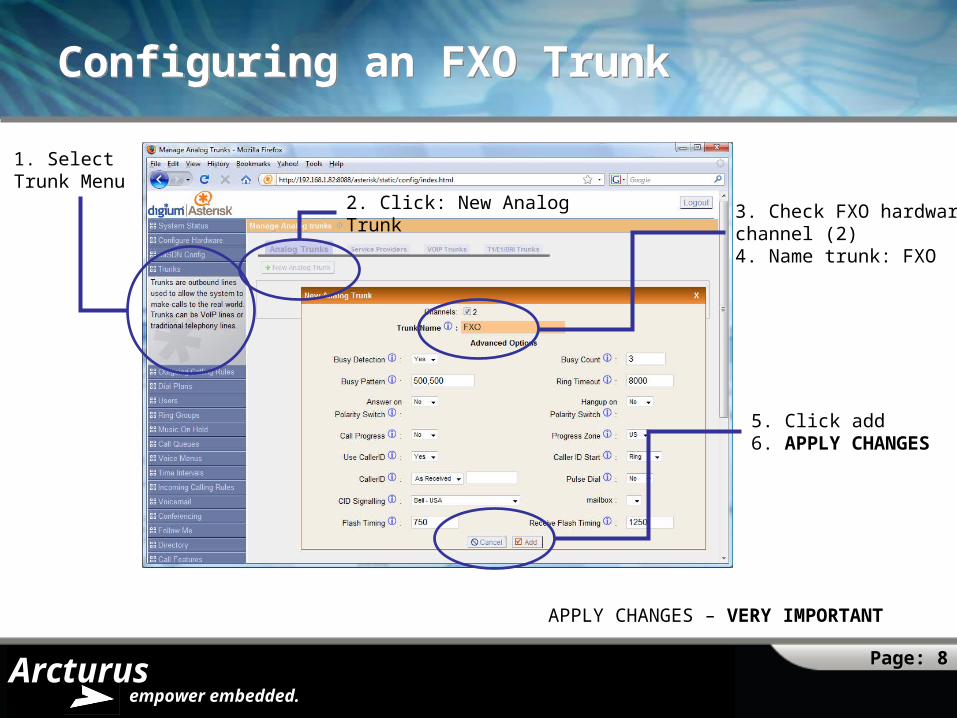
Configuring an FXO TrunkConfiguring an FXO Trunk
1. SelectTrunk Menu
2. Click: New Analog Trunk 3. Check FXO hardware channel (2)4. Name trunk: FXO
5. Click add6. APPLY CHANGES
APPLY CHANGES – VERY IMPORTANT
Page: Page: 88

Arcturusempower embedded.
Confirming the FXO TrunkConfirming the FXO Trunk
1. SelectStatus Menu
Page: Page: 99

Arcturusempower embedded.
Configuring an ExtensionConfiguring an Extension
To configure an extension you need to:1.Create a dial plan2.Create a User
– Setup number– Define the type of extension (SIP/IAX/Analog)– Select the capabilities (3WayCalling/in-
directory/call wait…)
Page: Page: 1010

Arcturusempower embedded.
About the DialplanAbout the Dialplan
• The dialplan defines the rules that are assigned to each user. These rules define how outgoing calls will be handled. It can be used to restrict calling or route calls in different ways based on the number dialed (least cost routing).
• The dialplan also defines the number of digits and starting number for extensions, parked calls, conferences, voice mail …..
Page: Page: 1111

Arcturusempower embedded.
Creating a Dial PlanCreating a Dial Plan
1. SelectDial PlanMenu
3. Use defaultSettings
4. Click Save5. APPLY CHANGES
APPLY CHANGES – VERY IMPORTANT
2. Click New Dial Plan
Page: Page: 1212
Arcturusempower embedded.
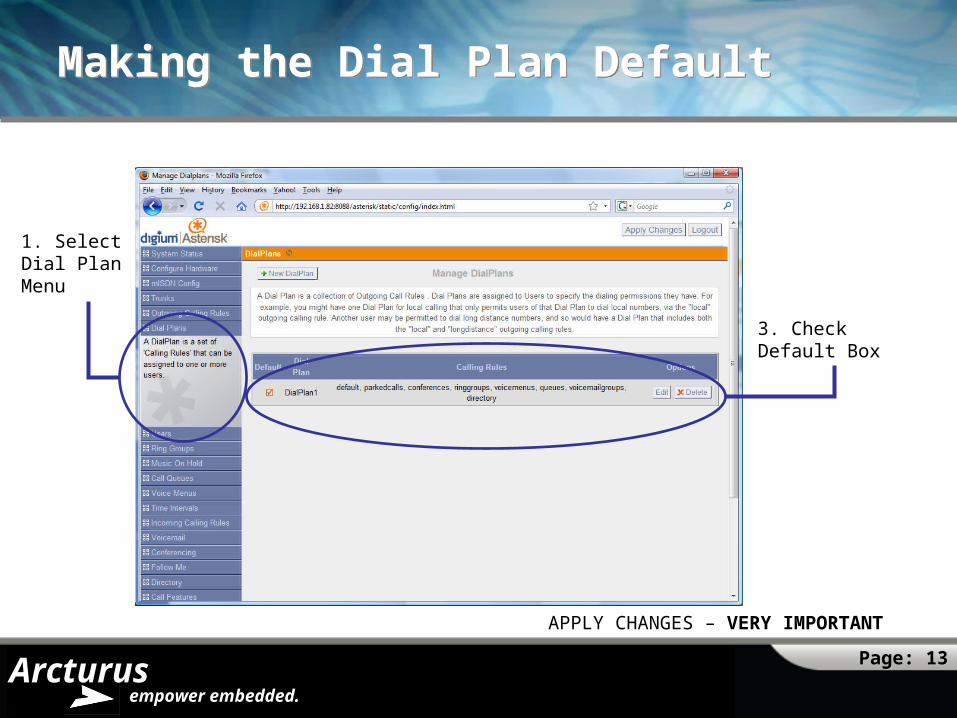
Making the Dial Plan DefaultMaking the Dial Plan Default
1. SelectDial PlanMenu
3. Check Default Box
APPLY CHANGES – VERY IMPORTANT
Page: Page: 1313
Arcturusempower embedded.
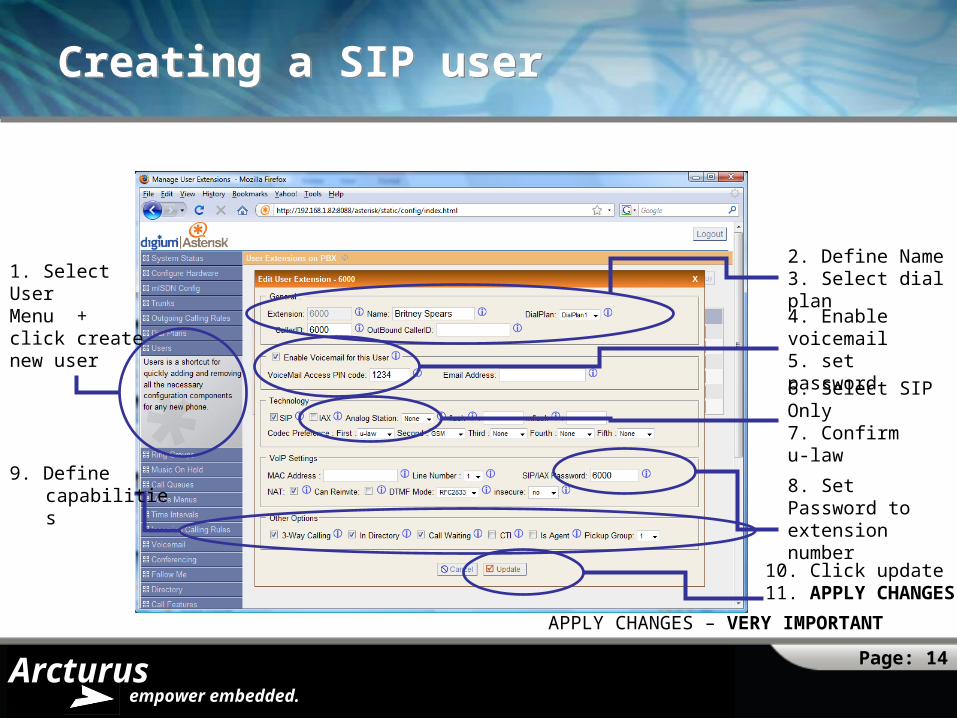
Creating a SIP userCreating a SIP user
1. Select UserMenu + click create new user
2. Define Name3. Select dial plan
4. Enable voicemail 5. set password
6. Select SIPOnly7. Confirmu-law
9. Define capabilities
APPLY CHANGES – VERY IMPORTANT
10. Click update11. APPLY CHANGES
8. Set Password to extension number
Page: Page: 1414

Arcturusempower embedded.
Configuring Zoiper PC SIP ClientConfiguring Zoiper PC SIP Client
1. Click tools icon
2. Add new SIP account
3. Enter Server IP4. Enter User Account and password
User Account InformationUsername: 6000Password: 6000
5. Click OK
Page: Page: 1515
Arcturusempower embedded.
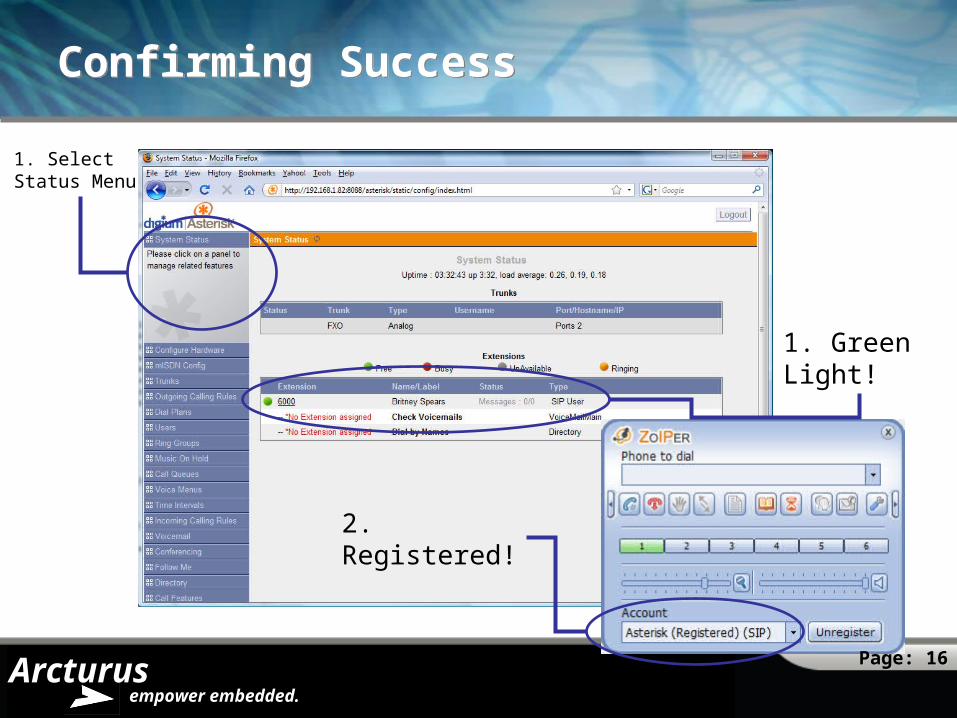
Confirming SuccessConfirming Success
1. Green Light!
2. Registered!
1. SelectStatus Menu
Page: Page: 1616
Arcturusempower embedded.
Setting Up an Analog Port (FXS)Setting Up an Analog Port (FXS)
• Set up user as described before • Configure for an Analog Station on
Port-1
Page: Page: 1717

Arcturusempower embedded.
Creating an Analog User (FXS)Creating an Analog User (FXS)
1. Select UserMenu
2. Define Name3. Select dial plan
4. Enable voicemail 5. set password
6. Select Analog Station: port-17. Confirmu-law
APPLY CHANGES – VERY IMPORTANT
9. Click update10. APPLY CHANGES
8. Define Capabilities
Page: Page: 1818
Arcturusempower embedded.
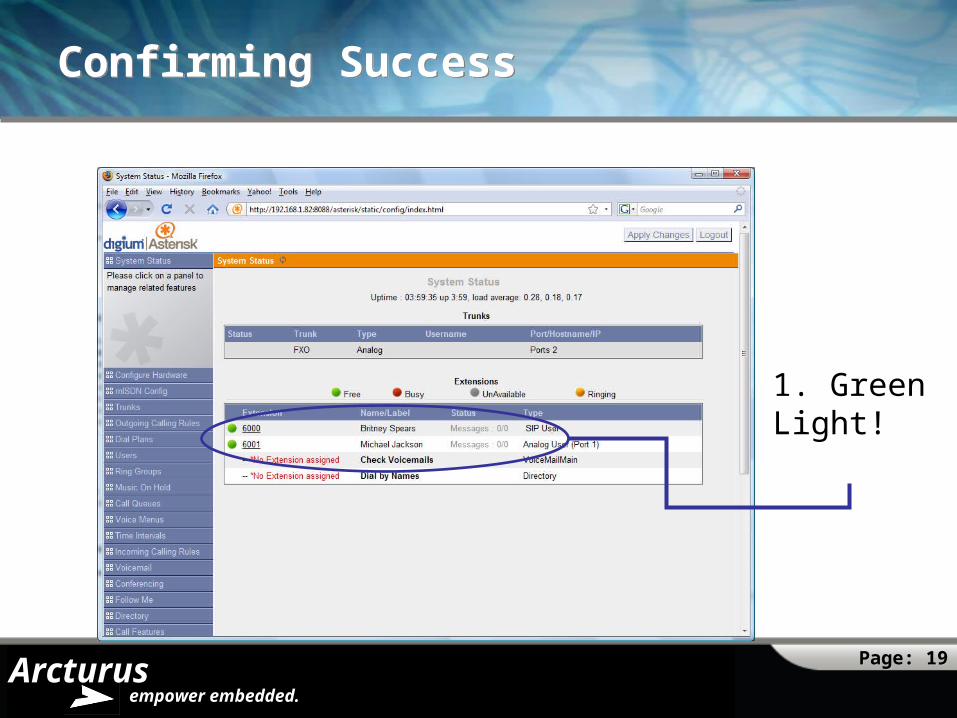
Confirming SuccessConfirming Success
1. Green Light!
Page: Page: 1919
Arcturusempower embedded.
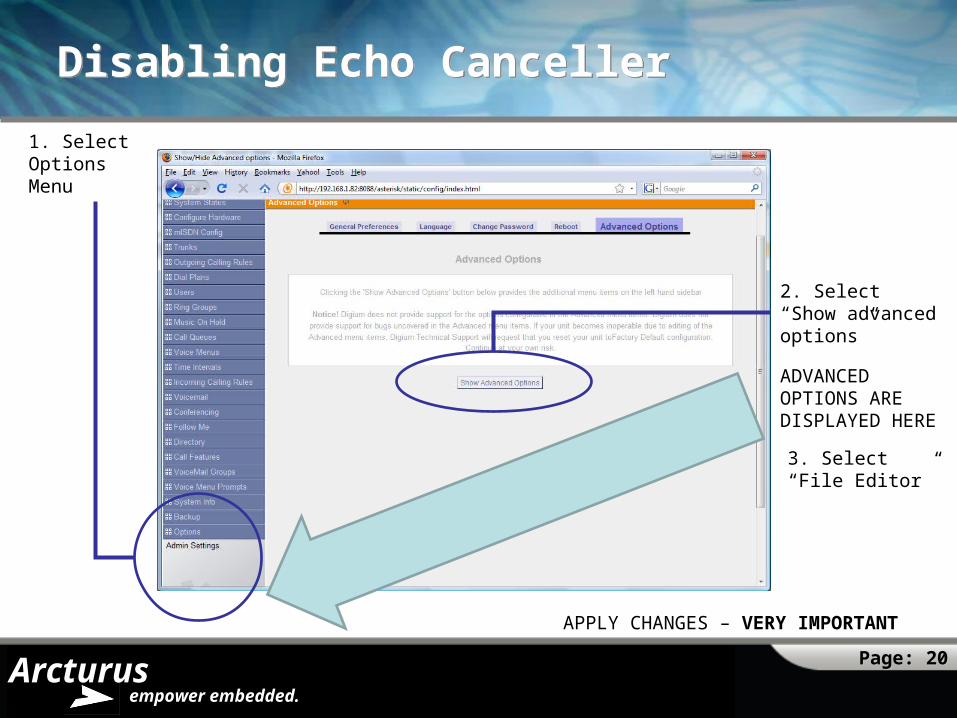
Disabling Echo Canceller Disabling Echo Canceller
Page: Page: 2020
1. Select OptionsMenu
2. Select “Show advanced options”
APPLY CHANGES – VERY IMPORTANT
ADVANCED OPTIONS ARE DISPLAYED HERE
3. Select “File Editor”
Arcturusempower embedded.
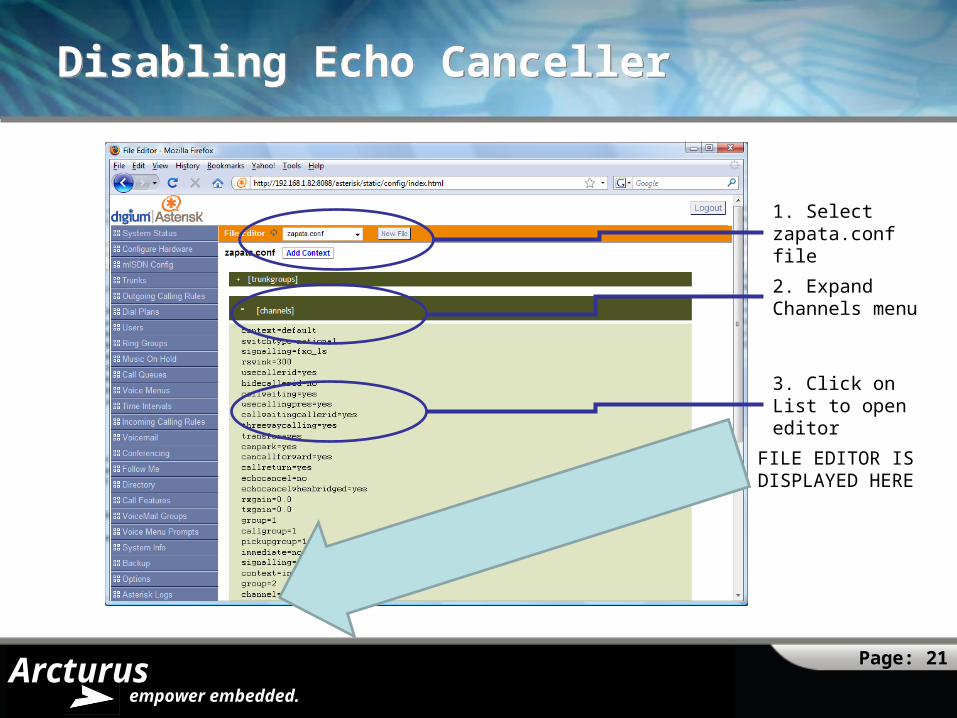
Disabling Echo CancellerDisabling Echo Canceller
Page: Page: 2121
1. Select zapata.conf file
2. Expand Channels menu
3. Click on List to open editor
FILE EDITOR IS DISPLAYED HERE

Arcturusempower embedded.
Disabling Echo CancellerDisabling Echo Canceller
Page: Page: 2222
1. Edit echocanel=no
3. Save & Apply changes
APPLY CHANGES – VERY IMPORTANT

Arcturusempower embedded.
NotesNotes
1. After you have configured hardware you will need to restart Asterisk for the hardware to init properly
# killall asterisk
2. After you have reset Asterisk your SIP client will need to register with Asterisk to work properly (unreg/reg the zoiper client or wait for re-registration)
Page: Page: 2323