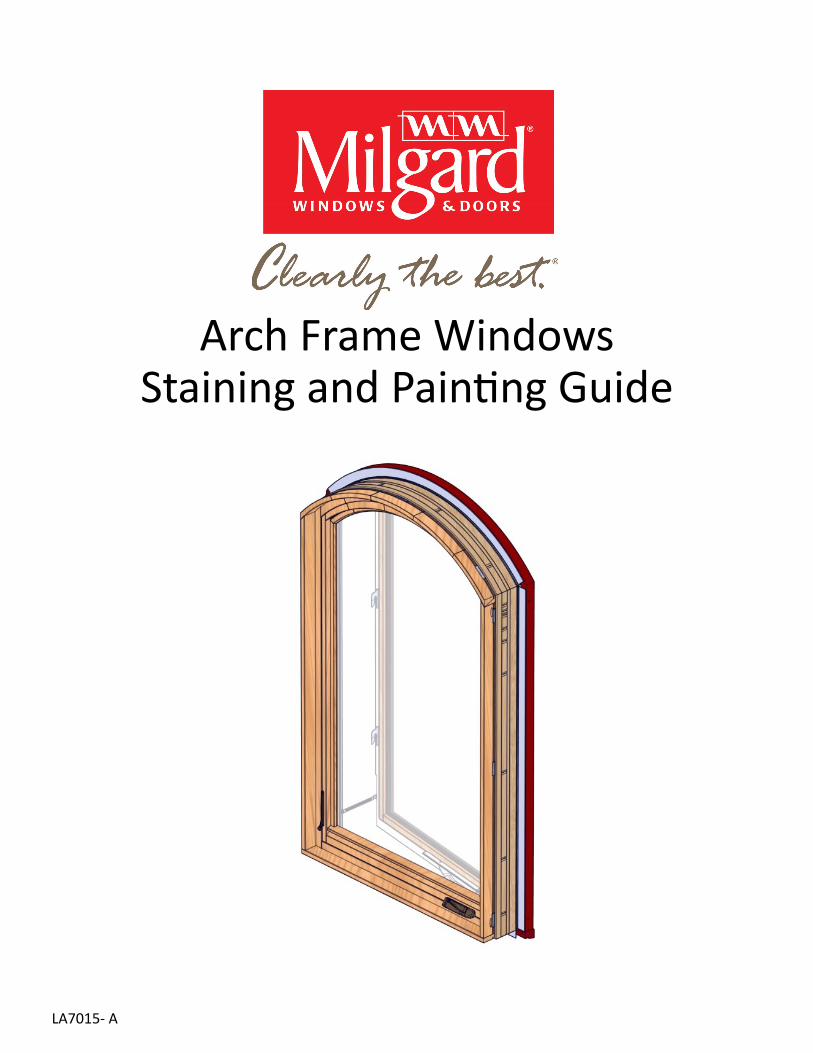
arch frame windows staining and painting guide - milgard · arch frame windows staining and...
TRANSCRIPT
LA7015- A
Arch Frame Windows Staining and Painting Guide

Essence Arch Frame Windows Painting and Staining Guide
LA7015 - A 2
Table Of Contents
Required Tools ............................................................... 3
Required Items ............................................................... 4
Painting/Staining Preparation Overview ...................... 5
General Paining / Staining, Cleaning and Care Instructions ........................................................................................ 6
Painting Exterior Trim, Frame and Sash ...................... 10
Glass Cleaning Instructions .......................................... 11
Grid and Insect Screen Cleaning Instructions ............. 12
Maintaining Hardware................................................. 13
Cover Removal ............................................................. 14
Cover Replacement ...................................................... 16
Frame Fascia Wood Removal ...................................... 19
Frame Fascia Wood Replacement ............................... 20
Wood Glazing Bead Removal ...................................... 21
Wood Glazing Bead Replacement ............................... 22
Mullion Cover Removal and Replacement ................. 23
Revisions ...................................................................... 24
Essence Arch Frame Windows Painting and Staining Guide
LA7015 - A 3
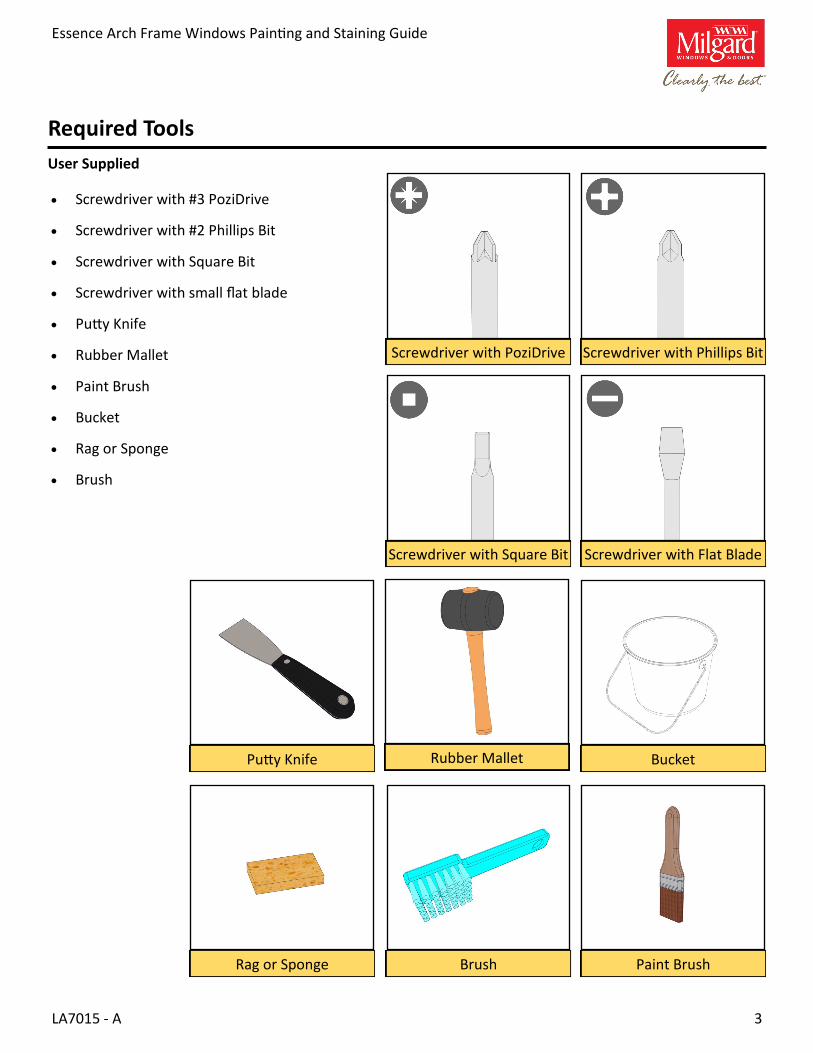
Required Tools
User Supplied
Screwdriver with #3 PoziDrive
Screwdriver with #2 Phillips Bit
Screwdriver with Square Bit
Screwdriver with small flat blade
Putty Knife
Rubber Mallet
Paint Brush
Bucket
Rag or Sponge
Brush
Rubber Mallet
Screwdriver with PoziDrive Screwdriver with Phillips Bit
Screwdriver with Flat Blade
Putty Knife
Screwdriver with Square Bit
Paint Brush Rag or Sponge Brush
Bucket
Essence Arch Frame Windows Painting and Staining Guide
LA7015 - A 4
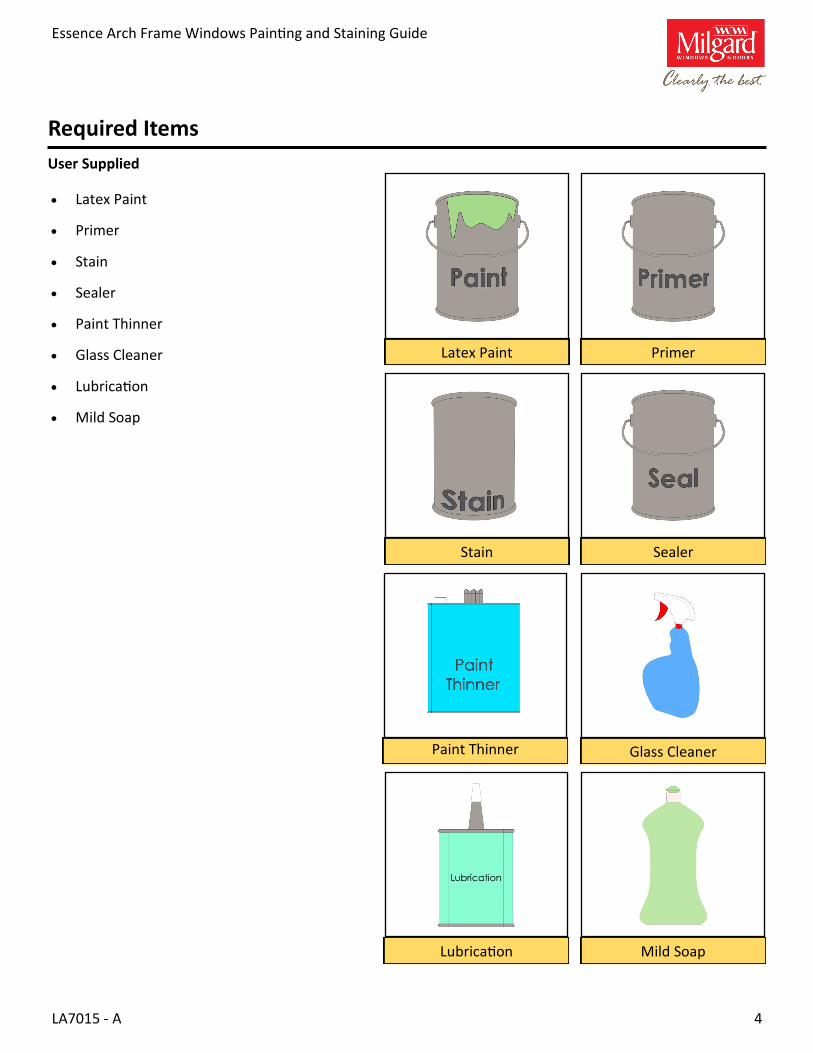
Required Items
User Supplied
Latex Paint Primer
Paint Thinner
Stain Sealer
Glass Cleaner
Latex Paint
Primer
Stain
Sealer
Paint Thinner
Glass Cleaner
Lubrication
Mild Soap
Mild Soap Lubrication

Essence Arch Frame Windows Painting and Staining Guide
LA7015 - A 5
Painting/Staining Preparation Overview
This manual provides basic guidelines for the general painting and staining, cleaning and care of Milgard Es-
sence Arch Frame Windows.
Also included in this manual are instructions for removal and replacement of the following wood
components:
Sill, Header and Jamb Covers
Wood Glazing Bead with and without grids
Wood Fascia Frame
Mullion covers
Note:
After removing any of the wood components, place wood in a safe place to avoid damage.
Although Milgard does not recommend removing the Wood Frame Fascia, instructions are included, to
prevent damage to window in case of the necessity to remove it.
If repairs to frame, sash or wood components are needed, refer to LA7031, Arch Frame Window Repair.
Essence Arch Frame Windows Painting and Staining Guide
LA7015 - A 6
The following finish recommendations have been provided based on our experience with long-lasting
wood windows and doors. However, please rely upon your wood finishing professional and the
instructions provided by coating manufacturers if the advice given conflicts with the following
instructions.
There are numerous ways to finish your windows and doors. Certain wood species require different
procedures. The following recommendations are for pine, primed pine or Douglas Fir wood species.
Following the recommendations on wood refinishing is a section on repainting the exterior trim, frame
and sash.
Timeliness of painting or finishing wood surfaces is very important. After a unit is installed and has been
exposed to weather and/or interior humidity, it can be difficult to dry the wood surface for good surface
finish adhesion. Unfinished wood surfaces will discolor, deteriorate, swell, and may bow or split. If your
windows or doors have been factory-primed, it is still important to final seal/finish the product
immediately according to these recommendations.
All pieces of wood are unique. Some wood will have more pronounced grain patterns than others. When
finished, the differences may become more pronounced. These are not defects in the wood or the finish.
With proper preparation prior to staining or varnishing, the application of the stain color can appear
more consistent. Due to the natural differences of wood, raised grain is possible when using a latex paint
or primer, it may be necessary to sand and possibly re-prime in areas where raised graining has occurred.
Milgard does not sand after factory primer has been applied. Therefore additional jobsite sanding and re-
priming may be required.
General Painting / Staining, Cleaning and Care Instructions
Important:
Immediately following installation, all bare and primed wood windows and doors must have a top quality
finish applied to the wood surfaces. Periodically refinishing or repainting may be required depending on
exposure and use. The Milgard Full Lifetime Warranty may be voided when wood parts are not stained or
painted immediately following installation, and periodically refinished.
Note:
Raised graining is not considered a defect in the wood, and is not covered under any warranty. Vertical
grain fir inherently has a red to yellow color hue, is not considered a defect in the wood and is not cov-
ered under any warranty.
Essence Arch Frame Windows Painting and Staining Guide
LA7015 - A 7
If windows and doors are not installed immediately upon receipt, they must be stored in a warm, dry
climate.
If any portion of the wood is cut off or otherwise disturbed (by installation or damage in the course of the
product’s lifetime), untreated wood will be exposed to the elements and will deteriorate. Untreated
wood must be protected by a water-repellant wood preservative which contains at least 0.5% IPBC.
Apply as recommended by the treatment manufacturer. Failure to re-treat properly or adequately voids
the Milgard Full Lifetime Warranty.
Milgard does not recommend non-water barrier, non-durable finishes such a Tung Oil, Danish Oil, or any
type of penetrating oil. These products allow water and water vapor to enter the wood causing potential
deterioration and rotting or warpage of the wood. Use of these finishes will result in voiding of the
Milgard Full Lifetime Warranty.
Milgard Essence Arch-Frame windows are constructed of a method that does not require staples or other
finishing holes in the wood surface. However, any holes created in the windows or jamb extensions
during installation should be prepped with appropriate putty prior to following the next steps.
For all operable windows (double hung, glider, casement, awning, etc.) leave sash or vent open (or
remove) when staining or finishing.
Warning:
Wearing of proper personal protective equipment like gloves, mask, and eye protection is advised while
performing procedures described in this document.
Important:
When applying paint, stain or other finish to windows it is extremely important that you do not paint,
stain or otherwise finish:
Weather-stripping or other non-wood parts, metal surfaces including hardware, handles, rollers,
etc. Or any surface which has an abrasive or sliding contact with another surface.
Paints, stains and varnishes contain solvents which cause plastic or vinyl profiles to dry out and become
brittle. Once brittle, they will have to be replaced.
General Painting / Staining, Cleaning and Care Instructions (Continued)
Essence Arch Frame Windows Painting and Staining Guide
LA7015 - A 8
All interior wood surfaces must be cleaned prior to
staining or finishing. Paint thinner applied with a
clean dry cloth will remove most dust and dirt from
wood surfaces. Some residue removal may require
the use of synthetic fiber abrasive pad. Use only a
fine finish, light-duty pad (usually a white color), or
a general purpose pad (usually a green color). If
sandpaper is used, sand very lightly with 220 grit
sandpaper.
Do not use cleaners containing abrasives or
solvents such as Acetone, Benzene, or Methyl Ethyl
Ketone on Milgard products, wood interior or
fiberglass, vinyl, or aluminum exterior frames.
Clean as described above, or with mild dish
detergent and warm water.
If a synthetic fiber abrasive pad or sandpaper is
used, it is recommended to again wipe the wood
surfaces afterward with lacquer thinner applied
with a clean dry cloth.
Allow sufficient time for the paint thinner to dry
completely. A dry wood surface ensures proper
paint adhesion. If staining wood surfaces, first
ensure the wood surfaces are dry. Next, it is
recommended that you apply a wood conditioner
according to the manufacturer’s instructions.
General Painting / Staining, Cleaning and Care Instructions (Continued)
Paint Steps
Stain Steps
Essence Arch Frame Windows Painting and Staining Guide
LA7015 - A 9
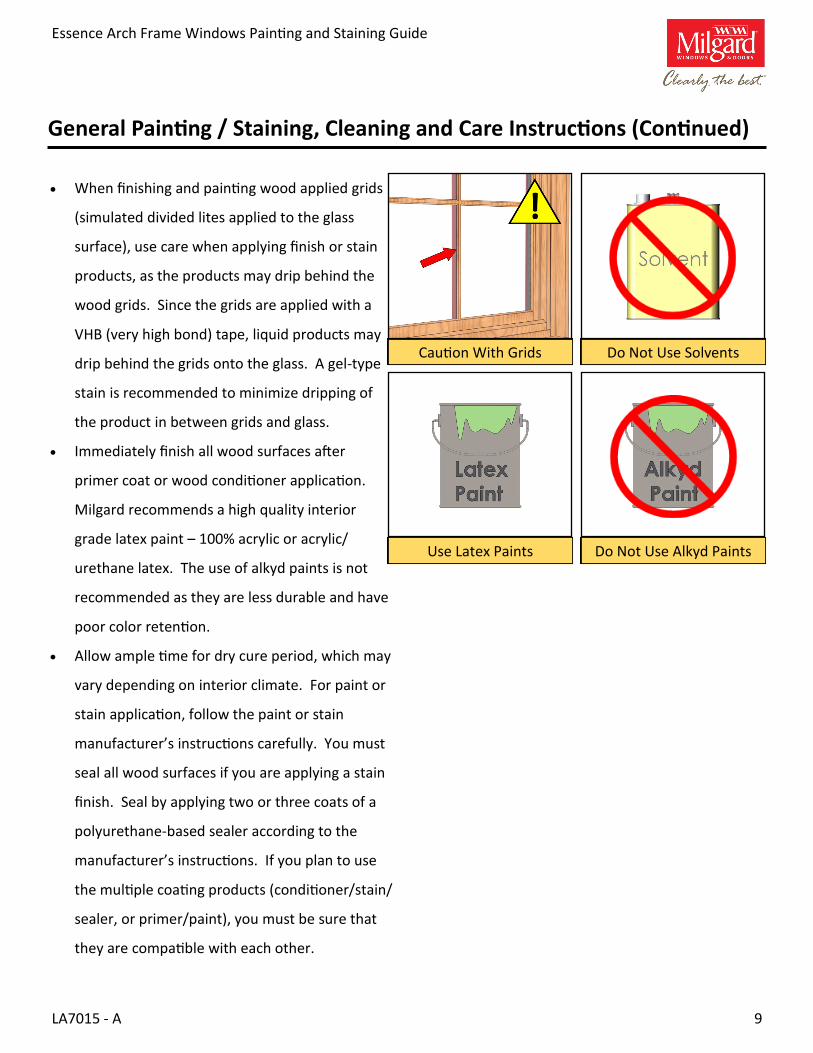
When finishing and painting wood applied grids
(simulated divided lites applied to the glass
surface), use care when applying finish or stain
products, as the products may drip behind the
wood grids. Since the grids are applied with a
VHB (very high bond) tape, liquid products may
drip behind the grids onto the glass. A gel-type
stain is recommended to minimize dripping of
the product in between grids and glass.
Immediately finish all wood surfaces after
primer coat or wood conditioner application.
Milgard recommends a high quality interior
grade latex paint – 100% acrylic or acrylic/
urethane latex. The use of alkyd paints is not
recommended as they are less durable and have
poor color retention.
Allow ample time for dry cure period, which may
vary depending on interior climate. For paint or
stain application, follow the paint or stain
manufacturer’s instructions carefully. You must
seal all wood surfaces if you are applying a stain
finish. Seal by applying two or three coats of a
polyurethane-based sealer according to the
manufacturer’s instructions. If you plan to use
the multiple coating products (conditioner/stain/
sealer, or primer/paint), you must be sure that
they are compatible with each other.
Do Not Use Alkyd Paints
Caution With Grids Do Not Use Solvents
General Painting / Staining, Cleaning and Care Instructions (Continued)
Use Latex Paints
Essence Arch Frame Windows Painting and Staining Guide
LA7015 - A 10
Milgard Essence Arch Frame Window trim, frames and sashes are fabricated from Phenolic-based
products which are then painted with a durable Essence paint for each individual job. If painting of the
trim, frame or sash becomes necessary, ordering touch-up pens or paint from Milgard will ensure colors
match. Exposure to the elements may cause the original paint to fade from the original color, resulting in
a possible mismatch of color if only a portion of the window is re-painted. If new colors are desired,
Milgard recommends using a water-based paint.
Prior to painting exterior trim, frame and sash components, follow the procedures outlined in this
document for cleaning window components. After cleaning and drying all affected surfaces, prepare the
surfaces as outlined.
Allow sufficient time for surfaces to dry, then mask off any surfaces, glass or components that do not
require painting, to avoid overspray.
Paint prepared surfaces by first covering with a light coat of paint, followed by a heavier coat within
approximately 15-20 minutes.
A second, heavier coat should be applied after allowing first two coats to cure/dry.
Remove masking and return window to normal service.
Painting Exterior Trim, Frame and Sash
Important:
It is extremely important that you do not paint or stain locks, hardware, weather-stripping, sill tracks, or
any other surface that comes in contact with another window or door surface.
Essence Arch Frame Windows Painting and Staining Guide
LA7015 - A 11
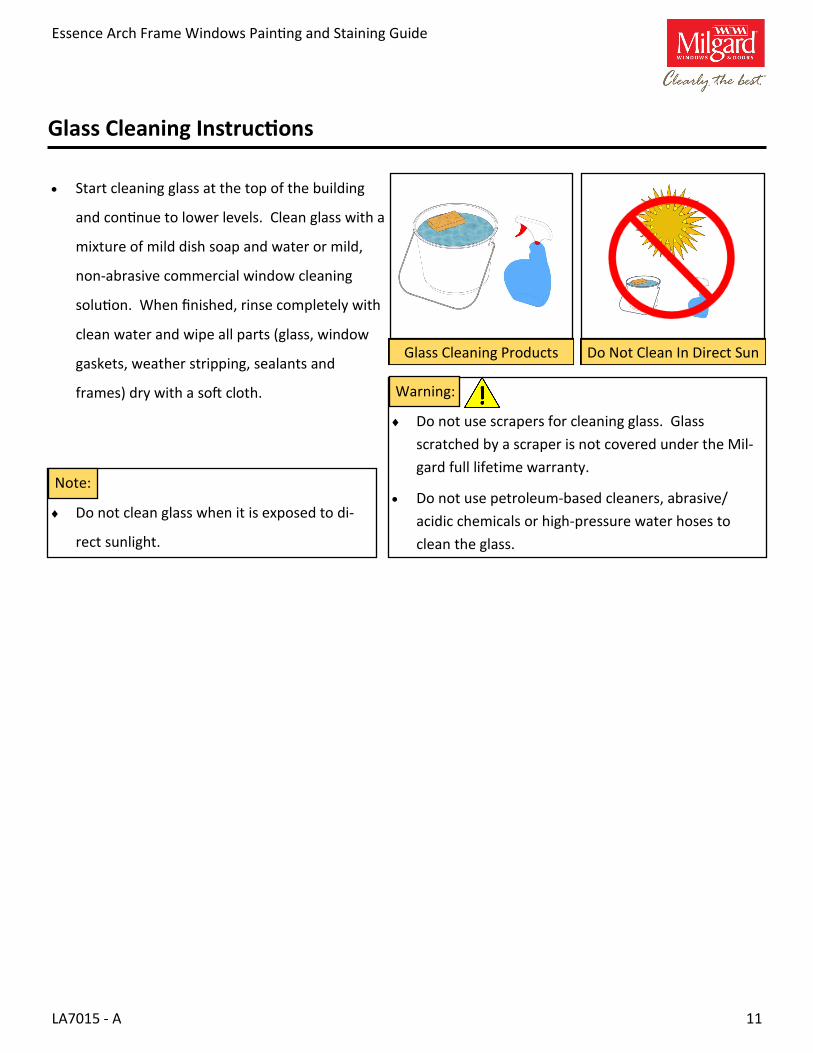
Start cleaning glass at the top of the building
and continue to lower levels. Clean glass with a
mixture of mild dish soap and water or mild,
non-abrasive commercial window cleaning
solution. When finished, rinse completely with
clean water and wipe all parts (glass, window
gaskets, weather stripping, sealants and
frames) dry with a soft cloth.
Glass Cleaning Instructions
Glass Cleaning Products Do Not Clean In Direct Sun
Warning:
Do not use scrapers for cleaning glass. Glass
scratched by a scraper is not covered under the Mil-
gard full lifetime warranty.
Do not use petroleum-based cleaners, abrasive/
acidic chemicals or high-pressure water hoses to
clean the glass.
Note:
Do not clean glass when it is exposed to di-
rect sunlight.

Essence Arch Frame Windows Painting and Staining Guide
LA7015 - A 12
Grid and Insect Screen Cleaning Instructions
To remove dust, dirt, smoke, soot, and salt
spray from exterior grids or screens, use a mild
detergent water solution and a soft cloth or
soft-bristled non-abrasive brush. To remove
grease, oil or industrial solids, you may need to
use stronger solutions such as Mr. Clean® Soft
Scrub®, or Simple Green®. Do not use cleaners
containing abrasives or solvents such as Acetone, Benzene, Methyl Ethyl Ketone, Isopropyl Alcohol, WD-
40®, GOOF-OFF® or ZEP® on Milgard products, including wood interior parts, or fiberglass, vinyl or alumi-
num exterior frames.
Mr. Clean® is a trademark of the Proctor and Gamble Company.
Soft Scrub® is a trademark of the Henkel North America Company.
Simple Green® is a trademark of the Sunshine Makers Company.
WD-40® is a trademark of the WD-40 Company.
GOOF-OFF® is a trademark of the W.M. Barr Company.
ZEP® is a trademark of the ZEP Company
Do Not Use Solvents Grid / Screen Cleaning

Essence Arch Frame Windows Painting and Staining Guide
LA7015 - A 13
Clean hardware with mild soap and water
using a soft damp cloth. When done, rinse
with clean water, wipe dry with a soft cloth,
then allow the hardware to air dry completely
before lubricating. Never use abrasive or acidic
cleaners such as Vinegar/ Citrus/ or Chlorine
Based Cleaners, Acetone, Lacquer Thinner,
Ammonia, Isopropyl Alcohol, Silicone Sprays/Lubricants, or Glass Cleaners with any of the above
ingredients. These types of cleaners will remove the lubricants and corrosion resistant coatings from the
hardware.
After the hardware is clean and dry it must be lubricated to restore the
smooth operation and corrosion resistance. There are a number of
commercially available products which can be used. Be careful not to apply
excessive amounts of grease. Wipe up any drips or spills when applying
grease since it will stain wood. If you would like a recommendation on which
lubricants are best for certain hardware parts, please call a Milgard Sales
Representative at 1.800.MILGARD.
Your Milgard hardware has been manufactured of high quality, fine materials. Fine metals may require
periodic attention to maintain its beauty and finish characteristics. Climate, location, and exposure to
corrosive environments such as industrial areas, pesticides, herbicides or salts can affect the hardware’s
beauty and characteristics.
Maintaining Hardware
Note:
Do not use or apply harsh chemicals, abrasives and/or cleaners. Product damage can occur.
Do not refurbish hardware. Contact a professional hardware restorer for refurbishing, or contact Milgard
at 1.800.Milgard.
Cleaning Hardware Do Not Use Solvents
Lubrication
Essence Arch Frame Windows Painting and Staining Guide
LA7015 - A 14
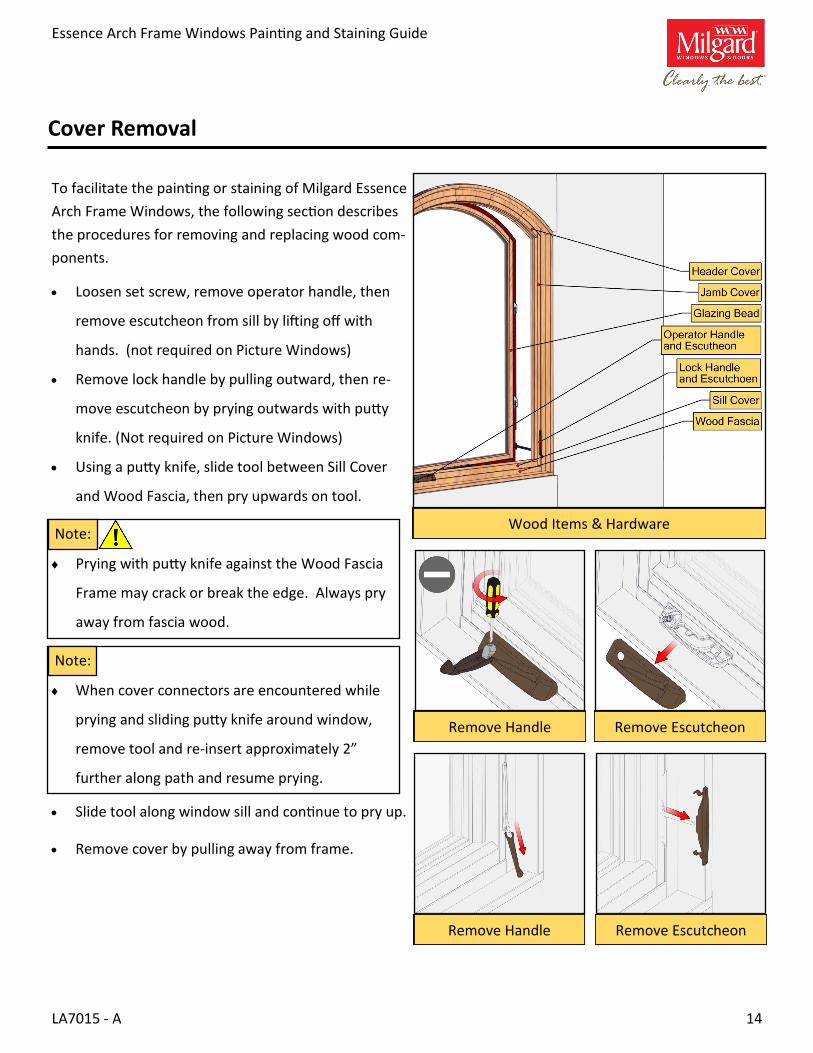
To facilitate the painting or staining of Milgard Essence
Arch Frame Windows, the following section describes
the procedures for removing and replacing wood com-
ponents.
Loosen set screw, remove operator handle, then
remove escutcheon from sill by lifting off with
hands. (not required on Picture Windows)
Remove lock handle by pulling outward, then re-
move escutcheon by prying outwards with putty
knife. (Not required on Picture Windows)
Using a putty knife, slide tool between Sill Cover
and Wood Fascia, then pry upwards on tool.
Slide tool along window sill and continue to pry up.
Remove cover by pulling away from frame.
Cover Removal
Wood Items & Hardware
Remove Escutcheon
Remove Handle Remove Escutcheon
Remove Handle
Note:
When cover connectors are encountered while
prying and sliding putty knife around window,
remove tool and re-insert approximately 2”
further along path and resume prying.
Note:
Prying with putty knife against the Wood Fascia
Frame may crack or break the edge. Always pry
away from fascia wood.
Essence Arch Frame Windows Painting and Staining Guide
LA7015 - A 15
Sill Cover Removal
Cover Removal (Continued)
Remove Plug
Head Cover Removal Head Screw Removal
Do Not Press on Fascia! Jamb Cover Removal
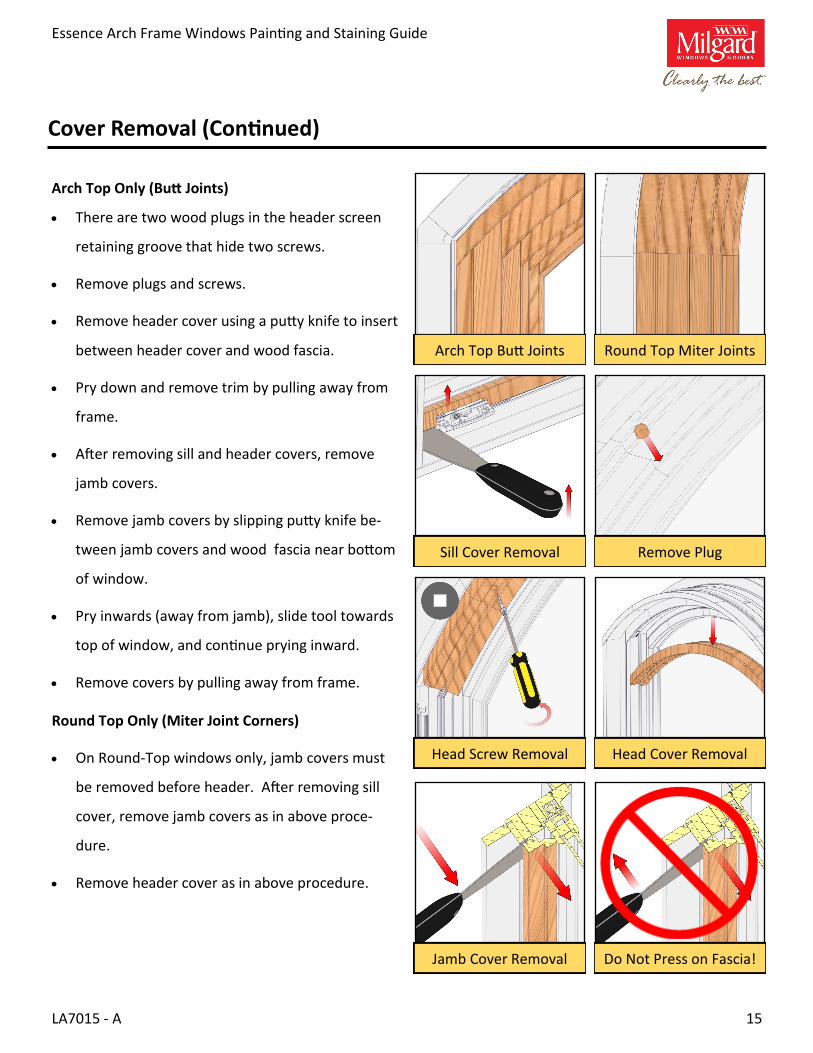
Arch Top Only (Butt Joints)
There are two wood plugs in the header screen
retaining groove that hide two screws.
Remove plugs and screws.
Remove header cover using a putty knife to insert
between header cover and wood fascia.
Pry down and remove trim by pulling away from
frame.
After removing sill and header covers, remove
jamb covers.
Remove jamb covers by slipping putty knife be-
tween jamb covers and wood fascia near bottom
of window.
Pry inwards (away from jamb), slide tool towards
top of window, and continue prying inward.
Remove covers by pulling away from frame.
Round Top Only (Miter Joint Corners)
On Round-Top windows only, jamb covers must
be removed before header. After removing sill
cover, remove jamb covers as in above proce-
dure.
Remove header cover as in above procedure.
Arch Top Butt Joints Round Top Miter Joints
Essence Arch Frame Windows Painting and Staining Guide
LA7015 - A 16
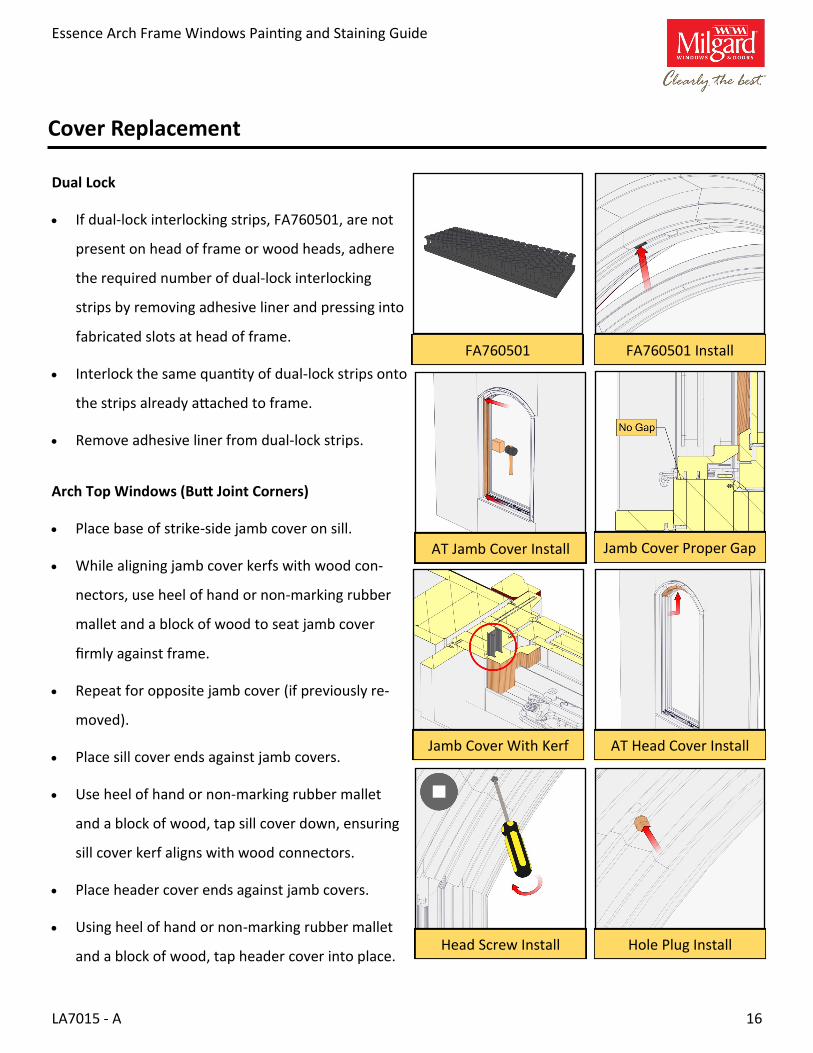
Cover Replacement
Arch Top Windows (Butt Joint Corners)
Place base of strike-side jamb cover on sill.
While aligning jamb cover kerfs with wood con-
nectors, use heel of hand or non-marking rubber
mallet and a block of wood to seat jamb cover
firmly against frame.
Repeat for opposite jamb cover (if previously re-
moved).
Place sill cover ends against jamb covers.
Use heel of hand or non-marking rubber mallet
and a block of wood, tap sill cover down, ensuring
sill cover kerf aligns with wood connectors.
Place header cover ends against jamb covers.
Using heel of hand or non-marking rubber mallet
and a block of wood, tap header cover into place.
Jamb Cover Proper Gap AT Jamb Cover Install
AT Head Cover Install
Hole Plug Install Head Screw Install
Jamb Cover With Kerf
Dual Lock
If dual-lock interlocking strips, FA760501, are not
present on head of frame or wood heads, adhere
the required number of dual-lock interlocking
strips by removing adhesive liner and pressing into
fabricated slots at head of frame.
Interlock the same quantity of dual-lock strips onto
the strips already attached to frame.
Remove adhesive liner from dual-lock strips.
FA760501 FA760501 Install
Essence Arch Frame Windows Painting and Staining Guide
LA7015 - A 17
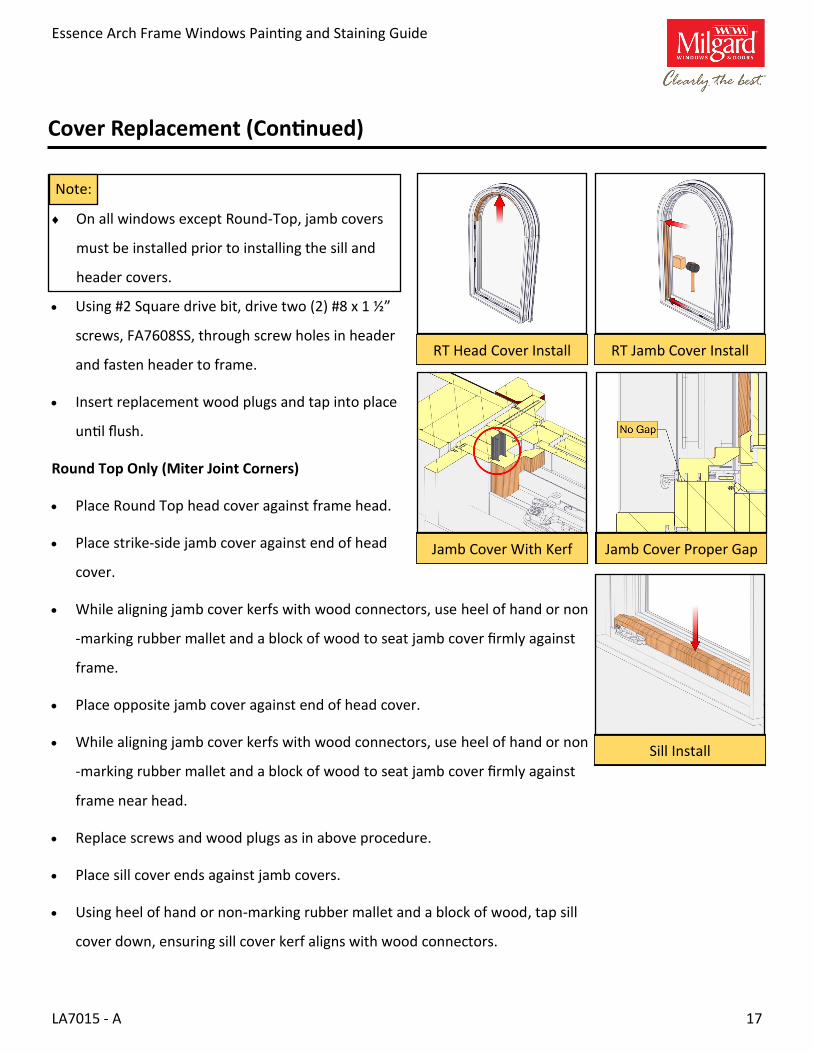
Cover Replacement (Continued)
Using #2 Square drive bit, drive two (2) #8 x 1 ½”
screws, FA7608SS, through screw holes in header
and fasten header to frame.
Insert replacement wood plugs and tap into place
until flush.
Round Top Only (Miter Joint Corners)
Place Round Top head cover against frame head.
Place strike-side jamb cover against end of head
cover.
While aligning jamb cover kerfs with wood connectors, use heel of hand or non
-marking rubber mallet and a block of wood to seat jamb cover firmly against
frame.
Place opposite jamb cover against end of head cover.
While aligning jamb cover kerfs with wood connectors, use heel of hand or non
-marking rubber mallet and a block of wood to seat jamb cover firmly against
frame near head.
Replace screws and wood plugs as in above procedure.
Place sill cover ends against jamb covers.
Using heel of hand or non-marking rubber mallet and a block of wood, tap sill
cover down, ensuring sill cover kerf aligns with wood connectors.
Jamb Cover Proper Gap
Sill Install
RT Jamb Cover Install RT Head Cover Install
Jamb Cover With Kerf
Note:
On all windows except Round-Top, jamb covers
must be installed prior to installing the sill and
header covers.

Essence Arch Frame Windows Painting and Staining Guide
LA7015 - A 18
Cover Replacement (Continued)
Handle Install Escutcheon Install
Secure Handle Set Screw Incorrect Handle Install
Handle Install Escutcheon Install
Lock / Unlock Motion
Replace Operator Handle and Escutcheon
Install operator escutcheon and handle.
Ensure that handle folds into recess on escutch-
eon.
Tighten set screw on handle.
Replace Lock Handle and Escutcheon
Install lock escutcheon and handle.
Confirm lock/unlock with handle.
Note:
Hardware replacement not required on picture
windows.
Essence Arch Frame Windows Painting and Staining Guide
LA7015 - A 19
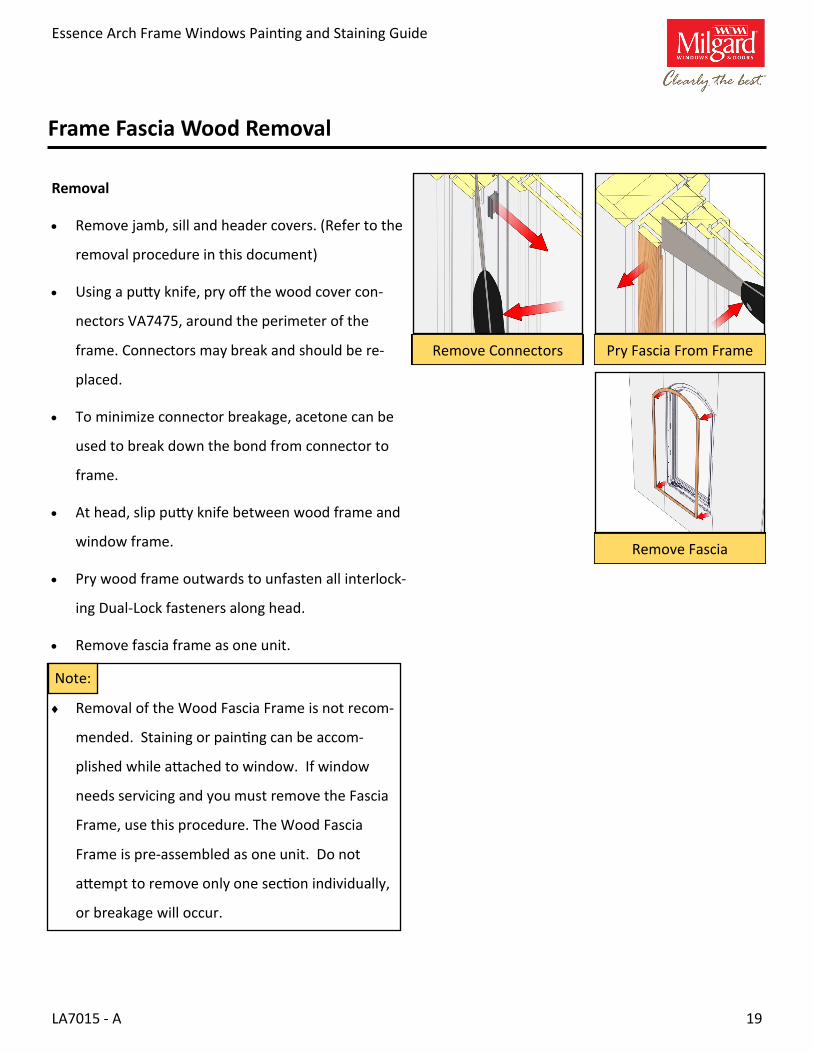
Frame Fascia Wood Removal
Pry Fascia From Frame
Remove Fascia
Removal
Remove jamb, sill and header covers. (Refer to the
removal procedure in this document)
Using a putty knife, pry off the wood cover con-
nectors VA7475, around the perimeter of the
frame. Connectors may break and should be re-
placed.
To minimize connector breakage, acetone can be
used to break down the bond from connector to
frame.
At head, slip putty knife between wood frame and
window frame.
Pry wood frame outwards to unfasten all interlock-
ing Dual-Lock fasteners along head.
Remove fascia frame as one unit.
Remove Connectors
Note:
Removal of the Wood Fascia Frame is not recom-
mended. Staining or painting can be accom-
plished while attached to window. If window
needs servicing and you must remove the Fascia
Frame, use this procedure. The Wood Fascia
Frame is pre-assembled as one unit. Do not
attempt to remove only one section individually,
or breakage will occur.

Essence Arch Frame Windows Painting and Staining Guide
LA7015 - A 20
Frame Fascia Wood Replacement
Fascia Install
Replacement
Prior to replacing wood fascia frame, clean existing
glue from wood cover connectors and window
frame. Use acetone to clean.
Place a drop of “Gel-type” superglue on the frame
at each connector location.
Place wood fascia frame against window frame,
ensuring the inside edges of the fascia frame and
the window frame are flush with each other.
Using the heel of your hand or a non-marking rub-
ber mallet, tap on the face of the frame header,
seating the interlocking connectors.
Snap wood cover connectors over fascia wood
frame and window frame at slotted areas on the
sill and stiles.
Allow glue to set for 1-5 minutes.
Replace Sill, Head and Jamb covers. (Refer to the
procedure in this document)
For Operable windows, re-attach lock escutcheon
and handle and operator escutcheon and handle.
Glue Connector Locations
Install Connectors
Note:
Replacement wood fascia frame and fasteners
can be ordered through your local Milgard repre-
sentative or by contacting your Milgard Windows
and Doors dealer.
Essence Arch Frame Windows Painting and Staining Guide
LA7015 - A 21
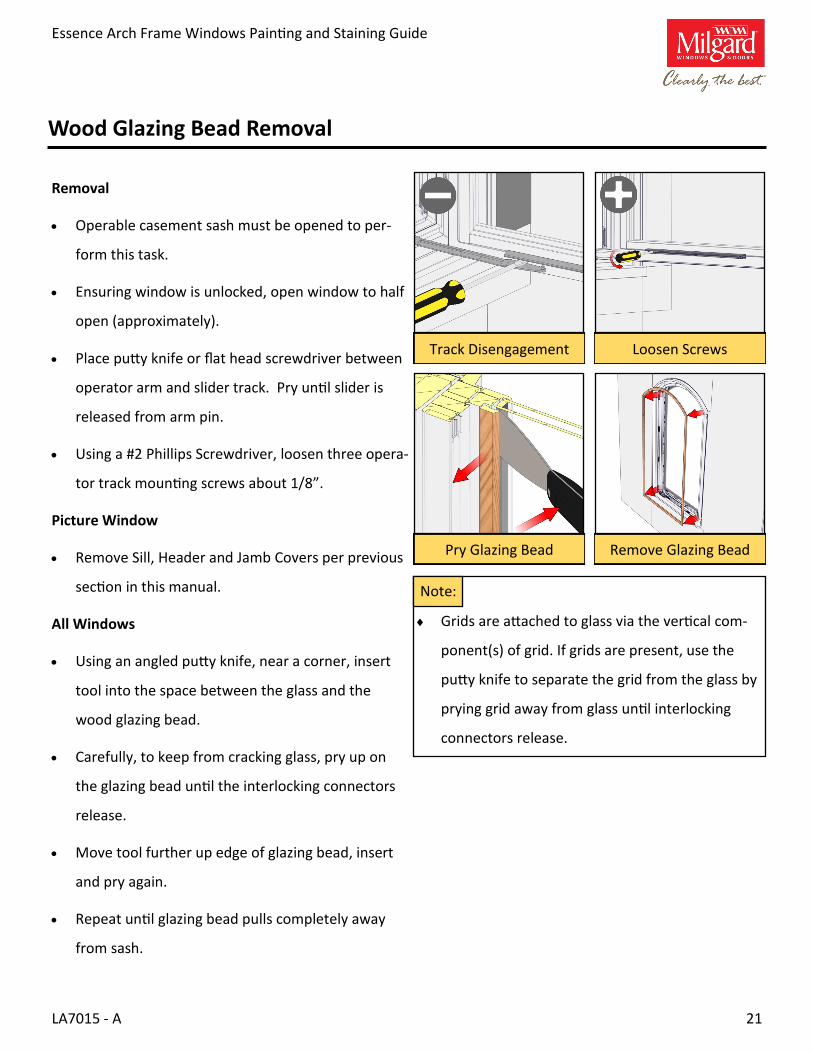
Wood Glazing Bead Removal
Removal
Operable casement sash must be opened to per-
form this task.
Ensuring window is unlocked, open window to half
open (approximately).
Place putty knife or flat head screwdriver between
operator arm and slider track. Pry until slider is
released from arm pin.
Using a #2 Phillips Screwdriver, loosen three opera-
tor track mounting screws about 1/8”.
Picture Window
Remove Sill, Header and Jamb Covers per previous
section in this manual.
All Windows
Using an angled putty knife, near a corner, insert
tool into the space between the glass and the
wood glazing bead.
Carefully, to keep from cracking glass, pry up on
the glazing bead until the interlocking connectors
release.
Move tool further up edge of glazing bead, insert
and pry again.
Repeat until glazing bead pulls completely away
from sash.
Loosen Screws Track Disengagement
Remove Glazing Bead Pry Glazing Bead
Note:
Grids are attached to glass via the vertical com-
ponent(s) of grid. If grids are present, use the
putty knife to separate the grid from the glass by
prying grid away from glass until interlocking
connectors release.
Essence Arch Frame Windows Painting and Staining Guide
LA7015 - A 22
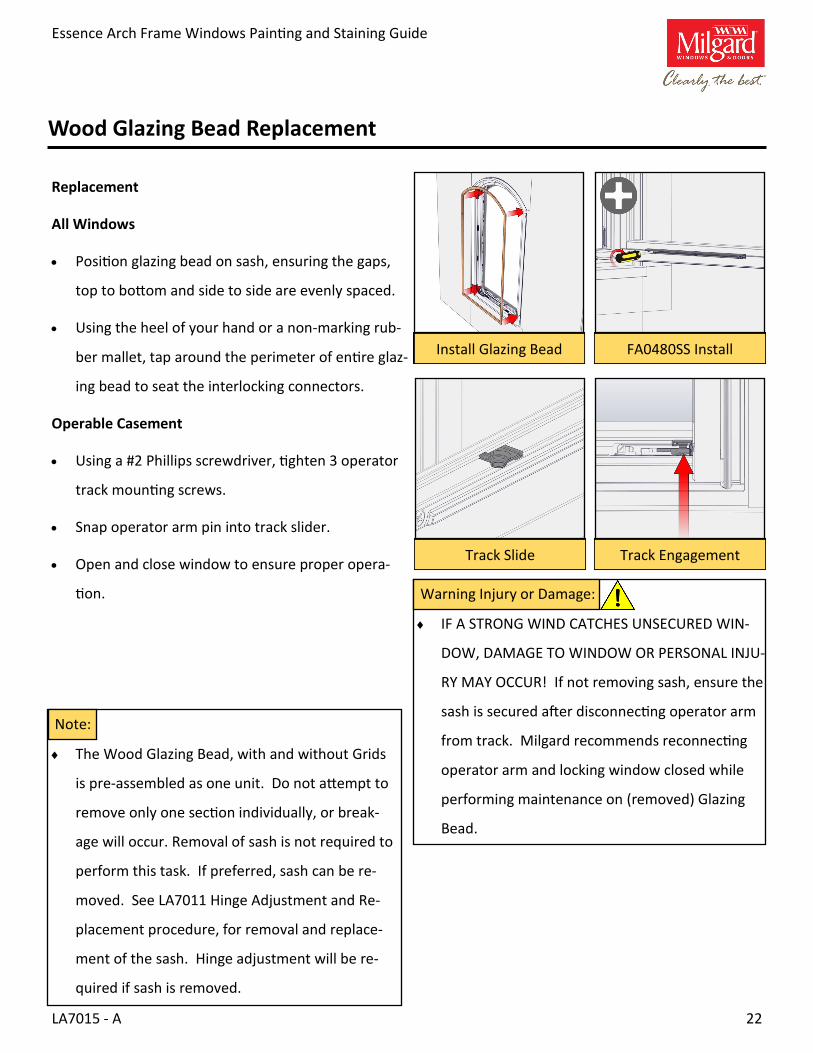
Wood Glazing Bead Replacement
Replacement
All Windows
Position glazing bead on sash, ensuring the gaps,
top to bottom and side to side are evenly spaced.
Using the heel of your hand or a non-marking rub-
ber mallet, tap around the perimeter of entire glaz-
ing bead to seat the interlocking connectors.
Operable Casement
Using a #2 Phillips screwdriver, tighten 3 operator
track mounting screws.
Snap operator arm pin into track slider.
Open and close window to ensure proper opera-
tion.
Install Glazing Bead FA0480SS Install
Track Engagement
Note:
The Wood Glazing Bead, with and without Grids
is pre-assembled as one unit. Do not attempt to
remove only one section individually, or break-
age will occur. Removal of sash is not required to
perform this task. If preferred, sash can be re-
moved. See LA7011 Hinge Adjustment and Re-
placement procedure, for removal and replace-
ment of the sash. Hinge adjustment will be re-
quired if sash is removed.
Warning Injury or Damage:
IF A STRONG WIND CATCHES UNSECURED WIN-
DOW, DAMAGE TO WINDOW OR PERSONAL INJU-
RY MAY OCCUR! If not removing sash, ensure the
sash is secured after disconnecting operator arm
from track. Milgard recommends reconnecting
operator arm and locking window closed while
performing maintenance on (removed) Glazing
Bead.
Track Slide

Essence Arch Frame Windows Painting and Staining Guide
LA7015 - A 23
Mullion Cover Removal and Replacement
Remove Mull Cover
Removal
Using an angled putty knife, at one end of mullion,
insert tool behind the wood mullion cover.
Carefully, to keep from chipping or scratching
wood fascia , pry up on the mullion cover until the
interlocking connectors release.
Move tool further up edge of cover, insert and pry
again.
Repeat until mullion cover pulls completely away
from frame.
Pry Mull Cover
Replace Mull Cover
Replacement
Position mullion cover on frame, ensuring the cov-
er is centered over joined window frame edges.
Using the heel of your hand or a non-marking rub-
ber mallet, tap along the length of the mullion cov-
er, to re-engage interlocking connectors.
Essence Arch Frame Windows Painting and Staining Guide
LA7015 - A 24
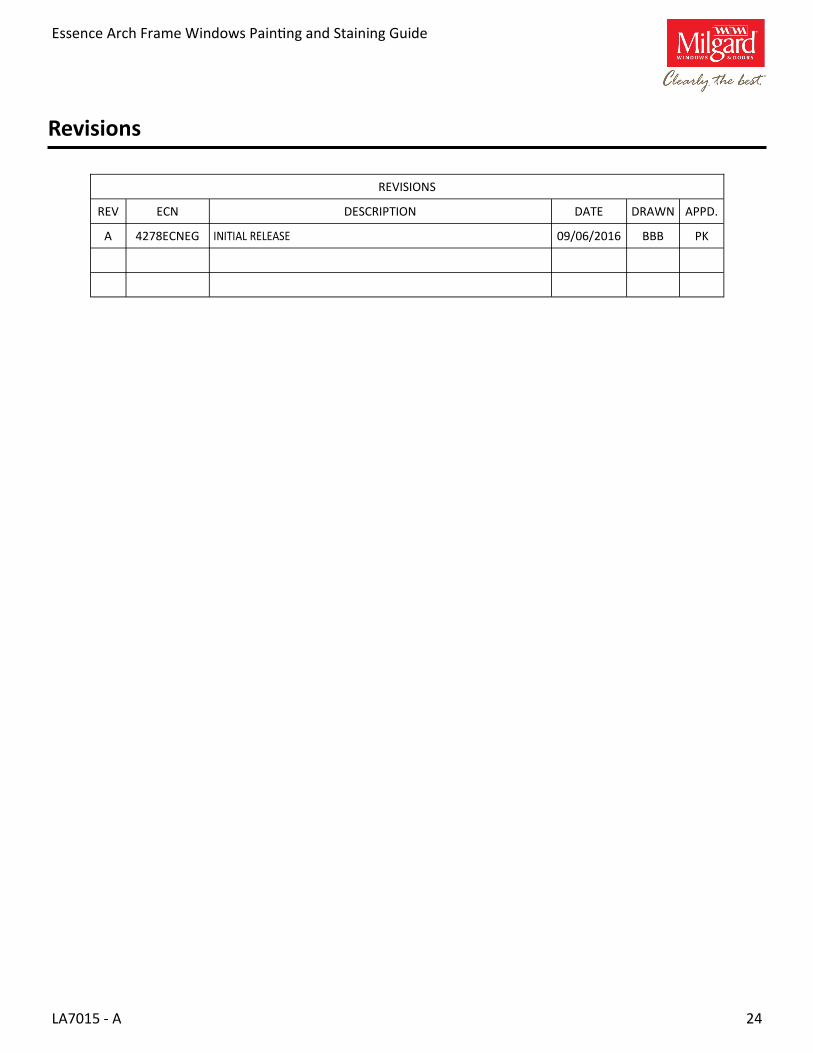
REVISIONS
REV ECN DESCRIPTION DATE DRAWN APPD.
A 4278ECNEG 09/06/2016 BBB PK
Revisions