aqua | tile - easy drain | ess fileaqua | tile 3 flexible sealing flüssige abdichtfolie flex....
TRANSCRIPT
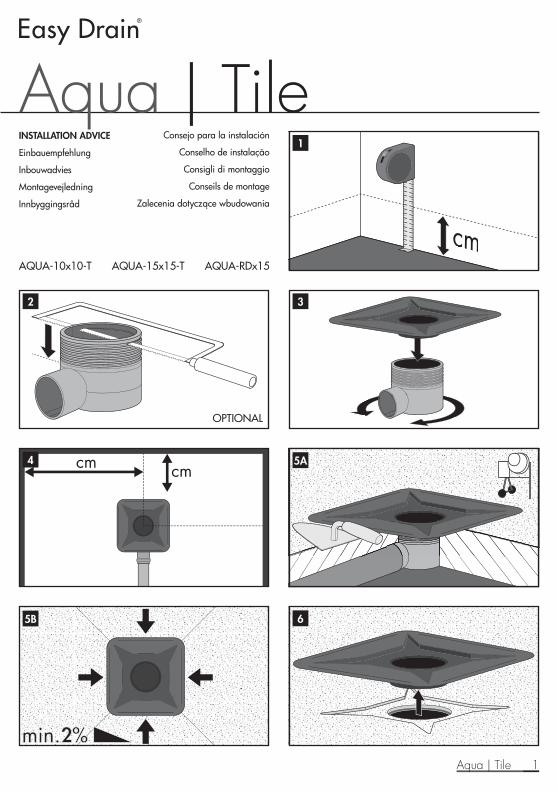
1 Aqua | Tile
OPTIONAL
1
2 3
4 5A
5B 6
INSTALLATION ADVICE
Einbauempfehlung
Inbouwadvies
Montagevejledning
Innbyggingsråd
Consejo para la instalación
Conselho de instalação
Consigli di montaggio
Conseils de montage
Zalecenia dotyczące wbudowania
AQUA-10x10-T AQUA-15x15-T AQUA-RDx15
Aqua | Tile
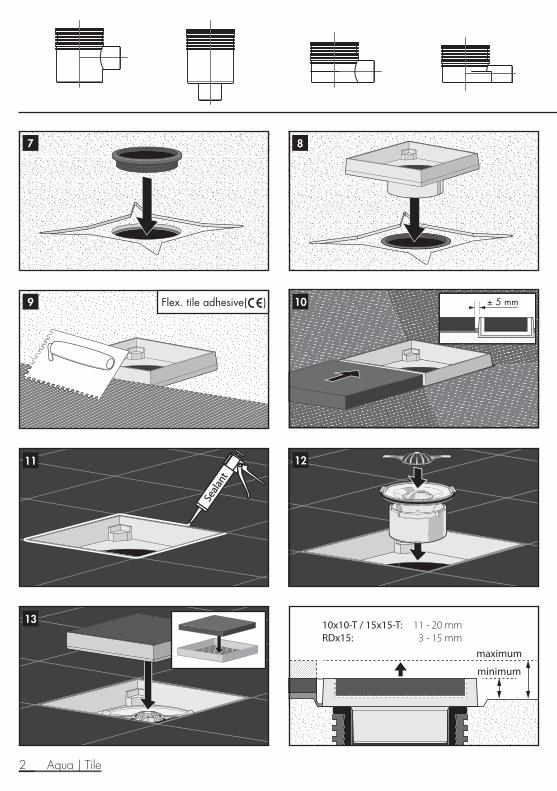
2 Aqua | Tile
Flex. tile adhesive( )
7 8
9 10
11 12
13
minimum
maximum
10x10-T / 15x15-T: 11 - 20 mmRDx15: 3 - 15 mm
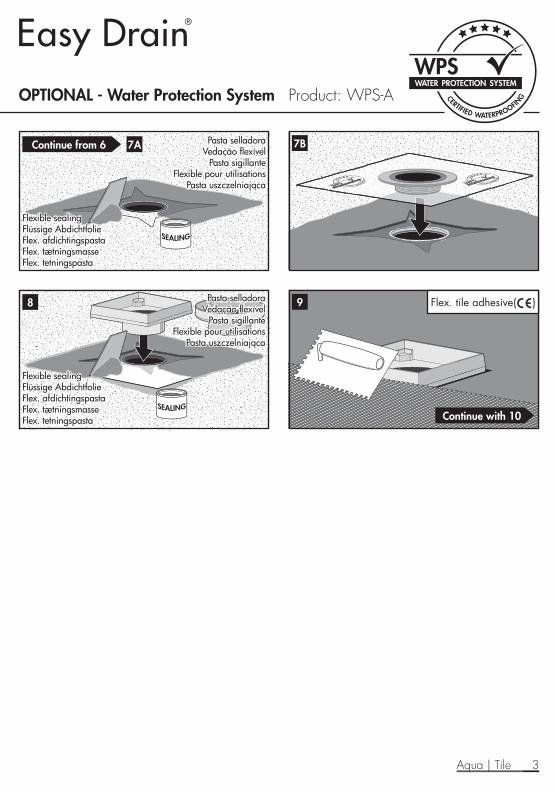
3 Aqua | Tile
Flexible sealingFlüssige AbdichtfolieFlex. afdichtingspastaFlex. tætningsmasseFlex. tetningspasta
Pasta selladoraVedação flexível
Pasta sigillanteFlexible pour utilisations
Pasta uszczelniająca
Flexible sealingFlüssige AbdichtfolieFlex. afdichtingspastaFlex. tætningsmasseFlex. tetningspasta
Pasta selladoraVedação flexível
Pasta sigillanteFlexible pour utilisations
Pasta uszczelniająca
Flex. tile adhesive( )
7B7A
8 9
Continue from 6
Continue with 10
OPTIONAL - Water Protection System Product: WPS-A
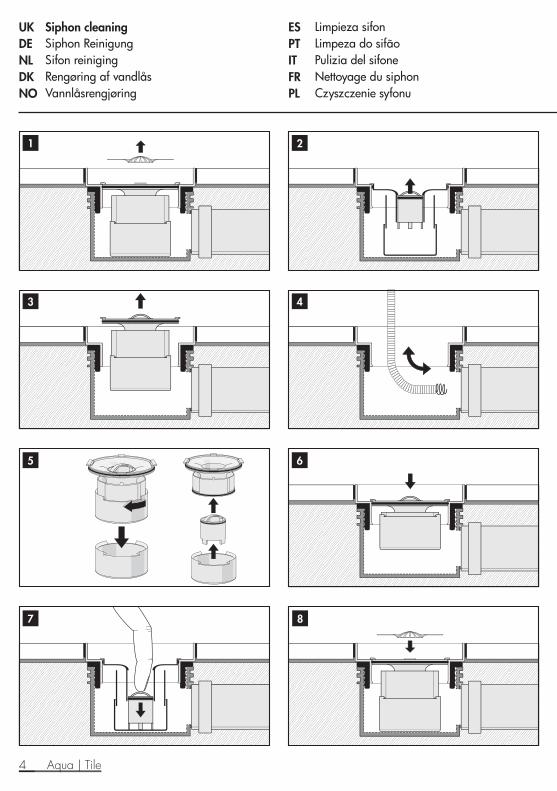
4 Aqua | Tile
1 2
UK Siphon cleaning ES Limpieza sifonDE Siphon Reinigung PT Limpeza do sifãoNL Sifon reiniging IT Pulizia del sifoneDK Rengøring af vandlås FR Nettoyage du siphonNO Vannlåsrengjøring PL Czyszczenie syfonu
8
5 6
7
3 4
5 Aqua | Tile
UK
Important assembling advice: Aqua®
Suitable for renovation work and new construction
Typing and printing errors reserved. Easy Sanitary Solutions BV excludes all liability for any damages whatsoever associated with the use and/or the installation of the drain. Easy Sanitary Solutions BV a priori excludes any liability whatsoever.
Aqua should only be installed by specialist companies in compliance with the building regulations. To achieve the best possible result, please carefully read the installation guide. If you have any questions, please consult your supplier.
▪ Please check the content of the package for completeness and integrity before proceeding with the assembly. Do not install the drain if any deviations are noted. Should this be the case, please consult your supplier.
▪ Prior to the assembly, the assembling advice and its special characteristics should be discussed with the tiler. After the assembly, please provide the tiler with the complete assembling advice.
▪ If the drain is used for several showers, please check to make sure that the drainage capacity is suf�cient. If you are unsure, please consult the supplier for advice.
▪ We recommend taping or closing the drain opening of the shower drain with a cement cap prior to the assembly to prevent construction debris from getting into the drainage pipe. To prevent damage to the tile frame, it should be kept in the package until the �nal installation by the tiler.
▪ Make sure the drain is level all around.
▪ Install the sewage system in compliance with the standards. Note: ensure that the sewage system is well ventilated and that the gradient is suf�cient.
▪ Check the drainage system and the sewer system connection for tightness.
▪ In order to prevent hollow spaces, the drain must be fully lined and sealed with �oor pavement to the upper edge of the �ange.
▪ The seal is applied in compliance with the “generally accepted engineering standards“ according to the ZDB (Central Association of the German Construction Industry) code of practice 1/2010 “sealing compounds”. If alternative seals are used, please read the manufacturer’s product information.
▪ When tiles are being �tted, the gradient of the tiles (min. 2% per linear metre) in the shower must always be towards the drain. The tiles should be laid level or 1 mm higher than the top edge of the tile frame to ensure good drainage toward the shower drain. Note: the requirements with regard to the �oor gradient may be different for walk-in showers with glass walls. Please consult your supplier in this respect.
▪ Once the tiles have been �tted, the joint between the tiled �oor and the drain should be permanently sealed with an elastic sealant (maintenance joint). The adhesion surfaces should be free of mortar, adhesive and other adhesion-
reducing materials.
▪ The drain is only intended for use with waste water common in households. Do not use other �uids as well as cleaning agents with the potential to damage sanitary equipment, drainage equipment and raw materials.
▪ If the drain is used for other purposes (e.g. swimming pools), where it may come in contact with aggressive cleaning agents or corrosive substances such as salt or chlorine, please consult your supplier.
▪ Compliance with this installation advice is required for any warranty claims based on our sale and delivery terms.
Caution !
▪ Tile cleaning products often contain aggressive chemicals that are abrasive in nature and may damage the drain. Please ensure that the drain is thoroughly �ushed after using any tile and grout cleaning products.
6 Aqua | Tile
NL
Belangrijke instructies voor installatie: Aqua®
Geschikt voor renovatie en nieuwbouw
Onder voorbehoud van zet- en drukfouten. Easy Sanitary Solutions BV sluit aansprakelijkheid uit voor schade die voortvloeit uit gebruik maken van en of het monteren van de douchegoot of doucheput..
De Aqua moeten door gespecialiseerde bedrijven en volgens bouwtechnische voorschriften worden ingebouwd. Lees voordat u gaat beginnen met installeren zorgvuldig de handleiding door. Bij vragen kunt u terecht bij uw leverancier.
▪ Controleer voorafgaand aan de installatie de verpakkingsinhoud op compleetheid en eventuele schades. Bij beschadiging of incompleetheid de Aqua niet installeren. Neem in dit geval contact op met uw leverancier.
▪ Bespreek vooraf samen met de tegelzetter de bijzonderheden bij het installeren. Overhandig nadat de doucheput is geïnstalleerd, de handleiding aan de tegelzetter.
▪ Raadpleeg vooraf uw leverancier bij toepassing van de doucheput in combinatie met meerdere douches of de afvoercapaciteit wel toereikend is.
▪ Voor montage de afvoeropening afplakken om bouw-vuil in de afvoerleidingen te voorkomen. Om beschadigingen tegen te gaan, laat het rooster in de verpakking totdat deze wordt gemonteerd door de tegelzetter.
▪ Het inbouwdeel van de doucheput moet in alle richtingen waterpas gesteld worden.
▪ De Aqua moet volgens geldende normeringen worden geïnstalleerd. Denk aan voldoende be- en ontluchting en zorg voor voldoende afschot.
▪ Controleer de waterdichtheid van de Aqua en de aansluitingen om eventuele lekkages uit te sluiten.
▪ Om holle ruimtes onder de Aqua te vermijden, moet het inbouwdeel van de afvoer tot aan de bovenkant van de �ens volledig worden onderkauwt met zandcement (krimpvrije mortel).
▪ Voor de afdichting dienen de technische regels zoals gespeci�ceerd in het ZDB-Merkblad 1/2010 te worden nageleefd. Bij gebruik van alternatieve afdichtingen, verwijzen wij naar de productinformatie van de desbetreffende leverancier.
▪ Bij het aanbrengen van het vloertegewerk moet het tegelafschot (min. 2% per m1) in de doucheruimte altijd naar de Aqua toe worden aangebracht. De tegels moeten gelijk of 1 mm hoger de bovenkant van de Aqua worden aangebracht. Dit om een goede afvloeiing te waarborgen. Let bij het monteren van glaswanden op het afschotadvies van de glasleverancier.
▪ Na het aanbrengen van het tegelwerk de tegelvloer en de Aqua blijvend elastisch afdichten. De hechtvlakken moeten vrij zijn van specie, lijm, voegresten en overige hechting verminderende stoffen.
▪ De Aqua is alleen geschikt voor huishoudelijk
afvoerwater. Vermijd andere vloeistoffen, zoals agressieve reinigingsmiddelen, die schadelijk kunnen zijn voor het afvoersysteem.
▪ Raadpleeg vooraf uw leverancier bij het installeren van de Aqua in andere toepassingsgebieden dan de badkamer (bv. zwembad).
▪ Strikte naleving van de gebruiksaanwijzing is vereist. Voor garantieaansprakelijkheid dient de gebruiksaanwijzing strikt te worden nageleefd. Zoals vermeld in onze verkoop- en leveringsvoorwaarden.
Let op !
▪ Reinigingsmiddelen bevatten vaak agressieve chemicaliën die het oppervlak van de Aqua aan kunnen tasten. Let erop dat na gebruik van tegel- en voegenreiniger de afvoer grondig wordt gereinigd.
7 Aqua | Tile
ES
Indicaciones importantes de colocación: Aqua®
Adecuado tanto en los edificios de nueva construcción como en la de renovación
Queda reservado cualquier error de impresión y de redacción. Queda excluida cualquier responsabilidad de Easy Sanitary Solutions BV por daños que se produzcan por el uso y/o colocación del drenaje de la ducha. Easy Sanitary Solutions BV queda eximida de cualquier responsabilidad a priori.
Únicamente una empresa especializada puede colocar el Aqua y siempre teniendo en cuenta las disposiciones técnicas de instalación. Para que la colocación resulte satisfactoria, lea las indicaciones de montaje cuidadosamente. En caso de consultas, póngase en contacto con su proveedor.
▪ Antes de comenzar con el montaje, veri�que que la caja esté completa y que su contenido esté íntegro. Si hubiera diferencias, no coloque el desagüe. En ese caso, contáctese con su proveedor.
▪ Antes de comenzar con el montaje, converse las particularidades de las indicaciones de colocación con el colocador de baldosas. Después de la colocación, entréguele las indicaciones de montaje del drenaje al colocador de baldosas.
▪ En caso de utilizar el drenaje para varias duchas, veri�que que la capacidad de descarga del desagüe de la ducha sea su�ciente. Si fuese necesario, solicite asesoramiento a su proveedor.
▪ Le recomendamos que adhiera el ori�cio de salida del desagüe de la ducha antes del montaje o que lo tape con cemento, para evitar que el desagüe de salida se ensucie. Para evitar roturas, el marco de baldosas debe permanecer en la caja hasta que el colocador de baldosas termine con el montaje �nal.
▪ Nivele el drenaje en forma horizontal en todas las direcciones.
▪ La instalación del equipo de desagüe debe realizarse conforme a las normas. Nota: tenga en cuenta la aireación y la ventilación y que el declive del desagüe sea su�ciente.
▪ Controle la estanqueidad del sistema de descarga y de las conexiones del desagüe.
▪ Para evitar espacios vacíos, se debe llenar e impermeabilizar el cuerpo del drenaje completamente hasta el borde superior de la brida y el solado.
▪ La impermeabilización debe realizarse según las disposiciones técnicas establecidas en la Hoja informativa 1/2010 de la Asociación Central de la Industria de la Construcción Alemana (ZDB) “Juntas de unión”. Al utilizar juntas alternativas, se debe tener en cuenta la información de producto del fabricante.
▪ Al colocar las baldosas del suelo, el desnivel de las baldosas (mínimo 2% cada m1) del área de la ducha siempre debe correr hacia la descarga. Las baldosas deben colocarse a la misma altura o 1mm más arriba del borde superior del marco de las baldosas. De esta manera, se garantiza un buen desagüe hacia el drenaje de la ducha. Nota: en caso de duchas en el mismo nivel del suelo con paneles de vidrio, es posible que para los desniveles sea necesario tener en cuenta
otros requisitos. Consulte a su proveedor al respecto.
▪ Después de colocar las baldosas, el paso entre el suelo de baldosas y la descarga debe impermeabilizarse con una junta elástica (junta de dilatación) en forma permanente. Las super�cies adherentes deben estar libres de mortero, adhesivo y otros materiales que disminuyan la adhesión.
▪ El sistema de descarga solo es apto para desagotar las duchas habituales para el hogar. Evite cualquier otro líquido y productos de limpieza, que puedan dañar el equipamiento sanitario, los elementos del desagüe y el material de los caños.
▪ Si se utiliza la descarga en otras áreas (por ejemplo, en piscinas), en las que la descarga entre en contacto con productos de limpieza agresivos o substancias corrosivas, tales como sal o cloro, póngase en contacto con su proveedor.
▪ Seguir esta recomendación de montaje es requisito para hacer uso del derecho de garantía, de acuerdo con nuestras condiciones de venta y de entrega.
Atención !
▪ Frecuentemente, los productos de limpieza de baldosas contienen químicos agresivos, que pueden dañar la super�cie del drenaje. Tenga en cuenta que, si utiliza productos de limpieza de baldosas y juntas, posteriormente deberá limpiar profundamente la descarga.
8 Aqua | Tile
Aqua | Tile
ESS PRODUCTS ARE PATENTED AND REGISTRATED
TRADEMARKS MADE BY ESS
www.easydrain.eu E60.
03.0
3.10
.25
|
1.0
| 13