application notes for simplicti oracle rnt - aes connector
TRANSCRIPT

KJA; Reviewed:
SPOC 11/5/2013
Solution & Interoperability Test Lab Application Notes
©2013 Avaya Inc. All Rights Reserved.
1 of 53
SCCM63
Avaya Solution & Interoperability Test Lab
Application Notes for SimpliCTI Oracle RNT – AES Connector with Avaya Aura® Application Enablement Services, Avaya Aura® Communication Manager and Avaya Call Management System – Issue 1.0
Abstract
These Application Notes contain instructions for SimpliCTI Oracle RNT – AES Connector
and Avaya Aura® Application Enablement Services and Avaya Aura® Communication
Manager to successfully interoperate.
Information in these Application Notes has been obtained through DevConnect compliance
testing and additional technical discussions. Testing was conducted via the DevConnect
Program at the Avaya Solution and Interoperability Test Lab.
KJA; Reviewed:
SPOC 11/5/2013
Solution & Interoperability Test Lab Application Notes
©2013 Avaya Inc. All Rights Reserved.
2 of 53
SCCM63
1. Introduction This document contains a sample configuration that was used for interoperability compliance
testing between SimpliCTI Oracle RNT – AES Connector and, Avaya Aura® Application
Enablement Services and Avaya Aura® Communication Manager.
1.1. Product Overview
SimpliCTI's Oracle RNT-AES Connector is a voice and multimedia connector that delivers pre-
established bi-directional and real-time integration between Oracle RightNow Technologies and
Avaya Aura® environment. The connector is designed to help customers quickly and easily
integrate Oracle RightNow Cloud Service and their Avaya Aura® environment.
With the SimpliCTI Media bar Add-In, information pertinent to voice calls, email, chat, and web
form is seamlessly shared between Avaya Aura® environment and Oracle RightNow Cloud
Service. Via automatic screen pop, the SimpliCTI Media Bar allows each contact center agent
access to a customer’s detailed information in the Oracle RightNow Cloud Service (RNT)
database.
2. General Test Approach and Test Results Interoperability testing contained functional tests that tested SimpliCTI Oracle RNT – AES
Connector’s ability to successfully operate with Avaya Aura® Application Enablement Services
and Avaya Aura® Communication Manager.
DevConnect Compliance Testing is conducted jointly by Avaya and DevConnect members. The
jointly-defined test plan focuses on exercising APIs and/or standards-based interfaces pertinent
to the interoperability of the tested products and their functionalities. DevConnect Compliance
Testing is not intended to substitute full product performance or feature testing performed by
DevConnect members, nor is it to be construed as an endorsement by Avaya of the suitability or
completeness of a DevConnect member’s solution.
2.1. Interoperability Compliance Testing
During Interoperability Compliance testing, call center call routing scenarios were tested along
Scenarios that were tested are, SimpliCTI Oracle RNT – AES Connector’s ability to:
• Monitor agent status
• Route calls to Oracle RightNow Agent Desktop
• Handle Voice, Email and Chat transactions
2.2. Test Results
All planned test cases were passed.
KJA; Reviewed:
SPOC 11/5/2013
Solution & Interoperability Test Lab Application Notes
©2013 Avaya Inc. All Rights Reserved.
3 of 53
SCCM63
2.3. Support
SimpliCTI Technical Support can be reached via email or phone.
E-mail: [email protected]
Phone: 1 (877) 591 - 7467

KJA; Reviewed:
SPOC 11/5/2013
Solution & Interoperability Test Lab Application Notes
©2013 Avaya Inc. All Rights Reserved.
4 of 53
SCCM63
3. Reference Configuration Figure 1 illustrates a sample configuration that consists of Avaya and SimpliCTI components
that were used during the compliance testing.
Figure 1: Reference Configuration
KJA; Reviewed:
SPOC 11/5/2013
Solution & Interoperability Test Lab Application Notes
©2013 Avaya Inc. All Rights Reserved.
5 of 53
SCCM63
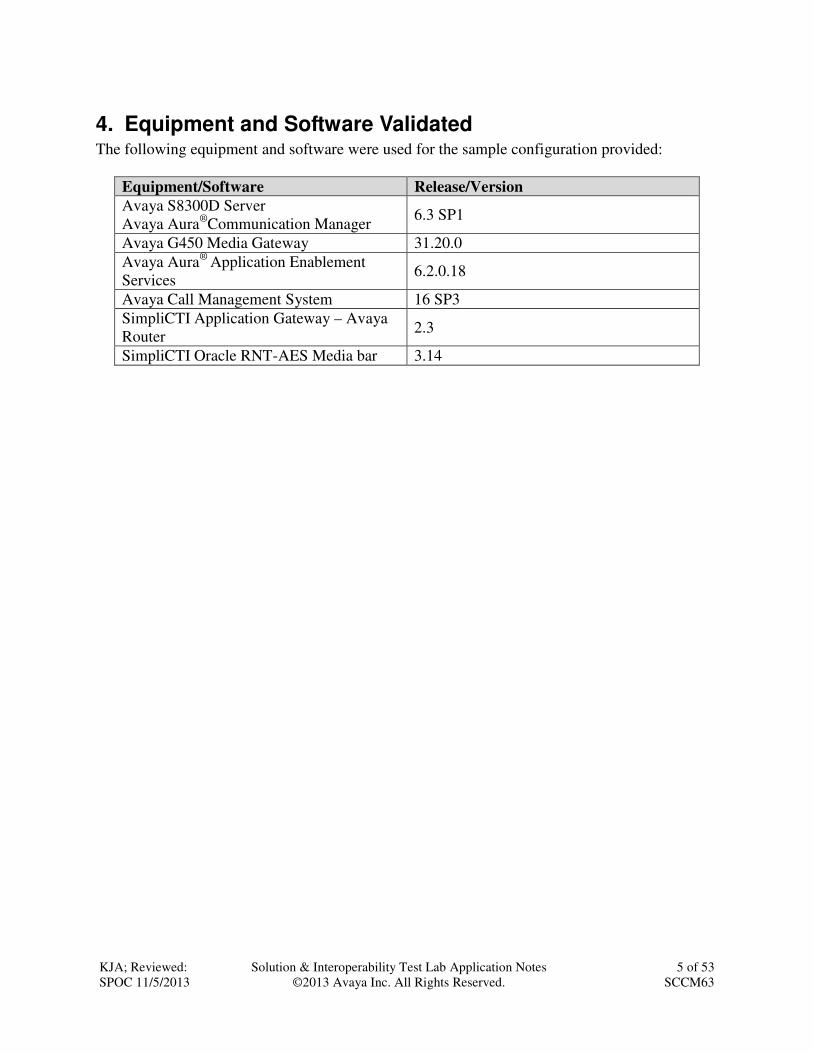
4. Equipment and Software Validated The following equipment and software were used for the sample configuration provided:
Equipment/Software Release/Version Avaya S8300D Server
Avaya Aura®
Communication Manager 6.3 SP1
Avaya G450 Media Gateway 31.20.0
Avaya Aura®
Application Enablement
Services 6.2.0.18
Avaya Call Management System 16 SP3
SimpliCTI Application Gateway – Avaya
Router 2.3
SimpliCTI Oracle RNT-AES Media bar 3.14

KJA; Reviewed:
SPOC 11/5/2013
Solution & Interoperability Test Lab Application Notes
©2013 Avaya Inc. All Rights Reserved.
6 of 53
SCCM63
5. Configure Avaya Aura® Communication Manager This section contains steps necessary to configure SimpliCTI successfully with Avaya Aura®
Communication Manager.
All configurations in Communication Manager were performed via SAT terminal.
5.1. Verify Feature and License
Enter the display system-parameters customer-options command and ensure that the
following features are enabled. Some of the features mentioned below are license dependent and
a license may be needed to access the feature.
One Page 3, verify Computer Telephone Adjunct Links is set to y.
display system-parameters customer-options Page 3 of 11
OPTIONAL FEATURES
Abbreviated Dialing Enhanced List? y Audible Message Waiting? y
Access Security Gateway (ASG)? n Authorization Codes? y
Analog Trunk Incoming Call ID? y CAS Branch? n
A/D Grp/Sys List Dialing Start at 01? y CAS Main? n
Answer Supervision by Call Classifier? y Change COR by FAC? n
ARS? y Computer Telephony Adjunct Links? y
ARS/AAR Partitioning? y Cvg Of Calls Redirected Off-net? y
ARS/AAR Dialing without FAC? y DCS (Basic)? y
ASAI Link Core Capabilities? y DCS Call Coverage? y
ASAI Link Plus Capabilities? y DCS with Rerouting? y
Async. Transfer Mode (ATM) PNC? n
Async. Transfer Mode (ATM) Trunking? n Digital Loss Plan Modification? y
ATM WAN Spare Processor? n DS1 MSP? y
ATMS? y DS1 Echo Cancellation? y
Attendant Vectoring? y

KJA; Reviewed:
SPOC 11/5/2013
Solution & Interoperability Test Lab Application Notes
©2013 Avaya Inc. All Rights Reserved.
7 of 53
SCCM63
On Page 4, verify ISDN Feature Plus, ISDN-PRI, IP Trunks and Multimedia IP SIP Trunking are set to y.
On Page 10, verify IP_API_A has a sufficient limit to support the configuration.
display system-parameters customer-options Page 10 of 11
MAXIMUM IP REGISTRATIONS BY PRODUCT ID
Product ID Rel. Limit Used
AgentSC * : 2400 0
IP_API_A * : 2400 6
IP_Agent * : 2400 0
IP_NonAgt * : 2400 0
IP_Phone * : 2400 1
IP_ROMax * : 2400 0
IP_Soft * : 2400 0
IP_Supv * : 2400 0
IP_eCons * : 68 0
oneX_Comm * : 2400 0
: 0 0
IP Attendant Consoles? y
display system-parameters customer-options Page 4 of 11
OPTIONAL FEATURES
Emergency Access to Attendant? y IP Stations? y
Enable 'dadmin' Login? y
Enhanced Conferencing? y ISDN Feature Plus? y
Enhanced EC500? y ISDN/SIP Network Call Redirection? y
Enterprise Survivable Server? n ISDN-BRI Trunks? y
Enterprise Wide Licensing? n ISDN-PRI? y
ESS Administration? y Local Survivable Processor? n
Extended Cvg/Fwd Admin? y Malicious Call Trace? y
External Device Alarm Admin? y Media Encryption Over IP? n
Five Port Networks Max Per MCC? n Mode Code for Centralized Voice Mail? n
Flexible Billing? n
Forced Entry of Account Codes? y Multifrequency Signaling? y
Global Call Classification? y Multimedia Call Handling (Basic)? y
Hospitality (Basic)? y Multimedia Call Handling (Enhanced)? y
Hospitality (G3V3 Enhancements)? y Multimedia IP SIP Trunking? y
IP Trunks? y

KJA; Reviewed:
SPOC 11/5/2013
Solution & Interoperability Test Lab Application Notes
©2013 Avaya Inc. All Rights Reserved.
8 of 53
SCCM63
From a web browser, use the http://<ip-address>, where ip-address is the ip address of
Communication Manager, URL to access System Management Interface for Communication
Manager. Log in using appropriate credentials.
Navigate to Administration ���� Licensing ���� Feature Administration. Select Current Settings
and click Display.
Verify ASAI Link Core Capabilities and ASAI Link Plus Capabilities are available and
turned on. A license may be required to enable these features.
Verify Vectoring features are available and turned on as shown in the screen capture below.
KJA; Reviewed:
SPOC 11/5/2013
Solution & Interoperability Test Lab Application Notes
©2013 Avaya Inc. All Rights Reserved.
9 of 53
SCCM63
5.2. Configure Stations – Call Center
Add stations for Call Center agents to answer calls. Use add station n command to add a station,
where n is an available station extension. Configure the station as follows, on Page 1:
• In Name field, enter a descriptive name
• Set Type to the type of the telephones
• Enter a Security Code
• Set IP SoftPhone to y
One Page 4, under BUTTON ASSIGNMENTS, add call-disp, auto-in, after-call, manual-in
and logout, as shown below:
add station 25001 Page 4 of 5
STATION
SITE DATA
Room: D4-H30 Headset? n
Jack: Speaker? y
Cable: Mounting: d
Floor: 4 Cord Length: 0
Building: D Set Color:
ABBREVIATED DIALING
List1: List2: List3:
BUTTON ASSIGNMENTS
1: call-appr 5: auto-in Grp:
2: call-appr 6: aux-work RC: Grp:
3: call-appr 7: after-call Grp:
4: call-disp 8: manual-in Grp:
Customizable Labels? y
Add station 25001 Page 1 of 5
STATION
Extension: 25001 Lock Messages? n BCC: 0
Type: 9630 Security Code: 123456 TN: 1
Port: IP Coverage Path 1: 1 COR: 1
Name: IP Station 1 Coverage Path 2: COS: 1
Hunt-to Station:
STATION OPTIONS
Time of Day Lock Table:
Loss Group: 19 Personalized Ringing Pattern: 1
Message Lamp Ext: 25001
Speakerphone: 2-way Mute Button Enabled? y
Display Language: english Button Modules: 0
Survivable GK Node Name:
Survivable COR: internal Media Complex Ext:
Survivable Trunk Dest? y IP SoftPhone? y
IP Video Softphone? n
Short/Prefixed Registration Allowed: default

KJA; Reviewed:
SPOC 11/5/2013
Solution & Interoperability Test Lab Application Notes
©2013 Avaya Inc. All Rights Reserved.
10 of 53
SCCM63
5.3. Configure Stations – CTI
Add CTI stations that will be used by SimpliCTI. CTI Stations are phantom stations and used by
SimpliCTI to change agent statuses. i.e., AUX, After-call, etc. Use add station n command to
add a station, where n is an available station extension. Configure the station as follows, on Page
1:
• In Name field, enter a descriptive name
• Set Type to CTI
5.4. Configure Hunt Group
Use add hunt-group n command to add a hunt group, where n is an available hunt group. On
Page 1:
• In the Group Name filed, enter a descriptive name.
• Set ACD, Queue, Vector to y.
• Enter an available Group Extension
add station 22001 Page 1 of 5
STATION
Extension: 22001 Lock Messages? n BCC: 0
Type: CTI Security Code: TN: 1
Port: X Coverage Path 1: COR: 1
Name: Simple CTI Station 1 Coverage Path 2: COS: 1
Hunt-to Station:
STATION OPTIONS
Time of Day Lock Table:
Loss Group: 1 Personalized Ringing Pattern: 1
Data Module? n Message Lamp Ext: 22001
Display Module? n
Survivable COR: internal Media Complex Ext:
Survivable Trunk Dest? y
add hunt-group 1 Page 1 of 4
HUNT GROUP
Group Number: 1 ACD? y
Group Name: Skill 1 Queue? y
Group Extension: 11001 Vector? y
Group Type: ucd-mia
TN: 1
COR: 1 MM Early Answer? n
Security Code: Local Agent Preference? n
ISDN/SIP Caller Display:
Queue Limit: unlimited
Calls Warning Threshold: Port:
Time Warning Threshold: Port:

KJA; Reviewed:
SPOC 11/5/2013
Solution & Interoperability Test Lab Application Notes
©2013 Avaya Inc. All Rights Reserved.
11 of 53
SCCM63
On Page 2, set Skill to y and Measured to both.
Note: During compliance test, 5 hunt groups, 1 thru 5, were created to test email, chat, voice and
mixed calls.
5.5. Configure Agents
User add agent-loginID n to add an agent, where n is an available agent id. On Page 1:
• In the Name field, type in a descriptive name
• Enter a Security Code
add agent-loginID 2501 Page 1 of 2
AGENT LOGINID
Login ID: 2501 AAS? n
Name: IP Agent 1 AUDIX? n
TN: 1 LWC Reception: spe
COR: 1 LWC Log External Calls? n
Coverage Path: AUDIX Name for Messaging:
Security Code: 1234
LoginID for ISDN/SIP Display? n
Password: 123456
Password (enter again): 123456
Auto Answer: station
MIA Across Skills: system
ACW Agent Considered Idle: system
Aux Work Reason Code Type: system
Logout Reason Code Type: system
Maximum time agent in ACW before logout (sec): system
Forced Agent Logout Time: :
add hunt-group 1 Page 2 of 4
HUNT GROUP
Skill? y Expected Call Handling Time (sec): 20
AAS? n Service Level Target (% in sec): 80 in 20
Measured: both
Supervisor Extension:
Controlling Adjunct: none
VuStats Objective:
Multiple Call Handling: none
Timed ACW Interval (sec): 1 After Xfer or Held Call Drops? n

KJA; Reviewed:
SPOC 11/5/2013
Solution & Interoperability Test Lab Application Notes
©2013 Avaya Inc. All Rights Reserved.
12 of 53
SCCM63
On Page 2, set skill number and skill level in SN and SL fields. Skill number is the hunt group
that was added in previous section.
5.6. Configure Vectors
Use change vector n to configure a Vector, where n is an available Vector number. Configure a
simple vector to queue the call as follows. In the example below, calls were queue to Skill 1, that
was created in Section 5.4.
add agent-loginID 2501 Page 2 of 2
AGENT LOGINID
Direct Agent Skill: 1 Service Objective? n
Call Handling Preference: skill-level Local Call Preference? n
SN RL SL SN RL SL
1: 1 1 16:
2: 2 1 17:
3: 18:
4: 19:
5: 20:
6:
7:
8:
9:
10:
11:
12:
13:
14:
change vector 121 Page 1 of 6
CALL VECTOR
Number: 121 Name: Email
Multimedia? n Attendant Vectoring? n Meet-me Conf? n Lock? n
Basic? y EAS? y G3V4 Enhanced? y ANI/II-Digits? y ASAI Routing? y
Prompting? y LAI? y G3V4 Adv Route? y CINFO? y BSR? y Holidays? y
Variables? y 3.0 Enhanced? y
01 wait-time 2 secs hearing music
02 queue-to skill 1 pri m
03

KJA; Reviewed:
SPOC 11/5/2013
Solution & Interoperability Test Lab Application Notes
©2013 Avaya Inc. All Rights Reserved.
13 of 53
SCCM63
5.7. Configure VDN
Use add vdn n to add a vdn, where n is an available vdn extension. On Page 1:
• In the Name field, enter a descriptive name
• In the Destination field, set Vector Number to the vector configured earlier in this
document. i.e., Vector Number 1.
• Set Measured to both
Note: During compliance test 5 different VDNs were created to test a various mix of calls.
change vdn 12001 Page 1 of 3
VECTOR DIRECTORY NUMBER
Extension: 12001
Name*: Email
Destination: Vector Number 1
Attendant Vectoring? n
Meet-me Conferencing? n
Allow VDN Override? n
COR: 1
TN*: 1
Measured: both
Acceptable Service Level (sec): 20
VDN of Origin Annc. Extension*:
1st Skill*:
2nd Skill*:
3rd Skill*:

KJA; Reviewed:
SPOC 11/5/2013
Solution & Interoperability Test Lab Application Notes
©2013 Avaya Inc. All Rights Reserved.
14 of 53
SCCM63
5.8. Configure AES connection
Use change ip-services command to add an entry for AES. On Page 1,
• In the Service Type field, type AESVCS.
• In the Enabled field, type y.
• In the Local Node field, type the Node name procr for the Processor Ethernet Interface.
• In the Local Port field, use the default of 8765.
On Page 4 of the IP Services form, enter the following values:
• In the AE Services Server field, type type in the hostname of AES Server.
• In the Password field, type a password to be administered on the Application
Enablement Services server from Section 6.2.
• In the Enabled field, type y.
Use add cti-link n command, where n is an available CTI link number.
• In the Extension field, type <station extension>, where <station extension> is a valid
station extension.
• In the Type field, type ADJ-IP.
• In the Name field, type a descriptive name.
change ip-services Page 1 of 4
IP SERVICES
Service Enabled Local Local Remote Remote
Type Node Port Node Port
AESVCS y procr 8765
change ip-services Page 4 of 4
AE Services Administration
Server ID AE Services Password Enabled Status
Server
1: aes6_tr1 devconnect123 y in use
2: AES_21_46 Interop123456 y in use
3:
4:
5:
6:
7:
8:
9:
10:
11:
12:
13:
14:
15:
16:

KJA; Reviewed:
SPOC 11/5/2013
Solution & Interoperability Test Lab Application Notes
©2013 Avaya Inc. All Rights Reserved.
15 of 53
SCCM63
change cti-link 1 Page 1 of 3
CTI LINK
CTI Link: 1
Extension: 6201
Type: ADJ-IP
COR: 1
Name: TSAPI

KJA; Reviewed:
SPOC 11/5/2013
Solution & Interoperability Test Lab Application Notes
©2013 Avaya Inc. All Rights Reserved.
16 of 53
SCCM63
6. Configure Avaya Aura® Application Enablement Services Configuration of Avaya Aura® Application Enablement Services requires a user account be
configured for SimpliCTI.
6.1. Configure User
All administration is performed by web browser, https://<aes-ip-address>/
A user needs to be created for SimpliCTI to communicate with AES. Navigate to User Management ���� User Admin ���� Add User.
Fill in User Id, Common Name, Surname, User Password and Confirm Password. Set the
CT User to Yes, and Apply.
Set the SimpliCTI user account to Unrestricted Access to enable any device (station, ACD
extension, DMCC port) to be used implicitly. This step avoids the need to duplicate
administration.
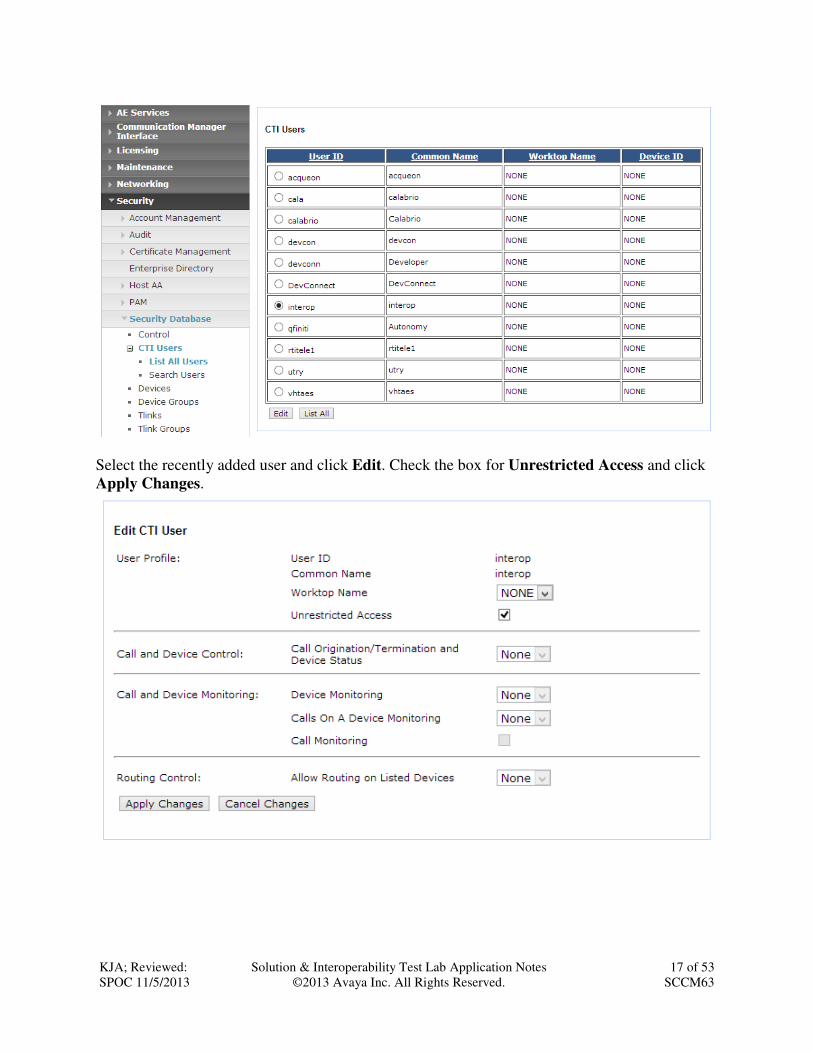
Navigate to Security ���� Security Database ���� CTI Users ���� List All Users.
KJA; Reviewed:
SPOC 11/5/2013
Solution & Interoperability Test Lab Application Notes
©2013 Avaya Inc. All Rights Reserved.
17 of 53
SCCM63
Select the recently added user and click Edit. Check the box for Unrestricted Access and click
Apply Changes.

KJA; Reviewed:
SPOC 11/5/2013
Solution & Interoperability Test Lab Application Notes
©2013 Avaya Inc. All Rights Reserved.
18 of 53
SCCM63
6.2. Configure Communication Manager Switch Connections
To add links to Communication Manager, navigate to the Communication Manager Interface ���� Switch Connections page and enter a name for the new switch connection and click the Add Connection button. This was previously configured as TR18300 for this test environment:
Use the Edit Connection button shown above to configure the connection. Enter the Switch Password and check the Processor Ethernet box if using the procr interface, as shown below.
This must match the password configured when adding the AESVCS connection in
Communication Manager (Section 5.8).
Use the Edit PE/CLAN IPs button (shown in this section’s first screen shot above) to configure
the procr or CLAN IP Address(es) for TSAPI message traffic.
Use the Edit H.323 Gatekeeper button (shown in this section’s first screen capture above) to
KJA; Reviewed:
SPOC 11/5/2013
Solution & Interoperability Test Lab Application Notes
©2013 Avaya Inc. All Rights Reserved.
19 of 53
SCCM63
configure the procr or CLAN IP Address(es).
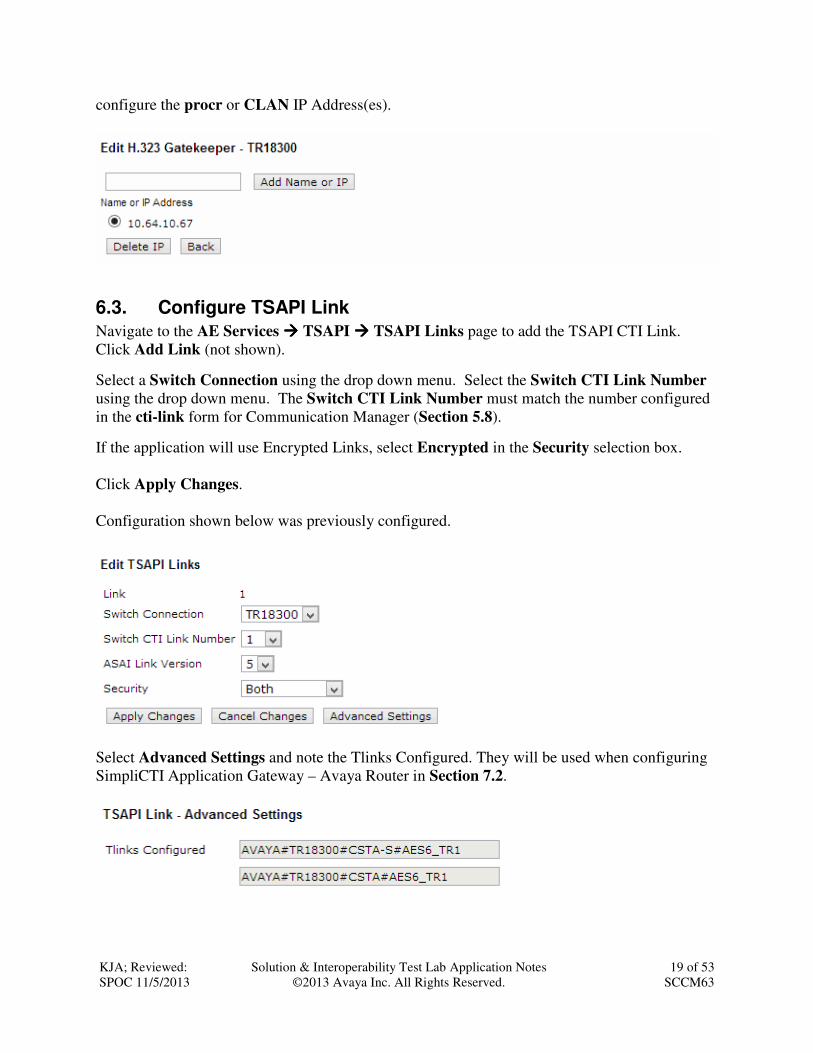
6.3. Configure TSAPI Link
Navigate to the AE Services ���� TSAPI ���� TSAPI Links page to add the TSAPI CTI Link.
Click Add Link (not shown).
Select a Switch Connection using the drop down menu. Select the Switch CTI Link Number
using the drop down menu. The Switch CTI Link Number must match the number configured
in the cti-link form for Communication Manager (Section 5.8).
If the application will use Encrypted Links, select Encrypted in the Security selection box.
Click Apply Changes.
Configuration shown below was previously configured.
Select Advanced Settings and note the Tlinks Configured. They will be used when configuring
SimpliCTI Application Gateway – Avaya Router in Section 7.2.
KJA; Reviewed:
SPOC 11/5/2013
Solution & Interoperability Test Lab Application Notes
©2013 Avaya Inc. All Rights Reserved.
20 of 53
SCCM63
7. Configure SimpliCTI SimpliCTI configuration includes three components:
1. Oracle RNT Configuration
2. SimpliCTI Application Gateway – Avaya Router
3. SimpliCTI Oracle RNT-AES Connector
7.1. Oracle RNT Configuration
Following configuration is required for Oracle RNT to successfully integrate with SimpliCTI
Application Gateway.
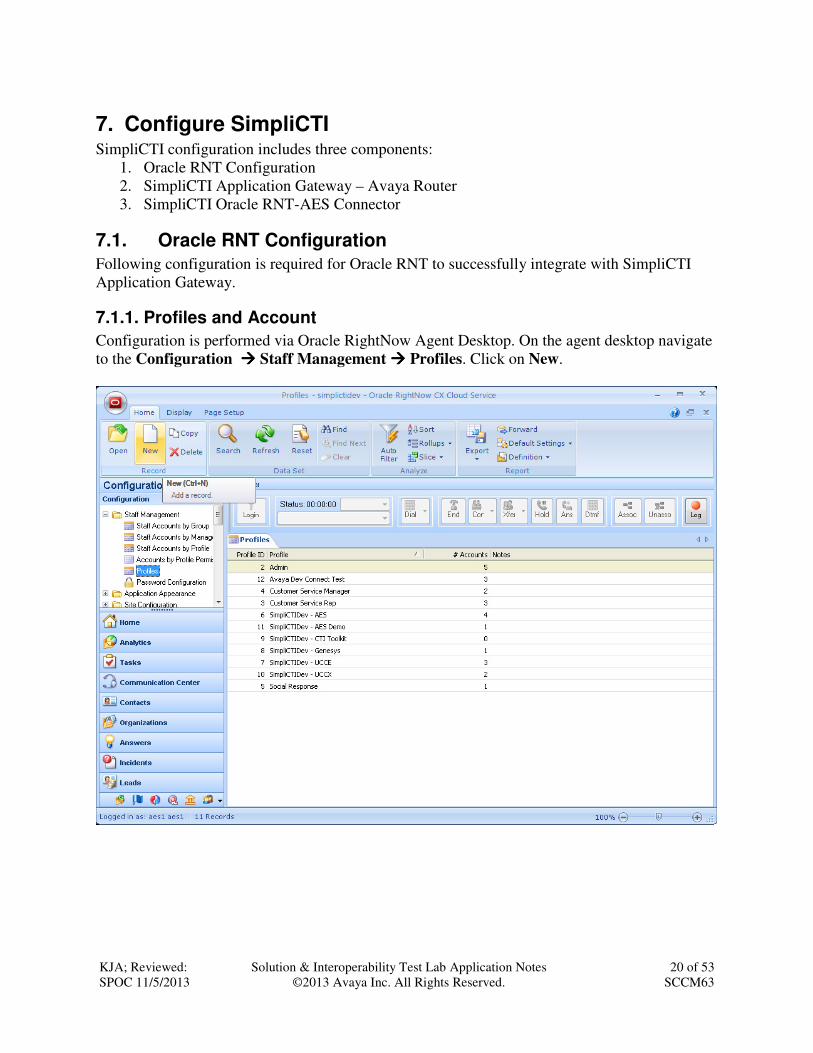
7.1.1. Profiles and Account
Configuration is performed via Oracle RightNow Agent Desktop. On the agent desktop navigate
to the Configuration ���� Staff Management ���� Profiles. Click on New.

KJA; Reviewed:
SPOC 11/5/2013
Solution & Interoperability Test Lab Application Notes
©2013 Avaya Inc. All Rights Reserved.
21 of 53
SCCM63
Type in a Name for the profile and select Permissions.

KJA; Reviewed:
SPOC 11/5/2013
Solution & Interoperability Test Lab Application Notes
©2013 Avaya Inc. All Rights Reserved.
22 of 53
SCCM63
Under the Administration tab, check box for Public SOAP API, Select All.

KJA; Reviewed:
SPOC 11/5/2013
Solution & Interoperability Test Lab Application Notes
©2013 Avaya Inc. All Rights Reserved.
23 of 53
SCCM63
Under the Service tab, check box for Select All for Chat Agent Permissions.

KJA; Reviewed:
SPOC 11/5/2013
Solution & Interoperability Test Lab Application Notes
©2013 Avaya Inc. All Rights Reserved.
24 of 53
SCCM63
Navigate to the Configuration ���� Staff Management ���� Staff Accounts by Profile. Select the
profile name created previously and click New.
Create a new user with the profile created in previous section. This user will be used by Oracle
RightNow Agent Desktop client to log in. Fill in all the fields marked with “*” and set a desired
password. For Profile, select the profile that was created in previous step and Admin for Group.
Please note that configuration for the group Admin is out of scope for this document.

KJA; Reviewed:
SPOC 11/5/2013
Solution & Interoperability Test Lab Application Notes
©2013 Avaya Inc. All Rights Reserved.
25 of 53
SCCM63
7.1.2. Email Channel
Navigate to the Analytics ���� Reports Explorer page to add the reports. Click New Report.
KJA; Reviewed:
SPOC 11/5/2013
Solution & Interoperability Test Lab Application Notes
©2013 Avaya Inc. All Rights Reserved.
26 of 53
SCCM63
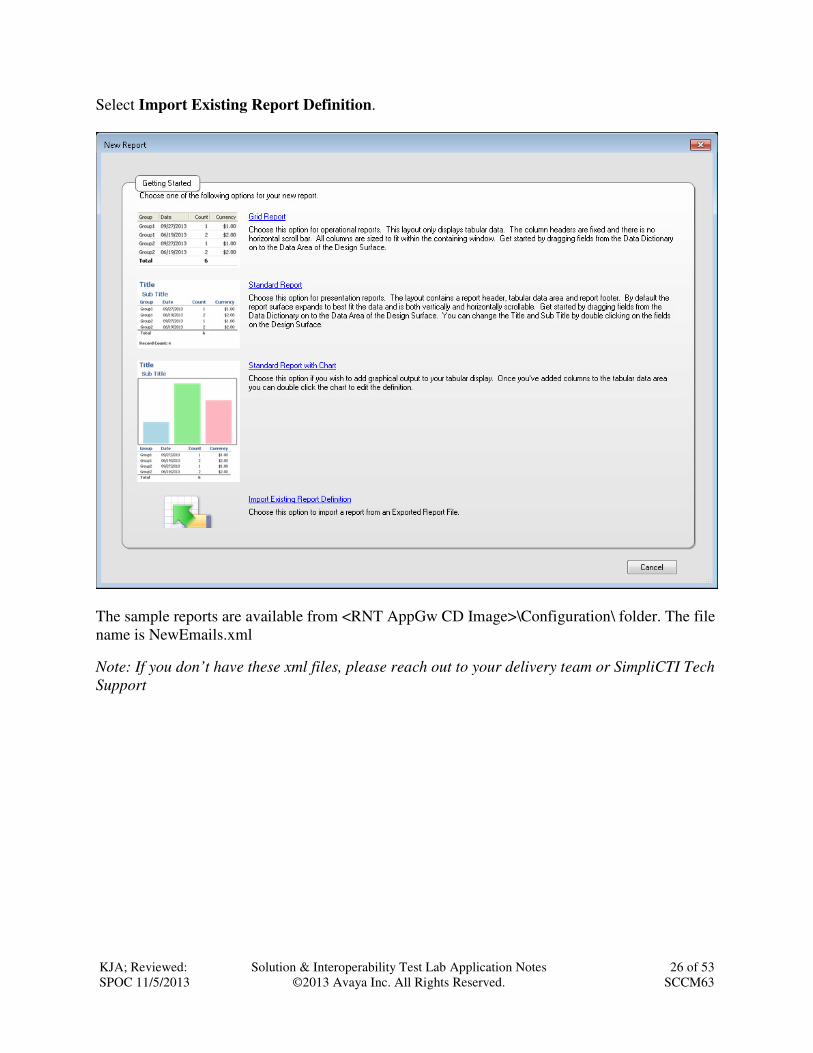
Select Import Existing Report Definition.
The sample reports are available from <RNT AppGw CD Image>\Configuration\ folder. The file
name is NewEmails.xml
Note: If you don’t have these xml files, please reach out to your delivery team or SimpliCTI Tech
Support
KJA; Reviewed:
SPOC 11/5/2013
Solution & Interoperability Test Lab Application Notes
©2013 Avaya Inc. All Rights Reserved.
27 of 53
SCCM63
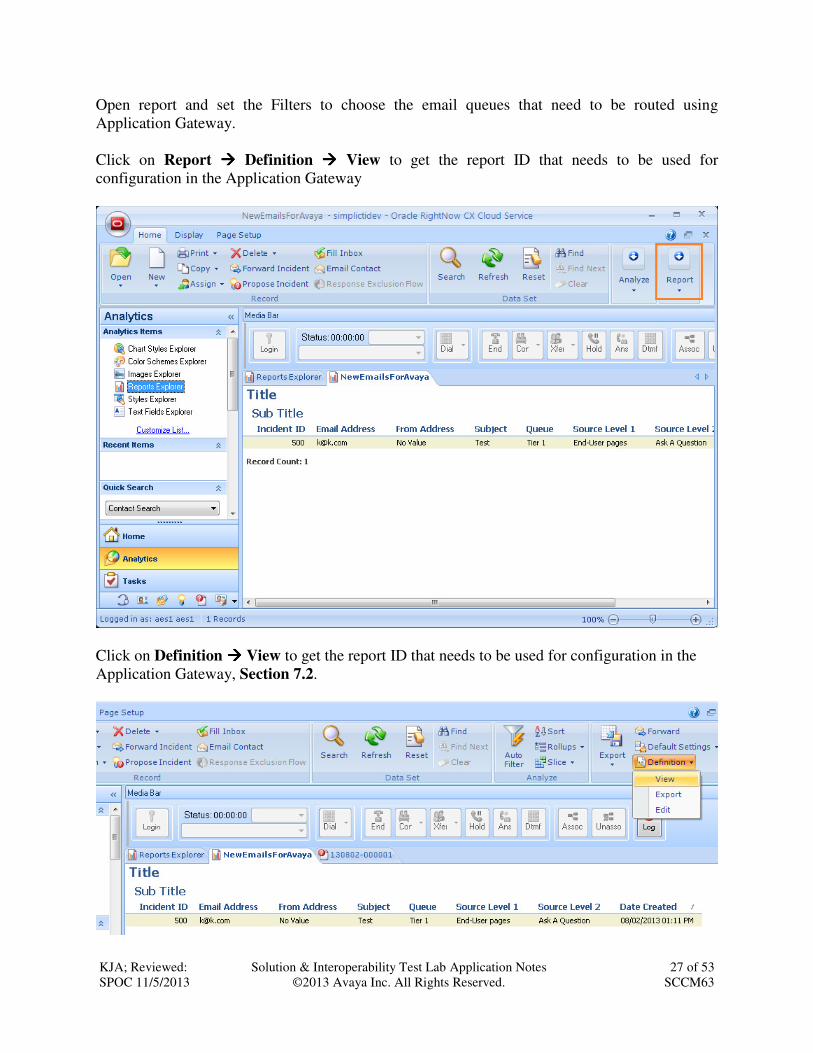
Open report and set the Filters to choose the email queues that need to be routed using
Application Gateway.
Click on Report ���� Definition ���� View to get the report ID that needs to be used for
configuration in the Application Gateway
Click on Definition ���� View to get the report ID that needs to be used for configuration in the
Application Gateway, Section 7.2.
KJA; Reviewed:
SPOC 11/5/2013
Solution & Interoperability Test Lab Application Notes
©2013 Avaya Inc. All Rights Reserved.
28 of 53
SCCM63
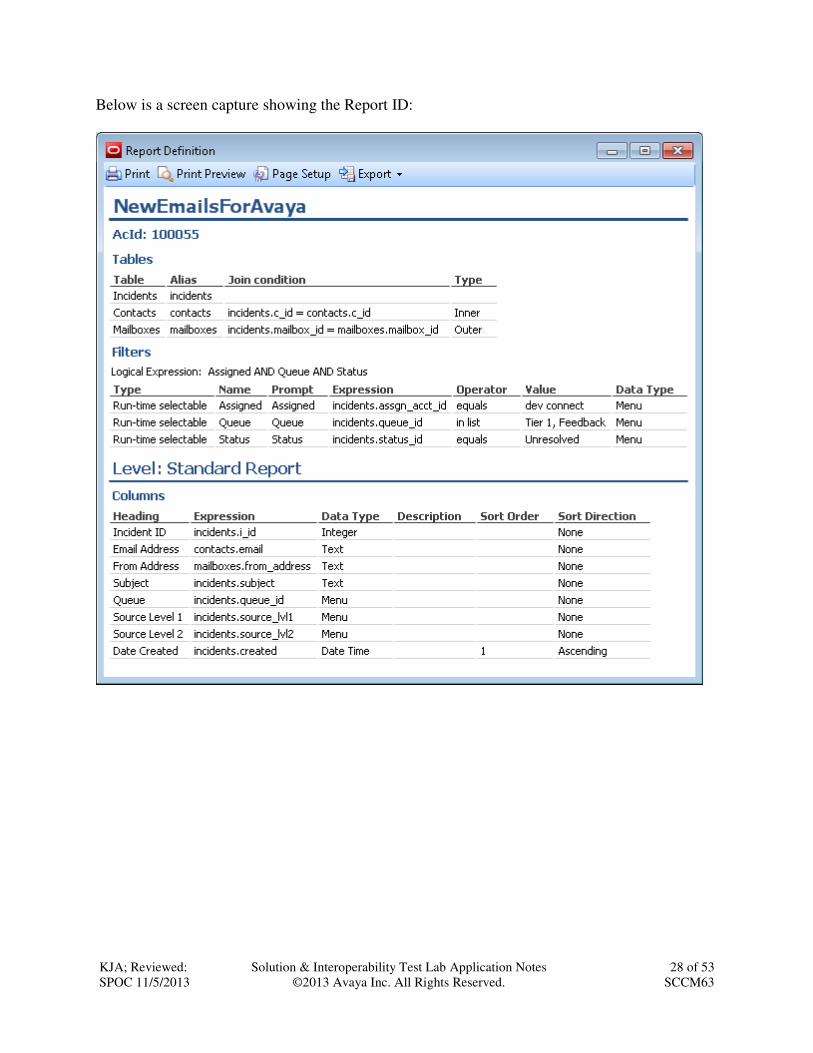
Below is a screen capture showing the Report ID:

KJA; Reviewed:
SPOC 11/5/2013
Solution & Interoperability Test Lab Application Notes
©2013 Avaya Inc. All Rights Reserved.
29 of 53
SCCM63
7.1.3. RNT Configuration – Chat Channel
If your Call center is using RNT Chat with SimpliCTI Application Gateway for Universal
queuing, please enable the External Chat Queues.
Navigate to the Configuration ���� Site Configuration ���� Configuration Settings ���� Chat ���� UQ_CHAT_EXTERNAL_QUEUES.

KJA; Reviewed:
SPOC 11/5/2013
Solution & Interoperability Test Lab Application Notes
©2013 Avaya Inc. All Rights Reserved.
30 of 53
SCCM63
Click on CHAT_UQ_EXTERNAL_QUEUES and enter 1, 6, 7 and 8 values in simplictidev
field. These are queue values that will be used when configuring Application Gateway in Section 7.2.4.
To verify the added values above, navigate to the Configuration ���� Application Appearance ���� Customizable Menus ���� Chat Queue.
To identify the queue IDs, hover over the queue labels. Screen capture below displays ID: 1

KJA; Reviewed:
SPOC 11/5/2013
Solution & Interoperability Test Lab Application Notes
©2013 Avaya Inc. All Rights Reserved.
31 of 53
SCCM63
7.2. SimpliCTI Application Gateway – Avaya Router Configuration
Application Gateway installation will add “Application GW Config” shortcut on the Server
Desktop and in the Start Programs Menu.
Launch the Application GW Configuration.
7.2.1. TSAPI Media Bar Monitor Settings
On the AppGatewayRouter Configure Tool, select TSAPI MediaBar Monitor tab and
configures as follows:
• TSAPI Setting o User Name: Avaya AES User Name as configured in Section 6.1. o Password: Avaya AES User Password as configured in Section 6.1. o TLink: As noted in Section 6.3.
• MediaBar Endpoint o net.tcp://<ip-address>:8014/simplicti/service/mediabar
Note: <ip-address> is the IP Address of Application Gateway
• Monitor Endpoint: o net.pipe://simplicti/service/monitor

KJA; Reviewed:
SPOC 11/5/2013
Solution & Interoperability Test Lab Application Notes
©2013 Avaya Inc. All Rights Reserved.
32 of 53
SCCM63
7.2.2. AES Queues Settings
On the AppGatewayRouter Configure Tool, select AES Queues tab and configure as follows:
Select Add Queue to add a Queue
• Name: Type in a descriptive name, which is unique in this window
• VDN: VDN as configured in Section 5.7.
• StationList: List of CTI Stations as configured in Section 5.3.
• MaxCalls: Maximum number of calls allowed in the Queue.

KJA; Reviewed:
SPOC 11/5/2013
Solution & Interoperability Test Lab Application Notes
©2013 Avaya Inc. All Rights Reserved.
33 of 53
SCCM63
7.2.3. Email Channel Settings
On the AppGatewayRouter Configure Tool, select Email tab and configure as follows:
• User Name and Password: As configured in Section 7.1.1.
• Report ID: Report ID retrieved from Section 7.1.2.
• Queue Map o Default AES Queue: Set it to the Email Queue configured in Section 7.2.2. o Select Add Map to add a Queue Map
� RNTEMailQueueName: Provide a Name of Queue
� AESQueue: Email Queue as configured in previous Section 7.2.2
KJA; Reviewed:
SPOC 11/5/2013
Solution & Interoperability Test Lab Application Notes
©2013 Avaya Inc. All Rights Reserved.
34 of 53
SCCM63
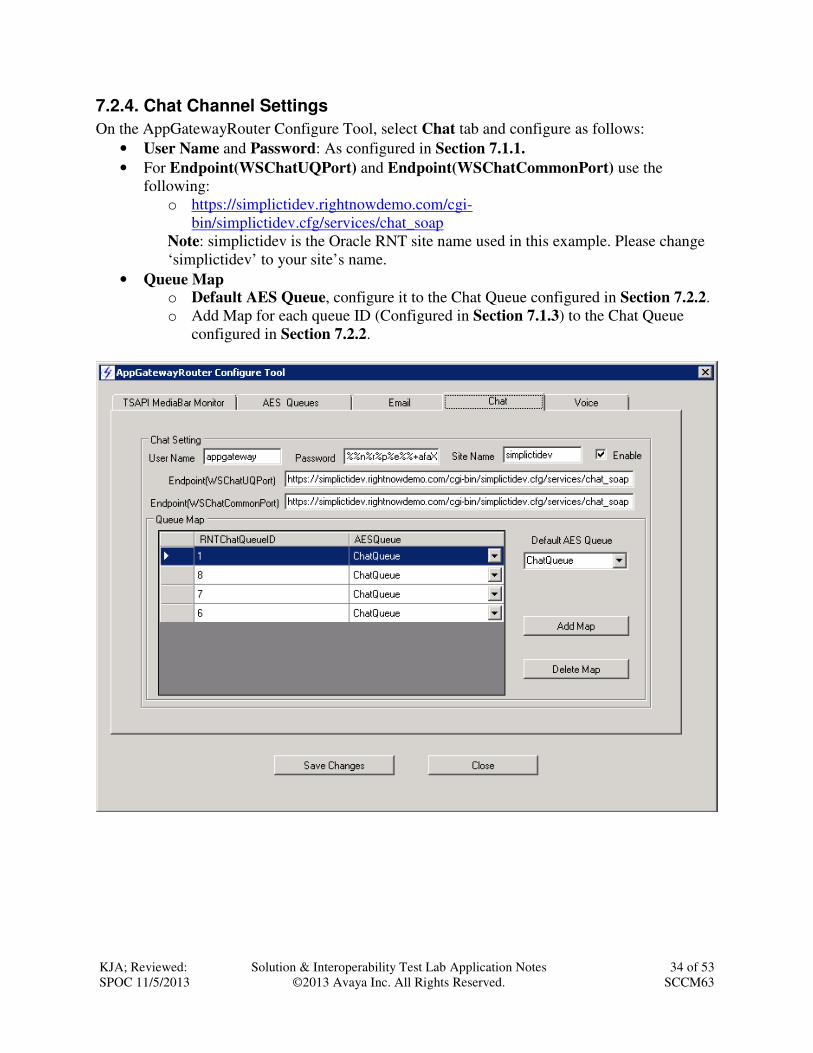
7.2.4. Chat Channel Settings
On the AppGatewayRouter Configure Tool, select Chat tab and configure as follows:
• User Name and Password: As configured in Section 7.1.1.
• For Endpoint(WSChatUQPort) and Endpoint(WSChatCommonPort) use the
following:
o https://simplictidev.rightnowdemo.com/cgi-
bin/simplictidev.cfg/services/chat_soap
Note: simplictidev is the Oracle RNT site name used in this example. Please change
‘simplictidev’ to your site’s name.
• Queue Map o Default AES Queue, configure it to the Chat Queue configured in Section 7.2.2.
o Add Map for each queue ID (Configured in Section 7.1.3) to the Chat Queue
configured in Section 7.2.2.
KJA; Reviewed:
SPOC 11/5/2013
Solution & Interoperability Test Lab Application Notes
©2013 Avaya Inc. All Rights Reserved.
35 of 53
SCCM63
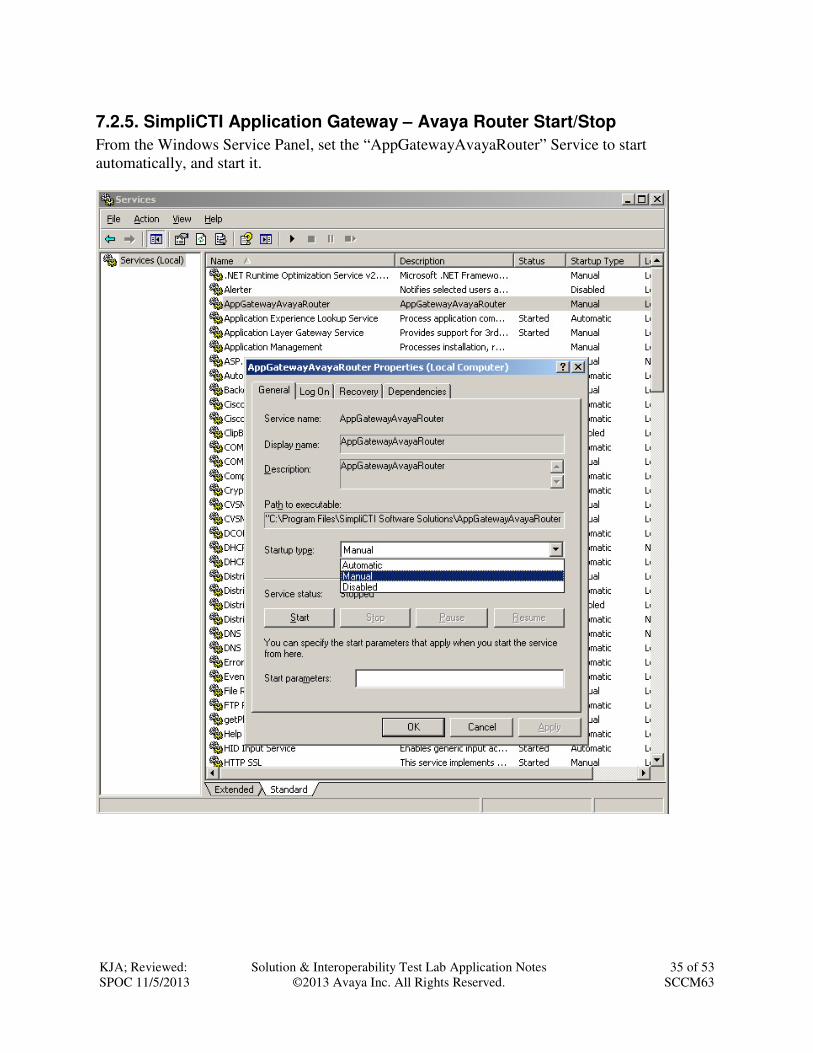
7.2.5. SimpliCTI Application Gateway – Avaya Router Start/Stop
From the Windows Service Panel, set the “AppGatewayAvayaRouter” Service to start
automatically, and start it.

KJA; Reviewed:
SPOC 11/5/2013
Solution & Interoperability Test Lab Application Notes
©2013 Avaya Inc. All Rights Reserved.
36 of 53
SCCM63
7.2.6. SimpliCTI Application Gateway – Avaya Router Monitor
To access the SimpliCTI Application Gateway - Avaya Router Monitor, using the browser go to
http://localhost/WebAppGateway (Default Website name) on the Application Gateway server.
If you are accessing from outside the Application gateway server, use http://ip-
address/WebAppGateway, where ip-address is the IP Address of Application Gateway.

KJA; Reviewed:
SPOC 11/5/2013
Solution & Interoperability Test Lab Application Notes
©2013 Avaya Inc. All Rights Reserved.
37 of 53
SCCM63
7.3. SimpliCTI Oracle RNT-AES Connector configuration
7.3.1. Set Up RightNow Custom Objects and Workspace
Import Custom Object - <RNT AES CD Image>\Configuration\RNT_AES_CustomObjects.zip
Note: If you don’t have this Custom objects zip file, please reach out to your delivery team or
SimpliCTI Tech Support.
Navigate to the Configuration ���� Database ���� Object Designer page to add the custom
objects. Click Import.
Locate the .zip file mentioned earlier in this section and select all columns and submit (not
shown). Import was successful pop-up will be displayed.

KJA; Reviewed:
SPOC 11/5/2013
Solution & Interoperability Test Lab Application Notes
©2013 Avaya Inc. All Rights Reserved.
38 of 53
SCCM63
Click Save and then select Deploy. Type in an email address and uncheck box for Deploy Immediately.
Once the deployment is completed, following pop-up window will appear.
KJA; Reviewed:
SPOC 11/5/2013
Solution & Interoperability Test Lab Application Notes
©2013 Avaya Inc. All Rights Reserved.
39 of 53
SCCM63
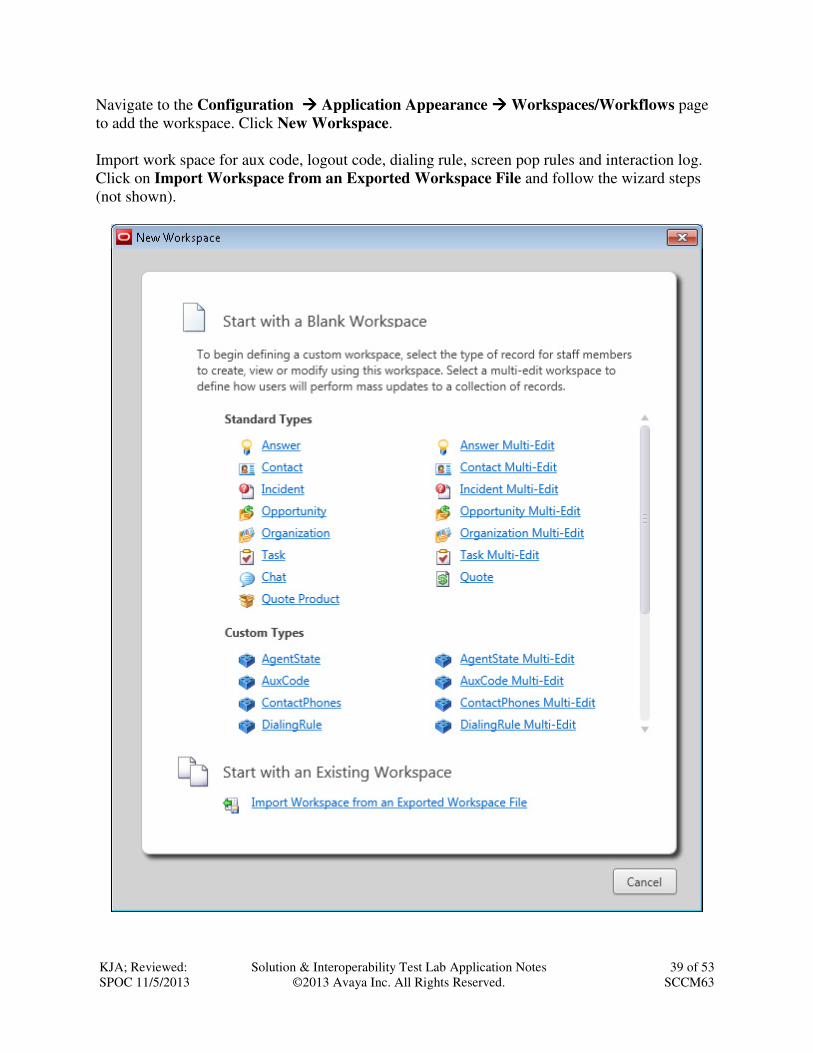
Navigate to the Configuration ���� Application Appearance ���� Workspaces/Workflows page
to add the workspace. Click New Workspace.
Import work space for aux code, logout code, dialing rule, screen pop rules and interaction log.
Click on Import Workspace from an Exported Workspace File and follow the wizard steps
(not shown).
KJA; Reviewed:
SPOC 11/5/2013
Solution & Interoperability Test Lab Application Notes
©2013 Avaya Inc. All Rights Reserved.
40 of 53
SCCM63
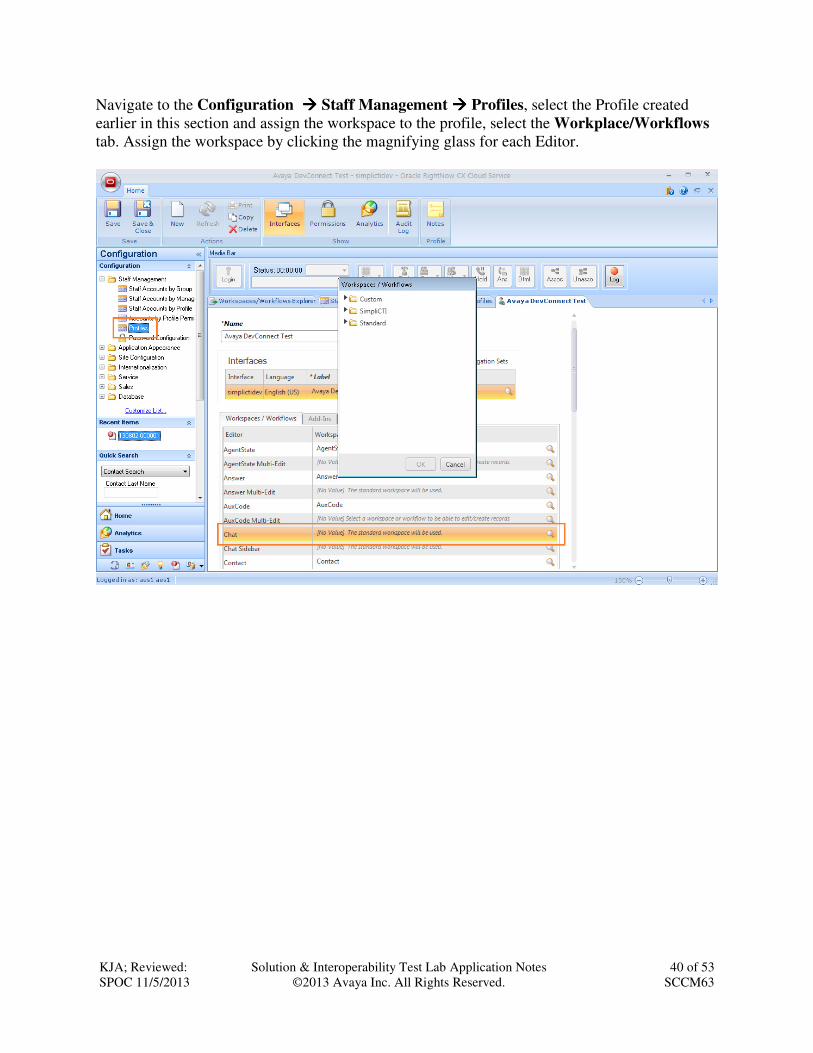
Navigate to the Configuration ���� Staff Management ���� Profiles, select the Profile created
earlier in this section and assign the workspace to the profile, select the Workplace/Workflows
tab. Assign the workspace by clicking the magnifying glass for each Editor.
KJA; Reviewed:
SPOC 11/5/2013
Solution & Interoperability Test Lab Application Notes
©2013 Avaya Inc. All Rights Reserved.
41 of 53
SCCM63
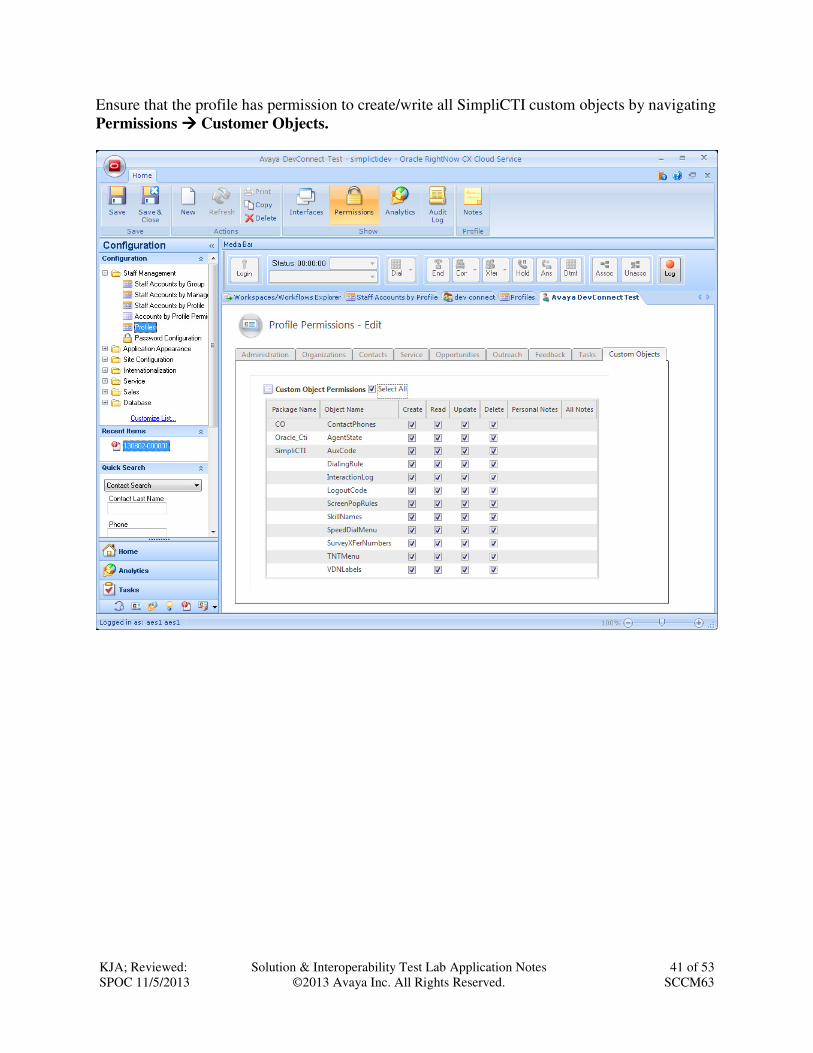
Ensure that the profile has permission to create/write all SimpliCTI custom objects by navigating
Permissions ���� Customer Objects.
KJA; Reviewed:
SPOC 11/5/2013
Solution & Interoperability Test Lab Application Notes
©2013 Avaya Inc. All Rights Reserved.
42 of 53
SCCM63
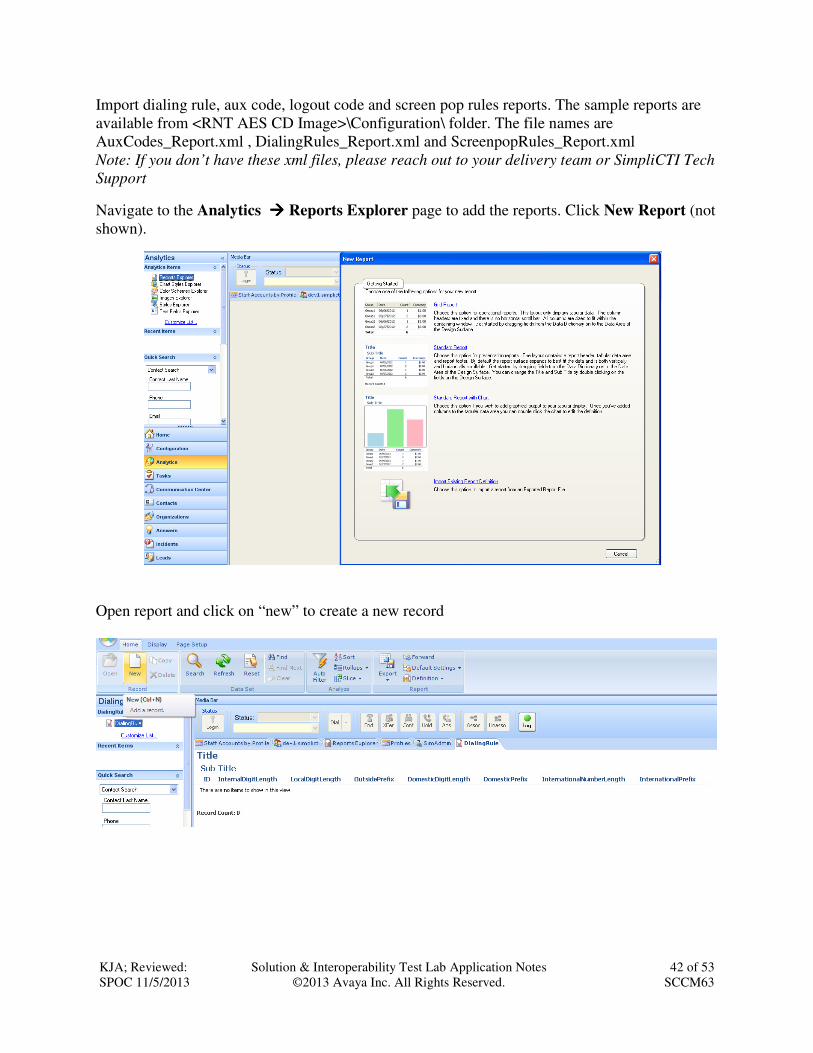
Import dialing rule, aux code, logout code and screen pop rules reports. The sample reports are
available from <RNT AES CD Image>\Configuration\ folder. The file names are
AuxCodes_Report.xml , DialingRules_Report.xml and ScreenpopRules_Report.xml
Note: If you don’t have these xml files, please reach out to your delivery team or SimpliCTI Tech
Support
Navigate to the Analytics ���� Reports Explorer page to add the reports. Click New Report (not
shown).
Open report and click on “new” to create a new record

KJA; Reviewed:
SPOC 11/5/2013
Solution & Interoperability Test Lab Application Notes
©2013 Avaya Inc. All Rights Reserved.
43 of 53
SCCM63
For screen pop rules, you can use the below screen shot as a reference.
Note that DeptName is just for labeling the rule.
Sample Query:
SELECT Id FROM Contact WHERE c$member_id = [UUI] SELECT Contact.Id FROM CO.ContactPhones WHERE PhoneNumber =
[ANI] Actions Supported:
Open Contact Open the contact match from query
Open Incident Open the incident match from query
New Contact Open a new contact
New Incident Open a new incident
New IncidentWithContact Open a new incident and have it associated with the contact that matches the
phone number or create a new contact if there is no match
Rule <Rule_Id> Run another rule
Report <report_id> <filter1> <filter2> Open a report with the specified report Id and filters. Multiple filters can be added
after a space. Example of a filter is like this: contacts.any_phone_raw;=;[ANI]
The IfTrue and IfFalse are reserved for future implementations.
Import Contacts by Phone reports. This report is available from <RNT AES CD
Image>\Configuration\ folder. The file name is ContactByAnyPhones .xml. This is used for
Standard screen pop from Media bar using ANI of the caller.
Note: If you don’t have these xml files, please reach out to your delivery team or SimpliCTI Tech
Support
Import Interaction Logs reports. This is to view historical reporting data of all the contacts
received by the Media Bar. This report is available from <RNT AES CD Image>\Configuration\
folder. The file name is InteractionLogs.xml
KJA; Reviewed:
SPOC 11/5/2013
Solution & Interoperability Test Lab Application Notes
©2013 Avaya Inc. All Rights Reserved.
44 of 53
SCCM63
Note: If you don’t have these xml files, please reach out to your delivery team or SimpliCTI Tech
Support
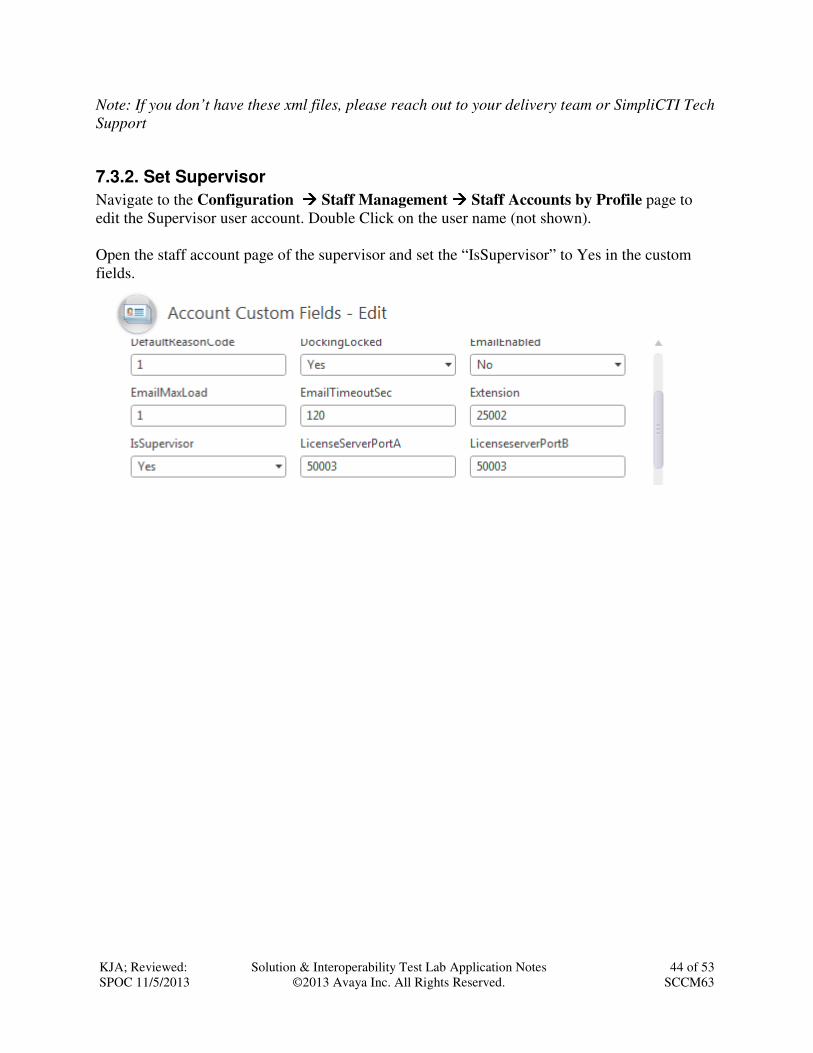
7.3.2. Set Supervisor
Navigate to the Configuration ���� Staff Management ���� Staff Accounts by Profile page to
edit the Supervisor user account. Double Click on the user name (not shown).
Open the staff account page of the supervisor and set the “IsSupervisor” to Yes in the custom
fields.

KJA; Reviewed:
SPOC 11/5/2013
Solution & Interoperability Test Lab Application Notes
©2013 Avaya Inc. All Rights Reserved.
45 of 53
SCCM63
7.3.3. Agent Configuration
To configure the agents to enable them to use Media bar, please follow the steps below.
Navigate to the Configuration ���� Site Configuration ���� Add-In Manager page to add the
media-bar addin.
1. From add-in manager, upload the media bar and screen pop add in zip files to the site.
2. The zip files are available from “<RNT AES CD Image>\Setup\” folder. The file names
are SimpliCTI_MediaBar_AES_MM.zip and SimpliCTI_ScreenpopHandler.zip
Note: If you don’t have this Custom objects zip file, please reach out to your delivery
team or SimpliCTI Tech Support
KJA; Reviewed:
SPOC 11/5/2013
Solution & Interoperability Test Lab Application Notes
©2013 Avaya Inc. All Rights Reserved.
46 of 53
SCCM63
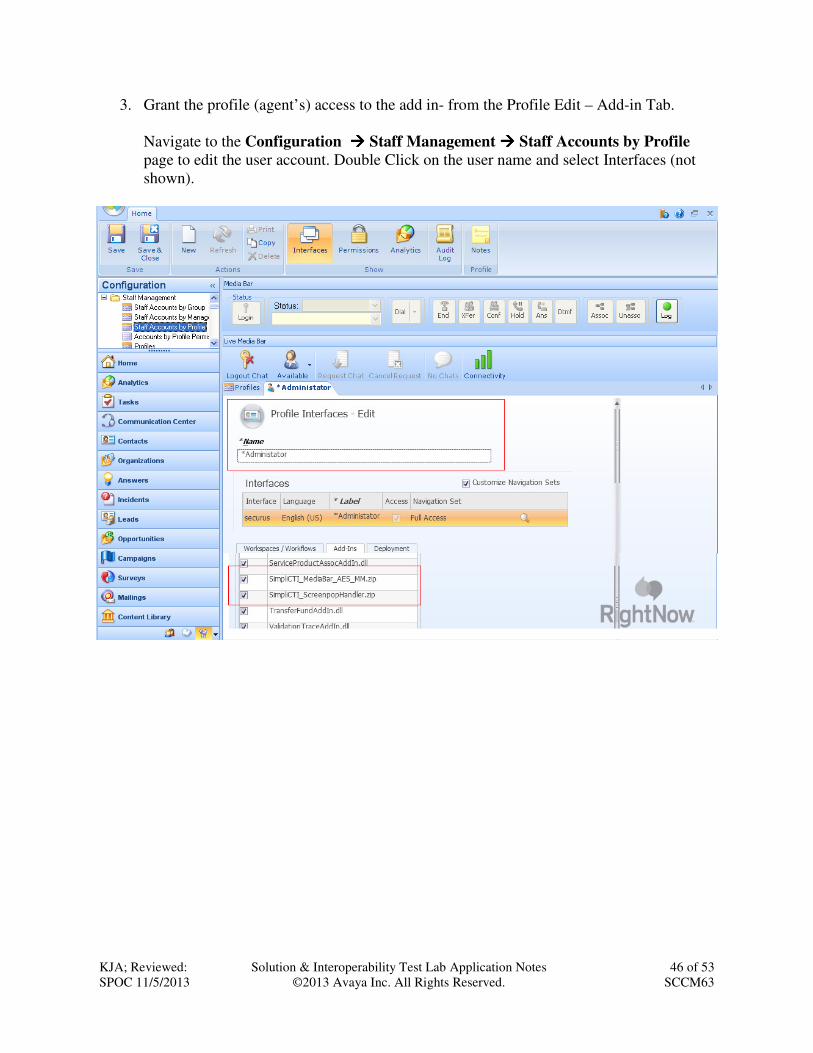
3. Grant the profile (agent’s) access to the add in- from the Profile Edit – Add-in Tab.
Navigate to the Configuration ���� Staff Management ���� Staff Accounts by Profile page to edit the user account. Double Click on the user name and select Interfaces (not
shown).

KJA; Reviewed:
SPOC 11/5/2013
Solution & Interoperability Test Lab Application Notes
©2013 Avaya Inc. All Rights Reserved.
47 of 53
SCCM63
4. In Add Manager, highlight SimpliCTI_MediaBar_AES
a. In “Profiles allowed to access” select appropriate profile.
b. Select appropriate Interface.
c. In “Server Configuration Properties”, configure all the values as
mentioned below. Default values of these Classes is blank. Values are configured
by clicking the value column for a specified Class.
RightNowServiceVersion: The right now SOAP API version. Currently 1.1 and 1.2 are supported.
AgentStatePoll: This turns on two timers. One does a short poll for timed ACW. The other one
does a long poll for general agent state sync between the soft phone and the hard
phone.
LongPollInterval: Interval in seconds for the agent state poll timer that does a long poll.
ShortPollInterval: Interval in seconds for the agent state poll timer that does a short poll.
MediaBarPort:
KJA; Reviewed:
SPOC 11/5/2013
Solution & Interoperability Test Lab Application Notes
©2013 Avaya Inc. All Rights Reserved.
48 of 53
SCCM63
The port that the media bar listens to for requests.
RaiseCallEventInThread: Raise the incoming call event from a thread. If turned on, this allows a toast to be
popped at the same time the search query is running and thus minimize answer
delay.
KeepLiveInterval: Interval in seconds of the timer that sends keep live messages to AES.
ReconnectInterval: Number of seconds the timer waits before it tries to re-establish connection to
AES after a lost connection is detected.
EnableClickToDial: Enables click to dial from contact or incident opened in the work space.
LogSize: The maximum size of the log file in MB.
LogLevel: The level of the log. 4 prints all logs. 1 prints only errors.
LogPath: The folder of the logs. In this folder, two log files are written.
MediaBar.<user_name>.log and AESConnector.<user_name>.log.
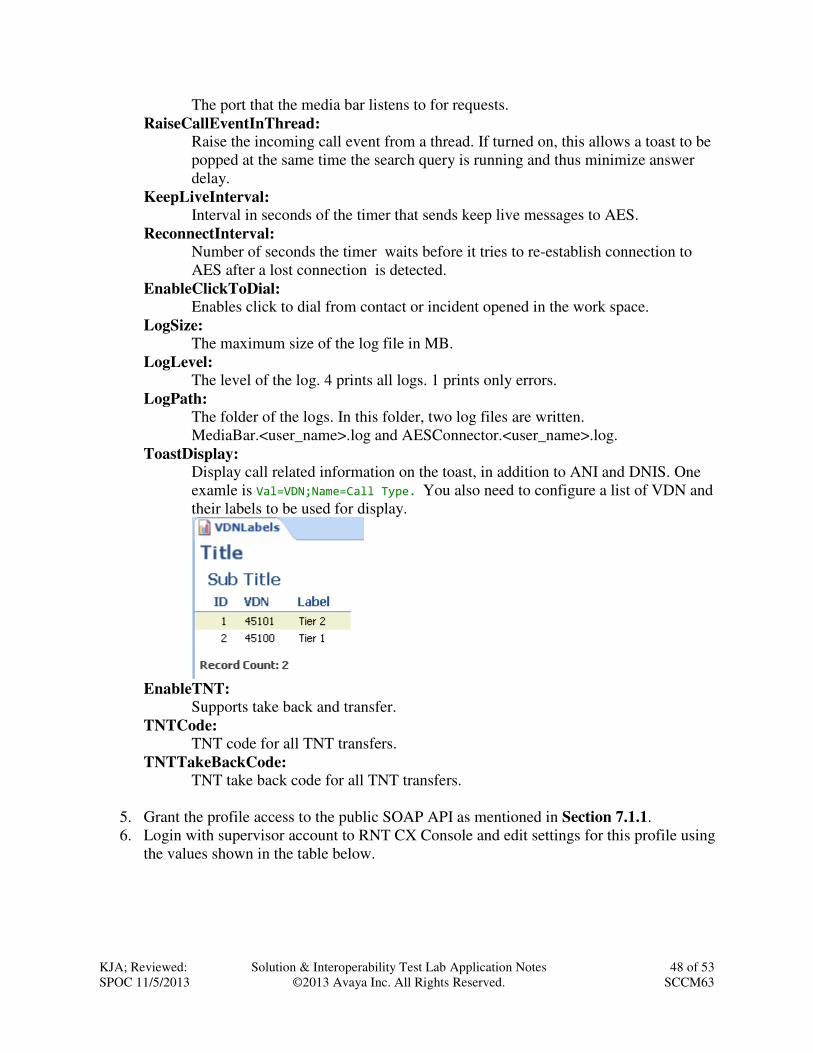
ToastDisplay: Display call related information on the toast, in addition to ANI and DNIS. One
examle is Val=VDN;Name=Call Type. You also need to configure a list of VDN and
their labels to be used for display.
EnableTNT: Supports take back and transfer.
TNTCode: TNT code for all TNT transfers.
TNTTakeBackCode: TNT take back code for all TNT transfers.
5. Grant the profile access to the public SOAP API as mentioned in Section 7.1.1.
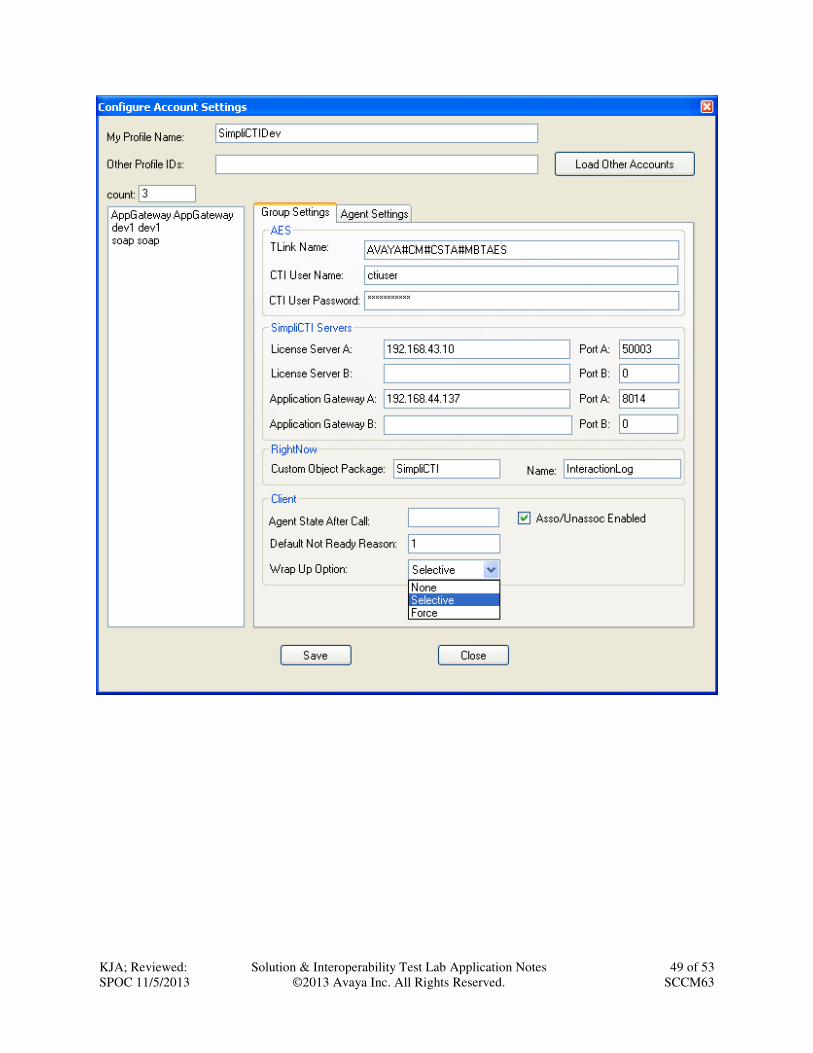
6. Login with supervisor account to RNT CX Console and edit settings for this profile using
the values shown in the table below.
KJA; Reviewed:
SPOC 11/5/2013
Solution & Interoperability Test Lab Application Notes
©2013 Avaya Inc. All Rights Reserved.
49 of 53
SCCM63
KJA; Reviewed:
SPOC 11/5/2013
Solution & Interoperability Test Lab Application Notes
©2013 Avaya Inc. All Rights Reserved.
50 of 53
SCCM63
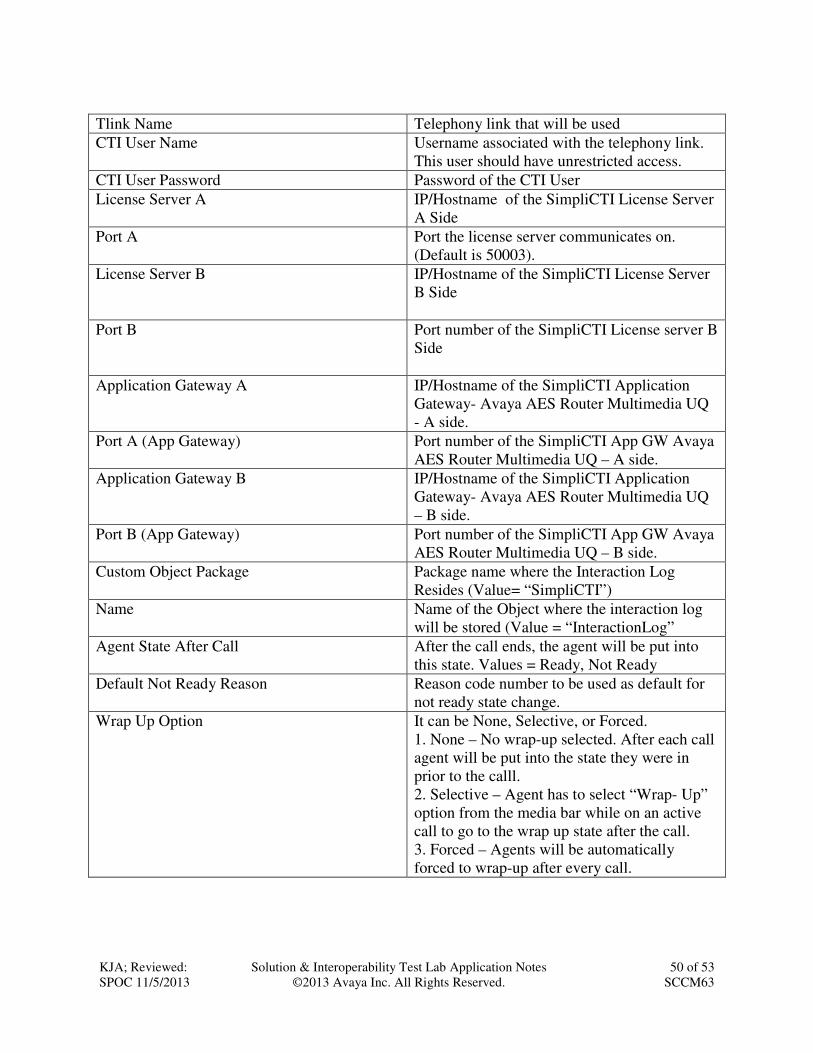
Tlink Name Telephony link that will be used
CTI User Name Username associated with the telephony link.
This user should have unrestricted access.
CTI User Password Password of the CTI User
License Server A IP/Hostname of the SimpliCTI License Server
A Side
Port A Port the license server communicates on.
(Default is 50003).
License Server B IP/Hostname of the SimpliCTI License Server
B Side
Port B Port number of the SimpliCTI License server B
Side
Application Gateway A IP/Hostname of the SimpliCTI Application
Gateway- Avaya AES Router Multimedia UQ
- A side.
Port A (App Gateway) Port number of the SimpliCTI App GW Avaya
AES Router Multimedia UQ – A side.
Application Gateway B IP/Hostname of the SimpliCTI Application
Gateway- Avaya AES Router Multimedia UQ
– B side.
Port B (App Gateway) Port number of the SimpliCTI App GW Avaya
AES Router Multimedia UQ – B side.
Custom Object Package Package name where the Interaction Log
Resides (Value= “SimpliCTI”)
Name Name of the Object where the interaction log
will be stored (Value = “InteractionLog”
Agent State After Call After the call ends, the agent will be put into
this state. Values = Ready, Not Ready
Default Not Ready Reason Reason code number to be used as default for
not ready state change.
Wrap Up Option It can be None, Selective, or Forced.
1. None – No wrap-up selected. After each call
agent will be put into the state they were in
prior to the calll.
2. Selective – Agent has to select “Wrap- Up”
option from the media bar while on an active
call to go to the wrap up state after the call.
3. Forced – Agents will be automatically
forced to wrap-up after every call.
KJA; Reviewed:
SPOC 11/5/2013
Solution & Interoperability Test Lab Application Notes
©2013 Avaya Inc. All Rights Reserved.
51 of 53
SCCM63
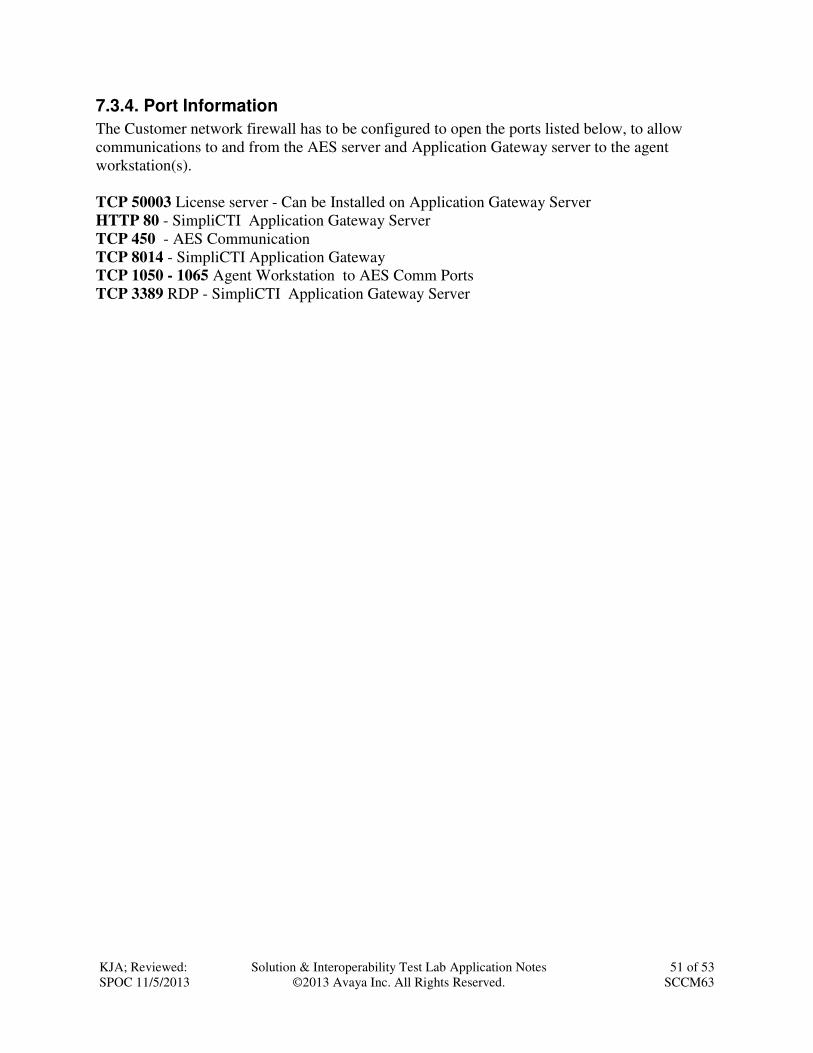
7.3.4. Port Information
The Customer network firewall has to be configured to open the ports listed below, to allow
communications to and from the AES server and Application Gateway server to the agent
workstation(s).
TCP 50003 License server - Can be Installed on Application Gateway Server
HTTP 80 - SimpliCTI Application Gateway Server
TCP 450 - AES Communication
TCP 8014 - SimpliCTI Application Gateway
TCP 1050 - 1065 Agent Workstation to AES Comm Ports
TCP 3389 RDP - SimpliCTI Application Gateway Server
KJA; Reviewed:
SPOC 11/5/2013
Solution & Interoperability Test Lab Application Notes
©2013 Avaya Inc. All Rights Reserved.
52 of 53
SCCM63
8. Conclusion SimpliCTI was able to successfully interoperate with Avaya Aura® Communication Manager
and Avaya Aura® Application Enablement. All executed test cases were passed.
9. Additional References Product documentation for Avaya products may be found at http://support.avaya.com.
[1] Administering Avaya Aura® Communication Manager, Release 6.3, Document 03-
3005089, Issue 7.0, December 2012
Product information for SimpliCTI can be found at the following URL: http://www.simplicti.com

KJA; Reviewed:
SPOC 11/5/2013
Solution & Interoperability Test Lab Application Notes
©2013 Avaya Inc. All Rights Reserved.
53 of 53
SCCM63
©2013 Avaya Inc. All Rights Reserved. Avaya and the Avaya Logo are trademarks of Avaya Inc. All trademarks identified by ® and
™ are registered trademarks or trademarks, respectively, of Avaya Inc. All other trademarks
are the property of their respective owners. The information provided in these Application
Notes is subject to change without notice. The configurations, technical data, and
recommendations provided in these Application Notes are believed to be accurate and
dependable, but are presented without express or implied warranty. Users are responsible for
their application of any products specified in these Application Notes.
Please e-mail any questions or comments pertaining to these Application Notes along with the
full title name and filename, located in the lower right corner, directly to the Avaya
DevConnect Program at [email protected].