application notes for oaisys recording server with avaya...
TRANSCRIPT

TLT; Reviewed:
SPOC 1/21/2013
Solution & Interoperability Test Lab Application Notes
©2013 Avaya Inc. All Rights Reserved.
1 of 23
OAISYS-AES62-ST
Avaya Solution & Interoperability Test Lab
Application Notes for OAISYS Recording Server with
Avaya Aura® Communication Manager 6.2 and Avaya
Aura® Application Enablement Services 6.2 Using Station
Tap – Issue 1.0
Abstract
These Application Notes describe the configuration steps required for OAISYS Recording
Server to interoperate with Avaya Aura® Communication Manager 6.2 and Avaya Aura®
Application Enablement Services 6.2 using station tap. OAISYS Recording Server is a call
recording solution.
In the compliance testing, OAISYS Recording Server used the Telephony Services
Application Programming Interface from Avaya Aura® Application Enablement Services to
monitor contact center devices on Avaya Aura® Communication Manager, and the station tap
method to capture the media associated with the monitored agents for call recording.
Information in these Application Notes has been obtained through DevConnect compliance
testing and additional technical discussions. Testing was conducted via the DevConnect
Program at the Avaya Solution and Interoperability Test Lab.

TLT; Reviewed:
SPOC 1/21/2013
Solution & Interoperability Test Lab Application Notes
©2013 Avaya Inc. All Rights Reserved.
2 of 23
OAISYS-AES62-ST
1. Introduction These Application Notes describe the configuration steps required for OAISYS Recording
Server to interoperate with Avaya Aura® Communication Manager 6.2 and Avaya Aura®
Application Enablement Services 6.2 using station tap. OAISYS Recording Server is a call
recording solution.
In the compliance testing, OAISYS Recording Server used the Telephony Services Application
Programming Interface (TSAPI) from Avaya Aura® Application Enablement Services to
monitor skill groups and agent stations on Avaya Aura® Communication Manager, and used the
station tap method to capture the media associated with the monitored agent stations for call
recording.
2. General Test Approach and Test Results The feature test cases were performed both automatically and manually. Upon start of the
Recording Server application, the application automatically obtains a list of configured security
devices from Application Enablement Services, and requests monitoring on the skill groups and
agent stations.
For the manual part of the testing, each call was handled manually on the agent station with
generation of unique audio content for the recordings. Necessary user actions such as hold and
reconnect were performed from the agent telephones to test the different call scenarios.
The serviceability test cases were performed manually by disconnecting/reconnecting the
Ethernet cable to Recording Server.
The verification of tests included using the Application Enablement Services logs for proper
message exchanges, and using the OAISYS Management Studio application for proper logging
and playback of calls.
DevConnect Compliance Testing is conducted jointly by Avaya and DevConnect members. The
jointly-defined test plan focuses on exercising APIs and/or standards-based interfaces pertinent
to the interoperability of the tested products and their functionalities. DevConnect Compliance
Testing is not intended to substitute full product performance or feature testing performed by
DevConnect members, nor is it to be construed as an endorsement by Avaya of the suitability or
completeness of a DevConnect member’s solution.

TLT; Reviewed:
SPOC 1/21/2013
Solution & Interoperability Test Lab Application Notes
©2013 Avaya Inc. All Rights Reserved.
3 of 23
OAISYS-AES62-ST
2.1. Interoperability Compliance Testing
The interoperability compliance test included feature and serviceability testing.
The feature testing focused on verifying the following on Recording Server:
Handling of TSAPI messages in the areas of event notification and value queries.
Proper recording, logging, and playback of calls for scenarios involving inbound, outbound,
internal, external, ACD, non-ACD, hold, reconnect, simultaneous, conference, and transfer.
The serviceability testing focused on verifying the ability of Recording Server to recover from
adverse conditions, such as disconnecting/reconnecting the Ethernet cable to Recording Server
2.2. Test Results
All test cases were executed and verified. The following were observations on Recording Server
from the compliance testing.
Held periods were included in the call recordings, and appeared in grey.
Each blind transfer and blind conference scenario produced two recording entries, with the
second recording entry appeared in grey with a short duration that corresponded to the
transfer/conference actions.
Each attended transfer and conference scenario produced two recording entries, with the
second recording entry containing grey for the period corresponding to the
transfer/conference actions, followed by the private conversation between the internal
parties.
The majority of the transfer and conference recording entries used the transfer-to and
conference-to for Extension, with all party extensions shown in the Detailed View.
An internal call between two agents generates one call recording, with the called agent used
for Extension.
For a call that stayed up during a link disruption, two call recordings were generated for the
call to capture the conversation before and after the disruption.
2.3. Support
Technical support on Recording Server can be obtained through the following:
Phone: (888) 496-9040
Web: http://www.oaisys.com/technical_support.aspx
Email: [email protected]
TLT; Reviewed:
SPOC 1/21/2013
Solution & Interoperability Test Lab Application Notes
©2013 Avaya Inc. All Rights Reserved.
4 of 23
OAISYS-AES62-ST
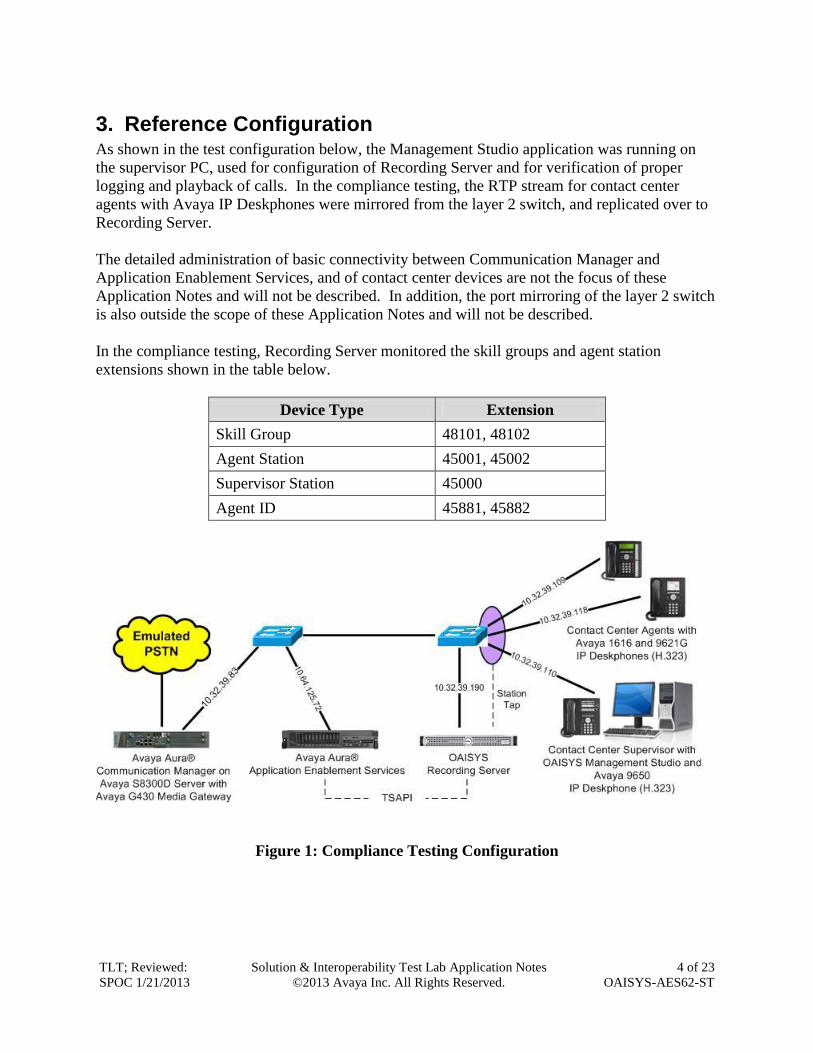
3. Reference Configuration As shown in the test configuration below, the Management Studio application was running on
the supervisor PC, used for configuration of Recording Server and for verification of proper
logging and playback of calls. In the compliance testing, the RTP stream for contact center
agents with Avaya IP Deskphones were mirrored from the layer 2 switch, and replicated over to
Recording Server.
The detailed administration of basic connectivity between Communication Manager and
Application Enablement Services, and of contact center devices are not the focus of these
Application Notes and will not be described. In addition, the port mirroring of the layer 2 switch
is also outside the scope of these Application Notes and will not be described.
In the compliance testing, Recording Server monitored the skill groups and agent station
extensions shown in the table below.
Device Type Extension
Skill Group 48101, 48102
Agent Station 45001, 45002
Supervisor Station 45000
Agent ID 45881, 45882
Figure 1: Compliance Testing Configuration

TLT; Reviewed:
SPOC 1/21/2013
Solution & Interoperability Test Lab Application Notes
©2013 Avaya Inc. All Rights Reserved.
5 of 23
OAISYS-AES62-ST
4. Equipment and Software Validated The following equipment and software were used for the sample configuration provided:
Equipment/Software Release/Version
Avaya Aura® Communication Manager on
Avaya S8300D Server with
Avaya G430 Media Gateway
6.2 SP3
(R016x.02.0.823.0-20001)
Avaya Aura® Application Enablement Services 6.2 (r6-2-0-18-0)
Avaya 1616 IP Deskphone (H.323) 1.302S
Avaya 9611G IP Deskphone (H.323) 6.2209
Avaya 9650 IP Deskphone (H.323) 3.105S
OAISYS Recording Server on
Windows 7 Professional
Avaya TSAPI Windows Client
7.2.1348
2009 SP1
6.2.0

TLT; Reviewed:
SPOC 1/21/2013
Solution & Interoperability Test Lab Application Notes
©2013 Avaya Inc. All Rights Reserved.
6 of 23
OAISYS-AES62-ST
5. Configure Avaya Aura® Communication Manager This section provides the procedures for configuring Communication Manager. The procedures
include the following areas:
Verify license
Administer CTI link
5.1. Verify License
Log in to the System Access Terminal (SAT) to verify that the Communication Manager license
has proper permissions for features illustrated in these Application Notes. Use the “display
system-parameters customer-options” command to verify that the Computer Telephony
Adjunct Links customer option is set to “y” on Page 3. If this option is not set to “y”, then
contact the Avaya sales team or business partner for a proper license file.
display system-parameters customer-options Page 3 of 11
OPTIONAL FEATURES
Abbreviated Dialing Enhanced List? y Audible Message Waiting? y
Access Security Gateway (ASG)? n Authorization Codes? y
Analog Trunk Incoming Call ID? y CAS Branch? n
A/D Grp/Sys List Dialing Start at 01? y CAS Main? n
Answer Supervision by Call Classifier? y Change COR by FAC? n
ARS? y Computer Telephony Adjunct Links? y
ARS/AAR Partitioning? y Cvg Of Calls Redirected Off-net? y
ARS/AAR Dialing without FAC? y DCS (Basic)? y
ASAI Link Core Capabilities? y DCS Call Coverage? y
ASAI Link Plus Capabilities? y DCS with Rerouting? y
Async. Transfer Mode (ATM) PNC? n
Async. Transfer Mode (ATM) Trunking? n Digital Loss Plan Modification? y
ATM WAN Spare Processor? n DS1 MSP? y
ATMS? y DS1 Echo Cancellation? y
Attendant Vectoring? y
5.2. Administer CTI Link
Add a CTI link using the “add cti-link n” command, where “n” is an available CTI link number.
Enter an available extension number in the Extension field. Note that the CTI link number and
extension number may vary. Enter “ADJ-IP” in the Type field, and a descriptive name in the
Name field. Default values may be used in the remaining fields.
add cti-link 1 Page 1 of 3
CTI LINK
CTI Link: 1
Extension: 40001
Type: ADJ-IP
COR: 1
Name: TSAPI Link

TLT; Reviewed:
SPOC 1/21/2013
Solution & Interoperability Test Lab Application Notes
©2013 Avaya Inc. All Rights Reserved.
7 of 23
OAISYS-AES62-ST
6. Configure Avaya Aura® Application Enablement Services This section provides the procedures for configuring Application Enablement Services. The
procedures include the following areas:
Launch OAM interface
Verify license
Administer TSAPI link
Administer security devices
Administer security device groups
Restart TSAPI service
Obtain Tlink name
Administer OAISYS user
Administer security CTI user
6.1. Launch OAM Interface
Access the OAM web-based interface by using the URL “https://ip-address” in an Internet
browser window, where “ip-address” is the IP address of the Application Enablement Services
server.
The Please login here screen is displayed. Log in using the appropriate credentials.

TLT; Reviewed:
SPOC 1/21/2013
Solution & Interoperability Test Lab Application Notes
©2013 Avaya Inc. All Rights Reserved.
8 of 23
OAISYS-AES62-ST
The Welcome to OAM screen is displayed next.
6.2. Verify License
Select Licensing WebLM Server Access in the left pane, to display the Web License
Manager pop-up screen (not shown), and log in with the appropriate credentials.

TLT; Reviewed:
SPOC 1/21/2013
Solution & Interoperability Test Lab Application Notes
©2013 Avaya Inc. All Rights Reserved.
9 of 23
OAISYS-AES62-ST
The Web License Manager screen below is displayed. Select Licensed products
APPL_ENAB Application_Enablement in the left pane, to display the Licensed Features
in the right pane.
Verify that there are sufficient licenses for TSAPI Simultaneous Users, as shown below.

TLT; Reviewed:
SPOC 1/21/2013
Solution & Interoperability Test Lab Application Notes
©2013 Avaya Inc. All Rights Reserved.
10 of 23
OAISYS-AES62-ST
6.3. Administer TSAPI Link
To administer a TSAPI link, select AE Services TSAPI TSAPI Links from the left pane
of the Management Console. The TSAPI Links screen is displayed, as shown below. Click
Add Link.
The Add TSAPI Links screen is displayed next.
The Link field is only local to the Application Enablement Services server, and may be set to
any available number. For Switch Connection, select the relevant switch connection from the
drop-down list. In this case, the existing switch connection “S8300D” is selected. For Switch
CTI Link Number, select the CTI link number from Section 5.2. Retain the default values in
the remaining fields, and click Apply Changes.

TLT; Reviewed:
SPOC 1/21/2013
Solution & Interoperability Test Lab Application Notes
©2013 Avaya Inc. All Rights Reserved.
11 of 23
OAISYS-AES62-ST
6.4. Administer Security Devices
All devices that are monitored by OAISYS Recording Server needs to be configured in the
security database. Select Security Security Database Devices from the left pane, to
display the Devices screen.
Enter the first agent station extension from Section 3, and click Add Device.
The Add Device screen is displayed next. For Device Type, select “PHONE”. For Tlink
Group, select “Any”. Click Apply Changes.

TLT; Reviewed:
SPOC 1/21/2013
Solution & Interoperability Test Lab Application Notes
©2013 Avaya Inc. All Rights Reserved.
12 of 23
OAISYS-AES62-ST
Repeat this section to add all monitored station and skill group extensions from Section 3, using
“PHONE” as Device Type for agent station extensions, and “ACD” as Device Type for skill
group extension, as shown below.
6.5. Administer Security Device Groups
Select Security Security Database Device Groups from the left pane (not shown below),
to display the Device Groups screen. Enter a desired device group name, and click Add Device
Group.

TLT; Reviewed:
SPOC 1/21/2013
Solution & Interoperability Test Lab Application Notes
©2013 Avaya Inc. All Rights Reserved.
13 of 23
OAISYS-AES62-ST
The Add Device Group screen is displayed. Check all configured security devices from Section
6.4, and click Apply Changes.
6.6. Restart TSAPI Service
Select Maintenance Service Controller from the left pane, to display the Service Controller
screen in the right pane. Check the TSAPI Service, and click Restart Service.

TLT; Reviewed:
SPOC 1/21/2013
Solution & Interoperability Test Lab Application Notes
©2013 Avaya Inc. All Rights Reserved.
14 of 23
OAISYS-AES62-ST
6.7. Obtain Tlink Name
Select Security Security Database Tlinks from the left pane. The Tlinks screen shows a
listing of the Tlink names. A new Tlink name is automatically generated for the TSAPI service.
Locate the Tlink name associated with the relevant switch connection, which would use the
name of the switch connection as part of the Tlink name. Make a note of the associated Tlink
name, to be used later for configuring Recording Server.
In this case, the associated Tlink name is “AVAYA#S8300D#CSTA#AES_125_72”. Note the
use of the switch connection “S8300D” from Section 6.3 as part of the Tlink name.

TLT; Reviewed:
SPOC 1/21/2013
Solution & Interoperability Test Lab Application Notes
©2013 Avaya Inc. All Rights Reserved.
15 of 23
OAISYS-AES62-ST
6.8. Administer OAISYS User
Select User Management User Admin Add User from the left pane, to display the Add
User screen in the right pane.
Enter desired values for User Id, Common Name, Surname, User Password, and Confirm
Password. For CT User, select “Yes” from the drop-down list. Retain the default value in the
remaining fields. Click Apply at the bottom of the screen (not shown below).

TLT; Reviewed:
SPOC 1/21/2013
Solution & Interoperability Test Lab Application Notes
©2013 Avaya Inc. All Rights Reserved.
16 of 23
OAISYS-AES62-ST
6.9. Administer Security CTI User
Select Security Security Database CTI Users > List All Users from the left pane (not
shown below), to display the CTI Users screen. Select the OAISYS user from Section 6.8, and
click Edit.
The Edit CTI User screen is displayed next. For Call Origination/Termination and Device
Status and Calls On A Device Monitoring, select “Any”. For Device Monitoring, select the
security device group from Section 6.5. Check Call Monitoring, and click Apply Changes.
TLT; Reviewed:
SPOC 1/21/2013
Solution & Interoperability Test Lab Application Notes
©2013 Avaya Inc. All Rights Reserved.
17 of 23
OAISYS-AES62-ST
7. Configure OAISYS Recording Server This section provides the procedures for configuring Recording Server. The procedures include
the following areas:
Administer TSAPI service
Launch Management Studio
Administer CTI port settings
Administer recording ports
The configuration of Recording Server is performed by authorized third party integrators. The
procedural steps are presented in these Application Notes for informational purposes.
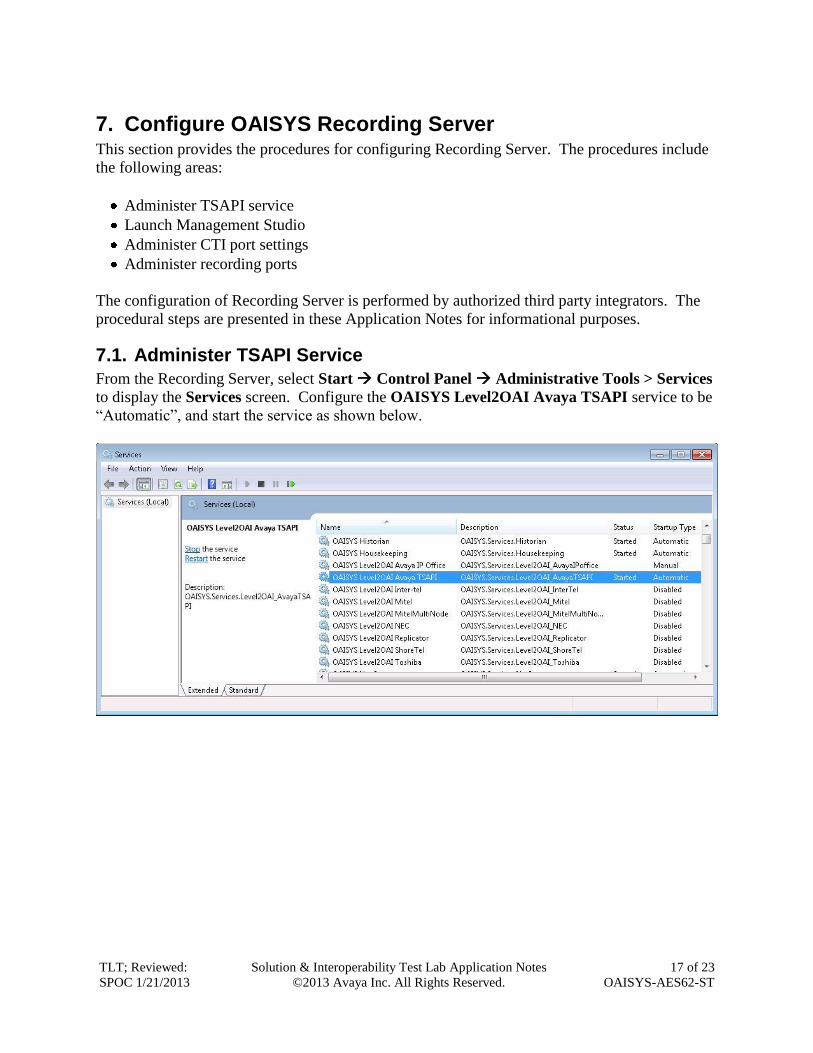
7.1. Administer TSAPI Service
From the Recording Server, select Start Control Panel Administrative Tools > Services
to display the Services screen. Configure the OAISYS Level2OAI Avaya TSAPI service to be
“Automatic”, and start the service as shown below.

TLT; Reviewed:
SPOC 1/21/2013
Solution & Interoperability Test Lab Application Notes
©2013 Avaya Inc. All Rights Reserved.
18 of 23
OAISYS-AES62-ST
7.2. Launch Management Studio
From a PC running the Management Studio application, select Start All Programs
OAISYS OAISYS Management Studio to launch the application, and log in using
administrative credentials.
7.3. Administer CTI Port Settings
The OAISYS Tracer Management Studio screen is displayed. Select Server CTI – Avaya
TSAPI Port Settings in the left pane, to display the Avaya Server Setup screen. Enter the
following values for the specified fields, and retain the default values for the remaining fields.
AES Tlink Name: The Tlink name from Section 6.7.
AES Login: The OAISYS user credentials from Section 6.8.
AES Password: The OAISYS user credentials from Section 6.8.

TLT; Reviewed:
SPOC 1/21/2013
Solution & Interoperability Test Lab Application Notes
©2013 Avaya Inc. All Rights Reserved.
19 of 23
OAISYS-AES62-ST
7.4. Administer Recording Ports
Select Server Recording Manager Ports in the left pane, to display a list of ports. Scroll
down as necessary to select and double-click on the first VoIP port, in this case port “49”.
In the updated screen shown below, check Enabled. For Extension, enter the first agent station
extension from Section 3. For VoIP Device Static IP Address, enter the IP address of the first
agent station. Retain the default values in the remaining fields.
Repeat this section to configure a port for each monitored agent. In the compliance testing, two
ports were configured with agent station extensions “45001” and “45002”.

TLT; Reviewed:
SPOC 1/21/2013
Solution & Interoperability Test Lab Application Notes
©2013 Avaya Inc. All Rights Reserved.
20 of 23
OAISYS-AES62-ST
8. Verification Steps This section provides the tests that can be performed to verify proper configuration of
Communication Manager, Application Enablement Services, and Recording Server.
8.1. Verify Avaya Aura® Communication Manager
On Communication Manager, verify the status of the administered CTI link by using the “status
aesvcs cti-link” command. Verify that the Service State is “established” for the CTI link
number administered in Section 5.2, as shown below.
status aesvcs cti-link
AE SERVICES CTI LINK STATUS
CTI Version Mnt AE Services Service Msgs Msgs
Link Busy Server State Sent Rcvd
1 4 no aes_125_72 established 60 30
8.2. Verify Avaya Aura® Application Enablement Services
On Application Enablement Services, verify the status of the TSAPI link by selecting Status
Status and Control TSAPI Service Summary from the left pane. The TSAPI Link Details
screen is displayed.
Verify that the Status is “Talking” for the TSAPI link administered in Section 6.3, as shown
below. Also verify that the corresponding Associations value reflects the total number of
monitored devices from Section 3.

TLT; Reviewed:
SPOC 1/21/2013
Solution & Interoperability Test Lab Application Notes
©2013 Avaya Inc. All Rights Reserved.
21 of 23
OAISYS-AES62-ST
8.3. Verify OAISYS Recording Server
Log an agent in to the skill group to handle and complete an ACD call. Follow the procedural
steps in Section 7.2 to launch the Management Studio application, and log in using the
appropriate user credentials.
Select Historical Calls in the lower left pane, followed by My Folder All Calls I Can View
in the upper left pane. Verify that there is an entry reflecting the last call, with proper values in
the relevant fields.
Double click on the entry to listen to the playback. Verify that the call recording can be played
back.

TLT; Reviewed:
SPOC 1/21/2013
Solution & Interoperability Test Lab Application Notes
©2013 Avaya Inc. All Rights Reserved.
22 of 23
OAISYS-AES62-ST
9. Conclusion These Application Notes describe the configuration steps required for OAISYS Recording
Server to successfully interoperate with Avaya Aura® Communication Manager 6.2 and Avaya
Aura® Application Enablement Services 6.2 using station tap. All feature and serviceability test
cases were completed with observations noted in Section 2.2.
10. Additional References This section references the product documentation relevant to these Application Notes.
1. Administering Avaya Aura® Communication Manager, Document 03-300509, Issue 7.0,
Release 6.2, July 2012, available at http://support.avaya.com.
2. Avaya Aura® Application Enablement Services Administration and Maintenance Guide,
Release 6.2, Issue 1, July 2012, available at http://support.avaya.com.
3. OAISYS Administration Guide, Version 7.2, May 29, 2012, available at
http://www.oaisys.com/downloads/OAISYS_Version_7.2_Administration_Guide.pdf.
4. OAISYS Management Studio User Guide, Version 7.2, May 23, 2012, available at
http://www.oaisys.com/downloads/OAISYS_Version_7.2_Management_Studio_User_gui
de.pdf.
TLT; Reviewed:
SPOC 1/21/2013
Solution & Interoperability Test Lab Application Notes
©2013 Avaya Inc. All Rights Reserved.
23 of 23
OAISYS-AES62-ST
©2013 Avaya Inc. All Rights Reserved.
Avaya and the Avaya Logo are trademarks of Avaya Inc. All trademarks identified by ® and ™
are registered trademarks or trademarks, respectively, of Avaya Inc. All other trademarks are the
property of their respective owners. The information provided in these Application Notes is
subject to change without notice. The configurations, technical data, and recommendations
provided in these Application Notes are believed to be accurate and dependable, but are
presented without express or implied warranty. Users are responsible for their application of any
products specified in these Application Notes.
Please e-mail any questions or comments pertaining to these Application Notes along with the
full title name and filename, located in the lower right corner, directly to the Avaya DevConnect
Program at [email protected].