application notes for nice engage platform 6.15 with avaya
TRANSCRIPT

TLT; Reviewed:
SPOC 3/2/2020
Solution & Interoperability Test Lab Application Notes
©2020 Avaya Inc. All Rights Reserved.
1 of 49
NICE-PC52-PG230
Avaya Solution & Interoperability Test Lab
Application Notes for NICE Engage Platform 6.15 with
Avaya Avaya Proactive Contact 5.2 with PG230 and Avaya
Aura® Application Enablement Services 8.1 – Issue 1.0
Abstract
These Application Notes describe the configuration steps required for NICE Engage Platform
6.15 to interoperate with Avaya Proactive Contact 5.2 with PG230 and Avaya Aura®
Application Enablement Services 8.1. NICE Engage Platform is a call recording solution.
In the compliance testing, NICE Engage Platform used the Event Services interface from
Avaya Proactive Contact to obtain information on calls and agent states, and used the Multiple
Registration feature from the Avaya Aura® Application Enablement Services Device, Media,
and Call Control interface to capture media associated with the agent stations for call
recording.
Readers should pay attention to Section 2, in particular the scope of testing as outlined in
Section 2.1 as well as any observations noted in Section 2.2, to ensure that their own use cases
are adequately covered by this scope and results.
Information in these Application Notes has been obtained through DevConnect compliance
testing and additional technical discussions. Testing was conducted via the DevConnect
Program at the Avaya Solution and Interoperability Test Lab.

TLT; Reviewed:
SPOC 3/2/2020
Solution & Interoperability Test Lab Application Notes
©2020 Avaya Inc. All Rights Reserved.
2 of 49
NICE-PC52-PG230
1. Introduction These Application Notes describe the configuration steps required for NICE Engage Platform
(Engage) 6.15 to interoperate with Avaya Proactive Contact 5.2 with PG230 and Avaya Aura®
Application Enablement Services 8.1. Engage is a call recording solution.
In the compliance testing, Engage used the Event Services interface from Proactive Contact to
obtain information on calls and agent states, and used the Multiple Registration feature from the
Application Enablement Services Device, Media, and Call Control (DMCC) .XML interface to
capture media associated with the agent stations for call recording.
The DMCC interface is used by Engage to register a virtual IP softphone against each agent
station to pick up the media for call recording. When there was an active call at the agent
station, Engage is informed of the call via events from the Event Services interface and starts the
call recording by use of media from the associated virtual IP softphone. The Event Services
events are also used to determine when to stop the call recordings.
Engage can be deployed with distributed components across multiple servers. The compliance
testing used two Engage servers in the test configuration – one server running the Application
Server, Database Server, and Interactions Center components, and the other server running the
Advanced Interaction Recorder component. The Application Server component is responsible
for the Engage web interface, the Interactions Center component is responsible for Event
Services connection with Proactive Contact, and the Advanced Interaction Recorder component
is responsible for DMCC connection with Application Enablement Services.
The compliance testing covered the recording of outbound and inbound calls that were delivered
by Proactive Contact for the PG230 deployment option. The recording of inbound calls
delivered by Communication Manager under the agent blending mode is outside the scope of this
compliance test.

TLT; Reviewed:
SPOC 3/2/2020
Solution & Interoperability Test Lab Application Notes
©2020 Avaya Inc. All Rights Reserved.
3 of 49
NICE-PC52-PG230
2. General Test Approach and Test Results The feature test cases were performed both automatically and manually. Upon start of the
Engage application, the application automatically established Event Services connection with
Proactive Contact and DMCC connection with Application Enablement Services.
For the manual part of testing, each call was handled manually at the agent with generation of
unique audio content for recording. Necessary agent actions such as forward work and release
line were performed from the Proactive Contact Agent application running on the agent desktops
to test various call scenarios.
The serviceability test cases were performed manually by disconnecting/reconnecting the
Ethernet connection to Engage.
The verification of tests included use of Engage logs for proper message exchanges and use of
Engage web interface for proper logging and playback of call recordings.
DevConnect Compliance Testing is conducted jointly by Avaya and DevConnect members. The
jointly-defined test plan focuses on exercising APIs and/or standards-based interfaces pertinent
to the interoperability of the tested products and their functionalities. DevConnect Compliance
Testing is not intended to substitute full product performance or feature testing performed by
DevConnect members, nor is it to be construed as an endorsement by Avaya of the suitability or
completeness of a DevConnect member’s solution.
Avaya recommends our customers implement Avaya solutions using appropriate security and
encryption capabilities enabled by our products. The testing referenced in these DevConnect
Application Notes included the enablement of supported encryption capabilities in the Avaya
products. Readers should consult the appropriate Avaya product documentation for further
information regarding security and encryption capabilities supported by those Avaya products.
Support for these security and encryption capabilities in any non-Avaya solution component is
the responsibility of each individual vendor. Readers should consult the appropriate vendor-
supplied product documentation for more information regarding those products.
For the testing associated with these Application Notes, the interfaces between Engage and
Avaya products included encrypted Event Services and DMCC connections.

TLT; Reviewed:
SPOC 3/2/2020
Solution & Interoperability Test Lab Application Notes
©2020 Avaya Inc. All Rights Reserved.
4 of 49
NICE-PC52-PG230
2.1. Interoperability Compliance Testing
The interoperability compliance test included feature and serviceability testing.
The feature testing focused on verifying the following on Engage:
• Handling of Event Services agent states and call events.
• Use of DMCC registration services to register virtual IP softphones.
• Use of DMCC device services and media control events to obtain media from the virtual IP
softphones.
• Proper recording, logging, and playback of calls for scenarios involving agent drop,
customer drop, hold, reconnect, simultaneous calls, forward work, long duration, multiple
agents, manual call, inbound call blending, outbound call blending, and outbound agent
blending scenarios.
The serviceability testing focused on verifying the ability of Engage to recover from adverse
conditions, such as disconnecting and reconnecting the Ethernet connection to Engage.
2.2. Test Results
All test cases were executed and verified. The following were the observations on Engage from
the compliance testing.
• Recording of supervised forward work with conference scenarios are not supported in this
release of Engage.
• In the unsupervised forward work scenario, the recording entry for the forward-from agent
reported a hold count of “1”, and the recording entry for the forward-to agent reported
direction of “Outgoing”.
• In the supervised forward work with transfer scenario, the recording entry for the forward-
from agent reported values for hold count and hold duration. In addition, the conversation
between the forward-to agent with the PSTN is part of the complete call entry for the
forward-from agent.
2.3. Support
Technical support on Engage can be obtained through the following:
• Web : http://www.extranice.com

TLT; Reviewed:
SPOC 3/2/2020
Solution & Interoperability Test Lab Application Notes
©2020 Avaya Inc. All Rights Reserved.
5 of 49
NICE-PC52-PG230
3. Reference Configuration The configuration used for the compliance testing is shown in Figure 1. The detailed
administration of basic connectivity between Communication Manager and Proactive Contact,
between Communication Manager and Application Enablement Services, and of call center
devices are not the focus of these Application Notes and will not be described.
The agent station extensions used in the compliance testing are shown in the table below.
Device Type Extension
Agent Station 65001 (H.323), 66006 (SIP)
Figure 1: Compliance Testing Configuration
TLT; Reviewed:
SPOC 3/2/2020
Solution & Interoperability Test Lab Application Notes
©2020 Avaya Inc. All Rights Reserved.
6 of 49
NICE-PC52-PG230
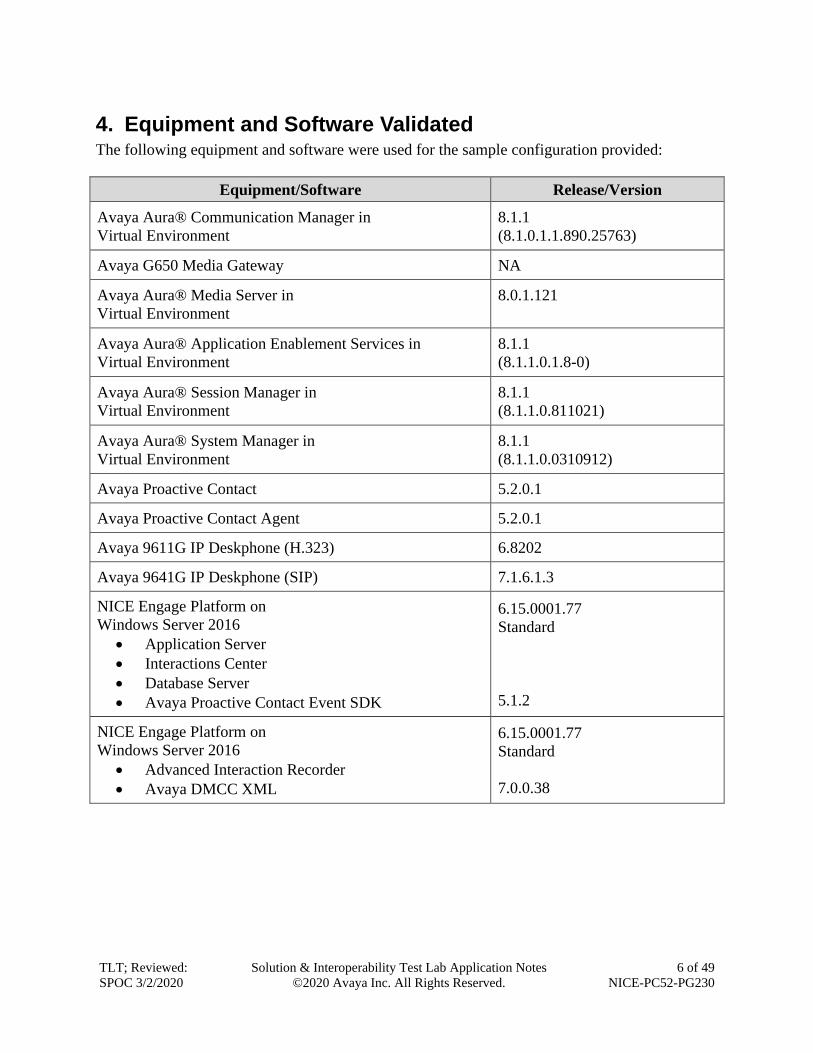
4. Equipment and Software Validated The following equipment and software were used for the sample configuration provided:
Equipment/Software Release/Version
Avaya Aura® Communication Manager in
Virtual Environment
8.1.1
(8.1.0.1.1.890.25763)
Avaya G650 Media Gateway NA
Avaya Aura® Media Server in
Virtual Environment
8.0.1.121
Avaya Aura® Application Enablement Services in
Virtual Environment
8.1.1
(8.1.1.0.1.8-0)
Avaya Aura® Session Manager in
Virtual Environment
8.1.1
(8.1.1.0.811021)
Avaya Aura® System Manager in
Virtual Environment
8.1.1
(8.1.1.0.0310912)
Avaya Proactive Contact 5.2.0.1
Avaya Proactive Contact Agent 5.2.0.1
Avaya 9611G IP Deskphone (H.323) 6.8202
Avaya 9641G IP Deskphone (SIP) 7.1.6.1.3
NICE Engage Platform on
Windows Server 2016
• Application Server
• Interactions Center
• Database Server
• Avaya Proactive Contact Event SDK
6.15.0001.77
Standard
5.1.2
NICE Engage Platform on
Windows Server 2016
• Advanced Interaction Recorder
• Avaya DMCC XML
6.15.0001.77
Standard
7.0.0.38
TLT; Reviewed:
SPOC 3/2/2020
Solution & Interoperability Test Lab Application Notes
©2020 Avaya Inc. All Rights Reserved.
7 of 49
NICE-PC52-PG230
5. Configure Avaya Aura® Communication Manager This section provides the procedures for configuring Communication Manager. The procedures
include the following areas:
• Administer IP codec set
• Administer agent station
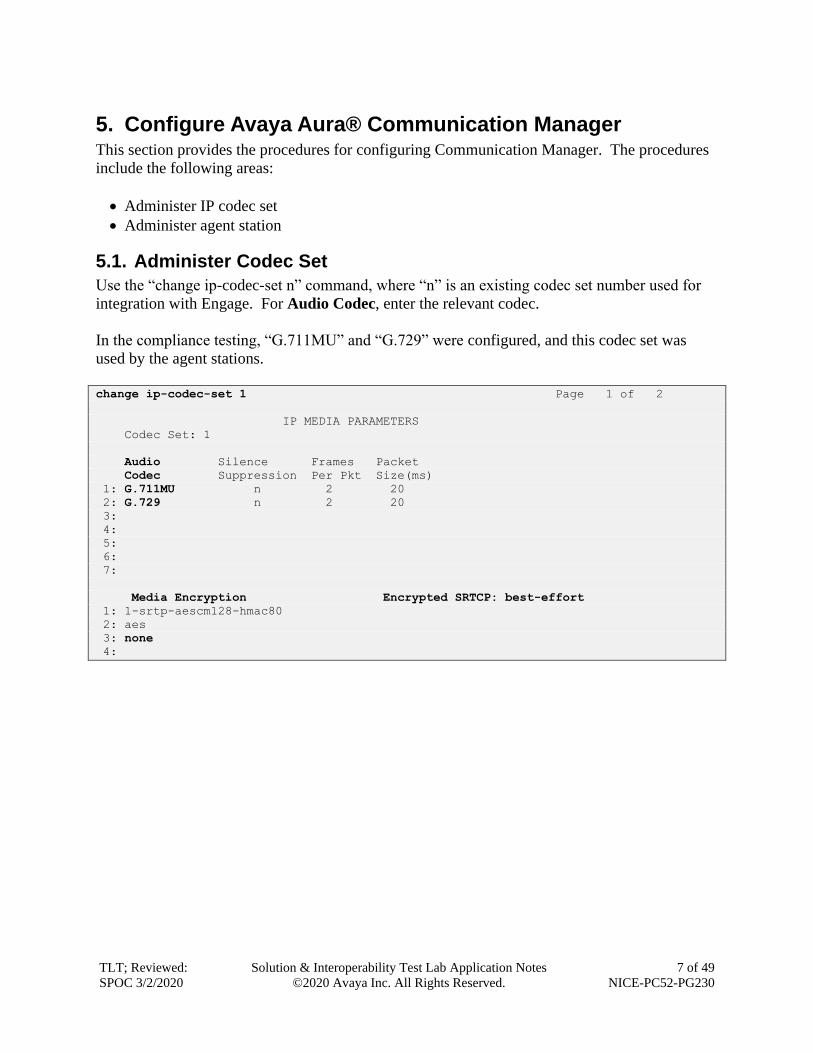
5.1. Administer Codec Set
Use the “change ip-codec-set n” command, where “n” is an existing codec set number used for
integration with Engage. For Audio Codec, enter the relevant codec.
In the compliance testing, “G.711MU” and “G.729” were configured, and this codec set was
used by the agent stations.
change ip-codec-set 1 Page 1 of 2
IP MEDIA PARAMETERS
Codec Set: 1
Audio Silence Frames Packet
Codec Suppression Per Pkt Size(ms)
1: G.711MU n 2 20
2: G.729 n 2 20
3:
4:
5:
6:
7:
Media Encryption Encrypted SRTCP: best-effort
1: 1-srtp-aescm128-hmac80
2: aes
3: none
4:
TLT; Reviewed:
SPOC 3/2/2020
Solution & Interoperability Test Lab Application Notes
©2020 Avaya Inc. All Rights Reserved.
8 of 49
NICE-PC52-PG230
5.2. Administer Agent Station
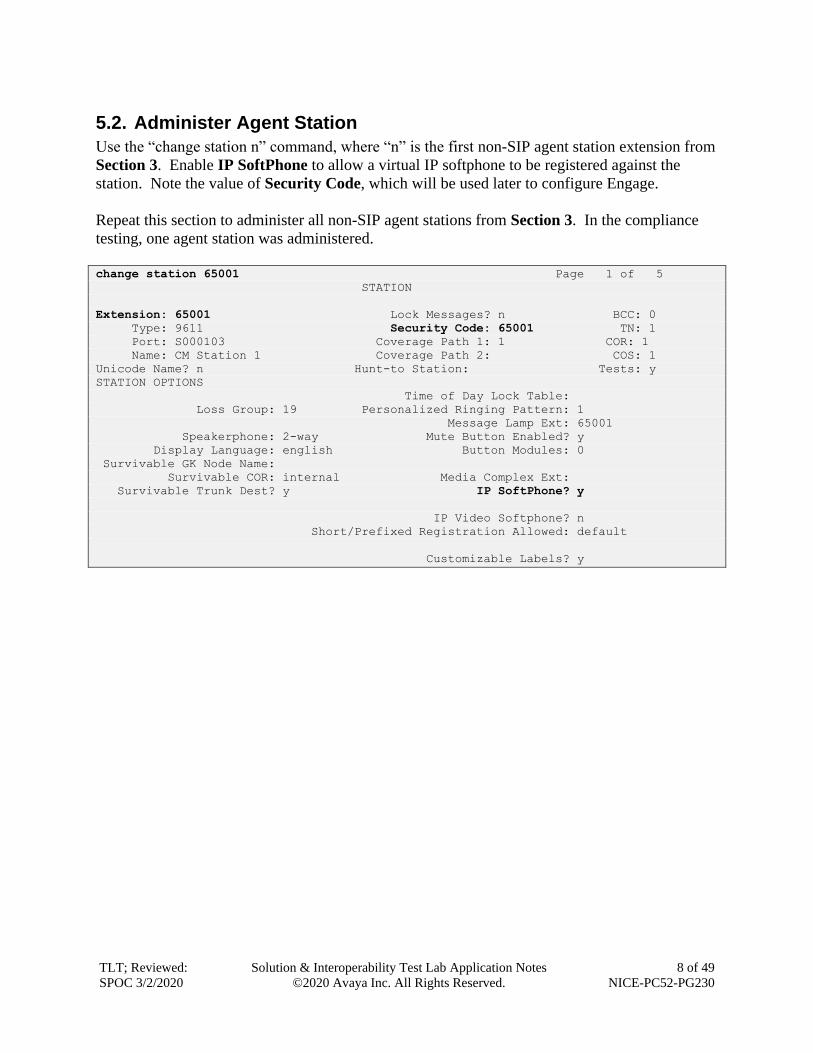
Use the “change station n” command, where “n” is the first non-SIP agent station extension from
Section 3. Enable IP SoftPhone to allow a virtual IP softphone to be registered against the
station. Note the value of Security Code, which will be used later to configure Engage.
Repeat this section to administer all non-SIP agent stations from Section 3. In the compliance
testing, one agent station was administered.
change station 65001 Page 1 of 5
STATION
Extension: 65001 Lock Messages? n BCC: 0
Type: 9611 Security Code: 65001 TN: 1
Port: S000103 Coverage Path 1: 1 COR: 1
Name: CM Station 1 Coverage Path 2: COS: 1
Unicode Name? n Hunt-to Station: Tests: y
STATION OPTIONS
Time of Day Lock Table:
Loss Group: 19 Personalized Ringing Pattern: 1
Message Lamp Ext: 65001
Speakerphone: 2-way Mute Button Enabled? y
Display Language: english Button Modules: 0
Survivable GK Node Name:
Survivable COR: internal Media Complex Ext:
Survivable Trunk Dest? y IP SoftPhone? y
IP Video Softphone? n
Short/Prefixed Registration Allowed: default
Customizable Labels? y

TLT; Reviewed:
SPOC 3/2/2020
Solution & Interoperability Test Lab Application Notes
©2020 Avaya Inc. All Rights Reserved.
9 of 49
NICE-PC52-PG230
6. Configure Avaya Aura® Application Enablement Services This section provides the procedures for configuring Application Enablement Services. The
procedures include the following areas:
• Launch OAM interface
• Verify license
• Administer H.323 gatekeeper
• Administer NICE user
• Administer security database
• Administer ports
• Restart services
• Export CA certificate
6.1. Launch OAM Interface
Access the OAM web-based interface by using the URL “https://ip-address” in an Internet
browser window, where “ip-address” is the IP address of the Application Enablement Services
server.
The screen below is displayed. Log in using the appropriate credentials.

TLT; Reviewed:
SPOC 3/2/2020
Solution & Interoperability Test Lab Application Notes
©2020 Avaya Inc. All Rights Reserved.
10 of 49
NICE-PC52-PG230
The Welcome to OAM screen is displayed next.
6.2. Verify License
Select Licensing → WebLM Server Access in the left pane, to display the applicable WebLM
server log in screen (not shown). Log in using the appropriate credentials and navigate to
display installed licenses (not shown).

TLT; Reviewed:
SPOC 3/2/2020
Solution & Interoperability Test Lab Application Notes
©2020 Avaya Inc. All Rights Reserved.
11 of 49
NICE-PC52-PG230
Select Licensed products → APPL_ENAB → Application_Enablement in the left pane, to
display the Application Enablement (CTI) screen in the right pane.
Verify that there is sufficient license for Device Media and Call Control as shown below.

TLT; Reviewed:
SPOC 3/2/2020
Solution & Interoperability Test Lab Application Notes
©2020 Avaya Inc. All Rights Reserved.
12 of 49
NICE-PC52-PG230
6.3. Administer H.323 Gatekeeper
Select Communication Manager Interface → Switch Connections from the left pane. The
Switch Connections screen shows a listing of the existing switch connections.
Locate the connection name associated with the relevant Communication Manager, in this case
“cm7”, and select the corresponding radio button. Click Edit H.323 Gatekeeper.
The Edit H.323 Gatekeeper screen is displayed next. Enter the IP address of a C-LAN circuit
pack or the Processor C-LAN on Communication Manager to use as the H.323 gatekeeper, in
this case “10.64.101.236” as shown below. Click Add Name or IP.

TLT; Reviewed:
SPOC 3/2/2020
Solution & Interoperability Test Lab Application Notes
©2020 Avaya Inc. All Rights Reserved.
13 of 49
NICE-PC52-PG230
6.4. Administer NICE User
Select User Management → User Admin → Add User from the left pane, to display the Add
User screen in the right pane.
Enter desired values for User Id, Common Name, Surname, User Password, and Confirm
Password. For CT User, select “Yes” from the drop-down list. Retain the default value in the
remaining fields.

TLT; Reviewed:
SPOC 3/2/2020
Solution & Interoperability Test Lab Application Notes
©2020 Avaya Inc. All Rights Reserved.
14 of 49
NICE-PC52-PG230
6.5. Administer Security Database
Select Security → Security Database → Control from the left pane, to display the SDB
Control for DMCC, TSAPI, JTAPI and Telephony Web Services screen in the right pane.
Make certain both parameters are unchecked, as shown below.
In the event that the security database is used by the customer with parameters already enabled,
then follow reference [2] to configure access privileges for the NICE user from Section 6.4.

TLT; Reviewed:
SPOC 3/2/2020
Solution & Interoperability Test Lab Application Notes
©2020 Avaya Inc. All Rights Reserved.
15 of 49
NICE-PC52-PG230
6.6. Administer Ports
Select Networking → Ports from the left pane, to display the Ports screen in the right pane.
In the DMCC Server Ports section, select the radio button for Encrypted Port under the
Enabled column, as shown below. Retain the default values in the remaining fields.

TLT; Reviewed:
SPOC 3/2/2020
Solution & Interoperability Test Lab Application Notes
©2020 Avaya Inc. All Rights Reserved.
16 of 49
NICE-PC52-PG230
6.7. Restart Services
Select Maintenance → Service Controller from the left pane, to display the Service Controller
screen in the right pane.
Check DMCC Service and select Restart Service.

TLT; Reviewed:
SPOC 3/2/2020
Solution & Interoperability Test Lab Application Notes
©2020 Avaya Inc. All Rights Reserved.
17 of 49
NICE-PC52-PG230
6.8. Export CA Certificate
Select Security → Certificate Management → CA Trusted Certificates from the left pane, to
display the CA Trusted Certificates screen in the right pane.
Select the pertinent CA certificate, in this case “SystemManagerCA”, and click Export.

TLT; Reviewed:
SPOC 3/2/2020
Solution & Interoperability Test Lab Application Notes
©2020 Avaya Inc. All Rights Reserved.
18 of 49
NICE-PC52-PG230
The Trusted Certificate Export screen is displayed. Select and copy everything from the
BEGIN CERTIFICATE to the END CERTIFICATE (not shown) lines. Paste the copied
content to a Notepad file and save with a desired file name such as “caSMGR.crt”.
This CA certificate needs to be installed on Engage for establishment of encrypted DMCC
connection with Application Enablement Services.

TLT; Reviewed:
SPOC 3/2/2020
Solution & Interoperability Test Lab Application Notes
©2020 Avaya Inc. All Rights Reserved.
19 of 49
NICE-PC52-PG230
7. Configure Avaya Aura® Session Manager This section provides the procedures for configuring Session Manager, which is performed via
the web interface of System Manager. The procedures include the following areas:
• Launch System Manager
• Administer users
7.1. Launch System Manager
Access the System Manager web interface by using the URL “https://ip-address” in an Internet
browser window, where “ip-address” is the IP address of System Manager. Log in using the
appropriate credentials.
7.2. Administer Users
In the subsequent screen (not shown), select Users → User Management from the top menu.
Select User Management → Manage Users (not shown) from the left pane to display the screen
below.
Select the entry associated with the first SIP agent station from Section 3, in this case “66006”,
and click Edit.

TLT; Reviewed:
SPOC 3/2/2020
Solution & Interoperability Test Lab Application Notes
©2020 Avaya Inc. All Rights Reserved.
20 of 49
NICE-PC52-PG230
The User Profile | Edit screen is displayed. Select the Communication Profile tab, followed
by CM Endpoint Profile to display the screen below.
For Security Code, enter a desired code, in this case “123456”. This security code is used for
multiple registration authentication against a SIP endpoint when the security database is disabled
in Section 6.5.
Click on the editor icon highlighted below.

TLT; Reviewed:
SPOC 3/2/2020
Solution & Interoperability Test Lab Application Notes
©2020 Avaya Inc. All Rights Reserved.
21 of 49
NICE-PC52-PG230
The popped-up screen below is displayed. Select the General Options tab, and set Type of
3PCC Enabled to “Avaya”.
Select the Feature Options tab, and check IP Softphone.
Repeat this section to administer all SIP agent user from Section 3. In the compliance testing,
one agent user was administered.

TLT; Reviewed:
SPOC 3/2/2020
Solution & Interoperability Test Lab Application Notes
©2020 Avaya Inc. All Rights Reserved.
22 of 49
NICE-PC52-PG230
8. Configure Avaya Proactive Contact This section provides the procedures for configuring Proactive Contact. The procedures include
the following areas:
• Obtain host name
• Obtain permission files
8.1. Obtain Host Name
Log in to the Linux shell of the Proactive Contact server. Use the “hostname” command to
obtain the host name, which will be used later to configure Engage.
In the compliance testing, the host name of the Proactive Contact server is “lzpds4b”, as shown
below.
$ hostname
lzpds4b
8.2. Obtain Permission Files
Use a tool such as WinSCP, to copy the following permission files from the Proactive Contact
server, which will be used later to configure Engage.
• /opt/avaya/pds/openssl/certificate/corbaServer_cert.pem
• /opt/avaya/pds/openssl/cacertificate/ProactiveContactCA.pem
• /opt/avaya/pds/openssl/private/corbaServer_key.pem

TLT; Reviewed:
SPOC 3/2/2020
Solution & Interoperability Test Lab Application Notes
©2020 Avaya Inc. All Rights Reserved.
23 of 49
NICE-PC52-PG230
9. Configure NICE Engage Platform This section provides the procedures for configuring Engage. The procedures include the
following areas:
• Launch Engage web interface
• Administer CTI for PC
• Administer CTI for AES
• Administer Interactions Center
• Administer certificates
• Restart services
• Administer system mapping
• Administer agent users
The configuration of Engage is performed by NICE engineers. The procedural steps are
presented in these Application Notes for informational purpose.
Prior to configuration, a pertinent interactions center is assumed to be pre-configured, and with
TLS 1.2 enabled on the server running the Advanced Interaction Recorder component.
9.1. Launch Engage Web Interface
Access the Engage web interface by using the URL “http://hostname/nice” in an Internet
Explorer browser window, where “hostname” is the host name of the Engage server with the
Application Server component. The Welcome screen below is displayed. Log in using the
appropriate credentials.

TLT; Reviewed:
SPOC 3/2/2020
Solution & Interoperability Test Lab Application Notes
©2020 Avaya Inc. All Rights Reserved.
24 of 49
NICE-PC52-PG230
The NICE screen below is displayed next. Select Administration → System Administrator
followed by Settings → Technician Mode from the top menu.
9.2. Administer CTI for PC
Expand Organization → Master Site as shown below. Right click on CTI Integrations and
select New CTI Connection to add a connection with Proactive Contact.

TLT; Reviewed:
SPOC 3/2/2020
Solution & Interoperability Test Lab Application Notes
©2020 Avaya Inc. All Rights Reserved.
25 of 49
NICE-PC52-PG230
The New CTI Connection pop-up screen is displayed. Click Next (not shown).
The Stage 2 screen is displayed as shown below.
For Regular Interactions Center, select the pertinent center, in this case “IC_on_AppServer
(NiceApp)” which was pre-configured.
For Switch Type, select “Avaya PC/ POM”, which auto populates Switch Name with the same
value.
TLT; Reviewed:
SPOC 3/2/2020
Solution & Interoperability Test Lab Application Notes
©2020 Avaya Inc. All Rights Reserved.
26 of 49
NICE-PC52-PG230
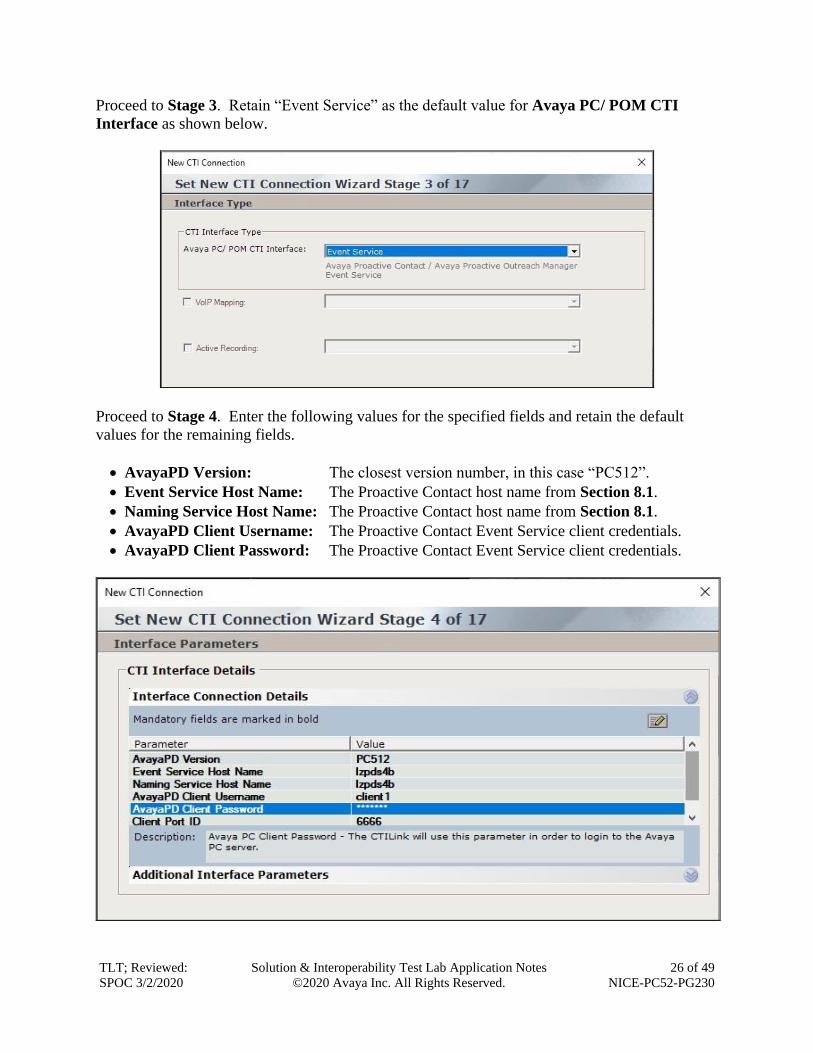
Proceed to Stage 3. Retain “Event Service” as the default value for Avaya PC/ POM CTI
Interface as shown below.
Proceed to Stage 4. Enter the following values for the specified fields and retain the default
values for the remaining fields.
• AvayaPD Version: The closest version number, in this case “PC512”.
• Event Service Host Name: The Proactive Contact host name from Section 8.1.
• Naming Service Host Name: The Proactive Contact host name from Section 8.1.
• AvayaPD Client Username: The Proactive Contact Event Service client credentials.
• AvayaPD Client Password: The Proactive Contact Event Service client credentials.

TLT; Reviewed:
SPOC 3/2/2020
Solution & Interoperability Test Lab Application Notes
©2020 Avaya Inc. All Rights Reserved.
27 of 49
NICE-PC52-PG230
Proceed to Stage 11. Select Add to add a device entry for each agent station extension from
Section 3. Set Device Number to the agent station extension and Type to “Extension” as shown
below.
Proceed to Stage 13, and check Call Flow Analysis.
Proceed to complete the wizard.

TLT; Reviewed:
SPOC 3/2/2020
Solution & Interoperability Test Lab Application Notes
©2020 Avaya Inc. All Rights Reserved.
28 of 49
NICE-PC52-PG230
9.3. Administer CTI for AES
The NICE screen is updated to reflect the newly added CTI connection as shown below. Right
click on CTI Integrations again and select New CTI Connection to add a connection with
Application Enablement Services.
The New CTI Connection pop-up screen is displayed as shown below. Click Next (not shown).
TLT; Reviewed:
SPOC 3/2/2020
Solution & Interoperability Test Lab Application Notes
©2020 Avaya Inc. All Rights Reserved.
29 of 49
NICE-PC52-PG230
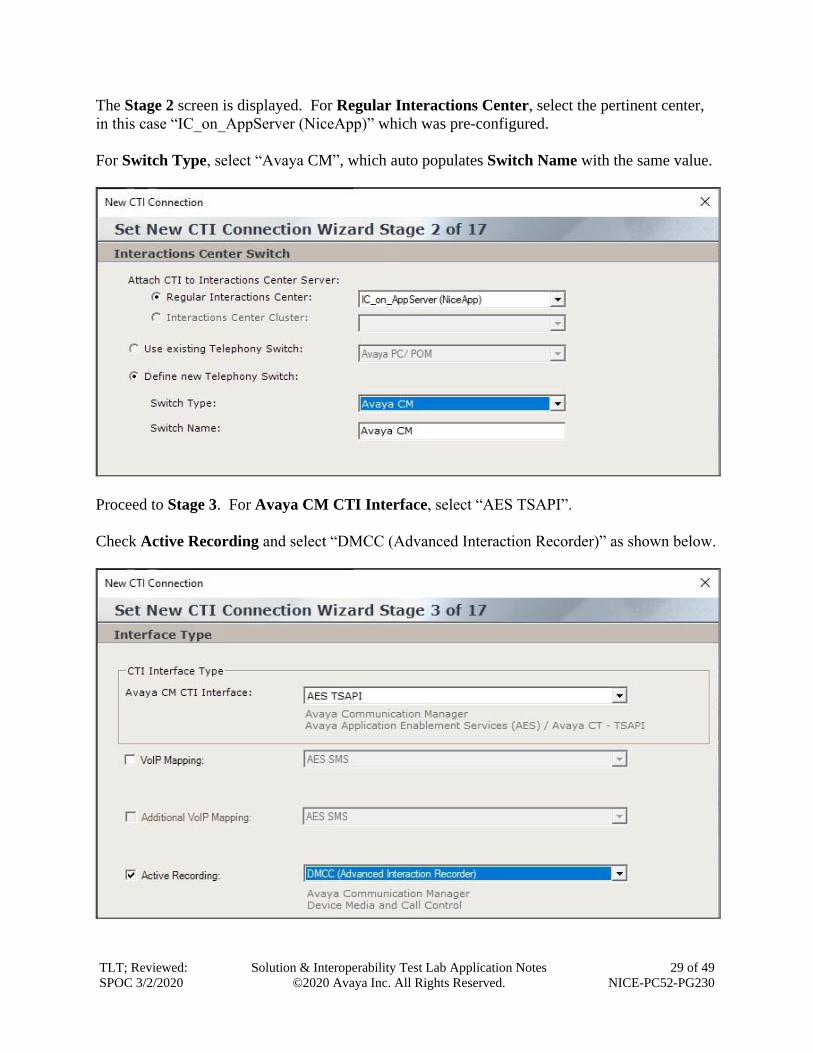
The Stage 2 screen is displayed. For Regular Interactions Center, select the pertinent center,
in this case “IC_on_AppServer (NiceApp)” which was pre-configured.
For Switch Type, select “Avaya CM”, which auto populates Switch Name with the same value.
Proceed to Stage 3. For Avaya CM CTI Interface, select “AES TSAPI”.
Check Active Recording and select “DMCC (Advanced Interaction Recorder)” as shown below.

TLT; Reviewed:
SPOC 3/2/2020
Solution & Interoperability Test Lab Application Notes
©2020 Avaya Inc. All Rights Reserved.
30 of 49
NICE-PC52-PG230
Proceed to Stage 4. Enter desired strings for ServerName, LoginID, and Password. These
parameters are not pertinent to the integration but are required to be configured.
Proceed to Stage 9. Enter the following values for the specified fields and retain the default
values for the remaining fields.
• PrimaryAESServerAddress: IP address of the Application Enablement Services server.
• PrimaryAESUserName: The NICE user credentials from Section 6.4.
• PrimaryAESPassword: The NICE user credentials from Section 6.4.

TLT; Reviewed:
SPOC 3/2/2020
Solution & Interoperability Test Lab Application Notes
©2020 Avaya Inc. All Rights Reserved.
31 of 49
NICE-PC52-PG230
Expand Media Provider Controllers – Location toward bottom of screen. Enter host name of
the Engage server with the Advanced Interaction Recorder component, in this case “niceair”, and
click the add icon. The resultant screen is shown below.
Proceed to Stage 11. Select Add to add a device entry for each agent station extension from
Section 3. Enter the following values for the specified fields (not shown) and retain the default
values for the remaining fields.
• Device Type: “Extension”
• Device Number: The agent station extension from Section 3.
• Observation Type: “Non-Resource-Based”
• SymbolicName: The switch connection name from Section 6.3, in this case “cm7”.
• CodecsList: Check pertinent codec, which were G711U and G729 in the testing.
• EncAlgList: Check “AES_128_HMAC”.
In the compliance testing, two entries were created as shown below.

TLT; Reviewed:
SPOC 3/2/2020
Solution & Interoperability Test Lab Application Notes
©2020 Avaya Inc. All Rights Reserved.
32 of 49
NICE-PC52-PG230
Proceed to Stage 12. Select all pertinent devices from the left pane and move to the right. The
screen below shows the result of the move.
Proceed to Stage 16. For Port, select an available port number, in this case “62095” as shown
below. Proceed and complete the wizard.

TLT; Reviewed:
SPOC 3/2/2020
Solution & Interoperability Test Lab Application Notes
©2020 Avaya Inc. All Rights Reserved.
33 of 49
NICE-PC52-PG230
9.4. Administer Interactions Center
From the NICE screen, expand Master Site → Interactions Center and select the pertinent
center, in this case “IC_on_AppServer”, which was pre-configured.
Select the General tab in the right pane, and check Voice as shown below.
Select the Configuration tab and expand RCM in the right pane. Locate the Support Switch Id
parameter and set it to “No” as shown below.

TLT; Reviewed:
SPOC 3/2/2020
Solution & Interoperability Test Lab Application Notes
©2020 Avaya Inc. All Rights Reserved.
34 of 49
NICE-PC52-PG230
9.5. Administer Certificates
From the Engage server running the Interactions Center component, navigate to the D:\Program
files\NICE Systems\CTI\AvayaPDCTILink\Certificates directory.
Rename the three Proactive Contact permission files obtained from Section 8.2 to end with the
configured AvayaPD version from Section 9.2 and paste into the directory as shown below.
From the Engage server running the Advanced Interaction Recorder component, copy the CA
certificate from Section 6.8 to a desired directory.
Double click on the certificate and install onto the server.

TLT; Reviewed:
SPOC 3/2/2020
Solution & Interoperability Test Lab Application Notes
©2020 Avaya Inc. All Rights Reserved.
35 of 49
NICE-PC52-PG230
9.6. Restart Services
From the Engage server running the Interactions Center component, navigate to Windows →
Nice Systems and launch Nice Service Configuration Manager. The NICE Services
Configuration Manager screen below is displayed. Restart the IntegrationsDispatch service.
From the Engage server running the Advanced Interaction Recorder component, navigate to
Windows → Windows System → Windows Administrative Tools → Services to display the
Services screen below.
Restart the NICE Connection Manager and NICE IP Capture services shown below.

TLT; Reviewed:
SPOC 3/2/2020
Solution & Interoperability Test Lab Application Notes
©2020 Avaya Inc. All Rights Reserved.
36 of 49
NICE-PC52-PG230
9.7. Administer System Mapping
From the NICE screen, select Master Site → System Mapping.
9.7.1. Recorder Pool
The screen below is displayed. In the right pane, select + Recorder Pool.
The New Advanced Interaction Recorder Pool Wizard pop-up screen is displayed as shown
below. Click Next (not shown).
TLT; Reviewed:
SPOC 3/2/2020
Solution & Interoperability Test Lab Application Notes
©2020 Avaya Inc. All Rights Reserved.
37 of 49
NICE-PC52-PG230
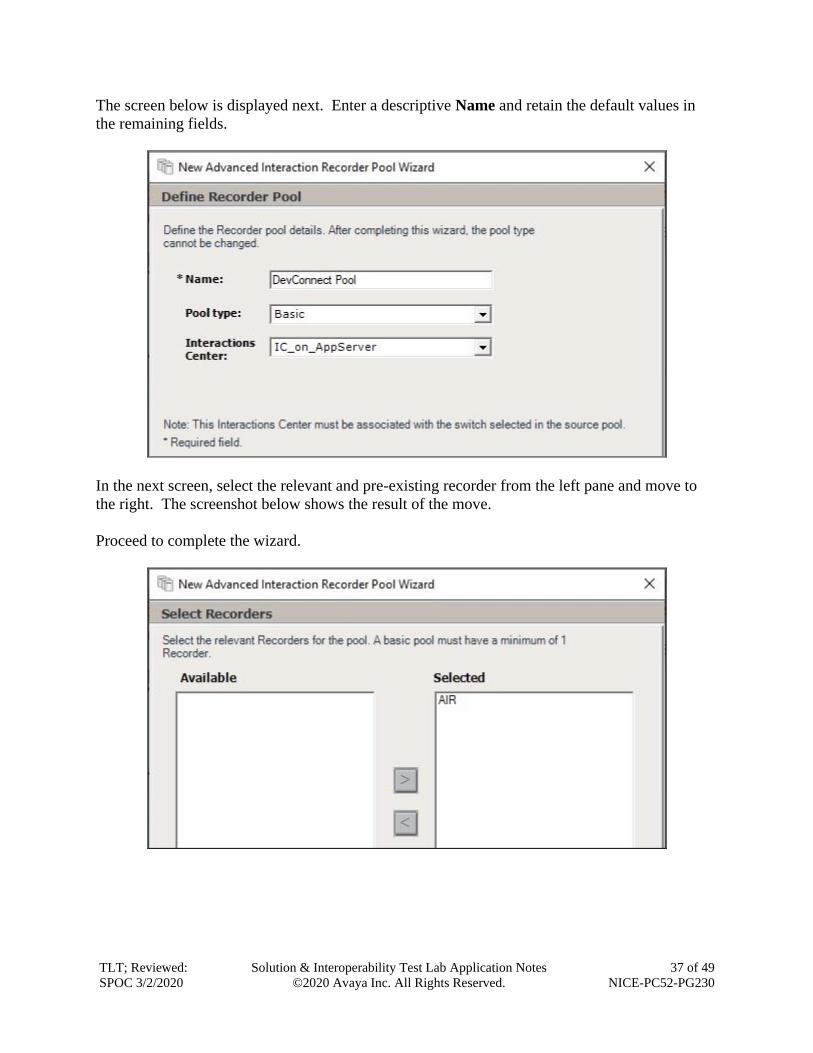
The screen below is displayed next. Enter a descriptive Name and retain the default values in
the remaining fields.
In the next screen, select the relevant and pre-existing recorder from the left pane and move to
the right. The screenshot below shows the result of the move.
Proceed to complete the wizard.

TLT; Reviewed:
SPOC 3/2/2020
Solution & Interoperability Test Lab Application Notes
©2020 Avaya Inc. All Rights Reserved.
38 of 49
NICE-PC52-PG230
9.7.2. Source Pool
The NICE screen is updated as shown below. Select + Source Pool to add a source pool.
The New Source Pool Wizard pop-up screen is displayed. Click Next (not shown).
TLT; Reviewed:
SPOC 3/2/2020
Solution & Interoperability Test Lab Application Notes
©2020 Avaya Inc. All Rights Reserved.
39 of 49
NICE-PC52-PG230
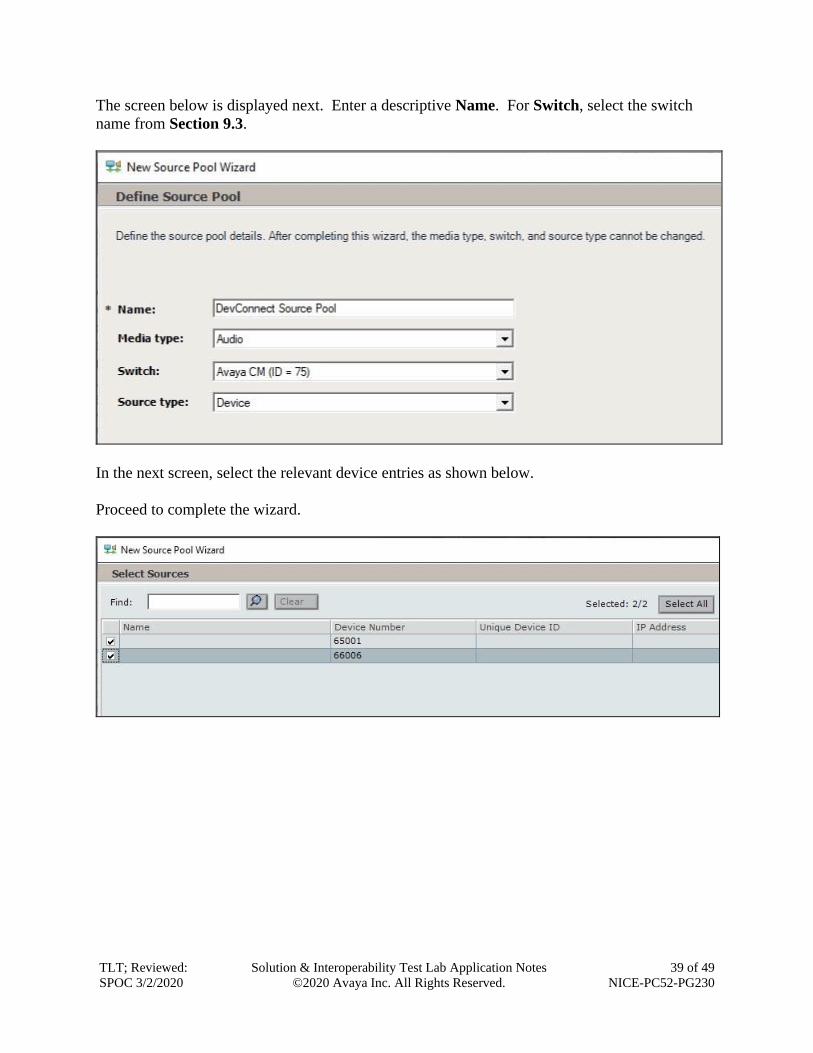
The screen below is displayed next. Enter a descriptive Name. For Switch, select the switch
name from Section 9.3.
In the next screen, select the relevant device entries as shown below.
Proceed to complete the wizard.

TLT; Reviewed:
SPOC 3/2/2020
Solution & Interoperability Test Lab Application Notes
©2020 Avaya Inc. All Rights Reserved.
40 of 49
NICE-PC52-PG230
9.7.3. Recording Profile
The NICE screen is updated as shown below. Drag the created source pool below and drop on
top of the created recorder pool, in this case DevConnect Source and DevConnect Pool
respectively.
The New Recording Profile Wizard pop-up screen is displayed. Click Next (not shown).

TLT; Reviewed:
SPOC 3/2/2020
Solution & Interoperability Test Lab Application Notes
©2020 Avaya Inc. All Rights Reserved.
41 of 49
NICE-PC52-PG230
The screen below is displayed next. Enter a descriptive Name.
In the next screen, enter the following values for the specified fields and retain the default values
for the remaining fields.
• Recording type: “Total”
• Capture type: “Active DMCC MR”
• Audio Compression: Check this option.
Proceed to complete the wizard.

TLT; Reviewed:
SPOC 3/2/2020
Solution & Interoperability Test Lab Application Notes
©2020 Avaya Inc. All Rights Reserved.
42 of 49
NICE-PC52-PG230
9.8. Administer Agent Users
The NICE screen is displayed again. Select Administration → User Administrator from the
top menu, followed by New User.
The Create New User Wizard pop-up screen is displayed. Click Next (not shown).

TLT; Reviewed:
SPOC 3/2/2020
Solution & Interoperability Test Lab Application Notes
©2020 Avaya Inc. All Rights Reserved.
43 of 49
NICE-PC52-PG230
The Step 1 screen displayed next. Enter pertinent values for First Name, Last Name, and
Windows User Name for the first agent user from Section 3. Retain the default values in the
remaining fields.
Proceed to Step 4 and check the Agent user type shown below.

TLT; Reviewed:
SPOC 3/2/2020
Solution & Interoperability Test Lab Application Notes
©2020 Avaya Inc. All Rights Reserved.
44 of 49
NICE-PC52-PG230
Proceed to Step 5 and click Add.
The Agent Identity Dialog pop-up box is displayed. For Switch, select the switch name from
Section 9.2. Select Extension and enter the first agent user extension from Section 3. Retain
the default values in the remaining fields and proceed to complete the Wizard.
Repeat this section to add an agent user for each agent station extension in Section 3. In the
compliance testing, two agent users were created as shown below.
TLT; Reviewed:
SPOC 3/2/2020
Solution & Interoperability Test Lab Application Notes
©2020 Avaya Inc. All Rights Reserved.
45 of 49
NICE-PC52-PG230
10. Verification Steps This section provides the tests that can be performed to verify proper configuration of
Communication Manager, Application Enablement Services, Proactive Contact, and Engage.
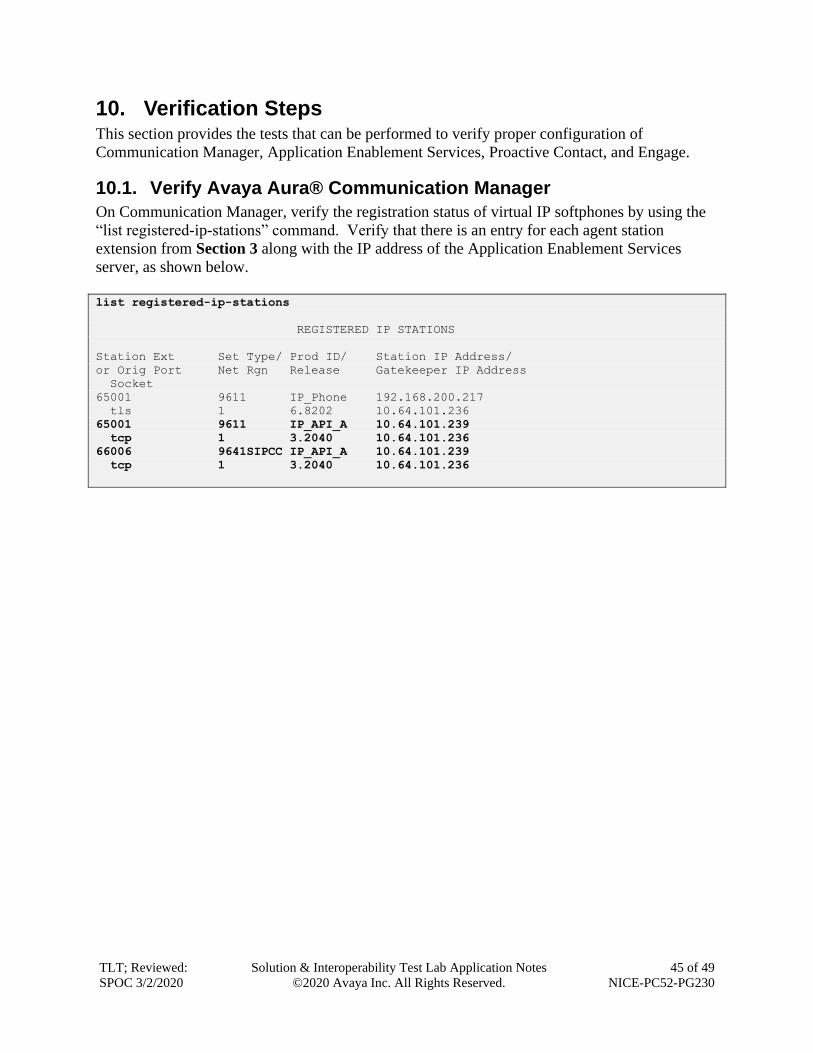
10.1. Verify Avaya Aura® Communication Manager
On Communication Manager, verify the registration status of virtual IP softphones by using the
“list registered-ip-stations” command. Verify that there is an entry for each agent station
extension from Section 3 along with the IP address of the Application Enablement Services
server, as shown below.
list registered-ip-stations
REGISTERED IP STATIONS
Station Ext Set Type/ Prod ID/ Station IP Address/
or Orig Port Net Rgn Release Gatekeeper IP Address
Socket
65001 9611 IP_Phone 192.168.200.217
tls 1 6.8202 10.64.101.236
65001 9611 IP_API_A 10.64.101.239
tcp 1 3.2040 10.64.101.236
66006 9641SIPCC IP_API_A 10.64.101.239
tcp 1 3.2040 10.64.101.236

TLT; Reviewed:
SPOC 3/2/2020
Solution & Interoperability Test Lab Application Notes
©2020 Avaya Inc. All Rights Reserved.
46 of 49
NICE-PC52-PG230
10.2. Verify Avaya Aura® Application Enablement Services
On Application Enablement Services, verify status of the DMCC link by selecting Status →
Status and Control → DMCC Service Summary from the left pane. The DMCC Service
Summary – Session Summary screen is displayed.
Verify the User column shows an active session with the NICE user name from Section 6.4, and
that the # of Associated Devices column reflects the number of agent users in Section 3, in this
case “2”.
10.3. Verify Avaya Proactive Contact
Log in to the Linux shell of Proactive Contact and issue the “netstat | grep enserver” command.
Verify that there is an entry showing an ESTABLISHED connection with the IP address of the
Engage server running the Interactions Center component, in this case “10.64.101.207”, as
shown below.
tcp 0 0 lzpds4b:enserver_ssl 10.64.101.207:51104 ESTABLISHED
tcp 0 0 lzpds4b:enserver_ssl lzpds4b:31478 ESTABLISHED
tcp 0 0 lzpds4b:31478 lzpds4b:enserver_ssl ESTABLISHED

TLT; Reviewed:
SPOC 3/2/2020
Solution & Interoperability Test Lab Application Notes
©2020 Avaya Inc. All Rights Reserved.
47 of 49
NICE-PC52-PG230
10.4. Verify NICE Engage Platform
Start a job on Proactive Contact and log an agent in to handle and complete an outbound call.
From the NICE screen, select Business Analyzer from the top menu to display the screen
below. Select Queries → Public → Complete – Last 2 hours from the left pane.
Verify that there is an entry in the right pane reflecting the last call, with proper values in the
relevant fields. Double click on the entry.
Verify that the pop-up screen below is displayed and that the recording can be played back.

TLT; Reviewed:
SPOC 3/2/2020
Solution & Interoperability Test Lab Application Notes
©2020 Avaya Inc. All Rights Reserved.
48 of 49
NICE-PC52-PG230
11. Conclusion These Application Notes describe the configuration steps required for NICE Engage Platform
6.15 to successfully interoperate with Avaya Proactive Contact 5.2 with PG230 and Avaya
Aura® Application Enablement Services 8.1. All feature and serviceability test cases were
completed with observations noted in Section 2.2.
12. Additional References This section references the product documentation relevant to these Application Notes.
1. Administering Avaya Aura® Communication Manager, Release 8.1.x, Issue 5, November
2019, available at http://support.avaya.com.
2. Administering Aura® Application Enablement Services, Release 8.1.x, Issue 3, October
2019, available at http://support.avaya.com.
3. Administering Avaya Aura® Session Manager, Release 8.1.1, Issue 2, October 2019,
available at http://support.avaya.com.
4. Administering Avaya Proactive Contact, Release 5.2, Issue 1, July 2018, available at
http://support.avaya.com.
5. System Administrator Configuration Guide, NICE Engage Platform 6.x, Revision A4,
September 2018, available at http://www.extranice.com.
6. Avaya PC Active-Passive Connectivity Guide, NICE Engage Platform 6.x, Revision C8,
January 2018, available at http://www.extranice.com.
7. Avaya CM Active Connectivity Guide, NICE Engage Platform 6.x, Revision B3, October
2019, available at http://www.extranice.com.

TLT; Reviewed:
SPOC 3/2/2020
Solution & Interoperability Test Lab Application Notes
©2020 Avaya Inc. All Rights Reserved.
49 of 49
NICE-PC52-PG230
©2020 Avaya Inc. All Rights Reserved.
Avaya and the Avaya Logo are trademarks of Avaya Inc. All trademarks identified by ® and ™
are registered trademarks or trademarks, respectively, of Avaya Inc. All other trademarks are the
property of their respective owners. The information provided in these Application Notes is
subject to change without notice. The configurations, technical data, and recommendations
provided in these Application Notes are believed to be accurate and dependable, but are
presented without express or implied warranty. Users are responsible for their application of any
products specified in these Application Notes.
Please e-mail any questions or comments pertaining to these Application Notes along with the
full title name and filename, located in the lower right corner, directly to the Avaya DevConnect
Program at [email protected].