application designer
DESCRIPTION
Application DesignerTRANSCRIPT

MicroStrategy Narrowcast ServerApplication Designer Guide
Version 9.0

ii
Sixteenth Edition, March 2009, version 9.0To ensure that you are using the documentation that corresponds to the software you are licensed to use, compare thisversion number with the software version shown in “About MicroStrategy...” in the Help menu of your software.
Document number: 09830900
Copyright © 2001-2009 by MicroStrategy Incorporated. All rights reserved.If you have not executed a written or electronic agreement with MicroStrategy or any authorized MicroStrategy distributor,the following terms apply:This software and documentation are the proprietary and confidential information of MicroStrategy Incorporated and maynot be provided to any other person. Copyright © 2001-2009 by MicroStrategy Incorporated. All rights reserved.THIS SOFTWARE AND DOCUMENTATION ARE PROVIDED “AS IS” AND WITHOUT EXPRESS OR LIMITEDWARRANTY OF ANY KIND BY EITHER MICROSTRATEGY INCORPORATED OR ANYONE WHO HAS BEENINVOLVED IN THE CREATION, PRODUCTION, OR DISTRIBUTION OF THE SOFTWARE OR DOCUMENTATION,INCLUDING, BUT NOT LIMITED TO, THE IMPLIED WARRANTIES OF MERCHANTABILITY AND FITNESS FOR APARTICULAR PURPOSE, GOOD TITLE AND NONINFRINGMENT, QUALITY OR ACCURACY. THE ENTIRE RISK AS TOTHE QUALITY AND PERFORMANCE OF THE SOFTWARE AND DOCUMENTATION IS WITH YOU. SHOULD THESOFTWARE OR DOCUMENTATION PROVE DEFECTIVE, YOU (AND NOT MICROSTRATEGY, INC. OR ANYONE ELSEWHO HAS BEEN INVOLVED WITH THE CREATION, PRODUCTION, OR DISTRIBUTION OF THE SOFTWARE ORDOCUMENTATION) ASSUME THE ENTIRE COST OF ALL NECESSARY SERVICING, REPAIR, OR CORRECTION.SOME STATES DO NOT ALLOW THE EXCLUSION OF IMPLIED WARRANTIES, SO THE ABOVE EXCLUSION MAYNOT APPLY TO YOU.In no event will MicroStrategy, Inc. or any other person involved with the creation, production, or distribution of the Softwarebe liable to you on account of any claim for damage, including any lost profits, lost savings, or other special, incidental,consequential, or exemplary damages, including but not limited to any damages assessed against or paid by you to any thirdparty, arising from the use, inability to use, quality, or performance of such Software and Documentation, even ifMicroStrategy, Inc. or any such other person or entity has been advised of the possibility of such damages, or for the claimby any other party. In addition, MicroStrategy, Inc. or any other person involved in the creation, production, or distribution ofthe Software shall not be liable for any claim by you or any other party for damages arising from the use, inability to use,quality, or performance of such Software and Documentation, based upon principles of contract warranty, negligence, strictliability for the negligence of indemnity or contribution, the failure of any remedy to achieve its essential purpose, orotherwise. The entire liability of MicroStrategy, Inc. and your exclusive remedy shall not exceed, at the option ofMicroStrategy, Inc., either a full refund of the price paid, or replacement of the Software. No oral or written information givenout expands the liability of MicroStrategy, Inc. beyond that specified in the above limitation of liability. Some states do notallow the limitation or exclusion of liability for incidental or consequential damages, so the above limitation may not apply toyou.The information contained in this manual (the Documentation) and the Software are copyrighted and all rights are reservedby MicroStrategy, Inc. MicroStrategy, Inc. reserves the right to make periodic modifications to the Software or theDocumentation without obligation to notify any person or entity of such revision. Copying, duplicating, selling, or otherwisedistributing any part of the Software or Documentation without prior written consent of an authorized representative ofMicroStrategy, Inc. are prohibited. U.S. Government Restricted Rights. It is acknowledged that the Software andDocumentation were developed at private expense, that no part is public domain, and that the Software and Documentationare Commercial Computer Software provided with RESTRICTED RIGHTS under Federal Acquisition Regulations andagency supplements to them. Use, duplication, or disclosure by the U.S. Government is subject to restrictions as set forthin subparagraph (c)(1)(ii) of the Rights in Technical Data and Computer Software clause at DFAR 252.227-7013 et. seq. orsubparagraphs (c)(1) and (2) of the Commercial Computer Software—Restricted Rights at FAR 52.227-19, as applicable.Contractor is MicroStrategy, Inc., 1861 International Drive, McLean, Virginia 22102. Rights are reserved under copyrightlaws of the United States with respect to unpublished portions of the Software.The following are either trademarks or registered trademarks of MicroStrategy Incorporated in the United States and certainother countries:

iii
MicroStrategy, MicroStrategy 6, MicroStrategy 7, MicroStrategy 7i, MicroStrategy 7i Evaluation Edition, MicroStrategy 7iOlap Services, MicroStrategy 8, MicroStrategy 9, MicroStrategy Distribution Services, MicroStrategy MultiSource Option,MicroStrategy Command Manager, MicroStrategy Enterprise Manager, MicroStrategy Object Manager, MicroStrategyReporting Suite, MicroStrategy Power User, MicroStrategy Analyst, MicroStrategy Consumer, MicroStrategy Email Delivery,MicroStrategy BI Author, MicroStrategy BI Modeler, MicroStrategy Evaluation Edition, MicroStrategy Administrator,MicroStrategy Agent, MicroStrategy Architect, MicroStrategy BI Developer Kit, MicroStrategy Broadcast Server,MicroStrategy Broadcaster, MicroStrategy Broadcaster Server, MicroStrategy Business Intelligence Platform, MicroStrategyConsulting, MicroStrategy CRM Applications, MicroStrategy Customer Analyzer, MicroStrategy Desktop, MicroStrategyDesktop Analyst, MicroStrategy Desktop Designer, MicroStrategy eCRM 7, MicroStrategy Education, MicroStrategyeTrainer, MicroStrategy Executive, MicroStrategy Infocenter, MicroStrategy Intelligence Server, MicroStrategy IntelligenceServer Universal Edition, MicroStrategy MDX Adapter, MicroStrategy Narrowcast Server, MicroStrategy Objects,MicroStrategy OLAP Provider, MicroStrategy SDK, MicroStrategy Support, MicroStrategy Telecaster, MicroStrategyTransactor, MicroStrategy Web, MicroStrategy Web Business Analyzer, MicroStrategy World, Alarm, Alarm.com, Alert.com,Angel, Angel.com, Application Development and Sophisticated Analysis, Best In Business Intelligence, CentralizedApplication Management, Changing The Way Government Looks At Information, DSSArchitect, DSS Broadcaster, DSSBroadcaster Server, DSS Office, DSSServer, DSS Subscriber, DSS Telecaster, DSSWeb, eBroadcaster, eCaster,eStrategy, eTelecaster, Information Like Water, Insight Is Everything, Intelligence Through Every Phone, Your TelephoneJust Got Smarter, Intelligence To Every Decision Maker, Intelligent E-Business, IWAPU, Personal Intelligence Network,Personalized Intelligence Portal, Query Tone, Quickstrike, Rapid Application Development, Strategy.com, Telepath,Telepath Intelligence, Telepath Intelligence (and Design), MicroStrategy Intelligent Cubes, The E-Business IntelligencePlatform, The Foundation For Intelligent E-Business, The Integrated Business Intelligence Platform Built For The Enterprise,The Intelligence Company, The Platform For Intelligent E-Business, The Power Of Intelligent eBusiness, The Power OfIntelligent E-Business, The Scalable Business Intelligence Platform Built For The Internet, Industrial-Strength BusinessIntelligence, Office Intelligence, MicroStrategy Office, MicroStrategy Report Services, MicroStrategy Web MMT,MicroStrategy Web Services, Pixel Perfect, MicroStrategy Mobile, MicroStrategy Integrity Manager and MicroStrategy DataMining Services are all registered trademarks or trademarks of MicroStrategy Incorporated.
All other products are trademarks of their respective holders. Specifications subject to change without notice. MicroStrategyis not responsible for errors or omissions. MicroStrategy makes no warranties or commitments concerning the availability offuture products or versions that may be planned or under development.
Patent InformationThis product is patented. One or more of the following patents may apply to the product sold herein: U.S. Patent Nos.6,154,766, 6,173,310, 6,260,050, 6,263,051, 6,269,393, 6,279,033, 6,501,832, 6,567,796, 6,587,547, 6,606,596,6,658,093, 6,658,432, 6,662,195, 6,671,715, 6,691,100, 6,694,316, 6,697,808, 6,704,723, 6,707,889, 6,741,980,6,765,997, 6,768,788, 6,772,137, 6,788,768, 6,792,086, 6,798,867, 6,801,910, 6,820,073, 6,829,334, 6,836,537,6,850,603, 6,859,798, 6,873,693, 6,885,734, 6,888,929, 6,895,084, 6,940,953, 6,964,012, 6,977,992, 6,996,568,6,996,569, 7,003,512, 7,010,518, 7,016,480, 7,020,251, 7,039,165, 7,082,422, 7,113,993, 7,181,417, 7,127,403,7,174,349, 7,194,457, 7,197,461, 7,228,303, 7,260,577, 7,266,181, 7,272,212, 7,302,639, 7,324,942, 7,330,847,7,340,040, 7,356,758, 7,356,840, 7,415,438, 7,428,302, 7,430,562, 7,440,898 and 7,457,397. Other patent applications arepending.
Various MicroStrategy products contain the copyrighted technology of third parties. This product may contain one or moreof the following copyrighted technologies:Graph Generation Engine Copyright © 1998-2009. Three D Graphics, Inc. All rights reserved.Actuate® Formula One. Copyright © 1993-2009 Actuate Corporation. All rights reserved.XML parser Copyright © 2003-2009 Microsoft Corporation. All rights reserved.Xalan XSLT processor. Copyright © 1999-2009. The Apache Software Foundation. All rights reserved.Xerces XML parser. Copyright © 1999-2009. The Apache Software Foundation. All rights reserved.FOP XSL formatting objects. Copyright © 2004-2009. The Apache Software Foundation. All rights reserved.Portions of Intelligence Server memory management Copyright 1991-2009 Compuware Corporation. All rights reserved.International Components for UnicodeCopyright © 1999-2009 Compaq Computer CorporationCopyright © 1999-2009 Hewlett-Packard CompanyCopyright © 1999-2009 IBM CorporationCopyright © 1999-2009 Hummingbird Communications Ltd.Copyright © 1999-2009 Silicon Graphics, Inc.Copyright © 1999-2009 Sun Microsystems, Inc.Copyright © 1999-2009 The Open GroupAll rights reserved.

iv
Real Player and RealJukebox are included under license from Real Networks, Inc. Copyright © 1999-2009. All rightsreserved.

v
Contents
Application Designer Overview xixOrganization xixReference materials xxTask list xx
Section I Application Designer Concepts 1
Chapter 1 Creating Services 3Choosing delivery methods 3
Delivery methods 3Publications 4
Creating service contents 8Content sections 8Documents 11Document elements 12Error handling 12Documents versus imported files 14Compressed documents 15
Specifying service recipients 16Specifying delivery schedules 17
Schedules 17Simulating compound schedules 17
Application design hierarchy 18Next steps 23
Chapter 2 Dynamic Content and Personalization 25Dynamic content 25Information objects 25
Roles of information objects 26Types of information objects 27Creating information objects 28Document elements with multiple information objects 30
Other types of dynamic content 30User information 30Subscription information 31
Personalization 32What is personalization? 32Types of personalization 32User and subscription preferences 33Personalization and system performance 34Advanced techniques 34

vi Contents
Other considerations 37For more information 38
Information source security 38Defining applications with security 39Implications for upgraded reports 45
To learn about... 46
Chapter 3 Working with Documents 47HTML documents 47
Working with the HTML Document Editor 47Strategy for HTML document development 48Helpful techniques 50
Excel documents 52General strategy 52Data placement and formatting 53Automatic chart creation 54Building EIS interfaces in Excel 56Building pivot tables 57Using macros in Excel 97 or 2000 60Converting URLs into hyperlinks 61Preserving leading zeros 62Accommodating reports of different sizes 62VBA macros and viruses 63Excel for Report from Intelligence Server 63Error handling 64
Text documents 65Imported documents 67Desktop documents 68Using XSL stylesheets 68
Advantages of XSL stylesheets 69Default stylesheets provided 70Column widths specified in MicroStrategy Web or Desktop 77Developing and testing XSL stylesheets 78
Chapter 4 User Management 81The Subscription Book 81Users and addresses 82
Users 82Addresses 83Governing 85
Subscriptions and subscription sets 86Subscriptions 86Static subscription sets 88Dynamic subscription sets 89Pre- and post-service execution SQL 92

Contents vii
Static subscription set governing 95Synchronization with external sources 95
Import or update user and address attributes 96Synchronize users 96Update user personalization and subscription 97
Subscription Book synchronization tutorial 97Scenario 1: Import users and addresses 98Scenario 2: Update users, remap users, add addresses, and create subscriptions 100
Chapter 5 Alert-Based Applications 105Importance of alert-based services 105Overview of support for alerting functionality 106
Process flow 106Event-triggered service execution 107Dynamic subscriptions and personalization 108
Application design for alert-based implementations 109Event-triggered service execution 110Dynamic subscriptions and personalization 117Post-service execution data source update 119
Summary 121
Chapter 6 Page Personalization and Dynamic Subscriptions 123Before you begin 123Introduction 123
Personalized page execution 123Dynamic subscription 125Storing subscription information in the Subscription Book Repository 125
Understanding personalized page execution and dynamic subscriptions 126Personalized page execution versus personalized report execution 126Personalization method and implications 128Content information objects personalization by subscription information objects 128
Slicing and segmentation 130Segmentation processes 131Segmentation implications for application design 133Subscription ID versus slicing attribute 136
Understanding subscription information 137Storing subscription information 137Subscription ID requirements 141
Designing applications to support dynamic subscriptions and personalized page execution 142
Application design requirements 142Scenario 1: Personalized report execution with static subscriptions 142Scenario 2: Personalized page execution with dynamic subscriptions 143Scenario 3: Personalized page execution with static subscriptions 145

viii Contents
Scenario 4: Personalized report execution with dynamic subscriptions 146Implementing personalized page execution and dynamic subscriptions 147
Advanced segmentation control techniques 149
Chapter 7 User Self Subscription 155Subscription Portal system 156
Subscription Portal application 157Portal Repository 157
Database connections 157Table prefixes 158
Site definition 158Portal 159Site name and description 159Object Repository 160Subscription Book Repository 160Channels 161Device types 162Devices 163Device settings 163Information sources 164Preferences 166
Services configuration 167Personalized page execution 167Dynamic subscription sets 172
Chapter 8 Supporting Diverse User Populations 175Multiple sets of user devices 175Multiple languages and locales 176
Overview 177Locale concepts 178Locale processes 178Using locales 179
Chapter 9 Advanced Subscription Portal Configuration 181Scenario 1: Basic personalized page execution 183
Change the warehouse 183Create objects in the MicroStrategy Desktop interface 184Create objects in Narrowcast Administrator 184Configure with the Portal Administrator Wizard 185Try it! 185How it works 186
Scenario 2: Page-by Subscription ID 186Change the warehouse 187Create objects in the MicroStrategy Desktop interface 187Create objects in Narrowcast Administrator 188

Contents ix
Configure with the Portal Administrator Wizard 189Try it! 189How it works 190
Scenario 3: Page-by Answer ID 191Change the warehouse 192Create objects in the MicroStrategy Desktop interface 192Create objects in Narrowcast Administrator 193Configure with the Portal Administrator Wizard 194Try it! 194How it works 195
Scenario 4: Non-personalized dynamic subscription 196Change the warehouse 196Create objects in the MicroStrategy Desktop interface 196Create objects in Narrowcast Administrator 197Configure with the Portal Administrator Wizard 198Try it! 199How it works 199
Scenario 5: Personalized dynamic subscription 200Change the warehouse 201Create objects in the MicroStrategy Desktop interface 201Create objects in Narrowcast Administrator 202Configure with the Portal Administrator Wizard 203Try it! 204How it works 205
Section II Application Designer Interfaces 207
Chapter 10 Choose Subscription Sets Dialog Box 209Choose Subscription Sets dialog box layout 209Executing a service without a subscription set 209
Chapter 11 Desktop Document Selector Dialog Box 211Desktop Document Selector dialog box layout 212
Advanced Properties dialog box 213Save Desktop Linked Document dialog box 216
Chapter 12 Dynamic Subscription Set Wizard 219Dynamic Subscription Set Wizard layout 220
Introduction 220Name and Description 220Subscription 220Segmentation 221Pre- and Post-SQL 221Summary 221

x Contents
Chapter 13 Document Element Properties Dialog Box 223Document Element Properties dialog box layout 224
Stylesheet selection 224Error handling 228
Chapter 14 Document Properties Dialog Box 229Document Properties dialog box layout 230
Choose Execution Locale 230Document-Level Error Handling 230Column Width Options 231
Chapter 15 Excel Document Editor 233Excel Document Editor layout 234
Content definition pane 234Menu bar 236Choose XML Information Object Destination dialog box 238
Chapter 16 Filter Editor and Governing Setting Dialog Box 239Filter editor and governing settings dialog box layout 240
Chapter 17 HTML Document Editor 241HTML Document Editor layout 242
Menu bar 242Toolbar 246Choose XML Information Object Destination dialog box 247
Chapter 18 Imported Document Editor 249Imported Document Editor layout 250
Imported Document Editor dialog box 250Import File dialog box 250Select Imported File 251Imported Document Editor - document name 251
Chapter 19 Import File Dialog Box 253Import File dialog box layout 254
Select a Character Set dialog box 255Refresh Imported File layout 256
Chapter 20 Information Object Wizard 257Information Object Wizard layout 258
Select Information Source dialog box 259Role page 259Source of Subscription Information page 259Report or Filter page 260

Contents xi
Information object validation 261Advanced Properties dialog box 263Format page 266Segmentation Prompts page 266User Properties and Personalization page 266Address Properties page 269Preferences page 269Authentication and Security page 269Segment Size page 269Summary page 269
Chapter 21 Modify Schedule Queue Parameters Dialog Box 271Modify Schedule Queue Parameters dialog box layout 272
Chapter 22 New Document Dialog Box 273New Document dialog box layout 274
Chapter 23 Portal Administrator Wizard 275Portal Administrator Wizard layout 276
System Configuration section 276Site Management section 278Site Preferences section 280Services Configuration section 290
Chapter 24 Plaintext Document Editor 295Plaintext Document Editor layout 296
Menu bar 296Choose XML Information Object Destination dialog box 298
Chapter 25 Subscription Set Properties Dialog Box 299Subscription Set Properties dialog box layout 300SQL statements dialog box layout 301
Chapter 26 Publication Wizard 303Publication Wizard layout 304
Welcome 304Name and Description 304Delivery Method 304Selection Locale 305Supported Devices 305Message Contents 305Delivery Method Rules 308Summary 308

xii Contents
Chapter 27 Question Object Dialog Set 309Question Object dialog set layout 310
Select Information Source dialog box 310Question Object dialog box 310Question Object Browser dialog box 310Question object validation 311
Chapter 28 Service Editor 313Service Editor layout 314
Menu bar 314Message Contents 315Subscription Sets and Schedules 316General Properties 317Service Execution Timeout 318
Chapter 29 Schedule Wizard 321Schedule Wizard layout 322
Introduction 322Name and Description 322Recurrence Pattern 322Interval 323Summary 324
Chapter 30 Static Subscription Set Editor 325Static Subscription Set Editor layout 326
The menu bar 327The toolbar 329
Chapter 31 Service Wizard 331Service Wizard layout 333
Welcome 333Delivery Methods 333Message Contents 334Subscriptions and Schedules 336Service Summary 337
Devices and Locale Support dialog box 338Compression Properties dialog box 338Error Handling dialog box 340General Service Settings dialog box 340
Name and Description tab 340Delivery Properties tab 340Execution Settings tab 341

Contents xiii
Chapter 32 Subscription Book Editor 343Subscription Book Editor layout 344
The menu bar 344The toolbar 346
Chapter 33 Subscription Book Synchronization Wizard 347Subscription Book Synchronization Wizard layout 348
Welcome 349Synchronization Options 349User and Address Properties 350Subscriptions 353Preferences 353Security 355Authentication 355User Addition or Mapping 356User Removal or Mapping 356Review 357Finish 357
Synchronization Settings dialog box 357Synchronization Process tab 357Synchronization Values tab 364
MicroStrategy Intelligence Server User Export Tool 367
Chapter 34 Subscription Properties Editor 369Subscription Properties Editor layout 370
Preference tab 370Transmission tab 371Status tab 371Notification tab 371
Chapter 35 Subscription Dialog Box 373
Chapter 36 User Properties Editor 375User Properties Editor layout 376
Login tab 376Addresses tab 377Preference tab 378Define User Preference dialog box 379Authentication and Security tab 380User Information tab 381

xiv Contents
Section III Application Designer How Do I...? 383
Chapter 37 Channel Operations 385Add a new channel 385Change the folder of services associated with a channel 385Delete a channel 386
Chapter 38 Device Type Operations 387Change the device folders associated with a device type 387Create a new device type 387Delete a device type 388Reconfigure a device type definition 388Rename a device type 388
Chapter 39 Information Object Operations 389Associate a question object to an information object 389Clear a question object from an information object 389Create a MicroStrategy content information object with personalized page execution 390Create a MicroStrategy content information object with personalized report execution 391Create a MicroStrategy question object 392Create a MicroStrategy segment information object 393Create a MicroStrategy subscription information object 394Define delivery information for a subscription information object 397Specify error handling rules for an information object 398
Chapter 40 Database Connection Operations 399Add a database connection 399Select an Object Repository 400Select a Portal Repository 400Select a Subscription Book Repository 400
Chapter 41 Publication Operations 403Add a dynamic text item to a document 403Add multiple XML information objects with the same stylesheet in a document 404Associate a macro with an event in Microsoft Excel 405Change the view in a document editor 405Create a link to a Desktop document 406Create an automatic chart 407Create an Excel document 407Create an Excel document 410Create an HTML document 412Create an imported document from a new imported file 414Create a new information object in a document 415Create a plain text document 416
Contents xv
Create a publication 416Import a file 418Preview an HTML document in the HTML Document Editor 418Reimport a file to update it 419Select a locale for a document 419Select a stylesheet file for a document 419Specify error handling rules for a document 420Specify error handling rules for a document element 421View an HTML document’s source code in the HTML Document Editor 421View object properties 422View the results of XSL stylesheets applied to various reports 422
Chapter 42 Service Operations 425Add zipped documents to a service 425Create a schedule 426Create a service using the Service Editor 427Create a service using the Service Wizard 429Modify a service to include or exclude report titles in the delivered reports 431
To edit the service for Report Email Deliveries 431To edit the service for Report File Deliveries 432
Modify the schedule queue parameters 432Run a service immediately 433View scheduled services 433
Chapter 43 Service Configuration Operations 435Configure a dynamic subscription set 435Configure page-by questions for dynamic subscription sets 436Configure page-by questions for static subscription sets 437Map dynamic subscription information to data warehouse tables 438Map question object information to data warehouse tables 439Select an alternate question 440Select tables for question mappings and subscription mappings 440
Chapter 44 Site Operations 443Add a new site definition 443Configure a different Subscription Portal 444Create a new Subscription Portal 444Delete a site definition 444Delete a Subscription Portal 445Edit a site definition 445
Chapter 45 Subscription Book Operations 447Add an address to the Subscription Book 447Add a user to the Subscription Book 448Add authentication and security personalization to a user in the Subscription Book 449

xvi Contents
Add preference personalization to a user in the Subscription Book 450Delete an address from the Subscription Book 451Delete a user from the Subscription Book 451Edit an address in the Subscription Book 452Edit a user in the Subscription Book 452Import user and address attributes 453Import user authentication 455Import user preferences 456Import user security 457Import user subscriptions 458Set governing limits for users and addresses 459Synchronize users 460
Chapter 46 Subscription Set Operations 463Activate or deactivate a subscription 463Add a subscription to a subscription set 463Add SQL statements to be executed after service execution is completed 464Add SQL statements to be executed before segmentation occurs 464Create a dynamic subscription set 465Create a static subscription set 466Delete a subscription from a subscription set 466Delete a subscription set 467Enable send now delivery 467Modify the subscription preferences for each information source 468Modify transmission properties regarding address display 469Send e-mail notification for file and print delivery 470Set an expiration date for a subscription 470Set governing limits for subscriptions 471
Section IV Application Designer Appendixes 473
Appendix A E-mail and Wireless (SMTP) ITM Execution Control Documents 475Custom e-mail headers 475
Syntax 475Example 476
Blind Carbon Copy (BCC) list 476Syntax 476Example 476
Change attachment name 477Syntax 477Examples 477
Dynamically change attachment name 478Example1 478

Contents xvii
Example2 479Dynamically renaming zip files in e-mail attachments 479
Syntax 479Example 480
Other properties 480Syntax 480Examples 481
Appendix B File ITM Execution Control Documents 483Change file name 483
Syntax1 483Example1 484Syntax2 484Example2 485
Dynamically change file name 486Example1 486Example2 487
Dynamically renaming zip files in file attachments 487Syntax 487Example 488
Appendix C SMS (SMPP) ITM Execution Control Documents 489Return Address, TON, NPI 489
Syntax 490Example 490
Expiration/Validation Date 490Syntax 491Example 491
Data Coding Scheme (DCS) 492Syntax 493Example 493
Priority 493Syntax 493Example 493
Appendix D XML for Narrowcast Server Objects 495Organization 495Plaintext XML format 496
Overview 496Tags 497Example 499
Excel XML format 500Overview 500Tags 502

xviii Contents
Color definition 511Example 512
Web (Portal) XML format 514Overview 514Tags 515Example 516
XML Structure for the Subscription Information Source Module XML 516XML Structure for the System Information Source Module XML 517
Appendix E Synchronization Data Types 519User properties 519Address properties 520Subscription set 522Preference 522Authentication 522Security 522Time zone constants 523
Section V Index 527

I N T R O D U C T I O N
xix
Application Designer Overview
Welcome to the MicroStrategy Narrowcast Server Application Designer Guide. This guide takes you through the fundamentals of designing Narrowcast Server applications and serves as a reference as you encounter questions. To begin, this guide covers a few basics about Narrowcast Sever and application design.MicroStrategy Narrowcast Server is an information delivery platform. An information delivery platform is a server that, whenever certain conditions are in effect, acquires information from a variety of sources, personalizes the information, formats it, and transmits it through a variety of technologies. Due to its open modular architecture, the Narrowcast Server can acquire reports from MicroStrategy projects, as well as other information sources, and deliver messages via e-mail and other delivery methods. In addition, MicroStrategy Narrowcast Server Subscription Portal allows users to subscribe to Narrowcast Server services using a Web browser.An application is everything you need to support your Narrowcast Server product goal, such as sending monthly sales reports to regional sales staff and delivering product inventory alerts to suppliers. Application design involves service design, portal configuration, and subscription administration.
OrganizationThe information in this guide is divided into three main sections:• Concepts—This section provides you with the key concepts about the
product components and features with which you are working.• Interfaces—Refer to this section for interface-specific information.
This section explains the interfaces you use to develop and test services.• How do I...?—This is where the procedural information is found. This
section provides the answers to the “how do I?” questions you might have while using Narrowcast Server.

xx Application Designer Overview
Reference materialsBefore you begin developing an application, you should read the MicroStrategy Narrowcast Server Getting Started Guide, which serves as an introduction to the features and functionality of MicroStrategy Narrowcast Server. The Getting Started Guide also provides you with the basic terminology and information resources that can help you navigate the software and accompanying documentation.
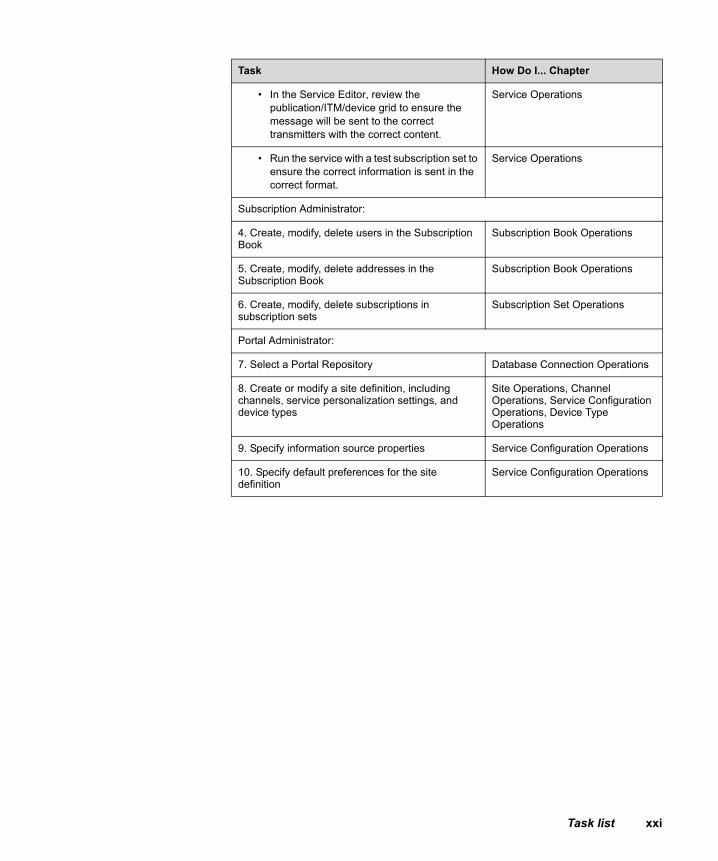
Task listA task list is shown below which identifies the application design tasks for the roles of application designer, subscription administrator, and portal administrator.• When designing services for a new system, you perform the application
designer tasks in the appropriate order.• When setting up subscription information for a new system, you
perform the subscription administrator tasks in the appropriate order.• When setting up a subscription portal for a new system, you perform the
portal administrator tasks in the appropriate order.You might perform additional tasks during the course of designing your application, but the following lists the basic tasks:
Task How Do I... Chapter
Application Designer:
1. Design and create services Service Operations
2. Create, modify, and delete objects, including services, schedules, subscription sets, documents, publications, information objects, question objects, and imported files
Service Operations, Publication Operations, Information Object Operations, Subscription Set Operations
3. Test services Service Operations
• Check the service’s subscription sets and information objects to ensure that the correct information will be sent to the correct subscribers.
Publication Operations, Information Object Operations
• Check the schedule to ensure the service will be sent at the correct time.
Service Operations
Task list xxi
• In the Service Editor, review the publication/ITM/device grid to ensure the message will be sent to the correct transmitters with the correct content.
Service Operations
• Run the service with a test subscription set to ensure the correct information is sent in the correct format.
Service Operations
Subscription Administrator:
4. Create, modify, delete users in the Subscription Book
Subscription Book Operations
5. Create, modify, delete addresses in the Subscription Book
Subscription Book Operations
6. Create, modify, delete subscriptions in subscription sets
Subscription Set Operations
Portal Administrator:
7. Select a Portal Repository Database Connection Operations
8. Create or modify a site definition, including channels, service personalization settings, and device types
Site Operations, Channel Operations, Service Configuration Operations, Device Type Operations
9. Specify information source properties Service Configuration Operations
10. Specify default preferences for the site definition
Service Configuration Operations
Task How Do I... Chapter

xxii Application Designer Overview

IS E C T I O N I
1
CONCEPTS
Application Designer Concepts I

2 Section I Application Designer Concepts
CONCEPTS

1C H A P T E R 1
3
CONCEPTS
1.Creating Services 1A service is the fundamental tool that you use to deliver information using Narrowcast Server. A service defines some set of information that should be delivered, how this information should be delivered, a set of users who want to receive this information, and the schedule on which they would like to receive it. Thus, a service is the entity that defines who should receive content, what content they should receive, how they should receive it, and when they should receive it. When you define a service you therefore answer these same questions. The Service Wizard is the recommended way to create services. It should satisfy your needs for most application design requirements. The Service Wizard guides you through the process of designing a service by having you define:• by which delivery methods a service should be delivered, such as e-
mail, wireless, and over the Web• the content that should be delivered, such as an HTML e-mail with
several reports or a wireless plain text service for a wireless service• the recipients who should receive this information and their preferences• the schedule on which the information should be delivered The following sections cover each of these topics in greater detail.
Choosing delivery methods
Delivery methodsServices can be delivered by one or more means such as via e-mail, to wireless devices, to the Subscription Portal, via voice, and so forth. Each means of delivering a message is called a delivery method. In Narrowcast Server, each service can be defined to support one or more delivery methods. For example, you might design a service to be sent to all subscribers via e-mail or to deliver content to subscribers via both e-mail and the Subscription Portal.

4 Chapter 1 Creating Services
CONCEPTS
Each delivery method is made possible by an information transmitter. Information transmitters are responsible for delivering messages once message contents are complete. The name of each information transmitter is listed in the Delivery Methods section of the Service Wizard. By default, Narrowcast Server provides e-mail, wireless, print, file, SMS, and Web information transmitters. As a result, these options appear on the Service Wizard’s Delivery Methods page. To enable additional delivery methods, additional information transmitters must be created and registered with the system. For more information on information transmitters, refer to the MicroStrategy Narrowcast Server System Administrator Guide.The message content delivered by each delivery method is created through one or more content sections that the delivery method provides. For example, the e-mail delivery method allows you to define a message subject, message body, and attachments. The content for each section is created using documents. For more information on the content sections available by default, see the Content sections section in this chapter. For more information on how documents are used to provide content for these sections, see the Documents section in this chapter.
PublicationsEach delivery method is supported by a single publication, which specifies the content to be delivered. Since each delivery method corresponds to an information transmitter, each publication is in turn created for a single information transmitter. It is the information transmitter for a publication that specifies which content sections the publication provides to the application designer and which types of content each section can accept. For example, the E-mail (SMTP) information transmitter informs publications for the E-mail (SMTP) delivery method that a message subject, message body, and a section for attachments should be provided. The E-mail (SMTP) information transmitter also dictates that the subject can only accept one text document, while the attachments section can accept any number of documents of any type. Other information transmitters specify their own content sections and their own rules for what types of content these sections can accept.In addition to this role of containing message content, publications also specify the locales and devices the publication supports. As discussed in chapter 8, Supporting Diverse User Populations, locales specify the regional characteristics of messages while devices control how messages are formatted for end user devices. When creating services using the Service Wizard, all of this functionality might not be immediately apparent. This is because the Service Wizard is designed to guide you through a streamlined application design process. For example, when you
Choosing delivery methods 5
CONCEPTS
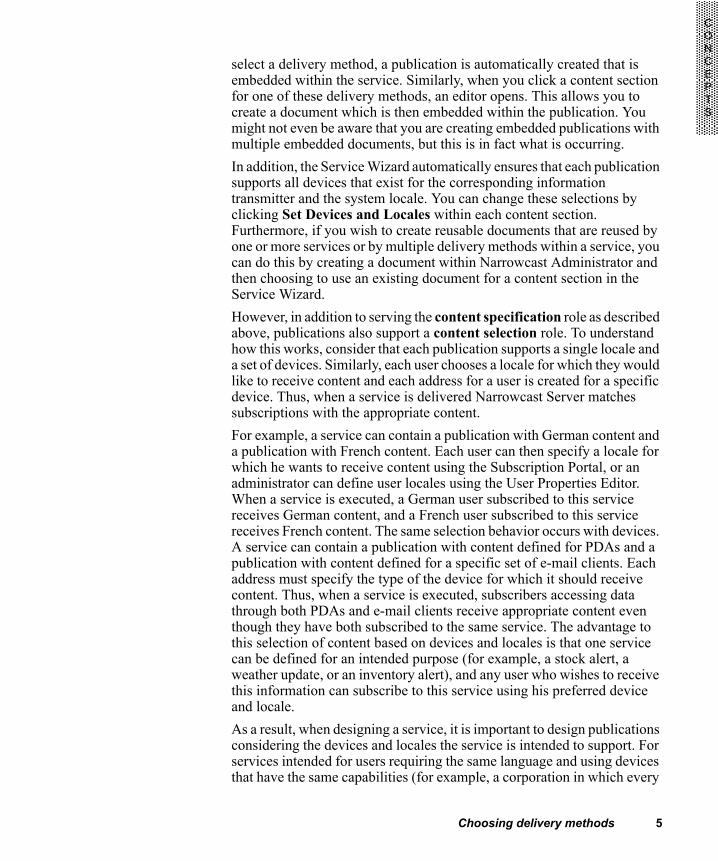
select a delivery method, a publication is automatically created that is embedded within the service. Similarly, when you click a content section for one of these delivery methods, an editor opens. This allows you to create a document which is then embedded within the publication. You might not even be aware that you are creating embedded publications with multiple embedded documents, but this is in fact what is occurring. In addition, the Service Wizard automatically ensures that each publication supports all devices that exist for the corresponding information transmitter and the system locale. You can change these selections by clicking Set Devices and Locales within each content section. Furthermore, if you wish to create reusable documents that are reused by one or more services or by multiple delivery methods within a service, you can do this by creating a document within Narrowcast Administrator and then choosing to use an existing document for a content section in the Service Wizard.However, in addition to serving the content specification role as described above, publications also support a content selection role. To understand how this works, consider that each publication supports a single locale and a set of devices. Similarly, each user chooses a locale for which they would like to receive content and each address for a user is created for a specific device. Thus, when a service is delivered Narrowcast Server matches subscriptions with the appropriate content.For example, a service can contain a publication with German content and a publication with French content. Each user can then specify a locale for which he wants to receive content using the Subscription Portal, or an administrator can define user locales using the User Properties Editor. When a service is executed, a German user subscribed to this service receives German content, and a French user subscribed to this service receives French content. The same selection behavior occurs with devices. A service can contain a publication with content defined for PDAs and a publication with content defined for a specific set of e-mail clients. Each address must specify the type of the device for which it should receive content. Thus, when a service is executed, subscribers accessing data through both PDAs and e-mail clients receive appropriate content even though they have both subscribed to the same service. The advantage to this selection of content based on devices and locales is that one service can be defined for an intended purpose (for example, a stock alert, a weather update, or an inventory alert), and any user who wishes to receive this information can subscribe to this service using his preferred device and locale.As a result, when designing a service, it is important to design publications considering the devices and locales the service is intended to support. For services intended for users requiring the same language and using devices that have the same capabilities (for example, a corporation in which every

6 Chapter 1 Creating Services
CONCEPTS
address belongs to a Microsoft Outlook e-mail client), a simple service with one publication that supports the appropriate devices handles the requirement. By default, the Service Wizard supports all devices for an information transmitter and the system locale, and all users are created using the system locale. Thus, for simple services that do not require multilocale support, locales should not be changed in the content specification process.However, for complex services that are intended to support multinational or multilanguage user communities, or multiple devices with varying capabilities, it is important to consider both publication content and how publication design impacts the content selection role of determining which users receive which publications. As noted above, a subscription only receives a publication if the locale and device used by the subscription are supported by the publication. The one exception to this rule is the system locale, which can be used to create a backup, or failover, publication. If a publication is defined for the system locale, it is delivered to a subscription if the device used by the subscription is supported by the publication (regardless of locale), and no publication is found that supports both the locale and device used by the subscription. This is best clarified by the following example.Address1 uses Device1 and exists for a user who uses Locale1.Service1 contains the following three publications:• Publication1: Supports Device1, Locale2• Publication2: Supports Device2, Locale1• Publication3: Supports Device2, Locale2If subscribed to a subscription set used by Service1, Address1 receives nothing.Service2 contains the following three publications:• Publication4: Supports Device1, Locale2• Publication5: Supports Device2, Locale1• Publication6: Supports Device1, System LocaleIf subscribed to a subscription set used by Service2, Address1 receives Publication6 since no publication supports Device1 and Locale1 but Publication6 supports the system locale and Device1.Service3 contains the following three publications:• Publication7: Supports Device1, Locale2• Publication8: Supports Device1, Locale1• Publication9: Supports Device2, SystemLocale
Choosing delivery methods 7
CONCEPTS
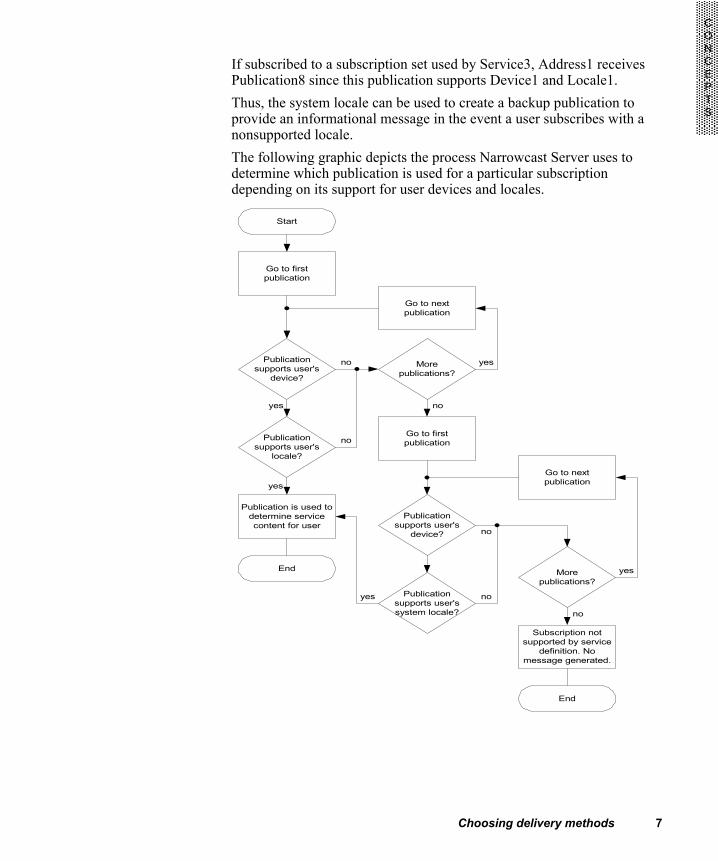
If subscribed to a subscription set used by Service3, Address1 receives Publication8 since this publication supports Device1 and Locale1.Thus, the system locale can be used to create a backup publication to provide an informational message in the event a user subscribes with a nonsupported locale.The following graphic depicts the process Narrowcast Server uses to determine which publication is used for a particular subscription depending on its support for user devices and locales.
Publicationsupports user's
device?
Publicationsupports user's
locale?
Publication is used todetermine servicecontent for user
Go to nextpublication
Morepublications?
Go to firstpublication
Publicationsupports user's
device?
Publicationsupports user'ssystem locale?
End
End
Subscription notsupported by service
definition. Nomessage generated.
Morepublications?
Go to nextpublication
yes
yes
no
no
yes
no
no
yes
no
yes
no
Go to firstpublication
Start

8 Chapter 1 Creating Services
CONCEPTS
Creating service contents
Content sectionsEach delivery method includes a number of content sections. They are described in the following sections.
Note: Other information transmitters might offer different content sections.
Content sections noted as advanced are sections that are not needed for basic applications, but can provide additional power and flexibility for advanced applications. These sections are typically execution control documents that provide additional flexibility to control how messages are delivered. For example, the contents of a MicroStrategy report can be used to dynamically control the sender that appears in e-mail messages sent by Narrowcast Server. The properties that are controlled by execution control documents vary from one information transmitter to the next. For more information on execution control documents for the e-mail and wireless (SMTP) information transmitters, see appendix A, E-mail and Wireless (SMTP) ITM Execution Control Documents. For more information on execution control documents for the File information transmitter, see appendix B., File ITM Execution Control Documents. For more information on execution control documents for the SMS (SMPP) information transmitter, see appendix C., SMS (SMPP) ITM Execution Control Documents.In addition, for the Wireless (SMTP) information transmitter, an HTML message body section is also provided as an advanced content section. This is for advanced devices that support HTML content. For the e-mail (SMTP) information transmitter, a text message body section is also provided as an advanced content section. If only a text message body and no HTML message body is specified, text e-mails are delivered. If both text and HTML message bodies are provided, a multi-part MIME message is delivered. Multipart MIME allows one e-mail message to contain both text and HTML bodies so that MIME-compatible e-mail clients can display the best content type that they support. MIME is an extension to the standard SMTP e-mail protocol that allows HTML messages, attachments and other content beyond plain ASCII text to be sent via e-mail.

Creating service contents 9
CONCEPTS
Within each content section, error handling can be used to control whether or not messages are sent to individual recipients if there is an error with any documents formatted for a particular recipient. Each document within a service can either be removed or can cause no content to be delivered to this recipient if an error is encountered.
Note: Using specific error handling settings, you can define services with alerting capability. For more information, refer to Error handling in this chapter and chapter 5, Alert-Based Applications.
E-mail (SMTP) delivery method
For the E-mail (SMTP) delivery method, you define the content by adding documents to the following content sections:• subject• message body (HTML)• attachments: includes Excel, HTML, and text, as well as zip and other
imported files• execution control (advanced): overrides the default information
transmitter settings; see appendix A.: E-mail and Wireless (SMTP) ITM Execution Control Documents for more information
• message body (text) (advanced)
Wireless (SMTP) delivery method
For the Wireless (SMTP) delivery method, the following content sections hold the service content:• subject• message body (text)• attachments: includes Excel, HTML, and text, as well as zip and other
imported files• execution control (advanced): overrides the default information
transmitter settings; see appendix A.: E-mail and Wireless (SMTP) ITM Execution Control Documents for more information
• message body (HTML) (advanced)

10 Chapter 1 Creating Services
CONCEPTS
Print delivery method
For the Print delivery method, the following content sections hold the service content:• cover page: allows one or more text or HTML documents; these are
printed first in the order they appear in the interface • documents: requires at least one text, PDF, imported, or HTML
document; these are printed second in the order they appear in the interface
File delivery method
For the File delivery method, the following content sections hold the service content:• saved documents: requires at least one document of any type; one or
more are allowed• execution control (advanced): allows only one text document; this
document is optional; see appendix B.: File ITM Execution Control Documents for more information
SMS (SMPP) delivery method
For the SMS (SMPP) delivery method, the following content sections hold the service content:• message body: required and limited to one plaintext document)• execution control document (advanced): overrides the default
information transmitter settings; this document is optional and limited to one plaintext document; see appendix C: SMS (SMPP) ITM Execution Control Documents for more information
Web (Portal) delivery method
For the Web (Portal) delivery method, the following content sections hold the service content:• document body: can be one HTML or one plaintext document• attachments: can be any number and any type of documents)• link rendering style: an XSL stylesheet file that transforms ITM-
generated XSML into hyperlinks. These hyperlinks are then added to the bottom of the HTML message body for Subscription Portal messages. By using a different XSL stylesheet, the appearance of these hyperlinks can be changed.

Creating service contents 11
CONCEPTS
DocumentsWhen content sections in a service such as a subject or message body are added for a delivery method, a document is created. Documents define the fully-formatted content that end users receive. Documents combine static content such as text, HTML, and static images with dynamic content such as reports returned from MicroStrategy Intelligence Server, personalized files, and personalized Web hyperlinks. Multiple types of documents are available to support different types of content such as HTML, text, and Excel. Each delivery method, such as e-mail or wireless, supports one or more content sections such as the subject or message body of an e-mail message. In the Service Wizard, content is defined by clicking a content section for the desired delivery method. This opens a document editor to define the appropriate type of content for the selected content section or opens a dialog box so that you can select the information source containing a MicroStrategy Desktop document to include. This process allows you to easily create and select the appropriate documents to serve as service content.
Note: The Service Wizard creates documents as embedded by default so that they are not saved in Narrowcast Administrator as independent, reusable objects. However, these documents can be made reusable by selecting Save As within the Service Wizard. In addition, reusable documents can be created within the Narrowcast Administrator for use in one or more services.
The export formats you can select in Narrowcast depend on the export formats set while creating the document. For details to define export formats for a document, see the Report Services Document Creation Guide.For more information on working with HTML, Excel, and text documents, refer to chapter 3, Working with Documents. This chapter provides in-depth information on how to create powerful, high-quality content within Narrowcast Server as well as techniques for working with each type of document. Also, information on how to link to MicroStrategy Desktop documents and include them in Narrowcast Server services is provided. An additional section on XSL stylesheets provides comprehensive information on using XSL stylesheets with Narrowcast Server.Both documents embedded within services and reusable documents saved within Narrowcast Administrator can be given names to help you identify them and remember their purpose. However, when naming documents to be used as attachments, you need to avoid the use of characters that could
12 Chapter 1 Creating Services
CONCEPTS
cause an invalid file name when files are sent as attachments. Invalid characters can cause undesired behavior in some e-mail clients. In general, avoid using the following characters:
Document elementsA document element consists of one or more information objects plus error handling settings and XSL stylesheet selection. A document element is essentially a place holder or container for one or more information objects, which allow dynamic content to be added to a document, and for the same formatting and error handling conditions to be applied to all information objects within this document element. This also allows an information object to be changed without changing the stylesheet or error handling settings. Its ability to hold multiple information objects permits several information objects to be merged by one XSL stylesheet. Each information object must have the same type, such as text, XML, or HTML.
Error handlingIn MicroStrategy Narrowcast Server, the error handling properties that govern the delivery of dynamic content are defined at the document element level, the document level, and the publication level.
Document element-level error handling
At the document element level, an error is considered to be any event that prevents a document element from being rendered or populated, and inserted into a document. In the Document Element Properties dialog box within each of the document editors, the following settings control how different types of errors are handled.• If an information object returns no data: This type of error is returned
if an information object executes successfully but the information source returns no data.
• If an information object returns an error: This type of error is returned if the information source cannot successfully execute an information object and returns an error.
\ / : * ? “ < > |

Creating service contents 13
CONCEPTS
• If the document formatter is unable to format the document element: This type of error is returned if an information object returns data, but after formatting the document element, invalid data is produced in the document element that cannot be used by the document formatter because it does not have the correct structure. This could result if an invalid XSL stylesheet is applied or if the XML format returned by the information object is invalid.
For each of these events, it is not possible to insert a rendered document element into the document. As a result, you can take two different actions based on the failure. First, the document element can be replaced with a string value that you define. Second, the document element can raise an error so that the document fails to be generated.
Document-level error handling
At the document level, an error occurs when a set of information objects fails or returns no data, cancelling the document. This allows you to define error handling based on the results of several information objects collectively, and not just the success or failure of a specific information object. The document cancellation is based on information objects rather than on document elements. That is, if a document element contains two or more information objects and one information object fails to return data, but the document element as a whole returns data, error handling assesses the failure of the information objects rather than the success of the document element. These error handling settings are specified in the Document Properties dialog box by making the appropriate selections in the Error Handling section.
Note: If error handling is set to cancel a document via either document- or document element-level error handling, the document is cancelled if either setting takes effect. In other words, if document-level error handling is set to fail a document if all information objects return no data, and document element-level error handling is set to fail a document if a specific information object fails, the document still fails if just the information object selected in the document element fails.
Publication-level error handling
At the publication level, error handling is designed to handle errors in the generation of documents. If a document cannot be generated correctly, the publication must determine how to handle this situation. Narrowcast Server provides two options. First, the document can be removed from the

14 Chapter 1 Creating Services
CONCEPTS
publication so that the recipient simply receives a message without this document. Second, the message containing this document can be aborted so that the recipient receives no message. These error handling settings can be defined for each document within a publication using either the Service Wizard or the Publication Wizard. In the Service Wizard, click Error Handling to set the desired delivery method.
Error handling and alerts
Document generation failure based on document or document element error handling can be used to create alert type services that deliver content to recipients only when certain conditions have been met. This type of behavior can be achieved by setting document or document element error handling settings to Fail the document when the desired error type is encountered, such as if the information object returns no data. In the publication containing these documents, the error handling should be set not to deliver messages if the document returns an error. In this case, when an information object fails, an error is returned to fail the document. Since the document is required for the publication to be delivered, the publication is not delivered to recipients for which the document element produced an error. Note that to achieve this alerting behavior, either (a) information objects must be properly designed to return no data or an error when no content should be delivered to subscribers, or (b) XSL stylesheets must be designed to produce an error based on certain conditions in the data.You can also choose to have a message delivered even if the Information Object is empty due to the report or document returning no report results. To have an empty message delivered, at the publication level, set Remove Content on Error. The report or document that had no results is removed from the publication, and an empty message is delivered.
Error handling for Excel documents
Error handling is also available at the document formatter level for the Excel document formatting module. No error handling is available for the HTML or Plaintext document formatting modules. For more information, see Excel documents in chapter 3, Working with Documents.
Documents versus imported filesIt is important to understand the difference between a document and an imported file. A file is imported from the Windows file system and is stored in the Object Repository in a special encoded form of the original file. For example, a text file contains only plain text and an HTML file

Creating service contents 15
CONCEPTS
contains only HTML. Therefore, files cannot be changed using the document editors, and cannot contain document elements and information objects, as documents can. Storing information in the file format preserves the integrity of the original data since files cannot be modified by Narrowcast Server. Imported files cannot be directly included in publications; they must first be used to create imported documents, which can then be included in service contents. Imported files can also be used as stylesheets or templates for documents. For example, imported Excel workbook files serve as the basis for creating new Excel documents. An imported Excel file determines the number of worksheets available in an Excel document and can provide formatting and macros to be used within the document. For more information on working with Excel documents, see Excel documents in chapter 3, Working with Documents.
Compressed documentsDelivering large documents in Narrowcast Server services can adversely affect the speed and performance of various downstream systems and can require large amounts of storage space. For example, this might occur when large Microsoft Excel workbooks are delivered via e-mail, published to the Subscription Portal, or saved to network locations. Compressing, or zipping, documents is one way to reduce the size of files generated by Narrowcast Server. File compression advantages include• reduced traffic across corporate networks• reduced storage in mail systems• reduced download times from the Subscription Portal• faster, more efficient transfer between mail systems and client machines• reduced database storage space requirements when storing Subscription
Portal documents in a databaseAny information transmitter that can accept imported documents can send compressed documents. This includes the E-mail (SMTP), Wireless (SMTP), and Web (Portal) information transmitters that are provided with Narrowcast Server. The SMS (SMPP) information transmitter, which does not accept imported documents, also does not allow documents to be compressed. Custom information transmitters follow the same rule: if it accepts imported documents, it can send compressed documents.

16 Chapter 1 Creating Services
CONCEPTS
Narrowcast Server’s file compression technology includes the following compression levels:• Maximum: This level is the slowest to produce a compressed file;
however, it produces the smallest files. As a result, the performance of other processes, such as saving files to databases for use by the Subscription Portal, can be greatly improved.
• Medium: This level produces compressed files faster than Maximum level. However, file size is not reduced as much as when Maximum level compression is used.
• Minimum: This level performs the least amount of compression possible. Files are compressed less, resulting in a fast compression time.
• None: No compression is performed.Overall system performance using compressed documents should be analyzed to determine the appropriate selection.
Note: If compression fails for any reason for a recipient, the service is not delivered to that recipient.
Specifying service recipientsWhen defining a service, one of the primary questions that needs to be answered is “To whom will this service be delivered?”. In Narrowcast Server, this question is answered by defining a subscription set for a service. A subscription is a request to deliver the content in a service to a recipient. A subscription also provides a particular address and personalization for this recipient. A subscription set is a collection of subscriptions that is used for the same service. Narrowcast Server has two fundamental types of subscription sets: static and dynamic. Static subscription sets store subscription information in the Narrowcast Server Subscription Book. Dynamic subscription sets execute an information object to retrieve user and subscription information from an external, dynamic data source such as a MicroStrategy project, a database query, or some other type of external system. Thus, when defining a service using the Service Wizard, you are first asked whether you want a static or dynamic subscription set. If you are a beginner, a static subscription set is the preferred choice because it is less complex and does not require subscription information in an external source. You are then asked to either provide a subscription information object if you have chosen a dynamic subscription set, or an editor appears
Specifying delivery schedules 17
CONCEPTS
in which you can create users and then subscribe them to this subscription set, if you have chosen a static subscription set. For more information on the Subscription Book, users and addresses, or subscriptions and subscription sets, see chapter 4, User Management.
Specifying delivery schedulesThe last question that you must answer when defining a service is “When should this content be delivered?”. In Narrowcast Server, this question is answered with the use of a schedule. In the Service Wizard, you are asked to select an existing schedule or create a new schedule. This section provides an overview of schedules in Narrowcast Server.
SchedulesA schedule sets the times or frequencies a service is executed and represents a recurrence pattern, not a fixed date on which to send the service. For example, although you can be specific with the service start date, for example, April 4, 2000, at 2:30 PM, it is still a recurring schedule, most likely on a yearly recurrence. Execution intervals are calculated by combining the start date of a service with the interval specification of a schedule to arrive at a set of dates and times when the service runs. All schedules are built using the standard Gregorian calendar, as opposed to a fiscal calendar. Schedules are defined relative to time zones, to automatically account for daylight savings time, date boundaries, and other time zone specific issues. To allow subscribers throughout the world to receive services at specific local times, each service can use more than one schedule. Since Narrowcast Server is driven by the calendar, use of other calendars, such as merchandising calendars and fiscal calendars, must be simulated. Similarly, holidays present disruptions in schedules which should be handled carefully.
Simulating compound schedulesConceptually, a compound schedule is any schedule that involves the use of two or more periodicities. For example, the schedule “weekly on Thursday and biweekly on Fridays” is a compound because it uses both a weekly and a biweekly periodicity. This kind of schedule cannot be created directly in Narrowcast Server, because Narrowcast Server allows only one periodicity to be defined for a given schedule. However, it is possible to achieve this functionality by simulating compound schedules.

18 Chapter 1 Creating Services
CONCEPTS
To simulate a compound schedule, it is necessary to create multiple individual schedules. When defining the service, add all the schedules to the same subscription set. Using the example above, the selected subscription set would use the “Weekly on Thursdays” schedule and the “Biweekly on Fridays” schedule. The service then runs every Thursday as well as every other Friday.
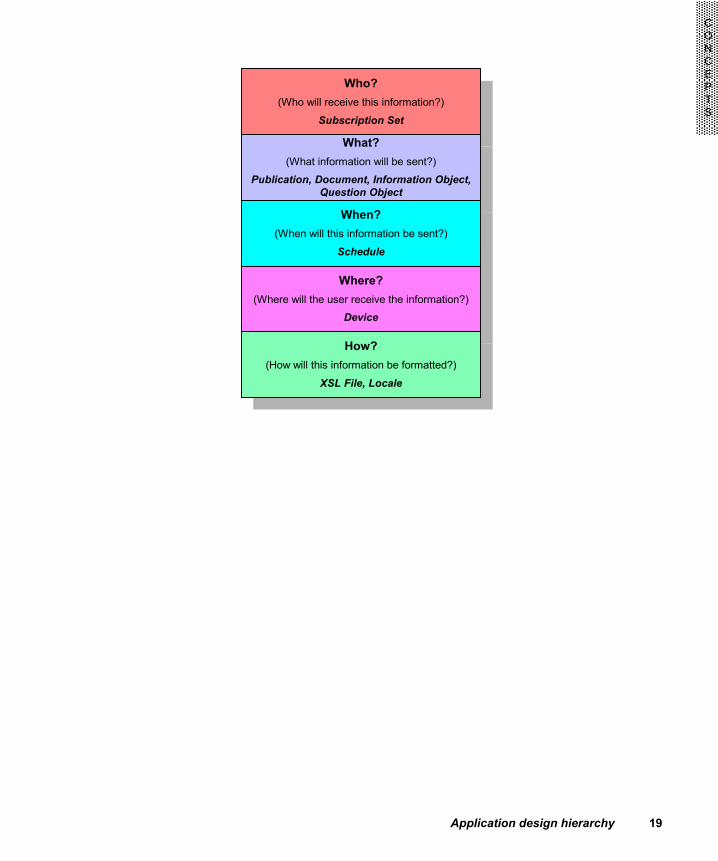
Application design hierarchyAlthough the Service Wizard guides you through a straightforward application design process which results in only one object (the service itself), Narrowcast Server provides a powerful component-based architecture. Even though you do not need to fully understand every object used by Narrowcast Server to create services, understanding how different objects fit together can provide powerful advantages. For example, one information object can be created and reused in multiple documents in the same service or even in several services, so preferences only need to be defined for one information object. In addition, one document can be reused across multiple delivery methods within one service or across multiple service so only one document needs to be maintained and updated so that changes are reflected in all services that use this document. This section provides a high-level overview of Narrowcast Server's objects and how they fit together to create powerful, flexible applications.The flexibility of MicroStrategy Narrowcast Server’s component-based object model allows objects to be built once and recombined and reused. This reduces duplicate work and increases the power and flexibility of the objects you create. To send a service in MicroStrategy Narrowcast Server, you must provide answers to the following questions:
Application design hierarchy 19
CONCEPTS
Who?(Who will receive this information?)
Subscription Set
What?(What information will be sent?)
Publication, Document, Information Object,Question Object
When?(When will this information be sent?)
Schedule
Where?(Where will the user receive the information?)
Device
How?(How will this information be formatted?)
XSL File, Locale

20 Chapter 1 Creating Services
CONCEPTS
MicroStrategy Narrowcast Server uses the following objects to answer these questions:
• Service: A service sends related content (what), to a subscription set (who), at a specified time based on a schedule (when). To do this, a service is composed of three types of MicroStrategy Narrowcast Server Objects: publications, which contain the content; subscription sets, which specify the recipients; and schedules, which determine the time to send the service. In addition, a service can contain more than one object of each type, allowing one service to send content in different formats to multiple sets of recipients on different schedules.

Application design hierarchy 21
CONCEPTS
• Publication: A publication contains the service content (what), defines which devices should receive this content (where), and controls how the content is formatted (how). A publication is composed of three types of MicroStrategy Narrowcast Server Objects: documents, which define the message content; devices, which indicate the types of devices to which the content can be sent (for example, e-mail client, cell phone, and so on); and a locale, which controls which users receive the publication. This structure allows each publication to be defined for a specific locale and set of devices. In the publication-service model, one service can contain multiple publications which all typically contain similar information for some messaging purpose (for example, an inventory alert). Subscribers can then identify their preferred method of contact (for example, e-mail or cell phone) and preferred locale (for example, France or Spain) and subscribe to this one service. When the service is run, MicroStrategy Narrowcast Server sends some messages to cell phone subscribers in Spain using one publication and other messages to e-mail subscribers in France using another publication.
• Schedule: A schedule defines the frequency with which a service is sent (when); for example, every Tuesday or twice daily. It is not dependent on other MicroStrategy Narrowcast Server objects.
• Subscription set: A subscription set defines who receives a particular service (who). Users subscribe to a service by adding their addresses to a subscription set used by the service. This address added to a subscription set is then called a subscription. Note that each address can be subscribed more than once. In a service, each subscription set is associated with one or more schedules. A service can contain multiple subscription sets and schedules. This allows different subscriptions to receive messages from a service at different times.
22 Chapter 1 Creating Services
CONCEPTS
• Document: A document defines the content that the recipient sees upon viewing the service (what). Document composition can include three types of MicroStrategy Narrowcast Server Objects: information objects, which pull dynamic data from an information source (for example, MicroStrategy Intelligence Server); XSL files, which format the information objects; and a template file, which determines the initial structure of the document (for example, a 3-sheet Excel workbook). There are four types of documents: plaintext documents, HTML documents, Excel documents, and imported documents. Documents are organized within publications. To understand how and why this is the case, consider that each publication is intended for one and only one transmission channel such as e-mail. Thus, each publication may contain only a certain set of documents that is valid for a particular information transmission channel. The publication structures these documents so that a valid message is produced for the transmission channel. For example, a publication intended for e-mail transmission allows a set of documents including an HTML body and a text subject.
• Locale: A locale helps control message formatting (how) and determine which subscriptions receive the publication. In the first role, locales tailor content to suit regional preferences by controlling what information is retrieved, how documents are formatted, and how messages are delivered. In the second role, locales control which subscribers receive a publication. Each publication is defined for one specific locale. When a service is executed, each publication is only delivered to subscribed addresses that specify the same locale. For example, if a French and a German locale are defined, a German publication is associated with the German locale, and a French publication is associated with the French locale. One service can then contain both publications. When the service is executed, French subscribers receive the French content, and German subscribers receive the German content.
• Device: A device specifies characteristics of the receiving device (where) to which the service content is sent and determines which subscriptions receive the publication. A publication is defined to support a set of devices, and a publication is only sent to user addresses that use those supported devices. For example, one publication can support all pagers, and another can support all PDAs. One service can contain both publications. Upon running the service, the PDA content is sent to PDA devices, and the pager content is sent to pager devices.

Next steps 23
CONCEPTS
• Information object: An information object specifies the dynamic (determined at execution time) part of a document's content (what). An information object retrieves dynamic data from an information source. For example, an information object might point to a report from the MicroStrategy Intelligence Server information source. The resulting information object data is either returned (a) in XML structure (to be formatted by an XSL stylesheet), (b) as plain text (to be added directly to the document content), or (c) as an image. Information objects can be personalized for each individual recipient, and can optionally be associated with question objects as described below.
• XSL file: An XSL stylesheet specifies how content returned by an XML information object is formatted (how). The document formatters use XSL stylesheets to format XML information objects into content appropriate for the document containing the information object (for example, a plaintext, HTML, or Excel document).
• Question object: A question object determines what preferences are gathered for each user. A question object is composed of a set of questions and thus provides a template for users to specify their preferences through answering these questions. The answers to these questions (preferences) impact the data (what) that is returned by information objects for each user. This process allows each recipient to receive data tailored to his individual preferences.
Next stepsIf you have read this chapter, you now understand how services work and how to create them. The next logical place to go is to the next chapter, Dynamic Content and Personalization, to learn how to add dynamic content such as reports to your service and how to personalize users so that each user receives content that is relevant to them. Once you complete this chapter, you can learn more about user management options in the User Management chapter, or explore other functionality within Narrowcast Server in the subsequent sections.

24 Chapter 1 Creating Services
CONCEPTS

2C H A P T E R 2
25
CONCEPTS
2.Dynamic Content and Personalization 2Dynamic content
After reading the chapter on Creating Services, you understand that service content is created using documents. These documents are created by entering content such as HTML or text into an editor. This content that is entered directly into the editor is called static content since it is not determined at service execution time and does not change from one recipient to the next or from one service execution to the next. However, the true power of Narrowcast Server comes from content that is determined at service execution time and can vary from recipient to recipient or from execution to execution. This type of content is called dynamic content. Like static content, dynamic content is added to documents, but dynamic content may be personalized so that each recipient receives information that is relevant for him. This section provides an overview of dynamic content and how Narrowcast Server uses Information Objects to retrieve dynamic content from external sources such as MicroStrategy projects, database queries, or external systems. See the following for more information:• Information objects• Other types of dynamic content
Information objectsA key feature of Narrowcast Server is the ability to gather and use information from external sources. This information can be used for message contents or for subscription set information. This information can be retrieved from diverse locations such as a relational database, on the Web, in a flat file, and so on. In Narrowcast Server information objects play this crucial role of gathering information from external sources. An information object is a set of instructions specifying how to get data from an external information source.

26 Chapter 2 Dynamic Content and Personalization
CONCEPTS
This section provides an overview of how information objects work and how you can use them to create powerful applications.
Roles of information objectsInformation objects can serve three roles in Narrowcast Server:• content, which supply data for documents• subscription, which provide subscription information for dynamic
subscription sets within the services• segment, which control how dynamic subscription sets are segmentedAs the application designer, you might create information objects for all three roles. Before you can create one, however, the system administrator must define the required information sources. For more information on working with a MicroStrategy information source, see appendix B in the MicroStrategy Narrowcast Server Getting Started Guide.
Content information objects
A content information object returns results that are used as dynamic content in a document and returned in a specific format as either XML, text or GIF. For the MicroStrategy Information Source, the main action required is to select a report created from within MicroStrategy Desktop. If a graph is returned a graph size will also need to be specified.
Subscription information objects
Subscription information objects are used by dynamic subscription sets to retrieve this subscription information during service execution. Subscription information objects return subscription information in a predefined format. For the MicroStrategy Information Source attribute forms (either on the page axis of a chosen report or returned directly from the project) must be mapped to corresponding subscription property fields, such as physical address and end user device. Constants can also be used by entering values manually. Other subscription information can be retrieved from the Subscription Book if the Subscription ID returned by the subscription information object matches the Subscription ID in the Subscription Book. For more information on this see chapter 6, Page Personalization and Dynamic Subscriptions.
Information objects 27
CONCEPTS
Segment information objects
Segment information objects are optional and are used to return a set of segment boundary values in a predefined format. These segment boundary values specify the ID for the first subscription in each segment of the subscription set for the service. When designing a segment information object, you must assign a prompt object to be used to control the segment size. The Information Object Wizard restricts your options at this stage, allowing you to select only those reports that have the correct prompt objects.For more information on this topic, see Slicing and segmentation in chapter 6, Page Personalization and Dynamic Subscriptions.
Types of information objectsInformation objects come in three types: text, XML, or image. An information object's type indicates the format of the data returned by the information object and how Narrowcast Server can use the data returned by the information object. • A text information object returns a plaintext string that is inserted
directly into a document's content. • An XML information object returns an XML string that must be
combined with an XSL stylesheet to produce content appropriate for each type of document. To illustrate further, an XML information object can be combined with different stylesheets to be used in text, HTML, or Excel documents. For MicroStrategy Grid report information objects, an appropriate XSL stylesheet is chosen automatically with no action by the user. Any report formatting specified in MicroStrategy Desktop is automatically preserved. For all XML information objects other than MicroStrategy Grid reports (that is, information objects returned by other information sources), you are prompted to select an XSL stylesheet once the information object is defined. Once a stylesheet is applied to an XML information object, you can change the stylesheet selected by editing the document element properties for the information object. You might want to do this, for example, if reports displayed via the Web and delivered via e-mail are required to have different formats, perhaps to match a Web page or to match an e-mail template.
• An image information object returns an image in GIF format that is inserted directly into the document's content.

28 Chapter 2 Dynamic Content and Personalization
CONCEPTS
Information object availability within documents
Not every document type (HTML, text, Excel) supports each information object type. Specifically, text documents and Excel documents do not support image information objects. However, HTML documents do support all information object types. When you insert a certain kind of information object (for example, a MicroStrategy Grid report), into a document, the information object type is automatically determined and you need not take any action other than to follow the instructions to define the information object correctly. Thus, you typically only need to be aware that different XSL stylesheets can be chosen for XML information objects to change formatting, and that images are not available in text or Excel documents.The related information objects are listed for each document type.• Excel: MicroStrategy Grid reports, user information, subscription
information• HTML: MicroStrategy Grid and MicroStrategy Graph reports, user
information, subscription information• Imported: These are containers for imported files and do not use
information objects• Text: MicroStrategy Grid reports, user information, subscription
informationAdditional kinds of information objects might be available if your system administrator has added a different kind of information source. For example, an ODBC information source might allow for a database query information object. These additional information objects will only be available in the appropriate types of documents.
Creating information objectsYou can create information objects several ways. Each case has a different impact on the creation process.When you create an information object directly from Narrowcast Administrator, all information object options are presented. You must select an information source as well as the role and other properties. An information object created this way is reusable; that is, it can be used for multiple services or other application objects.When you create an information object from within a document editor or a dynamic subscription set as you are creating or editing the document or subscription set, you simply select the kind of information object you would like to create, such as a report. The information object role is chosen
Information objects 29
CONCEPTS
automatically. Typically, several other information object properties are automatically defined as well. Content information objects created this way are embedded; that is, they can only be used by the object in which they were created, and are not saved to an independent location within Narrowcast Administrator.If at least one MicroStrategy Information Source is defined, MicroStrategy Grid and MicroStrategy Graph options are available. The type of document being created determines whether grid or graph options are available. For example, a plaintext and Excel document only allow grid reports to be inserted, whereas an HTML document also allows graph reports to be inserted. If more than one MicroStrategy information source is defined, the grid/graph options are grouped by information source.For new MicroStrategy information objects, report formatting defined in MicroStrategy Desktop and MicroStrategy Web is preserved by default. This default formatting can be changed by selecting a different stylesheet. Do this by importing the desired XSL stylesheet and then changing the document element properties to select this XSL.For a MicroStrategy Information Source, whenever you select a report or filter for an information object, the selection is validated to ensure it is suitable for the intended purpose. Messages are displayed indicating what is needed for a valid selection and whether or not a selection is valid. If a selection is not valid, an explanation of what is needed is shown. In this case you cannot proceed with the information object definition until you select a valid report or filter. See the Information object validation section in this chapter for more information.Since Narrowcast Server has an open architecture, your system administrator might have defined additional information sources. These information sources can provide additional information objects that you can use to insert content into your documents.For more information on working with information objects within documents, see the following interface topics:• Document Element Properties Dialog Box• Excel Document Editor• HTML Document Editor• Plaintext Document Editor

30 Chapter 2 Dynamic Content and Personalization
CONCEPTS
Document elements with multiple information objectsIt is sometimes desirable to apply a single stylesheet to two or more information objects at the same time. For example, this technique can be used to merge the contents of two MicroStrategy reports so that the contents of one report can be used to control the formatting of the other report. This advanced feature of Narrowcast Server requires the development of a custom XSL stylesheet. The XML structure that is produced when two or more XML information objects are merged is equivalent to the concatenation of the XML from each information object, encapsulated in a root element. This additional root element causes the resulting XML to be incompatible with the default XSL stylesheets. Therefore, if you wish to simply position two reports one after the other, you should use two separate document elements. But if you need to merge the data within two XML information objects, you can accomplish this only if you also develop and apply a custom XSL stylesheet.
Other types of dynamic content
User informationNarrowcast Server also provides the ability to insert information about message recipients into service content. This capability allows you to personalize messages using user information and create message content such as “Dear Mr. Smith,” or include any other user-related information such as title, state, or zip code.You can also provide preferences for user information from within Narrowcast Server or allow users to define their preferences through the Subscription Portal.The following user information is available by default in Narrowcast Server:• first name• last name• middle initial• salutation• suffix• title
Other types of dynamic content 31
CONCEPTS
• street address• city• state• country• zip code• custom combination (returns XML string with all user details)In addition, you can create your own user information properties that can be personalized by end users through the Subscription Portal and inserted into message contents. Do this by selecting Edit User Information Available from the Tools menu in Narrowcast Administrator. This user information property now appears on the Insert menu in the document editors along with all the other user information properties. You can combine user information with data from other information objects by inserting the desired user information into a document element with another information object such as a MicroStrategy report and using a stylesheet to format the combined data from both sources. You can also combine multiple pieces of user information and format them as desired by selecting the Custom Combination option and using stylesheets.
Subscription informationNarrowcast Server also provides the ability to insert information about the subscription that is being processed. This is typically used for message tracking purposes such as inserting a unique message identifier into a Web hyperlink to track which messages have been viewed or inserting other information such as address or subscription ID into message contents. Another example is for use with pagers, wherein a pager company requires that a PIN be inserted in the message subject. The format required is shown below:To: [email protected]: <PIN number of my pager>
The following subscription information is available by default in Narrowcast Server:• address ID• address Display• device ID• locale ID• physical address

32 Chapter 2 Dynamic Content and Personalization
CONCEPTS
• PIN• subscription ID• subscription set ID• user ID• all subscription data• unique message identifier
Personalization
What is personalization?In MicroStrategy Narrowcast Server, personalization refers to the process of providing different content to different subscribers within the same service execution by having information objects return content that is tailored for each user. The use of personalization in Narrowcast Server enables the following functionality:• Users can provide their preferences and receive only the information
that is relevant to them.• Administrators can control user access to information and prevent users
from accessing sensitive information.• Narrowcast Server can gather information from external sources using
the “identity” of individual users to integrate with the security features of external systems.
Personalization can be defined either after creating an information object or by creating and selecting a question object.
Types of personalizationIn MicroStrategy Narrowcast Server, personalization of dynamic content exists in four forms: preferences, authentication, security, and locale selection.• Preferences allow users to define the information they want to receive.
For example, a user might specify that he wants to receive weather information for Boston. Note that preferences can be defined at the user level or for individual subscriptions. Preferences defined at the user level are applied by default to all services to which the user subscribes, while preferences defined at the subscription level can only be applied to a specific subscription. Subscription preferences always override

Personalization 33
CONCEPTS
user preferences if both are defined. Preferences are defined by providing answers to either an information object or a question object, which can contain a set of questions. For this reason, information objects and question objects are sometimes referred to as “personalized objects” in Narrowcast Administrator. Answering these questions specifies the information the user wants to receive. A user can define preferences for all available personalized objects. For example, a user might provide preferences for a “What City?” question object and a “What Item?” prompted information object. For more information, see the User and subscription preferences section in this chapter.
• Authentication provides a means for each user to provide a login ID and password with which he can be authenticated by an external system when an information source gathers information. For example, for an information source gathering content from MicroStrategy Intelligence Server, user authentication is a login and password to a MicroStrategy project. Thus, you might require users to provide a login and password, so that you can take advantage of security features available through MicroStrategy Intelligence Server such as security filters. A user can have authentication defined for each available information source that supports authentication.
• Security provides a means for an administrator to control the information that can be accessed by individual users. For example, an administrator might want to set security for managers at the region level so that managers can only see sales numbers for their own region. Note that security can be defined for individual users or at the information source level. If security is defined at the user level this always overrides the default security defined at the information source level. For more information, see the Information source security section in this chapter.
• Locale selection also impacts message personalization by determining how numbers and dates are formatted, which language is used and which character set is applied. For more information on locales, see chapter 8, Supporting Diverse User Populations.
User and subscription preferencesA user preference is a named preference that can be reused across subscriptions. For example, a user might create a “Boston” user preference created for the “What City?” question object, which he selects for subscriptions to both the “Weather” and “Current Events” services. To create a user preference, the questions within an information object or question object are answered and the user preference is given a name and description. Multiple user preferences can be defined for an information object or question object (for example, a Boston user preference and an

34 Chapter 2 Dynamic Content and Personalization
CONCEPTS
Atlanta user preference can be created for the “Which City?” question object), but one and only one user preference is defined as the “default” user preference. The default user preference specifies the preferences that are used by default for all subscriptions defined for a user. At the subscription level, the default user preference can be overruled by selecting a different user preference (if more than one user preference exists for a question object) or by defining personalization at the subscription level called subscription preferences. Thus, user preferences enable the reuse of a user’s preference decisions across multiple subscriptions so that the same question object does not need to be answered multiple times. Subscription preferences cannot be reused for other subscriptions.
Personalization and system performanceThe personalization of users can impact service execution time. This is due to the process through which information objects are executed for subscribers within a segment. When an information object is executed, each user’s preference, authentication, security, and the document locale are combined to define that user’s complete personalization requirements. Within each segment execution, the personalization requirements (preference, authentication, security, and locale) for all subscribers are compared. All subscribers who have the same personalization requirements receive the same information object content from the same execution of an information object. The number of unique “personalization groups” thus determines the number of information object executions for a segment. As a result, for personalized report execution mode, the number of unique personalization groups is an important factor of system performance. Note, however, that the comparison of personalization requirements to create personalization groups occurs after segmentation. Thus, for large services with multiple segments, not all subscribers with the same personalization requirements receive content from the same information object execution.
Advanced techniquesUser and subscription preferences can be defined in their simplest form by answering the prompts within an information object. However, in some cases this results in a less than ideal application design.
Personalization 35
CONCEPTS
For example, suppose you need five reports that contain a prompt object on region and some other prompt object. You obviously cannot reuse the same information object since the report is not the same. However, when users define preferences, they will be forced to answer the same “which region” prompt five times. Furthermore, suppose you create a service with an information object prompting on region, then suppose you have your entire user population provide preferences for this information object. Now suppose you need to change the report to a different report which still prompts on region. You certainly do not want to lose preferences for all your regions.Question objects provide solutions to this kind of problem by providing an independent template for which users can define their preferences. This section explains how to use question objects.
Question objects
A question object is a container that holds a set of questions that users answer to define their preferences. Thus, a question object provides a template for users to specify their preferences through answering one or more questions. The answers to these questions (preferences) impact the information that is returned by information objects for each user. This process allows each recipient to receive information tailored to his individual preferences.
Note: Reports used as question objects in MicroStrategy Narrowcast Server can contain any type of prompt object created through MicroStrategy Desktop. The exception to this rule is that prompt objects that contain embedded prompt objects are not supported by Narrowcast Server.
Advantages
It is important to understand why question objects exist and how they are helpful. A question object allows the structure for providing preferences (a set of questions) to exist without linking this structure to any one specific information object or requiring any specific information object to exist without changing. This is powerful because it allows users to • define preferences that can be reused across multiple information
objects• define their preferences and maintain those preferences even if an
information object changes

36 Chapter 2 Dynamic Content and Personalization
CONCEPTS
Thus, if the concept of a question object did not exist, and the structure required for user preferences was always stored within information objects, users would not be able to ensure their preferences were reusable across multiple information objects or maintainable as application designs change.
Prerequisites
Before a question object can be defined, an information source must be properly defined and configured to provide the questions the question object displays to the user. For example, to create a question object for the MicroStrategy Information Source, an administrator must do the following:1. Create the desired reports in the MicroStrategy Desktop interface that contain the desired prompt objects (the questions that the user is asked).2. Properly configure an information source to connect to the project that contains these reports.
Question objects and personalization
Once an information source exists with which to gather personalized information, a question object may be created to define the questions that a user is asked when defining his personalization. For the MicroStrategy Information Source, this is done by selecting a report that contains one or more prompt objects. Each user answers these prompts to define his or her personalization. Once a question object has been created, it must be associated with an information object. In other words, once the structure used to define preferences has been created, this structure needs to be applied to an information object. For MicroStrategy information objects, this is done by selecting the question object within the question object tab under Advanced options within the Information Object Wizard. Once an information object is associated with a question object, when the information object is executed, these preferences are applied to personalize the content returned. Thus, when a user provides his preferences, he is providing answers to question objects, which are used to personalize the content returned by any information objects associated with these question objects.Users define their personalization (by answering question object questions) at the user level (which is applied to all subscriptions by default) or at the subscription level (which is only applied to one subscription). Thus, when personalization is defined, the user selects a question object and then is prompted to supply answers to these questions. At the user level, these answers are saved in a named, reusable collection called a user preference.
Personalization 37
CONCEPTS
For the MicroStrategy information source, whenever you select a report for a question object, the selection is validated to ensure it will work as intended. Messages are displayed indicating what is needed for a valid selection and whether or not a selection is valid. If a selection is not valid, an explanation of what is needed is shown. In this case you cannot proceed with the question object definition until you select a valid report. See the Question object validation section in this chapter for more information.
For more information
For more information on how preferences use question objects, see the Personalization section in this chapter.
Other considerationsIf two subscribers have the same personalization and are subscribed to the same service, they do not necessarily receive the same content. This is because there are two other ways to control the content that subscribers receive. Personalization, as described above, refers to different ways to control how information objects return information. In addition, it is also possible to control which content users receive and thus which information objects are executed for each subscriber. This can be done through the use of locales and devices. Thus, five factors control what information subscribers retrieve when a service is executed in MicroStrategy Narrowcast Server:• preference• authentication • security• locale• deviceAs noted above, personalization controls how information objects are executed and is determined by a user’s preference, authentication, security, and locale. Locales and devices impact the content subscribers receive differently than preference, authentication, and security definitions. Locales and devices control which publication is executed to deliver content for a given subscriber and hence which information object is executed. This has to do with the way users describe the type of information they want to receive and the type of information that services are designed to provide. On the user side of the equation, each user selects one locale for which the user wants to receive content, and each address is defined for one device on which the user wants to receive content. In the service

38 Chapter 2 Dynamic Content and Personalization
CONCEPTS
design, each service can contain multiple publications, and each publication is designed to support only one locale and a specific set of devices. In addition, each publication has its own content and can either share documents or information objects, or have independent documents and information objects. During service execution, publications are delivered to subscriptions based on the locale and devices supported by the publication. Therefore, if • a service contains multiple publications supporting different locales and
devices,• the publications contain different information objects, and• a service contains subscriptions for these different locales and devices, different subscribers receive content from different information objects.
For more informationTo fully understand personalization, it is necessary to understand how question objects and information objects work.See the following topics:• Question objects• Information objects
Information source securitySecurity in MicroStrategy Narrowcast Server is one of three methods (preference, authentication, and security) of personalizing the content returned by information objects. However, unlike user preferences and authentication, which users can set through the Subscription Portal to control the content they want to receive, security can only be defined by an administrator through the Narrowcast Administrator to control user access to information and thus to limit the information that users can receive. Security can be used to limit user information in two different ways.
Information source security 39
CONCEPTS
• Security can be used to limit the choices available when a user defines his preferences. For example, if an administrator uses security to constrain a user’s regional preferences to cities within the Southeast region, when a user defines his preferences, the user can see and select preferences for cities in the Southeast Region such as Atlanta and Charleston, but not for San Francisco or Chicago.
• Security can be used to limit the content returned by information objects. For example, for the case above, if security is instead defined to limit a user to see only sales for the electronics product category, a user can select preferences for any city in any region, but if the report returns sales broken down by both city and product category, only sales information for the electronics product category is returned by the information object.
Note: When defining a report in MicroStrategy Desktop to be used as an information object or question object that supports information source security, do not restrict the list of available elements in the prompt object that will be used for security. On the page in the Prompt Generation Wizard where you select how to limit element availability, select the option to List all elements (no restriction).
Defining applications with securityTo define a MicroStrategy Narrowcast Server application with security, consider the design of the following administration and application components:• Information sources• Information objects and question objects• User personalizationA description of the impact of these components on security follows.
Information sources
Information sources define three characteristics of security. First, information sources define whether or not security is used for all information objects using an information source. Second, information sources define the prompt object that allows administrators to define security for all information objects using an information source. Third, information sources define the default security that is applied if no security is defined for a specific user. Thus, all information objects for a given

40 Chapter 2 Dynamic Content and Personalization
CONCEPTS
information source will (a) have security either available or unavailable, (b) use the same prompt object to define security, and (c) have the same default security setting. The prompt object and default setting used to define security are set within an information source by selecting an element prompt object and then providing a default answer to this prompt object. Note that if security is enabled for an information source, an element prompt object and a default answer to this prompt object must be selected. To understand how this works, it is important to understand the difference between a security object prompt and a security object. A security object prompt is an element prompt object that asks a question to determine how security is defined for a user (for example, for the examples above, the security object prompts would be “Which Regions?” and “Which Product Categories?”). A security object is a user’s answer to a security object prompt (for example, “Southeast Region” and “Electronics Product Category”).
Note: If security is defined using a security object prompt on an SAP-based attribute, then personalization for content using that information source must be defined using attributes from the same SAP dimension. For more information on SAP BW, see the MicroStrategy Advanced Reporting Guide.
For more information on defining security for a MicroStrategy Information Source, see the MicroStrategy Narrowcast Server System Administrator Guide.
Information objects and question objects
Once the security object prompt and default security object have been selected in the information source, it is necessary to properly design information objects and question objects, if created and used, to support security.
The role of information objects and question objects in information object execution
To define information objects and question objects to satisfy a certain security requirement, it is important to understand the roles information objects and question objects play during the execution of information objects.

Information source security 41
CONCEPTS
• Information objects specify how dynamic content is gathered when a service is executed. For the MicroStrategy Information Source, information objects are defined by specifying a MicroStrategy report. This report controls how content is returned by specifying both the report structure and the collection of prompt objects that are answered when the report is executed to further refine the report results. Thus, the information object specifies both the report contents and the prompt objects that are asked at run time.
• Question objects, if created and used, define the structure of personalization and are used to gather preferences from users and security settings from administrators. A question object is defined by selecting a report that contains a number of prompt objects. This report should include all prompt objects that are to be answered during the process of defining either security or preference. These prompt objects are then presented to the user or administrator at the appropriate time according to whether the prompt object is to be used for preference or security. When a user provides his preferences by defining user preferences, the user selects a question object and provides answers to the prompt objects within this question object. All prompt objects in the question object except the security object prompt (as specified in the information source) are presented to the user when a user preference is defined. When an administrator defines a security object for a user, he answers the security object prompt. Later, when a user defines preferences, he selects a personalization object (either a question object or an information object with prompt objects and no question object explicitly selected). If the personalized object report includes the same prompt object as the security object prompt specified for the information source, Narrowcast Administrator automatically answers that prompt, and uses the answer to apply a filter to the remaining prompt objects in the question object report. The remaining prompts are then presented to the user, and the answers provided, including the answer to the security object prompt, are stored as user preferences for the selected question object.
To define security for a particular information object, consider which prompts to include in both the information object and the question object associated with this information object. The design of the information object and question object depends on which of the two roles for security you want to achieve. These roles and their requirements for information objects and question objects are described in the following sections.

42 Chapter 2 Dynamic Content and Personalization
CONCEPTS
Note: If an information object does not use a manually-created question object, the information object must meet the requirements of both the information object and the question object as described in the following sections, or security filtering does not occur.
Limiting the information returned by information objects
To satisfy the role of limiting the information returned by an information object, a security object prompt must be present in both the information object and the question object associated with this information object. If the security object prompt is present in both the information object and question object reports, properly defined security objects are applied when the information object is executed. Note that if the security object prompt is present in the question object report and not in the information object report, the security object prompt is not applied when the information object is executed, since, as noted above, the information object controls which prompts are asked at run time. However, one question object can be used for multiple information objects. As a result, in some cases, it might be desirable to add a security object prompt to a question object, but not include the prompt object in every information object that uses this question object. Thus, the question object is designed to support security, but security is applied only to information objects that also include the security object prompt. In the opposite scenario, a security object prompt generally must not be included in an information object and excluded from the question object associated with this information object. This rule applies in general: the prompt objects in an information object should always be present in the question object associated with the information object. This is because question objects gather the prompt answers that are required when information objects are executed. If a prompt object is not present in a question object, no prompt answer is gathered from users and the information object fails to execute if required prompt objects are present that have no answers. If a required security object prompt is not present in a question object, when the information object that uses this question object is executed, there is no prompt answer for the information object prompt and the report fails to execute. The only exception to this is if prompt object with an optional answer is provided in an information object report. If this prompt object is not in the question object, this prompt is not presented to the user for personalization, but the information object still executes correctly.It is important to understand the following concepts when defining security objects.

Information source security 43
CONCEPTS
• The information returned for each user as a result of the application of information source security is controlled by report design in MicroStrategy Desktop. In other words, proper information source security design in Narrowcast Server simply ensures that a prompt object in a report is answered on behalf of each user. How the information returned is filtered depends on the report design. Thus, it is recommended that you design a report with a prompt object intended for security and run this report several times while answering the prompt for several users to ensure you understand the prompt object implications on report data. Then ensure the same prompt object is selected in the information source and is also present in the question object, if defined. Finally, ensure that information source security is defined for several test users and deliver reports to these users to ensure security is working as intended.
• The security object defined for a specific user always overrides the default security object defined for the information source.
• For security to be applied to an information object, the security object prompt must be defined in the information source, the information object, and the question object, if manually created and used, for this information object.
• The prompt objects in a question object should always be a superset of the prompt objects in the information object (that is, the question object should include all prompt objects in the information object). If this is not the case, when an information object is executed, the report has a prompt object that is not answered. If this prompt object is required, the information object report fails to execute. The only exception to this rule is if a prompt object with an optional answer is included in an information object report that is not included in a question object report. In this case, users cannot provide their preferences for this prompt object through MicroStrategy Narrowcast Server Subscription Portal, but the information object still executes correctly without this prompt object being answered.
• If the prompt objects in an information object are required, users must provide their preferences by answering the same prompt object as found in the question object for this information object. If no preferences are defined, no answers are available when the report is executed for this user and the report and information object fail to execute.
• All prompt objects in the question object that are not defined in the information source as the security object prompt are presented to the user when the user defines user preferences for this question object.
• Once an information object and question object have been created and contain the appropriate prompt objects, the question object must be associated with the information object.

44 Chapter 2 Dynamic Content and Personalization
CONCEPTS
• The security object (either at the user or information source level) must be defined for information objects that contain the security object prompt. This ensures that it is applied whenever the information object is executed, whether or not users define any preferences. However, the information object must contain the security object prompt. A few potential scenarios related to this functionality are worth considering. For each of the scenarios below, the information object and question object associated with this information object contain the same prompt objects as described below. ◊ If (a) an administrator adds (i) a required security object prompt with
no default answer (no default security object) and (ii) additional required prompt objects (for personalization) to the question object and information object, and (b) a user does not provide his preferences for this question object, the information object fails since all required prompt objects go unanswered when the information object is executed.
◊ If (a) an administrator adds (i) a required security object prompt with no default answer (no default security object) and (ii) additional optional prompt objects (for personalization) to the question object and information object, and (b) a user does not provide his preferences for this question object, the information object fails since the user has no security object to apply to answer the required security object prompt.
◊ If (a) an administrator adds (i) a required security object prompt with a default answer (a security object) and (ii) no additional prompt objects (for personalization) to the question object and the information object, and (b) a user does not provide his preferences for this question object, the information object runs successfully, with the security object applied.
◊ If (a) an administrator adds (i) a required security object prompt with a default answer (a security object) and (ii) additional optional prompt objects (for personalization) to the question object and the information object, and (b) a user does not provide his preferences for this question object, the information object runs successfully, with the security object applied.
Limiting the choices available to users in question object prompts
A security object can also be used to limit the choices available to users when they define their preferences. In other words, the security object definition for a user can limit the choices available to the user when element prompt objects within a question object are presented for personalization. Thus, this can be used to limit the content that users can request. In this case, it is not necessary to have the security object prompt

Information source security 45
CONCEPTS
in either the information object or the question object used by this information object. Consider the following application design and user personalization.For application design, use the following:• information source: security object prompt defined as Prompt on
Region• information object: report with Prompt on Store• question object: report with Prompt on StoreFor user personalization, use the following:• User1: security object definition chosen as Region1In this case, when User1 provides personalization for this question object (either through Narrowcast Administrator or through the Subscription Portal), the user only sees the stores that belong to Region1. This is done even though the security object prompt (Prompt on Region) is not included in the question object or the information object report. Note that this can only be used when the question object provides an element prompt object in the same hierarchy as the security object such that the security object properly limits the prompt choices provided in the question object element prompts.
User personalization
Once the information source, information objects, and question objects are properly defined to support security, it is necessary to set security for each user. Do this by defining security objects for users within the Subscription Book or Static Subscription Set Editor. Note that unlike preferences, security can only be defined at the user level, and not at the subscription level. Remember that security objects are only applied if they are defined before a user’s preferences are defined. If users define their preferences before a security object is defined, the security object is not applied for these users.
Implications for upgraded reportsThis section discusses how security is handled when MicroStrategy Broadcast Server reports are upgraded to MicroStrategy Narrowcast Server information objects. MicroStrategy Broadcast Server does not have the concept of security objects. However, some reports can be upgraded to information sources with default security objects defined. If a report is upgraded for an information source with security defined, the security object prompt is added to the question object report, but is not added to the information object report. As described in Information objects and

46 Chapter 2 Dynamic Content and Personalization
CONCEPTS
question objects, since the security object prompt is not in both the information object and the question object, the security object is not applied when the information object is executed. As a result, the upgraded information object still returns the same content as the report in MicroStrategy Broadcast Server. However, the security object for each user can still be used to filter the choices available to the user when defining preferences. This only occurs if the question object prompt is an element prompt object in the same hierarchy as the security object prompt. For services upgraded from MicroStrategy Broadcast Server that were not personalized through MicroStrategy InfoCenter, the security object is not applied to limit the choices available for preferences, since the question object produced during upgrade prompts for a filter, not an attribute element. For services upgraded from MicroStrategy Broadcast Server that were personalized through MicroStrategy InfoCenter, upgraded services might have the security object prompt applied to limit choices available for preferences. This is only the case if the question object uses an attribute element prompt object in the same hierarchy as the security object prompt.
To learn about......tasks involving publications, information objects, and related objects, see the following topics in the How Do I...? section:• Information Object Operations• Publication Operations...the editors and wizards used to create and edit publications and their related objects, see the following topics in the Interfaces section:• Excel Document Editor• Imported Document Editor• HTML Document Editor• Import File Dialog Box• Information Object Wizard• Plaintext Document Editor• Publication Wizard• Question Object Dialog Set

3C H A P T E R 3
47
CONCEPTS
3.Working with Documents 3
As discussed in chapter 1, Creating Services, the content delivered by services is created using documents. While chapter 1 presented a brief overview of what documents are and how they are used in publications, this chapter gives detailed instructions for how to create different types of documents for use by Narrowcast Server. Each type of document, which includes HTML, Excel, Text, and Imported, and Desktop, is discussed, and information on using XSL stylesheets is also provided. Each section offers specific information for using the corresponding type of document as well as tips to effectively use Narrowcast Server to deliver powerful, well-formatted Excel, HTML, and text content.
HTML documentsNarrowcast Server allows application designers to leverage the full power of HTML to create beautifully formatted messages with individually personalized data and formatting. The Narrowcast Server HTML Document Editor provides an easy-to-use HTML authoring interface that allows you to enter text, define formatting, add images, provide personalized user information, and insert information objects, such as MicroStrategy reports, quickly and easily. However, HTML documents also offer a number of advanced, more subtle features. This section provides instructions to use Narrowcast Server to deliver high-quality, full-featured HTML content.
Working with the HTML Document Editor The HTML Document Editor provides three modes in which you can interact with HTML content. You can switch among these modes by selecting Editor, Source, or Preview from the View menu within the HTML Document Editor. The first option is the Editor mode. This mode provides an intuitive, WYSIWYG HTML editor in which you can add, edit, or remove content while it is rendered as HTML. This mode is useful for creating basic
48 Chapter 3 Working with Documents
CONCEPTS
HTML templates and for making simple changes. This mode is opened by default unless you have added information objects that are inserted into HTML tags and, hence, are not rendered and displayed in the Editor mode. The second mode is the Preview mode. This mode is similar to the Editor mode except that it shows your HTML content exactly as it will appear in Microsoft Internet Explorer Web browsers and it does not allow you to modify the HTML content. The third mode is the Source mode. This mode provides direct access to the HTML source. This mode is displayed by default if you have inserted information objects into HTML tags such that, as a result, the information objects can only be displayed in this mode. This mode is powerful because it provides direct access to the source HTML and allows you to copy and paste HTML templates that were developed in external tools or provided by other parties such as a graphics department. In this way, complex template files can be created in the preferred HTML authoring tool and added to Narrowcast Server to add personalized formatting and dynamic content.
Strategy for HTML document developmentHTML documents can be developed using a variety of processes. The following process has proven helpful to some application designers.1. Prepare or obtain HTML template. The HTML template forms the basis and overall structure for the HTML document. In many cases, an external party such as a graphics department or an existing corporate standard determines what HTML template is used. In other cases, you need to design and create the HTML template yourself. While Narrowcast Server provides an HTML editor suitable for creating HTML templates, many users prefer to use tools with which they are already familiar. Regardless of how the HTML template is obtained, you need to ensure that the desired HTML source is available in the HTML Document Editor.2. Determine dynamic content and formatting personalization strategy. If you are simply inserting a single grid report that is personalized for each user, this job is relatively simple. However, if you wish to personalize the HTML template formatting using HTML returned by an information object, return natural language text, or arrange multiple information objects on the template with a high degree of placement control, this task becomes more important. The following items describe specific instances when this step deserves special attention.

HTML documents 49
CONCEPTS
◊ If you want to personalize part of the HTML template using information object results, you need to cut this HTML content out of the report template and ensure that some combination of the information in the XSL stylesheet and the information object result replaces this data correctly. This strategy could range from returning most or all HTML content by storing it in an XSL stylesheet and selecting content based on information object results, or simply changing a value in existing HTML content such as an image link so that the rendered HTML is personalized. A simple example of this is shown in the MicroStrategy Tutorial for Narrowcast Server Service 3b.
◊ If you want to return natural language text using XML information object results such as a MicroStrategy Grid report, you need to design the desired XSL stylesheet and ensure that the rendered content fits as desired in the static HTML content. Examples of this functionality are shown in the XSL stylesheets used for the wireless messages delivered in the MicroStrategy Tutorial for Narrowcast Server Services 2a and 2b.
◊ If you want to arrange multiple information objects on the page, you need to construct the HTML around these information objects so that the rendered content is displayed as desired. This is often accomplished using HTML tables as discussed in the next section.
3. Design and test XSL stylesheets. Based on decisions made in the previous step, you might need to construct and test XSL stylesheets to achieve the formatting you desire. For more information on this task, see the Using XSL stylesheets section in this chapter.4. Add information objects, select stylesheets, and set error handling. Once you have the HTML template in place, the XSL stylesheets are available, and you have a strategy for how to add dynamic personalized content to your template, you are ready to add information objects and define related settings.
◊ First, insert the desired information objects in the correct location. Take care to insert the information objects in the correct location: either between tags where they are rendered or within tags where they impact the way the HTML itself functions. The latter case needs to be done in Source mode. Also be sure to select the correct information source if you have multiple information sources defined for the same MicroStrategy project.
◊ Once this is done, edit the document elements and select the desired XSL stylesheets and apply the desired error handling conditions.
For more information on document element error handling, see Error handling in chapter 1.

50 Chapter 3 Working with Documents
CONCEPTS
5. Deliver service to sample personalized subscriptions. Once the content is fully defined, create one or more sample subscriptions for this service. If this is a personalized service, be sure that the subscriptions have different personalizations that are representative of the intended recipients. Deliver the service and ensure that the message results appear as desired for all different personalized subscriptions.
Helpful techniquesSeveral techniques are discussed below.
Using tables to control the layout of information objects within the HTML content
Much commonly used HTML is composed of loosely structured paragraphs and lists. By contrast, HTML tables give precise layout control over how items are arranged on a page. This typically applies to text items separated by gridlines, but it need not be limited to this use. Nested HTML tables with no borders displayed provide an ideal way to organize multiple pieces of content within the two dimensional space of the page. A simple example of this is shown in the MicroStrategy Tutorial for Narrowcast Server in Service 1a.
Using remote and embedded images
Narrowcast Server provides the capability to either embed images within service contents so that the image file itself is delivered with messages or to link to image files stored on remote Web servers. Each method has its advantages and disadvantages. Embedding images within service contents has the advantage that the image will always be available even if the recipient is offline, behind a corporate firewall, or if the Web server is down. However, embedded images have the disadvantage that the message size is significantly larger and that receiving mail clients do not always know how to handle such messages. Links to images on remote Web servers results in standard HTML that is interpreted correctly by all e-mail clients that are HTML compatible. By contrast, some e-mail clients cannot render image links for embedded images and instead display the image link as broken and the image as a separate attachment that must be opened. To insert a link to a remote image, simply ensure the image is available on the desired Web server, and then edit the HTML source to add a link to the correct Web address. An
HTML documents 51
CONCEPTS
example of this functionality is shown in the headers and other images in the sample messages provided in the MicroStrategy Tutorial for Narrowcast Server. To add an embedded image:1. Import the desired image into your Narrowcast Server system as an imported file of the correct type.2. Add this imported file to an imported document and then add the document as an attachment to the HTML e-mail message.3. Edit the HTML source and add an image link referring to the correct file name but without any file path. To see an example of how this works, edit a message with a MicroStrategy Graph report using a text editor (drag Service 1a onto Notepad). Find the image link for the Graph report (search for “src”) and then find the image with the name (now converted to a long stream of letters and numbers) at the end of the message.
Using information objects within HTML tags
For this technique, information objects are used such that the information object results are not rendered directly as content but rather control how the HTML functions to render content. One example of this is the use of report data to personalize image links as discussed above and illustrated in MicroStrategy Tutorial for Narrowcast Server Service 3b. A second example is the use of subscription information in links to provide recipient-level read message tracking. In this case, a unique message identifier is inserted into an image link (or Active Server Page or Java Server Page link) on a remote server. The inclusion of this unique message identifier allows the Web server to determine which messages have been opened and to log this information to a relational database where it can be joined with recipient-level delivery status information logged using transmission recording. For more information on transmission recording, see Recording transmission information in chapter 4 of the MicroStrategy Narrowcast Server System Administrator Guide. For more information on inserting unique message identifiers into message contents, see the MicroStrategy Tutorial for Narrowcast Server Service 3a and the corresponding content in the MicroStrategy Narrowcast Server Getting Started Guide.

52 Chapter 3 Working with Documents
CONCEPTS
Note: MicroStrategy Narrowcast Server can generate HTML e-mail messages containing MicroStrategy graphs as embedded attachments. However, the graphs are displayed within the message body only if the HTML document is in the HTML body section of the message. If an HTML document that contains a graph is sent as attachment, the graph is not visible within the HTML content when the recipient opens the document. The graph is accessible as another attachment that the recipient can open separately.
Excel documentsMicroStrategy Narrowcast Server can leverage the full power of Microsoft Excel 97 or 2000 by including Excel content within services. As with other forms of content in Narrowcast Server, Excel workbooks are delivered using documents. As a result, any delivery method that supports Excel documents, such as E-mail (SMTP), Wireless (SMTP), or Web (Portal), can deliver Excel documents. This section introduces you to the capabilities that can be achieved using Excel workbooks in Narrowcast Server and provides tips for getting the most out of your Excel implementation.
Note: Thresholding and stoplighting functionality is provided in the MicroStrategy Desktop interfaces and Web. Narrowcast Server supports this in full for HTML documents. For Excel documents, certain limitations exist as to what types of information objects can be used (XML and text, but not image/graph), as well as to what can be rendered in Excel. You cannot insert hyperlinks or images into Excel documents, which are required for the stoplighting feature.
General strategyTo use Excel workbooks with Narrowcast Server, you should first understand how Narrowcast Server uses them. Narrowcast Server Excel documents first start with a template file that is created by importing an Excel workbook from outside of Narrowcast Server. Narrowcast Server can then insert static text or dynamic content, such as grid reports, into this template file.

Excel documents 53
CONCEPTS
The true power of Narrowcast Server is its ability to preserve all aspects of the original template file while only modifying the data values and the cell formatting on specific cells. Thus, you can generate complex, highly-formatted template files that are preserved by Narrowcast Server. Narrowcast Server then supplies dynamic, personalized data to this existing framework. You can also create Excel macros that are automatically run to perform actions on the data when the user opens the spreadsheet. Thus, an important consideration in designing applications with Excel is what can be defined in the template definition and what should be defined using macros that are run when the workbook is opened. As a general rule, you should define as much as possible in the Excel template and use macros only to do processing that you cannot do until the actual data is inserted. A good example of this is shown in the MicroStrategy Tutorial for Narrowcast Server in Service 1a. If you open the Excel workbook after it has been delivered by Service 1a (you can find the resulting message under ../Program Files/MicroStrategy/Narrowcast Server/Delivery Engine/Tutorial/SampleMessages), you notice that it contains a highly formatted workbook that includes graphs, images, number formatting, cell formatting, row and column resizing, and sheets with custom names. However, if you open the template file before it is imported (you can find the original template file under ../Program Files/MicroStrategy/Narrowcast Server/Delivery Engine/Tutorial// TemplatesandStylesheets), you notice that all of this formatting, including the graph definitions, is already present. As a result, Narrowcast Server inserts dynamic data from the warehouse and the workbook comes alive based on the existing template definition. This has the advantage that no macros need to be created or tested and the user is not prompted to run the macros. However, in some cases, the data returned is of an unknown number of rows or columns or you want to perform actions based on the data that you must determine based on the data itself. In these cases, you need to use Excel macros to perform actions once the data is in place. The remainder of this section explains specific ways that Narrowcast Server can leverage the power of Excel to create powerful applications.
Data placement and formattingOne important capability of Narrowcast Server is its ability to place static text or dynamic content anywhere in the workbook and to format this data as desired. If multiple sheets are present in the Excel template file, these sheets and their names are available in the Excel Document Editor. The

54 Chapter 3 Working with Documents
CONCEPTS
Excel Document Editor then allows you to place text or information object data anywhere within each sheet. This can be done by assigning absolute placement coordinates (for example, cell D11 corresponds to a row offset of 10 and a column offset of 3) or by using relative coordinates based on other information that has been inserted. The data that is inserted can then be formatted using XSL stylesheets to provide complete control over each cell including number formatting, color formatting, and so on. For MicroStrategy reports, the report formatting defined in MicroStrategy Desktop or MicroStrategy Web is preserved by default. However, this formatting can be overridden by selecting a different XSL stylesheet just as it can be for any XML information object. For more information on the Excel Document Editor, refer to chapter 15, Excel Document Editor. For more information on XSL stylesheets, refer to Using XSL stylesheets in this chapter.
Automatic chart creationAs the business intelligence saying goes, a graph is worth a thousand grid reports. For convenient overviews of data trends and comprehensive summaries of detailed data, Excel’s charting capabilities are extremely useful and versatile. By writing a few simple macros and embedding these macros in an Excel template, it is possible to generate workbooks that automatically convert raw data into charts or build graphs on the fly as the user selects different data views.
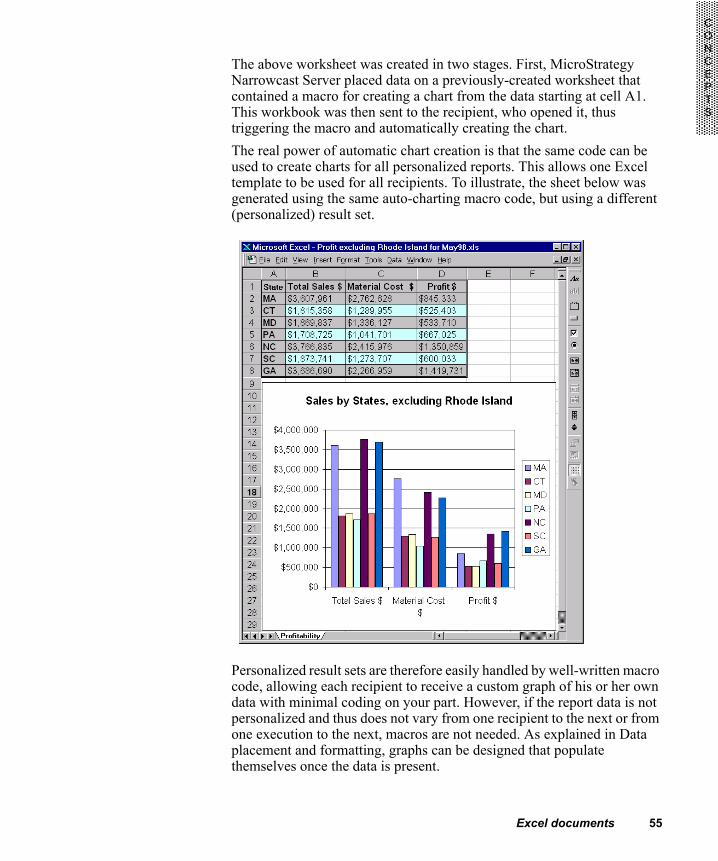
Excel documents 55
CONCEPTS
The above worksheet was created in two stages. First, MicroStrategy Narrowcast Server placed data on a previously-created worksheet that contained a macro for creating a chart from the data starting at cell A1. This workbook was then sent to the recipient, who opened it, thus triggering the macro and automatically creating the chart.The real power of automatic chart creation is that the same code can be used to create charts for all personalized reports. This allows one Excel template to be used for all recipients. To illustrate, the sheet below was generated using the same auto-charting macro code, but using a different (personalized) result set.
Personalized result sets are therefore easily handled by well-written macro code, allowing each recipient to receive a custom graph of his or her own data with minimal coding on your part. However, if the report data is not personalized and thus does not vary from one recipient to the next or from one execution to the next, macros are not needed. As explained in Data placement and formatting, graphs can be designed that populate themselves once the data is present.

56 Chapter 3 Working with Documents
CONCEPTS
Building EIS interfaces in ExcelExcel provides a wealth of programming tools which make it easy to build highly usable mini-applications within a workbook. A common mini-application is a so-called Executive Information System (EIS) that provides one-click access to popular reports. These systems can be built by first writing the appropriate code in Excel, and then building a MicroStrategy Narrowcast Server service that places report data on specific sheets. When the data-rich workbooks are sent to all subscribers, the recipients can open the workbooks and operate within an easy-to-use point-and-click interface that provides very quick access to their data.It is easy to create custom Excel interfaces that let the recipients interact directly with the contents of a workbook. In the example below, a four-sheet EIS is shown. A start sheet greets the user with the available reporting options, and three other sheets are populated with data from MicroStrategy Narrowcast Server.
A hyperlink behind each of the EIS buttons enables one-click access to any of the three available sheets. This is illustrated in the tutorial services in the attachment in Service 1a. For example, the user would see the following screen after clicking the Sports Equipment button:

Excel documents 57
CONCEPTS
Several important features are demonstrated in the above sheet:• Unknown to the user, the original report only contained three metrics:
Regular $, Promotion $, and Material Costs $. The two other metrics, Total Sales $ and Profit $, were calculated on-the-fly by Excel.
• This sheet provides the user with an easy-to-use banding mechanism at the top right. By entering a numerical range and clicking the Highlight Range button, the user causes Visual Basic for Applications (VBA) code to reformat the grid so that only values within the specified range are highlighted.
• The user can switch between bar and pie views of the sales data by clicking the Display As Pie Chart button.
• The user is given a way to export the contents of the sheet to Microsoft Word for further formatting or for incorporation into a larger document.
All of this functionality is built into the Excel template that MicroStrategy Narrowcast Server sent to the user, providing a very powerful and easy-to-use environment for users of any skill level.
Building pivot tablesData delivered by MicroStrategy Narrowcast Server can be readily inserted into pivot tables, which allow available data to be summarized along different dimensions and at different levels of granularity. Assume that a straightforward grid of profitability numbers needed to be analyzed. The grid might look as follows:

58 Chapter 3 Working with Documents
CONCEPTS
This table is not easy to work with because the data is not cross-tabulated, meaning that it is not grouped in any meaningful way. Excel’s pivot table functionality can be used to cross-tabulate the data in a way that makes it understandable.In the example below, a pivot table has been sent to the end user which groups sales by day of week for every state and class of item. Additionally, one or more stores can be selected from the Store drop-down list, which then adjusts the totals within the cells to reflect sales for the selected stores.
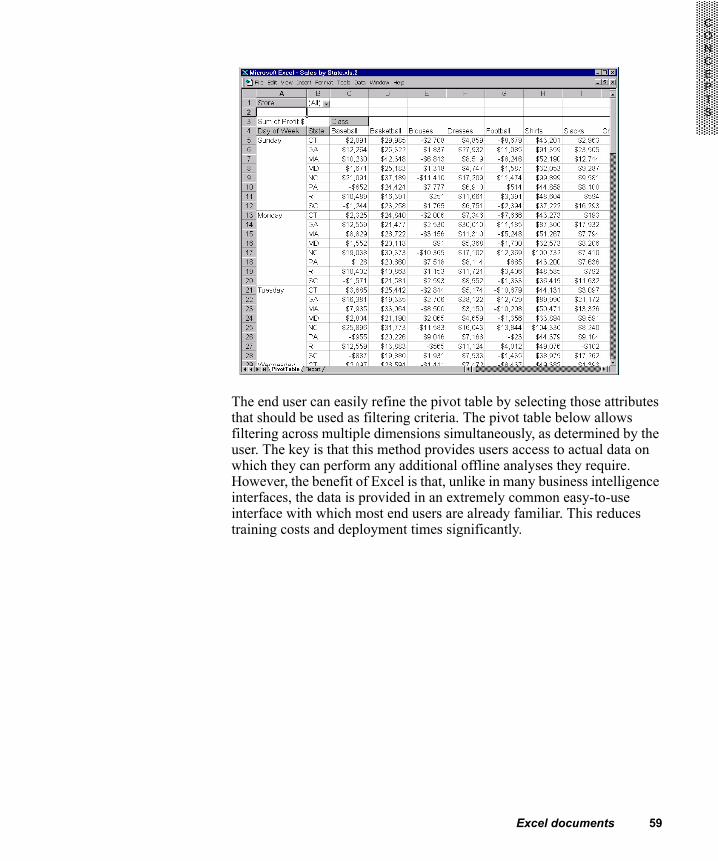
Excel documents 59
CONCEPTS
The end user can easily refine the pivot table by selecting those attributes that should be used as filtering criteria. The pivot table below allows filtering across multiple dimensions simultaneously, as determined by the user. The key is that this method provides users access to actual data on which they can perform any additional offline analyses they require. However, the benefit of Excel is that, unlike in many business intelligence interfaces, the data is provided in an extremely common easy-to-use interface with which most end users are already familiar. This reduces training costs and deployment times significantly.

60 Chapter 3 Working with Documents
CONCEPTS
In the above example, the user is looking at the data for basketball sales at the Greenville store, and is in the process of switching to the Greenwich store. With pivot tables, it is easy to give the end user the ability to add or remove levels of detail from a report and provide substantial analytical power with minimal complexity.Pivot tables require very little code; refer to the Excel documentation for more information.
Using macros in Excel 97 or 2000Excel 97 and 2000 use Visual Basic for Applications (VBA) as their macro language, and provide a macro recording feature that makes it easy to build macros. In most cases, creating such things as automatically updating charts is as simple as recording a macro and associating it with a particular Excel event. From that point on, whenever the event occurs, the corresponding macro is run.
Excel documents 61
CONCEPTS
Recording a macro in Excel 97
You can create a chart that automatically appears when a workbook is opened, using VBA and Excel’s macro recording functionality. For more information, see the following How Do I...? topic:• Create a link to a Desktop document
Associating macros with events
Once a macro has been recorded, it can be associated with an Excel event. While this continues the automatic chart example, the principles apply to any situation in which macros need to be run.Macro source code can be viewed and edited via the Tools, Macro, Visual Basic Editor menu item in Excel. All macros are contained in module folders, which can be opened by double-clicking them. For more information, see the following How Do I...? topic:• Associate a macro with an event in Microsoft Excel
Creating automatically-executed macros
While it is useful to run a macro at the click of a button, it is often more desirable to have a macro run as soon as a workbook is opened. This allows formatting to be done prior to the viewing of the data. For more information, see the following How Do I...? topic:• Create an Excel document
Converting URLs into hyperlinksIt is possible to use a macro to transform URLs from dynamic content (grid reports, direct text insertions, and so on) into hyperlinks. This creates a powerful capability when report data is combined with XSL formatting to create hyperlinks using dynamic report data. As an illustration, the following macro converts every cell entry starting with http:// into a hyperlink:

62 Chapter 3 Working with Documents
CONCEPTS
Dim xsheet As VariantDim xcell As VariantFor Each xsheet In Worksheets() For Each xcell In xsheet.UsedRange.Cells() If Left(xcell.Text, 7) = "http://" Then ActiveSheet.Hyperlinks.Add _ Anchor:=xcell, _ Address:=xcell.Text End If Next xcellNext xsheet
Note: This sample code is for illustration only, and should be tailored to your specific needs.
Preserving leading zerosSome reports contain ID numbers that have leading zeroes. Normally, Excel removes leading zeroes as the numbers are placed in the spreadsheet, but there is a way to preserve leading zeroes. An Excel template with predefined formatting characteristics solves the problem.Assume that a report contains leading-zero IDs in its third column, and assume that this report is placed on the sheet starting at location A1. The following macro sets the formatting for column C (the third column) to preserve all characters that are placed in the cell, even leading zeroes:Sub save_leading_zeros() Range("C:C").Select Selection.NumberFormat = "@"End Sub
This macro does not have to be run each time the workbook is opened. By running this macro once and saving the workbook, the altered formatting for column C is saved.
Accommodating reports of different sizesPersonalization often causes each subscriber to receive a different amount of data, which makes it seemingly difficult to build a single Excel chart which graphs varying amounts of data.

Excel documents 63
CONCEPTS
The easiest way to achieve this is to record the action of the Chart Wizard and then replace the Range("…") command in the Source:= line with the UsedRange command. This selects just the active data area, thereby enabling one chart macro to accommodate varied amounts of data.
VBA macros and virusesA macro virus is a program that is written in an application’s macro language and performs undesired actions (such as file deletions) on one or more machines. Several Excel 97 and 2000 macro viruses exist, and you must use extreme care to ensure that viruses are not transmitted inside spreadsheets that are generated by MicroStrategy Narrowcast Server. While Narrowcast Server itself cannot generate or deliberately enclose a macro virus in a workbook, viruses can be present in Excel templates used as the basis for narrowcasts.To combat macro viruses, the MicroStrategy Narrowcast Server machine should be regularly scanned for macro viruses, and you should take great precautions when working with third-party macros.
Excel for Report from Intelligence ServerExcel for reports generated from Intelligence Server are commonly used to provide consistency in the reports generated by MicroStrategy Desktop and Narrowcast Server, and to leverage any enhancements to the Excel formatting. You can choose to have the Excel reports generated from Intelligence Server by setting the execution and governing properties of Intelligence Server in the Information Source Wizard. For reports that have one or more attributes in the page-by field, you can choose to expand all the pages and view each page on a new sheet in the Excel report. This setting is available for subscriptions through Narrowcast Server and Web Deliveries.
Note: The Each page on a different worksheet option is available only for a report; it is not available for Report Services documents.
Note: This feature is available only for Excel 2002 and later.

64 Chapter 3 Working with Documents
CONCEPTS
Error handlingError handling for Excel documents is set in the following locations: the Document Element Properties dialog box within the Excel Document Editor, the Error Handling section of the Document Properties dialog box, and the Excel Document Formatter. It is important to understand the differences between the two locations in Narrowcast Administrator that control error handling for the execution of Excel documents with dynamic content.• Document Element Properties dialog box within the Excel
Document Editor: These settings control the execution of specific document elements and handle errors in creating properly imported document elements. For example, these settings apply when no data is returned by an information object, if an information object returns an error, or when there is a problem formatting document elements correctly. Thus, these errors occur when creating a document element, and apply to a specific document element but not to an entire Excel document.
• Error Handling section of the Document Properties dialog box: These settings specify whether a collection of information objects that fail or return no data cause the document to be cancelled. For example, these settings apply if the selected information objects return no data or return an error. This type of error applies to an entire Excel document rather than a specific document element.
• Excel Document Formatter: These settings control how successfully imported document elements are inserted into an Excel document by the Excel document formatting module. For example, these settings apply if the Excel document could not be created because some cells fall outside of the valid sheet area. Thus, this type of error is not specific to an individual document element, but rather concerns the entire Excel document.
For this reason, it is important to understand where to set error handling to control different events. Any errors produced by XSL stylesheets, bad XML format, errors with data returned, or with no data returned must be set at the document element level. Any errors produced when trying to format a document using properly imported document elements must be set at the document formatter level.

Text documents 65
CONCEPTS
Text documentsDue to the nature of text content, working with text documents in Narrowcast Server is often less involved than working with either HTML or Excel documents. As with HTML and Excel documents, the Plaintext Document Editor allows you to insert dynamic content such as MicroStrategy reports or user information. However, information objects used in text documents must be in text or XML format, since information objects in image format, such as MicroStrategy Graph reports, are not supported. You can also cut, copy, and paste text from within the document editor or from other sources. This is useful, for example, if you have a text template that you want to use as the basis for your text document.However, other advanced functionality associated with HTML and Excel documents, such as viewing different modes in HTML documents or working with Excel macros, does not apply due to the nature of text content. You should, however, ensure that the length of text messages is less than the maximum allowable character length for the types of devices you want to support. For example, most SMS providers and most wireless devices allow only a very limited number of characters to be delivered. Despite the relative simplicity of working with the Plaintext Document Editor, it is important to understand how Narrowcast Server devices can be used to ensure that text messages are formatted correctly for all end user devices. Different end user devices have differing capabilities for supporting text messages due to both the service provider delivering the message and the capabilities of the receiving device. As a result, it is important to format text documents so that delivered messages are appropriate for all service providers and end user devices. Narrowcast Server devices allow you to use grid formatting, cell padding, and string substitution to control how text documents are formatted. Grid formatting allows you to control both how cells in a grid are padded and which character is used to separate table columns. Cell padding refers to the insertion of additional characters (typically characters interpreted as blank spaces) after report data within each cell. These characters help ensure that columns within a table line up properly when dynamic content of different widths is inserted into table cells. Three cell padding options are available.• First, you can choose not to pad cells. In this case, no character is used
to pad cells and table columns do not line up unless data of the same width is returned for all cells. This option can be useful when generating delimited files such as comma separated values (CSV) files where the columns do not need to line up visually.

66 Chapter 3 Working with Documents
CONCEPTS
• Second, you can pad cells to support devices that use fixed width fonts. Fixed width fonts are fonts, such as Courier New, that display each character using the same width. Thus, two lines of text with the same number of characters always has the same length regardless of the characters used in each line. As a result, for fixed width fonts, as long as you enable cell padding and choose a character for cell padding that is recognized as a non-breaking space, table columns line up correctly. Nonbreaking spaces are discussed further below. Note that the choice of font, which determines whether fixed width or proportional fonts are used, is controlled by the receiving device; Narrowcast Server has no control over this choice.
• Third, you can pad cells to support devices that use proportional fonts. Proportional fonts are fonts, such as Times New Roman, that display different characters using different widths. As a result, two lines of text with the same number of characters cannot be guaranteed to have the same length unless the same characters are used in each line. One way to avoid this problem when using tabular data is by using the tab character as the column separator. This causes each column to start at a fixed location regardless of the width of the characters in preceding cells in the same row.You can also specify the width (typically in pixels) for each character that might be shown on a device. By choosing characters that show up as blank or similarly (for example, the underscore character) and that have a variety of widths, you can enable Narrowcast Server to approximately align the data in each column of grid reports. This, combined with the use of text-registration characters such as Tab, can ensure that the data in each cell of a column aligns correctly for a tabular report. As the capabilities of devices differ widely, not all devices support either text-registration or cell padding.
When using cell padding for either fixed width or proportional fonts, you should ensure that characters used for cell padding will be interpreted as a non-breaking spaces. The reason for this is that some receiving devices compress repeated “white space” characters such as the Space character (ASCII 32), the Carriage Return character (ASCII 13), and the Linefeed character (ASCII 10) into a single Space character. They might also break lines at white space characters so that table rows are continued on the next line. To avoid these problems, ensure that the character used for cell padding is interpreted correctly as a nonbreaking white space. Many character sets use the character ASCII 160 as a nonbreaking space. If this character is not interpreted correctly, and you do not know which characters would be interpreted correctly by the intended character set, trial and error can be used to determine which character to use as a nonbreaking space character.

Imported documents 67
CONCEPTS
Finally, Narrowcast Server devices enable string substitutions. String substitutions can be used to avoid characters that are not supported by certain devices. For example, some devices do not support ASCII characters 13 (CR) and 10 (LF). As a result, when these characters are used in text documents, you can replace these characters and use alternate characters for devices that do not support these characters.For more information on character sets, see the MicroStrategy Narrowcast Server System Administrator Guide.
Note: Thresholding and stoplighting functionality is provided in the MicroStrategy Desktop interfaces and Web. Narrowcast Server supports this in full for HTML documents. For plaintext documents, only text can be used rather than hyperlinks or images. If reports with image, URL, or special character thresholds are used, the result is always an unformatted value.
Imported documentsImported documents allow you to import various types of files into a Narrowcast Server system from the Microsoft Windows file system for use in Narrowcast Server services. These files are imported manually by the Narrowcast Server system administrator or application designer and are delivered as static content, which is not personalized or retrieved from outside Narrowcast Server at the time services are executed. When creating imported documents, it is important to correctly define the imported file used by the imported document. First, you must set the file type correctly so that the file is identified correctly when it is delivered by the information transmitter. For example, for e-mail delivery, the MIME type is determined by this setting. You must also ensure that the correct character set is chosen when the file is imported into the Narrowcast Server system. Files can be stored in the Windows file system in a number of different character sets, but files are always stored in the Narrowcast Server system using the Unicode character set. As a result, Narrowcast Server must know from which character set to translate the document into Unicode. You should always select the character set that was used to create the document, which is typically the default language for the machine on which it was created. For the United States and most Western countries, this is the Latin1 character set.

68 Chapter 3 Working with Documents
CONCEPTS
For more information on locales and character sets, refer to Locales in chapter 1, MicroStrategy Narrowcast Server, of the MicroStrategy Narrowcast Server System Administrator Guide.
Desktop documentsNarrowcast Server allows you to take advantage of the following fully-formatted documents created in MicroStrategy Desktop:• Report Services documents include both static items such as lines and
images, and dynamic items such as fields, columns, grids, and graphs that make up the data of a report.
• HTML documents are the standard containers in MicroStrategy Desktop for formatting, displaying, and distributing reports on the same page or at the same time within a project.
In Narrowcast Server, you can create links to these documents and then include them in your services. You cannot open or modify them from within Narrowcast Server. But you can create the links from anywhere in Narrowcast Server that documents are created, including Narrowcast Administrator, the Service Wizard, and the Publication Wizard. Report Services documents, referred to as documents in Desktop, are supported in Excel, Flash, and PDF formats, while HTML documents are in HTML format only. These HTML documents are not the same as the HTML documents created within Narrowcast Administrator.
Note: To make effective use of these Desktop documents, you need to know what they contain, which can only be determined from the Desktop interface.
The export formats you can select in Narrowcast depend on the export formats set while creating the document. For details to define export formats for a document, see the Report Services Document Creation Guide.
Using XSL stylesheetsAs discussed in chapter 2, Dynamic Content and Personalization, information objects always return contents in one of three formats: image, XML, and text. Information objects that return XML always use XSL stylesheets to format information object results into content that is

Using XSL stylesheets 69
CONCEPTS
appropriate for the document in which they are inserted. For MicroStrategy Grid reports, a default stylesheet is automatically applied that transforms the report XML into a grid that preserves all report formatting defined in MicroStrategy Desktop or Web. As a result, you do not need to know how XSL stylesheets work to use XML information objects. You simply need to know that when you insert a grid report into an HTML or Excel document that the report formatting appears the same as it does in MicroStrategy Web and Desktop. However, XSL stylesheets also offer some powerful advantages should you choose to take advantage of them. This section discusses some of these advantages and provides the basic tools to allow you to get started using XSL stylesheets.
Advantages of XSL stylesheetsXSL stylesheets provide complete control over how HTML, text, or Excel content is displayed based on the personalized data returned by information objects. In its simplest form, this allows application designers to format report grids. However, it also allows application designers to tailor message formatting and return highly personalized natural language text. Specifically, XSL stylesheets can• transform MicroStrategy reports or other XML information objects into
natural language text. This allows tabular data such as reports returned from relational databases to be used for text alerts. For example, a grid report returning items that are low on inventory and the current inventory deficit could be used for text alerts such as “Dear Bob, Sony Television Item 134 is 78% below average inventory.” Examples of this functionality are shown in the XSL stylesheets used for the wireless messages delivered in the MicroStrategy Tutorial for Narrowcast Server Services 2a and 2b.
• modify HTML templates by returning HTML content. This could allow personalized data returned by a report to personalize the HTML content received by recipients. A simple example of this is shown in the MicroStrategy Tutorial for Narrowcast Server Service 3b. In this example, an HTML link to an image on a Web server is personalized based on report content. This allows different recipients to see different images even though only one HTML template was constructed. Similar functionality could be used to personalize template formatting such as colors, images, links, or any other HTML constructions.
70 Chapter 3 Working with Documents
CONCEPTS
• standardize the report formatting when different reports should always have the same format. For example, suppose that all reports displayed on the Subscription Portal should have the same formatting to match the Web portal look and feel. This can be accomplished simply by selecting the same XSL stylesheet for all reports delivered to the Subscription Portal. Examples of this functionality are shown in the XSL stylesheets used for Subscription Portal content delivered by MicroStrategy Tutorial for Narrowcast Server Services 2a and 2b.
• apply conditional logic to information object results, to use some information to control the display of other information. For example, suppose that you want to show a recipient's name and mailing address, but only if you have all of the necessary information for a complete address. Otherwise, you want to return only the person's name. You can achieve this by using a customized XSL stylesheet that first checks whether the required information is available in the All User Information object, and then returns the recipient's mailing address only if all required information is present.
• enable response tracking. Using the All Subscription Information object, you can use a customized XSL stylesheet to transform such subscription information properties as the Service Execution ID, the Subscription ID, and the User ID into an HTML image tag with these properties included as parameters for the image source URL.
• merge the results of multiple reports or other information objects. Sometimes, you want to apply a single XSL stylesheet to a collection of information objects simultaneously. This is useful if parts of several information objects must be merged together in an HTML table, for example.
• use the results of one report to control the formatting of another report. Using this technique, you can allow subscribers to personalize the formatting for reports run using personalized page mode, for example.
Default stylesheets providedMicroStrategy Narrowcast Server provides a number of precreated XSL stylesheets in two locations. First, a small number of commonly used XSL stylesheets are automatically added to new systems when systems are first created. These files are available in the following folder location within Narrowcast Administrator:\\Applications\My First Application\Services\XSL Stylesheets

Using XSL stylesheets 71
CONCEPTS
Second, a larger number of XSL stylesheets is available where the Narrowcast Server program files are installed in the Windows file system. The files can be found in the following file location, where %%Application Path%% is the folder into which Narrowcast Server is installed (C:\Program Files\ by default):\%%Application Path%%\MicroStrategy\Narrowcast Server\Delivery Engine\XSL
The following sections provide a brief description of the XSL stylesheets that are provided with Narrowcast Server. The stylesheets with names in italics are created within Narrowcast Administrator by default, while all others are available in the Windows file system.
HTML documents
• EmptyResult.xsl: Removes the report content and returns no information. This stylesheet is useful for alert-driven applications where the presence or absence of report data for a recipient determines whether or not the recipient should receive a message, but the report should not be included in the message content. Such a report used only for alerting purposes can be combined with other reports such that one report controls whether or not a recipient receives an alert and other reports return the desired content. Since no information is returned, this stylesheet can be used for all document types.
• MSTR7ToHTML-Agent.xsl: Returns report formatting similar to the default formatting in MicroStrategy Desktop. Attributes and metric headers have a dark blue background with white text, while metric values have a white background and black text. Black gridlines separate all cells.
• MSTR7ToHTML-BandingAccounting.xsl: Returns a grid with a dark green background and white text for column headings, and a gray background and black text for attributes and metric values. Gridlines separate columns but are not present on rows.
• MSTR7ToHTML-BandingColorful.xsl: Returns a grid with a dark blue background and white text for column headings, a light gray background and black text for metric values, and a light blue background and black text for attributes. Gridlines separate columns but are not present on rows.
• MSTR7ToHTML-BandingFinance.xsl: Returns a grid with a green background and white text for column headings, and a gray background and black text attributes and metric values. White gridlines separate all cells.
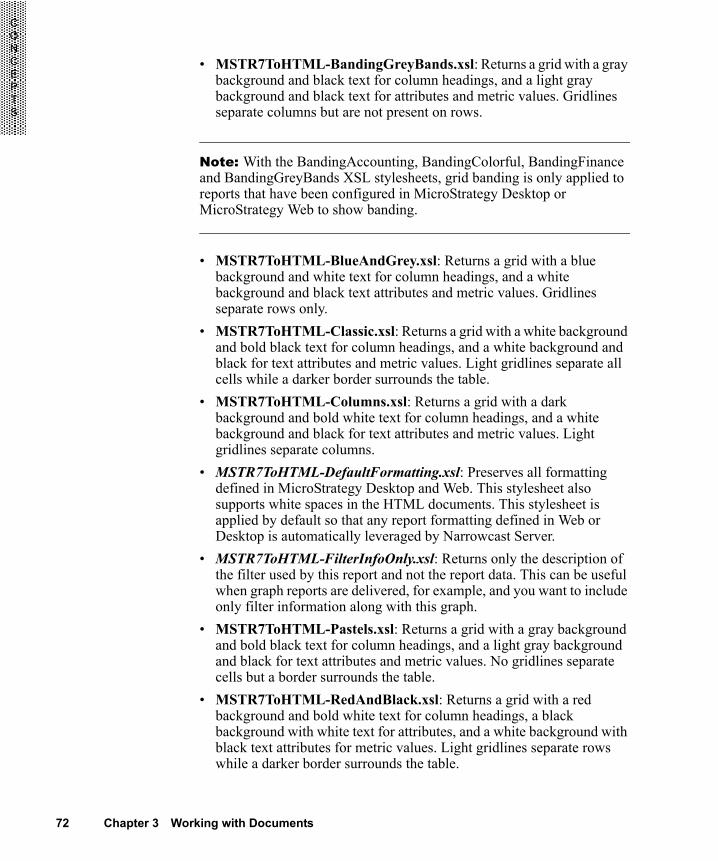
72 Chapter 3 Working with Documents
CONCEPTS
• MSTR7ToHTML-BandingGreyBands.xsl: Returns a grid with a gray background and black text for column headings, and a light gray background and black text for attributes and metric values. Gridlines separate columns but are not present on rows.
Note: With the BandingAccounting, BandingColorful, BandingFinance and BandingGreyBands XSL stylesheets, grid banding is only applied to reports that have been configured in MicroStrategy Desktop or MicroStrategy Web to show banding.
• MSTR7ToHTML-BlueAndGrey.xsl: Returns a grid with a blue background and white text for column headings, and a white background and black text attributes and metric values. Gridlines separate rows only.
• MSTR7ToHTML-Classic.xsl: Returns a grid with a white background and bold black text for column headings, and a white background and black for text attributes and metric values. Light gridlines separate all cells while a darker border surrounds the table.
• MSTR7ToHTML-Columns.xsl: Returns a grid with a dark background and bold white text for column headings, and a white background and black for text attributes and metric values. Light gridlines separate columns.
• MSTR7ToHTML-DefaultFormatting.xsl: Preserves all formatting defined in MicroStrategy Desktop and Web. This stylesheet also supports white spaces in the HTML documents. This stylesheet is applied by default so that any report formatting defined in Web or Desktop is automatically leveraged by Narrowcast Server.
• MSTR7ToHTML-FilterInfoOnly.xsl: Returns only the description of the filter used by this report and not the report data. This can be useful when graph reports are delivered, for example, and you want to include only filter information along with this graph.
• MSTR7ToHTML-Pastels.xsl: Returns a grid with a gray background and bold black text for column headings, and a light gray background and black for text attributes and metric values. No gridlines separate cells but a border surrounds the table.
• MSTR7ToHTML-RedAndBlack.xsl: Returns a grid with a red background and bold white text for column headings, a black background with white text for attributes, and a white background with black text attributes for metric values. Light gridlines separate rows while a darker border surrounds the table.
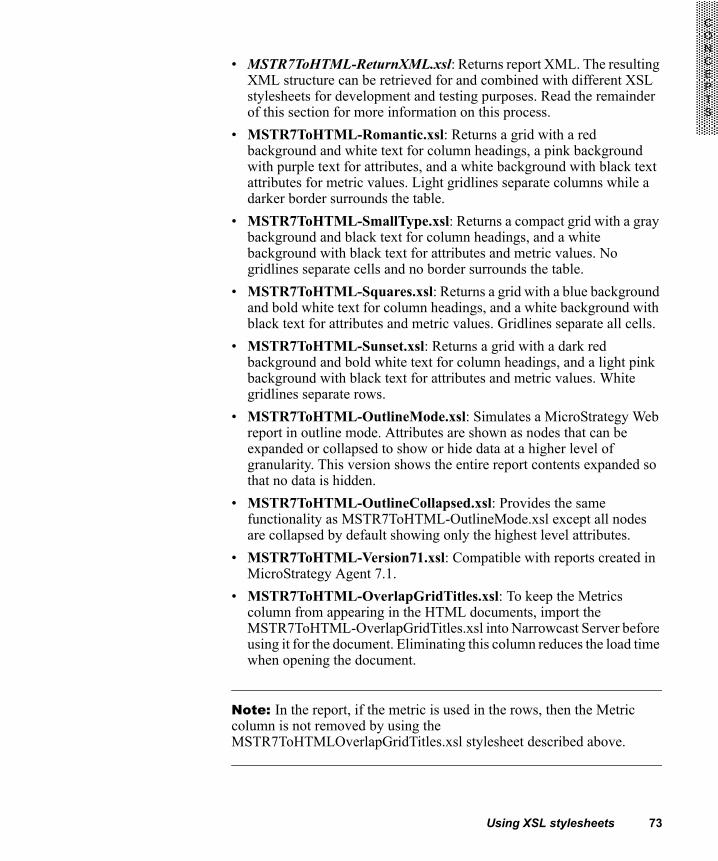
Using XSL stylesheets 73
CONCEPTS
• MSTR7ToHTML-ReturnXML.xsl: Returns report XML. The resulting XML structure can be retrieved for and combined with different XSL stylesheets for development and testing purposes. Read the remainder of this section for more information on this process.
• MSTR7ToHTML-Romantic.xsl: Returns a grid with a red background and white text for column headings, a pink background with purple text for attributes, and a white background with black text attributes for metric values. Light gridlines separate columns while a darker border surrounds the table.
• MSTR7ToHTML-SmallType.xsl: Returns a compact grid with a gray background and black text for column headings, and a white background with black text for attributes and metric values. No gridlines separate cells and no border surrounds the table.
• MSTR7ToHTML-Squares.xsl: Returns a grid with a blue background and bold white text for column headings, and a white background with black text for attributes and metric values. Gridlines separate all cells.
• MSTR7ToHTML-Sunset.xsl: Returns a grid with a dark red background and bold white text for column headings, and a light pink background with black text for attributes and metric values. White gridlines separate rows.
• MSTR7ToHTML-OutlineMode.xsl: Simulates a MicroStrategy Web report in outline mode. Attributes are shown as nodes that can be expanded or collapsed to show or hide data at a higher level of granularity. This version shows the entire report contents expanded so that no data is hidden.
• MSTR7ToHTML-OutlineCollapsed.xsl: Provides the same functionality as MSTR7ToHTML-OutlineMode.xsl except all nodes are collapsed by default showing only the highest level attributes.
• MSTR7ToHTML-Version71.xsl: Compatible with reports created in MicroStrategy Agent 7.1.
• MSTR7ToHTML-OverlapGridTitles.xsl: To keep the Metrics column from appearing in the HTML documents, import the MSTR7ToHTML-OverlapGridTitles.xsl into Narrowcast Server before using it for the document. Eliminating this column reduces the load time when opening the document.
Note: In the report, if the metric is used in the rows, then the Metric column is not removed by using the MSTR7ToHTMLOverlapGridTitles.xsl stylesheet described above.

74 Chapter 3 Working with Documents
CONCEPTS
• SubscriptionInfoToHTML.xsl: Returns the physical address for a given subscription in the form of a sentence such as “This message is sent to address [email protected].” This stylesheet provides a starting point with which you can develop custom XSL stylesheets to return a custom grouping of subscription information properties for HTML documents.
• UserInfoToHTML.xsl: Provides an example you can use to develop custom XSL stylesheets to return a logic-driven custom grouping of user information properties. If the recipient’s last name and user properties are set, this XSL returns the text “Dear title last-name”. For example, if a user’s title is “Mr.” and the last name is “Bush”, this XSL returns “Dear Mr. Bush”. If one of these two user properties is empty, this XSL returns “Dear Sir” so that the contents delivered to the recipient are still sensible.
Excel documents
• EmptyResult.xsl: See the description under HTML documents.• MSTR7ToExcel-DataOnly.xsl: Returns data only, with no additional
formatting such as colors, fonts, and so on. This can be useful if Excel macros are applied to data when no changes to the initial formatting is desired.
• MSTR7ToExcel-DefaultFormatting.xsl: Preserves all formatting defined in MicroStrategy Desktop and Web. This stylesheet also supports the hierarchy in the report template. This stylesheet is applied by default so that any report formatting defined in Desktop or Web is automatically used by Narrowcast Server.
• MSTR7ToExcel-FilterInfoOnly.xsl: Returns only the description of the filter used by this report.
• MSTR7ToExcel-OutlineMode.xsl: Simulates a MicroStrategy Web report in outline mode. Attributes are shown as nodes that can be expanded or collapsed to show or hide data at different levels of granularity.
• MSTR7ToExcel-Version71.xsl: Returns report result with formatting such as colors, fonts, and so on. Is compatible with reports created in MicroStrategy Agent 7.1.

Using XSL stylesheets 75
CONCEPTS
• MSTR7ToExcel-WithoutColumnAxisHeaders.xsl: Returns report results without the column axis headers. The column axis headers describe the items on the report columns. The column axis headers typically display the title “Metrics” or the names of any attributes that are present on the report columns. In Narrowcast Server 7.1 and previous versions, the column axis headers were not shown by default, so this stylesheet is necessary to achieve the default formatting provided by these product versions.
• SubscriptionInfoToExcel.xsl: Returns the physical address for a given subscription in the form of a sentence such as “This message is sent to address [email protected]” in the proper XML format for the Excel document formatter. This stylesheet provides a starting point with which you can develop custom XSL stylesheets to return a custom grouping of subscription information properties for Excel documents.
• UserInfoToExcel.xsl: Provides an example you can use to develop custom XSL stylesheets to return a logic-driven custom grouping of user information properties for Excel documents. If the recipient’s last name and user properties are set, this XSL returns the text “Dear title last-name” in the proper XML format for the Excel document formatter. For example, if a user’s title is “Mrs.” and the last name is “Smith”, this XSL returns “Dear Mrs. Smith”. If one of these two user properties is empty, this XSL returns “Dear Sir” so that the content delivered to the recipient is still sensible.
• MSTR7ToExcel-PageByInfo.xsl: Generates a document containing page-by information of a report. You can use this stylesheet to customize the display of the page-by information. If there is no page-by information, then the document generates a blank output but does not fail. For example, if a user has two document elements, then either similar information objects should be used or different information objects with similar personalization should be used in the documents.
• MSTR7ToExcel-DefaultFormattingTrim.xsl: Trims the leading and trailing spaces for attribute elements when exporting a report from MicroStrategy Web 8.x to Microsoft Excel with formatting.
Note: The MSTR7ToExcel-PageByInfo.xsl and MSTR7ToExcel-DefaultFormattingTrim.xsl have to be imported into the project. For more information on importing files, see Import a file.
Text documents
• EmptyResult.xsl: See the description under HTML documents.

76 Chapter 3 Working with Documents
CONCEPTS
• MSTR7ToText-CSV.xsl: Returns report results in comma separated values (CSV) format. This delimited file format allows report results to be used by Excel and other third-party applications and systems.
• MSTR7ToText-CSV-NoDoubleQuotes.xsl: Changes the name of the attachments sent using the Control Documents. This stylesheet is similar to MSTR7ToText-CSV.xsl, but it also removes the double quotes displayed around each cell and the linefeed after the last cell. For more information on changing attachment names using Control Documents, refer to Appendix A, Dynamically change attachment name.
• MSTR8ToText-CSVWithColumnTitles.xsl: Allows the attribute names to be displayed in the report columns on execution.
• MSTR7ToText-Default.xsl: Returns plain text grid suitable for display in wireless devices and other devices that render plain text content. This stylesheet is applied by default to reports in text documents.
• MSTR7ToText-FilterInfoOnly.xsl: Returns only the description of the filter used by this report and not the report data.
• MSTR8ToText-NoRowHeader.xsl: Changes the name of the attachments sent via the Control Documents. It displays only one attribute value and no attribute headers. This is possible only when the attribute is on the rows. This stylesheet retrieves an attribute element from the report as the attachment name. The only limitation is that the report which is used as an Information Object in the Control Document should have only one attribute element and the attribute should have only one form. For more information on changing attachment names using Control Documents refer to Appendix A, Dynamically change attachment name.
• SubscriptionInfoToText.xsl: Returns the physical address for a given subscription in the form of a sentence such as “This message is sent to address [email protected],” and in the proper XML format for the Plaintext document formatter. This stylesheet provides a starting point with which you can develop custom XSL stylesheets to return a custom grouping of subscription information properties for text documents.

Using XSL stylesheets 77
CONCEPTS
• UserInfoToText.xsl: This stylesheet provides an example you can use to develop custom XSL stylesheets to return a logic-driven custom grouping of user information properties for plain text documents. If the recipient’s last name and user properties are set, this XSL returns the text “Dear title last-name” in the proper XML format for the Plaintext document formatter. For example, if a user’s title is “Ms.” and the last name is “Jones”, this XSL returns “Dear Ms. Jones”. If one of these two user properties is empty, this XSL returns “Dear Sir” so that the contents delivered to the recipient are still sensible.
Subscription Portal attachments
• SubscriptionPortalAttachments.xsl: Controls how attachment links are formatted for HTML documents in the Subscription Portal. This stylesheet is applied by default when attachments are created for HTML documents.
Column widths specified in MicroStrategy Web or DesktopMicroStrategy Narrowcast Server allows you to preserve column width settings specified in MicroStrategy Web or MicroStrategy Desktop. This can be accomplished by selecting the default XSL stylesheets used by Narrowcast Server for MicroStrategy reports within HTML and Excel documents. Since this stylesheet is selected by default, this behavior is automatically enabled for new systems. To specify column widths for reports, Narrowcast Server must be used with Intelligence Server version 7.2.1 or later and must use the default XSL stylesheets provided with Narrowcast Server 7.2.1 or later as described below.For new systems created in Narrowcast Server 7.2.1 or later, the default XSL stylesheets for HTML and Excel documents automatically apply column widths set in Web or Desktop. Reports set to fit the entire page in MicroStrategy Web are set to fit report contents when delivered in HTML documents by Narrowcast Server since this produces more desirable results in most cases and provides consistency with Narrowcast Server 7.2 and previous versions. (An alternate XSL stylesheet is available that provides the ability to fit reports to the entire available window.)For Excel documents, you can either use column widths defined in the Excel template file (as is possible in Narrowcast Server 7.2 and previous versions) or use column widths defined in the report. You can set this in the document properties within the Excel Document Editor. If the XSL stylesheet does not support column widths (for example, if stylesheets are not upgraded), the column widths defined in the Excel template are always

78 Chapter 3 Working with Documents
CONCEPTS
preserved. If two different reports occupy the same column or row in an Excel sheet, the Excel column width or row height is set to match that of the largest report column or row occupying this space.
Implications for upgraded systems
For systems upgraded from Narrowcast Server 7.2 and previous versions, an option is provided during upgrade to either upgrade and use the new default XSL stylesheets or to maintain existing versions. Existing versions should only be maintained if you have customized these stylesheets. If you do choose to upgrade these stylesheets, column widths are preserved by default, and the following stylesheets are upgraded to the latest versions and applied by default:• MSTR7ToHTML-DefaultFormatting • MSTR7ToExcel-DefaultFormatting The original stylesheets are backed up as follows and are not applied to any documents:• 72_MSTR7ToHTML-DefaultFormatting • 72_MSTR7ToExcel-DefaultFormatting If you do not upgrade these stylesheets, column widths are not preserved by default, and the following new stylesheets, which do preserve column widths, are added to this system but are not applied by default:• 721_MSTR7ToHTML-DefaultFormatting • 721_MSTR7ToExcel-DefaultFormatting
Developing and testing XSL stylesheetsThe XSL stylesheets described above provide a variety of standard styles that can easily be applied to MicroStrategy reports to standardize the formatting of reports. You can import any of these files into your Narrowcast Server system by choosing to create a new imported file within Narrowcast Administrator and then selecting the XSL Imported File type and browsing for the desired XSL stylesheet. In addition, these files also provide an excellent starting point for developing stylesheets of your own. If you wish to customize stylesheets yourself, several references on the topic exist, including the following: • Microsoft’s Developer Network Library
(http://msdn.microsoft.com/library/default.asp?url=/library/en-us/xmlsdk30/htm/xmmscxmloverview.asp)

Using XSL stylesheets 79
CONCEPTS
• World Wide Web Consortium (http://www.w3.org/, http://www.w3.org/XML/, http://www.w3.org/Style/XSL/)
• “XML Design and Implementation” (Paul Spencer, 1999; Wrox Press Inc; ISBN: 1861002289)
If you do not wish to learn how XML and XSL transformation works, you can often arrive at a stylesheet that suits your needs simply by modifying one of the stylesheets provided by default. This can be done with some ingenuity as well as trial-and-error by changing fonts, text colors, background colors, borders, and so on.You can view the formatted results of these XSL stylesheets when applied to various reports without importing each stylesheet into the Narrowcast Server system or delivering a service using the stylesheet. Do this by gathering the desired report XML and using the XML Test Tool that is shipped with MicroStrategy Narrowcast Server. For details on this procedure, refer to the following How Do I...? topic:• Publication Operations

80 Chapter 3 Working with Documents
CONCEPTS
4C H A P T E R 4
81
CONCEPTS
4.User Management 4Since Narrowcast Server is an information delivery platform, a crucial task in application design is to determine how user information is defined, stored, and retrieved, and how services use this information to deliver personalized services. This chapter covers a variety of subjects related to Narrowcast Server’s ability to work with user information.
The Subscription BookThe Subscription Book is the component of Narrowcast Server responsible for administering and providing recipients of a service. The Subscription Book consists of users, addresses, subscriptions, and their corresponding personalization. At design time, the Subscription Book supplies full editing capabilities for these items. At run time, the Subscription Book supplies a list of subscriptions to be used as recipients of a service. The Subscription Book supports two types of subscription sets: static subscription sets and dynamic subscription sets. Static subscription sets are created by directly adding addresses into a subscription set. Dynamic subscription sets supply a list of subscribers via the execution of an information object. As a result, dynamic subscription sets can retrieve recipient data from a source outside the Subscription Book Repository (for example, a data warehouse). In this case, subscriber management cannot be performed with the interfaces provided by Narrowcast Server.The Subscription Book content is stored in a database location called the Subscription Book Repository and contains only information directly relevant to a subscriber. It is not a directory and does not store any information other than data that is essential for correctly personalizing and addressing content to subscribers. Sensitive information, such as passwords, is encrypted before being stored to provide security.Two primary items exist in the Subscription Book to store user-related information: Users and addresses. These two items are discussed in more detail in the following sections.

82 Chapter 4 User Management
CONCEPTS
Users and addresses
UsersUsers represent and serve as the end users who receive Narrowcast Server services. Each user is given an “account,” allowing a login ID and password to be associated with a user, thus enabling self-subscription interfaces to enforce authentication requirements. In addition, users allow all personalization settings to be defined at the user or “account” level. Finally, users provide the structure necessary to allow one user to have multiple addresses (such as a wireless PDA address and an e-mail address) so that personalization can be applied consistently across them.A user has the following properties:• Login ID• Password• Expiration date• Locale• Addresses• Personalization (preference, authentication, and security)• Status
Login ID
The login ID is a unique string that can be used to identify a user. The login ID is displayed in the Subscription Book and Subscription Set editors and can be used as a login for self-subscribing interfaces. Login IDs must be unique, which makes user management easier.
Password
Passwords are used to preserve user account integrity in self-subscription applications. Both a password and a password hint can be associated with each user. The password can be used in conjunction with the login ID to authenticate a user while the password hint can be used to help a user remember a password.
Expiration date
It is possible for users to expire. If a user has an expiration date, the user stops receiving services after the expiration date has elapsed.

Users and addresses 83
CONCEPTS
Locale
The locale is used to localize the service content sent to a subscriber. It controls character sets, number formats, date formats, and time formats. Your system might support multiple locales, but a given user has only one locale. For more information, see chapter 8, Supporting Diverse User Populations.
Addresses
Each address includes information that tells MicroStrategy Narrowcast Server how to send services to this user. Each user must have at least one address and can have multiple addresses, for example, an e-mail address and a cell phone address. A user can have one of his addresses set as the default address. For more information, see the section Addresses in this chapter.
Personalization
Narrowcast Server provides full personalization of services. Consequently, for a given service execution, different users can receive different data, formatted differently, based on their personal settings.For more information on personalization, refer to chapter 2, Dynamic Content and Personalization.
Status
Status includes three settings: active, inactive, and invalid. The settings identify whether a user can receive services. If a user is inactive or invalid, no services are sent to any addresses for this user.
AddressesAn address tells MicroStrategy Narrowcast Server how to send services to a particular subscriber. Each address can be associated with one and only one user, and a user can have multiple addresses. The address properties are as follows:• Address name• Physical address• Address display• Delivery method• Device

84 Chapter 4 User Management
CONCEPTS
• PIN• Status• Expiration date• Delivery windowAn address is added to subscription set to create a subscription to the chosen service.
Address name
The address name is used to identify an address for a given user. The address name is displayed in the Subscription Book and Subscription Set editors. Although address names do not have to be unique for a given user, it is preferable to keep the address names unique for a given user to facilitate administration.
Physical address
The physical address is where the service is sent when using this address. For example, in e-mail services, this is an e-mail address such as “[email protected].” For SMS services, the physical address is a mobile device’s telephone number such as 44.1753.8261.00.
Address display
The address display is used when sending services to devices that support a recipient display name. For example, in e-mail services, the address display is what appears in the “To:” field, such as “Last Name, First Name.” Address display is not currently used for SMS services.
Delivery method
The delivery method specifies the way a message is delivered, for example, E-mail (SMTP). When you select a delivery method, the set of devices associated with that delivery method are made available for that address. For more information, refer to chapter 1, Creating Services, and the MicroStrategy Narrowcast Server System Administrator Guide.
Device
A device provides a specification for how content information should be formatted and transmitted to the physical address. This is enforced by the transmitter.

Users and addresses 85
CONCEPTS
A device is defined by the following:• the formatter to use for different content types• properties to use for formatting• transmitter properties to govern transmissionFor more information, refer to chapter 8, Supporting Diverse User Populations, and the MicroStrategy Narrowcast Server System Administrator Guide.
PIN
A PIN, or personal identification number, can be specified for each address. The PIN must be entered correctly by the recipient before the message is delivered. The PIN is available for use by transmitters that must authenticate the recipient before delivering a message.
Status
Status includes three settings: active, inactive, and invalid. The settings identify whether an address can receive services. If an address is inactive or invalid, no services are sent to this address.
Expiration date
It is possible for addresses to expire. If an address has an expiration date, the address stops receiving services once the expiration date has passed.
Delivery window
The delivery window specifies when this address can receive messages. It specifies the hours each day during which messages can be transmitted to the address. The time zone specifies which international time zone should be used as a reference for the selected times. Time zones take regional customs such as daylight savings into account. If a service is executed outside a recipient’s delivery window, the recipient does not receive a message for the service execution.
GoverningGoverning is used to restrict the number of items that are retrieved when you open the Subscription Book. This allows Narrowcast Server to work more efficiently when you have a large subscription book and do not want to risk long waiting times when you open it. Governing can be set for both users and addresses. For example, if you set a limit of 5,000 users to

86 Chapter 4 User Management
CONCEPTS
retrieve for the Subscription Book and 10,000 users are in the Subscription Book, only the first 5,000 are retrieved. Governing can be used in conjunction with filtering to restrict the items that are retrieved.
Subscriptions and subscription setsNow that you understand the basic concepts of users and addresses, it is important to understand how to use these items effectively to create subscription sets that suit your application needs. This section introduces you to the concepts of subscriptions and subscription sets and provides a high-level overview of how to manage users and subscriptions in Narrowcast Server using both static and dynamic subscription sets.
SubscriptionsA subscription is a request to Narrowcast Server for a user to receive a certain service with a certain personalization and at a certain address. It is created when a user’s address is subscribed to or added to a subscription set. A user receives a particular service by subscribing to a subscription set used by the service. Subscription data for static subscription sets is stored in the Subscription Book.Subscriptions have the following properties:• Status• Expiration date• Subscription Preferences• Transmission• Notification
Status
Status includes three settings: active, inactive, and invalid. The settings identify whether a subscription can receive services. If a subscription is inactive or invalid, no services are sent to the subscription.
Expiration date
It is possible for subscriptions to expire. If a subscription has an expiration date, the subscription stops receiving services once the expiration date has elapsed.

Subscriptions and subscription sets 87
CONCEPTS
Subscription Preferences
Preferences are defined by answering the prompts in information objects or question objects. Preferences can be controlled by a subscriber using the Subscription Portal’s self-subscribing interfaces, or can be defined by an administrator.For additional information about preferences, see chapter 2, Dynamic Content and Personalization.
Transmission
You can specify transmission properties for each information transmitter. The transmission properties depend on the transmitter used by the subscription. For the e-mail transmitter, the transmission properties specify whether the recipient name should be put in the “To:,” “CC:,” or “BCC:” fields.For the print transmitter, transmission properties include the following:• Printer location, which specifies whether the user uses only a default
printer or can select or enter a printer location• Printer properties, which include the number of copies, scale, print
quality, paper source, paper size, collated or not, orientation (for HTML documents), and specific settings for PDF documents
• Backup delivery options, which identifies either a backup printer or file location
• Governing, which includes retry and timeout settingsFor the file transmitter, transmission properties include the following:• File location, which specifies where files can be saved and whether
macros are included• File system options, such as whether required folders should be created,
if files with the same name should be overwritten, if timestamps should be appended to file names, and settings for retries and timeout
• Backup file location, which specifies a location in which to store messages if delivery fails
Notification
When you create a file or print service, you have the option to send notification through e-mail when the service has been delivered.

88 Chapter 4 User Management
CONCEPTS
Static subscription setsA subscription set is a collection of subscriptions that is treated as a single unit. It can be associated with one or more services to specify what recipients should receive these services. Subscription sets can be termed reusable or embedded objects, and are either static or dynamic.A static subscription set retrieves the set of subscriptions from the Subscription Book. It is useful when the subscription set does not change often or is not alert driven. For static subscriptions, users, addresses, and subscriptions can be edited using the Static Subscription Set Editor. The key conceptual differences between static and dynamic subscription sets are the following:• Static subscription sets return the exact same set of subscriptions for
every execution of a service as long as no subscriptions are modified. Dynamic subscription sets might return different subscriptions from one service execution to the next depending on whether the external data source has changed.
• Dynamic subscription sets gather data from an external source, which static subscription sets retrieve subscription information from the Subscription Book.
When creating a static subscription set, Narrowcast Administrator provides an easy-to-use editor for working with users, addresses, and subscriptions. You can edit all user and address properties for any address, including• setting the user’s login ID and password for the Subscription Portal• creating any desired addresses for one or more delivery methods• defining this user’s preferences and any authentication and security that
should be in place for this user• defining user information such as first name or street address.You can also edit the properties for any subscription, including• defining preferences to be applied only to this subscription• defining transmission properties such as how recipient address
information appears• specifying whether the subscription expiresYou can also sort addresses and subscriptions using any column. This is useful, for example, for viewing all users with similar addresses or to view all addresses for a user. When large numbers of addresses or subscriptions are present, you can also filter the addresses and subscriptions displayed in this editor so that a smaller amount of data is presented. You can filter items based on the

Subscriptions and subscription sets 89
CONCEPTS
properties of the selected column. This might be helpful so that only the relevant data is displayed such as addresses for a certain domain or subscriptions with certain login IDs.For more information, see the following Interfaces topic:• Static Subscription Set Editor
Important: When static subscriptions are used with MicroStrategy information objects executed using personalized page execution, you must disable automatic segmentation under Advanced Options in the information object, unless the Subscription ID in the Subscription Book matches Subscription IDs in the MicroStrategy project. Automatic segmentation requires that the Subscription ID returned by the subscription set is present in the project used for the content report.
Dynamic subscription setsA dynamic subscription set is a subscription set that gathers some or all user and subscription related information from an external, dynamic data set such as a report result, a database query, or some other external system. It is also possible to gather only partial user and subscription information from an external source and to join this information with other user and subscription information in the Subscription Book. For user and subscription information that can be incorporated into a MicroStrategy project, a MicroStrategy information source can be used to gather subscription information either from a MicroStrategy report or directly from attributes in the project. Subscription information can also be gathered from other sources such as the Web, a flat file, and so on, using other information sources. Dynamic subscription sets are useful when customer data already exists in an external source such as a relational database and when subscription information is created or updated by an external system. They are particularly useful when a subscription set is expected to vary from one service execution to the next, such as with alert-driven services. Dynamic subscription sets use subscription information objects to gather information from external sources.The information object can provide the following information for each recipient:• subscription ID (required)• address ID

90 Chapter 4 User Management
CONCEPTS
• user ID• address Display• physical Address• locale• device• PIN• delivery window• time zone• transmission properties• personalizationWhen you create dynamic subscription sets, an information object is defined to return subscription information from an external source. As a result, your job is to ensure that any required data exists in the external source (for example, you cannot assign user devices if device information is not in the desired source), and to map this information to the appropriate subscription properties required by Narrowcast Server for service execution. Since Narrowcast Server has an open architecture, any information source can be used to return subscription information and the application design process for mapping external information to subscription properties will be information source-specific. When subscription information is available in a MicroStrategy project, the MicroStrategy information source can be used to map attribute forms in the desired project to the subscription information used by Narrowcast Server.To do this, edit the MicroStrategy information source for the desired project and select the check box to support dynamic subscriptions. You can then select an attribute form, apply a constant, or use information in the Subscription Book for the required subscription properties. You can select more than one item for each property, such as providing content for testing purposes and selecting two different attribute forms for e-mail addresses that might be applied. For more information on editing an information source, refer to chapter 15, Information Source Wizard in the MicroStrategy Narrowcast Server System Administrator Guide.

Subscriptions and subscription sets 91
CONCEPTS
Tip: You can use constants for all properties other than Subscription ID; use blank constants for Transmission Properties and PIN. Subscription ID, User ID, and Address ID can all use the same attribute form. You should not elect to use information in the Subscription Book unless you have designed your Subscription Book and MicroStrategy project such that Subscription IDs are synchronized between the two.
Once you complete this mapping, these properties are available whenever you define a subscription information object for this information source. If you have chosen more than one item for any property, you can choose which item you want to use for this subscription information object. Thus, the information source makes a group of properties available for future use, and the subscription information object determines which items to use for a specific subscription set. When defining the information object, you can also select an optional filter. This filter limits the subscriptions returned for the subscription set.
Important: When using a filter to limit the subscriptions returned, consider the dimensionality of the data that is returned. For example if a second report is designed that contains the same subscriptions and the same filter, but has different dimensionality (for example, due to metrics on the report), a different set of subscriptions might be returned due to the application of the filter at a different dimensionality. To understand what subscriptions are returned by the subscription set, create a report in MicroStrategy Desktop with the attribute forms used for subscription information on the page axis, the desired filter, and no other report objects.
Alternatively, you can use a MicroStrategy report to return subscription information for a subscription information object rather than directly selecting attribute forms. To accomplish this, you can add all attribute forms that are used for subscription properties to the page axis of a report. This report can then be selected when the subscription information object is defined and all attribute forms on the page axis are available to map to subscription properties.
92 Chapter 4 User Management
CONCEPTS
Important: When using a report to return subscription information, ensure that the first attribute form on the page axis matches the attribute form selected in this information source as Subscription ID. This is due to the fact that the first attribute form on the page axis is used as the Subscription ID when a report is selected. However, any content information objects that use automatic segmentation are segmented using the Subscription ID defined in the information source. Thus, you must ensure that the same attribute form is defined in the information source and on the subscription information object report or you must disable automatic segmentation for any content information objects used with this subscription information object. You can avoid any such problems by creating a separate information source for each Subscription ID to be used and ensuring that all subscription information object reports use the Subscription ID defined in the corresponding information source. This method is illustrated in the MicroStrategy Tutorial for Narrowcast Server, Services 1d and 3a.
For more information on dynamic subscription sets, refer to chapter 6, Page Personalization and Dynamic Subscriptions and to chapter 12, Dynamic Subscription Set Wizard.
Pre- and post-service execution SQL
Note: For the latest information on the certified databases for pre- and post-SQL, refer to the Narrowcast Server section of the MicroStrategy readme file. To access the MicroStrategy readme files, from the Windows Start menu, point to Programs, then to MicroStrategy, and then choose ReadMe.
Both static and dynamic subscription sets allow administrators to define SQL statements that are executed when a service is run. This is useful for modifying or checking certain criteria that relate to the service execution to these recipients.You can provide SQL statements that are executed at two different times during the subscription set execution:• before segmentation (pre-SQL)• following service execution (post-SQL)

Subscriptions and subscription sets 93
CONCEPTS
Pre-SQL statements are used for certain types of alerting known as edge-triggered alerting. This occurs when a service is designed to run once when a condition is true, but never again. For example, suppose a service checks every five minutes to see if a value is 1 (true) and only executes in the event the value is 1. As long as the value is at its initial state of 0 (false), the service does not run. When the value is changed from 0 to 1, the service runs once, then updates the value from 1 to 2 (or some other value) to prevent the service from running again. If the value were not changed, the service would run every five minutes since the value is still 1.You can specify whether the successful execution of the SQL statement is optional or required. This affects what happens if the attempted execution of the SQL statement returns an error.• If it is optional, service execution continues even if the execution of the
SQL statement returns an error. • If it is required, service execution stops when the execution of the SQL
statement returns an error.Because a common use of pre-SQL is to generate a “snapshot” of the data in a database that is used for a subscription set or service content, the successful completion of these SQL statements is critical to proper service execution behavior. This setting ensures that inappropriate behavior, such as duplicated messages or lost data, does not occur in the event of an error in the database.You can also choose whether the data returned by these SQL statements controls whether or not the service executes. This is achieved by selecting a check box to stop service execution if the SQL statement returns an empty result set. If this is not selected, any results returned by a SQL statement are ignored. If a SQL statement returns no data, that is handled in the same manner as a statement that returns an error when the check box is selected.
Note: When you make the selection for an empty result set to cancel a service, this is logged as an information-level message but not as an error. However, whenever a SQL error is used to cancel a service, this is logged as an error. To avoid logging an error when services are cancelled using pre-SQL, you must select this check box to stop the service if no data is returned and design your SQL query to return no data when services should be cancelled.
The pre- and post-SQL statements can contain multiple statements that can be executed against multiple databases. A SQL statement definition contains the following information:

94 Chapter 4 User Management
CONCEPTS
• name: name used to identify the SQL statement• connection information: data source name (DSN), user ID, password,
and database (optional) to be used when connecting to the database against which the statement is executed
• requirement: whether the execution should stop if the execution returns a false condition
The SQL statements can also be personalized to contain information about the service being executed. By using the macros described in the table below, SQL statements can be written such that they vary based on the execution.
Variable Macro Description Datatype Maximum Width
External service execution ID
\E Unique identifier of the current service execution; specified externally
char, varchar 32 characters
Service execution ID \F Unique identifier of the current service execution; assigned by the Narrowcast Server system
char, varchar 32 characters
Service ID \S Identifier of the service object in the repository
char, varchar 32 characters
Execution priority \P Priority of the execution integer —
Service execution timestamp
\C Date and time the service executes date-time —
Service expiration timestamp
\R Date and time the service expires date-time —
Subscription Set ID \D Identifier of the subscription set that receives the service
char, varchar 32 characters
Current timestamp \T Current date and time date-time —
\ \\ Escaped character char, varchar 1 character

Synchronization with external sources 95
CONCEPTS
Static subscription set governingGoverning is used to restrict the number of items that are retrieved when you open the subscription set in Narrowcast Administrator. This allows Narrowcast Administrator to work more efficiently when you have a large subscription book or subscription set and do not want to risk long waiting times when you open it. For example, if you set a limit of 5,000 subscriptions to retrieve for the subscription set and 10,000 subscriptions are in the subscription set, only the first 5,000 are retrieved. Governing can be used in conjunction with filtering to restrict the items that are retrieved.
Synchronization with external sourcesWhile users and addresses can be added to the Subscription Book manually through Narrowcast Administrator or by end users through the Subscription Portal, they can also be imported from and synchronized with external sources. This allows you to add large numbers of users and addresses to your Subscription Book from existing sources and to automatically define all user, address, personalization, and subscription information for these users. You might use this method when you have existing user information in, for example, a Lightweight Directory Access Protocol (LDAP) directory or a mail server such as Microsoft Exchange.To be used as a source for user import or synchronization, the user information must be exported to one of two file formats:• Delimited, for example, comma separated values (CSV)• Lightweight Directory Interchange Format (LDIF)Narrowcast Server provides a utility for you to export users from your MicroStrategy Intelligence Server to a CSV file. This file can then be used as your synchronization file for import into Narrowcast Server. The MicroStrategy Intelligence Server User Export Tool provides a way to export the existing information in a format that is readily used by the Narrowcast Server Subscription Book Synchronization Wizard.In Narrowcast Server, you can perform the following import and synchronization tasks:• Import or update user and address attributes• Synchronize users• Update user personalization and subscriptionThe following sections provide more information on each of these tasks. At the end of this section, the Subscription Book synchronization tutorial guides you through the process of completing these tasks.

96 Chapter 4 User Management
CONCEPTS
For information on the types of data that can go into the synchronization source files, see appendix E, Synchronization Data Types.
Import or update user and address attributesImporting or updating users and addresses involves choosing which• addresses to create or update for each user• user and address properties to synchronize• synchronization file attributes to map to the Subscription Book
properties for users and addressesUser properties that can be imported or synchronized include user login ID, locale, status, password, hint, and so forth. These properties can be mapped to any attributes in the synchronization file.Address properties that can be imported or synchronized include address name, transmitter, device, and so forth. These properties can be mapped to any attributes in the synchronization file.New users and addresses can be imported with no properties mapped, in which case the same defaults used when users and addresses are created through Narrowcast Administrator are applied.
Synchronize usersSynchronizing users is useful for updating existing users and addresses when information for these users and addresses has changed outside of Narrowcast Server. The following tasks are involved:• adding new users• deleting obsolete users• remapping usersWhen new users are found in the synchronization file that are not found in the Subscription Book, those users can be added or remapped to other users. Similarly, users who no longer exist in the synchronization file can be removed from the Subscription Book or remapped to new users in the synchronization file. Thus, new users can be mapped to obsolete users no longer in the synchronization file. For example, if a user name has changed so that a different distinguished name results in the synchronization file, the user should still maintain all subscriptions and have the same preferences.

Subscription Book synchronization tutorial 97
CONCEPTS
Update user personalization and subscriptionNarrowcast Server offers advanced synchronization capabilities including the ability to import user personalization and subscription. User personalization includes preference, security, and authentication, and each of these can be synchronized.User preferences are synchronized by mapping synchronization file attributes to the Narrowcast Server objects to be personalized. All information objects and question objects that can be personalized are provided such that synchronization file attributes can be mapped to these objects. Synchronization file attribute values used for user preferences must be in valid formats for each information object or question object.User authentication and security are synchronized by mapping a synchronization file attribute to each information source. Synchronization file attribute values used for information source authentication and security must be in valid formats for each information source.User subscriptions are synchronized by mapping a synchronization file attribute to each subscription set and choosing one value that indicates an address should be subscribed. If the selected attribute in the synchronization file has the chosen value for an address, that address is subscribed to this subscription set. Otherwise it is not subscribed.
Subscription Book synchronization tutorialTo understand how Subscription Book synchronization works, it is very helpful to actually proceed through the process yourself. The following section contains a brief tutorial that guides you the basic steps involved in synchronization. The tutorial uses two sample LDIF files as the basis for two potential scenarios relating to Subscription Book synchronization. In the first scenario, you import users and addresses and define their associated properties. Although only a few users are added in this example, this scenario demonstrates the ability of the Subscription Book Synchronization Wizard to import multiple users quickly and easily. The second scenario demonstrates more advanced capabilities based upon the lessons learned in the first scenario. In this scenario, you add additional addresses to an existing user, remap a user whose identity has changed in the synchronization file, and subscribe an address to an existing subscription set.

98 Chapter 4 User Management
CONCEPTS
Scenario 1: Import users and addresses
Requirements
• Ensure that the required LDIF file, SynchronizationTutorial1.ldif, is available. This file is installed with Narrowcast Server under %%Application Path%%\MicroStrategy\Narrowcast Server\Tutorial\SubsBookSynchronization\ where %%Application Path%% is the folder in which you installed Narrowcast Server. If you did not change the default location where Narrowcast Server is installed, this is C:\Program Files\ MicroStrategy\Narrowcast Server\Tutorial\SubsBookSynchronization\.
• Ensure that you have a fully-configured Narrowcast Server 7.2 system available.
Functionality demonstrated
• import of new users• creation of addresses• setting user and address properties based on synchronization file
attributes
Synchronization Wizard steps
Narrowcast Administrator
Start the Subscription Book Synchronization Wizard by selecting Synchronize Subscription Data from the Tools menu within Narrowcast Administrator.
Welcome page
Click Next.
Synchronization Options page
1. In the Synchronization Type frame, select First time import and enter Tutorial in the text box.2. Select LDIF File as the Source Type.3. In the File Location box enter the full path to the provided sample file SynchronizationTutorial1.ldif. 4. Click Next to start the import process.

Subscription Book synchronization tutorial 99
CONCEPTS
User and Address Properties page
1. In the User Property Mappings frame, for User Name select givenname from the corresponding list.2. In the Address Property Mappings frame, note that one blank address mapping is available automatically. 3. Select the following values in the corresponding lists:
◊ For Address Name, select email.◊ For Physical Address, select email.◊ For Address Display, select email.◊ For Device, select email_device.
4. Click Next.
User Addition or Mapping page
1. Note that three new users from the synchronization file appear in the Add Users list.2. Click Next.
User Removal or Mapping page
1. Note that any existing users in the subscription book appear in the Do Not Remove Users list.
Important: Moving users to the Remove Users list causes these users to be permanently deleted.
2. Click Next.
Review page
1. Note that the three new users appear under Users to Add.
Important: Any previously existing users that you selected for removal show up under Users to Delete. These users are permanently deleted from your Subscription Book if you click Next while they are in this list.
2. Click Next.

100 Chapter 4 User Management
CONCEPTS
Finish page
1. Check the Action Summary and Error Summary. If errors have occurred, review the resulting log file. The log file location is provided for you.2. Click Finish.
Narrowcast Administrator
1. From the Tools menu, select Open Subscription Book.2. Edit the users that have been added by the Subscription Book Synchronization Wizard and note their properties.
After the synchronization process
Edit the LDIF file and study its structure. Note how the attributes present in the file correspond to the users and user properties created during the synchronization process.
Scenario 2: Update users, remap users, add addresses, and create subscriptions
Requirements
1. Ensure that the required LDIF file, SynchronizationTutorial2.ldif, is available in the same location where you found SynchronizationTutorial1.ldif.2. Create two static subscription sets in Narrowcast Administrator and name them SubSet1 and SubSet2. Add at least one user to each subscription set. You will subscribe users to these subscription sets in this scenario.
Functionality demonstrated
• updating mapped user properties while preserving unmapped properties• remapping users whose distinguished name has changed• adding additional addresses to existing users• deleting unmapped addresses• subscribing users to subscription sets

Subscription Book synchronization tutorial 101
CONCEPTS
Synchronization Wizard steps
Narrowcast Administrator
Start the Subscription Book Synchronization Wizard by selecting Synchronize Subscription Data from the Tools menu in Narrowcast Administrator.
Welcome page
Click Next.
Synchronization Settings dialog box
1. Click Synchronization Settings. In the dialog box that opens, click the Synchronization Process tab. 2. Under User settings, select the Manually add/remove/remap users; Update existing user properties option. This allows you to preserve previous settings for this user that are not explicitly mapped so they are not returned to the default values. Using this functionality you can preserve any changes you might have made to settings that are not imported.3. Under Address settings, select the Replace mapped addresses; Delete unmapped addresses option. This removes obsolete addresses.4. Under Subscription settings, select the Subscribe addresses, preserve unmapped subscriptions option. This causes the Subscription Book Synchronization Wizard to provide a page to define subscriptions for the imported users. 5. Click OK to close the Synchronization Settings dialog box.6. In the Synchronization Type frame, select Re-import using a previous synchronization table. Select Tutorial from the list. Both settings should already be selected as a result of completing scenario 1.7. Keep LDIF File as the Source Type.8. Change the File Location box to the full path of the second sample LDIF file: SynchronizationTutorial2.ldif.9. Click Next to start the import process.
User and Address Properties page
1. In the User Property Mappings frame, for User Name select givenname from the corresponding list.2. In the Address Property Mappings frame, note that one blank address mapping is automatically created.

102 Chapter 4 User Management
CONCEPTS
3. Select the following values in the corresponding lists:◊ For Address Name, select email.◊ For Physical Address, select email.◊ For Address Display, select email.◊ For Device, select email_device.
4. Click Create Address Mapping to add a second address mapping with which you will import a wireless address.
◊ For Address Name, select wireless.◊ For Physical Address, select wireless.◊ For Address Display, select wireless.◊ For Device, select wireless_device.
5. Click Next.
Subscriptions page
1. The subscription sets you created named SubSet1 and SubSet2 should be shown in the leftmost column of the table.2. In the row for SubSet1, in the second column, select subscribetosubset1. In the third column, type yes.3. In the row for SubSet2, in the second column, select subscribetosubset2. In the third column, type yes.4. Click Next.
User Addition or Mapping page
1. Note that the user “Smith, Sarah” appears in the Add Users list. She has changed her name and, as a result, her distinguished name has changed in the synchronization file. It is desirable to preserve this user and all associated properties in the Subscription Book and remap the new “Sarah Smith” to her previous identity “Sarah Brown”. To do this, click her name and the click the lower arrow button to move her to the Make Users Available for Mapping list.2. Click Next.

Subscription Book synchronization tutorial 103
CONCEPTS
User Removal or Mapping page
1. Note that the user “Brown, Sarah” now appears in the Do Not Remove Users list. Click her name and then click the lower arrow button to move her to the User Mapping list. 2. In this list, click the right column of the row that has “Brown, Sarah” in the left column and select her new name “Smith, Sarah”. This remaps the Sarah Brown user in the Subscription Book to this new user Sarah Smith in the synchronization source. As a result, any preferences, subscriptions and other properties defined in the Subscription Book can be preserved, but the mapping to the external source is not broken. This allows future updates while preserving any changes made in the Subscription Book.3. Click Next.
Review page
1. Note that the mapping “Brown, Sarah” to “Smith, Sarah” appears under Existing Users and New Users.2. Click Next.
Finish page
1. Check the Action Summary and Error Summary. If errors have occurred, review the resulting log file. The log file location is provided for you.2. Click Finish.
Narrowcast Administrator
1. From the Tools menu, select Open Subscription Book.2. Edit the subscription sets SubSet1 and SubSet2 and verify that new subscriptions have been added.
After the synchronization process
Edit both LDIF files and study their structures. Note how the attributes present in the files correspond to the actions that were taken during synchronization and in the final results in the Subscription Book and subscription sets. Note especially the new addresses that are present in the second file and how certain attributes are used to indicate which users should be subscribed to which subscription sets.

104 Chapter 4 User Management
CONCEPTS

5C H A P T E R 5
105
CONCEPTS
5.Alert-Based Applications 5
MicroStrategy Narrowcast Server supports a wide variety of alert-based and event-triggered service functionality. “Alerting” functionality, often called alert-based or event-triggered functionality, refers to the ability to deliver content only to certain recipients for which a given criteria is met or when some event occurs. This is a broad requirement that has a number of potential implementations. For example, this can be achieved by • using an external system to trigger a service execution based on some
event• having Narrowcast Server only deliver content to certain recipients for
which some criteria is met• dynamically generating the list of recipients who should receive a
service• executing SQL queries before and after a service is executed to evaluate
some pre-defined condition and update the data warehouse after the information has been delivered
This chapter discusses the importance of alert-based services and provides an overview of the different ways to achieve alert-based functionality and the advantages and disadvantages of each method.
Importance of alert-based servicesFor the last ten years companies have expended large amounts of time, money, and energy to set up systems that aggregate and organize vast amounts of data. Now that companies have a wealth of data available for analysis, they are finding that it is not reasonable to assume that users have the time to search through all of this data to identify important information that should be acted upon. Proactive information delivery is increasingly becoming paramount to any business intelligence initiative, and alert-based information delivery can provide the crucial advantage of providing the right information at the right time to the right people when an alerting condition is met. MicroStrategy Narrowcast Server is designed to support a wide variety of alert-based functionality. Narrowcast Server can be used

106 Chapter 5 Alert-Based Applications
CONCEPTS
to deliver proactive inventory control alerts, business performance metric alerts, stock and personal finance alerts, last minute travel alerts, immediately available data warehouse information alerts, customer account activity alerts, fraud alerts, and a wealth of other alert applications.
Overview of support for alerting functionality
Process flowWhen creating alert-based applications, it is important to consider how the system works from both an end user and an administrator perspective. From the end user point of view, the recipient tells Narrowcast Server the event criteria for which he wants to receive information and what information he wants to receive. When this event occurs, Narrowcast Server delivers the requested information to the recipient. From the Narrowcast Server system administrator’s point of view, the process contains the following steps:1. New information is loaded into the data store to which the Narrowcast Server has been connected. This connection is most likely through a MicroStrategy Information Source Module connected to MicroStrategy Intelligence Server, but this connection could also be a Database (ODBC) Information Source Module or a custom information source module.2. Narrowcast Server and any required external applications are configured to evaluate some condition on a periodic basis. This can be accomplished in one of two ways:
◊ A Narrowcast Server service is executed on a scheduled periodic interval.
◊ A Narrowcast Server service execution is triggered via an external system through the use of the Narrowcast Server API function. In this way, the evaluation of the alerting condition can be handled by the external application.
3. Narrowcast Server can be configured to execute SQL statements before the service execution to determine whether the service should be run (pre-service execution SQL functionality).

Overview of support for alerting functionality 107
CONCEPTS
4. For services that are executed, Narrowcast Server is configured to deliver content to certain subscribers if some condition is met based on the subscriber’s personalization criteria. This involves determining which subscribers should be evaluated to receive this information, retrieving the information that should be delivered based on each subscriber’s personalization, and checking whether the information meets each user’s alert conditions. This can be accomplished through three pieces of functionality:
◊ An information object can be executed before the service is executed to determine which recipients can receive the service based on the current status of the data warehouse (dynamic subscription set functionality).
◊ Settings at the document element, document, and publication level can be used to deliver content only to certain subscribers based on their personalization criteria. In this case, only subscribers in the subscription for which certain conditions are met receive this service.
◊ Pre- and post-execution SQL can be used to evaluate whether or not a service should be delivered.
Note: If an external system triggered a service execution, the alert criteria evaluation might be handled completely by the external system. In this case, a static or dynamic subscription set can be used to determine who should receive this information.
5. For subscribers where information that meets their alert conditions is found, this information is then formatted and delivered. For subscribers for whom no information that meets their alert conditions is found, no messages are sent.6. In some cases, the data in the data store must be updated once the service has been delivered to acknowledge that the recipients have been sent the alert information. This data store update ensures that the Narrowcast Server does not send duplicate alert notifications (post-service execution SQL functionality).
Event-triggered service executionEvent-triggered services are services for which the triggering of the service itself is event or data driven. In other words, rather than having an already executing service evaluate which recipients should receive content (as
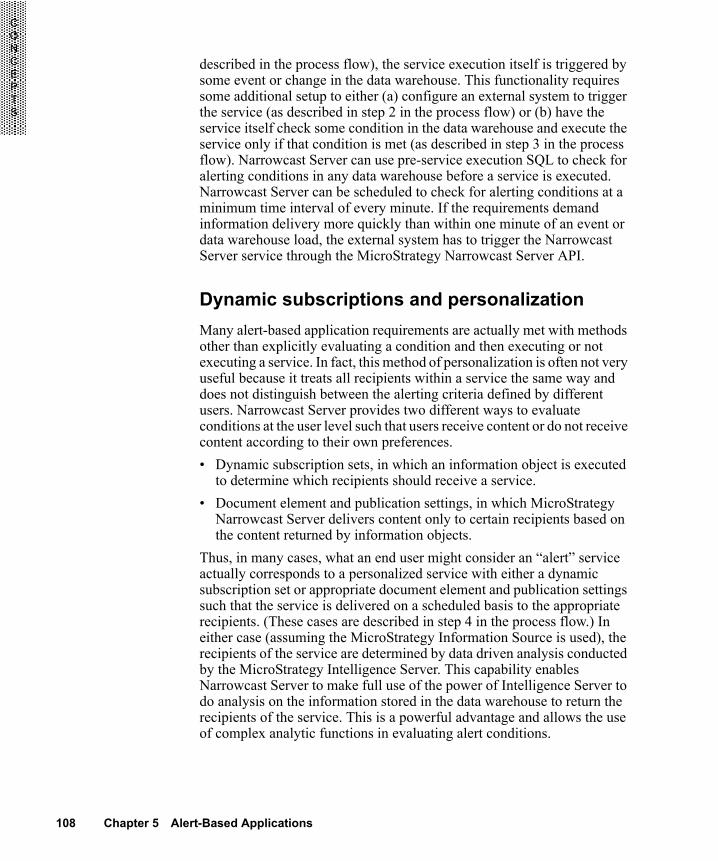
108 Chapter 5 Alert-Based Applications
CONCEPTS
described in the process flow), the service execution itself is triggered by some event or change in the data warehouse. This functionality requires some additional setup to either (a) configure an external system to trigger the service (as described in step 2 in the process flow) or (b) have the service itself check some condition in the data warehouse and execute the service only if that condition is met (as described in step 3 in the process flow). Narrowcast Server can use pre-service execution SQL to check for alerting conditions in any data warehouse before a service is executed. Narrowcast Server can be scheduled to check for alerting conditions at a minimum time interval of every minute. If the requirements demand information delivery more quickly than within one minute of an event or data warehouse load, the external system has to trigger the Narrowcast Server service through the MicroStrategy Narrowcast Server API.
Dynamic subscriptions and personalizationMany alert-based application requirements are actually met with methods other than explicitly evaluating a condition and then executing or not executing a service. In fact, this method of personalization is often not very useful because it treats all recipients within a service the same way and does not distinguish between the alerting criteria defined by different users. Narrowcast Server provides two different ways to evaluate conditions at the user level such that users receive content or do not receive content according to their own preferences. • Dynamic subscription sets, in which an information object is executed
to determine which recipients should receive a service. • Document element and publication settings, in which MicroStrategy
Narrowcast Server delivers content only to certain recipients based on the content returned by information objects.
Thus, in many cases, what an end user might consider an “alert” service actually corresponds to a personalized service with either a dynamic subscription set or appropriate document element and publication settings such that the service is delivered on a scheduled basis to the appropriate recipients. (These cases are described in step 4 in the process flow.) In either case (assuming the MicroStrategy Information Source is used), the recipients of the service are determined by data driven analysis conducted by the MicroStrategy Intelligence Server. This capability enables Narrowcast Server to make full use of the power of Intelligence Server to do analysis on the information stored in the data warehouse to return the recipients of the service. This is a powerful advantage and allows the use of complex analytic functions in evaluating alert conditions.

Application design for alert-based implementations 109
CONCEPTS
Note: Whether or not a service has a dynamic subscription set or document element and publication settings that achieve alerting functionality does not relate to how the service was initially triggered. Thus, either a scheduled service or a service triggered through the API can make full use of this functionality.
Application design for alert-based implementations
Alert-based services are feasible through several different MicroStrategy Narrowcast Server feature sets that support a wide variety of functional requirements. The following feature sets can be used to achieve alert-based functionality. The use of these feature sets in implementing alert-based service functionality is described below.• Event-triggered service execution enables Narrowcast Server to check
for the occurrence of an event that requires the delivery of information.◊ Narrowcast Server can be configured to execute SQL statements
before service execution to determine whether or not the service should be run.
◊ A Narrowcast Server service execution can be triggered via an external system through the use of the Narrowcast Server API function.
• Personalization capabilities and dynamic subscription sets to support alert services enable Narrowcast Server to select and deliver personalized information that complies with the alert thresholds or service personalization determined by the end recipients.◊ Settings at the document element and publication level can be used
to deliver content only to certain subscribers based on their personalization criteria and the data retrieved from information sources.
◊ An information object can be executed before the service is executed to determine which recipients should receive the service based on the current status of the data warehouse.
• Post-service data source cleansing enables Narrowcast Server to change information in the data source to acknowledge that an alert has already been sent so that when the Narrowcast Server rechecks this condition, it does not send another alert message.

110 Chapter 5 Alert-Based Applications
CONCEPTS
Event-triggered service executionEvent-triggered service execution functionality allows MicroStrategy Narrowcast Server to check a predefined alerting condition before a service execution is triggered. For example, this could provide a check to see if new information has loaded into the database or whether a given parameter has reached a critical value before a service is executed. This section describes two ways in which this functionality can be implemented.
Note: In MicroStrategy Broadcast Server 6.x, the Service Designer has the option to trigger a service using a predefined alert on a particular MicroStrategy report. The alert service then runs the report at the scheduled interval, and if the report returns information, the service execution is triggered. This functionality requires MicroStrategy Intelligence Server to run a report repeatedly whenever the alerting condition should be evaluated. This requires that the alerting condition exist in the data warehouse to which MicroStrategy Intelligence Server is connected. In addition, this type of alerting treats all subscribers in the service the same way and does not determine whether messages are sent based on the personalized content returned for each user. Both of these restrictions have been lifted in MicroStrategy Narrowcast Server. Narrowcast Server provides condition-based service triggering functionality, but in a more flexible manner.
Event-triggered service execution using pre-service execution SQL
The pre-service execution SQL feature in MicroStrategy Narrowcast Server can be used to check the status of a predetermined condition before a service is executed. Using a data source name you provide, Narrowcast Server can check any data warehouse to run the pre-defined SQL statement. A separate condition, in the form of a SQL statement, can be associated with each subscription set for a service. With the pre-service execution SQL set to “required,” the service is only triggered if this SQL statement returns valid data. If the SQL statement does not return valid data, the service is not triggered. For example, at the end of a data warehouse load, the database administrator could configure the system to set a data warehouse load flag from 0 to 1. MicroStrategy Narrowcast Server services could be configured to check for a load flag equal to one, and only trigger the service if this SQL statement returned valid data.

Application design for alert-based implementations 111
CONCEPTS
Note: While pre-service execution SQL does require explicitly providing a data source name and SQL statement, this method of triggering services is more flexible, and does not rely on MicroStrategy Intelligence Server as MicroStrategy Broadcast Server 6.x does. In addition, pre-service execution SQL can check alert conditions in any data warehouse, not only in the data warehouses used by MicroStrategy Intelligence Server.
The following examples illustrate a design problem and potential solution.The implementation goal is to trigger a service execution using a condition in a data warehouse that MicroStrategy Intelligence Server does not use. This service should use system resources efficiently and not require the creation or modification of objects in the MicroStrategy Desktop interface.The application design includes the following. This implementation requires that the event (for example, a warehouse load) create a flag in the data warehouse after the event finishes execution. The services created within MicroStrategy Narrowcast Server then use pre-service execution SQL defined for the subscription set to check for the event when the service is first executed. With the pre-service execution SQL set to “Required,” the SQL statement evaluates this flag in the warehouse and only triggers the service execution if the query does not return an error. The first example requires the event of interest to create an alert table in a data warehouse after the database load is complete. In this example, the presence of the alert table itself serves as the condition to be evaluated. Then, the services created in MicroStrategy Narrowcast Server must be designed to use pre-service execution SQL to check for the existence of this alert table for each of the subscription sets. When a service is executed, first it connects to the database specified by the data source name and runs the statement specified in the pre-service execution SQL such as Select * from AlertTable.If the database load is not complete, the alert table does not exist and the SQL statement fails with an invalid object error. With the pre-service execution SQL set to Required, the service halts execution with the error Invalid Pre-Execution SQL. In this case, the service is not triggered, no messages are delivered, and no services are submitted to MicroStrategy Intelligence Server.If the event completes and has created the alert table, the service connects to the database using the specified data source name and runs the pre-service execution SQL (for example, Select * from AlertTable).

112 Chapter 5 Alert-Based Applications
CONCEPTS
Since the table exists, the SQL statement runs successfully and the service executes. Note that any SQL query that is designed to fail in the correct conditions can be used to evaluate the alert condition.Post-service execution SQL (such as Drop Table AlertTable) can be used to reset the alerting condition. In this case, after the service has finished its execution the statement deletes the alert table so that the service does not execute until the next database load.Note that if more than one service is to be triggered by the same event, a different flag must be created and used for each service. If this is not done, the post-service execution SQL for one service resets the alerting condition used by the other service. With the very simplistic example discussed here, the SQL statement included in the event script must create as many alert tables as services depend on that event. However, pre-service execution SQL and post-service execution SQL statements could be designed to evaluate a particular row of a particular table for an appropriate event flag. For example, you could create a SQL statement that causes a division by zero when the alert condition is not met. For this case, the SQL statement is designed to divide by the value of the selected column, which is 0 if the condition was not met, and 1 if it was met. The division by zero makes the SQL execution fail.Some sample SQL follows:SELECT (10.0 / a1.ALERT_TRIGGER)FROM ALERT_TABLE a1WHERE a1.SERVICE_ID=123
This technique is outlined in the second example.The second example illustrates the use of a stored procedure in the data warehouse that returns an error if the particular event has not been completed.Perform the following steps. (This SQL is designed for a SQL Server database.)1. Create a table using SQL such as the following:create table event (event_flag int)
2. Insert a value into this table using SQL such as the following: insert into event values (0)

Application design for alert-based implementations 113
CONCEPTS
3. Create the stored procedure using SQL such as the following: create procedure SProcedure as begin DECLARE @del_error int select @del_error = event_flag from event where event_flag=0 IF @del_error = 0 RAISERROR ('Error- no services can be run', 16,1) end
4. Specify the pre-service execution SQL in the subscription set: exec SProcedure
5. Specify the pre-service execution SQL in the subscription set: insert into event values (0)
This procedure declares a variable and assigns a SQL query to that variable. Then the procedure returns an error if the query produces a specific value. Otherwise the procedure is completed successfully. Note that the stored procedure used above is not very useful. You can create different stored procedures that cause the pre-service execution SQL to fail when the alert condition is not met. For example, a column could return “0” if the alert condition is not met and “1” if it is met in the above code. Then a SQL statement can be used to divide by 0 or 1 to make the statement fail or succeed. For example:select (10.0 / event_flag)from event
Note: Although this example uses a SQL statement that returns an error, it is also possible to use SQL statements that return no data to prevent the service from being executed. Refer to Pre- and post-service execution SQL in chapter 4 for more information.
In summary, the maintenance required for this implementation is minimal since no objects need to be created in the MicroStrategy projects that MicroStrategy Narrowcast Server uses. The particular event needs to create a flag (such as a column value in an EVENT table) that Narrowcast Server can check through the use of pre-service execution SQL. Since post-service execution SQL can be used to reset the flag, the maintenance on the database is minimal.

114 Chapter 5 Alert-Based Applications
CONCEPTS
Important: Manually editing values in the database can cause serious, project-wide problems that can make your project unusable. Since these are user-initiated changes they are not covered by any MicroStrategy warranty.
Event-triggered service execution using the Narrowcast Server SDK
MicroStrategy Narrowcast Server is a powerful and flexible information delivery platform that provides a comprehensive SDK. This SDK includes a COM-based Application Program Interface (API) and Service Provider Interface (SPI). All MicroStrategy Narrowcast Server functionality is exposed through the API, which enables any application developer to customize his MicroStrategy Narrowcast Server application. With API functions to create application components, manage system configuration components, and execute services, application developers can build applications that execute or even create the specified service on demand. Then MicroStrategy Narrowcast Server can be integrated into the application that detects the alert condition to provide a complete event-based implementation. To learn more about these capabilities, see the online MicroStrategy Narrowcast Server SDK Guide where the MicroStrategy documentation is installed. The MicroStrategy Narrowcast Server SDK is provided automatically with the installation of MicroStrategy Narrowcast Server. It includes an overview of Narrowcast Server API and SPI functionality, sample code, and methods to use MicroStrategy Narrowcast Server within other applications.The implementation goal is to integrate MicroStrategy Narrowcast Server with an external application that should deliver content to users via e-mail and SMS when certain conditions are met.The application design includes the following. MicroStrategy Narrowcast Server supports event-triggered service execution through the availability of API functions that allow any external system to trigger a service execution. This eliminates the need for Narrowcast Server to periodically check for alert conditions. In this case, once the alert condition is satisfied in the external system, an “execute service” API function within the Narrowcast Server SDK triggers the chosen Narrowcast Server service. In addition, once the service is triggered, the personalization and dynamic subscription set capabilities of Narrowcast Server can be used to determine which recipients should receive information. This is discussed in the following example.

Application design for alert-based implementations 115
CONCEPTS
The following Visual Basic (VB) sample code provides a function RunService, which calls the MicroStrategy Narrowcast Server API function ExecuteService. The references needed for this function are provided by the MicroStrategy Delivery Engine API (MCBSAPI.DLL) and the MicroStrategy Delivery Engine Public Type Library (MCTypLib.DLL). For a complete list of API functions, see the online MicroStrategy Narrowcast Server SDK Guide where the MicroStrategy documentation is installed.Public Function RunService(ByVal sServiceID As String, ByVal sSubsID As String) As String 'Repository connection variablesDim ConnectionString As String Dim Prefix As StringDim DatabaseType As EnumMSTRDatabaseTypeDim ReconnectAttempts As LongDim oErrorInfo As IMSTRErrorInfoDefinition'Execute Function VariablesDim ServiceInfo As IMSTRServiceDefinitionDim SubInfo As IMSTRSubscriptionSetDefinitionDim oAPI As IMSTRDeliveryEngineSet oAPI = CreateObject("MSTRBSAPI.MSTRBroadcastServer")If oAPI Is Nothing ThenGoTo ErrorHandlerEnd IfConnectionString = "DSN=NC_REPOS;UID=sa;PWD="Prefix = "demo_"DatabaseType = MSTRDatabaseTypeSQLServerReconnectAttempts = 3Dim lResults As EnumMSTRReturnValueConstantslResults = oAPI.ConnectToRepository(ConnectionString, Prefix, DatabaseType, ReconnectAttempts, oErrorInfo) If lResults = MSTRError Then GoTo ErrorHandlerlResults = oAPI.ConnectToSystem(oErrorInfo) If lResults = MSTRError Then GoTo ErrorHandlerlResults = oAPI.GetObject(sServiceID, ServiceInfo, MSTRReturnFieldBrowsingInformation, oErrorInfo) If lResults = MSTRError Then GoTo ErrorHandlerlResults = oAPI.GetObject(sSubsID, SubInfo, MSTRReturnFieldBrowsingInformation, oErrorInfo) If lResults = MSTRError Then GoTo ErrorHandlerlResults = oAPI.ExecuteService(ServiceInfo, False, SubInfo, False, "1", "1", oErrorInfo) If lResults = MSTRError Then GoTo ErrorHandlerlResults = oAPI.DisconnectFromSystem(oErrorInfo)lResults = oAPI.DisconnectFromRepository(oErrorInfo) If lResults = MSTRError Then GoTo ErrorHandlerSet oAPI = NothingErrorHandler:
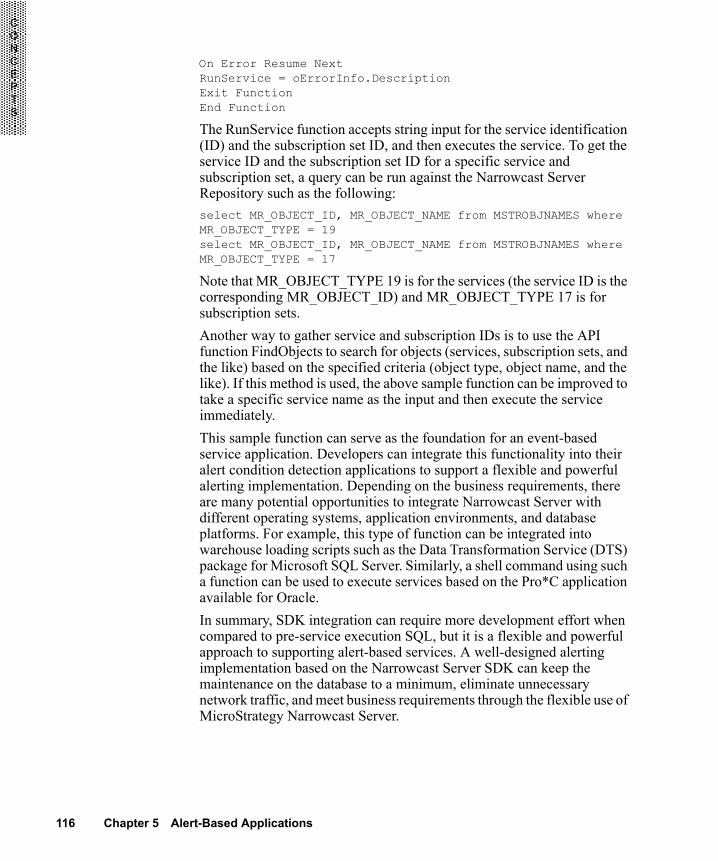
116 Chapter 5 Alert-Based Applications
CONCEPTS
On Error Resume NextRunService = oErrorInfo.DescriptionExit FunctionEnd Function
The RunService function accepts string input for the service identification (ID) and the subscription set ID, and then executes the service. To get the service ID and the subscription set ID for a specific service and subscription set, a query can be run against the Narrowcast Server Repository such as the following:select MR_OBJECT_ID, MR_OBJECT_NAME from MSTROBJNAMES where MR_OBJECT_TYPE = 19select MR_OBJECT_ID, MR_OBJECT_NAME from MSTROBJNAMES where MR_OBJECT_TYPE = 17
Note that MR_OBJECT_TYPE 19 is for the services (the service ID is the corresponding MR_OBJECT_ID) and MR_OBJECT_TYPE 17 is for subscription sets. Another way to gather service and subscription IDs is to use the API function FindObjects to search for objects (services, subscription sets, and the like) based on the specified criteria (object type, object name, and the like). If this method is used, the above sample function can be improved to take a specific service name as the input and then execute the service immediately.This sample function can serve as the foundation for an event-based service application. Developers can integrate this functionality into their alert condition detection applications to support a flexible and powerful alerting implementation. Depending on the business requirements, there are many potential opportunities to integrate Narrowcast Server with different operating systems, application environments, and database platforms. For example, this type of function can be integrated into warehouse loading scripts such as the Data Transformation Service (DTS) package for Microsoft SQL Server. Similarly, a shell command using such a function can be used to execute services based on the Pro*C application available for Oracle.In summary, SDK integration can require more development effort when compared to pre-service execution SQL, but it is a flexible and powerful approach to supporting alert-based services. A well-designed alerting implementation based on the Narrowcast Server SDK can keep the maintenance on the database to a minimum, eliminate unnecessary network traffic, and meet business requirements through the flexible use of MicroStrategy Narrowcast Server.

Application design for alert-based implementations 117
CONCEPTS
Dynamic subscriptions and personalizationIn addition to triggering service executions based on external events, alerting functionality can be achieved through the use of dynamic subscription sets and personalization. Dynamic subscription sets achieve alerting functionality by determining which subscribers should be included when a service is executed. Personalization can be used to determine which recipients should receive content based on the personalized content returned by information objects. Once a service is triggered, event-triggered services and scheduled services go through the same service execution process of determining the list of subscribers, and gathering, formatting and transmitting personalized content. Thus both event-triggered and scheduled services can use the methods described in this section.
Personalization
When an alert-based service is used, a recipient might want to receive East Coast sales information as soon as sales reach a certain predetermined threshold (this is often referred to as a metric qualification alert service) instead of a recipient wanting to receive East Coast sales information every Monday morning. Thus, the service as a whole is sent or not sent based on some condition, but content can be sent or not sent to individual subscribers based on their preferences. The robust personalization capabilities of MicroStrategy Narrowcast Server support alert services by determining who should receive information, what information should be sent, to what device, and under what conditions. Robust personalization capabilities ensure that the Narrowcast Server only delivers information that is in compliance with the alert thresholds and personalization requirements determined by each recipient.
Note: The personalization capabilities of Narrowcast Server, made possible through an intelligent personalization object model and through the use of the advanced analytical and prompting features of the MicroStrategy platform, far outreach the limited personalization capacities of the MicroStrategy Broadcast Server 6.x platform.
To use this functionality, Narrowcast Server can be configured to use MicroStrategy Intelligence Server to check for alert conditions, flags, or metric qualifications in the data warehouse. If the information returned by MicroStrategy Intelligence Server is not appropriate for a recipient based on the recipient’s preferences, messages are not sent to that recipient. With this kind of alert support, an information object can be created that

118 Chapter 5 Alert-Based Applications
CONCEPTS
evaluates the alert condition for each user and returns information to Narrowcast Server. Within the document containing this information object, error-handling settings can be used to fail the document if an information object or a set of information objects returns no data. These settings can be defined in the Document Element Properties and Document Properties dialog boxes.Using this method, the information object is defined to only return information if the alert threshold is reached or if the alert condition is met. In the example for East Coast sales, personalization would be used to answer a prompt on dollar sales. If no information was returned by the report based on the user’s answer to the prompt on sales, the information object would return no data and the document would fail. In the Publication Wizard or Service Wizard, you must indicate that the document that contains the alert information object is required for this publication. Thus, when the document fails, the publication fails to be delivered to any recipients for which the information object returns no data.
Dynamic subscriptions
Using the analytical power of MicroStrategy Intelligence Server, together with the dynamic subscription capabilities of MicroStrategy Narrowcast Server, MicroStrategy Narrowcast Server can support alert service functionality with dynamic subscription sets. Services with dynamic subscription sets are services for which the recipients of the service are not determined until after service execution is triggered. With dynamic subscription services, the recipients of the service are resolved or retrieved at service run time through the use of an information object. When a service with a dynamic subscription set is triggered, MicroStrategy Narrowcast Server uses an information source (typically the MicroStrategy Intelligence Server information source) to retrieve an information object (in the case of a MicroStrategy Intelligence Server information source, this is a MicroStrategy report) that contains the information of which recipients (Subscription IDs) should receive information services. Once the list of who should receive the information service is retrieved from the information source, Narrowcast Server can then retrieve user information, user address information, and personalization information from the same information source that provided the recipient list, or from the Narrowcast Server Subscription Book Repository. This powerful capability allows Narrowcast Server to derive recipient information from the data warehouse, the Subscription Book, or a combination of each (for example, recipient name and ID from the warehouse and device and locale information from the Subscription Book).

Application design for alert-based implementations 119
CONCEPTS
The support for dynamic subscription services allows Narrowcast Server to use all of the robust analytical capabilities of MicroStrategy Intelligence Server to determine which recipients should be sent information given the information stored in the data warehouse. From an end user perspective, the functionality provided by dynamic subscription set services makes the service appear to be alert driven. In actuality, dynamic subscription functionality is not related to the triggering of the service. This integration with the MicroStrategy platform allows Narrowcast Server to support many types of alert-based information services. Any of the information stored in the data warehouse and any analytical function that is possible with MicroStrategy Intelligence Server can be used to determine who should receive an alert notification. Also, any prompt object that can be created in the MicroStrategy Desktop interface can be used in Narrowcast Server to personalize the messages that are generated.In many implementations, the use of dynamic subscription services requires the collection of information from end users. For example, it is necessary to know information such as under which conditions or thresholds they would like to receive a message (for example, user John Smith would like to be notified if a stock goes up or down 20%). This information needs to be stored in the data warehouse since it is used in conjunction with other information in the data warehouse (for example, stock movement information) to determine which recipients need to receive the dynamic subscription service. For example, to know whether to send an alert to John Smith it is necessary to perform calculations based on both John Smith’s alerting criteria and the current and historical stock prices. To get this alert threshold information into the data warehouse, the Narrowcast Server Subscription Portal provides support for dynamic subscriptions. Thus, Narrowcast Server Subscription Portal can write user information directly into the appropriate table in the data warehouse. This is powerful functionality as it enables a wealth of alert-driven information services that were not supported with the MicroStrategy Broadcast Server 6.x platform. This dynamic subscription process is discussed further in chapter 9, Advanced Subscription Portal Configuration.
Post-service execution data source updateThe final feature set that might be needed by alert-based services is post-service execution SQL, which can be used to update or “clean” the data warehouse after an alert service has been run. This feature enables Narrowcast Server to change information in the data source to acknowledge that an alert service has already been delivered. In this way, when Narrowcast Server checks the data warehouse again (for example, for a scheduled service), it does not generate another alert message until the alert condition is reactivated by the desired event.

120 Chapter 5 Alert-Based Applications
CONCEPTS
MicroStrategy Narrowcast Server supports post-service execution data source cleansing through post-service execution SQL. This functions in the same way as the pre-service execution SQL. Post-service execution SQL functionality allows Narrowcast Server to reset or update alert conditions for future use. For instance, for a stock alert service, after generating a message notifying a recipient of a 10% increase in stock, the post-service execution SQL can be used to update the last notification stock price for each recipient. Thus, in the future, when Narrowcast Server checks for stock information that needs to be delivered, Narrowcast Server does not resend multiple alert messages to the same recipients.
Important: This method is extremely susceptible to duplicate alert messages. Implement the following steps to avoid duplicate messages.1. In the pre-execution SQL, use a SQL statement to put a copy of the data from the warehouse table into a snapshot table. Only data for subscriptions for which the alert condition is true should be copied. In this example, an alert is sent to any subscription with a DataValue=1:INSERT INTO SnapshotTable1(Subscription_ID,DataValue)SELECT Subscription_ID,DataValueFROM WarehouseTableWHERE DataValue=1
2. In the next SQL statement, update the contents of the Warehouse Table to reflect the subscriptions that receive alerts during this service execution. This prevents them from receiving duplicate alerts the next time the service is run, while freeing up the warehouse table for further updates as operational data changes:UPDATE WarehouseTableSET DataValue=0FROM WarehouseTable, SnapshotTable1WHERE WarehouseTable.Subscription_ID = SnapshotTable1.Subscription_ID
To ensure that no duplicates occur, place these two SQL statements inside a transaction.
You can use the post-service SQL to clear out the snapshot table and perhaps put an indicator that it can be used again into another table. This is useful if you have a fixed number of snapshot tables, and want to ensure that a long-running service does not have its snapshot table overwritten in the middle of service execution by a subsequent run of the same service.

Summary 121
CONCEPTS
SummaryMicroStrategy Narrowcast Server implements a number of features that enable alerting functionality. These features support a wide variety of requirements and uses. If the event status exists in the database or an external application, it is probable that MicroStrategy Narrowcast Server can support the required alert-based service.

122 Chapter 5 Alert-Based Applications
CONCEPTS

6C H A P T E R 6
123
CONCEPTS
6.Page Personalization and Dynamic Subscriptions
6Before you begin
You should familiarize yourself thoroughly with the following concepts before you attempt to develop services that use dynamic subscription or personalized page execution:• Subscriptions and subscription sets: refer to chapter 4, User
Management.• Segment and subscription information object roles: refer to Roles of
information objects in chapter 2, Dynamic Content and Personalization.• Project objects including attributes and attribute forms, prompts, filters,
reports and the page axis of a report: refer to the MicroStrategy Basic Reporting Guide and the MicroStrategy Advanced Reporting Guide.
Personalized page execution, also called page personalization, and dynamic subscriptions are discussed together in this chapter because these two pieces of functionality are interrelated. Understanding how these two pieces can work together is a key to implementing some of Narrowcast Server’s most powerful capabilities.
Introduction
Personalized page executionPersonalized page execution allows Narrowcast Server to retrieve personalized content for many subscriptions at once by executing a single report. Personalized page execution is now supported for consolidation in the page-by field and for Report Services documents in Flash format. To understand the significance of this, it is important to understand that Narrowcast Server can gather MicroStrategy reports in one of two ways: personalized report execution or personalized page execution. When using personalized report execution, Narrowcast Server gathers a separate prompted report result for each group of subscriptions with the same

124 Chapter 6 Page Personalization and Dynamic Subscriptions
CONCEPTS
personalization. Thus, since subscriptions with the same personalization are grouped before information object execution, Narrowcast Server does not necessarily execute a duplicate report for each subscriber with the same personalization.
Note: This is true for subscribers within a given segment, or group of subscriptions. Subscribers in different segments that have the same personalization will require the execution of duplicate reports. Because personalized report execution uses prompt objects, report caches cannot be used to improve performance.
For a group of subscriptions that contains many different personalizations, multiple reports need to be executed. This can be a time-consuming and expensive process in terms of system resources. By contrast, when using personalized page execution, Narrowcast Server executes one multi-page report for all subscribers in a segment where each page provides content for a group of subscribers with the same personalization. Regardless of how many subscriptions have different personalization, a single report is executed, which saves both time and system resources.
Note: This is true for all subscribers within a segment. Subscribers in different segments receive content from different report executions. Unlike personalized report execution, reports run using personalized page execution do not necessarily have prompt objects and can therefore use cached results in some situations to further improve performance.
It is important to note these two methods do not only differ in the way reports are retrieved, but also in the way recipients provide personalization. For personalized report execution, recipients indicate their preferences by answering one or more prompts, while in personalized page execution, recipients indicate their preferences by selecting a specific page of content. It is this key difference—one method of personalization allows recipients to select part of a single report while the other allows users to customize their own report—that allows these two methods to execute reports differently. One method, personalized report execution, provides greater control over personalization since reports can be fully customized using multiple prompt objects of any type, while personalized page execution, provides limited control since recipients select which page of content they would like to receive by selecting an attribute value from a list of available attribute values that represent available pages.

Introduction 125
CONCEPTS
Personalized report execution provides a flexible method of personalization for basic use cases and also provides an easier application design process. As a result, personalized report execution is selected by default when retrieving MicroStrategy reports, and in many cases application designers need not be aware of the difference between these two methods. As a result, personalized page execution is typically not used unless an application designer requires the benefits that personalized page execution or dynamic subscriptions provide.
Dynamic subscriptionDynamic subscription is a process that allows Narrowcast Server to retrieve a list of recipients and related subscription information from an external source such as a data warehouse. This is done by executing an information object which returns some or all subscription information. When used to gather subscription information stored in a MicroStrategy project, a subscription information object can gather subscription information from a MicroStrategy report or directly from attributes in the project. This information from the data warehouse can then be used directly or joined with information in the Subscription Book Repository to define a subscription set. If the list of recipients changes, dynamic subscriptions can be used for alerting applications by determining at the time of service execution who should receive the service, and what alert information they should receive.To understand how personal page execution and dynamic subscriptions can be used together, consider the case where the data warehouse holds both subscription information, such as a subscription ID and a physical address, and user preferences, for example, some attribute value which indicates user preference, such as customer region. In this case, dynamic subscriptions can be used to return both subscription information and personalization from the data warehouse. This personalization information can then be used to personalize information objects executed using personalized page execution. This is beneficial because dynamic subscriptions return a single attribute value for user preferences, while information objects executed using personalized page execution require a single attribute value to define preferences for each user.
Storing subscription information in the Subscription Book RepositoryFor static subscription sets, all subscription information is stored in and retrieved from the Subscription Book Repository. For dynamic subscription sets, it is also possible to retrieve some subscription

126 Chapter 6 Page Personalization and Dynamic Subscriptions
CONCEPTS
information, such as preferences, address information, and user authentication, from the Subscription Book Repository instead of from a subscription information object. Storing information in the Subscription Book Repository offers a number of benefits including the following:• Define preferences using personalized report execution: Preferences
can be defined with greater flexibility using any number of prompt objects of any type in a prompted report, rather than requiring the selection of an attribute value.
• Design applications easily: Administrators do not need to map information in the data warehouse to provide subscription properties and personalization.
• Administer subscription information within Narrowcast Administrator: Administration and maintenance of subscription information can be accomplished through the Narrowcast Administrator.
• Take advantage of advanced subscription properties: Advanced subscription properties (such as Devices, Locales Transmission Properties, and so on) can be used without storing and maintaining this information in an external data model.
Understanding personalized page execution and dynamic subscriptions
Personalized page execution versus personalized report executionPersonalized page execution and personalized report execution are different ways that an execution engine can request personalized reports from MicroStrategy Intelligence Server for content information objects.For personalized report execution, each execution engine looks at all subscriptions in the segment that is currently being processed by the execution engine and divides subscriptions into groups that share the same personalization. The execution engine then executes one report for each group of users with the same personalization. Thus, if a large number of subscriptions have a small number of different personalizations, personalized report execution can be a relatively efficient way to execute the service. On the other hand, if there is a large number of subscriptions and many subscriptions have different personalization, this can result in a very large number of reports being executed.

Understanding personalized page execution and dynamic subscriptions 127
CONCEPTS
This can become a resource drain in the execution process which can slow service execution. It can also consume a significant amount of system resources on both the database and Intelligence Server machines. Personalized page execution can remedy this problem by increasing the efficiency of the service execution process. Personalized page execution does this by executing one report that returns content for all subscriptions in the segment that the execution engine is processing—despite the fact that these subscriptions may have many different personalizations. This can speed up the report execution process since only one report request is made per segment.
Note: This can result in very large reports if the execution engine is processing a large number of subscriptions. This can be resolved by reducing the segment size for the service so that a smaller number of subscriptions is given to each execution engine in a segment.
The following diagram demonstrates the conceptual difference between personalized page execution and personalized report execution.
ExecutionEngine
IntelligenceServer
ExecutionEngine
IntelligenceServer
One prompted report isexecuted for each group ofsubscriptions with thesame personalization.
One multipage report isexecuted for all subscriptionsin a segment and then slicedby the execution engine togather content forsubscriptions with differentpersonalization.
Personalized Page Execution
Personalized Report Execution

128 Chapter 6 Page Personalization and Dynamic Subscriptions
CONCEPTS
Personalization method and implicationsIt is important to understand that personalized page execution and personalized report execution do not only differ in how reports are executed, but they also differ in how the reports are designed and how subscribers provide personalization for information objects. For MicroStrategy information objects executed using personalized report execution, reports are personalized by adding any number of prompt objects to the reports. These prompts are then answered by Narrowcast Server using the personalization defined for each group of subscribers. Any type of prompt object and any number of prompt objects can be used. As a result, personalized report execution provides much greater flexibility and control over personalization since user preferences are stored as each user’s answers to one or more prompts.For MicroStrategy information objects executed using personalized page execution, reports are personalized by adding an attribute form to the page axis of the report. This allows MicroStrategy Narrowcast Server to divide the report into multiple pages, which can be used for different subscriptions. Subscriptions indicate their preferences by specifying the attribute value for the first attribute form on the page axis. Thus, for personalized page execution, user preferences are stored as the value of an attribute form, such as for the region attribute, Region = Northeast. This can be a disadvantage when personalization is stored in the Subscription Book since the full power of prompted reports is not realized, but this is actually an advantage when user and subscription information is stored in a relational data warehouse since these attribute values are exactly the type of information that is easily returned by a report from a customer-centric data warehouse.
Content information objects personalization by subscription information objectsThe previous sections have explained how information objects are personalized when using personalized page execution. This section describes in greater detail how this personalization can be driven from the information returned in dynamic subscription sets. Subscription information objects always return a Subscription ID for each subscription and may also return any additional information required for personalization, such as a specific attribute form such as Region ID for each subscription.

Understanding personalized page execution and dynamic subscriptions 129
CONCEPTS
Content information objects executed using personalized page execution can be designed to use this same attribute form (Region ID) as the slicing attribute form (the first attribute form on the page axis). The result is that the content information object returns a multi-page report that provides a different page of content for each Region ID. When you define a subscription information object, you can map the attribute form returned from the data warehouse which defines preferences (Region ID) to a specific information object or question object which has Region ID as the slicing attribute form. Consider the example provided in the figure below. The box to the left represents the information returned by a subscription information object, while the box to the right represents the information returned by a content information object executed using personalized page execution. The administrator has mapped the Region ID returned by the subscription information object to this content information object. Narrowcast Server then executes the subscription information object, gathers the Region IDs for each subscription, and uses these regions as preferences when slicing the content information object to gather personalized content for each subscription. As a result, four different subscriptions all receive the same content (A) from the content information object report while all other subscriptions receive different content.
Readers familiar with SQL will recognize that this is very similar to a database join. Indeed, it can be thought of as a zero or one (result page) to zero, one, or many (subscriptions) join that is performed in memory by the Narrowcast Server. The allowance for the choice of which piece of information from a subscription set is used to choose a page from the report provides for a powerful Narrowcast Server feature. It enables different pieces of content within a service to be personalized at different levels in
Subscription Information Object
Subscription ID Region ID324789123479 1923875890247 2123798127430 3129839182734 4120395235255 1213512514523 3457626523472 2143625626766 3457436724717 4234624362366 2234672473476 1234632462346 1
Content Information Object
Page Axis: Region ID Report Content1 A2 B3 C4 D

130 Chapter 6 Page Personalization and Dynamic Subscriptions
CONCEPTS
an attribute hierarchy. For example, some pieces of content can be personalized at the region level, while others display data for a particular store or item.
Slicing and segmentationA key benefit of Narrowcast Server is that it provides both user and data scalability. This means that Narrowcast Server can scale linearly with available system resources to deliver to a large number of users and also handle a large amount of information that must be delivered to these users. To do this, Narrowcast Server employs two key capabilities:• the ability to execute reports efficiently to gather personalized content
for a large number of users• the ability to divide a large amount of work and distribute it across a
large number of machinesThe first of these capabilities, often termed “slicing,” is accomplished using personalized page execution and has been discussed in previous sections. The second of these capabilities requires Narrowcast Server to take the work required to execute a service, divide it into sections, and then distribute these sections across several machines. Narrowcast Server distributes work by dividing the subscription set into groups and assigning each group of subscriptions to a machine. Segmentation is this process of dividing a subscription set into smaller groups of subscriptions, called segments, and distributing the work required to execute a service among multiple machines. Although both slicing and segmentation improve the scalability of the service execution process, they achieve different goals. Slicing allows Narrowcast Server to execute reports more efficiently, while segmentation allows Narrowcast Server to distribute work across machines to both increase execution speed and provide failover support. The figure below provides a conceptual illustration of the segmentation process.

Slicing and segmentation 131
CONCEPTS
The figure below provides a conceptual illustration of the slicing process.
Segmentation processesWhen a large subscription set is executed for a service, this represents a potentially tremendous amount of work. For each subscription, content must be gathered, formatted, and delivered. Each of these processes can potentially take a long amount of time and can consume significant machine resources. To allow this process to be scalable so that a large number of subscriptions can be executed in a reasonable time, it is necessary to divide this workload and distribute it across multiple machines (called execution engines). As described previously,
SegmentExecutor
Segment #1
IntelligenceServer
Subscription IDs129857109235298367102895243523424535145153451354125145632365125457625671734756757868457437568754374373476347375347347347345623453254356236234656
Segment #1
Segment #2
Segment #3
Segment #4
Segment Executorgathers only contentfor subscriptions incurrent segmentsfrom IntelligenceServer
SegmentExecutor
Segment #2
Distribution Managerpasses only IDs forsubscriptions in eachsegments to eachSegment Executor
DistributionManager
Report Structure Conceptual Result:Multiple Pages
First attribute onPage Axis
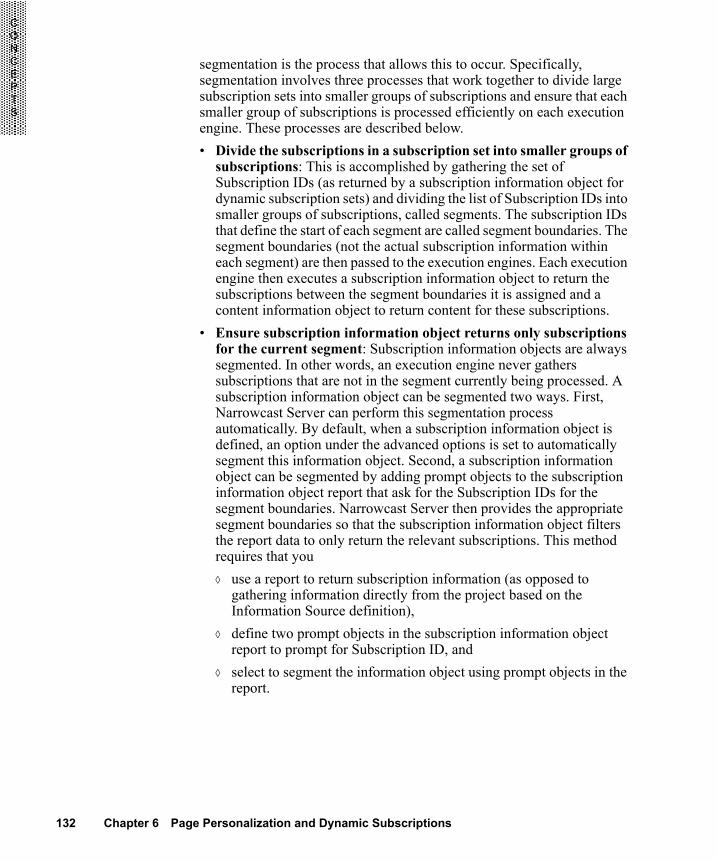
132 Chapter 6 Page Personalization and Dynamic Subscriptions
CONCEPTS
segmentation is the process that allows this to occur. Specifically, segmentation involves three processes that work together to divide large subscription sets into smaller groups of subscriptions and ensure that each smaller group of subscriptions is processed efficiently on each execution engine. These processes are described below.• Divide the subscriptions in a subscription set into smaller groups of
subscriptions: This is accomplished by gathering the set of Subscription IDs (as returned by a subscription information object for dynamic subscription sets) and dividing the list of Subscription IDs into smaller groups of subscriptions, called segments. The subscription IDs that define the start of each segment are called segment boundaries. The segment boundaries (not the actual subscription information within each segment) are then passed to the execution engines. Each execution engine then executes a subscription information object to return the subscriptions between the segment boundaries it is assigned and a content information object to return content for these subscriptions.
• Ensure subscription information object returns only subscriptions for the current segment: Subscription information objects are always segmented. In other words, an execution engine never gathers subscriptions that are not in the segment currently being processed. A subscription information object can be segmented two ways. First, Narrowcast Server can perform this segmentation process automatically. By default, when a subscription information object is defined, an option under the advanced options is set to automatically segment this information object. Second, a subscription information object can be segmented by adding prompt objects to the subscription information object report that ask for the Subscription IDs for the segment boundaries. Narrowcast Server then provides the appropriate segment boundaries so that the subscription information object filters the report data to only return the relevant subscriptions. This method requires that you ◊ use a report to return subscription information (as opposed to
gathering information directly from the project based on the Information Source definition),
◊ define two prompt objects in the subscription information object report to prompt for Subscription ID, and
◊ select to segment the information object using prompt objects in the report.

Slicing and segmentation 133
CONCEPTS
This option is available in the Information Object Wizard. • Ensure content information object reports return only content for
current subscriptions: It is important to note that only content information objects executed using personalized page execution can be segmented. It does not make sense to segment a content information object executed in personalized report execution since a separate report is executed for each group of users in the segment that have the same personalization. It only makes sense to segment an information object when a single report is executed to return information for multiple subscriptions. For information objects executed using personalized page execution, segmentation is optional but is enabled by default.
As with subscription information objects, a content information object can be segmented two ways. First, Narrowcast Server can perform this segmentation process automatically. By default, when a content information object using personalized page execution is defined, an option under the advanced options is set to automatically segment this information object. Second, a content information object can be segmented by adding prompt objects to the information object report that ask for the Subscription IDs for the segment boundaries. Narrowcast Server then provides the appropriate segment boundaries so that the content information object filters the report data to only return the relevant subscriptions. This method requires that you define two prompt objects in the subscription information object report to prompt for Subscription ID and select to segment the information object using prompt objects in the report. This option is available in the Information Object Wizard.For content information objects used with dynamic subscription sets, it generally makes sense to segment the content information object and only return content for subscriptions currently being processed by the execution engine. This is because both content and subscription information is stored in the same location, so the Subscription ID used by the subscription set can be returned by the content information object. However, for content information objects used with static subscription sets, it is generally not possible to segment the content information object. This is because segmentation of a content information object requires that the Subscription ID is present in the data warehouse, which is generally not the case when static subscription sets are used.
Segmentation implications for application designAs described in Segmentation processes, three processes come into play during segmentation to ensure that subscription sets are divided into smaller groups and that information objects return information appropriate
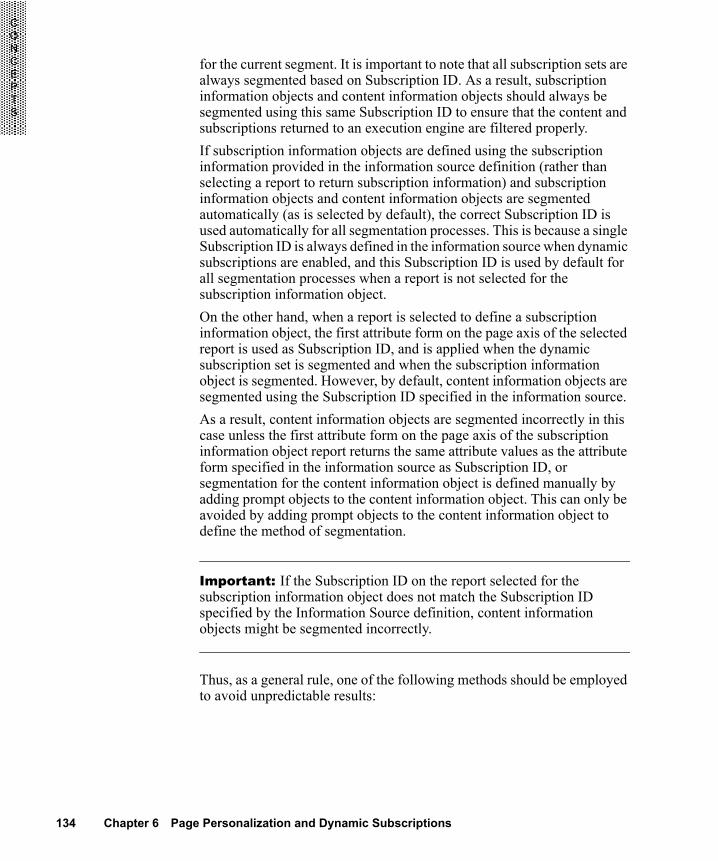
134 Chapter 6 Page Personalization and Dynamic Subscriptions
CONCEPTS
for the current segment. It is important to note that all subscription sets are always segmented based on Subscription ID. As a result, subscription information objects and content information objects should always be segmented using this same Subscription ID to ensure that the content and subscriptions returned to an execution engine are filtered properly.If subscription information objects are defined using the subscription information provided in the information source definition (rather than selecting a report to return subscription information) and subscription information objects and content information objects are segmented automatically (as is selected by default), the correct Subscription ID is used automatically for all segmentation processes. This is because a single Subscription ID is always defined in the information source when dynamic subscriptions are enabled, and this Subscription ID is used by default for all segmentation processes when a report is not selected for the subscription information object. On the other hand, when a report is selected to define a subscription information object, the first attribute form on the page axis of the selected report is used as Subscription ID, and is applied when the dynamic subscription set is segmented and when the subscription information object is segmented. However, by default, content information objects are segmented using the Subscription ID specified in the information source. As a result, content information objects are segmented incorrectly in this case unless the first attribute form on the page axis of the subscription information object report returns the same attribute values as the attribute form specified in the information source as Subscription ID, or segmentation for the content information object is defined manually by adding prompt objects to the content information object. This can only be avoided by adding prompt objects to the content information object to define the method of segmentation.
Important: If the Subscription ID on the report selected for the subscription information object does not match the Subscription ID specified by the Information Source definition, content information objects might be segmented incorrectly.
Thus, as a general rule, one of the following methods should be employed to avoid unpredictable results:

Slicing and segmentation 135
CONCEPTS
• Use subscription properties from the information source definition for the subscription information object and choose to automatically segment the content information object and subscription information object. In this case, the Subscription ID in the information source is used for all segmentation processes.
• Use a report for the subscription information object and ensure that the first attribute form on the page axis of the subscription information object matches the Subscription ID specified in the information source. (Multiple information sources can be used if multiple Subscription IDs are present.)
• Use a report for the subscription information object and, if the Subscription ID in the report does not match the Subscription ID specified in the information source, ensure that the content information object is segmented using prompt objects in the report.
A few additional application design requirements deserve special note:• When content information objects are segmented, the content
information object reports do not need to contain the Subscription ID since content information objects can be segmented without explicitly containing Subscription ID. This is important because it allows content information object reports to be filtered so that they only return content for subscriptions in the current segment even if subscription ID is not on the report template.
• When an information object is segmented using prompt objects in the report, these prompt objects must contain default answers. This is required so that the first and last segments are terminated properly.
Note: If personalized page execution is used with static subscriptions, you cannot use automatic segmentation unless a subscription ID in the MicroStrategy project corresponds to the Subscription ID used in the Subscription Book. If this is not the case, you must choose not to segment the content information object.
In some cases, it might be desirable to either segment dynamic subscription sets using a method other than the default segmentation method or control how content information objects and subscription information objects are segmented by the execution engines. The first of these cases can arise since the default method used for segmentation must handle complex scenarios, such as the subscription set returned varies from one execution to the next, or the segment size varies from one execution to the next. As a result, the resulting performance might be slower than when more simple, efficient segmentation methods

136 Chapter 6 Page Personalization and Dynamic Subscriptions
CONCEPTS
are used. The segmentation method used to segment dynamic subscription sets can be controlled by defining a segment information object and selecting this segment information object from within a dynamic subscription set. For more information on how to create a segment information object, see Advanced segmentation control techniques in this chapter.The second case arises due to the fact that it might be desirable to have more control over how content information objects and subscription information objects are segmented. This can be accomplished by adding prompt objects to these information objects which ask for the boundaries for the segment and are used to filter the report to only return the relevant subscriptions. This might be useful for applications upgraded from Narrowcast Server 7.0 or 7.1 where such prompt objects for segmentation were required or potentially for complex implementations where segmentation by some means other than a simple greater than or less than strategy is required.
Subscription ID versus slicing attributeWhen defining an application to support dynamic subscription sets and personalized page execution, it is important to properly select attribute forms that support the processes of segmentation and slicing. Although the same attribute form can be used to both segment a subscription set and to personalize a content information object using personalized page execution, this is not always the case. As a result, it is important to understand the difference between Subscription IDs and slicing attributes. A Subscription ID is the attribute form used to segment dynamic subscription sets, subscription information objects, and content information objects. By contrast, a slicing attribute is the attribute form used to slice the data set returned using personalized page execution mode to provide personalized content for each subscription. Thus, if the same attribute form is chosen for each purpose, each subscription receives a unique page of content and no two subscriptions share the same page. However, in many cases, the slicing attribute is a different value so that all subscriptions share a smaller number of available pages. In this case, Subscription IDs and slicing attributes have differing requirements due to their different purposes. A Subscription ID must be a 4-byte integer. No workaround exists for using Subscription IDs in other formats. However, a slicing attribute can be any numeric or text datatype. The integer-only constraint for Subscription ID ensures that database configuration differences such as case sensitivity on comparisons do not cause unpredictable behavior. On the other hand, a slicing attribute is used to match preferences to a specific page of content returned and thus any

Understanding subscription information 137
CONCEPTS
numeric or text data type can be used. However, the slicing attribute used for personalized page execution information object reports cannot use an attribute with a compound key.
Understanding subscription informationSubscription information refers to the information that fully defines a subscription and that is required to deliver messages for a subscription. This includes user information such as user name, address information such as physical address, device types, and personalization information. The following items comprise the complete list of subscription information. This is the information returned by either a static or a dynamic subscription set for each subscription.• subscription ID• address information
◊ address ID◊ address display◊ physical address◊ device◊ transmission properties◊ PIN◊ time zone◊ delivery window
• user information◊ user ID◊ locale ID◊ security for each information source◊ preferences for information objects and question objects
Storing subscription informationThe location of subscription information is a key determinant of how dynamic subscriptions and personalized page execution can be implemented. The location of subscription information determines application design characteristics such as

138 Chapter 6 Page Personalization and Dynamic Subscriptions
CONCEPTS
• whether dynamic subscriptions and personalized page execution functionality, and as a result, the benefits listed previously in this chapter, can be used,
• what type of personalization is used (using prompted reports or using information in the data warehouse to select a page of a report), and
• whether subscription information is populated and maintained by MicroStrategy Narrowcast Server or some external system.
As a result, when designing applications that intend to use dynamic subscriptions or personalized page execution, it is crucial to consider how much flexibility is available in existing or new data warehouses. The following paragraphs describe the various options for storing subscription information and discuss the advantages and disadvantages of each method.• All subscription information can be stored in the data warehouse
and returned using dynamic subscriptions: In this case, the Subscription Book is not used and all required subscription information is gathered from the data warehouse. As a result, Subscription IDs used in the data warehouse do not need to correspond to Subscription IDs in the Subscription Book, and there are no requirements on the Subscription ID other than it must be an integer value that is unique for all subscriptions. This allows existing ID values in the data warehouse to be used or for new IDs to be created without consideration for how these subscriptions will interact with subscriptions created by Narrowcast Server. It is important to note that in this case:◊ Personalization is accomplished using information in the data
warehouse to return attributes that indicate preference. For more information on this, see the Content information objects personalization by subscription information objects section in this chapter.
◊ Either an external system or the Subscription Portal must be used to create new subscriptions and maintain subscription information since Narrowcast Administrator cannot be used.

Understanding subscription information 139
CONCEPTS
This scenario can be implemented with no customization to existing schemas as long as the data warehouse contains physical addresses (such as e-mail addresses) and ID values that are unique for all intended subscriptions. More advanced scenarios might be implemented if customizations to existing schemas are possible. In this case, the data model can be extended to return additional subscription information such as the recipient’s device and the desired transmission properties to be used for each subscription. See the Understanding subscription information section in this chapter for a complete list of subscription information. Returning all subscription information using a subscription information object is faster than returning some information using a subscription information object and joining this to other subscription information in the Subscription Book Repository.
• All subscription information can be stored in the Subscription Book and returned using static subscriptions: Personalized page execution might be used with subscription information returned entirely from the Subscription Book. In this case, the preferences stored in the Subscription Book provide attribute values that are used to personalize reports by selecting a page of content for each user. It is important to note that, for this case, it might not be possible to segment content information objects since this would require that a Subscription ID in the data warehouse matches the Subscription ID used in the Subscription Book Repository. Unless some method is used to synchronize these Subscription IDs this implementation is not possible. For more information, see the Segmentation implications for application design section in this chapter.
• Subscription Information can be stored in both the data warehouse and the Subscription Book: This case can provide both the advantages of personalized page execution and dynamic subscriptions and the advantages of storing subscription information in the Subscription Book. However, to implement this case, the Subscription ID used in the data warehouse must match the Subscription ID used in the Subscription Book to join information in the Subscription Book with information in the data warehouse. The following provides more information on how this can be accomplished.◊ The Subscription Portal or Subscription Portal API can be used
to write the correct Subscription ID into the data warehouse: In this case, the user specifies which tables in the data warehouse should be used to hold subscription information such as subscription IDs, addresses and preferences. The Subscription Portal then writes subscription information such as preferences and address ID directly into the data warehouse while storing additional information to the Subscription Book Repository. It is important to note that, in this case, the Subscription Portal ensures that the Subscription ID written

140 Chapter 6 Page Personalization and Dynamic Subscriptions
CONCEPTS
to the data warehouse matches the Subscription ID used in the Subscription Book Repository. Thus, this method takes some additional setup since the Subscription Portal must be configured to write subscription information into the appropriate tables. However, this method also provides the advantages of enabling dynamic subscriptions and personalized page execution, and enabling the use of the Subscription Book and Subscription Portal. For more information on this method, see chapter 9, Advanced Subscription Portal Configuration.
◊ The (customer-centric) data warehouse can be integrated with the Subscription Book Repository: In this case, the same Subscription IDs are shared by both the Subscription Book and the data warehouse. This requires that either any existing schema can be adapted to integrate with the Subscription Book Repository structure or a new data model can be created which integrates with the schema of the Subscription Book Repository. This method provides the advantage that Subscription ID is automatically synchronized between the two systems. When using this method, it is important to consider how new subscriptions are created. For example, if new subscriptions are always created using MicroStrategy Narrowcast Server (either through the Subscription Portal or through the Narrowcast Administrator), unique Subscription IDs are automatically created. Conversely, if an external system is always used to created Subscription IDs, the only requirement is that the Subscription IDs must be unique integers. However, if both Narrowcast Server and an external system, such as the Narrowcast Administrator and some external application, are used to create new subscriptions, you must take care to ensure that both systems create Subscriptions IDs such that the IDs are guaranteed to be unique. In accomplishing this, it is important to note that Narrowcast Server leverages the ability of different databases to ensure that IDs are unique. As a result, the method used by Narrowcast Server to create Subscription IDs varies according to the database platform used as the Subscription Book Repository. As long as the external system uses a compatible method to create Subscription IDs and there is not conflict in writing to the same table, it is possible to have both systems successfully write to the same table and create a unique set of Subscription IDs.

Understanding subscription information 141
CONCEPTS
◊ An external application can be used to synchronize Subscription IDs between the Subscription Book Repository and the data warehouse: This method relies on some external method of updating the Subscription IDs in the data warehouse or the Subscription Book Repository to ensure that the Subscription IDs used in both locations are synchronized. If the Subscription Portal is installed, the Subscription Portal API can be used to return subscription ID using the getSubscription method in the ISubscription interface. This method allows Subscription ID to be returned without querying the data warehouse.
Subscription ID requirementsThe Subscription ID is significant among all other subscription information because the Subscription ID is the attribute form that is used to identify the list of subscriptions when dynamic subscriptions are used. In addition, the Subscription ID is significant because this attribute form may also be used to join subscription information in the data warehouse with subscription information in the Subscription Book. (For example, Subscription ID and physical address might be returned from the data warehouse, while personalization and Device ID might be returned from the Subscription Book.) As a result of these two roles, the requirements for Subscription IDs vary according to how the Subscription ID is used. If the Subscription ID is used to join information in the data warehouse with information in the Subscription Book, subscription IDs from the data warehouse must correspond to Subscription IDs in the Subscription Book. It is important to note that Subscription IDs stored in the Subscription Book Repository are always integers that start at a very large negative number and are incremented by one for each subscription. Thus, it is not possible to join data from the data warehouse to information in Subscription Book Repository unless one of the following is true:• The Subscription Portal is used to create the Subscription IDs in the data
warehouse. This is discussed further in chapter 9, Advanced Subscription Portal Configuration.
• The data warehouse is integrated with the Subscription Book Repository such that the same Subscription IDs are shared between the data warehouse and the Subscription Book Repository.
• Some external system is used to synchronize Subscription IDs between the Subscription Book Repository and the data warehouse.
However, if all subscription information is returned from the data warehouse and no information is stored in the Subscription Book, then Subscription IDs in the data warehouse does not need to correspond to

142 Chapter 6 Page Personalization and Dynamic Subscriptions
CONCEPTS
Subscription IDs in the Subscription Book. In this case, the only requirements on Subscription ID are that it is an integer value which is unique for each subscription.
Designing applications to support dynamic subscriptions and personalized page execution
Application design requirementsTo achieve the benefits of personalized page execution and dynamic subscriptions, it is important to properly design applications to support either dynamic subscription sets, personalized page execution, or both. Several application design scenarios are possible, including the following:• Scenario 1: Personalized report execution with static subscriptions• Scenario 2: Personalized page execution with dynamic subscriptions• Scenario 3: Personalized page execution with static subscriptions• Scenario 4: Personalized report execution with dynamic subscriptionsThis section provides an overview of these scenarios.
Scenario 1: Personalized report execution with static subscriptions
Overview
This is a very commonly used scenario and is the scenario used in most basic use cases. Reports are personalized using prompts and subscription information is stored in the Subscription Book. No subscription information object is used and subscription information including personalization information is stored in the Subscription Book and returned in a static subscription set. One or more content information objects executed using personalized report execution are then personalized using the personalization information stored in the Subscription Book Repository. Since information objects executed using personalized report execution are personalized by answering one or more prompts, the Subscription Book Repository is ideally suited to store answers to prompts in XML format.

Designing applications to support dynamic subscriptions and personalized page execution 143
CONCEPTS
Required reports and report design
No subscription information object is required. Multiple content information objects executed in personalized report execution are personalized using the personalization contained in Subscription Book Repository. The following image demonstrates the proper report design.
Scenario 2: Personalized page execution with dynamic subscriptions
Overview
This is a commonly used scenario where subscription information including personalization is stored in the data warehouse. A subscription information object is used to return subscription information including subscription ID and personalization information. One or more content information objects executed using personalized page execution are then personalized using the personalization information returned in the subscription information object. This scenario allows subscription, personalization, and content information stored in the data warehouse to be used together.
Required reports and report design
A subscription information object returns subscription information including Subscription ID and user information including personalization. One or more content information objects executed using personalized page execution are then personalized using the personalization contained in the subscription information object. The subscription information object can either be designed to retrieve information directly from a MicroStrategy project or it can use a report to provide subscription information. If subscription information is gathered directly from the MicroStrategy project, there are no report design requirements. If a report is used to deliver subscription information, the first attribute form on the page axis must provide the Subscription ID and all other attributes that provide subscription information must also be on the page axis. The remainder of
Note: no attributes areon the page axis andreport contains one ormore prompts
Content for each report. Content for each report.
One or moreprompts

144 Chapter 6 Page Personalization and Dynamic Subscriptions
CONCEPTS
the report other than the page axis content is ignored. The content information object must contain the slicing attribute as the first attribute on the page axis. Each page on the report is used as a page of content for a group of subscribers. The following image demonstrates proper report design.
Note: • The figure shows a subscription information object that gathers data
from a report, but the subscription information can also be gathered directly from the project.
• For a MicroStrategy information object, if subscription information is gathered directly from the MicroStrategy project, and a filter is used to constrain the subscriptions returned, the filter should be designed so that the dimensionality of the report does not change the results returned. For example, if a metric qualification is applied which changes results depending on which attribute is on the template, unexpected results may result. If you are unsure what results will be returned, it is advisable to create a report in MicroStrategy Desktop to return subscription information.
Note: the first attribute form on the pageaxis must be Subscription ID.
Subscription ID
Content for each reportpage.
Other subscriptioninformation (physicaladdress, etc.)
Attribute forms usedfor personalization
Subscription Information Content*
Content Information Objects
Report template is not used.
Content for each reportpage.
Note: the first attribute on the pageaxis is used to slice the ContentInformation Objects.

Designing applications to support dynamic subscriptions and personalized page execution 145
CONCEPTS
Scenario 3: Personalized page execution with static subscriptions
Overview
This scenario is used less commonly then either personalized report execution with static subscriptions or personalized page execution with dynamic subscriptions, but is still a viable use case. This lower applicability is due to the fact that personalization is stored in the Subscription Book as attribute values. In this scenario, subscription information including personalization is stored in the Subscription Book Repository. No subscription information object is used and subscription information is returned in a static subscription set. One or more content information objects executed using personalized page execution are personalized using the personalization information stored in the Subscription Book Repository. Since information objects executed using personalized page execution are personalized by selecting an attribute value, the personalization is stored as an attribute value.
Required reports and report design
No subscription information object is required. One or more content information objects executed using personalized page execution are personalized using an attribute value stored in the Subscription Book Repository. The following image demonstrates the proper report design.
Note: Automatic segmentation must be disabled in content information objects for the MicroStrategy information source unless Subscription IDs returned from the project match Subscription IDs in the Subscription Book.
Note: the first attribute onthe page axis is used toslice the ContentInformation Objects.
Content Information Objects
Content for eachreport page
Content for eachreport page

146 Chapter 6 Page Personalization and Dynamic Subscriptions
CONCEPTS
Scenario 4: Personalized report execution with dynamic subscriptions
Overview
This scenario is used less commonly than the other scenarios since personalization for prompted reports is not typically stored in the data warehouse. In this scenario, subscription information including personalization is stored in the data warehouse. A subscription information object is used to return subscription information including subscription ID and personalization information. One or more content information objects executed using personalized report execution are then personalized using the personalization information returned in the subscription information object. Since information objects executed using personalized report execution are personalized by answering one or more prompts, the personalization stored in the data warehouse must stored as prompts answers in XML format. It is also important to note that the use of Intelligence Server reports to return subscription information restricts the length of the XML string returned. As a result, when this method is used, you must take care to ensure that all XML stored in the data warehouse is less than the maximum allowable length. Thus, since personalization must be stored in a short XML format in a data warehouse, this scenario often has limited practical use.
Required reports and report design
A subscription information object returns subscription information including subscription ID and user information including personalization. Multiple content information objects executed in personalized report execution are then personalized using the personalization contained in the subscription information object. The personalization returned by the subscription information object is in XML format. The following image demonstrates the proper report design.

Designing applications to support dynamic subscriptions and personalized page execution 147
CONCEPTS
Note: The figure shows a subscription information object that gathers data from a report, but the subscription information could also be gathered directly from the MicroStrategy project.
Implementing personalized page execution and dynamic subscriptionsThe following steps provide a high-level overview of tasks that you need to accomplish to implement personalized page execution and dynamic subscriptions. For more information on specific tasks, please see other sections in this chapter and relevant How Do I...? topics in section III of this guide.
One or moreprompts
Content Information Objects
Content for each report. Content for each report.
Subscription ID
Other subscriptioninformation (physicaladdress, etc.)
XML used forpersonalization
Report template is not used.
Subscription Information Content*
Note: the first attribute form on the pageaxis must be Subscription ID.
Note: no attributes are on the pageaxis and reports contains one or moreprompts.

148 Chapter 6 Page Personalization and Dynamic Subscriptions
CONCEPTS
1. Determine where subscription information will be stored (that is, in the Subscription Book Repository, the data warehouse, or both) and what type of subscription sets and which execution mode will be used. These decisions are interrelated. Refer to Storing subscription information in this chapter for more information. Relevant questions an application designer should ask include:
◊ Does subscription information already exist and how flexible is the current or future schema?
◊ Will end users create and maintain their subscription information, will an administrator create and maintain subscription information, or will some other system create and maintain subscription information?
◊ Do reports need to be personalized using prompt objects or will attribute selection satisfy the application requirements?
2. Determine how MicroStrategy report and Narrowcast Server application design can support desired application goals determined in step 1. Refer to Designing applications to support dynamic subscriptions and personalized page execution in this chapter for more information. Relevant questions an application designer should ask include:
◊ What reports are required?◊ How many content information objects and/or subscription
information objects will be used? ◊ How is personalization stored?
3. For a MicroStrategy project, if dynamic subscriptions are used, define the MicroStrategy information source to support dynamic subscriptions and either select available subscription information or define a report that contains the desired attributes on the page axis. Refer to Designing applications to support dynamic subscriptions and personalized page execution in this chapter for more information.4. In MicroStrategy Desktop, design reports to be used for content information objects. Refer to Designing applications to support dynamic subscriptions and personalized page execution in this chapter for more information.5. Create content information objects using the desired reports.6. If dynamic subscriptions are used, create subscription information objects, select desired subscription information, and select content information objects created in step 5 to be personalized.

Advanced segmentation control techniques 149
CONCEPTS
7. Create a dynamic subscription set or a static subscription set. If a dynamic subscription set is used, select the subscription information object created in step 6.8. Add content information objects to documents within a service and add the subscription set to the same service.
Advanced segmentation control techniquesBy default, Narrowcast Server takes care of this segmentation process with no intervention required by the user. However, in some cases, you might want to control how this segmentation process is performed.When a dynamic subscription set is created, after the subscription information object is selected, you are presented with an advanced option to define how subscriptions are segmented. By default, this option is not selected. If this option is left unselected, MicroStrategy Narrowcast Server automatically segments the subscriptions returned by the subscription information object using a prompted rank value filter on the Subscription ID column. If this option is selected, you are asked to provide a segment information object.Segment information objects return the Subscription IDs at the beginning of segments and thus explicitly control how subscriptions are segmented into groups. To understand how Narrowcast Server performs segmentation, review the following steps, which explain how to create a segment information object that is functionally equivalent to Narrowcast Server’s default segmentation method. The following is a step-by-step example using the MicroStrategy Tutorial project from MicroStrategy Desktop. It can be used for services such as the tutorial examples 3a and 3b, which use the Customer ID attribute form as the Subscription ID.1. Make Customer_ID a fact. MicroStrategy can only rank facts and only if they are numeric. For a different project, you would choose whichever column you are using for the Subscription ID attribute form.
◊ Choose New Fact.◊ Choose the LU_CUSTOMER table or the lookup table where your
slicing attribute ID exists.◊ Drag Customer_ID into the Fact Expression window. ◊ Set Mapping method to Manual.◊ Click OK.

150 Chapter 6 Page Personalization and Dynamic Subscriptions
CONCEPTS
◊ Choose only the tables from which the fact will be used in ranking. This is likely the table with the most subscriber information, such as LU_CUSTOMER.
◊ Click Save and Close and name the fact Subscription_ID.2. Create a metric of the Subscription_ID fact so that the fact can be manipulated mathematically.
◊ Choose New Metric.◊ Drag Max from the Functions and Operators\Functions\Basic Functions folder into the metric definition window.
◊ Drag the Subscription_ID fact into the parentheses of the Max. ◊ Validate. Your metric formula should be Max(Subscription_ID).◊ Click Save and Close and name the metric Metric1.
3. Create a rank metric to turn the Subscription ID values into sequential integers.
◊ Choose New Metric.◊ Drag Rank from the Functions and Operators\Functions\Rank and Ntile Functions folder into the metric definition window.
◊ Drag Metric1 into the parentheses of the Rank. ◊ Validate. Your metric formula should be Rank(Metric1).◊ Click the Subtotals tab.◊ Change Allow Smart Totals to Yes.◊ Click Save and Close and name the metric Metric2.
4. Create the Report Limit metric. This metric returns the first subscription of each segment by calculating the Subscription IDs for which rank number divided by the segment size has a remainder of 1. Note: The modulus equals zero if the Segment Size is 1, and equals 1 for every other number.
◊ Choose New Prompt.◊ Choose Value Prompt, then select Numeric Prompt. ◊ Name the prompt Prompt-Segment Size and click Finish.◊ Click Save and Close.◊ Choose New Metric.

Advanced segmentation control techniques 151
CONCEPTS
◊ Drag Mod from the Functions and Operators\Plug-In Packages\Math Functions folder into the metric definition window.
◊ Drag Metric2 into the parentheses of Mod.◊ Insert a comma after Metric2. ◊ Drag Prompt-Segment Size after the comma.◊ Validate. Your metric formula should be Mod(Metric2,?Prompt-
SegmentSize).◊ Click the Subtotals tab.◊ Change Allow Smart Totals to Yes.◊ Click Save and Close and name the metric Metric3.◊ Choose New Metric.◊ Drag Mod from the Functions and Operators\Plug-In Packages\Math Functions folder into the metric definition window.
◊ Drag Prompt-Segment Size into the parentheses of Mod.◊ Insert +1 and then a comma.◊ Drag the same prompt into the parentheses after the comma.◊ Validate. Your metric formula should be Mod(?Prompt-
SegmentSize+1,?Prompt-SegmentSize).◊ Click Save and Close and name the metric Metric4.
5. Create a report that calculates the segment boundaries by returning every Xth Customer ID, where X is the answer to the prompt for segment size. These are passed to the subscription/content information object at run time. For a different project, you would use whichever attribute you are using that includes the Subscription ID form instead of the Customer attribute.
◊ Choose New Report.◊ Drag Customer onto the row axis of the template.
Note: You must configure this attribute to show the ID form first.◊ Drag Metric2 onto the column axis.◊ Select Report Data Options from the Data menu. ◊ Select the Report Limit category.◊ Click Modify.◊ Drag Metric3 into the limit definition window.

152 Chapter 6 Page Personalization and Dynamic Subscriptions
CONCEPTS
◊ Select the parameters as follows:– Function: Metric Value– Operator: Exactly– Value: Metric
◊ Drag Metric4 into the box next to the Metric selection.◊ Click OK, then Save and Close.◊ Select the Evaluation Order category.◊ Clear the Show consolidations…check box.◊ Set Metric2 to be evaluated first and Report Limit to be evaluated
second.◊ Click OK.◊ Click Save and Close and name the report Segmentation
Boundaries.6. Filter on subscriptions to a particular service.
◊ Create a new filter which limits the subscribers you want, for example, Sub Set = X, Customer(ID) < 10 (for testing), MetricX>20.
◊ Add the filter to the Segmentation Boundaries report. 7. Update the project schema or the fact you created will not be recognized and report execution will fail.8. Run the report to verify that it functions correctly. When prompted, enter a reasonable segment size (100 is the default for Services). Ensure that the report returns a table of data such as the following (segment size of 50 is shown):
151101151…
It is important to note that this method of segmentation is designed to handle complex cases such as• when the segment size varies from one execution to the next (for
example, if a subscription information object is shared by two services with different segment sizes)
• when the Subscription Set returned varies from one execution to the next
• when the segment boundaries cannot be pre-calculated in the data warehouse

Advanced segmentation control techniques 153
CONCEPTS
In some cases, however, it might be preferable to define a different method for segmenting subscriptions. For example, this might be useful to increase performance by using a simpler, less flexible method of segmentation. Consider the following cases in which simplified application requirements allow a simplified method of segmentation to be employed.• If the segment size is known to be constant, the segment size might be
hard coded instead of using a prompt object in the ranking metric filter.• If the subscription set boundaries can be precalculated, such as with a
stored procedure or using pre-SQL, a report can be run against the precalculated values to return the segment boundaries.
• If the Subscription Set ID values are uniformly distributed across the range of possible values, such as they are sequential, a simpler report can be used.
• If the Subscription Set does not change from one execution to the next, the boundaries can be hard coded in the data warehouse and a report can be run against the hard coded values to retrieve the segment boundaries. They could also be returned by another information source module that reads the boundaries from a file, database query, and so on.
Although segment information objects can be provided from any information source module that supports segment information objects, segment information objects for the MicroStrategy Information Source Module must meet the following requirements:• The segment information object must use a report that returns the
beginning subscriptions for each segment. These subscriptions define the segment boundaries.
• The report must have an integer attribute form on the rows, in sorted order, in which each element corresponds to the lower boundary of a segment.
Any other information on the report, such as a metric or another attribute, does not cause a problem but is ignored. For example, if the segments can be represented by the Subscription ID values (1-114, 115-243, and 244-555), the report should return the following:
Subscription ID1115244
One way to speed up the segmentation process is to precreate the segment boundary data in the data warehouse. One way to accomplish this is to use pre-SQL on the data that is the source of the subscription set. For example, the following sequence of SQL statements can be used on SQL Server 7 or

154 Chapter 6 Page Personalization and Dynamic Subscriptions
CONCEPTS
SQL Server 2000 to store every 100th Subscription ID value into a working table, which can then be read by a segment information object report to return segment boundaries.CREATE TABLE WORK_TABLE1 (
COUNTER_COLUMN INT IDENTITY (1,1) NOT NULL,
SUBSCRIPTION_ID INT NOT NULL,CONSTRAINT CTR_PK PRIMARY KEY(COUNTER_COLUMN)
)
INSERT INTO WORK_TABLE1(SUBSCRIPTION_ID)SELECT SUBSCRIPTION_ID
FROM (source of subscription data to be used by subscription information object)
...GROUP BY SUBSCRIPTION_ID{THIS ENSURES THAT THE SUBSCRIPTION IDS ARE SORTED)
CREATE TABLE SEGMENT_TABLE (SUBSCRIPTION_ID INT NOT NULL,
CONSTRAINT SUB_PK PRIMARY KEY(SUBSCRIPTION_ID)
)

7C H A P T E R 7
155
CONCEPTS
7.User Self Subscription 7MicroStrategy Narrowcast Server provides a Subscription Portal that allows end users to control the content they receive by specifying what information is relevant for them. Users can specify the frequency, schedule, delivery device, and personalization of information services, all from a Web-based portal. In this way, Narrowcast Server allows individuals to ensure that they receive one-to-one, personalized information where and when it is most useful.Subscription Portal offers users the ability to• subscribe to and view services, service descriptions, and the most recent
modification dates• modify subscriptions• enter new device addresses as needed• apply changes to schedules for each service• save personalization settings for future use.• create and modify their preferences• create, edit, and delete login IDs, passwords, and device addresses• specify the appropriate default languages, time zones, and currency
settingsAccess to information sources is controlled at the Subscription Portal where users are prompted to authenticate themselves for appropriate information access.Both the MicroStrategy Tutorial for Narrowcast Server configuration process and the System Configuration Wizard can configure a default Subscription Portal site. This site uses the virtual directory name provided during product installation. The System Configuration Wizard and the Tutorial configuration process add a link to this site to the Start menu when the default site is configured. This site provides a functional Subscription Portal site with which you can publish services and view content or subscribe to and view content from the demonstration services. Once you are ready to do more advanced site configuration such as specify different channels, you can use the Portal Administrator Wizard.

156 Chapter 7 User Self Subscription
CONCEPTS
The Portal Administrator Wizard is the tool that provides full control over the Subscription Portal configuration and allows you to create site definitions, publish services and device types, and specify information source properties and default portal preferences.The following diagram illustrates the four sections available in the Portal Administrator Wizard and the tasks that can be performed in each section.
Before you begin, you should be familiar with these basic concepts:• Subscription Portal system• Database connections• Site definition• Services configuration
Subscription Portal systemA Subscription Portal system includes:• an installation of the Subscription Portal application• a Portal Repository database
Select or create aSubscription PortalCreate or edit a site definition
Site Management
Define database connectionsSpecify the name of theserver running the SequeLinkserviceSpecify the location of thePortal Repository
System Configuration
Services Configuration
Pick a serviceConfigure page-by questionsfor static subscription setsConfigure page-by questionsfor dynamic subscription setsSet storage mappings fordynamic subscription sets
Define channelsSpecify device typesSelect default devicesSelect device settingsChoose information sourcesettingsConfigure other siteproperties
Site Preferences

Database connections 157
CONCEPTS
Subscription Portal applicationThe Subscription Portal application is a set of Web pages that provide the administrative and end user interfaces to Subscription Portal functionality. This application must be installed on a machine on which the Microsoft Internet Information Server World Wide Web publishing service has been installed and properly configured.
Portal RepositoryA Portal Repository is a specific set of tables defined by the Subscription Portal, located in a database, and identified by a certain table prefix. The tables for each Portal Repository can be given a unique table prefix, so that multiple Portal Repositories can exist in the same physical database instance. Each Portal Repository can store the definitions of one or more sites. Multiple Subscription Portal systems can also share the same set of Portal Repository tables.
Table prefixes for the Portal Repository
When you select the database connection that corresponds to the database you will use for the Portal Repository, you can enter a table prefix that will be used to prefix the names of all the Portal Repository tables in this database. This is useful if you want to have multiple independent Portal Repositories in the same physical database. If you are selecting a database in which Portal Repository tables have already been created and you want to reuse those tables, enter the same table prefix as the existing tables. If you enter a table prefix for which Portal Repositories tables have not been created, Subscription Portal creates those tables in the selected database.
Database connectionsThe first time you configure Subscription Portal, you must create a database connection for each of the databases to which you will connect. Subscription Portal connects to three information repositories:• Portal Repository• Object Repository• Subscription Book RepositoryThese information repositories, which can reside in the same database or separate databases, are described in detail in their corresponding sections.

158 Chapter 7 User Self Subscription
CONCEPTS
When you create a new database connection, the information entered is the same for all three repositories:• a name by which you want to refer to the connection you are creating • the type of the database (SQL Server, Oracle, DB2, or Teradata) • the name of the machine on which SequeLink is installed and running • the name of the ODBC DSN on the SequeLink machine that
corresponds to the database to which you want to connect • the login ID and password that the Subscription Portal should use when
it accesses that database
Table prefixesTable prefixes are useful if you have multiple independent repositories in the same physical database. If you are selecting a database in which tables have already been created and you want to reuse those tables, be sure to enter the same table prefix as on the existing tables. This is always the case when selecting an Object Repository or a Subscription Book Repository because Subscription Portal does not create those tables.When selecting a Portal Repository, if you enter a table prefix for which tables have never been created, Subscription Portal creates those tables for you in the selected database.
Site definitionA site identifies a set of services that are made available through a portal for access by end users. A site is defined by a connection to a single Object Repository and Subscription Book Repository.In addition, the definition of a site contains a collection of channels plus a set of properties that define certain characteristics of the Subscription Portal. Since each site is associated with a single Object Repository, multiple sites must be created to provide access to services in multiple Object Repositories. The definition of a site and its related channels is stored in a Portal Repository. A site can only be made available to end users through a portal, but multiple portals can provide access to the same site.

Site definition 159
CONCEPTS
The properties contained within the site definition include:• Portal• Site name and description• Object Repository• Subscription Book Repository• Channels• Device types• Devices• Device settings• Information sources• Preferences
PortalA portal defines the Web location (URL) through which end users access Subscription Portal services and subscriptions. A portal is defined by a Web server virtual directory and provides access to one and only one site. Two or more portals can, however, provide access to the same site. This is most typically done on different Web servers so that clustering can be used to provide increased system performance for a high number of concurrent users. The definition of each portal and which site it accesses are defined and saved in the file system of the machine running the Subscription Portal Web server.
Deleting a Subscription Portal
Deleting a portal means the site is no longer accessible through that virtual directory. It does nothing to the site definition or properties that were configured through the site. The site would still be available for viewing through another portal, once that Subscription Portal has been configured to point to the site definition.
Site name and descriptionEach site definition should have a unique name and description so you know at a glance which properties are contained within the definition. This name and description is seen only by the portal administrator.

160 Chapter 7 User Self Subscription
CONCEPTS
Deleting a site definition
If you delete a site it does not delete the subscriptions users have created. However, it cuts off access to those subscriptions. End users cannot edit, add, or delete subscriptions from their list of services. Also, any portal using the deleted site definition must be reconfigured to use a different site definition.
Object RepositoryThe site definition includes the location of the Object Repository. This information repository is created using Narrowcast Administrator and stores services, documents, publications, scheduling information, and device definitions.If you edit the location of the Object Repository, you have redefined the site definition, which means that services might no longer be available. You might be better served to create a new site and point it to a different database connection. The option to change the location of the Object Repository after the site has been defined is most useful if the new repository is an exact copy of the original repository.For additional information about Object Repository properties refer to the MicroStrategy Narrowcast Server System Administrator Guide.
Table prefixes for the Object Repository
When you select the database connection that corresponds to the database you will use for the Object Repository, you can enter a table prefix to prefix the names of all the Object Repository tables in this database. If you used a table prefix when creating the Object Repository tables through Narrowcast Administrator, you must enter that same table prefix here.
Subscription Book RepositoryThe site definition includes the location of the Subscription Book Repository. This information repository is created by Narrowcast Administrator and stores the user information, addresses, personalization, and subscriptions. You should not change the location of the Subscription Book Repository after defining the site because users might no longer be able to log in to the portal and access their subscription information. The option to change the
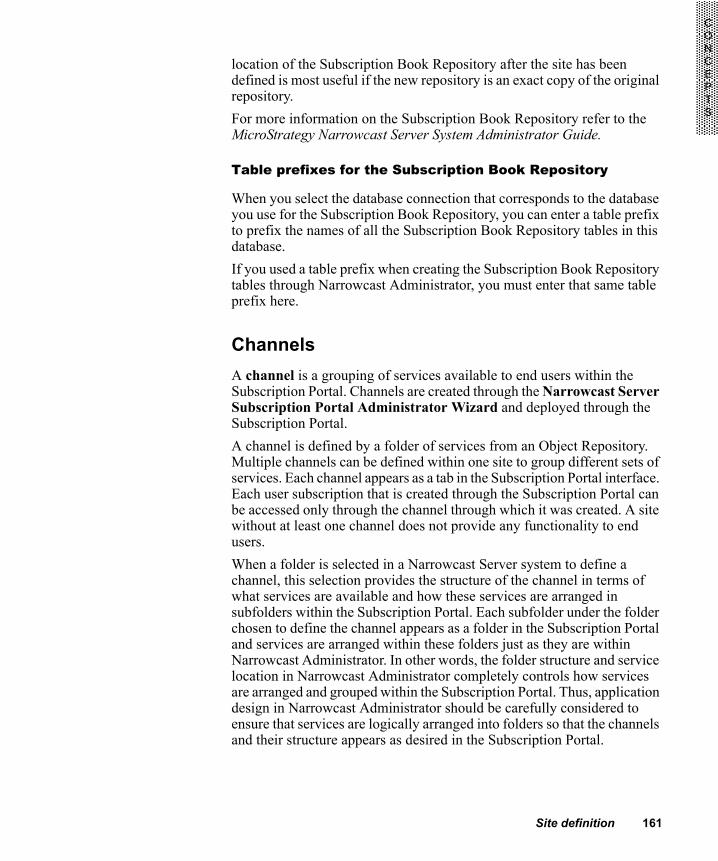
Site definition 161
CONCEPTS
location of the Subscription Book Repository after the site has been defined is most useful if the new repository is an exact copy of the original repository. For more information on the Subscription Book Repository refer to the MicroStrategy Narrowcast Server System Administrator Guide.
Table prefixes for the Subscription Book Repository
When you select the database connection that corresponds to the database you use for the Subscription Book Repository, you can enter a table prefix to prefix the names of all the Subscription Book Repository tables in this database. If you used a table prefix when creating the Subscription Book Repository tables through Narrowcast Administrator, you must enter that same table prefix here.
ChannelsA channel is a grouping of services available to end users within the Subscription Portal. Channels are created through the Narrowcast Server Subscription Portal Administrator Wizard and deployed through the Subscription Portal.A channel is defined by a folder of services from an Object Repository. Multiple channels can be defined within one site to group different sets of services. Each channel appears as a tab in the Subscription Portal interface. Each user subscription that is created through the Subscription Portal can be accessed only through the channel through which it was created. A site without at least one channel does not provide any functionality to end users. When a folder is selected in a Narrowcast Server system to define a channel, this selection provides the structure of the channel in terms of what services are available and how these services are arranged in subfolders within the Subscription Portal. Each subfolder under the folder chosen to define the channel appears as a folder in the Subscription Portal and services are arranged within these folders just as they are within Narrowcast Administrator. In other words, the folder structure and service location in Narrowcast Administrator completely controls how services are arranged and grouped within the Subscription Portal. Thus, application design in Narrowcast Administrator should be carefully considered to ensure that services are logically arranged into folders so that the channels and their structure appears as desired in the Subscription Portal.

162 Chapter 7 User Self Subscription
CONCEPTS
When a channel is created it is assigned a unique identification number. If a channel is deleted and then later recreated, it is assigned a different identification number in the Portal Repository database. One result of this is that end users cannot access, change, or delete services to which they have subscribed if the channel is deleted, or deleted and recreated.Publishing a channel consists of selecting a channel folder and entering a channel name and description.
Channel folders
Channel folders are the means by which services are grouped. Services can be published at any level within the folder structure. End users navigate through the Subscription Portal and select channel folders containing the services to which they want to subscribe.
Channel name and description
Once a folder has been selected from the Object Repository, a channel name and description must be entered. The name and description are visible to the end user through the Subscription Portal.
Device typesIn addition to defining channels, the portal administrator determines what devices are available to end users when they create addresses. Narrowcast Server can deliver content to a large variety of devices, and each service is designed to deliver content to some subset of these devices such as desktop e-mail clients or wireless devices. Thus, when users create addresses and subscribe to services via the Subscription Portal, they must be allowed to select devices that are supported by the services to which they are subscribing. This is controlled by the portal administrator using device types.A device type is a grouping of devices defined in a Subscription Portal to make it easier for a user to find a certain device. For example, all e-mail devices are in a grouping called E-mail. A device type is defined by selecting one or more folders of devices from the Object Repository. Each service defined in the Object Repository supports a specific list of devices. There is no need to allow users to create addresses using devices that are not supported in any services in your Narrowcast Server system.

Site definition 163
CONCEPTS
The four device types that Narrowcast Server Subscription Portal defines by default are:• mobile phone • pager • e-mail • personal digital assistantsThese device types simply organize the devices to be made available to your subscribers.If you do not plan to support any of the devices in a given device type, you can remove that type through the Portal Administrator Wizard. You can also define your own groupings of devices by creating a new device type definition.
Device folders
Devices are created by the system administrator in the Narrowcast Administrator Device Editor and stored in device folders. You can select groupings of devices and make them available to end users by selecting them through the Device Folders page in the Portal Administrator Wizard. The first time you access the Device Folders page it shows the four default device types. You can add additional folders to the available and selected tables by navigating through the folder structure.
DevicesA device is a format for receiving information content sent from Narrowcast Server to the subscriber of a specific service. These formats include settings such as Outlook 98, Outlook 2000, and a specific pager brand and model. New devices can be added to your system using Narrowcast Administrator.Each address that a user creates in the portal is designed for use with only one device. Refer to the MicroStrategy Narrowcast Server System Administrator Guide for more information on devices.
Device settingsEach subscription site can define which device is used as the device to deliver content to the “My Reports” page and which device is used by default when new addresses are created during subscription creation.

164 Chapter 7 User Self Subscription
CONCEPTS
Default device
The default device is used when the Subscription Portal automatically creates addresses. When a new user is created through the portal or when a user creates a subscription, the user can enter an address value directly without selecting a device. Those addresses are created using the device that you select as the default device. Only one device can be selected as a default device.
Portal device
This is a built-in device designed to deliver services to a Web page such as the Subscription Portal Reports page. You should only change this if you have built a customized version of the Web (Portal) information transmission module (ITM). For additional information on ITMs, refer to the MicroStrategy Narrowcast Server System Administrator Guide.
Information sourcesEach Narrowcast Server system supports a set of information sources. When Narrowcast Server connects to an information source to obtain content information, it uses authentication credentials that are specific to the information source. For example, when connecting to a MicroStrategy project, Narrowcast Server needs a login ID and password for that project.Narrowcast Server allows each user account to specify its own authentication credentials for each information source. If an authentication is specified for a certain user, that authentication is used for all connections to the specified information on behalf of that user. The definition of each information source also includes a default authentication that is used for all connections of any users for which no user-level authentication has been specified.
Site definition 165
CONCEPTS
Note: The user-level authentication, if specified, is used at design time. It is also used, if specified, at run time for personalized report execution. However, the default authentication is used at run time for personalized page execution. The default authentication allows the Narrowcast Server to connect to the Intelligence Server and retrieve personalized content for many subscriptions at once by executing a single report. Thus, the Narrowcast Server does not need to execute a duplicate report for each subscriber with the same personalization, which saves time and system resources.
The Portal Administrator Wizard allows you to specify whether user accounts created through the Subscription Portal interface are allowed to enter their own authentication credentials for each information source, or if the default credentials for that information source should be used instead.For each information source, you can select from the following options:• Use Project Credentials• Use User Credentials (required)• Use User Credentials (optional)
Use Project Credentials
When a new user account is created through the Subscription Portal interface, the user is not prompted to enter authentication credentials for this information source. Instead, all new accounts use the default authentication credentials as specified in the definition of the information source.
Use User Credentials (required)
When a new user account is created through the Subscription Portal interface, the user is required to enter a login ID and password to be used as authentication credentials for this information source. The user must enter valid credentials for connecting to the information source to create the new account.
Use User Credentials (optional)
When a new user account is created through the Subscription Portal interface, the user is prompted to enter a login ID and password to be used as authentication credentials for this information source. If the user

166 Chapter 7 User Self Subscription
CONCEPTS
chooses to do so, the login ID and password entered must be valid credentials for connecting to the information source. Alternatively, the user creating the account can choose to leave the login ID and password blank, in which case the new account uses the default authentication credentials as specified in the definition of the information source.
PreferencesThe Preferences section controls how the default values are set for users of the portal interface. It includes settings for• enabling/disabling creation of new users• selecting default user account expiration settings (Expired users no
longer receive messages from the services to which they have subscribed.)
• designating default values for DHTML settings• specifying the location of temporary files (Subscription Portal can
optionally create temporary files for performance purposes. If these files are needed, you should periodically delete any files that have not been cleaned up automatically. In most cases, temporary files are deleted after a subscription is created. However, if a user cancels before a subscription is complete, these files might not be cleaned up correctly in all cases.)
• providing administrative contact information• specifying available and supported user login modes• specifying prompt governing settingsAdditional information on these settings is included in the Interface section of this book.

Services configuration 167
CONCEPTS
Services configurationThe diagram below illustrates the steps necessary to configure services with page-by questions.
Before you begin configuring services with page-by questions it is important that you have a strong understanding of personalized page execution (page-by) question objects and dynamic subscription sets. You should also review chapter 9, Advanced Subscription Portal Configuration for examples of advanced configurations and when you would use the Services Configuration section of the Portal Administrator Wizard.It is not necessary to configure all services through the Services Configuration section of the Portal Administrator Wizard. Only those services using either personalized page execution or dynamic subscription sets need to be configured using this interface.
Personalized page executionThe definition of each subscription created for a personalized service must include an answer for each question object in the service. When these answers are used in a subscription they are known as preference objects. The Delivery Engine uses preference objects during service execution to generate personalized content for each subscription. For any question objects that use personalized report execution, the preference object answers the prompt objects in the content information object. For question objects that use personalized page execution, or page-by questions, the preference object is a single attribute element ID that selects a specific page of data from the content information object.
Configure page-byquestions for dynamic
subscription sets
Configure page-byquestions for staticsubscription sets
Set storage mappingsfor dynamic subscription
sets
Pick a service

168 Chapter 7 User Self Subscription
CONCEPTS
During subscription creation, a personalization prompt object can be on the same attribute as the one in the page-by section of the content information object report. This allows the user to directly select which page of data to receive. The preference object for the page-by question is the ID of the attribute element that the user selects. You can also store a user’s answers to a personalization prompt object in a warehouse table. The preference object for the page-by question is an ID that maps to the user's answers for the subscription. The content information object will page by an attribute that corresponds to the column in the warehouse that contains the ID of the answer object.In either case, the preference object for the page-by question is an attribute element ID that corresponds to the same attribute used in the page-by section of the content information object.
Configuration through the Portal Administrator Wizard
For each service that uses page-by questions, you must indicate to the Subscription Portal the value to use as the preference object for each page-by question in the service. The Services Configuration section of the Portal Administrator Wizard allows you to indicate the values to be used through the settings described below.
Answer to another question
The most typical setting to use is Answer to another question. This allows you to select a question object, called an alternate question, that prompts the end user when a subscription is created. This alternate question collects the user's personalization for this subscription. You can select how and where the answer to that question is stored. This choice also determines whether the value that is used as the preference object for the page-by question is the ID of the attribute element that the user selects or the ID that references the answer object as stored in the warehouse.• Subscription Book Repository: If you choose the option to store the
answer to the alternate question in the Subscription Book Repository (SBR), the ID of the attribute element that the user selects in the prompt is written in the subscription as the preference object for the page-by question. This value then determines which page of data the subscription receives.

Services configuration 169
CONCEPTS
This option is only appropriate when the personalization for the content information object is on a single attribute and the user is restricted to selecting a single attribute element. The attribute on which the user is prompted should be the same attribute that is used in the page-by section of the content information object. To allow the user to personalize on multiple attributes or to select more than one attribute element, you must use the storage mapping approach described below.The SBR storage option is only available in two situations. First, the alternate question that is selected must contain only a single prompt object, which is an attribute element prompt, and the prompt definition is not set to require the selection of more than one element. Second, it could contain a single, constant value prompt. Additionally, user preferences are disabled for this question, so users are not able to save and reuse their answers to this question.When the SBR storage option is used with a dynamic subscription set, it does not mean that the user's answer is only stored in the SBR. The ID of the attribute element that the user selects can also be written to the warehouse when defining the mapping of the subscription information. This is described in more detail in the Dynamic subscription sets section.For an example using this option, see Scenario 1: Basic personalized page execution in chapter 9, Advanced Subscription Portal Configuration.
• Use a Storage Mapping: If you choose to store the answer to the prompt question in the warehouse using a storage mapping, the actual value or values that the user selects can be written to the warehouse. The ID given to that answer is written in the subscription as the answer to the page-by question. The storage mapping is defined to write to the same warehouse that contains the information content for the content information object. The ID of the answer object that corresponds to the user’s selections for each subscription is used to select the page of data that the subscription receives. The attribute on which the content information object is paged by should correspond to the column in the warehouse to which the answer ID is written.This approach allows◊ personalization on multiple attributes at the same time◊ the user to select more than one attribute element from each attribute◊ personalization to include constant values such as metric
qualificationsThe question object that is selected can contain any number of prompt objects, but each must be either an attribute element prompt or a constant value prompt.

170 Chapter 7 User Self Subscription
CONCEPTS
User preferences are enabled for questions that use storage mappings, so user answers are reusable. If the user picks an existing answer, or preference, to answer the prompt for a subscription, nothing new is written to the warehouse. The ID of the selected answer object is written as the answer to the page-by question in that subscription. The subscription ID is typically not included in the mapping of a question to the warehouse table, but if it is included, user preferences functionality is disabled for that question.For an example using this option, see Scenario 3: Page-by Answer ID in chapter 9, Advanced Subscription Portal Configuration.
Subscription ID
When Subscription ID is selected, the ID of the subscription is written as the preference object for the page-by question. Typically, this option is used in conjunction with the additional questions option. One or more additional questions are selected, and the storage for each is specified in the same manner as with alternate questions. For more detail, see Additional questions below.For an example using this option and a static subscription set, see Scenario 3: Page-by Answer ID in chapter 9, Advanced Subscription Portal Configuration. For an example using this option and a dynamic subscription set, see Scenario 5: Personalized dynamic subscription in chapter 9, Advanced Subscription Portal Configuration.
User ID
When User ID is selected, the ID of the user who is creating the subscription is written as the preference object for the page-by question. This option is typically used only when the warehouse already contains relationship information between the ID of the user and the personalization content that this user should receive.
Address ID
When Address ID is selected, the ID of the address that is selected for delivery of the subscription is written as the preference object for the page-by question. This option is typically used only when the warehouse already contains relationship information between the ID of each of the user's addresses and the personalization content that this user should receive when subscribing to that address.

Services configuration 171
CONCEPTS
Additional questions
This option is most commonly used in conjunction with the Subscription ID setting for static subscription sets. It is also used with dynamic subscription sets. The same restrictions on the question objects and the storage locations apply here as with alternate questions.• Subscription Book Repository: When used with static subscription
sets, this option is generally not selected, since without writing the personalization information to the warehouse, the personalization cannot be included in the content information object. However, this option can be used with dynamic subscription sets, because in that case the answer value can also be written to the warehouse as part of the subscription set mapping. The dynamic subscription set approach is typically used when the user's personalization value is stored in the same warehouse table as the subscription information. This option is not possible when using a storage mapping. Choosing the Subscription Book Repository (SBR) option in this case is the equivalent of “do not write anything to the warehouse specifically for this question, but save the answer for me so that I can use it as part of the subscription information when the subscription gets written to the warehouse.”
• Use a Storage Mapping:◊ Static subscription sets: This option is commonly used with static
subscription sets when the answer to the page-by question is set to the Subscription ID. In this case, the Subscription ID is written to the warehouse table and user preferences functionality is disabled, since the preference becomes subscription-specific. The attribute on which the content information object is paged by then corresponds to the column in the warehouse to which the Subscription ID is written. Multiple additional questions can be added to the same service for use in this manner, even if there is only one page-by question.For an example using this option and a static subscription set, see Scenario 3: Page-by Answer ID in chapter 9, Advanced Subscription Portal Configuration.
◊ Dynamic subscription sets: This option is sometimes used in conjunction with dynamic subscription sets to allow the user to enter additional personalization information that is written to the warehouse. The information can then be used as part of the subscription information object or the content information object. This option is employed instead of SBR when the personalization information must be written to a table other than the subscription information, the user selects multiple attribute elements, the user enters a constant value, or if user preferences are used.

172 Chapter 7 User Self Subscription
CONCEPTS
For an example using this option and a dynamic subscription set, see Scenario 5: Personalized dynamic subscription in chapter 9, Advanced Subscription Portal Configuration.
Dynamic subscription setsUsing dynamic subscription sets allows the Delivery Engine to retrieve a list of subscriptions from a warehouse rather than from the Subscription Book Repository (SBR). While the minimum requirement is that the subscription information object returns the ID of each subscription, any or all of the subscription information that Narrowcast Server needs to execute, personalize, and transmit a set of subscriptions can be retrieved from the warehouse instead of the SBR. If some of the information, such as the page-by question answer, that the Delivery Engine needs to personalize or transmit the subscriptions is not retrieved in the subscription information object, the Delivery Engine can retrieve that information from the SBR based on the Subscription ID returned in the subscription information object.By contrast, if all of the required information is retrieved in the subscription information object, no lookup in the SBR is necessary. This only occurs if the SBR tables are located in the warehouse, because the Subscription Portal writes user information such as address definitions only to the SBR. The Subscription Portal can write the address ID to the warehouse as part of a dynamic subscription mapping, but the Delivery Engine can obtain the address definition only by looking it up in the SBR based on the address ID retrieved from the warehouse. The Delivery Engine can also retrieve it directly from the warehouse by joining to the SBR addresses table.
Configuration through the Portal Administrator Wizard
For the Subscription Portal to create a subscription in a dynamic subscription set, the Subscription Portal must write subscription information to the warehouse. In general, at least the Subscription ID must be written to the warehouse. The exact information that the Subscription Portal must write depends on how the dynamic subscription set has been defined in Narrowcast Administrator.For each service that uses a dynamic subscription set, the Subscription Portal administrator must define which subscription information is written to the warehouse and to which columns and tables this information is written. The Services Configuration section of the Portal Administrator Wizard is used to configure this information.

Services configuration 173
CONCEPTS
The first step of configuring a dynamic subscription set through the Subscription Portal is to configure any page-by questions that are used in the service. This configuration is described in the Personalized page execution section.The next step is to define how and where the subscription information for the current dynamic subscription set is written to the warehouse. As mentioned before, the exact information that needs to be written to the warehouse depends on how the dynamic subscription set is defined. The information that the Subscription Portal can write to the warehouse for each subscription includes the standard subscription fields, other fields from the MSTRSubscriptions table in the SBR, and the answer value or answer for each alternate or additional question in the service.The standard subscription fields are:• SUBSCRIPTION_ID: Integer ID used to uniquely identify a
subscription. This value is used when the Subscription ID is used as the answer to a page-by question. This field references an object in the SBR.
• USER_ID: Globally unique identifier (GUID) used to identify the user to whom this subscription belongs. This field references an object in the SBR.
• ADDRESS_ID: GUID used to identify the address to be used for this subscription. This field references an object in the SBR.
The remaining fields from the MSTRSubscriptions table in the Subscription Book Repository, which reference an object in the Object Repository unless otherwise noted, are:• CREATED_BY: Narrowcast Server account that created this
subscription. This field is set to SUBSCRIPTIONS_PORTAL if it was created by the Subscription Portal.
• CREATED_DATE: Time stamp indicating when the subscription was created.
• EXPIR_DATE: Time stamp indicating when the subscription expires.• LAST_ACC_DATE: Time stamp indicating the last time this
subscription was retrieved in a subscription set resolution.• LAST_MOD_BY: Narrowcast Server account that last modified this
subscription. This field is set to SUBSCRIPTIONS_PORTAL if it was last modified by the Subscription Portal.
• LAST_MOD_DATE: Time stamp indicating when the subscription was last modified.
• STATUS: Status, either valid or invalid, of this subscription.
174 Chapter 7 User Self Subscription
CONCEPTS
• SUB_ACCOUNT_ID: GUID used to identify an external account ID. This field currently is not used by the Subscription Portal.
• SUB_GUID: Alternate ID (GUID) used to identify a subscription internally.
• SUB_SET_ID: GUID used to identify the subscription set to which this subscription belongs.
• TRANSPROPS_ID: GUID used to identify the transmission properties object to be used for this subscription. This field references an object in the SBR.
Finally, if an alternate or additional question was defined to be stored using the SBR option, the ID of the attribute element that the user selected can be written to the warehouse as part of the subscription information. If the question was stored in the warehouse using a question storage mapping, the ID of the answer object that corresponds to the user's selections can be written to the warehouse as part of the subscription information.For examples using these options, see Scenario 4: Non-personalized dynamic subscription and Scenario 5: Personalized dynamic subscription in chapter 9, Advanced Subscription Portal Configuration.

8C H A P T E R 8
175
CONCEPTS
8.Supporting Diverse User Populations 8
Narrowcast Server provides the ability to support a diverse population of users such as users in different languages and users who use different devices, such as e-mail clients and cell phones. These capabilities are enabled through the use of devices and locales. Devices and locales are discussed in greater detail in the following sections.
Multiple sets of user devicesA powerful feature of Narrowcast Server is the ability to format the same service content for multiple delivery methods and multiple end-user devices. To design applications to support different delivery methods and end user devices, it is helpful to understand how Narrowcast Server supports different types of devices and delivery methods using the information transmitters available to the system.Each information transmitter enables some number of devices that it supports for a delivery method. For example, the e-mail information transmitter supports Outlook 2000, Yahoo, and so on, while the Wireless information transmitter supports various phones, pagers and PDAs. Each device can control how documents are formatted and how information transmitters deliver content. As a result, a message generated for Outlook 2000 might be formatted differently than a message generated for Yahoo even though they use the same delivery method. Similarly, messages sent to one wireless device might have different transmission requirements than messages sent to a different device, even when the same information transmitter is used. Thus, when designing applications to support multiple devices, it is important to create an appropriate set of end user devices that provide the formatting and delivery characteristics you desire and create a service that both supports the desired devices and provides appropriate content for these devices.To illustrate further, each publication in a service supports a set of devices for the corresponding delivery method. Each address that is subscribed to a service selects a device. Subscriptions will only receive content if the

176 Chapter 8 Supporting Diverse User Populations
CONCEPTS
address device matches one of the devices supported by the publication. Each device then controls the formatting and transmission of content that is delivered to subscriptions that use this device.New devices can be created by right-clicking the Devices folder under Administration. For more information on devices, see the MicroStrategy Narrowcast Server System Administrator Guide. In addition, the devices supported by a particular delivery method within a service can be edited within the Service Wizard on the content page for each delivery method.Narrowcast Server provides a wide variety of devices out of the box. Additional devices can be imported by right-clicking the Devices folder and selecting Import Devices. You are then asked to select a device file (.dvc). This can be helpful, for example, during upgrade if all desired SMTP devices do not exist under the desired information transmitter. It can also be helpful if subsequent device fixes of device sets are released by MicroStrategy and you want to add these to your system. For more information on how this functionality can be helpful when upgrading from MicroStrategy Broadcaster, see the MicroStrategy Narrowcast Server Upgrade Guide.
Note: Large numbers of devices for an information transmitter can impact the speed of some user interfaces such as the Service Editor and Publication Wizard.
The Service Wizard should support most of your needs when creating services to support different devices. The one limitation is that you can only create one publication per delivery method. For example, you cannot create one publication for Microsoft clients and a second publication for Internet-based clients and use the same information transmitter. If you need to implement this type of functionality, you can either use the Service Editor, which can add multiple publications for the same information transmitter, or you can create multiple information transmitters and create the appropriate devices for each information transmitter.
Multiple languages and localesAnother powerful capability of Narrowcast Server is the ability to support users with different language or regional preferences in the same service. Thus, content can be designed and created once and subscribed to by all users regardless of their regional preferences. In Narrowcast Server, this is

Multiple languages and locales 177
CONCEPTS
accomplished through the use of locales. Locales control which information end users receive and how content is retrieved, formatted and delivered to these users.
OverviewEach user specifies a locale for which he wants to receive content. This is done through the Subscription Portal when users subscribe themselves or it can be set in an advanced options tab in the User Properties Editor when an administrator controls users and subscriptions. When a publication is created, either using the Service Wizard or using the Publication Wizard, a specific locale is chosen. This is called the selection locale. Users are then matched to publications based on their chosen locale. In addition, each document is created to support one locale. This is called the execution locale and is set in the Properties dialog box for the document. The execution locale controls how information sources, document formatters, and information transmitters gather, format, and deliver content for this document. Thus, if one document is created for the English execution locale and a second document is created for a French execution locale, information sources can retrieve content in the correct language and character set and format numbers and dates according to the appropriate regional characteristics for each document. Note that the MicroStrategy information source supports locales, but it is up to the MicroStrategy Desktop administrator to ensure that content in the appropriate languages is available. Numbers and dates are formatted correctly automatically.You must add appropriate static content for each language in documents. As a result, locales typically require the use of multiple publications (one for each locale) for the same information transmitter. This type of application is best accomplished through the use of the Service Editor since the Service Wizard can only create one publication per information transmitter. For more information on using the Service Editor, see the following Interfaces topic:• Service Editor

178 Chapter 8 Supporting Diverse User Populations
CONCEPTS
Locale conceptsThe following concepts related to locales are used in Narrowcast Server:• Locale (administrative object): defined by the System Administrator
to specify how information should be retrieved, formatted, and transmitted for a particular region.
• Selection locale for a publication (administrative setting): locale selected within a service or publication to determine which content is delivered to users from a service. If the user’s selected locale matches the selection locale for the publication, the user receives that localized content.
• User locale (locale selected by user): locale chosen by end users to indicate regional preference. If the user’s selected locale matches the selection locale for a publication, the user receives that localized content.
• Execution locale (administrative setting): locale selected in a document to determine which locale should be used during service execution (content retrieval, document formatting, and delivery).
Locale processesLocales are used in two processes within Narrowcast Server:• Selection determines who receives what content. The Application
Designer designs one service with multiple sets of content defined for different sets of users with different regional preferences. If the selection local for a publication in the service definition matches the user locale, the users receive that content.
• Execution specifies how localized content is retrieved, formatted, and delivered. The execution locale in a document refers to the locale administrative object, which controls how information sources, document formatters, information transmitters, and compression (zip) processes handle regional characteristics.

Multiple languages and locales 179
CONCEPTS
Using localesThe following steps illustrate how locales can be configured and how they work with respect to multiple languages and locales.1. Create two locales using the Locale Editor, one for English (US) and one for French.2. For each locale, define the appropriate available settings for information sources, document formatters, information transmitters, and compression to control retrieval, formatting, and delivery.
◊ For a MicroStrategy information source, choose the language to be used by the MicroStrategy Intelligence Server (for example, English (US) or French).
◊ For the E-mail or Wireless SMTP Information Transmitter, choose the character set to use for delivery (for example, US ASCII or Western (ISO-8859-1)).
For some information sources, document formatters, and information transmitters, settings are not available.3. In the service (using the Service Wizard or the Publication Wizard), create two sets of content (that is, two publications) for two groups of users: English and French.4. Choose a selection locale for each publication to match the locales defined above. When users select French or English, they receive the appropriate content.5. For each document in each publication in the service, choose an execution locale as defined in step 2. This ensures that this locale’s settings are applied during service execution
◊ when information objects are retrieved (information source settings defined in the Locale Editor)
◊ when document formatters are used (no settings are available for PDF, HTML, plain text, or Excel)
◊ when information transmitters deliver information (information transmitter settings defined in the Locale Editor, where available)
Note: If no language is selected for a MicroStrategy information source in a locale definition (in the Locale Editor), the language selected in the information source definition is used by default. Otherwise this setting defined in the MicroStrategy information source is not used.

180 Chapter 8 Supporting Diverse User Populations
CONCEPTS
The following illustration summarizes the objects used in this sample service and how they are used:
Publication: P1 (Locale selection: French)
Document: D1 (Locale 1: French)
Information Object (IO1 from IS1)
Publication: P2 (Locale selection: English)
Document: D1 (Locale 2: English)
Information Object (IO2 from IS1)
Information Source: IS1 (Language: English)
Users: U1 (Locale selection: French) U2 (Locale selection: English)
Service
Locales
Locale 1: French
Information Source setting: French
Locale 2: English
Information Source setting: English
selection process
selection process
default if locale isnot fully defined
selection process
execution process
execution process
selection process
execution process
execution process
Information Transmitter setting: US ASCII execution process
Information Transmitter setting: US ASCII execution process

9C H A P T E R 9
181
CONCEPTS
9.Advanced Subscription Portal Configuration
9This section provides several examples of how applications can be designed to support self-subscription using Narrowcast Server Subscription Portal. Several examples are presented which illustrate various possible application design scenarios. The services in this section use both personalized page execution and dynamic subscription functionality. For more information on these topics see chapter 6, Page Personalization and Dynamic Subscriptions. Each scenario in this section explains the goal of the application design, discusses why this particular approach is chosen, outlines what has to be done using the MicroStrategy platform, and shows how the scenario works when complete.Each example consists of the following steps:1. Warehouse setup 2. Creation of MicroStrategy Desktop objects3. Definition of Narrowcast Server objects4. Service configuration through the Narrowcast Server Subscription Portal Administrator Wizard pages5. User subscription through the Subscription Portal6. Delivery via Narrowcast ServerThe general requirements for completing this section include the following:• Warehouse:
◊ ability to add tables for case numbers 2 (Subscription ID, value table), 3 (Answer ID, symbols table), 4, and 5 (Subscription data mapping table)

182 Chapter 9 Advanced Subscription Portal Configuration
CONCEPTS
• Desktop and Intelligence Server:◊ fully configured MicroStrategy project and Intelligence Server◊ Desktop administrator with permissions to add facts, metrics, and
attributes to the project, and to update the warehouse catalog and schema for the project
• Narrowcast Server:◊ fully configured Narrowcast Server system◊ information source configured to access the MicroStrategy project◊ Narrowcast Server user defined in this system (for testing services)◊ fully configured Narrowcast Server Subscription Portal◊ subscription site defined to access the Object Repository of your
Narrowcast Server system◊ database connection pointing to your warehouse
The following table summarizes the scenarios that are covered in this section.
Scenario Number
Scenario Name
Subscription Set
Page-By? Alternate/Additional Question Object?
Writing to Warehouse?
User Preference Support?
1 Scenario 1: Basic personalized page execution
Static On any content-related attribute (not Subscription ID or Answer ID); in this example, “Country”
Yes No No
2 Scenario 2: Page-by Subscription ID
Static Subscription ID; store Subscription ID as the preference in the Subscription Book Repository
Yes Yes; Subscription ID and the alternate question object answer value (Subscription_ID, threshold)
No
3 Scenario 3: Page-by Answer ID
Static Portfolio ID; store Portfolio ID as Answer ID
Yes Yes; Answer ID and the alternate question object answer value (Answer_ID, Symbol)
Yes
4 Scenario 4: Non-personalized dynamic subscription
Dynamic None No Yes; Subscription ID, Address ID, and User ID
N/A

Scenario 1: Basic personalized page execution 183
CONCEPTS
Scenario 1: Basic personalized page executionThis case is the most basic form of personalized page execution. The personalization for each subscription is a single attribute element, which corresponds to a page of data in a multi-page report. Subscription Portal prompts the user to choose an attribute element and writes this preference directly to the Subscription Book Repository. Narrowcast Server then runs the service and delivers the corresponding page of the report to the user based on the Subscription Book Repository preference. The report used as the content information object can be based on any attribute in any project, as long as the report has the personalization attribute in the page-by section.This approach is appropriate when you want to avoid executing a single query against the warehouse for each personalization value that a user might select when creating a subscription. This approach only works when the personalization for each information object is on a single attribute, and each subscription can specify only a single attribute element value. To allow personalization on multiple attributes or to allow subscribers to select more than one attribute element for each subscription, consider Scenario 3.
Change the warehouseNo changes are necessary.
5 Scenario 5: Personalized dynamic subscription
Dynamic Subscription ID Yes Yes; Subscription ID, Address ID, User ID, and the alternate question object answer value
No
Scenario Number
Scenario Name
Subscription Set
Page-By? Alternate/Additional Question Object?
Writing to Warehouse?
User Preference Support?

184 Chapter 9 Advanced Subscription Portal Configuration
CONCEPTS
Create objects in the MicroStrategy Desktop interface1. Create a report with the personalization attribute in the page-by section. (Suggested name: Report 1.1 Information Object)2. Create an attribute-element prompt for the attribute that you are paging by.3. Create a report using the attribute-element prompt. Other than the prompt, the rest of the definition of this report is irrelevant. (Suggested name: Report 1.1 Alternate Question Object)
Note: Subscription Portal can only display the page-by attribute elements to a user through a prompt interface. Therefore, an attribute-element prompt for the page-by attribute must be created, and an alternate question object report containing this prompt must be created and configured for each personalized page question object.
For more information, refer to the MicroStrategy Basic Reporting Guide and the MicroStrategy Advanced Reporting Guide.
Create objects in Narrowcast Administrator1. Create an information object from within Narrowcast Administrator (role: “Content Information Object”; Report Execution Method (under Advanced Properties, Report Execution tab): “Personalized Page Execution”) using Report 1.1 Information Object (Suggested name: 1.1 Personalized Page Content Information Object).2. Create a service with a document using the content information object.3. Create a static subscription set and add it to the definition of the service using whatever schedule is desired.
Note: You should create a new subscription set for each service as Subscription Portal does not recognize subscription sets that are used in more than one service.
4. Subscribe your user to this subscription set.

Scenario 1: Basic personalized page execution 185
CONCEPTS
5. Personalize the subscription at the subscription level for the content information object by selecting an attribute element value.6. Run the service to test and verify the results.7. Create a question object using Report 1.1 Alternate Question Object with Report Execution Method (under Advanced Properties, Report Execution tab) set to “Personalized Report Execution”. (Suggested name: 1.1 Alternate Question Object)
Configure with the Portal Administrator Wizard1. Use the Services Configuration page of the Portal Administrator Wizard to select the service that was created in the Narrowcast Administrator.2. On the Static Subscriptions page, click Configure to define the configuration for all the static subscription sets in this service.3. On the Configure Subscription Set page, mark the page-by question (1.1 Page-by Information Object) as “Page-by: Answer to another question”.4. Browse for the alternate question and choose the Question Object 1.1 Alternate Question Object.5. For storage of the alternate question, select the option to Use the Subscription Book Repository (as opposed to defining a storage mapping).6. Skip the Dynamic Subscription Configuration page for this service.
Try it!1. Go to the Subscription Portal end user interface.2. Select the service that was created in Narrowcast Administrator.3. After selecting a schedule and delivery location, you are prompted to choose an attribute element.4. On the Subscriptions page, you see that there are now two subscriptions to the service.5. Run the service in Narrowcast Administrator.6. In the Subscription Portal end user interface, verify the delivery of both subscriptions with the correct content to the address selected when the subscription was created.

186 Chapter 9 Advanced Subscription Portal Configuration
CONCEPTS
How it works1. When a user subscribes to this service through Subscription Portal, Subscription Portal determines that there is an alternate question object defined for this service. Subscription Portal retrieves the definition of the attribute element prompt from MicroStrategy Intelligence Server and shows that prompt to the user.2. The user answers the prompt by selecting a single attribute element.3. Subscription Portal creates an entry in the Subscription Book Repository for the new subscription. The definition of this subscription contains a preference object that is associated with Example 1 Page-by Information Object. The value of the preference object is the ID of the attribute element that the user selected, since “Answer to another question” was specified as the page-by answer for this question on the Portal Administrator Wizard Services Configuration page. Subscription Portal also stores the user's answer to the prompt in the Subscription Book Repository, as a preference object that is associated with the Example 1 Alternate Question Object.4. When Narrowcast Server runs the service, it first retrieves a list of subscriptions to this service from the Subscription Book Repository. For each subscription, Narrowcast Server retrieves the value of the preference object that corresponds to Example 1 Page-by Information Object, also from the Subscription Book Repository. Narrowcast Server then executes the report associated with the content information object just once. The results of this report contain data for all of the elements of the page-by attribute. Narrowcast Server uses the value of the preference object for each subscription, which in this case is the ID of the page-by attribute element, as the page-by value to personalize the content of the information object. Each page of data includes only the data that corresponds to the selected attribute element.
Scenario 2: Page-by Subscription IDWhen the user signs up for this service, the portal administrator wants the user to be prompted to enter a threshold value. The user then receives a service whose content includes a list of stocks whose percent change was greater than that value.The approach used in this example allows the Narrowcast Server application designer to use personalized page execution and to store the subscriber's preference value in the warehouse. This value is not

Scenario 2: Page-by Subscription ID 187
CONCEPTS
necessarily returned in the report but is used to calculate which data are returned. In this example, the subscriber chooses a stock alert threshold percentage. The report has a filter that returns only symbols whose percent change was greater than the threshold entered by the subscriber. The threshold values must be stored on the Subscription ID level and are more easily manipulated as metrics in the warehouse (rather than as preference objects in the Subscription Book Repository).You can choose this approach because you want to take advantage of the performance of personalized page execution (only execute one query against the warehouse). In this case, the user's personalization needs to be stored in the warehouse. You might also want to have easy access to each subscriber's personalization values, which is only feasible when the personalization information is stored in the warehouse. In this case, you choose to page by Subscription ID because that allows the personalization to be at the subscription level, but the threshold value is not reusable (that is, the User Preferences feature is disabled for this question in the Subscription Portal interface).This example assumes that your warehouse contains a populated table with a list of stock symbols and associated facts. The table is assumed to have the following columns:SYMBOL, LAST_TRADE_PRICE, and PCT_CHANGE
(Suggested name: LU_SYMBOLS)
Change the warehouse1. Create an empty table in the warehouse to hold the Subscription ID and the stock alert threshold, with the following columns:MR_USER_ID, MR_SUB_ID and THRESHOLD
(Suggested name: SUB_THRESHOLD)
Create objects in the MicroStrategy Desktop interface1. Update the warehouse catalog of your project.2. Create an attribute based on the Symbol column of the LU_SYMBOLS table.3. Create metrics based on the LAST_TRADE_PRICE and PCT_CHANGE columns of the LU_SYMBOLS table.4. Create an attribute based on the MR_SUB_ID column of the SUB_THRESHOLD table.

188 Chapter 9 Advanced Subscription Portal Configuration
CONCEPTS
5. Create a metric based on the THRESHOLD column of the SUB_THRESHOLD table.6. Update the schema of your project.7. Create a report with the Subscription attribute in the page-by section. Include the Symbol attribute and the metrics in the rows of the report. Include a metric qualification in the filter of the report where Pct change >= Threshold. (Suggested name: Report 1.2 Information Object)
Note: This report should generate SQL similar to the following:Select a.MR_SUB_ID, b.SYMBOL, sum(b.LAST_TRADE_PRICE), sum(b. PCT_CHANGE)from SUB_THRESHOLD a, LU_SYMBOLS b where sum(b.PCT_CHANGE)>=sum(a.THRESHOLD) group by a.MR_SUB_ID, b.SYMBOL
8. Create a numeric value prompt that is used to prompt the subscriber for the threshold.9. Create a report using the value prompt. Other than the prompt, the rest of the definition of this report is irrelevant. (Suggested name: Report 1.2 Additional Question Object)For more information, refer to the MicroStrategy Basic Reporting Guide and the MicroStrategy Advanced Reporting Guide.
Create objects in Narrowcast Administrator1. Create an information object from within Narrowcast Administrator (role: “Content Information Object”; Report Execution Method (under Advanced Properties, Report Execution tab): “Personalized Page Execution”) using Report 1.2 Information Object. (Suggested name: 1.2 Personalized Page Content Information Object)2. Create a service with a document using the content information object.3. Create a static subscription set and add it to the definition of the service using whatever schedule is desired.

Scenario 2: Page-by Subscription ID 189
CONCEPTS
Note: You should create a new subscription set for each service as Subscription Portal does not recognize subscription sets that are used in more than one service.
4. Create a question object using Report 1.2 Additional Question Object with Report Execution Method (under Advanced Properties, Report Execution tab) set to “Personalized Report Execution”. (Suggested name: 1.2 Additional Question Object)
Configure with the Portal Administrator Wizard1. Use the Services Configuration page of the Portal Administrator Wizard to select the service that was created in Narrowcast Administrator.2. On the Static Subscriptions page, click Configure to define the configuration for all the static subscription sets in this service.3. On the Configure Subscription Set page, mark the page-by question (1.2 Page-by Information Object) as “Page-by: Subscription ID”.4. Browse for an additional question and choose the question object 1.2 Additional Question Object.5. For storage of the additional question, choose to create a new storage mapping.6. Select the database connection that corresponds to your warehouse and select the SUB_THRESHOLD table created for this example.7. Using the available answer components, map User ID to the MR_USER_ID column of the SUB_THRESHOLD table, Subscription ID to the MR_SUB_ID column, and the Prompt Answer to the THRESHOLD column.8. Skip the Dynamic Subscription Configuration page for this service.
Try it!1. Go to the Subscription Portal end user interface.2. Select the service that was created in Narrowcast Administrator.3. After selecting a schedule and delivery location, you are prompted to enter a threshold value. (Be sure to select a value that is less than or equal to at least one value in the LU_SYMBOLS table.)

190 Chapter 9 Advanced Subscription Portal Configuration
CONCEPTS
4. On the Subscriptions page, you see that there is now one subscription to the service.5. If you view the contents of the SUB_THRESHOLD table in the warehouse, you see that a record has been inserted for the subscription you just created.6. Run the service in Narrowcast Server.7. In the Subscription Portal end user interface, verify the delivery of the subscription with the correct content to the address selected when the subscription was created.
How it works1. When a user subscribes to this service through Subscription Portal, Subscription Portal determines that there is an additional question object defined for this service. Subscription Portal retrieves the definition of the value prompt from MicroStrategy Intelligence Server and shows that prompt to the user (the threshold prompt).2. The user answers the prompt by entering a numeric value.3. Subscription Portal inserts a single record into the SUB_THRESHOLD table in the warehouse, as specified by the Portal Administrator Wizard additional question mapping. This record includes the Narrowcast Server User ID, the Subscription Portal-generated Subscription ID, and the numeric value the user entered.4. Subscription Portal creates an entry in the Subscription Book Repository for the new subscription. The definition of this subscription contains a preference object that is associated with Example 2 Page-by Information Object. The value of the preference object is the Subscription ID, since that is what was specified as the page-by answer for this question on the Portal Administrator Wizard Services Configuration page. Subscription Portal also stores the user's answer to the prompt in the Subscription Book Repository, as a preference object that is associated with the Example 2 Additional Question Object.

Scenario 3: Page-by Answer ID 191
CONCEPTS
5. When Narrowcast Server runs the service, it first retrieves a list of subscriptions to this service from the Subscription Book Repository. For each subscription, Narrowcast Server retrieves the value of the preference object that corresponds to Example 2 Page-by Information Object, also from the Subscription Book Repository. Narrowcast Server then executes the report associated with the content information object just once. The results of this report contain data for all of the subscriptions that were written to the SUB_THRESHOLD. Narrowcast Server uses the value of the preference object for each subscription, which in this case is the Subscription ID, as the page-by value to personalize the content of the information object. Each page of data includes only those stocks that meet the condition determined by the subscription's threshold value.
Scenario 3: Page-by Answer IDWhen the user signs up for this service, the portal administrator wants him to be prompted to select a set of stocks that he is interested in from a list that is presented to him. The content of the service that the user receives includes detailed information about each of these stocks. While creating the subscription, the user should be able to save the list of stocks with a name, so that when creating other subscriptions to this or other services the user can select from any of those saved lists.The approach used in this example allows the Narrowcast Server application designer to use personalized page execution, and gives the user the option of choosing more than one attribute element as a preference object. (Scenario 1 limits the user to only a single attribute element per Information Object.) In this example, the subscriber can choose multiple symbols as his preference. Each symbol is written to a table in the warehouse that relates a Subscription Portal-generated Answer ID to the selected symbols. This same Answer ID is stored in the Subscription Book Repository as the preference object of the subscription, and the content information object will page by Answer ID. When the service is run, the user receives all the stock information related to the Answer ID of the subscription. You can choose this approach because you want to take advantage of the performance of personalized page execution (only execute one query against the warehouse). This requires the user's personalization to be stored in the warehouse. You might also want to have easy access to each subscriber's personalization values, which is only feasible when the personalization information is stored in the warehouse. In this case, you choose to page by Answer ID because that allows the personalization to be at the subscription level, while not requiring the content information object

192 Chapter 9 Advanced Subscription Portal Configuration
CONCEPTS
to return duplicate data if the user subscribes to this service more than once using the same set of stocks (stored in a user preference), as would be the case if the page-by was by Subscription ID.This example assumes that your warehouse contains a populated table with a list of stock symbols and associated facts. The table is assumed to have the following columns:SYMBOL, LAST_TRADE_PRICE, and PCT_CHANGE
(Suggested name: LU_SYMBOLS)
Change the warehouse1. Create an empty table in the warehouse to hold the Answer ID and the selected stock symbols, with the following columns:MR_USER_ID, ANSWER_ID, and SYMBOL
(Suggested name: REL_ANSWER_SYMBOL)where the ANSWER_ID column gets populated by the Subscription Portal with a Preference_ID which is a 32-character-long GUID.
Create objects in the MicroStrategy Desktop interface1. Update the warehouse catalog of your project.2. Create an attribute based on the Symbol column of the LU_SYMBOLS table.3. Create metrics based on the LAST_TRADE_PRICE and PCT_CHANGE columns of the LU_SYMBOLS table.4. Create an attribute based on the ANSWER_ID column of the REL_ANSWER_SYMBOL table. Define a parent-child relationship between the ANSWER_ID attribute and the Symbol attribute.5. Update the schema of your project.6. Create a report with the ANSWER_ID attribute in the page-by section. Include the Symbol attribute and the metrics in the rows of the report. (Suggested name: Report 1.3 Information Object)

Scenario 3: Page-by Answer ID 193
CONCEPTS
Note: This report should generate SQL similar to the following:Select a.ANSWER_ID, a.SYMBOL, sum(b.LAST_TRADE_PRICE), sum(b. PCT_CHANGE) from REL_ANSWER_SYMBOL a, LU_SYMBOLS b where a.SYMBOL=b.SYMBOLgroup by a.ANSWER_ID, a.SYMBOL
7. Create an attribute-element prompt on the Symbol attribute.8. Create a report using the attribute-element prompt. Other than the prompt, the rest of the definition of this report is irrelevant. (Suggested name: Report 1.3 Alternate Question Object) For more information, refer to the MicroStrategy Basic Reporting Guide and the MicroStrategy Advanced Reporting Guide.
Create objects in Narrowcast Administrator1. Create an information object from within Narrowcast Administrator (role: “Content Information Object”; Report Execution Method (under Advanced Properties, Report Execution tab): “Personalized Page Execution”) using Report 1.3 Information Object. (Suggested name: 1.3 Personalized Page Content Information Object)2. Create a service with a document using the content information object.3. Create a static subscription set and add it to the definition of the service using whatever schedule is desired.
Note: You should create a new subscription set for each service as Subscription Portal does not recognize subscription sets that are used in more than one service.
4. Create a question object using Report 1.3 Alternate Question Object with Report Execution Method (under Advanced Properties, Report Execution tab) set to “Personalized Report Execution”. (Suggested name: 1.3 Alternate Question Object)

194 Chapter 9 Advanced Subscription Portal Configuration
CONCEPTS
Configure with the Portal Administrator Wizard1. Use the Services Configuration page of the Portal Administrator Wizard to select the service that was created in Narrowcast Administrator.2. On the Static Subscriptions page, click Configure to define the configuration for all the static subscription sets in this service.3. On the Configure Subscription Set page, mark the page-by question (1.3 Page-by Information Object) as “Page-by: Answer to another question”.4. Browse for the alternate question and choose the question object 1.3 Alternate Question Object.5. For storage of the alternate question, choose to create a new storage mapping.6. Select the database connection that corresponds to your warehouse and select the REL_ANSWER_SYMBOL table created for this example.7. Using the available answer components, map User ID to the MR_USER_ID column of the REL_ANSWER_SYMBOL table, Answer ID to the ANSWER_ID column, and the Prompt Answer to the SYMBOL column.8. Skip the Dynamic Subscription Configuration page for this service.
Try it!1. Go to the Subscription Portal end user interface.2. Select the service that was created in Narrowcast Administrator.3. After selecting a schedule and delivery location, you are prompted to select one or more stocks from a list. You have the option to save your selections under a name you choose.4. On the Subscriptions page, you see that there is now one subscription to the service.5. If you view the contents of the REL_ANSWER_SYMBOL table in the warehouse, you see that a record has been inserted for each of the selected stocks in the subscription you just created.6. Run the service in Narrowcast Server.7. In the Subscription Portal end user interface, verify the delivery of the subscription with the correct content to the address selected when the subscription was created.

Scenario 3: Page-by Answer ID 195
CONCEPTS
How it works1. When a user subscribes to this service through Subscription Portal, Subscription Portal determines that there is an alternate question object defined for this service. Subscription Portal retrieves the definition of the stock symbol prompt from MicroStrategy Intelligence Server and shows that prompt to the user.2. The user answers the prompt by selecting one or more stock symbols from the list.3. Subscription Portal inserts one record into the REL_ANSWER_SYMBOL table for each stock that the user selects, as specified by the Portal Administrator Wizard alternate question mapping. Each record includes the Narrowcast Server User ID, the Subscription Portal-generated Answer ID, and the stock symbol.4. Subscription Portal creates an entry in the Subscription Book Repository for the new subscription. The definition of this subscription contains a preference object that is associated with Example 3 Page-by Information Object. The value of the preference object is the Answer ID that was written to the warehouse, since “Answer to another question” was specified as the page-by answer for this question on the Portal Administrator Wizard Services Configuration page. Subscription Portal also stores the user's answer to the prompt in the Subscription Book Repository, as a preference object that is associated with the Example 3 Alternate Question Object.5. When Narrowcast Server runs the service, it first retrieves a list of subscriptions to this service from the Subscription Book Repository. For each subscription, Narrowcast Server retrieves the value of the preference object that corresponds to Example 3 Page-by Information Object, also from the Subscription Book Repository. Narrowcast Server then executes the report associated with the content information object just once. The results of this report contain data for all of the preferences that were written to the REL_ANSWER_SYMBOL table. Narrowcast Server uses the value of the preference object for each subscription, which in this case is the Answer ID that was written to the warehouse, as the page-by value to personalize the content of the information object. Each page of data includes those stocks that correspond to the user's selections for the subscription.

196 Chapter 9 Advanced Subscription Portal Configuration
CONCEPTS
Scenario 4: Non-personalized dynamic subscription
When the user signs up for this service, there is no personalization to be set. The subscriber can choose to receive the service or not, but everyone who receives it receives the same content.This example illustrates writing subscription information to the warehouse and retrieving it via a dynamic subscription set from the warehouse (previously known as a Dynamic Recipient List). The subscription information object returns Subscription IDs that match specific report filtering conditions. In this case, the subscription information object report brings back subscriptions based on a specific Subscription Set ID, which was associated with the service for which subscribers have signed up.Storing dynamic subscription sets and storing subscription information in a warehouse has many advantages, such as providing the ability to manage, analyze, filter, or even populate and modify subscription information from sources other than Narrowcast Server. It also allows the Narrowcast Server system administrator a large amount of flexibility in determining the structure of the tables that will hold the subscription information, which is not possible using static subscription sets.
Change the warehouse1. Create an empty table in the warehouse to hold the information about each subscription, with the following columns:MR_SUB_ID, MR_ADDRESS_ID, MR_USER_ID and MR_SUB_SET_ID
(Suggested name: WH_SUBSCRIPTIONS)
Note: Other fields can be added if useful. This example only uses these fields.
Create objects in the MicroStrategy Desktop interface1. Update the warehouse catalog of your project.2. Create attributes based on the Subscription ID, Address ID, User ID, and Subscription Set ID columns of the WH_SUBSCRIPTIONS table.

Scenario 4: Non-personalized dynamic subscription 197
CONCEPTS
3. Update the schema of your project.4. Create a report to be used as the content information object in your service. This can be any non-prompted report. (Suggested name: Report Example 4 Content Information Object)5. Create a report to be used as a subscription information object with the Subscription ID, Address ID, and User ID attributes in the page-by section in that order. (Suggested name: Report Example 4 Subscription Information Object)Optional: Include an attribute qualification in the filter of the report where Subscription Set ID = “SS for Example 4”. This allows you to store the subscriptions belonging to multiple subscription sets in the same warehouse table.For more information, refer to the MicroStrategy Basic Reporting Guide and the MicroStrategy Advanced Reporting Guide.
Create objects in Narrowcast Administrator
Note: You need to use an information source that is configured to support dynamic subscriptions. For more information, refer to the MicroStrategy Narrowcast Server System Administrator Guide, chapter 15, Information Source Wizard.
1. Create an information object from within Narrowcast Administrator (role: “Content Information Object”; Report Execution Method (under Advanced Properties, Report Execution tab): “Personalized Report Execution”) using Report Example 4 Content Information Object. (Suggested name: Example 4 Content Information Object) 2. Create an information object from within Narrowcast Administrator (role: “Subscription Information Object”) using Report Example 4 Subscription Information Object. On the Source of Subscription Information page, select the Select or define a report and return dynamic subscription information from the selected report check box. Map Address ID and User ID to the corresponding page-by attributes, and set the rest of the delivery information fields to “Retrieve from Subscription Book”. (Suggested name: Example 4 Subscription Information Object)

198 Chapter 9 Advanced Subscription Portal Configuration
CONCEPTS
3. Create a service with a document using the content information object. (Suggested name: Example 4 Service)4. Create a dynamic subscription set using the subscription information object from step 2. Ensure that the dynamic subscription set is defined to automatically segment subscriptions. Add this subscription set to the definition of the service using whatever schedule is desired. (Suggested name: Example 4 Dynamic Subscription Set)
Note: Create a new subscription set for each service as Subscription Portal does not recognize subscription sets that are used in more than one service.
Configure with the Portal Administrator Wizard1. Use the Services Configuration page of the Portal Administrator Wizard to select service Example 4 Service.2. Skip the Static Subscription Configuration page for this service.3. On the Dynamic Subscriptions Configuration page, choose to configure subscription set Example 4 Dynamic Subscription Set.4. On the Configure Subscription Set page you have no page-by questions to configure because the content is non-personalized, and you do not need to add any additional questions.5. Dynamic subscription sets require a subscription storage mapping. Select the database connection that corresponds to your warehouse and select the WH_SUBSCRIPTIONS table that was created for this example.6. Using the available subscription components, map Subscription ID to the MR_SUB_ID column of the WH_SUBSCRIPTIONS table, Address ID to the MR_ADDRESS_ID column, and the User ID to the MR_USER_ID column.Optional: Using the Custom Value field, map the string SS for Example 4 to the MR_SUB_SET_ID column. This makes it possible for the subscription information object report to filter on only those subscriptions that were created using this dynamic subscription set.

Scenario 4: Non-personalized dynamic subscription 199
CONCEPTS
Try it!1. Go to the Subscription Portal end user interface.2. Select the service Example 4 Service that was created in Narrowcast Administrator.3. After selecting a schedule and delivery location, the subscription is created.4. On the Subscriptions page, you see that there is now one subscription to the service.5. If you view the contents of the WH_SUBSCRIPTIONS table in the warehouse, you see that a record has been inserted for the subscription you just created.6. Run the service in Narrowcast Server.7. In the Subscription Portal end user interface, verify the delivery of the subscription with the correct content to the address selected when the subscription was created.
How it works1. When a user subscribes to this service through Subscription Portal, Subscription Portal determines that there are no question objects defined for this service, so the user does not need to answer any prompts.2. Subscription Portal creates an entry in the Subscription Book Repository for the new subscription. 3. Subscription Portal inserts a single record into the WH_SUBSCRIPTIONS table in the warehouse, as specified by the Portal Administrator Wizard dynamic subscription set mapping. This record includes the Subscription Portal-generated Subscription ID, the ID of the address the user selected for this subscription, and the Narrowcast Server User ID.

200 Chapter 9 Advanced Subscription Portal Configuration
CONCEPTS
4. When Narrowcast Server runs the service, it first retrieves a list of subscriptions to this service from the warehouse by executing Example 4 Subscription Information Object. Narrowcast Server then executes the report associated with the content information object just once. Since this information object is not personalized, the same content is used for all subscriptions to this service. Finally, Narrowcast Server uses the Address ID from the subscription information object to look up the delivery address for each subscription in the Subscription Book Repository, as specified in the definition of Example 4 Subscription Information Object.
Scenario 5: Personalized dynamic subscriptionWhen the user signs up for this service, the portal administrator wants him to be prompted to enter a threshold value. The user then receives a service whose content includes a list of stocks whose percent change was greater than that value.The approach used in this example allows the Narrowcast Server application designer to use personalized page execution and to store the subscriber's preference value in the warehouse. This value is not necessarily returned in the report but is used to calculate which data are returned. In this example, the subscriber chooses a stock alert threshold percentage. The report has a filter that returns only symbols whose percent change was greater than the threshold entered by the subscriber. The threshold values must be stored on the Subscription ID level and are more easily manipulated as metrics in the warehouse (rather than as preference objects in the Subscription Book Repository).This example illustrates a dynamic subscription set with subscription-level personalization. It requires both a question object storage mapping (for the threshold value) and a subscription set storage mapping. As in Scenario 4, you are writing subscriptions to the warehouse and retrieving them via a dynamic subscription set from the warehouse. The subscription information object returns Subscription IDs based on the threshold filtering conditions. To the user, this case is no different than Scenario 2 in terms of the process of signing up for the service. However, since this example uses a dynamic subscription set, Narrowcast Server retrieves the list of subscriptions from a warehouse report instead of from the Subscription Book Repository. You can choose this approach because you want to take advantage of the performance of personalized page execution (only execute one query against the warehouse). In this case, the user's personalization needs to be stored in the warehouse. You might also want to have easy access to each subscriber's personalization values, which is only feasible when the

Scenario 5: Personalized dynamic subscription 201
CONCEPTS
personalization information is stored in the warehouse. Finally, storing the subscription information in the warehouse has many advantages, such as the ability to manage, analyze, filter, or even populate and modify subscription information from sources other than Narrowcast Server. It also allows the Narrowcast Server system administrator a large amount of flexibility in determining the structure of the tables that hold the subscription information, which is not possible using static subscription sets.This example assumes that your warehouse contains a populated table with a list of stock symbols and associated facts. The table is assumed to have the following columns:SYMBOL, LAST_TRADE_PRICE, and PCT_CHANGE
(Suggested name: LU_SYMBOLS)
Change the warehouse1. Create an empty table in the warehouse to hold the information about each subscription, with the following columns:MR_SUB_ID, MR_ADDRESS_ID, MR_USER_ID and MR_SUB_SET_ID
(Suggested name: WH_SUBSCRIPTIONS2)
Note: Other fields can be added if useful. This example only uses these fields.
2. Create an empty table in the warehouse to hold the Subscription ID and the stock alert threshold, with the following columns:MR_USER_ID, MR_SUB_ID and THRESHOLD
(Suggested name: SUB_THRESHOLD)
Create objects in the MicroStrategy Desktop interface1. Update the warehouse catalog of your project.2. Create an attribute based on the Symbol column of the LU_SYMBOLS table.3. Create metrics based on the LAST_TRADE_PRICE and PCT_CHANGE columns of the LU_SYMBOLS table.

202 Chapter 9 Advanced Subscription Portal Configuration
CONCEPTS
4. Create attributes based on the Subscription ID, Address ID, User ID, and Subscription Set ID columns of the WH_SUBSCRIPTIONS2 table.5. Create a metric based on the THRESHOLD column of the SUB_THRESHOLD table.6. Update the schema of your project.7. Create a report to be used as both the subscription information object and the content information object with the Subscription ID, Address ID, and User ID attributes in the page-by section in that order. Include the Symbol attribute and the metrics in the rows of the report. Include a metric qualification in the filter of the report where Pct change >= Threshold. (Suggested name: Report Example 5 Subscription IO and Content IO)Optional: Include an attribute qualification in the filter of the report where Subscription Set ID = “SS for Example 5”. This allows you to store the subscriptions belonging to multiple subscription sets in the same warehouse table.8. Create a numeric value prompt that is used to prompt the subscriber for the threshold.9. Create a report using the value prompt. Other than the prompt, the rest of the definition of this report is irrelevant. (Suggested name: Report Example 5 Additional Question Object)For more information, refer to the MicroStrategy Basic Reporting Guide and the MicroStrategy Advanced Reporting Guide.
Create objects in Narrowcast Administrator
Note: You need to use an information source that is configured to support dynamic subscriptions. For more information, refer to the MicroStrategy Narrowcast Server System Administrator Guide, chapter 15, Information Source Wizard.
1. Create a content information object from within Narrowcast Administrator (role: “Content Information Object”) using the Report Example 5 Subscription IO and Content IO. On the Advanced Properties dialog box, Report Execution tab, set the Execution Mode to Personalized Page Execution and set the segmentation to segment automatically.

Scenario 5: Personalized dynamic subscription 203
CONCEPTS
2. Create a subscription information object from within Narrowcast Administrator (role: “Subscription Information Object”) using Report Example 5 Subscription IO and Content IO. On the Source of Subscription Information page, select the Select or define a report and return dynamic subscription information from the selected report check box. Map Address ID and User ID to the corresponding page-by attributes. Set personalization to “Generated by Report”, and set the rest of the delivery information fields to “Retrieve from Subscription Book”. On the Preferences page, set the preference for question object Example 5 Page-by Information Object to the Subscription ID attribute from the report.3. Create a service with a document using the content information object. (Suggested name: Example 5 Service)4. Create a dynamic subscription set using the subscription information object from step 2. Ensure that the dynamic subscription set is defined to automatically segment subscriptions. Add this subscription set to the definition of the service using whatever schedule is desired. (Suggested name: Example 5 Dynamic Subscription Set)
Note: You should create a new subscription set for each service as Subscription Portal does not recognize subscription sets that are used in more than one service.
5. Create a question object using Report Example 5 Additional Question Object with Report Execution Method (under Advanced Properties, Report Execution tab) set to “Personalized report Execution”. (Suggested name: Example 5 Additional Question Object)
Configure with the Portal Administrator Wizard1. Use the Services Configuration page of the Portal Administrator Wizard to select service Example 5 Service.2. Skip the Static Subscription Configuration page for this service.3. On the Dynamic Subscriptions Configuration page, choose to configure subscription set Example 5 Dynamic Subscription Set.4. On the Configure Subscription Set page, mark the page-by question (Example 5 Page-by Information Object) as “Page-by: Subscription ID”.

204 Chapter 9 Advanced Subscription Portal Configuration
CONCEPTS
5. Browse for an additional question and choose the question object Example 5 Additional Question Object.6. For storage of the additional question, choose to create a new storage mapping.7. Select the database connection that corresponds to your warehouse and select the SUB_THRESHOLD table created for this example.8. Using the available answer components, map User ID to the MR_USER_ID column of the SUB_THRESHOLD table, Subscription ID to the MR_SUB_ID column, and the Prompt Answer to the THRESHOLD column.9. Dynamic subscription sets require a subscription storage mapping. Select the database connection that corresponds to your warehouse and select the WH_SUBSCRIPTIONS2 table that was created for this example.10. Using the available subscription components, map Subscription ID to the MR_SUB_ID column of the WH_SUBSCRIPTIONS2 table, Address ID to the MR_ADDRESS_ID column, and the User ID to the MR_USER_ID column.Optional: Using the Custom Value field, map the string SS for Example 5 to the MR_SUB_SET_ID column. This makes it possible for the subscription information object report to filter on only those subscriptions that were created using this dynamic subscription set.
Try it!1. Go to the Subscription Portal end user interface.2. Select the service Example 5 Service.that was created in Narrowcast Administrator.3. After selecting a schedule and delivery location, you are prompted to enter a threshold value. (Be sure to select a value that is less than or equal to at least one value in the LU_SYMBOLS table.)4. On the Subscriptions page, you see that there is now one subscription to the service.5. If you view the contents of the WH_SUBSCRIPTIONS2 and SUB_THRESHOLD tables in the warehouse, you will see that a record has been inserted into each table for the subscription you just created.

Scenario 5: Personalized dynamic subscription 205
CONCEPTS
6. Run the service in Narrowcast Server.7. In the Subscription Portal end user interface, verify the delivery of the subscription with the correct content to the address selected when the subscription was created.
How it works1. When a user subscribes to this service through Subscription Portal, Subscription Portal determines that there is an additional question object defined for this service. Subscription Portal retrieves the definition of the value prompt from MicroStrategy Intelligence Server and shows that prompt to the user (the threshold prompt).2. The user answers the prompt by entering a numeric value.3. Subscription Portal inserts a single record into the SUB_THRESHOLD table in the warehouse, as specified by the Portal Administrator Wizard additional question mapping. This record includes the Narrowcast Server User ID, the Subscription Portal-generated Subscription ID, and the numeric value the user entered.4. Subscription Portal creates an entry in the Subscription Book Repository for the new subscription. The definition of this subscription contains a preference object that is associated with Example 5 Page-by Information Object. The value of the preference object is the Subscription ID, since that is what was specified as the page-by answer for this question on the Portal Administrator Wizard Services Configuration page. Subscription Portal also stores the user's answer to the prompt in the Subscription Book Repository, as a preference object that is associated with the Example 5 Additional Question Object.5. Subscription Portal inserts a single record into the WH_SUBSCRIPTIONS2 table in the warehouse, as specified by the Portal Administrator Wizard dynamic subscription set mapping. This record includes the Subscription Portal-generated Subscription ID, the ID of the address the user selected for this subscription, and the Narrowcast Server User ID.

206 Chapter 9 Advanced Subscription Portal Configuration
CONCEPTS
6. When Narrowcast Server runs the service, it first retrieves a list of subscriptions to this service from the warehouse by executing Example 5 Subscription IO and Content IO. For each subscription, Narrowcast Server retrieves the value of the preference object that corresponds to Example 5 Page-by Information Object, in this case from the Subscription ID column of the subscription information object, as specified in the definition of Example 5 Subscription IO and Content IO. The results of the subscription information object also contain data for all of the subscriptions that were written to the WH_SUBSCRIPTIONS2 table. Narrowcast Server uses the value of the preference object for each subscription, which in this case is the Subscription ID, as the page-by value to personalize the content of the information object. Each page of data includes only those stocks that meet the condition determined by the subscription's threshold value. Finally, Narrowcast Server uses the Address ID from the subscription information object to look up the delivery address for each subscription in the Subscription Book Repository, as specified in the definition of Example 5 Subscription IO and Content IO.

IIS E C T I O N I I
207
INTERFACE
Application Designer Interfaces II

208 Section II Application Designer Interfaces
INTERFACE

10C H A P T E R 1 0
209
INTERFACE
10.Choose Subscription Sets Dialog Box 10
What is it?
The Choose Subscription Sets dialog box opens when multiple subscription sets are associated with a service you are running. It allows you to pick which subscription sets to use.
How do I access it?
This dialog box appears automatically when you choose to run a service immediately, and that service has multiple subscription sets associated with it.
What can I do with it?
The Choose Subscription Sets dialog box allows you to select which subscription sets to use with the running service. For information on running a service immediately, see the following How Do I...? topic:• Service Operations
Choose Subscription Sets dialog box layoutThe Choose Subscription Sets dialog box lists the subscription sets associated with the immediately running service. Select the sets to use during this execution and click OK. Click Cancel to cancel the service execution.
Executing a service without a subscription setIf you execute a service using the Run Immediately option and no subscription sets are associated with the service, the Select a Subscription Set for Execution dialog box opens instead of the Choose Subscription Sets dialog box. This occurs, for example, when you are testing a new service.

210 Chapter 10 Choose Subscription Sets Dialog Box
INTERFACE
In the Select a Subscription Set for Execution dialog box, you can select only one subscription set to associate with the service you want to execute. Select the subscription set and click OK. Click Cancel to cancel the service execution.
11C H A P T E R 1 1
211
INTERFACE
11.Desktop Document Selector Dialog Box 11
What is it?
The Desktop Document Selector dialog box allows you to choose an existing MicroStrategy Desktop document to send in a Narrowcast Server service. These documents are already formatted and ready to be included. You cannot open or edit a Desktop document from within Narrowcast Server.
How do I access it?
From the New Document dialog box, select the option to link to an existing MicroStrategy Desktop document. Then, select the appropriate information source. Or from the Select Information Source dialog box, select the appropriate source. Click OK.
What can I do with it?
Through the Desktop Document Selector dialog box you can select an existing MicroStrategy Desktop document to include in your Narrowcast Server service.For instructions on the above topic, refer to the following How Do I...? topic:• Publication Operations
What should I know before I use it?
Before you begin using the Desktop Document Selector dialog box, you must understand how to use MicroStrategy Desktop documents within your Narrowcast Server services.For more information, refer to the following Concepts topics:• Documents• Desktop documents

212 Chapter 11 Desktop Document Selector Dialog Box
INTERFACE
Desktop Document Selector dialog box layoutThe Desktop Document Selector dialog box includes the following options:• List of MicroStrategy Desktop documents: Choose the document you
want to include in a Narrowcast Server service. This list includes what is available in the selected information source, identified at the top of the dialog box.
• Choose execution locale: Choose the appropriate execution locale for this document. For more information, see chapter 14, Document Properties Dialog Box.
• Choose document format: Depending on the type of document that you selected above, select a suitable document format such as HTML, PDF, Flash (.html), Flash attachment (.mht), or Excel. The formats you can select depend on the export formats set while creating the document. If you select Excel, you can: ◊ Choose the Content on a single sheet option to have all layouts of a
multi-layout document appear on a single Excel sheet. This feature is available only if the recipient has Excel 2000 SP3 or earlier versions of Excel installed on the machine.
◊ Choose the Content on multiple sheets option to have each layout of a multi-layout document sent to different Excel sheets. This feature is available only if the recipient has Excel 2003, Excel XP, or later versions installed on the machine. When creating documents linked to Excel, use this option to open or save the document in Outlook Web Access.
For more information see chapter 3, Working with Documents.Notes:
◊ There is a difference between Flash (.html) and Flash attachment (.mht) document formats. The difference is the .html file can only be sent in the e-mail body and the .mht file can only be a file for delivery or e-mail attachment.
◊ By default, HTML is the only enabled format if none of the export formats were selected while creating the document.
• Information Object Properties: Click Advanced Properties to open the Advanced Properties dialog box, where you can specify the information object properties. For more information, see Advanced Properties dialog box.
Click OK to save your selections. The Save Desktop Linked Document dialog box opens.
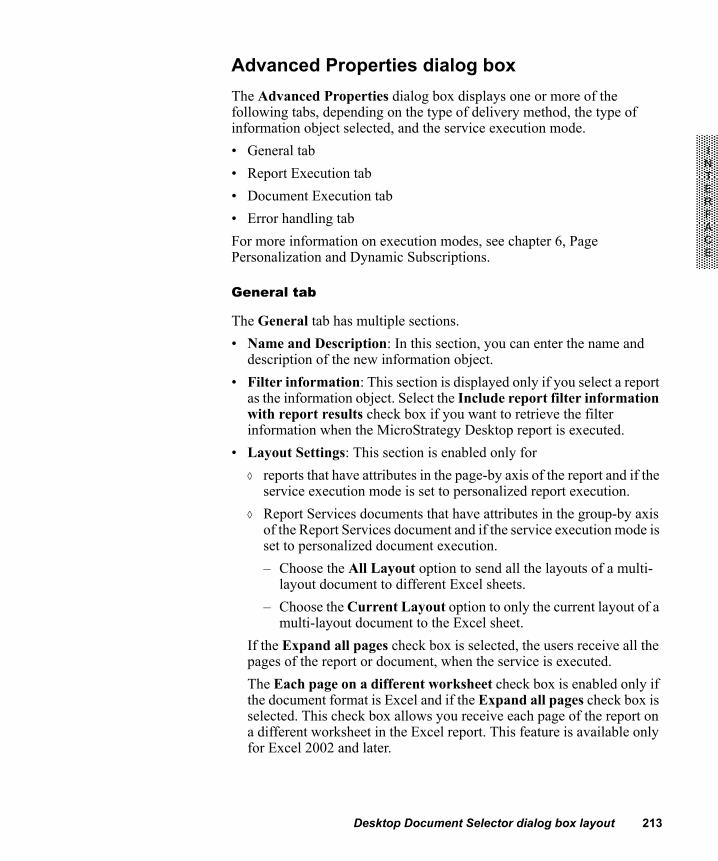
Desktop Document Selector dialog box layout 213
INTERFACE
Advanced Properties dialog boxThe Advanced Properties dialog box displays one or more of the following tabs, depending on the type of delivery method, the type of information object selected, and the service execution mode.• General tab• Report Execution tab• Document Execution tab• Error handling tabFor more information on execution modes, see chapter 6, Page Personalization and Dynamic Subscriptions.
General tab
The General tab has multiple sections. • Name and Description: In this section, you can enter the name and
description of the new information object.• Filter information: This section is displayed only if you select a report
as the information object. Select the Include report filter information with report results check box if you want to retrieve the filter information when the MicroStrategy Desktop report is executed.
• Layout Settings: This section is enabled only for ◊ reports that have attributes in the page-by axis of the report and if the
service execution mode is set to personalized report execution.◊ Report Services documents that have attributes in the group-by axis
of the Report Services document and if the service execution mode is set to personalized document execution. – Choose the All Layout option to send all the layouts of a multi-
layout document to different Excel sheets.– Choose the Current Layout option to only the current layout of a
multi-layout document to the Excel sheet.If the Expand all pages check box is selected, the users receive all the pages of the report or document, when the service is executed.The Each page on a different worksheet check box is enabled only if the document format is Excel and if the Expand all pages check box is selected. This check box allows you receive each page of the report on a different worksheet in the Excel report. This feature is available only for Excel 2002 and later.

214 Chapter 11 Desktop Document Selector Dialog Box
INTERFACE
Note: The Each page on a different worksheet option is available only for reports; it is not available for Report Services documents.
• Formatting: This section is enabled only if you select the document format as Excel. Use the Overlap grid titles check box to eliminate the blank column with the heading Metrics from the report exported in Excel format. Eliminating this column reduces the load time when opening the Excel document.Use the Include report title check box to include or exclude the report title from the report exported in Excel format.
Note: The Formatting option is available only for the reports.
Report Execution tab
The Report Execution tab is displayed only if you link a report to the service. It has the following sections.• Intelligence Server cache• Personalization Mode • Segmentation Properties• Formatting Information
Intelligence Server cache
In the Intelligence Server cache section, select one or both of the following check boxes:• Use cached report if available from MicroStrategy Intelligence
Server: If the report has been cached, use it; otherwise rerun the report.• Update MicroStrategy Intelligence Server cache with execution
result if cache is not used or unavailable: Run the report and cache it for future use.

Desktop Document Selector dialog box layout 215
INTERFACE
Note: If personalized page execution and autosegmentation are selected in the second and third sections of this tab, caching is not available. The check boxes are disabled, new caches cannot be generated, and existing caches cannot be used.
Personalization Mode
In the Personalization Mode section, select one of the following options:• Personalized report execution: A separate report is executed for each
group of subscriptions with the same personalization.• Personalized page execution: Narrowcast Server executes one report
for all subscriptions within a segment, and each subscription receives one page of content. It allows one report to satisfy many personalization sets.
Segmentation Properties
If you select Personalized page execution, the Segmentation Properties section is enabled. Select one of the following options:• Do not segment this information object. This information object
returns content for the entire subscription set. Any report can be used. For large subscription sets, this option can significantly reduce performance or increase memory consumption.
• Automatically segment this information object. This information object returns only subscriptions or content in the current segment. Any report can be used and the data is filtered automatically.
• Segment using segmentation prompts defined in the report. This information object returns only subscriptions or content in the current segment. To filter the data, the report must contain prompts to gather the subscription IDs for the start and end of the segment.
Formatting Information
Select the Improve performance by not preserving formatting defined in Desktop or Web. (Alternative XSL stylesheet can be applied to enhance formatting) check box to enable faster report execution. The default formatting options such as column width settings, defined in Desktop or Web, are not inherited if this check box is selected, which facilitates quicker execution of the report. (An alternate XSL stylesheet is available that provides the ability to fit reports to the entire available window.)

216 Chapter 11 Desktop Document Selector Dialog Box
INTERFACE
Document Execution tab
The Document Execution tab is available only if you link a report services document to a service. This tab has the following sections:• Document cache properties• Document execution• Segmentation Properties
Document cache properties
In the Document cache properties section, you can select the Use report cache during document execution check box. This applies only to existing MicroStrategy Desktop documents that are linked to from Narrowcast Administrator. Using the document cache speeds up document execution, but limits the data to what has already been cached.
Document execution
In the Document execution section, select one of the following options:• Personalized document execution: A separate document is executed
for each group of subscriptions with the same personalization.• Personalized page execution: Narrowcast Server executes one
document for all subscriptions within a segment, and each subscription receives one page of content. It allows one document to satisfy many personalization sets.
Segmentation Properties
If you select Personalized page execution, the Segmentation Properties section is enabled. Select one of the following options:• Do not segment this information object. This information object
returns content for the entire subscription set. Any document can be used. For large subscription sets, this option can significantly reduce performance or increase memory consumption.
• Segment using segmentation prompts defined in the document. This information object returns only subscriptions or content in the current segment. To filter the data, the document must contain prompts to gather the subscription IDs for the start and end of the segment.
Error handling tab
The settings on the Error handling tab allow you to specify error handling rules for the selected report or document. If the report or document returns partial data, you can choose to either fail the document or use the partial results. This tab is displayed only for File delivery services.
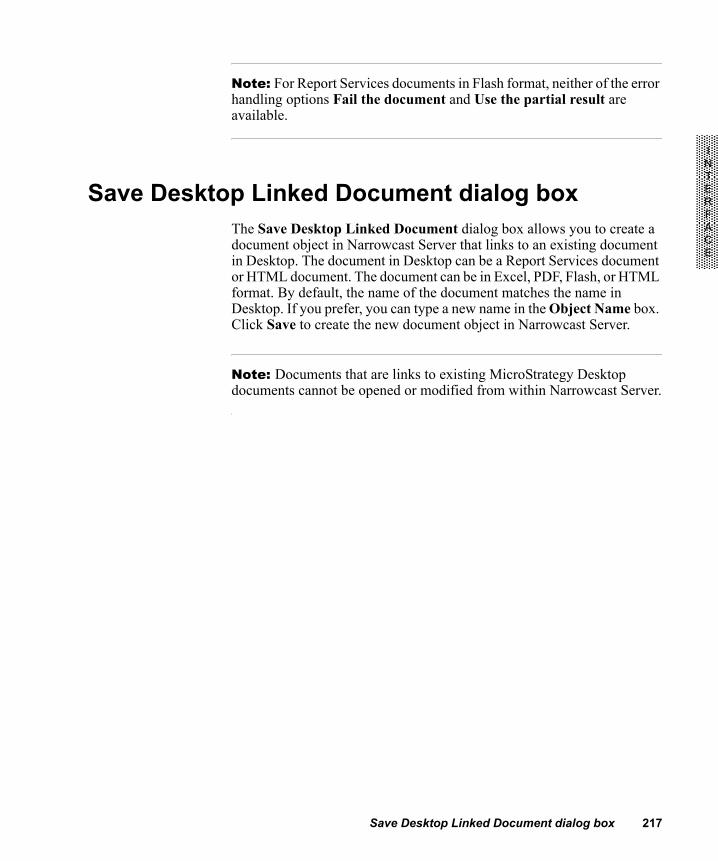
Save Desktop Linked Document dialog box 217
INTERFACE
Note: For Report Services documents in Flash format, neither of the error handling options Fail the document and Use the partial result are available.
Save Desktop Linked Document dialog boxThe Save Desktop Linked Document dialog box allows you to create a document object in Narrowcast Server that links to an existing document in Desktop. The document in Desktop can be a Report Services document or HTML document. The document can be in Excel, PDF, Flash, or HTML format. By default, the name of the document matches the name in Desktop. If you prefer, you can type a new name in the Object Name box. Click Save to create the new document object in Narrowcast Server.
Note: Documents that are links to existing MicroStrategy Desktop documents cannot be opened or modified from within Narrowcast Server.

218 Chapter 11 Desktop Document Selector Dialog Box
INTERFACE

12C H A P T E R 1 2
219
INTERFACE
12.Dynamic Subscription Set Wizard 12
What is it?
The Dynamic Subscription Set Wizard allows you to create and edit dynamic subscription sets in the Subscription Book.
How do I access it?
To access the Dynamic Subscription Set Wizard, launch the Narrowcast Administrator. Right-click the Applications folder or any subfolder, select New, then select Subscription Set. In the Subscription dialog box, select Dynamic Subscription Set, then click OK.
What can I do with it?
Through the Dynamic Subscription Set Wizard, you can• create a new dynamic subscription set• specify SQL statements to be executed before and after a dynamic
subscription set executesFor instructions on completing one of the above tasks, refer to the following How Do I...? topic:• Subscription Set Operations
What should I know before I use it?
Before you begin using the Dynamic Subscription Set Wizard, you should• know which information objects you want to include for segmentation
and subscription resolution• know the SQL statements you want to include for pre-processing and
post-processingFor more information on the above topics, refer to the following Concepts topic:• Subscription Preferences

220 Chapter 12 Dynamic Subscription Set Wizard
INTERFACE
Dynamic Subscription Set Wizard layoutThe Dynamic Subscription Set Wizard consists of the following pages:• Introduction• Name and Description• Segmentation• Subscription• Pre- and Post-SQL• SummaryEach page of the wizard includes some or all of the following buttons:• Cancel: closes the Dynamic Subscription Set Wizard• Back: returns to the previous page in the Dynamic Subscription Set
Wizard• Next: goes to the next page in the Dynamic Subscription Set Wizard• Finish: completes creation of the Dynamic Subscription Set and returns
you to the Narrowcast Administrator console; if creating a new subscription set, you are prompted to select a location in which to save the subscription set
IntroductionThe Introduction page provides you with a summary of what you can do in the Dynamic Subscription Set Wizard. Each step is identified on this page.
Name and DescriptionOn the Name and Description page, type the name of your subscription set, and an optional description to provide more information about the subscription set.
SubscriptionOn the Subscription page, browse through the folders and click the information object to use for subscription. Click Clear to remove a selected information object. You can also create a subscription information object from the Dynamic Subscription Set Wizard.

Dynamic Subscription Set Wizard layout 221
INTERFACE
Note: If a subscription information object report meets any of the following criteria, you should not use automatic segmentation. In this case, you must create a segment information object to avoid errors during segmentation.• The report is a datamart report • The report contains a custom group or consolidation.
For more information, refer to the following Concepts topic:• Information objects
SegmentationOn the optional Segmentation page, browse through the folders and click the information object to use for segmentation. Click Clear to remove a selected information object. You can also create a segmentation information object from the Dynamic Subscription Set Wizard. For more information, refer to the following Concepts topic:• Information objects
Pre- and Post-SQLOn the Pre- and Post-SQL page, add SQL statements to be executed before and after the subscription set is executed. Click Define to open the Pre- and Post-SQL dialog box, then select the appropriate tab and click Add to specify the details about the SQL statement you want to use. Click Remove to delete the selected SQL statement. Click Edit to modify the details about the selected SQL statement. For more information, refer to the following Concepts topic:• Pre- and post-service execution SQLFor more information about specifying SQL statements, refer to the following Interfaces topic:• Subscription Set Properties Dialog Box
SummaryThe Summary page provides you with a summary of the definition for this dynamic subscription set.

222 Chapter 12 Dynamic Subscription Set Wizard
INTERFACE

13C H A P T E R 1 3
223
INTERFACE
13.Document Element Properties Dialog Box 13
What is it?
The Document Element Properties dialog box allows you to select a different stylesheet and specify error handling rules for the selected document element.
How do I access it?
From within the Excel Document Editor, HTML Document Editor, or the Plaintext Document Editor, double-click on a document element (on the generic title “Document Element 1”, “Document Element 2”, and so on).
What can I do with it?
Through the Document Element Properties dialog box you can select a different stylesheet and specify error handling rules for the selected document element. You can use these error handling rules to fail documents. When these documents are set as “required” in the Publication Wizard, these rules can be used to control whether or not publications are delivered to individual recipients based on the data returned by information objects.For instructions on the above topics, see the following How Do I...? topic:• Publication Operations
What should I know before I use it?
Before you begin using the Document Element Properties dialog box, you must have created a document. For more information, refer to the following Concepts topic:• Error handling

224 Chapter 13 Document Element Properties Dialog Box
INTERFACE
Document Element Properties dialog box layoutThe Document Element Properties dialog box allows you to select a different stylesheet and specify error handling rules for the selected document element.
Stylesheet selectionBy default, MicroStrategy 8 information objects use a stylesheet that preserves the formatting defined in the MicroStrategy Desktop or Web products. Information objects from information sources other than the MicroStrategy information source prompt you if a stylesheet is required. The following stylesheets are available by default:
MicroStrategy information source
• Text documents◊ MSTR7ToText-CSV.xsl: Returns report results in comma separated
values (CSV) format. This delimited file format allows report results to be used by Excel and other third-party applications and systems.
◊ MSTR7ToText-CSV-NoDoubleQuotes.xsl: Changes the name of the attachments sent using the Control Documents. This stylesheet is similar to MSTR7ToText-CSV.xsl, but it also removes the double quotes displayed around each cell and the linefeed after the last cell. For more information on changing attachment names using Control Documents, refer to Appendix A, Dynamically change attachment name.
◊ MSTR8ToText-CSVWithColumnTitles.xsl: Allows the attribute names to be displayed in the report columns on execution.
◊ MSTR8ToText-NoRowHeader.xsl: Changes the name of the attachments sent via the Control Documents. It displays only one attribute value and no attribute headers. This is possible only when the attribute is on the rows. This stylesheet retrieves an attribute element from the report as the attachment name. The only limitation is that the report which is used as an Information Object in the Control Document should have only one attribute element and the attribute should have only one form. For more information on changing attachment names using Control Documents refer to Appendix A, Dynamically change attachment name.

Document Element Properties dialog box layout 225
INTERFACE
◊ MSTR7ToText-Default.xsl: Returns plain text grid suitable for display in wireless devices and other devices that render plan text content. This stylesheet is applied by default to reports in text documents.
◊ MSTR7ToText-FilterInfoOnly.xsl: Returns only the description of the filter used by this report and not the report data.
◊ SubscriptionInfoToText.xsl: Returns the physical address for a given subscription in the form of a sentence such as “This message is sent to address [email protected],” and in the proper XML format for the Plaintext document formatter. This stylesheet provides a starting point with which you can develop custom XSL stylesheets to return a custom grouping of subscription information properties for text documents.
◊ UserInfoToText.xsl: This stylesheet provides an example you can use to develop custom XSL stylesheets to return a logic-driven custom grouping of user information properties for plain text documents. If the recipient’s last name and user properties are set, this XSL returns the text “Dear title last-name” in the proper XML format for the Plaintext document formatter. For example, if a user’s title is “Ms.” and the last name is “Jones”, this XSL returns “Dear Ms. Jones”. If one of these two user properties is empty, this XSL returns “Dear Sir” so that the contents delivered to the recipient are still sensible.
• HTML documents◊ MSTR7ToHTML-DefaultFormatting.xsl: Preserves all formatting
defined in MicroStrategy Desktop and Web. This stylesheet also supports white spaces in the HTML documents. This stylesheet is applied by default so that any report formatting defined in Web or Desktop is automatically leveraged by Narrowcast Server.
◊ MSTR7ToHTML-FilterInfoOnly.xsl: Returns only the description of the filter used by this report and not the report data. This can be useful when graph reports are delivered, for example, and you want to include only filter information along with this graph.
◊ MSTR7ToHTML-ReturnXML.xsl: Returns report XML. The resulting XML structure can be retrieved for and combined with different XSL stylesheets for development and testing purposes. Read the remainder of this section for more information on this process.
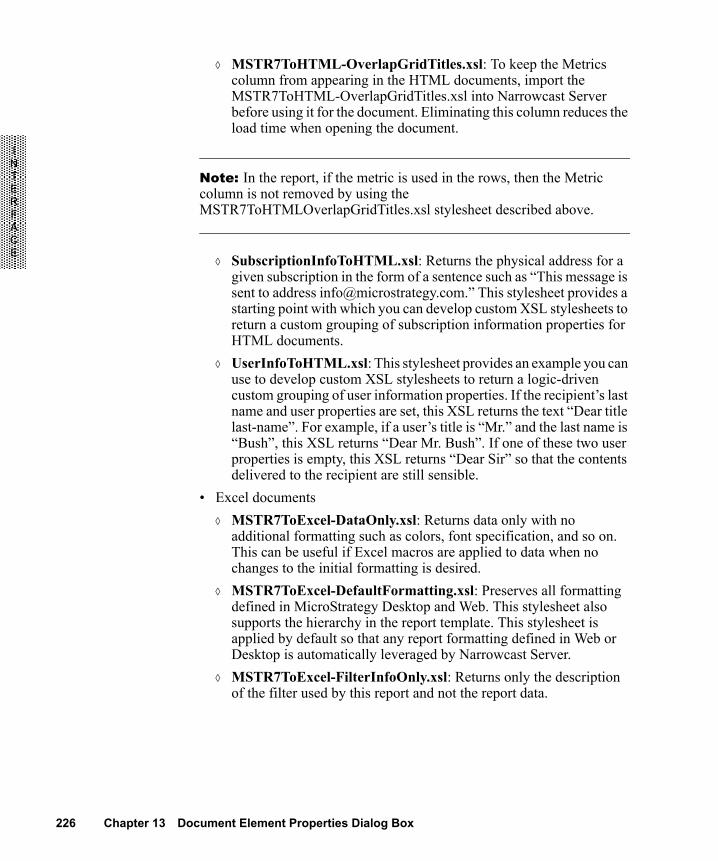
226 Chapter 13 Document Element Properties Dialog Box
INTERFACE
◊ MSTR7ToHTML-OverlapGridTitles.xsl: To keep the Metrics column from appearing in the HTML documents, import the MSTR7ToHTML-OverlapGridTitles.xsl into Narrowcast Server before using it for the document. Eliminating this column reduces the load time when opening the document.
Note: In the report, if the metric is used in the rows, then the Metric column is not removed by using the MSTR7ToHTMLOverlapGridTitles.xsl stylesheet described above.
◊ SubscriptionInfoToHTML.xsl: Returns the physical address for a given subscription in the form of a sentence such as “This message is sent to address [email protected].” This stylesheet provides a starting point with which you can develop custom XSL stylesheets to return a custom grouping of subscription information properties for HTML documents.
◊ UserInfoToHTML.xsl: This stylesheet provides an example you can use to develop custom XSL stylesheets to return a logic-driven custom grouping of user information properties. If the recipient’s last name and user properties are set, this XSL returns the text “Dear title last-name”. For example, if a user’s title is “Mr.” and the last name is “Bush”, this XSL returns “Dear Mr. Bush”. If one of these two user properties is empty, this XSL returns “Dear Sir” so that the contents delivered to the recipient are still sensible.
• Excel documents◊ MSTR7ToExcel-DataOnly.xsl: Returns data only with no
additional formatting such as colors, font specification, and so on. This can be useful if Excel macros are applied to data when no changes to the initial formatting is desired.
◊ MSTR7ToExcel-DefaultFormatting.xsl: Preserves all formatting defined in MicroStrategy Desktop and Web. This stylesheet also supports the hierarchy in the report template. This stylesheet is applied by default so that any report formatting defined in Web or Desktop is automatically leveraged by Narrowcast Server.
◊ MSTR7ToExcel-FilterInfoOnly.xsl: Returns only the description of the filter used by this report and not the report data.

Document Element Properties dialog box layout 227
INTERFACE
◊ MSTR7ToExcel-WithoutColumnAxisHeaders.xsl: This stylesheet does not display the column axis headers on the report template. The column axis headers describe the items on the report columns. Column axis headers typically display the title “Metrics” or the names of any attributes that are present on the report columns. In Narrowcast Server 7.1 and previous versions, the column axis headers were not shown by default, so this stylesheet is necessary to achieve the default formatting provided by these product versions.
◊ SubscriptionInfoToExcel.xsl: Returns the physical address for a given subscription in the form of a sentence such as “This message is sent to address [email protected],” and in the proper XML format for the Excel document formatter. This stylesheet provides a starting point with which you can develop custom XSL stylesheets to return a custom grouping of subscription information properties for Excel documents.
◊ UserInfoToExcel.xsl: This stylesheet provides an example you can use to develop custom XSL stylesheets to return a logic-driven custom grouping of user information properties for Excel documents. If the recipient’s last name and user properties are set, this XSL returns the text “Dear title last-name” in the proper XML format for the Excel document formatter. For example, if a user’s title is “Mrs.” and the last name is “Smith”, this XSL returns “Dear Mrs. Smith”. If one of these two user properties is empty, this XSL returns “Dear Sir” so that the contents delivered to the recipient are still sensible.
Note: Additional example stylesheets are installed with Narrowcast server. They are located in the ..\Delivery Engine\XSL\ subdirectory where the Narrowcast Server was installed. Once these stylesheets are imported into the Object Repository using the Import File dialog box, they are available for selection from the Document Element Properties dialog box. Stylesheets for reports running in MicroStrategy Intelligence Server 7.1 or earlier are also located in the same subdirectory.
User information
When user information (first name, last name, and so on) is inserted in a document, an appropriate stylesheet is automatically selected. You do not need to select a stylesheet.

228 Chapter 13 Document Element Properties Dialog Box
INTERFACE
Subscription information
When subscription information (address ID, subscription ID, and so on) is inserted in a document, an appropriate stylesheet is automatically selected. You do not need to select a stylesheet.
Error handlingError handling rules can be applied to three events:• if an information object returns no data• if an information object returns an error• if the document formatter is unable to format the document elementIn each case, you can choose one out of the following options:• Fail the document • Use stringIf you choose to fail the document, the document element raises an error so that the document fails to be returned to the publication. If you choose to use string, you can enter a string that is displayed in the document contents in place of the information object results in the case of this event.

14C H A P T E R 1 4
229
INTERFACE
14.Document Properties Dialog Box 14
What is it?
The Document Properties dialog box allows you to choose an execution locale for the current document. The execution locale defines how content is gathered, formatted, packaged and transmitted for a document. For most documents, it also allows you to specify document-level error handling. Document-level error handling is based on information objects and affects the entire document. For Excel documents, this dialog box also allows you to choose how column widths should be set for MicroStrategy reports.
How do I access it?
From within the Excel Document Editor, HTML Document Editor, or the Plaintext Document Editor, select Properties from the File menu. When linking to an existing MicroStrategy Desktop document, from the Desktop Document Selector dialog box, click Document Locale.
What can I do with it?
Through the Document Properties dialog box you can choose an execution locale for the current document, specify document-level error handling, and choose column width settings for Excel documents.For instructions on the above topics, refer to the following How Do I...? topic:• Publication Operations
What should I know before I use it?
Before you begin using the Document Properties dialog box, you must have created a document and understand the purpose of execution locales and error handling.For more information, refer to the following Concepts topic:• Error handling

230 Chapter 14 Document Properties Dialog Box
INTERFACE
For information on locales, see the MicroStrategy Narrowcast Server System Administrator Guide, chapter 1, MicroStrategy Narrowcast Server, Locales section.
Document Properties dialog box layoutThe Document Properties dialog box includes the following sections:• Choose Execution Locale• Document-Level Error Handling• Column Width Options
Note: Column Width Options only apply to Excel documents.
Choose Execution Locale The Document Properties dialog box allows you to select an execution locale from a list of all available locales for your document. An execution locale tailors the format of content such as numbers, date, and currency according to regional preferences. For example, if your system administrator defined French and German locales to gather information in the appropriate languages, you can select one of these locales as the execution locale for a document. All dynamic content in this document is then retrieved using the corresponding language.
Document-Level Error HandlingThe Document Properties dialog box allows you to specify error handling rules for this document. You can choose not to apply collective error handling rules (selected by default) or you can select any or all information objects in this document. If the selected information objects fail, the document is cancelled. You can also specify when to apply this rule by choosing one or both of the following: if information objects return an error or if information objects return no data.
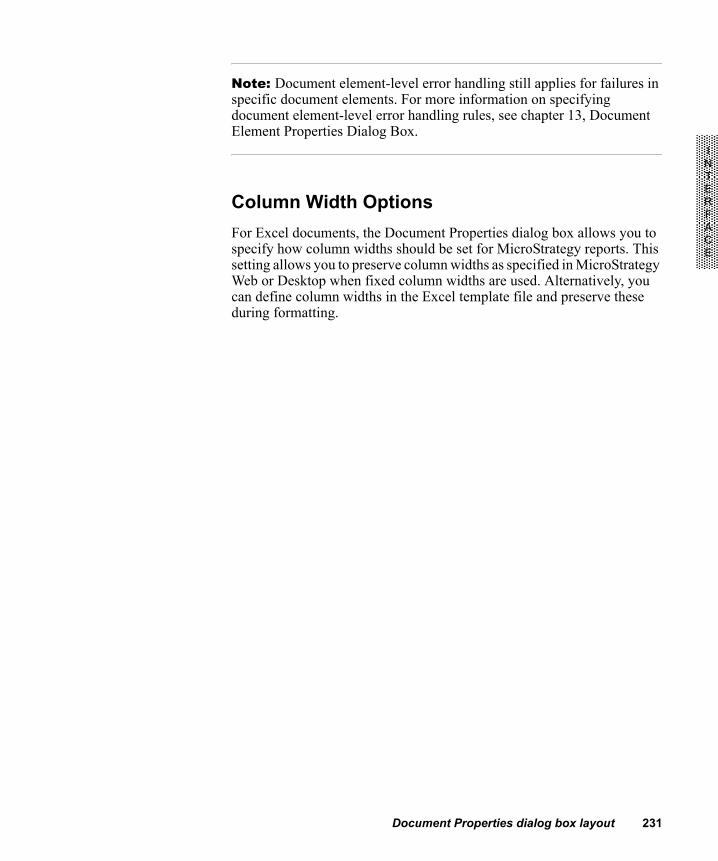
Document Properties dialog box layout 231
INTERFACE
Note: Document element-level error handling still applies for failures in specific document elements. For more information on specifying document element-level error handling rules, see chapter 13, Document Element Properties Dialog Box.
Column Width OptionsFor Excel documents, the Document Properties dialog box allows you to specify how column widths should be set for MicroStrategy reports. This setting allows you to preserve column widths as specified in MicroStrategy Web or Desktop when fixed column widths are used. Alternatively, you can define column widths in the Excel template file and preserve these during formatting.

232 Chapter 14 Document Properties Dialog Box
INTERFACE

15C H A P T E R 1 5
233
INTERFACE
15.Excel Document Editor 15
What is it?
The Excel Document Editor allows you to design Excel documents to include in services. An Excel document is composed of a set of worksheets that can contain static and dynamic text items. Static text is manually entered, while dynamic text is loaded through information objects.
How do I access it?
Right-click anywhere in the Applications folder, point to New, then choose Document. Double-click Excel Document on the New Document dialog box.
What can I do with it?
Through the Excel Document Editor you can• create an Excel document• add multiple XML information objects with the same stylesheet in a
document• select a different XSL stylesheet for an XML information objectFor instructions on completing one of the above tasks, refer to the following How Do I...? topic:• Publication Operations
What should I know before I use it?
Before you begin using the Excel Document Editor, you should• understand how documents are used in publications• know what document elements, information objects, and XSL
stylesheets are• understand the concept of imported files and know how to import them

234 Chapter 15 Excel Document Editor
INTERFACE
For more information on the above topics, refer to the following Concepts topic:• PublicationsFor information on XML, see appendix D, XML for Narrowcast Server Objects.
Excel Document Editor layoutThe Excel Document Editor is composed of the following elements: • a document element pane, which displays the dynamic content of the
Excel document in a hierarchical format and shows the properties of the currently selected document element or information object
• a content definition pane, which contains the document’s worksheets and allows you to reposition the contents
• a menu bar that offers standard Windows NT menus (Edit, View, and Help) as well as File and Insert menus that contain Narrowcast Server-specific items
• a toolbar that provides the ability to◊ open a document◊ save the document and exit◊ insert an information object (click the button to create a new
information object; click the arrow to see the available information sources and kinds of information objects as well as the option to insert a new or existing information object)
The Choose XML Information Object Destination dialog box is accessed only when you select a document element containing an XML information object, and then add another XML information object.
Content definition paneThe Browse button allows you to add a file to use as a template. A template is used as the basis for creating a new document. An Excel template file sets the number of worksheets in the document and can provide Excel macros as well. Once the template file is added, its Name and Description are displayed.

Excel Document Editor layout 235
INTERFACE
Note: You cannot see any Excel macros included in the template. Therefore, you need to know what the macros are, as well as where the macros assume the text is placed.
Right-clicking in the body of the template displays an insert menu, and selecting Insert Static Text inserts the static text in the next available cell. Clicking X deletes the selected row. The up and down arrows move the selected row up or down in the content definition spreadsheet. The sheet’s columns contain the following information:• Number (#): a reference number for the content item• Contents: the actual text included in the document, if it is a static text
item; otherwise, the document element number• Row Positioning: how the content item is placed in a row:
◊ Absolute means the item is offset from the top of the sheet. ◊ Relative Top means the item is offset from the top of another row. ◊ Relative Bottom means the item is offset from the bottom of another
row.• Row Reference: the row to use as the starting point for the offset; not
used for absolute row positioning, which is always offset from the top of the sheet
• Row Offset: the number of rows the item is offset from the top of the sheet, if absolute row positioning is used, or from the Row Reference
• Column Positioning: how the content item is placed in a column:◊ Absolute means the item is offset from the left of the sheet.◊ Relative Left means the item is offset from the left side of another
column. ◊ Relative Right means the item is offset from the right side of another
column. • Column Reference: the column to use as the starting point for the
offset; not used for absolute column positioning, which is always offset from the left of the sheet
• Column Offset: the number of columns the item is offset from the left of the sheet, if absolute column positioning is used, or from the Column Reference
You can resize the width of the columns to view the entire contents of the cells.

236 Chapter 15 Excel Document Editor
INTERFACE
Once you add a template file, you can insert information objects into it by right-clicking in the body of the template and selecting from the resulting menu to create a certain kind of information object or to insert an existing information object.Note the tabs that allow you to access different spreadsheets, if the template file contains multiple spreadsheets. The sheet names default to those of the template files. You can also change the name for each spreadsheet independently in either of the following ways:• Double-click the spreadsheet’s tab and enter a new name. • Right-click the spreadsheet’s tab and choose a kind of information
object or choose Insert Information Object, which allows you to create a new information object to supply the name. Or choose Insert Existing Information Object, which allows you to select an information object to supply the sheet name. The actual name is determined when the report is executed, and can be personalized for each subscriber.
Note: This information object must return only one line, without carriage returns, or the formatting could fail.
Menu barThe File and Insert menu bar options contain items unique to Narrowcast Server. The following tables describe the contents of each.
File menu options
Menu option Function
New Document Allows you to create a new document from within the document editor
Open Document Allows you to browse for an excel document to edit within the document editor
Save Saves the Excel document; if this is a new document, the Save As dialog box opens
Save As Saves the Excel document with a new name

Excel Document Editor layout 237
INTERFACE
Insert menu options
Note: When you insert an XML information object that was created for a MicroStrategy Information Source, an XSL stylesheet is automatically selected.
Properties Opens the Document Properties dialog box in which you can select the document’s locale from a list of all available locales and specify error handling rules for the document
Close Closes the Document Editor; if changes have been made, you are prompted if you want to save
Menu option Function
List of available information sources, for example, MicroStrategy Tutorial or User Information
Displays the kinds of information objects that can be created using each available information source; selecting one either lists the available information objects or the available properties for that information source
New Information Object
Opens the Select Information Source dialog box to begin creating a new information object, which will be added to the document
Existing Information Object
Opens the Select Information Object dialog box to choose an existing information object to insert.
Static Text Inserts static text into the next available cell
Menu option Function

238 Chapter 15 Excel Document Editor
INTERFACE
Choose XML Information Object Destination dialog boxThe Choose XML Information Object Destination dialog box is accessed only when you select a document element containing an XML information object and then add another XML information object. It provides two options for placing the new information object:• New Document Element, which creates a document element and
places the information object into it• Currently Selected Document Element, which adds the information
object into the document element you selected before you began inserting this information object. This allows all the information objects contained in this document element to be formatted by the same stylesheet. Use this option only if you have a stylesheet that supports it.
For information on XML, see appendix D, XML for Narrowcast Server Objects.

16C H A P T E R 1 6
239
INTERFACE
16.Filter Editor and Governing Setting Dialog Box
16What is it?
The Filter editor and governing setting dialog box allows you to restrict the number of users or addresses and the number of subscriptions to retrieve when you open the Subscription Book or a subscription set. It also allows you to define filters for the Users and addresses list as well as the Subscription list.
How do I access it?
To access the Filter editor and governing settings dialog box, open the Subscription Book Editor or the Static Subscription Set Editor. From the Tools menu, select Filter and governing editor.
What can I do with it?
Through the Filter editor and governing settings dialog box, you can• define the filters for the Subscription list and the Users and addresses
list• specify the maximum number of addresses and users to retrieve for the
Subscription Book• specify the maximum number of subscriptions to retrieve for
subscription sets (available only in the Static Subscription Set Editor)For instructions on completing one of the above tasks, refer to the following How Do I...? topics:• Subscription Set Operations• Subscription Book Operations

240 Chapter 16 Filter Editor and Governing Setting Dialog Box
INTERFACE
What should I know before I use it?
Before you begin using the Filter editor and governing settings dialog box, you should• know the total number of items in your Subscription Book• know the total number of items in your largest static subscription set• determine the maximum number of items you can retrieve without
having to wait longer than you desireFor more information on the above topics, refer to the following Concepts topics:• Subscriptions and subscription sets• The Subscription Book
Filter editor and governing settings dialog box layout
The Filter editor and governing settings dialog box consists of three sections, Define filter, Subscription Book, and Subscription Set. In the Define filter section, you first specify which list you define the filters for—the Users and addresses list or the Subscription list. You can then set the filter conditions for address names, login IDs, and physical addresses. In the Subscription Book section, you can specify the maximum number of users or addresses to retrieve for the Subscription Book. If the total number of users and addresses available in the Subscription Book exceeds the number in the governing setting, a message is displayed telling you that only the number of users and addresses indicated in the governing setting will be retrieved. In the Subscription Set section, you can specify the maximum number of subscriptions to retrieve for all subscription sets.The default value for both the Subscription Book and Subscription Set sections is 100, which is also the smallest number allowed for these settings.
Note: If you open this dialog box from the Subscription Book Editor, you can see the Define filter section and the Subscription Book section, but not the Subscription Set section.

17C H A P T E R 1 7
241
INTERFACE
17.HTML Document Editor 17
What is it?
The HTML Document Editor allows you to create and format HTML documents to include in services.
How do I access it?
Right-click anywhere in the Applications folder, point to New, then choose Document. Double-click HTML Document on the New Document dialog box.
What can I do with it?
Through the HTML Document Editor you can• add multiple XML information objects with the same stylesheet in a
document• create an HTML document• edit an HTML document• select a different XSL stylesheet for an XML information objectFor instructions on completing one of the above tasks, refer to the following How Do I...? topic:• Publication Operations
What should I know before I use it?
Before you begin using the HTML Document Editor, you should:• understand how documents are used in publications• know what document elements, information objects, and XSL
stylesheets areFor more information on the above topics, refer to the following Concepts topic:• Publications

242 Chapter 17 HTML Document Editor
INTERFACE
HTML Document Editor layoutThe HTML Document Editor is composed of the following elements: • a document element pane that displays the content of the document in
a hierarchical format and the properties of the currently selected document element
• a content definition pane that can be set to allow editing of the content, display the HTML source, or preview the document
• a menu bar that offers standard Windows menus (Edit and Help) as well as File, View, Insert, Format, and Table menus that contain Narrowcast Server-specific items
• a toolbar that provides formatting and table optionsIn addition, some of the same options are offered via the right-click menu. If you right-click in the content definition pane, you can insert information objects. Also, you can double-click the objects in the document element pane. If you double-click “Document Element 1,” “Document Element 2,” and so forth, the Document Element Properties dialog box appears. If you double-click the name of an inserted object, the Information Object Wizard appears.The Choose XML Information Object Destination dialog box is accessed only when you select a document element containing an XML information object, and then add another XML information object.You can create the desired content for your HTML document within the HTML Document Editor, in the content definition pane using the Editor mode (select View, Editor) or by typing the source code directly with the Source mode enabled (select View, Source). You can also create an HTML template in an external application such as Microsoft FrontPage or Allaire HomeSite and then copy the source HTML code from this application into the HTML Document Editor’s content definition pane with Source mode enabled. Within the HTML Document Editor, you can perform tasks such as adding tables, changing fonts, and so on, using the Editor mode. However, to accomplish more advanced tasks such as changing column widths or inserting HTML hyperlinks, use the Source mode and directly modify the HTML.
Menu barThe File, View, Insert, Format, and Table menu bar options contain items unique to Narrowcast Server. The following tables describe the contents of each.

HTML Document Editor layout 243
INTERFACE
File menu options
View menu options
Menu option Function
New Document Allows you to create a new document from within the document editor
Open Document Allows you to browse for an excel document to edit within the document editor
Save Saves the Excel document; if this is a new document, the Save As dialog box opens
Save As Saves the Excel document with a new name
Properties Opens the Document Properties dialog box in which you can select the document’s locale from a list of all available locales and specify error handling rules for the document
Close Closes the Document Editor; if changes have been made, you are prompted if you want to save
Menu option Function
Document Element List
Opens or closes the Document Element List
Editor Displays, in the Content Definition pane on the right, the editor view, which allows you to change formatting options; this is the default view
Source Displays, in the Content Definition pane on the right, the HTML source code underlying the document
Preview Displays, in the Content Definition pane on the right, a preview of the HTML document; does not allow editing

244 Chapter 17 HTML Document Editor
INTERFACE
Insert menu options
Note: When you insert an XML information object that was created for the MicroStrategy Information Source, an XSL stylesheet is automatically selected. For HTML documents, the original report’s formatting (from MicroStrategy Desktop) is preserved.
Format menu options
Menu option Function
List of available information sources, for example, MicroStrategy Tutorial or User Information
Displays the kinds of information objects that can be created using each available information source; selecting one either lists the available information objects or the available properties for that information source
New Information Object
Opens the Select Information Source dialog box to begin creating a new information object, which will be added to the document
Existing Information Object
Opens the Select Information Object dialog box to choose an existing information object to insert.
Picture Opens the Picture dialog box to insert the path to an image at the selected place in the Content Definition paneNote: End users must be able to access this path to view the image.
Hyperlink Opens the Hyperlink dialog box to insert a hyperlink on the selected item
Menu option Function
Font...
• Choose Opens the Font dialog box to choose a font to apply to the selected text
• Bold Bolds the selected text
• Italic Italicizes the selected text
• Underline Underlines the selected text
Alignment...
• Left Left-aligns the selected text

HTML Document Editor layout 245
INTERFACE
Table menu options
• Center Centers the selected text
• Right Right-aligns the selected text
Outdent Moves the selected indented text back to the left
Indent Indents the selected text
Foreground Color Opens the Color dialog box to set the color of the text
Background Color Opens the Color dialog box to set the background color of the text
Numbered List Formats the selected text into a numbered list
Bulleted List Formats the selected text into a bulleted list
Menu option Function
Create Opens the Create Table dialog box to create a new table
Insert Row Inserts a row above the selected row
Delete Rows Deletes the selected row
Insert Column Inserts a column to the left of the selected column
Delete Column Deletes the selected column
Insert Cell Inserts a cell to the left of the selected cell
Delete Cell Deletes the selected cell
Merge Cells Merges the selected cells
Split Cell Splits the selected cells
Menu option Function
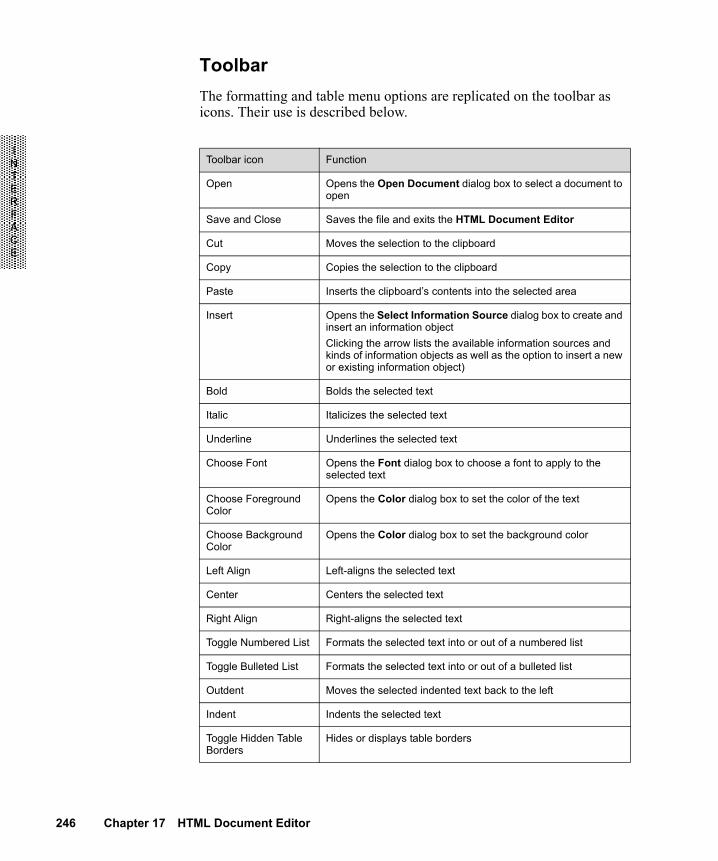
246 Chapter 17 HTML Document Editor
INTERFACE
ToolbarThe formatting and table menu options are replicated on the toolbar as icons. Their use is described below.
Toolbar icon Function
Open Opens the Open Document dialog box to select a document to open
Save and Close Saves the file and exits the HTML Document Editor
Cut Moves the selection to the clipboard
Copy Copies the selection to the clipboard
Paste Inserts the clipboard’s contents into the selected area
Insert Opens the Select Information Source dialog box to create and insert an information objectClicking the arrow lists the available information sources and kinds of information objects as well as the option to insert a new or existing information object)
Bold Bolds the selected text
Italic Italicizes the selected text
Underline Underlines the selected text
Choose Font Opens the Font dialog box to choose a font to apply to the selected text
Choose Foreground Color
Opens the Color dialog box to set the color of the text
Choose Background Color
Opens the Color dialog box to set the background color
Left Align Left-aligns the selected text
Center Centers the selected text
Right Align Right-aligns the selected text
Toggle Numbered List Formats the selected text into or out of a numbered list
Toggle Bulleted List Formats the selected text into or out of a bulleted list
Outdent Moves the selected indented text back to the left
Indent Indents the selected text
Toggle Hidden Table Borders
Hides or displays table borders
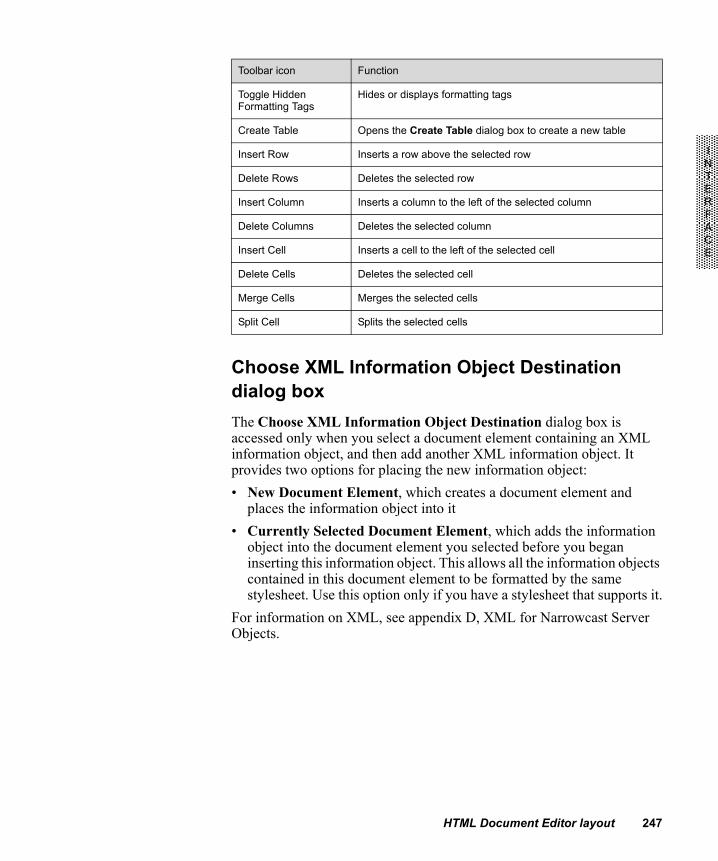
HTML Document Editor layout 247
INTERFACE
Choose XML Information Object Destination dialog boxThe Choose XML Information Object Destination dialog box is accessed only when you select a document element containing an XML information object, and then add another XML information object. It provides two options for placing the new information object:• New Document Element, which creates a document element and
places the information object into it• Currently Selected Document Element, which adds the information
object into the document element you selected before you began inserting this information object. This allows all the information objects contained in this document element to be formatted by the same stylesheet. Use this option only if you have a stylesheet that supports it.
For information on XML, see appendix D, XML for Narrowcast Server Objects.
Toggle Hidden Formatting Tags
Hides or displays formatting tags
Create Table Opens the Create Table dialog box to create a new table
Insert Row Inserts a row above the selected row
Delete Rows Deletes the selected row
Insert Column Inserts a column to the left of the selected column
Delete Columns Deletes the selected column
Insert Cell Inserts a cell to the left of the selected cell
Delete Cells Deletes the selected cell
Merge Cells Merges the selected cells
Split Cell Splits the selected cells
Toolbar icon Function

248 Chapter 17 HTML Document Editor
INTERFACE

18C H A P T E R 1 8
249
INTERFACE
18.Imported Document Editor 18
What is it?
The Imported Document Editor allows you to create a document from an imported file. A file itself cannot be used in a publication, only documents. Imported documents can be included in the publication as binary attachments. You can import a new file or use an already imported file.
How do I access it?
Right-click anywhere in the Applications folder, point to New, then choose Document. Double-click Imported Document on the New Document dialog box.
What can I do with it?
Through the Imported Document Editor you can• create an imported document from a new imported file• create an imported document from an existing imported fileFor instructions on completing one of the above tasks, refer to the following How Do I...? topic:• Publication Operations
What should I know before I use it?
Before you begin using the Imported Document Editor, you should• understand how documents are used in publications• understand that imported files must be associated with a document
before they can be used in a publication• understand how locales can be set for documents (locales are necessary
when an imported document contains a file that was imported using a character set other than the system default)

250 Chapter 18 Imported Document Editor
INTERFACE
For more information on the above topics, refer to the following Concepts topic:• Publications
Imported Document Editor layoutThe Imported Document Editor contains the following interfaces:• Imported Document Editor dialog box• Import File dialog box• Select Imported File• Imported Document Editor - document name
Imported Document Editor dialog boxThis dialog box allows you to choose to• create a new file object, which means you will import a file, then create
a document from it• use an existing file object, which means that you will create a document
from a file you already imported into the systemThe task flow changes depending on which option you select.
Import File dialog boxThe Import File dialog box is accessed only when you choose to create a new file object. It allows you to• enter a Name for the imported file• select a new File Type, which is set automatically, from the drop-down
list• select whether to import the file using the system character set as the
default or using another character set• Browse to find the File to import• click OK to import and save the file

Imported Document Editor layout 251
INTERFACE
Select Imported FileClick Browse to find the imported file to associate with the document.
Imported Document Editor - document nameWhen you double-click on an existing imported document, this editor allows you to change which file you are accessing or re-import the same file. Click Save and Close to save the new document.

252 Chapter 18 Imported Document Editor
INTERFACE

19C H A P T E R 1 9
253
INTERFACE
19.Import File Dialog Box 19What is it?
The Import File dialog box imports a file to use as a stylesheet, template, or attachment. An XSL stylesheet is applied at the document element level and transforms the XML returned by an information object into a format that can be used in a document. A template is used as the basis for creating a new document. For example, an Excel template file sets the number of worksheets in the document and can provide Excel macros as well.You can import a zip file, associate it to a document, and then attach it to a publication.
Note: • After the file has been saved, the file type cannot be changed. • After a file is imported, the character set used to import the file cannot
be changed.• After a file is imported, the file path displayed is blank because the file
path is saved in the Narrowcast Server Repository as part of the Narrowcast Server file object definition. The user can only reimport a file to that object.
How do I access it?
Right-click anywhere in the Applications folder, point to New, then choose Imported File.
What can I do with it?
Through the Import File dialog box you can• import a file• reimport a file to update it

254 Chapter 19 Import File Dialog Box
INTERFACE
For instructions on the above topics, refer to the following How Do I...? topic:• Publication Operations
What should I know before I use it?
Before you begin using the Import File dialog box, you should• understand how imported files are used in the Delivery Engine• know the location of the file to import• know the character set that was used to create the file if it differs from
your system character setFor more information on the above topics, refer to the following Concepts topic:• Creating Services
Import File dialog box layoutThe Import File dialog box allows you to• Enter a Name for the imported file.• Specify the File Type which is initially set automatically. You can
change it by selecting a File Type from the following options in the drop-down list:◊ Plaintext◊ HTML◊ XML◊ XSL◊ TML◊ WML◊ Excel◊ Word◊ PowerPoint◊ Zip◊ GIF◊ JPEG◊ BMP

Import File dialog box layout 255
INTERFACE
◊ AVI◊ MPEG◊ AIFF◊ WAV◊ Other◊ PDF
• Browse to locate the file to import.• Select the character set to use while importing a file. By default, the
System Character Set (ANSI) is selected. Click Modify to import the file using another character set. The Select a Character Set dialog box opens.
• Click OK to continue.
Select a Character Set dialog box The Select a Character Set dialog box lets you select the character set used while importing a file.Select the character set from the following options in the Character Set drop-down list:
◊ System character set (ANSI) ◊ US-ASCII ◊ Western (ISO-8859-1) ◊ Central European (ISO-8859-2) ◊ Baltic (ISO-8859-4) ◊ Arabic (ISO-8859-6)◊ Greek (ISO-8859-7)◊ Hebrew (ISO-8859-8)◊ Turkish (ISO-8859-9)◊ Kanji (Shift-JIS)◊ Japanese (ISO-2022-JP)◊ Korean (EUC-KR)◊ Cyrillic (KO18-R)◊ Chinese Simplified (GB2312)◊ Chinese Traditional (BIG-5)
256 Chapter 19 Import File Dialog Box
INTERFACE
◊ Thai (WINDOWS-874)◊ UTF-7◊ UTF-8◊ Unicode 1.1 (ISO-10646)
Note: The following file types are considered text files: plaintext, HTML, XML, XSL, and WML.
The character set that was used when creating the file should be selected, because this character set is used to interpret the file and store it in the Narrowcast Server Object Repository. When this file object is used within an imported document, the locale for the document should be set to a locale whose character set for relevant ITMs is the same as or compatible to the character set that was selected when the file was imported.
Note: You need to select a locale with this same character set (or a compatible character set) for any imported document that contains this file in the future for the file to be decoded correctly.
Click OK to continue.
Refresh Imported File layout The Refresh Imported File dialog box displays the status of file import, summary of the file import and errors, if any.Click Open Log File to view a summary of the file import. The summary details includes the date and time stamp, and the status, summary, and error details of the of the import process. Click OK to continue.

20C H A P T E R 2 0
257
INTERFACE
20.Information Object Wizard 20
What is it?
The Information Object Wizard allows you to quickly create a new MicroStrategy information object, which is a report with certain properties that specify how to get data from a MicroStrategy Information Source. The wizard allows you to create the following types of information objects:• content, which supplies data for the document• subscription, which provides a list of subscribers for the service• segment, which specifies the first and last subscriptions for each
segment of the subscription setThe Information Object Wizard displays different pages depending on which information object type, or role, you assign to your new information object.
How do I access it?
Right-click anywhere in the Applications folder, point to New, then choose Information Object. Double-click a MicroStrategy Information Source.
What can I do with it?
Through the Information Object Wizard you can• edit a MicroStrategy content information object• create a MicroStrategy subscription information object• create a MicroStrategy segment information object• set advanced options for report execution• associate a question object to an information object• define delivery information for a subscription information objectFor instructions on any of the above topics, refer to the following How Do I...? topic:

258 Chapter 20 Information Object Wizard
INTERFACE
• Information Object Operations
What should I know before I use it?
Before you begin using the Information Object Wizard, you should• understand what an information object is• know the difference between the various kinds of information objects• know how information objects are used in documents and subscription
sets• ensure that the system administrator has defined a MicroStrategy
Information Source• ensure that, in the project source, a report has been set up to be
associated with the information objectFor more information on the above topics, refer to the following:• Publications• Information objects• Appendix B, MicroStrategy Objects in the MicroStrategy Narrowcast
Server Getting Started Guide
Information Object Wizard layoutThe Information Object Wizard consists of the following pages and dialog boxes:• Select Information Source dialog box• Role page• Source of Subscription Information page• Report or Filter page• Advanced Properties dialog box• Format page• Segmentation Prompts page• User Properties and Personalization page• Address Properties page• Preferences page• Authentication and Security page

Information Object Wizard layout 259
INTERFACE
• Segment Size page• Summary pageThe pages that are displayed depend on the role that is chosen for the information object. The information object roles that apply to a specific page are described on that page. Click Next to advance to the next page of the wizard. Click Back to go back to the previous page. Click Cancel at any time to exit the wizard without saving any changes.
Select Information Source dialog boxThis dialog box lists the information sources available in the system. Select the information source to use.
Role pageChoose how this information object should be used:• Content Information Object: The report results are used as content in
document elements. • Subscription Information Object: The report results provide the
subscription set, within a particular segment. • Segment Information Object: The report results define segment
boundaries for subscriptions.
Source of Subscription Information pageFor subscription information objects, this page allows you to choose how you want to retrieve subscription information. Choose one of the following:• Retrieve dynamic subscription information from the information
source and do not choose a filter: Subscription information is gathered using the properties defined in the information source. You cannot provide a filter to constrain the subscription information returned.
• Retrieve dynamic subscription information from the information source and choose a filter: Subscription information is gathered using the properties defined in the information source. You must provide a filter to constrain the subscription information returned.

260 Chapter 20 Information Object Wizard
INTERFACE
• Select or define a report and retrieve dynamic subscription information from the selected report: Subscription information is gathered from the page axis of a report. You must select a report with subscription attributes on the page axis.
Report or Filter pageDepending on the type of information object you are creating, this page displays a browser allowing you to select a report or filter to use. For content and subscription information objects, a brief explanation of what is needed is shown. When you select a report or filter, the explanation changes to tell you whether the report or filter is valid for the type of information object you are creating. If the report or filter is not valid, the explanation indicates what is needed. For more information on validation, see Information object validation, below.You can navigate to the desired report and select it. Or you can open a folder, type some or all of the report name in the Find box, and click the Find in list button to list all reports with the typed characters in their names.
Note: • If multiple reports are found, the first one found is highlighted.• Reports in different subfolders are listed together.
You can create a new report or filter by clicking the New Report or New Filter button. You can edit an existing report or filter by clicking Edit Object. You can refresh the list of objects by clicking Refresh browser.
Note: You must have a compatible version of MicroStrategy Desktop installed on the local machine to access New Report, New Filter, and Edit Object functionality.
Click Advanced Options to access the Advanced Properties dialog box. For more information on execution modes, see chapter 6, Page Personalization and Dynamic Subscriptions.

Information Object Wizard layout 261
INTERFACE
Information object validationAs a result of information object validation, one of two things happens:• Narrowcast Server warns you about what might happen if you choose
to continue without changing your selection• Narrowcast Server does not allow you to continue without changing
your selectionSeveral situations prompt either a informational warning or an invalid selection error for content information objects and subscription information objects:• Content information object executed using personalized report
execution• Content information object executed using personalized page execution• Subscription information object
Content information object executed using personalized report execution
For these information objects, three potential problems exist:• A personalized report execution information object should not contain
an attribute on the page axis of the report. If it does, only one page is returned rather than the entire report. You cannot continue without changing your selection.
• A personalized report execution information object should contain the security object prompt if the information source contains a default security object. If a security object prompt is not in this information object, the security object is not applied to filter the report results if personalization is on a different attribute form than the security object. You are warned but can continue without changing your selection.
• A personalized report execution information object might fail to execute if required prompts with no default answer are present. For this information object to execute successfully, these prompts must be answered by user preferences. You are warned but can continue without changing your selection.

262 Chapter 20 Information Object Wizard
INTERFACE
Content information object executed using personalized page execution
• A personalized page execution information object must contain an attribute form on the page axis of the report. This enables the appropriate pages to be sent rather than the entire report. You cannot continue without changing your selection.
• A personalized page execution information object should not contain the security object prompt. If it does, the information source default security object is applied. This can mean that the page element selected for personalization is actually not present in the report results. This validation occurs when you have not chosen to segment prompts in the report. If segmenting using prompts in the report, it cannot be determined whether the prompts are for segmentation or security. You are warned but can continue without changing your selection.
• A personalized page execution information object fails to execute if required prompts with no default answer are present. This validation occurs when you have chosen to segment prompts in the report. If segmenting using prompts in the report, it cannot be determined whether the prompts are for segmentation. You cannot continue without changing your selection.
• If you are segmenting using prompts in a report, a personalized page execution information object must contain two prompts, for the beginning and end of the segments. You cannot continue without changing your selection.
Subscription information object
• A subscription information object using a report must contain one attribute form on the page axis. You cannot continue without changing your selection.
• If a report is selected as a subscription information object, the ID form of the first attribute on the page axis will be used as Subscription ID. This should match the Subscription ID selected in the information source definition. If it does not, any content information object executed using personalized page execution will be segmented incorrectly when used with a subscription information object.

Information Object Wizard layout 263
INTERFACE
• If you selected a filter, you cannot elect to segment this subscription information object using prompts in a report. You cannot continue without changing your selection.
• If you selected a report and if you are segmenting using prompts in a report, a subscription information object must contain two prompts, for the beginning and end of the segments. You cannot continue without changing your selection.
Advanced Properties dialog boxThe Advanced Properties dialog box contains the following tabs:• General tab• Report Execution tab• Question Object tab• Error handling tab
Note: • The Report Execution tab is not displayed in case of subscription
information objects in which you choose a filter to constrain the subscription information returned.
• The Question Object tab is not displayed in case of subscription information objects when you choose a filter to constrain the subscription information returned and when you choose a report to retrieve the subscription information.
For more information on execution modes, see chapter 6, Page Personalization and Dynamic Subscriptions.
General tab
The General tab has the following sections:• Name and Description: In this section, you can enter a name and
description for the information object.• Filter Information: Select the Include report filter information with
report results check box if you want to retrieve the filter information when the MicroStrategy Desktop report is executed.

264 Chapter 20 Information Object Wizard
INTERFACE
Note: The Filter Information is not displayed if you have subscription information objects that contain a filter for restricting the subscription information that is returned.
Report Execution tab
The Report Execution tab has multiple sections. In some cases, not all sections are available or visible. The following sections may appear:• Intelligence Server cache• Personalization Mode • Segmentation Properties
Intelligence Server cache
In the Intelligence Server cache section, select one or both of the following check boxes:• Use cached report if available from MicroStrategy Intelligence
Server: If the report has been cached, use it; otherwise rerun the report.• Update MicroStrategy Intelligence Server cache with execution
result if cache is not used or unavailable: Run the report and cache it for future use.
Note: If personalized page execution and autosegmentation are selected in the second and third sections of this tab, caching is not available. The check boxes are disabled, new caches cannot be generated, and existing caches cannot be used.
Personalization Mode
In the Personalization Mode section, select one of the following options:• Personalized report execution: A separate report is executed for each
group of subscriptions with the same personalization.• Personalized page execution: Narrowcast Server executes one report
for all subscriptions within a segment, and each subscription receives one page of content. It allows one report to satisfy many personalization sets.

Information Object Wizard layout 265
INTERFACE
Segmentation Properties
If you select Personalized page execution, the Segmentation Properties section is enabled. Select one of the following options:• Do not segment this information object. This information object
returns content for the entire subscription set. Any report can be used. For large subscription sets, this option can significantly reduce performance or increase memory consumption.
• Automatically segment this information object. This information object returns only subscriptions or content in the current segment. Any report can be used and the data is filtered automatically.
• Segment using segmentation prompts defined in the report. This information object returns only subscriptions or content in the current segment. To filter the data, the report must contain prompts to gather the subscription IDs for the start and end of the segment.
Note: The Segmentation Properties section is not displayed in case of subscription information objects in which you choose a report to retrieve the subscription information.
Question Object tab
On the Question Object tab, select or create a question object to be used with this information object. First select the Gather preferences using a question object check box. Then browse to an existing question object on the Narrowcast Server system, or click New to create a new question object. You can also select an existing question object and click Edit to modify it.For more information on question objects, see the following:• Question Object Browser dialog box
Note: An information object can be personalized without associating a question object to it.

266 Chapter 20 Information Object Wizard
INTERFACE
Error handling tab
On the Error handling tab, select the Fail segment if Information Object fails check box to fail the complete segment if the information object fails.
Format pageThe Format page is used for content information objects only. Report results can be returned in either a tabular format, ready for further processing, or in a graphical format, which is a GIF file. If graphical is selected, the image size can be customized.
Note: One graph is generated no matter how compact it might be. The entire report results are scaled according to the graph size setting. To ensure the graph is readable, check whether the report returns a suitable graph with personalized data in the MicroStrategy Desktop interface using the same settings as in MicroStrategy Narrowcast Server. The setting is under Graph Preference Options in the MicroStrategy Desktop interface when the report is running in graph mode. Ensure that the scrolling settings (the maximum number of categories and the maximum number of series) are large enough to cover the scope of the entire report results.
Segmentation Prompts pageThe Segmentation Prompts page is shown for personalized page content information objects that are segmented. This page allows you to select the prompts to use as the boundaries of the segment.
User Properties and Personalization pageThe User Properties and Personalization page is used for subscription information objects only.This page defines which fields in the report results map to which pieces of subscription information, including the Address ID, User ID, Locale ID, Security, and Personalization. The option you select for one ID affects the options available for the next ID. The following sections explain the operations:

Information Object Wizard layout 267
INTERFACE
• Address and User Information• Personalization (Authentication and Security, and Preference)
Note: The subscription ID is always generated from the report and defaults to the first page-by attribute in the selected report template.
Address and User Information
If Address ID is retrieved from the Subscription Book,Then:• User ID is retrieved from the Subscription Book• Locale ID is retrieved from the Subscription BookIf Address ID is generated by the report, Then:• Locale ID and User ID can be obtained from the Subscription Book, the
report, or a constant
Subscription Book,report, or constant
SubscriptionBook
SubscriptionBook
SubscriptionBook
Report SubscriptionBook
Report Subscription Book,report, or constant
Constant Subscription Book,report, or constant
Address ID User ID Locale ID

268 Chapter 20 Information Object Wizard
INTERFACE
Personalization (Authentication and Security, and Preference)
If User ID is retrieved from Subscription Book,Then:• security must come from Subscription Book,Else:• security can be obtained from Subscription Book, report or you can use
a constantPreferences can always be obtained from the Subscription book, report or a constant.
SubscriptionBook
SubscriptionBook
SubscriptionBook or report
SubscriptionBook or report
User ID Authenticationand Security
SubscriptionBook or report
SubscriptionBook or report
SubscriptionBook or report
SubscriptionBook or report
Preference
SubscriptionBook
Report
Address ID
SubscriptionBook
SubscriptionBook
Report
Constant

Information Object Wizard layout 269
INTERFACE
Address Properties pageThe Address Properties page is displayed only when the Address ID on the User Properties and Personalization page is generated by the report. This page allows you to define where the address information is found. For each piece of delivery information listed, you can choose whether to generate it from the report, retrieve it from the Subscription Book, or apply a constant.
Preferences pageThe Preferences page is displayed only if personalization was set to be generated by the report, on the User Properties and Personalization page.This page continues the specification of the personalization. For each information source and question object combination, the report’s page-by attribute forms are provided in drop-down lists to be selected for the preference object.
Authentication and Security pageThe Authentication and Security page is displayed only if security was set to be generated by the report on the User Properties and Personalization page.This page specifies how the data will be personalized. For each information source, the report’s page-by attribute forms are provided in drop-down lists to be selected for the authentication and security objects.
Segment Size pageThe Segment Size page is used only for segment information objects. Select the prompt that controls the size of the segments returned by the report.
Summary pageThis page provides a summary of the selections you made while building the information object. Review the information and click Finish. The Save XML Information Object dialog box appears so you can save the information object and return to the Narrowcast Administrator.

270 Chapter 20 Information Object Wizard
INTERFACE

21C H A P T E R 2 1
271
INTERFACE
21.Modify Schedule Queue Parameters Dialog Box
21What is it?
The Modify Schedule Queue Parameters dialog box allows you to change the following parameters for the Delivery Engine’s scheduled services queue:• how long to calculate the queue for each service• the maximum number, up to 999, of scheduled executions to display
How do I access it?
Select Schedule Services in the Administration folder. Click the Set Queue Parameters icon in the toolbar.
What can I do with it?
The Modify Schedule Queue Parameters dialog box allows you to modify the schedule queue parameters.For instructions on the above topic, refer to the following How Do I...? topic:• Service Operations
What should I know before I use it?
Before you begin using the Modify Schedule Queue Parameters dialog box, services must be scheduled.

272 Chapter 21 Modify Schedule Queue Parameters Dialog Box
INTERFACE
Modify Schedule Queue Parameters dialog box layout
The Modify Schedule Queue Parameters dialog box allows you to change the following parameters for the Delivery Engine’s scheduled services queue:• how long to calculate the queue for each service execution• the maximum number, up to 999, of scheduled service executions to
display

22C H A P T E R 2 2
273
INTERFACE
22.New Document Dialog Box 22
What is it?
The New Document dialog box allows you to choose whether to create a new Narrowcast Server document or to link to an existing MicroStrategy Desktop Report Services document.
How do I access it?
Right-click anywhere in the Applications folder, point to New, then choose Document.
What can I do with it?
Through the New Document dialog box you can• create an Excel document• create an HTML document• create an imported document• create a plaintext document• link to an existing MicroStrategy Desktop Report Services documentFor instructions on the above topics, refer to the following How Do I...? topic:• Publication Operations
What should I know before I use it?
Before you begin using the New Document dialog box, you should• understand how documents are used in publications• know what document elements, information objects, and XSL
stylesheets are

274 Chapter 22 New Document Dialog Box
INTERFACE
For more information on the above topics, refer to the following Concepts topics:• Publications• Documents
New Document dialog box layoutThe New Document dialog box allows you to choose from the following options:• Create new Narrowcast Server document• Link to existing MicroStrategy Report Services or HTML documentIf you choose the first option, you must also choose which document editor to access to create the new document. Your options are:• Open Excel Document Editor• Open HTML Document Editor• Open Imported Document Editor• Open Plaintext Document EditorIf you choose the second option, you must also choose which of the available information sources to access.You can choose to display the options as large icons or small icons.

23C H A P T E R 2 3
275
INTERFACE
23.Portal Administrator Wizard 23
What is it?
The Portal Administrator Wizard is the MicroStrategy Narrowcast Server tool for configuring the portal, creating site definitions, publishing services and device types, and specifying information source properties and default portal preferences.
How do I access it?
To access the Portal Administrator Wizard, from the Start menu, select Programs, MicroStrategy, Narrowcast Server and then choose Portal Administrator.
What can I do with it?
The Portal Administrator Wizard allows you to• configure and manage the Subscription Portal to allow end users to
subscribe to a variety of services via the Web• configure data sources and portal layouts• publish services and device types• select default devices for the Subscription Portal• specify information source properties and default portal preferencesFor more information on the above topics, see the following How Do I...? topics:• Channel Operations• Database Connection Operations• Device Type Operations• Service Configuration Operations• Site Operations

276 Chapter 23 Portal Administrator Wizard
INTERFACE
What should I know before I use it?
Before you use the Portal Administrator Wizard, you should familiarize yourself with• the relationship between a portal and site• the workflow of creating a service through the Service Wizard• the objects that have been created for the specific portal and will be
configured for the site being definedFor more information on the above topics, refer to the following Concepts topics:• Portal• Site definition• Creating Services
Portal Administrator Wizard layoutThe Portal Administrator Wizard consists of four sections:• System Configuration section• Site Management section• Site Preferences section• Services Configuration section
System Configuration sectionThe System Configuration section consists of the following:• Welcome page• System Configuration pages• Summary page
Welcome page
The System Configuration welcome page provides an overview for the Portal Administrator Wizard. It details the responsibilities of the portal administrator and outlines the capabilities of the Portal Administrator Wizard.
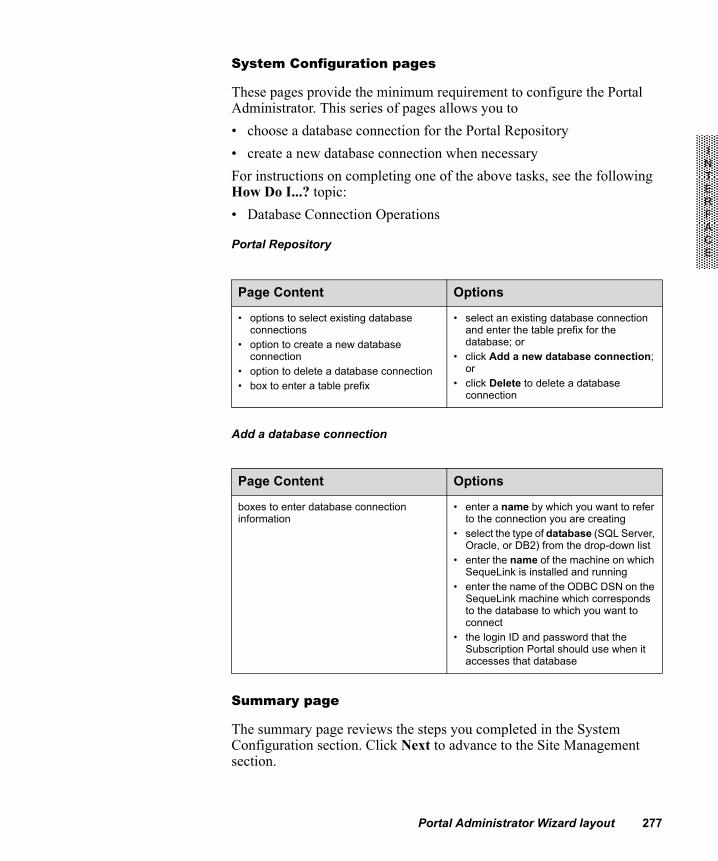
Portal Administrator Wizard layout 277
INTERFACE
System Configuration pages
These pages provide the minimum requirement to configure the Portal Administrator. This series of pages allows you to• choose a database connection for the Portal Repository • create a new database connection when necessaryFor instructions on completing one of the above tasks, see the following How Do I...? topic:• Database Connection Operations
Portal Repository
Add a database connection
Summary page
The summary page reviews the steps you completed in the System Configuration section. Click Next to advance to the Site Management section.
Page Content Options
• options to select existing database connections
• option to create a new database connection
• option to delete a database connection• box to enter a table prefix
• select an existing database connection and enter the table prefix for the database; or
• click Add a new database connection; or
• click Delete to delete a database connection
Page Content Options
boxes to enter database connection information
• enter a name by which you want to refer to the connection you are creating
• select the type of database (SQL Server, Oracle, or DB2) from the drop-down list
• enter the name of the machine on which SequeLink is installed and running
• enter the name of the ODBC DSN on the SequeLink machine which corresponds to the database to which you want to connect
• the login ID and password that the Subscription Portal should use when it accesses that database
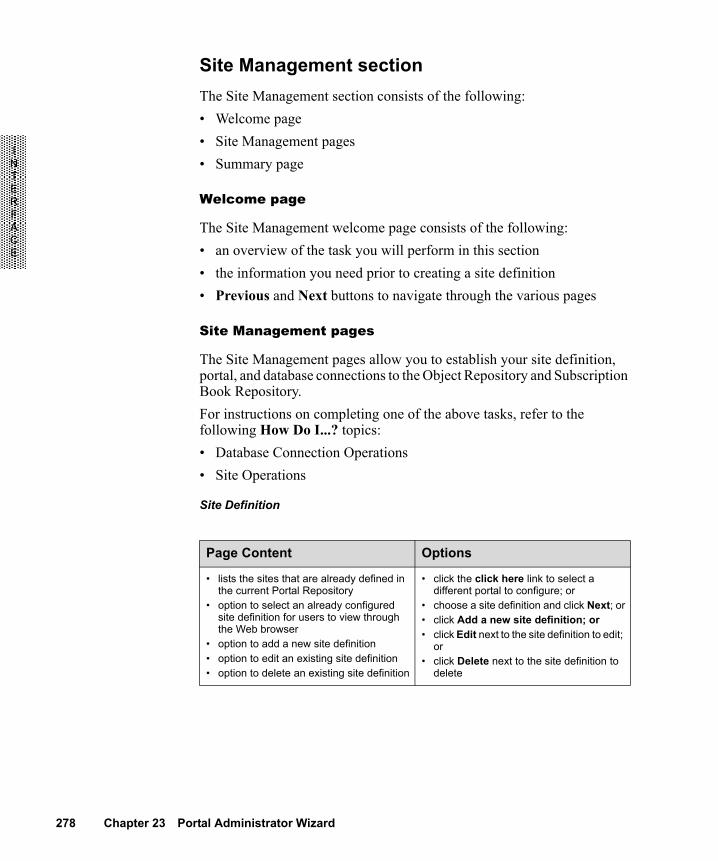
278 Chapter 23 Portal Administrator Wizard
INTERFACE
Site Management sectionThe Site Management section consists of the following:• Welcome page• Site Management pages• Summary page
Welcome page
The Site Management welcome page consists of the following:• an overview of the task you will perform in this section• the information you need prior to creating a site definition• Previous and Next buttons to navigate through the various pages
Site Management pages
The Site Management pages allow you to establish your site definition, portal, and database connections to the Object Repository and Subscription Book Repository.For instructions on completing one of the above tasks, refer to the following How Do I...? topics:• Database Connection Operations• Site Operations
Site Definition
Page Content Options
• lists the sites that are already defined in the current Portal Repository
• option to select an already configured site definition for users to view through the Web browser
• option to add a new site definition • option to edit an existing site definition• option to delete an existing site definition
• click the click here link to select a different portal to configure; or
• choose a site definition and click Next; or• click Add a new site definition; or• click Edit next to the site definition to edit;
or• click Delete next to the site definition to
delete

Portal Administrator Wizard layout 279
INTERFACE
Note: • If you create or edit a site definition you are returned to this page. Select
the site definition you just created or edited and click Next to proceed to the Site Preferences section.
• You can always jump directly to the active Subscription Portal by clicking the portal name in the upper left corner of the page.
Select or Create Portal
Note: After you create a new portal, the Site Definition page appears again.
Site Name and Description
Page Content Options
• options to select an existing portal• option to delete an existing portal• option to create a new portal
• select the portal to be activated; or• click Delete next to the portal to be
deleted; or• enter a name for a new portal
Page Content Options
boxes for name and description • enter a Name for the site• enter a Description for the site• click Next

280 Chapter 23 Portal Administrator Wizard
INTERFACE
Object Repository
Subscription Book Repository
Summary page
The summary page reviews the steps you completed in the Site Management section. Click Next to advance to the Site Preferences section.
Site Preferences sectionThe Site Preferences section consists of the following:• Welcome page• Site Preferences pages• Summary page
Welcome page
The Site Preferences welcome page consists of two areas:
Page Content Options
• options to select existing database connections
• option to create a new database connection
• option to delete a database connection• box to enter a table prefix• check box to use the same database
connection for the Subscription Book Repository
• select an existing database connection and enter the table prefix for the database; or
• click Add a new database connection; or
• click Delete to delete a database connection
• select the check box if the Subscription Book Repository and the Object Repository are stored in the same database location
Page Content Options
• options to select existing database connections
• option to create a new database connection
• option to delete a database connection• box to enter a table prefix
• select an existing database connection and enter the table prefix for the database; or
• click Add a new database connection; or
• click Delete to delete a database connection

Portal Administrator Wizard layout 281
INTERFACE
• The first area provides an overview of the task you will perform in this section.
• The second area displays Previous and Next buttons to navigate through the various pages.
Site Preferences pages
The Site Preferences pages allow you to establish channels, devices, information sources, and preferences for your site.For instructions on completing one of the above tasks, refer to the following How Do I...? topics:• Device Type Operations• Channel Operations
Channels
Select the Channels Folder
Page Content Options
• listing of all channels• option to edit a channel• option to delete a channel• option to add a new channel
• click Edit next to a channel to edit the channel folder name or description; or
• click Delete next to a channel to delete the channel from the Subscription Portal; or
• click Add a new channel to select a new service folder for the Subscription Portal
• click Next
Page Content Options
option to select a folder of services to be displayed in the Subscription Portal for this channel
• select the option next to the folder of services
• click Next
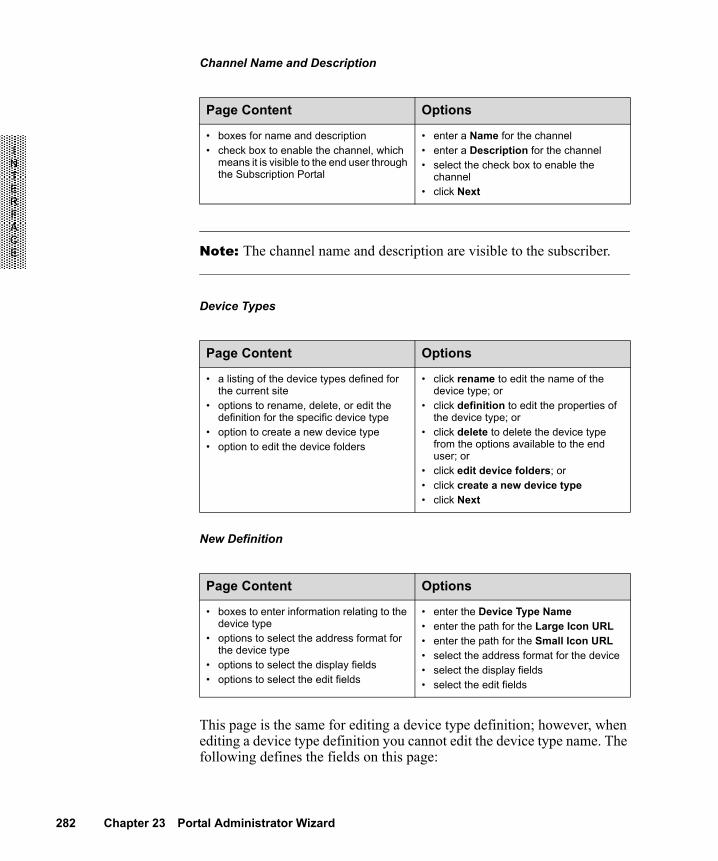
282 Chapter 23 Portal Administrator Wizard
INTERFACE
Channel Name and Description
Note: The channel name and description are visible to the subscriber.
Device Types
New Definition
This page is the same for editing a device type definition; however, when editing a device type definition you cannot edit the device type name. The following defines the fields on this page:
Page Content Options
• boxes for name and description• check box to enable the channel, which
means it is visible to the end user through the Subscription Portal
• enter a Name for the channel• enter a Description for the channel• select the check box to enable the
channel• click Next
Page Content Options
• a listing of the device types defined for the current site
• options to rename, delete, or edit the definition for the specific device type
• option to create a new device type• option to edit the device folders
• click rename to edit the name of the device type; or
• click definition to edit the properties of the device type; or
• click delete to delete the device type from the options available to the end user; or
• click edit device folders; or• click create a new device type• click Next
Page Content Options
• boxes to enter information relating to the device type
• options to select the address format for the device type
• options to select the display fields• options to select the edit fields
• enter the Device Type Name• enter the path for the Large Icon URL• enter the path for the Small Icon URL• select the address format for the device• select the display fields• select the edit fields

Portal Administrator Wizard layout 283
INTERFACE
• Device Type Name: should accurately describe the group of devices, for example, faxes, pager, e-mail, and so on
• Path for Large Icon URL: the icon in this path is displayed on the Addresses page of the Subscription Portal
• Path for Small Icon URL: the icon in this path is displayed on the Addresses page of the Subscription Portal
• Address format: allows you to select the appropriate validation to be applied to addresses created for devices within this device type:◊ E-mail requires that all addresses created for this device type follow
the standard electronic mail address format, for example, [email protected]
◊ Numeric requires the end user to enter an address for the device type using only numbers, parentheses, and dashes
◊ No validation allows the end user to enter any combination of text and numbers into the address field
• Display fields: selecting these check boxes determines which attributes appear in the Subscription Portal on the Addresses page:◊ Address Name shows the name given to each address by the user, for
example, “My Email”◊ Address Value shows the physical value of each address, for
example, [email protected]◊ Style displays the specific device for which each address was created◊ Delivery Window shows a specific time for services to be delivered
to each address such as sending services to a mobile telephone only during the morning hours
• Edit fields: selecting these check boxes determines which attributes of an address the end user can edit in the Subscription Portal environment:◊ Address Name allows the end user to give a name to each address
(cannot be disabled)◊ Address Value allows the end user to enter the physical value of the
address (cannot be disabled)◊ Style allows the end user to select the device for which the address is
defined (cannot be disabled)◊ PIN allows the end user to enter a personal identification number that
is used when sending content to the address◊ Delivery Window allows the end user to enter a starting and ending
time between which services can be delivered to the address

284 Chapter 23 Portal Administrator Wizard
INTERFACE
Device Folders
Note: Any given device folder can only be used for one device type. Once it has been used for one device type it is no longer shown as available for other device types.
Device Settings
Note: When you select the default device you must select validation for the address format. Validation occurs when the subscriber enters an address in the Subscription Portal. There are three options for address format:• E-mail requires that all addresses created for this device type follow the
standard electronic mail address format, for example, [email protected]
• Numeric requires the end user to enter an address for the device type using only numbers, parentheses, and dashes
• No validation allows the end user to enter any combination of text and numbers into the address field
Page Content Options
• list of available and selected devices in the device type folder
• check boxes for selecting devices to activate them for the specific device type
• select the folder or folders to be made active from the available list
• use the toggle button to move selected folders to the Selected side of the table
• click Next
Page Content Options
• listing of the default device• option to select the address format for the
portal devices• listing of the active default device• options to change and disable the portal
device or default device
• leave the default settings; or• click Change• select the Address format for the
Default Device• click Next

Portal Administrator Wizard layout 285
INTERFACE
Information Sources
Preferences
The following describes the options available on the Preferences page:Project Settings• Enable creation of new accounts: Selecting yes or no from the drop-
down list allows or prohibits the creation of new accounts through the Subscription Portal interface.
• New account expiration: This sets the date when new users will expire. This expiration has the same effect as expiring the user through Narrowcast Administrator. The three options to specify the expiration date of new accounts are:◊ no expiration: This default setting does not set an expiration date on
new user accounts.◊ on (mm/dd/yyyy): Entering a date in this box indicates that all new
user accounts terminate on the given date.◊ after (nn) days: Selecting this option and entering a valid number in
this box indicates that all new user accounts expire after the given number of days after being created.
Page Content Options
• list of information sources• options to set an authentication method
for each information source
• select the option desired for each information source
• click Next
Page Content Options
• options for project settings• options for interface settings• boxes to enter administrator information• options for login mode• options for prompt settings
• select the option to allow new users to be created at the subscription portal
• select the option to determine when new users accounts will expire
• select the option for DHTML usage• select the cache storage mechanism• select how the questions overview
page for personalized service will be displayed
• enter Administrator information• select the login mode• specify prompt settings• click Next

286 Chapter 23 Portal Administrator Wizard
INTERFACE
Interface settings• Default use DHTML: These options determine the use of DHTML for
the subscriber.◊ Determine Automatically: This default option enables the use of
DHTML only if the user’s Web browser supports DHTML.◊ Yes: Defaults all users to having DHTML enabled on their Web
browsers even if their Web browsers to do not support this option.◊ No: Defaults all users to having DHTML disabled on their Web
browsers even if their Web browsers support it.
Note: Selecting Yes or No does not prevent subscribers from enabling or disabling the DHTML settings on their Web browsers. The default option of Determine Automatically should be used unless there is a reason to change it to one of the other options, such as the DHTML is not working properly.
• Cache Storage Mechanism: While creating subscriptions the Subscription Portal has the option of writing temporary data to one of the following locations:◊ Session variables stores the temporary subscription data in memory.◊ Temp files directory stores the subscription temporary data in
temporary files in the directory location entered here.• Display questions overview page for personalized service: When an
end user creates a new subscription, an overview page appears if the subscription has personalization. Selecting one of the following options determines if this page appears in the Subscription Portal.◊ Always displays the summary page regardless of how many
questions are being asked.◊ Only when there is more than one question displays the summary
page only if multiple questions are asked of the end user.◊ Never never displays the summary page.
Administrator information• E-mail allows you to enter the e-mail address of the technical support
contact.• Telephone number allows you to enter the telephone number for
technical support.

Portal Administrator Wizard layout 287
INTERFACE
Login mode• 1. Narrowcast Server Normal (Login ID and Password): Select this
if the Subscription Portal users will use Narrowcast Server credentials (NOT Intelligence Server logins or NT authentication).
• 2. MicroStrategy Intelligence Server Normal (Login ID and Password): Select this if the Subscription Portal users will use Intelligence Server credentials (NOT Narrowcast Server credentials or NT authentication).
• 3. MicroStrategy Intelligence Server NT (NT Login ID): Select this if the Subscription Portal users will use NT authentication (NOT Narrowcast Server or Intelligence Server credentials).
• 4. Intelligence Server name: Provide a MicroStrategy Intelligence Server name if you selected option 2 or 3.
This feature allows existing users of MicroStrategy Intelligence Server to use the Subscription Portal interface without creating a new Narrowcast Server user. When this feature is enabled, an Intelligence Server user can log into Subscription Portal using the same login method he normally uses to log into MicroStrategy Web. The first time a user logs into Subscription Portal using this approach a Narrowcast Server user is created behind the scenes and the two user accounts are linked together. This happens transparently to the user, so the user is never aware of the fact that there are technically two user definitions.First you must enable Intelligence Server authentication (ISA) on this page. You can enable either standard Intelligence Server authentication, Intelligence Server-NT authentication, both, or neither. (If neither is enabled, Subscription Portal users need to log in using their Narrowcast Server login ID and password.) If either ISA option is enabled, you need to enter the name of the MicroStrategy Intelligence Server to be used for user authentication. Any combination of the three login options can be enabled together or independently. Depending on which of the three login modes are enabled, the Subscription Portal login page is modified to reflect the available options. If either Narrowcast Server authentication or MicroStrategy Intelligence Server Normal is enabled, the login page shows text boxes for login ID and password, and a login button. (If both are enabled, there is still only one set of text boxes and one login button.) If NT authentication is enabled, a link is displayed along with the text boxes and login button.For example, suppose the text boxes are displayed, and the user types in a login ID and password and clicks Login. If MicroStrategy Intelligence Server Normal is enabled, Subscription Portal passes the credentials that the user entered to the MicroStrategy Intelligence Server for authentication. If the Intelligence Server authenticates this user, the user is

288 Chapter 23 Portal Administrator Wizard
INTERFACE
logged into Subscription Portal (and a new Narrowcast Server user is created, if necessary). If the authentication on the Intelligence Server fails (for example, the login ID that was entered is not a recognized login ID on the Intelligence Server), if Narrowcast Server login mode is enabled, Subscription Portal attempts to log the user into Subscription Portal directly using the credentials entered. If that login fails, or if normal Narrowcast Server login mode is disabled, the user sees a message indicating that the login attempt failed. If MicroStrategy Intelligence Server Normal mode is not enabled, Subscription Portal attempts to log the user into Subscription Portal directly using the credentials entered.Alternatively, suppose that the option to login using MicroStrategy Intelligence Server NT is enabled, and the user clicks on the option to log in using NT. In this case, Subscription Portal requests that the Intelligence Server authenticate the user using his current NT credentials (see the MicroStrategy System Administration Guide for information on how to configure NT Authentication mode using Intelligence Server and MicroStrategy Web.) If the Intelligence Server authenticates this user, the user is logged into Subscription Portal (and a new Narrowcast Server user is created, if necessary). If the authentication on the Intelligence Server fails (for example, the NT user does not correspond to any recognized Intelligence Server user), the user sees a message indicating that the login attempt failed.

Portal Administrator Wizard layout 289
INTERFACE
Note: • Intelligence Server authentication only works for Normal login mode
and NT authentication, not for LDAP authentication, database authentication, or Guest user login modes.
• When using Intelligence Server authentication, the Allow Users to Create New Accounts option in the Portal Administrator Wizard works as follows: ◊ If normal Narrowcast Server login is enabled, this setting controls
whether or not the user sees a link to Create New Account on the login page. If the user chooses this option, he creates a Narrowcast Server user (not a new Intelligence Server user; there is no way to create a new Intelligence Server user from within Subscription Portal).
◊ Whether normal Narrowcast Server login is enabled or not, if either of the Intelligence Server authentication options are enabled, this setting controls whether or not a new Narrowcast Server user account is created if one does not already exist for the specified Intelligence Server user. For example, if you log in to Subscription Portal using your Intelligence Server login ID and password, Subscription Portal validates your credentials through Intelligence Server, then Subscription Portal attempts to connect you to Subscription Portal, but this fails since no corresponding Narrowcast Server user account exists. If this setting is ON, Subscription Portal automatically creates a new Narrowcast Server user account for you “behind the scenes,” and you are connected to Subscription Portal. But if this setting is Off, you are denied access to Subscription Portal.
Prompt settings• Number of items to be returned for element prompts: Specify the
maximum number of elements returned by an element prompt. The default is 30.
• Number of items to be returned for object prompts: Specify the maximum number of elements returned by an object prompt. The default is 30.
Note: Subscription Portal stores prompt information in temporary files. These files can be used for debugging purposes.
290 Chapter 23 Portal Administrator Wizard
INTERFACE
Summary page
The summary page reviews the steps you completed in the Site Preferences section. Click Next to advance to the Services Configuration section.
Services Configuration sectionThe Services Configuration section consists of the following:• Welcome page• Services Configuration pages• Finish page
Welcome page
The Services Configuration welcome page consists of two areas:• The first area provides an overview of the default service configuration
properties.• The second area displays Previous and Next buttons to navigate
through the various pages.
Services Configuration pages
It is not necessary to use all of the services configuration pages. You only use the services configuration pages when you are configuring a service with page-by questions or dynamic subscription sets. The Services Configuration pages allow you to establish your service configuration, select services to be configured, establish static and dynamic subscriptions, including alternate question objects, storage mappings, tables and columns.For instructions on completing one of the above tasks, refer to the following How Do I...? topic:• Service Configuration Operations

Portal Administrator Wizard layout 291
INTERFACE
Services
If you do not have any services with page-by questions or dynamic subscription sets, simply click Next to proceed to the Finish page and the option to log on to the Subscription Portal.
Select Services
Static Subscriptions
Once you have chosen to add or edit a service the Static Subscriptions page appears. If the default settings have been configured you have the option to edit the default settings.
Page Content Options
• listing of services that have already been configured
• option to configure a new service• option to edit service configuration• option to clear a service configuration
• click Edit to edit a service configuration; or
• click Clear to clear a service configuration; or
• click Configure another service to add a new service with personalization; or
• click Next
Page Content Options
list of folders and services navigate through the folders to find the service to be configured
Page Content Options
option to edit, configure, or clear default static subscription settings
• click configure to set the default configuration for all static subscription settings; or
• click clear to clear the default static subscription sets default settings
• click Next

292 Chapter 23 Portal Administrator Wizard
INTERFACE
Configure Subscription Set
Page-by questions can be answered in one of the following ways:• User_ID writes the unique user ID of the subscriber to the Subscription
Book Repository as the answer to the page-by question.• Subscription_ID writes the unique subscription ID to the Subscription
Book Repository as the answer to the page-by question.• Address_ID writes the unique address ID of the selected address to the
Subscription Book Repository as the answer to the page-by question.• Answer to another question writes data to the Subscription Book
Repository based on the information that the subscriber provides through a prompt in the Subscription Portal. The answer to the page-by question is either the value of the user’s answer to the alternate question or the ID of the preference object generated for that answer.
Note: If there are additional questions, you can browse for those questions by clicking Browse in the lower left corner of the page and continuing as if you were answering the page-by questions with an answer to another question.Once you are done configuring page-by questions for static subscription sets you are returned to this page. Click OK to proceed.
Select Question
Page Content Options
• list of page-by questions• drop-down list with options for how the
page-by question will be answered• option for additional question prompts to
be provided to the subscriber
• select how the page-by question will be answered
• select any additional questions (optional)• click OK
Page Content Options
list of alternate question objects to be shown to subscribers
• select the alternate question• click Next

Portal Administrator Wizard layout 293
INTERFACE
Note: You need to navigate through the services folders until you find the question object that corresponds to the specific question you wish to use.
Select Storage
If you have not created a storage mapping you must click Add a new storage mapping and follow the steps necessary to create the mapping. Once the mapping is created you are returned to the Select Storage page, where you need to select the mapping and click Next to proceed.
Dynamic Subscriptions
If the default settings have been configured you have the option to edit the default settings.
Note: You can edit the settings for an individual subscription set in addition to the default settings. The settings for the individual subset override the default settings for that particular service.
Page Content Options
• option to select the Subscription Book Repository
• option to select a different storage mapping
• option to add a new storage mapping
• select Subscription Book Repository; or• select a different storage mapping; or• click Add a new storage mapping• click Next
Page Content Options
• list of dynamic subscription sets for the selected service
• option to configure individual dynamic subscription sets
• option to configure the default for all dynamic subscription set
• click Edit next to the dynamic subscription to be modified; or
• click configure to set the default configuration for all dynamic subscription sets; or
• click edit under the dynamic subscription sets default settings to modify the default subscription sets settings; or
• click clear to clear the default dynamic subscription sets default settings
• click Next

294 Chapter 23 Portal Administrator Wizard
INTERFACE
Select Tables
This page allows you to select the tables from the data warehouse where you store the answers to your questions or the subscription information for dynamic subscription sets.
Note: You can use the Filter table names box to restrict the list of table names that is returned. You can use the percent sign (%) after the letter or string to return all entries beginning with that letter or series.
Select Columns
This page defines how questions are stored each time a subscriber answers the question through the Subscription Portal. The same page defines how dynamic subscriptions get written to the warehouse.
Finish page
This page congratulates you on completing the site configuration and allows you to link directly to the portal by clicking Finish.
Page Content Options
• drop-down list for selecting a connection to a data warehouse
• box to filter the list of tables • Refresh button
• select the database connection from the drop-down list
• click Refresh• select the table or tables on the left and
use the toggle buttons to move them to the right
• click Next
Page Content Options
• box containing storage mapping name• table containing answer components
broken into three fields• one or more empty tables with columns
representing tables in the data warehouse where information can be stored
• keep the current storage mapping name or change the name
• drag and drop answer components to the columns in the tables
• click Next

24C H A P T E R 2 4
295
INTERFACE
24.Plaintext Document Editor 24
What is it?
The Plaintext Document Editor allows you to create and format a plaintext document.
How do I access it?
Right-click anywhere in the Applications folder, point to New, then choose Document. Double-click Plaintext Document on the New Document window.
What can I do with it?
Through the Plaintext Document Editor you can• add multiple XML information objects with the same stylesheet in a
document• create a plaintext document• edit a plaintext document• select a different XSL stylesheet for an XML information objectFor instructions on completing one of the above tasks, refer to the following How Do I...? topic:• Publication Operations
What should I know before I use it?
Before you begin using the Plaintext Document Editor, you should• understand how documents are used in publications• know what document elements, information objects, and stylesheets areFor more information on the above topics, refer to the following Concepts topic:• Publications

296 Chapter 24 Plaintext Document Editor
INTERFACE
Plaintext Document Editor layoutThe Plaintext Document Editor is composed of the following elements: • a document element pane, which displays the content of the document
in a hierarchical format and the properties of the currently selected document element
• a content definition pane, which allows editing and repositioning of the document’s content
• a menu bar that offers standard Windows menus (Edit, View, and Help) as well as File and Insert menus that contain Delivery Engine-specific options
• a toolbar that provides the ability to◊ open a document◊ save the document and exit◊ perform cut and paste operations◊ insert an information object (click the button to create a new
information object; click the arrow to see the available information sources and kinds of information objects as well as the option to insert a new or existing information object)
In addition, some of the same options are offered via the right-click menu. If you right-click in the content definition pane, you can insert information objects. Also, you can double-click the objects in the document element pane. If you double-click “Document Element 1,” “Document Element 2,” and so forth, the Document Element Properties dialog box appears. If you double-click the name of an inserted object, the Information Object Wizard appears.The Choose XML Information Object Destination dialog box is accessed only when you select a document element containing an XML information object and then add another XML information object.
Menu barThe File and Insert menu bar options contain items unique to the Delivery Engine. The following tables describe the contents of each.

Plaintext Document Editor layout 297
INTERFACE
File menu options
Insert menu options
Note: When you insert an XML information object that was created for the MicroStrategy Information Source, an XSL stylesheet is automatically selected.
Menu option Function
New Document Allows you to create a new document from within the document editor
Open Document Allows you to browse for an excel document to edit within the document editor
Save Saves the Excel document; if this is a new document, the Save As dialog box opens
Save As Saves the Excel document with a new name
Properties Opens the Document Properties dialog box in which you can select the document’s locale from a list of all available locales and specify error handling rules for the document
Close Closes the Document Editor; if changes have been made, you will be prompted if you want to save
Menu option Function
List of available information sources, for example, MicroStrategy Tutorial or User Information
Displays the kinds of information objects that can be created using each available information source; selecting one either lists the available information objects or the available properties for that information source
New Information Object
Opens the Select Information Source dialog box to begin creating a new information object, which will be added to the document
Existing Information Object
Opens the Select Information Object dialog box to choose an existing information object to insert.

298 Chapter 24 Plaintext Document Editor
INTERFACE
Choose XML Information Object Destination dialog boxThe Choose XML Information Object Destination dialog box is accessed only when you select a document element containing an XML information object, and then add another XML information object. It provides two options for placing the new information object:• New Document Element, which creates a document element and
places the information object into it• Currently Selected Document Element, which adds the information
object into the document element you selected before you began inserting this information object. This allows all the information objects contained in this document element to be formatted by the same stylesheet. Use this option only if you have a stylesheet that supports it.
For information on XML, see appendix D, XML for Narrowcast Server Objects.

25C H A P T E R 2 5
299
INTERFACE
25.Subscription Set Properties Dialog Box 25
What is it?
The Subscription Set Properties dialog box allows you to add and modify SQL statements to be used before and after subscription sets are executed. Pre- and Post-SQL statements are optional for subscription set execution.
How do I access it?
In the Static Subscription Set Editor, select Subscription Set Properties from the Edit menu.In the Dynamic Subscription Set Wizard, on the Pre- and Post-SQL Definition page, click Define.
What can I do with it?
Through the Subscription Set Properties dialog box, you can• add, remove, or edit SQL statements to be executed before
segmentation occurs• add, remove, or edit SQL statements to be executed after service
execution is completed• enable one-time immediate delivery similar to Send Now in
MicroStrategy Web.For instructions on completing one of the above tasks, refer to the following How Do I...? topic:• Subscription Set Operations
What should I know before I use it?
Before you begin using the Subscription Set Properties dialog box, you should• identify the SQL statements needed both before segmentation and after
service execution

300 Chapter 25 Subscription Set Properties Dialog Box
INTERFACE
• determine the name, connection information, number of necessary retries, service execution impact, and the SQL definition for these SQL statements
For more information on the above topics, refer to the following Concepts topic:• Subscriptions and subscription sets
Subscription Set Properties dialog box layoutThe Subscription Set Properties dialog box consists of the following tabs:• Pre-execution SQL Specification tab, which lists the SQL statements
that run before segmentation occurs• Post-execution SQL Specification tab, which lists the SQL statements
that run after the service executes• Send Now tab, which enables a one-time immediate delivery On the Pre-execution SQL and Post-execution SQL tabs, a list of SQL statements appears, including the following:• Name: the name given to the SQL statement• DSN: the data source name needed to connect to the appropriate
database• SQL: the SQL statement• Execution Impact: whether the SQL statement is required or optional
for the service being sent to this subscription setThis information is entered in the SQL statements dialog box (see SQL statements dialog box layout, below).The following buttons appear at the bottom of the Pre- and Post-SQL Specification dialog box:• Add: displays the SQL statements dialog box, which allows you to
create a new SQL statement• Remove: allows you to remove the selected SQL statement• Edit: displays the SQL statements dialog box, which allows you to edit
the selected SQL statementThe arrows on the right side of this dialog box allow you to move the statements up and down within the list if multiple SQL statements are listed. The SQL statements are executed in the order in which they are displayed (top to bottom).

SQL statements dialog box layout 301
INTERFACE
On the Send Now tab, you must select the Enable send now delivery check box to enable the Subscription Portal users to have the option for a one-time immediate delivery similar to Send Now in MicroStrategy Web. The subscription set, which has this check box enabled should be used only with a schedule that has the On Demand Schedule property enabled. Otherwise, it can result in slower performance due to loading of the service. This subscription set deletes all the subscriptions in it once the service is delivered.
Note: By default, the Enable send now delivery check box is cleared.
SQL statements dialog box layoutThe SQL statements dialog box allows you to create and edit SQL statements for the Pre- and Post-execution SQL Specification tabs. The following table identifies the information that must be provided for SQL statements.
Box/Button Name Description
Statement Name Enter a name for the statement. This is used for identification only.
Connection
• Data Source Name Select the data source name (DSN) needed to connect to the database against which this SQL statement will execute.
• Login name Enter the login for the database.
• Password Enter the password for this login.
• Database (Optional) Enter the name of the database. If this is not specified, the default database is assumed.
• Test Connection Click to verify that this connection information is valid.
SQL RetriesNumber of retries for failed SQL statement executions
Select or enter a number to indicate the number of times a failed SQL statement should retry before stopping.
Service Execution Impact Pre SQL Post SQL

302 Chapter 25 Subscription Set Properties Dialog Box
INTERFACE
• Optional Errors in SQL statement execution do not impact service execution and a minor error is logged
Errors in SQL statement execution do not impact any subsequent Post-SQL statements and a minor error is logged
• Required Stop service execution and log an error if SQL statement returns an: • Empty result set • ErrorNote: The two check boxes are active only when the required radio button is selected. At least one check box must be selected.
Stop execution of any subsequent Post-SQL statements and log an error if SQL statement returns an:• Empty result set • ErrorNote: The two check boxes are active only when Required radio button is selected. At least one check box must be selected.
• Empty result set
• Error
• Select to indicate that any result that returns zero records cause the service execution to stop and a log file is created. This check box is available in the SQL statements dialog box for Pre-execution SQL and Post-execution SQL statements
• Select to indicate that a SQL statement that returns an error cause the service execution to stop and a log file is created. This log file, Delog*.txt, can be found in the location C: \Program Files\MicroStrategy\Narrowcast Server\Delivery Engine. This check box is available in the SQL statements dialog box for Pre-execution SQL and Post-execution SQL statements.
SQL Definition• SQL Statement• Insert Parameter
• Enter a single SQL statement.• Click to see a list of parameters that you can select
and insert into your SQL statement at the position of your cursor. Parameters are used to include information about the service being executed in your SQL statement. For more information, refer to the following Concepts topic:
• Pre- and post-service execution SQL
Box/Button Name Description

26C H A P T E R 2 6
303
INTERFACE
26.Publication Wizard 26What is it?
The Publication Wizard allows you to quickly create a new publication.
How do I access it?
Right-click anywhere in the Applications folder, point to New, then choose Publication.
What can I do with it?
Through the Publication Wizard you can• create a new publication• edit a publicationFor instructions on the above topics, refer to the following How Do I...? topic:• Publication Operations
What should I know before I use it?
Before you begin using the Publication Wizard, you should• understand how publications integrate with services• be familiar with the concepts of selection locales, information
transmission modules, devices, and documents• ensure that the system administrator has set up the appropriate locale,
information transmission module, and devices for this publicationFor more information on the above topics, refer to the following Concepts topics:• Publications• Creating Services

304 Chapter 26 Publication Wizard
INTERFACE
For information on locales, see the MicroStrategy Narrowcast Server System Administrator Guide, chapter 1, MicroStrategy Narrowcast Server, Locales section.
Publication Wizard layoutThe Publication Wizard consists of the following pages:• Welcome• Name and Description• Delivery Method• Selection Locale• Supported Devices• Message Contents• Delivery Method Rules• SummaryClick Next to advance to the next page of the wizard. Click Back to go back to the previous page. Click Cancel at any time to exit the wizard without saving any changes.
WelcomeThis page provides a brief summary of the steps required to create a publication. You can choose not to display this page again in the future.
Name and DescriptionThis page allows you to enter a Name and a Description for the publication you are creating.
Delivery MethodThis page identifies, in a drop-down list, every information transmission module (ITM) registered in the system. Choose the delivery method that will deliver the service. Once the publication has been saved, you cannot change the ITM without redoing the entire publication definition. In effect, it is the same as deleting the publication and starting a new one.

Publication Wizard layout 305
INTERFACE
Selection LocaleThis page identifies, in a drop-down list, the locales available in the system. Choose the Locale that this publication will support. This locale defines which users will receive the content of this publication. It must match the user locale (selected by either the subscription administrator via Narrowcast Server or by the user via Subscription Portal). Once the publication has been saved, the locale cannot be altered.
Supported DevicesThe available devices for the delivery method chosen previously are listed in the Available column. The Add button moves the selected device from the Available column to the Selected column. The Remove button moves the selected device from the Selected column to the Available column. The devices in the Selected column are used for the publication.
Message ContentsThe Available Documents browser on the left displays the Applications folder. On the right, the Publication Sections are listed, which are place holders provided by the ITM. For each Publication Section, select one or more documents, which define the content of the publication. You can create a new document by clicking anywhere in Available Documents and clicking New. The New Document dialog box opens.You can edit an existing document in both browsers by selecting it and clicking Edit. The appropriate document editor opens.
Note: • Documents used as the subject, a text attachment, or a binary attachment
should have names that can be shown with US ASCII characters, unless the publications using them are only being sent to devices that support other character sets for subject and attachment names. If the name of such a document cannot be shown with US ASCII characters, the publication is not sent to devices that do not support other character sets for subject and attachment names.
• For a custom ITM, different Publication Sections might be provided.

306 Chapter 26 Publication Wizard
INTERFACE
When you select a document from the browser, the sections to which it can be added are displayed in bold type. Choose a section and click Add. If the Add button is unavailable, the selected document-section combination is not allowed by the ITM. Refer to the tips area at the bottom of the page for helpful information. For more details, click Rules to display the Content Definition Rules dialog box. This summarizes the rules specified by the ITM. Until these rules are satisfied, the Next button is not enabled and you cannot complete the publication. For example, if the E-mail (SMTP) ITM must have at least one document in the Subject, Plaintext Body, or HTML Body sections, the Next button is not enabled until you add a document to one of those sections. Once a document has been added to a section, you can select the Do not deliver if document fails check box under the Document Sections tree. If this option is chosen, and the document cannot retrieve content from its information source or the content cannot be formatted, the publication is not sent. The Remove button deletes the selected document from the document section.
Note: The Publication Wizard does not support creating new zipped sections or displaying the zip status of documents. This can only be done when you create a service using the Service Wizard. However, if you add content to a publication section that is already compressed, or zipped, the new content can still be added and will also be zipped. See the following Interfaces topic for more information:• Service Wizard
E-mail (SMTP) ITM Publication Sections
The Publication Sections available for the E-mail (SMTP) ITM are• subject• message body (Text)• message body (HTML)• text and binary attachments: used to attach any binary files such as
WAV, zip, and the like• execution control (advanced): overrides the default information
transmitter settings; see appendix A: E-mail and Wireless (SMTP) ITM Execution Control Documents for more information

Publication Wizard layout 307
INTERFACE
Note: For the E-mail (SMTP) ITM, one document is required, but this document can go into any Publication Section.
Print ITM Publication Sections
The Publications Sections available for the Print ITM are• cover page: allows one or more text or HTML documents; these are
printed first in the order they appear in the interface • documents: requires at least one text, PDF, imported, or HTML
document; these are printed second in the order they appear in the interface
File ITM Publication Sections
The Publications Sections available for the File ITM are• saved documents: requires at least one document of any type; one or
more are allowed• execution control (advanced): allows only one text document; this
document is optional; see appendix B: File ITM Execution Control Documents for more information
SMS (SMPP) ITM Publication Sections
The Publication Sections available for the SMS (SMPP) ITM are• message body: required and limited to one plaintext document)• execution control document (advanced): overrides the default
information transmitter settings; this document is optional and limited to one plaintext document; see appendix C: SMS (SMPP) ITM Execution Control Documents for more information

308 Chapter 26 Publication Wizard
INTERFACE
Web (Portal) ITM Publication Sections
The Publication Sections available for the Web (Portal) ITM are• document body: can be one HTML or one plaintext document• attachments: can be any number and any type of documents)• link rendering style: an XSL stylesheet file that transforms ITM-
generated XSML into hyperlinks. These hyperlinks are then added to the bottom of the HTML message body for Subscription Portal messages. By using a different XSL stylesheet, the appearance of these hyperlinks can be changed.
Wireless (SMTP) ITM Publication Sections
The Publication Sections available for the Wireless (SMTP) ITM are• subject• message body (Text)• message body (HTML)• text and binary attachments: used to attach any binary files such as
WAV, zip, and the like• execution control (advanced): overrides the default information
transmitter settings; see appendix A: E-mail and Wireless (SMTP) ITM Execution Control Documents for more information
Delivery Method RulesThis dialog box is accessed when you click Rules on the Message Contents page.This is a summary of the rules specified by the selected ITM. Until these rules are satisfied, you cannot complete the publication definition.Click Close to return to the Message Contents page.
SummaryThis page provides a summary of the selections you made while building the publication. Review the information and click Finish to create the publication.

27C H A P T E R 2 7
309
INTERFACE
27.Question Object Dialog Set 27
What is it?
The Question Object dialog set is a series of dialog boxes that allow you to quickly create a new question object, either from a MicroStrategy or User Information Source. A question object is a set of questions that the end user answers to personalize the content of an information object. They allow services to be personalized at the information object, or report, level.
Note: You do not see an interface named Question Object dialog set; it is a term for a series of dialog boxes that allow you to perform an action.
How do I access it?
Right-click anywhere in the Applications folder, point to New, then choose Question Object.
What can I do with it?
Through the Question Object dialog set you can• create a MicroStrategy question objectFor instructions on the above topics, refer to the following How Do I...? topic:• Information Object Operations
What should I know before I use it?
Before you begin using the Question Object dialog set, you should• understand what a question object is and how it is used• ensure that the system administrator has defined an information source• ensure that, in the project source, a report has been set up to be
associated with the question object

310 Chapter 27 Question Object Dialog Set
INTERFACE
For more information on the above topics, refer to the following topics:• Publications• appendix B, MicroStrategy Objects in the MicroStrategy Narrowcast
Server Getting Started Guide
Question Object dialog set layoutThe Question Object dialog set consists of the following dialog boxes:• Select Information Source dialog box• Question Object dialog box• Question Object Browser dialog boxClick Cancel at any time to exit the dialog set without saving any changes.
Select Information Source dialog boxThis dialog box lists the information sources available in the system. Select the information source to use.
Question Object dialog boxThis dialog box allows you to enter a Name and a Description for the question object you are creating. When you click Define, the Question Object Browser dialog box opens.After the question object has been defined, the Summary of definition contains the Information Source selected. Click OK to save the new object.
Question Object Browser dialog boxTo access the Question Object Browser dialog box, click Define on the Question Object dialog box of a MicroStrategy question object.It displays a browser, allowing you to select a report to use as the question object. You can also select whether the personalization is by page or by report. Personalized page execution divides the report results into pages on the Delivery Engine. This allows one report to satisfy many personalization sets. In personalized report execution, one report is executed for each personalization set.

Question Object dialog set layout 311
INTERFACE
For question objects, a brief explanation of what is needed is shown. When you select a report, the explanation changes to tell you whether the report is valid for the type of information object you are creating. If the report is not valid, the explanation indicates what is needed. For more information on validation, see Question object validation, below.When you click OK, you are returned to the Question Object dialog box.
Question object validationAs a result of question object validation, one of two things happens:• Narrowcast Server warns you about what might happen if you choose
to continue without changing your selection• Narrowcast Server does not allow you to continue without changing
your selectionTwo kinds of question objects can be created. Each has its own potential problems.• Question object using personalized report execution• Question object using personalized page execution
Question object using personalized report execution
• A personalized report execution question object must contain a superset of information object prompts. This is necessary because one question object can be used by multiple information objects. You cannot continue without changing your selection.
• A personalized report execution question object for an information source with security should have the same security object prompt as the information source. If not, the security object is not applied and the information object might fail. You are warned but can continue without changing your selection.
Question object using personalized page execution
• A personalized page execution question object for an information source with security should have the security object prompt as the information source. This enables Narrowcast Server to limit the available page choices for a particular user based on his security object. If the security object is not present, the user’s available page choices are not limited. You are warned but can continue without changing your selection.

312 Chapter 27 Question Object Dialog Set
INTERFACE
• A personalized page execution question object must contain at least one attribute form on the page axis of the report. The first attribute form must be the same one as on the information object using this question object. You cannot continue without changing your selection.
Note: This validation only occurs for question objects created from within the Information Object Wizard. Otherwise the question object is not associated to any information object and the first attribute forms cannot be compared.

28C H A P T E R 2 8
313
INTERFACE
28.Service Editor 28What is it?
The Service Editor allows you to create a new service or modify an existing service’s properties. It provides access to all service-level settings and is more robust and flexible than the Service Wizard, which provides a simplified but less powerful way to build services. Use the Service Editor to• add multiple publications to a service to support more than one set of
devices per delivery method or more than one locale• use existing publications, schedules, and subscription sets• create new publications, schedules, and subscription sets on the fly• set service properties such as start and end dates, service priority
segment size, and service expiration• edit an existing service, whether it was created through the Service
Editor or Service WizardUse the Service Wizard to• create new documents, schedules, and subscription sets on the fly• be guided step by step through the process of creating a new service
using multiple delivery methods and the default devices and localeFor more information on the Service Wizard, see the following Interfaces topic:• Service Wizard
How do I access it?
Right-click anywhere in the Applications folder, point to New, then choose Service (Editor).

314 Chapter 28 Service Editor
INTERFACE
What can I do with it?
Through the Service Editor you can• create a new service• edit a serviceFor instructions on completing one of the above tasks, refer to the following How Do I...? topic:• Service Operations
What should I know before I use it?
Before you begin using the Service Editor, you should• understand how services integrate with publications and subscriptionsFor more information on the above topic, refer to the following Concepts topic:• Creating Services
Service Editor layoutThe Service Editor has the following tabs:• Message Contents• Subscription Sets and Schedules• General Properties• Service Execution TimeoutIt also has a Menu bar with some unique menu offerings.
Menu barThe File and Edit menu bar options contain items unique to the Delivery Engine. The following tables describe the contents of each.

Service Editor layout 315
INTERFACE
File menu options
Edit menu option
Message ContentsSelecting a locale from the drop-down list displays the list of devices and the publications supporting the devices for that locale in the display pane. This is useful for quickly determining what publications supports a particular device for the locale.
Menu option Function
New...
• Service Allows you to create a new service from within the Service Editor
• Publication Opens the Publication Wizard so that you can create a new publication from within the Service Editor
• Schedule Opens the Schedule Wizard so that you can create a new schedule from within the Service Editor
• Subscription Set Opens the Subscription dialog box so that you can create a new subscription set from within the Service Editor
Open Service Allows you to save and close the service you are currently defining and open a different existing service
Menu option Function
Definition • If the Content tab is displayed and a publication is selected, opens the Publication Wizard so that you can edit this publication from within the Service Editor
• If the Subscription Sets and Schedules tab is displayed and a schedule is selected, opens the Schedule Wizard so that you can edit this schedule from within the Service Editor
• If the Subscription Sets and Schedules tab is displayed and a subscription set is selected, opens the appropriate subscription set dialog box so that you can edit this subscription from within the Service Editor
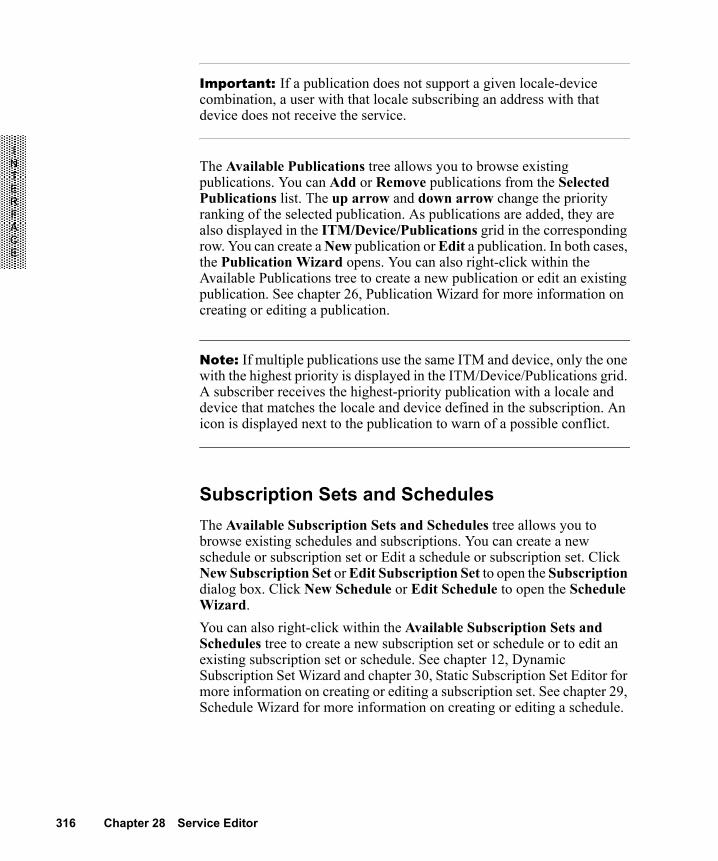
316 Chapter 28 Service Editor
INTERFACE
Important: If a publication does not support a given locale-device combination, a user with that locale subscribing an address with that device does not receive the service.
The Available Publications tree allows you to browse existing publications. You can Add or Remove publications from the Selected Publications list. The up arrow and down arrow change the priority ranking of the selected publication. As publications are added, they are also displayed in the ITM/Device/Publications grid in the corresponding row. You can create a New publication or Edit a publication. In both cases, the Publication Wizard opens. You can also right-click within the Available Publications tree to create a new publication or edit an existing publication. See chapter 26, Publication Wizard for more information on creating or editing a publication.
Note: If multiple publications use the same ITM and device, only the one with the highest priority is displayed in the ITM/Device/Publications grid. A subscriber receives the highest-priority publication with a locale and device that matches the locale and device defined in the subscription. An icon is displayed next to the publication to warn of a possible conflict.
Subscription Sets and SchedulesThe Available Subscription Sets and Schedules tree allows you to browse existing schedules and subscriptions. You can create a new schedule or subscription set or Edit a schedule or subscription set. Click New Subscription Set or Edit Subscription Set to open the Subscription dialog box. Click New Schedule or Edit Schedule to open the Schedule Wizard.You can also right-click within the Available Subscription Sets and Schedules tree to create a new subscription set or schedule or to edit an existing subscription set or schedule. See chapter 12, Dynamic Subscription Set Wizard and chapter 30, Static Subscription Set Editor for more information on creating or editing a subscription set. See chapter 29, Schedule Wizard for more information on creating or editing a schedule.

Service Editor layout 317
INTERFACE
You can Add or Remove them from the Selected Subscription Sets and Schedules grid to pair subscription sets and schedules. A pair is valid when it contains one schedule and one subscription. A green check means the pair is valid; a yellow and red X means that it is not valid. One subscription set can be paired with multiple schedules.You can sort paired subscription sets and schedules by clicking the Subscription Set or the Schedule column header. This is useful when you want to view all schedules paired with a subscription set or all subscription sets paired with a schedule.
General PropertiesThe General Properties tab allows you to define the following:• Start Date and End Date (optional): the service executes between these
two dates on the interval determined by its schedule; if they are not changed, the service starts today and runs indefinitelyThe service execution period determines when a service will be run automatically as scheduled. Outside of this time period, the service is not executed even if scheduled.
• Priority: determines which services will be executed first; higher priority services run before lower priority ones
• Segment Size: the number of recipients per segment; at run time, the total number of recipients will be divided into segments of this size
• Description: a description, up to 5000 characters, of the service• Segment Execution Timeout: specifies the timeout period for each
segment in this service; the default is 1 hourThe segment expiration period should be set according to how long the service content is expected to take to be sent to the number of recipients a segment can have. The purpose is to avoid hanging the system if a segment does not execute. The system retries up to the number of times set in the System Governing Settings dialog box. (See the MicroStrategy Narrowcast Server System Administrator Guide for more information.)
Note: Segment execution timeout should be set longer than the time it takes to run a segment. This prevents a segment from timing out while it is being sent.

318 Chapter 28 Service Editor
INTERFACE
Important considerations when setting durations
A service’s start date and its schedule interact with each other to determine an overall schedule for the service. Schedules define particular periodicities (every week, every second Tuesday, every third month), and a service’s start date is the starting point for the calculation of these periodicities. Thus, two services that use the same schedule but have different start dates can have very different overall schedules. For example, a quarterly update service that uses an Every Three Months schedule and starts on January 1, generates messages on April 1, July 1, October 1, and January 1. The same service starting on February 1, generates messages on May 1, August 1, November 1, and February 1. The only difference between these two services is that they have different start dates, thus changing the starting point of the schedule calculation. Note that in the case above, the best implementation of a quarterly schedule is to build a schedule that explicitly states the months in which to run, thereby avoiding the issue of having execution times that depend on the start date.
Tip: To verify that a service start date and schedule are interacting as expected, activate the service. Then view the Scheduled Services folder under the Administration folder when the system is running to see when the service will be triggered in the future.
Service Execution TimeoutService execution timeout is the date, specified by a time stamp, after which the content of the service is expected to be irrelevant or otherwise no longer useful to the subscriber. This date can be used to prevent delivery attempts after a certain time.You select an execution timeout option from the following:• Never Time Out: The service runs forever.• Time Out at Specific Time: The service ends at the time entered in the
selected time zone.• Offset Timeout from Service Execution Start: The service runs for
the specified length of time from the start of service execution. For example, if this is set to two hours and the service is triggered at 8 PM, any segments that have not been executed by 10 PM are cancelled.

Service Editor layout 319
INTERFACE
Note: Expiration applies only to each instance of the service execution.

320 Chapter 28 Service Editor
INTERFACE

29C H A P T E R 2 9
321
INTERFACE
29.Schedule Wizard 29What is it?
The Schedule Wizard allows you to quickly create a new schedule, which is the definition of the times or frequencies a service is executed.
Note: The Schedule Wizard does not define a service’s start and end dates; these are defined via the Service Editor.
How do I access it?
Right-click anywhere in the Applications folder, point to New, then choose Schedule.
What can I do with it?
Through the Schedule Wizard you can• create a schedule• edit a scheduleFor instructions on completing one of the above tasks, refer to the following How Do I...? topic:• Service Operations
What should I know before I use it?
Before you begin using the Schedule Wizard, you should• know how schedules integrate with services• understand how schedules execute a serviceFor more information on the above topics, refer to the following Concepts topic:• Creating Services
322 Chapter 29 Schedule Wizard
INTERFACE
Schedule Wizard layoutThe Schedule Wizard consists of the following pages:• Introduction• Name and Description• Recurrence Pattern• Interval• SummaryClick Next to advance to the next page of the wizard. Click Back to go back to the previous page. Click Cancel at any time to exit the wizard without saving any changes.
IntroductionThis page provides a brief summary of the steps required to create a schedule. You can choose not to display this page again in the future.
Name and DescriptionThis page allows you to enter a Name and a Description for the schedule you are creating.
Recurrence PatternOn this page you set the Recurrence Pattern, which is when the service will occur, at the daily, weekly, monthly, or yearly level. Also select a Start date for this schedule.
Note: If the start date is a valid execution day for the schedule, the schedule is triggered beginning on that day. For example, if you specify the schedule to run every Tuesday starting on Tuesday, October 17th, 2000, the schedule runs on that day and every Tuesday thereafter.When you specify a schedule to run on the 29th, 30th, or 31st day for every x number of months, if the month does not have a 29th, 30th, or 31st day, the schedule is triggered on the last day of the month.

Schedule Wizard layout 323
INTERFACE
Interval
Time zone
On this page you select a Time zone to use as a reference point for the service execution time. Choose the service’s Frequency and Starting Time:• If the frequency is set at once a day, you must enter the service’s start
time.• If the frequency is executed multiple times a day, you must enter the
start time, finish time, and interval between executions.• If the service runs all day, you must set the interval between executions.
On Demand Schedule
For Send Now schedules, select the On Demand Schedule check box. Select this check box for a Send Now schedule so that service execution is stopped before the segmentation of a service is performed. Segmentation is performed only when there is a subscription associated with the schedule that is fired. This prevents unnecessary loading of the Distribution Manager.
Important: An On-demand schedule must be paired only with a Send Now schedule.
The status of a Send Now schedule is Not Demanded by default. When a user clicks the Send Now button in MicroStrategy Web, the status of the Send Now schedule changes to Demanded. Once service execution is completed, the schedule status changes back to Not Demanded. An Application Administrator can still deactivate or activate a Send Now schedule. To do this, right-click a schedule and select Active/Inactive.Selecting the On Demand Schedule check box is recommended if the following conditions are satisfied:• Each service uses a separate on-demand schedule• In a service, an on-demand schedule is paired with a single subscription
set• In a service, a subscription set is paired with a single on-demand
schedule

324 Chapter 29 Schedule Wizard
INTERFACE
SummaryThis page provides a summary of the selections you made while building the schedule. The next 20 occurrences that the service will run are also listed. Review the information and click Finish to create the schedule.

30C H A P T E R 3 0
325
INTERFACE
30.Static Subscription Set Editor 30
What is it?
The Static Subscription Set Editor allows you to add and delete subscriptions to and from a subscription set.
How do I access it?
To access the Static Subscription Set Editor, launch the Narrowcast Administrator. Right-click the Applications folder, select New, then select Subscription Set. In the Subscription dialog box, select Static Subscription Set, then click OK.
What can I do with it?
Through the Static Subscription Set Editor, you can• create a static subscription set• add subscriptions to a static subscription set• remove subscriptions from a static subscription set• specify SQL statements to be executed before and after a static
subscription set executes• set properties for individual users and subscriptions• enable one-time immediate delivery similar to Send Now in
MicroStrategy Web.For instructions on completing one of the above tasks, refer to the following How Do I...? topic:• Subscription Set Operations
What should I know before I use it?
Before you begin using the Static Subscription Set Editor, you should• identify which addresses you want to include• identify which subscriptions you want to remove

326 Chapter 30 Static Subscription Set Editor
INTERFACE
• know the SQL statements you want to include for pre-processing and post-processing (if any)
For more information on the above topics, refer to the following Concepts topic:• Subscriptions and subscription setsFor more information on the Subscription Book, refer to the following Concepts topic:• The Subscription Book
Static Subscription Set Editor layoutThe Static Subscription Set Editor includes• a list of subscriptions in this subscription set, including address name,
login ID, physical address, locale, device, and transmitter (shown in the Subscriptions in Subscription Set pane on the right)
• a list of addresses in the Subscription Book, including status, address name, login ID, physical address, locale, device, and transmitter (shown in the Addresses in Subscription Book pane on the left)
Note: The left-hand pane is the same as the Subscription Book Editor and allows you to perform the same functions as in the Subscription Book Editor, such as adding and deleting users. The difference is that you can add users to new and existing subscription sets in the Static Subscription Set Editor, which you cannot in the Subscription Book Editor.
• a menu bar that includes Subscription Set, Edit, View, Tools, and Help menus
• a toolbar that provides the ability to ◊ save and close the subscription set◊ add users◊ delete users◊ add addresses◊ delete addresses◊ add subscriptions◊ delete subscriptions
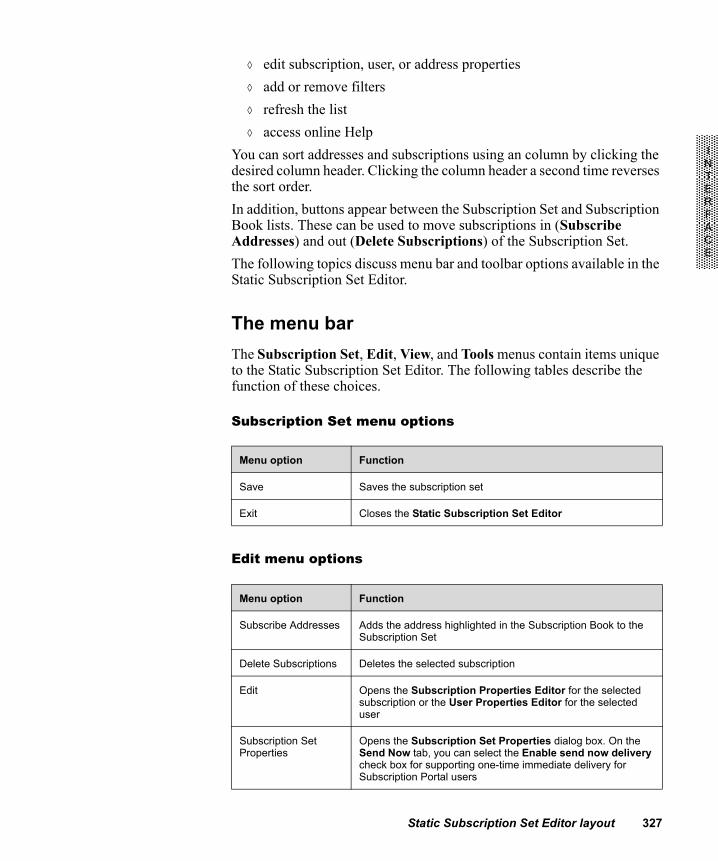
Static Subscription Set Editor layout 327
INTERFACE
◊ edit subscription, user, or address properties◊ add or remove filters◊ refresh the list◊ access online Help
You can sort addresses and subscriptions using an column by clicking the desired column header. Clicking the column header a second time reverses the sort order.In addition, buttons appear between the Subscription Set and Subscription Book lists. These can be used to move subscriptions in (Subscribe Addresses) and out (Delete Subscriptions) of the Subscription Set.The following topics discuss menu bar and toolbar options available in the Static Subscription Set Editor.
The menu barThe Subscription Set, Edit, View, and Tools menus contain items unique to the Static Subscription Set Editor. The following tables describe the function of these choices.
Subscription Set menu options
Edit menu options
Menu option Function
Save Saves the subscription set
Exit Closes the Static Subscription Set Editor
Menu option Function
Subscribe Addresses Adds the address highlighted in the Subscription Book to the Subscription Set
Delete Subscriptions Deletes the selected subscription
Edit Opens the Subscription Properties Editor for the selected subscription or the User Properties Editor for the selected user
Subscription Set Properties
Opens the Subscription Set Properties dialog box. On the Send Now tab, you can select the Enable send now delivery check box for supporting one-time immediate delivery for Subscription Portal users

328 Chapter 30 Static Subscription Set Editor
INTERFACE
View menu options
Tools menu options
New User Opens the User Properties Editor, in which you can add a new user
Delete Users Deletes the selected user or users
New Address Opens the User Properties Editor for the selected user, in which you can add a new address
Delete Addresses Deletes the selected address or addresses
Menu option Function
Status Bar Turns the status bar on or off
Refresh Updates the selected list with the most current information
Menu option Function
Sort...
• Ascending Sorts the selected list in ascending order by the selected column
• Descending Sorts the selected list in descending order by the selected column
Filter and Governing Editor
Opens the Filter Editor and Governing Settings dialog box, in which you can specify the maximum number of subscriptions to retrieve for all subscription sets and the maximum number of addresses/users for the Subscription BookDefine a filter for Address Name, Address ID, and Physical Address in the Users and Addresses List or Subscription List; filtering enables you to view a smaller, selected amount of data
Remove Filter Removes the sorting filter from the selected list
Menu option Function

Static Subscription Set Editor layout 329
INTERFACE
The toolbarThe most frequently used menu options are placed on the toolbar where they are accessible by clicking buttons. Their use is described below.• Save and Close saves and closes this subscription set.• New User opens the User Properties Editor, allowing you to add a
new user to the Subscription Book.• Delete Users deletes the selected user.• New Address opens the User Properties Editor for the selected user,
allowing you to add a new address for that user in the Subscription Book.
• Delete Addresses deletes the selected address.• Subscribe Addresses adds the address highlighted in the Subscription
Book to the subscription set.• Delete Subscriptions deletes the selected subscription.• Edit opens the Subscription Properties Editor or opens the User
Properties Editor for the selected user.• Filter adds a filter to the list for the selected field.• Remove Filter removes the filter from the list for the selected field.• Refresh updates the list with the most current information.• MicroStrategy Narrowcast Server Help accesses online Help for the
Static Subscription Set Editor.

330 Chapter 30 Static Subscription Set Editor
INTERFACE

31C H A P T E R 3 1
331
INTERFACE
31.Service Wizard 31What is it?
The Service Wizard guides you through the steps of creating a new service, including selecting a delivery method, developing documents with dynamic content, and defining a schedule and subscription set. The Service Wizard allows you to select as many delivery methods as are available in your system. The resulting service will support users using the system locale and all devices for the chosen delivery methods.The Service Wizard creates a fully-functional service and all supporting application objects required for a fully-functional Narrowcast Server application. The following objects are created:• Service: A service is created with the name and description entered on
the Service Name page.• Documents: Any documents required to provide the chosen content can
either be created or selected using an object browsing interface.• Schedules: Schedules can be created or selected using an object
browsing interface.• Subscription Sets: Subscription sets can be created or selected using an
object browsing interface.Use the Service Wizard to• create new documents, schedules, and subscription sets on the fly• be guided step by step through the process of creating a new service
using multiple delivery methods and the default devices and locale• edit existing serviceUse the Service Editor to• add multiple publications to a service to support more than one set of
devices per delivery method or more than one locale• use existing publications, schedules, and subscription sets• create new documents, schedules, and subscription sets on the fly

332 Chapter 31 Service Wizard
INTERFACE
• set service properties such as start and end dates, service priority segment size, and service expiration
• edit an existing service, whether it was created through the Service Editor or Service Wizard
For more information on the Service Editor, see the following Interfaces topic:• Service Editor
How do I access it?
Right-click anywhere in the Applications folder, point to New, then choose Service (Wizard).Or, double-click an existing service. The Service Wizard opens if the service is a simple service that can be edited in the Service Wizard.
What can I do with it?
Through the Service Wizard you can• create a new service• modify a serviceFor instructions on completing one of the above tasks, refer to the following How Do I...? topic:• Service Operations
What should I know before I use it?
Before you begin using the Service Wizard, you should• know what delivery method to use to send the service• understand how services integrate with subscriptionsFor more information on the above topics, refer to the following Concepts topic:• Creating Services

Service Wizard layout 333
INTERFACE
Service Wizard layoutThe Service Wizard is split into five sections:• Welcome• Delivery Methods• Message Contents• Subscriptions and Schedules• Service SummaryEvery page of the Service Wizard has the same basic layout. The various sections are displayed across the top of the page. The section you are currently working on is shown at the left with a list of topics for that section below it. The current page is highlighted. To hide this list, click the check on the far right. Clicking it again restores the list. The Home button in the upper left returns you to the Welcome page of the Service Wizard. Back and Next buttons are found at the lower right of every page. Next completes the current page and accesses the next page. Back returns you to the previous page. Help information about the current page is displayed in the help window on the right. For more in-depth information about the page, click Get More Help at the bottom of the window. To close the help window, click the question mark in the far right. Clicking it again reopens the help window.
WelcomeThis section contains one page, Welcome. The Service Wizard guides you through creating a service in three steps:• selecting the delivery method• specifying message contents• defining subscription sets and schedulesYou can select whether to display this page in the future.
Delivery MethodsThis section contains one page, Delivery Methods. Select one or more delivery methods. The following are always available:• E-mail (SMTP)• Web (Portal)

334 Chapter 31 Service Wizard
INTERFACE
• Wireless (SMTP)• SMS (SMP)• Print• File
Note: You must select at least one delivery method. E-mail (SMTP) is selected by default.
Additional delivery methods can be configured by the system administrator and are then available on this page.
Message ContentsThis section contains the Message Contents page and a page for each delivery method selected in the previous section. Each of these pages is named <Delivery Method> Content, where <Delivery Method> is the name of the selected method, for example E-mail (SMTP) Content.Each content page allows you to specify the content for each delivery method selected. For each delivery method, you can create new documents, insert existing documents, edit existing documents, save the document for use outside this service, verify the rules for content, and specify error handling. Each delivery method must have a certain amount and type of content specified for it.Each content page includes a toolbar with the following buttons:• New: Click to create a new document for the selected section. Only the
appropriate document types can be created.• Use existing: Click to browse for an existing document to insert into the
selected section.• Edit: Click to edit the selected document.• Rename: Click to rename the selected document (for new documents
only).• Delete: Click to remove the selected document from this service.• Save As: Click to save the selected document and make it reusable in
another service. By default, new documents are embedded and not available for other services.

Service Wizard layout 335
INTERFACE
• Specify Devices and Locales: Click to open the Devices and Locale Support dialog box. Use this to specify the devices and locale supported by the content.
• Compression: Click to open the Compression Properties dialog box. Use this to compress, or zip, documents in one content section in the selected delivery method.
• Rules: Click to open the Content Definition Rules dialog box. Use this to verify the types of documents required for this delivery method.
• Show Error Handling: Click to display the Error Handling dialog box. Use this to review and specify error handling settings for each document in this delivery method.
Below the toolbar is a box listing the content sections available for this delivery method. To define content, highlight a section and click the appropriate toolbar to create, insert, or edit a document. The section name indicates both the types of document that can be used and how the content will be used.From the toolbar you can select the devices and locale to use for this delivery method. By default all devices and the System locale are selected. Right-click and select Specify Devices and Locale to change the selection. For more information, see the following Interfaces topic:• Devices and Locale Support dialog boxYou can elect to include a compressed, or zipped, file for one content section using the selected delivery method. Several settings must be specified to produce the zipped file. For more information, see the following Interfaces topic:• Compression Properties dialog boxBelow the box listing the sections a message appears that tells you the type of content that must be included for this delivery method. Once you add the appropriate content, the message disappears.Select the Show advanced content sections check box to see additional content sections. These are sections not needed for basic applications, but which can provide additional power and flexibility for advanced users. See the following Concepts topic for more information:• Publication OperationsTo edit a document already inserted, highlight it and click Edit. You can also right-click on a document to access the same functionality as that provided in the toolbar.

336 Chapter 31 Service Wizard
INTERFACE
For more information on the rules and error handling settings, see the following Interfaces topics:• Delivery Method Rules• Error Handling dialog box
Subscriptions and SchedulesThis section contains one page, Subscriptions and Schedules. This page allows you to define subscription sets and schedules for this service. First define a subscription set that determines the recipients of this service. Then define schedules that determine when this service will be delivered to the selected subscription set.Each content page includes a toolbar with the following buttons:• New Subscription Set: Click to create a new subscription set for this
service. At least one address must already exist in the Subscription Book.
• Insert Existing Subscription Set: Click to insert an existing subscription set in the selected service. Right-click Subscriptions and Schedules, then select Use Existing Subscription Set. The “Use an existing subscription set dialog box”opens.
• New Schedule: Click to open the Schedule Wizard to create a new schedule for the selected subscription set.
• Insert Existing Schedule: Click to insert an existing schedule into the selected subscription set. This opens the Use an existing schedule dialog box.
• Edit: Click to edit the selected subscription set or schedule.• Rename: Click to rename the selected subscription set or schedule (for
new subscription sets and schedules only).• Delete: Click to remove the selected subscription set or schedule from
this service.• Save As: Click to save the selected subscription set or schedule and
make it reusable in another service. By default, new subscription sets and schedules are embedded and not available for other services.
You can insert multiple subscription sets and schedules into a service.At least one schedule must be associated with each subscription set For more information on the Schedule Wizard, see the following Interfaces topic:• Schedule Wizard

Service Wizard layout 337
INTERFACE
For more information on working with subscription sets, see the following Interfaces topics:• Dynamic Subscription Set Wizard• Static Subscription Set Editor
Use an existing schedule dialog box
This dialog box allows you to select an existing schedule to insert into the service. By default, the existing schedules in the Schedules folder are displayed. Select a schedule and click OK to insert the schedule, and close the dialog box.
Use an existing subscription set dialog box
The Use an existing subscription set dialog box lists the subscription sets that you can add to a service. Select a subscription and click OK to use thesubscription, and close the dialog box.
Save As dialog box
The Save As dialog box lets you to save the selected subscription set or schedule. Choose the folder in which to save the file. Enter a name and click Save.
Service SummaryThis section includes one page, Service Summary. This page provides an overview of the service definition, including a list of the content, subscriptions and schedules, and general settings. If any red text appears, you must go back to the appropriate wizard pages and complete the service definition as directed. You cannot continue without doing this.To change general settings for this service, click Modify General Settings. The General Service Settings dialog box appears.If no red text appears in the service definition, click Finish and save the service and return to the Narrowcast Administrator. To run the service immediately, highlight the service and click Run Immediately.For more information on service settings, see the following:• General Service Settings dialog box
338 Chapter 31 Service Wizard
INTERFACE
Note: Red text appears if you have specified no subscription set and schedule pairs.Because this incomplete service is useful for testing purposes, you are allowed to click Finish and save the service.
Devices and Locale Support dialog boxThis dialog box displays the currently selected devices and locale for this delivery method. By default, all available devices are selected. To deselect all the devices, clear the Devices check box. To specify a device, select the appropriate check box. A delivery method can support multiple devices. Only addresses that specify a supported device receive the content in this delivery method.By default, the System locale is selected. To specify a different locale for this delivery method to support, select it from the Locale drop-down list. Only users who specify this locale receive the content in this delivery method.Click OK to save your changes and return to the delivery method content page.
Compression Properties dialog boxThis dialog box allows you to specify a content section to be compressed and to specify the properties for the resulting zip file. One content section can be compressed, or zipped, per delivery method. Dynamic data such as the service name or execution time can be included in the file name.To specify the content section to be compressed, select the section name from the Section drop-down list. This list includes only the names of publication sections that allow imported documents. By default, Do not compress any sections is selected.To specify the file name for the zip file being produced, enter the appropriate name in the File Name box. By default, the section name, such as Attachments, is the file name. You can enter a name or specify one of the following macros:• %%SERVICE NAME%%
• %%SERVICE EXECUTION ID%%
• %%SERVICE EXECUTION TIMESTAMP%%

Compression Properties dialog box 339
INTERFACE
• %%SERVICE EXECUTION TIME%%
• %%SERVICE EXECUTION DATE%%
These macros are used to insert the service name, service execution ID, or the service execution time stamp at service run time, allowing dynamic data to be used in the file name.
Note: These macros are case-sensitive and must be entered exactly as shown.
In the Password section, select one of the following regarding passwords for your compressed files:• Do not use password protection.• Use the following password: (then type the password into the box)• Use the address PIN for each recipient individually.If you select the third option, the service delivery is canceled for recipients whose subscribed addresses do not have a PIN specified. To specify a PIN, go to the User Properties Editor, Addresses tab, and click Advanced Properties to open the Advanced Properties for Address dialog box. For more information, see chapter 36, User Properties Editor. End users can specify their PINs through the Subscription Portal. For more information, see chapter 23, Portal Administrator Wizard.To change the compression level, select from the following:• Maximum (slowest)• Medium• Minimum• NoneMaximum (slowest) is selected by default.For more information, see the following Concepts topic:• Compressed documentsClick OK to save your changes and return to the delivery method content page.

340 Chapter 31 Service Wizard
INTERFACE
Error Handling dialog boxThe Error Handling dialog box displays the current error handling settings for the documents that have been inserted as contents for this delivery method. For each document, you can choose to fail the message delivery or to remove the document on error. By default, the setting for each document is Remove Document on Error.
General Service Settings dialog boxThe General Service Settings dialog box is used for settings that you can choose to modify or not, if you are content with the default settings. Three tabs are included in this dialog box:• Name and Description tab• Delivery Properties tab• Execution Settings tab
Name and Description tabOn the Name and Description tab, you can enter a name for the new service. Enter a description to more clearly specify the function or use of this service. By default, the service name is New Service with no description.
Delivery Properties tabOn the Delivery Properties tab, you can specify a service execution period. This identifies when a service will run automatically. Use the priority settings to establish the priority and segment size used for this service. By default, there are no start and end dates; the priority is set to 5, and the segment size is 100.

General Service Settings dialog box 341
INTERFACE
Execution Settings tabOn the Execution Settings tab, you can change the timeout settings for service execution, as well as for segment execution.• Never Time Out - ensures that the service never expires. This is the
default setting.• Time Out at Specific Time - causes the service to expire at a specific
time that is not related to the time when the service began executing. You can select a time and a time zone when the service expires.For example, if you select the timeout for your service at 5.00 PM Mountain Time, this time is calculated in terms of GMT. Your service could start at 10.00 AM by your local time but it will expire at the time that you have specified with reference to GMT.
Note: The time stamp at which a service expires is always transformed in terms of the Greenwich Mean Time (GMT), as a standard reference time zone. Therefore, the service execution time stamp (in local time) and the time stamp (in GMT) of the timeouts could reference different time zones.
• Offset Timeout from Service Execution Start - causes the service to expire after a specified period after it begins executing. Select the days, hours, or minutes after which you want the service to expire.For example, if you want your service to expire after exactly 1 hour and 15 minutes after it begins executing, you can set the time accordingly. If the service is triggered at 8 PM, any segments that have not been executed by 9.15 PM are cancelled.
Note: Configuring the timeout too low will cause the service to fail unnecessarily.
• Segment Execution Timeout - specifies the timeout period for each segment in the service. The default setting is 1 hour. The Segment Execution Timeout should be set longer than the time it takes to run a segment. This prevents a segment from timing out while it is being sent.

342 Chapter 31 Service Wizard
INTERFACE
The system tries to re-execute the segment for the number of times specified in the Maximum failover count in the System Settings dialog box. However, if this time taken exceeds the segment execution timeout, the service fails.For example, you have a service in which you have set the Segment Execution Timeout as 10 minutes, and the Maximum failover count as 10. When the segment is assigned for the first time, it takes 10 minutes to execute. If it fails and is reassigned, the segment time is reset. The failover segment can use the whole segment timeout time, which is 100 minutes, to execute. As a result, the service has a total of 110 minutes to successfully execute the segment.The Information Transmission Modules are not affected by the timeouts. They have an expiration by date for User, Address, or Subscription. If a user, address or subscription expires while a service is being executed, the service expires.For more information on the System Settings dialog box, refer to the MicroStrategy Narrowcast Server System Administrator Guide.
• Service Execution Status - specifies the service should be failed if any of the segment fails and the remaining service segments should also be failed.The Fail service if any segment fails check box causes the service to fail if any of the segment fails. The Cancel remaining service segments check box causes the remaining service segments to be cancelled.

32C H A P T E R 3 2
343
INTERFACE
32.Subscription Book Editor 32
What is it?
The Subscription Book Editor allows you to administer users and addresses in the Subscription Book.
How do I access it?
To access the Subscription Book Editor, launch the Narrowcast Administrator. From the Tools menu, select Open Subscription Book.
What can I do with it?
Through the Subscription Book Editor, you can• add users to the Subscription Book• add addresses to the Subscription Book• edit users in the Subscription Book• edit addresses in the Subscription Book• delete users from the Subscription Book• delete addresses from the Subscription Book• define personalization for usersFor instructions on completing one of the above tasks, refer to the following How Do I...? topic:• Subscription Book Operations
What should I know before I use it?
Before you begin using the Subscription Book Editor, you should• ensure that your system administrator has set up the appropriate
information transmitters and devices• ensure that your system administrator has set up the information sources

344 Chapter 32 Subscription Book Editor
INTERFACE
• collect the appropriate user information, including login ID, locale, and personalization
• collect the appropriate address information, including physical address, device, and delivery window
For more information on the above topics, refer to the following Concepts topic:• The Subscription Book
Subscription Book Editor layoutThe Subscription Book Editor includes• a list of addresses in the Subscription Book, including status, address
name, login ID, physical address, locale, device, and transmitter• a menu bar that includes Subscription Book, Edit, View, Tools, and
Help menus• a toolbar that provides the ability to
◊ add users and addresses◊ edit user or address properties◊ delete users and addresses◊ add or remove filters to specify the addresses and displays shown in
the editor interface◊ refresh the list◊ access online Help
The following topics address menu bar and toolbar options available in the Subscription Book Editor.
The menu barThe Subscription Book, Edit, View, and Tools menus contain items unique to the Subscription Book Editor. The following tables describe the function of these choices.
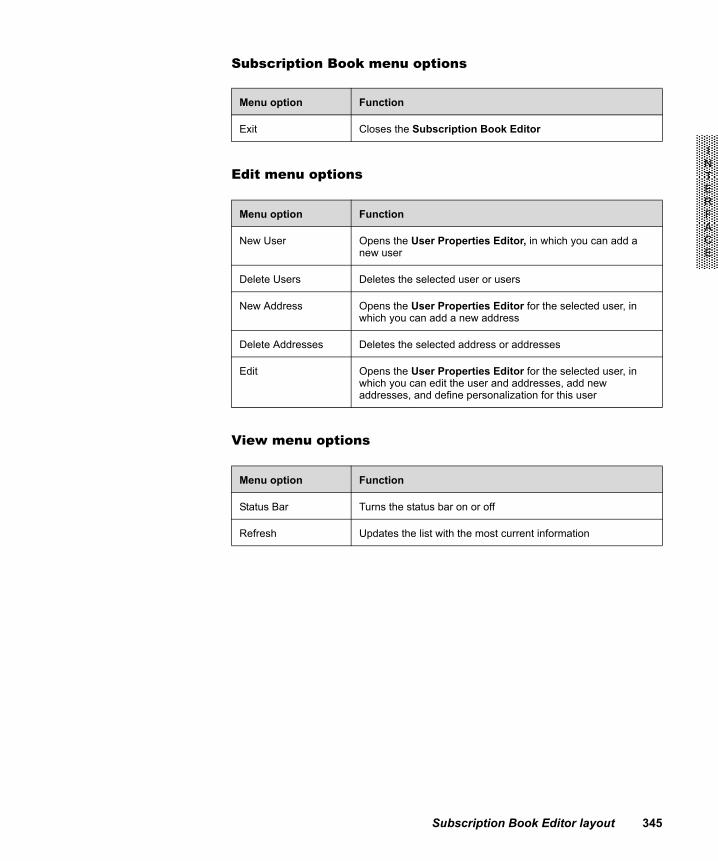
Subscription Book Editor layout 345
INTERFACE
Subscription Book menu options
Edit menu options
View menu options
Menu option Function
Exit Closes the Subscription Book Editor
Menu option Function
New User Opens the User Properties Editor, in which you can add a new user
Delete Users Deletes the selected user or users
New Address Opens the User Properties Editor for the selected user, in which you can add a new address
Delete Addresses Deletes the selected address or addresses
Edit Opens the User Properties Editor for the selected user, in which you can edit the user and addresses, add new addresses, and define personalization for this user
Menu option Function
Status Bar Turns the status bar on or off
Refresh Updates the list with the most current information

346 Chapter 32 Subscription Book Editor
INTERFACE
Tools menu options
The toolbarThe most frequently used menu options are placed on the toolbar where they are accessible by clicking buttons. Their use is described below.• New User opens the User Properties Editor, allowing you to add a new
user to the Subscription Book and define personalization and other characteristics for the user.
• Delete Users deletes the selected user or users.• New Address opens the User Properties Editor for the selected user,
allowing you to add a new address for that user in the Subscription Book.
• Delete Addresses deletes the selected address.• Edit opens the User Properties Editor for the selected user, in which you
can edit the user login, address, preference, authentication and security, and user information for this user.
• Filter adds a filter to the list for the selected field.• Remove Filter removes a filter from the list for the selected field.• Refresh updates the list with the most current information.• MicroStrategy Narrowcast Server Help accesses online Help for the
Subscription Book Editor.
Menu option Function
Sort...
• Ascending Sorts the list in ascending order for the selected field
• Descending Sorts the list in descending order for the selected field
Filter and governing editor
Opens the Filter editor and governing settings dialog box, in which you can define filters for the list selected, specify the maximum number of users and addresses to retrieve for the Subscription Book, and specify the maximum number of subscriptions to retrieve
Remove Filter Removes the filter from the list for the selected field

33C H A P T E R 3 3
347
INTERFACE
33.Subscription Book Synchronization Wizard
33What is it?
The Subscription Book Synchronization Wizard allows you to add new users, delete obsolete users, remap users, import or update user attributes, and import or update user personalization and subscription in the Subscription Book.
How do I access it?
You can access the Subscription Book Synchronization Wizard in two ways:• From the Narrowcast Administrator, select Tools, then select
Synchronize Subscription Data.• From the Narrowcast Administrator, click the Synchronize
Subscription Data toolbar button.
What can I do with it?
Through the Subscription Book Synchronization Wizard, you can• import externally-sourced users• synchronize usersFor instructions on completing one of the above tasks, refer to the following How Do I...? topic:• Subscription Book Operations
What should I know before I use it?
Before you begin using the Subscription Book Synchronization Wizard, you should• have a file ready to be used for synchronization• know which type of file you want to use for synchronization• understand the delimited and LDIF file formats

348 Chapter 33 Subscription Book Synchronization Wizard
INTERFACE
• be familiar with subscription book properties, including user and address information
• know which attributes and values exist for individuals and groups in your source file
• have subscription sets available for mapping subscriptionsFor more information on the above topics, refer to the following Concepts topics:• The Subscription Book• Subscriptions and subscription sets• Synchronization with external sources
Note: If you do not already have a synchronization file to use and want to export users from your MicroStrategy Intelligence Server, you can use the MicroStrategy Intelligence Server User Export Tool to create a comma separated values (CSV) file. See the MicroStrategy Intelligence Server User Export Tool section at the end of this chapter.
Subscription Book Synchronization Wizard layoutThe Subscription Book Synchronization Wizard consists of the following pages:• Welcome• Synchronization Options• User and Address Properties• Subscriptions• Preferences• Security• Authentication• User Addition or Mapping• User Removal or Mapping• Review• FinishEach page of the wizard includes some or all of the following buttons:

Subscription Book Synchronization Wizard layout 349
INTERFACE
• Help opens online help for the Subscription Book Synchronization Wizard.
• Cancel closes the Subscription Book Synchronization Wizard.• Back returns to the previous page in the Subscription Book
Synchronization Wizard.• Next goes to the next page in the Subscription Book Synchronization
Wizard.• Finish completes synchronization and returns you to the Narrowcast
Administrator console.
WelcomeThe Welcome page provides you with a summary of what you can do in the Subscription Book Synchronization Wizard. Each step is described on this page.
Synchronization OptionsThe Synchronization Options page allows you to• select the source for synchronization• select the type of synchronizationThe Synchronization Source section allows you to specify the source for synchronization information. This can be one of two types of flat files:• Lightweight Directory Interchange Format (LDIF)• delimited
Note: To use a delimited file with the Subscription Book Synchronization Wizard, each user must be unique. The column that contains the unique strings representing the user’s identity need to be selected in the Distinguished Name is in column number box.
Select the source type from the Source File Format drop-down list. Then browse to and select your source file in the Source File Location box, or enter the path and file name.If you select Delimited File as the source type, you can select from a variety of separators, including a comma, space or tab. You can specify the column to use for the distinguished name.

350 Chapter 33 Subscription Book Synchronization Wizard
INTERFACE
Two types of synchronization are available in the Synchronization Type section, which are represented by two radio buttons:• First-time synchronization using selected source. This button is
selected by default the first time you use this wizard. Enter the prefix to use for the user synchronization table.
• Synchronization using existing synchronization tables. Use this whenever you import using the same synchronization table you have used for previous imports. This is selected by default the second and succeeding times you use this wizard. Select the prefix to use for the user synchronization table.
In addition, you need to select the appropriate import settings. Click Synchronization Settings to access the Synchronization Settings dialog box.
User and Address PropertiesUser and address properties can be mapped to synchronization file attributes to be updated during synchronization. The User and Address Properties page allows you to choose • which addresses to create or update for each user• which user and address attributes to synchronize• which source file attributes to map to the Subscription Book properties
for users and addresses• whether to enable smart user remapping
Note: The column that was specified as the distinguished name in Synchronization Options page needs to contain a unique user identity. This is not an issue for LDIF files as the LDIF file specification indicates which item is the Distinguished Name. All other items in the delimited file are interpreted as attributes to be available for mapping on subsequent mapping pages.
Two tables, a check box, and a drop-down list appear on this page.The first table is in the User Property Mappings section. This table lists all user properties in the first column such as name, locale, activate and expire status, password, hint, and so forth. The second column in this table provides a drop-down list in each row. Each drop-down list contains all source file attributes where only one attribute can be specified for each row. For first-time synchronizations, blank is selected by default. For

Subscription Book Synchronization Wizard layout 351
INTERFACE
resynchronizations, the items are preselected to represent the mapping used during the last synchronization. If nothing is selected and a user is created, the user is created with the same default settings used in Narrowcast Administrator.At runtime, all mapped user attributes are imported. If nothing is selected for optional user attributes, these attributes will not be imported. If this is an existing user and nothing is selected for a given attribute, existing attribute is not overwritten unless you select to replace existing users in the Synchronization Settings dialog box. If this is a new user and nothing is selected for a given attribute, the default used when creating users through Narrowcast Administrators will be applied.Directly below the User Property Mappings table, the Enable Smart User Remapping check box appears. If this option is enabled, the Subscription Book Synchronization Wizard identifies users in the synchronization file who are not mapped to Subscription Book users, identifies unmapped users in the Subscription Book, and then determines which unmapped Subscription Book users have the same user name as unmapped synchronization file users. If the user names match, users in the synchronization file are automatically moved to the Users Available for Remapping table on the User Addition or Mapping page. Users in the Subscription Book with matching names are also moved to the Users Available for Remapping table and mapped to the corresponding new users in the synchronization file in the Remove Users table on the User Removal or Mapping page. This is useful when a large number of users should be remapped as the process is then more automated. However, each mapping can be changed or not performed, as needed, on the appropriate wizard page.In the second section, Address Property Mappings, a drop-down list is provided above the table which allows you to map address attributes to one of several addresses. This list includes address mappings that represent the action of gathering information from the synchronization source and mapping it to one address. When you click New Address Mapping, a new entry is created in the list. You can also delete an address mapping by clicking Delete Address Mapping. Creating a new address mapping resets the table to its defaults (described below) so that source file attributes can be mapped to address properties for this address.

352 Chapter 33 Subscription Book Synchronization Wizard
INTERFACE
Note: Physical Address and Address Name are required but the same attribute can be used for both. The attribute name specified for the physical address should be used along with the user’s distinguished name to synchronize the address. Thus a table is created mapping address IDs in the Subscription Book Repository to a concatenation of the user’s distinguished name and the attribute name specified to contain the physical address. This mapping is stored for each address mapping so that it is available for resynchronizations. If this is a resynchronization, all existing address mappings should be shown. Address Display is also required.
The second table is for Subscription Book address property mappings. This table lists all address properties in the first column, including name, transmitter, device, and so forth. The second column provides a drop-down list in each row. Each list contains all source file attributes where only one attribute can be specified for each row. If this is a first-time synchronization for the chosen address, Not mapped is selected by default. If this a resynchronization for the chosen address, these items are preselected to represent the mappings used during the last synchronization for the chosen address. If an address is invalid, this information is logged to the log file and the address is skipped.Addresses are mapped by their names. If an address already exists with a same name as the address being imported, the older address will be overwritten with the new address. Existing addresses will be preserved unless you select to delete unmapped addresses in the Synchronization Settings dialog box.
Note: • Address Name, Physical Address, and Address Display are required
properties. These properties must be mapped to synchronization file attributes if address properties are synchronized.
• An address must exist on this page to synchronize user subscriptions on the next page.
Subscription Book Synchronization Wizard layout 353
INTERFACE
SubscriptionsSubscriptions can be synchronized by defining subscriptions for the available address mappings. The Subscriptions page allows you to synchronize user subscriptions. If you choose to synchronize this information, the import file subscription information is always used and the chosen address is subscribed to the subscription sets indicated.This page provides a drop-down list including all address mappings defined on the User and Address Properties page. You must select an address mapping to reset the default on the table (described below) and map subscriptions in the table below. An address mapping must exist on the User and Address Properties page to synchronize user subscriptions.This page also provides a table to indicate which addresses should be subscribed to which subscription sets. In the table, the first column lists all subscription sets in the Subscription Book. The second column provides a drop-down list in each column. Each list contains all synchronization file attributes where only one can be selected for each row. For first-time synchronizations, nothing is selected by default. For resynchronizations, these items are preselected to represent the mappings used during the last synchronization for the chosen address mapping. The third column is enabled only if a mapping is chosen in the second column. You can enter a string representing the value that indicates that the selected address should be subscribed to this subscription set. For example, if you want to subscribe a particular user to a subscription set, you could select the attribute givenname and enter givenname=name (where name equals the user’s given name. If you want to subscribe a group of users to a subscription set, you could select a common attribute such as language and enter language=English (if those users share that value for the language attribute).At run time, all addresses indicated (by selecting an address mapping) are subscribed to the indicated subscription sets.Existing subscriptions of the subscription sets are preserved unless you select Delete subscriptions from the subscription book that are not found in the synchronization source in the Synchronization Settings dialog box.
PreferencesUser preferences can be synchronized by mapping synchronization file attributes to each question object. The Preferences page allows you to synchronize user preferences. This does not allow a user-by-user specification of whether to use import file preferences information. If you choose to synchronize this information, the latest information is always used.

354 Chapter 33 Subscription Book Synchronization Wizard
INTERFACE
This is accomplished in the table in which the first column lists all information sources and the second column lists all the question objects for these information sources. The third column provides a drop-down list in each row. Each list contains all synchronization file attributes where only one can be specified for each row. For first-time synchronizations, Not mapped is selected by default. For resynchronizations, these items are preselected to represent the mappings used during the last synchronization. The string returned by the specified synchronization file attribute is passed in directly as the user preference. The fourth column provides a drop-down list in each row. This column is enabled only after the third column is successfully mapped. Each list contains all synchronization file attributes where only one can be specified for each row. For first-time synchronizations, nothing is selected by default. For resynchronizations, these items are preselected to represent the mappings used during the last synchronization. The string returned by the specified synchronization file attribute is passed in directly as the user preference name. The string returned by the specified synchronization file attribute is passed in directly as the user preference string, something recognized only by the particular information source.Following is a sample preference string for the MicroStrategy information source.<rsl>
<pa pt="7" pin="0" did="A20C9CF311D60AE310008BB3D1CEE6A4" tp="10">
<mi>
<es>
<at did="8D679D4B11D3E4981000E787EC6DE8A4" tp="12"/>
<e emt="1" ei="8D679D4B11D3E4981000E787EC6DE8A4:1" art="1" disp_n="Northeast"/>
</es>
</mi>
</pa>
</rsl>
Note: The IDs represented here are IDs for report, attribute, and attribute element. For more information on the MicroStrategy information source preference string, refer to appendix E, Synchronization Data Types.

Subscription Book Synchronization Wizard layout 355
INTERFACE
SecurityUser security objects can be synchronized by mapping a synchronization file attribute to each information source. The Security page allows you to import user security. If you choose to import this information, the latest information is always used. This is accomplished in the table, in which the first column lists all information sources sorted alphabetically, and the second column provides a drop-down list in each row. Each list contains all synchronization file attributes where only one can be specified for each row. For first-time synchronizations, nothing is selected by default. For resynchronizations, these items are preselected to represent the mappings used during the last synchronization. The string returned by the specified synchronization file attributes is passed in directly as the security object.At run time, the indicated security objects are created. If this is an existing user, all existing user security objects are deleted.Following is a sample security string for the user information source.Authentication:AuthUserName="administrator" AuthUserPwd="ODEJQGGC" AuthUserID="54F3D26011D2896560009A8E67019608"
Security:SecurityObject="8D679D3811D3E4981000E787EC6DE8A4:5" SecurityObjName="Country = Germany"
UserDetailPref:<UserDetail><First_Name Name="First Name" Default="0"/><Last_Name Name="Last Name" Default="0" Value="Eberle"/><Middle_Initial Name="Middle Initial" Default="0"/><Suffix Name="Suffix" Default="0"/><Salutation Name="Salutation" Default="0"/><Zip_Code Name="Zip Code" Default="0"/><Title Name="Title" Default="0"/></UserDetail>
AuthenticationUser authentication can be synchronized by mapping a synchronization file attribute to each information source. The Authentication page allows you to import user authentication. If you choose to import this information, the latest information is always used. This is accomplished in the table in which the first column lists all information sources and the second column provides a drop-down list in each row. Each list contains all synchronization file attributes where only one can be specified for each row. For first-time synchronizations, Not mapped is selected by default. For resynchronizations, these items are preselected to represent the mappings used during the last synchronization. The string returned by the specified synchronization file attribute is passed in directly as the authentication object. In other words, for a MicroStrategy Intelligence Server information source, this string is a concatenation of user and password.

356 Chapter 33 Subscription Book Synchronization Wizard
INTERFACE
At run time, the indicated authentication objects are created. If this is an existing user, all existing authentication objects are deleted.
User Addition or MappingWhen new users that have not been previously synchronized are found in a synchronization file, you can either add these users to the Subscription Book, leave them out of the Subscription Book, or map them to existing users in the Subscription Book. Use the User Addition or Mapping page to determine which users are added. All users found in the synchronization file and not in the Subscription Book synchronization tables are shown in the Add Users table on the left side of the page. To add users, leave them in the Add Users table. Use the arrows to move individual or multiple (multi-select is enabled) users to the right-hand tables. Users moved to the upper right table (Do Not Add Users) are ignored and are not added to the Subscription Book or the Subscription Book synchronization tables. Users moved to the lower right table (Users Available for Remapping) are stored and made available in the next wizard page. When you click Next, the changes are not committed but are stored until you reach the Review Changes page.
User Removal or MappingWhen previously synchronized users no longer exist in the synchronization file, you can perform three actions:• Remove the users from the Subscription Book.• Leave the users in the Subscription Book.• Remap the users to new users found in the synchronization file and set
aside as available for remapping to existing users.The User Removal or Mapping page determines which users are deleted and remapped. All users found in the Subscription Book synchronization tables (this can include users from the Subscription Book if you enabled this option on the first wizard page) and not in the synchronization file are shown in the Remove Users table on the left side of the page. To remove users, leave them in the Remove Users table. Use the arrows to move individual or multiple (multi-select is enabled) users to either of the right-hand tables. Users moved to the top right table are ignored and are maintained in the Subscription Book and in the Subscription Book synchronization tables. Users moved to the lower right table (Remap Users) must be remapped before continuing. For each user in the lower right table, a drop-down list is provided that lists all users specified as available for remapping on the User Addition or Mapping wizard page.

Synchronization Settings dialog box 357
INTERFACE
Select one of these users for each remapped user. When you click Next, the changes are not committed but are stored until you reach the Review Changes page.
ReviewA summary of all changes to be made appears on this page. Three tables list all users to be added, removed, and remapped. The User Removal or Mapping table has two columns for existing and new users, which shows you how existing users are going to be remapped. Review the summary of changes and click Next to commit these changes or click Back to modify these changes.
FinishThe Finish page indicates that you have successfully synchronized or imported users. Click Finish to close the Subscription Book Synchronization Wizard.
Synchronization Settings dialog boxThe Synchronization Settings dialog box includes two tabs:• Synchronization Process tab• Synchronization Values tabOnce you make your selections, click OK to return to the Subscription Book Synchronization Wizard.
Synchronization Process tabOn the Synchronization Process tab, you can define the synchronization options. The options include the following:• User Settings• Address Settings• Subscription Settings• Preference Settings• Authentication Settings• Security Settings

358 Chapter 33 Subscription Book Synchronization Wizard
INTERFACE
Note: Each option requires mapping properly formatted synchronization file (synchronization source file) attributes and should not be selected unless the synchronization file contains the required information.
User Settings
User settings include the following:• Automatically Add/Remove Users; Update Existing User
Properties—Select this option to automatically add new users, update existing users, and delete users not found in the synchronization source file. (See the Note about deleting users at the end of this section.) No user remapping takes place. For users who exist in both the import source and the Subscription Book, only user properties mapped from the source file are updated. Other user properties in the Subscription Book are maintained and are not reset based on the Subscription Book Synchronization Wizard’s default user property values. The Add or Map Users, Remove or Map Users, and Review Changes pages of the Subscription Book Synchronization Wizard do not appear if this is selected.
• Automatically Add/Remove Users; Replace Existing Users—Select this option to automatically add new users, replace existing users, and delete users not found in the synchronization source file. (See the Note about deleting users at the end of this section.) No user remapping takes place. Users who exist in both the synchronization source file and the Subscription Book are deleted and recreated in the Subscription Book so that all user properties are updated according to the synchronization source file and the Subscription Book Synchronization Wizard’s default user property values. The Add or Map Users, Remove or Map Users, and Review Changes pages of the Subscription Book Synchronization Wizard do not appear if this is selected.Important: All addresses, subscriptions, preferences, authentication, and security for existing users in the Subscription Book are lost.

Synchronization Settings dialog box 359
INTERFACE
• Manually Add/Remove/Remap Users; Update Existing User Properties—Select this option to manually determine which new users in the synchronization source file to add to the Subscription Book, which obsolete users not in the synchronization source file to delete from the Subscription Book, and which new users to remap to obsolete users. (See the Note about deleting users at the end of this section.) Existing users are updated. For users who exist in both the synchronization source file and the Subscription Book, only user properties that are mapped from the source file are updated. Other user properties in the Subscription Book are maintained and are not reset based on the Subscription Book Synchronization Wizard’s default user property values.
• Manually Add/Remove/Remap Users; Replace Existing Users—Select this option to manually determine which new users in the synchronization source file to add to the Subscription Book, which obsolete users not in the synchronization source file to delete from the Subscription Book, and which new users to remap to obsolete users. (See the Note about deleting users at the end of this section.) Users who exist in both the synchronization source file and the Subscription Book are deleted and recreated in the Subscription Book so that all user properties are updated according to the synchronization source file and the Subscription Book Synchronization Wizard’s default user property values. This is selected by default.Important: All addresses, subscriptions, preferences, authentication, and security for existing users in the Subscription Book are lost.
• Manually Add/Remove/Remap Users; Don’t Update Existing Users—Select this option to manually determine which new users in the synchronization source file to add to the Subscription Book, which obsolete users not in the synchronization source file to delete from the Subscription Book, and which new users to remap to obsolete users. (See the Note about deleting users at the end of this section.) For users who exist in both the synchronization source file and the Subscription Book, no user properties are updated. User properties in the synchronization source file and the Subscription Book Synchronization Wizard’s default user property values are not used.
• Do Not Add/Remove/Remap Users; Don’t Update Existing Users—Select this option if you do not want to add new users to or delete obsolete users from the Subscription Book. No user remapping takes place. For users who exist in both the synchronization source file and the Subscription Book, no user properties are updated. User properties in the synchronization source file and the Subscription Book Synchronization Wizard’s default user property values are not used.

360 Chapter 33 Subscription Book Synchronization Wizard
INTERFACE
Note: Users, addresses, subscriptions, preferences, authentication, and security created through methods other than the Subscription Book Synchronization Wizard (that is, through the Narrowcast Administrator, through the Subscription Portal, or using another synchronization source) are deleted if this option is chosen. This wizard does not synchronize solely with Subscription Book information originally created through this synchronization source.
Address Settings
Address settings include the following:• Update Mapped Addresses; Delete Unmapped Addresses—Select
this option to automatically add new addresses to and delete unmapped addresses from the Subscription Book. (See the Note about deleting addresses at the end of this section.) For addresses mapped from the synchronization source file to the Subscription Book, only address properties that are mapped from the source file are updated. Other address properties in the Subscription Book are maintained and are not reset based on the Subscription Book Synchronization Wizard’s default address property values.
• Replace Mapped Addresses; Delete Unmapped Addresses—Select this option to automatically add new addresses to and delete unmapped addresses from the Subscription Book. (See the Note about deleting addresses at the end of this section.) Addresses mapped from the synchronization source file to the Subscription Book are deleted and replaced so that all address properties are updated according to the synchronization source file and the Subscription Book Synchronization Wizard’s default address property values.Important: All subscriptions and subscription-level preferences for existing addresses are lost.
• Update Mapped Addresses; Preserve Unmapped Addresses—Select this option to automatically add new addresses to the Subscription Book and preserve unmapped addresses. For addresses mapped from the synchronization source file to the Subscription Book, only address properties that are mapped from the source file are updated. Other address properties in the Subscription Book are maintained and are not reset based on the Subscription Book Synchronization Wizard’s default address property values. This is selected by default.

Synchronization Settings dialog box 361
INTERFACE
• Replace Mapped Addresses; Preserve Unmapped Addresses—Select this option to automatically add new addresses to the Subscription Book and preserve unmapped addresses. Addresses mapped from the synchronization source file to the Subscription Book are deleted and replaced so that all address properties are updated according to the source file and the Subscription Book Synchronization Wizard’s default address property values. (See the Note about deleting addresses at the end of this section.)Important: All subscriptions and subscription-level preferences for existing addresses are lost.
• Do Not Update Mapped Addresses; Preserve Unmapped Addresses—Select this option if you do not want to add new addresses to or delete unmapped addresses from the Subscription Book. For addresses mapped from the synchronization source file to the Subscription Book, no address properties are updated. Address properties in the synchronization source file and the Subscription Book Synchronization Wizard’s default address property values are not used. The Map User and Address Properties page of the Subscription Book Synchronization Wizard does not appear if this is selected.
Note: Users, addresses, subscriptions, preferences, authentication, and security created through methods other than the Subscription Book Synchronization Wizard (that is, through the Narrowcast Administrator, through the Subscription Portal, or using another synchronization source) are deleted if this option is chosen. This wizard does not synchronize solely with Subscription Book information originally created through this synchronization source.
Subscription Settings
Subscription settings include the following:• Subscribe Addresses, Delete Unmapped Subscriptions—Select this
option to subscribes addresses as indicated in the synchronization source file and delete existing subscriptions for these addresses. (See the Note about deleting subscriptions at the end of this section.)
• Subscribe addresses, Preserve Unmapped Subscriptions—Select this option to subscribe addresses as indicated in the synchronization source file and preserve existing subscriptions for these addresses.

362 Chapter 33 Subscription Book Synchronization Wizard
INTERFACE
• Do Not Subscribe Addresses—Select this option if you do not want to subscribe addresses based on the synchronization source file. Existing subscriptions for these addresses are preserved. This is selected by default. The Define Subscriptions page of the Subscription Book Synchronization Wizard does not appear if this is selected.
Note: Users, addresses, subscriptions, preferences, authentication, and security created through methods other than the Subscription Book Synchronization Wizard (that is, through the Narrowcast Administrator, through the Subscription Portal, or using another synchronization source) are deleted if this option is chosen. This wizard does not synchronize solely with Subscription Book information originally created through this synchronization source.
Preference Settings
Preference settings include the following:• Create Preferences, Preserve Unmapped Preferences—Select this
option to create preferences as indicated in the synchronization source file and preserve existing preferences for all other information objects and question objects.
• Create Preferences, Delete Unmapped Preferences—Select this option to create preferences as indicated in the synchronization source file and delete existing preferences for all other information objects and question objects. (See the Note about deleting subscriptions at the end of this section.)
• Do Not Create Preferences—Select this option if you do not want to create preferences based on the synchronization source file. Existing preferences for all information objects and question objects are preserved. This is selected by default. The Define Preferences page of the Subscription Book Synchronization Wizard does not appear if this is selected.

Synchronization Settings dialog box 363
INTERFACE
Note: Users, addresses, subscriptions, preferences, authentication, and security created through methods other than the Subscription Book Synchronization Wizard (that is, through the Narrowcast Administrator, through the Subscription Portal, or using another synchronization source) are deleted if this option is chosen. This wizard does not synchronize solely with Subscription Book information originally created through this synchronization source.
Authentication Settings
Authentication settings include the following:• Define Information Source Authentication—Select this option to
define information source authentication as indicated in the synchronization source file and preserve existing information source authentication for all other information sources.
• Do Not Define Information Source Authentication—Select this option if you do not want to define information source authentication based on the synchronization source file. Existing information source authentication for all information sources is preserved. This is selected by default. The Define Authentication page of the Subscription Book Synchronization Wizard does not appear if this is selected.
Security Settings
Security settings include the following:• Define Information Source Security—Select this option to define
information source security as indicated in the synchronization source file and preserve existing information source security for all other information sources.
• Do Not Define Information Source Security—Select this option if you do not want to define information source security based on the synchronization source file. Existing information source security for all information sources is preserved. The Define Security page of the Subscription Book Synchronization Wizard does not appear if this is selected.

364 Chapter 33 Subscription Book Synchronization Wizard
INTERFACE
Synchronization Values tabOn the Synchronization Values tab, file settings and the logging level are displayed.• Subscription Book Attribute File: This setting points to the file that
specifies what subscription book attributes are supported by the Subscription Book Synchronization Wizard. This file can be modified to import and synchronize additional attributes or remove current attributes when performing import and synchronization. You can also use this file to determine which attributes are required and must be mapped during the synchronization process.
Note: By default, NCS uses the file SBRAttributeList.txt installed in the Delivery Engine folder where the program files are installed. You can specify a different file in the wizard. For more information, see the following section, Subscription Book Attribute File.
• Default Attribute Values File: This setting points to the file that specifies the default values for attributes when either no specific attribute mapping is specified for the attribute or no value is found in the source file and the attribute is not required. This file can be modified to give different default values to attributes that are mapped to attributes in the source file. For example, you can change the devices of addresses by replacing the value in this file.
Note: By default, Narrowcast Server uses the file SBRAttributeDefaultValues.txt installed in the Delivery Engine folder where the program files are installed. You can specify a different file in the wizard. For more information, see the following section, Default Attribute Values File.
• Log File: This setting points to the location of the log file if the log file is generated.
• Logging Level: This setting determines how much logging is performed when the Subscription Book Synchronization Wizard imports or synchronizes the subscription book information. Select one of the following:◊ Log errors and information: logs all actions taken and errors
encountered

Synchronization Settings dialog box 365
INTERFACE
◊ Log errors only: logs only errors encountered◊ Do not create a log file: logs nothing
Subscription Book Attribute File
A sample of this file is shown along with an explanation of how this information is used.User Name:MR_USER_NAME,true,truePassword:MR_PASSWORD,false,falsePassword Hint:MR_PWD_HINT,false,falseLocale:MR_LOCALE_ID,false,falseUser Status:MR_STATUS,false,falseUser Expiration Date:MR_EXPIR_DATE,false,falseAddress Name:ADDR_MR_NAME,true,truePhysical Address:ADDR_MR_PHYSICAL_ADD,true,falseAddress Display:ADDR_MR_DISPLAY,true,falseDevice:ADDR_MR_DEVICE_ID,false,falsePIN:ADDR_MR_PIN,false,falseDelivery Window:ADDR_MR_DELIVERY_WIN,false,falseTime Zone:ADDR_MR_TIMEZONE_ID,false,falseAddress Status:ADDR_MR_STATUS,false,falseAddress Expiration Date:ADDR_MR_EXPIR_DATE,false,false
The following list identifies the information and its use in the Subscription Book Attribute file.• The first item before the colon (:) is the option that appears in the
Subscription Book Synchronization Wizard. • The second item is the user or address property that is available for
synchronization. You can add or remove items from this list to control what user and address properties are available for synchronization.
• The third item controls whether the option is required (true=required, false=optional). If an item is required, a mapping must be provided in the Subscription Book Synchronization Wizard. You cannot continue unless you map all required properties to source file attributes. By default, User Name, Address Name, Physical Address, and Address Display are required. All other user and address properties do not need to be provided and constants in the Default Attribute Values File can be used.

366 Chapter 33 Subscription Book Synchronization Wizard
INTERFACE
• The fourth item determines which user and address properties are used to uniquely identify addresses once they are synchronized. This value should generally not be changed and there must be only one “True” value among all address properties and only one “True” value among all user properties.
Default Attribute Values File
A sample of this file is shown along with an explanation of how this information is used.MR_PASSWORD:passwordMR_PWD_HINT:password hintMR_LOCALE_ID:FBBF7C1E37EC11D4887C00C04F48F8FDMR_STATUS:1MR_EXPIR_DATE:12/30/9999ADDR_MR_DEVICE_ID:1D2E6D168A7711D4BE8100B0D04B6F0BADDR_MR_PIN:0000ADDR_MR_DELIVERY_WIN:0x000000000000000000000000000000000000000000000000ADDR_MR_TIMEZONE_ID:21ADDR_MR_STATUS:1ADDR_MR_EXPIR_DATE:12/30/9999
The following list identifies the information and its use in the Default Attribute Values file.• The first item before the colon (:) is the user or address property for
which a default value is being provided. • The second item provides the default value to be used if the
synchronization source file does not provide a value.
Incomplete Records in Source Files
By default, if the synchronization source file does not contain a user name, physical address, address display name, or address name for a particular user or address, the synchronization of the corresponding user or address fails (not for all users or addresses, just for the user or address that is missing information) and is logged. This is controlled by the fact that SBRAttributeDefaultValues.txt does not contain default values for the following properties:MR_USER_NAME ADDR_MR_NAMEADDR_MR_PHYSICAL_ADDADDR_MR_DISPLAY

MicroStrategy Intelligence Server User Export Tool 367
INTERFACE
If the synchronization source file does not contain these properties, the user (for MR_USER_NAME) or address (for all other properties) synchronization fails and is logged. For addresses, no address is added or updated. For users, the user does not appear on the User Addition or Mapping page and is subsequently ignored.However, you can change this behavior and assign a default physical address, display name, and address name by adding the corresponding lines to the SBRAttributeDefaultValues.txt file:ADDR_MR_NAME:Default AddressADDR_MR_PHYSICAL_ADD:Physical AddressADDR_MR_DISPLAY:Address Display By default, the values specified in the file SBRAttributeDefaultValues.txt are skipped. But in this case, it is important to understand the following:• The synchronization process maps addresses in the synchronization
source with addresses in the Subscription Book based on user ID and address name (note: not physical address).
• The address name is missing in the synchronization source file.When both of these are true, this address is added to the Subscription Book as a new address using the default values specified in the file SBRAttributeDefaultValues.txt.
MicroStrategy Intelligence Server User Export ToolThe MicroStrategy Intelligence Server User Export Tool provided with Narrowcast Server allows you to export users from MicroStrategy Intelligence Server to a file format that is compatible with the Subscription Book Synchronization Wizard. You can add these users to the Narrowcast Server Subscription Book using the Subscription Book Synchronization Wizard.The MicroStrategy Intelligence Server User Export Tool is a separate, external utility that is installed automatically when you install Narrowcast Server. To access it, navigate to the Narrowcast Server\Delivery Engine\Utilities folder you installed on your machine. Double-click UserExportTool.exe to open the MicroStrategy Intelligence Server User Export Tool.The first step is to connect to the Intelligence Server. You need to provide the following information:• Server Name: the name of Intelligence Server to which you want to
connect

368 Chapter 33 Subscription Book Synchronization Wizard
INTERFACE
• Port Number: the port number; this defaults to the standard port number used by Intelligence Servers
• User: the appropriate user name for this Intelligence Server• Password: the appropriate password for this user nameClick Connect. Note that the Status message, which originally is Waiting for user input, changes to Connected to MicroStrategy Intelligence Server when the connection is made.The second step is to export the users. You can use the default file location and file name, or click the browse button to select a different one. Once you are ready, click Export to export the Intelligence Server users to the specified comma separated values (CSV) file. Once the export is complete, the Status message becomes Status: XXX users exported to file where XXX is the number of users exported.Click Exit to close the MicroStrategy Intelligence Server User Export Tool.The CSV file that is created includes the following types of information for each user: user name, password, address name, address display, physical address, Web portal device ID, e-mail device ID, and authentication. Some or all of this information can be used by the Subscription Book Synchronization Wizard, depending on the needs of your application. For more information, refer to the following Concepts topic:• Synchronization with external sources

34C H A P T E R 3 4
369
INTERFACE
34.Subscription Properties Editor 34
What is it?
The Subscription Properties Editor allows you to modify subscription properties for subscriptions within static subscription sets.
How do I access it?
To access the Subscription Properties Editor, in the Static Subscription Set Editor, select a subscription in the Subscriptions in Subscription Set box (the right-hand pane), then select Edit from the Edit menu.
What can I do with it?
Through the Subscription Properties Editor, you can• modify the subscription’s preferences for each information source• modify transmission properties• activate or deactivate this subscription• set an expiration date for this subscription• send a notification through e-mail when a file or print delivery is
completeFor instructions on completing one of the above tasks, refer to the following How Do I...? topic:• Subscription Set Operations
What should I know before I use it?
Before you begin using the Subscription Properties Editor, you should• determine the appropriate preferences for this subscription• determine the correct transmission properties for this subscription• determine the appropriate status for this subscription
370 Chapter 34 Subscription Properties Editor
INTERFACE
For more information on the above topics, refer to the following Concepts topic:• Subscriptions and subscription sets
Subscription Properties Editor layoutThe Subscription Properties Editor consists of four sections, each identified by a tab:• Preference tab• Transmission tab• Status tab• Notification tab
Preference tabWhen you create a service using the Service Wizard and insert a subscription set (either a new one you are creating on the fly or an existing subscription set), you can edit the subscription properties. The Preference tab allows you to specify preferences for this subscription based on the information objects used in your service’s delivery methods. You can specify settings for subscription preferences. After preferences have been specified, you can modify or delete each setting. The default user preference for each personalized object is listed next to the information source if a default user preference exists for the personalized object. Subscription preferences apply only to one subscription, but they override any existing user preferences.To create a subscription preference, highlight the appropriate personalized object and click Define Subscription Preference.If the personalized object is executed using personalized page execution, the Select Attribute Form dialog box appears. In the Select Attribute Form dialog box, select an attribute form from a list of available attributes so that only the content corresponding to that attribute is sent to the subscription recipient.If the personalized object is executed using personalized report execution, the Prompt Resolution Wizard appears.The Prompt Resolution Wizard allows you to select elements that govern the options that are available when selecting preferences and to set the first level of information filtering. You answer a series of prompts to define the subscription preference.

Subscription Properties Editor layout 371
INTERFACE
Transmission tabThe Transmission tab allows you to specify transmission properties that govern certain information transmitter settings. The transmission properties depend on the transmitter used by the subscription. For the e-mail transmitter, the transmission properties specify whether the recipient name should be put in the “To:,” “CC:,” or “BCC:” fields. Click the button next to the desired setting in the Recipient Field box to specify where the recipient name should be displayed. By default, the recipient name is entered in the “BCC:” field.For the file transmitter, the transmission properties include the following selections: • Overwrite files with the same name: Select this check box to
overwrite files when they have the same name. If it is not selected, the file transmitter uses the device settings (specified by the system administrator). If these settings are not available, the service fails.
• Create required folders: Select this check box to create any folders that are needed. If it is not selected, the file transmitter uses the device settings (specified by the system administrator). If these settings are not available, the service fails.
• Append timestamp to file name: Select this check box to add the time the file is saved to the end of the file name.
There are no subscription-level properties for the print transmitter, the SMS transmitter or the Portal transmitter.
Status tabThe Status tab allows you to specify the following:• Status: whether this subscription is active or inactive• Expiration date: whether this subscription has an expiration date
Notification tabThe Notification tab allows you to notify the user when a file or print delivery service has been completed. Choose from the following:• No notification required: Select this option if user notification is not
required.• E-mail: Select this option if a notification is to be sent through e-mail.
By default, the system sends the e-mail to the address of the user you have specified in the User Properties Editor.

372 Chapter 34 Subscription Properties Editor
INTERFACE

35C H A P T E R 3 5
373
INTERFACE
35.Subscription Dialog Box 35
What is it?
The Subscription dialog box allows you to select the type of subscription set you want to create: either Static Subscription Set or Dynamic Subscription Set.
How do I access it?
To access the Subscription dialog box, launch the Narrowcast Administrator. Right-click the Applications folder, select New, then select Subscription Set.
What can I do with it?
Through the Subscription dialog box, you can• elect to create a static subscription set• elect to create a dynamic subscription setFor instructions on completing one of the above tasks, refer to the following How Do I...? topics:• Subscription Set Operations• Subscription Book Operations
What should I know before I use it?
Before you begin using the Subscription dialog box, you should know which type of subscription set you want to create.For more information on the above topic, refer to the following Concepts topic:• Subscriptions and subscription sets

374 Chapter 35 Subscription Dialog Box
INTERFACE

36C H A P T E R 3 6
375
INTERFACE
36.User Properties Editor 36What is it?
The User Properties Editor allows you to add and edit users and addresses in the Subscription Book, as well as define personalization for a user.
How do I access it?
To access the User Properties Editor, launch the Narrowcast Administrator. From the Tools menu, select Subscription Book. In the Subscription Book Editor, from the Edit menu, select Add, then Users or Add, then Addresses to add a new User or Address. Or from the Edit menu, select Properties to edit the selected address or user.
What can I do with it?
Through the User Properties Editor, you can• add users to the Subscription Book• add addresses to the Subscription Book• edit users in the Subscription Book• edit addresses in the Subscription Book• delete addresses from the Subscription Book• define personalization for a user• assign a password for the user• edit user informationFor instructions on completing one of the above tasks, refer to the following How Do I...? topic:• Subscription Book Operations

376 Chapter 36 User Properties Editor
INTERFACE
What should I know before I use it?
Before you begin using the User Properties Editor, you should• ensure that your system administrator has set up the appropriate
information transmitters and devices• ensure that your system administrator has set up the information sources• collect the appropriate user information, including login ID, locale, and
personalization• collect the appropriate address information, including physical address,
device, and delivery windowFor more information on the above topics, refer to the following Concepts topic:• The Subscription BookFor more information on locales, see the MicroStrategy Narrowcast Server System Administrator Guide, chapter 1, MicroStrategy Narrowcast Server, Locales section.
User Properties Editor layoutThe User Properties Editor consists of five sections, each identified by a tab:• Login tab• Addresses tab• Preference tab• Authentication and Security tab• User Information tab
Login tabThe Login tab allows you to specify the following:• Login ID: an ID of your choosing. It must be unique and is limited to
127 characters. The “\” character is not permitted. The default is “New User.”
• Password: a password for the user. This is especially useful for self-subscription applications to preserve user account integrity.
• Hint: a hint for the user to help remember the password.

User Properties Editor layout 377
INTERFACE
Click Advanced Properties to open the Advanced Properties for User dialog box to specify additional user properties.
Advanced Properties for User dialog box
The Advanced Properties for User dialog box allows you to specify the following:• Locale: defines which content the user will receive. It controls character
sets, number formats, date formats, and time formats. Your system might support multiple locales, but a given user only has one locale. This locale must match the selection locale for a given publication to receive it. The default is “System Locale.”
• Status: allows you to select either to Activate this user or to Expire this user on, with an expiration date that you specify. When a user expires, no services are sent to any addresses for this user.
It also displays Information showing when this user was created and modified, and by whom.
Addresses tabThe Addresses tab allows you to create, delete, and rename addresses. To create a new address, click New Address. To delete an address, select it and click Delete Address. To rename an address, select it and click Rename Address.The Addresses tab allows you to specify the following:• Address Name: a name of your choosing. It is limited to 250 characters.
The “\” character is not permitted. The default is “New Address 1.” Available under Available Addresses option.
• Physical Address: the actual address where the message is sent when using this address. An example is [email protected]. It is limited to 250 characters. The “\” character is not permitted. The default is “Physical Address.”
• Address Display: appears in the “To:” box in e-mail services. An example is Last Name, First Name. It is limited to 250 characters. The “\” character is not permitted. The default is “Display Name.”
• Delivery Method: the way messages are delivered to this address. The default is E-mail (SMTP). When you select this, the set of devices associated with the selected delivery method becomes available.
• Device: the device to use to format and transmit to a specific receiver type. The default is Generic e-mail client.

378 Chapter 36 User Properties Editor
INTERFACE
Click Advanced Properties to open the Advanced Properties for Address dialog box to specify additional address properties.
Advanced Properties for Address dialog box
The Advanced Properties for Address dialog box allows you to specify the following:• Status: indicates whether this address is the default for this user (must
have one default address per user), whether this address is activated, or whether this address should be expired and the date for the expiration.
• Delivery Window: indicates the hours each day during which messages can be transmitted to this address and the time zone being used for the delivery window for this address. The default time zone is the time zone specified in the local machine. In this manner, a user can specify that no messages should be delivered until 9:00 am Eastern time, and the delivery window automatically takes into effect time changes resulting from Daylight Savings Time.
• PIN: defines a personal identification number for this address.It also displays Information showing when this address was created and modified, and by whom.
Preference tabThe Preference tab allows you to specify user preferences for the selected user. All information objects with question objects selected and all question objects are listed, along with the corresponding information sources and any previously-defined user preferences. You can create new user preferences, modify existing ones, or delete user preferences that are no longer needed.Specifying preferences uses interfaces supplied by the information source. Though these interfaces vary for each information source, the MicroStrategy Information Source provides the following:• Define User Preference dialog box to define user preferences• Prompt Resolution Wizard to specify preferences for personalized
objects that contain prompts• Select Attribute Form dialog box to specify preferences for other
personalized objectsMultiple user preferences can be defined for a given personalized object. After preferences are defined, you are asked to provide a name for this user preference. As user preferences are defined, they are added to a drop-down

User Properties Editor layout 379
INTERFACE
list next to the question object to which they belong. The default user preference is identified in the drop-down list with a (default) next to its name. User preferences apply to all subscriptions for this user.If user preferences have already been set, select the user preference you want from the drop-down list and click Modify to update it or click Delete to remove it from the selected question object.
Note: This applies only for MicroStrategy information sources. Other information sources provide different user interfaces.
Define User Preference dialog boxOn the User Properties Editor - Preference tab, highlight the personalized object for which you want to define a preference and click New to display the Define User Preference dialog box.This dialog box allows you to enter a name for this preference and then go to the Prompt Resolution Wizard to specify the preference elements.Click Answer to display the Prompt Resolution Wizard if the personalized object contains prompts, or the Select Attribute Form dialog box for other personalized objects.
Prompt Resolution Wizard
On the Define User Preference dialog box, click Answer to display the Prompt Resolution Wizard. This dialog box opens only for personalized objects with prompts.The Prompt Resolution Wizard allows you to select elements that govern the options that are available when selecting preferences and to set the first level of information filtering. You answer a series of prompts to define your user preferences.
Note: This applies only for MicroStrategy information sources. Other information sources provide different user interfaces.
380 Chapter 36 User Properties Editor
INTERFACE
Select Attribute Form dialog box
On the Define User Preference dialog box, click Answer to display the Select Attribute Form dialog box. The Select Attribute Form dialog box allows you to select the attribute elements for an attribute. When the service is executed, the recipients receive only the page of content that corresponds to the element that you have selected. Click Purge cache to clear the Intelligence Server's element cache.
Note: This applies only for MicroStrategy information sources. Other information sources provide different user interfaces.
Authentication and Security tabThe Authentication and Security tab allows you to specify authentication and security for this user. All the information sources available to your system are listed. After authentication and security is specified, you can modify or delete each setting.For more information about security, see the following:• Information source securitySpecifying preferences uses interfaces supplied by the information source. Though these interfaces vary for each information source, the MicroStrategy Information Source provides the following:• Login Information dialog box to specify authentication• Prompt Resolution Wizard to specify authentication and security
Login Information dialog box
On the User Properties Editor - Authentication and Security tab, select an information source in the Authentication table, then click Define to display the Login Information dialog box.The Login Information dialog box allows you to specify a MicroStrategy user login and password that the selected information source will use to validate permissions for this user to view and access MicroStrategy Desktop (or metadata) objects.

User Properties Editor layout 381
INTERFACE
Note: Use standard authentication when connecting Narrowcast Server to Intelligence Server. However, database authentication and warehouse pass-through may also be used for the MicroStrategy platform. For details, please refer to TechNote TN6200-75x-0709 or the MicroStrategy System Administration Guide.
If authentication has already been set, click Define to update it or click Clear to remove it from the selected information source.
Note: This applies only for MicroStrategy information sources. Other information sources provide different user interfaces.
Prompt Resolution Wizard
On the User Properties Editor - Authentication and Security tab, select an information source in the Security table and click Define to display the Prompt Resolution Wizard.The Prompt Resolution Wizard allows you to select elements that govern the options that are available when selecting preferences and to set the first level of information filtering. You answer a series of prompts to define your user preferences.
Note: This applies only for MicroStrategy information sources. Other information sources provide different user interfaces.
User Information tabThe User Information tab allows you to personalize service content for this user by adding user-specific information to the content. You can specify values for user properties such as the following:• first name• middle initial • last name• suffix

382 Chapter 36 User Properties Editor
INTERFACE
• title• salutation• street address• city• state• zip code• countryYou can add or remove user properties within Narrowcast Administrator by selecting Edit Available User Properties from the Tools menu.

IIIS E C T I O N I I I
383
HOW
DO
I
Application Designer How Do I...? III

384 Section III Application Designer How Do I...?
HOW
DO
I

37C H A P T E R 3 7
385
HOW
DO
I
Channel Operations 37Add a new channel
Steps
1. In the Site Preferences section, on the Channels page, click Add a New Channel.
2. Select the folder that contains the services you wish to be displayed in the Subscription Portal for this channel. 3. Click Next.4. Enter a name for the channel. 5. Enter a description of the channel.6. To display this channel to the end user, select the Channel Enabled option.7. Click Next. You are returned to the Channels page.
Change the folder of services associated with a channel
Steps
1. In the Site Preferences section, on the Channels page, click the Edit link next to the channel whose folder you wish to change.2. Select the folder that contains the services you wish to be displayed in the Subscription Portal for this channel. 3. Click Next.

386 Chapter 37 Channel Operations
HOW
DO
I
Delete a channelSteps
1. In the Site Preferences section, on the Channels page, click Delete next to the channel to be deleted.2. At the confirmation window, click Yes to delete the channel.

38C H A P T E R 3 8
387
HOW
DO
I
Device Type Operations 38Change the device folders associated with a device type
Steps
1. In the Site Preferences section, on the Device Types page, click edit device folders... next to the device type whose folders you want to edit.2. Select a folder on the left that you wish to make active for this device type.3. Using the toggle switch, move the selected folder to the right.4. Click Next to proceed to the Name and Description page.5. Click Next to return to the Channels page.
Create a new device typeSteps
1. In the Site Preferences section, on the Device Types page, click Create new device type.2. Type the new device type name.3. Type the URLs of the large and small icons.4. Select the address format.5. Select the fields to use when displaying and editing. 6. Click Next.

388 Chapter 38 Device Type Operations
HOW
DO
I
Delete a device typeSteps
1. In the Site Preferences section, on the Device Types page, click Delete next to the device type to be deleted.2. Click Yes to confirm the deletion.
Reconfigure a device type definitionSteps
1. In the Site Preferences section, on the Device Types page, click definition next to the device type to be reconfigured.
2. Type the URLs of the large and small icons.3. Select the address format.4. Select the fields to use when displaying and editing. Selecting any of the check boxes under Edit fields causes these fields to be displayed to the end user when he edits an address of this particular device type.5. Click Next to proceed to the Device Folders page.
Rename a device typeSteps
1. In the Site Preferences section, on the Device Types page, click Rename next to the device type to be renamed.2. Type the new name of the device.3. Click Rename.

39C H A P T E R 3 9
389
HOW
DO
I
Information Object Operations 39Associate a question object to an information object
Steps
1. On the Report page of the Information Object Wizard, click Advanced Options to open the Advanced Properties dialog box.2. Click the Question Object tab.3. Select an existing question object or create a new one and click OK. You are returned to the Report page.
Clear a question object from an information object
Step
1. On the Report page of the Information Object Wizard, click Advanced Options.2. The Advanced Properties dialog box opens. Click the Question Object tab.3. Clear the Gather preferences using a question object check box.4. Click OK to return to the Report page.

390 Chapter 39 Information Object Operations
HOW
DO
I
Create a MicroStrategy content information object with personalized page execution
Steps
1. Right-click anywhere in the Applications folder, point to New, then choose Information Object. The Select Information Source dialog box opens.2. Double-click the MicroStrategy information source to use. The Information Source Wizard opens at the Role page. 3. Choose Content Information Object to create an information object used as document content only. 4. Click Next. The Report page opens.5. Select the report to be used as content. 6. Click Advanced Options. The Advanced Properties dialog box opens.7. In the Personalization Mode section, select Personalized page execution. One report will be used for multiple personalization sets by dividing the report results into pages on the Delivery Engine.8. To change how the server cache is used, make the appropriate selections in the Intelligence Server cache section.
◊ The default is Use cached report if available from MicroStrategy Intelligence Server. If the report has not been cached, it will be executed.
◊ You can also select Update MicroStrategy Intelligence Server cache with execution results if cache is not used or unavailable.
9. In the Segmentation Properties section, select whether to segment the report. If you choose to segment it, the report must contain two segmentation prompts. 10. Click OK to save your changes and return to the Report page.11. Click Next. The Format page opens. If the Segmentation Prompts page opens instead, you chose to segment the report:
◊ Select the prompt from the drop-down list to use as the Segment beginning prompt.
◊ Select the prompt from the drop-down list to use as the Segment end prompt.

Create a MicroStrategy content information object with personalized report execution 391
HOW
DO
I
◊ Click Next. The Format page opens. 12. On the Format page, select whether to return the report results in a tabular or graphical format. 13. If you choose graphical format, you can also customize the image size. Select the appropriate check box and enter the width and height in pixels.14. Click Next. The Summary page opens. 15. Review the information on the Summary page and click Finish to create the new information object. The Save XML Information Object dialog box opens.16. Choose the directory in which to save the object. Enter a name for the new information object and click Save.
Create a MicroStrategy content information object with personalized report execution
Steps
1. Right-click anywhere in the Applications folder, point to New, then choose Information Object. The Select Information Source dialog box opens.2. Double-click the MicroStrategy information source to use. The Information Source Wizard opens at the Role page. 3. Choose Content Information Object to create an information object used as document content only. 4. Click Next. The Report page opens.5. Select the report to be used as content. 6. Click Advanced Options. The Advanced Properties dialog box opens.7. In the Personalization Mode section, select Personalized report execution. One report is executed for each personalization set.8. To change how the server cache is used, make the appropriate selections in the Intelligence Server cache section.

392 Chapter 39 Information Object Operations
HOW
DO
I
◊ The default is Use cached report if available from MicroStrategy Intelligence Server. If the report has not been cached, it will be executed.
◊ You can also select Update MicroStrategy Intelligence Server cache with execution results if cache is not used or unavailable.
9. Click OK to save your changes and return to the Report page.10. Click Next. The Format page opens.11. Select whether to return the report results in a tabular or graphical format. 12. If you choose graphical format, you can also customize the image size. Select the appropriate check box and enter the width and height in pixels.13. Click Next. The Summary page opens. 14. Review the information on the Summary page and click Finish to create the new information object. The Save XML Information Object dialog box opens.15. Choose the directory in which to save the object. Enter a name for the new information object and click Save.
Create a MicroStrategy question object
Steps
1. Right-click anywhere in the Applications folder, point to New, then choose Question Object. The Select Information Source dialog box opens.2. Double-click the MicroStrategy 7 Information Source. The Question Object dialog box opens. 3. Enter a Name and Description for the new question object. 4. Click Define. The Question Object Browser dialog box opens.5. Select the report to be used as the question object. 6. Select whether to use Personalized page execution, which divides the report results so that one report satisfies many personalization sets; or select Personalized report execution, where one report is executed for each personalization set.

Create a MicroStrategy segment information object 393
HOW
DO
I
Note: If you select personalized report execution, the selected report is not validated because the intended information object is unknown. Do one of the following:
◊ Save this question object as is. Then create or edit the intended information object, and associate this question object with the information object. Click Edit on the Advanced Options dialog box to validate the report.
◊ Do not save this question object. Create or edit the intended information object. From the Advanced Options dialog box, Question Object tab, create a new question object for the intended information object. The report is validated.
7. Click OK. You are returned to the Question Object dialog box.
8. Click OK. The Save Question Object dialog box opens.9. Choose the directory in which to save the object. Enter a name for the new question object and click Save.
Create a MicroStrategy segment information object
Steps
1. Right-click anywhere in the Applications folder, point to New, then choose Information Object. The Select Information Source dialog box opens.2. Double-click the MicroStrategy information source to use. The Information Source Wizard opens at the Role page.3. Choose Segment Information Object to create an information object that defines segment boundaries for subscriptions. 4. Click Next. The Report page opens.5. Select the report that contains the segment boundaries. The report must have at least one prompt for segmentation by size.

394 Chapter 39 Information Object Operations
HOW
DO
I
Note: If the selected report is not valid for this type of information object, an error message displays in the middle of the page. If the report is valid, a green check appears.
6. To change how the server cache is used, click Advanced Options. The Advanced Properties dialog box opens.7. Make the appropriate selections in the Intelligence Server cache section.
◊ The default is Use cached report if available from MicroStrategy Intelligence Server. If the report has not been cached, it will be executed.
◊ You can also select Update MicroStrategy Intelligence Server cache with execution results if cache is not used or unavailable.
◊ Click OK. You are returned to the Report page.8. Click Next. The Segment Size page opens.9. Select the prompt which controls the Segment size returned by the report.10. Click Next. The Summary page opens. 11. Review the information on the Summary page and click Finish to create the new information object. The Save XML Information Object dialog box opens.12. Choose the directory in which to save the object. Enter a name for the new information object and click Save.
Create a MicroStrategy subscription information object
Steps
1. Right-click anywhere in the Applications folder, point to New, then choose Information Object. The Select Information Source dialog box opens.2. Double-click the MicroStrategy information source to use. The Information Source Wizard opens at the Role page.

Create a MicroStrategy subscription information object 395
HOW
DO
I
3. Choose Subscription Information Object to create an information object used for subscription information. 4. Click Next. The Source of Subscription Information page opens.5. Make the appropriate selection and click Next. One of the following pages opens:
◊ If you selected the option to Retrieve dynamic subscription information from the information source and do not choose a filter, the User Properties and Personalization page opens. Go to step 10.
◊ If you selected the option to Retrieve dynamic subscription information from the information source and choose a filter, the Filter page opens. Go to step 6.
◊ If you selected the option to Select or define a report and retrieve dynamic subscription information from the selected report, the Report page opens. Go to step 6.
6. Select the report or filter to use for subscription information. A report must contain segmentation prompts and at least one page by attribute.
Note: If the selected report is not valid for this type of information object, an error message displays in the middle of the page. If the report is valid, a green check appears.
7. If you selected a report, to change how the server cache is used, click Advanced Options. The Advanced Properties dialog box opens. In the Intelligence Server cache section, make the appropriate selections.
◊ The default is Use cached report if available from MicroStrategy Intelligence Server. If the report has not been cached, it will be executed.
◊ You can also select Update MicroStrategy Intelligence Server cache with execution results if cache is not used or unavailable.
8. In the Segmentation Properties section, select whether to segment the report. If you choose to segment it, the report must contain two segmentation prompts. 9. Click OK. You are returned to the Report page.10. Click Next. The User Properties and Personalization page opens.11. Select whether the Address ID is generated by the report or retrieved from the subscription book.

396 Chapter 39 Information Object Operations
HOW
DO
I
◊ If you select generate from the report, another drop-down box appears. Use it to select the attribute form on the report that maps to the address ID.
12. Select whether the User ID is generated by the report, retrieved from the subscription book, or set to apply a constant.
◊ If the user ID is generated by the report, another drop-down box appears. Use it to select the attribute form on the report that maps to the user ID.
◊ If the user ID is set to apply a constant, a text box appears. Enter the constant in it.
13. Select whether the Locale ID is generated by the report, retrieved from the subscription book, or set to apply a constant.
◊ If the locale ID is generated by the report, another drop-down box appears. Use it to select the attribute form on the report that maps to the locale ID.
◊ If the locale ID is set to apply a constant, another drop-down box appears. Use it to select the correct locale.
Note: The Subscription ID is always generated from the report. By default, it is the ID form of the first page-by attribute in the selected report template. You cannot change the Subscription ID.
14. Click Next. The Summary page opens. If the Address Properties page opens instead, the Address ID has been set to be generated from the report. See the following How Do I...? topic for information on this page:
◊ Define delivery information for a subscription information object15. Review the information on the Summary page and click Finish to create the new information object. The Save XML Information Object dialog box opens.16. Choose the directory in which to save the object. Enter a name for the new information object and click Save.
Define delivery information for a subscription information object 397
HOW
DO
I
Define delivery information for a subscription information object
Steps
1. On the Information Object Wizard’s Address Properties page, select a source for each piece of delivery information. The options include retrieve from subscription book, generate by report, or apply a constant. The delivery information fields are listed below:
◊ Address Display◊ Physical Address◊ Device◊ Transmission Properties◊ PIN◊ Time Zone◊ Delivery Window
2. If you choose Generated by report, another drop-down box appears. From this list, select the corresponding attribute form.3. If you choose Apply a constant, another field appears. Enter or select the constant to use for that piece of delivery information.4. Click Next. The Preferences page opens. 5. For each information source and question object combination, you can select a Preference object from the drop-down list of the report’s page-by attribute forms.6. Click Next. The Summary page opens.7. Once the Summary page opens, return to the previous How Do I...? topic to continue creating an information object.

398 Chapter 39 Information Object Operations
HOW
DO
I
Specify error handling rules for an information object
Steps
1. On the Report page of the Information Object Wizard, click Advanced Options.The Advanced Properties dialog box opens. 2. Click the Error handling tab.3. Select the Fail segment if Information Object fails check box, to fail the complete segment if the Information Object fails.4. Click OK to return to the Report page.

40C H A P T E R 4 0
399
HOW
DO
I
Database Connection Operations 40Add a database connection
The first time you create a portal, the list of database connections for all databases (Portal Repository, Object Repository and Subscription Book Repository) is blank. You need to add a new one.
Steps
1. Open Portal Administrator.2. In the System Configuration section, click Portal Repository.3. Click Add a new database connection for a new database connection. The Add a new database connection page is displayed.4. In the Database connection name text box, enter a name for the database connection .
Note: This name is displayed in the Database connections list on the Portal Repository page after the new dababase connection is created.
5. From the Database drop-down list, select the type of database to store the portal repository.6. In the SequeLink Server name box, type the name of the computer on which SequeLink is running .7. In the ODBC data source name box, type the ODBC DSN as defined on the computer on which the SequeLink server is running.8. Type the Login ID that the Subscription Portal should use to connect to this database.9. Type the Password that corresponds to this User ID.10. In the Confirm password text box, re-enter the password.

400 Chapter 40 Database Connection Operations
HOW
DO
I
11. In the Number of pooled connections text box, enter the connection pool size.
Note: To disable connection pooling, set the pool size to 0.
12. Click Add database connection to add a new database connection with the specified detalis. The Portal Repository page is displayed.
Select an Object RepositorySteps
1. In the Site Management section, on the Object Repository page, select the database connection that contains the Object Repository.2. Type the Tables prefix found in the Object Repository.3. Click Next.
Select a Portal RepositorySteps
1. In the System Configuration section, on the Portal Repository page, select the database connection that contains the Portal Repository.2. Type the Tables prefix found in the Portal Repository.3. Click Next.
Select a Subscription Book RepositorySteps
1. In the Site Management section, on the Subscription Book Repository page, select the database connection that contains the Subscription Book Repository.2. Type the Tables prefix found in the SBR.3. Click Next.

Select a Subscription Book Repository 401
HOW
DO
I
←

402 Chapter 40 Database Connection Operations
HOW
DO
I

41C H A P T E R 4 1
403
HOW
DO
I
Publication Operations 41Add a dynamic text item to a document
Steps
1. Click anywhere in the contents area of the document editor. Note: If you are working in the Excel Document Editor and you click on a spreadsheet tab before this step, the information object becomes the name of the spreadsheet.2. From the Insert menu, select Existing Information Object. The Select Information Object dialog box opens.3. Select an information object and click OK. You are returned to the document editor and a document element is automatically created.
Note: If this object is an XML information object created for the MicroStrategy Information Source, an XSL stylesheet is automatically selected.
4. To change the stylesheet, double-click the document element (on the words “Document Element 1”or “Document Element 2”, for example, in the Document Element List frame). The Document Element Properties dialog box opens.5. Click Browse and select a different stylesheet file, then click OK to return to the document editor.6. To set error handing rules, double-click any of the error handling rules at the bottom of the Document Element pane. The Document Element Properties dialog box opens.7. Set the Error Handling Rules. For each type of error, choose whether to send an error or a text string you define.

404 Chapter 41 Publication Operations
HOW
DO
I
8. Click OK. You are returned to the document editor.
Add multiple XML information objects with the same stylesheet in a document
Only XML information objects can be placed into the same document element, and therefore be formatted by the same stylesheet. You can add any number of XML information objects to the same document element.
Steps
1. From a document editor’s Insert menu, select Existing Information Object. The Select Information Object dialog box opens.2. Select an XML information object and click OK. You are returned to the document editor.
Note: A document element is automatically created. If this object is an XML information object created for the MicroStrategy Information Source, an XSL stylesheet is automatically selected.
3. To change the stylesheet, double-click the document element (on the words “Document Element 1”or “Document Element 2”, for example, in the Document Element List frame). The Document Element Properties dialog box opens.4. Click Browse and select a different stylesheet file, then click OK to return to the document editor.5. To set error handling, double-click any of the error handling rules at the bottom of the Document Element pane. The Document Element Properties dialog box opens.6. Set the Error Handling Rules. For each type of error, choose whether to send an error or a text string you define.7. Click OK. You are returned to the document editor. 8. Select the newly created document element. 9. From the Insert menu, select Existing Information Object. The Select Information Object dialog box opens.
Associate a macro with an event in Microsoft Excel 405
HOW
DO
I
10. Select an XML information object and click OK. The Choose XML Information Object Destination dialog box opens.11. Select Currently Selected Document Element and click OK.
Associate a macro with an event in Microsoft ExcelYou can associate a macro with an event, by creating a button in Microsoft Excel that will be used to trigger the macro.
Steps
1. Open an Excel workbook.2. Click the Button icon from the Forms toolbar.Note: To view the Forms toolbar, select View>Toolbars>Forms.3. Click and drag the mouse on the worksheet Assign macro dialog box is displayed.4. Assign a macro to the new button by choosing from the list of available macros.5. Click OK.From this point on, whenever you click the new button, the macro is executed. By incorporating the Excel workbook into a MicroStrategy Narrowcast Server service, this macro can be sent to all subscribers for quickly charting the data. For more information on importing this newly created Excel workbook as a template in MicroStrategy Narrowcast Server, refer the following topic:Import a file
Change the view in a document editor
Step
From the View menu, select Document Element Pane. This works as a toggle, hiding and revealing the Document Element pane on the left.

406 Chapter 41 Publication Operations
HOW
DO
I
Create a link to a Desktop document
Steps
1. From Narrowcast Administrator, click the New toolbar button and select Document.2. From the New Document dialog box, select the option to Link to existing Microstrategy web or Report Services document and select the appropriate information source. Or from the Select Information Source dialog box, select the appropriate information source.3. Click OK. The Desktop Document Selector dialog box opens.4. Navigate to the MicroStrategy Desktop document to which you want to link and select it.5. If you wish, click Document Locale to open the Document Properties dialog box and specify the appropriate execution locale. Click OK.6. If you wish, click Information Object Properties to open the Advanced Properties dialog box and select the Use report cache during document execution check box. Click OK.7. Click OK in the Desktop Document Selector dialog box. The Save Desktop Linked Document dialog box opens.8. If you wish, enter a new name in the Object Name box.9. Click Save. The new document object is created in Narrowcast Administrator.
Note: You can also create links to Desktop documents from within both the Service Wizard and the Publication Wizard. Service Wizard documents are embedded within the service and do not appear in Narrowcast Administrator.

Create an automatic chart 407
HOW
DO
I
Create an automatic chart
Steps
1. Select Macros from the Tools menu, then select Record New Macro.2. Enter a name for the macro, press ENTER, and note that a recorder symbol appears. Excel records all actions performed until you click the recorder’s Stop button.3. Launch the Chart Wizard by selecting Chart from the Insert menu.4. Select the chart type and the chart’s characteristics.5. Bind the chart to a particular cell range. Do this by manually entering the cell range or by dragging over the desired cells with the mouse. Discontinuous cell ranges can be selected by control-selecting and shift-selecting, and these cell ranges can reside on multiple sheets.6. Specify where the chart should be placed. It can either be placed on an existing worksheet or it can be placed on a special chart sheet (a sheet that has no cells and is just used to hold the chart).7. Click Finish on the Chart Wizard’s final page. The new chart appears as specified in the wizard.8. Click the recorder’s Stop button to end the recording session and save the macro.
Note: To verify that a chart is correct, you can place dummy data that closely matches the structure and content of the real data in the appropriate cell ranges. This data should be removed from the template/workbook before saving.
Create an Excel document
Steps
1. Right-click anywhere in the Applications folder, point to New, then choose Document. The New Document dialog box opens.2. Double-click Excel Document. The Excel Document Editor opens.

408 Chapter 41 Publication Operations
HOW
DO
I
3. Click Browse in the Excel Spreadsheet File box. The Open Excel Spreadsheet File dialog box opens.4. Select an Excel document to use as the template and click OK. You are returned to the Excel Document Editor.
Note: You do not see any Excel macros included in the template. Therefore, you need to know what the macros are, as well as where the macros assume the text is placed.
5. To add a static text item, ◊ From the Insert menu, select Static Text.◊ Click in the Contents column. ◊ Type the static text.
6. To add a dynamic text item, see the following How Do I...? topic:◊ Add a dynamic text item to a document
7. To create a new information object and add it to the document, see the following How Do I...? topic:
◊ Create a new information object in a document8. To change the row position of a document item,
◊ In the Content Definition pane, click the Row Positioning cell for the document item to be positioned.
◊ Choose the type of positioning from the pull-down list:– Absolute means the item is offset from the top of the sheet. Enter
the number of rows in the Row Offset cell.– Relative Top means the item is offset from the top of another
document item. Enter the number of rows to offset by in the Row Offset cell. Select the document item number in the Row Reference cell.
– Relative Bottom means the item is offset from the bottom of another document item. Enter the number of rows to offset by in the Row Offset cell. Select the document item number in the Row Reference cell.
Create an Excel document 409
HOW
DO
I
Note: Relative Top and Relative Bottom are not available for the first content element in a spreadsheet.
9. To change the column position of a document item, ◊ In the Content Definition pane, click the Column Positioning cell
for the document item to be positioned.◊ Choose the type of positioning from the pull-down list:
– Absolute means the item is offset from the left of the sheet. Enter the number of columns in the Column Offset cell.
– Relative Left means the item is offset from the left side of another document item. Enter the number of columns to offset by in the Column Offset cell. Select the document item number in the Column Reference cell.
– Relative Right means the item is offset from the right side of another document item. Enter the number of columns to offset by in the Column Offset cell. Select the document item number in the Column Reference cell.
Note: Relative Left and Relative Right are not available for the first content element in a spreadsheet.
10. To change a spreadsheet name, do one of the following:◊ Double-click the spreadsheet’s tab and enter a new name. ◊ Right-click the tab and choose Insert Information Object, which
allows you to select an information object to supply the sheet name. This operation is the same as inserting an information object into the spreadsheet. For instructions, see the following How Do I...? topic:– Add a dynamic text item to a document
◊ Right-click the tab and select Insert New Information Object, which allows you to create a new information object to supply the name. This operation is the same as creating a new information object and adding it to the spreadsheet. For instructions, see the following How Do I...? topic:– Create a new information object in a document
11. Click Save and Close. The Save Excel Document dialog box opens.

410 Chapter 41 Publication Operations
HOW
DO
I
12. Choose the directory in which to save the document. Enter a name for the new document and click Save.
Create an Excel document
Steps
1. Right-click anywhere in the Applications folder, point to New, then choose Document. The New Document dialog box opens.2. Double-click Excel Document. The Excel Document Editor opens.3. Click Browse in the Excel Spreadsheet File box. The Open Excel Spreadsheet File dialog box opens.4. Select an Excel document to use as the template and click OK. You are returned to the Excel Document Editor.
Note: You do not see any Excel macros included in the template. Therefore, you need to know what the macros are, as well as where the macros assume the text is placed.
5. To add a static text item, ◊ From the Insert menu, select Static Text.◊ Click in the Contents column. ◊ Type the static text.
6. To add a dynamic text item, see the following How Do I...? topic:◊ Add a dynamic text item to a document
7. To create a new information object and add it to the document, see the following How Do I...? topic:
◊ Create a new information object in a document8. To change the row position of a document item,
◊ In the Content Definition pane, click the Row Positioning cell for the document item to be positioned.
◊ Choose the type of positioning from the pull-down list:

Create an Excel document 411
HOW
DO
I
– Absolute means the item is offset from the top of the sheet. Enter the number of rows in the Row Offset cell.
– Relative Top means the item is offset from the top of another document item. Enter the number of rows to offset by in the Row Offset cell. Select the document item number in the Row Reference cell.
– Relative Bottom means the item is offset from the bottom of another document item. Enter the number of rows to offset by in the Row Offset cell. Select the document item number in the Row Reference cell.
Note: Relative Top and Relative Bottom are not available for the first content element in a spreadsheet.
9. To change the column position of a document item, ◊ In the Content Definition pane, click the Column Positioning cell
for the document item to be positioned.◊ Choose the type of positioning from the pull-down list:
– Absolute means the item is offset from the left of the sheet. Enter the number of columns in the Column Offset cell.
– Relative Left means the item is offset from the left side of another document item. Enter the number of columns to offset by in the Column Offset cell. Select the document item number in the Column Reference cell.
– Relative Right means the item is offset from the right side of another document item. Enter the number of columns to offset by in the Column Offset cell. Select the document item number in the Column Reference cell.
Note: Relative Left and Relative Right are not available for the first content element in a spreadsheet.
10. To change a spreadsheet name, do one of the following:◊ Double-click the spreadsheet’s tab and enter a new name.
412 Chapter 41 Publication Operations
HOW
DO
I
◊ Right-click the tab and choose Insert Information Object, which allows you to select an information object to supply the sheet name. This operation is the same as inserting an information object into the spreadsheet. For instructions, see the following How Do I...? topic:– Add a dynamic text item to a document
◊ Right-click the tab and select Insert New Information Object, which allows you to create a new information object to supply the name. This operation is the same as creating a new information object and adding it to the spreadsheet. For instructions, see the following How Do I...? topic:– Create a new information object in a document
11. Click Save and Close. The Save Excel Document dialog box opens.12. Choose the directory in which to save the document. Enter a name for the new document and click Save.
Create an HTML document
Steps
1. Right-click anywhere in the Applications folder, point to New, then choose Document. The New Document dialog box opens.2. Double-click HTML Document. The HTML Document Editor opens.3. To add a static text item,
◊ Position the cursor in the Content Definition pane at the desired location within the document.
◊ Type the static text.
Note: You can format the text, using the options in the Format menu. They are similar to standard Windows formatting choices, such as font selection, indents, and lists.
4. To add a dynamic text item, see the following How Do I...? topic:◊ Add a dynamic text item to a document
5. To create a new information object and add it to the document, see the following How Do I...? topic:
Create an HTML document 413
HOW
DO
I
◊ Create a new information object in a document6. To insert an image,
◊ Position the cursor in the Content Definition pane at the desired location within the document.
◊ From the Insert menu, select Image. The Picture dialog box opens.◊ Click Browse, select the image file, and click Open. You are returned
to the Picture dialog. ◊ You can enter Alternate Text to be displayed if an end user has
selected not to display images. ◊ Customize the layout, by selecting an Alignment option from the
drop-down menu and entering a Border Thickness.◊ Enter the Horizontal and Vertical spacing.◊ Click OK. You are returned to the HTML Document Editor.
7. To insert a hyperlink, ◊ Select the item to be hyperlinked.◊ From the Insert menu, select Hyperlink. The Hyperlink dialog box
opens.◊ Choose a protocol Type from the drop-down list.◊ Enter the URL or e-mail address in the URL field.
Note: It is important for hyperlinks to reference only complete URLs, because no source path is available for relative URLs in an HTML e-mail. However, bookmarks relative to the page, such as “#top”, can be used.
8. To create a table, ◊ Position the cursor in the Content Definition pane at the desired
location within the document.◊ From the Table menu, select Create. The Create Table dialog box
opens.◊ Enter the Number of Rows and the Number of Columns.◊ Change the Table Tag Attributes, if desired, to change the size of the
border, cell padding, and cell spacing.◊ If desired, add Cell Tag Attributes, which allow you to specify a
string with HTML attributes to be included with every cell in the table.

414 Chapter 41 Publication Operations
HOW
DO
I
◊ Type a Caption, if desired. ◊ Click OK. You are returned to the HTML Document Editor.◊ You can enter text, document elements, or images into the table’s
cells.9. You can resize any item, except for static text, by clicking and dragging one of the item’s handles. You can also move any item, except for static text, by clicking on it and dragging it to the new position. 10. Click Save and Close. The Save HTML Document dialog box opens.11. Choose the directory in which to save the document. Enter a name for the new document and click Save.
Create an imported document from a new imported file
Follow this procedure to import a new file and then associate it with a document. If your file has already been imported, see the following topic:• Create an imported document from an existing imported file
Steps
1. Right-click anywhere in the Applications folder, point to New, then choose Document. The New Document dialog box opens.2. Double-click Imported Document. The Imported Document Editor dialog box opens.3. Select Create a new File object and click OK. The Import File dialog box opens.4. Enter a Name for the new file.5. The File Type is automatically set, but you can change it by selecting a File Type from the drop-down list.6. Click the browse button to locate the file. The Open dialog box opens.7. Select the file to be imported and click Open. You are returned to the Import File dialog box.8. Click OK. The Save As dialog box opens.

Create a new information object in a document 415
HOW
DO
I
9. Choose the directory in which to save the file. Enter a name and click Save. The Save Imported Document As dialog box opens.10. Choose the directory in which to save the document. Enter a name for the new document and click Save.
Create a new information object in a document
Steps
1. From the Insert menu, select New Information Object. The Select Information Source dialog box opens. 2. If you select a MicroStrategy information source, refer to one of the following How Do I... topics:
◊ Create a MicroStrategy content information object with personalized page execution
◊ Create a MicroStrategy content information object with personalized report execution
3. If this is an XML information object created for the MicroStrategy Information Source, an XSL stylesheet is automatically selected.Note: A document element is automatically created containing the new information object.4. You are returned to the document editor. 5. To change the stylesheet, double-click the document element (on the words “Document Element 1”or “Document Element 2”, for example, in the Document Element List frame). The Document Element Properties dialog box opens.6. Click Browse and select a different stylesheet file, then click OK to return to the document editor.7. To set error handling, double-click any of the error handling rules at the bottom of the Document Element pane. The Document Element Properties dialog box opens.8. Set the Error Handling Rules. For each type of error, choose whether to send an error or a text string you define.9. Click OK. You are returned to the document editor.

416 Chapter 41 Publication Operations
HOW
DO
I
Create a plain text document
Steps
1. Right-click anywhere in the Applications folder, point to New, then choose Document. The New Document dialog box opens.2. Double-click Plaintext Document. The Plaintext Document Editor opens.3. To add a static text item, type the text in the Content Definition pane.4. To add a dynamic text item, see the following How Do I...? topic:
◊ Add a dynamic text item to a document5. To create a new information object and add it to the document, see the following How Do I...? topic:
◊ Create a new information object in a document6. You can resize a document element by clicking and dragging one of the item’s handles. You can also move a document element by clicking on it and dragging it to the new position. 7. Click Save and Close. The Save Plaintext Document dialog box opens.8. Choose the directory in which to save the document. Enter a name for the new document and click Save.
Create a publication
Steps
1. Right-click anywhere in the Applications folder, point to New, then choose Publication. The Publication Wizard opens at the Welcome page.2. Read the introduction and click Next. The Name\Description page opens.3. Provide the following information:
◊ Publication name: Type a name for the new publication.◊ Publication description: Type a description, up to 5000 characters,
of the new publication.

Create a publication 417
HOW
DO
I
4. Click Next. The ITM Specification page opens.5. From the drop-down list, select the information transmission module (ITM) that will broadcast the service.Note: Once the publication has been saved, the ITM cannot be altered.6. Click Next. The Locale Specification page opens.7. From the drop-down list, select the Locale that this publication will support. Note: Once the publication has been saved, the locale cannot be altered.8. Click Next. The Device Specification page opens.9. From the Available list, select the devices to use and click Add to add them to the Selected list.10. Click Next. The Content Specification page opens.11. Select a document in the Available Documents browser on the left. The document sections to which it can be added become bold. To create a new document, click New to open the New Document dialog box and create a document. To edit an existing document, select it and click Edit to open the appropriate document editor.12. Select a Publication Section on the right to which to add this document. If the document-document section combination is valid, the Add button becomes available. Tip: Refer to the tips area at the bottom of the page for helpful information on the status of your selections.13. Click Add to assign the selected document to the selected section.14. To require a document to be in this publication before the publication will be sent, select the This document is required check box under the Document Sections tree. Note: If this option is chosen and the document cannot retrieve content from its information source or the formatting fails, the publication will not be sent.15. Continue to add documents to document sections until your publication is complete. The Next button will become available when all the ITM’s rules have been fulfilled.Tip: For a summary of the ITM’s rules, click Rules to access the Content Definition Rules dialog box.16. Click Next. The Summary page opens.

418 Chapter 41 Publication Operations
HOW
DO
I
17. Review the information and click Finish to create the new publication. The Save Publication dialog box opens.18. Choose the directory in which to save the publication. Enter a name for it and click Save.
Import a file
Steps
1. Right-click anywhere in the Applications folder, point to New, then choose Imported File. The Import File dialog box opens.2. Enter a Name for the new file.3. The File Type is automatically set, but you can change it by selecting a File Type from the drop-down list.4. Click the Browse button to locate the file. The Open dialog box opens.5. Select the file to be imported and click Open. You are returned to the Import File dialog box.6. Click OK. The Save As dialog box opens.7. Choose the directory in which to save the file. Enter a name and click Save.
Preview an HTML document in the HTML Document Editor
Step
From the View menu, select Preview. The Content Definition pane (on the right) now displays a preview of the HTML document. To return to editing, select Editor from the View menu.

Reimport a file to update it 419
HOW
DO
I
Reimport a file to update it
Steps
1. Double-click the file to reimport. The Import File dialog box opens.2. Click OK.
Note: You cannot change the File Type.
Select a locale for a documentThis applies to Excel, HTML, and plain text documents.
Steps
1. Create a new document (Excel, HTML, or plain text) or edit an existing document.2. In the document editor, select Properties from the File menu.3. In the Document Properties dialog box, select the locale that is appropriate for this document. System is the default locale.4. Click OK to return to the document editor.5. Click Save and close to return to the Narrowcast Administrator.
Select a stylesheet file for a documentThis applies to Excel, HTML, and plain text documents.
Steps
1. Create a new document (Excel, HTML, or plain text) or edit an existing document.2. In the document editor, double-click on a document element (on the words “Document Element 1”or “Document Element 2”, for example, in the Document Element List frame).

420 Chapter 41 Publication Operations
HOW
DO
I
3. In the Document Element Properties dialog box, click Browse and select the stylesheet file you want to use in this document.4. Click OK to return to the document editor.5. Click Save and close to return to the Narrowcast Administrator.
Specify error handling rules for a documentThis applies to Excel, HTML, and plain text documents, and also to PDF documents in Web subscription services.
Steps
1. Create a new document (Excel, HTML, or plain text) or edit an existing document.
Or edit a service containing a document. Go to the Message Contents page and double-click the document.
Note: For PDF documents in Web subscription services, the Document Properties dialog box opens at this point. Go to step 3.
2. In the document editor, select Properties from the File menu.3. In the Document-Level Error Handling section of the Document Properties dialog box, select Cancel this document if all selected information objects fail. Then select one of the following:
◊ All information objects: Select this check box to select all information objects in this document. The entire set of information objects must fail for error handling to apply to this document.
◊ One or more check boxes in the list of information objects. All the selected information objects must fail for error handling to apply to this document.
4. Select the appropriate check boxes to specify how to apply this error-handling rule:
◊ Return no data: Select to apply the rule for information objects that return no data.
◊ Return an error: Select to apply the rule for information objects that fail.
Specify error handling rules for a document element 421
HOW
DO
I
Note: One of these check boxes must be selected.5. Click OK to return to the document editor.6. Click Save and close to return to the Narrowcast Administrator.
Specify error handling rules for a document element
This applies to document elements in Excel, HTML, and plain text documents.
Steps
1. Create a new document (Excel, HTML, or plain text) or edit an existing document.2. In the document editor, double-click on a document element (on the words “Document Element 1”or “Document Element 2”, for example, in the Document Element List frame).3. In the Document Element Properties dialog box, select Fail the Document or Use String, as appropriate, for each error situation.4. For any situation where you selected Use String, enter the string to use in the Use String box.5. Click OK to return to the document editor.6. Click Save and close to return to the Narrowcast Administrator.
View an HTML document’s source code in the HTML Document Editor
Step
From the View menu, select Source. The Content Definition pane (on the right) now displays the HTML source code underlying the document.

422 Chapter 41 Publication Operations
HOW
DO
I
Note: You can copy and paste HTML source code from other applications into the HTML Document Editor in this view. To return to editing, select Editor from the View menu.
View object properties
Steps
1. Right-click the object and choose Properties from the menu. 2. Information on the Properties dialog box includes
◊ Type◊ Owner◊ Status (whether it is active, inactive, or invalid)◊ ID (the object identifier used by Narrowcast Server)◊ Creation Time◊ Modification Time◊ Description
View the results of XSL stylesheets applied to various reports
Steps
1. Determine which reports you want to use for stylesheet testing. If you plan to use reports with many different characteristics such as subtotals, thresholds, different arrangements of metrics and attributes in the rows and columns, and so on, select a representative sample of reports.2. Create a simple e-mail service containing one or more of the reports in an HTML message.3. Edit the document elements containing these reports and apply the MSTR7ToHTML-ReturnXML.xsl stylesheet.

View the results of XSL stylesheets applied to various reports 423
HOW
DO
I
4. Set the information transmitter used for this service to save messages to file only.5. Execute the service and edit the message that is saved to file.6. Copy the XML structures from this service and save to files with .xml extensions.7. From the Start menu, select Programs, MicroStrategy, Tools, and then XML Test Tool.8. In the XML window, click Load and then browse for one of the XML files that you created.9. In the XSL window, click Load and then browse for the stylesheet that you want to test.10. Click Transform and then View Source.11. Repeat steps 8 through 10 for as many reports (XML files) and XSL stylesheets as you want to test.

424 Chapter 41 Publication Operations
HOW
DO
I

42C H A P T E R 4 2
425
HOW
DO
I
Service Operations 42Add zipped documents to a service
This procedure begins on the <Delivery Method> Content page of the Service Wizard. For information on how to create a service using the Service Wizard, see the following How do I...? topic:• Create a service using the Service Wizard
Steps
1. On the Service Wizard - <Delivery Method> Content page, click Compression to open the Compression Properties dialog box.2. Select the content section to be zipped from the Section drop-down list.3. Enter the name or macro for the zip file to be produced in the File Name box. For more information on the use of macros, please see the Compression Properties dialog box topic in the Service Wizard chapter.4. To specify a password, select the Use Password check box and type a password in the Password box.5. Select the desired compression level from the Compression Level drop-down list.6. Click OK to save this information and return to the Service Wizard - <Delivery Method> Content page.
Note: The option to zip attachments is not available with the SMS (SMPP) delivery method.

426 Chapter 42 Service Operations
HOW
DO
I
Create a schedule
Steps
1. Right-click anywhere in the Applications folder, point to New, then choose Schedule. The Schedule Wizard opens at the Introduction page.2. Read the introduction and click Next. The Name/Description Entry page opens. 3. Enter the following information:
◊ Name: Type a name, up to 50 characters and not including \, for the new schedule.
◊ Description: Type a description, up to 5000 characters, of the new schedule.
4. Click Next. The Recurrence Pattern page opens.5. Select the Recurrence Pattern, or the interval on which the schedule will run:
◊ Daily: The service will run every x number of days or every weekday. ◊ Weekly: The service will run every x number of weeks for any given
days.◊ Monthly: The service will run any given day or date every x number
of months.◊ Yearly: The service will run any given day or date in any given
month on an annual basis.Tip: If you set a service to run yearly starting on February 29th, 2000, the next run date of the service will be February 28th, 2001, not March 1st, 2001. Similarly, a monthly service starting on March 31st results in a next execution date of April 30th, not May 1st. 6. Select a start date for the schedule. 7. Click Next. The Interval page opens.8. Select the time zone on which to base the service execution time. 9. Select how frequently your service will run during the day:
◊ Executes once a day: The service will run once a day at the specified time.
◊ Executes multiple times a day: The service will run multiple times at the specified interval between the selected start and end times.

Create a service using the Service Editor 427
HOW
DO
I
◊ Executes all day: The service will run all day at the specified interval.
10. Click Next. The Summary page opens.11. Review the summary information and click Finish to create the new schedule. The Save Schedule page opens.12. Choose the directory in which to save the new schedule. Enter a name for it, then click Save.
Create a service using the Service EditorThe Service Editor allows more flexibility than the Service Wizard. The Service Editor allows you to add multiple publications for a given information transmitter, allowing messages tailored specifically to sets of devices to be sent out when the service is executed.
Steps
1. Right-click anywhere in the Applications folder, point to New, then choose Service (Editor). The Service Editor opens at the Content tab.2. Select the Locale for which to define publications. 3. The Available Publications tree allows you to browse existing publications.
◊ To add a publication, select it in the Available Publications tree and click Add.
◊ To edit a publication, select it in the Available Publications tree and click Edit and use the Publication Wizard. Then click Add.
◊ To create a new publication, click New and use the Publication Wizard. Then click Add.
4. As publications are added, the Selected Publications grid lists them with their assigned priority. To reprioritize a publication, select it in the grid and click the up or down arrow next to the grid.5. As publications are added, they are also added on the corresponding row in the information transmitter/Device/Publications grid.

428 Chapter 42 Service Operations
HOW
DO
I
Note: If multiple publications use the same information transmitter and device, only the one with the highest priority is displayed in the information transmitter/Device/Publications grid. A subscriber receives the highest-priority publication with a locale and device that matches the locale and device defined in the subscription. An icon is displayed next to the publication to warn of a possible conflict.
6. The Subscription Sets and Schedules tab allows you to combine subscription sets and schedules to use for this service. First you need to select a subscription set.
◊ To add a subscription set, select it in the Available Schedules/Subscriptions browser and click Add.
◊ To edit a subscription set, select it in the Available Schedules/Subscriptions browser and click Edit to open the Static Subscription Set Editor or Dynamic Subscription Set Wizard and modify the subscription set. Then click Add.
◊ To create a new subscription set, click New and build the subscription set. Then click Add.
7. Select a schedule.◊ To add a schedule, select it in the Available
Schedules/Subscriptions browser and click Add. A green check appears when the pair is valid.
◊ To edit a schedule, select it in the Available Schedules/Subscriptions browser and click Edit. Then click Add. A green check appears when the pair is valid.
◊ To create a new schedule, click New and use the Schedule Wizard. Then click Add. A green check appears when the pair is valid.
Note: You cannot save the new service until your combined subscription sets and schedules are valid.
8. On the General Properties tab, you can change the Start Date by selecting the check box and choosing a date from the drop-down calendar. If you do not change the start date, the service begins today.9. You can change the End Date by selecting the check box and choosing a date from the drop-down calendar. If you do not change the end date, the service broadcasts indefinitely.

Create a service using the Service Wizard 429
HOW
DO
I
10. Set the Priority and Segment Size for the service.11. Enter a Description, up to 5000 characters long, for the service.12. On the Service Execution Timeout tab, select an expiration option:
◊ Never Time Out◊ Time Out at Specific Time, and enter the time and time zone◊ Offset Timeout from Service Execution Start, and enter the length
of time, in days, hours, or minutes, to run the service13. When you have completed all the tabs, click Save and Close on the toolbar. The Save Service dialog box opens.14. Choose the directory in which to save the new service. Enter a name for it, then click Save.
Create a service using the Service WizardThe Service Wizard guides you through the steps of creating a new service, including selecting a delivery method, developing documents with dynamic content, and defining a schedule and subscription set. The Service Wizard allows you to select as many delivery methods as are available in your system. The resulting service will support users using the system locale and all devices for the chosen delivery methods. To create a service with multiple publications for a given information transmitter, which can then support different sets of devices, use the Service Editor.
Steps
1. Right-click anywhere in the Applications folder, point to New, then choose Service (Wizard). The Service Wizard opens at the Welcome page. 2. Review the information and click Next. The Delivery Method page opens.3. Select one or more delivery methods for this service.4. Click Next. The first page of the Message Contents section opens. A list of pages to follow appears on the left, one for each delivery method chosen in the previous section.5. Click Next. A page appears for the delivery method selected first, with the name <Delivery Method> Content, where <Delivery Method> is the name of the delivery method.

430 Chapter 42 Service Operations
HOW
DO
I
6. Insert or create the necessary documents for this delivery method. Review the content definition rules to ensure that the correct content is added. Update error handling as desired.
Note: The delivery method will automatically default to sending the content to all devices for the selected information transmitter. To modify the set of devices (useful in the event a new device is added to the system), click the Devices and Locale button in the toolbar to open the Devices and Locale Support dialog box. The default locale for the delivery method can also be set in the Devices and Locale Support dialog box.
7. Click Next. If multiple delivery methods were chosen, a content page for the next delivery method selected opens.8. Repeat steps 6 and 7 as necessary.9. Click Next. The Subscriptions and Schedules page opens.10. Insert or create subscription sets and schedules as appropriate. Make sure that each subscription set has at least one schedule associated with it.11. Click Next. The Service Summary page opens.12. If any red text appears in the summary, click Back to return to the appropriate page and make any changes necessary.
Note: Service settings, such as the start date and execution settings, can be accessed by clicking Modify General Settings.For more information on modify general settings, see General Service Settings dialog box.
13. If no red text appears in the summary, click Finish.14. Choose the directory in which to save the new service. Enter a name for it, then click Save.

Modify a service to include or exclude report titles in the delivered reports 431
HOW
DO
I
Modify a service to include or exclude report titles in the delivered reports
By default, the reports delivered in the form of attached Excel files have the report title appearing in the first row of the Excel file. You can change this default behavior by editing the services that are used to deliver the reports (Excel file attachments).For reports subscribed through Narrowcast Server, edit the service that is used to deliver Excel file attachments:
Note: The steps listed below are applicable to services for both file and email deliveries.
1. Right-click the service and select Edit with Service Wizard. The Service Wizard opens.2. On the Message Contents tab, browse to the Excel file attachment.3. Right-click the Excel file attachment and select Edit. The Desktop Document Selector dialog box opens.4. Click Advanced Properties. The Advanced Properties dialog box opens.5. On the General tab, clear the Include report title check box and click OK to return to the Desktop Document Selector dialog box.6. Click OK to save the changes and return to the Service Wizard.7. Close the Service Wizard.
Note: For each project, supporting services are created in the Services for Web Deliveries folder in the Narrowcast Administrator Folder List.
To edit the service for Report Email Deliveries1. Right-click the supporting service for Report Email Deliveries and select Child dependencies. The Object child dependencies dialog box opens.

432 Chapter 42 Service Operations
HOW
DO
I
2. Expand Email (SMTP), expand Excel Attachment, right-click Information Object for Excel Reports for ProjectName, and select Edit. The Advanced Properties dialog box opens.3. On the General tab, clear the Include report title check box and click OK.4. Close the Object child dependencies dialog box.
To edit the service for Report File Deliveries1. Right-click the supporting service for Report File Deliveries and select Child dependencies. The Object child dependencies dialog box opens.2. Expand File Publication, expand Excel Document, right-click Information Object for Excel Reports for ProjectName, and select Edit. The Advanced Properties dialog box opens.3. On the General tab, clear the Include report title check box and click OK.4. Close the Object child dependencies dialog box.
Modify the schedule queue parameters
Steps
1. Select Scheduled Services in the Administration folder. 2. Click the Set Queue Parameters icon. The Modify Schedule Queue Parameters dialog box opens.3. Select the number and unit of measure to set how far into the future the service queue shows service executions.4. Select the Maximum scheduled executions to display, up to 999. 5. Click OK.

Run a service immediately 433
HOW
DO
I
Run a service immediately
Steps
1. Select the service to run.2. Click Run Immediately in the toolbar.3. If the system is not currently running, a message box opens. Click Yes to start the server. 4. If the system is out of compliance with respect to CPU usage, a message appears. Refer to the MicroStrategy Narrowcast Server System Administrator Guide, chapter 3, Configuring Machines, Clustering section, for more information.5. If the service has only one distribution set, the service runs automatically using it.
6. If the service has multiple distribution sets, the Choose Subscription Sets dialog box opens. Select the subscription sets to use from the list. Click OK to run the service.7. If the service has no distribution sets associated with it, a message box opens allowing you to browse for a subscription set. Click Yes to open a browser to find one. Select the subscription set to use and click OK to run the service.
View scheduled services
Steps
1. Double-click the Administration folder to open it.2. Click the Scheduled Services object in the object browser folder list. Services scheduled to execute the soonest appear in the object browser folder contents window. The services shown depend on the service queue parameters specified.

434 Chapter 42 Service Operations
HOW
DO
I
Note: The information displayed is only a snapshot of the upcoming services to be executed. Since the listing is not dynamic and does not update to reflect recently executed services, it must be refreshed whenever an accurate list of upcoming services is needed. However, the listing is automatically updated whenever a service is activated or deactivated in the object browser.

43C H A P T E R 4 3
435
HOW
DO
I
Service Configuration Operations 43Configure a dynamic subscription set
Steps
1. In the Services Configuration section, on the Welcome page, review the Default Service Configuration settings.
2. Click Next.Note: If you have already configured one or more services, proceed with the following steps. If you have not configured any services, skip step 3 and proceed directly to step 4.3. On the Services page, click the Configure another service link.4. Navigate through the folders until you locate the application object that represents the service to be configured. Select the object and click Next to proceed to the Static Subscriptions page.5. Click Next to proceed to the Dynamic Subscriptions page.6. Select a subscription set and click configure.
Note: ◊ You can choose either to configure dynamic subscription sets
individually or to define a single configuration to blanket all dynamic subscription sets. If you wish to configure dynamic subscription sets individually, click the configure link next to the subscription set you wish to configure. To create a single configuration, select the configure link available under the Configure dynamic subscription sets default option.
◊ If you configure the default dynamic subscription set configuration, you can configure individual dynamic subscription sets as well. The individual configurations overwrite the default settings for the specific subscription set it is being configured for.

436 Chapter 43 Service Configuration Operations
HOW
DO
I
7. Set the options for the page-by questions.8. Click Next.9. Select the warehouse and tables in which you want to store the subscriptions for the selected subscription set. Click Next.10. Map the subscription information to the database tables. Click Next.11. Repeat steps 6 through 10 for all dynamic subscription sets you wish to configure.12. Having configured all dynamic subscriptions sets, click Next to return to the Configured Services page.
Configure page-by questions for dynamic subscription sets
Steps
1. In the Services Configuration section, on the Welcome page, review the Default Service Configuration settings.2. Click Next.
Note: If you have already configured one or more services, proceed with the following steps. If you have not configured any services, skip step 3 and proceed directly to step 4.
3. On the Services page, click the Configure another service link.4. Navigate through the folders until you locate the application object that represents the service to be configured. Select the object and click Next to proceed to the Dynamic Subscriptions page.5. Click the configure link next to the dynamic subscription set to be configured.6. Select the answer to be used for each page-by question.Note: For each question for which you choose “answer to another question,” you need to select an alternative question by following the steps described in Select an alternate question.
Configure page-by questions for static subscription sets 437
HOW
DO
I
7. Configure any additional questions you want the user to answer when creating a subscription (optional).8. Proceed with mapping the subscription information to the data warehouse tables.
Configure page-by questions for static subscription sets
Steps
1. In the Services Configuration section, on the Welcome page, review the Default Service Configuration settings.2. Click Next.
Note: If you have already configured one or more services, proceed with the following steps. If you have not configured any services, skip step 3 and proceed directly to step 4.
3. On the Services page, click the Configure another service link.4. Navigate through the folders until you locate the application object that represents the service to be configured. Select the object and click Next to proceed to the Static Subscriptions page.5. Click the configure link in the Static subscription sets default settings.6. Select the answer to be used for each page-by question.Note: For each question for which you choose “answer to another question,” you need to select an alternative question by following the steps described in Select an alternate question.7. Configure any additional questions you want the user to answer when creating a subscription (optional).8. Click Next to proceed to the Configure Dynamic Subscription Sets page.

438 Chapter 43 Service Configuration Operations
HOW
DO
I
Map dynamic subscription information to data warehouse tables
Steps
1. In the Services Configuration section, on the Select Columns page, select one or more general components and drag them each to one of the table columns on the right.
Note: ◊ The general components include all of the standard subscription
fields, including Subscription_ID, User_ID and Preference_ID. ◊ Subscription_ID must be included in every table.◊ Every time a subscription is created, Subscription Portal creates a
new Subscription ID, which is unique to the subscription.
2. Select one or more question components and drag them each to one of the table columns on the right.Note: A question component is the answer ID for each question in the service. 3. If desired, create a custom value by typing the name of the value in the custom value box. Select the desired custom value component and drag it to the desired table column and release.Note: Custom values allow you to write a constant value into warehouse tables each time data is inserted.

Map question object information to data warehouse tables 439
HOW
DO
I
Map question object information to data warehouse tables
Steps
1. In the Services Configuration section, on the Select Columns page, enter a name you want to use to save this storage mapping.Notes:
◊ The name of the storage mapping is initially generated from the list of tables for this data warehouse as shown in the Select Tables page.
◊ Storage mapping names cannot contain spaces. Use underscores instead of spaces; for example, Subscription_Stocks_Two.
2. Select one or more general components and drag each of them to one of the table columns on the right.
Important: ◊ General components include Subscription_ID, User_ID and
Preference_ID. A general component provides a reference to the Subscription Book Repository for the prompts.
◊ Either Subscription_ID or Preference_ID has to be included in every table.
◊ Every time the question is answered it creates a new Preference ID, which will be unique to the subscription.
3. Select one or more question components and drag each of them to one of the table columns on the right.Note: A question component is either the answer value for each prompt or the answer ID of the question.4. If desired, create a custom value by typing the name of the value in the custom value box. Select the desired custom value component and drag it to the desired table column and release.Note: Custom values allow you to write a constant value into warehouse tables each time data is inserted.

440 Chapter 43 Service Configuration Operations
HOW
DO
I
Select an alternate questionSteps
1. In the Services Configuration section, on the Select Question page, browse through the folders to find the application object that corresponds to the question you want to use to prompt users when they subscribe to this service. 2. Select the question object and click Next. 3. Select whether you would like to store the answers to this question in the Subscription Book Repository or in a warehouse. 4. To store the answers in a warehouse, you can either select an existing storage mapping that has previously been created for this question object, or you can create a new storage mapping. 5. Continue with the steps to Select tables for question mappings and subscription mappings and Map question object information to data warehouse tables and return to this screen 6. Click Next to finish the process of selecting the alternative question.
Select tables for question mappings and subscription mappings
Steps
1. In the Services Configuration section, on the Select Tables page, select the data warehouse from the drop-down list.2. Click Refresh to refresh the list of available tables associated with the selected data warehouse.3. Highlight the tables to be used from the Available Tables list.4. Using the toggle switches, move the tables to the left and right until all the desired tables are present in the Selected Tables box.

Select tables for question mappings and subscription mappings 441
HOW
DO
I
Note: You can use the Filter table names box to restrict the list of tables names that is returned. You must use the percent (%) sign after the letter, that is, a%, to return all entries beginning with that letter or series of letters.
←

442 Chapter 43 Service Configuration Operations
HOW
DO
I
44C H A P T E R 4 4
443
HOW
DO
I
Site Operations 44Add a new site definition
Steps
1. In the Site Management section, on the Site Definition page, click Add a new site definition.
2. Type a Name for the site definition.3. Type a Description of the site.4. Click Next.5. Select the database connection where the Object Repository is stored.6. Enter the table prefix for the Object Repository.7. Select the Use same database connection for the Subscription Book Repository check box. Click Next.
Note: If the Subscription Book Repository is in a different location, clear the check box and click Next. On the Subscription Book Repository page, enter the database connection where the Subscription Book Repository (SBR) is stored and the table prefix for the SBR.

444 Chapter 44 Site Operations
HOW
DO
I
Configure a different Subscription PortalThis changes the Subscription Portal that you are configuring.
Steps
1. In the Site Management section, on the Site Definition page, click the link labeled click here.2. Choose the button next to the portal to be configured.3. Click OK.
Create a new Subscription PortalThis creates a new virtual directory through which a site definition can be made available to end users.
Steps
1. In the Site Management section, on the Site Definition page, click the link labeled click here.2. Specify the new portal name.3. Click Create New Portal.
Delete a site definitionSteps
1. In the Site Management section, on the Site Definition page, select a site from the list.2. Click Delete.3. At the confirmation window click OK.

Delete a Subscription Portal 445
HOW
DO
I
Delete a Subscription PortalThis removes a virtual directory without modifying the definition of the site.
Steps
1. In the Site Management section, on the Site Definition page, click the link labeled click here.2. Select a portal from the list.3. Click Delete.4. At the confirmation window click Yes.
Edit a site definitionSteps
1. In the Site Management section, on the Site Definition page, select a site from the list.2. Click Edit.3. Edit the Name and Description boxes.4. Click Next.5. Select the Object Repository.6. Click Next.7. Select the Subscription Book Repository.

446 Chapter 44 Site Operations
HOW
DO
I
45C H A P T E R 4 5
447
HOW
DO
I
Subscription Book Operations 45Add an address to the Subscription Book
Steps
1. Launch the Narrowcast Administrator console.2. From the Tools menu, select Open Subscription Book.3. Select the user for whom you want to add a new address.4. From the Edit menu, select New Address. The User Properties Editor - Addresses tab opens.5. Click New Address.6. Enter a name for the address, which appears in the Available Addresses list.7. Enter the actual address to which messages will be sent in the Physical Address box.8. Enter a display for the address in the Address Display box.9. Select a delivery method from the list in the Delivery Method box.10. Select a device from the list in the Device box.11. Click Advanced Properties to specify additional address properties.12. If this is going to be the default address, select the Set this address as default check box. Each user can have a default address.13. To activate this address, select the Activate this address check box.14. To specify an expiration date, select the Expire this address on check box and choose a date.15. To change the delivery window start time, select from the list in the Start box.16. To change the delivery window end time, select from the list in the End box.

448 Chapter 45 Subscription Book Operations
HOW
DO
I
17. To change the time zone, select from the list in the Time Zone box.18. To add a Personal Identification Number for this address, enter a number in the Enter PIN box. Enter the same number to confirm the PIN in the Confirm PIN box.19. Click OK to save your changes and return to the Addresses tab.20. Click OK to finish and return to the Subscription Book Editor. You might not see the new address if the filter being applied to the list excludes it.21. From the Subscription Book menu, select Exit to return to the Narrowcast Administrator console.
Add a user to the Subscription Book
Steps
1. Launch the Narrowcast Administrator console.2. From the Tools menu, select Open Subscription Book.3. On the toolbar, click New User.4. On the Login tab, enter a login ID for the user in the Login ID box.5. To specify password information for this user, enter a password in the Enter Password and Confirm Password boxes.6. To provide a password hint for the user, enter text in the Hint box.7. Click Advanced Properties to specify additional user properties.8. Select a locale from the list in the Select locale box or use the default suggested.9. To deactivate this user, clear the Activate this user check box.10. To specify an expiration date, select the Expire this user on check box and choose a date.11. Click OK to save your changes and return to the Login tab.12. To add an address for this user, click the Addresses tab. See Add an address to the Subscription Book.13. To specify preference personalization settings, click the Preference tab. See Add preference personalization to a user in the Subscription Book.

Add authentication and security personalization to a user in the Subscription Book 449
HOW
DO
I
14. To specify authentication and security personalization settings, click the Authentication and Security tab. See Add authentication and security personalization to a user in the Subscription Book.15. To add user-specific information, click the User Information tab.16. Click OK to finish and return to the Subscription Book Editor. You might not see the new user if the filter being applied excludes it.17. From the Subscription Book menu, select Exit to return to the Narrowcast Administrator console.
Add authentication and security personalization to a user in the Subscription Book
Steps
1. Launch the Narrowcast Administrator console.2. From the Tools menu, select Open Subscription Book.3. Double-click the user you want to modify, or create a new user. The User Properties Editor opens.4. Click the Authentication and Security tab.5. To add authentication personalization for this user, select an information source in the Authentication table and click Define. If you selected the MicroStrategy 7 Information Source, the Login Information dialog box opens.6. Type the MicroStrategy user login and password for the selected information source.7. Click OK to finish and return to the User Properties - Authentication and Security tab.8. To add security personalization for this user, select an information source in the Security table and click Define. If you selected the MicroStrategy 7 Information Source, the Prompt Resolution Wizard opens.9. Make the appropriate selections and click Next to go to the next page of the wizard.

450 Chapter 45 Subscription Book Operations
HOW
DO
I
10. Make the appropriate selections and click Finish. The wizard closes and you are returned to the User Properties - Authentication and Security tab.11. Click OK to finish and return to the Subscription Book Editor.12. From the Subscription Book menu, select Exit to return to the Narrowcast Administrator console.
Add preference personalization to a user in the Subscription Book
Steps
1. Launch the Narrowcast Administrator console.2. From the Tools menu, select Open Subscription Book.3. Double-click the user you want to modify, or create a new user. The User Properties Editor opens.4. Click the Preference tab.5. In the User Preference column next to the information object or question object for which you want to specify a user preference, select Create to add a new user preference. The User Preference Editor opens.6. Give the user preference a name and description.7. To use this user preference as the user-level preference for this question object, select the Use this profile as the default check box.8. Click Answer to specify a preference. The Prompt Resolution Wizard opens.9. Make the appropriate selections and click Next to go to the next page of the wizard.10. Make the appropriate selections and click Finish. The wizard closes and you are returned to the User Preference Editor.11. Click OK to save and return to the User Properties - Preference tab.12. Repeat steps 4 through 11 for each information object or question object you want to answer for this user.

Delete an address from the Subscription Book 451
HOW
DO
I
13. Click OK to finish and return to the Subscription Book Editor.14. From the Subscription Book menu, select Exit to return to the Narrowcast Administrator console.
Delete an address from the Subscription Book
Steps
1. Launch the Narrowcast Administrator console.2. From the Tools menu, select Open Subscription Book.3. Select the address you want to delete.4. From the Edit menu, select Delete Addresses.
5. In the Confirm Deletion of address(es) dialog box, click Yes to complete the deletion.6. From the Subscription Book menu, select Exit to return to the Narrowcast Administrator console.
Important: Deleting an address deletes all subscriptions for that address.
Delete a user from the Subscription Book
Steps
1. Launch the Narrowcast Administrator console.2. From the Tools menu, select Open Subscription Book.3. Highlight the user you want to delete.4. On the toolbar, click Delete Users.5. In the Confirm Deletion of user(s) dialog box, click Yes to complete the deletion.

452 Chapter 45 Subscription Book Operations
HOW
DO
I
6. From the Subscription Book menu, select Exit to return to the Narrowcast Administrator console.
Important: Deleting a user deletes all addresses and subscriptions belonging to that user.
Edit an address in the Subscription Book
Steps
1. Launch the Narrowcast Administrator console.2. From the Tools menu, select Open Subscription Book.3. Select the address you want to edit.4. From the Edit menu, select Edit.5. Click the Addresses tab.6. From the Selected Address list, select the address you want to modify.7. Modify the information as needed.8. Click OK to finish and return to the Subscription Book Editor.9. From the Subscription Book menu, select Exit to return to the Narrowcast Administrator console.
Edit a user in the Subscription Book
Steps
1. Launch the Narrowcast Administrator console.2. From the Tools menu, select Open Subscription Book.3. Select the user you want to edit.4. From the Edit menu, select Edit.5. Modify the information on each tab as needed.

Import user and address attributes 453
HOW
DO
I
6. Click OK to finish and return to the Subscription Book Editor.7. From the Subscription Book menu, select Exit to return to the Narrowcast Administrator console.
Warning: Do not change the password of a MicroStrategy user stored in the Subscription Book Repository. When a MicroStrategy user subscribes to a report or document from MicroStrategy Web, the user is stored in the Narrowcast Server Subscription Book Repository. The Login ID of the MicroStrategy user is stored in the form of UserName(GUID), for example, Edward Perryman(28ECA8CF11D5188EC000E9ABCA1B1A4F). The GUID associated with the user name helps you distinguish MicroStrategy users from the Narrowcast Server users.
Import user and address attributes
Steps
1. Launch the Narrowcast Administrator console.2. From the Tools menu, select Synchronize Subscription Data. The Subscription Book Synchronization Wizard opens at the Welcome page.3. Click Next to go to the Synchronization Options page.4. Select the synchronization type.5. Select the synchronization source file format. 6. Specify the synchronization source file location.7. For delimited files, make additional selections as appropriate.8. If comma separated value (CSV) file, specify which column contains the distinguished name.9. Click Synchronization Settings. The Synchronization Settings dialog box opens.10. On the Synchronization Process tab, select the appropriate option under User Settings.11. Select the appropriate option under Address Settings.

454 Chapter 45 Subscription Book Operations
HOW
DO
I
12. Click OK to return to the Subscription Book Synchronization Wizard.13. Click Next to go to the User and Address Properties page.14. Select a source file attribute to use for the User Name property (required).15. Select source file attributes to use for the other user properties, as desired.16. Select the Enable Smart User Remapping check box, if desired.17. Select an address mapping from the Address Mapping drop-down list or click New Address Mapping to create a new address mapping.18. Select source file attributes to use for the Address Name, Physical Address, and Address Display properties (required).19. Select source file attributes to use for the other address properties, as desired.20. Click Next to go to the User Addition or Mapping page. 21. To add, exclude, and remap new users, choose from the following:
◊ To add all the users to the Subscription Book, do nothing; leave them in the Add Users table.
◊ To exclude any users in the import file from being added to the Subscription Book, highlight and move them to the Do Not Add Users table.
◊ To make new users available for mapping to existing Subscription Book users, highlight and move them to the Make Users Available for Mapping table.
22. Click Next to go to the Users Removal or Mapping page.23. To remove, keep, or remap existing users, choose from the following:
◊ To remove all existing users from the Subscription Book, do nothing; leave them in the Remove Users table.
◊ To keep existing Subscription Book users, highlight and move them to the Do Not Remove Users table.
◊ To map existing Subscription Book users to new users available for mapping, highlight and move them to the User Mappings table. Then select a new user from the drop-down list in the New Users column for each existing user.
24. Click Next to go to the Review Changes page.

Import user authentication 455
HOW
DO
I
25. Review the information and click Next to run the synchronization and go to the Finish page.26. Click Finish to return to the Narrowcast Administrator console.
Import user authentication
Steps
1. Launch the Narrowcast Administrator console.2. From the Tools menu, select Synchronize Subscription Data. The Subscription Book Synchronization Wizard opens at the Welcome page.3. Click Next to go to the Synchronization Options page.4. Select the synchronization type.5. Select the synchronization source file format. 6. Specify the synchronization source file location.7. For delimited files, make additional selections as appropriate.8. Click Synchronize Settings. The Synchronization Settings dialog box opens.9. On the Synchronization Process tab, under User Settings, select Do Not Add/Remove/Remap Users; Don’t Update Existing Users.10. Under Address Settings, select Do Not Update Mapped Addresses; Preserve Unmapped Addresses.11. Under Subscription Settings, select Do Not Subscribe Addresses.12. Under Preference Settings, select Do Not Create Preferences.13. Under Authentication Settings, select Define Information Source Authentication.14. Under Security Settings, select Do Not Define Information Source Security.15. Click OK to return to the Subscription Book Synchronization Wizard.16. Click Next to go to the Authentication page.17. Select an import file attribute to use for each information source.18. Click Next to go to the Review page.

456 Chapter 45 Subscription Book Operations
HOW
DO
I
19. Review the information and click Next to run the synchronization and go to the Finish page.20. Click Finish to return to the Narrowcast Administrator console.
Import user preferences
Steps
1. Launch the Narrowcast Administrator console.2. From the Tools menu, select Synchronize Subscription Data. The Subscription Book Synchronization Wizard opens at the Welcome page.3. Click Next to go to the Synchronization Options page.4. Select the synchronization type.5. Select the synchronization source file format. 6. Specify the synchronization source file location.7. For delimited files, make additional selections as appropriate.8. Click Synchronize Settings. The Synchronization Settings dialog box opens.9. On the Synchronization Process tab, under User Settings, select Do Not Add/Remove/Remap Users; Don’t Update Existing Users.10. Under Address Settings, select Do Not Update Mapped Addresses; Preserve Unmapped Addresses.11. Under Subscription Settings, select Do Not Subscribe Addresses.12. Under Preference Settings, select one of the following:
◊ Create Preferences, Preserve Unmapped Preferences to create preferences as indicated in the synchronization source file and preserve existing preferences for all other information objects and question objects
◊ Create Preferences, Delete Unmapped Preferences to create preferences as indicated in the synchronization source file and delete existing preferences for all other information objects and question objects
13. Under Authentication Settings, select Do Not Define Information Source Authentication.

Import user security 457
HOW
DO
I
14. Under Security Settings, select Do Not Define Information Source Security.15. Click OK to return to the Subscription Book Synchronization Wizard.16. Click Next to go to the Preferences page.17. Select an import file attribute to use for each question object.18. Click Next to go to the Review page.19. Review the information and click Next to run the synchronization and go to the Finish page.20. Click Finish to return to the Narrowcast Administrator console.
Import user security
Steps
1. Launch the Narrowcast Administrator console.2. From the Tools menu, select Synchronize Subscription Data. The Subscription Book Synchronization Wizard opens at the Welcome page.3. Click Next to go to the Synchronization Options page.4. Select the synchronization type.5. Select the synchronization source file format. 6. Specify the synchronization source file location.7. For delimited files, make additional selections as appropriate.8. Click Synchronize Settings. The Synchronization Settings dialog box opens.9. On the Synchronization Process tab, under User Settings, select Do Not Add/Remove/Remap Users; Don’t Update Existing Users.10. Under Address Settings, select Do Not Update Mapped Addresses; Preserve Unmapped Addresses.11. Under Subscription Settings, select Do Not Subscribe Addresses.12. Under Preference Settings, select Do Not Create Preferences.13. Under Authentication Settings, select Do Not Define Information Source Authentication.

458 Chapter 45 Subscription Book Operations
HOW
DO
I
14. Under Security Settings, select Define Information Source Security.15. Click OK to return to the Subscription Book Synchronization Wizard.16. Click Next to go to the Security page.17. Select an import file attribute to use for each information source.18. Click Next to go to the Review page.19. Review the information and click Next to run the synchronization and go to the Finish page.20. Click Finish to return to the Narrowcast Administrator console.
Import user subscriptions
Steps
1. Launch the Narrowcast Administrator console.2. From the Tools menu, select Synchronize Subscription Data. The Subscription Book Synchronization Wizard opens at the Welcome page.3. Click Next to go to the Synchronization Options page.4. Select the synchronization type.5. Select the synchronization source file format. 6. Specify the synchronization source file location.7. For delimited files, make additional selections as appropriate.8. Click Synchronize Settings. The Synchronization Settings dialog box opens.9. On the Synchronization Process tab, under User Settings, select Do Not Add/Remove/Remap Users; Don’t Update Existing Users.10. Under Address Settings, select Do Not Update Mapped Addresses; Preserve Unmapped Addresses.11. Under Subscription Settings, select one of the following:
◊ Subscribe Addresses, Delete Unmapped Subscriptions to subscribe addresses as indicated in the synchronization source file and delete existing subscriptions for these addresses

Set governing limits for users and addresses 459
HOW
DO
I
◊ Subscribe Addresses, Preserve Unmapped Subscriptions to subscribe addresses as indicated in the synchronization source file and preserve existing subscriptions for these addresses
12. Under Preference Settings, select Do Not Create Preferences.13. Under Authentication Settings, select Do Not Define Information Source Authentication.14. Under Security Settings, select Do Not Define Information Source Security.15. Click OK to return to the Subscription Book Synchronization Wizard.16. Click Next to go to the Subscriptions page to define subscriptions for the available address mappings.17. Select an address mapping.18. For each subscription set listed, select which synchronization file attribute to use to determine whether the selected address mapping should be included in the subscription set.19. In the third column, enter a value to indicate that the selected address mapping should be subscribed to this subscription set.20. Click Next to go to the Review page.21. Review the information and click Next to run the synchronization and go to the Finish page.22. Click Finish to return to the Narrowcast Administrator console.
Set governing limits for users and addresses
Steps
1. Launch the Narrowcast Administrator console.2. From the Tools menu, select Open Subscription Book.3. From the Tools menu, select Filter and governing editor. The Filter editor and governing settings dialog box opens.4. In the Subscription Book section, specify the maximum number of users and addresses to retrieve for the Subscription Book.5. Click OK to finish and return to the Subscription Book Editor.

460 Chapter 45 Subscription Book Operations
HOW
DO
I
6. From the Subscription Book menu, select Exit to return to the Narrowcast Administrator console.
Synchronize users
Steps
1. Launch the Narrowcast Administrator console.2. From the Tools menu, select Synchronize Subscription Data. The Subscription Book Synchronization Wizard opens at the Welcome page.3. Click Next to go to the Synchronization Options page.4. Select the synchronization type.5. Select the synchronization source file format. 6. Specify the synchronization source file location.7. For delimited files, make additional selections as appropriate.8. Click Synchronize Settings. The Synchronization Settings dialog box opens.9. On the Synchronization Process tab, select the appropriate option under User Settings.10. Click OK to return to the Subscription Book Synchronization Wizard.11. Click Next to go to the User and Address Properties page.12. Select an import file attribute to use for the User Name property (this is required).13. Select import file attributes to use for the other properties, as desired.14. Select the Enable Smart User Remapping check box, if desired.15. Click Next to go to the User Addition or Mapping page. 16. To add, exclude, and remap new users, choose from the following:
◊ To add all the users to the Subscription Book, do nothing; leave them in the Add Users table.
◊ To exclude any users in the import file from being added to the Subscription Book, highlight and move them to the Do Not Add Users table.
Synchronize users 461
HOW
DO
I
◊ To make new users available for mapping to existing Subscription Book users, highlight and move them to the Make Users Available for Mapping table.
17. Click Next to go to the User Removal or Mapping page.18. To remove, keep, or remap existing users, choose from the following:
◊ To remove all existing users from the Subscription Book, do nothing; leave them in the Remove Users table.
◊ To keep existing Subscription Book users, highlight and move them to the Do Not Remove Users table.
◊ To map existing Subscription Book users to new users available for mapping, highlight and move them to the User Mappings table. Then select a new user from the drop-down list in the New Users column for each existing user.
19. Click Next to go to the Review page.
20. Review the information and click Next to run the synchronization and go to the Finish page.21. Click Finish to return to the Narrowcast Administrator console.

462 Chapter 45 Subscription Book Operations
HOW
DO
I

46C H A P T E R 4 6
463
HOW
DO
I
Subscription Set Operations 46Activate or deactivate a subscription
Steps
1. In the Static Subscription Set Editor, select a subscription in the Subscription Set box, then select Edit from the Edit menu.2. Click the Status tab.3. In the Subscription Properties - Status tab, select or clear the Activate this subscription check box.4. Click OK to save your changes and return to the Static Subscription Set Editor.
Add a subscription to a subscription set
Steps
1. In the Static Subscription Set Editor, select the address in the Addresses in Subscription Book pane you want to add to the subscription set. An address can be added to the same subscription set more than once, and personalization can be set for each address.2. Click Subscribe Addresses. You may not see the subscription you added if your filter excludes it.

464 Chapter 46 Subscription Set Operations
HOW
DO
I
Add SQL statements to be executed after service execution is completed
Steps
1. In the Static Subscription Set Editor, select Subscription Set Properties from the Edit menu.ORIn the Dynamic Subscription Set Wizard, on the Subscription Set Properties page, click Define.2. In the Subscription Set Properties dialog box, click the Post-execution SQL Specification tab.3. Click Add to display the SQL Statements dialog box.
4. Enter or specify the information as needed.5. Click OK to return to the Post-Execution SQL Specification tab. The new SQL statement appears in the list.6. Click OK to return to the Static Subscription Set Editor or the Dynamic Subscription Set Wizard.
Add SQL statements to be executed before segmentation occurs
Steps
1. In the Static Subscription Set Editor, select Subscription Set Properties from the Edit menu.ORIn the Dynamic Subscription Set Wizard, on the Subscription Set Properties page, click Define.2. In the Subscription Set Properties dialog box, click the Pre-execution SQL Specification tab.3. Click Add to display the SQL Statements dialog box.4. Enter or specify the information as needed.

Create a dynamic subscription set 465
HOW
DO
I
5. Click OK to return to the Pre-execution SQL Specification tab. The new SQL statement appears in the list.6. Click OK to return to the Static Subscription Set Editor or the Dynamic Subscription Set Wizard.
Create a dynamic subscription set
Steps
1. In Narrowcast Administrator, right-click the Applications folder, select New, then select Subscription Set. The Subscription dialog box opens.2. Select Dynamic Subscription Set and click OK. The Dynamic Subscription Set Wizard opens.3. On the Introduction page, click Next.4. On the Name and Description page, enter a name for the subscription set and a description (optional). Click Next.5. On the Subscription Selection page, select the information object to be used for subscription and click Next.Advanced option: provide a segmented information object. If this is clicked, you will go to step 6. Otherwise, you will advance to step 7.6. On the Segmentation Selection page, select the information object to be used for segmentation and click Next. (optional - advanced)7. On the Pre- and Post-SQL specification page, if desired, click Define to display the Pre- and Post-SQL specification dialog box. (See Add SQL statements to be executed before segmentation occurs and Add SQL statements to be executed after service execution is completed.) Click Next.8. On the Summary page, review the information and click Finish to display the Save Subscription Set dialog box.9. Type a name for the subscription set and select a folder to save it in.10. Click Save to return to Narrowcast Administrator.

466 Chapter 46 Subscription Set Operations
HOW
DO
I
Create a static subscription set
Steps
1. In the Narrowcast Administrator console, right-click the Applications folder, select New, then select Subscription Set. The Subscription dialog box opens.2. Select Static Subscription Set and click OK. The Static Subscription Set Editor opens.3. Add subscriptions as needed (see Add a subscription to a subscription set).4. Add pre- and post-SQL statements as needed. See the following topics for more information:
◊ Add SQL statements to be executed before segmentation occurs◊ Add SQL statements to be executed after service execution is
completed5. Click Save and Close to display the Save Subscription Set dialog box.6. Type a name for the subscription set and select a folder to save it in.7. Click Save to return to the Narrowcast Administrator console.
Delete a subscription from a subscription set
Steps
1. In the Subscriptions in Subscription Set pane of the Static Subscription Set Editor, select the subscription you want to delete.2. Click Delete Subscriptions.

Delete a subscription set 467
HOW
DO
I
Delete a subscription set
Steps
1. In the Narrowcast Administrator console, open the Applications folder.2. Browse to find the subscription set you want to delete.3. Right-click the subscription set and select Delete.4. In the Confirm Object Delete dialog box, click Yes.
Enable send now delivery
Steps
1. In Static Subscription Set Editor, select Subscription Set Properties from the Edit menu.2. In the Subscription Set Properties dialog box, click the Send Now tab.3. Select the Enable send now delivery check box to enable one-time immediate delivery similar to Send Now in MicroStrategy Web. By default, this check box is cleared.
Note: The subscription set, which has the Enable send now delivery check box selected should be used only with a schedule that has the On Demand Schedule property enabled. Otherwise, it can result in slower performance due to loading of the service.
4. Click OK to return to Static Subscription Set Editor.

468 Chapter 46 Subscription Set Operations
HOW
DO
I
Modify the subscription preferences for each information source
Steps
1. In the Static Subscription Set Editor, select a subscription in the Subscription Set box (the right-hand pane), then select Edit from the Edit menu.2. In the Subscription Properties - Preference tab, select the question object for which you want to modify the subscription’s preferences.3. In the Preference Applied drop-down list, select from the following options:
◊ Select a user preference to use as the preference for this personalized object.
◊ Select [default user preference] to use the default user preference for this personalized object.
◊ Select Define Subscription Preference to create an “on-the-fly” preference for this personalized object.
If you selected either a user preference or [default user preference], continue with step 7.
If you selected Define Subscription Preference from the Profile drop-down list, the Prompt Resolution Wizard opens.4. In the Prompt Resolution Wizard, make the appropriate selections and click Next to go to the next page.5. Make the appropriate selections and click Finish. The Prompt Resolution Wizard closes and you are returned to the Subscription Properties - Preference tab.6. Repeat steps 3 through 5 for as many personalized objects as desired.7. To remove preferences from a personalized object, select the appropriate personalized object and select [default user preference] from the drop-down list.

Modify transmission properties regarding address display 469
HOW
DO
I
8. To modify a personalized object, select the appropriate personalized object and select the appropriate option in the drop-down list.
If the selected personalized object belongs to a MicroStrategy Information Source and you selected Define Subscription Preference, the Prompt Resolution Wizard opens.
If you selected any other option, continue with step 11.9. In the Prompt Resolution Wizard, make the appropriate selections and click Next to go to the next page.10. Make the appropriate selections and click Finish. The Prompt Resolution Wizard closes and you are returned to the Subscription Properties - Preference tab.11. Click OK to finish and return to the Static Subscription Set Editor.
Modify transmission properties regarding address display
Steps
1. In the Static Subscription Set Editor, select a subscription in the Subscription Set box (top pane), then select Edit from the Edit menu.2. Click the Transmission tab.3. In the Subscription Properties - Transmission tab, select the appropriate properties. 4. For the e-mail transmitter, select To:, CC:, or BCC:.
Note: There are no subscription-level properties for the SMS (SMPP) ITM or the Web (Portal) ITM.
5. Click OK to save your changes and return to the Static Subscription Set Editor.
470 Chapter 46 Subscription Set Operations
HOW
DO
I
Send e-mail notification for file and print delivery
Steps
1. In the Static Subscription Set Editor, select a subscription in the Subscription Set box (top pane), then select Edit from the Edit menu.2. Click the Notification tab.
Note: This tab is available only if you select File or Print as the delivery method in the Service Wizard, and the User Properties Editor.
3. Select the E-mail option if you want to send a notification through e-mail after the service has been delivered.
4. Click OK to save your changes and return to the Static Subscription Set Editor.
Set an expiration date for a subscription
Steps
1. In the Static Subscription Set Editor, select a subscription in the Subscription Set box, then select Edit from the Edit menu.2. Click the Status tab.3. In the Subscription Properties - Status tab, select the Expire this subscription on check box.4. The expiration date defaults to two years from today’s date. Click the down arrow next to the date to select a different expiration date on a calendar.5. Click OK to save your changes and return to the Static Subscription Set Editor.

Set governing limits for subscriptions 471
HOW
DO
I
Set governing limits for subscriptions
Steps
1. Launch Narrowcast Administrator.2. Either create a new static subscription set (see Create a static subscription set) or double-click an existing one. 3. In the Static Subscription Set Editor, from the Tools menu, select Filter and governing editor. The Filter editor and governing settings dialog box opens.4. In the Subscription Set section, specify the maximum number of subscriptions to retrieve for the Subscription Set.
Note: The number in this setting applies to all subscription sets.
5. If needed, in the Subscription Book section, specify the maximum number of users and addresses to retrieve for the Subscription Book.
Note: In both the Subscription Set section and the Subscription Book section, 50 is the default and also the smallest number allowed. A number smaller than 50 automatically reverts to 50.
6. Click OK to finish and return to the Static Subscription Set Editor.7. From the Subscription Set menu, select Exit to return to Narrowcast Administrator.
Note: You can also open the Filter editor and governing settings dialog box from the Subscription Book Editor by selecting Filter and governing editor from the Tools menu. However, you will not see the Subscription Set section.

472 Chapter 46 Subscription Set Operations
HOW
DO
I

IVS E C T I O N I V
473
APPENDIXES
Application Designer Appendixes IV

APPENDIXES
474 Appendixes

A P P E N D I X A
475
APPENDIXES
AA.E-mail and Wireless (SMTP) ITM Execution Control Documents
AAn execution control document is a plaintext document containing specific information. The E-mail (SMTP) Transmitter uses this information to complement or overwrite message properties. Execution control documents allow you to insert dynamic content into any of these properties. For example, sender name and the e-mail importance level could be obtained from a report, so that each user receives a different broadcast.The execution control document properties are:• Custom e-mail headers• Blind Carbon Copy (BCC) list• Change attachment name• Dynamically change attachment name• Dynamically renaming zip files in e-mail attachments• Other properties
Custom e-mail headersThis property allows the user to include any custom header in the message. These fields are not standard and most e-mail clients can ignore them, but a customized application can be developed to interpret and use them.
SyntaxCustomHeaders=’ CustomHeaderList ’
Replace CustomHeaderList with a control line feed-delimited list of custom headers. A custom header should always be a field name, a colon, and an optional text field.The field name always starts with “X-” or “x-”, followed by any printable character except a space, tab, or colon. Only ASCII characters from 33 to 126 are allowed.

476 Appendix A E-mail and Wireless (SMTP) ITM Execution Control Documents
APPENDIXES
The text field can be any text including the space, tab, and colon characters. A maximum of 75 characters per line is recommended to prevent an old SMTP gateway from truncating the text. To extend a text field to any length, multiple lines are allowed. Each new line must start with a tab or space.If any header in the list is malformed, the message fails.
ExampleCustomHeaders=’X-FirstHeader: This is a sample header, add any information you want herex-SecondHeader: more dataX-EmptyHeader:’
Blind Carbon Copy (BCC) listThis property allows you to specify addresses to receive messages without specifying any personalization. It works like a BCC copy of all the personalized messages.
SyntaxBCC=’ Addresses List ’
Replace Addresses List with a semicolon-separated e-mail address list. It obeys all the syntax rules any other e-mail address has. These addresses have the same properties on the information transmission module as any subscription address, except that the execution engine does not have knowledge of them.
ExampleBCC=’[email protected];[email protected]’
Note: Control line feeds, spaces, and tabs are not accepted in this list.

Change attachment name 477
APPENDIXES
Change attachment nameThis property allows administrators to change the name of e-mail attachments (including extensions such as .csv) sent via the E-mail and Wireless (SMTP) ITMs.
SyntaxChangeAttachmentName = ’ORIGINAL_DOC_NAME.EXT1=NEW_FILE_NAME.EXT2’
Replace ORIGINAL_DOC_NAME.EXT1 with the original name of the file. Replace NEW_FILE_NAME.EXT2 with the new name of the file.
Note: This feature is not applied to documents in zip files.
• Single quotes are used, not double quotes.• Document names are case sensitive.• The separator for renaming multiple documents is the pipe symbol (|).• Invalid characters in the new name are replaced with underscore
characters.• Renaming a non-existent attachment has no effect.• Creating more than one ChangeAttachmentName entry in the control
document causes the service to fail.• Renaming the new document into an empty name causes the document
to be given an automatically-generated new name.
ExamplesChangeAttachmentName = ’MyAttachments.txt=Sales Report.txt’
ChangeAttachmentName = ’MyAttachments.txt=Sales Report.csv’
ChangeAttachmentName = ’MyAttachments.txt=Sales Report.txt|MyExcelAtachments.xls=Profit Report.xls’ChangeAttachmentName = ’MyAttachments.txt=Sales Report.txt|MyExcelAtachments.xls=Profit_Report.xls’
478 Appendix A E-mail and Wireless (SMTP) ITM Execution Control Documents
APPENDIXES
Dynamically change attachment nameAdministrators can dynamically name the e-mail attachments delivered through Narrowcast Server by adding a report Information Object to the control document. The Information Objects use XSL stylesheets that help to change the name of the e-mail attachment as follows:• For a report filter, the name of the attachment is same as the name of the
filter.For example, if the Information Object contains a report filter “Report filter: Region = Northeast”, the attachment takes the same name.
• For a report attribute in the page-by field, the name of the attachment is Attributename:Elementname.For example, if the Information Object contains a report attribute Manager in the page-by field, the attachment takes the name “Manager - Aoter:Barbara”.
The sample XSL stylesheets are installed in the Delivery Engine\XSL\TextDocuments folder. They are:• MSTR8ToText-PageByInfoOnly.xsl for report attribute in the
page-by field. • MSTR8ToText-FilterNameOnly.xsl for the report filter.
Example1You want to create a service to be named dynamically according to the details of the report filter contained in the report. The high level steps to do this are as follows:1. Create a report using the report filter, “Region = Northeast”. 2. Create an Information Object that uses this report.3. Create a service that uses e-mail delivery and this Information Object.4. Use the following syntax in the control document:
ChangeAttachmentName = ‘MyAttachments.html=[IO].html’
where [IO] is the placeholder for the Information Object icon.
5. Select the stylesheet as MSTR8ToText-FilterNameOnly.xsl. When you execute the service, the attachment is created with the name Region_Northeast.html.

Dynamically renaming zip files in e-mail attachments 479
APPENDIXES
Example2You want to create a service to be named dynamically according to the attribute called Manager which is contained in the page-by field of the report. The high level steps to do this are as follows:1. Create a report using the attribute "Manager" in the page-by field. 2. Create an Information Object that uses this report.3. Create a service that uses e-mail delivery and this Information Object.4. Use the following syntax in the control document:
ChangeAttachmentName = ‘MyAttachments.html=[IO].html’
where [IO] is the placeholder for the Information Object icon.
5. Select the stylesheet as MSTR8ToText-PageByInfoOnly.xsl
When you execute the service, the file is created with the name Manager - Aoter_Barbara.html.
Dynamically renaming zip files in e-mail attachments
Administrators can dynamically rename the files contained within a zip file in e-mail deliveries. All System, Subscription, and User Information information objects can be used in the new file name.
SyntaxChangeAttachmentName = ‘My Attachment.xls=NewName.xls | My Attachment.pdf=[IO].pdf | My Zipped File=NewZipName.zip’
Replace NewName with the new name of the file. Replace [IO] with the Information Object.The following syntax rules apply to the control documents:• Single quotes are used, not double quotes.• Document names are case sensitive.• The separator for renaming multiple documents is the pipe symbol (|).• Invalid characters in the new name are replaced with underscore
characters at run-time.• Renaming a non-existent attachment has no effect.

480 Appendix A E-mail and Wireless (SMTP) ITM Execution Control Documents
APPENDIXES
• Creating more than one ChangeAttachmentName (e-mail) entry in the control document causes the SMTP ITM to fail the service.
• Renaming the new document into an empty name has no effect.
Important: An execution control document does not support macros for renaming the files that you want to zip. To rename a file, use static strings or information objects.
ExampleChangeAttachmentName = ‘My Attachment.xls=MonthlySales.xls | My Attachment.pdf=[IO].pdf | My Zipped File.zip=MonthlySales.zip’
where [IO] is the placeholder for the Information Object.
Other propertiesEach of the following properties overwrites the corresponding property defined in the SMTP ITM properties. The one exception is Importance; there is no corresponding SMTP ITM property for it to overwrite.
SyntaxSenderDisplayName=’XXX’SenderEmailAddress=’XXX’ReplyToDisplayName=’XXX’ReplyToEmailAddress=’XXX’Importance=’normal/high/low’DeliveryStatusNotificationEmailAddress=’XXX’RequestDeliveryStatusNotificationOnSuccess=’yes/no’RequestDeliveryStatusNotificationOnFailure=’yes/no’
The syntax is a subset of the XML definition for tag attribute lists, the part that is inside tags:• Single quotes are used, not double quotes.• Text is case sensitive.• White space can be any character, including tabs, spaces, carriage
returns, or line feeds.• The order of parameters is arbitrary.

Other properties 481
APPENDIXES
• Not all parameters have to be included.• Escaping rules apply only in decimal format, for example, ’	’ but not
’<’.• Replace the XXX in the SenderEmailAddress, ReplyToEmailAddress,
and DeliveryStatusNotificationEmailAddress properties with an e-mail address in the format name@company.
ExamplesSenderDisplayName=’MicroStrategy’ReplyToDisplayName=’MicroStrategy’Importance=’high’RequestDeliveryStatusNotificationOnSuccess=’yes’RequestDeliveryStatusNotificationOnFailure=’no’

482 Appendix A E-mail and Wireless (SMTP) ITM Execution Control Documents
APPENDIXES

A P P E N D I X B
483
APPENDIXES
BB.File ITM Execution Control Documents B
An execution control document is a plaintext document containing specific information. The File Transmitter uses this information to complement or overwrite file properties. Execution control documents allow you to insert dynamic content into any of these properties. The execution control document properties are:• Change file name• Dynamically change file name• Dynamically renaming zip files in file attachments
Change file nameThis property allows the user to specify the name of the file, including the extension.
Syntax1SaveDocumentAs=’HTMLDocument1.html=NewFileName.html’
SaveDocumentAs=’HTMLDocument1.html=NewFileName.html|HTMLDocument2.html=NewFileName2.html’
Replace HTMLDocument1.html with the original file name. Replace NewFileName.html with the new name of the file.
Note: This feature is not applied to documents in zip files.
• Single quotes are used, not double quotes.• Document names are case sensitive.• The separator for renaming multiple documents is the pipe symbol (|).
484 Appendix B File ITM Execution Control Documents
APPENDIXES
• Invalid characters in the new name are replaced with underscore characters.
• Renaming a non-existent attachment has no effect.• Creating more than one SaveDocumentAs entry in the control
document causes the service to fail.• Renaming the new document into an empty name causes the document
to be given an automatically-generated new name.
Example1SaveDocumentAs=’HTMLDocument1.html=Sales Report.html’
SaveDocumentAs=’HTMLDocument1.html=Sales Report.html|HTMLDocument2.html=Sales Report2.html’
SaveDocumentAs=’HTMLDocument1.html=Sales Report.htm’
Syntax2You can create an Execution Control Document that uses an Information Object to rename a service dynamically. The syntax in a Control Document is as follows:SaveDocumentAs=`My Saved Documents.html=[IO].html`
where [IO] is the placeholder for the Information Object icon. To add the Information Object, choose Existing Information Object from the Insert menu of the File Execution Control editor. The Information Object used in the control document refers to a MicroStrategy report to generate the file name. You must modify the XSL used by the Information Object in the Control Document so that the Information Object returns the attribute name and the attribute element name.

Change file name 485
APPENDIXES
An extract of the modified XSL is shown as follows:<?xml version="1.0" ?> - <!-- Stylesheet Name: MSTR7ToText-Default.xsl Version: 7.2.1 Last Modified Date: July 25, 2002 Copyright (c) 1996-2002 MicroStrategy Incorporated, All rights reserved. --> - <xsl:stylesheet version="1.0" xmlns:xsl="http://www.w3.org/1999/XSL/Transform"> <xsl:output method="xml" omit-xml-declaration="yes" indent="yes" />- <xsl:template match="/">- <xsl:element name="pt-container">- <xsl:element name="table"> <xsl:attribute name="row-count">1</xsl:attribute> <xsl:attribute name="column-count">1</xsl:attribute>- <xsl:element name="row">- <xsl:element name="cell"> <xsl:value-of select="./mi/in/oi[3]/@n" /> <xsl:text></xsl:text> <xsl:value-of select="./mi/rit/vw/gr/rh/rw//h/fv" /> </xsl:element> </xsl:element> </xsl:element> </xsl:element> </xsl:template> </xsl:stylesheet>
During service execution, the name of the attribute element is appended to the file name of the file generated during service execution.
Example2You want to create a service to be named dynamically according to the name of the Distribution Center that the information object returns. The high level steps to do this are as follows:1. Create a report just using the attribute "Distribution Center" and filter it on one single distribution center “Washington” so that the result will be one row only. 2. Modify the XSL as shown in Syntax2. 3. Create a service that uses the File ITM and use a control document with the following syntax: SaveDocumentAs='DistributionCenter.html=[IO].html'
where [IO] is the placeholder for the Information Object icon.

486 Appendix B File ITM Execution Control Documents
APPENDIXES
When you execute the service, the file is created with the name DistributionCenterWashington.html.
Dynamically change file nameAdministrators can dynamically name the file delivered through Narrowcast Server by adding a report Information Object to the control document. Information Objects use XSL stylesheets that help to change the name of the file as follows:• For a report filter, the name of the attachment is same as the name of the
filter.For example, if the Information Object contains a report filter “Report filter: Region = Northeast”, the attachment takes the same name.
• For a report attribute in the page-by field, the name of the attachment is Attributename_Elementname.For example, if the Information Object contains a report attribute Manager in the page-by field, the attachment takes the name “Manager - Aoter_Barbara”.
The sample XSL stylesheets are installed in the Delivery Engine\XSL\TextDocuments folder. They are:• MSTR8ToText-PageByInfoOnly.xsl for report attribute in the
page-by field. • MSTR8ToText-FilterNameOnly.xsl for the report filter.
Example1You want to create a service to be named dynamically according to the details of the report filter contained in the report. The high level steps to do this are as follows:1. Create a report using the report filter, “Region = Northeast”. 2. Create an Information Object that uses this report.3. Create a service that uses the File ITM and this Information Object.4. Use the following syntax in the control document:
SaveDocumentAs='My Saved Documents.html=[IO].html'
where [IO] is the placeholder for the Information Object icon.
5. Select the stylesheet as MSTR8ToText-FilterNameOnly.xsl.

Dynamically renaming zip files in file attachments 487
APPENDIXES
When you execute the service, the file is created with the name Region_Northeast.html.
Example2You want to create a service to be named dynamically according to the attribute called Manager, which is contained in the page-by field of the report. The high level steps to do this are as follows:1. Create a report using the attribute "Manager" in the page-by field. 2. Create an Information Object that uses this report.3. Create a service that uses the File ITM and this Information Object.4. Use the following syntax in the control document:
SaveDocumentAs='My Saved Documents.html=[IO].html'
where [IO] is the placeholder for the Information Object icon.
5. Select the stylesheet as MSTR8ToText-PageByInfoOnly.xsl
When you execute the service, the file is created with the name Manager - Aoter_Barbara.html.
Dynamically renaming zip files in file attachmentsAdministrators can dynamically rename the files contained within a zip file in file deliveries. All System, Subscription, and User Information information objects can be used in the new file name.
SyntaxSaveDocumentAs = ‘My Saved Document.xls=NewName.xls | My Saved Document.pdf=[IO].pdf | My Zipped File.zip=NewZipName.zip’
Replace NewName with the new name of the file. Replace NewZipName with the new name of the zip file. Replace [IO] with the Information Object.The following syntax rules apply to the control documents:• Single quotes are used, not double quotes. • Document names are case sensitive. • The separator for renaming multiple documents is the pipe symbol (|).

488 Appendix B File ITM Execution Control Documents
APPENDIXES
• Invalid characters in the new name are replaced with underscore characters at run-time.
• Renaming a non-existent attachment has no effect. • Creating more than one SaveDocumentAs (file) entry does not cause the
service to fail. The last entry in the control document takes effect, per the File ITM.
• Renaming the new document as an empty name has no effect.
Important: An execution control document does not support macros for renaming the files that you want to zip. To rename a file, use static strings or information objects.
ExampleSaveDocumentAs = ‘My Saved Document.xls=MonthlySales.xls | My Saved Document.pdf=[IO].pdf | My Zipped File.zip=MonthlySales.zip’
where [IO] is the placeholder for the Information Object.

A P P E N D I X C
489
APPENDIXES
CC.SMS (SMPP) ITM Execution Control Documents
CAn execution control document is a plaintext document containing specific information. The SMS (SMPP) Transmitter uses this information to complement or overwrite message properties. Execution control documents allow you to alter these properties at the message level. For example, the return address and the priority could vary for different services that use the same SMS (SMPP) ITM.The execution control document properties are • Return Address• Type of Number (TON)• Numbering Plan Indicator (NPI)• Expiration/Validation Date• Data Coding Scheme (DCS)• Priority
Return Address, TON, NPIThe combination of these three properties defines an SMS address. The NPI and TON values that are set for the return address are also used for all destination SMS addresses. These values can be altered at the message level to avoid the need to create a new SMS (SMPP) ITM for changing the properties.Valid TON values are the numbers in bold to the left of their description below:• 0 = Unknown• 1 = International• 2 = National• 3 = Network Specific• 4 = Subscriber

490 Appendix C SMS (SMPP) ITM Execution Control Documents
APPENDIXES
• 5 = Alphanumeric• 6 = Abbreviated• 7 = ReservedValid NPI values are the numbers in bold to the left of their description below:• 0 = Unknown• 1 = ISDN/Telephone (E.164/E.163)• 3 = Data (X.121)• 4 = Telex• 8 = National• 9 = Private• 10 = ERMES (ETSI DE/PS 3 01-3)• 15 = Reserved
SyntaxReturnAddress=’XXX’TON=’XXX’NPI=’XXX’
Replace XXX in ReturnAddress, TON, and NPI with the actual values you want to be used.
ExampleReturnAddress=’60000’TON=’1’NPI=’1’
Expiration/Validation DateThe expiration/validation date serves as the date up until which an SMSC (the server) continues trying to send an SMS message to a mobile device. The default behavior is no expiration if a date is omitted. Dates are in the following format defined in the SMPP 3.4 protocol specification section 7.1.1 YYMMDDhhmmsstnnp and explained below.

Expiration/Validation Date 491
APPENDIXES
In this interface, all time/date related fields will be in ASCII with the following format:“YYMMDDhhmmsstnnp” where• YY = last two digits of the year (00-99)• MM = month (01-12)• DD = day (01-31)• hh = hour (00-23)• mm = minute (00-59)• ss = second (00-59)• t = tenths of second (0-9)• nn = time difference in quarter hours between local time (as expressed
in the first 13 octets) and UTC (Universal Time Constant) time (00-48)• p - + = local time in quarter hours advanced in relation to UTC time• - = local time in quarter hours retarded in relation to UTC time• R = local time relative to the current SMSC time
Note: Where responses are reported by the SMSC the local time of the SMSC is given, and the format is “YYMMDDhhmmssp”, with the same definitions as above.
SyntaxExpire=’XXX’
Replace XXX in Expire with the actual expiration date you want to be used by the SMSC for all messages sent in the publication that contains your execution control document.
ExampleExpire=’021201000000+’
This sets the expiration date to December 1, 2002.

492 Appendix C SMS (SMPP) ITM Execution Control Documents
APPENDIXES
Data Coding Scheme (DCS)The data coding scheme can be used for character set manipulation as explained in SMPP 3.4 protocol specification section 5.2.19. The default is the SMSC default alphabet if the data coding scheme is not specified. The range of values is explained below.SMPP 3.4 protocol specification section 5.2.19Bits
7 6 5 4 3 2 1 0 Meaning Notes0 0 0 0 0 0 0 0 SMSC Default Alphabet0 0 0 0 0 0 0 1 IA5 (CCITT T.50)/ASCII (ANSI X3.4) b0 0 0 0 0 0 1 0 Octet unspecified (8-bit binary) b0 0 0 0 0 0 1 1 Latin 1 (ISO-8859-1) b0 0 0 0 0 1 0 0 Octet unspecified (8-bit binary) a0 0 0 0 0 1 0 1 JIS (X 0208-1990) b0 0 0 0 0 1 1 0 Cyrllic (ISO-8859-5) b0 0 0 0 0 1 1 1 Latin/Hebrew (ISO-8859-8) b0 0 0 0 1 0 0 0 UCS2 (ISO/IEC-10646) a0 0 0 0 1 0 0 1 Pictogram Encoding b0 0 0 0 1 0 1 0 ISO-2022-JP (Music Codes) b0 0 0 0 1 0 1 1 reserved0 0 0 0 1 1 0 0 reserved0 0 0 0 1 1 0 1 Extended Kanji JIS(X 0212-1990) b0 0 0 0 1 1 1 0 KS C 5601 b0 0 0 0 1 1 1 1 reserved:1 0 1 1 1 1 1 1 reserved1 1 0 0 x x x x GSM MWI control; see [GSM 03.38] d1 1 0 1 x x x x GSM MWI control; see [GSM 03.38] d1 1 1 0 x x x x reserved1 1 1 1 x x x x GSM message class control; see [GSM 03.38] e
Notes:• These coding schemes are common to Global System for Mobile
Communication (GSM), Time Division Multiple Access (TDMA) and Code-Division Multiple Access (CDMA). The SMPP protocol allows client applications to use the same DCS value (that is, the GSM 03.38 value) for all three technologies.
• In cases where a data coding scheme is defined for TDMA or CDMA but not for GSM, SMPP uses GSM 03.38 reserved values.

Priority 493
APPENDIXES
SyntaxDataEncoding =’XXX’
Replace XXX in DataEncoding with a valid data coding value that you want to be used.
ExampleExpire =’00000000’
This specifies the SMSC default alphabet.
PriorityThe priority can be set for messages to indicate to the SMSC that a particular message has a low or high priority. If a mobile user has more than one message waiting at an SMSC, messages with a high priority are sent to the user before messages that are nonpriority. A 0 specifies nonpriority and a 1 indicates high priority. All messages are nonpriority by default.
SyntaxPriority =’XXX’
Replace XXX in Priority with a 0 or a 1 to mark messages as nonpriority or priority.
ExamplePriority =’1’
This specifies that the message is high priority.

494 Appendix C SMS (SMPP) ITM Execution Control Documents
APPENDIXES

A P P E N D I X D
495
APPENDIXES
DD.XML for Narrowcast Server Objects D
This appendix describes the format of the XML structures used by various components of Narrowcast Server. This information can be used to develop custom modules such as information source modules, and to write custom XSL stylesheets that control how information is rendered and delivered by Narrowcast Server. The term tag is used instead of the XML term element to avoid confusion with MicroStrategy object elements.XML is used throughout Narrowcast Server to share information between modules. The MicroStrategy Information Source Module uses XML to represent reports that are displayed in grid mode. The plaintext and Excel document formatting modules expect XML in a certain format that represents how data should be rendered or arranged in the documents they produce. The Web (Portal) Information Transmitter uses XML to communicate the attached documents for which links need to be provided. By using custom XSLs that handle these specific XML formats, you gain more control over how information is rendered and how it is delivered.For information on the format of the XML structure for the MicroStrategy Information Source Module, see the MicroStrategy Narrowcast Server SDK Guide, available in the MicroStrategy Developer Library, which is sold as part of the MicroStrategy SDK.
OrganizationThis appendix provides the following pieces of information about each XML specification:• Overview: a list of all of the tags in the specification and a diagram
showing how they relate to each other in the XML tree structure• Tags: detailed information about each tag, including the attributes that
apply and whether the tag or any of these attributes are required• Example: a fragment of XML meeting the specification

496 Appendix D XML for Narrowcast Server Objects
APPENDIXES
Plaintext XML formatThe plaintext document formatting module (DFM) is a powerful component of the Delivery Engine architecture. It can render text strings and tabular data on nearly any device. It can even do so with devices that have limited column alignment capabilities, proportional fonts, or character set limitations. For this module to render tabular data properly, it must be provided with information about the structure of the data such as which pieces of text fall under which columns. This is done using the XML structure described below.
OverviewThis section summarizes the XML representation of document elements expected by the plaintext DFM. It details the characteristics of each tag and the attributes within it.A plaintext XML document element can have two types of content: text and table. The only processing performed on text content is character replacement. For example, if a specific pager cannot support the <Carriage Return> character, it might be useful to replace that character with a blank space to maintain the white space arrangement of the content. This replacement process is applied to both text and table content.Table content is processed much more intensely. Table content processing ensures that the strings in each column are aligned properly with each other. This alignment often requires that specific modifications be made to the underlying text for each device. Some devices support tab stops while others do not. Some have fixed-width fonts like Courier New so that a blank space can be used to pad the strings to equal lengths. Others have proportional fonts such as Times New Roman that require string width calculations to take string contents into account. All of these formatting and alignment factors are accounted for in the plaintext DFM so that the best possible output is rendered for each device.These are the tags that make up the plaintext XML document element specification:• The pt-container tag is the root level of every plaintext XML document
element that contains the text and table tags. This tag is required.• The text tag contains text, including white space, that is inserted directly
into plaintext documents. Character replacement then occurs according to the definition of the receiving device.
• The table tag contains data that is represented in a tabular or grid format. It is divided into rows. A table must contain at least one row.

Plaintext XML format 497
APPENDIXES
• Each row in a table can contain cells. If it has no cells, it represents a blank row.
• Each cell in a row contains the data that should be placed into the corresponding cell in the resulting grid. To align the columns in a grid, the string in each cell is compared to the string of every other cell in the same column. Padding characters, cell separation characters, or both are added as needed by each device.
TagsAll the tags allowed in a plaintext XML document element are listed below, along with their meanings. None of the tags have attributes.
Tag Name Purpose
pt-container The root tag of a plaintext XML document element.
text A string of text that is inserted directly into the plaintext document. Afterwards, character replacement will be performed.
table A collection of strings of text arranged in rows and columns. The strings in each column are padded so that they align properly on devices.
pt-container
text
table
row
cell
cell
row

498 Appendix D XML for Narrowcast Server Objects
APPENDIXES
pt-container
The root tag of a plaintext XML document element.
Parent tags
None
Child tags
text, table
text
A string of text that is inserted directly into the plaintext document. Afterwards, character replacement is performed. White space in a text tag is preserved.
Parent tags
pt-container
Child tags
None
table
A collection of strings of text arranged in rows and columns. The strings in each column are padded so that they align properly on devices. Every table must contain at least one row, and there must be at least one row containing at least one cell.
Parent tags
pt-container
Child tags
row
row An individual row of data in a table. There must be at least one row in each table.
cell An individual field or cell of data in a row. Cells with the same ordinal position in different rows are considered to be part of the same column. There must be at least one cell in each table.
Tag Name Purpose

Plaintext XML format 499
APPENDIXES
row
An individual row of data in a table. There must be at least one row in each table. At least one of the rows in each table must contain at least one cell. A row with no cells can represent a blank row.
Parent tags
table
Child tags
cell
cell
An individual field or cell of data in a row. Cells with the same ordinal position in different rows are considered to be part of the same column. There must be at least one cell in each table.
Parent tags
row
Child tags
None
ExampleThis is an example of a valid plaintext XML document element.<pt-container>
<text>Northeast Sales Report</text><table>
<row><cell /><cell>2000</cell><cell>1999</cell>
</row><row>
<cell>New York</cell><cell>$150k</cell><cell>$138k</cell>
</row><row>
<cell>Boston</cell><cell>$82k</cell><cell>$86k</cell>
</row><row>

500 Appendix D XML for Narrowcast Server Objects
APPENDIXES
<cell>Providence</cell><cell>$91k</cell><cell>$76k</cell>
</row> </table>
</pt-container>
On a typical device, the result resembles this:
Note that all information is left-justified.
Excel XML formatThe Excel document formatting module (DFM) is a powerful component of the Delivery Engine architecture. It can insert text, numbers, and dates into any location in any Excel 97 or Excel 2000 compatible workbook. It can apply complex formatting such as borders, text rotation, colors, fonts, and alignment, as well as numeric and date formatting. For this module to perform rendering operations correctly, it must be provided with information about the structure of the data, such as which pieces of text fall under which columns, as well as information about the desired formatting. This is done using the XML structure explained below.
OverviewThis section provides an overview of the XML representation of document elements expected by the Excel DFM. It details the characteristics of each tag and the attributes within it.
Note: All aspects of this XML specification, including element (tag) names, attribute names, and attribute values are case sensitive.
Northeast Sales Report
2000 1999
New York $150k $138k
Boston $82k $86k
Providence $91k $76k
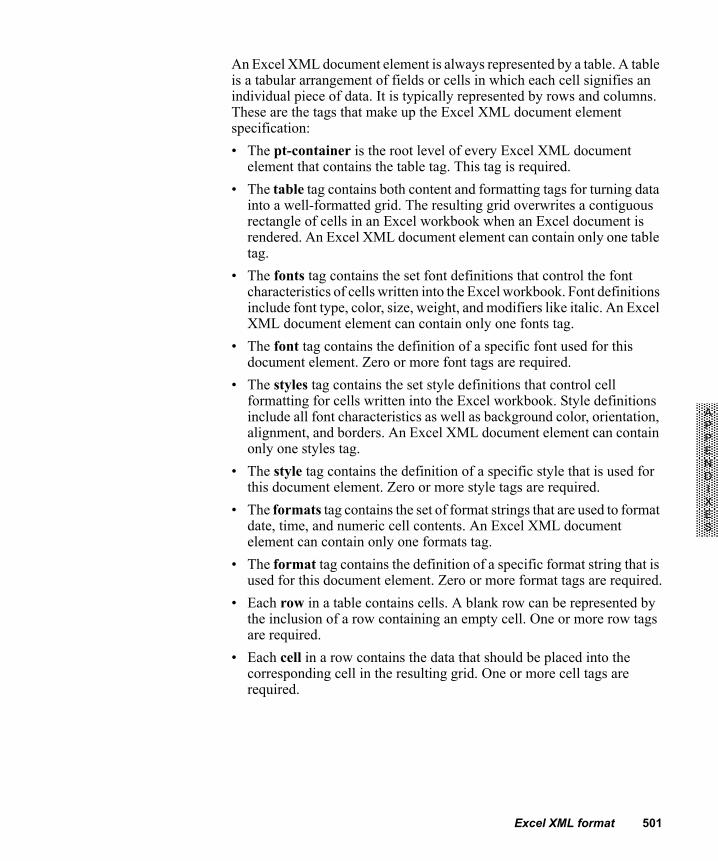
Excel XML format 501
APPENDIXES
An Excel XML document element is always represented by a table. A table is a tabular arrangement of fields or cells in which each cell signifies an individual piece of data. It is typically represented by rows and columns. These are the tags that make up the Excel XML document element specification:• The pt-container is the root level of every Excel XML document
element that contains the table tag. This tag is required.• The table tag contains both content and formatting tags for turning data
into a well-formatted grid. The resulting grid overwrites a contiguous rectangle of cells in an Excel workbook when an Excel document is rendered. An Excel XML document element can contain only one table tag.
• The fonts tag contains the set font definitions that control the font characteristics of cells written into the Excel workbook. Font definitions include font type, color, size, weight, and modifiers like italic. An Excel XML document element can contain only one fonts tag.
• The font tag contains the definition of a specific font used for this document element. Zero or more font tags are required.
• The styles tag contains the set style definitions that control cell formatting for cells written into the Excel workbook. Style definitions include all font characteristics as well as background color, orientation, alignment, and borders. An Excel XML document element can contain only one styles tag.
• The style tag contains the definition of a specific style that is used for this document element. Zero or more style tags are required.
• The formats tag contains the set of format strings that are used to format date, time, and numeric cell contents. An Excel XML document element can contain only one formats tag.
• The format tag contains the definition of a specific format string that is used for this document element. Zero or more format tags are required.
• Each row in a table contains cells. A blank row can be represented by the inclusion of a row containing an empty cell. One or more row tags are required.
• Each cell in a row contains the data that should be placed into the corresponding cell in the resulting grid. One or more cell tags are required.
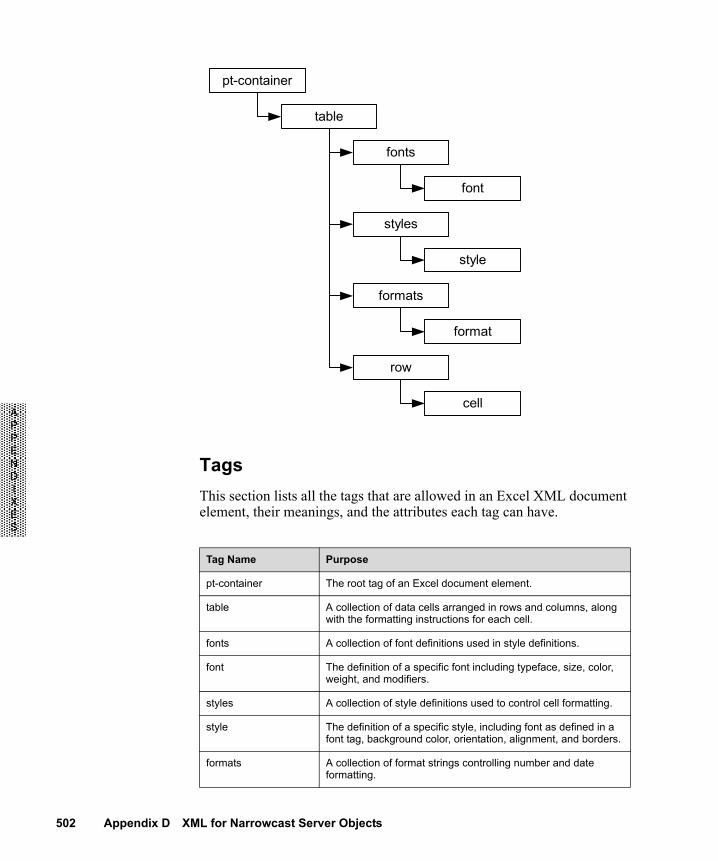
502 Appendix D XML for Narrowcast Server Objects
APPENDIXES
TagsThis section lists all the tags that are allowed in an Excel XML document element, their meanings, and the attributes each tag can have.
Tag Name Purpose
pt-container The root tag of an Excel document element.
table A collection of data cells arranged in rows and columns, along with the formatting instructions for each cell.
fonts A collection of font definitions used in style definitions.
font The definition of a specific font including typeface, size, color, weight, and modifiers.
styles A collection of style definitions used to control cell formatting.
style The definition of a specific style, including font as defined in a font tag, background color, orientation, alignment, and borders.
formats A collection of format strings controlling number and date formatting.
pt-container
fonts
row
font
format
styles
table
formats
style
cell
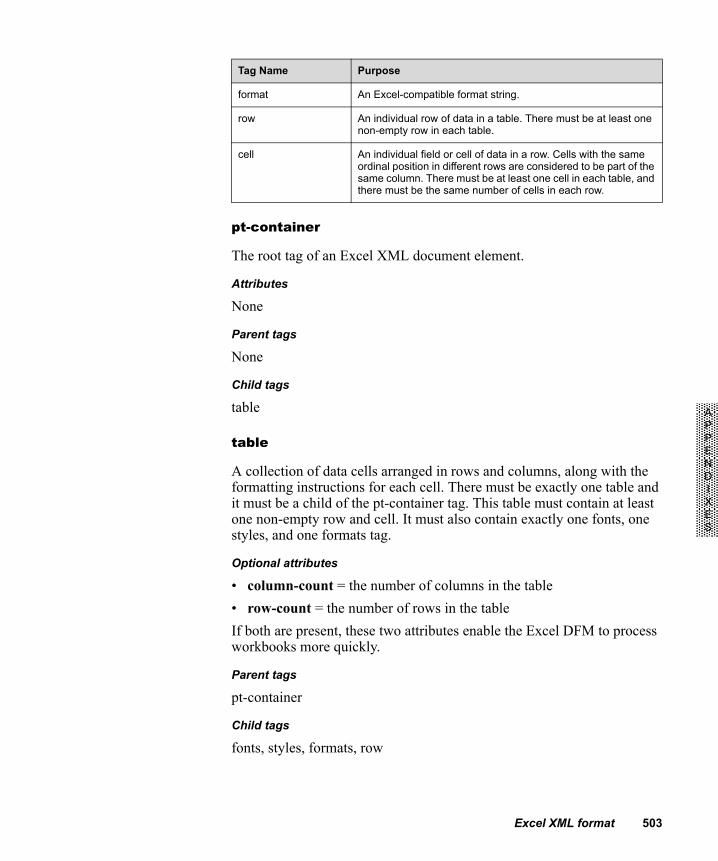
Excel XML format 503
APPENDIXES
pt-container
The root tag of an Excel XML document element.
Attributes
None
Parent tags
None
Child tags
table
table
A collection of data cells arranged in rows and columns, along with the formatting instructions for each cell. There must be exactly one table and it must be a child of the pt-container tag. This table must contain at least one non-empty row and cell. It must also contain exactly one fonts, one styles, and one formats tag.
Optional attributes
• column-count = the number of columns in the table• row-count = the number of rows in the tableIf both are present, these two attributes enable the Excel DFM to process workbooks more quickly.
Parent tags
pt-container
Child tags
fonts, styles, formats, row
format An Excel-compatible format string.
row An individual row of data in a table. There must be at least one non-empty row in each table.
cell An individual field or cell of data in a row. Cells with the same ordinal position in different rows are considered to be part of the same column. There must be at least one cell in each table, and there must be the same number of cells in each row.
Tag Name Purpose

504 Appendix D XML for Narrowcast Server Objects
APPENDIXES
fonts
A collection of font definitions used in style definitions. There must be exactly one fonts tag and it must be a child of the table tag.
Attributes
None
Parent tags
table
Child tags
font
font
The definition of a specific font including typeface, size, color, weight, and modifiers. There can be any number of font tags.
Required attributes
• name = the name that a style in this document element uses to reference this font. It can be any XML-compliant string that does not include the following characters: &, <, >, ", ', space.
• family = the typeface of the font, such as Times New Roman.
Optional attributes
• color = A number between 8 and 63. If not specified, the default font color for the cell is used.
• size = A number between 1 and 409 representing the font size in points. If not specified, the value 10 is used.
• style = A string representing the modifiers to the font such as italics. Possible values may include any combination of: ["italic", "strikeout"]. If not specified, no modifiers are used. The strikeout attribute overrides this attribute.
• underline = A string representing the type of underline to apply. Possible values: ["none" | "single" | "double" | "single accounting" | "double accounting"]. If not specified, the value "none" is used.
• weight = A string representing the weight of the font. Possible values: ["bold" | "normal"]. If not specified, the value "normal" is used.
• strikeout = A string indicating whether or not the strikeout modifier should be applied. Possible values: ["yes" | "no"]. This attribute overrides the style attribute.

Excel XML format 505
APPENDIXES
Parent tags
fonts
Child tags
None
styles
A collection of style definitions that control cell formatting. There must be exactly one styles tag and it must be a child of the table tag.
Attributes
None
Parent tags
table
Child tags
style
style
The definition of a specific style, including font as defined in a font tag, background color, orientation, alignment, and borders. There can be any number of style tags.
Required attributes
• name = the name that a cell in this document element uses to reference this style. It can be any XML-compliant string that does not include the following characters: &, <, >, ", ', space.
Optional attributes
• align = A string representing the horizontal alignment of cell data. Possible values: ["general" | "left" | "center" | "right" | "fill" | "justify"]. If not specified, the value "general" is used.
• background-color = A number between 8 and 63 or the number 0. If not specified, or the number 0 is used, the default font color for the cell is used.
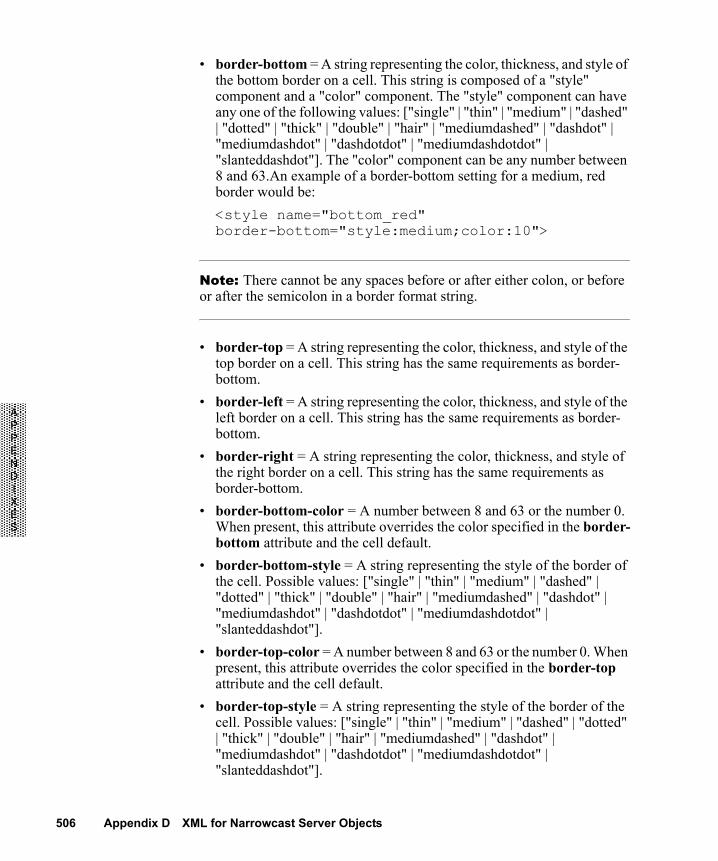
506 Appendix D XML for Narrowcast Server Objects
APPENDIXES
• border-bottom = A string representing the color, thickness, and style of the bottom border on a cell. This string is composed of a "style" component and a "color" component. The "style" component can have any one of the following values: ["single" | "thin" | "medium" | "dashed" | "dotted" | "thick" | "double" | "hair" | "mediumdashed" | "dashdot" | "mediumdashdot" | "dashdotdot" | "mediumdashdotdot" | "slanteddashdot"]. The "color" component can be any number between 8 and 63.An example of a border-bottom setting for a medium, red border would be:<style name="bottom_red"border-bottom="style:medium;color:10">
Note: There cannot be any spaces before or after either colon, or before or after the semicolon in a border format string.
• border-top = A string representing the color, thickness, and style of the top border on a cell. This string has the same requirements as border-bottom.
• border-left = A string representing the color, thickness, and style of the left border on a cell. This string has the same requirements as border-bottom.
• border-right = A string representing the color, thickness, and style of the right border on a cell. This string has the same requirements as border-bottom.
• border-bottom-color = A number between 8 and 63 or the number 0. When present, this attribute overrides the color specified in the border-bottom attribute and the cell default.
• border-bottom-style = A string representing the style of the border of the cell. Possible values: ["single" | "thin" | "medium" | "dashed" | "dotted" | "thick" | "double" | "hair" | "mediumdashed" | "dashdot" | "mediumdashdot" | "dashdotdot" | "mediumdashdotdot" | "slanteddashdot"].
• border-top-color = A number between 8 and 63 or the number 0. When present, this attribute overrides the color specified in the border-top attribute and the cell default.
• border-top-style = A string representing the style of the border of the cell. Possible values: ["single" | "thin" | "medium" | "dashed" | "dotted" | "thick" | "double" | "hair" | "mediumdashed" | "dashdot" | "mediumdashdot" | "dashdotdot" | "mediumdashdotdot" | "slanteddashdot"].
Excel XML format 507
APPENDIXES
• border-left-color = A number between 8 and 63 or the number 0. When present, this attribute overrides the color specified in the border-left attribute and the cell default.
• border-left-style = A string representing the style of the border of the cell. Possible values: ["single" | "thin" | "medium" | "dashed" | "dotted" | "thick" | "double" | "hair" | "mediumdashed" | "dashdot" | "mediumdashdot" | "dashdotdot" | "mediumdashdotdot" | "slanteddashdot"].
• border-right-color = A number between 8 and 63 or the number 0. When present, this attribute overrides the color specified in the border-right attribute and the cell default.
• border-right-style = A string representing the style of the border of the cell. Possible values: ["single" | "thin" | "medium" | "dashed" | "dotted" | "thick" | "double" | "hair" | "mediumdashed" | "dashdot" | "mediumdashdot" | "dashdotdot" | "mediumdashdotdot" | "slanteddashdot"].
• font = A string indicating which font, as defined in a font tag in the document element, should be used for this style. This should match the name of the font specified in the "name" attribute. If no font is specified, the default font for the cell is used.
• orientation = A number between -90 and 90, or the number 255. This number represents the orientation, in degrees, of text in the cell. A value of 0 is horizontal. Positive numbers tilt the text up and to the right. Negative numbers tilt the text down and to the right. The value 255 arranges the letters in the text vertically. If not specified, the value 0 is used and the text is oriented horizontally.
• vertical-align = A string representing the vertical alignment of cell data. Possible values: ["top" | "center" | "bottom" | "justify"]. If not specified, the value "top" is used.
• wrap = A string indicating whether cell data may wrap lines. Possible values: ["True" | "False"]. If not specified, the value "False" is used.
Parent tags
styles
Child tags
None

508 Appendix D XML for Narrowcast Server Objects
APPENDIXES
formats
A collection of format strings used to control number and date formatting. There must be exactly one formats tag and it must be a child of the table tag.
Attributes
None
Parent tags
table
Child tags
format
format
An Excel-compatible format string. There can be any number of format tags. For numeric format strings, certain characters have special effects:• # displays a significant digit• 0 displays insignificant leading or trailing zeros• / displays a number or decimal portion of a number as a fraction• , divides the number by 1000 or displays thousands separator characters• % shows the number as a percentage• ? adds a space so that values with different numbers of significant digits
align along the decimal point or division character, for example, "/"Examples of valid format string values and their effects on numeric data:
Positive Number Negative Number
Format String 1234.567 -1234.567
0 1235 -1235
#,##0 1,235 -1,235
0.00; (0.00) 1234.57 (1234.57)
0% 123457% -123457%
00.0, 01.2 -01.2
# ??/?? 1234 55/97 -1234 55/97

Excel XML format 509
APPENDIXES
For date and time formatting, the following character combinations have special meanings:• "m" represents months as 1-12 and minutes as 0-59• "mm" represents months as 01-12 and minutes as 00-59• "mmm" represents months as a three-character string such as "Jan"• "mmmm" represents months as the full month name such as "January"• "mmmmm" represents months by their first letters such as "J", "F", or
"M"• "d" represents days as 1-31• "dd" represents days as 01-31• "ddd" represents the day of the week as a three-character string such as
"Mon"• "dddd" represents the day of the week name such as "Monday"• "yy" represents years using 2 digits• "yyyy" represents years using 4 digits• "h" represents hours as 0-23• "hh" represents hours as 00-23• "h AM/PM" represents hours as 12 AM, 1 AM,… 11 PM• "s" represents seconds as 0-59• "ss" represents seconds as 00-59For example, to display the date and time as "Monday, January 3, 2001 4:01:05 PM", use the string "dddd, mmmm d, yyyy h:mm:ss PM".For more information about Excel format strings, refer to Microsoft Excel online help.
Attributes
id = A numeric value used to identify this format when it is used in a cell.
Parent tags
formats
Child tags
None

510 Appendix D XML for Narrowcast Server Objects
APPENDIXES
row
An individual row of data in a table. There must be at least one non-empty row in a table. All rows in a table should have the same number of cells.
Attributes
None
Parent tags
table
Child tags
cell
cell
An individual field or cell of data in a row. Cells with the same ordinal position in different rows are considered to be part of the same column. There must be at least one non-empty cell in each table.
Optional attributes
• format = A number indicating which format, as defined in a format tag in the document element, should be used for this cell. This should match the ID of the format specified in the id attribute. If no format is specified, the default format string for the workbook is used.
Note: If no format is specified, any format string currently applied to the cell in the document template is overwritten by the default workbook format.
• style = A string indicating which style, as defined in a style tag in the document element, should be used for this cell. This should match the name of the style specified in the name attribute. If no style is specified, the default style for the workbook is used.
Note: If no style is specified, any cell formatting applied to the cell in the document template is overwritten by the default workbook cell format.
• type = A number indicating the type of data being returned by the cell. Possible values:

Excel XML format 511
APPENDIXES
◊ 1 is not used◊ 2 is a two-byte integer◊ 3 is a four-byte integer◊ 4 is a single-precision floating point◊ 5 is a double-precision floating point◊ 6 is not used◊ 7 is a date◊ 8 is a string
Parent tags
row
Child tags
None
Color definitionColor is defined three ways for Excel XML.• Excel color index• RGB color• Named color
Excel color index
Colors are predefined in Excel. Each of them has an index. The numbers you can use are from 8 to 63, as shown below:

512 Appendix D XML for Narrowcast Server Objects
APPENDIXES
An example using the Excel color index is:border-top-color = ["0" | "8" - "63"]
RGB color
RBG color uses values from 0 to 255. The following syntax is used:"rgb(RED,GREEN,BLUE)"
where RED,GREEN,BLUE are the desired values of red, green, and blue. An example using RGB color is:
border-top-color = "rgb(0,60,0)"
Named color
You can use named values instead of indexes. The names correspond to the indexes in the table in Excel color index. An example using named colors is:
border-top-color = "bright green"
ExampleHere is an example of a valid Excel XML document element.<pt-container>
<table><fonts>
<fontname="Header" color="8"
family="Arial"size="12"weight="bold"style="italic"underline="none" />
8-Black 9-White 10-Red 11-Bright Green
12-Blue 13-Yellow 14-Pink 15-Turquoise
16-Dark Red
17-Green 18-Dark Blue
19-Dark Yellow
20-Violet 21-Teal 22-Gray-25%
23-Gray-50%
40-Sky Blue
41-Light Turquoise
42-Light Green
43-Light Yellow
44-Pale Blue
45-Rose 46-Lavender
47-Tan
48-Light Blue
49-Aqua 50-Lime 51-Gold 52-Light Orange
53-Orange 54-Blue-gray
55-Gray-40%
56-Dark Teal
57-Sea Green
58-Olive Green
59-Olive Green
60-Brown 61-Plum 62-Indigo 63-Gray-80%

Excel XML format 513
APPENDIXES
<fontname="Body"size="10"weight="normal" />
</fonts><styles>
<stylename="CHeader"background-color="22"align="right"border-bottom="style:medium;color:8"font="Header" />
<stylename="RHeader"background-color="22"align="left"border-right="style:thin;color:8"font="Body" />
<stylename="data"align="right"font="Body" />
</styles><formats>
<format id="1">0000</format><format id="2">$?,??0, k</format>
</formats><row>
<cell style="CHeader" /><cell style="CHeader" type="2"
format="1">2000</cell><cell style="CHeader" type="2"
format="1">1999</cell></row><row>
<cell style="RHeader" type="8">New York</cell><cell style="data" type="5"
format="2">1350300.0</cell><cell style="data" type="5"
format="2">1338100.0</cell></row><row>
<cell style="RHeader" type="8">Boston</cell><cell style="data" type="5"
format="2">820200.0</cell><cell style="data" type="5"
format="2">861300.0</cell></row><row>
<cell style="RHeader" type="8">Providence</cell><cell>912800.0</cell><cell>760100.0</cell>

514 Appendix D XML for Narrowcast Server Objects
APPENDIXES
</row> </table>
</pt-container>
In Excel, the result resembles this:
Web (Portal) XML formatThe Web (Portal) Information Transmission Module (ITM) is a key component that links the Narrowcast Server Delivery Engine and Narrowcast Server Subscription Portal. Through this module, the Delivery Engine puts formatted documents into the Portal Repository used by the Subscription Portal. These documents are then retrieved and presented to the users by the Subscription Portal.Each publication transmitted through the Web (Portal) ITM is allowed to have one body document and one or more optional attachments. For the user to access the attachments from the Subscription Portal, a list of links to the attachments is generated and appended to the document body. The formatting of this list is customizable, and is done using the XML structure described below.
OverviewThe XML structure used to represent the attachment list is a fairly simple one. Two tags make up this XML specification:• The atts tag is the root-level tag. This tag is required.• Each att tag contains information about one attachment. The
information is stored in various attributes, all of which are required. Depending on the publication definition, there can be zero to many attachments in the list.
2000 1999
New York $1,350 k $1,388 k
Boston $ 820 k $ 861 k
Providence $ 913 k $ 760 k

Web (Portal) XML format 515
APPENDIXES
TagsAll the tags allowed in an attachment list XML are listed below, along with their meanings.
atts
The root tag of an Excel XML document element.
Parent tags
None
Child tags
att
att
An individual attachment. All the information about the attachment is stored in various attributes within this tag.
Required attributes
• name = the name of the attachment document• type = the file type of the attachment document• docId = the unique identifier of the body document• index = index of this attachment in the attachment list
Parent tags
atts
Child tags
None
Tag Name Purpose
atts The root tag of an attachment list XML
att An individual attachment. All the information about the attachment is stored in various attributes within this tag.

516 Appendix D XML for Narrowcast Server Objects
APPENDIXES
ExampleThis is an example of a valid attachment list XML.<atts>
<att name='doc1.txt' type='text/plain' docId='12345'index='1' /><att name='doc2.htm' type='text/html' docId='23456'index='2' />
</atts>
XML Structure for the Subscription Information Source Module XML
The XML structure for the Subscription Information Source Module is shown as follows:Subscription ISM tag: <SubsInfo>Address ID: <AddrID>Address Display: <AddrDspl>Device ID: <DvcID>Device Name: <DvcName>Locale ID: <LclID>Physical Address: <PhysicalAddr>PIN: <PIN>Subscription ID: <SubsID>Subscription Set ID: <SubsSetID>Subscription Set Name: <SubsSetName>User ID: <UsrID>Unique Message ID: <UniqueMsgID>
Example
A sample XML structure is shown as follows:<SubsInfo> <AddrDspl>Edgar email</AddrDspl> <AddrID>15DF1790C1D74D00924F5162B06935A9</AddrID> <DvcID>B8D0B2C18D9511D4B89E00C04F33122E</DvcID> <LclID>FBBF7C1E37EC11D4887C00C04F48F8FD</LclID> <PhysicalAddr>[email protected]</PhysicalAddr> <PIN>1234</PIN> <SubsID>23</SubsID> <SubsSetID>A190A57660B0421089AC6CF631F3583D</SubsSetID> <UsrID>39754310A6554EE082BFA4B17FD5894B</UsrID> <SubsSetName>My Subscription Set</SubsSetName> <DvcName>Microsoft Outlook 2000</DvcName>

XML Structure for the System Information Source Module XML 517
APPENDIXES
<UniqueMsgID>0AC6A72F989D4184B13E34BCA30D0D2F23</UniqueMsgID></SubsInfo>
XML Structure for the System Information Source Module XML
The XML structure for the System Information Source Module is shown as follows:System ISM tag: <SysInfo>Service ID: <ServiceID>Service Name: <ServiceName>Service Description: <ServiceDesc>Service Execution ID: <ServiceExecID>Service Creation Date: <ServiceCreationDate>Service Execution Date: <ServiceExecDate>Service Execution Time: <ServiceExecTime>Service External Execution ID: <ServiceExternalExecID>Service Segment Execution ID: <ServiceSegmentExecID>
Example
A sample XML structure is shown as follows:<SysInfo> <ServiceID>89B7E1493DAC449A82778FB1EC855E00</ServiceID> <ServiceName>New Service</ServiceName> <ServiceDesc>Test Service</ServiceDesc> <ServiceExecID>7D98AC1D6A264A26BD7ED8DB652785EF</ServiceExecID> <ServiceCreationDate>04/26/2004</ServiceCreationDate> <ServiceExecDate>04/26/2004</ServiceExecDate> <ServiceExecTime>19:54:24</ServiceExecTime> <ServiceExternalExecID>FC24C58C5D1747FBB3B2FB9EBE243123</ServiceExternalExecID> <ServiceSegmentExecID>FC24C58C5D1747FBB3B2FB9EBE243282</ServiceSegmentExecID></SysInfo>

518 Appendix D XML for Narrowcast Server Objects
APPENDIXES

A P P E N D I X E
519
APPENDIXES
EE.Synchronization Data Types E
For Subscription Book synchronization, synchronization source files, including delimited (for example, CSV) and Lightweight Directory Interchange Format (LDIF) files, must contain certain types of data. Data for user and address properties, subscription set, preference, authentication, and security must be in the appropriate format to be synchronized. These data types are described below.
User properties
Login ID Data type: text
Restrictions: 127 characters, unique
Sample: user1
Password Data type: text
Restrictions: 250 characters
Sample: pwd
Default: password
Password hint Data type: text
Restrictions 250 characters
Sample: hint
Default: password hint

520 Appendix E Synchronization Data Types
APPENDIXES
Address properties
Locale Data type: GUID
Restrictions: 32 characters
How to get it: Object Repository
Sample: FBBF7C1E37EC11D4887C00C04F48F8FD
Default: FBBF7C1E37EC11D4887C00C04F48F8FD
User status Data type: Boolean
Restrictions: 0 (inactive) or 1 (active)
Sample: 1
Default: 1
User expiration date: Data type: date
Sample: 12/30/9999
Default: 12/30/9999
Address name Data type: text
Restrictions: 250 characters
Sample: work e-mail
Default: Default Address
Physical address Data type: text
Restrictions: 250 characters
Sample: [email protected]
Default: Physical Address
Address display Data type: text
Restrictions 250 characters
Sample: User 1
Default: Address Display
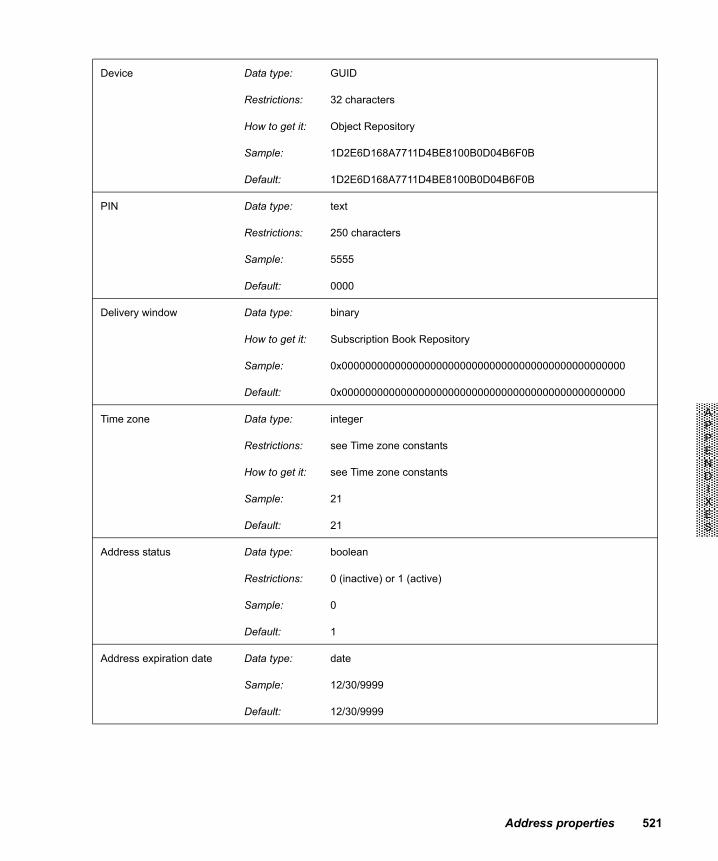
Address properties 521
APPENDIXES
Device Data type: GUID
Restrictions: 32 characters
How to get it: Object Repository
Sample: 1D2E6D168A7711D4BE8100B0D04B6F0B
Default: 1D2E6D168A7711D4BE8100B0D04B6F0B
PIN Data type: text
Restrictions: 250 characters
Sample: 5555
Default: 0000
Delivery window Data type: binary
How to get it: Subscription Book Repository
Sample: 0x000000000000000000000000000000000000000000000000
Default: 0x000000000000000000000000000000000000000000000000
Time zone Data type: integer
Restrictions: see Time zone constants
How to get it: see Time zone constants
Sample: 21
Default: 21
Address status Data type: boolean
Restrictions: 0 (inactive) or 1 (active)
Sample: 0
Default: 1
Address expiration date Data type: date
Sample: 12/30/9999
Default: 12/30/9999

522 Appendix E Synchronization Data Types
APPENDIXES
Subscription set
Preference
Authentication
Security
Subscription set Data type: text
Sample: finance department
Preference Data type: xml
How to get it: Subscription Book Repository
Sample: <UserDetail><First_Name Name="First Name" Default="0" Value="John"/><Last_Name Name="Last Name" Default="0"/><Middle_Initial Name="Middle Initial" Default="0"/><Suffix Name="Suffix" Default="0"/><Salutation Name="Salutation" Default="0"/><Zip_Code Name="Zip Code" Default="0"/><Title Name="Title" Default="0"/></UserDetail>
Authentication Data type: xml
How to get it: Subscription Book Repository
Sample: AuthUserName="Administrator" AuthUserPwd="pwd" AuthUserID="54F3D26011D2896560009A8E67019608"
Security Data type: xml
How to get it: Subscription Book Repository
Sample: SecurityObject="A6DE4BA111D3ADA0C0002B91E22B284F:8" SecurityObjName="Sector Group = T"

Time zone constants 523
APPENDIXES
Time zone constants
Time zone City Constant
(GMT+04:00) Abu Dhabi, Muscat 2
(GMT+09:30) Adelaide 9
(GMT-09:00) Alaska 1
(GMT+06:00) Almaty, Dhaka 10
(GMT+01:00) Amsterdam, Copenhagen, Madrid, Paris, Vilnius 40
(GMT-07:00) Arizona 55
(GMT+02:00) Athens, Istanbul, Minsk 26
(GMT-04:00) Atlantic Time (Canada) 3
(GMT+12:00) Auckland, Wellington 37
(GMT-01:00) Azores, Cape Verde Is. 5
(GMT+03:00) Baghdad, Kuwait, Riyadh 46
(GMT+04:00) Baku, Tbilisi 8
(GMT+07:00) Bangkok, Hanoi, Jakarta 6
(GMT+08:00) Beijing, Chongqing, Hong Kong, Urumqi 15
(GMT+01:00) Belgrade, Sarajevo, Skopje, Sofija, Zagreb 12
(GMT-05:00) Bogota, Lima, Quito 43
(GMT+05:30) Bombay, Calcutta, Madras, New Delhi 30
(GMT-03:00) Brasilia 20
(GMT+01:00) Bratislava, Budapest, Ljubljana, Prague, Warsaw 11
(GMT+10:00) Brisbane 18
(GMT+01:00) Brussels, Berlin, Bern, Rome, Stockholm, Vienna 58
(GMT+02:00) Bucharest 19
(GMT-03:00) Buenos Aires, Georgetown 42
(GMT+02:00) Cairo 22

524 Appendix E Synchronization Data Types
APPENDIXES
(GMT+10:00) Canberra, Melbourne, Sydney 50
(GMT-04:00) Caracas, La Paz 44
(GMT) Casablanca, Monrovia 28
(GMT-06:00) Central Time (US & Canada) 14
(GMT+06:00) Colombo 49
(GMT+09:30) Darwin 4
(GMT-05:00) Eastern Time (US & Canada) 21
(GMT+05:00) Ekaterinburg 23
(GMT-12:00) Eniwetok, Kwajalein 16
(GMT+12:00) Fiji, Kamchatka, Marshall Is. 24
(GMT) Greenwich Mean Time: Dublin, Edinburgh, Lisbon, London 27
(GMT+10:00) Guam, Port Moresby 60
(GMT+02:00) Harare, Pretoria 48
(GMT-10:00) Hawaii 29
(GMT+02:00) Helsinki, Riga, Tallinn 25
(GMT+10:00) Hobart 52
(GMT-05:00) Indiana (East) 54
(GMT+05:00) Islamabad, Karachi, Tashkent 59
(GMT+02:00) Israel 32
(GMT+04:30) Kabul 0
(GMT+11:00) Magadan, Solomon Is., New Caledonia 13
(GMT-06:00) Mexico City, Tegucigalpa 34
(GMT-02:00) Mid-Atlantic 35
(GMT-11:00) Midway Island, Samoa 45
(GMT+03:00) Moscow, St. Petersburg, Volgograd 41
(GMT-07:00) Mountain Time (US & Canada) 36
Time zone City Constant

Time zone constants 525
APPENDIXES
(GMT+03:00) Nairobi 17
(GMT-03:30) Newfoundland 38
(GMT+09:00) Osaka, Sapporo, Tokyo 53
(GMT-08:00) Pacific Time (US & Canada); Tijuana 39
(GMT+08:00) Perth 57
(GMT-06:00) Saskatchewan 7
(GMT+09:00) Seoul 33
(GMT+08:00) Singapore 47
(GMT+08:00) Taipei 51
(GMT+03:30) Tehran 31
(GMT+10:00) Vladivostok 56
(GMT+09:00) Yakutsk 61
Time zone City Constant

526 Appendix E Synchronization Data Types
APPENDIXES

INDEX
Index 527
Aactivating subscriptions 463adding
addresses 447channels, new 385database connections 399documents, zipped 425dynamic text to documents 403personalization to users 449, 450site definitions, new 443SQL for post-service execution 464SQL for pre-service execution 464subscriptions to subscription sets 463users 448XML information objects, multiple 404zipped documents 425
additional questions option, Portal Administrator Wizard 171Address IDs, as preference object 170addresses
adding 447deleting 451display 84editing 452formats 283, 284names 84overview 83properties 520user property 83
Advanced Properties dialog box 263advanced segmentation control techniques 149alert-based applications 105alert-based services
application design 109importance 105process flow 106
alerting, edge-triggered 93alternate questions 168, 174alternate questions, selecting 440answer to another question setting, Portal Administrator
Wizard 168application design
hierarchy 18requirements 142
application designer tasks xxapplications, defining with security 39
architecture, component-based 18associating
macros with events 405question objects to information objects 389
attachment names, changing 477attributes, importing user and address 453authentication 33, 522authentication and security
adding to users 449authentication, importing user 455automatic charts, creating 407
Bblind carbon copy (BCC) list 476
Cchanging
device folders associated with device types 387folders of services associated with channels 385views in document editors 405
channelsadding new 385deleting 386description 161folders 162names and descriptions 162, 282selecting folder 281Site Preferences page 281
chart creation in Excel documents 54charts, creating automatic 407Choose Subscription Sets dialog box 209clearing question objects from information objects 389clients see devicescolumn widths
in MicroStrategy Web or Desktop 77setting 231upgraded systems 78
compressed documents 15Compression Properties dialog box 338configuring
dynamic subscription sets 435page-by questions for dynamic subscription sets 436page-by questions for static subscription sets 437Subscription Portal, different 444
Index

INDEX
528 Index
content information objectscreating with personalized page execution 390creating with personalized report execution 391overview 26personalization by subscription information objects 129
control documentsE-mail and Wireless (SMTP) ITM execution 475File ITM execution 483SMS (SMPP) ITM execution 489
creatingautomatic charts 407content information objects with personalized page
execution 390content information objects with personalized report
execution 391device types 387dynamic subscription sets 465Excel documents 407, 410HTML documents 412imported documents from new imported files 414information objects in documents 415links to Desktop documents 406plain text documents 416publications 416question objects 392schedules 426segment information objects 393services 427, 429static subscription sets 466subscription information objects 394Subscription Portal, new 444text documents 416
credentialsproject 165user, optional 165users, required 165
Ddata coding scheme (DCS) 492data in Excel documents 53data warehouse tables, mapping question object information 439database connections
adding 399overview 157Portal Administrator Wizard page 277
deactivating subscriptions 463defining delivery information for subscription information
objects 397
deletingaddresses 451channels 386device types 388site definitions 444Subscription Portal 445subscription sets 467subscriptions 466users 451
delivery information, defining for subscription information objects 397
delivery methodsdefinition 84E-mail (SMTP) 9File 10multiple 175overview 3Print 10SMS (SMPP) 10Web (Portal) 10Wireless (SMTP) 9
delivery see Web deliverydelivery windows 85Desktop Document Selector dialog box 211Desktop documents
creating links to 406overview 68
device type definitions, reconfiguring 388device types
changing device folders for 387creating new 387deleting 388name 283new 163new definition 282overview 162renaming 388specifying 282
devicescontent selection 5default 164definition 84, 163description 22device file 176folders 163, 284multiple end-user 175multiple sets 175portal 164settings 163
Devices and Locale Support dialog box 338

INDEX
Index 529
display fields 283Document Element Properties dialog box 223document element-level error handling 12document elements
overview 12properties 223specifying error handling rules 421with multiple information objects 30
Document Properties dialog box 229document-level error handling 13, 230documents
compressed 15creating Excel 407, 410creating HTML 412creating links to 406creating plain text 416definition 22Desktop 68Excel 52, 233HTML 47, 241HTML (Desktop) 68imported 67, 249imported - creating from new imported files 414new 273overview 11plain text 295properties 229Report Services 68specifying error handling rules 420text 65versus imported file 14working with 47zipped 15zipped, adding to services 425
dynamic content 25dynamic subscription information, mapping to data warehouse
tables 438Dynamic Subscription Set Wizard 219dynamic subscription sets
advanced Subscription Portal configuration 181configuring 172, 435configuring page-by questions for 436creating 465description 89for storage mapping 171overview 16, 81personalization 172to support alert services 109
dynamic subscriptionsdescription 125implementing 147non-personalized 196personalization 108, 117personalized 200
dynamic text, adding to documents 403
Eedge-triggered alerting 93edit fields 283editing
addresses 452site definitions 445users 452
EIS interfaces, building in Excel 56E-mail (SMTP) delivery method 9E-mail (SMTP) ITM Publication Sections 306E-mail and wireless (SMTP) ITM execution control
documents 475blind carbon copy (BCC) list 476changing attachment names 477custom e-mail headers 475other properties 480
e-mail headers, custom 475e-mail transmitters, transmission properties 371error handling
alerts 14document element-level 12document-level 13, 230Excel documents 14, 64properties 12publication-level 13specifying rules for document elements 421specifying rules for documents 420
Error Handling dialog box 340event-triggered service execution 107, 109, 110event-triggered services 105Excel Document Editor 233

INDEX
530 Index
Excel documentsaccommodating reports of different sizes 62automatic chart creation 54building EIS interfaces 56building pivot tables 57converting URLs into hyperlinks 61creating 407, 410data placement and formatting 53editor 233error handling 64overview 52preserving leading zeros 62reports from Intelligence Server 63strategy 52using macros 60VBA macros and viruses 63
Excel XMLcolor definition 511formats 500tags 502
execution control documentsE-mail and Wireless (SMTP) ITM 475File ITM 483SMS (SMPP) ITM 489
execution locales 177, 178, 230execution periods see schedulesExecutive Information System 56expiration 82, 85, 86, 371expiration dates, setting for subscriptions 470expiration/validation dates 490external sources 89
FFile delivery method 10File ITM execution control documents 483File ITM Publication Sections 307file transmitters, transmission properties 371files
imported versus document 14importing 418reimporting to update 419
folders, changing for services associated with channels 385
GGeneral Service Settings dialog box 340
governing 85, 95setting limits for subscriptions 471setting limits for users and addresses 459
HHTML (Desktop) documents 68HTML Document Editor 47, 241HTML documents
creating 412development strategy 48editor 47, 241overview 47previewing 418techniques 50
HTML source code, viewing 421hyperlinks in Excel documents 61
Iimage information objects 27Import File dialog box 253import tasks 95Imported Document Editor 249imported documents
creating from new imported files 414overview 67versus imported files 15
imported files 14importing
files 418user and address attributes 453user authentication 455user preferences 456user security 457user subscriptions 458users and addresses 96
information delivery platforms xixInformation Object Wizard 257

INDEX
Index 531
information objectsadding multiple XML 404content 26, 129creating 28creating content information objects with personalized page
execution 390creating content information objects with personalized report
execution 391creating in documents 415creating segment information objects 393creating subscription information objects 394description 23error handling 398image 27limiting information returned 42overview 25role in execution 41roles 26segment 27, 149subscription 26text 27types 27XML 27
information sourcesoverview 164security 38site preferences 285Use Project Credentials 165Use User Credentials 165
information transmission modules 164information transmitters 4, 175ITM see information transmission modules
Jjobs see services
Llanguages see localeslanguages, multiple 176large icon URL 283leading zeros in Excel documents 62links to Desktop documents, creating 406locale objects 178
localesadvanced user properties 377content 5description 22execution 178multiple languages and nationalities 177objects 178selecting for documents 419selection 33, 178user 83, 178using 179
login IDs 82Login Information dialog box 380
Mmacros
associating with events 405in Excel documents 60
mappingdynamic subscription information to data warehouse
tables 438question object information to data warehouse tables 439
messages see servicesMicroStrategy Intelligence Server User Export Tool 367MicroStrategy Web delivery 23Modify Schedule Queue Parameters dialog box 271modifying
schedule queue parameters 432subscription preferences for each information source 468transmission properties for address display 469, 470
MSTRSubscriptions table 173
NNarrowcast Server SDK 114nationalities, multiple 176New Document dialog box 273NPI see numbering plan indicator propertynumbering plan indicator property 489
OObject Repository
overview 160Portal Administrator Wizard page 280selecting 400

INDEX
532 Index
objectsdevices 22documents 22information objects 23locales 22publications, description 21question objects 23schedules 21services 20subscription sets 21viewing properties 422XSL files 23
organization of guide xix
Ppage-by
answer ID 191questions 167subscription ID 186
page-by questionsconfiguring for dynamic subscription sets 436configuring for static subscription sets 437
passwords 82personal identification numbers 85personalization
adding to users for authentication and security 449adding to users for preference 450advanced techniques 34description 32dynamic subscriptions 108, 117to support alert services 109types 32users 83
personalized page executionadvanced Subscription Portal configuration 181basic 183configuring 167, 168creating content information objects 390implementing 147implications 128overview 123versus personalized report execution 126with dynamic subscriptions 143with static subscriptions 145
personalized report executioncreating content information objects 391implications 128overview 124versus personalized page execution 126with dynamic subscriptions 146with static subscriptions 142
physical addresses 84PIN see personal identification numberspivot tables in Excel documents 57plain text documents, creating 416Plaintext Document Editor 295plaintext XML
example 499format 496tags 497
portaldescription 159devices 284selecting or creating 279
portal administrator tasks xxiPortal Administrator Wizard
configuration 168, 172introduction 275services configuration 290site management 278site preferences 280Subscription Portal configuration 156system configuration 276
Portal Repositoryoverview 157Portal Administrator Wizard page 277selecting 400
post-servicedata source cleansing 110execution SQL 119
post-SQL 92pre- and post-service execution SQL 92Pre- and Post-SQL Specification dialog box 299preference personalization, adding to users 450preferences
importing user 456modifying subscription preferences for each information
source 468objects 167page in Portal Administrator Wizard 285regional 176subscriptions 34, 87synchronization data type 522type of personalization 32

INDEX
Index 533
pre-service execution SQL 110pre-SQL 92, 93previewing HTML documents 418Print delivery method 10Print ITM Publication Sections 307priority, SMS (SMPP) ITM execution control documents 493project credentials 165projects see information sourcesPrompt Resolution Wizard 379, 381Publication Sections
E-mail (SMTP) ITM 306File ITM 307Print ITM 307SMS (SMPP) ITM 307Web (Portal) ITM 308Wireless (SMTP) ITM 308
Publication Wizard 303publication-level error handling 13publications
creating 416description 21overview 4
QQuestion Object Browser dialog box 310Question Object dialog box 310Question Object dialog set 309question object information, mapping to data warehouse
tables 439question objects
advanced techniques 35advantages 35associating to information objects 389clearing from information objects 389creating 392description 23personalization 36prerequisites 36role in execution 41validation 311
queues 271
Rrecipients see subscriptionsreconfiguring device type definitions 388reference material xxregional preferences 176
reimporting files to update 419renaming device types 388renaming zip files 487report delivery methods see information transmittersReport Services documents 68report sizes in Excel documents 62report types see documentsreports from Intelligence Server
Excel documents 63reports see information objectsrepositories
selecting Object Repository 400selecting Portal Repository 400selecting Subscription Book Repository 400
Return Address property 489rules, error handling - specifying for document elements 421running services immediately 433
SSave Desktop Linked Document dialog box 216scalability 130schedule queue parameters, modifying 271, 432Schedule Wizard 321scheduled services, viewing 433schedules
creating 426definition 21delivery, specifying 17overview 17
securitydescription 33importing user 457information objects 40information sources 38, 39objects 44question objects 40synchronization data type 522upgraded reports 45user personalization 45
segment information objectsadvanced segmentation control techniques 149creating 393overview 27
segmentationadvanced segmentation control techniques 149application design implications 133processes 131
Select Information Source dialog box 259, 310

INDEX
534 Index
selectingalternate questions 440locales for documents 419Object Repository 400Portal Repository 400stylesheet files for documents 419Subscription Book Repository 400tables for question and subscription mappings 440
selection locales 177, 178self subscription 155send now 467Service Editor
creating services 427using 313
Service Wizardcreating services 429using 331
servicesconfigure with page-by question 167creating 3creating with Service Editor 427creating with Service Wizard 429description 20event-triggered 105overview 3running immediately 433specifying recipients 16viewing schedules 433
services configuration, Portal Administrator Wizard 290setting
expiration dates for subscriptions 470governing limits for subscriptions 471governing limits for users and addresses 459
site definitionsadding new 443deleting 160, 444editing 445
Site Management, Portal Administrator Wizard 278Site Preferences, Portal Administrator Wizard 280sites
definitions 158names and descriptions 159, 279preferences 166
slicing and segmentation 130slicing attributes 136small icon URL 283SMS (SMPP) delivery method 10
SMS (SMPP) ITM execution control documentsdata encoding scheme 492expiration/validation dates 490NPI 489overview 489priority 493return address 489TON 489
SMS (SMPP) ITM Publication Sections 307specifying
error handling rules for document elements 421error handling rules for documents 420
SQL statements 92, 299adding for post-service execution 464adding for pre-service execution 464
SQL statements dialog box 301static content 25Static Subscription Set Editor 325static subscription sets
creating 466description 88for storage mapping 171introduction 16overview 81
statusaddresses 85advanced user properties 377subscriptions 86, 371users 83
storage mappings 169, 171stylesheet files, selecting for documents 419subscription administrator tasks xxiSubscription Book 81Subscription Book Editor 343Subscription Book Governing dialog box 239Subscription Book Repository
additional questions setting 171answer to another question setting 168overview 160, 161Portal Administrator Wizard page 280selecting 400
Subscription Book synchronization tutorialadding addresses 100creating subscriptions 100importing users and addresses 98introduction 97remapping users 100updating users 100
Subscription Book Synchronization Wizard 347Subscription dialog box 373

INDEX
Index 535
Subscription IDas preference object 170requirements 141versus slicing attribute 136
subscription imports see synchronizationsubscription information
description 137location 137overview 31store in the Subscription Book Repository 125
subscription information objectscreating 394overview 26personalizing content information objects 129
Subscription Portaladvanced configuration 181application 157configuring different 444creating new 444deleting 445site, default 155system 156user self subscription 155
subscription preferences 34Subscription Properties Editor 369subscription sets
concepts 86configuring 292configuring page-by questions 436, 437creating dynamic 465creating static 466definition 21deleting 467dynamic 89introduction 16SQL statements 92static 88synchronization data type 522
subscriptions 16, 86activating 463adding to subscription sets 463deactivating 463deleting 466importing user 458
subscriptions and subscription sets 86supporting diverse user populations 175
synchronizationimporting or updating users and addresses 96overview 95synchronizing users 96tutorial 97updating user personalization and subscription 97with external sources 95
synchronization data typesaddress properties 520authentication 522preferences 522security 522subscription set 522time zone constants 523user properties 519
Synchronization Settings dialog box 357synchronizing users 460System Configuration Wizard 155System Configuration, Portal Administrator Wizard 276system performance 34
Ttable prefixes
description 158Object Repository 160Portal Repository 157Subscription Book Repository 161
tables, selecting for question and subscription mappings 440tasks
application designer xxoverview xxportal administrator xxisubscription administrator xxi
text documentscreating 416overview 65
text information objects 27time zone constants 523TON see type of number propertytouch points see devicestransmission properties
e-mail transmitters 87, 371file transmitters 87, 371modifying for address display 469, 470overview 87print transmitters 87Subscription Properties Editor 371
transmissions see services

INDEX
536 Index
Tutorial configuration process 155type of number property 489
Uupdating users and addresses 96URLs in Excel documents 61user and address attributes, importing 453user authentication, importing 455User IDs, as preference object 170user locales 178user preferences, importing 456User Properties Editor 375user security, importing 457user subscriptions, importing 458users
adding 448credentials 165deleting 451editing 452export tool 367information 30login IDs 82management 81overview 82preferences 33, 170properties 519self subscription 155synchronizing 460
VVBA macros and viruses in Excel documents 63viewing
HTML source code 421object properties 422scheduled services 433XSL stylesheet results 422
views, changing in document editors 405
WWeb (Portal) delivery method 10Web (Portal) ITM Publication Sections 308Web delivery
documents 23reports 23
Wireless (SMTP) delivery method 9Wireless (SMTP) ITM Publication Sections 308
working with documents 47
XXML
Excel 500for Narrowcast Server objects 495format 495information objects 27plaintext 496
XML information objects, adding multiple 404XSL files 23XSL stylesheets
advantages 69default Excel documents 74default HTML documents 71default stylesheets provided 70default Subscription Portal attachments 77default text documents 75developing and testing 78using 68viewing results 422XML for Narrowcast Server object 495
Zzipped documents
adding to services 425overview 15