apple education - njit: itunesu: njit on itunes u
TRANSCRIPT
Apple Education
iTunes U User’s Guide September 4, 2007
Apple Inc. © 2007 Apple Inc. All rights reserved.
Apple, the Apple logo, iPod, iTunes, Mac, and QuickTime are trademarks of Apple Inc., registered in the U.S. and other countries. Apple TV, iPhone, and Safari are trademarks of Apple Inc. iTunes Store is a service mark of Apple Inc.
Other company and product names mentioned herein are trademarks of their respective companies.
Welcome to iTunes U
Apple shares common goals with education—to advance teaching, learning, and research through innovation, and to engage and empower students. Students, as well as instructors and staff, expect a campus environment that accommodates their digital lifestyle, adapts to their individual learning and teaching needs, and encourages collaboration and teamwork. iTunes U provides a way to meet all these expectations.
Based on the same easy-to-use technology as the iTunes Store, iTunes U features Apple simplicity and portability and is designed as a service for institutions to manage a broad range of audio, video, and PDF content, and to make it available quickly and easily to students, instructors, staff, alumni, and, optionally, the public.
iTunes U offers an experience similar to using the iTunes Store. In fact, because iTunes U pages are displayed within the iTunes application itself, just like iTunes Store pages, navigating within iTunes U is much like navigating within the iTunes Store. For information on how to use iTunes or the iTunes Store, in iTunes, choose Help > iTunes Help.
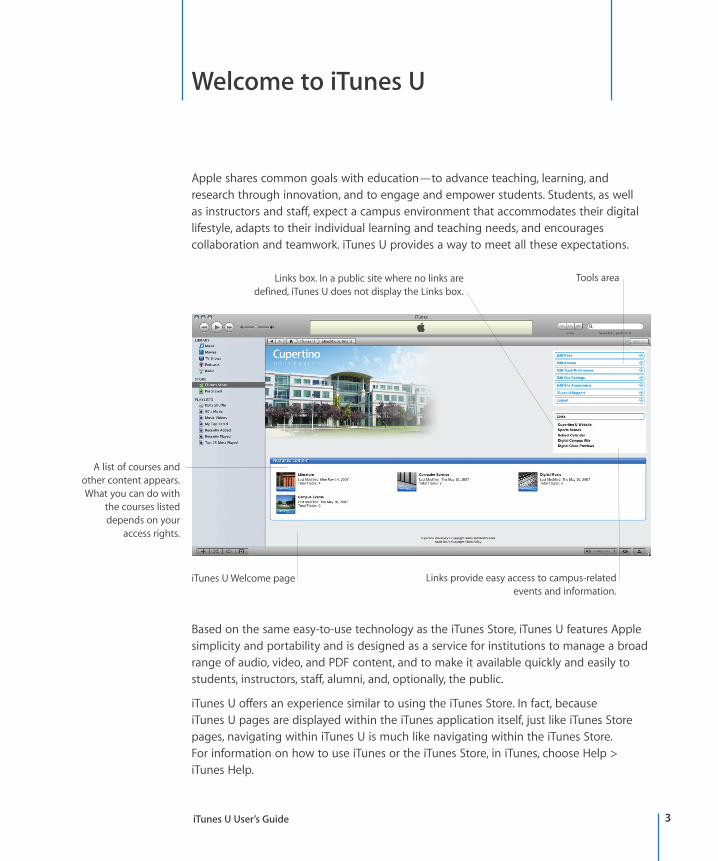
Links box. In a public site where no links are Tools area defined, iTunes U does not display the Links box.
A list of courses and other content appears. What you can do with
the courses listed depends on your
access rights.
iTunes U Welcome page Links provide easy access to campus-related events and information.
iTunes U User’s Guide 3
With iTunes U, users can access educational content, including lectures and interviews, 24 hours a day, 7 days a week. Users can browse content and download it to their Mac computers or PCs, regardless of their location. They can then listen to and view that content on their computers or transfer the content to an iPod, iPhone, or Apple TV for listening or viewing on the go.
Instructors and staff can easily post and change content on their own without impacting their IT department. Instructors can also set a page to allow students to upload their own content for review or to share with other students in the class.
System Requirements iTunes U requires iTunes version 6.0 or later for Mac and Windows. Apple recommends using iTunes version 7 and, in order to guarantee a consistent user experience, always using the latest version of iTunes.
iTunes U works with most modern, standards-compliant browsers. Apple recommends using one of the following browsers:
• Safari 2.0 or later on Mac
• Internet Explorer 6.0 or later on Windows
Note: Internet Explorer on Windows may have performance limitations when uploading files. For more information, see the Microsoft Help and Support Site at http://support.microsoft.com/default.aspx?scid=kb;en-us;329781.
Supported Formats iTunes U supports the distribution of compressed audio and video files. Apple recommends using the following formats for your iTunes U audio and video content:
• Audio files (AAC, MP3) with appropriate file extensions (.m4a, .mp3). For best results during playback, Apple recommends converting MP3 files greater than 32 megabytes (MB) to AAC format.
• Video files (MPEG-4 with H.264 compression) with appropriate file extensions (.mp4, .m4v, .mov). For best results with iPod, Apple recommends using MPEG-4 with H.264 compression.
See the section “Uploading Content to a Course Page” later in this guide for detailed specifications on audio and video formats.
If you are using QuickTime to create and edit video content, it is recommended that you export your videos by choosing Movie to iPod from the Export pop-up menu in QuickTime Pro.
You can also use iTunes U to distribute Portable Document Format (PDF) files.
iTunes U User’s Guide 4
Preparing Course Page Content for iTunes U iTunes U is designed to provide students and instructors easy access to course content. It can also provide access to institutional information such as on-campus events, news, sports, or a message from your institution’s president.
Each course has its own Course page, initially created by a site administrator.
The instructor or course manager creates or prepares content for the course, structures and organizes the course, and then uploads the content to the Course page.
Creating Content and Structuring Course Pages An instructor or course manager can create and prepare content for a course by recording lectures, developing assignments, creating videos and podcasts, and much more. For more information, see iTunes U Content Scenarios and Creating Content for iPod + iTunes located at http://www.apple.com/support/itunes_u/.
How a course is structured and organized depends on the instructor’s or course manager’s preferences. Each Course page can consist of various groups, displayed as tabs, used to help organize the course. Courses can, for example, be organized by subject matter or by media type. For example, a course covering the life and works of F. Scott Fitzgerald could have groups organized by subject matter (life and works) or by type of work (novels and short stories).
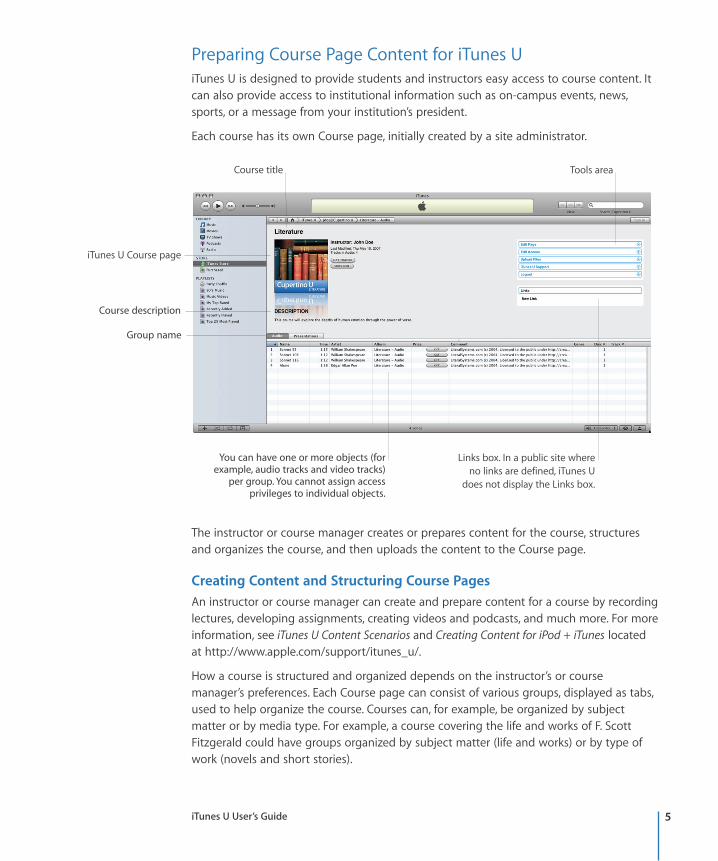
iTunes U Course page
Course description
Group name
Course title Tools area
You can have one or more objects (for Links box. In a public site where example, audio tracks and video tracks) no links are defined, iTunes U
per group. You cannot assign access does not display the Links box. privileges to individual objects.
iTunes U User’s Guide 5
Alternatively, the course could be organized by media type, for example, with one group for audio content, another group for video content, and another group for PDF content.
Instructors and course managers can structure and organize a course however they deem appropriate. Course page groups provide a way to help subdivide and categorize courses.
Other groups might include a Drop Box for students to upload assignments for review by the instructor and a Shared group for students to upload assignments and share their work with others in the course. For example, in a journalism course, students might upload recorded interviews into a Drop Box group for the instructor to review.
Keep in mind that your courses should be organized in clear categories that are relevant to your institution, and you should develop a plan to manage your content on an ongoing basis. Keep your content fresh and current to help maintain the effectiveness of your iTunes U site.
Uploading Course Content After creating course content and developing a structure for the course, the instructor or course manager can upload the content into the different groups, displayed as tabs, in the Course page.
Depending on how the course is structured, the instructor or course manager can upload content to Simple, Smart, or Feed groups in the Course page. For information on these group types, see the section “Creating Group Types” later in this guide.
For information on how to upload content to iTunes U, see the section “Uploading Content to a Course Page” later in this guide.
Providing Links to Other Information In addition to groups, instructors and course managers can add links in the Course page to point students to more information. For example, the instructor or course manager could add a link to a website that discusses all the films made from F. Scott Fitzgerald’s works.
Creating a Public iTunes U Site If your institution’s iTunes U site will be offered to the public, plan to include content categories relevant to the public—for example, Public Lecture Series, Museums on Campus, Special Collections, Digital Archives, Campus Life, or Published Research Results. Whenever you create or update an iTunes U site for your institution, regardless of whether the site is available to the public, Apple provides guidelines designed to help you create an effective and clear iTunes U site. For more information, see Creating Your iTunes U Site available at http://www.apple.com/support/itunes_u.
iTunes U User’s Guide 6
Logging In to Your iTunes U Site To organize a Course page and upload content, an instructor or course manager needs to log in to the iTunes U site.
Your site administrator should provide you with your login information and instructions.
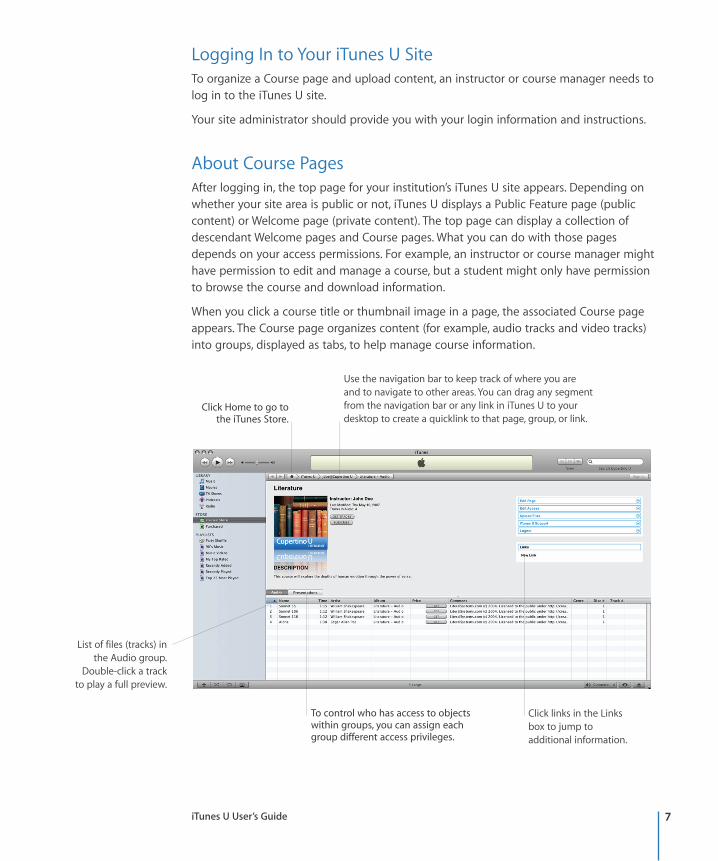
About Course Pages After logging in, the top page for your institution’s iTunes U site appears. Depending on whether your site area is public or not, iTunes U displays a Public Feature page (public content) or Welcome page (private content). The top page can display a collection of descendant Welcome pages and Course pages. What you can do with those pages depends on your access permissions. For example, an instructor or course manager might have permission to edit and manage a course, but a student might only have permission to browse the course and download information.
When you click a course title or thumbnail image in a page, the associated Course page appears. The Course page organizes content (for example, audio tracks and video tracks) into groups, displayed as tabs, to help manage course information.
Use the navigation bar to keep track of where you are and to navigate to other areas. You can drag any segment
Click Home to go to from the navigation bar or any link in iTunes U to your the iTunes Store. desktop to create a quicklink to that page, group, or link.
List of files (tracks) in the Audio group.
Double-click a track to play a full preview.
To control who has access to objects Click links in the Links within groups, you can assign each box to jump to group different access privileges. additional information.
iTunes U User’s Guide 7
About Groups Within a Course page, instructors and course managers can use editing tools to create different groups, displayed as tabs, to organize the course content and then can assign permissions to each group to control user access to the content.
Instructors and course managers can create the following types of groups within a Course page:
• Simple. A Simple group populates track content in a Course page when users explicitly upload tracks to the course in your iTunes U site.
• Smart. A Smart group displays tracks in a Course page by performing a real-time search of your entire site for all tracks that match the specified criteria.
• Feed. A Feed group automatically populates track content in a Course page based on the specified podcast feed URL and details. Course content can be updated on a periodic basis and, depending on your site settings, can be updated as often as every day.
For more details and information on how to create the different group types, see “Creating Group Types” later in this guide.
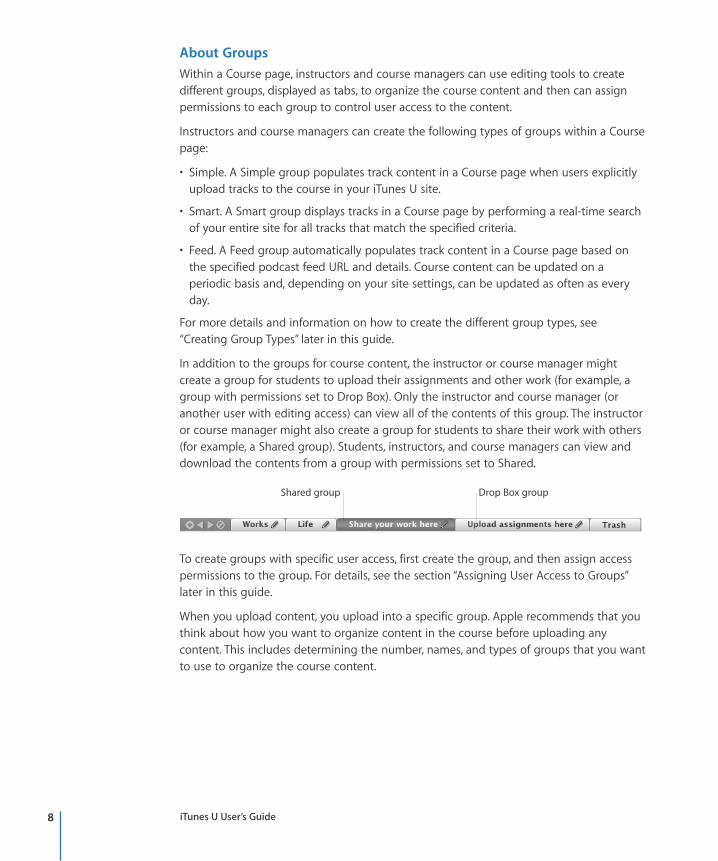
In addition to the groups for course content, the instructor or course manager might create a group for students to upload their assignments and other work (for example, a group with permissions set to Drop Box). Only the instructor and course manager (or another user with editing access) can view all of the contents of this group. The instructor or course manager might also create a group for students to share their work with others (for example, a Shared group). Students, instructors, and course managers can view and download the contents from a group with permissions set to Shared.
Shared group Drop Box group
To create groups with specific user access, first create the group, and then assign access permissions to the group. For details, see the section “Assigning User Access to Groups” later in this guide.
When you upload content, you upload into a specific group. Apple recommends that you think about how you want to organize content in the course before uploading any content. This includes determining the number, names, and types of groups that you want to use to organize the course content.
iTunes U User’s Guide 8
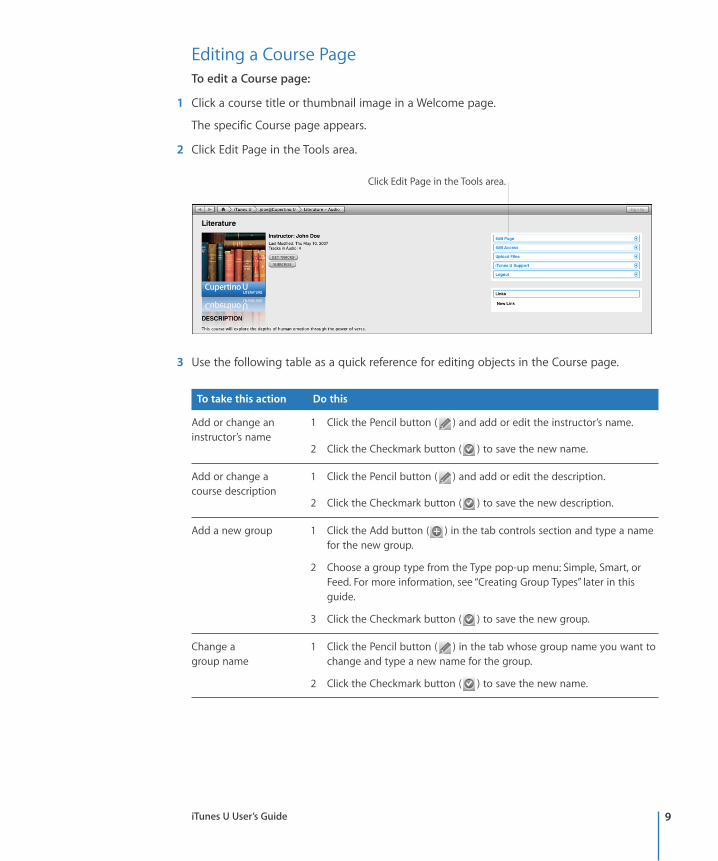
Editing a Course Page To edit a Course page:
1 Click a course title or thumbnail image in a Welcome page.
The specific Course page appears.
2 Click Edit Page in the Tools area.
Click Edit Page in the Tools area.
3 Use the following table as a quick reference for editing objects in the Course page.
To take this action Do this
Add or change an instructor’s name
1 Click the Pencil button ( ) and add or edit the instructor’s name.
2 Click the Checkmark button ( ) to save the new name.
Add or change a course description
1 Click the Pencil button ( ) and add or edit the description.
2 Click the Checkmark button ( ) to save the new description.
Add a new group 1 Click the Add button ( ) in the tab controls section and type a name for the new group.
2 Choose a group type from the Type pop-up menu: Simple, Smart, or Feed. For more information, see “Creating Group Types” later in this guide.
3 Click the Checkmark button ( ) to save the new group.
Change a group name
1 Click the Pencil button ( ) in the tab whose group name you want to change and type a new name for the group.
2 Click the Checkmark button ( ) to save the new name.
iTunes U User’s Guide 9
To take this action Do this
Change a group type 1 Click the Pencil button ( ) in the tab whose group type you want to change.
2 Choose a new group type from the Type pop-up menu: Simple, Smart, or Feed. If you are changing from a Simple group to a Smart group or Feed group and the group contains files, you must move or delete the files before changing the group type.
3 Click the Checkmark button ( ) to save the new group type.
Delete a group 1 Click the tab for the group you want to delete.
2 Click the Delete button ( ) in the tab controls section. When you delete agroup, iTunes U moves any items in the group to the Trash for you to permanently delete later.
Change the order of groups
1 Click the tab for the group you want to move.
2 Click the Left Triangle button ( ) to move the group to the left one position or click the Right Triangle button ( ) to move the group to the right one position.
4 Click End Editing if you are finished or continue with the following sections to create group types, assign user access, add a course image, add links, and upload content to the page.
Creating Group Types Instructors and course managers can create groups, displayed as tabs, to help organize course content. How instructors and course managers create content and structure a course can determine the types of groups you choose to create and therefore how iTunes U populates the groups within a Course page.
Instructors and course managers can create the following types of groups within a Course page:
• Simple. A Simple group populates track content in a Course page when users explicitly upload tracks to the course in your iTunes U site.
• Smart. A Smart group displays tracks in a Course page by performing a real-time search of your entire site for all tracks that match the specified criteria.
• Feed. A Feed group automatically populates track content in a Course page based on the specified podcast feed URL and details. Course content can be updated on a periodic basis and, depending on your site settings, can be updated as often as every day.
Using Feed groups, your institution can host content on a local server instead of uploading content to Apple’s servers, allowing the content to remain inside your institution’s network. This technique offers multiple forms of distribution from a single
iTunes U User’s Guide 10
source, allows the content to appear in iTunes U and other podcast aggregation destinations without multiple efforts, and allows your institution to provide much more content than if it was all uploaded to Apple’s servers.
To create a Simple group:
1 Make sure you are editing a Course page (click Edit Page in the Tools area).
2 Click the Add button ( ) in the tab controls section to create a new group.
3 Type a name for the new group.
4 Choose Simple from the Type pop-up menu.
5 Click the Checkmark button ( ) in the tab controls section to save the new group.
A Simple group populates track content in a Course page when users explicitly upload tracks to the course in your iTunes U site.
To explicitly upload tracks to the course, click Upload Files in the Tools area of the Course page.
To create a Smart group:
1 Make sure you are editing a Course page (click Edit Page in the Tools area).
2 Click the Add button ( ) in the tab controls section to create a new group.
3 Type a name for the new group.
4 Choose Smart from the Type pop-up menu.
5 Choose one of the following from the Rules pop-up menu:
• All. Indicates you want iTunes U to combine rules and search for tracks that match all the rules you define.
• One. Indicates you want iTunes U to search for tracks that match at least one of the rules you define.
6 Choose the criteria you want to search from the pop-up menu and type the text you want to match. You can choose one of the following criteria: Title, Album Name, Artist Name, Comment, Course Description, Group Name, Course Name, Information, Keywords, Description, Lyrics.
For example, you can create a rule with the criteria that “Title matches physics” or “Artist Name matches John Smith.”
7 Click the Add button ( ) to add more rules, or click the Checkmark button ( ) to save the rule.
8 Click the Checkmark button ( ) in the tab controls section to save the new group.
A Smart group displays tracks in a Course page by performing a real-time search of your entire site for all tracks that match the criteria you specify.
iTunes U User’s Guide 11
1 Make sure you are editing a Course page (click Edit Page in the Tools area).
2 Click the Add button ( ) in the tab controls section to create a new group.
3 Type a name for the new group.
4 Choose Feed from the Type pop-up menu.
5 Provide details about the new Feed group using the fields and options provided:
• Feed URL. Type a Really Simple Syndication (RSS) 2.0 full podcast feed URL.
• Security. If the podcast feed URL is protected by HTTP Basic Authentication, choose HTTP Basic Authentication from the Security pop-up menu and specify a username and password in the fields provided. iTunes U uses the credential information to authenticate both the podcast feed URL and the actual content when users attempt to download content.
• Signature. To enable download authentication, choose Append SHA-256 Signature from the Signature pop-up menu. iTunes U appends a SHA-256 Signature to both the podcast and enclosure URLs.
• Check for changes. To check the feed for updates on a daily basis, choose Daily from the “Check for changes” pop-up menu and provide an email address in “Feed owner email.” iTunes U uses the email address to report errors when the non-interactive check of the podcast feed URL fails for any reason. When these periodic checks fail ten times, iTunes U stops checking the feed and no longer updates the group content.
• Status. Displays the status of the last attempt to update the group’s content from the specified podcast feed URL.
6 Click Apply to save changes.
Click Revert to revert any changes you made since the last save.
7 Click the Checkmark button ( ) in the tab controls section to save the new group.
A Feed group automatically populates track content in a Course page based on the podcast feed URL and details you specify. Course content can be updated on a periodic basis and, depending on your site settings, can be updated as often as every day.
When you have finished creating group types or making edits, click End Editing if you are finished or continue with the following sections to assign user access, add a course image, add links, and upload content to the page.
To create a Feed group:
Assigning User Access to Groups If you have edit access for a Course page, you can define the access users have to each group within the Course page, thus determining the activities the users can perform in each group. The combination of a user’s credentials and the specific group access you assign to the credential defines the permissions and actions the user has within the group.
iTunes U User’s Guide 12
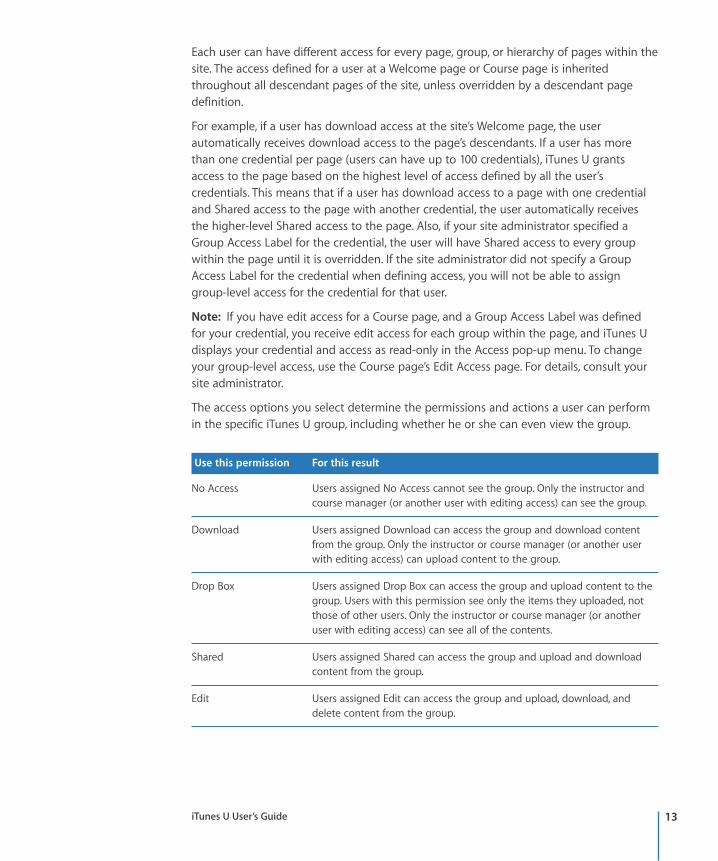
Each user can have different access for every page, group, or hierarchy of pages within the site. The access defined for a user at a Welcome page or Course page is inherited throughout all descendant pages of the site, unless overridden by a descendant page definition.
For example, if a user has download access at the site’s Welcome page, the user automatically receives download access to the page’s descendants. If a user has more than one credential per page (users can have up to 100 credentials), iTunes U grants access to the page based on the highest level of access defined by all the user’s credentials. This means that if a user has download access to a page with one credential and Shared access to the page with another credential, the user automatically receives the higher-level Shared access to the page. Also, if your site administrator specified a Group Access Label for the credential, the user will have Shared access to every group within the page until it is overridden. If the site administrator did not specify a Group Access Label for the credential when defining access, you will not be able to assign group-level access for the credential for that user.
Note: If you have edit access for a Course page, and a Group Access Label was defined for your credential, you receive edit access for each group within the page, and iTunes U displays your credential and access as read-only in the Access pop-up menu. To change your group-level access, use the Course page’s Edit Access page. For details, consult your site administrator.
The access options you select determine the permissions and actions a user can perform in the specific iTunes U group, including whether he or she can even view the group.
Use this permission For this result
No Access Users assigned No Access cannot see the group. Only the instructor and course manager (or another user with editing access) can see the group.
Download Users assigned Download can access the group and download content from the group. Only the instructor or course manager (or another user with editing access) can upload content to the group.
Drop Box Users assigned Drop Box can access the group and upload content to the group. Users with this permission see only the items they uploaded, not those of other users. Only the instructor or course manager (or another user with editing access) can see all of the contents.
Shared Users assigned Shared can access the group and upload and download content from the group.
Edit Users assigned Edit can access the group and upload, download, and delete content from the group.
iTunes U User’s Guide 13
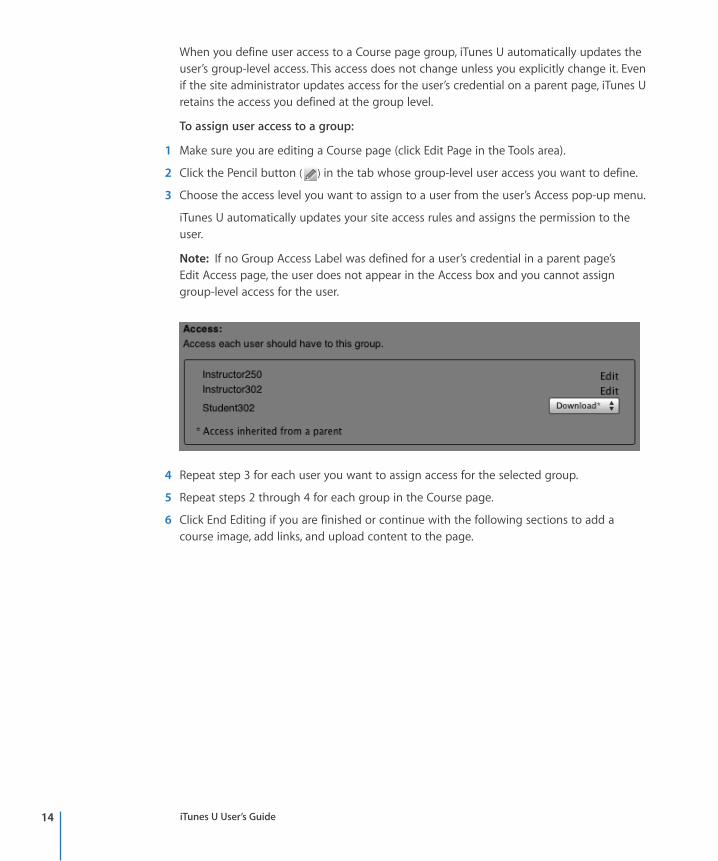
When you define user access to a Course page group, iTunes U automatically updates the user’s group-level access. This access does not change unless you explicitly change it. Even if the site administrator updates access for the user’s credential on a parent page, iTunes U retains the access you defined at the group level.
To assign user access to a group:
1 Make sure you are editing a Course page (click Edit Page in the Tools area).
2 Click the Pencil button ( ) in the tab whose group-level user access you want to define.
3 Choose the access level you want to assign to a user from the user’s Access pop-up menu.
iTunes U automatically updates your site access rules and assigns the permission to the user.
Note: If no Group Access Label was defined for a user’s credential in a parent page’s Edit Access page, the user does not appear in the Access box and you cannot assign group-level access for the user.
4 Repeat step 3 for each user you want to assign access for the selected group.
5 Repeat steps 2 through 4 for each group in the Course page.
6 Click End Editing if you are finished or continue with the following sections to add a course image, add links, and upload content to the page.
iTunes U User’s Guide 14
Adding a Course Image to a Course Page A Course page includes an image that represents the course. The site administrator might have added a default image. You can change the default image to an image specific for the course. A thumbnail version of the image appears on Welcome pages used to navigate to the course.
Note: Each track can have its own artwork. The artwork is displayed in the iTunes Now Playing window when the track is selected or on the iPod, iPhone, or Apple TV during playback. If the site administrator specifies a preference to overwrite the Artwork field, the course image replaces the artwork for the track.
Use an image that is 300 x 300 pixels square and in one of the following formats: JPEG, PNG, or GIF. The file must have the appropriate file extension: .jpg, .jpeg, .png, or .gif.
To add a course image:
1 Make sure you are editing a Course page (click Edit Page in the Tools area).
2 Click the Up Arrow button ( ) in the upper-left corner of the course image.
3 Click Choose File.
4 Browse for a new file and select it.
5 Click Return to iTunes.
6 Click End Editing if you are finished or continue with the following sections to add links and upload content to the page.
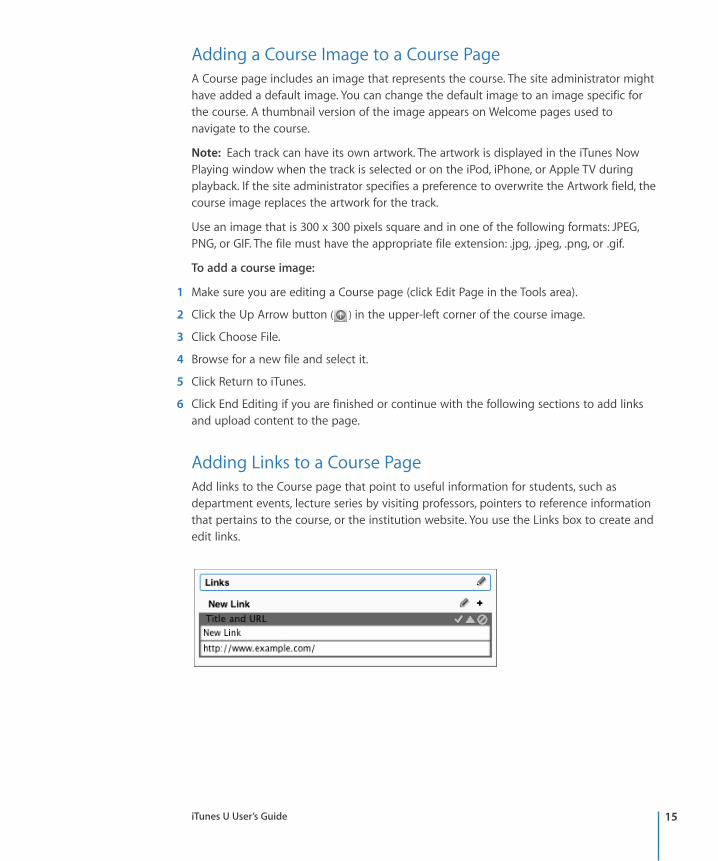
Adding Links to a Course Page Add links to the Course page that point to useful information for students, such as department events, lecture series by visiting professors, pointers to reference information that pertains to the course, or the institution website. You use the Links box to create and edit links.
iTunes U User’s Guide 15
The following table describes how to add and edit links in a Course page Links box. First, make sure you are editing a Course page (click Edit Page in the Tools area).
To take this action Do this
Add a link 1 Click the Add button ( ) in the Links box above where you want the new link to appear.
2 Type a title and URL for the link in the Title and URL edit box.
3 Click the Checkmark button ( ) to save the new link.
Edit an existing link 1 Click the Pencil button ( ) in the Links box next to the link you want to edit.
2 Edit the existing link title and URL.
3 Click the Checkmark button ( ) to save the new information.
Reorder links 1 Click the Pencil button ( ) in the Links box next to the link you want to move.
2 Click the Up Triangle button ( ) to move the link up one position, or
click the Down Triangle button ( ) to move the link down one position.
3 Click the Checkmark button ( ) to save the new link order.
Delete a link 1 Click the Pencil button ( ) in the Links box next to the link you want to delete.
2 Click the Delete button ( ) .
Change a Links box title
1 Click the Pencil button ( ) in the Links box title bar.
2 Edit the existing Links box title text.
3 Click the Checkmark button ( ) to save the new title.
Click End Editing if you are finished or continue with the following sections to upload content to the page.
Note: To add links between iTunes U pages, you can copy and paste an iTunes U URL directly into the Links box Title and URL edit box. Because the link uses the https:// URL protocol, when a user clicks the link, the user is first redirected to a web browser and then taken to the page, group, or track defined in the link. To avoid the trip through the web browser, use an iTunes link by changing the https:// in the URL to itmss://. When iTunes was installed on your system, it added itself as a URL scheme handler for itmss:// URLs. When a user tries to access an itmss:// URL, if the user has not already established a session, iTunes U reroutes the user to the Site login URL specified by your site administrator.
iTunes U User’s Guide 16
Understanding Track Information Fields The content you upload into iTunes U can include information fields, such as Name or Artist. Information fields help students locate and organize their iTunes U content after they download it to their computers, iPod music players, iPhone, and Apple TV. For more information on these fields, see Creating Content for iPod + iTunes located at http://www.apple.com/support/itunes_u.
Before you upload content to your iTunes U site, use iTunes to add or edit track information to provide helpful details and extra information for students and others (Control-click the track, choose Get Info from the shortcut menu, click the Info tab, and then add or edit the track information fields).
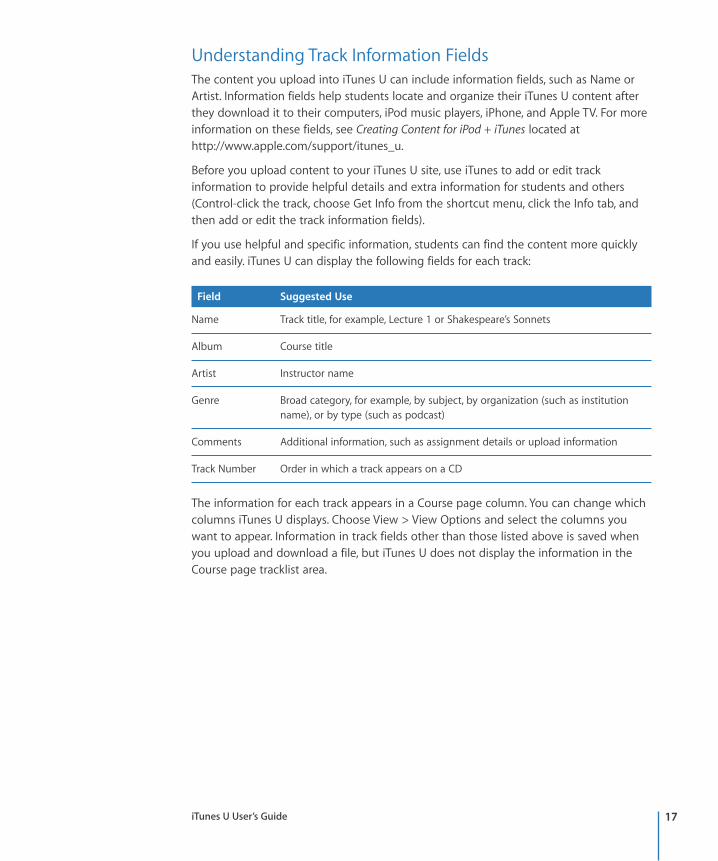
If you use helpful and specific information, students can find the content more quickly and easily. iTunes U can display the following fields for each track:
Field Suggested Use
Name Track title, for example, Lecture 1 or Shakespeare’s Sonnets
Album Course title
Artist Instructor name
Genre Broad category, for example, by subject, by organization (such as institution name), or by type (such as podcast)
Comments Additional information, such as assignment details or upload information
Track Number Order in which a track appears on a CD
The information for each track appears in a Course page column. You can change which columns iTunes U displays. Choose View > View Options and select the columns you want to appear. Information in track fields other than those listed above is saved when you upload and download a file, but iTunes U does not display the information in the Course page tracklist area.
iTunes U User’s Guide 17
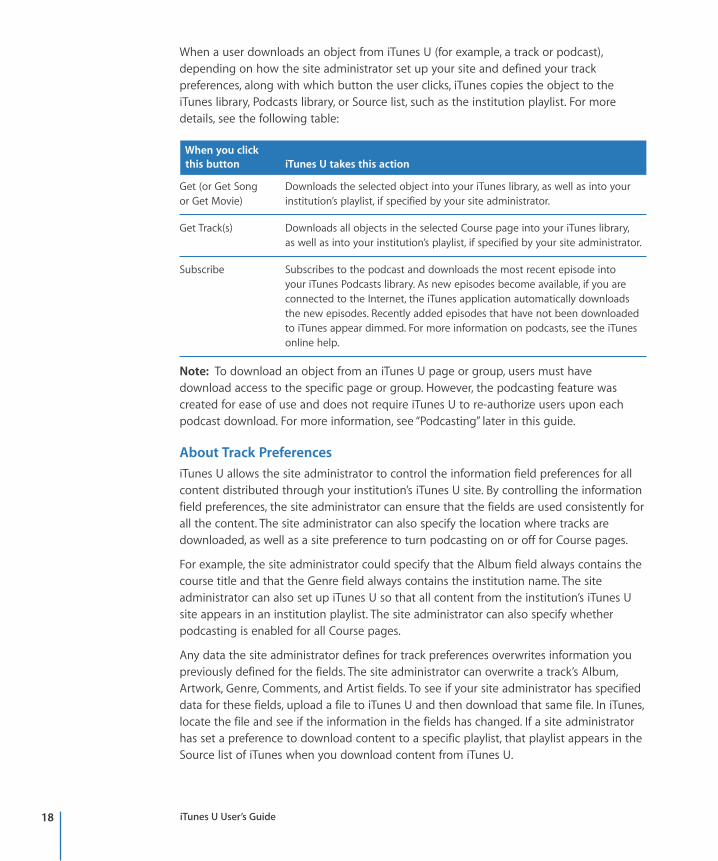
When a user downloads an object from iTunes U (for example, a track or podcast), depending on how the site administrator set up your site and defined your track preferences, along with which button the user clicks, iTunes copies the object to the iTunes library, Podcasts library, or Source list, such as the institution playlist. For more details, see the following table:
When you click this button iTunes U takes this action
Get (or Get Song or Get Movie)
Downloads the selected object into your iTunes library, as well as into your institution’s playlist, if specified by your site administrator.
Get Track(s) Downloads all objects in the selected Course page into your iTunes library, as well as into your institution’s playlist, if specified by your site administrator.
Subscribe Subscribes to the podcast and downloads the most recent episode into your iTunes Podcasts library. As new episodes become available, if you are connected to the Internet, the iTunes application automatically downloads the new episodes. Recently added episodes that have not been downloaded to iTunes appear dimmed. For more information on podcasts, see the iTunes online help.
Note: To download an object from an iTunes U page or group, users must have download access to the specific page or group. However, the podcasting feature was created for ease of use and does not require iTunes U to re-authorize users upon each podcast download. For more information, see “Podcasting” later in this guide.
About Track Preferences iTunes U allows the site administrator to control the information field preferences for all content distributed through your institution’s iTunes U site. By controlling the information field preferences, the site administrator can ensure that the fields are used consistently for all the content. The site administrator can also specify the location where tracks are downloaded, as well as a site preference to turn podcasting on or off for Course pages.
For example, the site administrator could specify that the Album field always contains the course title and that the Genre field always contains the institution name. The site administrator can also set up iTunes U so that all content from the institution’s iTunes U site appears in an institution playlist. The site administrator can also specify whether podcasting is enabled for all Course pages.
Any data the site administrator defines for track preferences overwrites information you previously defined for the fields. The site administrator can overwrite a track’s Album, Artwork, Genre, Comments, and Artist fields. To see if your site administrator has specified data for these fields, upload a file to iTunes U and then download that same file. In iTunes, locate the file and see if the information in the fields has changed. If a site administrator has set a preference to download content to a specific playlist, that playlist appears in the Source list of iTunes when you download content from iTunes U.
iTunes U User’s Guide 18
Note: If the site administrator specifies to override comment data with upload information, instructors and course managers cannot use the Comments field to communicate with their students. Any comments the instructor, course manager, or student might write about content they have uploaded are overwritten with information about when the track was uploaded to iTunes U.
Uploading Content to a Course Page After creating groups, assigning user access, adding an image, and adding links to the Course page, you are ready to upload audio, video, and PDF files. Audio files can be in AAC or MP3 format with the appropriate file extension (.m4a or .mp3). Video files can be in MPEG-4 format with H.264 compression with the appropriate file extension (.mp4, .m4v, or .mov). PDF booklets must have the .pdf extension.
For audio files, Apple recommends the following:
• Audio Format: AAC-LC (Music)
• Data Rate: 128 kbits/sec
• Channels: Stereo
• Output Sample Rate: 44.100 kHz
• Encoding Quality: Better
For video files, Apple recommends the following:
• Video Format: MPEG-4 with H.264
• Data Rate: 256 kbits/sec
• Image Size: 320 x 240
• Frame Rate: 30
• Key Frame: Every 24 frames
For details on file formats and preparing content, see Creating Content for iPod + iTunes located at http://www.apple.com/support/itunes_u.
If you are using QuickTime to create and edit video content, it is recommended that you export your videos by choosing Movie to iPod from the Export pop-up menu in QuickTime Pro.
Note: Internet Explorer on Windows may have performance limitations when uploading files. For more information, see the Microsoft Help and Support Site at http://support.microsoft.com/default.aspx?scid=kb;en-us;329781.
iTunes U User’s Guide 19
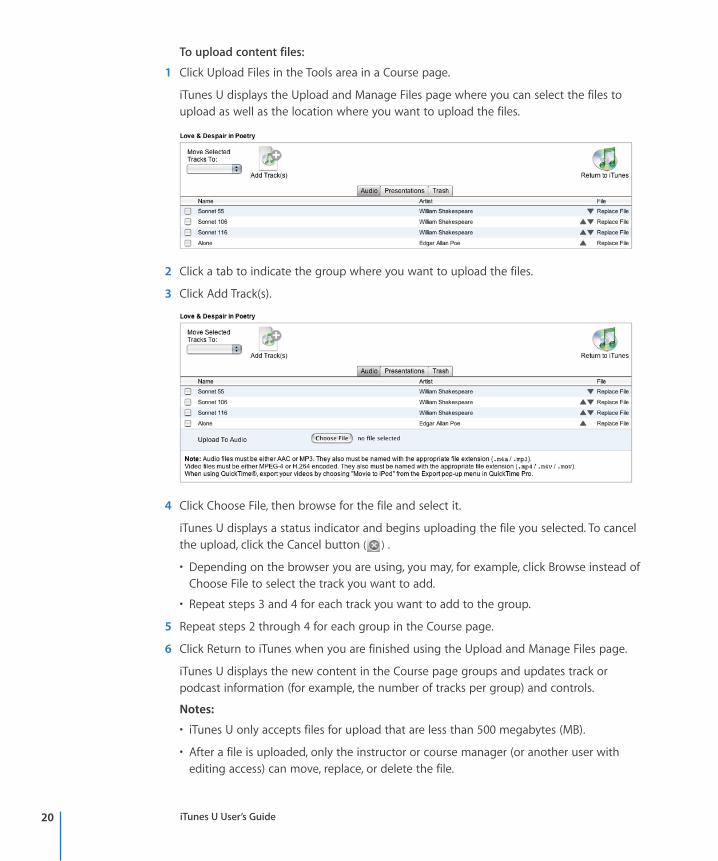
To upload content files:
1 Click Upload Files in the Tools area in a Course page.
iTunes U displays the Upload and Manage Files page where you can select the files to upload as well as the location where you want to upload the files.
2 Click a tab to indicate the group where you want to upload the files.
3 Click Add Track(s).
4 Click Choose File, then browse for the file and select it.
iTunes U displays a status indicator and begins uploading the file you selected. To cancel the upload, click the Cancel button ( ) .
• Depending on the browser you are using, you may, for example, click Browse instead of Choose File to select the track you want to add.
• Repeat steps 3 and 4 for each track you want to add to the group.
5 Repeat steps 2 through 4 for each group in the Course page.
6 Click Return to iTunes when you are finished using the Upload and Manage Files page.
iTunes U displays the new content in the Course page groups and updates track or podcast information (for example, the number of tracks per group) and controls.
Notes:
• iTunes U only accepts files for upload that are less than 500 megabytes (MB).
• After a file is uploaded, only the instructor or course manager (or another user with editing access) can move, replace, or delete the file.
iTunes U User’s Guide 20
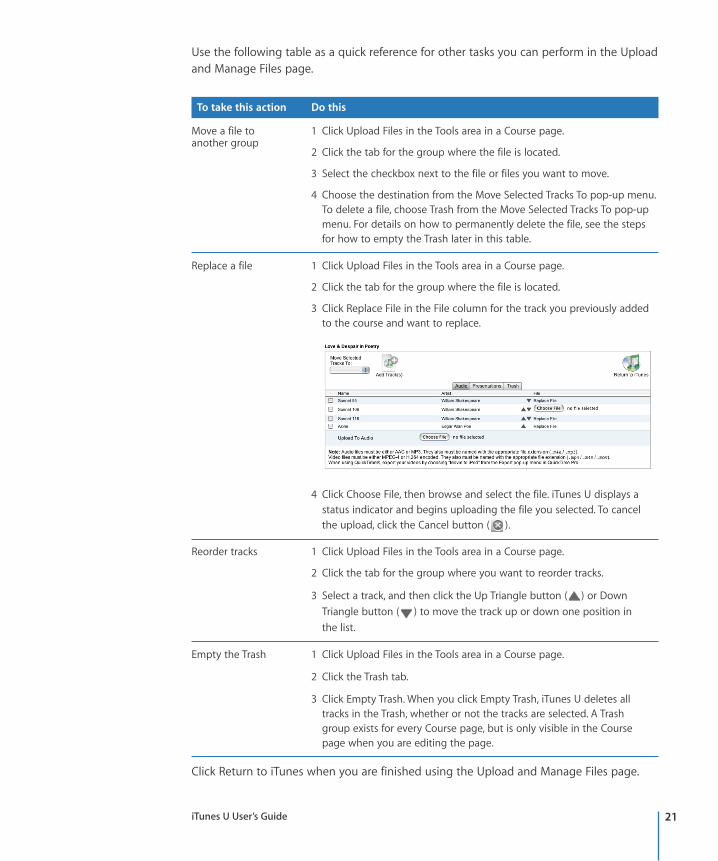
Use the following table as a quick reference for other tasks you can perform in the Upload and Manage Files page.
To take this action Do this
Move a file to another group
1 Click Upload Files in the Tools area in a Course page.
2 Click the tab for the group where the file is located.
3 Select the checkbox next to the file or files you want to move.
4 Choose the destination from the Move Selected Tracks To pop-up menu. To delete a file, choose Trash from the Move Selected Tracks To pop-up menu. For details on how to permanently delete the file, see the steps for how to empty the Trash later in this table.
Replace a file 1 Click Upload Files in the Tools area in a Course page.
2 Click the tab for the group where the file is located.
3 Click Replace File in the File column for the track you previously added to the course and want to replace.
4 Click Choose File, then browse and select the file. iTunes U displays a status indicator and begins uploading the file you selected. To cancel the upload, click the Cancel button ( ).
Reorder tracks 1 Click Upload Files in the Tools area in a Course page.
2 Click the tab for the group where you want to reorder tracks.
3 Select a track, and then click the Up Triangle button ( ) or Down Triangle button ( ) to move the track up or down one position in the list.
Empty the Trash 1 Click Upload Files in the Tools area in a Course page.
2 Click the Trash tab.
3 Click Empty Trash. When you click Empty Trash, iTunes U deletes all tracks in the Trash, whether or not the tracks are selected. A Trash group exists for every Course page, but is only visible in the Course page when you are editing the page.
Click Return to iTunes when you are finished using the Upload and Manage Files page.
iTunes U User’s Guide 21
1 Click the iTunes search field.
2 Type the text you want to find.
3 Press the Return key.
In the top half of the Search Results window, iTunes U displays up to four unique Welcome or Course pages that contain the most relevant matches to the text you entered (for example, a track title match has a higher relevance than another information field match). Clicking a Welcome or Course page in the Search Results window displays the Welcome page or Course page with the first tab selected.
Podcasting Podcasting provides a convenient, subscription-based model for distributing course content. Podcasting makes your course content mobile and supports anywhere, anytime learning. Students can subscribe to the course and have the content automatically downloaded as soon as it is made available.
Your site administrator controls whether or not podcasting is a feature available within Course pages at your institution. Because distributing content via podcasting might be a security concern at your institution, it might not be available. If podcasting is available, users see a Subscribe button in the Course page. Clicking Subscribe allows users to subscribe to the selected podcast and use the podcasting features in iTunes.
The podcasting feature in iTunes U was created for ease of use and therefore does not require iTunes U to re-authorize users upon each podcast download. When a user first subscribes to a course or group, iTunes U verifies that the user has access permissions to the course or group. After the initial subscription, iTunes U does not re-authorize the user to verify that the user still has permissions to view or download course content. For example, if a student enrolls in a course, clicks Subscribe, and downloads course content, the student continues to receive the podcast content even after the student drops the course or leaves your institution.
Note: When a user subscribes to a podcast, iTunes U displays all information fields (for example, Course name, Group name, Track name, and Comment) in the Description column in the Podcasts library.
Searching Your iTunes U Site You can use the search field (in the upper-right corner of the iTunes window) to quickly locate items in your iTunes U site. When you search for items within your iTunes U site, iTunes U displays results that contain the text you entered based on matches within specific fields, including page name, group name, track title, artist name, album name, comments, lyrics, and course descriptions.
To find an item in your iTunes U site:
iTunes U User’s Guide 22
In the tracklist area of the Search Results window, iTunes U displays the items that contain the text you entered. You cannot search on tracks that were moved to the Trash.
To view comments matching the search results for the Comment column, make sure iTunes is displaying the Comment column (choose View > View Options).
To see all your items again, click the Back button in the navigation bar.
For MPEG-4 files, you can also search on keyword, description, and information fields. iTunes sets the information field when a user edits the Grouping field in the iTunes Get Info page for an MPEG-4 file.
For ID3-compliant files, you can also search on the TIT1 and TIT3 fields. iTunes sets the ID3 TIT1 field when a user edits the Grouping field in the iTunes Get Info page for an ID3-compliant file.
If your iTunes U site is included in the iTunes Store directory and you search your site from within the iTunes Store, your initial search returns all matches throughout all iTunes U sites, as well as all matches throughout the iTunes Store.
To narrow your initial search to your iTunes U site:
1 Click the iTunes U category in the Search Results window.
2 Click Power Search.
3 Type a title, description, or institution name in the search fields.
4 Click Search or press the Enter key.
To add additional keywords for iTunes U to search:
1 Control-click the track where you want to add keywords, then choose Get Info from the shortcut menu that appears.
2 Click the Info tab.
3 Add keywords to the Grouping field.
When searching your iTunes U site, after a track title, keywords in the Grouping field have the second-highest matching relevance.
4 Click OK.
Logging Out of iTunes U When you have finished making changes to the Course page, click End Editing.
iTunes U applies changes on an ongoing basis, not only after you click End Editing. Other users of the Course page see changes immediately after you make each change.
Click Logout in the Tools area to log out of your iTunes U site.
iTunes U User’s Guide 23