apache kafka cluster and zookeeper setup/administration in … · to understand how kafka does...
TRANSCRIPT

APACHE KAFKA Cluster and Zookeeper Setup/Administration in
AWS

(Abhishek Dhar) [email protected] 2
DOCUMENT HISTORY
VERSION DATE AUTHOR CHANGES
1.0 07/07/2018 Abhishek Dhar First Draft of Document
(Abhishek Dhar) [email protected] 3
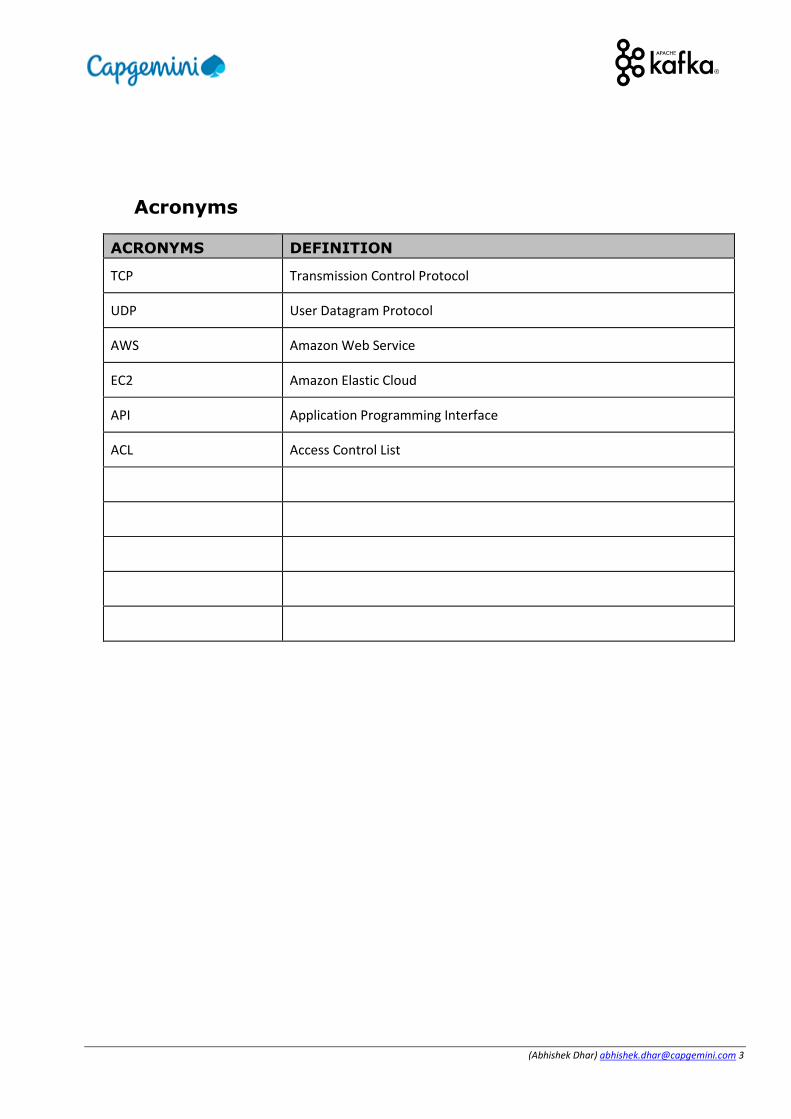
Acronyms
ACRONYMS DEFINITION
TCP Transmission Control Protocol
UDP User Datagram Protocol
AWS Amazon Web Service
EC2 Amazon Elastic Cloud
API Application Programming Interface
ACL Access Control List

(Abhishek Dhar) [email protected] 4
TABLE OF CONTENTS
1 OBJECTIVE .......................................................................................................................... 5
1.1 Objective .................................................................................................................................... 5
1.2 What is KAFKA ............................................................................................................................ 5
1.3 ZooKeeper Quorum Architecture ................................................................................................. 7
1.4 KAFKA Cluster Architecture ......................................................................................................... 7
1.5 Consolidated Architecture ........................................................................................................... 8
2 ZOOKEEPER ........................................................................................................................ 8
2.1 What is Zookeeper ...................................................................................................................... 8
2.2 What is Zookeeper’s role in KAFKA .............................................................................................. 9
2.3 Zookeeper quorum sizing ............................................................................................................ 9
2.4 Zookeeper configuration ........................................................................................................... 10
3 AWS SETUP ....................................................................................................................... 10
3.1 zookeeper aws setup ................................................................................................................. 10
3.2 Single zookeeper machine setup ................................................................................................ 14
3.3 Zookeeper command line interface ............................................................................................ 17
3.4 Zookeeper Quorum setup – PART 1 ............................................................................................ 17
3.5 Zookeeper Quorum setup – PART 2 ............................................................................................ 19
4 WEB TOOLS AWS EC2 MACHINE (DOCKER) ........................................................................ 20
4.1 Management tools for zookeeper (ZooNavigator) ...................................................................... 23
5 KAFKA............................................................................................................................... 23
5.1 KAFKA Cluster size ..................................................................................................................... 23
5.2 KAFKA configuration ................................................................................................................. 24
5.3 KAFKA setup in AWS .................................................................................................................. 25
5.4 single kafka broker setup ........................................................................................................... 29
5.5 KAFKA multi cluster setup ......................................................................................................... 32
5.6 Testing the kafka cluster and connecting from Outside ............................................................... 34
5.7 KAFKA Manager for Cluster Management .................................................................................. 34
6 INSTALLING KAFKA TOPICS UI, CONFLUENT REST PROXY AND SCHEMA ............................. 60
(Abhishek Dhar) [email protected] 5
1 OBJECTIVE
1.1 OBJECTIVE
This document is not intended to illustrate or talk about KAFKA since there are plenty of online resources available that discusses KAFKA. This document however aims to illustrate how to do a KAFKA Cluster setup in Amazon AWS and then leverage the infrastructure to create scalable applications.
Intention
1. One Cluster Setup in production in AWS 2. Zookeeper
a. Setup, usage and maintenance 3. KAFKA Setup
a. Setup, configuration, maintenance, settings and optimization, recovery 4. Tools setup
a. ZooNavigator b. KAFKA Manager (Administrative tasks) c. Confluence schema registry d. Landoop KAFKA Topics UI
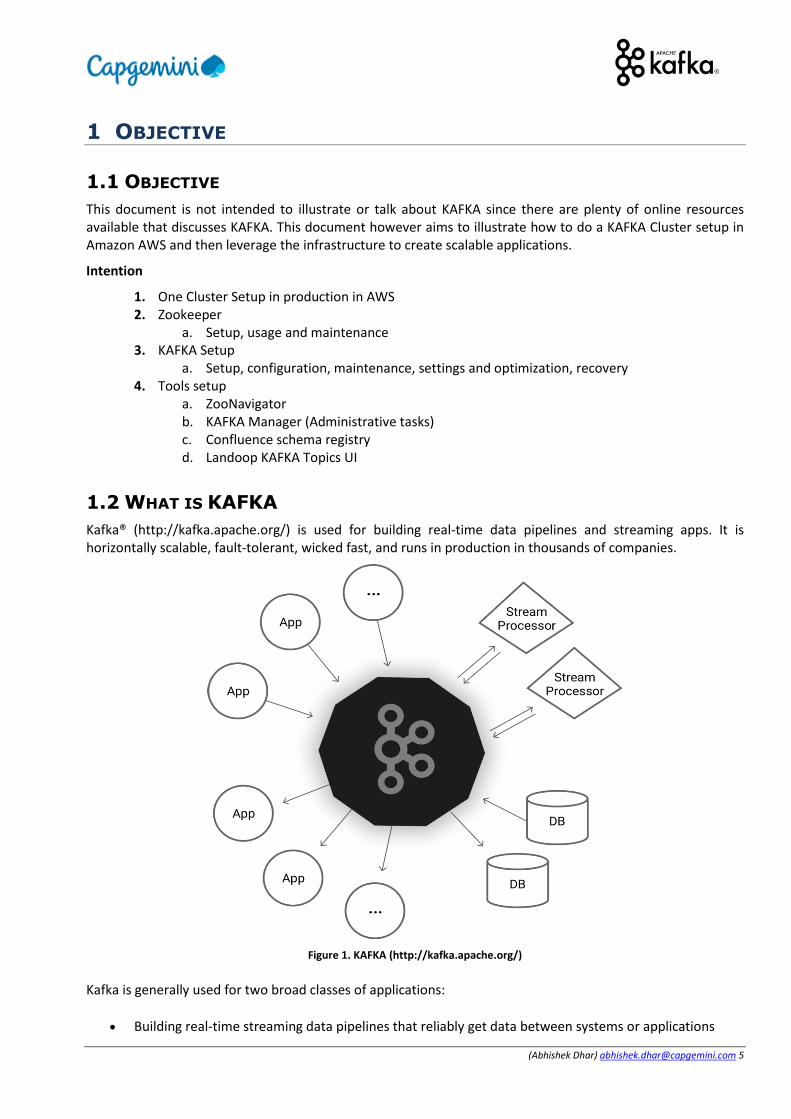
1.2 WHAT IS KAFKA
Kafka® (http://kafka.apache.org/) is used for building real-time data pipelines and streaming apps. It is horizontally scalable, fault-tolerant, wicked fast, and runs in production in thousands of companies.
Figure 1. KAFKA (http://kafka.apache.org/)
Kafka is generally used for two broad classes of applications:
• Building real-time streaming data pipelines that reliably get data between systems or applications

(Abhishek Dhar) [email protected] 6
• Building real-time streaming applications that transform or react to the streams of data
To understand how Kafka does these things, let's dive in and explore Kafka's capabilities from the bottom up.
First a few concepts:
• Kafka is run as a cluster on one or more servers that can span multiple datacenters. • The Kafka cluster stores streams of records in categories called topics. • Each record consists of a key, a value, and a timestamp.
Figure 2. KAFKA Aspects (http://kafka.apache.org/)
Kafka has four core APIs:
• The Producer API allows an application to publish a stream of records to one or more Kafka topics. • The Consumer API allows an application to subscribe to one or more topics and process the stream of
records produced to them. • The Streams API allows an application to act as a stream processor, consuming an input stream from
one or more topics and producing an output stream to one or more output topics, effectively transforming the input streams to output streams.
• The Connector API allows building and running reusable producers or consumers that connect Kafka topics to existing applications or data systems. For example, a connector to a relational database might capture every change to a table
In Kafka the communication between the clients and the servers is done with a simple, high-performance, language agnostic TCP protocol. This protocol is versioned and maintains backwards compatibility with older version. We provide a Java client for Kafka, but clients are available in many languages.
(Abhishek Dhar) [email protected] 7
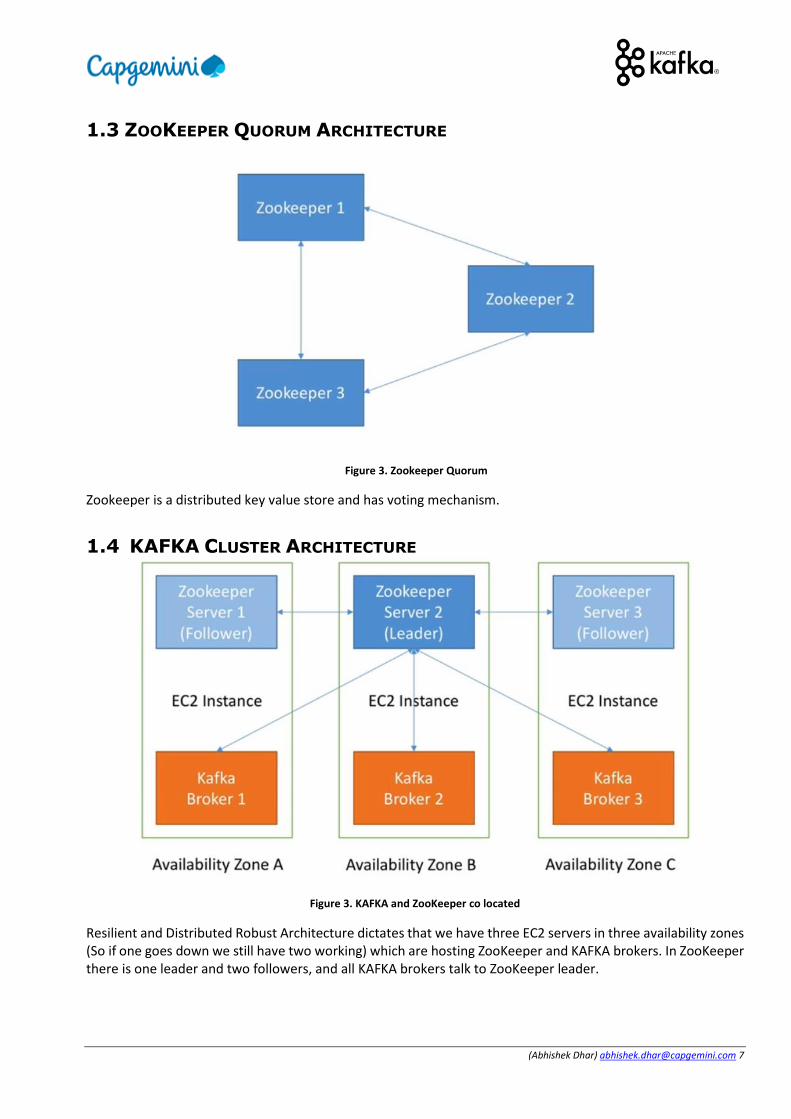
1.3 ZOOKEEPER QUORUM ARCHITECTURE
Figure 3. Zookeeper Quorum
Zookeeper is a distributed key value store and has voting mechanism.
1.4 KAFKA CLUSTER ARCHITECTURE
Figure 3. KAFKA and ZooKeeper co located
Resilient and Distributed Robust Architecture dictates that we have three EC2 servers in three availability zones (So if one goes down we still have two working) which are hosting ZooKeeper and KAFKA brokers. In ZooKeeper there is one leader and two followers, and all KAFKA brokers talk to ZooKeeper leader.
(Abhishek Dhar) [email protected] 8
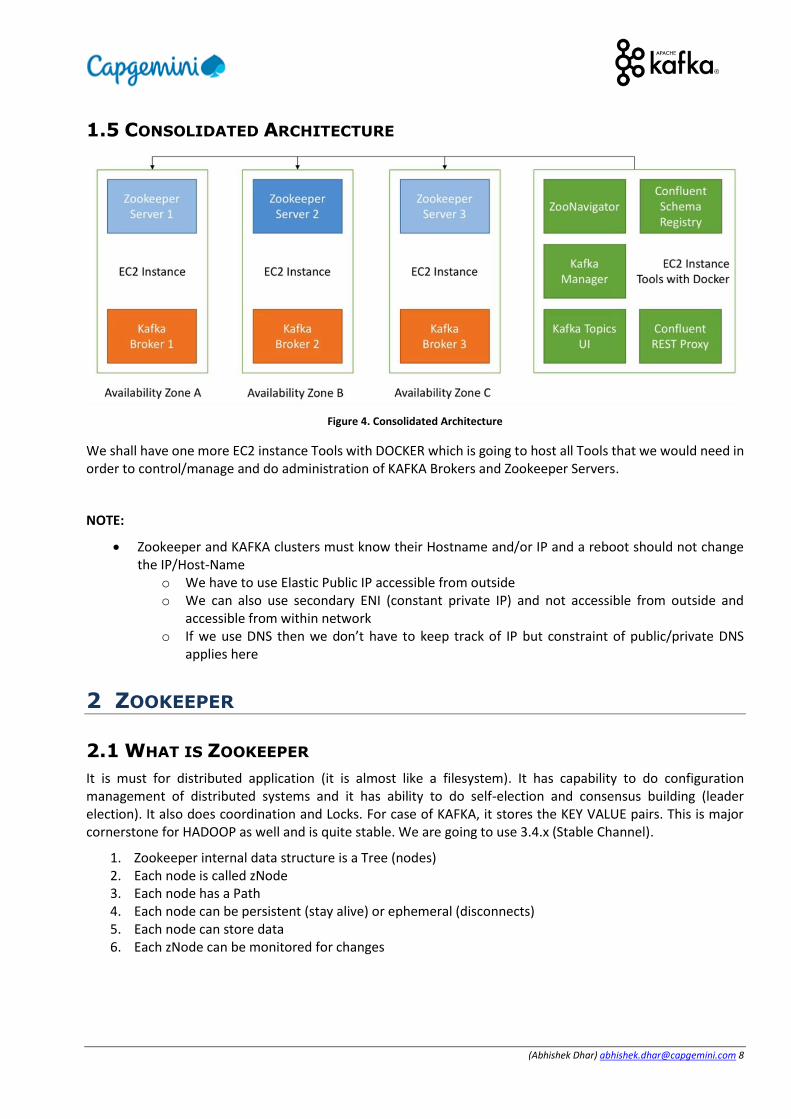
1.5 CONSOLIDATED ARCHITECTURE
Figure 4. Consolidated Architecture
We shall have one more EC2 instance Tools with DOCKER which is going to host all Tools that we would need in order to control/manage and do administration of KAFKA Brokers and Zookeeper Servers.
NOTE:
• Zookeeper and KAFKA clusters must know their Hostname and/or IP and a reboot should not change the IP/Host-Name
o We have to use Elastic Public IP accessible from outside o We can also use secondary ENI (constant private IP) and not accessible from outside and
accessible from within network o If we use DNS then we don’t have to keep track of IP but constraint of public/private DNS
applies here
2 ZOOKEEPER
2.1 WHAT IS ZOOKEEPER
It is must for distributed application (it is almost like a filesystem). It has capability to do configuration management of distributed systems and it has ability to do self-election and consensus building (leader election). It also does coordination and Locks. For case of KAFKA, it stores the KEY VALUE pairs. This is major cornerstone for HADOOP as well and is quite stable. We are going to use 3.4.x (Stable Channel).
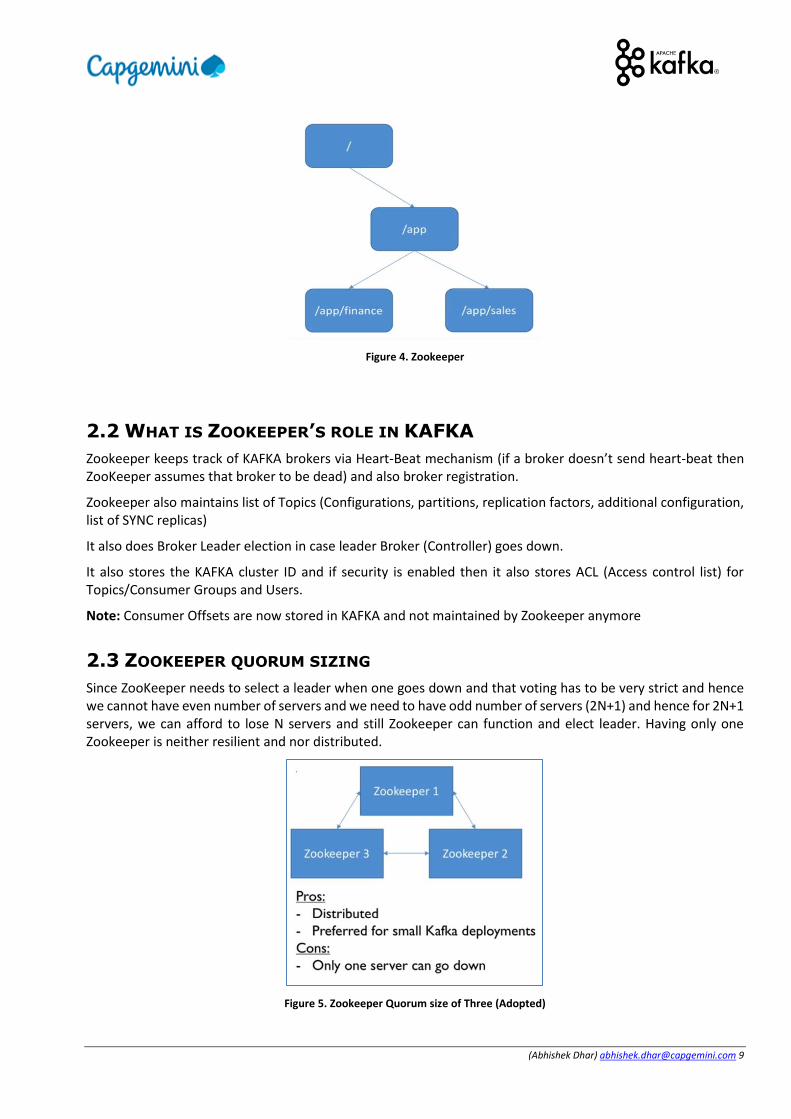
1. Zookeeper internal data structure is a Tree (nodes) 2. Each node is called zNode 3. Each node has a Path 4. Each node can be persistent (stay alive) or ephemeral (disconnects) 5. Each node can store data 6. Each zNode can be monitored for changes
(Abhishek Dhar) [email protected] 9
Figure 4. Zookeeper
2.2 WHAT IS ZOOKEEPER’S ROLE IN KAFKA
Zookeeper keeps track of KAFKA brokers via Heart-Beat mechanism (if a broker doesn’t send heart-beat then ZooKeeper assumes that broker to be dead) and also broker registration.
Zookeeper also maintains list of Topics (Configurations, partitions, replication factors, additional configuration, list of SYNC replicas)
It also does Broker Leader election in case leader Broker (Controller) goes down.
It also stores the KAFKA cluster ID and if security is enabled then it also stores ACL (Access control list) for Topics/Consumer Groups and Users.
Note: Consumer Offsets are now stored in KAFKA and not maintained by Zookeeper anymore
2.3 ZOOKEEPER QUORUM SIZING
Since ZooKeeper needs to select a leader when one goes down and that voting has to be very strict and hence we cannot have even number of servers and we need to have odd number of servers (2N+1) and hence for 2N+1 servers, we can afford to lose N servers and still Zookeeper can function and elect leader. Having only one Zookeeper is neither resilient and nor distributed.
Figure 5. Zookeeper Quorum size of Three (Adopted)

(Abhishek Dhar) [email protected] 10
2.4 ZOOKEEPER CONFIGURATION
Figure 6. Zookeeper.Properties File
1. Specifies where ZooKeeper stores data 2. Specifies the port at which client will connect 3. How many clients can connect with zookeeper (0 is unlimited) 4. 2 Seconds is the Heart Beat Time 5. Init Time (10 * 2000 milliseconds) is used for initial synchronization 6. Sync Limit specifies the time of ticks requires to receive an acknowledge for a request 7. It also defines the ZooKeeper clusters of three servers and the PORTS it needs to open up
3 AWS SETUP
3.1 ZOOKEEPER AWS SETUP
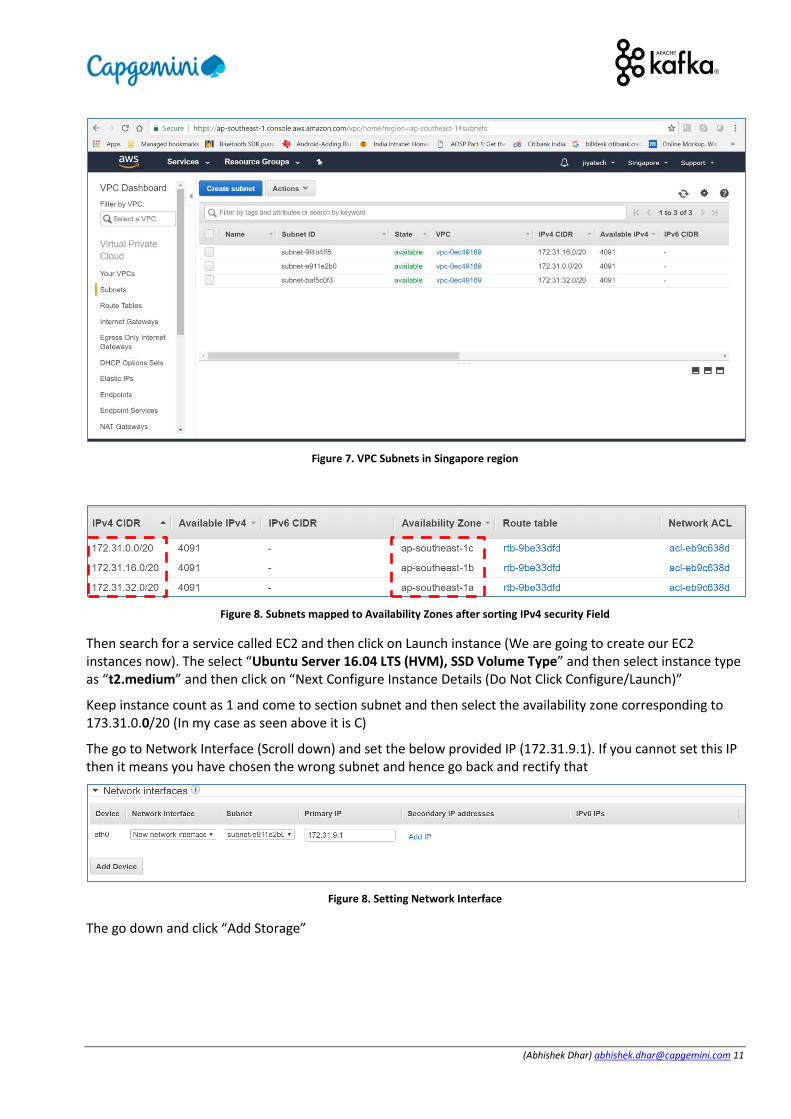
Create an account in https://console.aws.amazon.com and select a region that is closest to you. Then search for a service called VPC and then select subnets (For Mumbai region there are two subnets but we atleast need three subnets and hence switch to some other region like Singapore and then keep a track of Availability zones corresponding to the subnets )
(Abhishek Dhar) [email protected] 11
Figure 7. VPC Subnets in Singapore region
Figure 8. Subnets mapped to Availability Zones after sorting IPv4 security Field
Then search for a service called EC2 and then click on Launch instance (We are going to create our EC2 instances now). The select “Ubuntu Server 16.04 LTS (HVM), SSD Volume Type” and then select instance type as “t2.medium” and then click on “Next Configure Instance Details (Do Not Click Configure/Launch)”
Keep instance count as 1 and come to section subnet and then select the availability zone corresponding to 173.31.0.0/20 (In my case as seen above it is C)
The go to Network Interface (Scroll down) and set the below provided IP (172.31.9.1). If you cannot set this IP then it means you have chosen the wrong subnet and hence go back and rectify that
Figure 8. Setting Network Interface
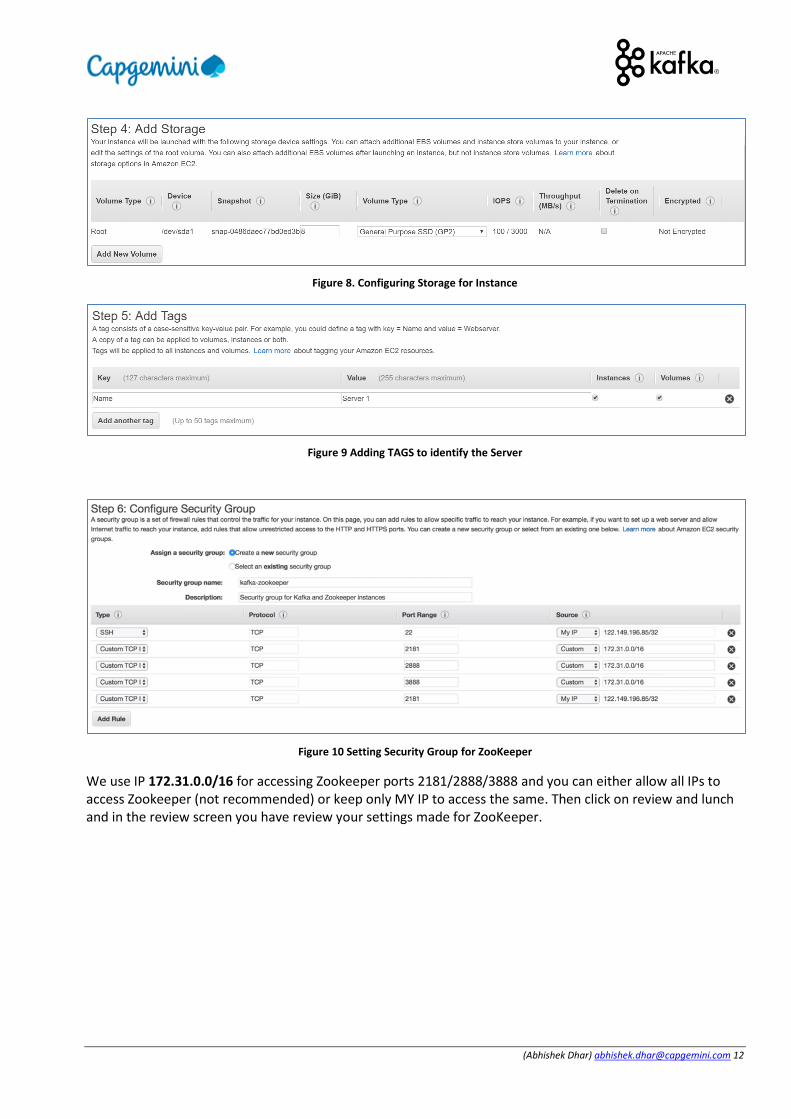
The go down and click “Add Storage”
(Abhishek Dhar) [email protected] 12
Figure 8. Configuring Storage for Instance
Figure 9 Adding TAGS to identify the Server
Figure 10 Setting Security Group for ZooKeeper
We use IP 172.31.0.0/16 for accessing Zookeeper ports 2181/2888/3888 and you can either allow all IPs to access Zookeeper (not recommended) or keep only MY IP to access the same. Then click on review and lunch and in the review screen you have review your settings made for ZooKeeper.
(Abhishek Dhar) [email protected] 13
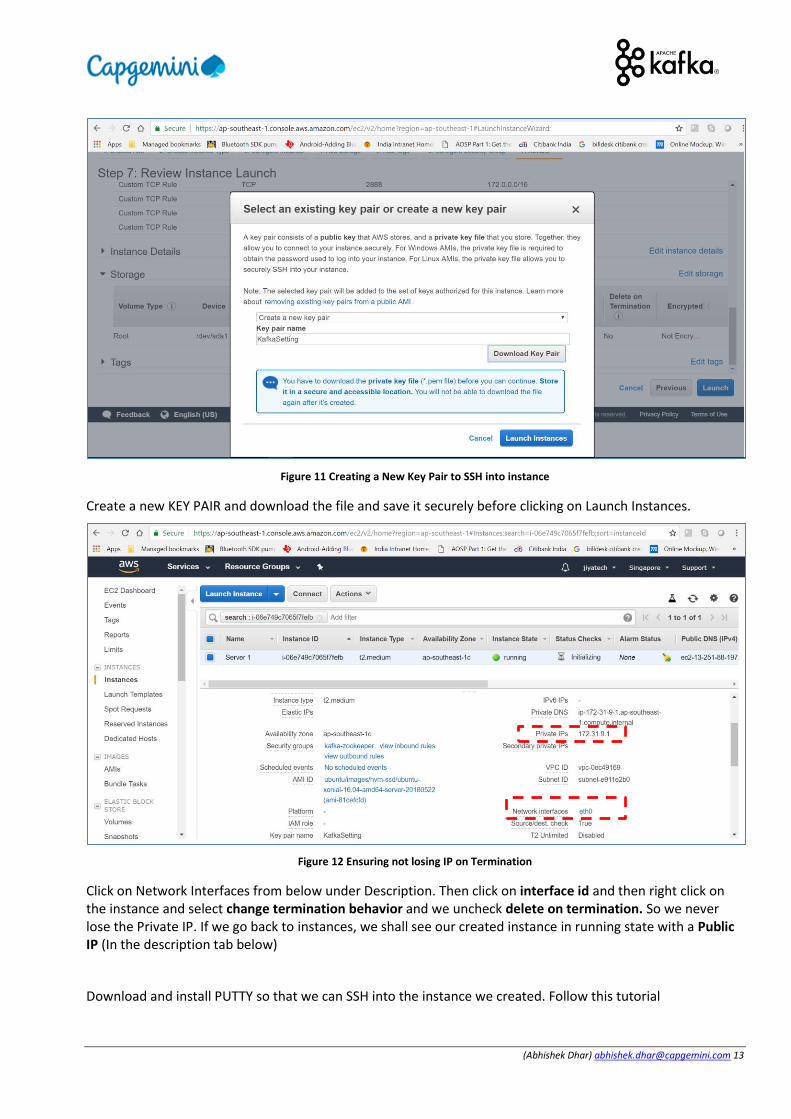
Figure 11 Creating a New Key Pair to SSH into instance
Create a new KEY PAIR and download the file and save it securely before clicking on Launch Instances.
Figure 12 Ensuring not losing IP on Termination
Click on Network Interfaces from below under Description. Then click on interface id and then right click on the instance and select change termination behavior and we uncheck delete on termination. So we never lose the Private IP. If we go back to instances, we shall see our created instance in running state with a Public IP (In the description tab below)
Download and install PUTTY so that we can SSH into the instance we created. Follow this tutorial
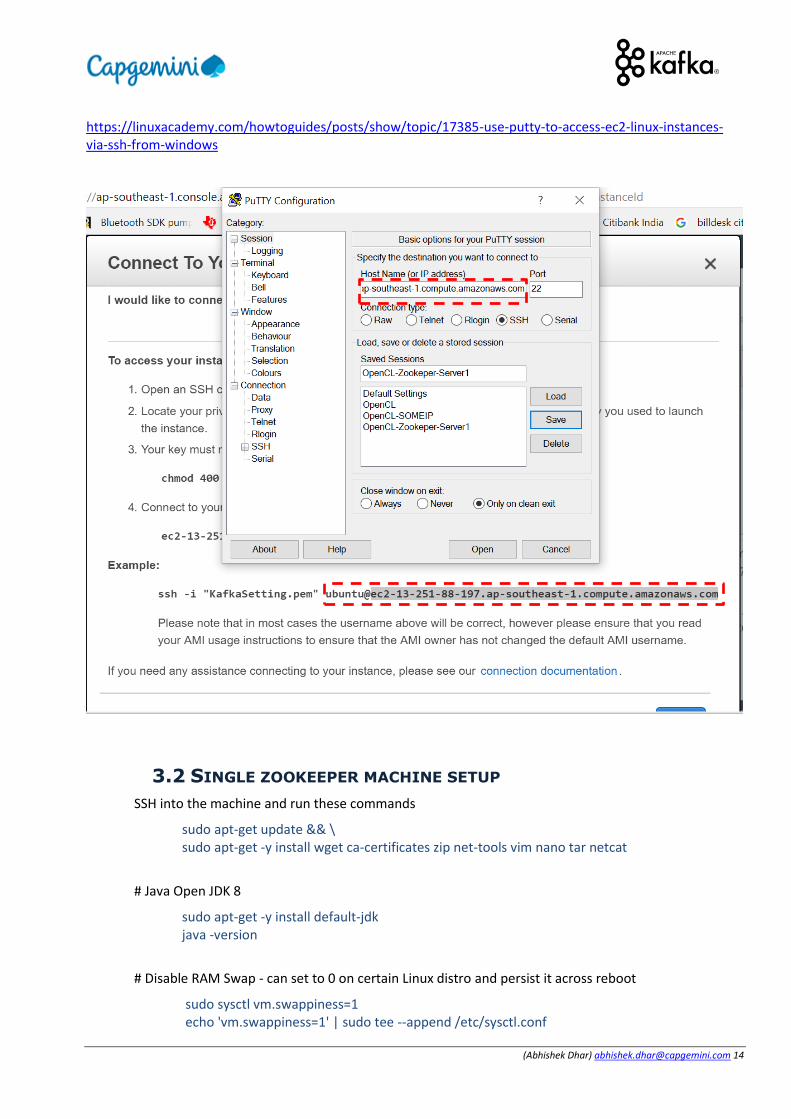
(Abhishek Dhar) [email protected] 14
https://linuxacademy.com/howtoguides/posts/show/topic/17385-use-putty-to-access-ec2-linux-instances-via-ssh-from-windows
3.2 SINGLE ZOOKEEPER MACHINE SETUP
SSH into the machine and run these commands
sudo apt-get update && \ sudo apt-get -y install wget ca-certificates zip net-tools vim nano tar netcat
# Java Open JDK 8
sudo apt-get -y install default-jdk java -version
# Disable RAM Swap - can set to 0 on certain Linux distro and persist it across reboot
sudo sysctl vm.swappiness=1 echo 'vm.swappiness=1' | sudo tee --append /etc/sysctl.conf
(Abhishek Dhar) [email protected] 15
# Add hosts entries (mocking DNS) - put relevant IPs here (IPs provided below should be good)
echo "172.31.9.1 kafka1
172.31.9.1 zookeeper1
172.31.19.230 kafka2
172.31.19.230 zookeeper2
172.31.35.20 kafka3
172.31.35.20 zookeeper3" | sudo tee --append /etc/hosts
# download Zookeeper and Kafka. Recommended is latest Kafka (0.10.2.1) and Scala 2.12
wget http://apache.mirror.digitalpacific.com.au/kafka/0.10.2.1/kafka_2.12-0.10.2.1.tgz tar -xvzf kafka_2.12-0.10.2.1.tgz rm kafka_2.12-0.10.2.1.tgz mv kafka_2.12-0.10.2.1 kafka cd kafka/
# Zookeeper quickstart (This is just to test if Zookeeper can start) bin/zookeeper-server-start.sh config/zookeeper.properties
# Start Zookeeper in the background
bin/zookeeper-server-start.sh -daemon config/zookeeper.properties
# Test Zookeeper
bin/zookeeper-shell.sh localhost:2181
ls /
# demonstrate the use of a 4 letter word (it should say “imok”)
echo "ruok" | nc localhost 2181 ; echo
# Install Zookeeper boot scripts (Put the content of script below in this file and SAVE)
sudo nano /etc/init.d/zookeeper
#!/bin/bash #/etc/init.d/zookeeper DAEMON_PATH=/home/ubuntu/kafka/bin DAEMON_NAME=zookeeper # Check that networking is up. #[ ${NETWORKING} = "no" ] && exit 0 PATH=$PATH:$DAEMON_PATH # See how we were called. case "$1" in start) # Start daemon. pid=`ps ax | grep -i 'org.apache.zookeeper' | grep -v grep | awk '{print $1}'` if [ -n "$pid" ] then
(Abhishek Dhar) [email protected] 16
echo "Zookeeper is already running"; else echo "Starting $DAEMON_NAME"; $DAEMON_PATH/zookeeper-server-start.sh -daemon
/home/ubuntu/kafka/config/zookeeper.properties fi ;; stop) echo "Shutting down $DAEMON_NAME"; $DAEMON_PATH/zookeeper-server-stop.sh ;; restart) $0 stop sleep 2 $0 start ;; status) pid=`ps ax | grep -i 'org.apache.zookeeper' | grep -v grep | awk '{print $1}'` if [ -n "$pid" ] then echo "Zookeeper is Running as PID: $pid" else echo "Zookeeper is not Running" fi ;; *) echo "Usage: $0 {start|stop|restart|status}" exit 1 esac exit 0
# Install Zookeeper boot scripts
sudo chmod +x /etc/init.d/zookeeper
sudo chown root:root /etc/init.d/zookeeper
# you can safely ignore the warning
sudo update-rc.d zookeeper defaults
# stop zookeeper
sudo service zookeeper stop
# stop zookeeper
sudo service zookeeper stop
# verify it's stopped
nc -vz localhost 2181
# start zookeeper
sudo service zookeeper start
# verify it's started
(Abhishek Dhar) [email protected] 17
nc -vz localhost 2181
echo "ruok" | nc localhost 2181 ; echo (it should say “imok”)
# check the logs
cat logs/zookeeper.out
3.3 ZOOKEEPER COMMAND LINE INTERFACE
# Starting Zookeeper and connecting to it
sudo service zookeeper start ubuntu@ip-172-31-9-1:~/kafka$ bin/zookeeper-shell.sh localhost:2181
# display help
help
# display root and create a Node
ls / create /my-node "foo" ls /
# Get data corresponding to nodes created
get /my-node get /zookeeper
# Create Deeper Nodes inside Zookeeper
create /my-node/deeper-node "bar" ls / ls /my-node ls /my-node/deeper-node get /my-node/deeper-node
# removes are recursive rmr /my-node ls /
# create a watcher create /node-to-watch "" get /node-to-watch true set /node-to-watch "has-changed" rmr /node-to-watch
3.4 ZOOKEEPER QUORUM SETUP – PART 1 Right click on instance in the dashboard and select “Create Image” (We create AMI image so that we can replicate setup on all instances for setting up Zookeeper quorum). This will create a new Image (Open up two screens snapshot screen and image screen in order to check if image/snapshot has been created or not and this takes about 5-Mins)
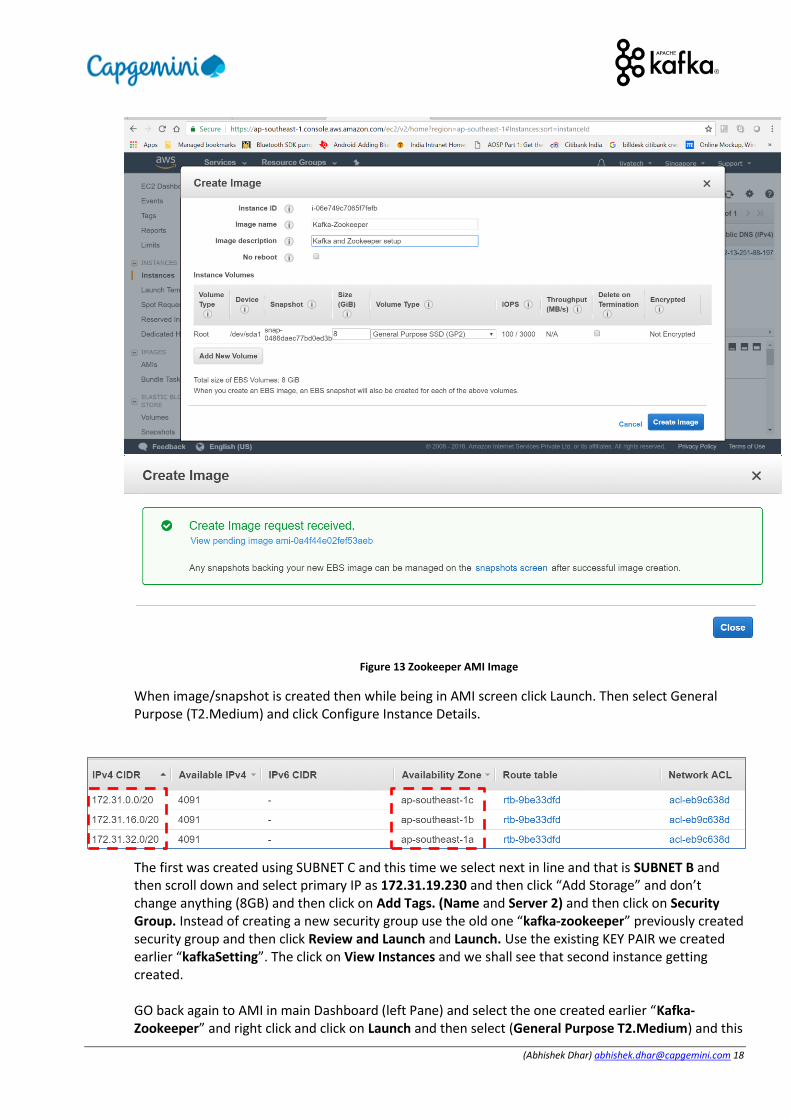
(Abhishek Dhar) [email protected] 18
Figure 13 Zookeeper AMI Image
When image/snapshot is created then while being in AMI screen click Launch. Then select General Purpose (T2.Medium) and click Configure Instance Details.
The first was created using SUBNET C and this time we select next in line and that is SUBNET B and then scroll down and select primary IP as 172.31.19.230 and then click “Add Storage” and don’t change anything (8GB) and then click on Add Tags. (Name and Server 2) and then click on Security Group. Instead of creating a new security group use the old one “kafka-zookeeper” previously created security group and then click Review and Launch and Launch. Use the existing KEY PAIR we created earlier “kafkaSetting”. The click on View Instances and we shall see that second instance getting created. GO back again to AMI in main Dashboard (left Pane) and select the one created earlier “Kafka-Zookeeper” and right click and click on Launch and then select (General Purpose T2.Medium) and this
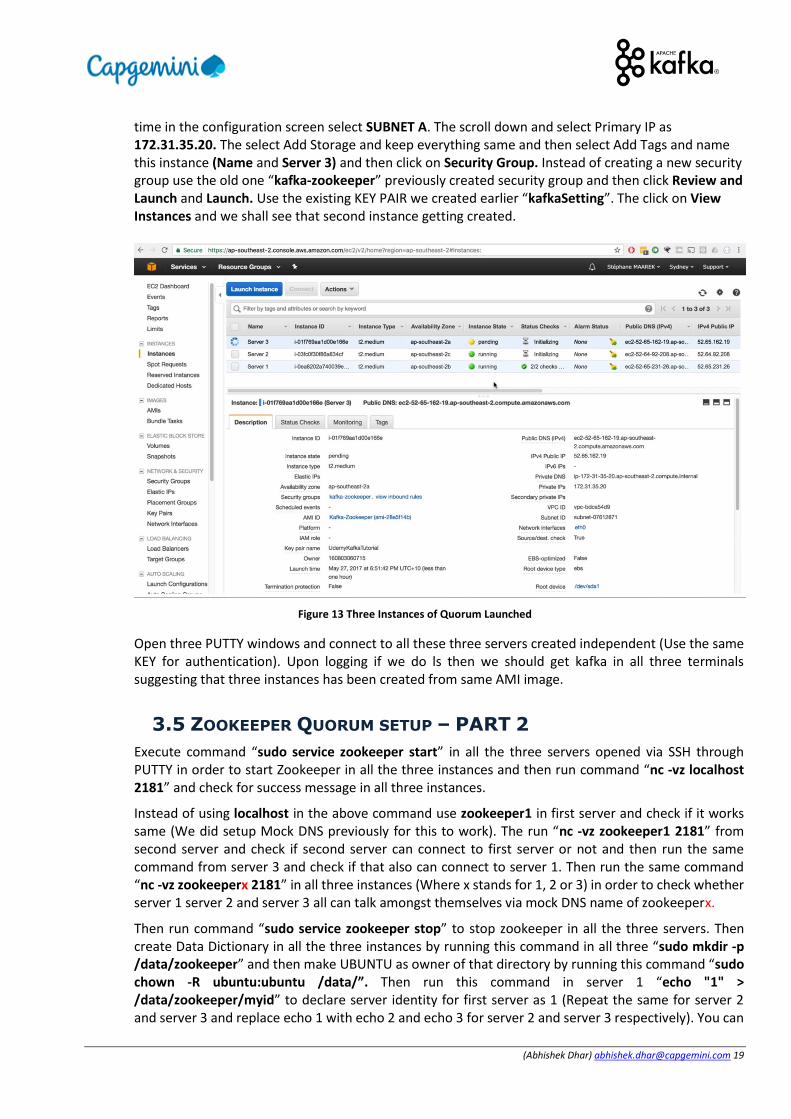
(Abhishek Dhar) [email protected] 19
time in the configuration screen select SUBNET A. The scroll down and select Primary IP as 172.31.35.20. The select Add Storage and keep everything same and then select Add Tags and name this instance (Name and Server 3) and then click on Security Group. Instead of creating a new security group use the old one “kafka-zookeeper” previously created security group and then click Review and Launch and Launch. Use the existing KEY PAIR we created earlier “kafkaSetting”. The click on View Instances and we shall see that second instance getting created.
Figure 13 Three Instances of Quorum Launched
Open three PUTTY windows and connect to all these three servers created independent (Use the same KEY for authentication). Upon logging if we do ls then we should get kafka in all three terminals suggesting that three instances has been created from same AMI image.
3.5 ZOOKEEPER QUORUM SETUP – PART 2
Execute command “sudo service zookeeper start” in all the three servers opened via SSH through PUTTY in order to start Zookeeper in all the three instances and then run command “nc -vz localhost 2181” and check for success message in all three instances.
Instead of using localhost in the above command use zookeeper1 in first server and check if it works same (We did setup Mock DNS previously for this to work). The run “nc -vz zookeeper1 2181” from second server and check if second server can connect to first server or not and then run the same command from server 3 and check if that also can connect to server 1. Then run the same command “nc -vz zookeeperx 2181” in all three instances (Where x stands for 1, 2 or 3) in order to check whether server 1 server 2 and server 3 all can talk amongst themselves via mock DNS name of zookeeperx.
Then run command “sudo service zookeeper stop” to stop zookeeper in all the three servers. Then create Data Dictionary in all the three instances by running this command in all three “sudo mkdir -p /data/zookeeper” and then make UBUNTU as owner of that directory by running this command “sudo chown -R ubuntu:ubuntu /data/”. Then run this command in server 1 “echo "1" > /data/zookeeper/myid” to declare server identity for first server as 1 (Repeat the same for server 2 and server 3 and replace echo 1 with echo 2 and echo 3 for server 2 and server 3 respectively). You can
(Abhishek Dhar) [email protected] 20
run cat /data/zookeeper/myid in all three servers to determine if what was written as server ID got reflected properly or not. Then run this command in all three “rm /home/ubuntu/kafka/config/zookeeper.properties” to remove default properties and then run “nano /home/ubuntu/kafka/config/zookeeper.properties” in all three to create a new property file.
The create this configuration in all three servers file (Save CTRL+X Y Enter)
# the location to store the in-memory database snapshots and, unless specified otherwise, the transaction log of updates to the database. dataDir=/data/zookeeper # the port at which the clients will connect clientPort=2181 # disable the per-ip limit on the number of connections since this is a non-production config maxClientCnxns=0 # the basic time unit in milliseconds used by ZooKeeper. It is used to do heartbeats and the minimum session timeout will be twice the tickTime. tickTime=2000 # The number of ticks that the initial synchronization phase can take initLimit=10 # The number of ticks that can pass between # sending a request and getting an acknowledgement syncLimit=5 # zoo servers # these hostnames such as `zookeeper-1` come from the /etc/hosts file server.1=zookeeper1:2888:3888 server.2=zookeeper2:2888:3888 server.3=zookeeper3:2888:3888 Enter directory kafka and verify by running cat config/zookeeper.properties in all three instances. The starting from first server and then second and then run this command (Don’t bother about error, that will be resolved when zookeeper runs in all three), “sudo service zookeeper start” (Once you run in all three servers, one will assume LEADER role and other two will assume FOLLOWER role) Then run this command “echo "ruok" | nc zookeeperx 2181 ; echo” in first/second/third server and x stands for 1/2/3 (We should get “imok” in all three cases for all three servers) Then run this command “echo "stat" | nc zookeeperx 2181 ; echo” in first server and x stands for 1/2/3 (We should get Mode: follower for two servers and Mode: leader for one) Run ZooKeeper SHELL in all three servers by running command in all three (bin/zookeeper-shell.sh zookeeperx:2181 replace “x” with 1 when running in first server and 2 when running in second server and 3 when running in third server) and then running ls / command in all three shall return zookeeper
4 WEB TOOLS AWS EC2 MACHINE (DOCKER)
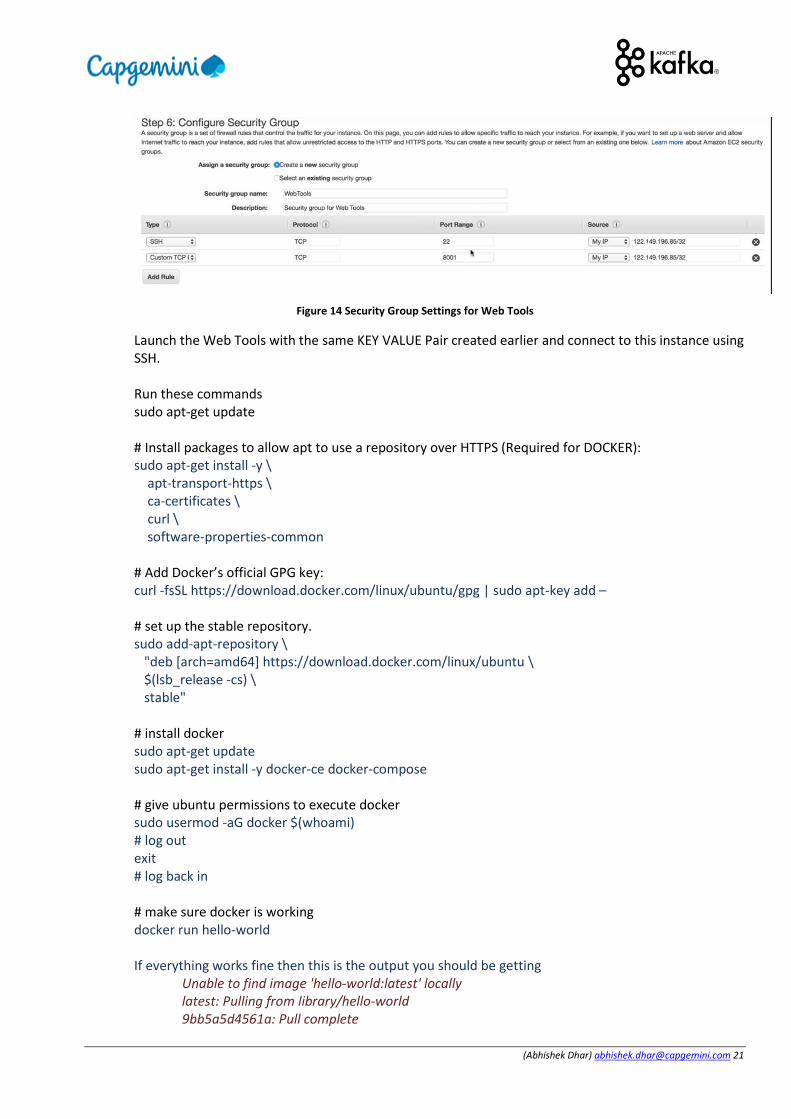
Go to dashboard and Launch an Instance and select “Ubuntu Server 16.04 LTS (HVM), SSD Volume Type” and then select “T2.Small” and there is no need to add subnet or IP in configure instance details screen. Default data in storage screen is also fine and no need to make any changes. Then add a KEY VALUE pair (Name Web Tools) in Add Tags screen. We however create a new Security Group for Web Tools.
(Abhishek Dhar) [email protected] 21
Figure 14 Security Group Settings for Web Tools
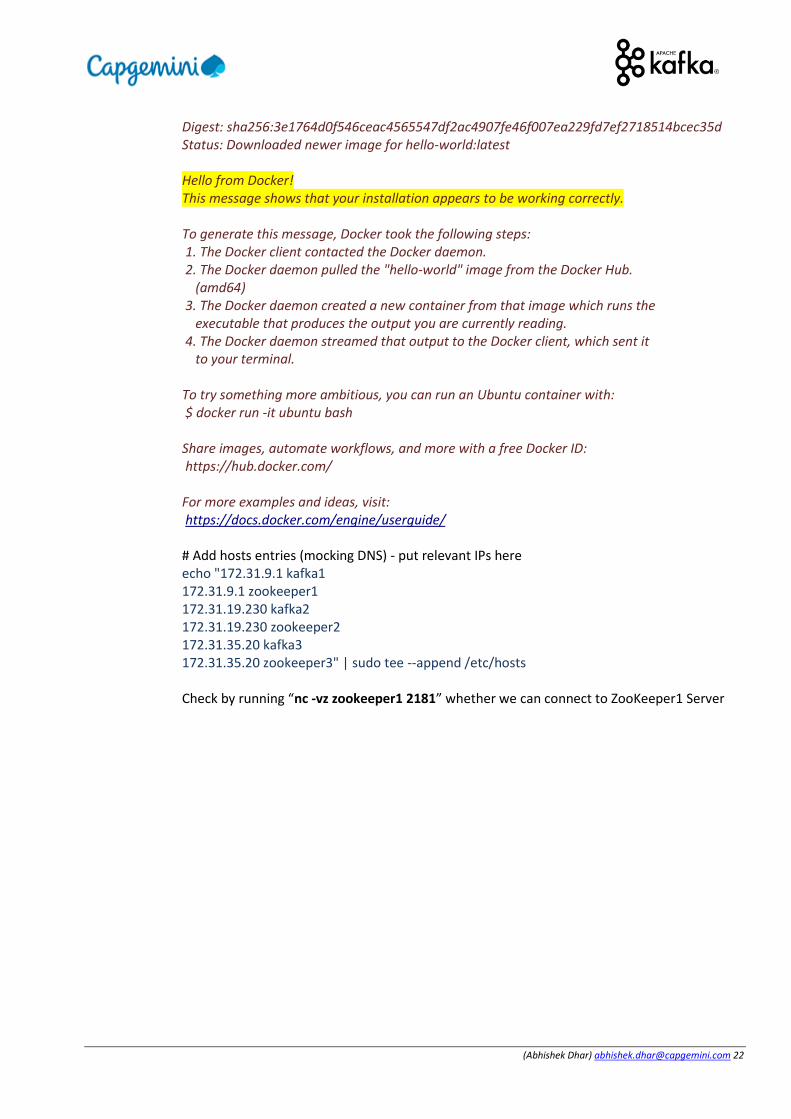
Launch the Web Tools with the same KEY VALUE Pair created earlier and connect to this instance using SSH. Run these commands sudo apt-get update # Install packages to allow apt to use a repository over HTTPS (Required for DOCKER): sudo apt-get install -y \ apt-transport-https \ ca-certificates \ curl \ software-properties-common # Add Docker’s official GPG key: curl -fsSL https://download.docker.com/linux/ubuntu/gpg | sudo apt-key add – # set up the stable repository. sudo add-apt-repository \ "deb [arch=amd64] https://download.docker.com/linux/ubuntu \ $(lsb_release -cs) \ stable" # install docker sudo apt-get update sudo apt-get install -y docker-ce docker-compose # give ubuntu permissions to execute docker sudo usermod -aG docker $(whoami) # log out exit # log back in # make sure docker is working docker run hello-world If everything works fine then this is the output you should be getting
Unable to find image 'hello-world:latest' locally latest: Pulling from library/hello-world 9bb5a5d4561a: Pull complete
(Abhishek Dhar) [email protected] 22
Digest: sha256:3e1764d0f546ceac4565547df2ac4907fe46f007ea229fd7ef2718514bcec35d Status: Downloaded newer image for hello-world:latest Hello from Docker! This message shows that your installation appears to be working correctly. To generate this message, Docker took the following steps: 1. The Docker client contacted the Docker daemon. 2. The Docker daemon pulled the "hello-world" image from the Docker Hub. (amd64) 3. The Docker daemon created a new container from that image which runs the executable that produces the output you are currently reading. 4. The Docker daemon streamed that output to the Docker client, which sent it to your terminal. To try something more ambitious, you can run an Ubuntu container with: $ docker run -it ubuntu bash Share images, automate workflows, and more with a free Docker ID: https://hub.docker.com/ For more examples and ideas, visit: https://docs.docker.com/engine/userguide/ # Add hosts entries (mocking DNS) - put relevant IPs here echo "172.31.9.1 kafka1 172.31.9.1 zookeeper1 172.31.19.230 kafka2 172.31.19.230 zookeeper2 172.31.35.20 kafka3 172.31.35.20 zookeeper3" | sudo tee --append /etc/hosts Check by running “nc -vz zookeeper1 2181” whether we can connect to ZooKeeper1 Server
(Abhishek Dhar) [email protected] 23
4.1 MANAGEMENT TOOLS FOR ZOOKEEPER (ZOONAVIGATOR)
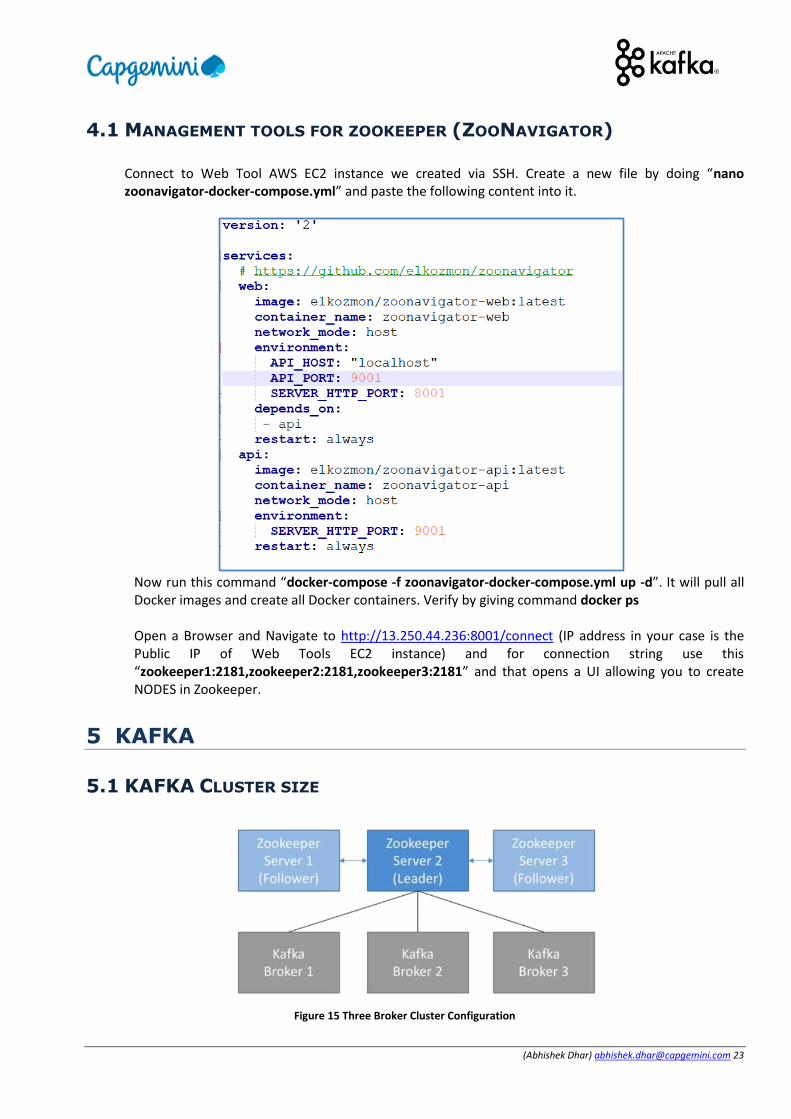
Connect to Web Tool AWS EC2 instance we created via SSH. Create a new file by doing “nano zoonavigator-docker-compose.yml” and paste the following content into it.
Now run this command “docker-compose -f zoonavigator-docker-compose.yml up -d”. It will pull all Docker images and create all Docker containers. Verify by giving command docker ps Open a Browser and Navigate to http://13.250.44.236:8001/connect (IP address in your case is the Public IP of Web Tools EC2 instance) and for connection string use this “zookeeper1:2181,zookeeper2:2181,zookeeper3:2181” and that opens a UI allowing you to create NODES in Zookeeper.
5 KAFKA
5.1 KAFKA CLUSTER SIZE
Figure 15 Three Broker Cluster Configuration
(Abhishek Dhar) [email protected] 24
N-1 Brokers can be down if N is default topic replication factor. Producer consumer requests are going to be spread out amongst different machines. Data is also going to be spread out amongst different brokers.
5.2 KAFKA CONFIGURATION
(Abhishek Dhar) [email protected] 25
5.3 KAFKA SETUP IN AWS
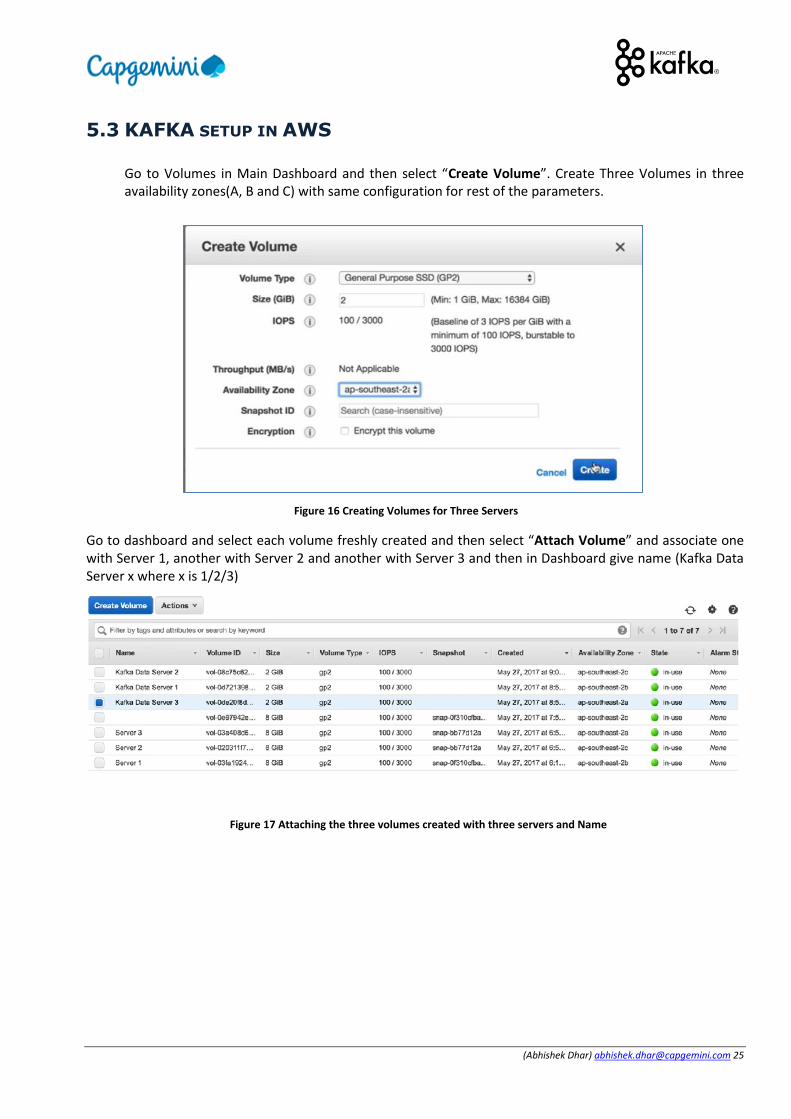
Go to Volumes in Main Dashboard and then select “Create Volume”. Create Three Volumes in three availability zones(A, B and C) with same configuration for rest of the parameters.
Figure 16 Creating Volumes for Three Servers
Go to dashboard and select each volume freshly created and then select “Attach Volume” and associate one with Server 1, another with Server 2 and another with Server 3 and then in Dashboard give name (Kafka Data Server x where x is 1/2/3)
Figure 17 Attaching the three volumes created with three servers and Name
(Abhishek Dhar) [email protected] 26
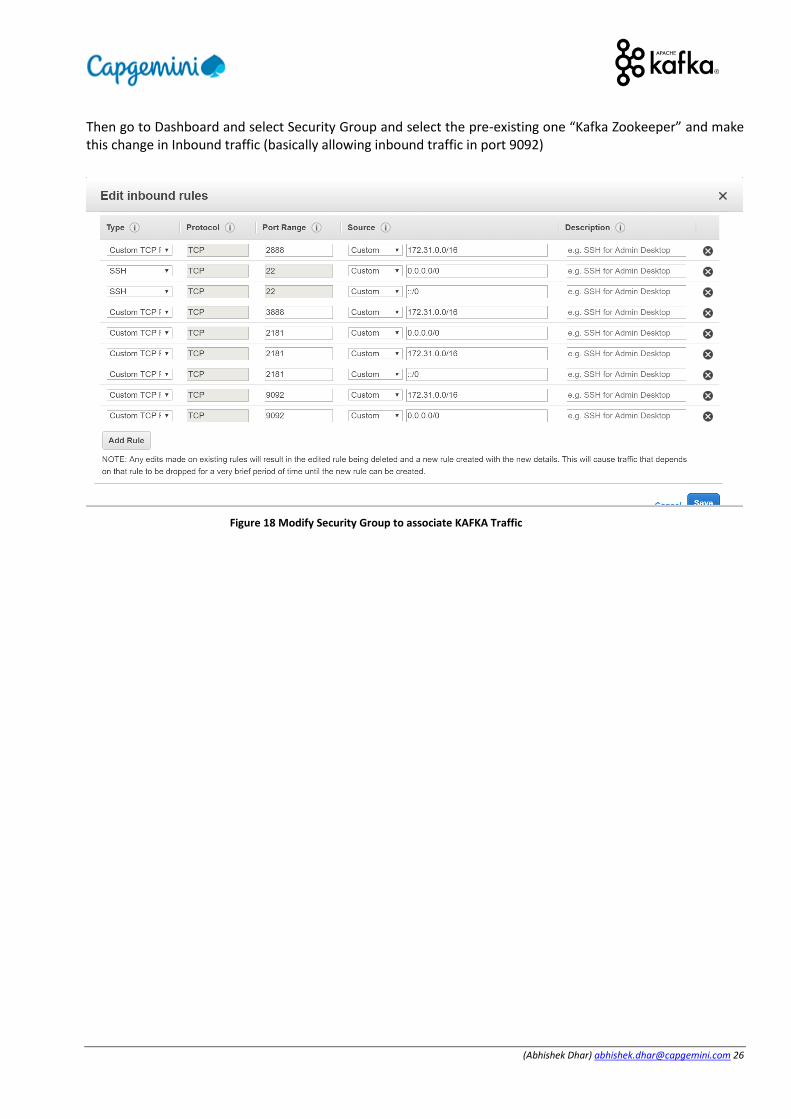
Then go to Dashboard and select Security Group and select the pre-existing one “Kafka Zookeeper” and make this change in Inbound traffic (basically allowing inbound traffic in port 9092)
Figure 18 Modify Security Group to associate KAFKA Traffic
(Abhishek Dhar) [email protected] 27
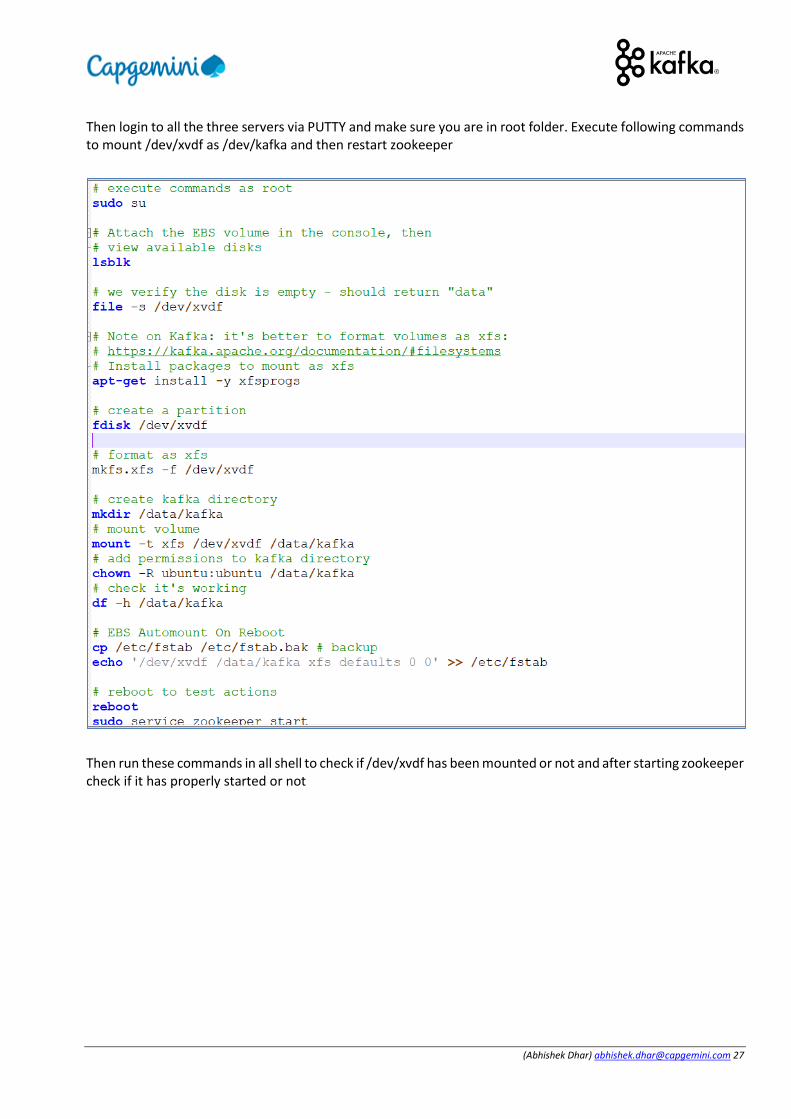
Then login to all the three servers via PUTTY and make sure you are in root folder. Execute following commands to mount /dev/xvdf as /dev/kafka and then restart zookeeper
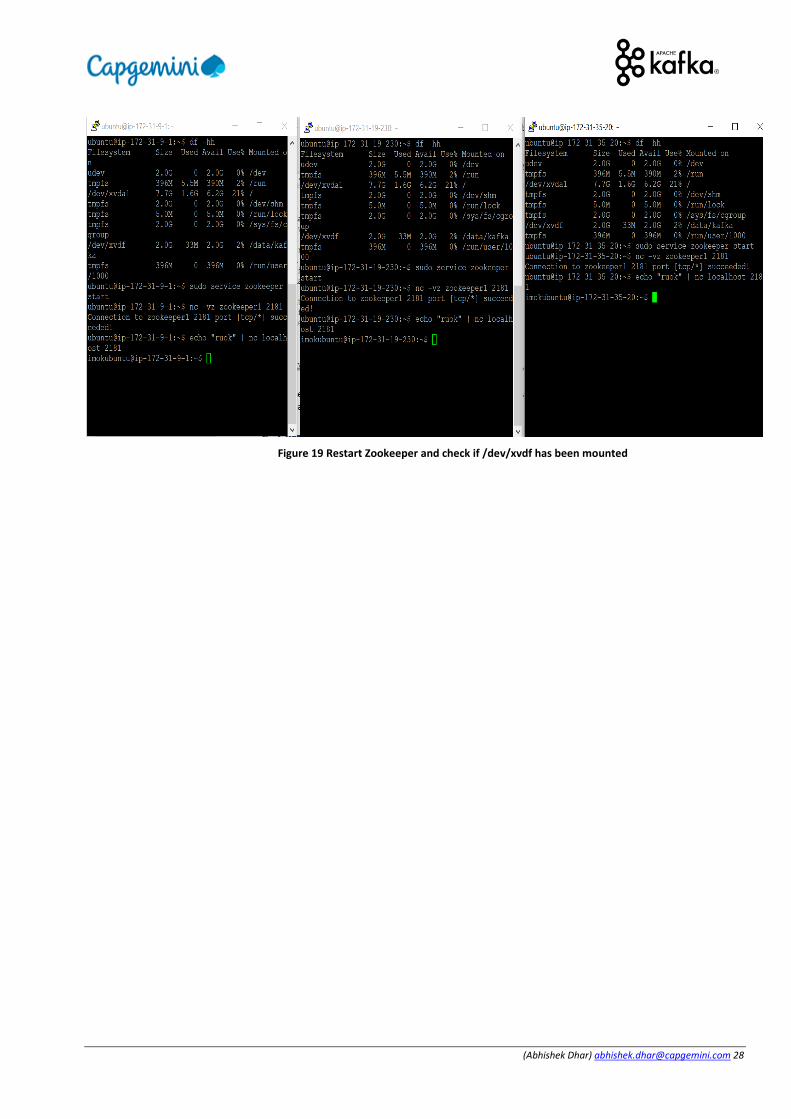
Then run these commands in all shell to check if /dev/xvdf has been mounted or not and after starting zookeeper check if it has properly started or not
(Abhishek Dhar) [email protected] 28
Figure 19 Restart Zookeeper and check if /dev/xvdf has been mounted

(Abhishek Dhar) [email protected] 29
5.4 SINGLE KAFKA BROKER SETUP
Enter into all three servers are increase maximum count of open file handles by running this command # Add file limits configs - allow to open 100,000 file descriptors
echo "* hard nofile 100000 * soft nofile 100000" | sudo tee --append /etc/security/limits.conf
# reboot for the file limit to be taken into account sudo reboot
# restart zookeeper sudo service zookeeper start
Then work with server 1 only and create server.properties file in server 1 (inside kafka) after removing config/server.properties inside kafka folder and then create a new file by doing nano config/server.properties and paste this content
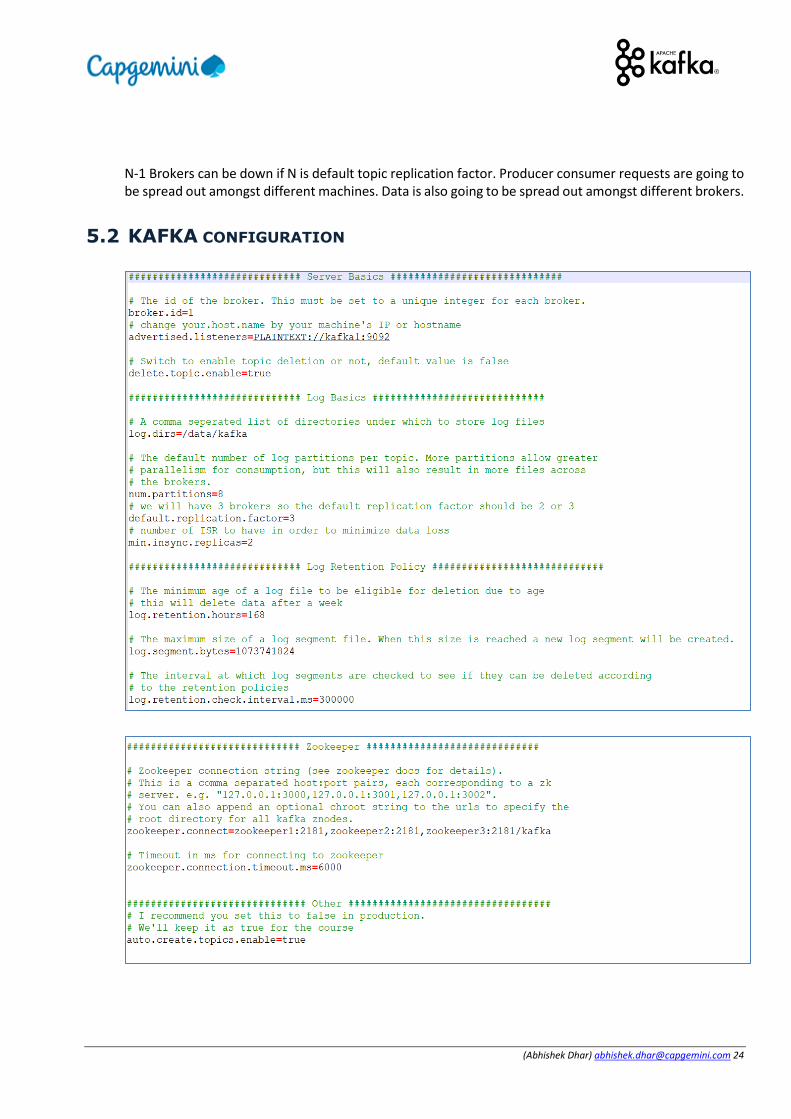
############################# Server Basics ############################# # The id of the broker. This must be set to a unique integer for each broker. broker.id=1 # change your.host.name by your machine's IP or hostname advertised.listeners=PLAINTEXT://0.0.0.0:9092 # Switch to enable topic deletion or not, default value is false delete.topic.enable=true ############################# Log Basics ############################# # A comma seperated list of directories under which to store log files log.dirs=/data/kafka # The default number of log partitions per topic. More partitions allow greater # parallelism for consumption, but this will also result in more files across # the brokers. num.partitions=8 # we will have 3 brokers so the default replication factor should be 2 or 3 default.replication.factor=3 # number of ISR to have in order to minimize data loss min.insync.replicas=2 ############################# Log Retention Policy ############################# # The minimum age of a log file to be eligible for deletion due to age # this will delete data after a week log.retention.hours=168 # The maximum size of a log segment file. When this size is reached a new log segment will be created. log.segment.bytes=1073741824 # The interval at which log segments are checked to see if they can be deleted according # to the retention policies
(Abhishek Dhar) [email protected] 30
log.retention.check.interval.ms=300000 ############################# Zookeeper ############################# # Zookeeper connection string (see zookeeper docs for details). # This is a comma separated host:port pairs, each corresponding to a zk # server. e.g. "127.0.0.1:3000,127.0.0.1:3001,127.0.0.1:3002". # You can also append an optional chroot string to the urls to specify the # root directory for all kafka znodes. zookeeper.connect=zookeeper1:2181,zookeeper2:2181,zookeeper3:2181/kafka # Timeout in ms for connecting to zookeeper zookeeper.connection.timeout.ms=6000 ############################## Other ################################## # I recommend you set this to false in production. auto.create.topics.enable=true
Then give permission by running this command (sudo chown -R ubuntu:ubuntu /data/kafka) in all three servers and then Launch KAFKA Server by running this command “bin/kafka-server-start.sh config/server.properties” and that should get started KAFKA Server If you now log into ZooNavigator via Web Browser then you should see KAFKA alongside ZooKeeper. Then run this command in all the three servers “sudo nano /etc/init.d/kafka” inside KAFKA directory and paste this content (CTRL+X Y Enter)
#!/bin/bash #/etc/init.d/kafka DAEMON_PATH=/home/ubuntu/kafka/bin DAEMON_NAME=kafka # Check that networking is up. #[ ${NETWORKING} = "no" ] && exit 0 PATH=$PATH:$DAEMON_PATH # See how we were called. case "$1" in start) # Start daemon. pid=`ps ax | grep -i 'kafka.Kafka' | grep -v grep | awk '{print $1}'` if [ -n "$pid" ] then echo "Kafka is already running" else echo "Starting $DAEMON_NAME" $DAEMON_PATH/kafka-server-start.sh -daemon /home/ubuntu/kafka/config/server.properties fi
(Abhishek Dhar) [email protected] 31
;; stop) echo "Shutting down $DAEMON_NAME" $DAEMON_PATH/kafka-server-stop.sh ;; restart) $0 stop sleep 2 $0 start ;; status) pid=`ps ax | grep -i 'kafka.Kafka' | grep -v grep | awk '{print $1}'` if [ -n "$pid" ] then echo "Kafka is Running as PID: $pid" else echo "Kafka is not Running" fi ;; *) echo "Usage: $0 {start|stop|restart|status}" exit 1 esac
exit 0 Then make it executable by running this command “sudo chmod +x /etc/init.d/kafka” and “sudo chown root:root /etc/init.d/kafka” and “sudo update-rc.d kafka defaults” in this order
# start kafka sudo service kafka start
# verify it's working nc -vz localhost 9092
# look at the server logs cat /home/ubuntu/kafka/logs/server.log
# status of kafka sudo service kafka status
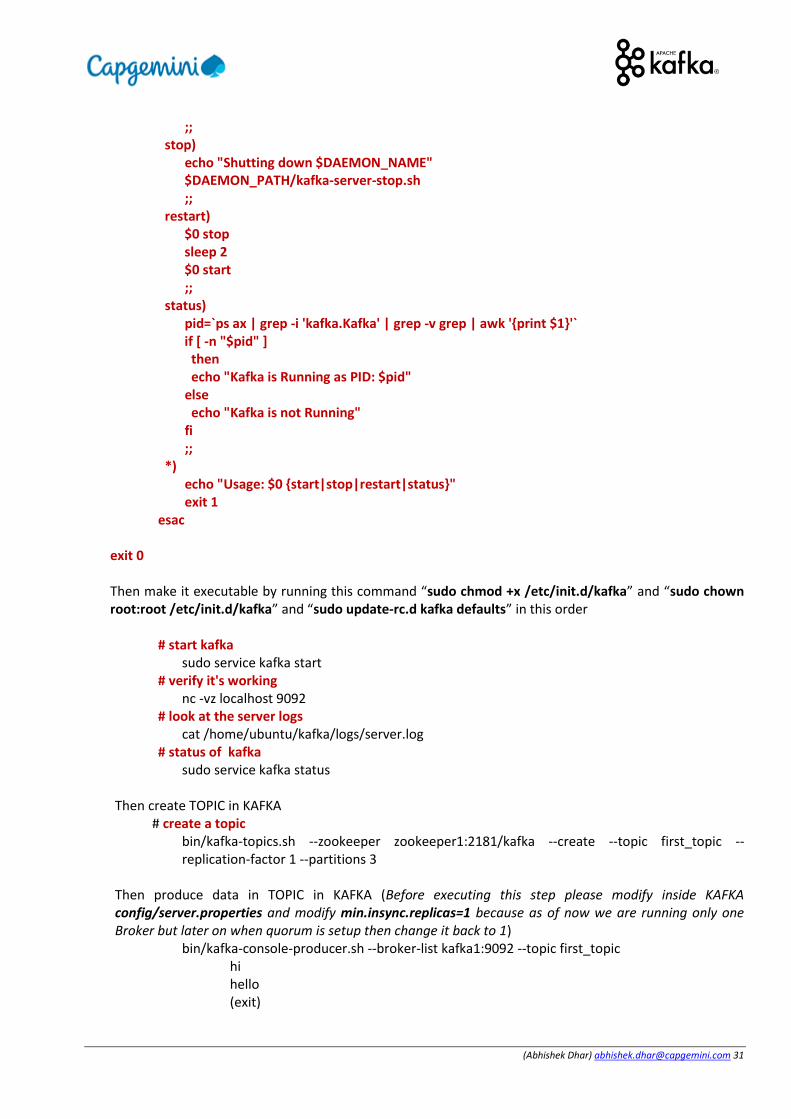
Then create TOPIC in KAFKA # create a topic
bin/kafka-topics.sh --zookeeper zookeeper1:2181/kafka --create --topic first_topic --replication-factor 1 --partitions 3
Then produce data in TOPIC in KAFKA (Before executing this step please modify inside KAFKA config/server.properties and modify min.insync.replicas=1 because as of now we are running only one Broker but later on when quorum is setup then change it back to 1)
bin/kafka-console-producer.sh --broker-list kafka1:9092 --topic first_topic hi hello (exit)
(Abhishek Dhar) [email protected] 32
# read that data bin/kafka-console-consumer.sh --bootstrap-server kafka1:9092 --topic first_topic --from-beginning
# list kafka topics bin/kafka-topics.sh --zookeeper zookeeper1:2181/kafka –list
5.5 KAFKA MULTI CLUSTER SETUP Open file inside KAFKA directory in all three server config/server.properties and for first server make Broker ID as 1 and for second 2 and for third 3. Change Advertised Listeners in First server as PLAINTEXT://kafka1:9092 and in second server PLAINTEXT://kafka2:9092 and in third server PLAINTEXT://kafka3:9092 and ensure that min.insync.replicas in all three is set as 2. Save the file in all three servers.
# start kafka
sudo service kafka start # verify it's working
nc -vz localhost 9092 # look at the server logs
cat /home/ubuntu/kafka/logs/server.log # status of kafka
sudo service kafka status if one of the server doesn’t start then please check config/server.properties file and see if BROKER ID is correctly set. Sometimes if it still doesn’t start then follow this trouble shooting
(Abhishek Dhar) [email protected] 33
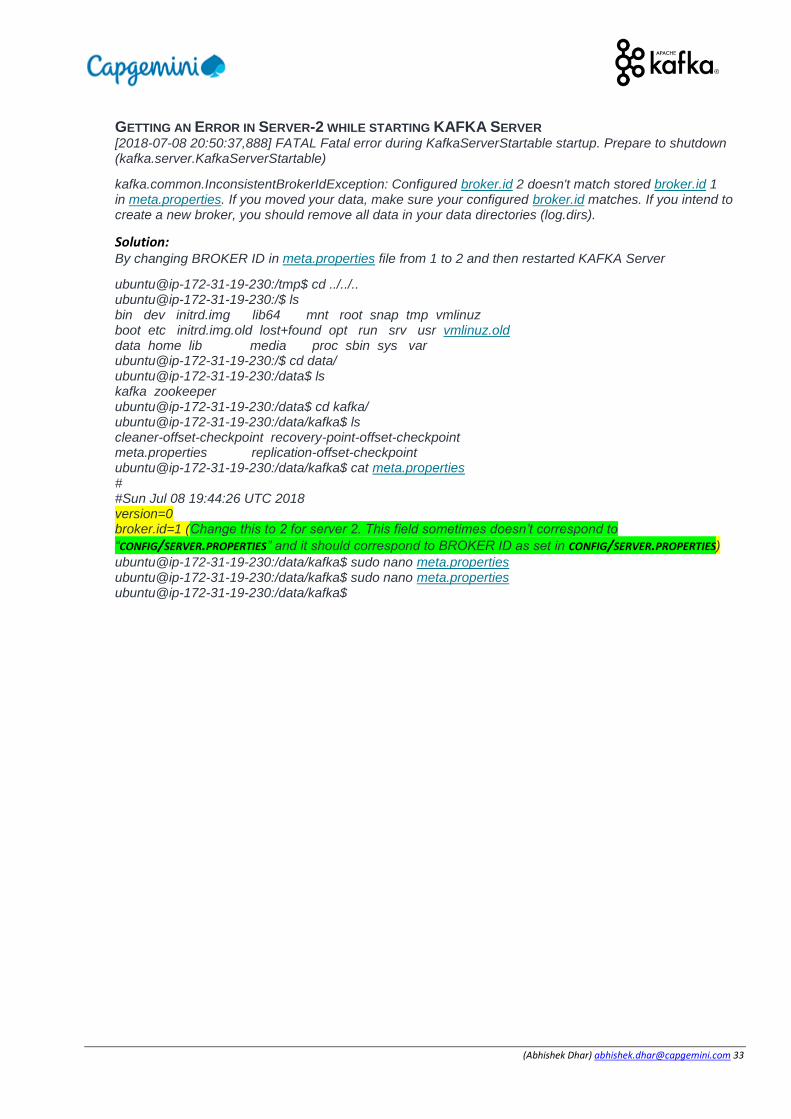
GETTING AN ERROR IN SERVER-2 WHILE STARTING KAFKA SERVER [2018-07-08 20:50:37,888] FATAL Fatal error during KafkaServerStartable startup. Prepare to shutdown (kafka.server.KafkaServerStartable)
kafka.common.InconsistentBrokerIdException: Configured broker.id 2 doesn't match stored broker.id 1 in meta.properties. If you moved your data, make sure your configured broker.id matches. If you intend to create a new broker, you should remove all data in your data directories (log.dirs).
Solution: By changing BROKER ID in meta.properties file from 1 to 2 and then restarted KAFKA Server
ubuntu@ip-172-31-19-230:/tmp$ cd ../../.. ubuntu@ip-172-31-19-230:/$ ls bin dev initrd.img lib64 mnt root snap tmp vmlinuz boot etc initrd.img.old lost+found opt run srv usr vmlinuz.old data home lib media proc sbin sys var ubuntu@ip-172-31-19-230:/$ cd data/ ubuntu@ip-172-31-19-230:/data$ ls kafka zookeeper ubuntu@ip-172-31-19-230:/data$ cd kafka/ ubuntu@ip-172-31-19-230:/data/kafka$ ls cleaner-offset-checkpoint recovery-point-offset-checkpoint meta.properties replication-offset-checkpoint ubuntu@ip-172-31-19-230:/data/kafka$ cat meta.properties # #Sun Jul 08 19:44:26 UTC 2018 version=0 broker.id=1 (Change this to 2 for server 2. This field sometimes doesn’t correspond to
“CONFIG/SERVER.PROPERTIES” and it should correspond to BROKER ID as set in CONFIG/SERVER.PROPERTIES)
ubuntu@ip-172-31-19-230:/data/kafka$ sudo nano meta.properties ubuntu@ip-172-31-19-230:/data/kafka$ sudo nano meta.properties ubuntu@ip-172-31-19-230:/data/kafka$
(Abhishek Dhar) [email protected] 34
# make sure to fix the __consumer_offsets topic bin/kafka-topics.sh --zookeeper zookeeper1:2181/kafka --config min.insync.replicas=1 --topic __consumer_offsets –alter # read the topic on broker 1 by connecting to broker 2! bin/kafka-console-consumer.sh --bootstrap-server kafka2:9092 --topic first_topic --from-beginning
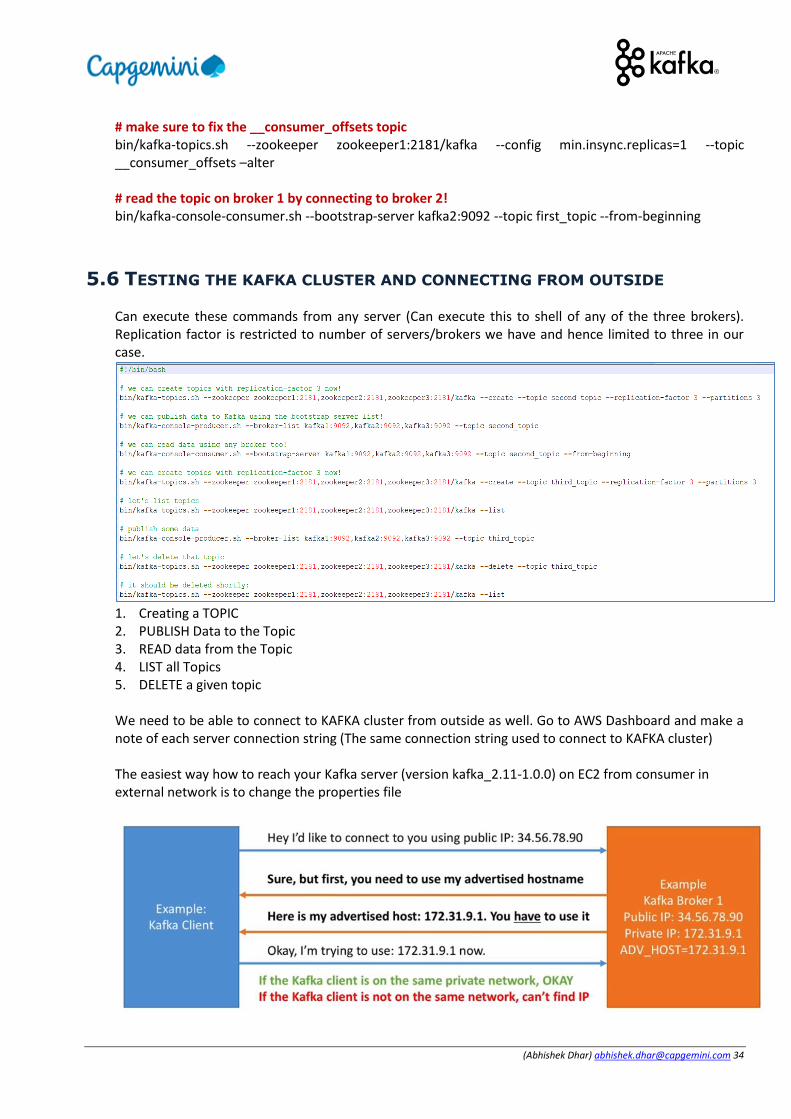
5.6 TESTING THE KAFKA CLUSTER AND CONNECTING FROM OUTSIDE Can execute these commands from any server (Can execute this to shell of any of the three brokers). Replication factor is restricted to number of servers/brokers we have and hence limited to three in our case.
1. Creating a TOPIC 2. PUBLISH Data to the Topic 3. READ data from the Topic 4. LIST all Topics 5. DELETE a given topic
We need to be able to connect to KAFKA cluster from outside as well. Go to AWS Dashboard and make a note of each server connection string (The same connection string used to connect to KAFKA cluster) The easiest way how to reach your Kafka server (version kafka_2.11-1.0.0) on EC2 from consumer in external network is to change the properties file
(Abhishek Dhar) [email protected] 35
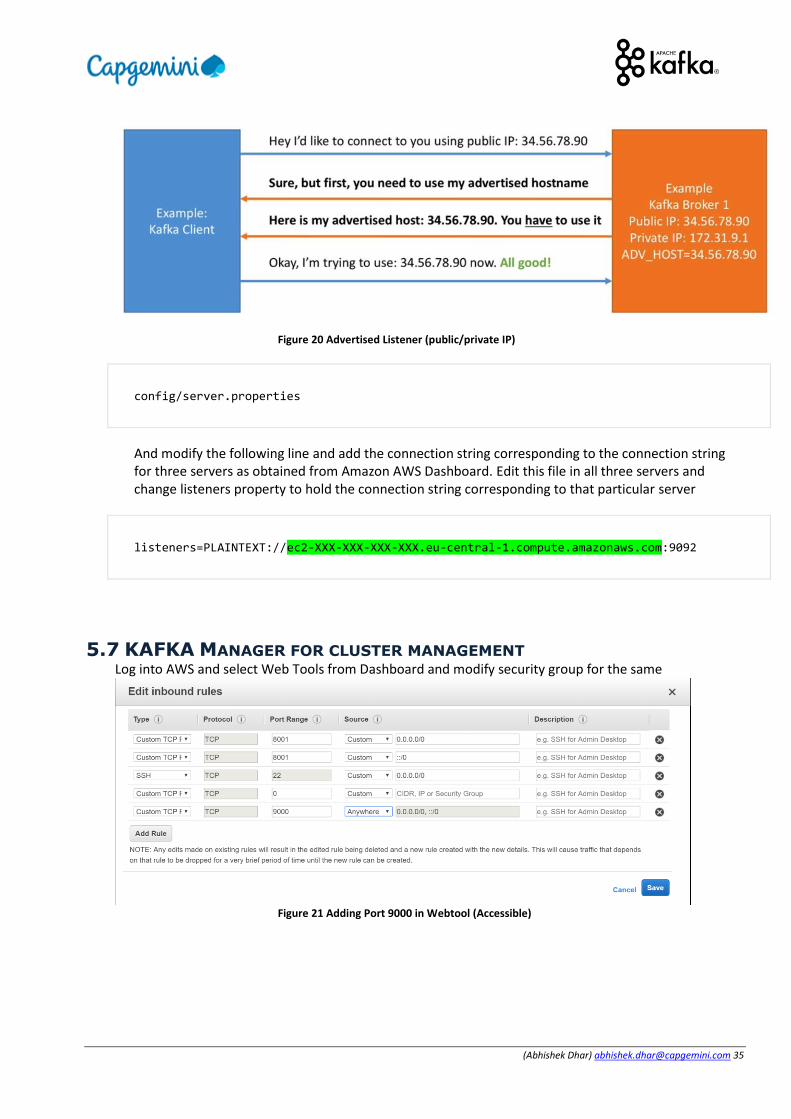
Figure 20 Advertised Listener (public/private IP)
config/server.properties
And modify the following line and add the connection string corresponding to the connection string for three servers as obtained from Amazon AWS Dashboard. Edit this file in all three servers and change listeners property to hold the connection string corresponding to that particular server
listeners=PLAINTEXT://ec2-XXX-XXX-XXX-XXX.eu-central-1.compute.amazonaws.com:9092
5.7 KAFKA MANAGER FOR CLUSTER MANAGEMENT Log into AWS and select Web Tools from Dashboard and modify security group for the same
Figure 21 Adding Port 9000 in Webtool (Accessible)
(Abhishek Dhar) [email protected] 36
Log into (SSH) Web Tool EC2 instance. Execute these commands (First phase of commands to check if we can connect to Zookeeper and KAFKA independently)
#!/bin/bash # make sure you open port 9000 on the security group # make sure you can access the zookeeper endpoints nc -vz zookeeper1 2181 nc -vz zookeeper2 2181 nc -vz zookeeper3 2181 # make sure you can access the kafka endpoints nc -vz kafka1 9092 nc -vz kafka2 9092 nc -vz kafka3 9092 # copy the kafka-manager-docker-compose.yml file nano kafka-manager-docker-compose.yml Insert this content in file Opened version: '2' services: # https://github.com/yahoo/kafka-manager kafka-manager: image: qnib/plain-kafka-manager network_mode: host environment: ZOOKEEPER_HOSTS: "zookeeper1:2181,zookeeper2:2181,zookeeper3:2181" APPLICATION_SECRET: change_me_please
restart: always # launch it docker-compose -f kafka-manager-docker-compose.yml up -d
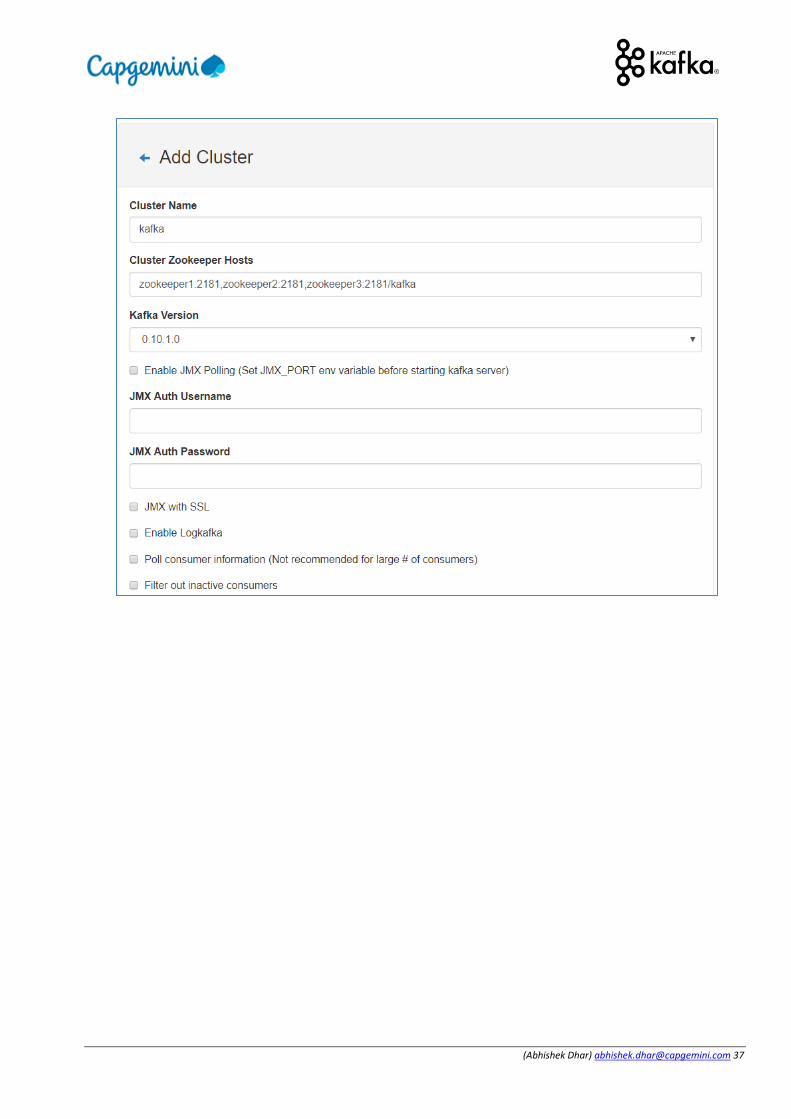
Do a docker ps to check if KAFKA manager is running in Web Tool Instance Open a web browser and browse into the public IP of your web tool instance (Port 9000 which we opened in security group). That should give you KAFKA manager up and running. Opening ZooNavigator will show KAFKA Manager alongside kafka and zookeeper. Then go to KAFKA Manager web UI and Add Cluster and Make these settings
(Abhishek Dhar) [email protected] 38
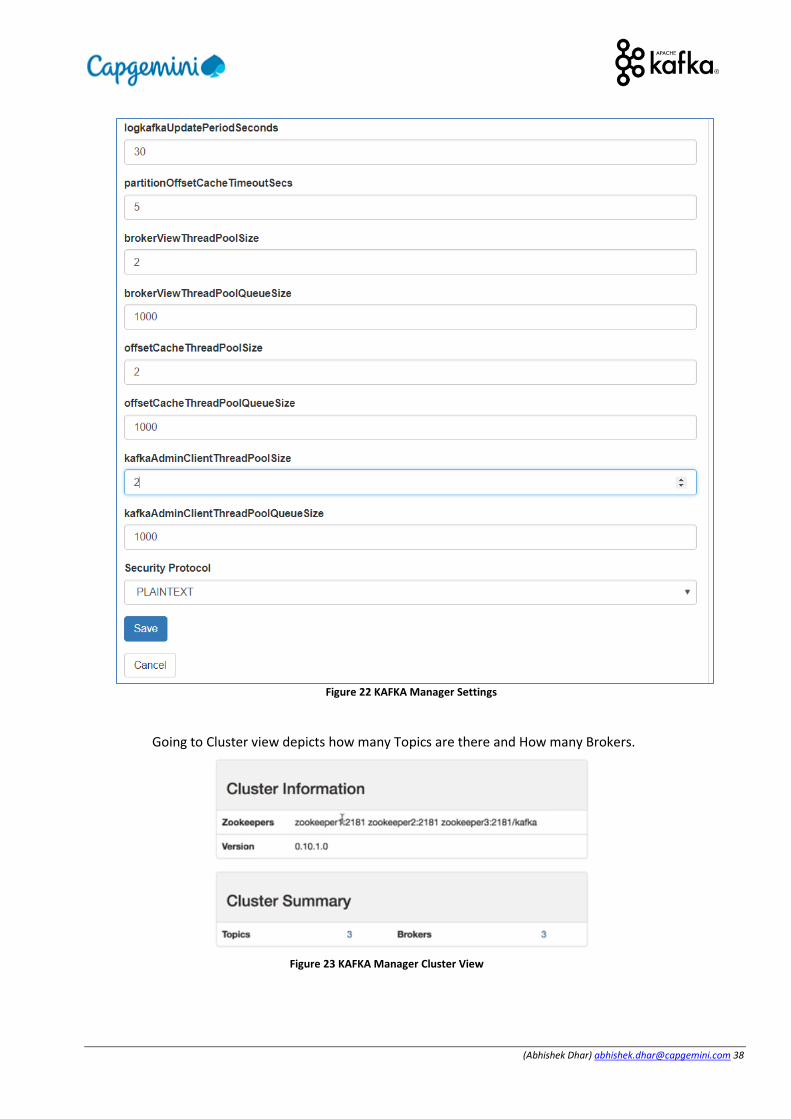
Figure 22 KAFKA Manager Settings
Going to Cluster view depicts how many Topics are there and How many Brokers.
Figure 23 KAFKA Manager Cluster View
(Abhishek Dhar) [email protected] 39
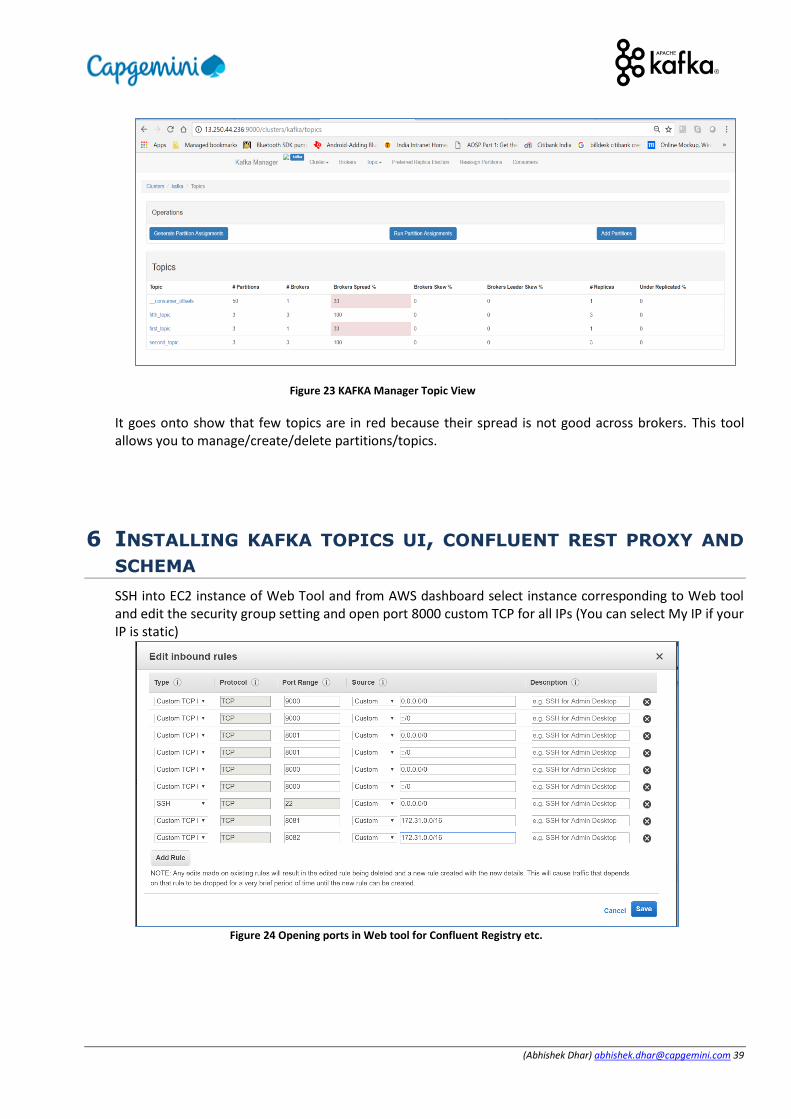
Figure 23 KAFKA Manager Topic View
It goes onto show that few topics are in red because their spread is not good across brokers. This tool allows you to manage/create/delete partitions/topics.
6 INSTALLING KAFKA TOPICS UI, CONFLUENT REST PROXY AND
SCHEMA
SSH into EC2 instance of Web Tool and from AWS dashboard select instance corresponding to Web tool and edit the security group setting and open port 8000 custom TCP for all IPs (You can select My IP if your IP is static)
Figure 24 Opening ports in Web tool for Confluent Registry etc.

(Abhishek Dhar) [email protected] 40
Log into Web tool and use this command nano kafka-topics-ui-docker-compose.yml and please ensure that “SCHEMA_REGISTRY_HOST_NAME: "13.250.44.236"” and “KAFKA_REST_HOST_NAME: "13.250.44.236"” has the Public IP corresponding to your Web Tool Instance in AWS
version: '2' services: # https://github.com/confluentinc/schema-registry confluent-schema-registry: image: confluentinc/cp-schema-registry:3.2.1 network_mode: host environment: SCHEMA_REGISTRY_KAFKASTORE_CONNECTION_URL: zookeeper1:2181,zookeeper2:2181,zookeeper3:2181/kafka SCHEMA_REGISTRY_LISTENERS: http://0.0.0.0:8081 # please replace this setting by the IP of your web tools server #SCHEMA_REGISTRY_HOST_NAME: "54.206.91.106" SCHEMA_REGISTRY_HOST_NAME: "13.250.44.236" restart: always # https://github.com/confluentinc/kafka-rest confluent-rest-proxy: image: confluentinc/cp-kafka-rest:3.2.1 network_mode: host environment: KAFKA_REST_BOOTSTRAP_SERVERS: kafka1:9092,kafka2:9092,kafka3:9092 KAFKA_REST_ZOOKEEPER_CONNECT: zookeeper1:2181,zookeeper2:2181,zookeeper3:2181/kafka KAFKA_REST_LISTENERS: http://0.0.0.0:8082/ KAFKA_REST_SCHEMA_REGISTRY_URL: http://localhost:8081/ # please replace this setting by the IP of your web tools server #KAFKA_REST_HOST_NAME: "54.206.91.106" KAFKA_REST_HOST_NAME: "13.250.44.236" depends_on: - confluent-schema-registry restart: always # https://github.com/Landoop/kafka-topics-ui kafka-topics-ui: image: landoop/kafka-topics-ui:0.9.2 network_mode: host environment: KAFKA_REST_PROXY_URL: http://localhost:8082 PROXY: "TRUE" depends_on: - confluent-rest-proxy
restart: always # launch it by running this command
docker-compose -f kafka-topics-ui-docker-compose.yml up -d
(Abhishek Dhar) [email protected] 41
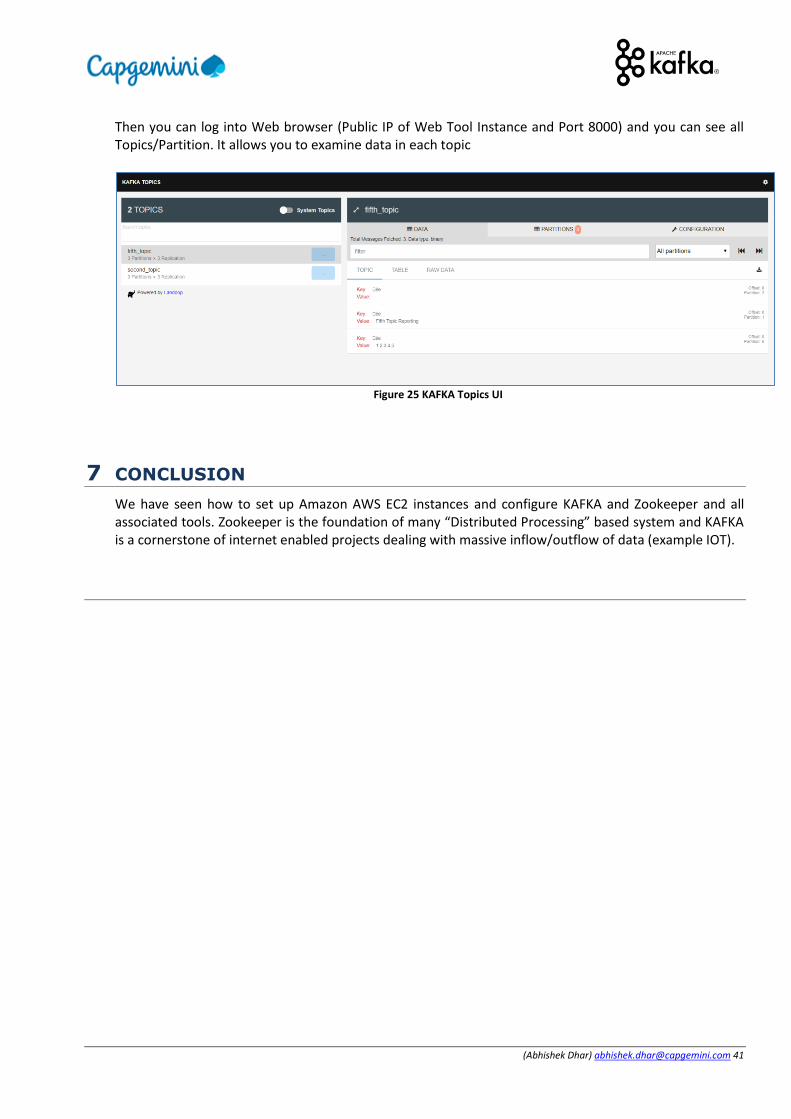
Then you can log into Web browser (Public IP of Web Tool Instance and Port 8000) and you can see all Topics/Partition. It allows you to examine data in each topic
Figure 25 KAFKA Topics UI
7 CONCLUSION
We have seen how to set up Amazon AWS EC2 instances and configure KAFKA and Zookeeper and all associated tools. Zookeeper is the foundation of many “Distributed Processing” based system and KAFKA is a cornerstone of internet enabled projects dealing with massive inflow/outflow of data (example IOT).