“plug-ins” table of contents index the author · 2018-12-21 · 269 7 chapter 7 plug-ins...
TRANSCRIPT

Browse the BookThis chapter walks you through developing a plug-in and then deploying it on SAP Cloud Platform or SAP NetWeaver AS ABAP. It also provides a quick look at the predefined plug-ins provided by SAP.
Steve Guo
SAP Fiori Launchpad: Development and Extensibility304 Pages, 2019, $79.95 ISBN 978-1-4932-1645-1
www.sap-press.com/4556
First-hand knowledge.
“Plug-Ins”
Table of Contents
Index
The Author

269
7
Chapter 7
Plug-Ins
Plug-ins help you run custom code just after SAP Fiori Launchpad has
been initialized. In this chapter, you’ll learn how to develop a plug-in
and deploy it on both SAP Cloud Platform and SAP NetWeaver AS ABAP.
Plug-ins are SAPUI5 components without a user interface. They use a special intent,
such as shell plugin, when deploying on SAP Fiori launchpad. All plug-ins will be
loaded, and the initialize code in those plug-ins will be executed after SAP Fiori
launchpad has been loaded.
A plug-in is a major container for code that changes SAP Fiori launchpad globally.
Plug-ins have the following characteristics:
� Plug-ins are automatically loaded and initialized when SAP Fiori launchpad is
started.
� Plug-ins are implemented as SAPUI5 components and provide all standard deploy-
ment and lifecycle features of SAPUI5.
� Plug-ins will always be implemented in a platform-independent way, but plat-
form-specific configuration is allowed. On SAP Cloud Platform, you need to config-
ure plug-ins on SAP Cloud Platform Portal. On SAP NetWeaver AS ABAP, you
configure them via SAP Fiori launchpad designer.
� On SAP NetWeaver AS ABAP, plug-ins can be enabled and configured dynamically
by assigning users to roles.
In this chapter, we’ll walk you through developing a plug-in and then deploying it on
SAP Cloud Platform or SAP NetWeaver AS ABAP. We’ll end the chapter with a quick
look at the predefined plug-ins provided by SAP.
7.1 Developing a Plug-In
This section will walk you through developing a plug-in, from using templates and
adjusting your code through testing the plug-in to ensure it’s working properly.

7 Plug-Ins
270
7.1.1 Creating a Plug-In Using a Template
The easiest way to create a new plug-in is by using the template provided by SAP Web
IDE full-stack version. Because it’s normally not recommended to write complex
code in a plug-in, you can always create plug-ins based on the template.
The template not only contains the basic structure and mandatory code for initializ-
ing the component but also can help you generate sample code to perform the fol-
lowing activities:
� Adding a button to the SAP Fiori launchpad header
� Adding an SAP Fiori launchpad footer with a button
� Adding buttons to the Me Area
The following procedure will guide you through the basic process of creating a plug-
in:
1. Enter SAP Web IDE full-stack version.
2. Follow menu path File � New � Project from Template, as shown in Figure 7.1.
Figure 7.1 Create Project from Template
3. In the Template Selection window, select SAP Fiori Launchpad Plug-In and click
Next, as shown in Figure 7.2.
4. In the Basic Information window, enter “FlpPlugin” for the Project Name and then
click Next, as shown in Figure 7.3.
271
7.1 Developing a Plug-In
7
Figure 7.2 Template Selection
Figure 7.3 Basic Information

7 Plug-Ins
272
5. In the Template Customization window, enter “flpdev.flpplugin” for Plugin ID and
any text of your choice for Title. Here you can choose the Sample Code you need.
For this example, select Add Button to Launchpad Header, then click Finish, as
shown in Figure 7.4.
Figure 7.4 Template Customization
Now that you’ve created your first plug-in, let’s look at the generated code (see Listing
7.1). The most important file for the plugin is component.js.
sap.ui.define(["sap/ui/core/Component","sap/m/Button","sap/m/Bar","sap/m/MessageToast"
], function (Component, Button, Bar, MessageToast) {
return Component.extend("flpdev.flpplugin.Component", {
273
7.1 Developing a Plug-In
7
metadata: {"manifest": "json"
},
init: function () {var rendererPromise = this._getRenderer();
// This is example code. Please replace with your implementation!
/*** Add item to the header*/rendererPromise.then(function (oRenderer) {// Here is the place for your custom code
oRenderer.addHeaderItem({icon: "sap-icon://add",tooltip: "Add bookmark",press: function () {
MessageToast.show("This SAP Fiori launchpad has been extended to improve your experience");
}}, true, true);
});
},
/**This method help you get a deferred object which will return the rend
erer object
*/_getRenderer: function () {
//You can just ignore the generated code,just use it!}
});});
Listing 7.1 FlpPlugin: Generated Component

7 Plug-Ins
274
Note the following elements of this file:
� The component is a subclass of sap.ui.core.Component. In contrast, other SAPUI5
applications are subclasses of sap.ui.core.UIComponent. A plug-in will never have a
view or controllers; it inherits from component so that the request payload can be
minimized.
� A _getRenderer method is generated for you. The most common usage for a plug-
in is to extend SAP Fiori launchpad, so the renderer is the most used object. Unlike
normal applications, a plug-in is executed during the startup of SAP Fiori launch-
pad, so it’s not certain that the renderer object has been loaded when the plug-in is
executing. The _getRenderer method returns a deferred object that helps you make
sure your code is executed after the renderer has been loaded.
� In the init method, some example code has been generated; all your code that
accesses the SAP Fiori launchpad should be placed in the functions after resolving
the rendererPromise object.
7.1.2 Adjusting Implementation Code
Now let’s focus on the core of the code (see Listing 7.2), in which you can find in init
method adds a header item.
oRenderer.addHeaderItem({icon: "sap-icon://add",tooltip: "Add bookmark",press: function () {MessageToast.show("This SAP Fiori launchpad has been extended to i
mprove your experience");}
}, true, true);
Listing 7.2 FlpPlugin: Code Generated for Adding Header Item
As you’ve already seen, it’s not easy to test this because the header item will not dis-
play if there isn’t enough space. Let’s change the code where you found in init
method to add a header end item, as shown in Listing 7.3.
oRenderer.addHeaderEndItem("sap.ushell.ui.shell.ShellHeadItem", {
id: "addbookmarkitem",
275
7.1 Developing a Plug-In
7
icon: "sap-icon://add",tooltip: "Add bookmark",press: function () {MessageToast.show("This SAP Fiori launchpad has been extended to i
mprove your experience");}
}, true, true);
Listing 7.3 FlpPlugin: Add Header End Item
7.1.3 Testing Your Plug-In
Testing of a plug-in is a little different compared to testing a normal SAPUI5 applica-
tion. The following procedure will guide you through the testing process:
1. Right-click Component.js and choose Run � Run Configurations in the context
menu, as shown in Figure 7.5.
Figure 7.5 Run Configuration
2. Click the Plus button and choose Run as SAP Fiori Launchpad Sandbox in the pop-
over, as shown in Figure 7.6.

7 Plug-Ins
276
Figure 7.6 Choose Run as SAP Fiori Launchpad Sandbox
3. For the File Name field, choose /fioriSandboxConfig.json from the dropdown list.
Keep the other fields unchanged, as shown in Figure 7.7.
Figure 7.7 Run Configuration: General
4. Switch to the URL Components tab and the set value of the URL Hash Fragment
field to “#Shell-home”, as shown in Figure 7.8.
277
7.2 Deploying the Plug-In on SAP Cloud Platform
7
Figure 7.8 Run Configuration: URL Components
5. Click Save and Run.
The reason for a test like this is that the plug-in doesn’t have a UI. The fioriSandbox-
Config.json file is a configuration file that loads the plug-in. To make sure the index
page displays, you need to specify the intent as #Shell-home in the run configuration.
7.2 Deploying the Plug-In on SAP Cloud Platform
After development and testing, it’s time to deploy your plug-in to SAP Fiori launch-
pad. First you need to deploy your plug-in as an SAPUI5 application on SAP Cloud
Platform, then you need to add an app as a plug-in in SAP Fiori configuration cockpit
for your SAP Fiori launchpad site.

7 Plug-Ins
278
7.2.1 Deployment and Activation
As we mentioned in earlier chapters, you need to deploy your plug-in as an SAPUI5
application to SAP Cloud Platform. Proceed as follows:
1. In your SAP Web IDE full-stack version, keep your project for the plug-in selected.
Choose menu path Deploy � Deploy to SAP Cloud Platform, as shown in Figure 7.9.
Figure 7.9 Deploy to SAP Cloud Platform
2. On the Deploy Application to SAP Cloud Platform page, keep everything unchanged
and click Deploy, as shown in Figure 7.10.
Figure 7.10 Deploy Application to SAP Cloud Platform: Application Details
3. Once you receive the message that your application has deployed successfully,
click Close, as shown in Figure 7.11.
279
7.2 Deploying the Plug-In on SAP Cloud Platform
7
Note
The plug-in is not an SAPUI5 application, so it can’t be registered to SAP Fiori launch-
pad here. You must do it manually.
Figure 7.11 SAP Fiori Application Successfully Deployed
4. Enter the management page of your SAP Fiori launchpad site and follow menu
path Content Management � Apps.
5. Click the Plus button to add an app and open the search help for App Resource, as
shown in Figure 7.12.
Figure 7.12 Add New App

7 Plug-Ins
280
6. In the value help dialog, search for “flpplugin”, then choose the line that rep-
resents your plug-in and click OK, as shown in Figure 7.13.
Figure 7.13 Select Your Plug-In
7. Scroll down to the App Resources Details section. For App Type, choose Shell Plugin
from the dropdown list. For Shell Plugin Type, choose Custom. Leave the other
fields unchanged, as shown in Figure 7.14.
Figure 7.14 Set App as Plug-In
8. Switch to the Catalogs tab and click the Plus button to assign the app to a tile cata-
log, as shown in Figure 7.15.
281
7.2 Deploying the Plug-In on SAP Cloud Platform
7
Figure 7.15 Assign Catalog
9. Select Sample Catalog and click OK in the Select Catalogs pop-up shown in Figure 7.16.
Figure 7.16 Select Catalogs
7 Plug-Ins
282
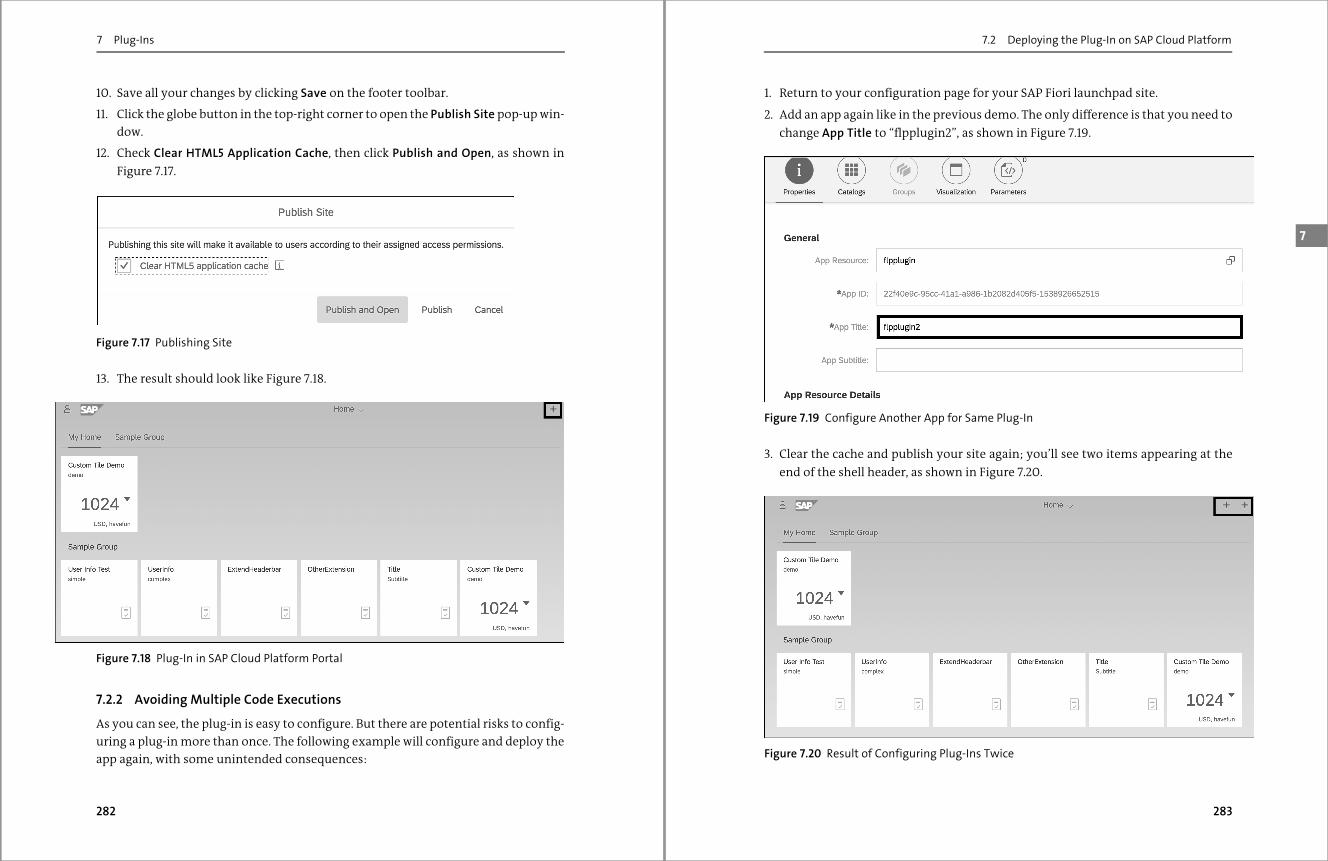
10. Save all your changes by clicking Save on the footer toolbar.
11. Click the globe button in the top-right corner to open the Publish Site pop-up win-
dow.
12. Check Clear HTML5 Application Cache, then click Publish and Open, as shown in
Figure 7.17.
Figure 7.17 Publishing Site
13. The result should look like Figure 7.18.
Figure 7.18 Plug-In in SAP Cloud Platform Portal
7.2.2 Avoiding Multiple Code Executions
As you can see, the plug-in is easy to configure. But there are potential risks to config-
uring a plug-in more than once. The following example will configure and deploy the
app again, with some unintended consequences:
283
7.2 Deploying the Plug-In on SAP Cloud Platform
7
1. Return to your configuration page for your SAP Fiori launchpad site.
2. Add an app again like in the previous demo. The only difference is that you need to
change App Title to “flpplugin2”, as shown in Figure 7.19.
Figure 7.19 Configure Another App for Same Plug-In
3. Clear the cache and publish your site again; you’ll see two items appearing at the
end of the shell header, as shown in Figure 7.20.
Figure 7.20 Result of Configuring Plug-Ins Twice

7 Plug-Ins
284
To solve this problem, you need to ensure your code executes only once regardless of
how many times the plug-in is executed. A general approach is to check for the existence
of the control you want to add before adding it. To do so, switch back to SAP Web IDE
full-stack version, then change the init method of component.js as shown in Listing 7.4.
init: function () {var rendererPromise = this._getRenderer();rendererPromise.then(function (oRenderer) {
//get reference of the itemvar oItem = sap.ui.getCore().byId("addbookmarkitem");
//Add item only if the item does not existif (!oItem) {
oRenderer.addHeaderEndItem("sap.ushell.ui.shell.ShellHeadItem",
{id: "addbookmarkitem",icon: "sap-icon://add",tooltip: "Add bookmark",press: function () {
MessageToast.show("This SAP Fiori launchpad has been extendedto improve your experience");
}}, true, true);}
});},
Listing 7.4 FlpPlugin: Code for Avoiding Multiple Executions
Deploy your plug-in again and publish your site once more. You’ll find that the issue
has been solved.
7.2.3 Working with Configurable Parameters
By working with configurable parameters, you can make your plug-in more flexible.
In this section, you’ll modify your plug-in to work with configurable parameters, as
follows:
1. Return to your SAP Fiori launchpad site management page. Follow menu path
Content Management � Apps, then select flpplugin in the app list. Enter edit mode
by clicking Edit.
285
7.2 Deploying the Plug-In on SAP Cloud Platform
7
2. Switch to the Parameters tab. Click the Plus button on the toolbar of the Intent Param-
eters table. Enter “icon” in the Name column and “accept” in the Default Value col-
umn. Then click Save to save all changes. The form should look like Figure 7.21.
Figure 7.21 Set Parameter for Plug-In
3. To avoid confusion, delete the flpplugin2 app by clicking on it in the apps list and
clicking Delete, as shown in Figure 7.22.
Figure 7.22 Delete flpplugin2

7 Plug-Ins
286
4. Switch to the SAP Web IDE and change the code of the init method of compo-
nent.js as shown in Listing 7.5. Here we get parameter icon as the icon’s name, after
which we can display the icon according to user settings.
init: function () {
var rendererPromise = this._getRenderer();//Get configurable parameter and generate the icon URLvar oComponentData = this.getComponentData();var icon = oComponentData.config.icon;var iconUrl = "sap-icon://" + icon;rendererPromise.then(function (oRenderer) {var oItem = sap.ui.getCore().byId("addbookmarkitem");if (!oItem) {oRenderer.addHeaderEndItem(
"sap.ushell.ui.shell.ShellHeadItem", {id: "addbookmarkitem",//Change the static parameter to variableicon: iconUrl,tooltip: "Add bookmark",press: function () {
MessageToast.show("This SAP Fiori launchpad has been extended to improve your experience");
}}, true, true);
}});
},
Listing 7.5 FlpPlugin: Read Parameters
5. Deploy your plug-in again to SAP Cloud Platform and republish your site, as shown
in Figure 7.23.
Figure 7.23 Publishing Site
287
7.3 Deploying the Plug-In on SAP NetWeaver AS ABAP
7
6. As a result, the icon for the item you’ve added will change according to your con-
figuration.
7.3 Deploying the Plug-In on SAP NetWeaver AS ABAP
A change in code level isn’t needed to deploy your plug-in on SAP NetWeaver AS
ABAP. The only difference is the method of deployment and configuration. In this
section, we’ll guide you through these processes.
7.3.1 Deployment
To deploy your plug-in to SAP NetWeaver AS ABAP, you first need to deploy it to the
ABAP Repository as a BSP (Business Server Page) application. Then use SAP Fiori
launchpad designer to create a target mapping using a predefined intent called shell
plugin. To begin the deployment, follow these steps:
1. Switch back to SAP Web IDE full-stack version and choose Deploy � Deploy to
SAPUI5 ABAP Repository, as shown in Figure 7.24.
Figure 7.24 Menu for Deploying to ABAP
2. In the Deployment Options step, choose your system and select Deploy a New
Application. Then click Next, as shown in Figure 7.25.

7 Plug-Ins
288
Figure 7.25 Deployment Options
3. In the Deploy a New Application step, enter “zplugin” for Name and text of your
choice for Description. Select $TMP by clicking the Browse button to the right of
the Package field. Then click Next, as shown in Figure 7.26.
Figure 7.26 Deploy New Application
289
7.3 Deploying the Plug-In on SAP NetWeaver AS ABAP
7
4. Finally, click Finish in the Confirm step, as shown in Figure 7.27. Your application
has now been successfully deployed!
Figure 7.27 Confirm Deployment of SAPUI5 Application
7.3.2 Configuration
With the plug-in deployed, you can start to configure and activate the plug-in for
your user. A predefined intent is reserved for plug-ins: shell plugin. To begin, follow
these steps:
1. Open SAP Fiori launchpad designer on your local computer.
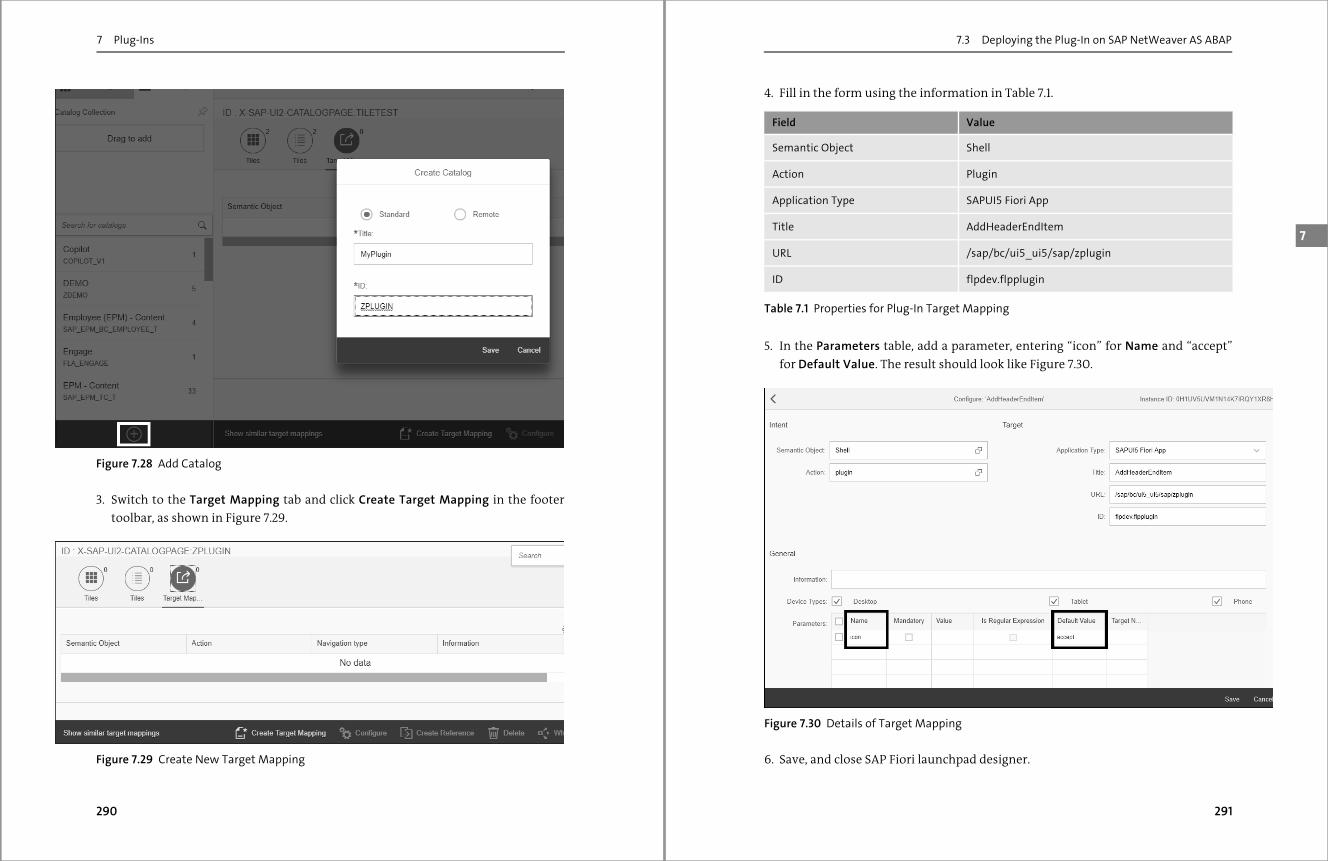
2. Add a tile catalog by clicking the Add button in the footer toolbar of the catalog list.
Use “MyPlugin” for the Title and “ZPLUGIN” for the ID. Then click Save in the pop-
up window, as shown in Figure 7.28.
7 Plug-Ins
290
Figure 7.28 Add Catalog
3. Switch to the Target Mapping tab and click Create Target Mapping in the footer
toolbar, as shown in Figure 7.29.
Figure 7.29 Create New Target Mapping
291
7.3 Deploying the Plug-In on SAP NetWeaver AS ABAP
7
4. Fill in the form using the information in Table 7.1.
5. In the Parameters table, add a parameter, entering “icon” for Name and “accept”
for Default Value. The result should look like Figure 7.30.
Figure 7.30 Details of Target Mapping
6. Save, and close SAP Fiori launchpad designer.
Field Value
Semantic Object Shell
Action Plugin
Application Type SAPUI5 Fiori App
Title AddHeaderEndItem
URL /sap/bc/ui5_ui5/sap/zplugin
ID flpdev.flpplugin
Table 7.1 Properties for Plug-In Target Mapping

7 Plug-Ins
292
7. Logon to the SAP GUI and enter Transaction PFCG.
8. Enter “ZROLE_PLUGIN” for the Role name and click the Single Role button, as
shown in Figure 7.31.
Figure 7.31 Create New Role
9. Provide a Description and click Save, as shown in Figure 7.32.
Figure 7.32 Save Role before Continuing
293
7.3 Deploying the Plug-In on SAP NetWeaver AS ABAP
7
10. Switch to the Menu tab, click the small triangle after button Transaction, and
select SAP Fiori Tile Catalog, as shown in Figure 7.33.
Figure 7.33 Add Tile Catalog as Menu
11. In the pop-up window, enter “ZPLUGIN” for Catalog ID, then click the green
checkmark to confirm, as shown in Figure 7.34.
Figure 7.34 Select Catalog

7 Plug-Ins
294
12. The result should look like Figure 7.35.
Figure 7.35 Result of Adding Tile Catalog
13. Switch to the User tab, add your user to the list, and save the role, as shown in Fig-
ure 7.36.
Figure 7.36 Add User and Save
14. Switch back to your browser and enter SAP Fiori launchpad on your SAP
NetWeaver AS ABAP system. The SAP Fiori launchpad will now look like Figure
7.37.
295
7.4 Predefined Plug-Ins
7
Figure 7.37 Result of Plug-In Activated on SAP NetWeaver AS ABAP
7.4 Predefined Plug-Ins
There are predefined plug-ins for special purposes in the system. For example, a plug-
in for setting user defaults is available for SAP S/4HANA Finance to help users set
default values for common parameters. Another plug-in is for enabling or disabling
runtime authoring tools for a specific user.
7.4.1 Plug-In for Setting User Defaults
This plug-in adds setting options in the user setting dialog. It consists of common
finance parameters like company code.
If you’re using SAP Fiori launchpad on SAP NetWeaver AS ABAP and all apps for SAP
S/4HANA have been installed, you can find the plug-in in business catalog SAP_SFIN_
BC_USER_PARAM.
For SAP Fiori launchpad on SAP Cloud Platform, you need to perform the following
steps:
1. Import the Default Values shell plug-in app using the Transport Manager.
Note
This feature is only available if you’re subscribed to SAP Fiori Cloud for SAP S/4HANA
Finance content.

7 Plug-Ins
296
2. In the Configure Apps editor, select the Parameters tab. For each application that
was developed to support user defaults as a navigation parameter, populate the
parameter fields using the following structures:
– Parameter name: <parametername>
– Parameter default value: userdefault.<parametername>
These parameters enable the apps to use the Default Values shell plug-in.
7.4.2 Plug-In for Activating Runtime Authoring
Flexibility is key! Enterprise software must adapt to rapidly changing environments.
For example, customers need their apps to fit their processes without long IT projects
to adapt them, and cloud providers want to run the same software for everyone to
reduce total cost of ownership (TCO). Do you think adapting the user interface of SAP
Fiori apps (e.g., by adding, hiding or rearranging fields) is a complex process? Think
again! SAPUI5 flexibility services allow for upgrade-safe and modification-free UI
changes on different levels (e.g., on the customer side) that can be performed by dif-
ferent users (end users, key users, and developers).
The plug-in for runtime authoring can enable or disable key users from creating their
own adaptions of an SAP Fiori application based on the SAPUI5 flexibility service.
In SAP NetWeaver AS ABAP, there’s already a tile catalog called SAP_UI_FLEX_KEY_
USER. A plug-in is contained in this catalog, which adds a new item in the Me Area,
which is used to adapt SAP Fiori apps at runtime.
7.5 Summary
In this chapter, you learned how to develop a plug-in using SAP Web IDE full-stack
version and how to deploy it to both cloud and on-premise environments. When you
want to call services at startup or extend SAP Fiori launchpad in your system, you can
write the code you used in Chapter 4 and Chapter 5 in the plug-ins.
After reading all seven chapters of this book, I hope you’ve found that SAP Fiori
launchpad is a good friend, there to give you a lot of help when you develop your
SAPUI5 apps and ready for you to add your own customizations and extensions.

7
Contents
Preface ..................................................................................................................................................... 13
1 Overview of SAP Fiori Launchpad 17
1.1 Introduction to SAP Fiori Launchpad .......................................................................... 17
1.1.1 End User’s Perspective ........................................................................................ 18
1.1.2 Administrator’s Perspective .............................................................................. 18
1.1.3 Developer’s Perspective ...................................................................................... 19
1.2 Versions of SAP Fiori Launchpad ................................................................................... 19
1.2.1 SAP Fiori Launchpad for SAP NetWeaver with SAP_UI Component .... 19
1.2.2 SAP Fiori Launchpad in UI Add-On for SAP NetWeaver ........................... 20
1.2.3 SAP Fiori Launchpad for SAP Cloud Platform .............................................. 20
1.2.4 SAP Fiori Launchpad for SAP S/4HANA Cloud ............................................. 21
1.2.5 SAP Fiori Launchpad for SAP HANA XS Advanced ...................................... 21
1.2.6 SAP Fiori Launchpad for SAP Enterprise Portal ........................................... 21
1.3 Development Capabilities of SAP Fiori Launchpad .............................................. 21
1.3.1 Embed SAPUI5 Applications in SAP Fiori Launchpad ................................ 22
1.3.2 Client-Side Services .............................................................................................. 22
1.3.3 Extend SAP Fiori Launchpad ............................................................................. 22
1.3.4 Custom Tile Types for SAP Fiori Launchpad ................................................. 23
1.3.5 Plug-ins for SAP Fiori Launchpad ..................................................................... 23
1.4 Summary ................................................................................................................................. 23
2 Development Environment Setup 25
2.1 Cloud-Based Development Environment ................................................................. 25
2.1.1 Register SAP Cloud Platform Trial Account .................................................. 26
2.1.2 Open SAP Web IDE Full-Stack Version ........................................................... 29
2.1.3 Activate SAP Cloud Platform Portal Service ................................................. 31

Contents
8
2.2 On-Premise Development Environment .................................................................. 38
2.2.1 Prerequisites .......................................................................................................... 39
2.2.2 Create a Virtual Machine ................................................................................... 45
2.2.3 Install the Operating System ........................................................................... 49
2.2.4 Prepare the Operating System for SAP NetWeaver AS ABAP ................ 55
2.2.5 Install SAP NetWeaver AS ABAP Components ........................................... 64
2.2.6 Post-Installation Steps ....................................................................................... 66
2.3 Connect a Cloud Environment to an On-Premise Environment ..................... 80
2.3.1 Install SAP Cloud Connector ............................................................................. 80
2.3.2 Set Up SAP Cloud Connector ............................................................................ 84
2.3.3 Create a Destination in SAP Cloud Platform ............................................... 92
2.4 Summary ................................................................................................................................. 95
3 SAPUI5 Applications in SAP Fiori Launchpad 97
3.1 Architecture ........................................................................................................................... 97
3.2 Intent-Based Navigation ................................................................................................. 101
3.3 Embedding SAPUI5 Applications ................................................................................. 103
3.3.1 Testing SAPUI5 Apps ........................................................................................... 103
3.3.2 Provisioning Application Title and Description ......................................... 106
3.3.3 Proposing an Intent ............................................................................................. 107
3.4 Navigation between SAPUI5 Applications .............................................................. 112
3.4.1 Set Up Test Environment for Cross-Application Navigation ................. 112
3.4.2 Calling Navigation Services .............................................................................. 115
3.4.3 Test Supportability .............................................................................................. 117
3.4.4 Navigation Back to Previous App .................................................................... 119
3.4.5 Configuring Navigation Targets in App Descriptor .................................. 121
3.5 Passing Parameters between Apps ............................................................................. 124
3.6 Summary ................................................................................................................................. 126
9
Contents
4 Client-Side Services 127
4.1 User Info Service .................................................................................................................. 128
4.1.1 Creating and Testing a Simple SAPUI5 Application .................................. 129
4.1.2 Exploring the User Info Service API ................................................................ 140
4.1.3 Creating and Testing a Complex SAPUI5 Application .............................. 148
4.2 Bookmark Service ................................................................................................................ 167
4.2.1 Creating an SAPUI5 Application ...................................................................... 167
4.2.2 Using Additional Functions ............................................................................... 177
4.3 Personalization Service ..................................................................................................... 179
4.3.1 Creating an SAPUI5 Application ...................................................................... 179
4.3.2 Data Storage Locations ....................................................................................... 184
4.3.3 Handling Complex Data ..................................................................................... 185
4.4 Summary ................................................................................................................................. 188
5 Extensibility 189
5.1 Extension Options ............................................................................................................... 189
5.2 App Title Information Extensions ................................................................................ 192
5.2.1 Preparing a Project ............................................................................................... 193
5.2.2 Changing the App Title ....................................................................................... 196
5.2.3 Changing the Title Context Menu .................................................................. 198
5.3 Shell Header Extensions ................................................................................................... 201
5.3.1 Preparing a Project ............................................................................................... 201
5.3.2 Setting a Secondary Header Title .................................................................... 203
5.3.3 Managing Header Items .................................................................................... 204
5.3.4 Managing Extension Element States ............................................................. 210
5.4 Launch Page Extensions ................................................................................................... 211
5.4.1 Preparing a Project ............................................................................................... 211
5.4.2 Adding a Subheader ............................................................................................ 213
5.4.3 Adding a Footer Bar ............................................................................................. 214
5.4.4 Adding Tool Area Items ...................................................................................... 215

Contents
10
5.5 Me Area Extensions ............................................................................................................ 218
5.5.1 Preparing a Project .............................................................................................. 218
5.5.2 Adding a Button to the Me Area ..................................................................... 220
5.5.3 Adding Setting Options ..................................................................................... 221
5.5.4 Fetching Data from Custom Setting Options ............................................. 223
5.6 Summary ................................................................................................................................. 225
6 Custom Tile Types 227
6.1 Creating a Custom Tile ...................................................................................................... 227
6.1.1 Basics of a Generic Tile ....................................................................................... 227
6.1.2 Creating a Generic Tile ....................................................................................... 229
6.1.3 Organizing Tile Content ..................................................................................... 231
6.1.4 Creating a Slide Tile ............................................................................................. 235
6.1.5 Adding Content to Your Tile ............................................................................. 236
6.2 Deploying a Custom Tile to SAP Cloud Platform ................................................... 237
6.2.1 Deploying Your Tile to SAP Cloud Platform Portal .................................... 237
6.2.2 Applying Your Tile to an SAP Fiori App .......................................................... 240
6.2.3 Setting and Parsing Parameters ..................................................................... 243
6.2.4 Implementing Navigation ................................................................................. 247
6.3 Deploying a Custom Tile to SAP NetWeaver AS ABAP ....................................... 248
6.3.1 Developing a Tile .................................................................................................. 249
6.3.2 Creating a CHIP Description File ..................................................................... 251
6.3.3 Deploying Your Tile as an SAPUI5 Application ........................................... 253
6.3.4 Registering Your Tile ........................................................................................... 255
6.3.5 Creating a Configuration Screen .................................................................... 258
6.3.6 Setting and Getting Parameters ..................................................................... 264
6.4 Summary ................................................................................................................................. 267
11
Contents
7 Plug-Ins 269
7.1 Developing a Plug-In .......................................................................................................... 269
7.1.1 Creating a Plug-In Using a Template ............................................................. 270
7.1.2 Adjusting Implementation Code ..................................................................... 274
7.1.3 Testing Your Plug-In ............................................................................................ 275
7.2 Deploying the Plug-In on SAP Cloud Platform ....................................................... 277
7.2.1 Deployment and Activation .............................................................................. 278
7.2.2 Avoiding Multiple Code Executions ............................................................... 282
7.2.3 Working with Configurable Parameters ....................................................... 284
7.3 Deploying the Plug-In on SAP NetWeaver AS ABAP ............................................ 287
7.3.1 Deployment ............................................................................................................ 287
7.3.2 Configuration ......................................................................................................... 289
7.4 Predefined Plug-Ins ............................................................................................................. 295
7.4.1 Plug-In for Setting User Defaults .................................................................... 295
7.4.2 Plug-In for Activating Runtime Authoring ................................................... 296
7.5 Summary ................................................................................................................................. 296
The Author ............................................................................................................................................ 297
Index ........................................................................................................................................................ 299

299
Index
A
ABAP Development Tools (ADT) ....................... 78
ABAP Repository ................................................... 287
deployment options ........................................ 288
Action ........................................................................... 19
Administrators ......................................................... 18
API reference .......................................................... 140
App descriptor ............................................. 123, 196
setting parameters .......................................... 197
App finder ......................................................... 18, 220
App node deletion ................................................ 229
App resource ........................................................... 279
details ................................................................... 280
Application container ............................................ 98
Application programming interfaces
(APIs) ........................................................................ 17
B
Binding parameters ............................................. 266
Binding path ........................................................... 158
Bookmark service ................................ 22, 128, 167
additional functions ....................................... 177
button ................................................................... 177
existing tiles ....................................................... 178
testing ......................................................... 168, 175
tiles ......................................................................... 172
Boot disk file .............................................................. 49
Business Object Processing Framework
(BOPF) ................................................................... 188
Business Server Page (BSP) ................................ 287
Button control ....................................................... 194
Buttons ............ 133, 170, 177, 180, 202, 211, 218
custom .................................................................. 191
disable .................................................................. 120
enable state ........................................................ 119
pressed code ....................................................... 163
C
Callback function .................................................. 177
Callback method ................................................... 118
Chrome developer tools .................................... 142
Client-side rendering CHIPs ............................. 251
Client-side services ....................................... 22, 127
Code editor ..................................................... 193, 231
Collaborative Human Interface Part
(CHIP) ................................................. 248, 251, 253
API ................................................................. 259, 265
configuration parameters ............................ 264
create .................................................................... 255
details ................................................................... 255
value ...................................................................... 257
ColumnMicroChart control ............................. 234
Configurable parameters .................................. 284
Configuration cockpit ........................... 20, 25, 277
Configuration screen .......................................... 259
create .................................................................... 258
parameters ......................................................... 264
tile initialization .............................................. 262
Configure Apps editor ........................................ 296
Container mode .................................................... 187
Content aggregation ........................................... 153
Core data services (CDS) ..................................... 188
Cross-app navigation ... 112–113, 115–116, 121
Custom tiles ............................................................ 227
add parameters ................................................ 243
best practices ..................................................... 266
configure ............................................................. 262
republish .............................................................. 241
results ................................................................... 242
SAP Cloud Platform deployment ............... 237
SAP NetWeaver AS ABAP deployment ..... 248
visualization parameters ............................. 240
visualizations .................................................... 239
D
Dashboard .................................................................. 36
Data binding .................................................. 169, 245
Data changes frequency .................................... 185
Data storage locations ........................................ 184
Deferred object ...................................................... 224
Descriptor editor ......................................... 150, 168

Index
300
Destination ................................................................ 93
configuration ....................................................... 94
Developer license .................................................... 69
Developers ................................................................. 19
Development environment
cloud-based ........................................................... 25
connect cloud to on-premise ......................... 80
hardware requirements ................................... 40
on-premise ............................................................. 38
on-premise architecture ................................... 39
setup ........................................................................ 25
Development overview ........................................ 21
DNS record ................................................................. 64
Dynamic tiles ......................................................... 179
E
End users ..................................................................... 18
Error message ........................................................ 118
Event handler ................... 133, 160, 163, 181, 196
Event listener ................................................ 198, 212
Events ........................................................................ 133
Extensions ............................................... 22, 189, 274
launch page ....................................................... 211
managing element states ............................. 210
Me Area ................................................................ 218
options ................................................................. 189
shell header ........................................................ 201
F
FeedContent control ........................................... 231
Fetching data .......................................................... 223
Firewall ........................................................................ 53
Footer bar ................................................................ 214
add ......................................................................... 215
Footers ................................................... 155, 170, 270
Frame types ............................................................ 228
G
Generic tiles ............................................................ 227
create .................................................................... 229
GenericTile control ..................................... 230, 247
H
Hardware key ............................................................ 73
Header end item .................................................... 190
add ................................................................ 205–206
pop-up ................................................................... 207
URL redirect ........................................................ 206
Header item ................................................... 190, 204
add ................................................................ 206, 208
pop-up ................................................................... 209
show ....................................................................... 205
with link ............................................................... 208
Headers ..................................................................... 274
Hierarchy navigation .......................................... 199
Hook method .......................................................... 246
Hosts file ..................................................................... 68
HTML5 app name .................................................. 238
HTML5 application repository .......................... 25
HTTP Service Management app ........................ 78
HTTPS certificate ..................................................... 75
HTTPS protocol ........................................................ 87
I
Icon control ............................................................. 169
Icons ........................................................................... 286
ImageContent control ......................................... 232
Inbound navigation ............................................. 109
index.html ................................................................. 97
Input control .............................. 132, 152, 169, 181
Intent ..................................... 19, 101, 114, 118, 121
access .................................................................... 101
app descriptor .................................................... 123
availability .......................................................... 117
configuration ..................................................... 111
navigation ........................................................... 117
parameters .......................................................... 108
propose ................................................................. 107
URL ......................................................................... 112
Intent-based navigation ................. 101–102, 167
benefits ................................................................. 103
Internal host .............................................................. 90
IP address ................................................................... 64
301
Index
J
Java Platform, Standard Edition Development
Kit (JDK) ............................................................ 80, 82
JavaScript APIs ................................................ 99, 127
JavaScript promise objects ................................ 145
jQuery object .......................................................... 222
JSON model ...................... 150, 157, 168, 171, 180,
245–246, 265
JSON object ........................ 115, 204, 211, 221, 250
L
Label control ................................................. 131, 153
Languages ...................................................... 146, 165
default .................................................................. 146
settings .................................................................... 50
Launch page ............................................................ 190
Layout editor .......... 131, 150, 158, 194, 229, 260
set properties ..................................................... 230
License administration ......................................... 72
Local disk .................................................................. 185
M
Me Area ................. 18, 98, 191, 204, 218, 221, 270
add button .......................................................... 220
add settings .............................................. 221, 223
event handlers ................................................... 219
settings ................................................................. 220
Memory size .............................................................. 46
Microchart controls ............................................. 233
Microservices ............................................................ 21
Multiple code executions ........................ 282, 284
N
Namespace .............................................................. 252
nano ....................................................................... 58, 63
install ....................................................................... 58
Navigation ............................................ 112, 118, 247
configuring targets ......................................... 121
flow ........................................................................ 120
services ................................................................. 115
target .......................................................... 113, 125
testing ................................................................... 117
to previous app ................................................. 119
NewsContent control .......................................... 232
Notification center .................................................. 18
NumericContent control ................................... 233
O
OData service ......................................................... 127
OData service call ................................................. 248
onInit method ....................................................... 250
onPress method .................................................... 112
onTilePress method ............................................ 247
openSUSE Linux ....................................................... 39
download ............................................................... 41
install ....................................................................... 49
Operating system .................................................... 49
change hosts file .................................................. 68
network settings .................................................. 62
prepare for ABAP ................................................ 55
Outbound navigation target ............................ 122
Outline structure .................................................. 153
P
Package selection .................................................. 254
Page builder ............................................................ 251
Page control ............................................................... 98
Partition settings ..................................................... 51
Password ..................................................................... 85
Personalization service ............................... 22, 179
complex data ..................................................... 185
fetch data ............................................................ 183
initalization with container mode ............ 186
initialize ............................................................... 182
restrict usage ..................................................... 187
save data ............................................................. 183
Plug-ins .............................................................. 23, 269
add button .......................................................... 270
add header .......................................................... 274
basic information ............................................ 270
characteristics ................................................... 269
configuration .................................................... 289
create with template ...................................... 270
development ...................................................... 269
generated component ................................... 273
parameters ......................................................... 285
predefined ........................................................... 295
SAP Cloud Platform deployment ............... 277
SAP NetWeaver AS ABAP deployment ..... 287
Index
302
Plug-ins (Cont.)
template customization ............................... 272
templates ............................................................ 270
testing .................................................................. 275
Port forwarding ........................................................ 67
Port number .............................................................. 81
Press event .................................. 133, 160, 170, 247
Promise object ....................................................... 196
Promise type return object ........... 171–172, 174
Property target ...................................................... 115
R
Register app ............................................................ 138
Related apps ............................................................ 200
Renderer object ........................ 201–202, 212, 219
Report /UI2/INVALIDATE_CLIENT_
CACHES ................................................................ 262
Resource bindle ..................................................... 189
Roles .................................................. 33–34, 292, 294
Router .............................................................. 167, 198
Runtime authoring .............................................. 296
S
SAP Belize Plus ....................................................... 166
SAP Cloud Connector ..................... 40, 80, 92, 253
define subaccount .............................................. 86
download ............................................................... 44
install ................................................................ 81, 83
set up ....................................................................... 84
SAP Cloud Platform ............ 20, 84, 106, 108, 199
create destination .............................................. 92
deploy app ....................................... 110, 137, 278
index page ............................................................. 26
log on ....................................................................... 35
registration ........................................................... 27
trial account ......................................................... 26
trial index .............................................................. 29
update app ......................................................... 147
SAP Cloud Platform Cockpit ........................ 27, 92
SAP Cloud Platform Portal .................... 20, 23, 25,
135, 137, 165, 199, 237
activate ................................................................... 31
admin space .......................................................... 36
administration page ...................................... 238
app deployment ............................................... 237
authorization ....................................................... 32
SAP Cloud Platform Portal (Cont.)
create site ............................................................... 36
enable ...................................................................... 31
index page ........................................................... 246
plug-in ................................................................... 282
publish site ............................................................ 37
site template ......................................................... 36
testing ................................................................... 146
SAP Community ...................................................... 41
SAP Enterprise Portal ............................................. 21
SAP Fiori Cloud ....................................................... 295
SAP Fiori launchpad designer .................. 77, 252,
257, 289
SAP Fiori launchpad sandbox ..... 106, 135–136,
163, 184, 236, 275
SAP Fiori launchpad sites ..................................... 75
SAP Gateway ............................................................. 87
SAP GUI ................................................................ 66, 73
logon ........................................................................ 71
SAP HANA XS Advanced ....................................... 21
SAP JVM ....................................................................... 80
download ............................................................... 44
SAP NetWeaver ........................................................ 19
SAP NetWeaver AS ABAP ...... 23, 38–39, 84, 106,
253, 294
commands ............................................................ 66
download ............................................................... 41
install components ............................................ 64
post-installation ................................................. 66
SAP S/4HANA ................................................ 103, 295
SAP S/4HANA Cloud .............................................. 21
SAP S/4HANA Finance ........................................ 295
SAP Screen Personas .............................................. 97
SAP Smart Business .............................................. 227
SAP Web IDE ..................... 25, 29, 39, 97, 103, 129,
205, 229, 236, 245, 270
Chrome settings ................................................ 136
service page .......................................................... 30
SAP_UI component ................................................ 20
SAPUI5 ......................................................... 17, 97, 262
app creation ................ 129, 148, 167, 179, 193
app testing ................................................ 135, 163
app title ................................................................ 106
application descriptor .................................... 108
architecture ................................................. 97, 100
component .......................................................... 238
embedding apps ......................................... 22, 103
flexibility service ............................................... 296
303
Index
SAPUI5 (Cont.)
SDK ........................................................................ 142
template customization ................................ 105
templates ............................................................. 104
testing apps ........................................................ 103
Search ........................................................................... 18
Secondary header title ........................................ 203
Select controls ........................................................ 159
Semantic object ........................................................ 19
Service alias ................................................... 192–193
Shared folder ...................................................... 59, 64
add ............................................................................ 60
Shell ............................................................................... 98
container ................................................................ 99
header ................................................ 190, 201, 283
plugin .......................................................... 269, 280
renderer ................................................................... 99
ShellUIService ........................................................ 192
Simple form control .................................. 152–153
Slide tiles .................................................................. 235
numeric and microchart ............................... 235
SlideTile control .................................................... 236
SSH service ................................................................. 53
Startup failures ......................................................... 82
States .......................................................................... 210
parameters ......................................................... 211
Storage file .................................................................. 47
Subheader ...................................................... 190, 213
add ......................................................................... 214
System mapping .............................................. 88–89
T
Target mapping ........................... 19, 101, 103, 290
Templates ................................................................ 129
Test environment ................................................. 112
Themes ............................................................ 146, 166
Tile catalog ........................... 19, 257, 262, 280, 293
add ......................................................................... 290
Tile types ................................................. 23, 227, 258
none ....................................................................... 238
TileContent control .................................... 230–231
Tiles .................................................................. 114, 208
add content ........................................................ 236
content ................................................................. 231
create .................................................................... 172
delete ..................................................................... 173
deploy as SAPUI5 app ..................................... 253
Tiles (Cont.)
development ...................................................... 249
footer .................................................................... 227
get parameters .................................................. 246
header image ..................................................... 228
navigation .......................................................... 248
parameters ......................................................... 243
perform count ................................................... 175
register ........................................................ 251, 255
update .................................................................. 173
XML code ............................................................. 250
Time zone settings .................................................. 52
Title ............................................................................ 189
change ......................................................... 196, 198
context menu .................................................... 198
information extensions ................................. 192
set hierarchy ...................................................... 199
Title control ............................................................ 155
Tool area item ........................................................ 215
expandable ................................................ 215, 217
simple ................................................................... 216
Toolbar control ...................................................... 155
Transaction
/UI2/PERS_EXPIRED_DELETE ..................... 185
PFCG ...................................................................... 292
SE16 ........................................................................ 185
SICF ........................................................................... 78
UI2/CHIP ............................................................. 255
Transport Manager .............................................. 295
U
UI add-on for SAP NetWeaver ............................ 20
Universally unique identifiers (UUIDs) .......... 55
URL components .................................................. 276
User defaults ........................................................... 295
User experience ....................................................... 31
User ID ........................................................ 33, 44, 140
User info service ................................... 22, 128, 135
API .......................................................................... 140
methods ...................................................... 143, 148
promise object ................................................... 145
testing ................................................................... 143
testing methods ................................................ 144
User input ....................................................... 171, 208
User perspectives .................................................... 18
User settings ........................................ 164, 223–224
Users .......................................................................... 294

Index
304
uuidd ............................................................................ 55
check commands ................................................ 62
check service ......................................................... 61
install ....................................................................... 56
V
VBox ....................................................... 202, 212, 219
control .................................................................. 194
Versions ....................................................................... 19
Views ......................................................................... 131
create new .......................................................... 259
information ........................................................ 260
Virtual hard disk ...................................................... 47
size ............................................................................ 48
Virtual host ................................................................ 88
Virtual machine ....................................................... 45
network settings .................................................. 67
reboot ...................................................................... 61
start .......................................................................... 49
Virtual port ................................................................ 89
VirtualBox ........................................................... 39, 59
download ............................................................... 40
install ....................................................................... 45
Vrtual machine
set up ....................................................................... 46
W
Web Dynpro .............................................. 17, 97, 256
X
XML view .................................................................. 177
XTerm .......................................................................... 62
Y
Yast UI .......................................................................... 56

First-hand knowledge.
We hope you have enjoyed this reading sample. You may recommend or pass it on to others, but only in its entirety, including all pages. This reading sample and all its parts are protected by copyright law. All usage and exploitation rights are reserved by the author and the publisher.
Steve Guo is an SAP mentor, developer, and trainer who has been working with SAP for more than 8 years. Since 2014 he has been working with SAP‘s new tech-nologies, including SAP HANA and SAP Fiori, and has helped numerous developers and SAP customers adopt and use SAP software. Steve is the author of three SAP training courses for SAP Fiori and other SAP user
interface technologies. He has been recognized as a Gold trainer for his training work by SAP Greater China.
Steve Guo
SAP Fiori Launchpad: Development and Extensibility304 Pages, 2019, $79.95 ISBN 978-1-4932-1645-1
www.sap-press.com/4556