“a few of my favorite things”things.pdf · favorite things wool felt & a little visual...
TRANSCRIPT

Wool Felt & Needle Felting
“How in the world am I supposed to share with you my favorite things without taking up the entire day…Even though I am a very simple girl, I do love to create…alot., so when I was asked to create a class around my Favorite Things…I had to really think about what it was I was going to share…then I remembered a photo of me that was taken in the fall…at a quilt shop it Pennsylvania…and how happy I felt…keyword FELT. Bingo…
“A Few of My Favorite Things”by Stephanie Ackerman

Favorite ThingsWool Felt & A Little Visual Inspiration
It seems that I am incorporating wool felt into all of my creative and crafty projects more and more. Wool Felt is one of my most favorite things and I love it to embellish my surroundings.
When I came across beautiful shades of wool felt while walking in a quilt store in Pennsylvania last year, I think my heart skipped a beat! When the women at the cutting table asked what I was going to make with my bundles and bundles of felt, I replied…”Oh, I don’t really know, I just love wool felt!”
In general, one thing leads to another in my craft life, so I knew that at some point, I would use it…and as much as I have tried to change the fact of buying something without a specific “purpose” when it comes to wool felt, I have to embrace it.
Wool Felt. Not so soft to touch, but to my eye, beautiful, calming, and makes me happy. It can be cut, stitched, glued, die-cut, sewn, stapled, painted, wrapped…I am safe to say that anything you can do with paper, you can do with felt.

Here is a peek into my little world of creating with felt…I have gone a little crazy!!!
I hope that something here inspires you to create!
Print your favorite quote on manila colored paper, trim to the shape of a hanging tag, add a tiny wool felt heart, add a string and you have a tag that is cuter than any you could buy!
Create mini pouches to hold coins, gift cards or little stitch kits…
Embellish cards, pages and projects by trimming/die cutting shapes from felt, add stitches, buttons & enjoy!

Cut flowers and leaves by hand or use your favorite Sizzix dies to cut shapes. Layer different sized circles to create the centers of the flowers and alternate stitches to add an additional element of design.Stitch them onto squares, stuff with filler to create cute pin cushions.
SimpleFelt Pin
Cushions

Add buttons, layers of circles, roses made from felt…stitches…
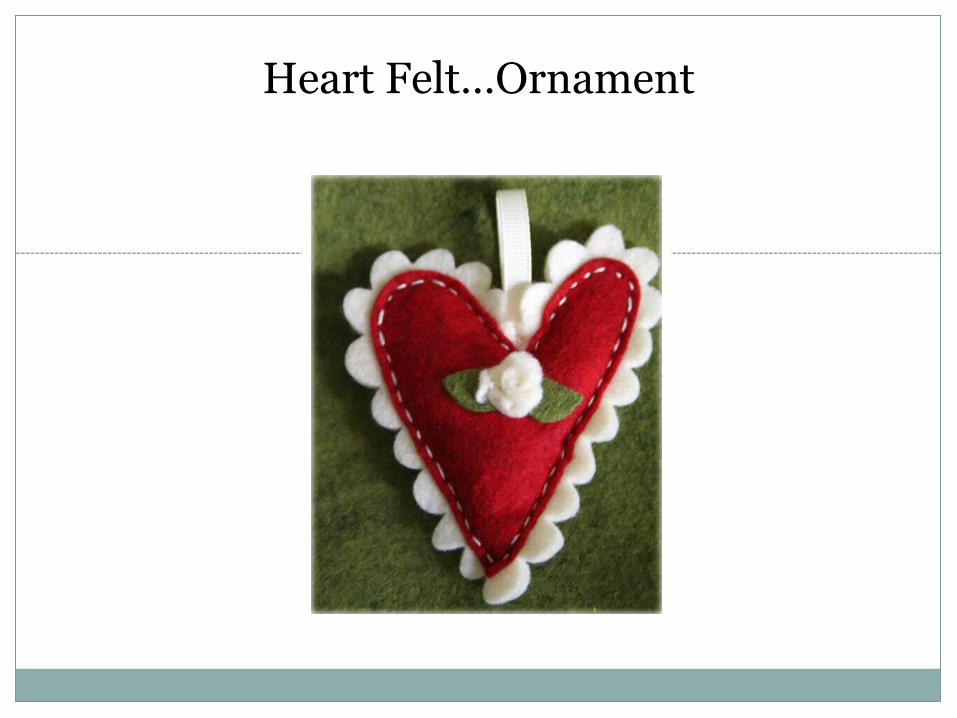
Heart Felt…Ornament

1. Start by layering one white scallop heart, the red heart and the two green leaves together.
2. Thread needle and come up from the bottom, through one leaf and down thorough the other to “tact” them down.

3. Add the bottom scalloped heart layer to the top and start to stitch around the edge all the way around the heart leaving a space open to “stuff”

4. Stuff heart with 3-4 cotton balls/filler.
5. Create a loop using cream ribbon and place inside opening. Stitch remaining area closed. ALL DONE!

Favorite Things…Wool Roving & Needle Felting
I am a very visual person so just looking at this technique confused me until I just sat down a tried it. It took all of 3 seconds to get it so my best advice to you is to try it. You won’t “get it” until you “do it”… What you are basically doing is weaving tiny strands of wool (referred to as “roving”) together to create felted wool with a tool that has TINY little barbs at the end of it. Now, you are thinking, “Can’t I just go buy wool felt” and yes, you can, but this is WAY better, because with flat wool felt, you will never get the dimension that you will want to get, PLUS..we are MAKING things, duh! The tools you will be using are very simple:A piece of foam (to poke, poke, poke, poke into)A couple of felting needles (at least 2-3)Wool Roving
and your visual imagination. All of these things can be found at JoAnn’s and online (well except for the imagination…YOU need to provide that, and you do have it…) I did purchase a few extra sets of needles at JoAnn’s because they break…and..THEY HURT when you pierce yourself with them..which will happen…maybe more often than you want so you may want to add Band-Aids to that supply list.

The easiest way for me to teach you is to show you, and well since I am on this side of the screen and you are on your side of the screen, I will use photos to demonstrate.
For our first lesson, we will make a heart. (wow..how “me!”)
Start with two small clumps of “Roving”. These only measure about an inch or so. START SMALL…you can always add on.
Now what you are going to do is take your felting needle and just poke, poke, poke, poke…thought the roving, into the foam…poke, poke, poke
STOP…now before you continue poking, pull your little piece up and off the foam and then just set it back down. If you don’t do this every once in awhile, you will find that you are going to “sew” this little piece right into your foam.
Keep doing this…poking, poking, poking….
Look at this photo…Do you see what your roving is doing?? All of the little wool fibers are binding together and becoming more dense.
Continue poking, poking, lifting, poking and start using your needle to “shape and mold” your piece.
(this is where the visuals and imagination comes in)

Continue poking, poking, lifting, poking and create two similar “rectangular-ish” shapes similar to the ones you see in the photo. .
Overlap the two bottom edges…Wait..do you see it???? It is the beginning of a heart!
Now poke, poke, poke, poke, poke those ends together to connect them (do not forget to lift it off of the foam once in awhile or your foam will have a cute lil heart sewn to it!)
To make you lil heart more dimensional, start adding & poking lil bits of “roving” to the places where it looks like it needs it…
As you pull it off of the foam, you will notice a few things. There are LOTS of tiny lil strands of roving on the “reverse” side. You can either gently poke those in or you can simply trim them off with scissors.
The “reverse” side is going to be a little flat…so if you want a puffy two sided heart, just add a little “roving” to the flat side.
Now you are going to either LOVE this technique or not at all…if you do not love it, at least you tried it and know that you do not like it.Warning…if you love it…YOU WILL NOT STOP…you are going to poke poke poke your little life away. Tip – DO NOT LOOK AROUND while poking…because then you will poke your finger..Guaranteed. My left pointer finger has been pierced a 1000 times and it hurts just as bad each time!

This is “Pete”. He is the little felted snowman that I created a few years ago. There is no “pattern” for Pete because I made him up….BUT, follow the same steps as the felted heart, and look at the following photos…and YOU can make your very own Pete…
For The Love
of Pete

You are going to create someone similar to Pete by needle felting in the same way you created the heart but you are going to felt “balls” for Pete’s body and then “poke, poke, poke” them together to create a snowman figure. Once you have the body done, start creating a carrot shape for the nose and a scarf. Felt together a long “scarf” like strip and then wrap it around his little neck..and then poke it in.

Felt in small bits of black or use tiny black seed beads for Pete’s eyes.I know Pete does not have ears, but if he did, they would need to be warm, so maybe add on small puffs of felting to the sides of Pete’s head and use a tiny piece of wire (or a trimmed paper clip) for the ear muffs…
This little cutie is Charlie, Pete’s pumkin pal….no pattern for him either…just experiment and play to create a pumpkin shape…and add details..
Some of Pete’s friends…you may find yourself addicted…just have fun and be careful not to poke yourself!